

Page 1
ASSEMBLY INSTRUCTIONS
READ ALL INSTRUCTIONS BEFORE INSTALLING THIS PRODUCT
Congratulations and thank you for purchasing the Monkey Bar Storage Rack®, the most heavy-duty, cutting
edge system for garage organization in the world. We know you will be satisfied with this product. For more
information about this product and other products oered by Monkey Bars®, go to www.MonkeyBarStorage.com.
SAFETY INSTRUCTIONS
PLEASE USE CAUTION WHEN INSTALLING THIS PRODUCT. INSTALLATION INVOLVES THE USE OF POWER TOOLS, DRILLING, HAMMERING AND OTHER POSSIBLE HAZARDS.
• See your power tool safety instruction manual for proper use of your power tool before attempting to install this product.
• Use eye protection when drilling.
• Be sure to check for electrical wiring inside the selected wall before attempting to drill.
!!
WHAT YOU WILL NEED:
stud finder, level, power drill, 3/16” drill bit, pencil, hammer, and a nail.
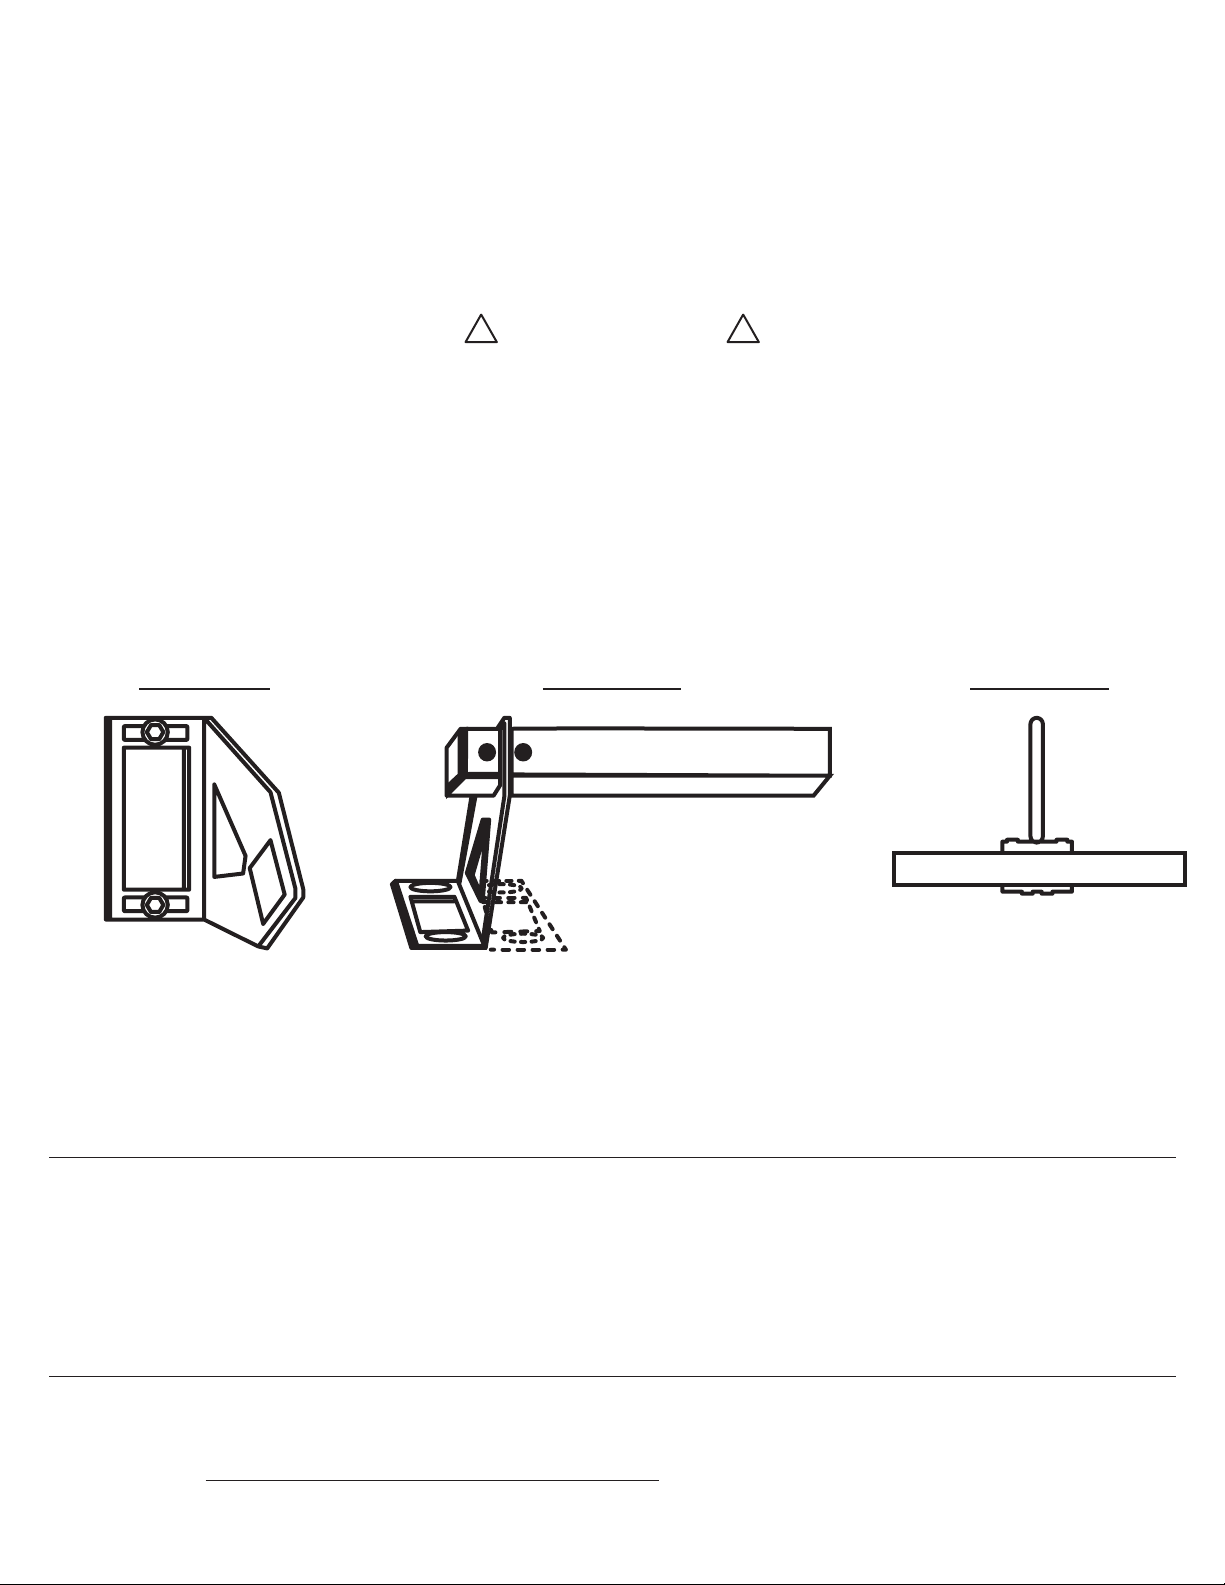
Figure 1 Figure 2 Figure 3
Step 1: Using a stud finder, locate a stud in the wall where you would like to install the mounting bracket. Make sure it is high enough to get all items o the floor. Mark with a pencil the
location of the top oval shaped hole.
Step 2: Lightly tap a nail into the location determined by the stud finder to verify that a stud is
where the stud finder says it is. Using a 3/16” drill bit, drill a hole approximately 2 inches deep
in the oval-shaped mark on the wall. MAKE SURE THAT YOU DRILL INTO THE CENTER OF
THE STUD OR ELSE THE BRACKET WILL NOT BE FULLY SECURED INTO THE WALL.
Step 3: Align the mounting bracket over the drilled hole and tighten the screw with a Phillips
screw driver. DO NO OVER TIGHTEN THE SCREWS, it will only need to be snug. See Figure 1.
(The mounting bracket is reversible- as seen by the dashed lines in Figure 2- so that the bracket can be accommodated to virtually any width of studs withing the reach of the hanger bar.)
Page 2
Step 4: Using the level, ensure that the bracket is vertically level and pre-drill a 2” deep hole in
the second oval-shaped mark. Tighten the screw in the second hole.
Step 5: Find another stud the same height for the opposite mounting bracket. If the included
Bar is 50” you need to find a stud that is about 48” away from you first bracket, if your bar is
35 inches you will need to find a stud that is about 32” from the first bracket.
Step 6: Once one mounting bracket is secured to the wall, place the push button side of the
bar into the diamond-shaped hole on the bracket. Slide the hanger bar into the hole and
secure it by depressing the first push button and sliding the bar through the hole into the
mounting bracket as shown in Figure 2. Next, slide the other mounting bracket on to the
opposite end of the hanger bar and position it approximately where the opposite stud is
located. Place a level on top of the hanger bar and adjust the unsecured mounting bracket up
and down on the wall until the hanger bar is level. Mark the opposing mounting bracket’s top
oval hole on to the wall with a pencil. Remove the hanger bar.
Step 7: Repeat steps 2 through 4 for the opposite mounting bracket.
Step 8: Slide the non-push button side of the hanger bar in the diamond shaped hole on one
of the brackets. Slide the other side of the bar into the opposing bracket as described in step
5 (see figure 2).
Step 9: The hooks provided in your rack system are designed to hold a variety of items. The
“J” hook is designed to hang either down, or perpendicular to the wall. All other hooks hang
perpendicular. By placing the shorter hooks backwards on the bar you can hang items in the
back space as well. Determine which hook will best hang your items, by utilizing the smallest
hook that will work. Position items used the most where they are most accessible.
Step 10: For hanging hooks on the hanger bar See Figure 3 (as seen from underneath.) The
hooks will snap on lightly allowing you to securely hang each item on a hook. 3” hooks may
also be placed backwards toward the wall, this only applies to kits equipped with 3” hooks.
www.monkeybarstorage.com
 Loading...