

Page 1
1
MONJA
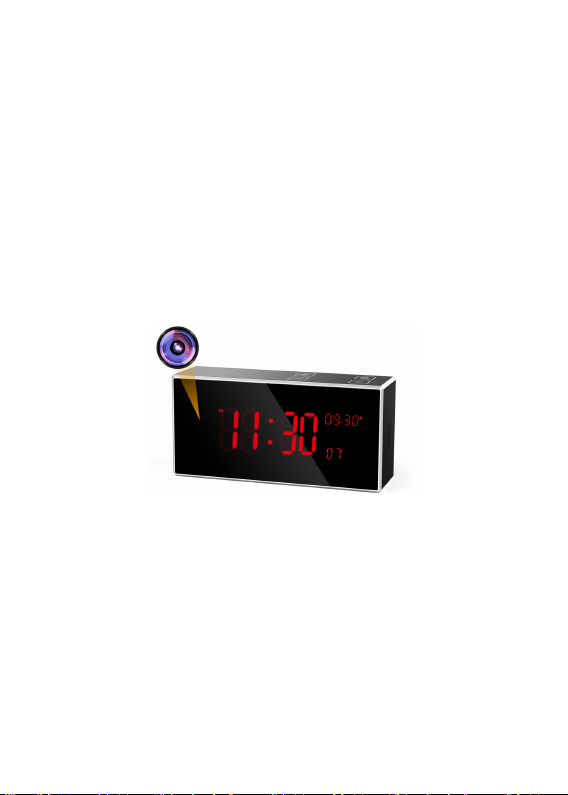
1080P Full HD Camera
User Manual
V 1.1
Page 2

2
Thank you for choosing the
MONJA Clock Hidden Camera.
Please read the operating
instructions carefully and use
them correctly.
Please keep it in a safe place.
Page 3

3
Catalogue
1. Product details ............................................ 1-1
2. Installation ...................................................2-3
3. APP Support ................................................ 3-4
4. Wifi connection & Use ...............................5-11
5. Button Definition .....................................11-12
6. Alarm clock setting ...................................12-14
7. Warming Tips ...........................................14-17
Notes (Very important): If you do not know
how to set the device or have any other
questions, please contact us via this email:
Page 4
4
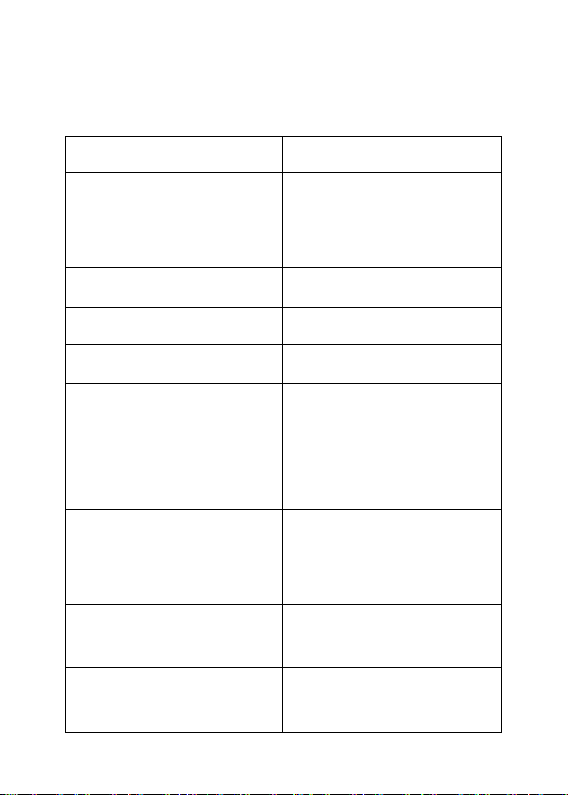
Product details
Model
T1
Resolution
1920x1080
1280x720
640x480
Lens angle
170 degree
Battery capacity
3000 mA
USB Input
DC 5V/2A Max
Time of full charge
5V/2A Input: 0.6
Stunden
5V/1A Input: 1
Stunden
Height and Weight
43mm*43mm*23m
m;
30g
Memory card
Micro SD card (Max
128G)
APP support
IOS、Android、XP、
Win7
Page 5

5
About Monja Camera
Installation
Remove the camera battery cover and put
the memory card (TF card) into the
corresponding card slot.
Remove the white battery separator and
turn the camera switch to “ON” to turn on
the camera.
Cover the battery cover, then connect the
USB power wire (5V/2A) and place the
product in the proper position.
After electrify source, the blue indicator
light will be on twice during the start-up of
the camera. After about 40 seconds, the
camera will be turned on, and the blue
Page 6

6
indicator light flashes slowly waiting for
networking configuration.
The indicator light is on after the camera is
connected to the network.
APP Support
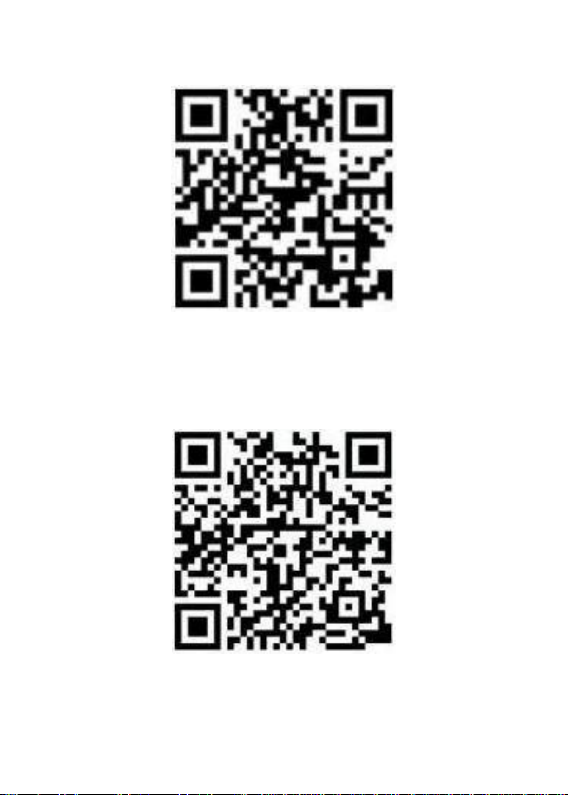
IOS System: Please scan the QR code (Pic
1-1), then choose the "IPHONE/IPAD
AppStore" , search the App which name is
Minicam. Or scan the QR code(in next page),
Android System: Please search the
App which name is Minicam in
Android/Google play Appstore. Or scan the
QR code(in next page),
Page 7
7
IOS QR code
Android QR code
Page 8
8
Wifi connection & Use
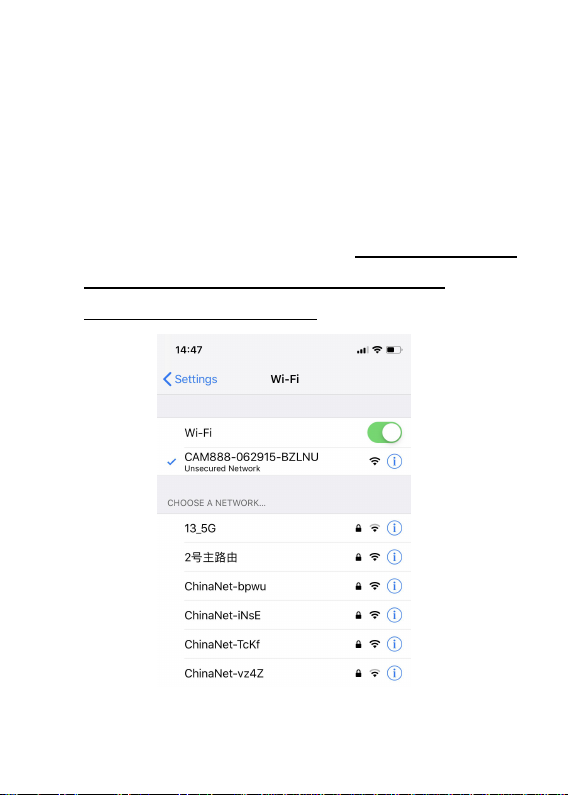
In the phone's settings menu, open
the wireless network (Wi-Fi or WLAN) and
select the hotspot with the same name as
the camera UID. As pic 2-1 (Note: When the
WIFI icon appears on the phone, the
connection is successful.)
2-1
Page 9
9
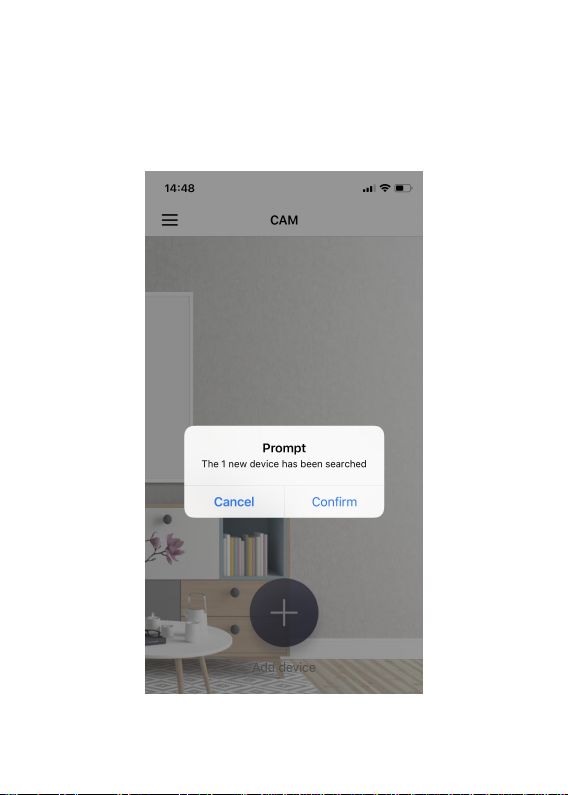
Now open APP: Minicam, the software's
home page will automatically display a
Prompt. As pic 2-2:
2-2
Page 10
10
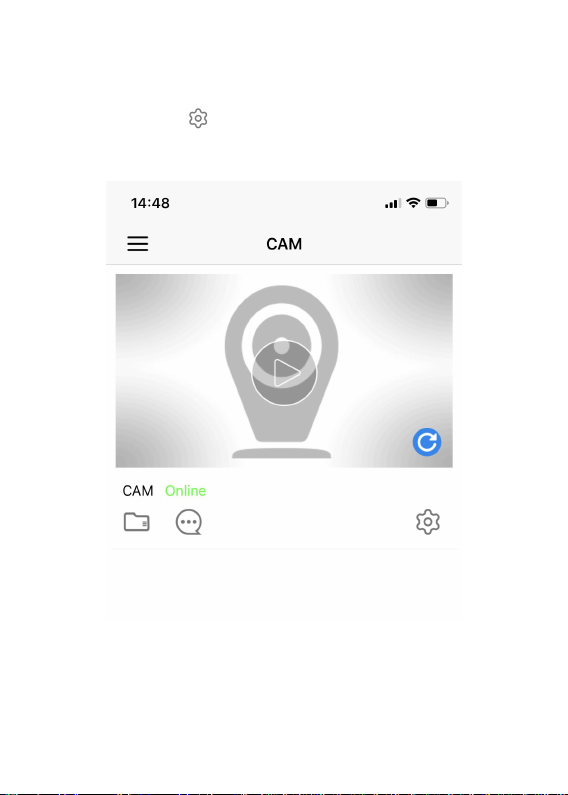
Then press the Confirm to add, the
device will be added automatically. And
press the ( ) icon to set:
2-3
Page 11
11
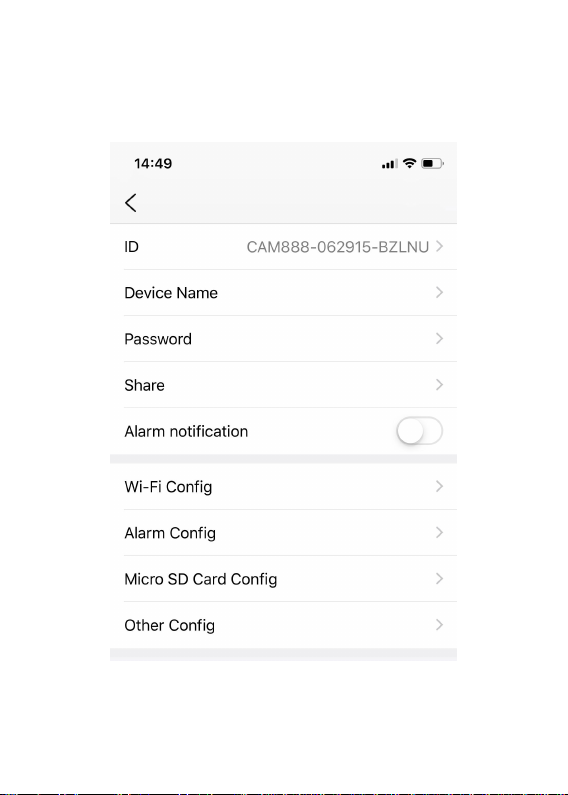
Choose the Wi-Fi Config to set wifi
connection, as pis 2-4:
2-4
Page 12
12
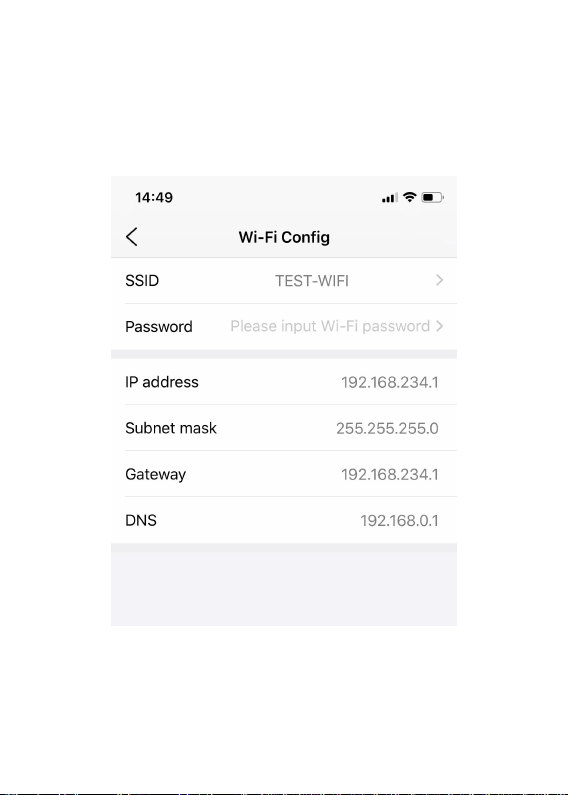
Press the SSID, choose your home Wifi, and
press the Password, then press the Confirm
to connect your camera with Wifi. as pis 2-5:
2-5
Page 13
13
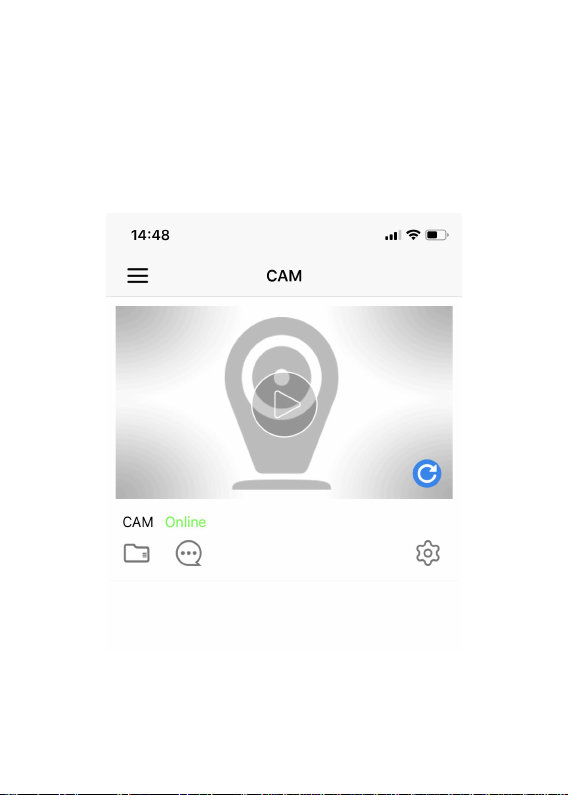
Then go back to home page, wait 15-25
seconds, refresh the CAM. When it’s
displaying Online, the connection is
successful.
2-6
Page 14
14
Note: After the configuration is completed and
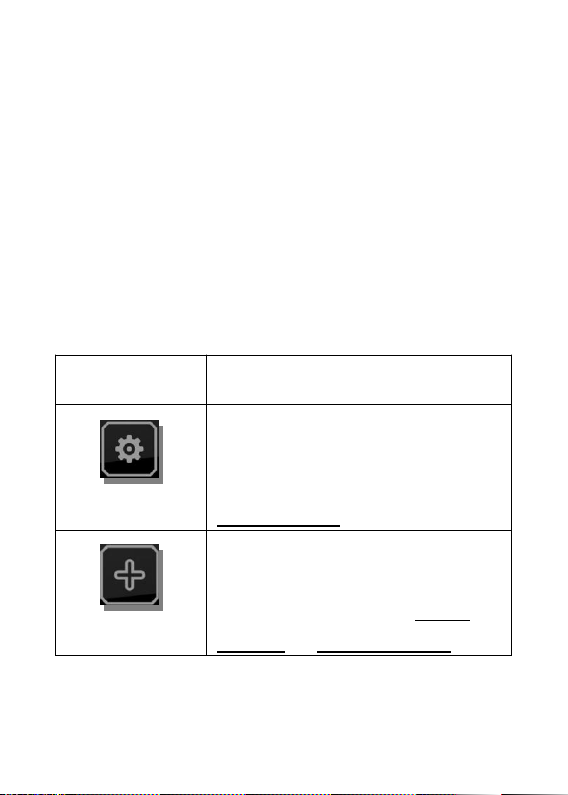
Icon of Key
Button function description
Long press to turn the
electronic clock on or off;
Short press to enter the
Time setting.
Long press to switch 12/24
hour system; Press to
increase the time in Time
setting or Alarm setting.
restarted, the indicator flashes to indicate that
the network connection is abnormal. Press the
reset button for 10 seconds, and reconfigure
after the camera restarts/reset.
Button Definition
Page 15
15
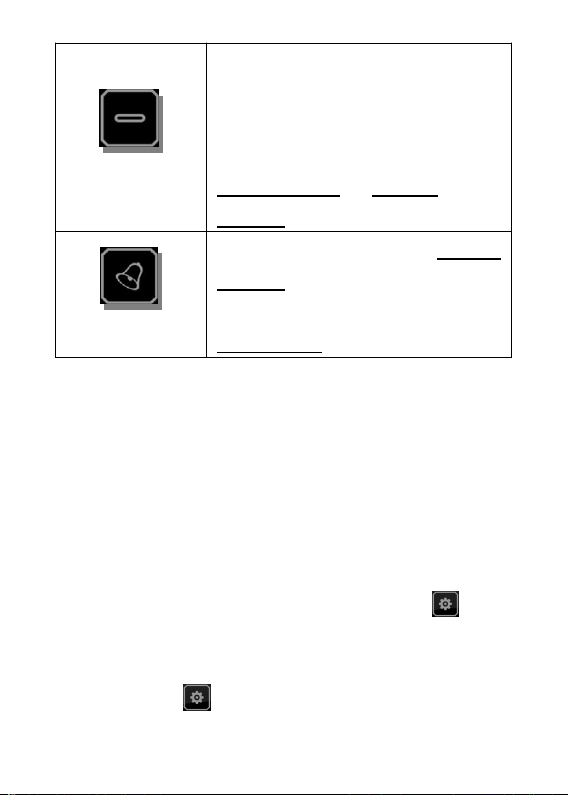
Long press to adjust the
brightness of the display (a
total of three levels);
Press to decrease the time in
Time setting or Alarm
setting.
Long press to turn the Alarm
setting on or off;
Short press to enter the
Alarm ring time setting.
Alarm clock setting
Electronic clock switch: When there is no
operation, long press the "Settings/ " to
turn off the electronic clock; Also press the
"Settings/ " to turn on the electronic clock.
Page 16
16
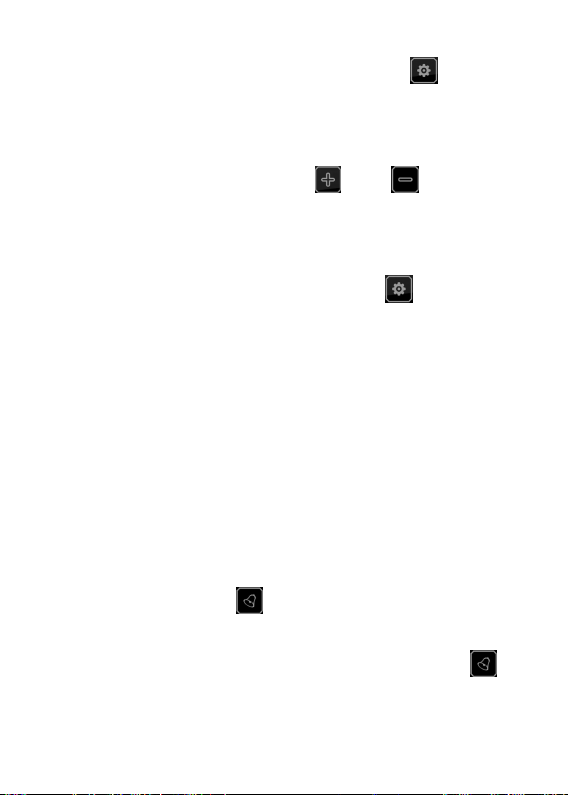
Time setting: Press the "Settings/ " to
enter the hour, minute and second time
respectively. Press the " " or " " to
adjust the time. After the time set, you need
to keep pressing the "Settings/ ", ensure
the hour, minute and second displays are not
flashing, otherwise the time will not be
saved.
Alarm setting: When there is no operation,
long press the " " to turn the alarm ring on
or off; when the alarm is on, press the " "
to enter the time and minute time setting
Page 17

17
respectively.
Press the " " and " " buttons to adjust
the ring time. After setting, you need to
continue to press the " " until the display is
not flashing, otherwise the alarm will not be
saved.
Note: The display flashes "L0", indicating low
power prompt, please charge it before use.
Warm tips
◣ For security
1. Do not disassemble. If the human body comes
into contact with the inside of the device, it
may get an electric shock.
Page 18

18
2. Do not place it in a damp or humid place.
3. Do not install it in a place where there is a risk
of instability or falling.
4. Do not use this camera for any illegal activities.
5. Do not touch any wiring during lightning.
Avoid wiring to places where wire and cable
may break.
6. Do not install it in a place where there is a risk
of instability or falling.
7. Do not use this camera for any illegal activities.
8. Do not touch any wiring during lightning.
Avoid wiring to places where wire and cable
may break.
◣ Questions & Answers
Q: There is no reaction even if the signal is
connected to the product.
A: Please stop the connection and restart the
application, then try to reconnect the signal
of the product.
Q: What should i do if i forget this password?
Page 19

19
A: Please press the device reset button for 5
seconds to restore the factory settings.
Q: Can you connect directly to the monitor, etc.
and use it?
A: Due to the operation of the application, this
product only supports the system installed
devices, such as IOS, Android, APP, XP, Win
7/10. Do not place it in a damp or humid
place.
◣ 12 Mouths No-Risk Guarantee
Monja offers you a 12-month guarantee without risk.
If you have any questions when using our products,
you can contact me at any time by email. We will not
hesitate to provide you with customer support, and
soon you will receive Come to our friendly response.
Page 20

20
The replacement or refund corresponds to purchase
only from Monja Direct. If you buy it from other
dealers or platforms, this is not within our support,
thank you in advance for your understanding.
Within 30 days after purchase, we will support
unconditional refund. However, in the case of a
convenient return by the customer, the return
shipping charges will be borne by the customer.
Page 21

21
If you are satisfied with this product...
As we all know, the voice of the customer is a
very good reference for other buyers. If you
can publish the real experience, leave your
comments and suggestions on Amazon's
product display page, then for other buyers, It
is a very lucky thing, even a word will be very
informative, and we will be very grateful for it.
Our service email:
 Loading...