


USER MANUAL
GENERAL CONFIGURATIONS
MONIVOX SMART DEVICE - MVX400


PRODUCT SPECIFICATIONS 4
ACCESSORIES INCLUDED 9
GENERAL DEFINITIONS 12
Used Terms 12
Shortcuts 12
Dynamic use of the service buttons (top of the screen) 12
BASIC CONFIGURATION OF YOUR MVX400 AT POWER UP FOR THE FIRST TIME 14
1. SELECT A LANGUAGE 14
2. TO LOG IN 14
3. CONFIGURATION SCREENS OF YOUR MVX400 15
4. DETAILED SETTING SCREENS OF YOUR MVX400 16
FCC COMPLIANT 23
TABLE OF CONTENTS
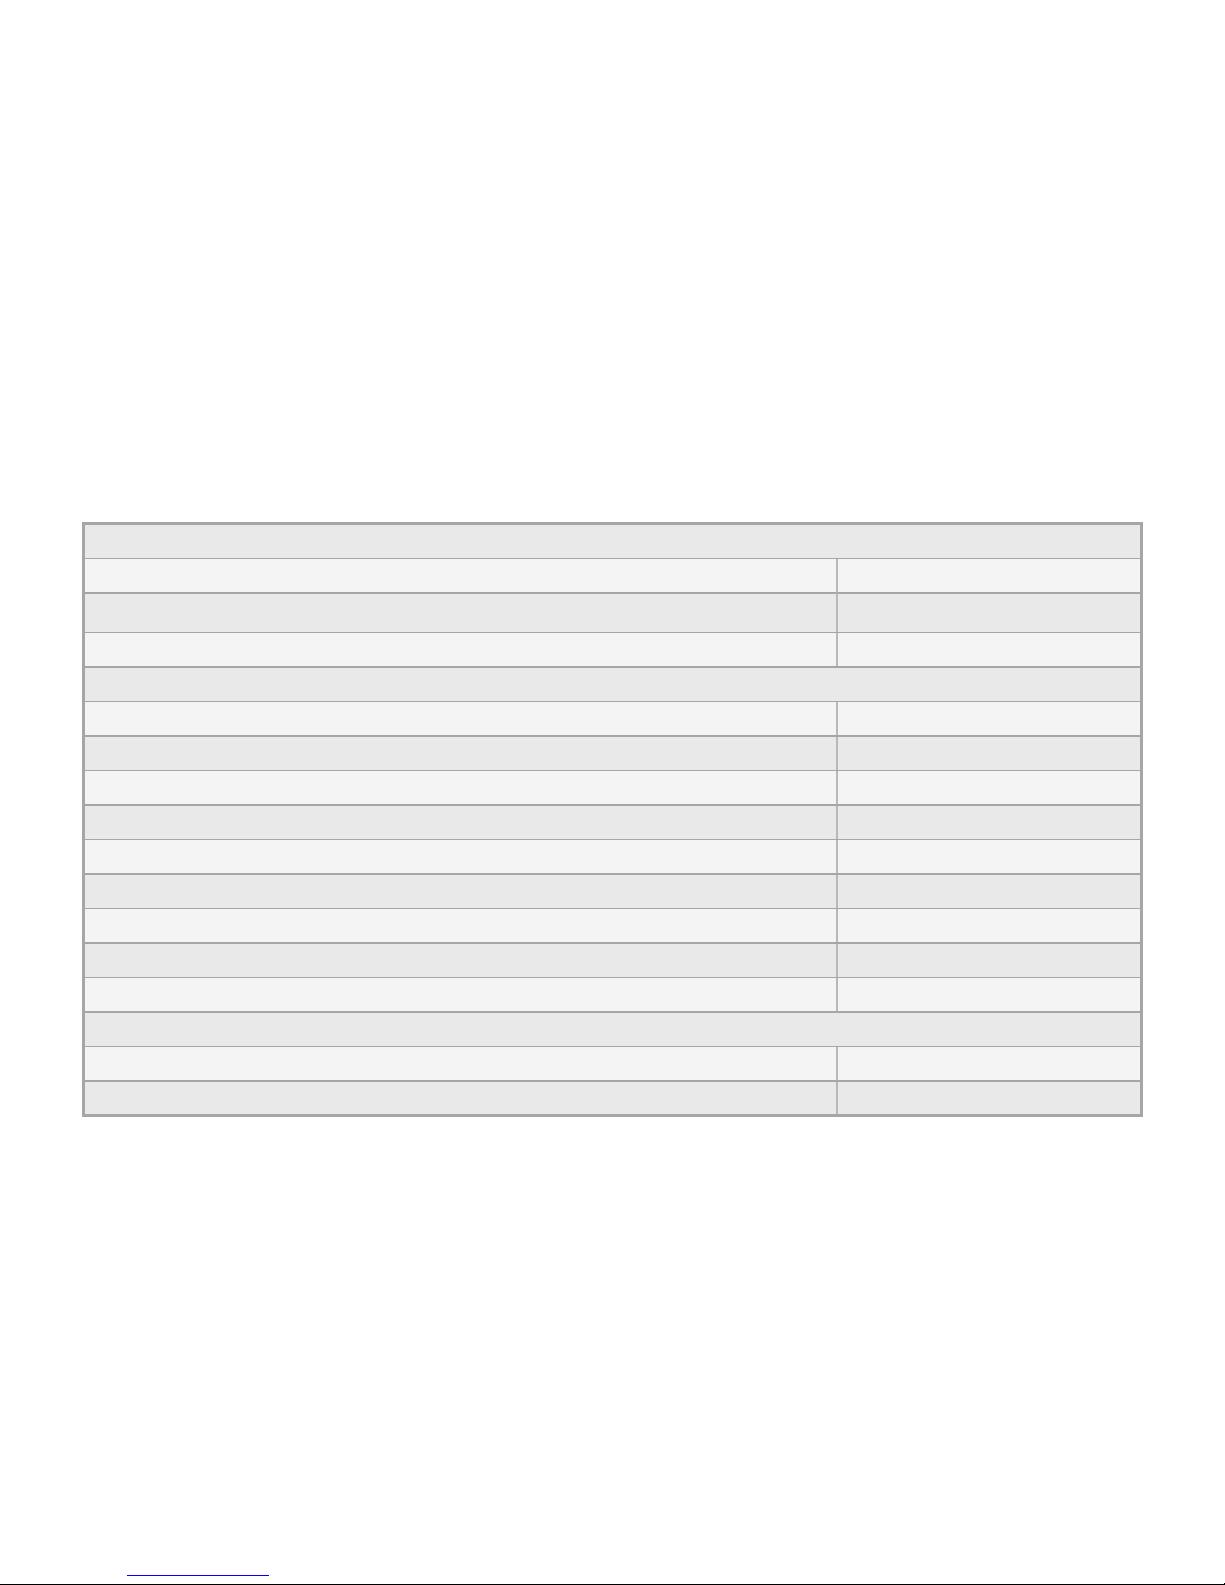
EXTERNAL COMMUNICATION
Digital radio MOTOTRBO™ Motorola (digital slot data port) 01
GPRS quad band module (Telit GL865 QUAD) 01
Ethernet (TCP/IP) 01
PORTS
RS232 (DB9) 01
USB 2.0 external (host) 04
USB 2.0 (DB15 to communicate with the digital radio) 01
GPIO (programmable IN/OUT) 08
Monitor (VGA 1024x768) 01
External microphone (RJ45) 01
Audio IN (DB15) 01
Audio OUT (P2) 01
I2C (internal, not used) 01
OPERACIONAL SYSTEM AND MICROPROCESSOR
Operational System Android 2.3
Microprocessador ARM Cortex A8 1GHz
PRODUCT SPECIFICATIONS

MEMORY
Mass memory Micro SD card (SD card not included) 01
Memory SDRAM DDR3 1GB 01
NAND eMMC 4GB 01
GENERAL INFORMATION
SIM Card 01
RTC battery holder CR1220 (access through bottom lid) 01
RTC 01
Watch dog timer 01
LED indicator (On - Radio - App - Link - Fail) 05
Buzzer 01
External power DC 9~36VDC
Product operating temperature 0~60°C

Reset Button
Power
Status
App
Status
Boot
Fail
Radio
Connection
IP Link
USB port
RJ 45
MIC IN
USB port

AUX PIN
to MOTOTRBO radio
(use MVX-AB0025)
GPRS CNT
to antenna
Power 9-36 VCD
(use MVX-AU0012)
08 GPIO ports
VGA monitor port
RJ 45 CNT
Ethernet port
02 USB ports AUDIO OUT
to speaker
RS323 port
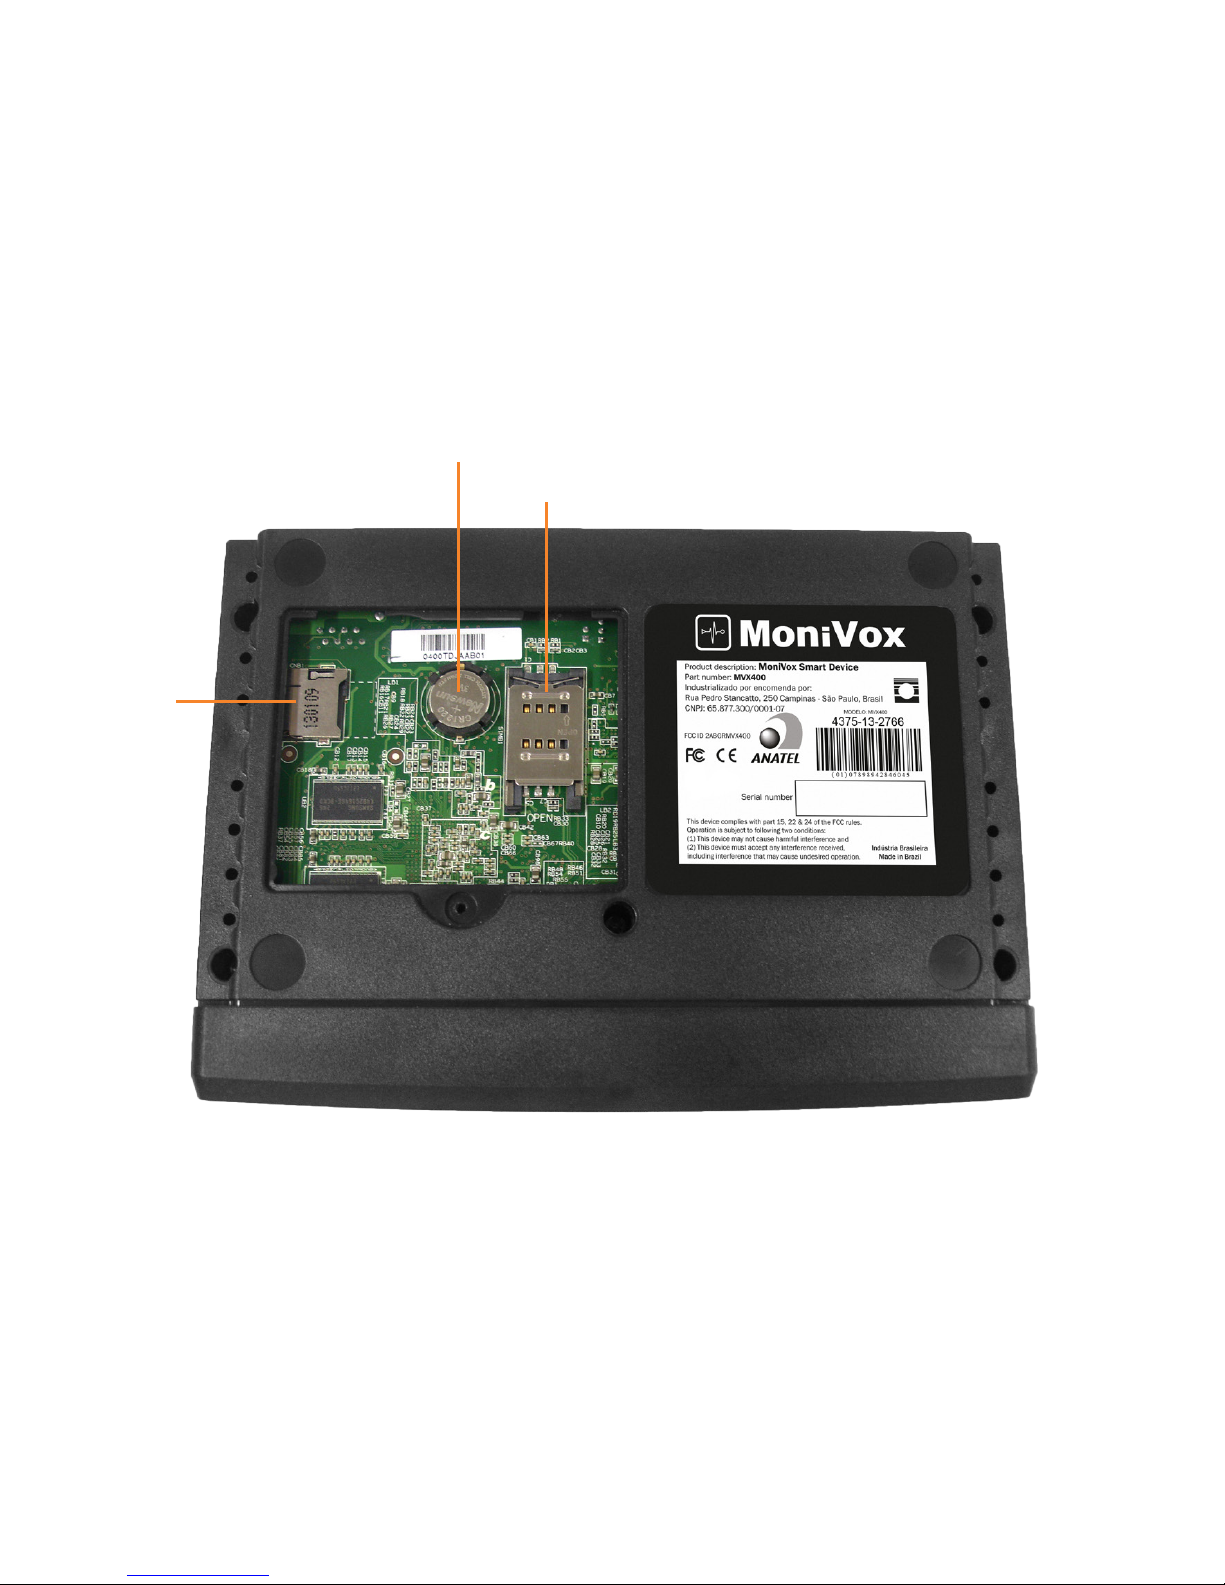
SIM CARD
Micro
SD CARD
CR1220
Battery Holder

ACCESSORIES INCLUDED
PRODUCT PART NUMBER QUANTITY
Cabo conversor DC-DC MVX-AU0012 01
Transformador automático AC/DC MVX-AU0013 01
Plug adaptador, BR MVX-AU0014 01
Antena magnetica GPRS 02 mts. MVX-AU0019
01
Parafuso borboleta MVX-AB0022 03
Porca auto travante inox M5 MVX-AB0023 02
Cabo PP conexão MVX400/Radio MVX-AB0025 01
Suporte MVX400 MVX-AB0020 01
Manual do usuário MVX-AB0026 01
Tampa de borracha power MVX-AB0024
01
Base de silicone moldado 3M clear MVX-AB0034 04
Parafuso philips plastic 3 x 10 panela - base MVX-AB0035 05
Cabo manga fonte de alimentação DC-DC MVX-AB0036 01

MVX-AU0019MVX-AU0036
MVX-AB0025

MVX-AU0012
MVX-AU0014
MVX-AU0013

MVX400
12
GENERAL DEFINITIONS
Used Terms
“Default” means “factory standard”.
“App” means MoniVox Application in this manual.
“Android™” is the operational system used in the MVX400.
Shortcuts
Left mouse button (one click) - move command (Enter).
Right mouse button (one click) - command to go back.
Note: Do not use the double-click.
Clicking the left mouse button inside the field, if there is no keyboard, a virtual keyboard is opened in the
bottom of the screen.
For vertical scrolling of the screen, click and hold the right mouse button and drag vertically.
Dynamic use of the service buttons (top of the screen)
Click on the button at the top of the screen “Add” to select the option to add a record.
After entering a new record, click the button at the top of the screen “Save”.
To delete a record, select it and click the following icon at the top of the screen “Delete” (if you want to find an
existing record, select the filter field, the search is dynamic).
The screens do not have the option to save logs, registry changes are saved when you exit the screen (by
clicking the right mouse button).

MVX400
13
MVX400 Front LEDs
Observe the operation of the LEDs and compare with the following
table. Adjacent is the legend with the status of the LEDs.
ACTIONS LEDS
ON RADIO APP LINK FAIL
After activation of the MVX400 and during the BOOT of Android
After successfully BOOT of Android
After unsuccessfully BOOT of Android without App service
After unsuccessfully BOOT of Android with App service
Active connection of MVX400 with MOTOTRBO™ base radio
Inactive connection of MVX400 with MOTOTRBO™ base radio
App not working properly
App is working correctly
App RoIP with keep alive for at least 1 PEER
App RoIP with keep alive failure to all PEERS
App RoIP is not available for any PEER
On Off
Legend
Flashing
USB INSTALL
LED “ON” flashing every 1 second (1 Hz) - during installation / verification
LED “ON” flashes 3 times per second (3 Hz) (for 5 seconds) - flawless installation
LED “FAIL” flashes 3 times per second (3 Hz) (for 5 seconds) - completed the process with a mistake/error.

MVX400
14
BASIC CONFIGURATION OF YOUR MVX400 AT POWER UP FOR
THE FIRST TIME
1. SELECT A LANGUAGE
Default: Portuguese (Brazil)
Select the language you want (left mouse button) and exit the screen (click the right mouse button)
Click the grid button on the right side of the screen to view available applications.
2. TO LOG IN
Enter username and Password
User (default): MASTER
Password (default): #mvx400
After their first session, the MVX400 will ask for a new password, click the “yes” button and change the
MASTER password.
Current Password: #mvx400
New password: Minimum of 6 characters with at least one letter and one number.
Confirm Password: Repeat new password.

MVX400
15
3. CONFIGURATION SCREENS OF YOUR MVX400
Icon - Configuration MVX400
MVX400 Administration
Permissions
Backup
SIM card
E-mail
Destination of mass data storage
Idiom
Date and time
MoniVox Application Manager
Installation of MoniVox application
Manage MoniVox applications
Master configurations
Master password
MVX400 Informations
MVX400 serial numver
Version
Network
Ethernet
Wi-Fi
GPRS test
Bluetooth
System
Dynamic DNS
Local FTP
MOTOTRBO™ Administration
MOTOTRBO™
State
Users Management MVX400
Managing access profiles
Manage Users

MVX400
16
4. DETAILED SETTING SCREENS OF YOUR MVX400
MVX400 Congurations > Network > Ethernet
Ethernet Configuration
Apply changes (this icon applies the changes to this screen)
Enables Ethernet - setting default “enabled”.
Keep the setting enabled to access Ethernet and click “apply changes” to force the connection, if it is not
done automatically.
Use DHCP
Use DHCP - setting default “enabled”
Keep this setting “enabled” to obtain the IP automatically.
If the setting is set to “disabled”, the field “fixed IP configurations” must be filled.
Fixed IP settings
IP: Clicking on the IP, type the fixed IP address and click “OK”.
Netmask: Clicking Netmask, enter the netmask address of your netmask and click “OK” (standard
255.255.255.0).
Gateway: Clicking Gateway, type the address and click “OK”.
DNS 1: When you click the DSN 1, enter the address and click “OK”. If no DNS 1 address, enter the fixed IP
address.
DNS 2: Clicking DNS 2, enter the address and click “OK”.
This option of DNS2 is an alternative if in case the MVX400 does not get connect to the DNS 1, optional.

MVX400
17
MVX400 Congurations > Network > Wi-Fi
Wi-Fi Configuration
Wi-Fi (default): setting “disabled”
Click the setting for available Wi-Fi networks and wait until the networks shows in field below “Wi-Fi
Networks” are presented.
To connect to the network you want, hold the left mouse button for 2 seconds to bring up the options,
“connect to the network”, “forget the network” and “modify network”.
The option “modify network” is used to change the security password of a live network connection.
MVX400 Congurations > Network > GPRS Test
Click the setting to test the GPRS connectivity.
This feature requires the SIM Card is installed in the MVX400 and valid data packets and enabled by your
operator.
The MVX400 has been tested to work with the following operators, Claro, VIVO, TIM and Oi.
MVX400 Congurations > Network > Bluetooth
Bluetooth Configuration
Bluetooth (default): setting “disabled”.
Click the setting to activate the Bluetooth connection.
The MVX400 device name is “imx53_loco”.
MVX400 Congurations > System > Dynamic DNS
Dynamic DNS
Name (default): the serial number is MVX400.dyndns - ip.com
This name can be changed with and ALIAS created in Dyn DNS.
Dyn DNS User: enter the user of the Dyn DNS and click “OK”.
Dyn DNS Password: enter your Dyn DNS password and click “OK”..

MVX400
18
Dyn DNS Update: click once with the left mouse button to save the changes and request the Dyn DNS
connection.
MVX400 Configurations > System > Local FTP
Local FTP
User (default): admin
Enter the user name and click “OK”..
Password (default): admin
Enter the password and click “OK”.
Port (default): 2121
Enter the port and click “OK”.
Root directory (default): /sdcard/
Enter the address of the root directory of the MVX400 you want to get the data and click “OK”.
MVX400 Congurations > MOTOTRBO™ Administration > MOTOTRBO™
MOTOTRBO™ Configurations
MOTOTRBO™ IP (default): 192.168.10.1 (to connect to the MVX400)
Confirm the IP address of the MOTOTRBO™ base radio and click “OK” (the IP address should be the same
that is found in the Motorola CPS).
Port (default): 8002
Confirm the port of the MOTOTRBO™ base radio and click “OK”.
MVX400 Congurations > MOTOTRBO™ Administration > Status
Connection status with the MOTOTRBO™
Connection
Connection with MOTOTRBO™ radio: This field indicates if there is a connection between the MVX400 and
a MOTOTRBO™ base radio.

MVX400
19
Input
PTT Mic In: This field allows you to verify if the PTT MIC IN of the MVX400 is active or not. If enabled the
settings in the PTT MIC IN is “enabled”, if inactive, “disabled”.
CSQ In: This field indicates if there is a carrier from the MOTOTRBO™ base radio connected to the MVX400.
Output
PTT out: This field allows you to check if the PTT OUT of the MVX400 is active or not. If enabled the PTT OUT
setting is “enabled”, if inactive, “disabled”.
Áudio Jack: default disabled (This field must be enabled, setting “enabled” to activate the audio output pin
also for the P2-AUDIO OUT of the MVX400).
MVX400 Congurations > MVX400 User Administration > Access prole administration
On this screen you can create new access proles. The prole “Admin” is the default of the MVX400 and
cannot be removed.
MVX400 Configurations > MVX400 User Administration > Users administration
In this screen you can create users and assign them to the desired “Access proles”.
MVX400 Congurations > MVX400 User Administration > Permissions
Permissions
Users Administration: In this screen the “master” user can create new “profiles” that have the autonomy to
create new “access profiles”.
Server connection administration: In this screen the “master” user can create new “profiles” that have
autonomy to authorize connection of the MVX400 to the MoniVox server.
The MVX400 connection with the MoniVox server is intended to upload and download on-line applications
and MoniVox licenses.

MVX400
20
MVX400 Congurations > MVX400 User Administration > Backup
Backup MoniVox
Allows you to run the automatic backup: Default “disabled”.
Clicking the setting, the fields below are enabled.
Destination: Enter the URL of the FTP server and click “OK”.
Username: Enter the FTP username and click “OK”.
Password: Enter the password for the FTP and click “OK”.
Frequency: Default “daily”.
Select the frequency when the backup should be performed automatically.
Time of execution: select the time when the backup should be executed automatically.
Default : 23:59/11:59 PM
Backup Status and History
This screen has two functions, namely:
- Button to “Start the backup now”, when you click this button a new backup is started;
- History of the backup made;
Restore
This screen has the function of showing the backups made; by selecting the desired file and click the button
“start restoring data now” the database that is in that file will be restored.
MVX400 Congurations > MVX400 User Administration > SIM card
This screen has the functionality to record the phone number of the SIM card, your configuration is not
mandatory for the GPRS function to be activated in the MVX400.
MVX400 Configurations > MVX400 User Administration > E-mail
Configure E-mail
SMTP Server: Enter the address and click “OK”.

MVX400
21
Port: enter the port and click “OK”.
Security type (all fields default disabled): when select SSL or TLS, the option is automatically recorded.
Requires Login (default “disabled”): Clicking on “Test Connection” the MVX400 will conduct a routine to test
sending the email, and showing the results.
MVX400 Congurations > MVX400 User Administration > Mass data storage destination
Storage Directory
Select the directory to store the mass data saved by the MoniVox applications, they can be stored on the
SD card of the MVX400 or via USB/pen drive.
To select the SD card destination, click on “search” and “SD card” link at the top of the screen, then click
on the bar “select”.
To select the USB/pen drive destination, click the “search” icon and “MNT” and “udisk” and select the USB
where your pen drive is connected.
Note: The USB ports are dynamic in the MVX400, click on the 4 options to find the port that the pen drive
unit is connected.
MVX400 Congurations > MVX400 User Administration > Language
Select the language for this MVX400
Select the language for this MVX400 and click the right mouse button to exit and save the desired option.
MVX400 Configurations > MVX400 User Administration > Date and time
Date and Time Settings
Automatic

MVX400
22
MVX400 Configurations > MoniVox Application Manager > Installing applications
This screen allows two activities, namely:
Identifies the MoniVox applications, versions and quantities of licenses installed in this MVX400.
Force update of new applications, versions and MoniVox licenses on- line through the MoniVox server via
the button “check through the net”, or off-line via the button “check pen drive”.
MVX400 Configurations > MoniVox Application Manager > MoniVox Application Manager
Connecting to a MoniVox server
Connecting to a MoniVox server: For the application updates, versions and licenses to be conducted on-
line through the network, it is necessary that this option setting is “enabled”.
Connection Frequency: Default “Daily”
Select how often you want to connect the MVX400 to the MoniVox server.
Time to connect to server: Default “11:00 PM”
Select the time you want to connect the MVX400 to the MoniVox server.
MVX400 Congurations > Master conguration > Master password
This screen allows you to change the “master” user password.
Changing the default MASTER password “#mvx400” is highly recommended after your first login to the
MVX400.
MVX400 Congurations > MVX400 Information > Serial number MVX4000
Displays the serial number of the MVX400.
The sixth letter from left of the serial number identifies the year of manufacture of the MVX400, as follows:
2010-A, 2011-B, 2012-C , 2013-D, 2014-E , 2015-F, 2016-L, 2017-H, 2018-I, 2019-G , 2020-K ...

MVX400
23
The seventh letter from left of the serial number identifies the manufacturing month of the MVX400, as
follows: JANUARY-A, FEBRUARY-B , MARCH-C , APRIL-D , MAY-E, JUNE-F , JULY-G, AUGUST-H, SEPTEMBER-I,
OCTOBER-J, NOVEMBER-K, DECEMBER-L.
MVX400 Congurations > MVX400 Information > Version
Displays the build version of the MVX400.
FCC COMPLIANT
Product: MVX400
FCC ID: 2ABGRMVX400
This device complies with part 15, 22 & 24 of the FCC rules. Operation is subject to following two conditions:
(1) This device may not cause harmful interference and (2) This device must accept any interference received,
including interference that may cause undesired opertion.
Made in China
Brand: MoniVox
Federal Communication Commission Interference Statement
This equipment has been tested and found to comply with the limits for a Class B digital device, pursuant to
Part 15, 22 & 24 of the FCC Rules.
These limits are designed to provide reasonable protection against harmful interference in a residential
installation.
This equipment generates, uses and can radiate radio frequency energy and, if not installed and used in
accordance with the instructions, may cause harmful interference to radio communications. However, there

MVX400
24
is no guarantee that interference will not occur in a particular installation. If this equipment does cause
harmful interference to radio or television reception, which can be determined by turning the equipment off
and on, the user is encouraged to try to correct the interference by one of the following measures:
. Reorient or relocate the receiving antenna.
. Increase the separation between the equipment and receiver.
. Connect the equipment into an outlet on a circuit different from that to which the receiver is connected.
. Consult the dealer or an experienced radio/TV technician for help.
FCC Caution: To assure continued compliance, any changes or modications not expressly approved by the
party responsible for compliance
could void the user’s authority to operate this equipment. (Example - use only shielded interface cables when
connecting to computer or peripheral devices).
FCC Radiation Exposure Statement
This equipment complies with FCC RF radiation exposure limits set forth for an uncontrolled environment.
This equipment should be installed and operated with a minimum distance of 20 centimeters between the
radiator and your body.
This transmitter must not be co-located or operating in conjunction with any other antenna or transmitter.
The antennas used for this transmitter must be installed to provide a separation distance of at least 20 cm
from all persons and must not be co-located or operating in conjunction with any other antenna or transmitter

www.monivox.com
Ver: i140116_01
 Loading...