

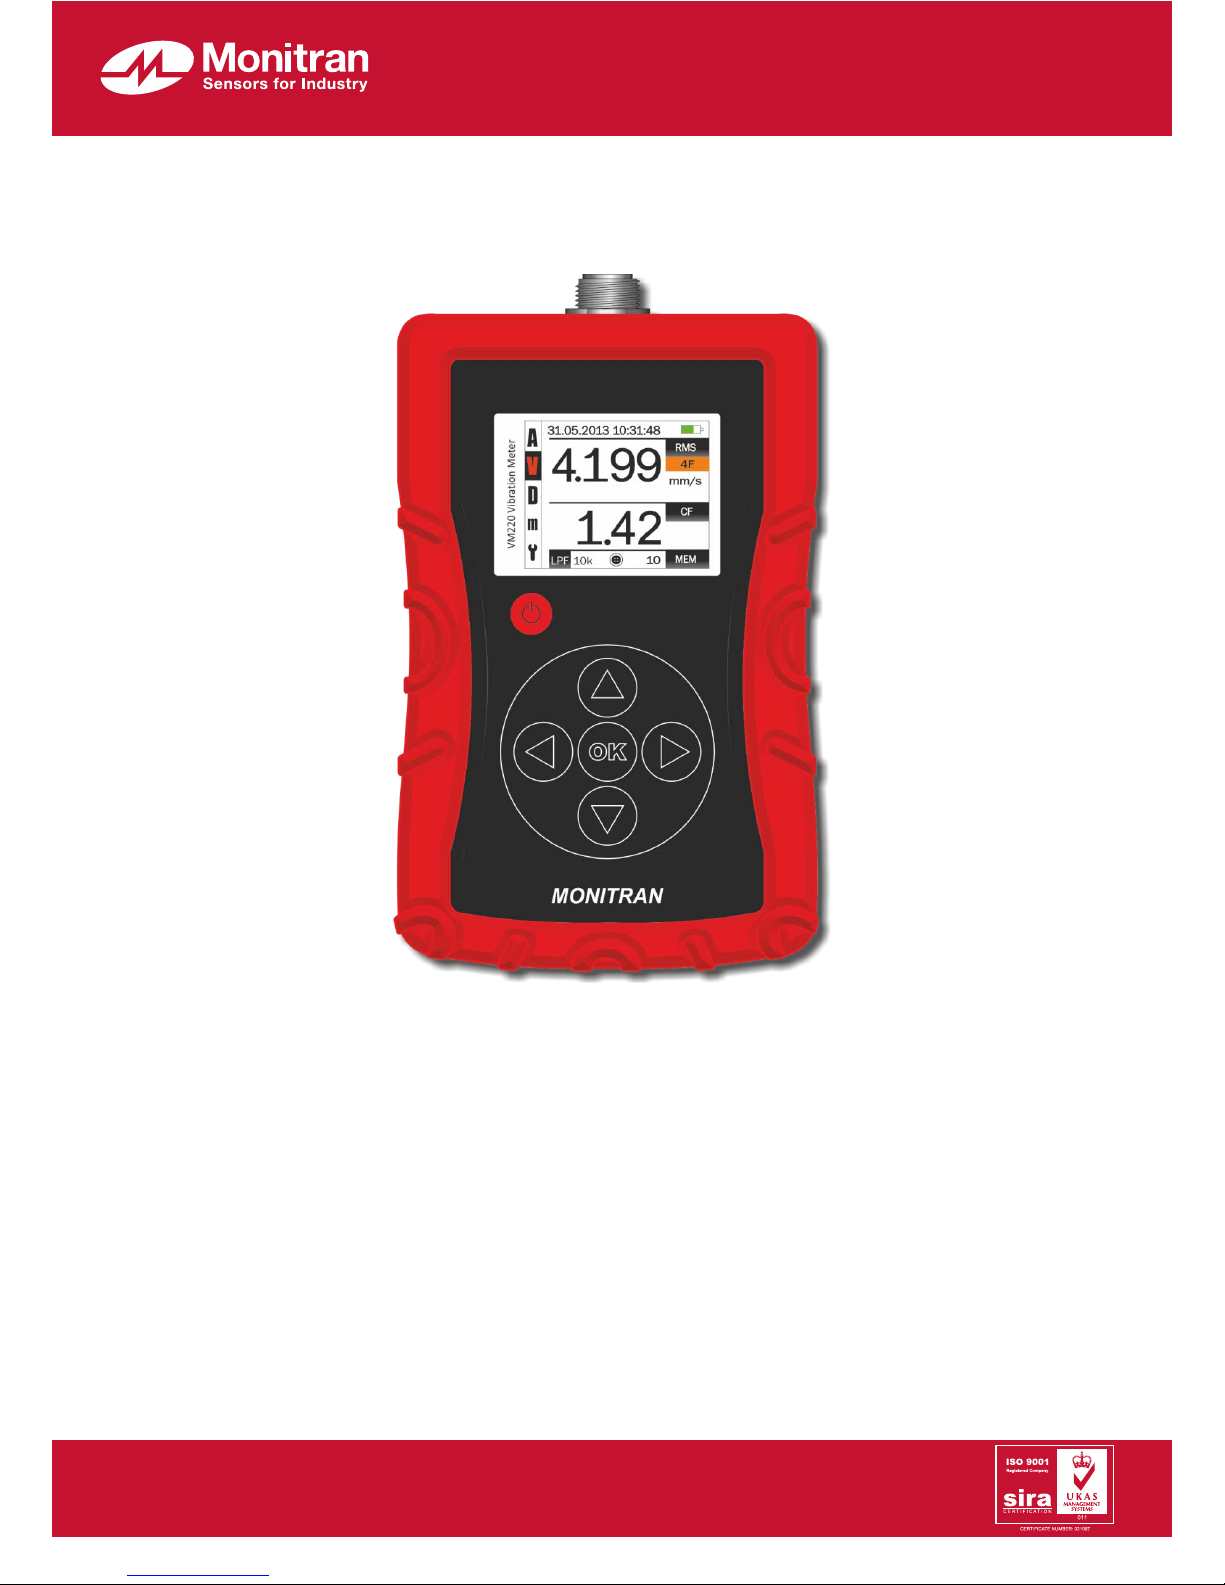
MTN/VM220
High performance Vibration Meter
Monitran Ltd
| Monitor House | 33 Hazlemere Road | Penn | Bucks | UK | HP10 8AD
Telephone
+44 (0)1494 816569 | E-mail info@monitran.com | Website www.monitran.com
We reserve the right to alter specifications without prior notice.
HB039.3
Instruction Manual

0.
Contents
Page
1.
Introduction
1
2.
Precautions
1
3.
Equipment details
1
4.
Preparation for use
2
5.
Buttons
3
6.
Display
3
7.
Connections
4
8.
Battery status
4
9.
Charging the unit
4
10.
Connecting sensor
5
11.
Measurement modes
6
12.
Calculation modes
6
13.
Memory recall mode
7
14.
Settings menu
8
15.
Setting the clock
8
16.
Setting units
8
17.
Setting low pass filter
9
18.
Setting ISO10816 group
9
19.
Clearing memories
9
20.
ISO10816
10
21.
Physical
11
22.
Specifications
12
23.
Troubleshooting
14
24.
After sales support
14
A.
Main operations
15
B.
Conversions and formulae
16

1
1.
Introduction
The MTN/VM220 Vibration Meter is a rechargeable, portable instrument designed to operate with a constant current
type accelerometer to provide accurate vibration measurements.
Conforming to ISO10816-3/7, MTN/VM220 will display RMS, peak, peak-peak, crest factor and bearing condition on its
colour screen. Up to 100 time-stamped readings can be stored to non-volatile memory.
The MTN/VM220 is an invaluable trouble-shooting tool for instrumentation engineers familiar with the problems of
plant vibration monitoring, providing an instant readout of the condition of bearings and rotating parts.
2.
Precautions
• Only use the unit as directed in this manual.
• Protect the unit from shocks and extremes of temperature, humidity and harsh environments (such as high salt).
• Use only a soft clean cloth. Do not use solvents or harsh cleaning agents.
• The unit contains no user serviceable parts. Do not attempt to disassemble or repair the unit, as this will invalidate
your warranty.
• To ensure continued performance, have the unit checked and serviced at regular intervals.
3.
Equipment Details
Purchase date:
Vibration meter serial number:
Cable serial number:
Sensor serial number:
Software version:
2
4.
Preparation for use
Carefully remove the instrument from the transit packaging and ensure all accessories supplied agree with the delivery
note.
Visually inspect for transit damage.
3
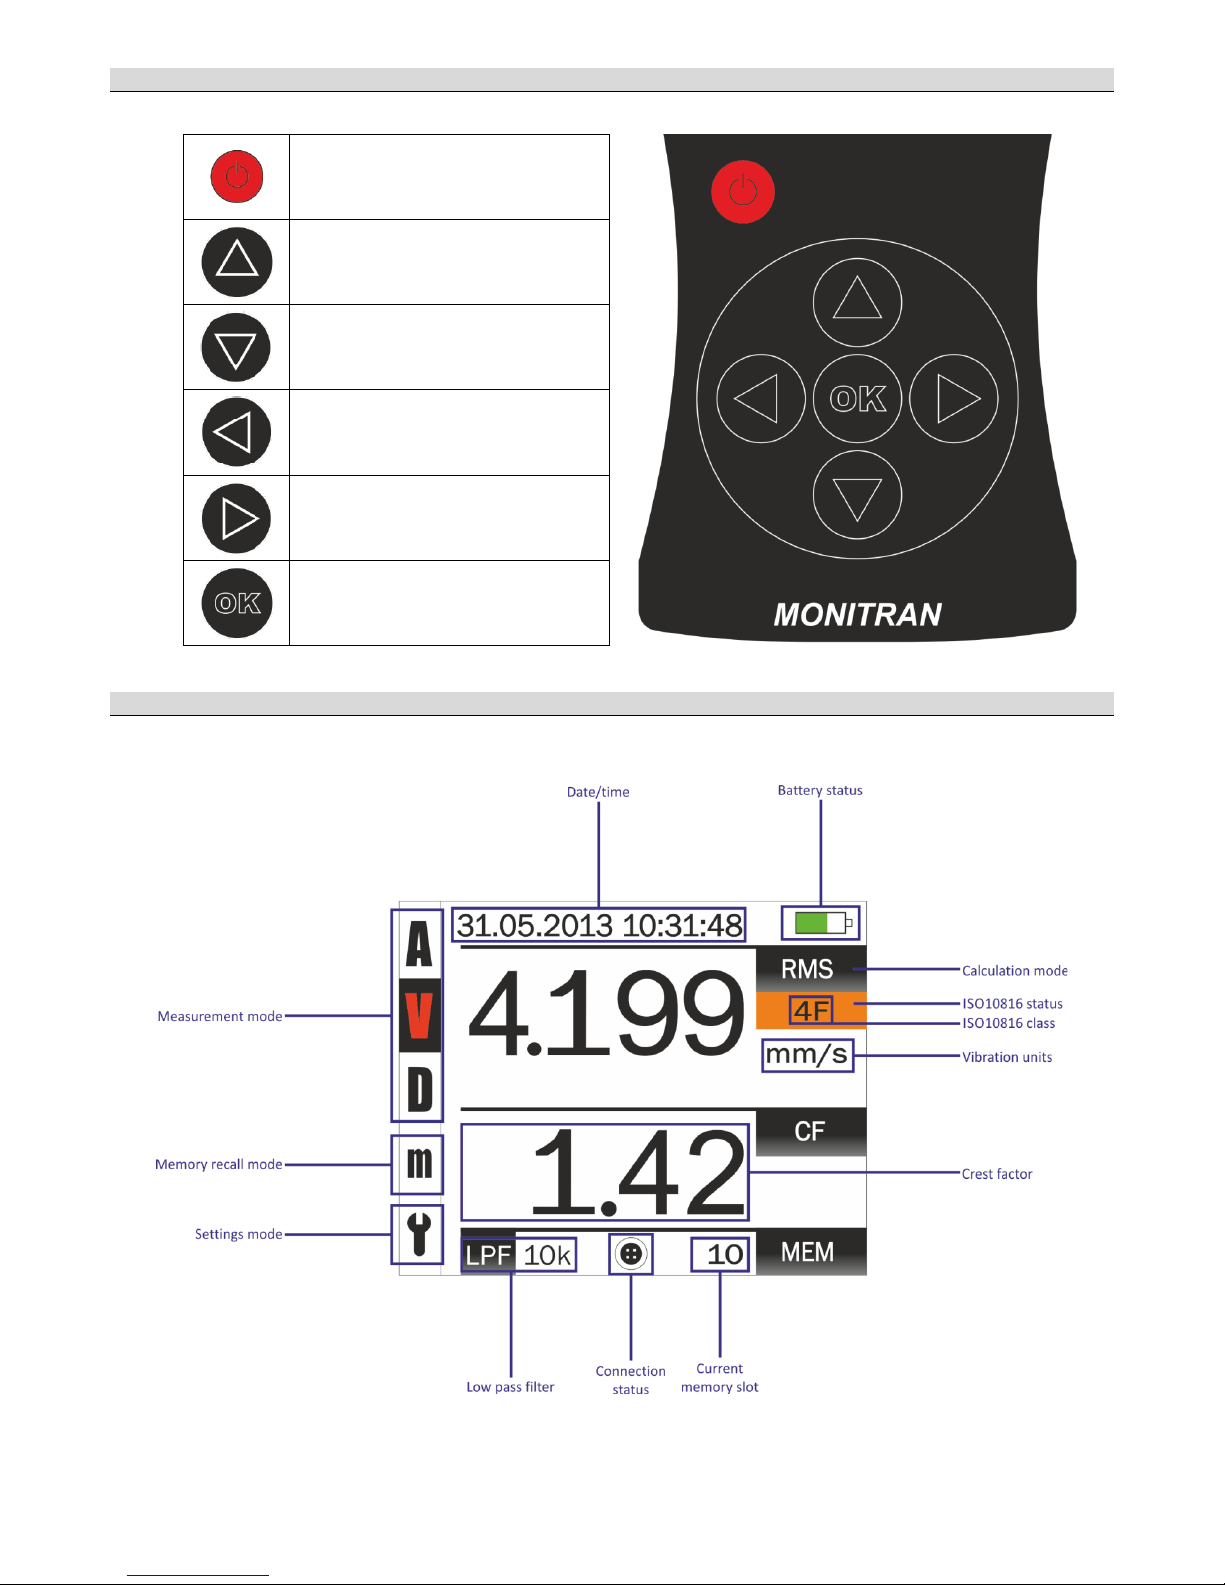
5.
Buttons
• Power on
• Power off
• Previous operating mode
• Value increase
• Next operating mode
• Value decrease
• Previous calculation mode
• Previous memory slot
• Next calculation mode
• Next memory slot
• Store value to memory slot
• Select parameter
6.
Display
4
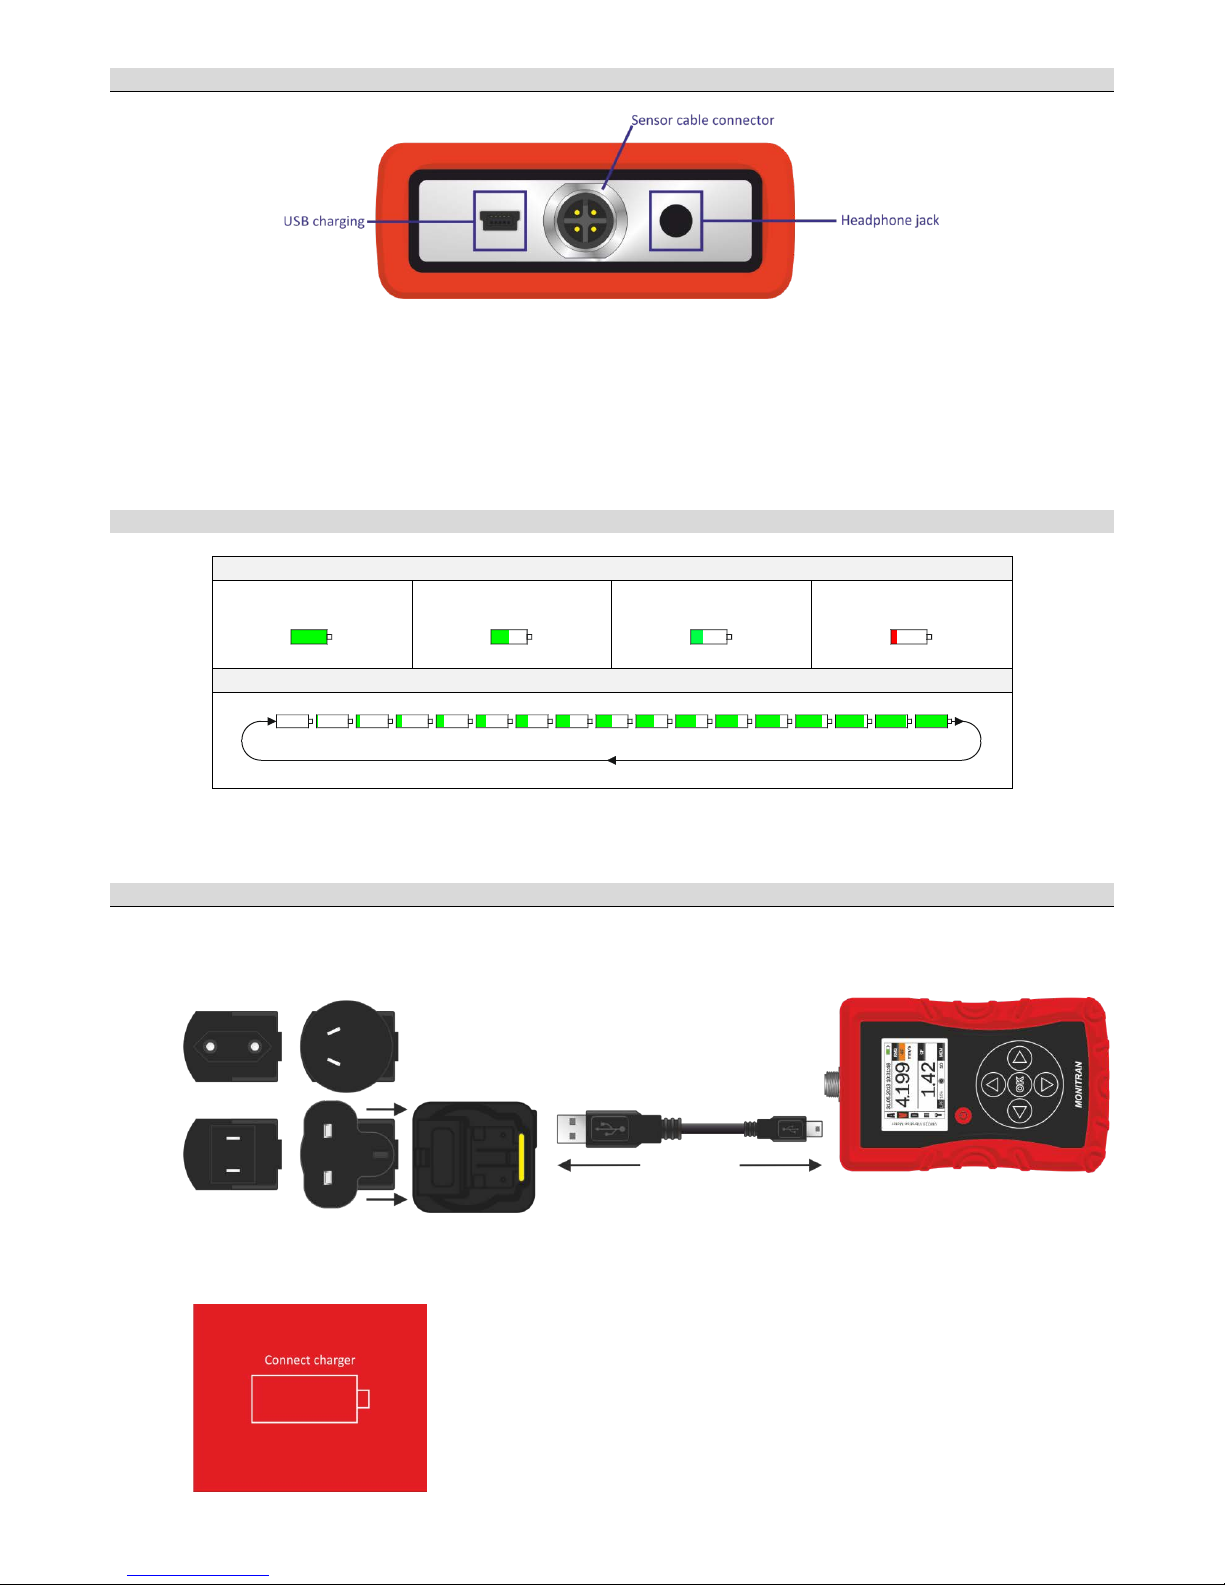
7.
Connections
The headphone jack
will accept a 3.5mm stereo jack plug. Headphones (not included) may be used to listen to the vibration
directly.
To avoid hearing damage, use of headphones with an inline volume adjustment is recommended. Ensure the volume is turned
down before connectin
g your headphones. After placing headphones in your ears, gradually turn up the volume until you reach a
comfortable listening level. Do not use headphones when it's unsafe to do so - while operating a vehicle, or during any activity or in
an environment where your full attention to your surroundings is required.
8.
Battery status
Normal operation
100%
50%
25%
10%
Charging
The meter will automatically turn-off after 15 minutes of inactivity (5 minutes if sensor not connected).
9.
Charging the unit
The supplied multi-voltage charger comes with 4 adaptors and is suitable for use worldwide.
Connect the correct adaptor for your region, plug into mains and connect the mini USB to the MTN/VM220.
The unit should reach full charge within 4 hours. The battery status icon will indicate charging is in progress (see 6.
Display & 8. Battery status).
When the battery is level is low, a warning screen (see left) will display for 5
seconds and the unit will power off.
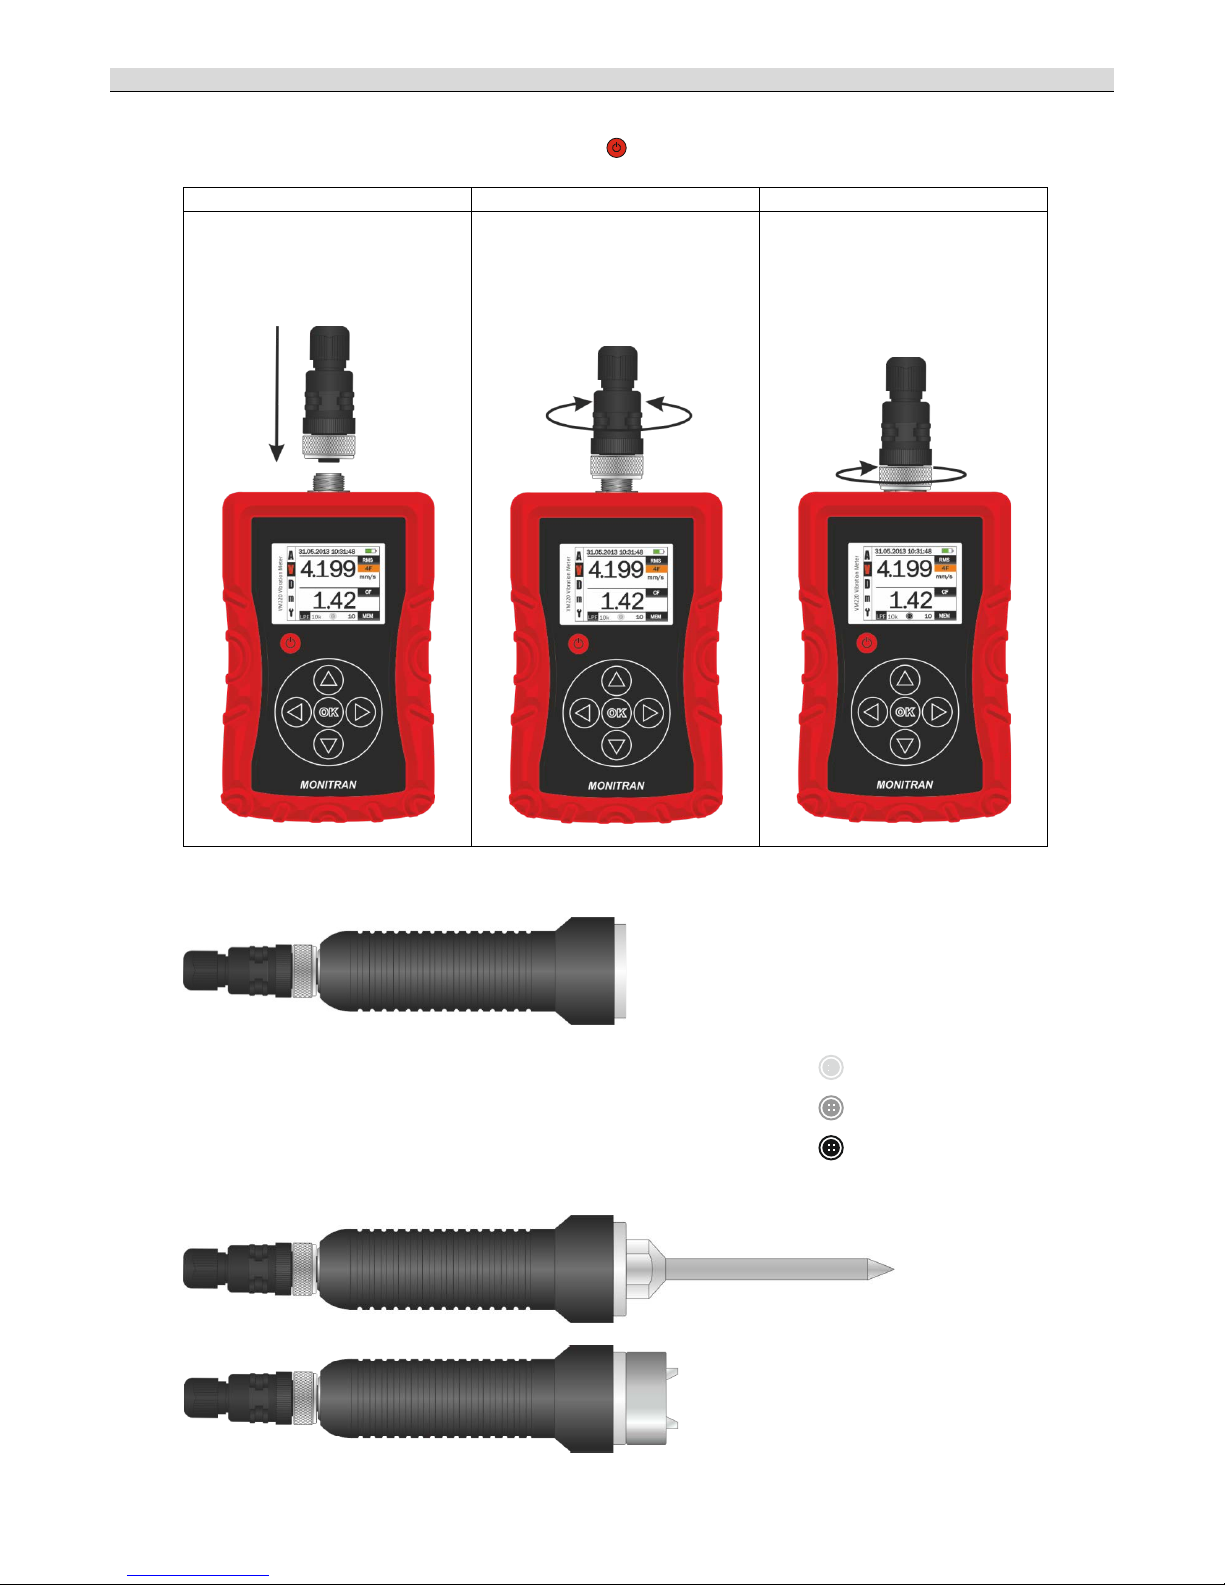
5
10.
Connecting sensor
• The sensor and cable can be connected/disconnected at any time.
• Once fully charged, briefly press the power button to switch the unit on.
1 2 3
Connect either end of the cable to
the unit by rotating the connector
to align the key.
Once in the correct position, the
connector will drop into the socket
and the knurl can be tightened to
hold the connector in place. Do
not overtighten.
• Repeat this process to connect the sensor to the other end of the cable.
Notes:
The connection status icon (see 6. Display) will change accordingly.
No connection
Cable connected
Sensor connected
• Attach spike or magnet, if required.

6
11.
Measurement modes
Press buttons to switch between measurement modes.
The current mode will be highlighted.
Units for each measurement mode can be set (see 16. Setting units)
MODE UNITS
Acceleration mode g m/s²
Velocity mode mm/s in/s
Displacement mode µm mils
Memory recall mode (see 13. Memory recall mode)
Settings (see 14. Settings menu)
12.
Calculation modes
When the unit is in one of the measurement modes (acceleration, velocity, displacement), press buttons to
switch between RMS, peak-peak and 0-peak displays. An additional bearing display is available in both acceleration and
velocity measurement modes. The bearing mode passes the vibration signal through a 1kHz-10kHz band-pass filter to
attenuate non-bearing vibration found at lower frequencies, and is used for more precise monitoring of bearings.
Display
Calculation mode
RMS
Root mean square
PK-PK
Peak to peak
0-PK
Zero to peak
B
Bearing (RMS)
Press
to store the displayed value in the current memory slot. The current memory number will automatically move
to the next slot.
• Current time
• Current date
• Measurement mode
• Calculation mode
• Crest factor value
• Vibration value & units
The Crest Factor is equal to the peak amplitude of a waveform divided by the RMS value. The purpose of the
crest factor calculation is to give an analyst a quick idea of how much impacting is occurring in a waveform.
Impacting is often associated with roller bearing wear, cavitation and gear tooth wear.

7
13.
Memory recall mode
Using buttons , select memory recall mode. Press buttons to navigate through memory slots.
When returning to the measurement mode, the selected memory slot will be the current memory slot for the next
store.
It is possible to quickly clear all memory slots (see 18. Clearing memories).
There are 100 memory slots in total. The blue fields shown in the above figure are saved into memory
Provided the unit is returned to Monitran for service, the memories will remain intact, even after battery replacement
and calibration (see 24. After Sales Support)

8
14.
Settings menu
• Using buttons , select .
• Press button
to enter settings menu.
• Use buttons
to navigate and press to select option.
• Use button
to navigate back to the main menu.
15.
Setting the clock
•
Enter settings menu (see
14. Settings menu
)
• Press button twice to highlight CLOCK and press to enter clock mode.
• Use buttons
to set DAY/MONTH/YEAR/HOUR/MINUTE settings.
• Press buttons
to change between DAY/MONTH/YEAR/HOUR/MINUTE.
• Press
at any time to save and return to settings menu.
16.
Setting units
•
Enter settings menu (see
14. Settings menu
)
• Press to select UNITS.
• Use buttons
to choose between acceleration (A), velocity (V), displacement
(D).
• Use buttons
to select units.
• Press
to save and return to settings menu.

9
17.
Setting low pass filter
• Enter settings menu (see 14. Settings menu)
• Press to select FILTER.
• Use buttons
to choose between 1, 5, 10 kHz.
• Press
to save and return to settings menu.
18.
Clearing memories
• Enter settings menu (see 14. Settings menu)
• Press to select RESET.
• A red bar will appear under the button to indicate progress.
NOTE: The clock and unit settings will be unaffected.
19.
Setting ISO10816 group
•
Enter settings menu (see
14. Settings menu
)
• Press to select ISO10816 (see 20. ISO10816).
• Use buttons
to select group (1F, 1R, 2F, 2R, 1<, 1>, 2<, 2>).
• Press
to save and return to settings menu.
1F
ISO10816-3 Group 1 (300kW-50MW) flexible foundation
1R
ISO10816-3 Group 1 (300kW-50MW) rigid foundation
2F
ISO10816-3 Group 1 (15kW-300kW) flexible foundation
2R
ISO10816-3 Group 1 (15kw-300kW) rigid foundation
1<
ISO10816-7 Category 1 (<200kW)
1>
ISO10816-7 Category 1 (>200kW)
2<
ISO10816-7 Category 2 (<200kW)
2>
ISO10816-7 Category 2 (>200kW)
See 20. ISO10816

10
20.
ISO10816
ISO10816-3:2009
Industrial machines with nominal power above 15kW and
nominal speeds between 120rpm and15000rpm when
measured in situ.
1F
ISO10816-3 Group 1 (300kW-50MW)
flexible foundation
1R
ISO10816-3 Group 1 (300kW-50MW)
rigid foundation
2F
ISO10816-3 Group 1 (15kW-300kW)
flexible foundation
2R
ISO10816-3 Group 1 (15kw-300kW)
rigid foundation
ISO10816-7:2009
Rotodynamic pumps for industrial applications, including
measurements on rotating shafts.
1< ISO10816-7 Category 1 (<200kW)
1> ISO10816-7 Category 1 (>200kW)
2< ISO10816-7 Category 2 (<200kW)
2> ISO10816-7 Category 2 (>200kW)
Sufficient severity to cause damage to the machine
Restricted operation until remedial action can be taken
Unrestricted long-term operation
Newly commissioned machines
Please consult ISO10816 standards for more information.

11
21.
Physical
All dimensions in mm, unless stated otherwise.

12
22. Specifications
Measurement ranges
Acceleration
Velocity
Displacement
20g
200mm/s
2000 µm
Different ranges available
Modes
RMS
Peak
Peak
-peak
Crest factor
Bearing acceleration
Bearing velocity
ISO10816
• ISO10816-3: 4 modes
ISO10816-3 Group 1 (300kW-50MW) flexible foundation
ISO10816-3 Group 1 (300kW-50MW) rigid foundation
ISO10816-3 Group 1 (15kW-300kW) flexible foundation
ISO10816-3 Group 1 (15kw-300kW) rigid foundation
• ISO10816-7: 4 modes
ISO10816-7 Category 1 (<200kW)
ISO10816-7 Category 1 (>200kW)
ISO10816-7 Category 2 (<200kW)
ISO10816-7 Category 2 (>200kW)
•
Visual indication of machine status:
Severe
Restricted
Unrestricted
Good
Frequency range
Low pass filters
Band
-pass filter
1kHz, 5kHz, 10kHz
1
-10kHz
Units
Acceleration
Velocity
Displacement
g, m/sec²
mm/sec, in/sec
µm, mils
Display
Type
Resolution
Viewing angle
Viewable size
TFT 16bit colour
160 x 128
100°
35 x 28mm
Memory
Size
100 slots storing vibration, time, date, filter, units, crest factor
Connections
Power
Headphones/AC signal
Sensor
USB mini-B
3.5mm stereo
4 pin Lumberg

13
Environmental
Operating temperature
0 to +45°C
Storage temperature
-20 to +60°C
Protection:
IP54
Power
Charger
100-240V/5V 1A USB with 4 adaptors
Battery
Li-ion 3.7V
Battery life
>20 hours
Power status
Battery icon indicates charging status, battery level
Dimensions
Size (L x W x H)
Weight
(meter only)
(complete kit)
130 x 78 x 28mm
0.215kg
1.427kg
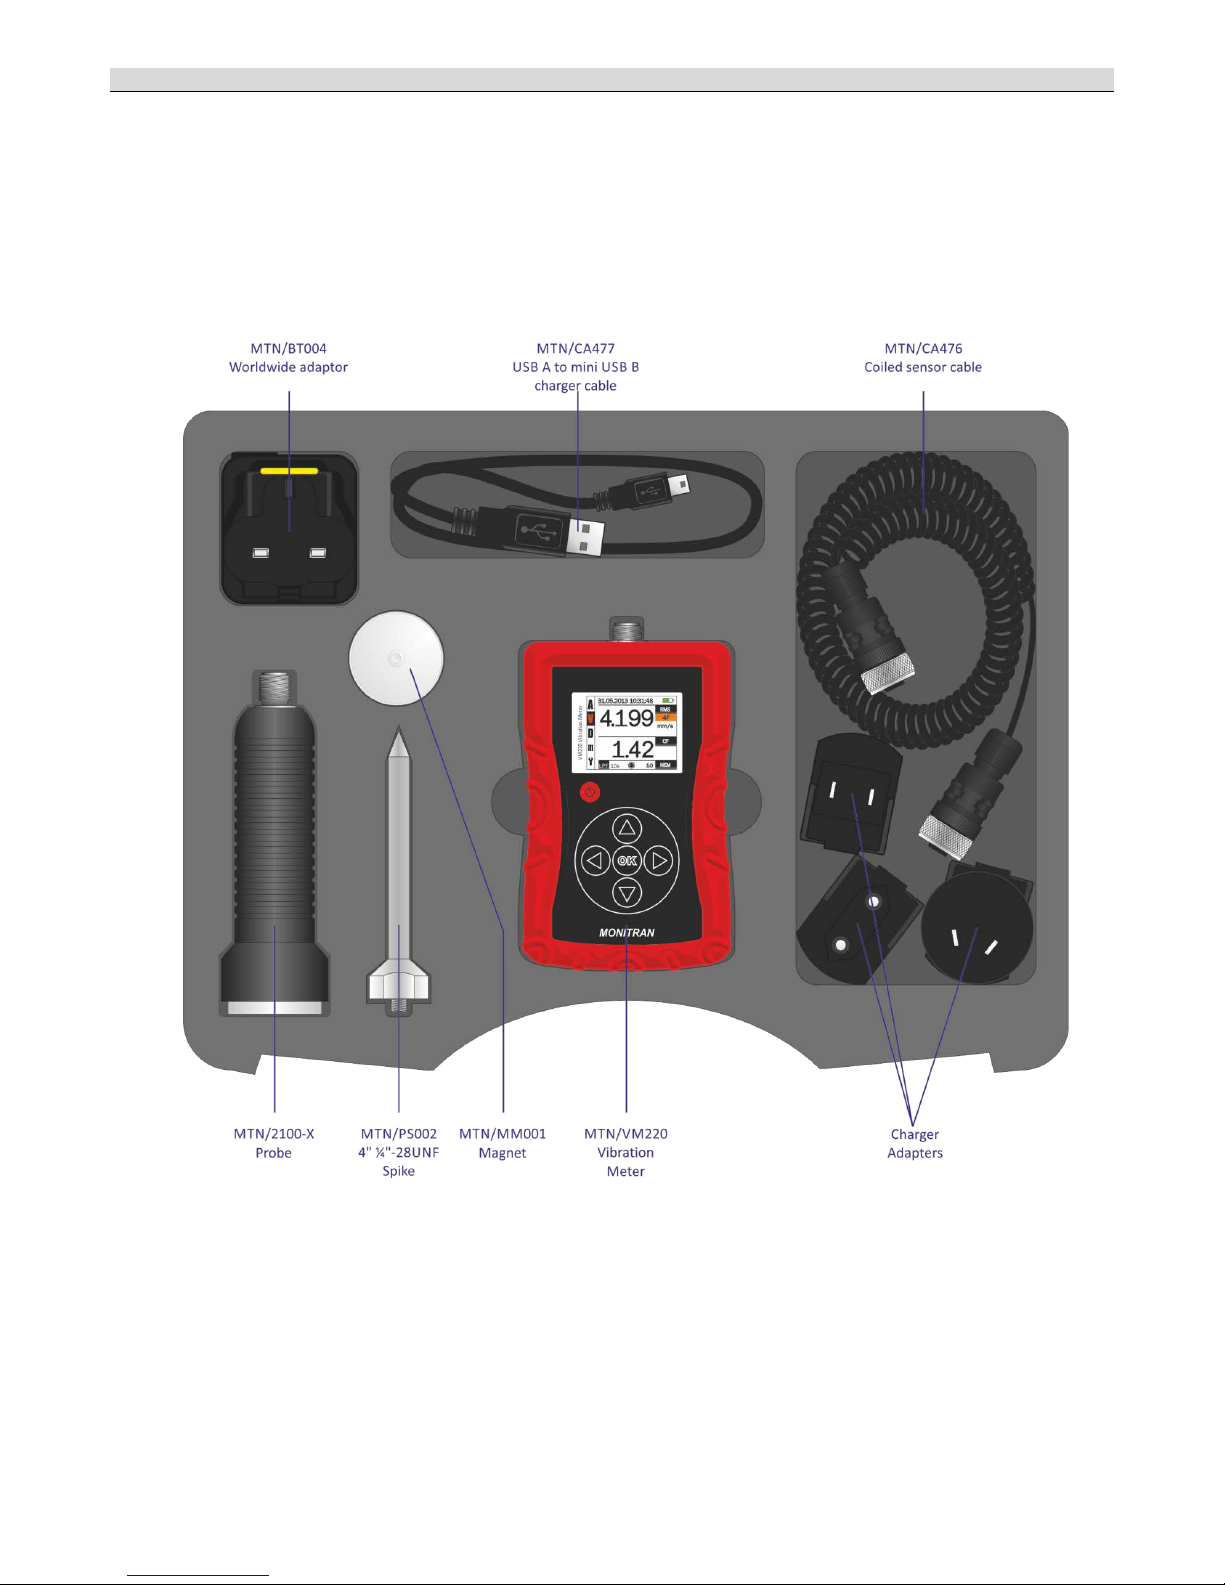
Accessories
MTN/VM220
MTN/2100
-X
MTN/MM001
MTN/PS002
MTN/CA476
MTN/CA477
MTN/BT004
MTN/HE016
MTN/HB039
Vibration meter
Probe
Magnet
4" ¼"
-28UNF Spike
Coiled sensor cable
USB A to mini
USB B cable
Worldwide adaptor with 4 adaptors
Carry case
Handbook

14
23.
Troubleshooting
The unit will not power on
• Recharge battery.
The battery will not charge
• Try a different charger.
• Check charger cable for signs of damage.
•
Return the unit to Monitran for service.
The unit has frozen
• Hold the button for at least 10 seconds to force the unit to perform a hard
shutdown. Wait a few seconds, then restart as usual.
The unit is displaying
unexpected readings
• Ensure connectors are securely fastened at both ends of the cable.
•
Check cable and connectors for signs of damage.
24.
After Sales Support
Warranty
All products are guaranteed against defects in materials and workmanship for a period of 24 months from
the date of purchase. In the event of failure within 24 months of the original purchase the Company will
promptly repair or replace any defective products without charge.
This warranty is void if repair has been attempted by unauthorised persons or agents, if the products have
been used for purposes for which they were not intended, if they have been subjected to abuse or wilful
neglect or if the user has in any way failed to take sufficient precautions to safeguard the products.
No liability will be accepted for loss of items or component parts.
Recalibration
It is recommended that the Vibration Meter is recalibrated annually to maintain optimum performance.
Monitran are pleased to provide this service. Please contact our Sales Office for details.

15
Appendix A – Main operations

16
Appendix B – Conversions and formulae
A V D
F
ACCELERATION
m/s² g in/s² ft/s²
1 0.102 39.37 3.281
9.807 1 386.1 32.17
0.0254 0.00259 1 0.08333
0.3048 0.03108 12 1
VELOCITY
mm/s
m/s
in/s
ft/s
1 0.001 0.03937 0.003281
1000 1 39.37 3.281
25.4 0.0254 1 0.08333
304.8 0.3048 12 1
DISPLACEMENT
µm mm mils in
1 0.001 0.03937 0.0000394
1000 1 39.37 0.03937
0.0254 0.0000254 1 0.001
25400 25.4 1000 1
FREQUENCY
Hz CPS RPM CPM
1 1 60 60
1 1 60 60
0.01667 0.01667 1 1
0.01667 0.01667 1 1
𝐀 = 𝐕. 𝟐𝛑𝐅
= 𝐃. (𝟐𝛑𝐅)²
m/s²
m/s m Hz
𝐀 =
𝐕. 𝟐𝛑𝐅
𝟏𝟎𝟎𝟎
=
𝐃. (𝟐𝛑𝐅)²
𝟏𝟎𝟎𝟎𝟎𝟎𝟎
m/s²
mm/s
µm
Hz
𝐀 =
𝐕. 𝟐𝛑𝐅
𝟗𝟖𝟎𝟕
=
𝐃. (𝟐𝛑𝐅)²
𝟗𝟖𝟎𝟔𝟔𝟓𝟎
g
mm/s
µm
Hz
𝐕 =
𝐀
𝟐𝛑𝐅
= 𝐃. 𝟐𝛑𝐅
m/s²
m/s m Hz
𝐕 =
𝟏𝟎𝟎𝟎. 𝐀
𝟐𝛑𝐅
= 𝐃.
𝟐𝛑𝐅
𝟏𝟎𝟎𝟎
m/s²
mm/s
µm
Hz
𝐕 =
𝟗𝟖𝟏𝟎. 𝐀
𝟐𝛑𝐅
= 𝐃.
𝟐𝛑𝐅
𝟏𝟎𝟎𝟎
g
mm/s
µm
Hz
𝐃 =
𝐀
(𝟐𝛑𝐅)²
=
𝐕
𝟐𝛑𝐅
m/s²
m/s m Hz
𝐃 =
𝟏𝟎𝟎𝟎𝟎𝟎𝟎. 𝐀
(𝟐𝛑𝐅)²
=
𝟏𝟎𝟎𝟎. 𝐕
𝟐𝛑𝐅
m/s²
mm/s
µm
Hz
𝐃 =
𝟗𝟖𝟎𝟔𝟔𝟓𝟎. 𝐀
(𝟐𝛑𝐅)²
=
𝟏𝟎𝟎𝟎. 𝐕
𝟐𝛑𝐅
g
mm/s
µm
Hz
Where:
A = Acceleration
V = Velocity
D = Displacement
F = Frequency
Waveform
RMS value
Crest factor
Sine wave
𝟏
√
𝟐
≈ 𝟎. 𝟕𝟎𝟕
√
𝟐 ≈ 𝟏. 𝟒𝟏𝟒
Triangle wave
𝟏
√
𝟑
≈ 𝟎. 𝟓𝟕𝟕
√
𝟑 ≈ 𝟏. 𝟕𝟑𝟐
Sawtooth wave
𝟏
√
𝟑
≈ 𝟎. 𝟓𝟕𝟕
√
𝟑 ≈ 𝟏. 𝟕𝟑𝟐
Square wave 1 1
Where: Peak-peak = 1

17
Notes

© Monitran Limited 2016 HB039.3 11/2016
Right of modification reserved.

ALPINE
COMPONENTS
Postal Address
Alpine Components Ltd
Innovation Centre, Highfield Drive
Churchfields
St. Leonards-on-
Sea
TN38 9UH
United Kingdom
Telephone
01424 858118
Website Address
www.alpine-
components.co.uk
"Alpine Components" is the abbreviated trading name for "Alpine Components Limited"
The company has been trading since 1991 and was incorporated on 13/11/2006 in the United Kingdom
Company Registration Number: 05996485
VAT Number: GB583598190
 Loading...