

Page 1

Custom nsta
saies
INSTALLATION
GUIDE
GUIDA
INSTAL
MANUAL
GUIA
HANDLEIDING
PyKOBO.QCTBO
D'INSTALLATION
INSTALLAZIONE
LAT
DE
DE
~~1~~
GUIDE
I 0 N
INSTALAQAO
SHAND
INSTALACION
INSTALLATIE
no
ycTaHOBKe
B U C H
Page 2
Pri
or
to
Fitting
CAUTION: These Custom Install loudspeakers can only be fixed into plasterboaro (dry-lined) or suspended
ceilings/ walls with a thickness of up
work constructed
of
your ability
of
a competent and qualified trades person.
the
Custom Inst
to
provide a structure for the
to
provide a secure and safe fixing,
all Seri
es Speaker
to
45mm
(1
Tri
s
3
14
"). Solid wall installation will require channeling out and frame
Grip®
dog legs
do
not attempt
to
clamp to. For safety reasons, if you are unsure
to
fix these speakers, please obtain the services
CAUTION: Ensure that there are
the speaker apertures. Work from secure steps and avoid trailing wires.
Over lighten
ing Warni
ng
no
water pipes or electricity cables running within the wall structure before cutting
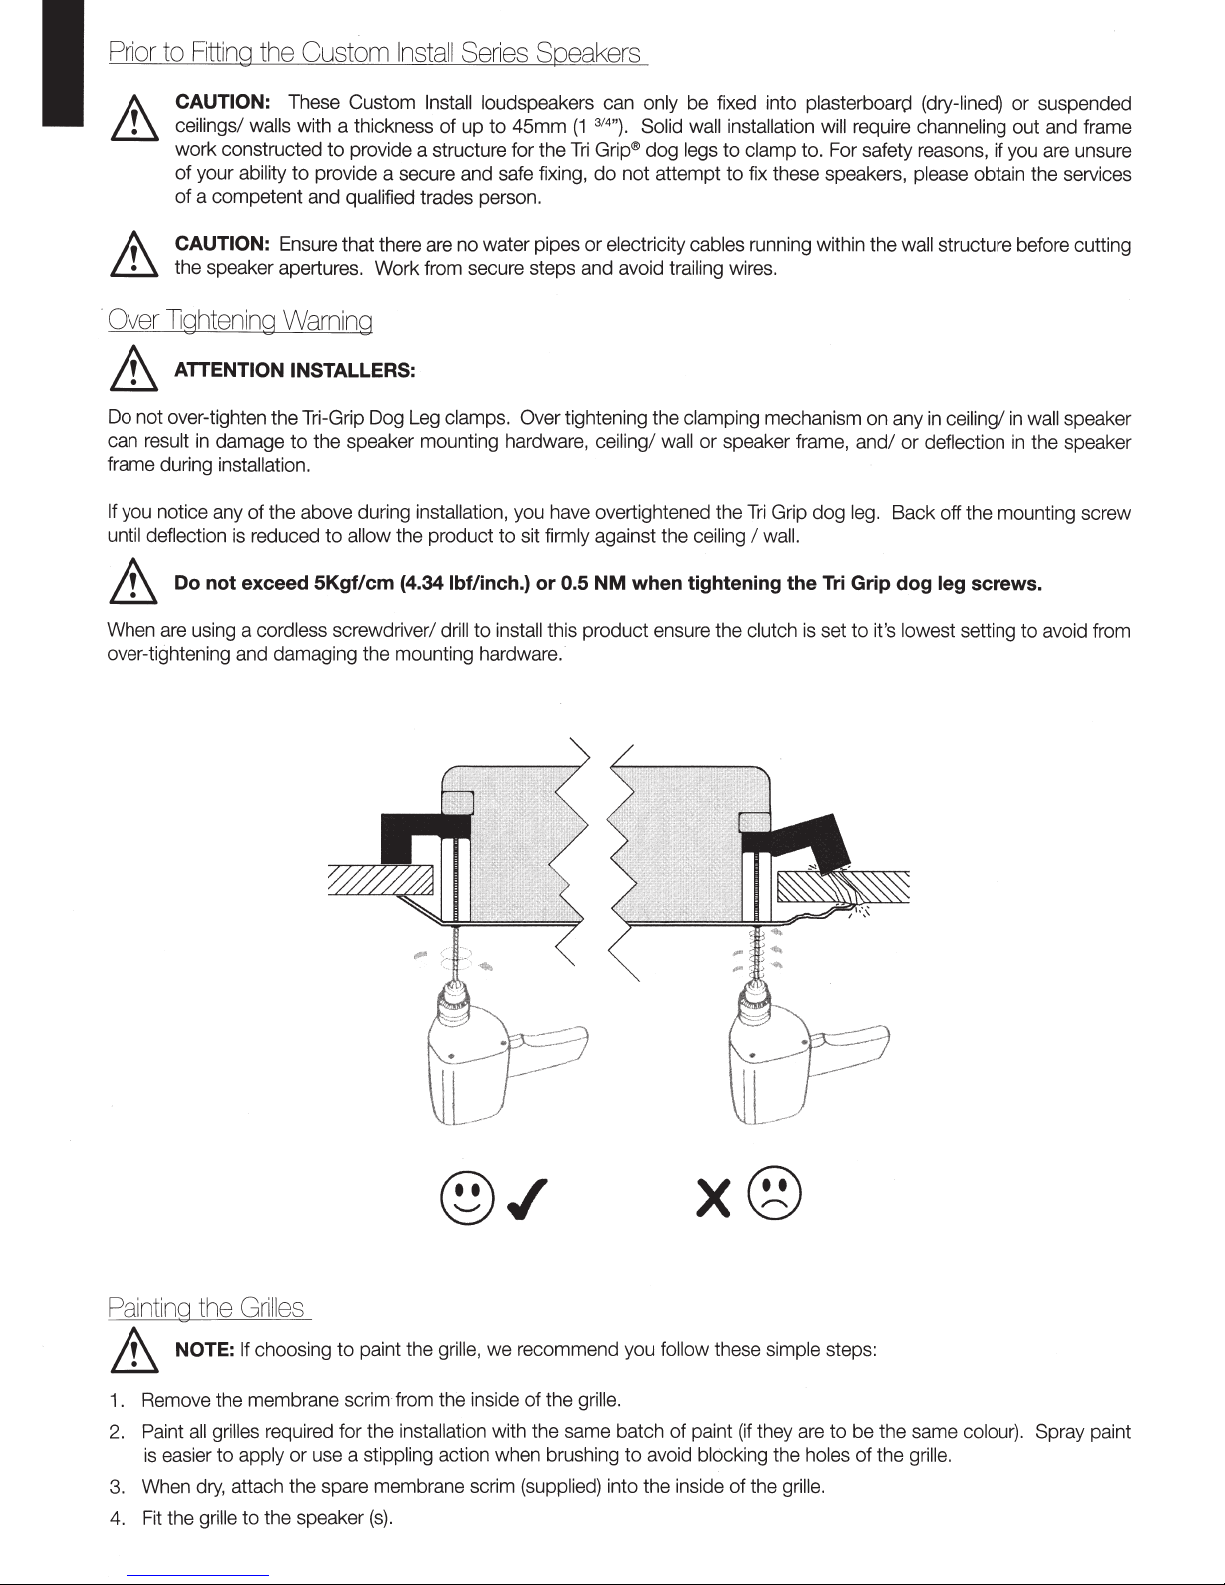
& ATTENTION INSTALLERS:
Do not over-tighten the Tri-Grip Dog Leg clamps. Over tightening the clamping mechanism on any
can result
frame during installation.
If you notice any
until deflection is reduced
& Do not exceed
When are using a cordless screwdriver/ drill to install this product ensure the clutch
over-tightening and damaging the mounting hardware.
in
damage
to
the speaker mounting hardware, ceiling/ wall or speaker frame,
of
the above during installation, you have overtightened the
to
allow the product
5Kgf/cm
(4.34 lbf/inch.)
to
sit firmly against the ceiling I wal
or
0.5
NM
when tightening
and/
or
Tri
Grip dog leg. Back off the mounting screw
l.
the
Tri
Grip dog leg screws.
is
set
to
it's lowest setting to avoid from
in
ceiling/
deflection
in
wall speaker
in
the speaker
Painting
& NOTE: If choosing
1.
2. Paint
3. When
4.
the
Grilles
to
paint the grille, we recommend you follow these simple steps :
Remove the membrane scrim from the inside of the grille.
all
grilles required for the installation with the same batch of paint
is
easier
to
apply or use a stippling action when brushing
dry,
attach the spare membrane scrim (supplied) into the inside of the grille.
Fit
the grille to the speaker
(s)
.
x®
(if
they are
to
avoid blocking the holes
to
be the same colour). Spray paint
of
the grille.
Page 3

Fi
tting
the
Custom
Install Loudspeakers
0
8
Draw
centre l
around
ines
0
CUSTOM
·-
·
~
m
CT280-IOC,CT380-IDC.CT380-FX CT180,CT18<l-T2, <=n80
Connect
down
the
on
bare
speaker
the
wire
template
if
necessary
I
~C?~If<?~
.
~~~~C!
INSTA~LATION
terminals
SERIES
i
I
i
i
J
Wl-,~
cables
in
the
through
·
by
and
and
mark
pushing
clamping
hole.
f)
0
Cut
around
Guide
marked line
speaker into cut
out
8
11ghten
in
ceiling
screws
See
&
t
ig
ht~ning
warn1ng.
3 Tri-Grip scr
models
on the
ove
r
or
in wall
the
models.
ews
on
6 Tri-Grip
the
G
Fit
magnetically
p
lace.
grilles.
•
-
They
and
are held
should
in place
'snap'
into
Page 4
Monitor Audio Ltd.
24
Brook
Road
Rayleigh,
Tel
: +44
Fax
: +44
Email: info@monitoraudio.co.uk
Essex
SS6
7XJ
England
(0)1268
(0)1268
740580
7 40589
Designed and Engineered
in
the United Kingdom
© Monitor Audio.
Version 1 201
2
Page 5

MONITOR
AUDIO
®
monitoraudio.com
CUSTOM
INSTALLATION
SERIES
Tri-Grip x 6
=
5Kgf/cm; 4.34 lbf/inch;
0.5
NM
------------------t-------------------
234mm
(9
3116
")
1
93mm
(3
11
116
")
WT180, WT280, WT280-IDC
97.5mm
(3
13116
")
WT380-IDC
I
I
387mm
(15
114
")
Page 6

Page 7

PLEASE
STAMP
AFFIX
HERE
0
MONITOR
24
BROOK
RAYLEIGH
ESSEX
·ENGLAND
AUDIO
SS6
LTD
ROAD
7XL
Page 8

.MONITOR
validate
To
where
applicable.
AUDIO
your
warranty
Alternatively,
please
fill
you
in
can
this
register
Limited Warranty/Registration card
tick
card
(using
line
on
block
capitals)
www.monitoraudio.co.uk
at
and
boxes
Should
Personal
Title
First Name
Ad~ress
Town
Zip/
Product
~
Date
phone,
be contacted
to
not
wish
you
Details
M-.
...............................................................................
Post
details
..........................................................................
of
0
....................................
.......................................................................................................................................................................................
Code
Purchase
Mrs.
...............................................................
.........................................
0
..................................
by
Ms
Other
0
Last name
State/County
Country
~al
........
,
where purchased
Shop
..............................................................................................
Number
post, e-mail
by
either
us
or
...................................................................................
..............................................................................
............................................................................
.........................................
please
tick
..............................
:
box.
this
0
..
.
.
.
.
.
t
Which
What
·
Is
Q)
c:
What
~
c:
0
Dealer
"0
0
u..
Ottler please
"0
c:
co
Q)
~
Q)
What
:I:
c:
5
(/)
Your
·c;
~
Your
Your CD/DVD
related
the
is
purchase?
the
made
recommendation
music
age is?
amp/receiver
Thank you
magazines
intended
Replacement/ Additional purchase
pur~hase
you
specify
you
do
player
time.
your
for
do
use
Monitor
of
you
the
read?
Audio?
.........................................................................................................................
speakers?
Music
Existing owner
0
0
0
Movies
Your
0
first
Magazine review
Both
purchase
0
·0
0
0
....................................................................................................................................................................
listening
like
.................................................................................................................................................................
is?
...............................................................................................................................................................
is?
you have any
If
to?.
16-25
further
0
comments
26-35
Ocountry
Jazz
Oclassical
0
about
36-55
products
our
.0
0
please use
Rock/Pop
the
0
55+0
space below.
..
..
_
..
..
t
Page 9

m
MONITOR
AUDIO®
design
for
sound
IMPORTANT SAFETY INSTRUCTIONS
GB -
SAFETY INSTRUCTIONS
FR-
CONSIGNES DE
SECURITE
IT-
ISTRUZIONI
PER LA SICUREZZA
DE -
SICHERHEITSANWEISUNGEN
ES
-
INSTRUCCIONES
DE
SEGURIDAD
PT-
INSTRU<;OES
DE SEGURAN<;A
NL-
VEILIGHEIDSINSTRUCTIES
CH-
~~~B~
RU -
lllHCTPYKL\111111
no
TEXHII1KE 6E30nACHOCTII1
RU -
YCnOBV1fl
rAPAHTV1111
SPEAKERS
Page 10

IMPORTANT
SAFETY
INSTRUCTIONS
1.
2.
3.
4.
5.
6.
7.
8.
9.
10.
11.
12.
13.
Please read these instructions.
Please keep these instructions.
Heed all warnings.
Follow all instructions.
Do
not use this apparatus with water.
Clean only with a dry cloth. Great care and attention has gone into the
materials chosen to produce your Monitor Audio loudspeakers. A gentle
wipe with a
dry,
clean cloth
is
all
that
is
required to remove any dust. Treat
them as you would a fine piece of furniture because that
is
how they have
been designed.
To
clean the high gloss finishes use our "Lacquer Polish"
that has been developed alongside Auto Glym.
It
can only be purchased
from the online shop at www.monitoraudio.com (UK customers only).
Do not install near any heat source, such as radiators, heat registers,
stoves, or other apparatus (including amplifiers) that produce heat.
Only use attachments/ accessories specified by Monitor Audio.
Use
only with the cart, stand, tripod, bracket, or table
<I
specified by monitor Audio or sold with the apparatus. When
a cart
is
used, use caution when moving the cart/ apparatus
combination to avoid injury from tip-over.
Refer all servicing
to
qualified service personnel. Servicing
is
required when the apparatus has been damaged
in
any
way,
such as
power supply cord or plug
is
damaged, liquid has been spilled or objects
have fallen onto the apparatus, the apparatus has been exposed to rain
or moisture, does not operate normally or has been dropped.
This apparatus shall not
be
exposed
to
dripping
or
splashing
water
and that no object filled with liquids such as vases shall be placed
on the apparatus.
This exclamation point within an equilateral triangle
&
is
intended to alert the user to the presence of important f
maintenance (servicing) instructions
in
the literature •
accompanying the appliance.
No
naked flame sources, such as lighted candles, should be placed.
on the apparatus.
RE-CYCLING
Correct Disposal of Waste Electrical and Electronic Equipment
(WEEE)
by User
in
Private Households
in
the
EU.
This symbol on the product or accessories
indicat~s
that they must not be disposed of with your household
wastes throughout the
EU.
To
prevent possible harm to
the environment or human health from uncontrolled waste
disposal, recycle it responsibly to promote the sustainable
reuse of material resources. Instead it
is
your responsibility
to
dispose of your waste equipment by handing it over
to a designated
WEEE
collection point for recycling. The
separate collection and recycling of your waste equipment
will help conserve natural resources and ensure that it
is
recycled
in
a manner that protects human health and the environment.
For more specific information about where you can take your equipment for
recycling please contact your local city/council office, your local waste disposal
service or the outlet where you purchased your Monitor Audio product.
ROHS
DECLARATION
OF
CONFORMI1Y
· Directive 2011 /65/EU of the European Parliament and of
the Council on the reduction of the use of certain hazardous
substances
in
electrical and electronic equipment, June
2011.
Background
RoHS2
COMPLIANT
2011/65/EU
The RoHS directive restricts the use of Lead
(Pb),
Cadmium
(Cd),
Mercury
(Hg),
hexavalent Chromium
(CrVI),
polybrominated biphenyl
(PBB)
compounds, and
polybrominated diphenyl ether
(PBDE)
compounds
in
electrical and electronic
equipment sold
in
the European Union.
monitoraudio.com
1
Page 11

GUARANTEE
AND
SERVICE
To
validate your warranty please visit www.monitoraudio.com within
30
days of
purchase.
When you register online
you'll gain free entry to our monthly prize draw!
What's more you'
II
be the first to hear about the great things happening at
Monitor Audio, including new products and events!
This equipment has been
fully
tested prior to dispatch from the factory.
Both the craftsmanship and the performance of this product
is
guaranteed
against manufacturing defects for the period of
five years
from the date of
purchase
(see
conditions below), provided that the product was supplied by
an
authorised Monitor Audio retailer under the consumer sale agreement.
(The
words 'consumer sale'
shall
be construed
in
accordance with section 15 of
the supply of goods act 1973). Monitor Audio accepts no responsibility for
defects arising from accident, misuse, abuse, wear and
tear,
modification or
operation outside of that specified within this instruction manual. Neither
will
responsibility be accepted for damage or loss occurring during transit to or
from the parties claiming under this guarantee.
This guarantee covers both labour and parts. The liability of Monitor Audio
is
limited to the cost of repair or replacement of the defective parts
(at
the discretion of Monitor Audio) and under no circumstances extends to
consequential losses or damage.
CLAIMS
UNDER
THIS
GUARANTEE
The equipment should be returned
in
its original packaging to the original
supplier where possible, or to any other authorised Monitor Audio
dealer.
If
it
is
not possible to return the equipment by hand, then
it
should be sent
carriage prepaid via a reputable
carrier.
If
the original packing
is
not available
replacement packaging can be purchased from Monitor Audio.
If
you have any difficulties complying with these requirements please contact
us
at the following
address:
Customer Service
Monitor Audio Ltd.
24 Brook Road
Rayleigh
Essex, SS6
7XJ
England
Tel:
+44
(0)1268 740580
Fax:
+44 (0)1268
7
40589
Internet: www.monitoraudio.com
Email:
info@monitoraudio.co. uk
Th1s
guarantee does not affect the statutory rights of the consumer under UK
law.
DATA
PROTECTION
We
at Monitor Audio
are
committed to respecting the wishes and privacy of our
customers. Ahy information you provide
will be held
in
the strictest confidence
and only used within the Monitor Audio organisation for the provision of
services such
as
warranty claims or spare parts.
We
may wish to contact you
in
the future to ensure you are happy with the
products and standards of service we provide and to keep you up-to-date with
the latest products and promotions we have to
offer.
Should you wish not to be contacted by us either by post, e-mail or phone,
please tick the box on the warranty form on the web site.
Alternatively
you can
request not to be contacted
in
futu.re
by writing to Customer Service, at the
address above.
2
Important Safety Instructions
Page 12

EC
Declaration
of
Conformity
We, Monitor Audio Ltd.
24 Brook Road
Rayleigh
Essex
SS6 7XJ
England
12
Declare
in
own responsibility, that the Monitor Audio products
described
in
this manual
is
in
compliance with Technical Standards/
Council Directives:
(LVD)
2006/95/EC Low Voltage Directive
EN60065: 2002+A1:
2006 Safety requirements for mains operated
electronic and related apparatus for household and similar use.
(EMC) 89/336/EEC Electro Magnetic Compatibility
EN55013: 08.90+A12:08.94+A13:12.96
Limits and methods
of
measurement of radio disturbance characteristics of broadcast
receivers and associated equipment.
EN55020: 12.94+A11:12.96 Electro magnetic immunity
of
broadcast receivers and associated equipment.
EN61000-3-2: 04.95+A1:1998+A2:1998 Electro magnetic
compatibility
(EMC)-
Part
3:
Limits-
Section
2:
Limits for harmonic
current emissions (equipment input current up to and including
16
Ampere per phase).
EN6100-3-3: 01.95 Electro magnetic compatibility
(EMC)-
Part
3:
Limits - Section
3:
Limits of voltage fluctuations and flicker
in
lowvoltage supply systems for equipment with rated current up and
including
16 Ampere per phase.
Signedby:
~
Name: D.S. Hartley
Position: Technical Director
Company: Monitor Audio Ltd
monitoraudio.com
3
Page 13

m
MONITOR
AUDIO®
monitoraudio.com
Monitor Audio Ltd.
24 Brook Road
Rayleigh, Essex
886
7XJ
England
Tel:
+44 (0)1268 7
40580
Fax:
+44
(0)1268 7 40589
Email:
info@monitoraudio.co.uk
Web: www.monitoraudio.com
Designed
in
the United Kingdom
©
2012.
Version 3
 Loading...