

Page 1

Anthra Subwoofer Series
Product Manual
Page 2
Register your Anthra Subwoofer
to ensure the best possible product and customer support
Register your speakers using the QR code
or visit monitoraudio.com/registration
Welcome to Anthra
Thank you for purchasing one of our Anthra Subwoofers,
you’re now ready to start your journey to breathtaking sound.
It takes conidence to dare to be simple. Anthra subwoofers
embrace this methodology. Our standalone subwoofer series
partners innovative acoustic know-how with an intuitive
user-experience. Which isn’t as simple as it sounds.
In this product manual, you’ll ind information about setting
up your subwoofer and how to maintain your subwoofer for
a lifetime of enjoyment.
If you need any further assistance,
please contact our technical team at monitoraudio.com/support
Contents
Spikes & feet 2
Controls & connections 4
Front LED colour matrix 6
Setting up 8
On-screen menu 10
MaestroUnite app 12
Factory reset 14
Care & maintenance 15
Warranty 16
Speciications 17
1
Page 3
Spikes & feet
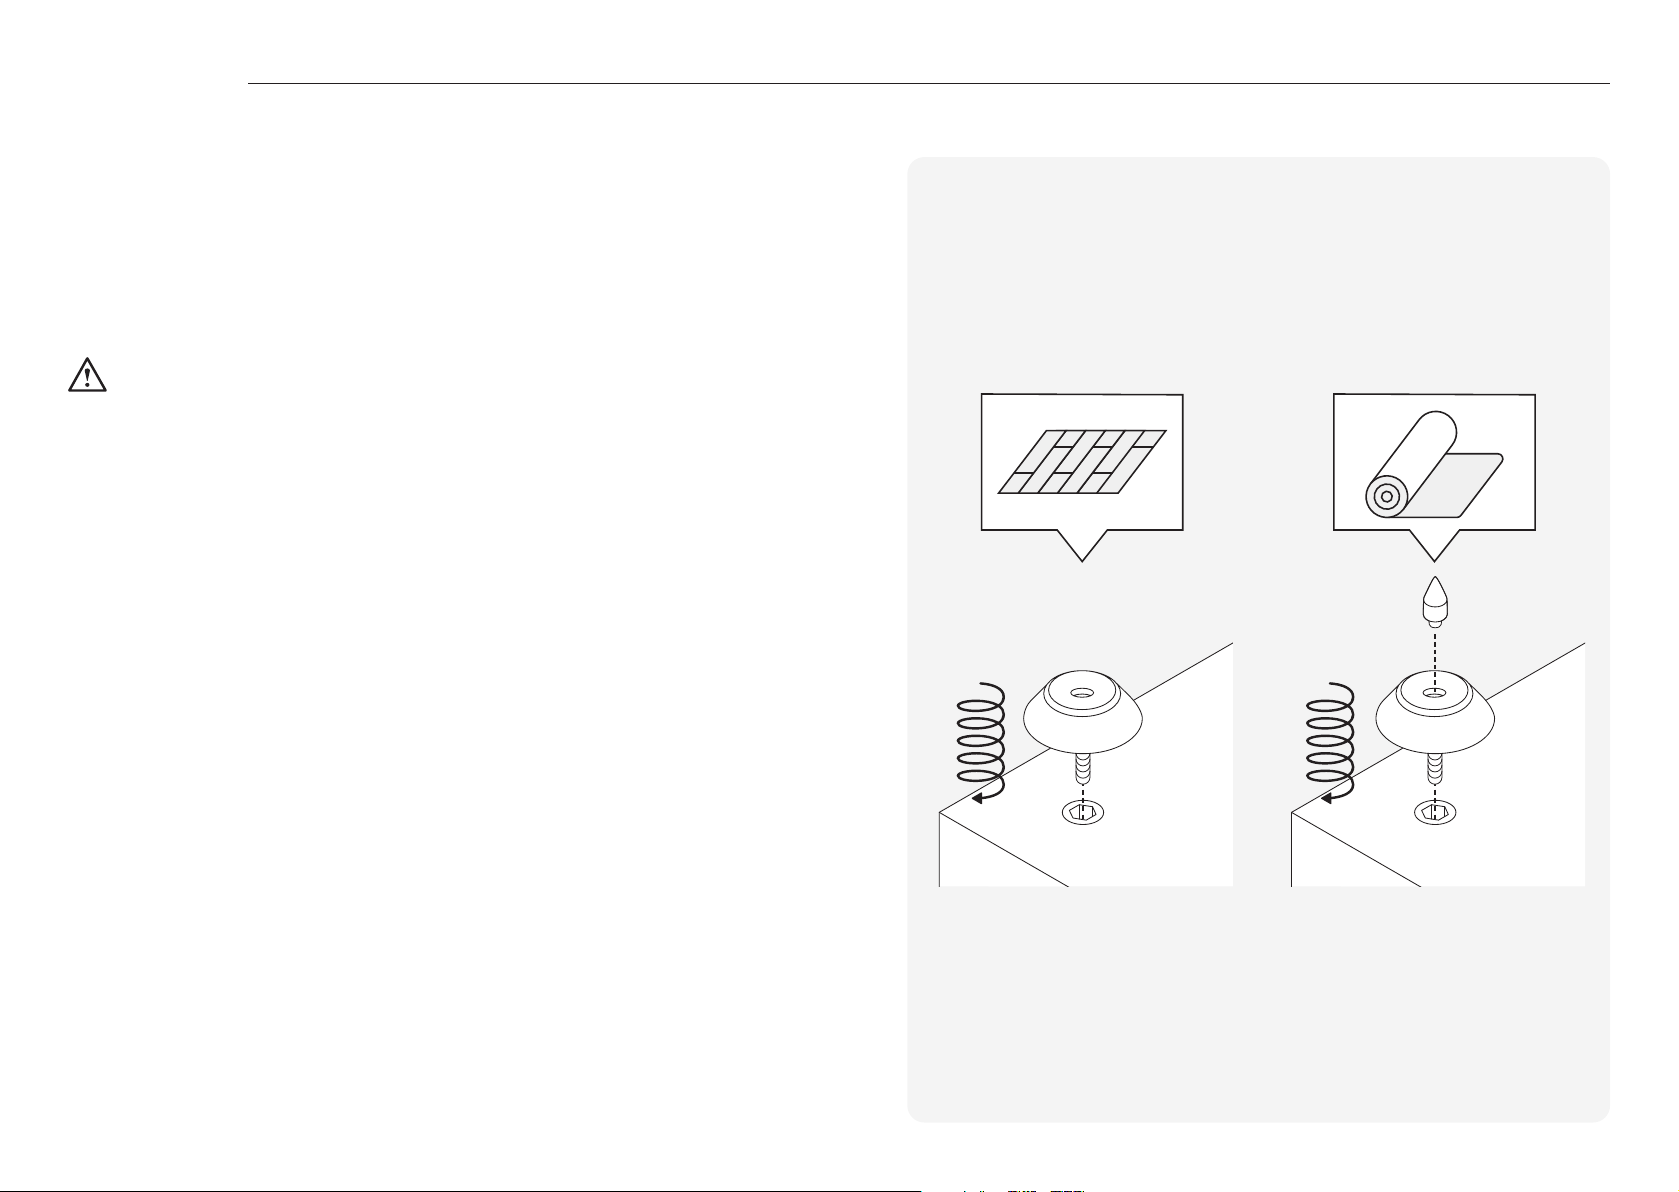
Use on wooden or hard loors
The foot comes fully assembled for use on hard loors. All that is required is ixing into the bottom
of the cabinet. This is achieved by simply screwing the feet fully into the 4-threaded inserts in the
underside of the cabinet.
Use on carpeted loors
For carpeted loors, or where spikes are appropriate, the spike can be screwed into the foot
assembly. If your carpet has a very thick pile, remove the soft polymer pad from the foot to
ensure the spike goes all-the-way through the carpet into the loor.
Please ensure there are no hidden wires under the carpet that could be damaged by
the spikes.
Levelling the speaker
Place the cabinet in your desired location, and check that it is level on all sides. If it is slightly
uneven, unscrew the main threaded assembly at the lowest point and check again.
Continue this process until the cabinet is fully level. Use the locking nut on the foot to ix the
foot in place and to stop any unwanted vibrations.
M5
M10 x 1.25
2 3
Page 4
Controls and connections
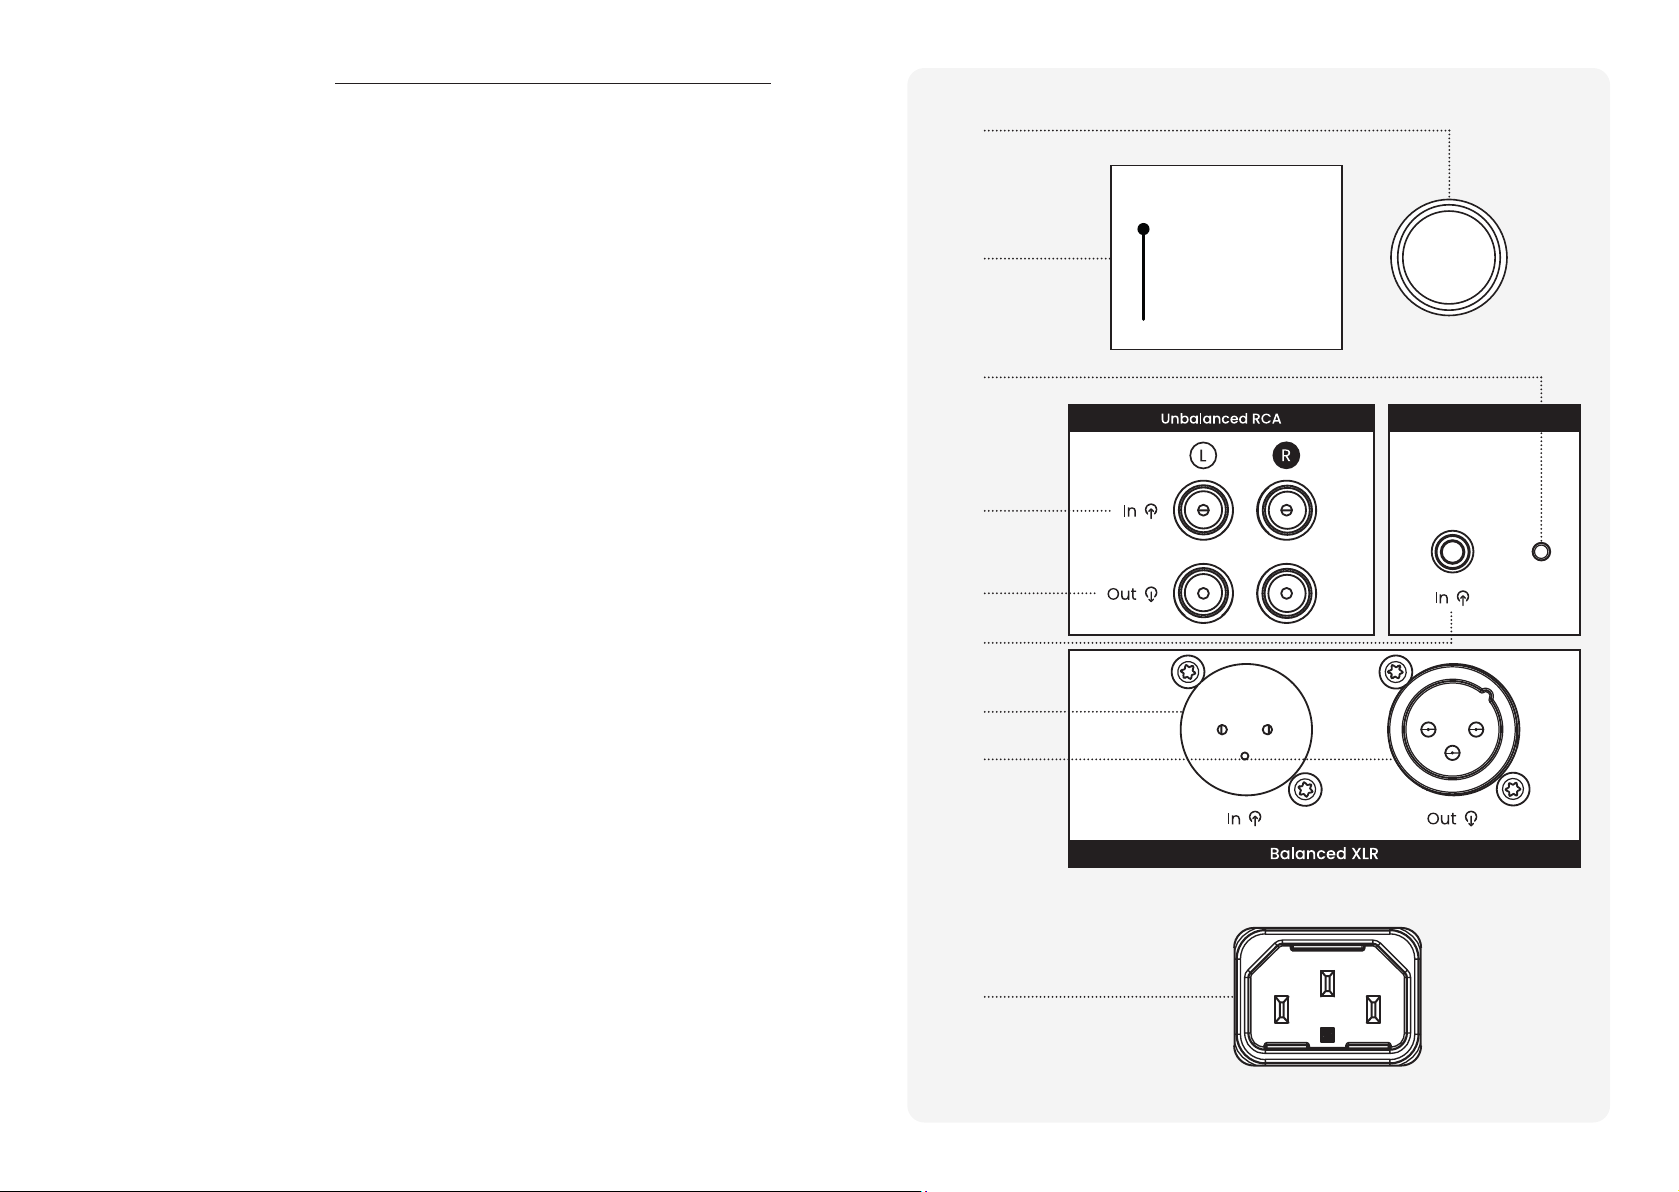
1 - Encoder
Press the Encoder to wake up the Subwoofer and to select options within the Subwoofers menu system. Turn the
encoder to scroll the menu and to change the volume, Low Pass Filter settings, and EQ presets in the menu.
2 - Screen
Displays the Anthra menu for setup using the encoder. Refer to page 10 for more on the menu system layout.
3 - Factory Reset
With the subwoofer switched On, press and hold for 5 seconds to perform a factory reset of the Anthra
subwoofer. To access the button use a thin or pointed object.
4 - RCA Line Level Inputs
For connection to a 2 channel/ stereo ampliier system, connection should be provided by a pair of high-quality
signal cables from the pre-out section of an ampliier. Connection from an AV receiver or processor should be
made using a single subwoofer cable into either of the inputs.
NOTE: Cable lengths should not exceed 10 metres to avoid interference from other electrical appliances.
5 - RCA Line Level Outputs
To be used to feed additional sub-woofers or power ampliiers from the Anthra subwoofer by ‘daisy chain’ type
connection. The outputs are link-out only connections and do not provide any form of iltering or ampliication.
There must be a signal into the RCA inputs for the linked outputs to work.
NOTE: Cable lengths should not exceed 10 metres to avoid interference from other electrical appliances.
6 - 12 Volt Trigger Input ~ Centre Pin Tip = +12Vdc
For external power control from an AV ampliier/ receiver to the Anthra Subwoofer. Monitor Audio recommend
using this function and a lead is supplied. This 12 volt signal is generated by the AV amp/receiver and tells the
Subwoofer to turn On from standby mode. This allows a more accurately controlled auto On/O function, and
is far more energy eicient.
7 - Balanced LFE Input (Female XLR Type)
To be used when connecting to the balanced output on the ampliier. This is the best method of connection
when using long runs of cables (over 10m up to 100m). A balanced connection provides a much better, almost
noise free method of connection over RCA connectors.
8 - Balanced LFE Output (Male XLR Type)
To be used to feed additional sub-woofers or power ampliiers from the Anthra subwoofer by ‘daisy chain’ type
connection. This is the best method of connection when using long runs of cables (over 10m, up to 100m).
A balanced connection provides a much better (almost noise free) method of connection over RCA
connectors. The output is a link-out only connection and does not provide any form of iltering or
ampliication. There must be a signal into the XLR input for the linked output to work.
9 - IEC Mains Input Socket
The subwoofer is supplied with a three-pin mains input socket for connection to the mains supply. Use ONLY
the appropriate IEC mains lead provided with the product.
1
Menu
Volume
2
3
4
5
6
7
8
9
EQ Presets
Low Pass Filter
Service
12v DC Trigger
4 5
Page 5
Front LED colour matrix
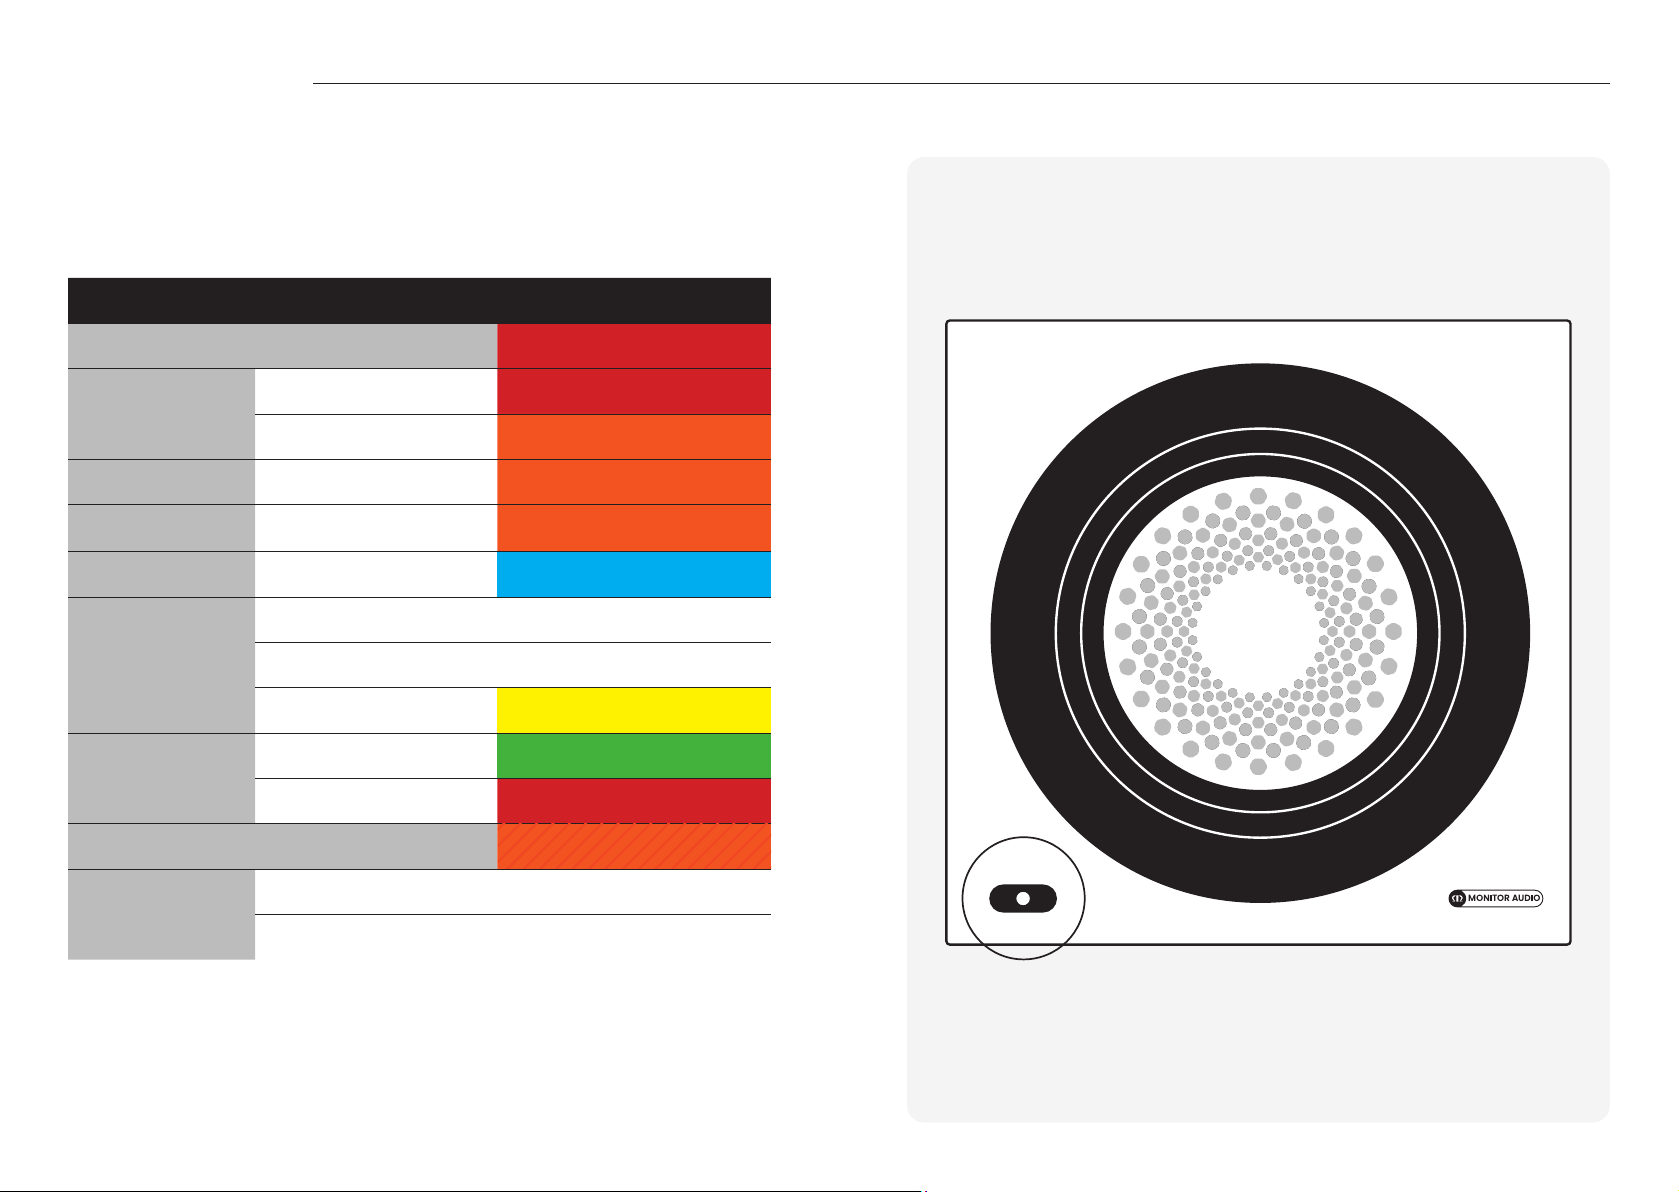
The front LED has multiple colours/ indicators.
Please refer to the below table for their meaning.
Function Indication
Unit Standy Continuous Red
Power Up Sequence 3 x Red Pulses
Power On
Unit On Continuous Orange
BLE Pairing Pairing Complete Quick Flashes Orange for 3 seconds
Paired State
OTA Update Mode Updating Process Continuous Blue
Fault Indications
Factory Reset
LED
Check connction option selected in
MaestroUnite App
General White
Temperature Flashing Orange & White
DC or Overcurrent Error Flashing Orange & Yellow
Reset Continuous Green
Completed Continuous Red (Standby)
Mute On Continuous Flashing Orange
Brightness Level Adjustment Dimming Level Indication
O All LED Indications O
Quick Flashes Orange for 3 seconds
6 7
Page 6
Setting up
Initial set-up
Follow the steps to get started setting up your Anthra Subwoofer. More detail for each step is also
given in the corresponding sections.
Leave the subwoofer unplugged from the mains until all signal cables are connected.
1. Position subwoofer, all features and settings can be conigured using the MaestroUnite app or
from the back of the subwoofer.
2. Connect the signal cables based on your system, refer to the AV or Stereo System section
below.
3. Connect the IEC mains lead provided and switch the subwoofer On by pressing the encoder.
4. Download MaestroUnite, refer to page 12.
5. Connect to MaestroUnite.
Positioning
The subwoofer should be sited in the most suitable position, preferably not directly in the corner
of a room as this may cause excessive bass boom. Once a desirable position is achieved it is
important to check if the cables are long enough to reach comfortably without being under
tension. If using the RCA inputs, cables should be less than 10 metres to avoid interference.
Audio Connections
When using a mono subwoofer output from your ampliier/ receiver, connection is made by RCA
type connectors to the left or right input or a balanced XLR connection.
If a stereo RCA connection is preferred, connect to the left and right RCA inputs from the pre-amp
outputs on your source ampliier.
When daisy chaining to an additional product ensure the output from the Anthra Subwoofer is
connected to the corresponding input on the Anthra Subwoofer. For example, use the left RCA
input and left RCA output. Not the Left RCA input and balanced XLR output.
Do not connect or disconnect the signal leads with the Anthra Subwoofer
switched on.
AV System
By default the Anthra LPF is bypassed, we recommend setting the crossover at the receiver or
ampliier. This is usually done as part of the automatic setup on the AV ampliier/ receiver. It is
recommended to double check the settings of the automatic setup to ensure the levels and
crossover settings are correct.
Stereo System
It is recommended to use an AV ampliier/ receiver or an ampliier with dedicated sub out to
simplify setup and achieve the best performance. However if this is not possible, when connecting
using this method, you use the LPF settings in the Anthra Subwoofer to allow only the bass
frequencies to be played. This can be done using the encoder or the MaestroUnite app.
For best practice when integrating the Anthra Subwoofers with Monitor Audio loudspeakers, we
would recommend using the port bungs - where supplied with the speakers (replacements or
additional bungs can be purchased from Monitor Audio or their partners), and setting the LPF -3dB
frequency to that of the tuning frequency of the port where this data is available from our website.
If this isn’t quoted, use the table below as a guide and experiment with the frequency to ind the
perfect setting for you and your listening environment. The slope angle for the LPF should be kept
at the default -12dB/ octave.
For use with other manufacturers speakers, please refer to the table below as a guide and
experiment with the frequency to ind the best setting for your tastes and listening environment,
although a good starting point is to set the LPF -6dB frequency on the subwoofer to the -6dB in
room frequency if that is quoted on the manufacturers website. For use with ported loudspeakers,
and no port bungs, use a -24dB/ Octave slope and for sealed cabinets or those with blocked ports,
use a -12dB/ octave slope.
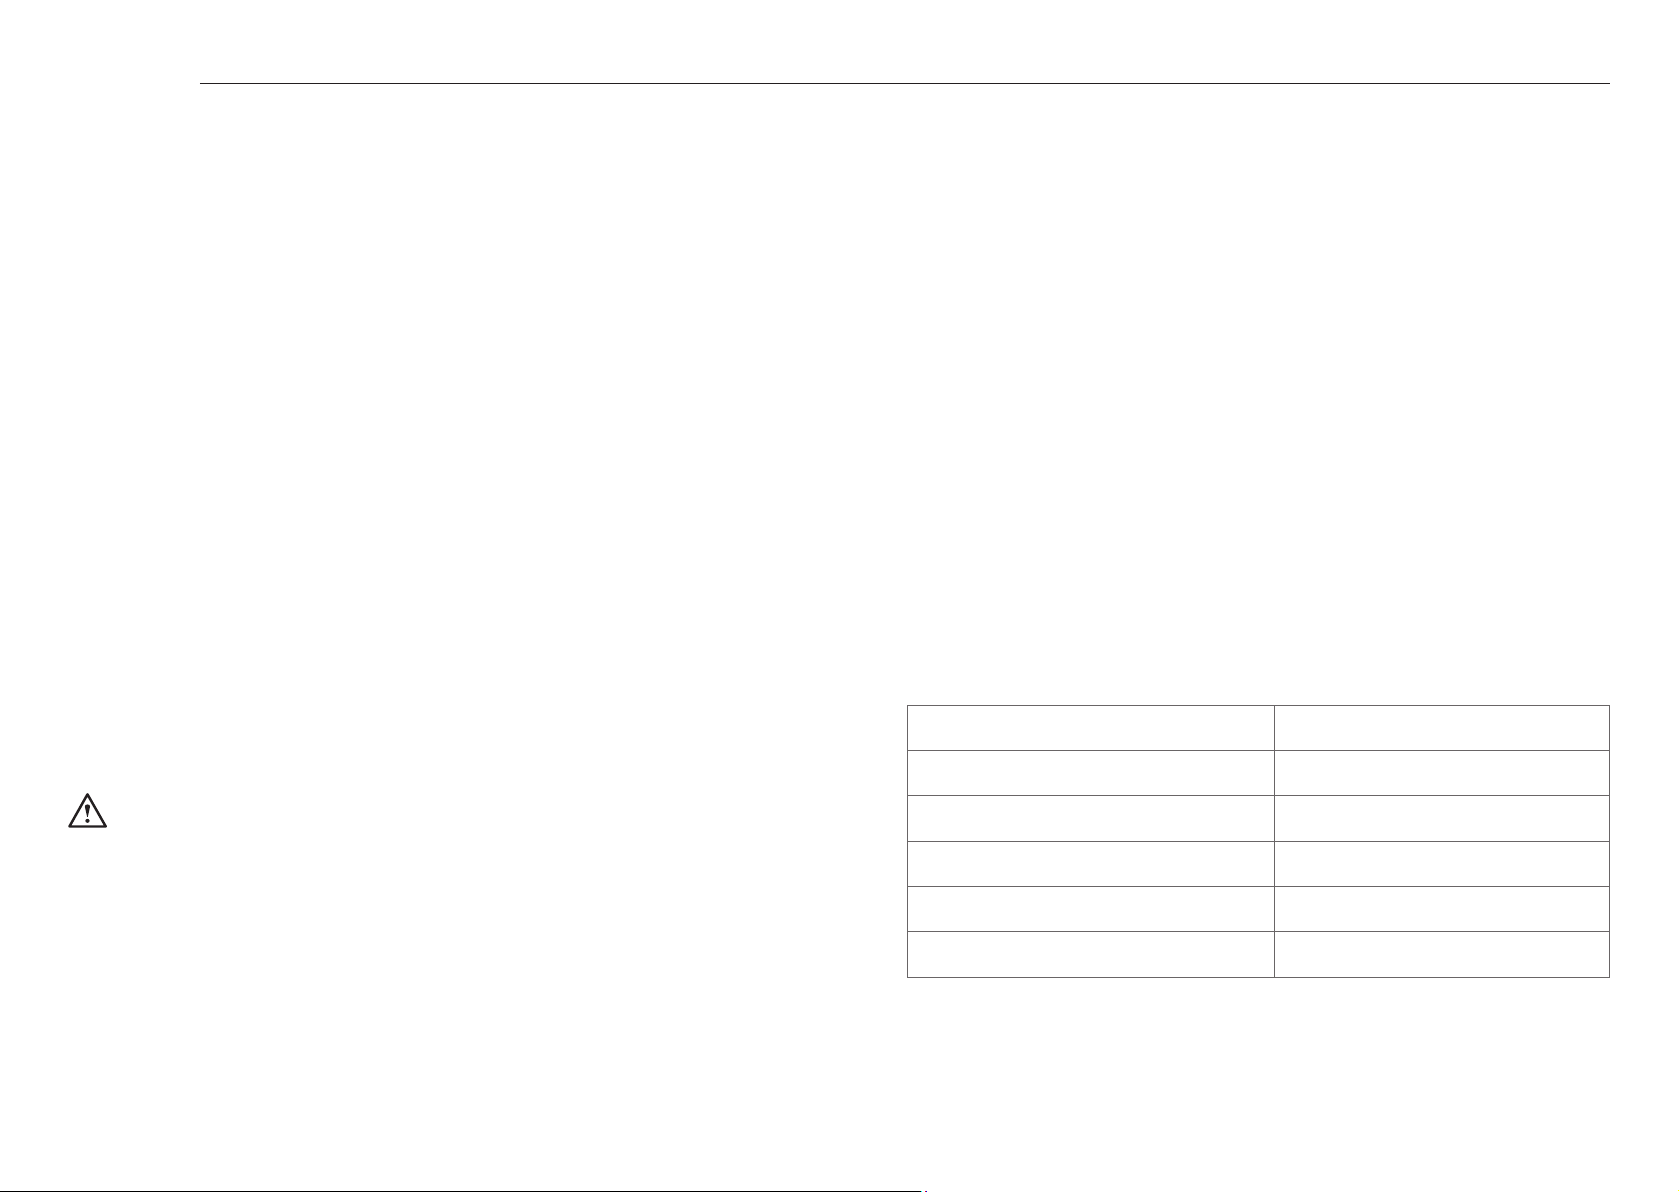
Type of Main Speaker Crossover Control Setting
Large loor-standing speaker 2080 Hz
Small loor-standing speaker 3080Hz
Power
To power on the subwoofer connect the supplied IEC power cable and press the encoder on the
amp panel. The Monitor Audio Logo will briely appear on the screen followed by the menu system.
The Anthra subwoofer can also be set to wake from standby using Music Sense or the 12v Trigger
from the MaestroUnite app.
8 9
Large stand-mount/ bookshelf speaker 3080 Hz
Small stand-mount/ bookshelf speaker 40100 Hz
Small satellite speaker 80120 Hz
To improve the integration further, including optimising the phase alignment,
please see the Monitor Audio Guide to Tuning Subwoofers.
Page 7
On-screen menu
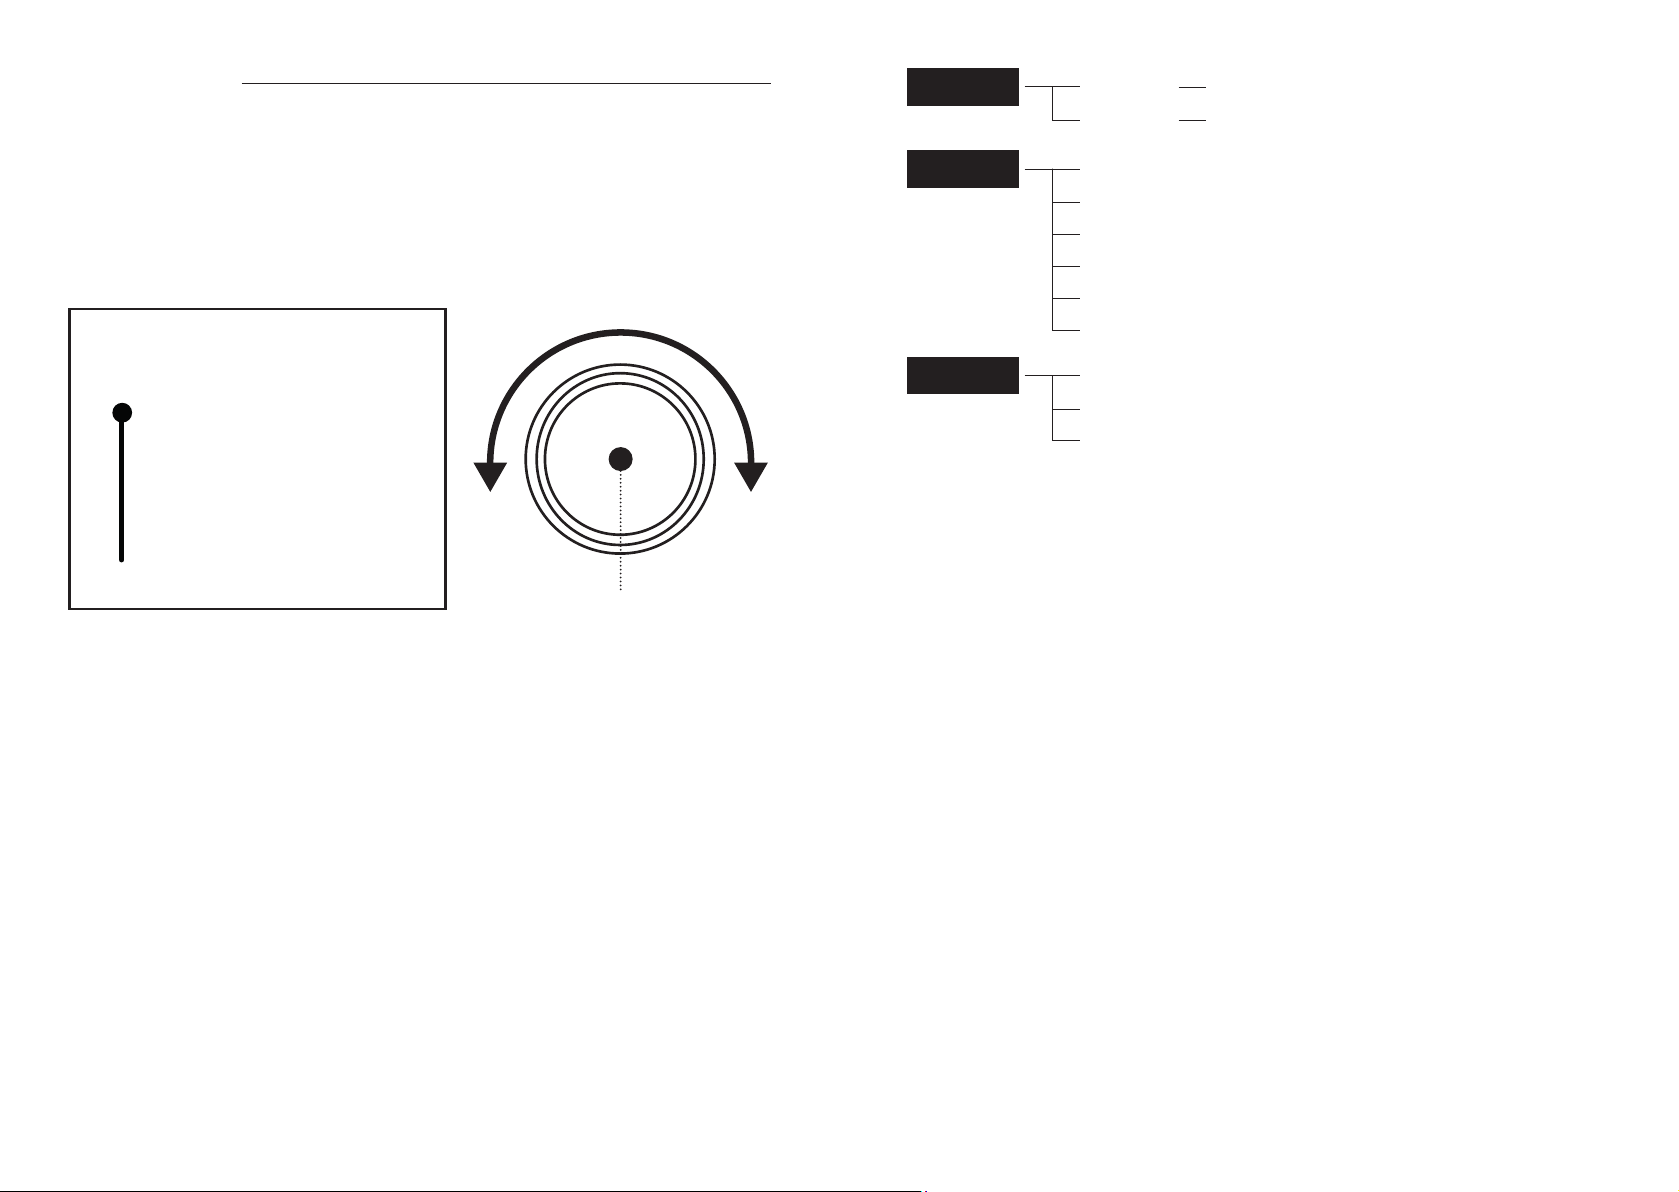
Volume
Step Control
Fine Control -6 dB to +6 dB
-40 to 12 dB
Using the encoder and screen on the Anthra ampliier panel you can adjust the volume, low pass
ilter and select EQ presets. You can also check for irmware updates if the subwoofer is connected
to the network.
See the opposite page for the menu structure.
Menu
Volume
EQ Presets
Low Pass Filter
Service
Press to select
Volume
A stepped volume control ranging from -40 - 20 dB.
EQ Presets
Here you can select from a list of three predeined Monitor Audio presets (Music, Movie, Impact)
designed by our audio experts, or three custom presets. These can be created and saved to the
subwoofer using the MaestroUnite app.
EQ Presets
Low Pass
Filter
Music
Movie
Impact
Custom 1
Custom 2
Custom 3
On/O
40 to 200 Hz
Reset
Low Pass Filter
By default the Low Pass Filter is disabled, for use with a iltered signal from an AV receiver or
amplier. If your connection is from a full range source, for example a stereo ampliier, you should
enable the Low Pass Filter to allow only the bass frequencies to be played. Adjustable between 40200 Hz.
Service
If your Anthra subwoofer is connected to a network (see MaestroUnite on page 12) you can check
here for irmware updates. You can also put the subwoofer into standby manually.
10 11
Page 8
MaestroUnite app
Download the MaestroUnite app from the Google Play Store (Android) or Apple Store (iOS). In the
MaestroUnite app you can control / select all functions available in the on-screen menu described
previously and additional settings such as Auto-On, Phase, Custom EQ, LED Brightness and more.
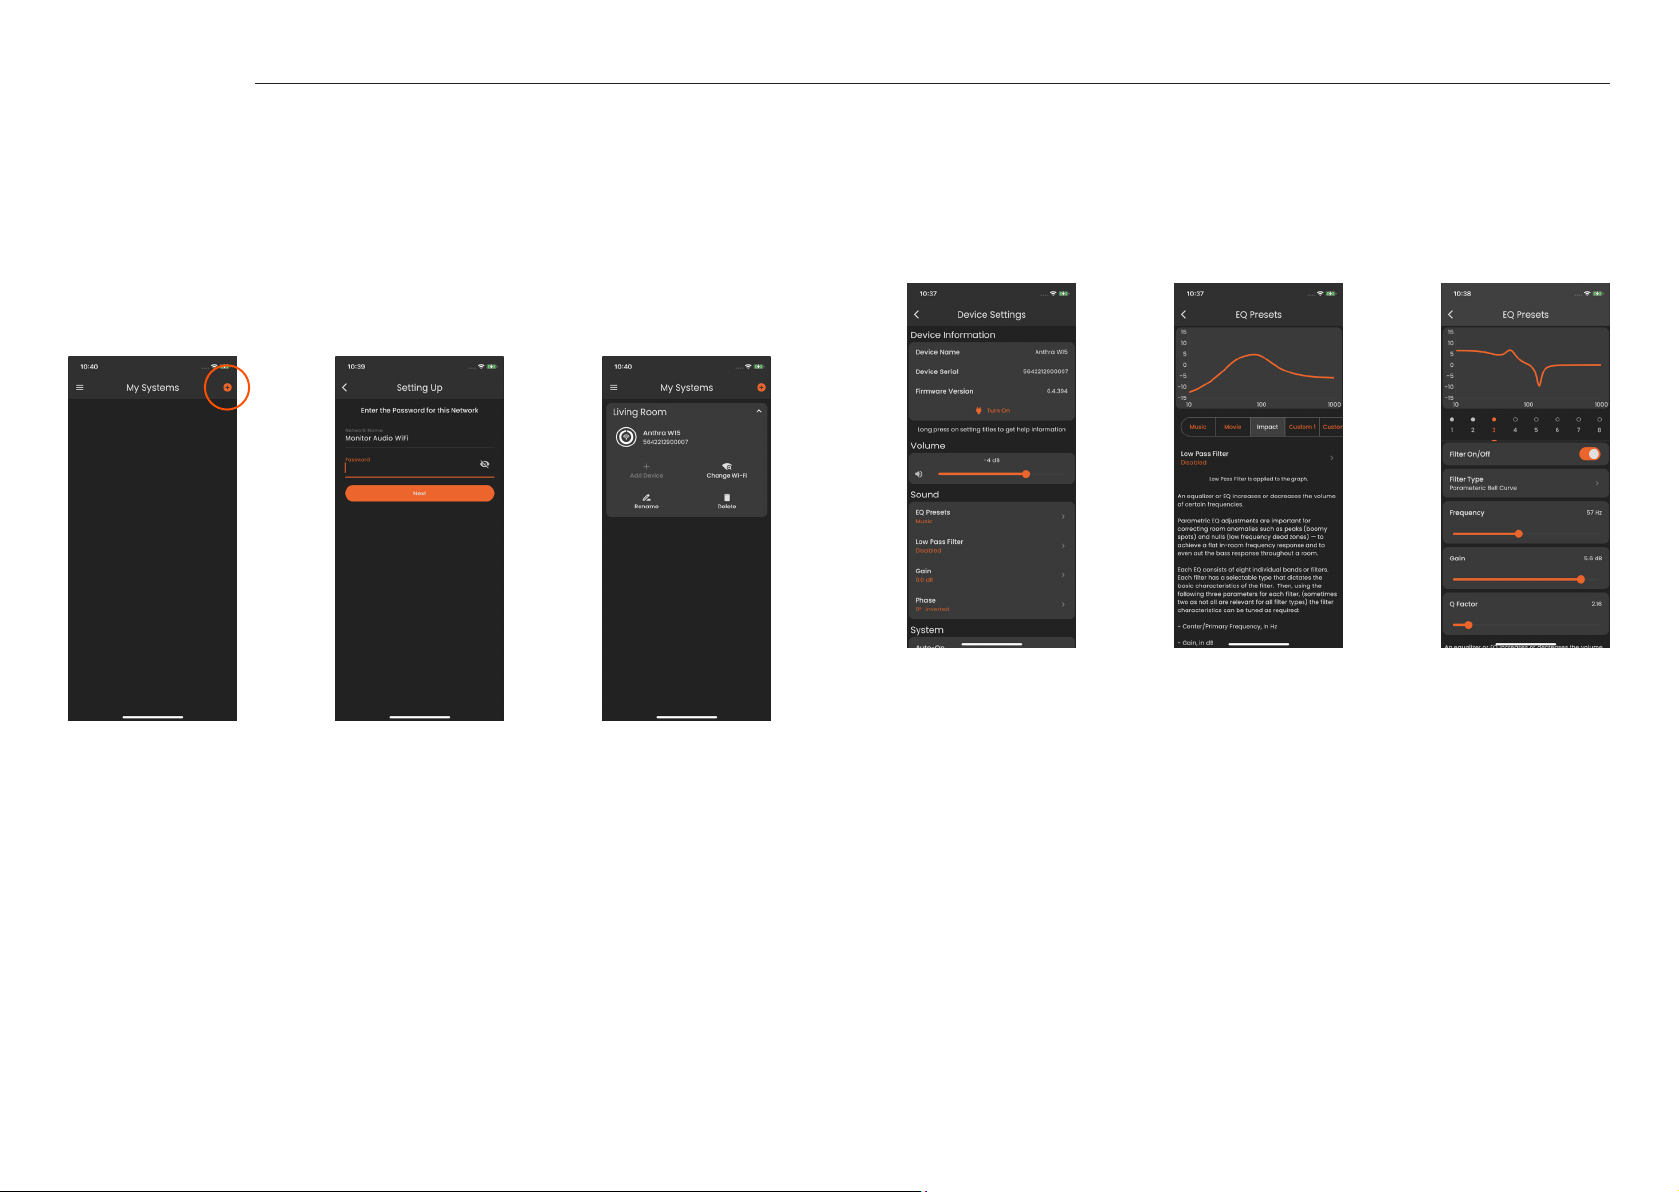
Creating a System & Connecting to a Network
To create a system, open the MaestroUnite app and press the ‘+’ icon in the top right to set up a
new system as highlighted in the image below.
You will irst be asked to choose a name for the system, then follow the on screen prompts to
connect to your Anthra Subwoofer and enter the Wi-Fi credentials for your network.
Anthra Subwoofers are listed with their serial number for ease of identiication when using multiple
subwoofers. Once connected your Anthra Subwoofer will be displayed as a system on the home
page of MaestroUnite.
Creating a Custom EQ Preset
One of the many customisable features of Anthra is that you can create your own Custom EQ
Presets. To do this open MaestroUnite and tap on the Anthra Subwoofer system you have created,
this will open the “Device Information”. Scroll down to “Sound” and tap on the “EQ Presets” option.
To create your own Custom EQ Preset select the Preset you wish to edit (Custom 1, 2, 3).
Note: If a Low Pass Filter has been previously set, this will be applied to all presets including custom
presets.
Below the EQ graph is an 8-band Parametric EQ, of which each ilter can be individually selected
and switched On/ O. When enabled you can set the Filter Type, Frequency, Gain and Q Factor.
Deinitions for each setting are given within MaestroUnite.
Settings will be saved and applied to the subwoofer automatically. Tap “Reset This Filter” to clear
any changes made.
12 13
Page 9

Care & maintenanceFactory reset
Should the need arise to carry out a factory reset on your Anthra Subwoofer simply hold down the
Factory Reset button on the back of the ampliier panel for approximately 5 seconds whilst the
subwoofer is switched On. The ampliier panel screen will display “Factory Reset in Progress” before
entering standby mode.
NOTE: all Wi-Fi details will be erased as well as any other settings and customisation.
Upkeep of cabinets
The inish of the cabinet can be maintained by regular dusting using a soft or micro ibre cloth.
The drive units should only be cleaned with a damp cloth, if more than normal dusting is required.
Be careful not to damage the driver units whilst cleaning.
Never use solvents or aggressive cleaning/polishing agents on your Anthra Subwoofer. When in
doubt, test the cleaning product on an inconspicuous area on the cabinet, and let it sit for several
days before committing to its use on visible portions of the cabinet.
14 15
Page 10
Warranty
Specications
In the unlikely event that there is a defect with this product, it is covered by the Monitor Audio
manufacturer’s warranty, provided that the product was supplied by an authorised Monitor Audio
retail specialist.
For the period of cover please refer to the product page on our website at monitoraudio.com
Register your Anthra Subwoofer
to ensure the best possible product and customer support
Register your speakers using the QR code
or visit monitoraudio.com/registration
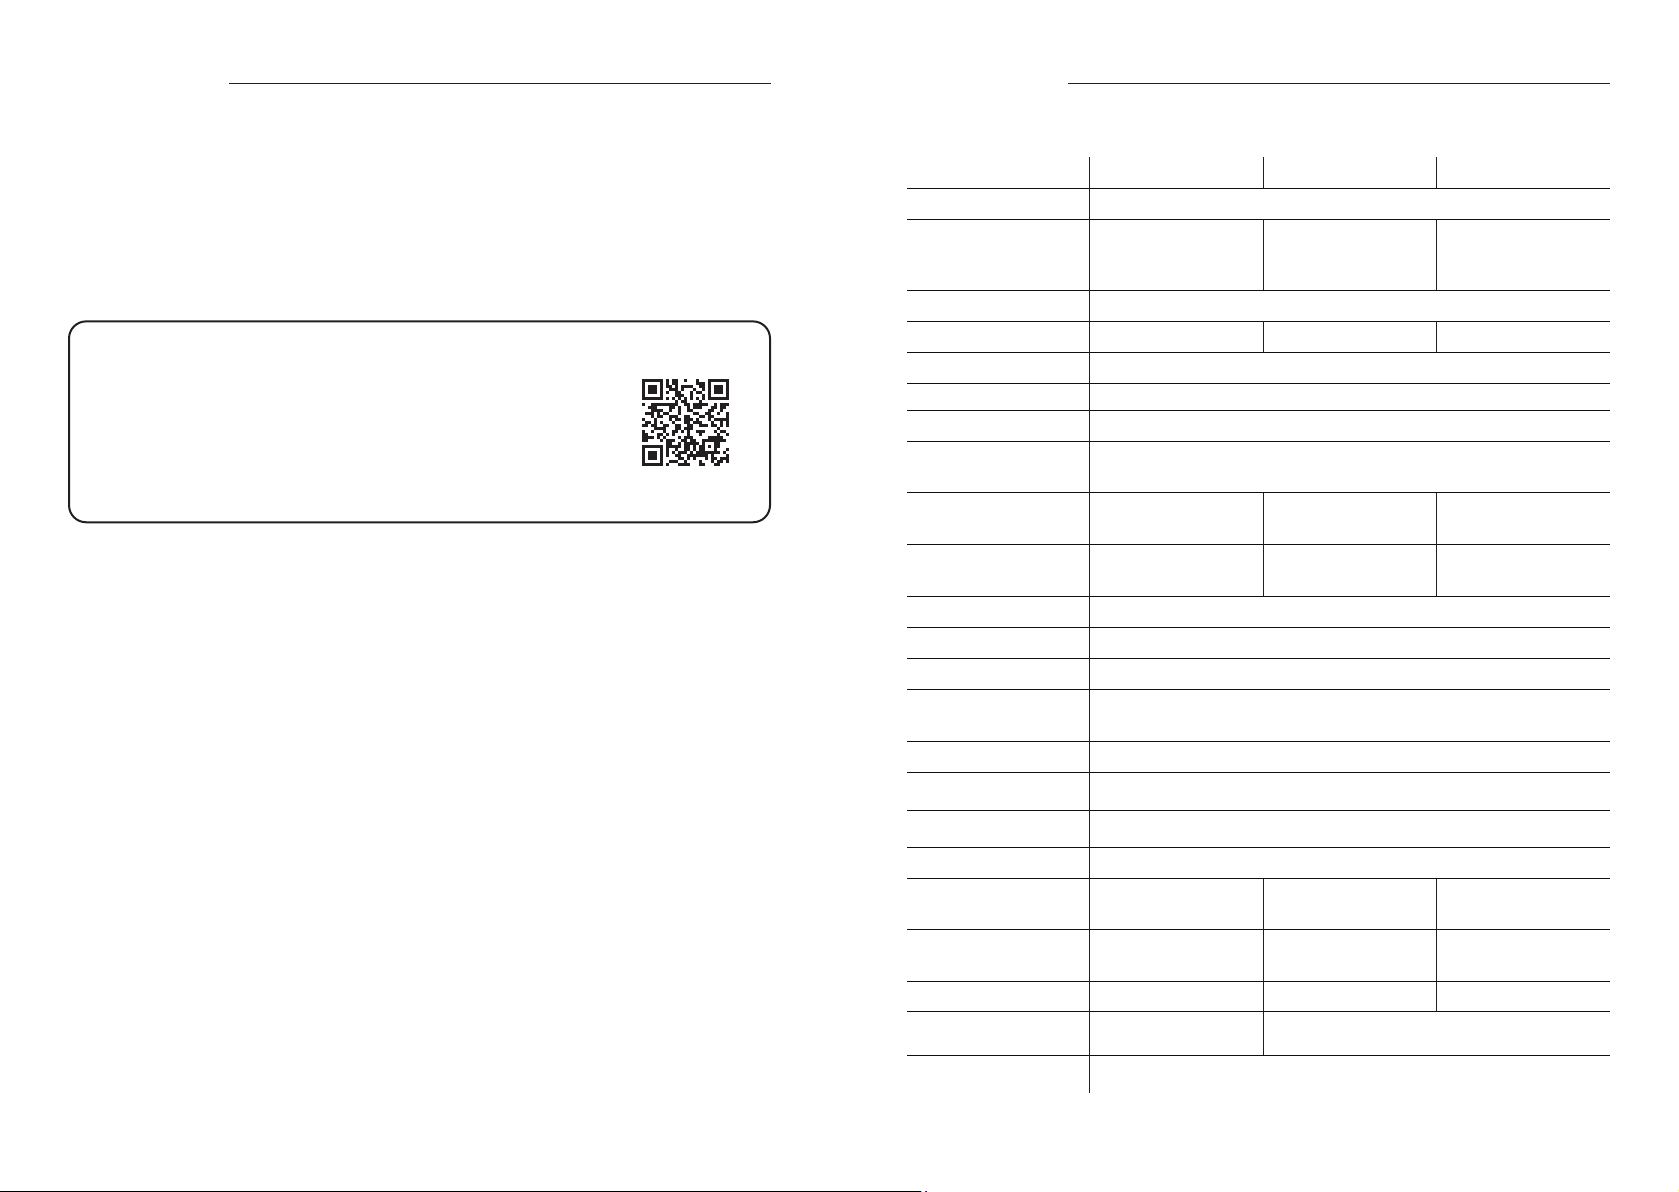
System Format
Drive unit Complement
Ampliier Classiication
Lower Frequency Limit
Upper Frequency Limit
Driver Excursion (pk-pk)
DSP
Analogue Digital Conversion
Ampliier Output Power,
240 VAC
Ampliier Output Power,
120 VAC
LED UI Control
Phase Control
Low Pass Filter
Custom EQ
Volume Level
Inputs
Outputs
Mains Input Voltage
External Dimensions
Without feet (H x W x D)
Anthra 10 Anthra 12 Anthra 15
Active - Sealed Cabinet
1 x 10” (254 mm) High Linear-
Excursion Triple Suspension
Driver
-6 dB @ 17 Hz -6 dB @ 16 Hz -6 dB @ 16 Hz
28 Bit 50 MIPS Conigurable through MaestroUnite app
Auto ranging Input which combines a 10 Vrms maximum input with low signal to noise for
Instantaneous: 500 W*
Continuous short-term:
425 W**
Instantaneous: 450 W
Continuous short-term:
390 W
20200 Hz LPF with Rolloff Adjustable from -3 to -48 dB/Oct
3 pre-deined EQ curves plus 3 custom EQ curves each with 8 band custom EQ supporting
Wide adjustable input gain to allow maximum output from a wide range of input signals
Stereo unbalanced outputs with unbuffered throughput from RCA Inputs
Mono/LFE Balanced XLR outputs with unbuffered throughput from XLR Input
321 x 321 x 321 mm
5/8
5/8
x 12
x 12
5/8
(12
1 x 12” (305 mm) High Linear-
Excursion Triple Suspension
Driver
High-Eficiency Class-D
(LPF Off) -6 dB @400 Hz
15/16
50 mm (1
small signals
Instantaneous: 1700 W*
Continuous short-term:
Instantaneous: 1325 W
Continuous short-term:
Brightness, On-Off
0360 Degrees measured at LPF Crossover
Conigurable through MaestroUnite;
Peaking, High Shelf, Low Shelf and High Pass.
Stereo Unbalanced RCA
Mono/LFE Balanced XLR
Universal Mains, 85265 VAC
374 x 374 x 374 mm
“)
(14
3/4
900 W**
700 W
3/4
x 14
x 14
”)
3/4
“)
1 x 15” (381 mm) High LinearExcursion Triple Suspension
Driver
Instantaneous: 2500 W*
Continuous short-term:
1400 W**
Instantaneous: 2500 W
Continuous short-term:
1400 W
439 x 439 x 439 mm
5/16
5/16
(17
x 17
x 17
5/16
”)
Weight
Power consumption
Cabinet Construction
Grille
* Maximum RMS output for an instantaneous signal ** Sinewave for 10 seconds
16 17
22.2 kg (48 lb 15 oz) 32.4 kg (71 lb 7 oz) 40.3 kg (88 lb 14 oz)
120 W 200 W 550 W
Braced 18 mm thick MDF with
36 mm front bafle
Cloth covered magnetically attached grilles
Braced 25 mm thick MDF with 36 mm front bafle
Page 11

Listen Again.
Monitor Audio Ltd.
24 Brook Road
Rayleigh, Essex
SS6 7XJ
England
Tel: +44 (0)1268 740580
Email: [email protected]
monitoraudio.com
©Monitor Audio Ltd. | V12023 - Anthra
 Loading...