

Page 1

Owners Manual
Page 2

Page 3

Contents
Introduction from the Technical Director 2
Technical Director 2
Company History 2
PLW215 II Technology 3
Real Wood Veneers 3
Amplier 4
Remote 6
Front Panel 6
Control Panel 7
Positioning 8
Spiked Foot Fixing For Carpeted Floors 8
Spiked Foot Fixing For Wooden/Hard Floors 8
Using the PLW215 II 9
Power Cycle 9
Waking Up 9
Room Correction 9
Using SubConnect for Room Correction 10
Recommended Settings for AV Systems 10
Recommended Settings for Stereo 10
SubConnect Application 11
About the Application 11
Installation 11
Initial Setup 12
Master Controls 13
Presets 15
EQProles 16
Infra Red Remote Codes 16
RS232 16
RS232WiringConguration 16
Command Protocol 16
Command List 17
Update Subconnect 18
Update Firmware on Sub 19
Bootloader Mode 19
Automatic Update. 19
Manual Update 20
Factory Reset 21
Care and Maintenance 21
Guarantee 21
Specications 22
SubConnectSpecications 23
Trouble Shooting 23
monitoraudio.com 1
Page 4
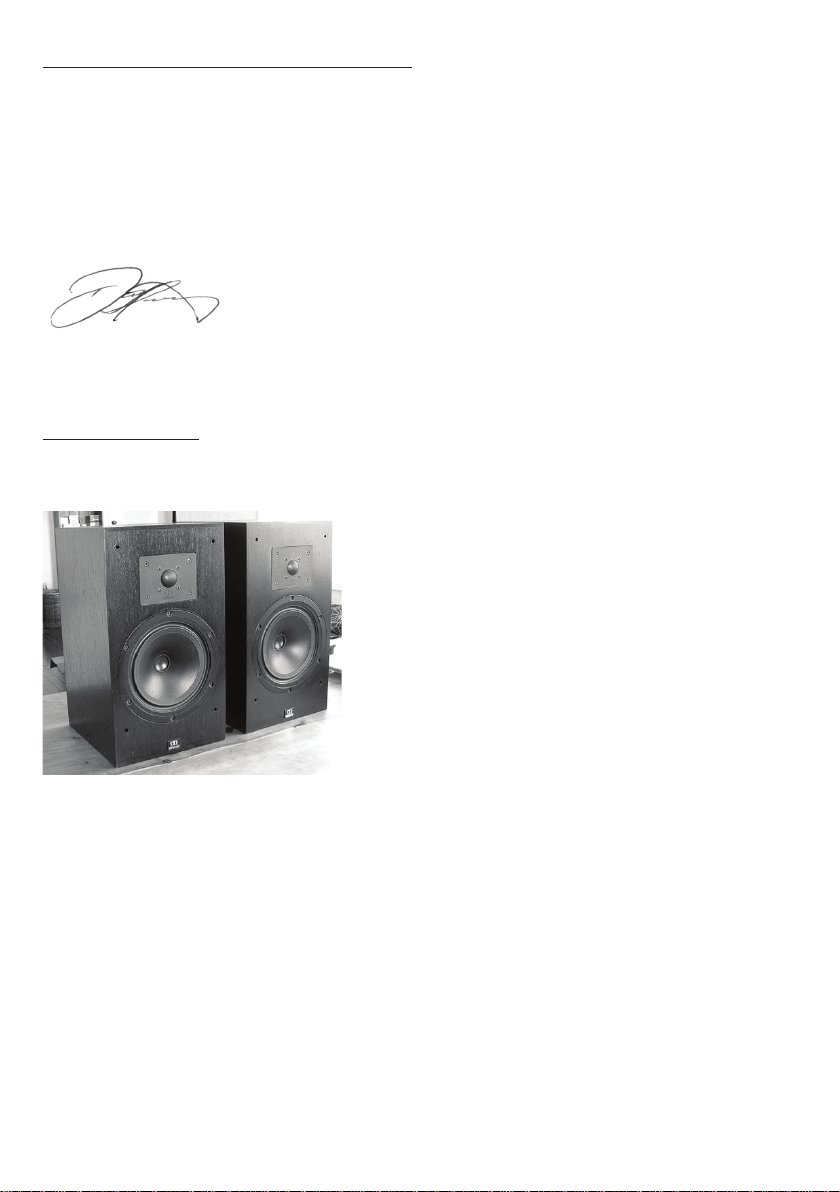
Introduction from the Technical Director
How can a loudspeaker be made to sound more natural? This is the question that drives our endeavour day- in, day-out. We’re
motivated by the quest to eliminate distortion from the most important element in your audio system. How far we’ve come can
be measured by the sound of Platinum II: the most accurate and beautiful loudspeakers Monitor Audio has ever made. Supported
by painstaking analysis and a lifetime of listening, their evolution has rened our technologies, inspired new discoveries and
achieved advances in every area of design - electrical, mechanical, magnetic, acoustic and aesthetic. The result is a speaker
range of exceptional quality, dedicated to raising your emotional contact with music and lm sound in all its natural glory. Built
by audio lovers, for audio lovers, Platinum II provides our answer to the primary challenge of speaker design. To the big question
we simply reply “like this”!
Dean Hartley
Technical Director
Company History
Since 1972, Monitor Audio’s near fanatical commitment to quality in every aspect of loudspeaker design coupled with its willingness
to innovate has inspired global recognition and acclaim. Daring to challenge design orthodoxy has been its signature approach.
When Monitor Audio launched its R852MD loudspeaker – the rst model to
incorporate a metal dome tweeter - it caused quite a stir. Until that time,
most metal domes were single-metal types made from copper or titanium
and virtually all sounded unconvincing. The R852 used an aluminium-
magnesium alloy dome and sounded signicantly better and smoother
than all of its single-metal rivals. It also incorporated ferro-uid damping/
cooling of the metal voice-coil former and a vented voice coil mechanism
for better heat dissipation. These radical design elements formed the basis
for successive generations of C-CAM® metal domes.
By consistently rening and applying the technology, Monitor Audio has
become the world’s foremost proponent of metal dome drivers. Monitor
Audio designs everything in house at their world headquarters in England,
so that it can optimise the incomparable blend of virtues that makes
Monitor Audio loudspeakers unique: clean, dynamic sound, superior build quality and innovative design. Because they share a
philosophy of excellence and a consistency of quality and voicing, loudspeakers of dierent types: on-wall, in-wall, oor and
stand-mounting, may be used together to create the perfect acoustic blend for any room.
In the strength and depth of Monitor Audio’s evolving product portfolio, the ideal of a universal whole-house loudspeaker brand
nds true expression. Decades of accumulated expertise and knowledge have rened the rare mix of innovation, reliability and
sheer performance that has propelled the brand to global status and on which acionados of music and movie sound have come to
rely.
PLW215 II2
Page 5

PLW215 II Technology
The PLW215 II has been designed to produce wall-shaking bass using the best
technologies available to our team of designers and engineers. The sealed cabinet
houses a vibration-cancelling driver conguration featuring 2 x 15” sub woofer drivers
with an inverted surround, triple suspension, and a single layer edge wound, vented
voice coil, to enable a massive 42mm (peak to peak) of excursion. Drawing power
from the Hypex supply, each driver has its own 700w RMS Hypex amplier providing
a combined 1400W RMS power output. Controlling all of this is our bespoke, in house
designed, 172MHz DSP Core. The DSP can handle 3500 instructions per sample, with
139dB of dynamic range and 56-bit double precision processing all dynamically
updated by an 80MHz MCU. The Wolfson Microelectronics (Cirrus Logic) ADC & DAC @
24bit/48KHz (WM8786 ADC & WM8740 DAC) handles all of the important conversions.
The DSP is set by our proprietary application, SubConnect. It can be used straight
out of the box, being set by the control panel on the top of the sub woofer, or more
advanced settings can be adjusted using the application. Refer to page 11.
One of the features of the DSP is the room calibration. This, again using our own algorithms, measures the room acoustics and
smooths out any major peaks and troughs found in the room creating as a smooth a response as possible before applying the preset
equalisation curves. That can also be customised in the application. Refer to page 15.
Real Wood Veneers
Just like a human ngerprint, no two trees are identical. Each wood grain has an
exclusive aesthetic beauty that tells a story of a lifetime of growth. We use only
the highest quality natural wood veneers, hand selected and pair matched from
sustainable sources. Platinum II speakers are hand veneered after the cabinet
structure is made, and then coated with 11 layers of clear gloss piano lacquer.
These traditional techniques ensure close grain matching, and invisible veneer panel
joining. The exquisite grain denition and rich colour variation provided by our Santos
Rosewood and Natural Ebony veneers make a statement of quality, while blending
naturally with any interior style or decor. Each cabinet is a unique and natural work
of art!
Because of this, Monitor Audio Ltd. is unable guarantee that the veneer on dierent
pairs of speakers will be identical in colour or grain denition. We can only assure you
that the very best raw materials have been selected and applied.
Please refer to page 21 for advice on care and maintenance.
monitoraudio.com 3
Page 6
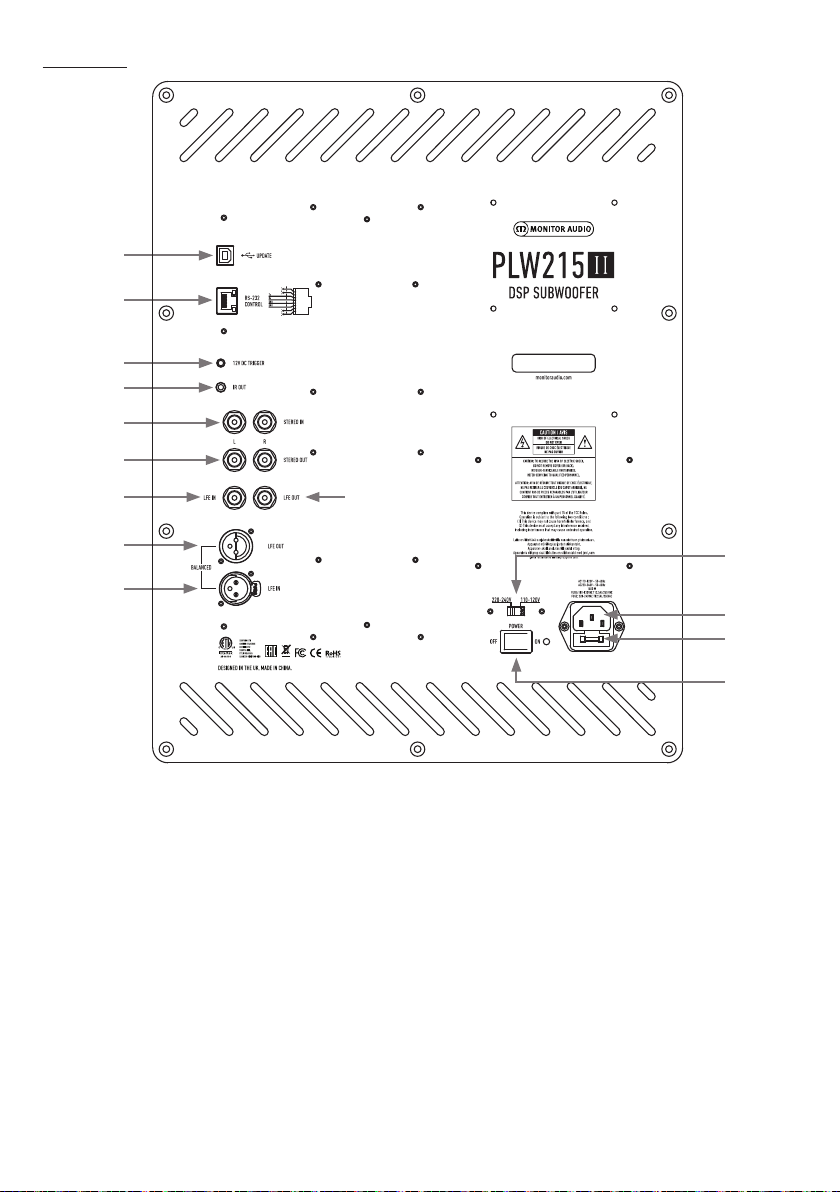
Amplier
1
2
3
4
5
6
7
9
10
8
1. USB Connector
This is provided to update the rmware and settings of the PLW215 II in conjunction with the SubConnect application (refer
to page 11). A USB cable is not included, please use the appropriate USB A to USB B cable.
2. RS232 Input
For use with home automation systems through a conventional RJ45 connector. Please refer to page 16 for the wiring
conguration and set up protocol.
3. 12 Volt Trigger Input ~ Centre Pin = +12Vdc.
For external power control from AV amplier/receiver to the PLW215 II (lead supplied), and to toggle between dierent
presets depending on set up via the SubConnect application (refer to page 11). The default setting controls the power. This
12 volt signal comes from the source amplier and supplies the PLW215 II with a signal to perform a predetermined action:
either to power up/down or to switch presets. When used to power PLW215 II up or down, the trigger is a very energy ecient
method of power control. The auto o timer and signal sense will not operate when the 12V trigger is connected.
11
12
12a
13
4
PLW215 II
Page 7

4. IR (Infrared) Output
For use when controlling other IR devices via the PLW215 II. Connect the PLW215 II with a second device using a mono 3.5mm
jack connector and control the second device with its remote via the PLW215 II. This is ideal when the device is out of sight
or in another room.
5. Line Level Inputs (Stereo Left & Right)
For connection to a 2 channel/ stereo amplier system. Connection should be provided by a pair of high-quality signal cables
from the pre-out section of an amplier. Note: Cable lengths should not exceed 10 metres to avoid interference from other
electrical appliances.
6. RCA Line Level Outputs (Stereo Left & Right)
To be used to feed additional sub-woofers or power ampliers from the PLW215 II by ‘daisy chain’ type connection. The
outputs are link-out only connections and do not provide any form of ltering or amplication. There must be a signal on the
stereo input for the linked outputs to work.
7. LFE Input (RCA Type)
This input is to be used when connecting the PLW215 II to an AV amplier/ receiver. When using the LFE input, the crossover
function in the menu/ set-up is not used. This is due to the crossover function being controlled by the source to which it is
connected. Input between LFE and Stereo input is switched automatically.
8. LFE Output/ Link (RCA Type)
To be used to feed additional PLW215 IIs (or another sub woofer) by ‘daisy chain’ type connection. The output is a link out
only connection and does not provide any form of ltering.
9. Balanced LFE Output (Male XLR Type)
To be used when connecting to the balanced input on an additional sub woofer or amplier. This is the best method of
connection when using long runs of cables (over 10m, up to 100m). A balanced connection provides a much better (almost
noise free) method of connection over analogue audio type connectors.
10. Balanced LFE Input (Female XLR Type)
To be used when connecting to the balanced output on the amplier. This is the best method of connection when using long
runs of cables (over 10m upto 100m). A balanced connection provides a much better, almost noise free method of connection
over analogue audio type connectors.
11. Voltage Selection Switch
Factory preset to suit the voltage of the country of origin. This should not be adjusted.
12. IEC Mains Power Connector/Fuse Location
The PLW215 II is supplied with a three-pin mains input socket for connection to the mains supply. Use ONLY the appropriate
IEC mains lead provided with the product. Also tted is an external mains fuse. If a fuse blows during operation a spare fuse
is provided within the fuse holder for replacement. If you wish to change the fuse, you can do this by removing the IEC mains
lead and carefully levering out the original fuse from its holder below the IEC mains input socket (12a, opposite). If the fuse
blows again it is advisable to seek help from an authorised service agent. DO NOT attempt to re-t a further fuse as this could
result in serious damage to the amplier unit.
13. Mains Power Switch
Mains ‘rocker switch’ providing overall power o and on/ auto. In the on/auto mode, the unit will turn on when an input signal
is sensed or the control dial/ power button on remote is pressed. It will turn o after 20 minutes (default setting) when the
signal is removed (source turned o). Alternatively, using the 12V trigger (see above) to control the power by turning the
source on or o.
monitoraudio.com 5
Page 8

Remote
1
2
3
4
5
6
7
8
1. Preset 1
Selects preset 1. The default EQ prole is Music mode.
2. Preset 2
Selects preset 2. The default EQ prole is Movie mode.
3. Preset 3
Selects preset 3. The default EQ prole is Flat mode.
9
10
11
12
13
14
4. Preset 4
Selects preset 4. The default EQ prole is Impact mode.
5. + Vol
Increases the volume trim level.
6. Enter
Selects/ conrms the command.
7. - Vol
Decreases the volume trim level.
8. LED Brightness
Toggles the LED display on or o.
9. Standby
Puts the PLW215 II into standby or wakes it up from
standby. Refer to page 9.
10. Mute
Mutes all output from the PLW215 II.
11. Crossover Point
Selects the crossover control on the PLW215 II. Use the
left and right arrows to adjust the crossover frequency.
This is set in 5Hz steps from 20 to 135 Hz.
12. Phase
Selects the phase control of the PLW215 II. Use the left
and right arrows to adjust the phase. This is set in 15
degree increments from 0 - 360 degrees.
13. Left arrow
Adjusts the chosen control.
14. Right Arrow
Adjusts the chosen control.
Front Panel
1
2
6
1. PLW215 II IR Receiver
Aim the PLW215 II remote here for it to function.
2. IR LED Indicator
Blinks when an IR signal is received.
3. Room EQ Set Up Microphone
3
PLW215 II
Connect the supplied set up microphone here and run the
set up procedure detailed below.
Page 9

Control Panel
1
2
3
7
4 6
5
1. Main Indicator LEDs
These LEDs show the levels and the presets selected depending on the mode being adjusted. It will by default show the trim
volume level.
In normal operation, the volume trim level will be displayed along with the Level LED (2) and numbered preset LED 1-4 (3)
will be illuminated.
2. Trim Level Indicator
When just turning the control dial, the trim level is the default mode. This can be adjusted +/- 11 dB and does not adjust the
master volume control. This must be set by the SubConnect application.
3. Numbered LEDs
These are the 4 presets. Only the selected preset will be illuminated and remain illuminated whilst the preset is in use.
4. Preset Select.
By pressing down on the control dial repeatedly to illuminate the Preset LED, the preset selection mode is activated. Turn the
dial to select the required preset. By default EQ proles for each of the presets are: Music (1), Movie (2), Flat (3) and Impact
(4). When adjusting the presets, the 7 Indicator LEDs around that preset will be illuminated
5. Phase Adjustment.
Press down on the control dial repeatedly to illuminate the Phase LED. The phase is adjusted in 15 degree increments with
the main LEDs illuminating to show the phase angle.
6. Crossover Adjustment
Press down on the control dial to illuminate the Crossover LED. Here you adjust the LPF crossover frequency (when using the
stereo inputs). This is adjusted in 5Hz steps from 20 to 135 Hz and is preset to 80Hz.
7. Control Dial
Use this to adjust the trim level (just turn the dial) or select from the crossover selection, phase or presets by pressing the
dial until the required feature is illuminated.
monitoraudio.com 7
Page 10

Positioning
The PLW215 II should be sited in the most suitable position,
preferably not directly in the corner of a room as this may cause
excessive bass boom. The optimal position is along the front
wall in the centre of the front left and right speakers. Obviously
this isn’t always going to be possible in all instances, so as
close to the optimum is advisable. Once a desirable position is
achieved it is important to check if the cables are long enough
to reach comfortably without being under tension. Leave the
PLW215 II unplugged until you are happy with its location and
the feet have been tted.
Never connect or disconnect any of the input connections
with the PLW215 II switched on.
Once in position, you should t the feet/ spike assemblies in
accordance with the guidelines below. Once the feet have been
tted, connect the signal cable(s) and mains cable and turn on
at the main switch.
Spiked Foot Fixing For Wooden/Hard Floors
For use on solid oors or where spikes are inappropriate, it is
possible to use the foot without the spike insert. To use the foot
in this manner carefully grip the knurled portion of the spike
and rotate anti clockwise to unscrew the spike fully.
You may nd it easier to rst remove the polymer pad to gain
more purchase on the spike.
The pad should be replaced before carrying out the levelling
operation previously described.
Locking Nut
Spiked Foot Fixing For Carpeted Floors
The spiked foot assembly incorporates a spike for use on
carpeted oors and also, a soft polymer pad (for use on wooden
or tiled oors).
Please ensure there are no hidden wires under the carpet, or
trailing mains leads that could be damaged by the spikes.
The foot comes fully assembled for use on carpeted oors. All
that is required is xing into the cabinet. This is achieved by
simply screwing the feet fully into the 4, threaded inserts in the
underside of the cabinet. If your carpet has a very thick pile,
remove the soft polymer pad from the foot to ensure the spike
goes right through the carpet onto the oor. Place the cabinet
in your desired location, and check that it is level on all sides.
If it is slightly uneven, unscrew the foot at the lowest point
and check again. Continue this process until the cabinet is fully
level. Use the locking nut on the foot to x it in place and to
stop any unwanted vibrations.
Main Threaded Part
Polymer Pad
Spike
8 PLW215 II
Page 11

Using the PLW215 II
The default settings of the PLW215 II are enough to get you
using the product as intended. You can then tweak and adjust
them using the control dial for basic settings (refer to page 7),
or more advanced settings via the SubConnect application. By
default all of the presets are the same except for the EQ proles
(refer to page 15).
Once in position and the cables have been run and connected
(mains cable last), turn on the PLW215 II but do not play any
music or movies yet. The room correction should be run before
any further settings are changed and before any automatic
setup is started on the AV receiver.
Power Cycle
When woken up from standby by one of the below methods,
all of the LEDs will illuminate on the top, then fading o in
a sequence leaving only the volume trim level and selected
preset number LEDs illuminated. These will then fade to 10%
or o, dependant on the chosen settings. The fade settings can
be adjusted in the SubConnect application.
Room Correction
The PLW215 II has a sophisticated room correction algorithm
that detects any unwanted room modes and attens them out
to give the most accurate bass response possible.
NOTE
To ensure there are no interruptions in the room correction
sweep tests, you must disconnect the RS232 cable (if
connected) until the room correction has been completed.
To carry out the room EQ, simply connect the supplied
microphone to the input socket on the front of the PLW215
II (Item 1 page 6) and place the microphone in the seating
position. To get the most accurate response, point the mic up
to the ceiling. The PLW215 II will run 2 sweeps by default, but
this can be changed in the SubConnect application under Tools
> Room Correction.
NOTE
This should be run on the sub woofer before running the set
up calibration on any other equipment.
Waking Up
There are a number of dierent ways that the PLW215 II
becomes operational:
Remote: By pressing the standby button on the remote, the
PLW215 II will wake from standby. When woken in this mode,
the auto turning o will function as normal. However, if the
PLW215 II is turned o by the remote, it will only turn on at next
use, by either the control dial (see below) or by the remote. The
auto signal sensing will be disabled.
Control Dial: When woken by pressing or turning the control
dial, the PLW215 II will continue to remain on while a signal
is present or until the dened auto o time has been reached
(default 20 minutes)
Signal Sense: This method is fully automatic. The PLW215 II
will wake when it receives a signal on any of its inputs. It will
then go into standby after the dened period of time (default
20 minutes).
12V Trigger: This is a method of control by the AV receiver
or amplier. Whenever the source amplier is turned on, the
PLW215 II will wake. Likewise when the source amp is turned
o, the PLW215 II will also turn o.
RS232: This method of control is dened by the home
automation control. Further details on this method of control
and the programming can be found on page 16.
monitoraudio.com 9
With the mic in the rst position, press and hold the control dial
as it counts down, it will illuminate all outer (main indicator)
LEDs and then ash. When it ashes you can then release the
dial. After the rst sweep, there will be a pause of about 20
seconds. In this time you can either move to a new location or
leave it in the same location before a second sweep is run. This
pause can be cancelled by pressing the control dial again and
the next sweep will start immediately.
The PLW215 II will then run through the room correction by
playing a number of test tones. If the test has been successful,
the LEDs will illuminate in a “happy face” arrangement. If it
fails then it will be a “sad face” arrangement.
Successful Test Failed Test
NOTE
If the sweep is run without the microphone connected an
error code will be displayed, illuminating ALL LEDs. To reset
it from this error state, just turn the dial.
Page 12

Using SubConnect for Room Correction
To run the room correction on the SubConnect application,
follow the steps below. For information on installing the
application please refer to page 11.
1. With the PLW215 II on and connected to the PC by USB
cable, open the SubConnect app on your PC and click on
Tools > Room Correction
2. Select the number of cycles you wish to run (default is 2)
and then click on the RUN button. The sweeps will start
as soon as the RUN button is pressed. There will be a
pause of around 20 seconds between sweeps.
Recommended Settings for AV Systems
When using the PLW215 II in an AV system, it is recommended to
use Presets 2 (Movies) or 4 (Impact) as the starting points. You
can then, if you wish, tweak these slightly to get it sounding
just how you want in your room. For advice on adjusting the
EQ settings, refer to page 15. When using the LFE input, the
crossover adjustment feature will not work.
NOTE
If any adjustments are made by the Control Dial, they will
only be remembered if the sub is left to turn o automatically
or put into standby by the remote. If the mains switch on the
amp is turned o or the power removed from the sub woofer,
it will not remember the settings.
Recommended Settings for Stereo
When using the PLW215 II in a stereo system, it is recommended
to use Presets 1 (Music) or 3 (Flat) as the starting points. You
can then, if you wish, tweak these slightly to get it sounding
just how you want in your room. For advice on adjusting the EQ
settings, refer to page 15. Once the preset is selected, adjust
the crossover frequency so that it blends in seamlessly with
your main speakers. This may take some adjustment and the
playing of various pieces of familiar music to get it sounding
perfect.
NOTE
If any adjustments are made by the Control Dial, they will
only be remembered if the sub is left to turn o automatically
or put into standby by the remote. If the mains switch on the
amp is turned o or the power removed from the sub woofer,
it will not remember the settings.
The PLW215 II will then run through the room correction
by playing a number of test tones. If the test has been
successful, the LEDs will illuminate in a “happy face”
arrangement. If it fails then it will be a “sad face”
arrangement. Refer to page 9.
10 PLW215 II
Page 13

SubConnect Application
About the Application
The SubConnect application has been developed to enable the
user to create the best sound regardless of room constraints.
This application has an abundance of features and adjustments
it just wouldn’t be possible to have them all on the sub woofer
itself.
Installation
You can download our SubConnect application from our website
(www.monitoraudio.com) from the PLW215 II product page in
the downloads section. Alternatively from the USB. Please then
refer to the installation instructions below for Windows.
1. Unpack the zipped folder using your computer’s
designated application and run the le ‘setup.exe’,
this will open up the SubConnect Setup Wizard. Press
Next, accept the license agreement and then set
your installation location, and follow the on screen
instructions.
2. When prompted click install and wait for the progress
bar to reach 100%, upon completion simply click Finish.
If you wish to launch the application upon closing this
window tick the box, if not you will now be able to nd
SubConnect amongst your computer’s applications.
monitoraudio.com 11
Page 14

Initial Setup
With the SubConnect application now installed on your PC you
are ready to start the setup procedure. Before launching the
application rst ensure your PLW215 II is connected to your
PC using an appropriate USB cable and switched on. When
you turn the PLW215 II on, it will automatically download the
drivers on to the computer.
1. Launch the SubConnect application.
2. When running it for the rst time, the wizard will
automatically start. Select Platinum 2G in the “Range”
drop down list and PLW215 II as the “Model”, as seen
below. Press the Next button and you will see the
Platinum PLW215 II, select it and press the Next button
again.
3. Now you will have three options to choose from. You can
either start the SubConnect App with your sub’s current
settings by clicking on the “Read” button; load the default
values we have set for the application by selecting “load
defaults”, or open a pre-saved setting. If you’re setting
up the sub woofer for the rst time we would recommend
the default values as a good platform to work from.
These will be the same settings that the PLW215 II uses
as default out of the box..
Every time you subsequently run the SubConnect
program, it will start up without going through the wizard
and will show the “Master” settings page.
NOTE
If your PLW215 is not seen in the SubConnect application
then check that the sub is powered on by pressing the
top control dial. The PLW215 II will not be detectable if
in standby. You may also need to reconnect to establish
a connection with your PC. Ensure drivers on your
machine are kept up to date.
12 PLW215 II
Page 15

Master Controls
The SubConnect application will enable you to control and
adjust every part of the sub woofer you could imagine and
more. Below are the descriptions of each feature and what they
will do. The default settings are those we recommend setting
the AV receiver up with. You can then adjust/ tweak them once
the AVR’s set up has been run.
NOTES
Save any changes before clicking on “CONNECT” or they
will be lost and over written by the settings read from the
PLW215 II.
Any changes made within the application will need to be
downloaded to the PLW215 II before their eect can be heard.
The Master Controls are the same for every preset.
DISPLAY BRIGHTNESS
Here you can adjust the brightness of the PLW215 II LEDs. It
can be adjusted using the slider: hovering the cursor over it and
scrolling up and down using the wheel on the mouse or clicking
on the up and down arrows. It is also possible to set the LEDs
to dim (down to 10% brightness) or o completely following 2
minutes of inactivity.
monitoraudio.com 13
DEFAULT PRESET
Choose whether to start the PLW215 II on a particular EQ preset or
the preset active when the PLW15 was last turned o.
MUTE LINK OUT
If you are not daisy-chaining sub woofers together or linking
from the stereo inputs to a power amp (for example) you can
choose to mute the link outputs.
12V TRIGGER
The 12V trigger input can be used in 2 dierent ways: to
simply turn the sub woofer on and o, or to use it to select
dierent presets when it is high or low. This feature is ideal
when connecting the PLW215 II to a stereo amplier and an
AV Receiver at the same time. You can have one preset for
the stereo amplier and one for the AV receiver. Whichever
amplier has the 12V trigger connected to the PLW215 II
(normally the AV Receiver) set the preset you want to enable, to
be the “12V” option. The “0V” option should be selected for the
amplier without the trigger.
When using it in “Preset X/Y” mode, the PLW215 II will turn on
and o when it senses a signal and will automatically select
the appropriate preset.
Page 16

The PLW215 II is clever enough to know if there is a 12V trigger
connected or not. When there isn’t one connected, this feature
is redundant and the PLW215 II will rely on the Auto on/o
settings.
If using a multi-input set up, we recommend using the 12V
trigger or RS232 connection (see page 16) to select the presets.
The PLW215 II will still turn on using the auto on/ o.
INPUT SIGNAL
There are three parameters to be adjusted here: Gain, Trim and
Phase. They can all be adjusted using the sliders, using the
scroll wheel on the mouse, clicking on the up and down buttons
or manually inputting the desired gure. The output can be
muted in this section as well.
Gain is the master output level control. This can only be set in
this application. We recommend leaving it set at zero and ne
tuning the level using the Trim control. If this doesn’t oer
enough control, adjust the gain accordingly and ne tune it
again with the trim control.
Trim is used to ne tune the output level of the PLW215 II. This
is adjusted both on the application and on the product itself.
The level it is set to will be displayed by the LEDs around the
control dial on the top of the sub woofer.
Phase is used to synchronise any delay between the PLW215 II
and main speakers. When the sub woofer is in phase with the
main speakers the sound should be full bodied. Sit in a normal
listening position whilst adjusting the phase settings. When
set correctly the location of the sub woofer should be almost
undetectable. Experimentation is advisable, however it should
be noted that in most cases the phase control should be set
to 0 degrees, especially when using a digital AV processor or
AV receiver amplier. The phase can also be adjusted on the
PLW215 II itself.
AUTO ON/ OFF
Enable signal sensing if a 12V trigger is not being used or the
12V trigger is being used to toggle between presets. If a 12V
trigger is connected and it is set to turn the PLW215 II on and
o, it will know there is one connected and will not wake on
signal sensing. It will wait for the 12V trigger to go high.
The Auto O time can be set manually to anything between 5 to
240 minutes. The arrows adjust the auto o time in 5 minute
steps.
SYSTEM INFO
Here the PLW215 II information is displayed. The Status
(connected, not connected or Boot Loader mode), the device
(model name) and rmware version will all be displayed in this
window.
CONNECT
Connect to the PLW215 II. You will be asked if you wish to
read the settings from the PLW215 II or not. If you do read the
settings from the sub woofer, any changes made within the app
prior to reading the data will be lost.
NOTE
If you make changes to the settings on the application
and then read the data from the PLW215 II before saving
the changes, they will be lost.
DOWNLOAD
Download the parameters from the application to the PLW215 II
RESET
Reset ALL parameters to the default settings.
NIGHT MODE
Night mode is a feature that reduces the peaks on the bass
output by reducing the overall level but not the extension of
the sub. You are able to adjust the amount of attenuation that
is added when night mode is enabled by adjusting the slider.
Night mode is enabled or disabled in the preset panels..
14 PLW215 II
Page 17

Presets
The PLW215 II has 4 separate presets. These can all be set up
for dierent situations. The presets can be selected by either
the control panel on the sub, remote control, RS232 control or
two can be selected to toggle between depending on the 12V
trigger connection and settings.
LOW PASS FILTER
Here the cut o frequency and crossover slope is set. A ported
loudspeaker naturally has a low frequency roll o of 24dB per octave,
whereas a sealed loudspeaker has a 12dB per octave roll o. For best
integration, set the roll o of the sub to match that of your speakers.
The actual frequency can also be adjusted in accordance with
the main speakers. This can also be set on the control dial as
well. When using the LFE input the low pass lter is not active
as this is set by the AVR.
INPUT MODE
Select the input that is active on this preset. If selecting only
LFE for example, only a LFE signal will be output. This helps to
eliminate any potential interference from other connected devices.
PRESET NAME
The name of the preset can be customised for ease of use.
monitoraudio.com 15
TRIM OFFSET
This can be customised for each preset in addition to the
master gain and trim.
PARAMETRIC EQ
Here you are able to select the type of equalisation you want
for the particular preset. There are 4 factory default modes
each with its own characteristics. Alternatively, it is possible
to customise them to suit your tastes. This customisation is in
addition to the factory loaded EQ prole. We would recommend
using ‘Flat’ as a starting point for your own custom EQ.
Alternatively, you may want to start with your preferred default
EQ and make adjustments to compensate for the response of
your listening room. The customisation can only be done using
the up and down arrows. You can toggle the Room Correction
(see page 9) and Night Mode on and o.
Frequency: chose the frequency that you wish to adjust.
Gain: adjust the gain or attenuation of the selected frequency.
Q-Factor: adjusts the bandwidth relative to its centre
frequency (set above)
Page 18

EQProles
RS232
The PLW215 II can be controlled via the RS232 port on the
amplier panel. The PLW215 II can be controlled by sending a
string of characters to the RS232 connector.
RS232WiringConguration
The RS232 communication socket uses a standard RJ45
connector. This should be wired as illustrated on the amp panel
and below.
Impact: Uses the maximum natural eciency of the drivers
for explosive impact.
Flat: This is the sweet spot between a at extended response
and minimal use of DSP enhancement. A good starting point to
create your own custom EQ proles from.
Movie: The same at response with good sensitivity, but a
little more extension to create a balance between the explosive
and atmospheric moments of a good lm.
Music: Maximum low frequency extension to pick out the
fundamental frequencies of every musical instrument.
RS232 Communication Set-Up Parameters
Infra Red Remote Codes
The PLW215 II has discreet remote control commands for
use with universal remote controls, along with additional
commands not found on the supplied remote. The commands
follow the standard NEC protocol.
Device Address: 0x7D
POWER 0x48
ON 0xd1
OFF 0xf1
MUTE 0x78
VOL_UP 0xa0
VOL_DOWN 0x08
PRESET_1 0x28
PRESET_2 0x58
PRESET_3 0x88
PRESET_4 0xB8
TOGGLE_SOURCE 0x00
VOLUME_SELECT 0x28
LPF_SELECT 0xA8
PHASE_SELECT 0xD8
16 PLW215 II
DISPLAY 0x30
ENCODER 0xD0
PRESET_SELECT 0xB8
RIGHT_BUTTON 0xe0
LEFT_BUTTON 0xc0
PLAY_PAUSE 0xd8
TOGGLE_NIGHTMODE 0xA8
NIGHTMODE_ON 0xd2
NIGHTMODE_OFF 0xf2
ROOMEQ_ON 0xd3
ROOMEQ_OFF 0xf3
DISPLAY_ON 0xd4
DISPLAY_OFF 0xf4
Baud Rate: 57600
Data Size: 8
Parity: None
Stop Bits: 1
Handshaking/ Flow Control: None
Command Protocol
Each string of commands sent to the PLW215 II must follow the
same structural protocol. These commands are detailed in the
Command List opposite. To control the PLW215 II using RS232
commands, specic strings of characters (forming a command
string) must be sent via a RS232 terminal. Each command
string should be terminated by both:
<CR> (the ASCII carriage return character, 13 decimal)
<LF> (the ASCII line feed character, 10 decimal)
These are generally found in the RS232 terminal settings.
The PLW215 II replies to a valid command with the updated
information changed by a SET command, or the information that
was requested by a GET command. If the PLW215 II receives an
invalid command it will reply with ERROR<CR><LF>
Note: any SET command other than SET_O during Standby is
deemed invalid.
1. Not Used
2. Not Used
3. Ground
4. Ground
5. Rx
6. Tx
7. Not used
8. Not Used.
1 2 76543 8
Page 19

Command List
The following GET commands are used to request information from the PLW215 II:
Command Description Reply from PLW215
GET_O
GET_P Requests the current Phase setting
GET_M Requests the current Mute state
GET_L Requests the current Mute Link Out state
GET_S Requests the current Preset
GET_D Requests the current Display state
GET_T Requests the current Volume Trim Level
GET_R Requests the Room EQ state
GET_N Requests the Night Mode state
The following SET commands control the operation of the PLW215 II
Command Description Reply from PLW215
SET_O:1 Go to Power On POWER_ON:1<CR><LF>
SET_O:0 Go to Standby POWER_ON:0<CR><LF>
SET_P:X
SET_M:1 Mute output MUTE_ON:1<CR><LF>
SET_M:0 Unmute output MUTE_ON:0<CR><LF>
SET_L:1 Mute Link Out output MUTE_LINK_OUT_ON:1<CR><LF>
SET_L:0 Unmute Link Out output MUTE_LINK_OUT_ON:0<CR><LF>
SET_S:X
SET_D:1 Turn the Display on DISPLAY_ON:1<CR>LF>
SET_D:0 Turn the Display off DISPLAY_ON:0<CR>LF>
SET_T:X
SET_R:1 Turn Room EQ on ROOM_EQ:1<CR><LF>
SET_R:0 Turn Room EQ off ROOM_EQ:0<CR><LF>
SET_N:1 Turn Night Mode on NIGHT_MODE:1<CR><LF>
SET_N:0 Turn Night Mode off NIGHT_MODE:0<CR><LF>
Requests the Power state of the PLW215
(Active/ Standby)
Select Phase setting
Where X is in the range 0 345
Select the Preset
Where X is in the range 1 4
Set the Volume Trim Level
Where X is in the range -11 11
Where X is either 1 (Active) or 0 (Standby)
Where X is either 1 (Muted) or 0 (Not Muted)
MUTE_LINK_OUT_ON:X<CR><LF>
Where X is either 1 (Link Out Muted) or 0 (Link Out Not Muted)
Where X is either 1 (Display On) or 0 (Display Off)
Where X is in the range -11 11
Where X is either 1 (Room EQ On) or 0 (Room EQ Off)
Where X is either 1 (Night Mode On) or 0 (Night Mode Off)
Where X is in the range -11 11
POWER_ON:X<CR><LF>
PHASE:X<CR><LF>
Where X is in the range 0 345
MUTE_ON:X<CR><LF>
PRESET:X<CR><LF>
Where X is in the range 1 4
DISPLAY_ON:X<CR>LF>
TRIM_LEVEL:X<CR><LF>
ROOM_EQ:X<CR><LF>
NIGHT_MODE:X<CR><LF>
PHASE:X<CR><LF>
Where X is in the range 0 345
PRESET:X<CR><LF>
Where X is in the range 1 4
TRIM_LEVEL:X<CR><LF>
monitoraudio.com 17
Page 20

Update Subconnect
Every time the SubConnect application is started, it checks for
an update. If it nds one you will be notied as per the image
below. Click on update and follow the installation instructions
on screen.
If you wish to check manually, you can do so by following the
steps below.
1. Start the SubConnect application.
2. Click on Tools > SubConnect Update
3. Click Check for update.
4. If there is no update available, you will be notied
accordingly.
5. If there is an update available, you will be notied and
18 PLW215 II
then follow the onscreen instructions.
Page 21

Update Firmware on Sub
Once the SubConnect app has loaded and established
connection with the sub woofer, either by automatic detection
or by you manually pressing CONNECT, it will always check for a
rmware update. If it nds one, you will see the below image.
Bootloader Mode
To get the PLW215 II into bootloader mode, you must rst turn
the sub woofer o by the mains switch. When it has shut down,
press and hold the control dial while simultaneously turning
the sub woofer back on.
The Inner blue and cyan LEDs will illuminate with the outer
white LEDs ashing in a chase sequence nishing at “Phase”
(as per illustration below). This is now in bootloader mode.
Automatic Update.
1. To carry out the update, click on OK. You will then see
another pop up showing the product, version number and
a brief summary of the changes.
2. Click on Update and you will then see a progress bar
showing the status of the update.
3. When it is complete you will get conrmation and the sub
woofer will reboot (when you click on OK). If there is
a signal going into the sub woofer, it will automatically
start up. If there is no signal, the sub woofer will need
to be woken up by applying a signal or by pressing or
turning the Control Dial.
Now click on OK on the application. The “Status” will show
that it is disconnected. Click on CONNECT and then when
reconnected, the pop up showing there is an update available
will reappear. Proceed to Automatic Update.
monitoraudio.com 19
Page 22

Manual Update
If the automatic update doesn’t work, or you wish to manually
check for an update, open the app and with the PLW215 II on
and connected, click on Tools > Firmware Update.
1. Click check for update. If the PLW215 II is up to date, you
will be informed, likewise, if there is an update available
for it you will also be informed.
2. If it isn’t already, you will receive a prompt asking for the
PLW215 II to be put into Bootloader mode. For information
on how to do this refer to page 19. Follow these steps
and when you have re-established connection to the
PLW215 II click on Tools > Firmware Update again and
you will see a new prompt. Click on Update.
3. A progress bar will now be displayed showing the status
of the update.
4. When it is complete you will receive conrmation and the
20 PLW215 II
sub woofer will reboot (when you click on OK). If there
is a signal going into the sub woofer, it will automatically
start up. If there is no signal, the sub woofer will need
to be woken up.
Page 23

Factory Reset
Sometimes it may be necessary to carry out a factory reset. If
this needs to be done, it can be done by the following.
1. Enter Bootloader mode (refer to page 19)
2. When in Bootloader mode illustrated by the below LED
pattern, press and hold the Control Dial again.
3. As you are holding the Control Dial down, the LEDs will
count down starting with the below pattern and then
nish by ashing twice. When it ashes the Control Dial
can be released.
4. After being reset, the PLW215 II will go into standby
mode.
Care and Maintenance
The high gloss nish of the cabinet can be maintained by
regular dusting using a soft or micro bre cloth and standard
furniture polish. The drive units should only be cleaned with
a damp cloth if more than normal dusting is required. Please
contact Monitor Audio for further information on cleaning and
caring for your cabinet and for products available from us.
Guarantee
Both the craftsmanship and the performance of this product
is guaranteed against manufacturing defects for the period
of two years from the date of purchase (see conditions in
the Important Safety Instructions booklet), provided that the
product was supplied by an authorised Monitor Audio retailer
under the consumer sale agreement.
To verify your manufacturer’s warranty, please visit the online
registration form at: www.monitoraudio.com
monitoraudio.com 21
Page 24

Specications
Platinum PLW215 II
System Format Sealed cabinet with vibration cancelling driver configuration. 25mm M.D.F construction with internal
Low Frequency Response -3dB @ 23Hz / -10dB @ 18Hz (Free Field) default preset: Music
Upper Frequency Limit -3dB @ 150Hz
Driver Compliment 2 x 15” C-CAM® sub-woofer driver featuring inverted surround and triple suspension for
Black single layer, edge wound 3” voice coil with vented pole, vented coil and black CED coated motor
unit to reduce power compression and increase thermal dissipation.
FEA optimised cone, magnetics and suspensions for optimal performance and increased linearity.
Linear Driver Excursion 42mm Peak to Peak. Total displacement 6.4 Litres
Amplifier Power Output Dual amplifier design with a single amplifier powering each driver.
Combined 1400W RMS, 2000W Peak (Burst ratio 1:4 continuous, measured into two nonreactive 4 ohm loads)
Amplifier Classification 2 x Class-D amplifiers; Balanced differential Input; Differentially loaded power supply; DSP controlled.
DSP 172MHz DSP Core with 3500 instructions per sample, 139dB of dynamic range and 56-bit double precision
Digital Conversion Wolfson Microelectronics (Cirrus Logic) ADC & DAC @ 24bit/48KHz.
LED UI Control Panel Adjustable brightness 0% - 100%, configurable auto off feature.
Room Correction EQ 6 System controlled parametric EQ filters set using advanced detection algorithm. Measurement can be
initiated from the control panel or the SubConnect with up to 6 microphone positions (default 2).
bracing and sealed amplifier compartment
-3dB @ 19Hz / -10dB @ 16Hz (In Room) default preset: Music
Limited by low frequency protection filter (-3dB @ 12Hz)
increased support at high excursions.
High current switch mode power supply (SMPSU)
processing, dynamically updated by an 80MHz MCU
(WM8786 ADC & WM8740 DAC)
Quick access to menu items: Trim, LPF, Phase, Preset Select.
Phase Control 0-360 degrees, Increments of 15 degrees with a pure invert at 180 degrees
Low Pass Filter 2nd or 4th order (12 or 24 dB/Octave), Increments of 5Hz from 35Hz to 135Hz
Auto Sensing Input Level
Requirements
Digital Volume Control -11 to +11dB in 1dB increments, Via the control panel.
IR Remote Control Supplied with IR remote. Front facing IR receiver with red LED response.
Audio Input Connection LFE Input with balanced (XLR) and Unbalanced (RCA) inputs,
Auto Standby feature, adjustable between 5-240 minutes in increments of 5mins
All commands are on the Logitech database for use with their all in on remotes.
Line Level >1mV on unbalanced and balanced inputs.
-80 to +20 in 1dB increments, via SubConnect application
Additional discrete IR codes for automation.
Stereo Input with unbalanced (RCA) inputs.
Inputs individually assignable to any Preset.
22 PLW215 II
Page 25

Control Connections/
Interfaces
Electrical Certifications CE / CB/ ETL / Fcc / ErP (Energy saving compliant)
Mains Input Voltage 100 - 120 VAC / 220 - 240 VAC 50/60Hz (Manually selected)
Power Consumption Maximum 1200W, Standby <0.5W (ErP compliance)
Fuse Type 20mm T12.5AL 250VAC
Weight (unpacked) 57.54Kg (126lb 10oz)
12V Trigger in (3.5mm mono mini-jack, 6V threshold), assignable to On/Off or Preset change
3.5mm Microphone input jack (mic supplied)
RJ45 connector supporting RS232 (EIA/TIA - 561, Tx Pin 6, Rx Pin 5, Gnd Pin 4)
IR repeater – Output (3.5mm mono mini-jack)
USB – Type B, for connecting to SubConnect PC application and Firmware update
Dimensions
(inc amp, drivers and feet).
(H x W x D)
Finished Available Santos Rosewood veneer with piano lacquer, Ebony veneer with clear piano lacquer or Piano Black
546.3 x 504 x 512mm
1/2
13/16
21
x 19
x 20
lacquer
3/16
Inches
SubConnectSpecications
SubConnect Windows (7 onwards, 32/64bit) compatible setup application available from the
Allows the user to control advanced sub woofer setup features.
Settings can be saved while not connected to the sub woofer for off sight setup.
Global Settings Display Brightness (0-100%), Dim (to 50% or to Off), Default Preset, Mute Link Outputs,
12V Trigger Assignment (Power on/off or Preset select), Input gain (Master -80 to +20dB, Trim -6 to +6dB,
Mute), Phase (0-360 in 15 degree steps), Night Mode Threshold (-2dB to -20dB), Auto On / OFF (Enable
User Presets 4 fully configurable user Presets including,
Preset Name, LPF Frequency (5Hz Steps from 20-135Hz), LPF Slope Order (-12 or -24dB/Oct), Input
(Stereo, LFE or Both), Trim Offset (-6 to +6dB), EQ mode (Impact, Music, Movie or Default), User EQ (6
adjustable filters applied on top of EQ mode), Room EQ (On/OFF), Night Mode (On/OFF)
User Equalisation 6 fully controllable EQ filters and 6 default filters with gain offset per preset.
Night Mode Night mode, assignable (on or off) per Preset with global threshold (-2dB to -20dB).
Introduces dynamic range reduction lowering the level of loud sections.
Monitor Audio website and the USB stick
Signal Sense, Always On, Time to off 5-240mins)
Default settings: Flat / Music / Movie / Impact
Trouble Shooting
The PLW215 II can show various fault codes on its LED user interface. The display will illuminate all of the inner circle of LEDs (blue
and cyan) with a specic quarter segment of the outer white LEDs illuminated depending on fault.
In the rst instance remove the power for 10 minutes, reconnect and turn back on. If it still displays the same pattern attempt
to carry out a factory reset as shown on page 21. If that still fails to rectify the problem, try loading the rmware back onto the
PLW215 II via the SubConnect app. Finally, if the problem still persists contact Monitor Audio or your approved Monitor Audio
retailer.
monitoraudio.com 23
Page 26

24 PLW215 II
Page 27

Page 28

Monitor Audio Ltd.
24 Brook Road
Rayleigh, Essex
SS6 7XJ
England
Tel: +44 (0)1268 740580
Fax: +44 (0)1268 740589
Email: info@monitoraudio.co.uk
Web: www.monitoraudio.com
Designed & Engineered in the United Kingdom
Made In China
Version 1. 2015
 Loading...