

USER GUIDE
SHOE RACK
Natural / Stylish / Unique
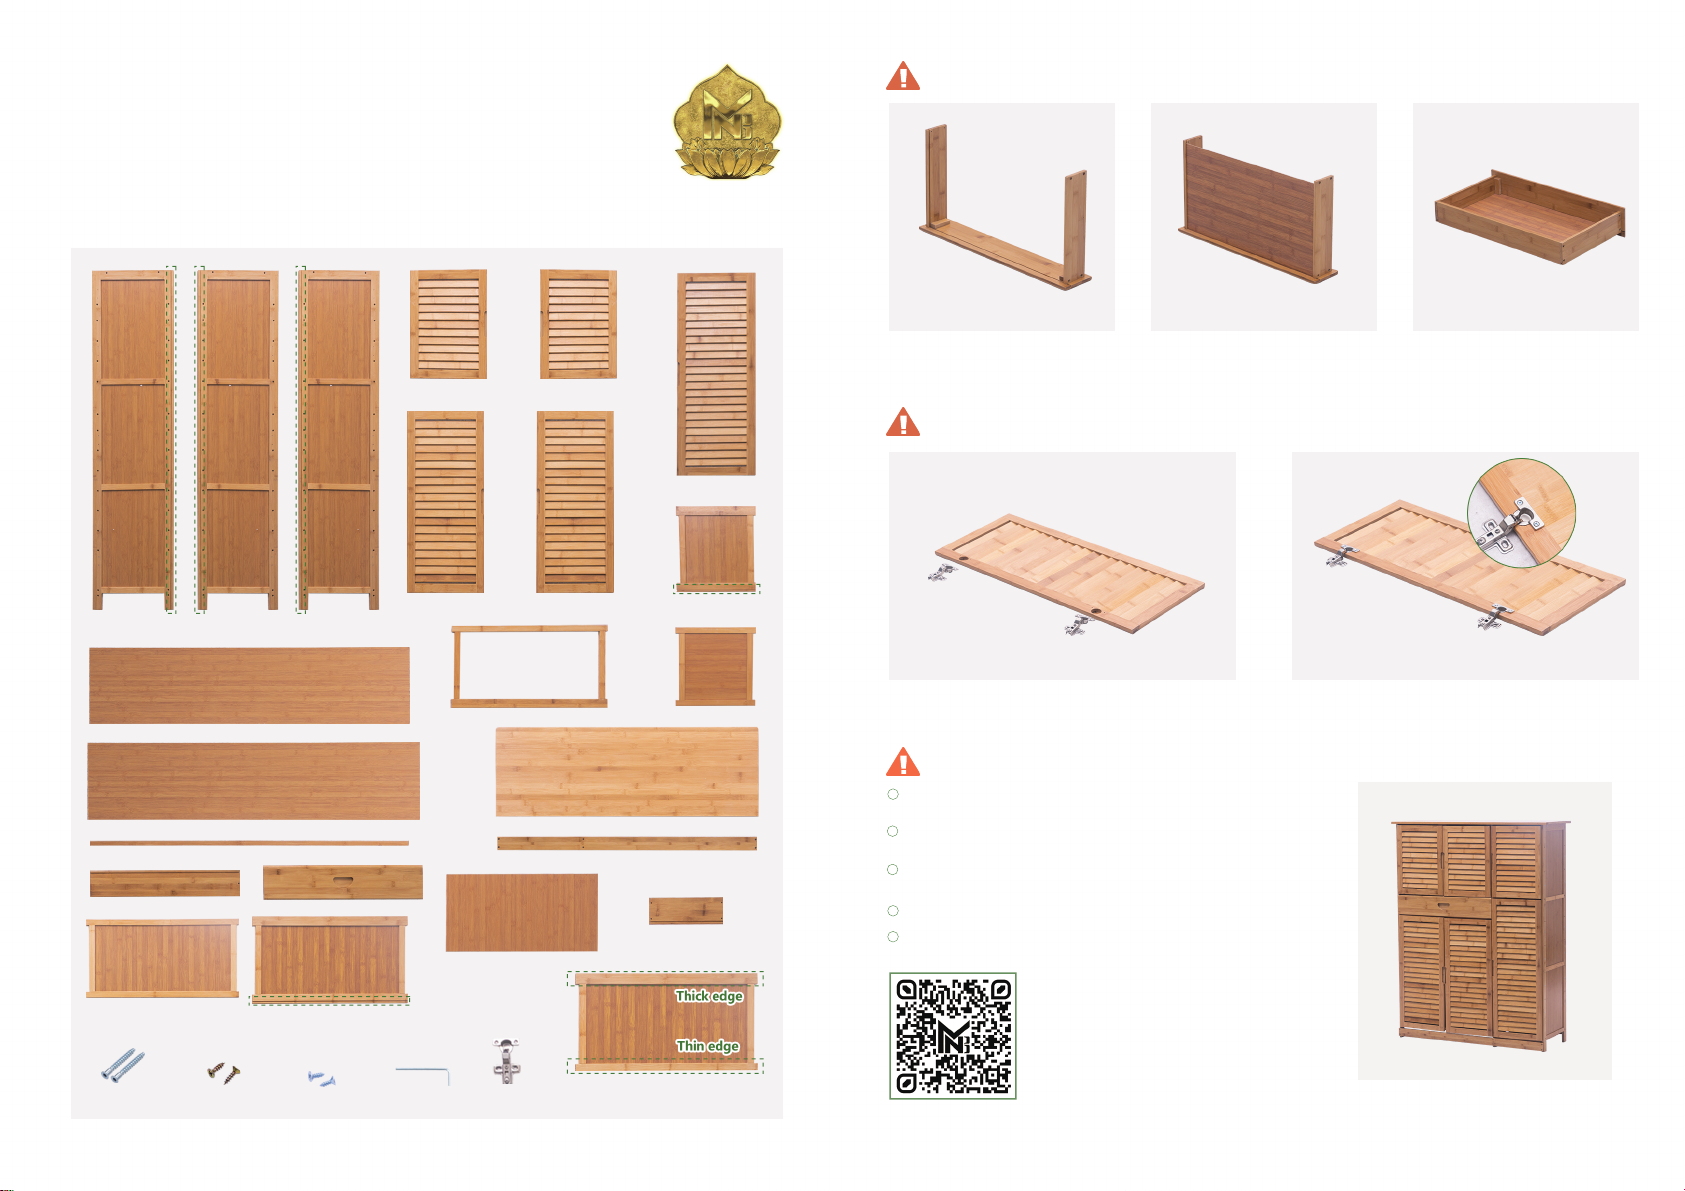
HARDWARE
CABINET ASSEMBLY
(a) Left Frame x 1
(One Side w/ Slot) (Both Sides w/ Slot) (One Side w/ Slot)
(k) Short Back Panel x 2
(l) Long Back Panel x 1
(o) Back Slat x 1
(s) Cabinet Back Panel x 1
(b) Mid Frame x 1
(c) Right Frame x 1
(t) Cabinet Front Panel x 1
(d) Small Door x 1
(f) Medium Door x 1
(w) Cabinet Support Frame x 1
(v) Cabinet Panel x 1
(e) Small Door x 2
(g) Medium Door x 1
(q) Top Panel x 1
(p) Bottom Slat x 1
(h) Large Door x 1
(i) Bottom Small Panel x 1
(j) Small Panel x 6
(u) Cabinet Side Panel x 2
①
Position Side Panel (u) and Front
Panel (t) as picture shown, secure
with Medium Screw (y).
②
Position and insert Panel (v)
to slot.
HINGE ASSEMBLY
①
Position Door (d)(e)(f)(g)(h) and Hinge as picture shown.
ATTENTION
1
Please always read and follow the assembly, maintenance and operating
instruction.
2
Do not discard any of the packaging until you have checked that you have
all the parts and pack of fittings.
3
Keep children away during assembly. This item contains small parts which
can be swallowed by children.
4
Wipe frames with water gently, do not use bleach, acid, or other solvents.
5
Check all hardwares before assembly. Incorrect parts used may lead to
damage.
③
Insert Back Panel (s) to slot as
picture shown, secure with Medium
screw (y).
②
Secure with Small Screw (z).
© 2020-2021 by Pundarika LLC - MoNiBloom.com
(m) Large Panel x 5
(n) Bottom Large Panel x 1
(y) Screw-M (z) Screw-S Allen Wrench(x) Screw-L Hinge
© 2020-2021 by Pundarika LLC - MoNiBloom.com © 2020-2021 by Pundarika LLC - MoNiBloom.com
(r) Mid Panel x 1
Scan the QR code to view the
assembly video.
FINISHED PRODUCT

ASSEMBLY INSTRUCTIONS
1
Position Frames (a)(b)(c) on Top Panel (q), secure with Large
Screws (z).
5
Insert Long Back Panel (l) to slot.
Thin edge
Thick edge
Mid Panel (r)
Large Panel (m)
2
Secure Panels (j)(m)(r) with Large Screws (x) as picture shown.
6
Insert Short Back Panels (k) to slot.
3
Position and secure Cabinet Support Frame (w) with Large
Screws (x).
7
Insert Back Slat (o) to slot.
© 2020-2021 by Pundarika LLC - MoNiBloom.com
4
Position and secure rest of the Panels (j)(m) with Large
Screws (x).
8
Secure Bottom Panels (j)(n) with Large Screws (x). Then
reverse the rack.
9
Secure Bottom Slat (p) with Medium Screws (y).
© 2020-2021 by Pundarika LLC - MoNiBloom.com © 2020-2021 by Pundarika LLC - MoNiBloom.com
10
Position Doors (d)(e)(f)(g)(h) with Hinges, secure on rack with
Small Screws (z).
11
Install rest of the doors.
12
Insert the cabinet.
 Loading...