

Page 1
850
SERIES
Page 2
ENGLISH 3
ITALIANO 17
РУССКИЙ 31
УКРАЇНСЬКА 45
2
Page 3

MONGOOSE AMG 850C
Introduction
The AMG 850C alarm system has been designed to protect car doors, hood and trunk,
dorm space and the space closed to your car.
TM
To prevent unauthorised access to the system, a KeeLoq
code protection is provided, which will prevent any attempted code interception with
code grabber. Also provided are a built"in Antiscanner feature, which inhibits alarm
system disarming by random code fitting and a Status memory feature, which excludes
alarm system being disarmed by just disconnecting and then connecting the car battery
terminal, since in this case an alarm will be triggered and the engine blocking will persist.
Power supply interruption and recovery with the system disarmed will not trigger an
alarm to avoid problems, for instance, during repair.
If the car is powered off with the alarm system in the Valet mode, a subsequent power"
on will return the alarm system to that state.
To avoid locking the keys inside the car, no change in the door locks status occurs at
the recovery of supply from the car battery.
False alarm can be avoided by the Defective zone bypass feature, which will disable
the faulty sensor until the end of arm cycle once it has triggered 8 alarms.
The other controlled zones and blockings will remain armed.
The programmable feature of Interior light detection allows using AMG 850С with
any type of car.
To enhance the system security properties and the car’s ease of use, AMG 850С is
equipped with the following auxiliary outputs:
" pager connection,
" trunk unlock control,
" power window close while arming,
" power window or external lighting control from remote control.
A standard AMG850C package includes:
Central unit with a complete installation kit.
A two"stage shock sensor, which either issues a short siren chirp or activates a full
alarm depending on the strength of impact upon the car body.
Two remote control transmitters.
A LED indicating the alarm system mode of operation and intended for installation
inside the car.
An Override Switch, which point of installation inside the car you select together
with your installer so that it is both inconspicuous and easy to use.
A complete instruction for controlling all AMG 850C modes and also a memo card
with a shorter description, which you can always take around.
"based radio command
English
To enhance the security properties of your alarm system you are advised to
purchase an optional two"stage space disturbance sensor, which is able to register any
movement both inside the car and in immediate proximity to it. Your AMG 850C has a
special input to connect such a sensor.
3
Page 4

Remote control transmitter.
This is a miniature radio transmitter fed from a 12 volt battery (type 23 А), which lasts
for about 1 year of operation. A considerable decrease in the transmitter coverage points
to the need for battery replacement. The transmitter features three control buttons and
an indicator LED. When any button is pushed, the transmitter forms and transmits a
special coded command, which is altered with every new button push to prevent your
code interception with a code grabber.
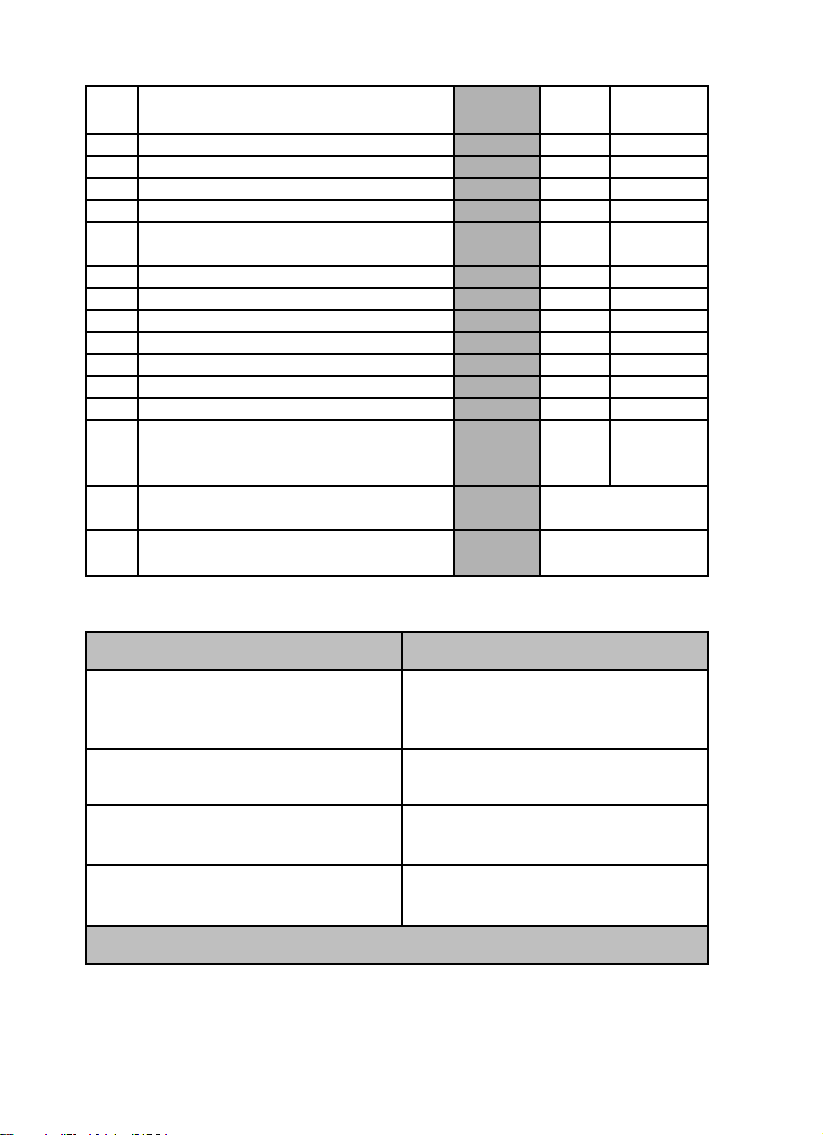
Control summary
Feature Button 1 Button 2 Button 3 Note
Arm/Disarm Ignition OFF
Door locking Ignition ON
Arm with sensors disabled Ignition OFF
Silent arm/disarm 2 1 Ignition OFF
Silent arm with sensors disabled 2 1 Ignition OFF
Door unlock Ignition ON
Panic 3 sec Ignition OFF
Trunk unlock 3 sec Ignition OFF
Power window/external lighting turn#on 3 sec Ignition OFF
Multifunctional output to control power 3 sec 3 sec
window or external lighting
VALET mode 3 sec 3 sec Alarm system disabled
Two#step unlock Ignition OFF
Anti#hijack 3 sec Ignition ON
Arm/disarm of a second car Ignition OFF
press button briefly
press briefly two times in an interval no longer than 3 seconds
3 sec press and hold button for at least 3 seconds
3 sec press and hold buttons for 3 seconds to activate channel, keep held for the
time required for channel operation but no longer than 30 seconds.
1, 2 order of button pressing
Useful information.
PIN code.
To enhance the secrecy of alarm system control, AMG 850C provides an option to
use a personal PIN code for emergency cancellation of alarm signals, memorisation of
additional transmitters and user functions, or disabling the Anti"hijack feature.
PIN consists of two digits and can have a value from 11 to 99. In the factory the value
«11» is set but we recommend you to change it after installation (see the section «Feature
programming»). This will secure your alarm system against unauthorised disarming.
PIN code is entered using the Emergency disarm button and the ignition key.
4
Page 5
Emergency disarm.
If the control transmitter is missing or broken, to disarm the system: unlock the door
with a key " an alarm mode will be started " take your seat in the car and turn the ignition
on. With ignition on press the Override Switch as many times and the first digit of the
current PIN code, then turn the ignition off/on and press the Override Switch as many
times as the second digit of your PIN code. Turn the ignition off " the system will disarm.
LED indication of system status
Armed blinks slowly
Disarmed out
Arming blinks fast
Valet mode continually lit
DIRECTIONS FOR USE.
Basic security features control
Arm.
To arm the system, press button 1 of the transmitter with ignition off. If the doors,
hood and trunk are closed, the siren will chirp once and the lights will flash once. The
system LED will blink slowly, the door locks will lock (if the car is equipped with lock
blocking actuators). If any door, hood or trunk happen to be open, three chirps and three
flashes will follow.
Arm status.
In the arm status the system monitors the state of all available pin switches of the
doors, hood and trunk, the status of ignition and the status of shock sensor, and also the
space disturbance and other sensors if installed. In addition, engine start is blocked in
this mode. If any guard zone is violated, a 30"second alarm mode is triggered.
English
Alarm.
Once the alarm mode is started, the siren will chirp and the signal lights will flash for
30 seconds or until cancelled using button 1 of the transmitter.
If the warning zone of shock sensor or the external zone of an additional sensor is
violated, the siren will issue a warning chirp.
Disarm.
To disarm the system, push button 1 of the transmitter, the siren will chirp twice and
the lights will flash twice. The LED will go out, the door locks will unlock (if the car is
equipped with lock blocking actuators). If an alarm mode has been started within the
armed period, there will be four chirps and four flashes at disarm.
If you opted for the Twostep door unlock scheme at setup, the first push of the
button will open only the driver’s door, to unlock the other doors press button 1 again
and hold it for 3 seconds.
5
Page 6

Panic.
If your press button 1 and hold it down for 3 sec with ignition on, the siren and signal
lights will be started. A repeated push of button 1 will cancel the mode. Activation and
deactivation of Panic does not change the system status, i. e. if armed, the system will
remain armed with doors locked, and if not armed and the doors unlocked, there will be
no arming or door locking.
Silent arm.
If you have to arm the alarm system without audible confirmation, i. e. if you do not
want to disturb people around you with siren chirps, press button 3 of the transmitter
immediately before pressing button 1, the lights will flash once as usual, but the siren
will remain silent. The system LED will blink slowly, the doors will lock (if the car is equipped
with lock blocking actuators). With silent arming audible warnings about open doors,
hood or trunk remain functional, so there is no risk of your leaving the car unlocked.
Silent disarm.
To disarm the system without audible confirmation, press buttons 3 and 1 in the same
sequence, the lights will flash twice, but the siren will remain silent. The LED will go out,
the doors will unlock (if the car is equipped with lock blocking actuators). However, if an
alarm has been started within the guarded period, this will be indicated with usual audible
signals even at Silent disarm.
Arm with sensors disabled.
If it is necessary to disable the dorm sensors at arming, i. e. if passengers or animals
are to be left in the dorm, press button 1 twice. The system will confirm sensor disabling
with an additional chirp and a flash.
Silent arm with sensors disabled.
You can also disable the dorm sensors at silent arming; to do so press button 2 twice.
In this case only an additional flash will confirm sensor disabling.
Additional security features control
Automatic rearm (protection against inadvertent button push).
If neither door, the hood or the trunk have been opened and ignition has not been
turned on within 30 sec after disarm, the system will automatically rearm. Door locking
at rearm can be disabled by programming.
Twostep disarm
If an alarm has been started, then pressing the button once will only cancel the siren
chirps and flashes (if the cause of alarm has been removed, e. g. an open door has been
closed or a shock sensor triggers no more). But if the cause of alarm persists, a repeated
push of the button is needed to cancel the alarm. Full disarming requires a further push
of the button after the alarm is cancelled.
6
Page 7

Passive arm.
This function can be enabled or disabled by programming at setup.
If the feature is enabled, then turning off the ignition, opening or closing the door, will
cause two flashes of the signal lights and the LED will blink fast. If 30 seconds later all
doors, the hood and the trunk remain closed, the alarm system will be armed and the
doors will lock.
If the Passive arm feature is used, the alarm delay mode is activated, which allows you
to take your seat in the car and disarm the system with a PIN code " there will be no
alarm for 10 seconds. Delay duration of up to 20 seconds can be set by programming.
Automatic door lock at ignition turnon.
The electrical door locks automatically lock 10 sec after ignition switch"on, once the
ignition is switched off, the locks will unlock. If any door happens to be open within these
10 sec, there will be no automatic locking to avoid locking in the keys. The function can
be disabled by programming.
Remote control of central lock.
With the ignition on, the door locks can be locked or unlocked at any moment by
pressing the transmitter buttons 1 or 2 respectively.
Antihijack. Protection against robbery.
This function can be enabled or disabled at any time by programming.
If the feature is enabled by programming, it will be activated each time the ignition
turning on follows a door open and closed as well as each time someone opens a door
with ignition turned on and also remotely by pressing button 3 of the transmitter for 3
seconds. Thus, if a robber forces you to leave the car and give him the keys, obey: Anti"
hijack will trigger the alarm and block the engine.
A siren beep will confirm the Anti Hijack activation by switching the ignition on or
remotely, that will be followed by 2"minute pause with the LED flashing slowly. After the
pause, the siren will emit beeps during 30 seconds. After those 30 seconds of siren
signals the signal lights will begin to flash and the engine will be blocked. Starting from
this moment, the engine will be blocked until complete cancellation of Anti"hijack. In a
minute of blocking the engine the alarm system will begin 30"second alarming and will
repeat these 30 second alarming cycles until the ignition is switched off.
If a door is opened with the ignition turned on, this will cause the LED to flash for
30 seconds (but not 2 minutes), after that the above procedure will follow.
English
From the moment of Anti"hijack activation and until its complete cancellation, all
transmitters will be blocked and the system will not respond to any remote commands.
To cancel Anti"hijack within the 2"minute or 30"second (the second case) pause, enter
the first digit of your PIN code using the override switch. The LED will go out, the system
will revert to normal operation, one flash/beep signal will confirm the Anti Hijack has
been disarmed.
Note: as soon as you turn the ignition off without the Anti Hijack previously disarmed
the alarm system will warn you by double beeps.
To cancel Anti"hijack after the 2"minute or 30"second pause, you have to stop the car
and enter the full code, the same as while emergency disarming. If the full PIN code is
7
Page 8

used to disarm the Anti Hijack, then there will be no Anti Hijack activation with exception
of remote mode unless you open and close a door with the ignition turned off.
To suspend Antihijack functionality you can use the Valet mode, however, to enable
Valet mode you must first disable Antihijack.
Diagnostic features
Fault warning.
If any door, the hood or the trunk remain unclosed at arming, you will hear 3 audible
signals instead of 1 and the lights will flash 3 times.
Alarm memory.
If an alarm has been activated during the guard period, then at disarming the system
will issue four chirps and four sounds instead of the usual two and will report the cause
of alarm with series of LED flashes within 10 seconds after the first ignition turn"on.
Number of flashes in a series Component involved
2 Dorm sensor
3 Door pin switch «"» or «+»
4 Trunk pin switch «"»
5 Ignition
Interior light detection.
If your car has the interior light delay functionality and interior light detection mode is
enabled by programming, then the door pin switches will be armed only after the light in
the dorm goes out. In this mode there will be no warning about unclosed doors at arming.
Programming enables the mode.
Valet mode.
In this mode all the system’s security features are disabled. You can enable this mode,
for instance, when you leave your car at the service centre, then you will not have to
leave your control transmitter along with the car. This is a 100% warranty against
unauthorised memorisation of new control transmitters with your system.
To enable the mode press buttons 1 and 2 for 3 sec with alarm system disarmed; the
signal lights will flash three times, the system LED will be continually lit. In Valet mode
you retain the option to remotely control the central lock and auxiliary outputs. A repeated
push of the same buttons will return the system to normal operation, which will be reported
by three chirps.
To exit the Valet mode the PIN code can also be used.
Transmitter programming.
A standard AMG 850C package includes 2 remote control transmitters, however, the
alarm system is capable of memorising up to 4 transmitters. You can initialise additional
transmitters using this procedure:
8
Page 9

1. Turn the ignition on.
2. Enter the first digit of the current PIN code by pressing the Emergency disarm button
as many times.
3. Turn the ignition off/on.
4. Enter the second digit of the set PIN code by pressing the Emergency disarm button
as many times..
5. Turn the ignition off/on. If the correct PIN code was entered, the siren will chirp
twice confirming your entering the Transmitter programming mode.
6. Push button 1 of the transmitter. The siren will chip once confirming the transmitter
code recording.
7. Turn the ignition off and press the Emergency disarm button or wait for 15 seconds,
there will be two chirps confirming you have quit Transmitter programming.
CAUTION! If you have enabled Antihijack by programming, then for
memorising new transmitters you should turn on the ignition (1), then first enter
the PIN code to disable Antihijack, then wait for a chirp and a flash confirming
Antihijack disabling, and then without turning the ignition off proceed to
transmitter programming (2) i. e. enter the PIN code once again.
Feature programming.
To change a PIN code value, erase the transmitters you no longer need from the system
memory, or change the settings of programmable features, you should first perform
transmitter programming (see above) using a transmitter already known by the system.
Then proceed as follows:
1. Complete transmitter programming and turn the ignition on.
2. Enter the number of program switches group by pressing the Emergency disarm
button as many times (first digit). A siren chirp will confirm each push of the button.
3. Turn the ignition off/on.
4. Enter the number of switch within the group (second digit) by pressing the
Emergency disarm button as many times. A chirp will confirm each button push.
5. The feature current status is indicated by the system LED, which is lit if the feature is
enabled or is out if it is disabled.
6. To enable a feature press button 1 of the transmitter, to disable it press button 2.
7. To exit the Feature programming mode, turn the ignition off or wait several seconds
for a double siren chirp. To proceed with programming, turn the ignition on without
waiting for a chirp and resume from step 2.
English
9
Page 10
Switch function Factory LED lit LED out
default
1"1 Passive arm OFF ON OFF
1"2 Alarm duration 30 sec 30 sec 60 sec
1"3 Door locking at rearm ON ON OFF
1"4 Door locking at ignition turn"on ON ON OFF
1"5 Audible signals confirming command ON ON OFF
execution
1"6 Central lock pulse duration 0.6 s 0.6 s 3.5 s
2"1 Window closing while arming OFF ON OFF
2"2 Pulse duration at power window output 25 s 10 s 25 s
2"3 Delay of alarm from door at passive arm ON ON OFF
2"4 Duration of alarm from door 10 s 10 s 20 s
2"5 Interior light detection OFF ON OFF
2"6 Anti hijack OFF ON OFF
3"1 PIN code setting (11÷99) 1 Button 1 Button 2
A chirp accompanies entering each digit: code value code value
long for tens, short for units. increase decrease
3"2 Erasing the codes of all transmitters " Press buttons 1& 2
except the one being used simultaneously
3"3 Return to factory defaults " Press buttons 1& 2
simultaneously
Troubleshooting
Fault
The system does not respond to remote control or
emergency disarm commands
No optical signals with otherwise normal functioning
of all modes.
Electric door locks do not function.
The remote control panel LED will not light, the
system does not respond to remote control.
For other faults turn to your local service centre.
10
Action
1. Check whether the car battery is charged.
2. Check the system power circuit fuse and
replace it if necessary.
Check the signal lights power circuit fuse, replace
if necessary.
Check the locks power circuit fuse, replace if
necessary.
Replace the control panel cell.
Page 11
Scope of delivery
Mongoose AMG"850 C electronic unit " 1
Main bundle of wires with connectors " 1
Installation kit " 1
LED " 1
Emergency disarm button " 1
Remote control transmitter " 1
Shock sensor " 1
General recommendations
ELECTRONIC MODULE.
The electronic module is installed inside the dorm, away from sources of moisture or
heat. It should be installed in such a way that it could be removed only using special
tools or at least along with one decorative panel. The module is fixed in the selected
location with screws from the kit.
SIREN.
The siren is installed in the engine compartment at least 30cm away from potential
shock zones, away from sources of heat and moisture, and fixed with two screws from
the kit.
EMERGENCY DISARM BUTTON.
The emergency disarm button is fixed on the dashboard so that the driver could reach
it from the driver’s seat. To fix the button, drill a through hole 7mm in diameter and fasten
the button with a nut. Pass the wires to the electronic module and connect them to the
connector in accordance with the Wiring diagram.
LED.
Drill a hole 8mm in diameter in the dashboard or lining panel and fix the LED in it. Pass
the cable to the electronic module and connect it to the connector in accordance with
the Wiring diagram.
SHOCK SENSOR
Install the shock sensor on body metal inside the dorm, as close to the car’s longitudinal
axis as possible. Fasten the sensor with self"tapping screws or stick it with double
adhesive tape.
English
11
Page 12

Technical specifications
Supply voltage 10...15 V
Power consumption in arm mode 20 mA
Radio channel frequency 433.92 MHz
Operating temperature range "40...+850С
Upper current limit
" engine blocking circuits 300 mA
" signal light circuits 10 A
" central lock control circuits 15 A
" auxiliary output circuits 300 mA
Transmitter maximum range of coverage 30 m
Installation
Before you get down to connection, select locations in your car for the following
instruments and connections:
direct current source;
current source to be used with ignition on;
lights connection points (positive pulse);
door pin switches;
trunk pin switch;
hood pin switch (install an additional pin switch if necessary);
starter wire;
disconnect the «(« terminal of car battery.
Main 24way connector.
BLACK WIRE
Connect to car body.
GREEN/BROWN WIRE
Electronic module power supply. Connect to 12V direct current source via a 5A fuse.
BLACK/WHITE and BLACK/GREEN WIRES
Relay outputs to lights. One wire is connected to the left side lights circuit, the other "
to the right side lights circuit.
GREEN and YELLOW WIRES
These wires are connected to the door pin switches. The connection layout depends
on whether positive or negative door pin switches are used.
Negative door pin switches:
connect the YELLOW wire to ground, the GREEN wire to the door wire between the
door pin switches and dorm light lamp, on which ground appears at doors opening.
Make sure that the selected wire is connected to all the car’s doors.
Positive door pin switches:
Connect the GREEN wire to the (+) terminal of the 12V power supply, the YELLOW wire
to the door wire between the door pin switches and dorm light lamp, on which 12V appears
at doors opening. Make sure that the selected wire is connected to all the car’s doors.
CAUTION! It is strongly prohibited to use the yellow and green wires simultaneously
as the system trigger inputs, i. e. there must be no simultaneous connection to the positive
and the negative door pin switches.
12
Page 13

VIOLET WIRE
«+0.3A» output to connect the pager or the klaxon relay.
BLUE/BLACK WIRE
«"0.3A» output of the trunk opening device. If button 2 is pressed for 3 seconds with
ignition off, a 0.5s negative pulse appears on this wire.
BROWN WIRE
Pass the wire through the rubber ferrule in the engine compartment partition and
connect it to the siren red wire. Connect the siren black wire to the body.
RED WIRE
Input for lights supply and for selecting the polarity of lights control. Normally
connected to +12V via a 15A fuse.
ORANGE WIRE (Connected to relay).
BROWN/WHITE WIRES
«"0.3A» outputs to connect to the engine blocking relay.
ORANGE WIRE
Connect to ignition power supply.
Caution! This power supply must not be switched off at engine start.
GREY/WHITE WIRE
Connect the wire to any circuit on which ground appears at trunk opening. If there is
no such circuit, install an additional pin switch at which ground will appear at trunk
opening.
GREY WIRE
Connect the wire to any circuit on which ground appears at hood opening. If there is
no such circuit, install an additional pin switch at which ground will appear at trunk
opening.
GREEN/RED WIRE
«"0.3A» output to control closing of windows/hatch, Comfort system and the lights.
When button 3 is pressed for 3 seconds with ignition off in the arm mode, a 10s or 25s
signal appears at this output (See programmed features switches 2.2).
This channel can also be enabled automatically at each system arming (See
programmed features switches).
WHITE WIRE
«"0.3A» output to control auxiliary devices. When buttons 2 and 3 of the transmitter
are pressed simultaneously, a signal appears at this wire and is present until the buttons’
release, but no longer than 30 seconds.
BLUE WIRE
«"0.3A» output to organise two"step doors unlocking. A signal appears at this wire
when button 2 of the transmitter is pressed twice in succession.
Wires for door locking devices.
Mongoose AMG"850 C is supplied with a multifunctional door locking system having
six wires. See the attached diagrams for connection layouts of negative control, positive
control, installation of new actuators and pneumatic actuator.
GREY/RED WIRE "locking relay " common contact
RED/YELLOW WIRE"locking relay " open contact
GREY/YELLOW WIRE"locking relay " closed contact
BLUE/YELLOW WIRE"unlocking relay " closed contact
RED/BLACK WIRE"unlocking relay " open contact
BLUE/RED WIRE"unlocking relay " common contact
English
13
Page 14
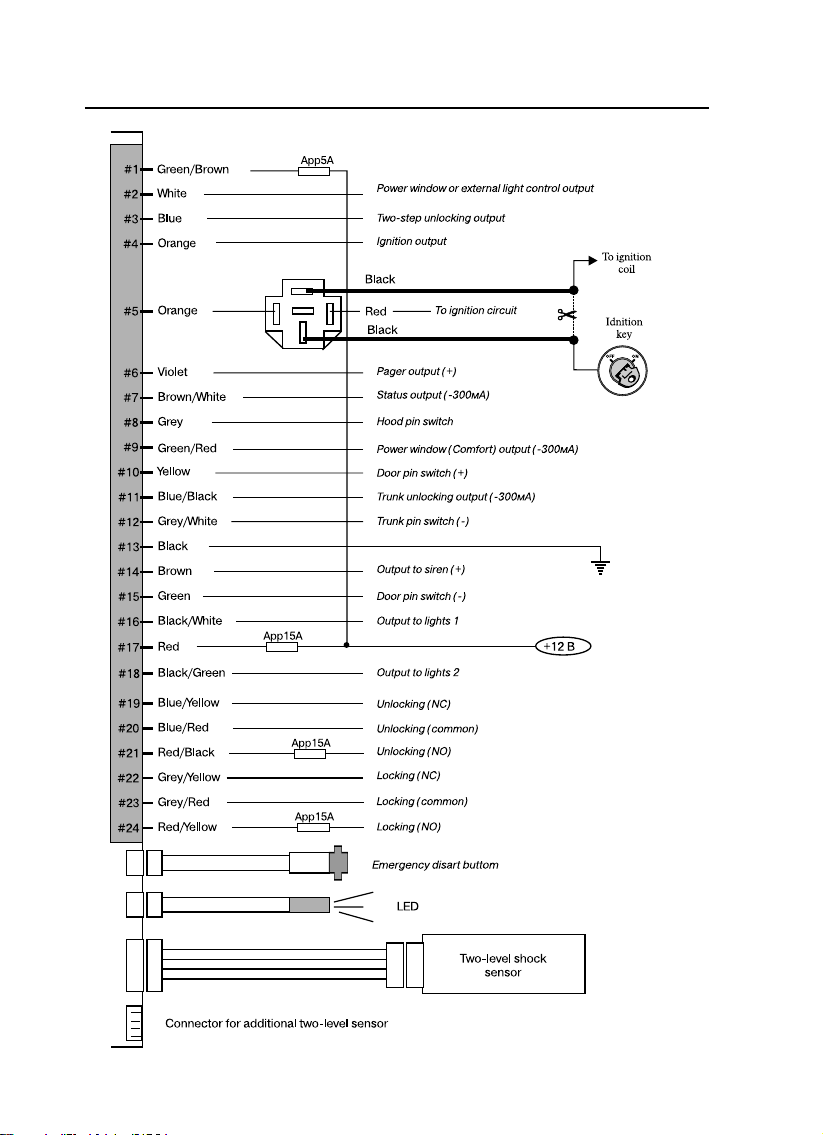
WIRING DIAGRAM
14
Page 15
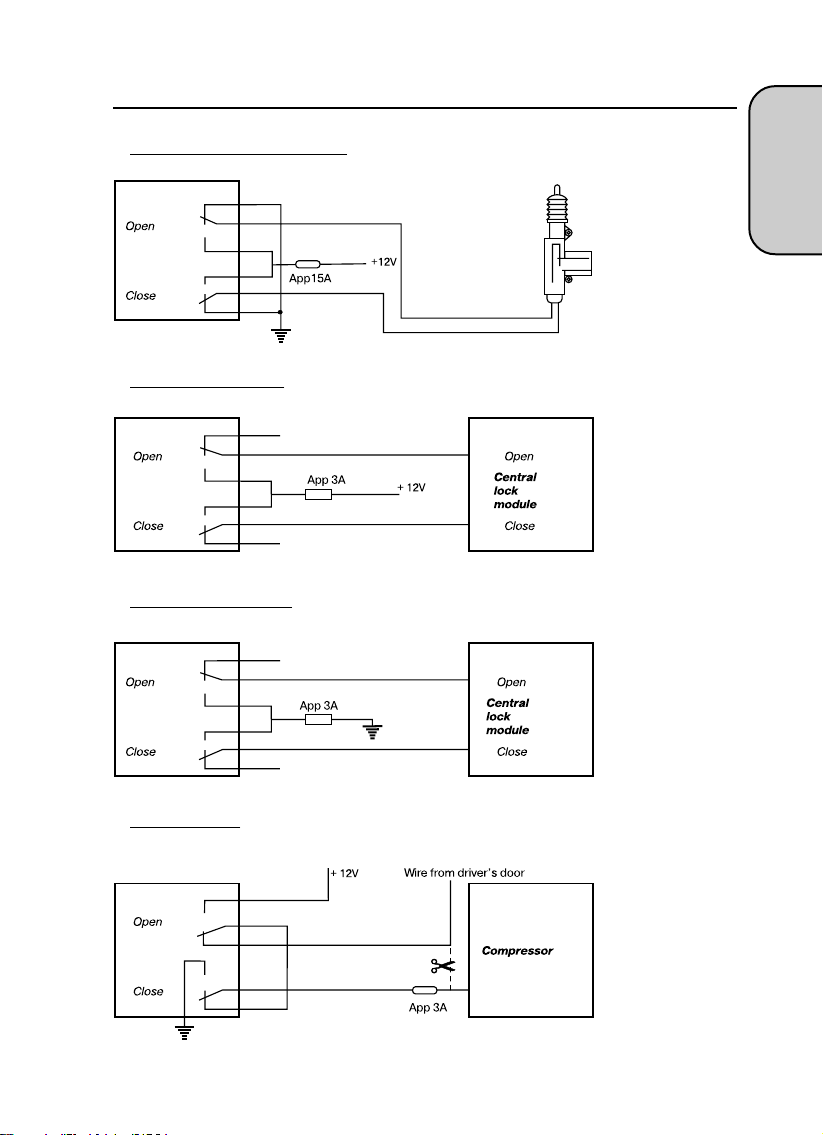
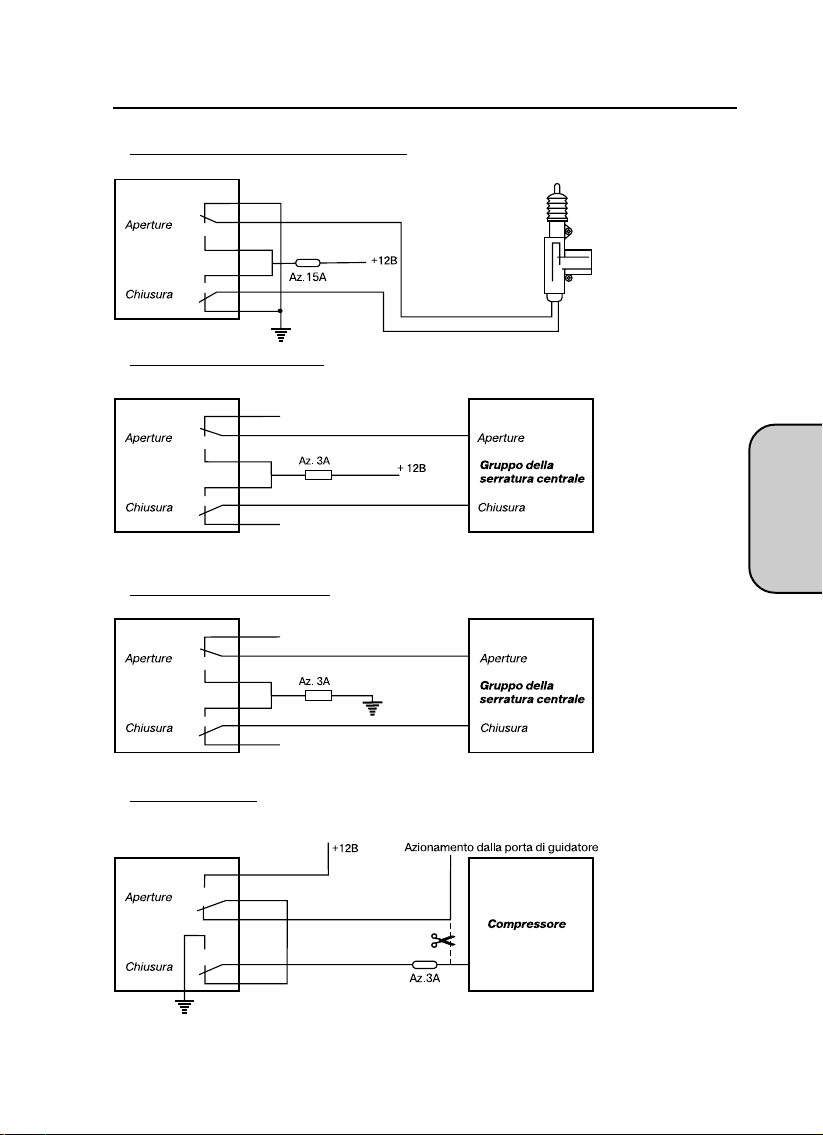
CONNECTION TO CENTRAL LOCK.
Additional electric actuator
Positive CL control.
Negative CL control.
English
Pneumatic CL
(Audi, Mercedes)
15
Page 16

16
Page 17
MONGOOSE AMG 850C
Introduzione
L’antifurto AMG 850С e’ progettato per proteggere gli sportelli dell’automobile, la
capotta e il bagagliaio, lo spazio dentro il salotto e attorno la Vs vettura.
Per evitare l’accesso non sanzionato nel sistema e’ prevista la protezione del codice
dei comandi radio, basata sulla tecnologia KeeLoqTM; la protezione neutralizza i tentativi
di intrecciare il codice con un code grabber, dispone della funzione antiscan, che non
permette di disattivare l’allarme con una serie di codici randomizzati, e della funzione
della memoria degli status, che non permette di disattivare l’allarme semplicemente
rimuovendo e rimettendo il morsetto della batteria: in questo caso l’allarme scatta e il
motore rimane bloccato.
Con l’antifurto non attivo, si puo’ staccare e riattacare la batteria senza far scattare
l’allarme " per evitare problemi, per esempio, durante la manutenzione.
Se la batteria verra’ staccata nel modo Valet, il suo riattacco riportera’ il sistema allo
stesso status.
Per escludere la possibilita’ di lasciare le chiavi dentro la vettura, rimettendo
l’alimentazione elettrica lo status delle serrature rimane invariato.
Per evitare i falsi allarmi, e’ prevista la funzione del bypass della zona difettosa.
Questa funzione stacchera’ il sensore difettoso, se quello provochi l’allarme 8 volte.
Rimangono attive tutte le altre zone controllate e tutti i blocchi.
La funzione programmabile del ritardo della luce nel salotto permette di utilizzare
l’AMG 850С per qualsiasi tipo di automobile.
Per migliorare le caratteristiche protettive e la comodita’ di utilizzo dell’automobile,
l’AMG 850С dispone dei canali supplementari:
" per attacare il pager;
" per gestire la serratura elettrica del bagagliaio;
" per la chiusura automatica dei vetri all’attivazione del sistema;
" per gestire i vetri elettrici e le luci esterni con il portachiavi.
Italiano
Il kit AMG 850С comprende:
Il comando centrale con tutti i fissaggi indispensabili.
Il sensore del colpo, a due livelli, che attacca il trillo di avvertenza o l’allarme definitivo
" a seconda della forza del colpo sull’automobile.
Due portachiavi di comando remoto.
Il LED di indicazione dei modi, da installare nell’automobile.
Il tasto di disattivazione in emergenza; Lei dovra’ scegliere la posizione di questo
tasto insieme al’installatore, prendendo in considerazione, che il posto deve essere
abbastanza nascosto, ma allo stesso tempo, comodo.
Il manuale completo di gestione dell’AMG 850С, con la descrizione di tutti i modi,
nonche’ una carta di memoria, da portare sempre dietro, con una breve descrizione
della gestione del sistema.
Se Lei vuole migliorare le capacita’ protettive del Suo antifurto, Le consigliamo di
acquistare un sensore volumetrico opzionale, a due livelli; questo sensore potra’
registrare qualsiasi movimento, sia dentro la macchina, sia nelle vicinanze. Il Suo AMG
850С ha un’entrata speciale per allacciare questo sensore.
17
Page 18

Portachiavi del comando remoto
E’ una microtrasmettente alimentata da una batteria 12 V (tipo 23A), che Le servira’
circa 1 anno. La batteria va cambiata, quando si nota la diminuzione seria della distanza
d’azione. Sul portachiavi si trovano tre tasti di comando e un LED di indicazione.
Premendo uno dei tasti, la trasmettente forma e manda uno dei comandi codificati, il
quale comando cambia con ogni impulso successivo, il che preventa l’intercezione del
codice da un code grabber.
Tabella dei comandi
Funzione Tasto 1 Tasto 2 Tasto 3 Note
Attivare/disattivare la protezione Accensione staccata
Serrare gli sportelli Accensione attaccata
Attivare la protezione con dei sensori inattivi Accensione staccata
Attivare/disattivare la protezione in modo 2 1 Accensione staccata
silenzioso
Attivare la protezione con dei sensori inattivi, 2 1 Accensione staccata
in modo silenzioso
Aprire gli sportelli Accensione attaccata
Panico 3 sec. Accensione staccata
Aprire il bagagliaio 3 sec. Accensione staccata
Chiudere i vetri, gestione delle luci esterne 3 sec. Accensione staccata
Uscire per gestire i vetri e le luci esterne 3 sec. 3 sec.
Modo VALET 3 sec. 3 sec. Protezione staccata
Disserratura a due passi Accensione staccata
Anti Hi#jack 3 sec. Accensione attaccata
Attivare/disattivare la protezione della Accensione staccata
seconda macchina
premere il tasto ad impulso
premere ad impulsi, due volte, entro 3 sec.
3 sec. Premere il tasto e tenerlo premuto non meno di 3 sec.
3 sec. Premere il tasto e tenerlo premuto 3 secondi per attivare il canale, poi tenere
premuto ancora durante il tempo indispensabile per il funzionamento del canale, ma
non oltre 30 secondi.
1, 2 ordine dei tasti da schiacciare.
Informazioni utili
PIN
Per aumentare la segretezza della gestione l’AMG 850С prevede la possibilita’ di
utilizzare un PIN, che permette di disattivare l’allarme in emergenza, di entrare nella
programmazione degli eventuali portachiavi aggiuntivi e funzioni d’utente, di staccare la
funzione Anti Hi"jack (contro la prepotenza).
18
Page 19

Il PIN si compone di 2 cifre e puo’ essere tra 11 e 99. Alla fabbrica viene installato il
PIN «11», pero’ Le consigliamo di inserire un altro numero del PIN (veda il capitolo
«Programmazione»). Cosi’ Lei potra’ proteggere il Suo sistema contro un eventuale
accesso degli estranei.
Per introdurre il PIN si utilizza il tasto di emergenza e la chiave dell’accensione.
Disattivazione dell’allarme in emergenza
Se il portachiavi non e’ con Lei, oppure non funziona, per disattivare l’allarme e’
necessario fare il seguente: aprire lo sportello con la chiave " si attiva il modo d’allarme,
salire in macchina e attaccare l’accensione. Con l’accensione attiva, premere il tasto
d’emergenza il numero di volte pari alla prima cifra del PIN, poi staccare l’accensione,
riattaccarla e premere il tasto d’emergenza il numero di volte pari alla seconda cifra del
PIN. Staccare l’accensione " il sistema e’ disattivato.
Indicazioni dei LED
Protezione attivata Lampeggia lentamente
Protezione disattivata Spento
Attivazione automatica Lampeggia rapidamente
Modo Valet E’ illuminato sempre
REGOLE DELL’UTILIZZO
Gestione dei modi principali di protezione
Attivazione dell’antifurto
Per attivare il sistema, con l’accensione spenta prema il tasto 1 del portachiavi; se
tutti gli sportelli, la cappotta e il bagagliaio sono chiusi, la sirena dara’ un segnale acustico,
e i fari si accenderanno una volta ad impulso. Il LED del sistema comincera’ a lampeggiare
lentamente, le serrature verranno chiuse (se la macchina e’ dotata del sistema del
bloccaggio serrature). Se una delle porte, la capotta o il bagagliaio saranno aperti,
arriveranno tre segnali acustici e i fari si accenderanno tre volte ad impulsi.
Protezione
Nel modo della protezione, il sistema controlla tutti i finecorsa delle porte, capotta,
bagagliaio, accensione e il sensore del colpo, nonche’ il sensore volumetrico e/o altri
dispositivi opzionali. Oltre a cio’, nel modo della protezione l’avviamento del motore e’
bloccato. Se una delle zone della protezione risulta trasgredita, si avvia un allarme di 30
secondi.
Allarme
Nel modo di allarme, arriva la sirena, e lampeggiano i fari entro 30 secondi, se l’allarme
non sia staccato prima con il tasto 1 del portachiavi.
Se verra’ attivato il livello d’avvertenza del sensore del colpo, oppure la zona esterna
del sensore opzionale, la sirena mandera’ un trillo d’avvertenza.
Italiano
19
Page 20

Disattivazione dell’antifurto
Per disattivare l’antifurto e’ necessario premere il tasto 1 del portachiavi, la sirena
mandera’ 2 segnali acustici, e i fari si accenderanno 2 volte, ad impulsi. Il LED si
spegnera’, le serrature degli sportelli si apriranno (se l’automobile e’ dotata delle serrature
automatiche). Se, durante il modo di protezione, e’ stato attivato l’allarme, la sirena
mandera’ quattro segnali, e i fari daranno quattro impulsi.
Se, durante l’installazione, ha scelto un sistema di apertura a due passi, premendo il
tasto la prima volta, si apre soltanto lo sportello dell’autista; per aprire gli altri sportelli,
prema il tasto 1 ancora una volta, tenendola premuta 3 secondi.
Panico
Se, con l’accensione spenta, viene premuto e tenuto 3 secondi il tasto 1, si attivera’ la
sirena e i fari. Premendo il tasto 1 ancora una volta stacca l’allarme. L’attivazione e la
disattivazione del Panico non cambia lo status del sistema: rimane nel modo di protezione
se prima si trovava in questo modo (con le serrature chiuse); se la protezione non era
attiva, non diventa attiva neanche dopo il Panico (gli sportelli rimangono aperti).
Messa in protezione nel modo silenzioso
Se e’ necessario attivare la protezione senza la conferma acustica (per non disturbare
le persone con la sirena), prema il tasto 3 del portachiavi, e subito dopo il tasto 1: i fari
daranno 1 colpo, come sempre, ma la sirena rimane muta. Il LED comincera’ a
lampeggiare lentamente, le serrature si chiuderanno (se l’automobile e dotata delle
serrature automatiche). Nel modo silenzioso, comunque rimane l’avvertenza della
chiusura degli sportelli, capotta o bagagliaio, e quindi Lei non rischia di lasciare la
macchina aperta.
Disattivazione della protezione nel modo silenzioso
Per disattivare la protezione senza la conferma acustica, prema i tasti 3 e 1 alla stessa
maniera. I fari daranno due colpi, ma la sirena non suonera. Il LED verra’ spento, le
serrature si apriranno (se l’automobile e dotata delle serrature automatiche). Pero’ se
nel modo della protezione era stato attivato l’allarme, il sistema Glielo comunichera’
con i soliti segnali acustici.
Messa in protezione con dei sensori staccati
Se e’ necessario disattivare i sensori dentro al salotto, come ad esempio, quando si
lasciano nella macchina passeggieri o animali, prema due volte il tasto 1. Il sistema
confermera’ la disattivazione dei sensori con un segnale in piu’, sia acustico, che
luminoso.
Messa in protezione con dei sensori staccati nel modo silenzioso
Si possono staccare i sensori del salotto anche nel modo silenzioso. Per questo
bisogna premere il tasto 3, e dopo due volte il tasto 2. In questo caso la conferma della
disattivazione dei sensori avverra’ soltanto tramite un segnale luminoso.
20
Page 21

Utilizzo delle funzioni supplementari di protezione
Rimessa automatica in protezione (per evitare l’errore della
disattivazione spontanea)
Se entro 30 secondi dalla disattivazione non viene aperto nessuno sportello, ne’ la
capotta o il bagagliaio, e non viene avviata l’accensione, il sistema si rimettera’
automaticamente nel modo di protezione e chiudera’ le serrature. La chiusura delle
serrature nella rimessa puo’ essere disattivata nella programmazione.
Disattivazione «a due passi»
Se si attiva l’allarme, premendo qualsiasi tasto una volta si stacca solamente la sirena
e i fari (se la causa dell’allarme e’ stata eliminata: chiuso lo sportello, o il sensore non
sente piu’ colpi). Se invece, la causa dell’allarme permane, per disattivarlo bisogna
premere il tasto la seconda volta. Per disattivare completamente la protezione, dopo
aver spento l’allarme, prema il tasto ancora una volta.
Messa in guardia automatica
La funzione puo’ essere disattivata via programmazione, o durante l’installazione.
Se questa funzione e attiva: quando e’ spenta l’accensione, la porta si apre e si
richiude, il LED comincia a lampeggiare rapidamente. Se, entro 30 secondi tutti gli
sportelli, la capotta e il bagagliaio rimangono chiusi, il sistema si mettera’ in guardia. Nel
modo automatico, le serrature non vengono chiuse.
Con la messa in guardia automatica viene attivato anche l’allarme dilazionato
dell’apertura degli sportelli. Questo ci permette di salire sulla macchina e staccare la
protezione, introducendo il PIN. L’allarme, in questo caso viene dilazionato di 10 secondi.
E’ possibile dilazionare l’allarme di 20 secondi via programmazione.
Chiusura automatica degli sportelli all’accensione
10 secondi dopo l’accensione, gli sportelli vengono serrati automaticamente. Allo
spegnimento dell’accensione, le serrature si aprono immediatamente. Se, durante i 10
secondi, uno degli sportelli risulta aperto, la chiusura automatica non avviene, per evitare
la chiusura della chiave dentro la macchina. La funzione puo’ essere disattivata via
programmazione.
Italiano
Gestione remota della serratura centrale
Con l’accensione inserita, le serrature degli sportelli potranno essere aperte o chiuse
a qualsiasi momento, premendo, rispettivamente, il tasto 1 o 2 del portachiavi.
AntiHiJack. Protezione contro la prepotenza.
Con la programmazione, Lei potra’ attivare o disattivare questa funzione a qualsiasi
istante.
Se la funzione e’ attivata nel programma, verra’ riattivata ogni volta che qualceduno
sale in macchina e inserisce l’accensione, se qualcheduno apre uno sportello con
l’accensione inserita, nonche’ a distanza: tenendo premuto il tasto 3 del portachiavi per
3 secondi. Cosi’ se Lei e’ richiesto di lasciare la macchina e le chiavi, lo potra’ fare, e
l’Anti Hi"Jack si mettera’ in allarme e blocchera’ il motore.
21
Page 22

Un breve segnale acustico Le confermera’ l’attivazione dell’Anti Hi"Jack, fatta con il
portachiavi a distanza oppure in automatico, con l’inserzione dell’accensione. Il LED
lampeggera’ lentamente per 2 minuti, poi, per altri 30 secondi la sirena mandera’ dei
brevi segnali acustici, e finalmente il motore verra’ bloccato e i segnali acustici verranno
seguiti da quei luminosi. Alla scadenza di un altro minuto e 30 secondi si accende il
pieno allarme acustico. I cicli dell’allarme acustico da 30 secondi verranno ripetuti fino
alla disinserzione dell’accensione; il motore rimarra’ bloccato fino alla disattivazione
completa dell’Anti Hi"Jack.
Se, con l’accensione inserita, si apre uno sportello, il LED comincera’ a lampeggiare,
per 30 secondi (ma non piu’ per 2 minuti); poi seguira’ la sequenza di azioni descritta
sopra.
Dallo scatto dell’Anti Hi"Jack, e fino alla sua disattivazione completa, tutti i portachiavi
rimarranno bloccati, e il sistema non accettera’ nessun comando remoto.
Per disinserire l’Anti Hi"Jack entro la pausa di 2 minuti (o, nel secondo caso, di 30
secondi), introduca, con il tasto d’emergenza, la prima cifra del Suo PIN. Il LED si
spegnera’, il sistema tornera’ nel modo normale, il che verra’ confermato con un segnale
acustico e uno luminoso.
NOTA: se Lei inserira’ l’accensione durante la pausa di 2 minuti senza disattivare l’Anti
Hi"Jack, il sistema Glielo comunichera’ con i doppi segnali acustici.
Per disattivare l’Anti Hi"Jack dopo la pausa di 2 minuti (o 30 secondi), e’ necessario
fermare la macchina e introdurre con il tasto d’emergenza il PIN completo. Alla
introduzione del PIN completo per disattivare l’Anti Hi"Jack, Lei potra’ riattivarlo soltanto
a distanza " fino all’apertura successiva di uno sportello con l’accensione inserita.
Per proibire temporaneamente l’attivazione dell’Anti HiJack, Lei potra’ utilizzare il
modo Valet, pero’ per attivare il modo Valet, bisogna prima disattivare l’Anti HiJack.
Funzioni diagnostiche
Notifica di errore
Se, durante la messa in guardia, uno sportello, la capotta o il bagagliaio risultano
aperti, Lei sentira 3 segnali acustici e luminosi invece di uno.
Memoria di allarmi
Se, durante la guardia, funziona l’allarme, disattivando la guardia, il sistema manda 4
segnali acustici e luminosi entro 10 secondi dopo l’accensione. Il LED indica la causa
dell’allarme:
Quantita’ dei lampeggi nella serie Tipo del sensore
2 Sensore del salotto
3 Finecorsa sportello, «(« o «+»
4 Capotta / bagagliaio
5 Accensione
Considerazione del ritardo delle luci nel salotto
Se nella macchina e’ prevista la dilazione dello spegnimento della luce, e il modo di
considerazione e’ inserito via programma, i finecorsa degli sportelli verranno messi in
guardia soltanto dopo lo spegnimento della luce dentro. In questo modo non esiste la
notifica di sportelli non chiusi. Il modo viene attivato via programmazione.
22
Page 23

Modo Valet.
In questo modo tutte le funzioni protettive del sistema vengono escluse. Lei potra’ attivarlo,
per esempio, quando lascia la macchina dal meccanico: cosi’ non gli dovra’ consegnare anche
il portachiavi. E una garanzia assoluta contro la memorizzazione dei nuovi portachiavi nel Suo
sistema.
Per attivare questo modo, bisogna, al sistema disenserito, premere simultaneamente i tasti
1 e 2 del portachiavi: i fari daranno tre impulsi, il LED del sistema verra’ illuminato
permanentemente. Nel modo Valet permane la possibilita’ di gestione remota della serratura
centrale e dei canali supplementari. Premendo il tasto 1 e 2 del portachiavi, il sistema ritorna
nel modo normale, e ne notifica l’utente con 3 segnali acustici.
Lei potra’, comunque, disattivare la funzione introducendo il PIN.
Programmazione dei portachiavi
La fornitura standard dell’ AMG 850C comprende 2 portachiavi, pero’ il sistema e’ capace
a memorizzare fino a 4 portachiavi; quindi, se Lei ha bisogno di aumentarne la quantita, potra’
programmare i portachiavi aggiuntivi, facendo i passi seguenti:
1. Inserire l’accensione
2. Introdurre la prima cifra del PIN, premendo il tasto d’emergenza la quantita’ di volte
dovuta
3. Disinserire e riinserire l’accensione
4. Introdurre la seconda cifra del PIN, premendo il tasto d’emergenza la quantita’ di volte
dovuta
5. Disinserire e riinserire l’accensione. Se il PIN e’ stato introdotto correttamente, il sistema
manda due segnali acustici per confermare l’entrata nel modo di programmazione
portachiavi.
6. Premere il tasto 1 sul portachiavi. Viene mandato un segnale acustico, confermando la
memorizzazione del portachiavi.
7. Disinserire l’accensione, premere il tasto d’emergenza e tenerlo premuto per 15 secondi:
il sistema manda due segnali acustici, confermando l’uscita del modo di programmazione
portachiavi.
ATTENZIONE! Se Lei ha inserito, via programmazione, il modo Anti Hijack, per la
programmazione dei portachiavi nuovi dopo l’inserzione dell’accensione (p.1) bisogna
prima introdurre il PIN per staccare l’Anti Hijack, e poi, ricevendo il segnale acustico
e quello luminoso della disattivazione dell’Anti Hijack,
passare al punto 2 della programmazione (introdurre il PIN ancora una volta).
senza disinserire l’accensione,
Italiano
Programmazione delle funzioni
Per cambiare il PIN, cancellare dalla memoria i portachiavi che non servono, cambiare i
valori delle funzioni proggrammabili, e’ indispensabile, dinnanzitutto, procedere per
programmare i portachiavi, come descritto sopra,
nel sistema. Dopo vanno fatte le azioni seguenti:
1. Concludere la programmazione portachiavi e inserire l’accensione.
2. Inserire il numero del gruppo dei selettori programmabili, per questo: premere il tasto
d’emergenza il numero di volte, corrispondente al numero del gruppo (la prima cifra).
Ogni pressione del tasto verra’ confermata con il segnale acustico.
3. Disinserire e riinserire l’accensione.
4. Introdurre, con il tasto d’emergenza, il numero del selettore dentro il gruppo (la seconda
cifra), premendo il tasto il numero di volte dovuto. Ogni pressione del tasto verra’
confermata con il segnale acustico.
5. Lo stato corrente della funzione verra’ indicato dal LED, il quale e’ illuminato se la funzione
e attiva, ed e’ spento, se e inattiva.
6. Per inserire la funzione, prema il tasto 1, per disinserirla, il tasto 2.
7. Per uscire dal modo di programmazione, disinserisca l’accensione, oppure aspetti alcuni
secondi il doppio squillo della sirena. Per continuare la programmazione, riinserisca
l’accensione prima del segnale e continui dal punto 2.
utilizzando il portachiave, gia memorizzato
23
Page 24

Funzione del selettore Impostazione Il LED e’ Il LED e’
di fornitura acceso spento
1#1 Messa in guardia automatica OFF ON OFF
1#2 Durata dell’allarme 30 сек. 30 sec. 60 sec.
1#3 Chiusura degli sportelli alla rimessa in guardia ON ON OFF.
1#4 Chiusura degli sportelli all’accensione ON ON OFF.
1#5 Segnali acustici di conferma dei comandi ON ON OFF.
1#6 Durata d’impulso della serratura centrale 0,6 с 0,6 s 3.5 s
2#1 Messa in guardia con il sollevamento dei vetri OFF ON OFF.
2#2 Durata d’impulso alla fine del sollevamento dei vetri 25 с 10 s 25 s
2#3 Dilazione dell’allarme dello sportello, con la ON ON OFF.
messa in guardia automatica
2#4 Dilazione dell’allarme dello sportello 10 с 10 s 20 s
2#5 Considerazione della dilazione della luce OFF ON OFF.
2#6 Anti Hi#Jack OFF ON OFF.
3#1 Cambio del PIN (11÷99) 1 Tasto 1 Tasto 1
Con l’introduzione di ogni cifra viene mandato un segnale acustico:
lungo per le decine, breve per le unita’.
aumenta diminuisce
la cifra la cifra
3#2 Cancellazione di tutti i portachiavi, eccetto quello # Premere i tasti 1&2 insieme
utilizzato
3#3 Ritorno alle impostazioni di fornitura # Premere i tasti 1&2 insieme
Eliminazione guasti
Guasto
Il sistema non risponde ai comandi remoti e alla
procedura della disattivazione d’emergenza.
Mancano segnali luminosi, mentre tutto il resto
funziona normalmente.
Non funzionano le serrature elettriche.
Il LED non si accende, il sistema non risponde ai
comandi remoti.
Se si manifestano altri guasti, si rivolga al centro di servizio, dove ha installato l’antifurto.
24
Metodo di eliminazione
1. Controllare se la batteria e’ carica.
2. Controllare il fusibile del circuito di
alimentazione del sistema; se necessario,
sostituirlo.
Controllare il fusibile dell’alimentazione dei fari;
se necessario, sostituirlo.
Controllare il fusibile dell’alimentazione delle
serrature; se necessario, sostituirlo.
Sostituire la batteria del portachiavi.
Page 25

Dotazione
Modulo elettronico del sistema Mongoose AMG"850 C " 1
Trefolo di fili principale con connettori " 1
Set per installazione" 1
Diodo emettitore di luce " 1
Pulsante di disinserimento di emergenza " 1
Panelli di controllo remoto " 1
Trasduttore di colpo " 1
Raccomandazioni generali
MODULO ELETTRONICO.
Il modulo elettronico si installa nell’abitacolo di autoveicolo lontano da sorgenti di
umidita e di calore. Il modulo va installato in tal modo che si possa esser tolto solo per
mezzo di un attrezzo speciale oppure per lo meno assieme con un panello decorativo. Il
modulo elettronico si fissa in un posto prescelto con i viti in dotazione.
SIRENA.
La sirena si installa nel vano motore a distanza non meno di 30cm dalle zone di colpo
potenziale, lontano da sorgenti di umidita e di calore. La sirena si fissa con due viti in
dotazione.
PULSANTE DI DISINSERIMENTO DI EMERGENZA.
Il pulsante di disinserimento di emergenza si fissa sul panello di strumenti in tal modo
che il guidatore, trovandosi nella sua poltrona, la possa accedere. Per installare la
pulsante di disinserimento di emergenza occorre a trapanare un foro passante con il
diametro di 7mm e fissare il pulsante per mezzo di un dado. Tirare i fili al modulo
elettronico ed allacciare al connettore secondo lo schema di installazione.
DIODO EMETTITORE DI LUCE.
Trapanare un foro con il diametro di 8mm nel panello di strumenti oppure nel panello
decorativo e fissare il diodo emettitore di luce in questo foro. Tirare un cavo al modulo
elettronico ed allacciare al connettore secondo lo schema di installazione.
TRASDUTTORE DI COLPO.
Il trasduttore di colpo si installa nell’abitacolo di autoveicolo sul metallo di carrozzeria,
il piu vicino possibile al asse longitudinale del autoveicolo. Fissare il trasduttore per mezzo
di viti autofilettanti oppure incollare per mezzo di un nastro adesivo a due.
Italiano
25
Page 26

Caratteristiche tecniche
Tensione di alimentazione 10...15 В
Corrente consumata nel regime di protezione 20 мА
Frequenza di canale radio 433,92 МГц
Diapason di temperature di lavoro "40...+850С
Corrente massima ammissibile
" di circuito blocco motore 300 мА
" di circuito fanali segnalazione 10 А
" di circuiti commando serratura centrale 15 А
" di circuiti canali addizionali 300 мА
Raggio di azione massima del ciondolo 30 м
Installazione
Prima di iniziare l’allacciamento, occorre scegliere il posto nell’autoveicolo per i
seguenti strumenti e connessioni:
sorgente di corrente continua;
sorgente di corrente ad accensione inserita;
punti di connessione fanali (impulso positivo);
interruttore di fine corsa porte;
interruttore di fine corsa portabagagli;
interruttore di fine corsa cofano (installare un addizionale interruttore di fine corsa se
e necessario);
comando dell’aviatore;
disconnettere «(« il morsetto della batteria.
Connettore principale a 24 contatti.
FILO NERO
Attaccare al corpo dell’autoveicolo.
FILO VERDE/BRUNO
Alimentazione del modulo elettronico. Attaccare alla sorgente di corrente continua da 12V
attraverso una protezione da 5А.
FILI NERO/BIANCO e NERO/VERDE
Uscite rele verso i fanali. Un filo si attacca al circuito fanali del bordo sinistro, l’altro " al circuito
fanali del bordo destro.
FILI VERDE e GIALLO
Questi fili si attaccano agli interruttori di fine corsa delle porte. Lo schema di allacciamento
dipende dal tipo degli interruttori di fine corsa delle porte " positivi oppure negativi.
Interruttori di fine corsa delle porte negativi:
attaccare il filo GIALLO alla terra, VERDE " al filo della porta tra gli interruttori di fine corsa delle
porte e la lampada di illuminazione abitacolo, sul quale all’apertura delle porte appare la terra.
Verificare che il filo prescelto sia allacciato a tutte le porte dell’autoveicolo.
Interruttori di fine corsa delle porte positivi:
attaccare il filo VERDE al morsetto (+) della sorgente di alimentazione da 12V, GIALLO " al filo
della porta tra gli interruttori di fine corsa delle porte e la lampada di illuminazione abitacolo, sul
quale all’apertura delle porte appare 12V. Verificare che il filo prescelto sia allacciato a tutte le
porte dell’autoveicolo.
26
Page 27

ATTENZIONE: E’ vietato categoricamente l’uso simultaneo dei fili giallo e verde nella capacita
delle entrate trigger del sistema. Cioe, si esclude l’allacciamento simultaneo agli interruttori di
fine corsa delle porte «positivi» e «negativi».
FILO VIOLETTO
Uscita «+0.3А» per allacciamento di un pager oppure di un rele avvisatore acustico elettrico.
FILO BLU/NERO
Uscita «"0.3А» del dispositivo di apertura vano portabagagli. Se si preme il pulsante 2 durante 3
secondi all’accensione disinserita qui appare un impulso negativo che dura 0,5s.
FILO BRUNO
Tirare il filo attraverso il boccola di gomma nella paratia del vano motore ed attaccarlo al filo
rosso della sirena. Attaccare il filo nero al corpo.
FILO ROSSO
Entrata di alimentazione fanali e di scelta polarita di commando fanali. Di solito si allaccia a
+12V attraverso una protezione da 15А.
ARANCIO (Allacciato al rele),
FILI BRUNO/BIANCO
Uscite «"0.3А» per allacciamento al rele blocco motore.
FILO ARANCIO
Attaccare alla sorgente di alimentazione dell’accensione.
Attenzione: questa sorgente di alimentazione non si deve disinserire all’avviamento del motore.
FILO GRIGIO/BIANCO
Attaccare il filo a qualsiasi circuito nel quale appare la terra all’apertura del vano portabagagli.
Se un tale circuito non esiste, occorre installare un addizionale interruttore finecorsa nel quale
all’apertura del vano portabagagli apparira la terra.
FILO GRIGIO
Attaccare il filo a qualsiasi circuito nel quale appare la terra all’apertura del cofano. Se un tale
circuito non esiste, occorre installare un addizionale interruttore finecorsa nel quale all’apertura
del cofano apparira la terra.
FILO VERDE/ROSSO
Uscita «"0,3А» per comando di chiusura finestre/portello, del sistema comfort, dei fanali. Se si
preme il pulsante 3 durante 3 secondi all’accensione disinserita ed alla protezione inserita a questa
uscita appare un segnale che dura 10 oppure 25s. (Vedi i commutatori delle funzioni del programma
2.2).
E“ possibile anche l”inserimento automatico di questo canale ad ogni messa del sistema al
regime di protezione (Vedi i commutatori delle funzioni del programma).
FILO BIANCO
Uscita «"0,3А» per comando di dispositivi ausiliari. Se si preme simultaneamente i pulsanti 2 e
3 del panello di controllo in questo filo appare un segnale che resta presente fino al momento di
rilascio dei pulsanti, ma non piu` di 30s.
FILO BLU
Uscita «"0.3А» per controllo di sblocco porte a due passi. In questo filo il segnale appare dopo
che il pulsante 2 del panello di controllo si preme due volte.
Italiano
Fili per i dispositivi blocco porte.
Il sistema Mongoose AMG"850 C si fornisce con un sistema blocco porte universale, avente
sei fili. Vedi i diagrammi acclusi sui quali si mostrano i schemi di connessioni per il comando
negativo, per il comando positivo, per l’installazione di azionamenti nuovi ed azionamento
pneumatico.
FILO GRIGIO/ROSSO "rele di blocco " contatto comune
FILO ROSSO/GIALLO" rele di blocco " contatto aperto
FILO GRIGIO/GIALLO" rele di blocco " contatto chiuso
FILO BLU/GIALLO " rele di sblocco " contatto chiuso
FILO ROSSO/NERO " rele di sblocco " contatto aperto
FILO BLU/ROSSO " rele di sblocco " contatto comune
27
Page 28

SCHEMA DI ALLACCIAMENTI
28
Page 29
ALLACCIAMENTO ALLA SERRATURA CENTRALE.
Azionamento elettrico addizionale.
Comando positivo di SC.
Comando negativo di SC.
Italiano
SC pneumatico.
(Audi, Mercedes)
29
Page 30

30
Page 31

MONGOOSE AMG 850C
Введение
Сигнализация AMG 850С сконструирована для охраны дверей автомобиля, его
капота и багажника, внутрисалонного пространства и пространства в непосред"
ственной близости от Вашего автомобиля.
Для предотвращения несанкционированного доступа в систему предусмотре"
на защита кода радиокоманд на базе технологии кодирования KeeLoq
пешно противостоящая попыткам перехвата кодов с помощью код"граббера,
встроенная функция антисканирования, запрещающая отключение сигнализа"
ции простым подбором случайных кодов и функция памяти состояний, не по"
зволяющая обезвредить стоящую на охране сигнализацию просто сняв и надев
клемму автомобильного аккумулятора, так как в этом случае включится тревога и
сохранится блокировка двигателя.
Прерывание и восстановление питания при отключенной охране не вызовет
срабатывания сигнализации, чтобы не создавать трудностей, например, при ре"
монте.
Если питание было отключено, когда сигнализация находилась в режиме Valet,
то последующая его подача вернет сигнализацию в это же состояние.
Во избежание запирания ключей внутри автомобиля, при восстановлении пи"
тания от автомобильного аккумулятора не происходит изменения состояния двер"
ных замков.
Избежать ложных тревог позволит функция обхода неисправной зоны, кото"
рая отключит неисправный датчик до конца цикла охраны, если он вызвал включе"
ние тревоги 8 раз.
Все остальные контролируемые зоны и блокировки останутся включенными.
Программируемая функция учета задержки салонного света дает возмож"
ность использовать AMG 850С на любых типах автомобилей.
Для повышения охранных свойств системы и удобства пользования автомоби"
лем AMG 850С оснащена дополнительными каналами:
" для подключения пейджера,
" для управления электрическим замком багажника,
" для автоматического закрывания стекол при постановке на охрану,
" для управления электрическими стеклоподъемниками или наружным освеще"
нием с брелока.
В комплект Mongoose AMG 850С входят:
TM
, ус"
Русский
Центральный блок управления с полным комплектом для установки.
Двухуровневый датчик удара, включающий либо предупредительную трель,
либо полную тревогу сигнализации в зависимости от силы удара по кузову
автомобиля.
Два брелока дистанционного управления.
Светодиод для индикации режимов работы сигнализации, предназначенный
для установки в автомобиле.
31
Page 32

Кнопка аварийного отключения, место установки которой в автомобиле Вам
следует выбрать совместно с Вашим установщиком, с таким расчетом, чтобы
обеспечить достаточную скрытность ее расположения, с одной стороны, и
удобство пользования, с другой.
Полную инструкцию по управлению всеми режимами AMG 850С.
Если Вы хотите повысить охранные свойства Вашей сигнализации, мы со"
ветуем Вам приобрести дополнительно двухуровневый датчик объема, способ"
ный регистрировать любое движение как внутри автомобиля, так и в непосред"
ственной близости от него. Ваш AMG 850С имеет специальный вход для
подключения такого датчика.
Брелок дистанционного управления сигнализацией.
Представляет собой миниатюрный радио передатчик, питающийся от 12 воль"
товой батарейки (тип 23 А), которой хватает примерно на 1 год эксплуатации. Су"
щественное снижение дальности приема системой команд передатчика говорит
о необходимости замены батарейки. На брелоке расположены три кнопки управ"
ления и индикаторный светодиод. При нажатии на любую из кнопок передатчик
формирует и передает специальную кодированную команду, которая меняется при
каждом новом нажатии на кнопки, предотвращая таким образом возможность
перехвата кода Вашей сигнализации код"граббером.
Таблица команд.
Функция Кнопка 1 Кнопка 2 Кнопка 3 Примечание
Постановка/снятие с охраны Зажигание ВЫКЛ.
Запирание дверей Зажигание ВКЛ.
Постановка на охрану с Зажигание ВЫКЛ.
отключенными датчиками
Тихая постановка/снятие с 2 1 Зажигание ВЫКЛ.
охраны
Тихая постановка на охрану с 2 1 Зажигание ВЫКЛ.
отключенными датчиками
Отпирание дверей Зажигание ВКЛ.
Паника 3 сек. Зажигание ВЫКЛ.
Отпирание багажника 3 сек. Зажигание ВЫКЛ.
Закрывание окон/включение 3 сек. Зажигание ВЫКЛ.
наружного освещения
Универсальный выход для
управления стеклоподъемниками
или наружным освещением
VALET#режим 3 сек. 3 сек. Охрана отключена
Двушаговое отпирание Зажигание ВЫКЛ.
Анти Хайджек 3 сек. Зажигание ВКЛ.
Постановка снятие с охраны Зажигание ВЫКЛ.
второго автомобиля
3 сек. 3 сек.
32
Page 33

кратковременно нажать на кнопку
кратковременно нажать два раза в интервале не более 3 секунд
3 сек. нажать и удерживать кнопку в нажатом состоянии не менее 3 секунд
3 сек. нажать и удерживать кнопки 3 секунды для запуска канала, продолжать
удерживать в течение времени, необходимого для работы канала, но не более 30
секунд.
1, 2 порядок нажатия кнопок
Необходимая информация
PINкод.
Для повышения секретности управления сигнализацией в AMG 850С предус"
мотрена возможность использования персонального кода (PIN"кода) для аварий"
ного отключения сигнализации, входа в режим программирования дополнитель"
ных брелоков и пользовательских функций, отключения противоразбойной
функции Anti Hi"jack.
PIN"код состоит из двух цифр и может иметь значение от 11 до 99. При изготов"
лении системы в нее записывается код, равный 11, однако, мы рекомендуем пос"
ле установки системы установить другое значение PIN кода (как это сделать, про"
чтите в разделе «Программирование»). Это позволит Вам обезопасить свою
охранную систему от несанкционированного снятия с охраны.
Для ввода PIN кода используется кнопка аварийного отключения и ключ зажи"
гания
Аварийное отключение сигнализации.
В случае если брелок сигнализации отсутствует или неисправен, для снятия
системы с охраны необходимо: открыть дверь ключом, при этом включится ре"
жим тревоги, сесть в автомобиль и включить зажигание. При включенном зажига"
нии нажать кнопку аварийного отключения число раз равное первой цифре за"
данного Вами PIN кода, затем выключить и снова включить зажигание, нажать
кнопку аварийного отключения число раз равное второй цифре Вашего PIN"кода.
Выключить зажигание " система снимется с охраны.
Светодиодная индикация состояний.
Русский
Охрана включена медленно мигает
Охрана отключена не горит
Автопостановка быстро мигает
Valet"режим горит постоянно
33
Page 34

ПРАВИЛА ПОЛЬЗОВАНИЯ
Управление основными режимами охраны
Постановка на охрану.
Чтобы поставит сигнализацию на охрану надо при выключенном зажигании на"
жать кнопку 1 брелока, если все двери, капот и багажник закрыты, сирена подаст
один звуковой сигнал и фонари мигнут один раз. Светодиод системы начнет мед"
ленно мигать, дверные замки закроются (если автомобиль оборудован привода"
ми блокировки замков). Если какая"либо из дверей, капот или багажник окажутся
незакрытыми последуют три звуковых сигнала и фонари мигнут три раза.
Охрана.
В режиме охраны сигнализация контролирует состояние всех имеющихся кон"
цевых выключателей дверей, капота, багажника, включение зажигания, и состоя"
ние датчика удара, а так же, если дополнительно установлены, датчика объема и
др.. Кроме того, в режиме охраны блокируется запуск двигателя. При нарушении
какой"либо из зон охраны, включается 30 секундный режим тревоги.
Тревога.
Если режим тревоги включился, то сирена будет звучать, а сигнальные фонари
мигать в течение 30 секунд или до отключения их кнопкой 1 брелока.
При срабатывании предупредительной зоны датчика удара или внешней зоны
дополнительного датчика, прозвучит предупредительная трель сирены.
Снятие с охраны.
Для снятия сигнализации с охраны надо нажать кнопку 1 брелока, сирена по"
даст 2 звуковых сигнала, и дважды мигнут сигнальные фонари. Светодиод погас"
нет, дверные замки откроются (если автомобиль оборудован приводами блоки"
ровки замков). Если в период охраны включался режим тревоги, то при снятии с
охраны последуют четыре звуковых сигнала и фонари мигнут четыре раза.
Если при установке Вами выбрана двушаговая схема отпирания дверей, то при
первом нажатии на кнопку откроется только дверь водителя, для отпирания ос
тальных дверей, повторно нажмите кнопку 1 в течение 3 секунд.
Паника.
Если при выключенном зажигании нажать и удерживать в течение 3 сек. кнопку
1 включится сирена и сигнальные фонари. Повторное нажатие на кнопку 1 отклю"
чает режим. Включение и последующее выключение Паники не изменяет состоя"
ния системы, то есть она останется в охране, если находилась в этом режиме две"
ри, при этом, останутся запертыми, если же режим охраны был отключен и замки
дверей открыты, постановки на охрану и запирания дверей не произойдет.
Тихая постановка на охрану.
Когда необходимо поставить сигнализацию на охрану без звукового подтверж"
дения, чтобы не беспокоить окружающих звуками сирены, нажмите кнопку 3 бре"
лока непосредственно перед нажатием кнопки 1, фонари как обычно мигнут один
раз, но сирена будет молчать. Светодиод системы начнет медленно мигать, двер"
34
Page 35

ные замки закроются (если автомобиль оборудован приводами блокировки зам"
ков). При тихой постановке на охрану звуковое предупреждение о незакрытых две"
рях, капоте и багажнике сохраняется, поэтому нет опасности, что Вы оставите свой
автомобиль незапертым.
Тихое снятие с охраны.
Чтобы снять сигнализацию с охраны без звукового подтверждения нажмите
кнопки 3 и 1 в той же последовательности, дважды мигнут сигнальные фонари, но
сирена будет молчать. Светодиод погаснет, дверные замки откроются (если авто"
мобиль оборудован приводами блокировки замков). Однако если в период охра"
ны включалась тревога, то и при тихом снятии система сообщит Вам об этом обыч"
ными звуковыми сигналами.
Постановка на охрану с отключенными датчиками.
Если при постановке на охрану возникает необходимость отключить салонные
датчики, например в том случае, когда в салоне автомобиля требуется оставить
пассажиров или животных, надо дважды нажать кнопку 1. Система подтвердит
отключение датчиков дополнительным звуковым и световым сигналом.
Тихая постановка на охрану с отключенными датчиками.
Вы можете отключить салонные датчики и при тихой постановке на охрану, для
этого нужно нажать кнопку 3, а затем дважды кнопку 2. Отключение датчиков, в
этом случае, будет подтверждено только дополнительным световым сигналом.
Использование дополнительных охранных функций
Автоматическая перепостановка на охрану (защита от случайного
нажатия).
Если в течение 30 сек. после снятия с охраны не открывалась ни одна из две"
рей, капот или багажник, а также не включалось зажигание, система автомати"
чески вернется в режим охраны и запрет двери автомобиля. Запирание дверей
при перепостановке может быть программно отключено.
Русский
Двушаговое снятие с охраны.
Если включилась тревога, то нажав любую кнопку один раз Вы только выключи"
те сирену и сигнальные фонари (в случае, если причина тревоги устранена, т.е.,
например, закрыта открытая дверь или датчик удара перестал срабатывать). Если
же причина, вызвавшая тревогу, сохраняется, для ее отключения требуется по"
вторное нажатие на кнопку. Для полного отключения охраны нажмите на кнопку
еще раз, после того как выключите тревогу.
Автопостановка.
Функция может быть программно включена или выключена при установке.
Если функция включена, то после выключения зажигания, открывания и закры"
вания двери светодиод начнет быстро мигать. Если в течение 30 секунд после этого
все двери, а также капот и багажник останутся закрытыми, сигнализация встанет
на охрану. Замки дверей при автопостановке не запираются.
35
Page 36

В случае использования функции автопостановки включается режим задержки
тревоги при открывании двери в режиме охраны, позволяющий сесть в автомо"
биль и отключить охрану введя PIN"код, тревога, при этом не будет включаться в
течение 10 секунд. Программно можно установить длительность задержки рав
ной 20 секундам или отключить задержку.
Автоматическое запирание дверей при включении зажигания..
Через 10 сек. после включения зажигания автоматически запираются электри"
ческие замки дверей, при выключении зажигания замки немедленно отпираются.
Если в течение этих 10 сек. какая"либо из дверей окажется открытой, то автома"
тического запирания не произойдет во избежание запирания ключей внутри ав"
томобиля. Функция может быть программно отключена.
Дистанционное управление центральным замком.
При включенном зажигании замки дверей автомобиля могут быть в любой мо"
мент заперты или открыты нажатием на брелоке кнопок 1 или 2 соответственно.
AntiHiJack. Защита от разбойного нападения.
Вы можете в любой момент включить или выключить эту функцию с помощью про
граммирования
Если функция программно включена, то она будет активизирована каждый раз, ког"
да кто"нибудь сядет в автомобиль и затем включит зажигание, если кто"нибудь откро"
ет дверь при включенном зажигании, а так же дистанционно, нажатием кнопки 3 бре"
лока на 3 секунды. Таким образом, если от Вас требуют покинуть автомобиль и отдать
ключи, выполните требования грабителей, Anti Hi"Jack сам включит тревогу и заблоки"
рует двигатель.
Короткий звуковой сигнал сообщит Вам об активизации Anti Hi"Jack от зажигания
или дистанционно, а светодиод системы будет медленно мигать в течение 2 минут, за"
тем в течение еще 30 секунд сирена будет подавать короткие звуковые сигналы, после
чего включится блокировка двигателя, а к звуковым сигналам добавятся световые. Еще
через 1 минуту на 30 секунд включится полная звуковая тревога. 30 секундные циклы
тревоги будут повторяться до выключения зажигания, блокировка двигателя сохранится
до полного отключения Anti HI"Jack.
Если при включенном зажигании открыть дверь, светодиод системы начнет и будет
мигать в течение 30 секунд (но не 2 минуты), далее процедура соответствует описан"
ной выше.
С момента активизации и до полного отключения Anti Hi"Jack все брелоки окажутся забло"
кированы, и система не будет выполнять никакие дистанционные команды.
Для отключения Anti"Hi"Jack в течение 2 минутной или 30 секундной (во втором слу"
чае) паузы введите кнопкой аварийного отключения первую (старшую) цифру Вашего
PIN"кода. Светодиод погаснет, система вернется в режим нормальной эксплуатации,
подтвердив это одним световым и одним звуковым сигналом
Примечание: если Вы выключите зажигание во время 2 минутной паузы, не отклю"
чив Anti Hi"Jack, система предупредит Вас об этом двойными «чирпами».
Для отключения Anti Hi"Jack по окончании 2 минутной, или 30 секундной паузы тре"
буется остановить автомобиль и ввести полный код, так же как при аварийном отклю"
чении. При вводе полного PIN"кода для отключения Anti Hi"Jack, его активизация все"
ми способами кроме дистанционного будет отменена до следующего открывания/
закрывания двери при выключенном зажигании.
36
Page 37

Для временного предотвращения активизации AntiHiJack можно использовать
Valetрежим, однако, чтобы включить Valetрежим, Anti HiJack должен быть пред
варительно отключен.
Примечание: Вы также можете активизировать Anti Hi"jack дистанционно, на"
жав и удерживая в течение 3 секунд при включенном зажигании кнопку 3 брелока.
После такой активизации Anti Hi"jack будет действовать в соответствие с описан"
ной выше процедурой.
Функции диагностики
Предупреждение о неисправности.
Если при постановке на охрану какая"либо дверь, капот или багажник окажутся
незакрыты, Вы услышите 3 звуковых сигнала вместо одного и фонари мигнут 3
раза.
Память тревог.
Если в период охраны включался режим тревоги, то при снятии с охраны систе"
ма выдает 4 дополнительных звуковых и световых сигнала и в течение 10 секунд
после первого включения зажигания с помощью серий вспышек светодиода со"
общает о причине вызвавшей тревогу:
Количество вспышек в серии Вид датчика
2 Салонный датчик
3 Концевик двери «"» или «+»
4 Капот/багажник
5 Зажигание
Учет задержки салонного света.
Если автомобиль имеет функцию задержки салонного света, и программно
включен режим учета задержки, концевики дверей будут взяты под охрану только
после того как погаснет свет в салоне. Оповещение о не закрытых дверях при по"
становке на охрану в этом режиме отсутствует. Режим включается программиро
ванием.
Русский
Режим Valet.
В этом режиме отключаются все охранные функции системы. Вы можете вклю"
чить его, например, когда отдаете автомобиль на сервис, и тогда Вам не придется
оставлять там брелок Вашей сигнализации. Это абсолютная гарантия от несанк"
ционированной записи новых брелоков в память Вашей охранной системы.
Для включения режима необходимо при отключенной охране на 3 сек. нажать
одновременно кнопки 1 и 2 брелока, трижды мигнут сигнальные фонари, свето"
диод системы загорится в постоянном режиме. В Valet"режиме сохраняется воз"
можность дистанционного управления центральным замком и дополнительными
каналами. Повторное нажатие кнопок 1 и 2 возвращает систему в режим нормаль"
ной эксплуатации, о чем она сообщает тремя звуковыми сигналами.
Для выхода из режима, можно также ввести PIN"код.
37
Page 38

Программирование брелоков.
В стандартный комплект AMG 850C входит 2 брелока однако сигнализация спо"
собна запомнить до 4 брелоков, и если у Вас возникла необходимость увеличить
количество брелоков для управления Вашей охранной системой, Вы можете зап"
рограммировать их используя следующую процедуру:
1. Включить зажигание.
2. Ввести первую цифру установленного PIN"кода, для этого нажать кнопку ава"
рийного отключения соответствующее число раз.
3. Выключить и включить зажигание.
4. Ввести вторую цифру установленного PIN"кода, для этого нажать кнопку ава"
рийного отключения соответствующее число раз.
5. Выключить и включить зажигание. Если PIN"код введен правильно, система
подаст двойной звуковой сигнал, подтверждающий вход в режим програм"
мирования брелоков.
6. Нажать кнопку 1 на брелоке. Сирена подаст один звуковой сигнал, подтверж"
дая запись кода брелока.
7. Выключить зажигание и нажать кнопку аварийного отключения или подож"
дать 15 секунд, система подаст двойной звуковой сигнал, подтверждая вы"
ход из режима программирования брелоков.
ВНИМАНИЕ! Если система находится в режиме Anti Hijack, то для про
граммирования новых брелоков Вам нужно ввести PIN код для отключения
Anti Hijack, а затем, после звукового и светового сигнала подтверждаю
щего отключение Anti Hijack,не открывая двери еще раз ввести PIN код.
Программирование функций.
Для того чтобы изменить значение PIN"кода, стереть из памяти системы ненуж"
ные Вам брелоки, изменить значение программируемых функций, необходимо,
прежде всего, выполнить программирование брелоков, описанное выше, причем
для этого можно использовать брелок, который уже известен системе. Затем вы"
полнить следующую процедуру:
1. Закончить программирование брелоков и включить зажигание.
2. Набрать номер группы программных переключателей, для этого нажать кнопку
аварийного отключения число раз равное этому номеру (первая цифра). Каж"
дое нажатие кнопки будет подтверждаться звуком сирены.
3. Выключить и включить зажигание.
4. Ввести кнопкой аварийного отключения номер переключателя внутри группы
(вторая цифра) нажав ее соответствующее число раз. Каждое нажатие кноп"
ки будет подтверждаться звуком сирены.
5. Текущее состояние функции отражается светодиодом системы, который го"
рит, если функция включена и не горит, если выключена.
6. Для включения функции нажмите кнопку 1, для выключения кнопку 2 брелока.
7. Для выхода из режима программирования выключите зажигание и нажмите
кнопку аварийного отключения или подождите несколько секунд двойного зву"
ка сирены. Для того, чтобы продолжить программирование, включите зажи"
гание, не дожидаясь сигнала и продолжите с шага 2.
38
Page 39
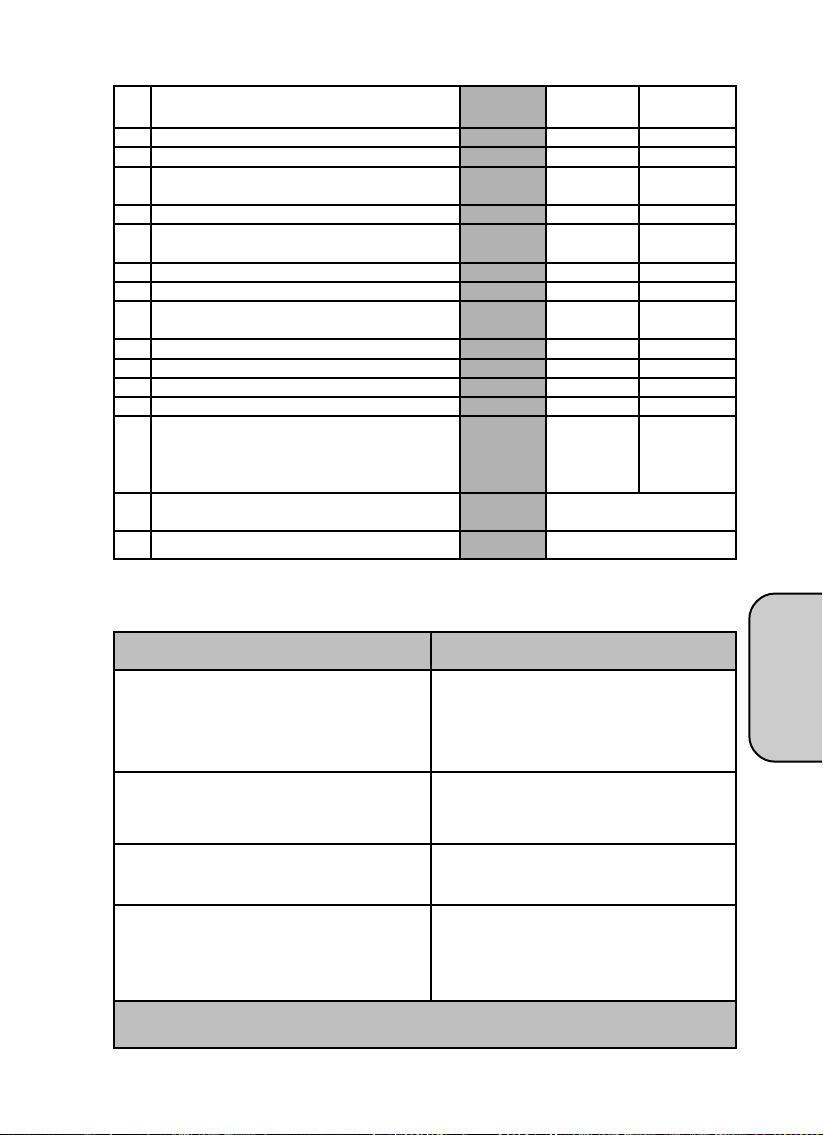
Функция переключателя Заводская Светодиод Светодиод
установка горит не горит
1#1 Автопостановка ВЫКЛ. ВКЛ. ВЫКЛ.
1#2 Длительность тревоги 30 сек. 30 сек. 60 сек.
1#3 Запирание дверей при перепостановке ВКЛ. ВКЛ. ВЫКЛ.
на охрану
1#4 Запирание дверей при включении зажигания ВКЛ. ВКЛ. ВЫКЛ.
1#5 Звуковые сигналы подтверждения выполнения ВКЛ. ВКЛ. ВЫКЛ.
команд
1#6 Длительность импульса центрального замка 0,6 с 0,6 с 3.5 с
2#1 Постановка на охрану с подниманием стекол ВЫКЛ. ВКЛ. ВЫКЛ.
2#2 Длительность импульса на выходе подъема 25 с 10 с 25 с
стекол
2#3 Задержка тревоги от двери при автопостановке ВКЛ. ВКЛ. ВЫКЛ.
2#4 Длительность задержки тревоги от двери 10 с 10 с 20 с
2#5 Учет задержки салонного света ВЫКЛ. ВКЛ. ВЫКЛ.
2#6 Anti Hi#Jack ВЫКЛ. ВКЛ. ВЫКЛ.
3#1 Изменение PIN#кода (11÷99) 1 Кнопка1 Кнопка2
При вводе каждой цифры подается звуковой сигнал:
длинный # при вводе десятков, короткий при вводе # единиц.
увеличение уменьшение
значения значения
кода кода
3#2 Стирание кодов всех брелков кроме Нажать кнопки 1&2 вместе
используемого
3#3 Возврат к заводским установкам Нажать кнопки 1&2 вместе
Действия при отказе системы
Неисправность
Система не реагирует на команды
дистанционного управления и процедуру
аварийного отключения.
Методы устранения
1. Проверьте заряженность аккумулятора
автомобиля.
2. Проверьте предохранитель цепи питания
системы, при необходимости замените его.
Отсутствуют оптические сигналы при
нормальном функционировании всех остальных
режимов.
Не работают электрические замки дверей.
Проверьте предохранитель цепи питания
сигнальных фонарей, при необходимости
замените его.
Проверьте предохранитель цепи питания
замков, при необходимости замените его.
Отсутствует свечение светодиода на пульте
дистанционного управления, система не
выполняет команды дистанционного управления.
Замените элемент питания пульта.
В случае прочих отказов, обратитесь в
сервисный центр по месту установки
сигнализации.
В случае прочих отказов, обратитесь в сервисный центр по месту установки сигнализации.
Русский
39
Page 40

ИНСТРУКЦИЯ ПО УСТАНОВКЕ
Комплектация
Электронный модуль системы Mongoose AMG"850 C " 1
Главный жгут проводов с разъемами " 1
Установочный комплект " 1
Светодиод " 1
Кнопка аварийного отключения " 1
Пульты дистанционного управления " 2
Датчик удара " 1
Общие рекомендации
ЭЛЕКТРОННЫЙ МОДУЛЬ.
Электронный модуль устанавливают в салоне автомобиля вдали от источников
влаги и нагревания. Модуль следует устанавливать так, чтобы его можно было
снять только с помощью специального инструмента или хотя бы вместе с одной
декоративной панелью. Электронный модуль крепят в выбранном месте винтами
из комплекта.
СИРЕНА.
Сирену устанавливают в отсеке для двигателя на расстоянии не менее 30см от
зон потенциального удара, вдали от источников тепла и влаги. Сирену крепят дву"
мя винтами из комплекта.
КНОПКА АВАРИЙНОГО ОТКЛЮЧЕНИЯ.
Кнопку аварийного отключения крепят на приборной доске так, чтобы водитель,
находясь в своем кресле, мог её достать. Для крепления кнопки аварийного от"
ключения необходимо просверлить сквозное отверстие диаметром 7мм и зафик"
сировать кнопку с помощью гайки. Провести провода к электронному модулю и
присоединить к разъему в соответствии со схемой установки.
СВЕТОДИОД.
Просверлить отверстие диаметром 8мм в приборной доске или панели обли"
цовки и закрепить в нём светодиод. Провести кабель к электронному модулю и
подсоединить к разъему в соответствии со схемой установки.
ДАТЧИК УДАРА
Датчик удара установить в салоне автомобиля на металл кузова, как можно ближе
к продольной оси автомобиля. Закрепить датчик винтами"саморезами или при"
клеить двусторонней клеящей лентой.
40
Page 41
Технические характеристики
Напряжение питания 10...15 В
Потребляемый ток в режиме охраны 20 мА
Частота радиоканала 433,92 МГц
Диапазон рабочих температур "40...+850С
Максимально допустимый ток
" цепи блокировки двигателя 20 А
" цепи сигнальных фонарей 10 А
" цепей управления центральным замком 15 А
" цепей дополнительных каналов 300 мА
Максимальный радиус действия брелока 30 м
Установка
Прежде чем начать подсоединение, выберите место в автомобиле для следую"
щих приборов и присоединений:
источника постоянного тока;
источника тока при включенном зажигании;
точек подсоединения фонарей (положительный импульс);
концевых выключателей дверей;
концевого выключателя багажника;
концевого выключателя капота (установите дополнительный концевой выклю"
чатель при необходимости);
провод стартера;
отсоедините «"» клемму аккумулятора.
Главный 24контактный разъем.
ЧЁРНЫЙ ПРОВОД
Подсоединить на корпус автомобиля.
ЗЕЛЁНЫЙ/КОРИЧНЕВЫЙ ПРОВОД
Питание электронного модуля. Подсоединить к источнику постоянного тока 12В через 5А
предохранитель.
ЧЁРНЫЙ/БЕЛЫЙ и ЧЁРНЫЙ/ЗЕЛЁНЫЙ ПРОВОДА
Релейные выходы на фонари. Один провод подсоединяют к контуру фонарей левого бор"
та, другой " к контуру фонарей правого борта.
ЗЕЛЁНЫЙ и ЖЁЛТЫЙ ПРОВОДА
Эти провода подключают к дверным концевым выключателям. Схема подключения зави"
сит от того, какие дверные концевые выключатели используются " положительные или отри"
цательные.
Отрицательные дверные концевые выключатели:
подсоединить ЖЕЛТЫЙ провод к земле, ЗЕЛЕНЫЙ " к дверному проводу между дверными
концевыми выключателями и лампой салонного света, на котором при открывании дверей
появляется земля. Проверьте, чтобы выбранный провод был подключен ко всем дверям ав"
томобиля.
Положительные дверные концевые выключатели:
подсоедините ЗЕЛЕНЫЙ провод к (+) клемме источника питания 12В, ЖЕЛТЫЙ " к дверно"
му проводу между дверными концевыми выключателями и лампой салонного света, на кото"
ром при открывании дверей появляется 12В. Проверьте, чтобы выбранный провод был под"
ключен ко всем дверям автомобиля.
Русский
41
Page 42

Примечание: Подключив ЖЕЛТЫЙ и ЗЕЛЕНЫЙ провода, описанным выше способом, Вы
реализуете режим задержки подсветки салона на 20 секунд после закрывания двери, но до
включения зажигания или постановки на охрану. Если такой режим не требуется или не же
лателен, не подключайте ЖЕЛТЫЙ или ЗЕЛЕНЫЙ провода к «земле» или + соответственно.
ВНИМАНИЕ: Категорически запрещено одновременное использование желтого и зеле"
ного проводов в качестве триггерных входов системы. Т.е. нельзя одновременное подключе"
ние к «плюсовым» и «минусовым» концевым выключателям дверей.
ФИОЛЕТОВЫЙ ПРОВОД
«+0.3А» выход для подключения пейджера.
СИНИЙ/ЧЁРНЫЙ ПРОВОД
«"0.3А» выход устройства открывания багажника. При нажатии кнопки 2 на 3 секунды при
выключенном зажигании на нём появляется отрицательный импульс продолжительностью 0,5с.
КОРИЧНЕВЫЙ ПРОВОД
Провести провод через резиновую втулку переборки отсека двигателя и подсоединить к
красному проводу сирены. Подсоединить чёрный провод сирены на корпус.
КРАСНЫЙ ПРОВОД
Вход питания фонарей и выбора полярности управления ими. Обычно присоединяется к
+12В через предохранитель 15А.
ОРАНЖЕВЫЙ (Подключен к реле),
КОРИЧНЕВЫЙ/БЕЛЫЙ ПРОВОД
«"0.3А» выход для подключения к реле блокировки двигателя.
ОРАНЖЕВЫЙ ПРОВОД
Подсоединить к проводу зажигания.
Внимание: данный источник питания не должен отключаться при запуске двигателя.
СЕРЫЙ/БЕЛЫЙ ПРОВОД
Подсоединить провод к любому контуру, на котором появляется земля при открывании
багажника. Если такого контура нет, установите дополнительный концевой выключатель, на
котором при открывании багажника будет появляться земля.
СЕРЫЙ ПРОВОД
Подсоединить провод к любому контуру, на котором появляется земля при открывании ка"
пота. Если такого контура нет , установите дополнительный концевой выключатель , на кото"
ром при открывании капота будет появляться земля.
ЗЕЛЕНЫЙ/КРАСНЫЙ ПРОВОД
«"0,3А» выход для управления закрыванием окон/люка, системой комфорт, фонарями. При
нажатии на кнопку 3 на 3 секунды при выключенном зажигании или при постановке на охрану
на этом выходе появляется сигнал длительностью 10 или 25с. (См. переключатели программ"
ных функций 2.2).
БЕЛЫЙ ПРОВОД
«"0.3А»выход для управления дополнительными устройствами. При одновременном нажа"
тии кнопок 2 и 3 пульта на этом проводе появляется сигнал и присутствует до отпускания
кнопок, но не более 30 секунд.
СИНИЙ ПРОВОД
«"0.3А» выход для организации двушагового отпирания дверей. На этом проводе появля"
ется сигнал при повторном, в течение 3 секунд, нажатии на кнопку 2 пульта.
Провода для устройств запирания дверей.
Система Mongoose AMG"850 C поставляется с универсальной системой запирания две"
рей, имеющей шесть проводов. Смотри приложенные диаграммы, на которых показаны схе"
мы соединений для негативного управления, позитивного управления, установки новых при"
водов и пневматического привода.
СЕРЫЙ/КРАСНЫЙ ПРОВОД " реле запирания " общий контакт
КРАСНЫЙ/ЖЕЛТЫЙ ПРОВОД " реле запирания " разомкнутый контакт
СЕРЫЙ/ЖЕЛТЫЙ ПРОВОД " реле запирания " замкнутый контакт
ГОЛУБОЙ/ЖЕЛТЫЙ ПРОВОД " реле отпирания " замкнутый контакт
КРАСНЫЙ/ЧЕРНЫЙ ПРОВОД " реле отпирания " разомкнутый контакт
ГОЛУБОЙ/КРАСНЫЙ ПРОВОД " реле отпирания " общий контакт
42
Page 43
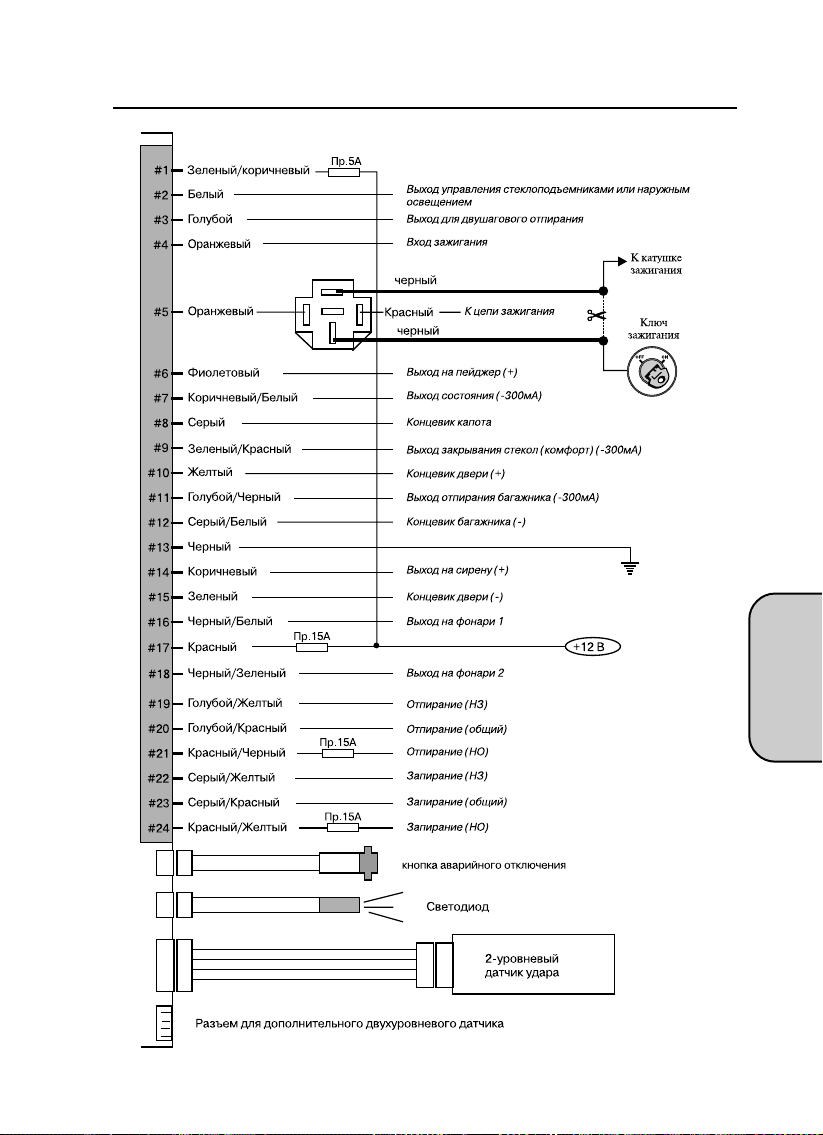
СХЕМА ПОДКЛЮЧЕНИЙ
Русский
43
Page 44

ПОДКЛЮЧЕНИЕ К ЦЕНТРАЛЬНОМУ ЗАМКУ.
Дополнительный электропривод.
Позитивное управление ЦЗ.
Негативное управление ЦЗ.
Пневматический ЦЗ
(Audi, Mercedes)
44
Page 45

MONGOOSE AMG 850C
Вступ
Сигналізація AMG 850С сконструйована для охорони дверей автомобіля, його
капота і багажника, внутрішнього простору в салоні, а також простору в безпосе"
редній близькості від Вашого автомобіля.
Для запобігання несанкціонованого доступу в систему передбачений захист
коду радіокоманд на базі технології кодування KeeLoq
тоїть спробам перехоплення кодів за допомогою код"граббера, також є вмонто
ваною функція антисканування, що забороняє відключення сигналізації простим
добором випадкових кодів і функція пам’яті поточного стану, що не дозволяє
знешкодити сигналізацію, яка є під охороною, шляхом знімання та надівання кле"
ми автомобільного акумулятора, тому що в цьому випадку включиться тривога і
буде зберігатися блокування двигуна.
Переривання і відновлення напруги при відключеній охороні не викликає спра"
цьовування сигналізації, щоб не спричиняти зайвих труднощів, наприклад, при
ремонті.
Якщо напругу було відключено, коли сигналізація знаходилася в режимі Valet, то
наступна його подача поверне сигналізацію в це ж стан.
Щоб уникнути запирання ключів усередині автомобіля, при відновленні подачі
напруги від автомобільного акумулятора не відбувається зміни стана дверних
замків.
Функція обходу несправної зони дозволяє уникнути помилкової тривоги. Ця
функція відключить поламаний датчик до кінця циклу охорони у разі, якщо він вик"
ликав вмикання тривоги 8 разів.
Всі інші контрольовані зони та блокування залишаться включеними.
Функцію обліку затримки салонного світла можна запрограмувати самостійно.
Ця функція дає можливість використовувати AMG 850С на будь"яких типах авто"
мобілів.
Для підвищення охоронних властивостей системи і зручності користування ав"
томобілем AMG 850С має додаткові канали:
" для підключення пейджера,
" для керування електричним замком багажника,
" для автоматичного зачинення вікон, коли об’єкт ставлять під охорону,
" для керування електричними стеклопідйомниками або зовнішнім освітленням
за допомогою брелока.
TM
, що успішно протис"
До комплекту Mongoose AMG 850С належать:
Центральний блок керування з повним комплектом для установки.
Дворівневий датчик удару, що включає або попереджувальну трель, або по"
вну тривогу сигналізації в залежності від сили удару по кузові автомобіля.
Два брелоки дистанційного керування.
Світодіод для індикації режимів роботи сигналізації, призначений для уста"
новки в автомобілі.
Українська
45
Page 46

Кнопка аварійного відключення, місце установки якої в автомобілі Вам нале"
жить вибрати разом із спеціалістом, який буде встановлювати цю систему.
При цьому Вам треба зробити це із таким розрахунком, щоб забезпечити до"
статню таємність її розташування з одного боку, і зручність користування з
іншого.
Повну інструкцію керування всіма режимами AMG 850С, а також картку"пам’"
ятку, що завжди зручно мати при собі, із стислим описом керування сигналі"
зацією.
Якщо Ви хочете підвищити охоронні властивості Вашої сигналізації, ми
радимо Вам додатково придбати дворівневий датчик об’єму , спроможний реєст"
рувати будь"який рух як усередині автомобіля, так і в безпосередній близькості від
нього. Ваш AMG 850С має спеціальний вхід для підключення такого датчика.
Брелок дистанційного керування сигналізацією.
Брелок зроблено у вигляді мініатюрного радіо передавача, що живиться від 12
вольтової батарейки (тип 23 А), якої вистачає приблизно на 1 рік експлуатації. Істот"
не зниження дальності прийому системою команд передавача говорить про не"
обхідність заміни батарейки. На брелоку розташовані три кнопки керування й інди"
каторний світодіод. При натисканні на будь"яку з кнопок передавач формує і
передає спеціальну кодовану команду, що змінюється при кожному новому натис"
канні на кнопки, запобігаючи таким чином використання можливості перехоплен"
ня коду Вашої сигналізації код"граббером.
Таблиця команд.
Функція Кнопка 1 Кнопка 2 Кнопка 3 Примітка
Постановка/ зняття з#під охорони z Запалювання ВИМИКНУТИ
Замикання дверей z Запалювання ВМИКНУТИ
Постановка на охорону з відключеними датчиками zz Запалювання ВИМИКНУТИ
Тиха постановка/ зняття з#під охорони z2 z1 Запалювання ВИМИКНУТИ
Тиха постановка під охорону з відключеними zz2 z1 Запалювання ВИМИКНУТИ
датчиками
Відмикання дверей z Запалювання ВМИКНУТИ
Паніка z3 сек. Запалювання ВИМИКНУТИ
Відмикання багажника z3 сек. Запалювання ВИМИКНУТИ
Зачинення вікон/ вмикання зовнішнього освітлення z3 сек. Запалювання ВИМИКНУТИ
Універсальний вихід для керування z3 сек. z3 сек.
стеклопідйомниками або зовнішнім освітленням
VALET#РЕЖИМ z3 сек. z3 сек. Охорона відключена
Двокрокове відмикання zz Запалювання ВИМИКНУТИ
Анти Хайджек (Anti Hi#Jack) z3 сек. Запалювання ВМИКНУТИ
Постановка/ зняття з#під охорони zz Запалювання ВИМИКНУТИ
другого автомобіля
z
короткочасно натиснути на кнопку
z короткочасно натиснути два рази в інтервалі не більш 3 секунд
46
Page 47
z3 сек. натиснути й утримувати кнопку в натиснутому стані не менше 3 секунд
z3 сек. натиснути й утримувати кнопки протягом 3"х секунд для запуску каналу,
продовжувати утримувати протягом часу, необхідного для роботи каналу, але не
більш 30 секунд.
1, 2 порядок натискання кнопок
Необхідна інформація
PINКОД.
Для підвищення таємності керування сигналізацією в AMG 850С передбачена
можливість використання персонального коду (PIN"коду) для аварійного відклю"
чення сигналізації, входу в режим програмування додаткових брелоків і користу"
вальних функцій, відключення функції Anti Hi"jack, яка допомагає уникнути погра"
бування автомобіля.
PIN код складається з двох цифр і може мати значення від 11 до 99. При виго"
товленні системи в її пам’ять записується код, який дорівнює 11. Проте, ми реко"
мендуємо Вам після установки системи запрограмувати інше значення PIN коду
(детальніше про встановлення іншого PIN коду йдеться в розділі «Програмуван"
ня»). Це дозволить Вам забезпечити свою охоронну систему від несанкціонова"
ного зняття з"під охорони.
Для вводу PIN коду використовується кнопка аварійного відключення і ключ за"
палювання
Аварійне відключення сигналізації.
У випадку, якщо брелок сигналізації є відсутній або несправний, для зняття сис"
теми з"під охорони необхідно: відчинити двері ключем, при цьому включиться ре"
жим тривоги, сісти в автомобіль і включити запалювання. При включеному запа"
люванні натиснути кнопку аварійного відключення таке число разів, яке дорівнює
першій цифрі заданого Вами PIN коду, потім виключити і знову включити запалю"
вання, натиснути кнопку аварійного відключення таке число разів, що дорівнює
другій цифрі Вашого PIN"коду. Потім Вам треба виключити запалювання " і систе"
ма зніметься з"під охорони.
Світодіодна індикація стану.
Охорона включена повільно миготить
Охорона відключена не горить
Автопостановка швидко миготить
Valet"режим горить постійно
Українська
47
Page 48

ПРАВИЛА КОРИСТУВАННЯ
Керування основними режимами охорони
Постановка під охорону.
Щоб поставити сигналізацію під охорону, треба при виключеному запалюванні
натиснути кнопку 1 брелока. Якщо всі двері, капот і багажник закриті, сирена по"
дасть один звуковий сигнал і ліхтарі мигнуть один раз. Світодіод системи почне
повільно миготіти, дверні замки закриються (якщо автомобіль є обладнаний при"
водами блокування замків). Якщо одна з дверей, капот або багажник виявляться
незачинені, пролунають три звукових сигнали і ліхтарі промиготять три рази.
Охорона.
У режимі охорони сигналізація контролює стан усіх наявних кінцевих вимикачів
дверей, капота, багажника, вмикання запалювання і стан датчика удару, а також
датчика об’єму, якщо він був додатково встановлений, та інше. Крім того, у ре"
жимі охорони блокується запуск двигуна. При порушенні якоїсь із зон охорони
включається 30 секундний режим тривоги.
Тривога.
Якщо режим тривоги включився, те сирена буде звучати, а сигнальні ліхтарі бу"
дуть миготіти протягом 30 секунд або до їхнього відключення кнопкою 1 брелока.
При спрацьовуванні попереджувальної зони датчика удару або зовнішньої зони
додаткового датчика, пролунає попереджувальна трель сирени.
Зняття з охорони.
Для зняття сигналізації з"під охорони треба натиснути кнопку 1 брелока, сирена
подасть 2 звукових сигнали, і двічі мигнуть сигнальні ліхтарі. Світодіод погасне,
дверні замки відчиняться (якщо автомобіль є обладнаний приводами блокування
замків). Якщо в період знаходження об’єкта під охороною включався режим три"
воги, то при знятті з"під охорони пролунають чотири звукових сигнали і ліхтарі миг"
нуть чотири рази.
Якщо при установці Вами була обрана двокрокова схема відмикання дверей,
то при першому натисканні на кнопку відчиняться тільки двері водія, для відмикан
ня інших дверей треба повторно натискати кнопку 1 протягом 3 секунд.
Паніка.
Якщо при виключеному запалюванні натиснути й утримувати протягом 3 сек.
кнопку 1, то включиться сирена і сигнальні ліхтарі. Повторне натискання на кнопку
1 відключає цей режим. Вмикання і наступне вимикання Паніки не змінює стан
системи, тобто вона залишиться під охороною, якщо вже знаходилася в цьому
режимі. При цьому двері залишаться замкнені. Якщо ж режим охорони був відклю"
чений і замки дверей відкриті, то постановки під охорону і замикання дверей не
відбудеться.
48
Page 49

Тиха постановка під охорону.
Коли необхідно поставити сигналізацію під охорону без звукового підтверджен"
ня, щоб не турбувати навколишніми звуками сирени, натисніть кнопку 3 брелока
безпосередньо перед натисканням кнопки 1, ліхтарі як звичайно мигнуть один раз,
але сирена буде мовчати. Світодіод системи почне повільно миготіти, дверні зам"
ки закриються (якщо автомобіль є обладнаний приводами блокування замків). При
тихій постановці під охорону звукове попередження про незачинені двері, капот і
багажник зберігається, тому можна не турбуватися, якщо Ви залишаєте свій авто"
мобіль незамкненим.
Тихе зняття зпід охорони.
Для того, щоб зняти сигналізацію з"під охорони без звукового підтвердження,
треба натиснути кнопки 3 і 1 у тієї ж послідовності, при цьому двічі мигнуть сиг"
нальні ліхтарі, але сирена буде мовчати. Світодіод погасне, дверні замки відчи"
няться (якщо автомобіль є обладнаний приводами блокування замків). Проте,
якщо в період знаходження об’єкта під охороною включалася тривога, то навіть
при тихому знятті з"під охорони система повідомить Вам про це звичайними зву"
ковими сигналами.
Постановка під охорону з відключеними датчиками.
Якщо при постановці під охорону виникає необхідність відключити салонні дат"
чики, наприклад у тому випадку, коли в салоні автомобіля потрібно залишити па"
сажирів або тварин, треба двічі натиснути кнопку 1. Система підтвердить відклю"
чення датчиків додатковим звуковим і світловим сигналом.
Тиха постановка під охорону з відключеними датчиками.
Ви можете відключити салонні датчики і при тихій постановці під охорону, для
цього потрібно натиснути кнопку 3, а потім двічі кнопку 2. Відключення датчиків у
цьому випадку буде підтверджено тільки додатковим світловим сигналом.
Використання додаткових охоронних функцій
Автоматична перепостановка під охорону (захист від випадкового
натискання).
Якщо протягом 30 сек. після зняття з"під охорони не відчинялася жодна з две"
рей, капот або багажник, а також не включалося запалювання, система автома"
тично перейде до режиму охорони і замкне двері автомобіля. Замикання дверей
при перепостановці можна програмно відключити.
Двокрокове зняття зпід охорони.
Якщо включилася тривога, то натиснувши будь"яку кнопку один раз, Ви тільки
виключите сирену і сигнальні ліхтарі (у випадку, якщо причина тривоги усунута,
тобто, наприклад, Ви вже закрили відкриті двері або датчик удару перестав спра"
цьовувати). Якщо ж причина, що викликала тривогу, зберігається, то для відклю"
чення тривоги потрібно повторне натискати на кнопку. Для повного відключення
охорони натисніть на кнопку ще раз після того, як виключите тривогу.
Українська
49
Page 50

Автопостановка.
Функція може бути програмно включена або виключена при установці.
Якщо функція включена, те після вимикання запалювання, відкриття і закриван"
ня дверей світодіод почне швидко миготіти. Якщо протягом 30 секунд після цього
всі двері, а також капот і багажник залишаться закритими, сигналізація перейде в
режим охорони. Замки дверей при автопостановці не замикаються.
У випадку використання функції автопостановки включається режим затримки
тривоги при відкритті дверей в режимі охорони, що дозволяє сісти в автомобіль і
відключити охорону шляхом введення PIN"коду. При цьому тривога не буде вклю"
чатися протягом 10 секунд. Програмно можна встановити тривалість затримки,
що може дорівнювати 20 секундам.
Автоматичне замикання дверей при вмиканні запалювання.
Через 10 сек. після вмикання запалювання автоматично замикаються електричні
замки дверей, при вимиканні запалювання замки негайно відмикаються. Якщо
протягом цих 10 сек. одна з дверей залишиться відкритою, то автоматичного за"
микання не відбудеться, щоб уникнути випадку замикання ключів усередині авто"
мобіля. Функція може бути програмно відключена.
Дистанційне керування центральним замком.
При включеному запалюванні замки дверей автомобіля можна у будь"який мо"
мент зачинити або відкрити шляхом натисканням на брелоку кнопок 1 або 2 відпо"
відно.
AntiHiJack. Захист від нападу грабіжників.
Ви можете в будьякий момент включити або виключити цю функцію за допомо
гою програмування
Якщо функція програмно включена, те вона буде активізована щоразу при вми"
канні запалювання, а так само щоразу, коли хтось відчинить двері при включеному
запалюванні. Таким чином, якщо від Вас потребують покинути автомобіль і відда"
ти ключі, Ви можете виконувати вимоги грабіжників, бо Anti Hi"Jack сам включить
тривогу і змусить грабіжників зупинитися.
При активізації Anti"Hi"Jack світодіод системи почне повільно миготіти, потім
наступає 2 хвилинна пауза, призначена для того, що б дати можливість грабіжнику
від’їхати на безпечну відстань, а Вам у цей час ввести код відключення.
Після паузи, якщо код відключення не був введений, включається режим попе"
редження. Сигнальні ліхтарі будуть миготіти, попереджаючи про те, що через 30
секунд включиться сирена.
Після закінчення 30 секунд звучання сирени, на 30 секунд включиться також і
миготіння сигнальних ліхтарів. Починаючи з цього моменту, двигун буде заблоко"
вано до повного відключення Anti Hi"Jack.
Починаючи з моменту активізації Anti Hi"Jack і до повного його відключення всі
брелоки будуть заблоковано, і система не буде виконувати ніякі дистанційні ко"
манди.
Для відключення Anti"Hi"Jack протягом 2 хвилинної паузи введіть кнопкою авар"
ійного відключення першу цифру Вашого PIN"коду. Світодіод погасне, система
повернеться в режим нормальної експлуатації.
50
Page 51

Для відключення Anti Hi"Jack по закінченні 2 хвилинної паузи потрібно зупинити
автомобіль і ввести повний код, так само як і при аварійному відключенні.
ПАМ’ЯТАЄТЕ, що включивши Anti HiJack, Ви повинні вводити першу циф
ру Вашого PINкоду щоразу, коли Ви включите запалювання, а так само,
коли відчиняєте двері при включеному запалюванні.
Для тимчасового запобігання активізації AntiHiJack можна використовувати
Valetрежим, проте, щоб включити Valetрежим, Anti HiJack повинен бути попе
редньо відключений.
Функції діагностики
Попередження про несправність.
Якщо при постановці під охорону одна з дверей, капот або багажник не будуть
зачинені, то Ви почуєте 3 звукових сигнали замість одного, а до того ж ліхтарі миг"
нуть 3 рази.
Пам’ять тривоги.
Якщо під час знаходження об’єкта під охороною включався режим тривоги, то
при знятті з"під охорони система видає 4 додаткових звукових і світлових сигнали
і протягом 10 секунд після першого вмикання запалювання за допомогою серій
спалахів світодіоду повідомляє про причину, яка викликала тривогу:
Кількість спалахів у серії Вид датчика
2 Салонний датчик
3 Кінцевик дверей «(« або «+»
4 Капот/ багажник
5 Запалювання
Облік затримки салонного світла.
Якщо автомобіль має функцію затримки салонного світла, і програмно був вклю"
чений режим обліку затримки, то кінцевики дверей будуть взяті під охорону тільки
після того, як погасне світло в салоні. В цьому режимі не передбачається наявність
якогось інформаційного сигналу про незачинені двері при постановці під охорону.
Режим включається програмуванням.
Режим Valet.
У цьому режимі відключаються всі охоронні функції системи. Ви можете вклю"
чити його, наприклад, коли віддаєте автомобіль на сервіс, і тоді Вам нетреба зали"
шати там також і брелок Вашої сигналізації. Це " абсолютна гарантія від несанкц"
іонованого запису нових брелоків у пам’ять Вашої охоронної системи.
Для вмикання режиму необхідно при відключеній охороні натискати одночасно
протягом 3"х секунд кнопки 1 і 2 брелока, при цьому тричі мигнуть сигнальні ліхтарі,
світодіод системи буде миготіти в постійному режимі. Під час знаходження в Valet"
режимі зберігається можливість дистанційного керування центральним замком і
додатковими каналами. Натискання кнопки 1 i 2 брелока повертає систему в ре"
жим нормальної експлуатації, про що вона повідомляє трьома звуковими сигна"
лами.
Українська
51
Page 52

Програмування брелоків.
До стандартного комплекту AMG 850c входять 2 брелока, проте сигналізація
має можливість запам’ятовувати до 4 брелоків, і якщо у Вас виникла необхідність
збільшити кількість брелоків для керування Ваші охоронні системи, Ви можете їх
запрограмувати за допомогою приведеної нижче процедури:
1. Включити запалювання.
2. Ввести першу цифру встановленого PIN"коду, для цього натиснути кнопку ава"
рійного відключення відповідне число разів.
3. Виключити і включити запалювання.
4. Ввести другу цифру встановленого PIN"коду, для цього натиснути кнопку ава"
рійного відключення відповідне число разів.
5. Виключити і включити запалювання. Якщо PIN"код був введений правильно,
то система подасть подвійний звуковий сигнал, що підтверджує вхід у режим
програмування брелоків.
6. Натиснути кнопку 1 на брелоку. Сирена подасть один звуковий сигнал, підтвер"
джуючи запис коду брелока.
7. Виключити запалювання і натиснути кнопку аварійного відключення або поче"
кати 15 секунд, система подасть подвійний звуковий сигнал, підтверджуючи
вихід із режиму програмування брелоків.
УВАГА! Якщо Ви програмно включили режим Anti Hijack, то для програ
мування нових брелоків Вам потрібно після вмикання запалювання (п. 1)
спочатку ввести PIN код для відключення Anti Hijack, а потім, після звуко
вого і світлового сигналу, що підтвердив відключення Anti Hijack,
лючаючи запалювання, перейти до виконання п. 2 програмування брелоків,
тобто ще раз ввести PIN код.
не вик
Програмування функцій.
Для того, щоб змінити значення PIN"коду, стерти з пам’яті системи непотрібні
Вам брелоки, змінити значення запрограмованих раніше функцій, Вам треба на"
самперед виконати програмування брелоків, описане вище. Для цього можна ви"
користовувати брелок, що уже є відомий системі. Потім треба виконати таку про"
цедуру:
1. Закінчити програмування брелоків і включити запалювання.
2. Набрати номер групи програмних перемикачів, для цього натиснути кнопку
аварійного відключення таку кількість разів, яка дорівнює цьому номеру (пер"
ша цифра). Кожне натискання кнопки буде підтверджуватися звуком сирени.
3. Виключити і включити запалювання.
4. Ввести кнопкою аварійного відключення номер перемикача усередині групи
(друга цифра) натиснувши її відповідне число разів. Кожне натискання кноп"
ки буде підтверджуватися звуком сирени.
5. Світодіод системи відображає поточний стан функції: так, якщо світодіод го"
рить, то це означає, що функція включена, а якщо не горить, то виключена.
6. Для вмикання функції натисніть кнопку 1, для вимикання " кнопку 2 брелока.
7. Для виходу з режиму програмування виключите запалювання або почекайте
декілька секунд подвійного звука сирени. Для того, щоб продовжити програ"
мування, включите запалювання, не чекаючи сигналу і почніть виконання про"
цедури з кроку 2.
52
Page 53

Функція перемикача Заводська Світодіод Світодіод
установка горить не горить
1#1 Автопостановка ВИКЛ. ВКЛ. ВИКЛ.
1#2 Тривалість тривоги 30 сек. 30 сек. 60 сек.
1#3
Зачинення дверей при перепостановці під охорону
ВКЛ. ВКЛ. ВИКЛ.
1#4 Зачинення дверей при вмиканні запалювання ВКЛ ВКЛ. ВИКЛ.
1#5
Звукові сигнали підтвердження виконання команд
ВКЛ. ВКЛ. ВИКЛ.
1#6 Тривалість імпульсу центрального замка 0,6 із 0,6 із 3.5 с
2#1 Постановка під охорону з підніманням стекол ВЫКЛ. ВКЛ. ВИКЛ.
2#2 Тривалість імпульсу на виході підйому стекол 25 із 10 із 25 із
2#3 Затримка тривоги від дверей при автопостановці ВКЛ. ВКЛ. ВИКЛ.
2#4 Tривалість затримки тривоги від дверей 10 із 10 із 20 із
2#5 Урахування затримки салонного світла ВИКЛ. ВКЛ. ВИКЛ.
2#6 Anti Hi#Jack ВИКЛ. ВКЛ. ВИКЛ.
3#1 Зміна PIN#коду (11÷99) 1 Кнопка 1 Кнопка 1
При вводі кожної цифри подається звуковий сигнал:
довгий # при вводі десятків, короткий # при вводі одиниць.
збільшення зменшення
значення значення
коду коду
3#2 Стирання кодів усіх брелоків крім того, # Натиснути кнопки 1&2 разом
що зараз використовується
3#3 Повернення до заводських установок # Натиснути кнопки 1&2 разом
Дії при відмові системи
Несправність
Система не реагує на команди дистанційного
керування і процедуру аварійного відключення.
1. Перевірте зарядженість акумулятора
автомобіля.
Методи усунення
2. Перевірте запобіжник в колі подачі
живлення системи, при необхідності замініть
його.
Відсутні оптичні сигнали при нормальному
функціонуванні всіх інших режимів.
Перевірте запобіжник в колі подачі живлення
до сигнальних ліхтарів, при необхідності
замініть його.
Не працюють електричні замки дверей.
Перевірте запобіжник ланцюга подачі палива
до замків, при необхідності замініть його.
Відсутнім є миготіння світодіоду на пульті
Замініть елемент живлення пульта.
дистанційного керування, система не виконує
команди дистанційного керування.
У випадку інших відмов, звертайтесь до сервісного центру по місцю установки сигналізації.
Українська
53
Page 54

Комплектація
Електронний модуль системи Mongoose AMG"850 C " 1
Головний джгут проводів iз роз’ємами " 1
Комплект для установки " 1
Світодіод " 1
Кнопка аварійного відключення " 1
Пульти дистанційного керування " 1
Датчик удару " 1
Загальні рекомендації
ЕЛЕКТРОННИЙ МОДУЛЬ.
Електронний модуль встановлюють у салоні автомобіля вдалечині від джерел
вологи і нагрівання. Модуль треба встановлювати таким чином, щоб його можна
було зняти тільки за допомогою спеціального інструмента або разом з однією з
декоративних панелей. Електронний модуль кріплять в обраному місці гвинтами,
які входять до комплекту.
СИРЕНА.
Сирену встановлюють у відсіку для двигуна на відстані не менш 30 см від зон
потенційного удару, вдалечині від джерел тепла і вологи. Сирену кріплять двома
гвинтами, які входять до комплекту.
КНОПКА АВАРІЙНОГО ВІДКЛЮЧЕННЯ.
Кнопку аварійного відключення кріплять на приладовій дошці таким чином, щоб
водій, знаходячись у своєму кріслі, міг до неї дістати. Для кріплення кнопки аварій"
ного відключення необхідно просвердлити наскрізний отвір діаметром 7мм і заф"
іксувати кнопку за допомогою гайки. Потім треба провести проводи до електрон"
ного модуля і приєднати до роз’ єму відповідності зі схемою установки.
СВІТОДІОД.
Просвердлити отвір діаметром 8мм у приладовій дошці панелі облицювання і
закріпити в ньому світодіод. Провести кабель до електронного модуля і приєднати
до роз’єму у відповідності зі схемою установки.
ДАТЧИК УДАРУ
Датчик удару треба встановити в салоні автомобіля на метал кузова, якнайб"
лижче до подовжньої осі автомобіля. Закріпити датчик гвинтами " саморізами чи
приклеїти двосторонньою стрічкою (скотчем).
54
Page 55

Технічні характеристики
Напруга живлення 10...15...15 В
Споживаний струм у режимі охорони 20 мА
Частота радіоканалу 433,92 МГц
Діапазон робочих температур (40...+85(З
Максимально припустимий струм
" ланцюга блокування двигуна 300 мА
" ланцюга сигнальних ліхтарів 10 А
" ланцюгів керування центральним замком 15 А
" ланцюгів додаткових каналів 300 мА
Максимальний радіус дії брелока 30 м
Установка
Перш ніж почати приєднання, оберіть місце в автомобілі для того, щоб приєдна"
ти подані нижче прилади та приєднання:
джерела постійного струму;
джерела струму при включеному запалюванні;
місць приєднання ліхтарів (позитивний імпульс);
кінцевих вимикачів дверей;
кінцевого вимикача багажника;
кінцевого вимикача капота (при необхідності потрібна встановити додатковий
кінцевий вимикач);
провід стартера;
відключіть «(« клему акумулятора.
Головний 24контактний роз’єм
ЧОРНИЙ ПРОВІД
Приєднати на корпус автомобіля.
ЗЕЛЕНИЙ / КОРИЧНЕВИЙ ПРОВІД
Цей провід означає живлення електронного модуля. Приєднати до джерела постійного
струму 12В через 5А запобіжник.
ЧОРНИЙ/ БІЛИЙ і ЧОРНИЙ/ ЗЕЛЕНИЙ ПРОВОДИ
Релейні виходи на ліхтарі. Один провід приєднують до контуру ліхтарів лівого борта, інші
" до контуру ліхтарів правого борта.
ЗЕЛЕНИЙ ТА ЖОВТИЙ ПРОВОДИ
Ці проводи підключають до дверних кінцевих вимикачів. Схема підключення залежить від
того, які дверні кінцеві вимикачі використовуються " позитивні чи негативні.
Негативні дверні кінцеві вимикачі:
Треба приєднати ЖОВТИЙ провід до землі, ЗЕЛЕНИЙ " до дверного проводу між дверни"
ми кінцевими вимикачами і лампою салонного світла, на якому при відкриванні дверей з’яв"
ляється заземлення. Перевірте, щоб обраний провід був підключений до всіх дверей авто"
мобіля.
Позитивні дверні кінцеві вимикачі:
Треба приєднати ЗЕЛЕНИЙ провід до (+) клеми джерела живлення 12В, ЖОВТИЙ " до
дверного проводу між дверними кінцевими вимикачами і лампою салонного світла, на яко"
му при відкриванні дверей з’являється 12В. Перевірте, щоб обраний провід був підключе"
ний до всіх дверей автомобіля.
Українська
55
Page 56

УВАГА: Категорично заборонено одночасне використання жовтого і зеленого проводів
у вигляді триггерних входів системи. Тобто забороняється одночасне підключення до «плю"
сового» і «мінусового» кінцевих вимикачів дверей.
ФІОЛЕТОВИЙ ПРОВІД
«+0.3А» вихід для підключення пейджера чи реле клаксона.
СИНІЙ/ЧОРНИЙ ПРОВІД
«"0.3А» вихід пристрою відкривання багажника. При натисканні кнопки 2 протягом 3х се"
кунд при виключеному запалюванні на ньому з’являється негативний імпульс тривалістю
0,5с.
КОРИЧНЕВИЙ ПРОВІД
Провести провід через гумову втулку переборок відсіку двигуна і приєднати до червоно"
го проводу сирени. Приєднати чорний провід сирени на корпус.
ЧЕРВОНИЙ ПРОВІД
Вхід живлення ліхтарів і вибору полярності керування ними. Як правило, приєднується
до +12В через запобіжник 15А.
ЖОВТОГАРЯЧИЙ (Підключений до реле),
КОРИЧНЕВИЙ/БІЛИЙ ПРОВОДИ
«"0.3А» виходи для підключення до реле блокування двигуна.
ЖОВТОГАРЯЧИЙ ПРОВІД
Приєднати до джерела живлення запалювання.
Увага: це джерело живлення не повинне відключатися при запуску двигуна.
СІРИЙ/БІЛИЙ ПРОВІД
Приєднати провід до будь"якого контуру, на якому з’являється земля при відкриванні ба"
гажника. Якщо такого контуру немає, то треба встановити додатковий кінцевий вимикач, на
якому при відкриванні багажника буде з’являтися земля.
СІРИЙ ПРОВІД
Приєднати провід до будь"якого контуру, на якому з’являється земля при відкриванні ка"
пота. Якщо такого контуру немає, то треба встановити додатковий кінцевий вимикач, на
якому при відкриванні капота буде з’являтися земля.
ЗЕЛЕНИЙ/ЧЕРВОНИЙ ПРОВІД
«"0,3А» вихід для керування функцією зачинення вікон/люка, системою «комфорт» та ліхта"
рями. При натисканні на кнопку 3 протягом 3х секунд при виключеному запалюванні і вклю"
ченій охороні на цьому виході з’являється сигнал тривалістю 10 чи 25с. (Див. перемикачі
програмних функцій 2.2).
Також можливе включення цього каналу автоматично при кожній постановці системи під
охорону (Див. перемикачі програмних функцій).
БІЛИЙ ПРОВІД
«"0,3А» вихід для керування додатковими пристроями. При одночасному натисканні кно"
пок 2 і 3, що розташовані на пульті, на цьому проводі з’являється сигнал, який не зникає аж
до моменту відпускання кнопок, але тривалість цього сигналу не перевищує 30 секунд.
СИНІЙ ПРОВІД
«"0,3А» вихід для організації двокрокового відмикання дверей. При дворазовому натис"
канні на кнопку 2 пульту на цьому проводі з’являється сигнал .
Проводи для пристроїв зачинення дверей.
Система Mongoose AMG"850 C поставляється разом із універсальною системою зачи"
нення дверей. Ця система має шість проводів. На додаткових діаграмах (поставляються в
комплекті) показані схеми з’єднань для негативного керування, позитивного керування,
установки нових приводів і пневматичного приводу.
СІРИЙ/ЧЕРВОНИЙ Реле зачинення " загальний контакт
ЧЕРВОНИЙ/ЖОВТИЙ Реле зачинення " розімкнутий контакт
СІРИЙ/ЖОВТИЙ Реле зачинення " замкнутий контакт
ГОЛУБОЙ/ЖОВТИЙ Реле відмикання " замкнутий контакт
ЧЕРВОНИЙ/ЧОРНИЙ Реле відмикання " розімкнутий контакт
ГОЛУБОЙ/ЧЕРВОНИЙ Реле відмикання " загальний контакт
56
Page 57
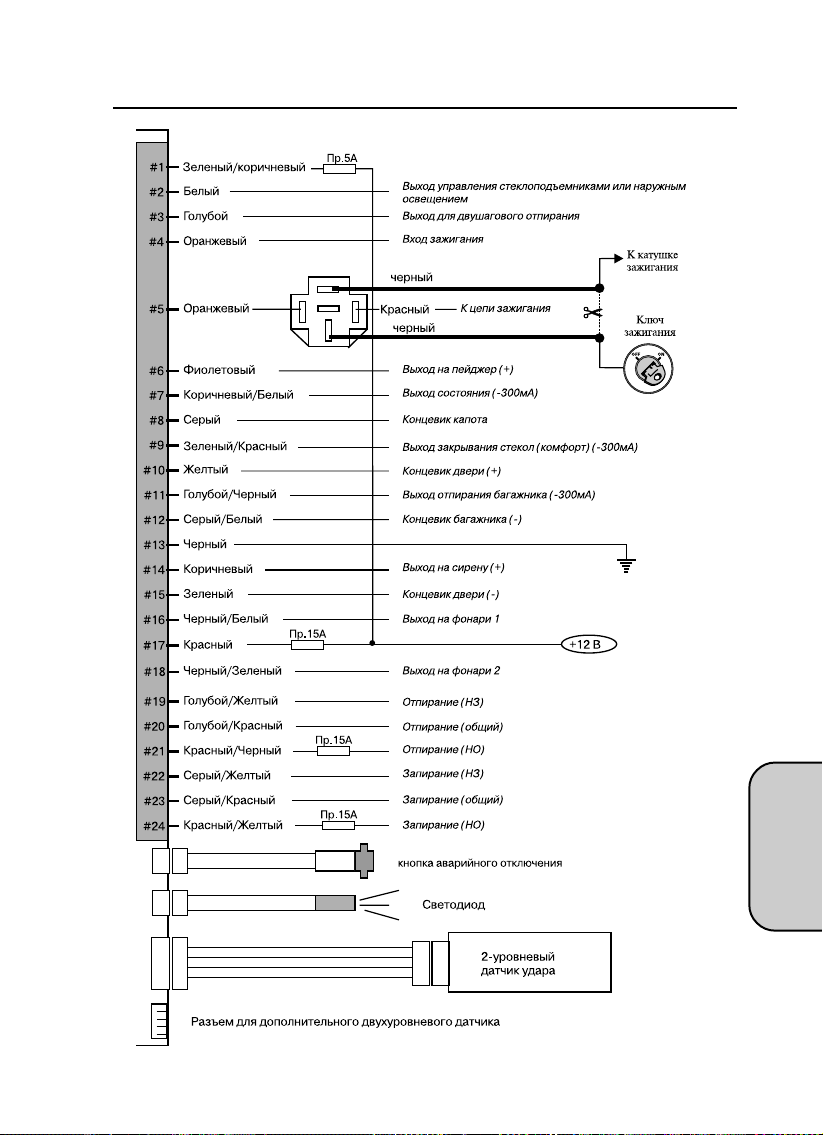
СХЕМА ПІДКЛЮЧЕНЬ
Українська
57
Page 58
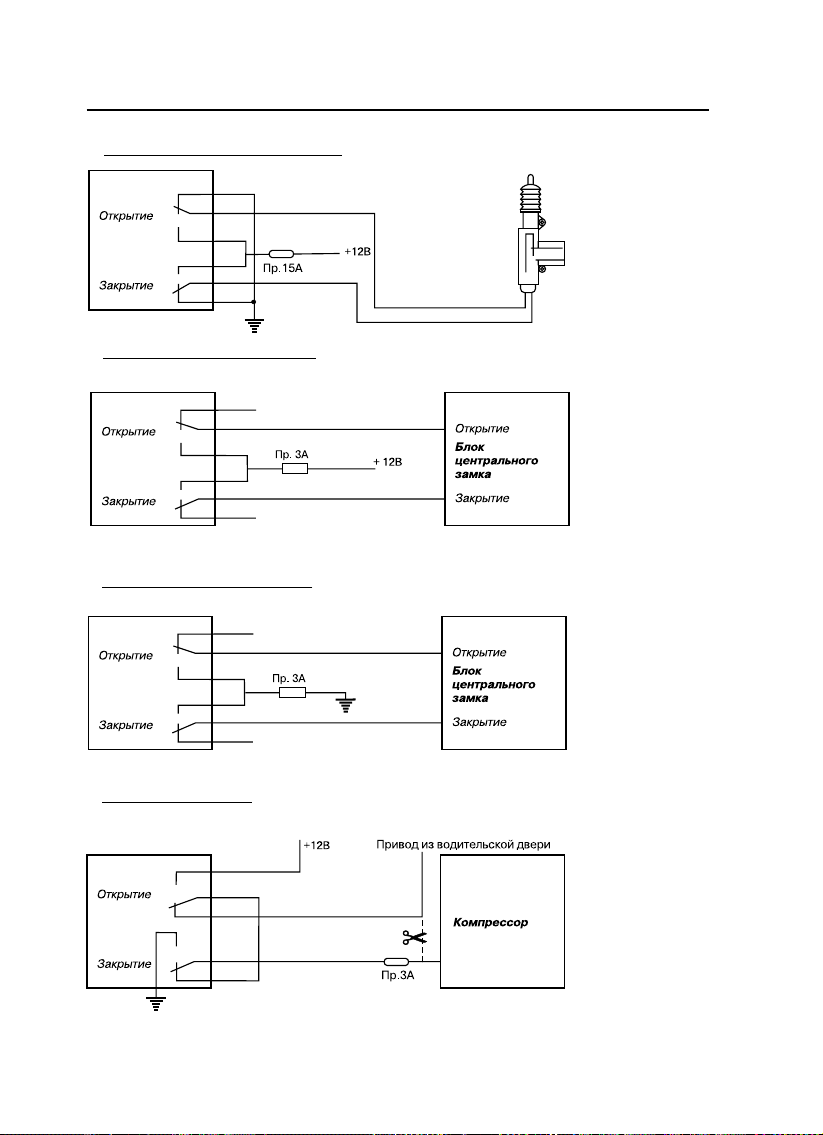
ПІДКЛЮЧЕННЯ ДО ЦЕНТРАЛЬНОГО ЗАМКА.
Додатковий електропривод.
Позитивне керування ЦЗ.
Негативне керування ЦЗ.
Пневматичний ЦЗ
(Audi, Mercedes)
58
 Loading...