

Moneual MBOT 900 User Manual

Ver 1.0
iOS Android
User manual
MBOT 900
01
Thank you for deciding to purchase this MONEUAL
MBOT robot vacuum cleaner. Before using the product,
please read this user manual carefully and keep it for
future reference.
Depending on the model, some content of this user
manual may vary from the actual product. The
contents of this manual are subject to change without
notice.
Copyright
All rights reserved.
Published on 1 February 2019
MONEUAL is a brand/a registered trademark of MTG
GmbH in Europe and/or other countries.
The publication is protected by copyright and all rights
are reserved. No part may be copied or communicated in
any form without prior written approval from MONEUAL.
Contents
Depending on your model and type of device, some
content in this manual may vary.
MTG GmbH takes no responsibility for any technical or
text-related errors, omissions or any incidental or
consequential damages or malfunctions of the
equipment resulting from failure to comply with the
safety and user instructions.
MTG GmbH assumes no responsibility for damages
caused by not intended use of the product.
2

01
Contents
Before use
Installation
instructions
Product
operation
Important notes
Package content
Product description
Preparation
Charging the device
Charging station
Setting up the app
Notes before operation
Operation without the app
App functions
Zone cleaning
Spot cleaning
Regulating the suction
Cleaning schedule
My robots
Maintenance & fault diagnosis
04
Care and
maintenance
06
07
08
08
09
10
Customer service
13
15
16
18
20
21
22
23
24
Cleaning the dust bin
Cleaning the dust lter
Cleaning the sensors and wheels
Cleaning the main brush
Cleaning the side brushes
Storage/Battery change
Cleaning the charging contact
Troubleshooting
Technical specications
Notes
25
26
27
28
29
29
30
31
32
32
3

02
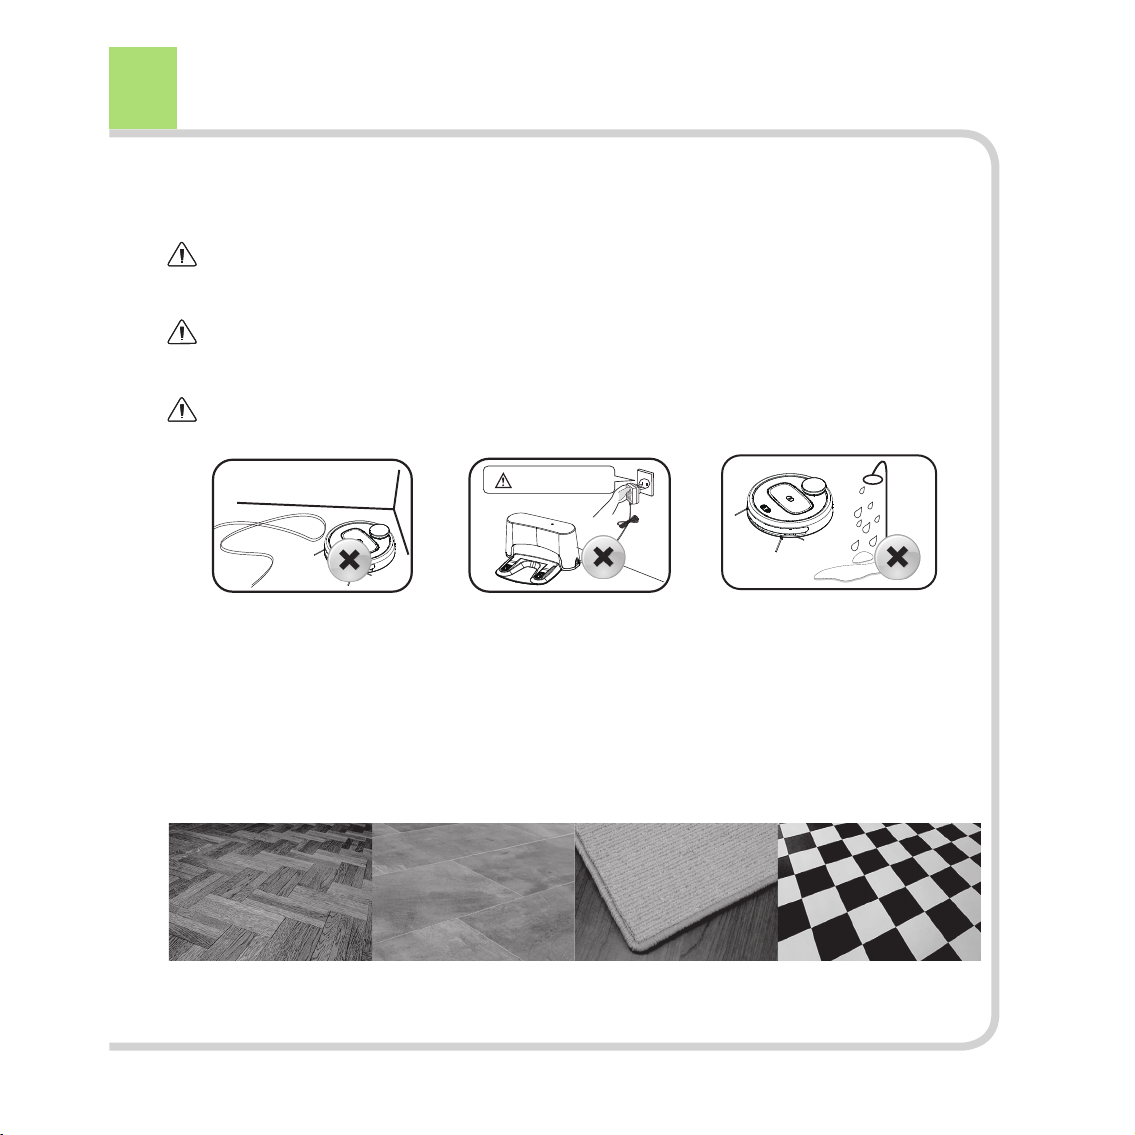
Important Instructions
You may be killed or seriously injured
if you do not follow this instruction.
You may be injured or your appliance
may be damaged if you do not follow
this instruction.
Important information, denitions,
general rules and notes are explained.
etoNnoituaCgninraW
Warning: Please read and follow the instructions in the manual to ensure your safety and the safe use of your
robot cleaner. In case of disregard, there is no liability for personal injury and property damage. Warranty is valid
only if you follow the instructions.
Keep away from abysses and do not use on elevated objects such as tables, etc.. To prevent your device from falling,
place an obstacle in front of the abyss.
When using the device, ensure that you are within reach of the device, so that you can intervene and relocate
the device.
This appliance can be used by children aged 8 years and above, same as persons with reduced physical, sensory or mental
capabilities or lack of experience and knowledge if they have been given supervision or instruction concerning the use of
this appliance in a safe way and understand the hazards involved.
Children shall not play with the appliance. Cleaning and user maintenance shall not be made by children without supervision.
WARNING: For the purposes of recharging the battery, only use the detachable supply unit provided with this appliance. The battery
must be removed from the appliance before it is scrapped. The appliance must be disconnected from the supplymains when
removing the battery. The battery must be disposed of in accordance with local regulations.
If the dust bin is full, the cleaning performance will be reduced.
Empty the dust bin after each use (see page 25).
Please clean the cli sensors and wheels regulary (see page 27).
Be careful not to break the robot cleaner when you pull it out of the box.
Install the side brushes.
The device must be fully charged before rst use.
Remove any obstacles on the oor before you start cleaning mode.
The robot cleaner can not climb thresholds higher than 15mm.
After charging is complete, keep the robot cleaner docked to the charging station.
The robot will turn o automatically.
Install the charging station in a location that can be easily accessed by the robot cleaner (1m distance to each side).
4
02
Important notes
Only use the original adapter, battery and the original charging station to prevent damage to the
device as well as electric shocks, surges and/or re.
If damage occurs to the device or accessories, discontinue use of the robot and contact customer
service. Never perform any repairs yourself.
Never operate the device and any accessories with wet hands.
CAUTION!
Before cleaning, remove
any cables and loose
objects to avoid the
device malfunctioning.
Areas of use
Wooden oors Stone oors Short and medium pile
If the device is not used
for several weeks, unplug
the power cable to protect
the battery.
The device can be used on the following surfaces:
carpets
Do not use the device in
damp, ammable,
explosive or corrosive
environments.
Plastic oors
5
03
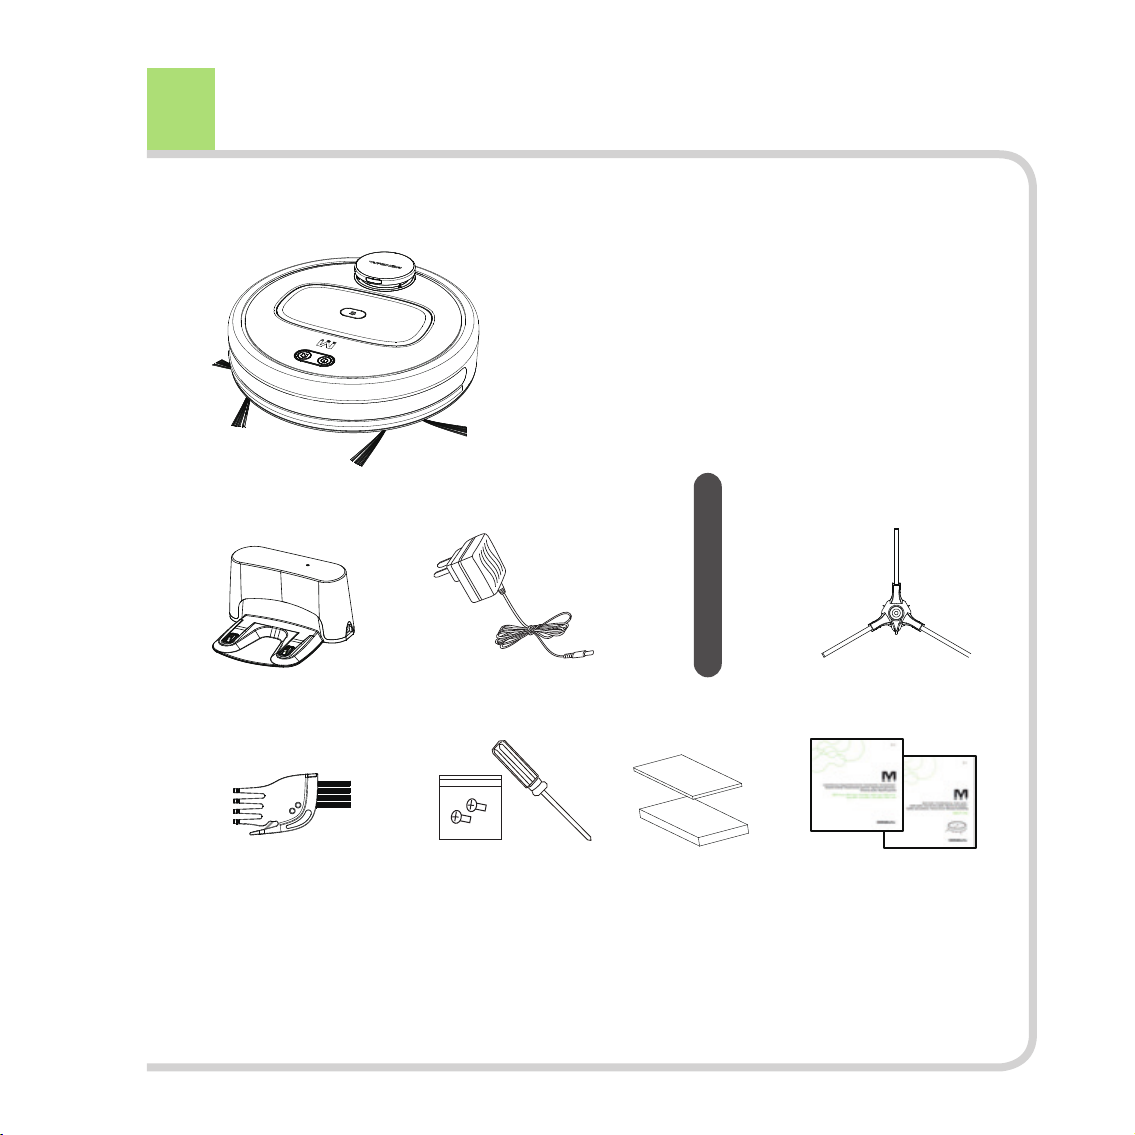
Package content
MBOT900 robot vacuum cleaner
- Pre-assembled main brush and side brushes
- Pre-assembled dust bin and lter
Charging station Mains adapter Protective strip Replacement set
of side brushes
Cleaning brush -
for cleaning
the main brush
6
Screwdriver and replacement
screws - for loosening/
tightening the side brushes
Replacement
lter set
Warranty booklet and
Quick Guide
04
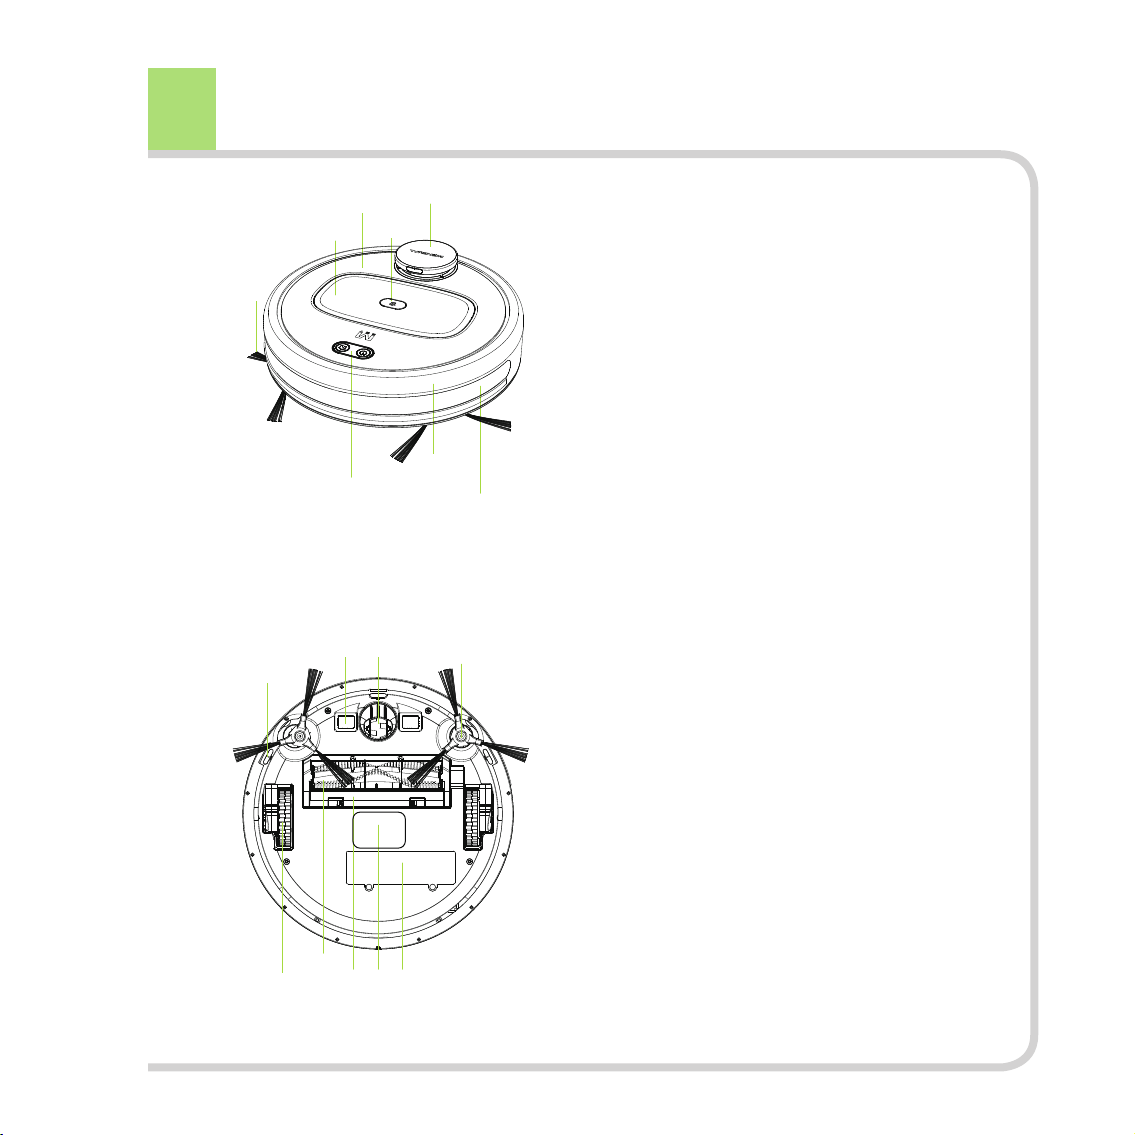
Product description
⑧
①
④
⑤
②
②
③
③
①
⑥
④
① Laser sensor & impact strip
② Upper cover
③ Dust bin button
④ Dust bin
⑤ Operating button
⑥ Impact strip
⑦ Signal window for obstacle sensors
⑧ Side brushes
⑦
① Floor sensor/fall sensor
② Charging contact
③ Front wheel/castor
⑥
⑤
⑦ ⑧ ⑨
④ Side brushes
⑤ Main brush
⑥ Drive wheel
⑦ Cover for main brushes
⑧ Name plate
⑨ Battery cover
7
05
Preparation
Download the
free smartphone
app for full use
of the MBOT900.
iOS Android
06
Remove the protective strip,
so that the impact strip can
move and can recognise obstacles.
Attach the protective strip
supplied to the impact strip
of the laser sensor.
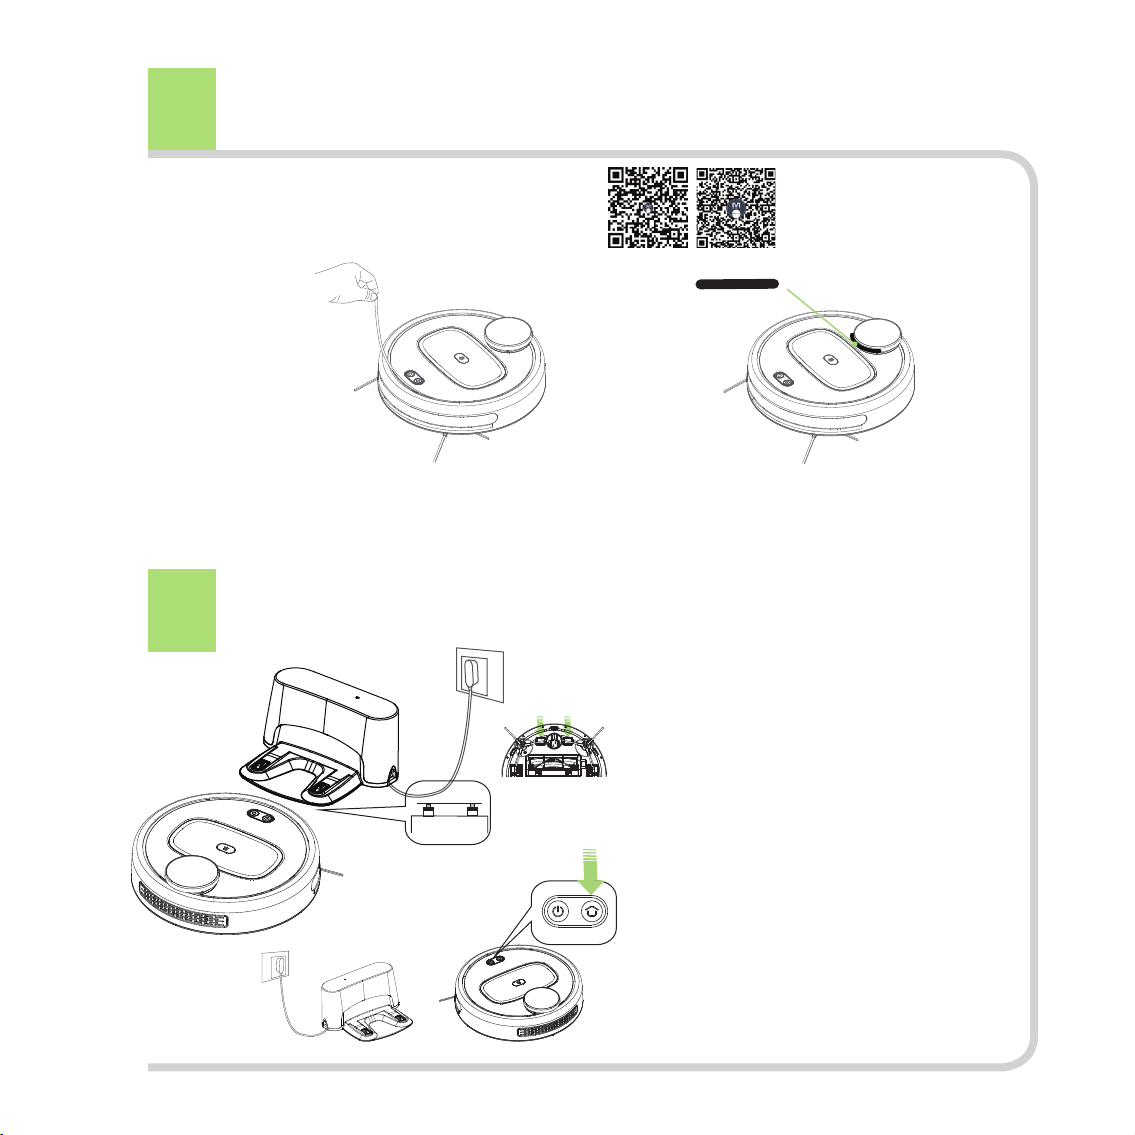
Charging the device
Hold the device with both hands and place it
on the charging station. Make sure that the
robot's contact is on the charging station.
The device beeps after a second and the LED
ring lights up as soon as contact is made.
When the battery level of the robot is sucient,
you can position the device approx. 2 m in front
of the charging station and press the HOME
button on the device. The robot will then dock
automatically to the charging station.
8
07
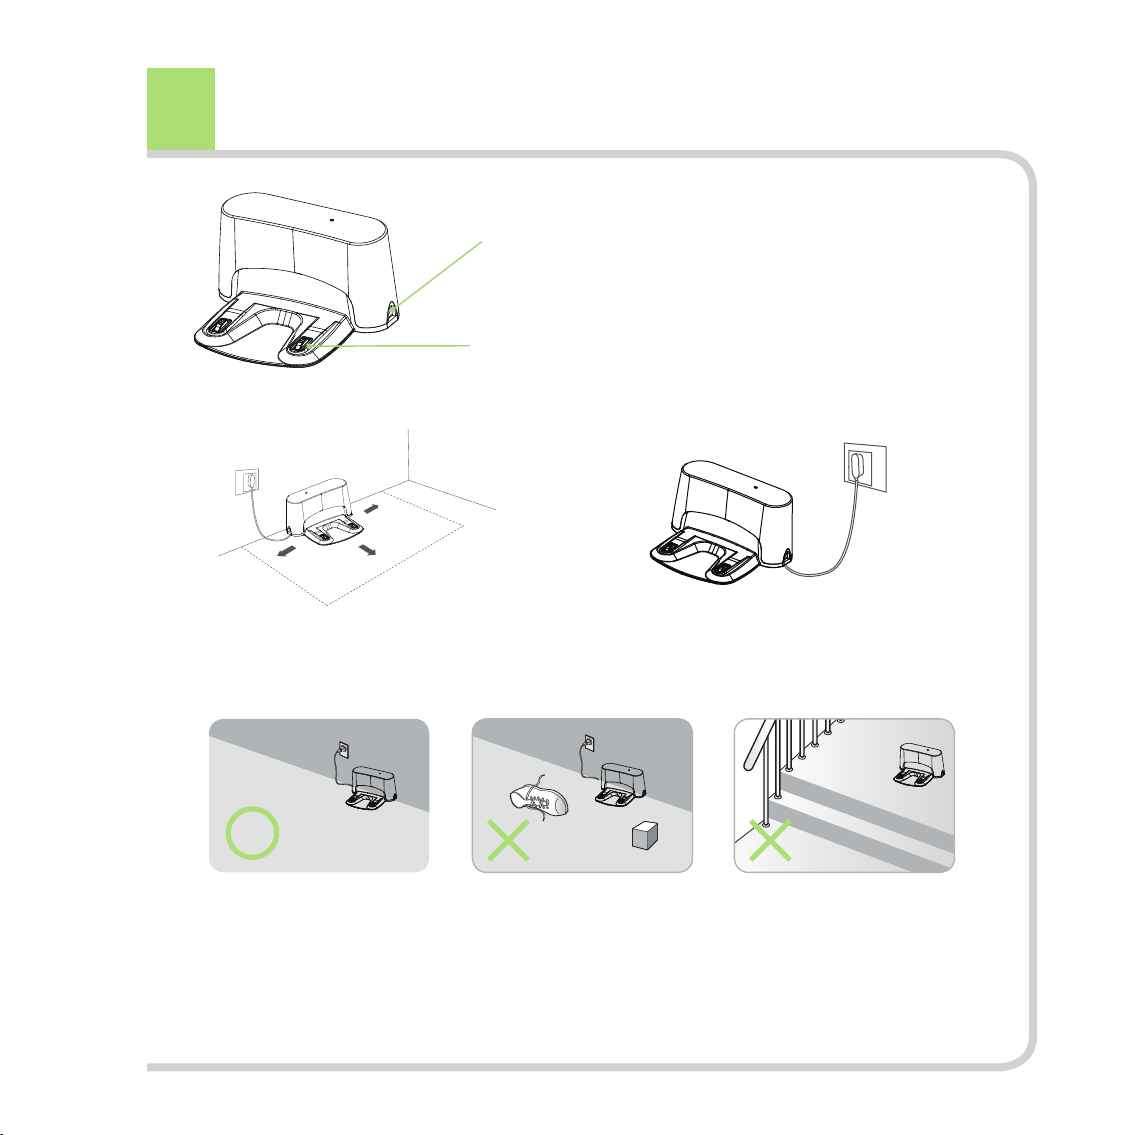
Charging station
Adaptor plug
Charging terminal
CAUTION!
m
1
3
m
1
m
When using the charging station, remember that
there should be a min. clearance of 3m at the front
and 1m at the sides.
Make sure that there
are no loose objects
around the charging station.
Plug in the mains adaptor. If there is a power
connection, the green LED on the top of the
charging station is lit.
Do not place the
charging station
next to a down stairway.
9
08
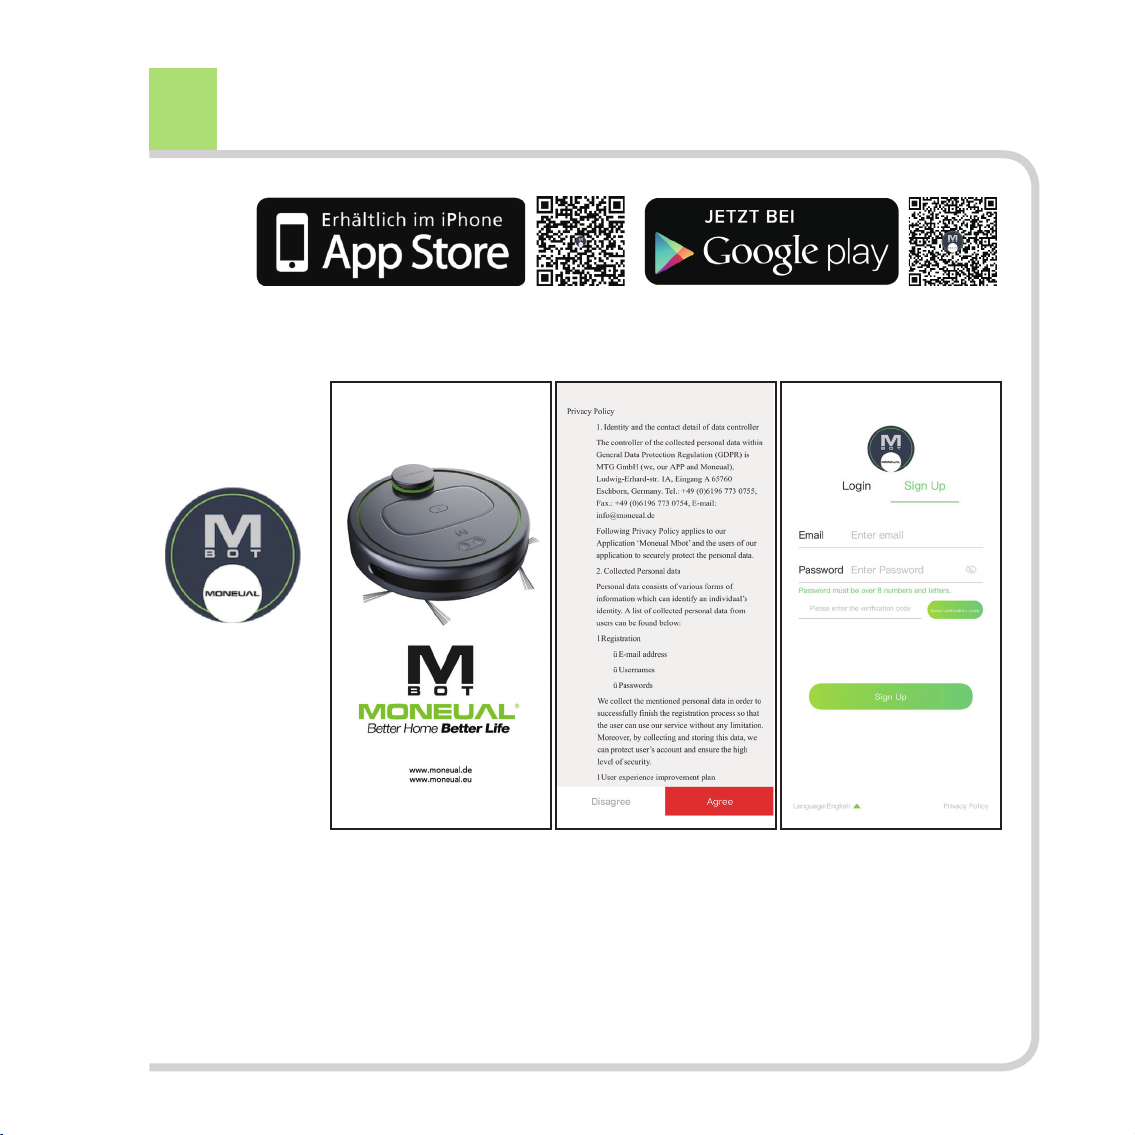
Download:
Setting up the app
10
app on your
smartphone.
Home screenOpen the MBOT
Please read the terms of
use and accept them,
if this applies
(required for use of the app).
Select your preferred
language in the
left bottom of the screen.
08
Setting up the appt
Click “Register” to register
to use the app.
Enter your data. The
verication code is sent to
the email address entered.
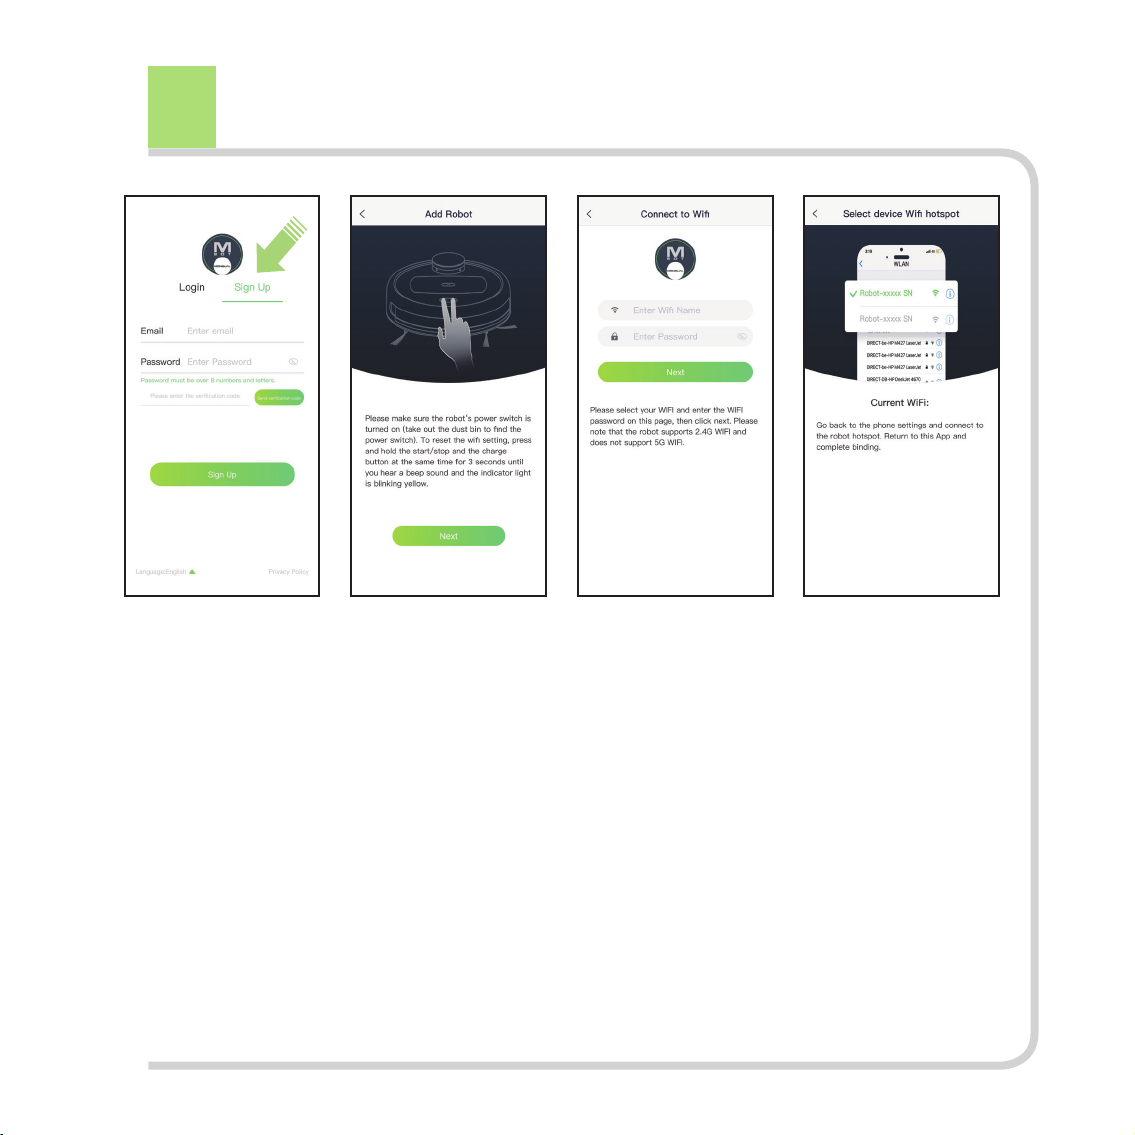
Click “Add device” in the
main menu and follow the
instructions.
Enter the details of your
wireless home network.
Go to your smartphone
settings and connect your
smartphone to the robot
network (the name always
begins with "Robot-")
It may take a few seconds
until the robot has set up the
network and becomes visible
on the smartphone.
Return to the MBOT app. The
robot will be connected.
11
 Loading...