

Page 1

Moneris® V400c
Reference Guide
(Apr 2019)
Page 2

Need help?
Web: moneris.com/support-v400c
Tech Trial Support: 1-866-319-7450
Record your Moneris merchant ID here:
____________________________________
Page 3

Contents
Setting up Your Terminal ..............................................................................................3
Before you get started ................................................................................................................................ 4
Hardware setup.......................................................................................................................................... 5
Connect cables to the all-in-one cable ............................................................................................................... 5
Remove the protective film (if applicable) ......................................................................................................... 6
Install the paper roll ........................................................................................................................................... 7
Software setup ........................................................................................................................................... 8
Connection setup ............................................................................................................................................................ 8
Securing your terminal ................................................................................................................................................... 9
Editing your settings ....................................................................................................................................................... 9
Enroll in Merchant Direct® ........................................................................................................................................... 10
Choose what to do next ................................................................................................................................................ 10
Communications troubleshooting ............................................................................................................. 11
Error messages .................................................................................................................................................11
Additional settings ................................................................................................................................... 12
Language settings .............................................................................................................................................12
Tip settings........................................................................................................................................................12
Multi-terminal settings .....................................................................................................................................14
Clerk settings ....................................................................................................................................................14
Receipt settings ................................................................................................................................................15
Communication settings ...................................................................................................................................17
Security settings ...............................................................................................................................................19
Processing purchase transactions when your Internet connection is down ....................................................21
Using Your Terminal ................................................................................................... 22
Moneris V400c ......................................................................................................................................... 23
Terminal keys and hardware ............................................................................................................................24
On-screen buttons ............................................................................................................................................25
Navigating the terminal ....................................................................................................................................25
Touch screen interaction .............................................................................................................................................. 25
Start up ......................................................................................................................................................................... 26
Getting to the Main menu ............................................................................................................................................ 26
Main menu .......................................................................................................................................................27
Security prompts ..............................................................................................................................................28
Locking the screen ............................................................................................................................................28
Card entry options .................................................................................................................................... 29
Insert: Chip cards ..............................................................................................................................................29
Wave/Tap: Contactless cards ...........................................................................................................................29
Swipe: Magnetic stripe cards ...........................................................................................................................30
Transactions ............................................................................................................................................. 31
Moneris V400c Terminal: Reference Guide 1
Page 4

Transaction guidelines ......................................................................................................................................31
Purchase - debit/credit .....................................................................................................................................31
Partially approved Purchase .............................................................................................................................32
Balance inquiry on pre-paid credit cards ..........................................................................................................33
Refund - debit/credit ........................................................................................................................................33
Void ...................................................................................................................................................................35
Pre-authorization ..............................................................................................................................................36
Completion .......................................................................................................................................................37
Merchant prompts ...........................................................................................................................................38
Purchase and pre-authorization ................................................................................................................................... 38
Refund .......................................................................................................................................................................... 39
Void ............................................................................................................................................................................... 39
Customer prompts ............................................................................................................................................40
Purchase and Pre-authorization ................................................................................................................................... 40
Refund .......................................................................................................................................................................... 42
Void ............................................................................................................................................................................... 43
Receipts ................................................................................................................................................... 44
Processing receipts from a transaction ............................................................................................................44
Customer copy .............................................................................................................................................................. 44
Merchant copy .............................................................................................................................................................. 44
Reprinting receipts ...........................................................................................................................................45
Reprint both customer and merchant receipt for the last transaction ........................................................................ 45
Reprint both customer and merchant receipt for a previous transaction ................................................................... 45
Receipt examples ..............................................................................................................................................46
Original receipt ............................................................................................................................................................. 46
Partial approval receipt ................................................................................................................................................ 47
Signing a credit card receipt ......................................................................................................................................... 47
Card masking ....................................................................................................................................................47
Reports .................................................................................................................................................... 48
Merchant Direct reporting ...............................................................................................................................48
Transaction reports ..........................................................................................................................................48
Clerk totals report ......................................................................................................................................................... 48
Terminal totals report ................................................................................................................................................... 49
Transaction Details report ............................................................................................................................................ 49
Pre-Authorization report .............................................................................................................................................. 50
Tip totals report ............................................................................................................................................................ 50
Settings reports ................................................................................................................................................51
Basic terminal report .................................................................................................................................................... 51
Enhanced report ........................................................................................................................................................... 51
End of day process .................................................................................................................................... 52
System close .....................................................................................................................................................52
Merchant close .................................................................................................................................................53
Troubleshooting ....................................................................................................................................... 54
Error messages on the V400c terminal ............................................................................................................54
Equipment issues ..............................................................................................................................................55
Other issues ......................................................................................................................................................55
Merchant support ....................................................................................................... 56
Moneris V400c Terminal: Reference Guide 2
Page 5

In this section, we go over everything you need to
know to set up your V400c terminal.
Setting up Your Terminal
Setting up Your Terminal
Moneris V400c Terminal: Reference Guide 3
Page 6
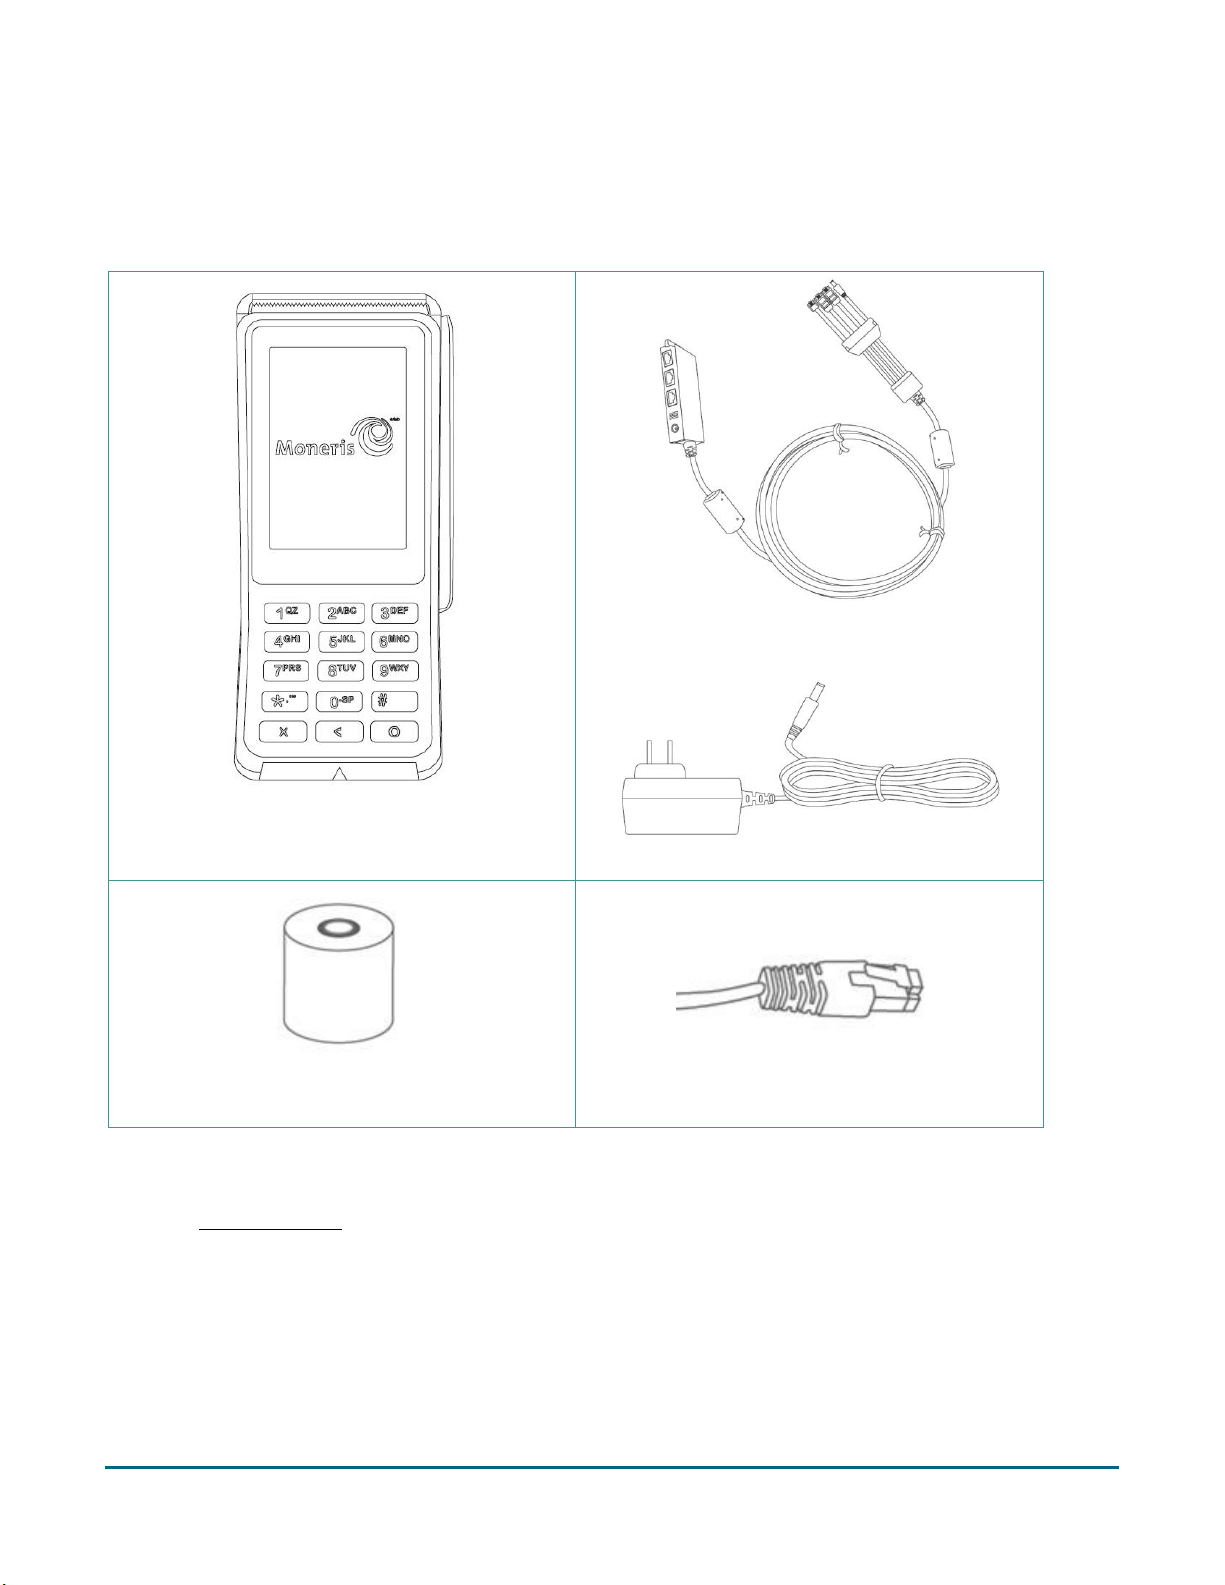
Before you get started
V400c terminal
All-in-one cable (connected to terminal)
Power cable
Paper roll
Ethernet cable
1. Confirm you have received the required hardware.
2. Review the Moneris Ethernet Readiness Checklist to ensure that your Ethernet service is ready to support
your terminal. The checklist is available online at moneris.com/support-V400c
3. Go to Hardware setup on page 5.
Moneris V400c Terminal: Reference Guide 4
Page 7
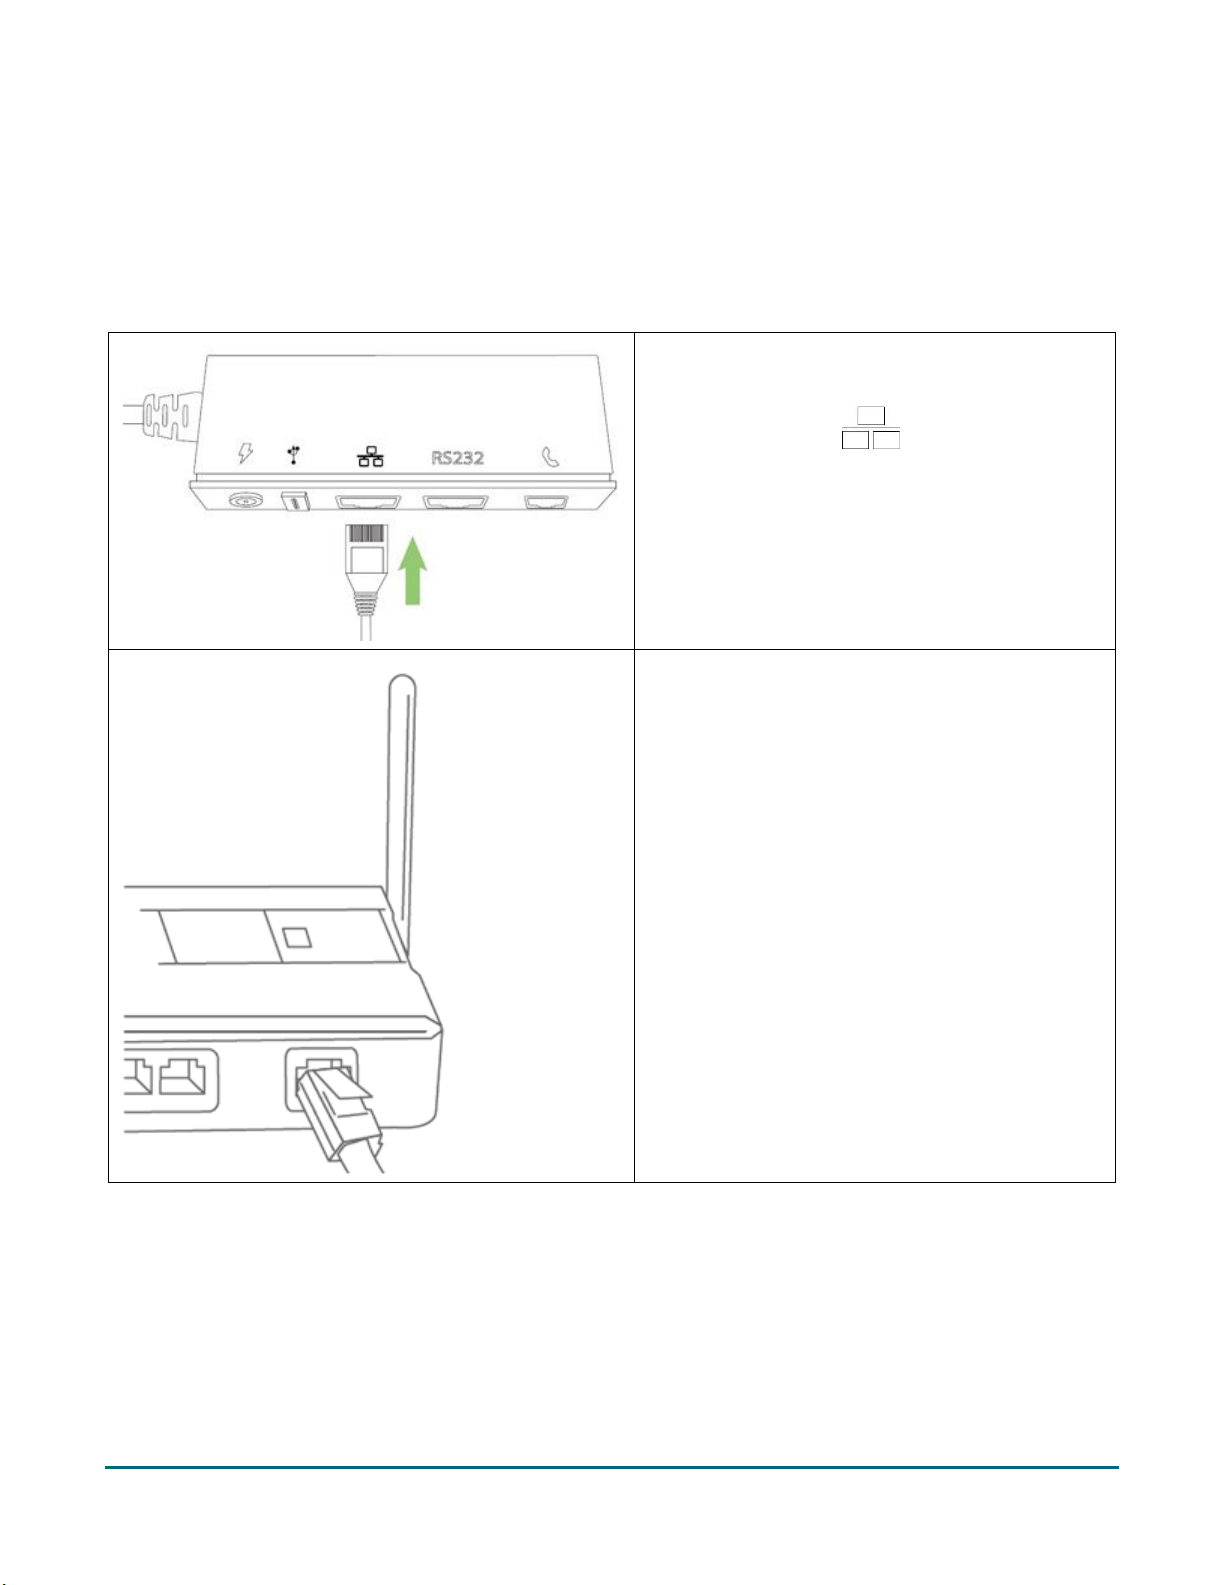
Hardware setup
1. Plug one end of the Ethernet cable into the
port on the multi-port box labelled with the
network symbol ( ).
2. Plug the other end of the Ethernet cable into
the router/switch/hub/internal wiring —
whatever is applicable to the high-speed
Internet service at your location. (If necessary,
please refer to the Moneris Ethernet
Readiness Checklist).
Connect cables to the all-in-one cable
The all-in-one cable is already connected to the terminal when Moneris ships it to you. These steps explain how
to connect cables to the all-in-one cable.
Moneris V400c Terminal: Reference Guide 5
Page 8
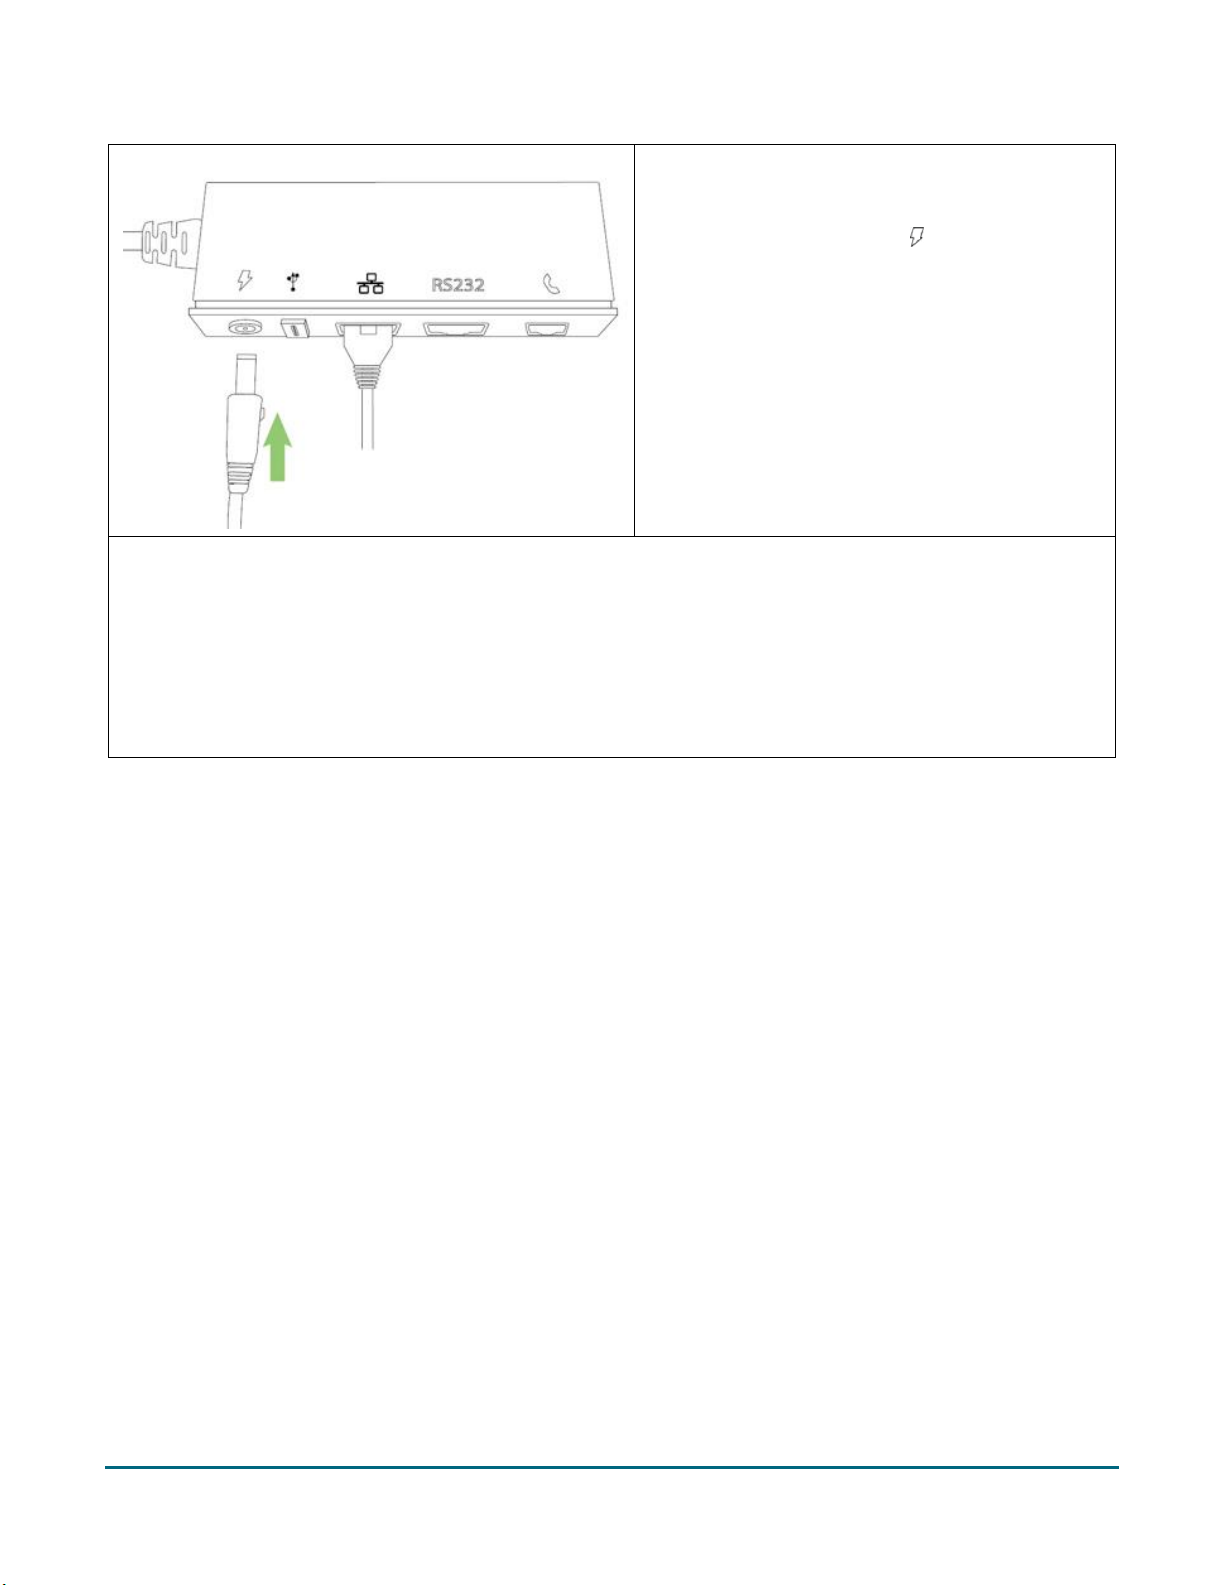
3. Plug the barrel connector of the power cable
into the port on the multi-port box labelled
with the power symbol ( ).
4. Plug the other end of the power cable into a power source. The terminal will power on.
Recommendations: Always plug the power cable into the power source last to avoid power surges. Use a
power bar equipped with surge protection if possible. Do not use the power cable from your existing
terminal, as it may damage your new terminal.
IMPORTANT! You must use the exact power adaptor and cables provided by Moneris to work with
your terminal. Failure to do so may affect the operability of, or cause damage to, the equipment.
Remove the protective film (if applicable)
If your V400c terminal has a protective film covering the display screen, peel the film off.
Hint: Peel from the top right to the bottom left corner.
Moneris V400c Terminal: Reference Guide 6
Page 9

Install the paper roll
1. Lift the printer latch up, and then pull back to open the
lid and expose the paper well.
2. Insert the paper roll into the paper well with the loose
end unrolling from the top of the roll toward the back
of the terminal.
Note: If the paper is installed backward, your
printouts will be blank.
3. Unroll enough paper to extend at least one inch (2.5
cm) over the top of the lid.
4. Close the lid, and press down to snap it back into place
so that the extended paper is pressed securely against
the top of the closed lid.
Note: The paper should unroll back over the top and
back of the terminal, not unroll over the faceplate.
5. Your hardware setup is complete. Go to Software setup on page 8.
Moneris V400c Terminal: Reference Guide 7
Page 10

Software setup
To set up your terminal software quickly and start processing transactions, simply respond to the prompts on
screen. If you need help, follow these step-by-step instructions.
1. At the “Welcome! Let’s get you payment ready” screen, tap OK.
The terminal displays the message “Please wait while your device syncs with Moneris”.
If the “Please make sure your device is connected to the Internet” message appears, the terminal is not
able to connect to the Internet. Make sure your terminal is connected to your network by Ethernet
cable. If needed, refer to the Moneris Ethernet Readiness Checklist to make sure your terminal is ready
for Internet communication.
2. Wait while the terminal connects to Moneris to obtain your account settings.
If the “We're unable to connect” message appears, the terminal is unable to connect to Moneris. Refer
to Connection setup below.
3. The next step is to set up a high security user ID and password. Go to the Securing your terminal section on
page 9.
Connection setup
The terminal is unable to connect to Moneris and requires information about your network to establish the
connection settings. If you are not sure how your network is set up, contact your network administrator.
Note: When entering IP addresses, use the terminal's keypad. To enter a period, press the punctuation key
once.
1. Tap the Select IP Address Type field and select the type of IP addressing used by your network.
If you selected Dynamic IP, the screen shows the Automatic DNS setting with the toggle set to ON. Go to
step 2.
If you selected Static IP, the screen shows the fields required for static IP. Go to step 3.
2. Review the Automatic DNS setting.
If your network uses automatic DNS, tap OK to accept the setting and continue. Go to step 4.
If your network does not use automatic DNS, tap the toggle to change it to the OFF position, then tap
OK.
a. Tap the Primary DNS field and enter the IP address of your primary DNS server.
b. Tap the Secondary DNS field and enter the IP address of your secondary DNS server.
c. Tap OK at the bottom of the screen then go to step 4.
3. At the static IP setup screen, tap each field and enter the requested IP address, then tap OK.
Note: The automatic DNS toggle (set to off) is shown for information only and cannot be changed at this
screen.
The terminal displays: “Please wait while your device syncs with Moneris”.
4. Go to the Securing your terminal section on the next page.
Moneris V400c Terminal: Reference Guide 8
Page 11
Securing your terminal
Menu
Instructions
Tip
Use this screen to turn tip entry on or off. Once tipping is on, you can set the options
that your customers will see when leaving a tip. Refer to Tip settings on page 12 for
more information.
Multi-terminal
Use this screen to enable multi-terminal settings, in order to use multi-terminal batch
close. Refer to Multi-terminal settings on page 14 for more information.
Clerks
Use this screen to turn clerk IDs on or off. Once clerk IDs are on, you can create new
clerk IDs and display clerk IDs. Refer to Clerk settings page 14 for more information.
A high security user ID and passcode are required to protect the terminal. Use this user ID/passcode to perform
protected transactions and to set up other users/clerks on the terminal.
Note: If you already have a V400c terminal, the user ID/passcode setup prompt will not appear. Moneris will
download the high security user ID/passcode you created when setting up your first terminal.
1. At the “Let's secure this device” screen, tap the User ID field and enter a user ID consisting of 1 to 4 digits,
then tap OK.
2. Tap the Passcode field and enter a passcode consisting of 4 to 10 digits, then tap OK.
You cannot use 3 or more consecutive numbers such as 1236, 65439, or 3 or more repeating numbers
such as 9996, 1113.
3. Tap the Personal Identifier field and enter a name, then tap OK.
This field is optional.
It can be letters or numbers.
It could be your name or employee number, or other descriptor such as Manager or Supervisor.
4. Tap OK at the bottom of the screen to accept the information you entered.
The “Congratulations, you're payment ready!” message appears.
5. Go to the Editing your settings section on page 9 to review the most common settings on your terminal to
ensure they match the needs of your business.
Editing your settings
The Quick Setup menu appears after you tap 1 Edit your Settings or you press 1 on the keypad.
1. Tap each menu item to view the settings. You can edit them, if needed.
Moneris V400c Terminal: Reference Guide 9
Page 12
Menu
Instructions
Receipts
Use this receipt settings screen to:
enable the options for how a customer can receive their receipt (email, text, and
no receipt, in addition to printing which is always available)
enable or disable specific options for customer receipts (for example, enable print
and text only)
set the print delay (in seconds) between the customer and merchant copies being
printed
specify the number of merchant receipt copies
set up or modify a header on your receipts
set up or modify a footer on your receipts
Refer to Receipt settings on page 15 for more information.
2. When finished reviewing or editing your settings, tap Next.
The “Congratulations, you're payment ready!” message appears.
3. Tap OK.
4. Go to the Enroll in Merchant Direct section below.
Enroll in Merchant Direct®
Merchant Direct is the Moneris online tool for accessing all of your merchant reports, including end-of-day
reports. To sign up for Merchant Direct, follow these steps.
Note: If you have already enrolled for Merchant Direct, you do not have to enroll again.
1. Go to moneris.com
2. In the top, right area of the screen, click Login and select Merchant Direct.
3. Click Online Enrolment.
4. Fill in the fields in the online form to complete your enrolment.
5. Proceed to Choose what to do next on the next page.
Choose what to do next
To process a Purchase transaction, refer to Purchase – debit/credit on page 31.
To process another transaction: From the Main menu (refer to page 27), tap Transactions then select the
transaction you wish to perform.
To change settings: From the Main menu (refer to page 27), tap Settings.
For an overview of the terminal, refer to Moneris V400c (refer to page 23).
If you are experiencing issues with setting up your terminal to communicate with Moneris, go to
Communications troubleshooting (refer to page 11).
Moneris V400c Terminal: Reference Guide 10
Page 13

Communications troubleshooting
Error messages
Click on each error message link to see troubleshooting solutions.
Please make sure your device is connected to the Internet.
We're unable to connect.
Cannot connect to cloud / host.
Moneris V400c Terminal: Reference Guide 11
Page 14
Additional settings
Menu option
Instructions
Tip Support
Tap the toggle to turn this setting on or off.
Turn this setting on if you want your customers to be prompted to leave a tip.
Tip by Dollar
Tap the toggle to turn this setting on or off.
Turn this setting on if you want your customers to be able to enter a tip as a
dollar amount.
Tip by Percent
Tap the toggle to turn this setting on or off.
Turn this setting on if you want your customers to be able to enter a tip as a
percentage of the bill.
If you change a setting and save it, the terminal displays “Settings Saved” or a similar message. To clear the
message, you have 3 options:
Tap it;
Press the green key; or
Simply wait for 3 seconds for the message to disappear.
Language settings
Use this screen to set the language of the terminal to English or French.
1. From the Main menu , tap Settings > Application > Language
Respond to any security prompts (refer to page 28) that appear.
2. To change the language, tap the Language field, then tap English or French.
3. When you are finished, tap Save.
The screen returns to the Application Settings menu in case you wish to change other settings.
4. When “Settings Saved” appears, press the green key to clear the message.
5. Press the red key to return to the Main menu.
Tip settings
This screen allows you to:
turn tip entry on or off;
choose which options your customers will see when entering a tip.
1. From the Main menu, tap Settings > Application (or Quick Setup) > Tip.
Respond to any security prompts ((refer to page 28) that appear.
2. To change the settings, follow the instructions in the table.
Moneris V400c Terminal: Reference Guide 12
Page 15
Menu option
Instructions
Tip Pre-set 1
Tap the toggle to turn this setting on or off.
Tap the pre-set value field and key in a percentage value (for example, 15).
Turn this setting on if you want your customers to be able to enter a tip as a preset percentage.
Tip Pre-set 2
Tap the toggle to turn this setting on or off.
Tap the pre-set value field and key in a percentage value (for example, 20). This
value must be greater than Tip Pre-set 1.
Turn this setting on if you want your customers to be able to enter a tip as a preset percentage.
Tip Pre-set 3
Tap the toggle to turn this setting on or off.
Tap the pre-set value field and key in a percentage value (for example, 25). This
value must be greater than Tip Pre-set 2.
Turn this setting on if you want your customers to be able to enter a tip as a preset percentage.
Tip Warning
Tap the toggle to turn this setting on or off.
Tap the pre-set value field and key in a percentage value (for example, 40). This
value must be greater than Tip Pre-set 3.
Turn this setting on if you want your customers to see a notification on screen
when they enter a tip as a large percentage of the purchase amount. It protects
customers from data entry errors. The notification will allow customers to
change the amount or to proceed.
3. When you are finished setting the tip options, tap Save.
The screen returns to the Application Settings menu (or the Quick Setup menu if you accessed it from
there).
4. When “Settings Saved” appears, press the green key to clear the message.
5. Press the red key to return to the Main menu.
Moneris V400c Terminal: Reference Guide 13
Page 16
Multi-terminal settings
Menu option
Instructions
Multi-Terminal
Support
Tap the toggle to turn this setting on or off.
When this setting is on, the next two fields appear.
Single Terminal
Support
When multi-terminal support is enabled, this setting allows you to close the
batch or generate reports for just one terminal.
Tap the toggle to turn this setting on or off.
Terminal Name
To assign a name to the terminal, tap Terminal Name, enter a descriptive
name (for example, Bar1), then tap OK.
This screen allows you to:
enable multi-terminal support, such as multi-terminal batch close and multi-terminal reports;
assign a name to a terminal so that you can easily select it for multi-terminal operations.
1. From the Main menu, tap Settings > Application or Quick Setup > Multi-terminal.
Respond to any security prompts (refer to page 28) that appear.
2. To change these settings, follow the instructions in the table.
3. When you are finished setting the multi-terminal options, tap Save.
The screen returns to the Application Settings menu (or the Quick Setup menu if you accessed it from
there).
4. When “Settings Saved” appears, press the green key to clear the message.
5. Press the red key to return to the Main menu.
Clerk settings
Follow these steps to:
turn clerk IDs on or off
create a new clerk ID
manage clerk IDs
Turning on clerk IDs allows you to identify which clerk processed a transaction. You can then generate reports
such as transaction totals by clerk and tip totals by clerk.
1. From the Main menu, tap Settings > Application or Quick Setup > Clerk
Respond to any security prompts (refer to page 28) that appear.
Moneris V400c Terminal: Reference Guide 14
Page 17

2. To change the settings, follow the instructions in the table.
Menu option
Instructions
Clerk IDs
Tap the toggle to turn this setting on or off.
Turn this setting on if you want the terminal to prompt for a clerk ID.
Display Clerk IDs
Tap the toggle to display the current list of clerk IDs.
The terminal connects to Moneris to retrieve the list of clerks.
Note: Your terminal must be connected to Moneris.
+ Add Clerk ID
a. Tap this menu item to add a clerk ID.
b. Key in a new clerk ID (minimum 1 and maximum 6 characters, using any
combination of numbers and letters), then tap OK.
3. When you are finished setting the Clerk ID options, tap Save.
The screen returns to the Application Settings menu (or the Quick Setup menu if you accessed it from
there).
4. When “Settings Saved” appears, press the green key to clear the message.
5. Press the red key to return to the Main menu.
Receipt settings
Follow these steps to:
enable the options for how a customer can receive their receipt (email, text, none, in addition to Print which
is always available). If Cardholder Choice is turned off, the receipt will be printed by default.
enable or disable specific options for customer receipts (for example, print and text only).
set the print delay (in seconds) between the customer and merchant copies being printed.
specify the number of merchant receipt copies.
set up or modify a header on your receipts.
set up or modify a footer on your receipts.
1. From the Main menu, tap Settings > Application or Quick Setup > Receipt
Respond to any security prompts (refer to page 28) that appear.
Moneris V400c Terminal: Reference Guide 15
Page 18
2. To change the settings, follow the instructions in the table below.
Menu option
Instructions
Cardholder Choice
Tap the toggle to turn this setting on or off.
Turn this feature on to give your customers a choice of how to receive their
receipts.
The following options can be set only when Cardholder Choice is turned on.
Tap the toggle beside each option to turn the option on or off.
Note: The option to print the receipt does not appear on the list since
a printed receipt must always be available to the customer.
Email Receipt: Turn this option on if you wish to allow your
customers to receive their receipt by email.
Text Receipt: Turn this option on if you wish to allow your
customers to receive their receipt by text.
No Receipt: Turn this option on to allow your customers to choose
not to receive a receipt.
If you turn off these three options, the terminal will automatically print the
customer receipt without prompting.
Print Delay
The print delay determines how long the terminal pauses between printing
the customer receipt and printing the merchant receipt.
To change the default of 3 seconds, tap the Print Delay field, enter a new
value (in seconds), then tap OK.
Number of
Merchant Receipts
This setting determines how many copies of the merchant receipt are
printed. To change the default, tap the field, select a new value, then tap
OK.
Note: A merchant receipt is always printed for transactions that require a
customer signature, even when Number of Merchant Receipts is set to zero.
Header Settings
The header settings allow you to print information at the top of your
receipts, such as your website address or other social media contacts. You
do not need to enter the name of your business or your address in the
header. This information will be included automatically on your receipts.
Note: Information you enter in the header will only appear on the receipt
when printed from the terminal. It will not appear on the receipt if it is sent
by text or email to the customer.
To set up a header for your receipts, tap Header Settings, choose a
language, tap each field you want to fill out, enter the text you wish, then
tap OK.
Moneris V400c Terminal: Reference Guide 16
Page 19

Menu option
Instructions
Footer Settings
The footer settings allow you to print information at the end of your
receipts, such as a holiday greeting (for example, Happy Mother’s Day) or a
message of appreciation (for example, Thank you for your business).
Note: Information you enter in the header will only appear on the receipt
when printed from the terminal. It will not appear on the receipt if it is sent
by text or email to the customer.
To set up a footer for your receipts, tap Footer Settings, choose a language,
tap each field you want to fill out, enter the text you wish, then tap OK.
3. When you are finished setting the receipt options, tap Save.
Static IP fields
Instructions
IP Address
Tap the field, key in the IP address to be assigned to the terminal, and tap OK.
Subnet Mask
Tap the field, key in the subnet mask, and tap OK.
Gateway
Tap the field, key in your gateway address, and tap OK.
Primary DNS
Tap the field, key in your primary DNS address, and tap OK.
Secondary DNS
Tap the field, key in your secondary DNS address, and tap OK.
Connection
Timeout
(seconds)
This field indicates the number of seconds the terminal will try to connect to the
network before timing out.
If the default value is acceptable, go to step 4.
If you wish to change the value, tap the field, key in a new value, and tap OK. Go to
step 4.
The screen returns to the Application Settings menu (or the Quick Setup menu if you accessed it from
there).
4. When “Settings Saved” appears, press the green key to clear the message
5. Press the red key to return to the Main menu.
Communication settings
This screen allows you to set up your terminal to communicate with your network. You can choose dynamic IP or
static IP addressing.
Note: When entering IP addresses, use the terminal's keypad. To enter a period, press the punctuation key
once.
1. From the Main menu, tap Settings > Communication > Communication Setup
Respond to any security prompts (refer to page 28) that appear.
2. Tap the IP Address Type field, and select Static IP or Dynamic IP.
If you selected Dynamic IP, go to step 3
If you selected Static IP, complete the rest of the fields on the screen as described in this table. If you
need assistance with these fields, contact your network administrator.
Moneris V400c Terminal: Reference Guide 17
Page 20

3. After selecting Dynamic IP, complete the rest of the fields on the screen as described in this table. If you
Dynamic IP fields
Instructions
Automatic DNS
Tap the toggle to turn this setting on or off.
If you turn it on, go to the Connection Timeout field below.
If you turn it off, complete the next two fields: primary DNS and
secondary DNS.
Primary DNS
Tap the field, key in your primary DNS address, and tap OK.
Secondary DNS
Tap the field, key in your secondary DNS address, and tap OK.
Connection
Timeout (seconds)
This field indicates the number of seconds the terminal will try to connect
to the network before timing out.
If the default value is acceptable, go to step 4.
If you wish to change the value, tap the field, key in a new value, and
tap OK. Go to step 4.
need assistance with these fields, contact your network administrator.
4. When you are finished setting the Communication options, tap Save.
If you changed the IP Address Type (from static IP to Dynamic IP or vice versa), the terminal will reboot, as
indicated by the notification on screen “The terminal will now reboot. Please wait”. After the terminal
reboots, continue at Security settings below.
If you changed one of the other fields, the screen returns to the Communication Settings menu. Go to the
next step.
5. When “Settings Saved” appears, press the green key to clear the message.
6. Press the red key to return to the Main menu.
Moneris V400c Terminal: Reference Guide 18
Page 21

Security settings
Menu option
Instructions
Security Access
Tap each field to set the security access level for specific transactions and
functions. Tap Save when done.
Temporary
Lockcode
To lock the terminal, enter a lock code of your own choosing, then tap OK.
If needed, review the passcode rules directly below.
To unlock the terminal, re-enter the lock code.
Add New Passcode
Tap each field and enter a value then tap Save.
Passcode:
The passcode must be 4 to 10 digits.
You cannot use 3 or more consecutive numbers, such as 12358,
654975,
You cannot repeat a number 3 times or more, such as 99975,
85111
Personal Identifier:
This field is optional.
It can be letters or numbers.
It could be the person's name or employee number, or other
descriptor such as Day Shift or Night Shift.
It does not have to be unique — it can be assigned to more than
one passcode.
User ID: The User ID must be 1 to 4 digits long, for example, 0001.
Access Level: The access level can medium security or high security.
High security passcodes have access to all terminal functions.
The first passcode you set up on the terminal must be high security.
This passcode will have the ability to assign medium level or high
level passcodes to other users.
Change Passcode
Tap each field and enter the required information, then tap Save:
User ID
Existing passcode
New passcode
If needed, review the passcode rules above.
Follow these steps to add, change, or delete a passcode:
1. From the Main menu, tap Settings > Application > Security
Respond to any security prompts (refer to page 28) that appear.
2. To view or change settings, tap each menu item and follow the instructions in the table.
Moneris V400c Terminal: Reference Guide 19
Page 22

Menu option
Instructions
Forgot Passcode
Resetting a medium security passcode.
A user with a high security passcode can reset a medium security passcode.
a. Tap Medium Sec. Passcode.
Note: If all your user IDs are at the same security level, you will not see
this screen.
b. Enter the user ID of the medium security user who forgot their
passcode, then tap Next.
c. Tap the New Passcode field, enter a new passcode for the user who
forgot their passcode. If needed, review the passcode rules on page 19.
d. Tap the User ID and Passcode fields, enter your high security user ID
and passcode, then tap Save.
e. The terminal saves the new passcode, and then displays “Passcode
Saved”.
f. Tap Passcode Saved to clear the message.
g. Give the new passcode to the medium security user who can then
change it to a confidential passcode using the Change Passcode
function on page 19.
Resetting a high security passcode
A high security passcode user can allow another high security user to reset
their passcode using this screen, with assistance from Moneris.
a. Tap High Security Passcode.
Note: If all your user IDs are at the same security level, you will not
see this screen.
b. Enter the user ID of the high security user who forgot their passcode,
then tap Next.
c. Tap the New Passcode field, enter a new passcode, re-enter the
passcode, then tap OK. If needed, review the passcode rules on
page 19.
d. Call Moneris to obtain an unlock code. We will ask you for the unlock
token found at the top of the screen.
e. Tap the Unlock Code field and enter the unlock code provided by
Moneris, then tap OK.
f. Tap Save.
g. Tap Passcode Saved.
Delete Passcode
Tap each field and enter the required information, then tap Delete:
User ID
Existing passcode
Moneris V400c Terminal: Reference Guide 20
Page 23

3. When you are finished setting the passcode options, tap Save.
The screen returns to the Security Settings menu.
4. When “Settings Saved” appears, press the green key to clear the message.
5. Press the red key to return to the Main menu.
Processing purchase transactions when your Internet connection is down
If your Internet connection is down, you can still process some credit card purchase transactions on your
terminal using an optional feature called Store and Forward (SAF). Store and Forward processing allows you to
continue to accept purchase transactions even when the terminal is unable to connect to the Moneris host. SAF
purchases are stored securely on the terminal and are automatically forwarded to Moneris once the host
connection is available.
To request Store and Forward, contact Moneris in order to understand the risks and restrictions around this
feature. Carefully review the statement below before requesting and using SAF.
Please note that Store and Forward is an optional feature which will allow you to process transactions
which are not authorized by the issuing bank at the time you submit the transaction for acceptance by
the bank. For that reason, SAF carries increased risks and if you enable the feature you will be agreeing
to assume these risks, including that you may not receive settlement funds for some of these
transactions because the cards may not have sufficient funds available, the cards may be blocked, stolen
or fraudulently used, the stored transactions data on the terminals may be lost or damaged, you may
exceed the capacity of the terminals to store transactions, etc. Additionally, many safety features cannot
be used for such transactions and this increases the risk of chargebacks with limited or no remedies
available for the merchant, even if chip and PIN are used. You should only use store and forward if you
are prepared to assume these risks and you are allowed to do so by the Card Brand Rules and
Regulations. It is your responsibility to monitor how your terminals are used and you are fully liable for
all transactions processed using store and forward.
Notification before performing a SAF purchase transaction
The steps for performing a SAF purchase are the same as a regular credit purchase, with two additional steps.
The terminal will prompt you before performing a SAF transaction. At the prompt, you can cancel the
transaction or proceed. Before deciding to proceed with performing the SAF transaction, Moneris advises you to
exercise caution in considering the customer’s credit card, the customer’s behavior, and the transaction amount,
among other factors in order to identify and minimize potential fraud. If you decide to proceed, you must enter
your user ID and passcode each time you perform a SAF purchase.
To view the terminal prompt associated with the SAF feature, go to Merchant prompts (“Your terminal is
currently offline! You can… ) on page 38.
Moneris V400c Terminal: Reference Guide 21
Page 24

In this section, we go over everything you need to
know to use your V400c, including how to perform
transactions and end-of-day processes.
Using Your Terminal
Using Your Terminal
Moneris V400c Terminal: Reference Guide 22
Page 25
Moneris V400c
Use this handheld, all-in-one terminal and PINpad to process transactions at the point of sale (POS).
Both you and your customer will enter information and respond to prompts on the terminal. When directed on
screen, pass the terminal to the customer. When the customer has finished, they will pass the terminal back to
you as directed on screen. Respond to the prompts to complete the transaction.
Moneris V400c Terminal: Reference Guide 23
Page 26

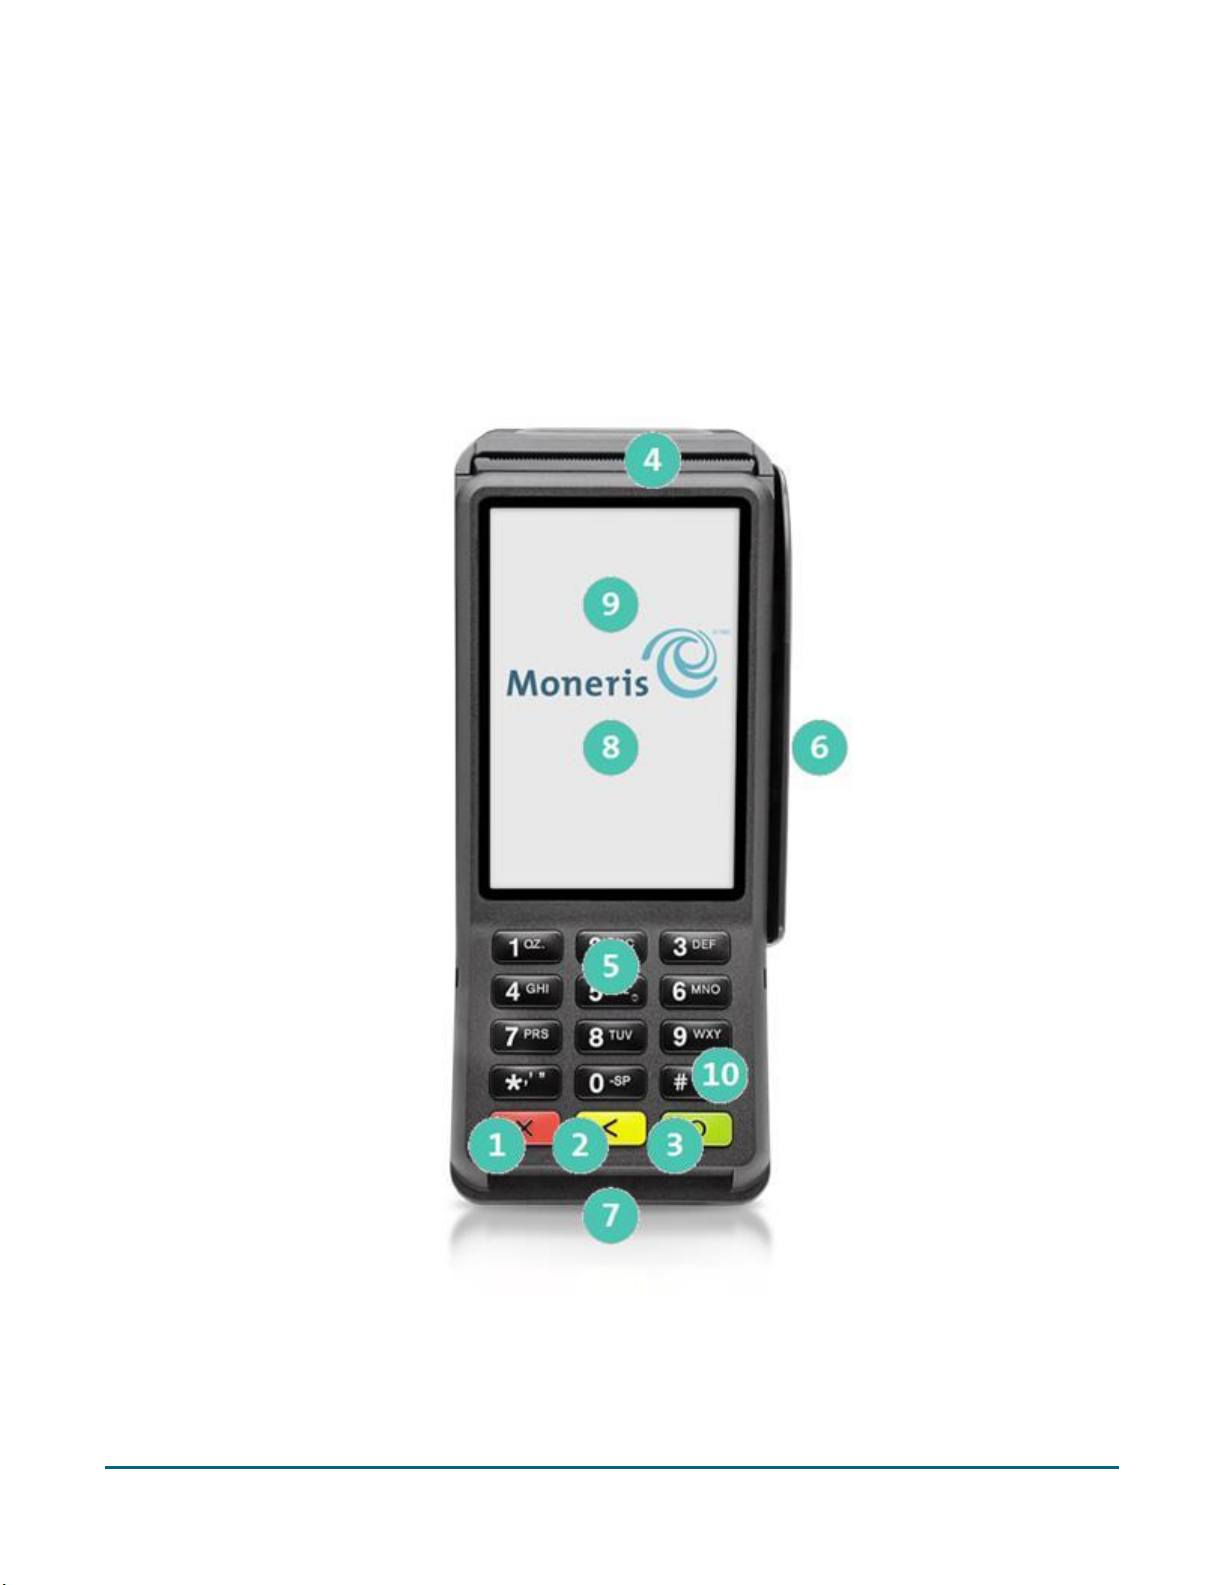
Terminal keys and hardware
Label
Terminal key or hardware
Use this key or hardware element to:
1
Red key
Cancel a transaction or function.
(Same as tapping the Cancel button on the display screen)
2
Yellow key
Delete one or more characters in a data field.
(Same as tapping the Delete button on the display screen)
3
Green key
Accept or submit data.
(Same as tapping the OK button on the display screen)
4
Printer
Print receipts and reports.
5
Keypad
Enter numerical data.
To enter a period or other punctuation, press the
punctuation key once.
6
Magnetic stripe reader
Read card information when a card is swiped.
7
Chip reader
Read card information when a chip card is inserted.
8
Display screen
Displays information.
9
Contactless reader (embedded in
display screen)
Read card information when a card is tapped.
10
Pound key
Go to the Main menu.
Moneris V400c Terminal: Reference Guide 24
Page 27

On-screen buttons
Screen element
Action performed:
Main menu icon
Go to the Main menu.
Cancel a transaction and return to the Purchase screen.
Note: You can also press the red key on the terminal keypad to
perform the same action.
Delete one or more characters in a data-entry field.
Note: You can also press the yellow key on the terminal keypad to
perform the same action.
Submit the data shown on-screen. For example, tap OK to indicate the
transaction amount is correct.
Accept/confirm the choice or information displayed on-screen.
Note: You can also press the green key on the terminal keypad to
perform the same action.
Go back to the previous screen/menu.
Help icon
To view the website address of the Moneris support page for your terminal.
The screen of your terminal is touch sensitive, like a smartphone. You can move around the application and
choose options by touching the appropriate element on screen. Here are the most common icons and buttons
that you should be familiar with.
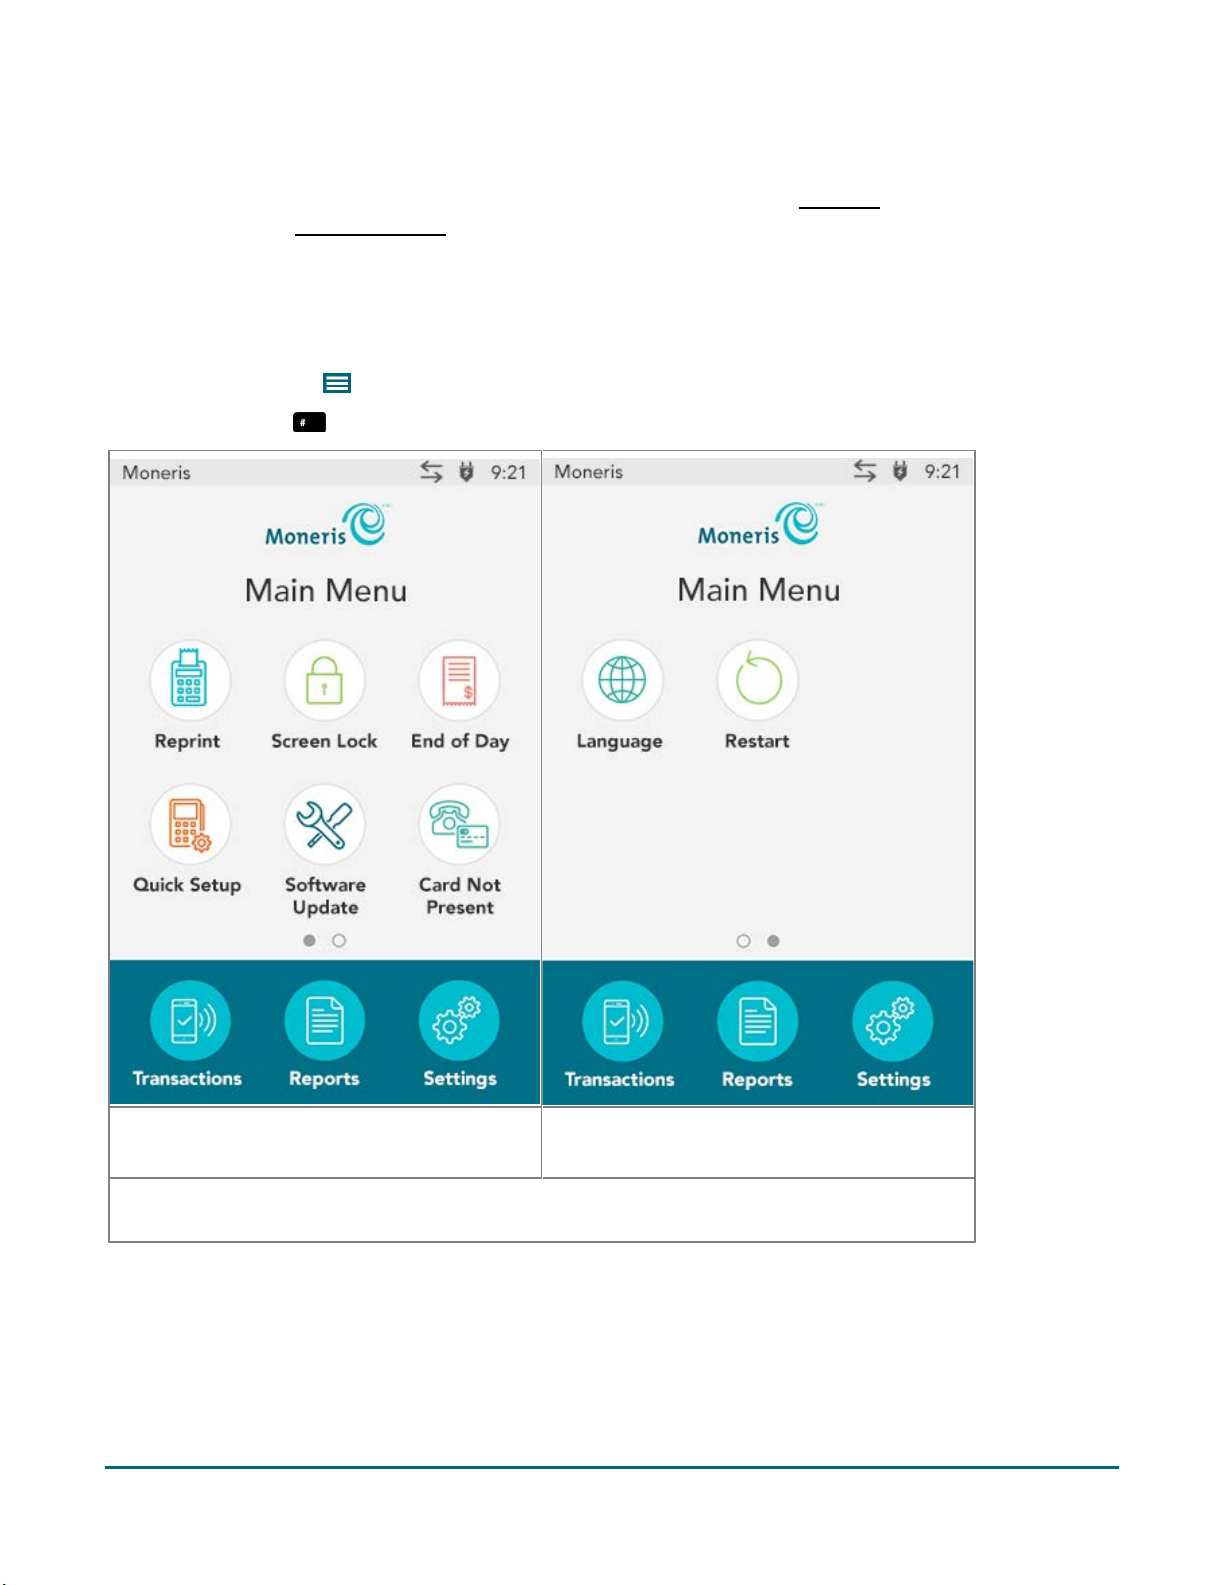
Navigating the terminal
Touch screen interaction
Your Moneris terminal features a color touch screen.
To access a function displayed on screen (for example, a button, a menu, a field), simply use your finger to
tap the item on the screen, or if a number is displayed beside the button text (for example )
press that number on the terminal keypad.
To view content (for example, a menu or report) that extends past the bottom of the screen, swipe up.
Swipe down to go back to the top of the screen.
The Main menu includes two screens. Swipe left to view screen 2. Swipe right to go back to screen 1.
Moneris V400c Terminal: Reference Guide 25
Page 28
Start up
Main menu screen 1
Swipe left to view screen 2.
Main menu screen 2
Swipe right to return to screen 1.
If the “Card Not Present” function is disabled, the icon for “Card Not Present” will not appear on
the Main menu. You will see the Language icon instead.
When the terminal starts up (after your initial setup), it will go directly to the Purchase screen. However, there
may be one or more security prompts (refer to page 28) that appear before you see the Purchase screen.
Getting to the Main menu
You can access all of the terminal functions from the Main menu. To get to the Main menu, use one of these
methods:
Tap the Main menu icon on the screen (if it is available)
Press the pound key on the keypad
Moneris V400c Terminal: Reference Guide 26
Page 29

Main menu
Menu item
Use this menu to:
Reprint
Reprint the last receipt or another receipt. Go to Reprinting receipts on
page 45.
Screen Lock
Lock the screen using a temporary lock code. Go to Locking the screen on
page 28.
End of Day
Close your batch and print batch reports. Go to End of day process on
page 52.
Quick Setup
Launch the Quick Setup procedure to set up your terminal. Go to Software
setup on page 8 and review each sub-section.
Software Update
Display the Software Update menu. You can check for software updates, sync
your settings with the Moneris cloud, or sync all functions with the Moneris
host. For more information, go to the V400c Online Operating Manual
available at moneris.com/support-V400c.
Card Not Present
Turn on or off the ability to process financial transactions when the
customer’s card is not present; for example, email and telephone orders. For
more information, go to the V400c Online Operating Manual available at
moneris.com/support-V400c.
Note: If this function is off, the icon will not appear on the main menu.
Language Settings
Set the language of the terminal to French or English. Go to Language settings
on page 12.
Transactions
Display the Transactions menu. Go to the Transactions section on pages 31-43
for transaction guidelines and instructions for each procedure.
Reports
Display the Reports menu to run reports on transactions or on settings. Go to
Reports on page 48.
Settings
Display the Settings menu. When setting up the terminal, you may have set
some settings (such as tip and clerk ID). To review the most common settings,
go to Additional settings on page 12.
To navigate to the Main menu, refer to Getting to the Main menu on page 26.
Moneris V400c Terminal: Reference Guide 27
Page 30

Security prompts
Prompt
Action
Screen saver showing the
date and time (idle
screen)
The application has timed out.
Tap the screen or press any key to continue.
Enter Temporary Lock
code
This screen appears if you locked the terminal using a temporary lock
code.
To unlock, enter your temporary lock code.
You can also tap Use a User ID and Passcode instead. See below.
Please enter your User ID
and Passcode
To use protected menus and transactions, you must identify yourself
by user ID and passcode.
1. Tap the User ID field and enter your user ID.
2. Tap the Passcode field and enter your passcode.
3. Tap OK.
Enter Clerk ID
If clerk IDs are turned on (refer to Clerk settings on page 14), you must
identify yourself by entering your clerk ID.
Key in your clerk ID, then tap OK.
You may see various security prompts before you are able to process transactions and access functions. Some
examples include the screen saver (idle screen), the temporary lockcode prompt, the user ID/passcode prompt,
and the Clerk ID prompt.
Review the table below on how to respond to each prompt.
Locking the screen
In order to prevent unauthorized use, Moneris recommends locking the terminal screen when:
your terminal is unattended, for example, when you are away from the cash register area;
your business is closed. Leave the terminal powered on and lock the screen.
To lock the screen:
1. Think of a lock code you will remember (using 4 to 10 digits).
You cannot use 3 or more consecutive numbers (such as 1236) or 3 or more repeating numbers (such as
11125).
2. On the Main menu, tap Screen Lock.
The “Please enter a temporary lock code for this device” prompt appears.
3. Enter the lock code you determined in step 1, then tap OK.
The screen is locked.
To unlock the screen:
enter the same lock code you used to lock the screen, or
enter your user ID and passcode.
Moneris V400c Terminal: Reference Guide 28
Page 31

Card entry options
1. The screen displays “Tap, insert, or swipe”.
2. The customer inserts the card into the terminal’s chip reader.
Note: Unless the device prompts otherwise, do not swipe a
chip card even if the card has a magnetic stripe.
3. The customer may be prompted to key in a PIN.
4. The chip card must remain inserted until the screen displays
“Please remove your card”.
1. The screen displays “Tap, insert, or swipe”.
2. The customer taps their card over the embedded
contactless reader which is located behind the display
screen.
Note: The card must be tapped or waved by itself (the
customer cannot leave the card in their wallet and wave it
over the contactless reader).
Note: If the customer is using a mobile device, they may
be directed to enter a passcode on their smartphone or
tablet.
3. Note the following:
Your merchant account must be configured for contactless functionality.
Only Purchases, Refunds, and Balance Inquiries can be processed using a contactless card.
The transaction amount must be equal to or less than the contactless transaction limit set for
the card. If the amount is greater than the contactless limit for the card, when the customer
taps their card, the terminal displays “Limit exceeded” followed by “Insert or swipe”. To
complete the transaction for the same amount, the customer inserts or swipes their card.
Insert: Chip cards
Wave/Tap: Contactless cards
Moneris V400c Terminal: Reference Guide 29
Page 32
Swipe: Magnetic stripe cards
1. The screen displays “Tap, insert, or swipe”.
2. The customer swipes the card on the terminal’s magnetic stripe
reader.
Note: If the card has a chip, the card must be inserted into the
terminal’s chip reader.
Moneris V400c Terminal: Reference Guide 30
Page 33

Transactions
Transaction guidelines
To process financial transactions, follow these general guidelines.
1. Make sure you are connected to Moneris. Look for LAN or the network connection icon in the
notification area at the top of the screen. If the connection icon is red, refer to the connection error
messages on page 54.
2. Determine which transaction you want to process (for example, Purchase, Refund, Void, Pre-authorization,
Completion, among others).
3. Start the transaction on the terminal and follow the prompts on screen. For instructions, refer to pages 31-
37.
If prompted, pass the terminal to your customer so they can respond to the customer prompts (refer to
page 40).
If card entry is required to complete the transaction, the customer enters their card using tap, insert, or
swipe.
The merchant prompts and the customer prompts may vary depending on:
the transaction type (for example, Purchase or Refund)
the payment type (for example, credit or debit)
the method of card entry (for example, insert, swipe, or tap)
any features you have turned on (for example, tipping or cashback)
4. Process any printed receipts (refer to page 44).
Purchase - debit/credit
Follow these steps to process a Purchase transaction when the customer pays with a debit or credit card.
1. Start at the Purchase - Enter amount screen. This is the terminal's default screen.
Respond to any security prompts (refer to page 28) that appear.
If your terminal is at a different screen, go to the Main menu, tap Transactions, then tap Purchase.
2. Key in the amount of the purchase and tap OK.
Respond to any merchant prompts (refer to page 38) that appear. The terminal may ask for an invoice
number and other information.
3. When prompted, pass the terminal to your customer so they can respond to the customer prompts.
If tip entry is turned on (refer to page 12), the customer enters a tip (or no tip).
The “Tap, insert or swipe” prompt appears, showing the final total and the cards you accept.
4. The customer enters their card on the terminal. Depending on the type of card, they can tap, insert, or
swipe it.
Moneris V400c Terminal: Reference Guide 31
Page 34

The customer responds to any additional customer prompts, including prompts related to cashback,
foreign exchange, and PIN entry among others (refer to page 40).
The “Processing your request” message appears.
5. Once the transaction is approved, the “How would you like your receipt?” prompt appears, showing the
customer the available options for receiving a receipt: 1 Email, 2 Text, 3 Print, and 4 None.
Note: You can choose which receipt options customers will see (refer to page 15).
6. The customer selects a receipt format (or no receipt) by tapping one of the options on screen or by pressing
the corresponding number on the keypad.
The “Transaction Complete/Please pass terminal back to clerk” prompt appears.
7. The customer passes the terminal back to you. Press the green key to continue, if needed.
8. When “Transaction Approved” appears, tap OK.
9. Process any printed receipts (refer to page 44).
Note: A customer signature is always required for UnionPay transactions, so the merchant copy of the receipt is
always printed. Ask the customer to sign the merchant copy of the receipt.
Partially approved Purchase
A Partial Approval of a purchase transaction occurs when the customer pays for a purchase with a pre-paid
credit card but the value on the pre-paid card is less than the purchase amount.
Pre-paid cards include:
A credit card (such as Visa® or Mastercard®) loaded with a specific value.
A gift card from a specific store.
When presented with a pre-paid card:
1. Follow the Purchase transaction (refer to page 31).
IMPORTANT! Process any pre-paid cards first -- the customer may have more than one.
2. The terminal approves the partial amount tendered on the pre-paid card, then displays to the customer and
to the merchant the amount still owing. For example:
Amount approved $10.00
Amount due $20.50
3. Tap OK to accept the partial approval.
The amount due can be paid by another tender type, e.g. another pre-paid card, a credit card, a debit card,
or cash.
4. Follow the merchant prompts on screen for each tender type offered by the customer until the full purchase
amount is paid.
5. Process any printed receipts (refer to page 44).
Moneris V400c Terminal: Reference Guide 32
Page 35

Balance inquiry on pre-paid credit cards
Use the Balance Inquiry procedure to allow customers to check the balance on a pre-paid credit card.
1. From the Main menu, tap Transactions, then tap Balance Inquiry.
2. As prompted on screen, pass the terminal to your customer so they can respond to the customer prompts.
The “Tap, insert or swipe” screen appears.
3. The customer enters their card on the terminal. Depending on the type of card, they can tap, insert, or swipe
as described in Card entry options on page 29).
4. The customer responds to any customer prompts, such as PIN entry.
The terminal displays the card balance on the screen.
5. The customer views the balance on screen.
To print the balance, the customer taps Print or presses 1 on the keypad.
Note: Respect the customer's privacy. Do not look at the balance, whether printed or on screen. The
terminal prints only one copy of the receipt, the customer copy.
6. After viewing or printing the balance, the customer taps OK to end the balance inquiry.
7. The screen prompts the customer to return the terminal to you.
The customer passes the terminal to you.
8. Tap OK to continue.
Refund - debit/credit
A refund credits a customer's account. You can refund the whole amount of a purchase transaction or a portion
of the amount.
1. From the Main menu, tap Transactions, then tap Refund.
Respond to any security prompts (refer to page 28) that appear.
The Refund screen appears.
2. Key in the amount of the refund and tap OK.
Respond to any merchant prompts (refer to page 39) that appear. The terminal may ask for an invoice
number and other information.
The terminal prompts you to “Enter the authorization number of the transaction that is to be refunded”.
3. Key in the 6-digit authorization number found on the Purchase receipt, and tap OK. See the original receipt
example on page 46.
If you do not have the receipt or the authorization number, simply tap OK to continue without entering
a value.
4. Pass the terminal to your customer so they can respond to the customer prompts.
The “Tap, insert or swipe” prompt appears, showing the total refund and the cards you accept.
Moneris V400c Terminal: Reference Guide 33
Page 36

5. The customer enters their card on the terminal. Depending on the type of card, they can tap, insert, or
swipe it.
The customer responds to any customer prompts (refer to page 42).
The “Processing your request” message appears.
6. Once the transaction is approved, the “How would you like your receipt?” prompt appears, showing the
customer the available options for receiving a receipt: 1 Email, 2 Text, 3 Print, and 4 None.
7. The customer selects a receipt format (or no receipt) by tapping one of the options on screen or by pressing
the corresponding number on the keypad.
The “Transaction Complete/Please pass terminal back to clerk” prompt appears.
8. The customer passes the terminal back to you. Press the green key to continue, if needed.
9. When “Transaction Approved” appears, tap OK.
10. Process any printed receipts (refer to page 44).
Note: A customer signature is always required for UnionPay transactions; therefore the merchant copy of
the receipt is always printed. Ask the customer to sign the merchant copy of the receipt.
Moneris V400c Terminal: Reference Guide 34
Page 37

Void
Void last transaction
Search for transaction to void
a. Tap Void last transaction.
The terminal displays the last
completed transaction that can be
voided.
a. Tap Search for transaction to void.
b. When prompted, enter the sequence number of the
transaction you want to void. To locate the sequence
number, refer to the receipt sample on page 46.
The terminal searches the current batch and displays the
transaction(s) that match the sequence number you entered.
b. Tap OK to void the
transaction.
To cancel the Void operation,
tap Cancel.
c. Tap the appropriate transaction on the screen to proceed
with voiding it. If there is only one transaction, simply tap
OK.
To enter a different sequence number, tap Back.
To cancel the Void operation and return to the Purchase -
Enter amount screen, tap Cancel.
Perform a void when a transaction has been entered incorrectly and needs to be cancelled and re-done.
The whole transaction will be voided -- you cannot perform a partial void.
Only transactions in the current batch can be voided. For example, if the purchase transaction that you
want to void is in a batch that is already closed, perform a refund instead.
To void a pre-authorization, perform a completion for $0 (refer to page 37).
1. From the Main menu, tap Transactions, then tap Void.
Respond to any security prompts (refer to page 28) that appear.
The Void menu appears.
2. Follow the instructions in one of the columns in the table below.
3. When prompted, pass the terminal to your customer so they can respond to the customer prompts.
The “Insert or swipe” prompt appears, showing the total void amount and the cards you accept.
4. The customer enters their card on the terminal.
The customer responds to any customer prompts (refer to page 42).
The “Processing your request” message appears.
5. Once the transaction is approved, the “How would you like your receipt?” prompt appears, showing the
customer the available options for receiving a receipt: 1 Email, 2 Text, 3 Print, and 4 None.
6. The customer selects a receipt format (or no receipt) by tapping one of the options on screen or by pressing
the corresponding number on the keypad.
The “Transaction Complete/Please pass terminal back to clerk” prompt appears.
7. The customer passes the terminal back to you. Press the green key to continue, if needed.
8. Process any printed receipts (refer to page 44).
Moneris V400c Terminal: Reference Guide 35
Page 38

Pre-authorization
Perform a credit card pre-authorization if the final Purchase amount is unknown (for example, car rental or hotel
stay).
1. From the Main menu, tap Transactions, then Pre-Authorized Transactions, then Pre-authorization.
Respond to any security prompts (refer to page 28) that appear.
2. Key in the amount you want to pre-authorize and tap OK.
Respond to any merchant prompts (refer to page 38) that appear. The terminal may ask for an invoice
number and other information.
3. Pass the terminal to your customer so they can respond to the customer prompts.
4. At the “Insert or swipe” prompt, the customer visually confirms the pre-authorization amount.
5. The customer enters their card on the terminal. Depending on the type of card, they can insert or swipe it.
Note: Tapping the card is not allowed for pre-authorization.
The customer responds to any additional customer prompts, including prompts related to foreign
exchange and PIN entry among other scenarios (refer to page 40).
The “Processing your request” message appears.
6. Once the transaction is approved, the “How would you like your receipt?” prompt appears, showing the
customer the options for receiving a receipt: 1 Email, 2 Text, 3 Print, and 4 None.
7. The customer selects a receipt format (or no receipt) by tapping one of the options on screen or by pressing
the corresponding number on the keypad.
The “Transaction Complete/Please pass terminal back to clerk” prompt appears.
8. The customer passes the terminal back to you. Press the green key to continue, if needed.
9. When “Transaction Approved” appears, tap OK.
10. Process any printed receipts (refer to page 44).
Note: A customer signature is always required for UnionPay transactions; therefore the merchant copy of
the receipt is always printed. Ask the customer to sign the merchant copy of the receipt.
If the customer swiped their card, obtain the customer signature on the merchant copy of the receipt, then tap
OK as indicated on screen.
Moneris V400c Terminal: Reference Guide 36
Page 39

Completion
Perform this transaction to:
complete a pre-authorization when the final purchase amount is known (for example, at the end of a hotel
stay, or when a rental car is returned);
cancel a pre-authorization that is no longer needed.
1. From the Main menu, tap Transactions, then Pre-Authorized Transactions, then Completion.
Respond to any security prompts (refer to page 28) that appear.
The terminal prompts you to “Please enter the sequence number of the pre-authorized transaction you
would like to complete”.
2. Enter the 6-digit sequence number from the receipt of the pre-authorization transaction (refer to page 46),
then tap OK.
The terminal displays any matching transactions.
3. Tap the pre-authorization transaction you wish to complete or cancel. If only one pre-authorization was
found, go directly to step 4.
If there are no matching transactions:
Tap Back to re-enter the sequence number; or
Tap Cancel to cancel the completion process.
4. The terminal prompts you to “Please enter the completion amount”.
5. Do one of the following:
To complete the pre-authorization, enter the final purchase amount and tap OK.
To cancel the pre-authorization and release the pre-authorized funds, enter a single zero then tap OK.
The “Processing your request” message appears.
6. When “Transaction Approved” appears, tap OK.
7. Process any printed receipts (refer to page 44).
Moneris V400c Terminal: Reference Guide 37
Page 40
Merchant prompts
Merchant prompt
Merchant action
Your terminal is
currently offline!
You can cancel this
transaction or press
OK to proceed and we
will store the details
and send the
transaction once the
terminal is online
This prompt appears if your account is set up for store and forward (SAF)
processing and if your terminal is unable to connect to the Moneris host. For
more information, go to Processing transactions when your Internet
connection is down.
Tap Cancel to cancel the transaction. You will need to re-establish a
connection to Moneris in order to process transactions. Go to “Cannot
connect to host” in the Troubleshooting section on page 54.
Tap OK to proceed with SAF processing. If the transaction is eligible for
SAF, the terminal will store it and then send it to Moneris once the
connection is restored.
Please enter invoice
number, if applicable.
This prompt appears if your terminal is set up to ask for an invoice number.
To enter a numeric invoice number, use the number keys on the
terminal's keypad.
To enter an alphanumeric invoice number, tap the invoice number field. A
virtual keyboard appears. Use the virtual keyboard to enter the number
and letters, then tap the Enter icon.
To bypass the invoice prompt, simply tap OK without entering a value.
Please pass the
terminal to your
customer
Pass the terminal to your customer so they can respond to the customer
prompts.
Amount due $NN.NN
Tender type?
This screen appears during a partial approval transaction where the customer
used a pre-paid card to pay for a portion of the total amount. The terminal
prompts you to ask the customer for their next form of payment to complete
the purchase.
If the customer offers another card, tap Cards.
If the customer offers cash, tap Cash.
If the customer is unable to pay, tap Cancel to cancel the transaction.
Please pass terminal
back to the clerk
You may see this prompt when the customer passes the terminal back to you.
Press the green key to continue.
For security related screens, including clerk ID, refer to security prompts (refer to page 28).
Purchase and pre-authorization
This table shows, in order of appearance, the merchant prompts that you would see on the terminal during a
financial transaction if the applicable feature is enabled. Only some of the prompts will appear for any single
transaction.
Moneris V400c Terminal: Reference Guide 38
Page 41

Refund
Merchant prompt
Merchant action
Please enter invoice
number, if applicable.
This prompt appears if your terminal is set up to ask for an invoice number.
To enter a numeric invoice number, use the number keys on the
terminal's keypad.
To enter an alphanumeric invoice number, tap the invoice number field. A
virtual keyboard appears. Use the virtual keyboard to enter the number
and letters, then tap the Enter icon.
To bypass the invoice prompt, simply tap OK without entering a value.
Enter the
authorization number
of the transaction
that is to be refunded
Enter the authorization number of the transaction you want to void.
To locate the authorization number, refer to the original receipt sample (refer
to page 46).
Please pass the
terminal to your
customer
Pass the terminal to the customer. The customer will respond to the
customer prompts then pass the terminal back to you.
Merchant prompt
Merchant action
Enter the sequence
number of the
transaction that is to
be voided
This screen appears if you selected Search for transaction to void from the
Void menu.
Enter the sequence number of the transaction you want to void.
To locate the sequence number, refer to the original receipt sample (refer to
page 46).
Please pass the
terminal to your
customer
Pass the terminal to the customer. The customer will respond to the
customer prompts then pass the terminal back to you.
Transaction Approved
Tap OK to print any receipts.
Void
Moneris V400c Terminal: Reference Guide 39
Page 42

Customer prompts
Customer prompt
Customer action
Would you like to leave
a tip?
This screen appears when the tip feature is turned on.
There are 4 possible tip options the customer can choose, depending on how
you have set up tip entry (refer to page 12).
Pre-set tip percentages. For example, 15%, 20%, 25%. Customer taps the
desired percentage.
No tip. Customer taps the No Tip button on screen or presses 1 on the
keypad.
Tip as a specific dollar amount. The customer taps the $ button or
presses 2 on the keypad, then enters the tip amount in dollars and cents.
Tip as a specific percentage amount. The customer taps the % button or
presses 3 on the keypad, then enters the tip amount as a percentage of
the bill.
Ready to pay?
Tap, insert or swipe
The customer taps, inserts, or swipes their card. The customer may also tap
their mobile device (a smartphone, for example) or other mobile format.
Which language would
you like to proceed in?
Dans quelle langue
souhaitez-vous
continuer?
This screen appears after the customer enters their credit or debit card on
the terminal.
The customer taps 1 English or 2 Français on screen, or presses the
corresponding number on the keypad.
The language they select will be used on screen for the rest of the customer
prompts and on the customer copy of the receipt.
If the language code on the card is not readable, or the language code is
neither English nor French, the terminal will display the customer prompts in
the same language as the merchant prompts.
Which application
would you like to use?
This screen appears for chip cards when more than one card is available on
the chip. Each card is considered an application.
a. The customer taps one of the applications from the list of available
applications.
The Confirm application screen appears with two options, No and OK.
b. The customer responds to the confirmation screen.
To proceed with the selected application, the customer taps OK.
To return to the list of applications, the customer taps No.
If the “Please pass the terminal to your customer” prompt appears, pass the terminal to your customer so they
can respond to their prompts.
This table shows, in order of appearance, the prompts that a customer would see on the terminal during a
financial transaction. The prompts will depend on the transaction being processed and on the features you have
enabled.
Purchase and Pre-authorization
Moneris V400c Terminal: Reference Guide 40
Page 43

Customer prompt
Customer action
Would you like
cashback?
This screen appears when the cashback feature is turned on and the
customer pays with a supported debit card or pre-paid credit card.
Note: For Visa and Mastercard, the card must be inserted into the terminal.
There are 5 possible cashback options the customer can choose, depending
on how you have set up cashback.
Up to 3 pre-set cashback amounts. For example, $40, $60, $100. The
customer taps the desired cashback amount.
No cashback. The customer taps the No Cashback button or presses 1
on the keypad.
A different dollar amount. The customer taps the $ icon or presses 2 on
the keypad, then enters the desired cashback amount in dollars then
taps OK. The dollar amount must in increments of $10.
There is a surcharge for
this transaction. Would
you like to proceed?
This screen appears when the customer uses an Interac debit card and you
have turned on surcharge fees on the terminal. The customer responds to
the two choices:
To accept the surcharge, the customer taps Yes.
To cancel the transaction, the customer taps No.
Which account would
you like to use?
This screen appears when the customer uses an Interac debit card.
The customer taps 1 Chequing or 2 Savings on screen, or presses the
corresponding number on the terminal keypad.
Which currency would
you like to pay in?
This screen appears when the Dynamic Currency Conversion (DCC) feature is
turned on and the customer swiped or inserted a foreign Visa or Mastercard
debit or credit card.
The screen displays the exchange rate and the fee for DCC service, as well as
the purchase total in two currencies, Canadian dollars and the currency of
the card, for example:
1 $ N.NN CAD
2 £ N.NN GBP
The customer taps their preferred currency on screen, or presses the
corresponding number on the terminal keypad.
Please enter your PIN
This prompt appears if the customer inserts their card into the terminal's
chip reader.
The customer enters their PIN, then taps OK on screen. They can also key in
their PIN on the terminal's keypad and then press the green key.
Note: Please respect the cardholder’s privacy, and encourage them to protect
their PIN.
Moneris V400c Terminal: Reference Guide 41
Page 44

Customer prompt
Customer action
Processing your request.
Please do not remove
your card
This message appears when the terminal is processing the payment request.
The sentence "Please do not remove your card" appears only if the customer
inserted a chip card into the terminal.
Approved. Please
remove card
The transaction has been approved. The customer removes their chip card
from the card reader.
Amount Approved
$NN.NN
Amount due $NN.NN
This screen appears when the customer used a pre-paid card to pay for a
portion of the total amount.
To accept the partial approval, tap OK.
To cancel the transaction, tap Cancel.
How would you like
your receipt?
1 Email, 2 Text, 3 Print,
and 4 None
The customer selects a receipt format by tapping one of the options on
screen or by pressing the corresponding number on the keypad.
Payment approved
Moneris has approved the payment.
Please pass terminal
back to clerk
The customer passes the terminal back to you.
Press the green key to continue.
Refund
Customer prompt
Customer action
Refund total
$NN.NN
Tap, insert or swipe
The customer taps, inserts, or swipes their card. The customer may also tap
their mobile device (a smartphone, for example) or other mobile format.
For UnionPay cards, only swipe is allowed.
Which currency would
you like your refund in?
This screen appears when the Dynamic Currency Conversion feature is
turned on and the customer paid for the original purchase using a foreign
Visa or Mastercard debit or credit card.
The screen displays the refund total in two currencies, Canadian dollars and
the currency of the card, for example:
1 $ N.NN CAD
2 £ N.NN GBP
The customer taps their preferred currency on screen, or presses the
corresponding number on the terminal keypad.
Please enter your PIN
This prompt appears for Refunds only if the customer is using an Interac
debit card or a UnionPay debit card.
The customer enters their PIN, then taps OK on screen. They can also key in
their PIN on the terminal's keypad and then press the green key.
Note: Please respect the cardholder’s privacy, and encourage them to
protect their PIN.
Moneris V400c Terminal: Reference Guide 42
Page 45
Customer prompt
Customer action
How would you like your
receipt?
1 Email, 2 Text, 3 Print,
and 4 None
The customer selects a receipt format by tapping one of the options on
screen or by pressing the corresponding number on the keypad.
Please pass the terminal
back to the clerk
The customer passes the terminal back to you.
Press the green key continue.
Void
Customer prompt
Customer action
Insert or swipe
The customer inserts or swipes their card. Tap is not allowed.
Which account would you
like to use?
The customer taps 1 Chequing or 2 Savings, or presses the corresponding
number keys on the keypad.
Please enter your PIN
The customer uses the keypad to enter their PIN, then presses the green
key.
Please pass terminal back
to clerk
The customer passes the terminal back to you.
Press the green key continue.
Moneris V400c Terminal: Reference Guide 43
Page 46
Receipts
Customer
option
Merchant action
1 Email
No action required.
Moneris does not store the customer's email address. This means the customer will have to
enter their email address each time they wish to receive a receipt by email.
2 Text
No action required.
Moneris does not store the customer's cell phone number. This means the customer will have
to enter their cell phone number each time they wish to receive a receipt by text.
3 Print
The customer copy of the receipt will print on the terminal, followed by a 3-second pause
which you can change (refer to Print Delay on page 15). The pause allows you time to tear off
the receipt before the merchant copy begins printing.
Give the customer copy to the customer, but note:
If a merchant signature line is printed, sign this copy before giving it to the customer.
4 None
No action required.
Processing receipts from a transaction
Customer copy
The customer has up to 4 options for receiving a receipt: 1 Email, 2 Text, 3 Print, and 4 None, depending on how
you have set up the receipt options (refer to Receipt settings on page 15).
Merchant copy
The merchant copy of the receipt prints after the cardholder copy. Always keep the merchant copy for your
records, but note:
If indicated on screen, ask the customer to sign your copy of the receipt, then tap OK.
Note: For UnionPay transactions, always obtain the customer's signature on the merchant copy of the
receipt.
You do not need to obtain a signature if any of these messages are printed:
VERIFIED BY PIN
NO SIGNATURE REQUIRED
Moneris V400c Terminal: Reference Guide 44
Page 47

Reprinting receipts
Reprint both customer and merchant receipt for the last transaction
1. From the Main menu, tap Reprint.
Respond to any security prompts (refer to page 28) that appear.
The Reprint menu appears.
2. Tap Reprint last receipt.
The terminal prints the customer copy of the receipt, then pauses (to allow you to tear off the customer
copy) before printing the merchant copy.
Reprint both customer and merchant receipt for a previous transaction
1. From the Main menu, tap Reprint.
Respond to any security prompts (refer to page 28) that appear.
The Reprint menu appears.
2. Tap Search for receipt to reprint.
The Reprint search screen appears.
3. Tap one or more of the three search fields and key in a value to search for a transaction:
sequence number;
last 4 digits of the card number;
transaction date.
4. After entering your search term(s), tap OK to continue.
The terminal displays all transactions that match your search criteria.
If the results extend past the screen, swipe up to see more.
To perform another search, tap Back.
To cancel the search and return to the idle screen, tap Cancel.
5. Tap the transaction for which you want to print the receipts.
The terminal prints the customer copy of the receipt, then pauses (to allow you to tear off the customer
copy) before printing the merchant copy.
Moneris V400c Terminal: Reference Guide 45
Page 48

Receipt examples
Item
Description
A
Transaction type. For example,
Purchase, Refund, Pre-authorization.
B
Card type and card number.
Examples of card type include Visa,
Mastercard, and American Express®.
The card number is masked — an
asterisk is printed in place of the card
number except for the last four
numbers.
C
Sequence number. Use this number
to process a Void or a Completion.
D
Authorization number. Use this
number to process a Refund.
E
Amount. This is the dollar amount of
the transaction.
F
Tip. This line appears if you have
tipping turned on.
G
Total. This is the total sale amount
including any tip.
These example receipts will help you to locate the authorization number (for refunds) or the sequence number
(for Void and Completion).
Original receipt
Moneris V400c Terminal: Reference Guide 46
Page 49

Partial approval receipt
Signing a credit card receipt
Card masking
When printed on receipts, all card numbers are masked except for the last 4 digits. Masking replaces a card’s
numbers with asterisks (e.g., ************1234). The expiry date is not printed on any copy of any
receipt. These measures help to prevent fraud.
Moneris V400c Terminal: Reference Guide 47
Page 50

Reports
There are many reports that can be viewed (and printed) on your terminal. These reports contain:
transaction details and transaction totals by various search criteria;
terminal settings and logs.
To view the Reports menu: From the Main menu, tap Reports, then Transactions or Settings.
Merchant Direct reporting
In addition to viewing reports on your Moneris terminal, you can also view reports online by logging into
Merchant Direct (refer to page 10 for enrolment instructions). Merchant Direct allows you to view and
download transaction reports by batch, date, clerk ID, and device number. You can also view and download
standard monthly merchant reports and special reports. To login:
1. Go to moneris.com.
2. In the top, right area of the screen, click Login.
3. From the dropdown list, select Merchant Direct.
4. Enter your user ID and password.
Transaction reports
When card numbers are printed on reports, the card numbers are masked or truncated. Masking replaces a
card’s numbers with asterisks (e.g., ************1234). Truncation prints only the last 4 digits of a card (e.g.,
1234). The expiry date is not printed on reports. These measures help to prevent fraud.
Clerk totals report
Generate this report to see transaction totals for one or more individual clerks or for all clerks.
Note: Clerk totals are cleared when your batch is closed. If you need the clerk totals report, be sure to print it
before batch close.
1. On the Main menu, tap Reports > Transaction Reports > Clerk Totals.
Respond to any security prompts (refer to page 28) that appear.
The terminal may display Processing your request, please wait while it connects to the Moneris host to
retrieve the list of clerks.
2. Select the clerks to be included in the report:
For one or more individual clerks, tap the associated toggle to include them; OR
For all clerks, tap the toggle for All Clerks. This will deselect the individual clerks.
3. Tap OK to generate the report.
4. The terminal displays the report on screen.
If the report extends past the screen, swipe up to see more.
To print the report, tap Print, or press 1 on the terminal keypad.
To view the report for a different clerk or set of clerks, tap Back.
Moneris V400c Terminal: Reference Guide 48
Page 51

To clear the screen and return to the Transactions Reports menu, tap OK.
Terminal totals report
Generate this report to see transaction totals for the current batch or for a specific date. The totals are broken
down by card brand with a grand total at the end.
Note: Transaction totals are cleared when your batch is closed. If you need the transaction totals report, be
sure to print it before batch close.
1. On the Main menu, tap Reports > Transaction Reports > Terminal Totals.
Respond to any security prompts (refer to page 28) that appear.
The Terminal Totals search screen appears.
2. Tap the Select Type field to display the drop-down list, then tap the type of search you wish to perform.
By date: Tap Date to see totals for a specific date.
To enter or change the date, tap the date field, key in a new date using the terminal keypad, then
tap OK.
By batch: Tap Entire Batch to see totals for the current batch.
3. Tap OK to generate the report.
4. The terminal displays the report on screen.
If the report extends past the screen, swipe up to see more.
If no totals or transactions are displayed, there were no transactions approved on the date specified or
the current batch may be empty.
To print the report, tap Print, or press 1 on the terminal keypad.
To change the type of search, tap Back.
To clear the screen and return to the Transaction Reports menu, tap OK.
Transaction Details report
Generate this report to see details for all transactions stored on the terminal in the current batch or all
transactions processed on a specific date.
Note: Transaction details are cleared when your batch is closed. If you need the transaction report, be sure to
print it before batch close.
This report also prints the transaction totals at the end of the transaction details. If you wish to see the totals
only, generate the Terminal Totals report (refer to page 49).
1. On the Main menu, tap Reports > Transaction Reports > Transaction Details.
Respond to any security prompts (refer to page 28) that appear.
The Transaction Details search screen appears.
Moneris V400c Terminal: Reference Guide 49
Page 52

2. Tap the Select Type field to display the drop-down list, then tap the type of search you wish to perform.
By date: Tap Date to see transaction details for a specific date.
To enter or change the date, tap the date field and key in a new date using the terminal keypad,
then tap OK.
By batch: Tap Entire Batch to see details for all the transactions in the current batch.
3. Tap OK to generate the report.
4. The terminal displays the report on screen.
If the report extends past the screen, swipe up to see more.
If no transactions are found, there were no transactions approved on the date specified or the current
batch may be empty.
To print the report, tap Print, or press 1 on the terminal keypad.
To change the type of search, tap Back.
To clear the screen and return to the Transaction Reports menu, tap OK.
Pre-Authorization report
Generate this report to view open pre-authorization transactions. These pre-authorizations have not yet been
completed or cancelled.
1. On the Main menu, tap Reports > Transaction Reports > Pre-Authorizations.
The terminal displays any open pre-authorizations found.
If the report extends past the screen, swipe up to see more.
To print, tap Print or press 1 on the terminal keypad.
To clear the screen and return to the Transactions Reports menu, tap OK.
Tip totals report
Generate this report to see tip totals in the current batch for a specific date or for the entire batch. You can
request tip totals for one or more individual clerks or for all clerks.
Note: Tip totals are cleared when your batch is closed. If you need the tip totals report, be sure to print it before
batch close.
1. On the Main menu, tap Reports > Transaction Reports > Tip Totals.
Respond to any security prompts (refer to page 28) that appear.
The Tip Totals search screen appears.
2. Tap the Select Type field to display the drop-down list, then tap the type of search you wish to perform.
Tap Date to see tip totals for transactions processed on a specific date in the current batch.
To enter or change the date, tap the date field, key in a new date using the terminal keypad, and tap OK.
Tap Entire Batch to see tip totals for all transactions in the current batch.
Moneris V400c Terminal: Reference Guide 50
Page 53

3. Tap OK to continue.
The terminal displays the list of all clerks.
4. Select the clerks to be included in the report:
For one or more individual clerks, tap the associated toggle to include them; OR
For all clerks, tap the toggle for All Clerks.
5. Tap OK to generate the report.
The terminal displays the report on screen.
If the report extends past the screen, swipe up to see more.
To print the report, tap Print, or press 1 on the terminal keypad.
To view the report for a different clerk or set of clerks, tap Back.
To clear the screen and return to the “Transactions” reports menu, tap OK.
Settings reports
View or print these reports to identify the settings on your terminal.
Basic terminal report
Use this report to find out basic information about your terminal, including the terminal ID, merchant ID, and
the version of the software.
1. On the Main menu, tap Reports, Settings Reports, then Basic Terminal.
Respond to any security prompts (refer to page 28) that appear.
The terminal displays the Basic Terminal report.
2. View the report and print it if you wish.
To print, tap Print or press 1 on the keypad.
To clear the screen and go back to the Settings Reports menu, tap OK.
Enhanced report
Use this report to find out detailed information about your terminal settings.
1. On the Main menu, tap Reports, Settings Reports, then Enhanced Terminal.
Respond to any security prompts (refer to page 28) that appear.
The terminal displays the Terminal Configuration report.
2. View the report and print it if you wish.
To print, tap Print or press 1 on the keypad.
To clear the screen and go back to the Settings Reports menu, tap OK.
Moneris V400c Terminal: Reference Guide 51
Page 54

End of day process
Debit and credit transactions processed on your terminal are stored in a batch. In order for Moneris to transfer
the funds from those transactions into your business account, the batch must be closed. There are two ways to
close a batch: system close and merchant close.
System close
If your account is set up for system close, Moneris automatically closes your batch for you at the end of each
day. You must verify transaction totals on a daily basis. Here's how.
1. Print the Host Totals report.
Note: The Host Totals report must be printed before 11:00 p.m. local time, that is, before Moneris closes
your batch. You can also view (and download) the host totals report online starting at 7 a.m. the next day by
logging into the Merchant Direct web portal and selecting Daily Transaction Report Menu, then Daily Batch
Summary Report.
a. From the Main menu, tap End of Day, then Host Totals.
The terminal communicates with the Moneris Host to obtain the batch totals recorded on the host.
b. Tap Print or press 1 on the keypad to print the report.
c. Tap OK to return to the End of Day menu.
2. Print the Terminal Totals report.
a. On the End of Day menu, tap Terminal Totals.
b. Tap Select Type, then Entire Batch, then tap OK.
c. Tap Print or press 1 on the keypad to print the report.
d. Tap OK to return to the End of Day menu.
3. Compare the Host Totals report (printed in step 1) with the Terminal Totals report (printed in step 2).
If the totals on the host agree with the totals on the terminal, no further action is required.
If the totals on the host are different from the totals on the terminal, continue with the rest of this
procedure.
4. Compare the 2 reports again to determine which transaction type is missing from the Moneris host. For
example, the Visa section may show five Purchases on the terminal totals but only four Purchases on the
host totals.
5. View the Transaction Details report to find the missing transaction(s).
a. On the End of Day menu, tap Transaction Details.
The Transaction Details search screen appears.
b. Tap Select Type, then Entire Batch, then tap OK.
The terminal displays the details of all transactions in the current batch, together with transaction totals,
as recorded on the terminal.
c. For each missing transaction, locate the date, time, dollar amount, and the last 4 digits of the card
number. Print the report if you wish.
Moneris V400c Terminal: Reference Guide 52
Page 55

If requested, the terminal prints the transaction details and totals, and returns to the Transactions
Details screen.
6. Call Moneris Customer Care toll-free at 1-866-319-7450, now or the next business day, to obtain assistance
with reconciling your out-of-balance batch.
a. When listening to the options on the telephone menu, select “Financial Inquiry”. We will ask you for the
information gathered in step 5c. You can read it from the Transaction Details report screen or from the
printed report.
b. After speaking to Moneris, if the terminal still displays the Transaction Details report, press the yellow
key twice to return to the End of Day menu.
Merchant close
If you do not wish to have your batch closed automatically each day, contact Moneris Customer Care toll-free at
1-866-319-7450 to discuss merchant close. If your account is set up for merchant close, you must verify
transaction totals and close the batch yourself using the terminal.
To find out more about merchant close, go to the V400c Online Operating Manual available at
moneris.com/support-v400c.
Moneris V400c Terminal: Reference Guide 53
Page 56

Troubleshooting
Error message
Problem and solution
Cannot connect to host
The terminal cannot establish a connection to the Moneris host or cloud.
1. Tap OK or press the green key to clear the error message.
2. Make sure that the Ethernet cable is securely plugged into the ETH
port on the Magic Box. If needed, refer to Hardware setup.
3. Make sure that the router and hub/switch (if any) are working. Refer
to the Moneris Ethernet Readiness Checklist to confirm that
messages from the terminal to the Moneris host can pass through
your firewall.
4. Confirm that your network is working:
Public Internet: Contact your Internet Service Provider (ISP) for
help.
Corporate network: Contact your corporate help desk to make
sure your terminal can access the Moneris host.
Cannot connect to
cloud
Go to error message “Cannot connect to host” above.
No clerks configured
You attempted to generate a report organized by clerk ID, but the
terminal did not find any clerks to report on.
Tap Back to revise your search.
Tap Cancel to cancel the report.
Refer to clerk ID set up to see if you have created any clerk IDs (see
Display Clerk IDs on page 14).
Please make sure your
device is connected to
the Internet.
Go to error message “Cannot connect to host” above.
Sorry, we're unable to
close your batch. /
Batch Close Fail
Please try again at
another time.
This message appears if you tried to close your batch but the terminal
was unable to reach the Moneris host.
Try closing the batch later. If the error message re-appears, refer to error
message "Cannot connect to host" (see above).
Error messages on the V400c terminal
A message will appear on the screen if an error occurs. In the table below, find the error message that appears
on the terminal and try the solution. If the error message re-appears, contact Moneris Customer Care toll-free at
1-866-319-7450.
All error messages are listed in alphabetical order.
Moneris V400c Terminal: Reference Guide 54
Page 57

Error message
Problem and solution
Sorry, we're unable to
obtain your Clerk list.
Please try again at
another time.
This message appears if you requested a report organized by clerk ID but
the terminal was unable to reach the Moneris host to obtain the clerk
information.
Try generating the report later. If the error message re-appears, refer to
error message "Cannot connect to host" (see above).
Sorry, we're unable to
obtain your totals.
Please try again at
another time.
This message appears if you tried to close your batch or tried to generate
a totals report but the terminal was unable to reach the Moneris host.
Try closing the batch or generating the report later. If the error message
re-appears, refer to error message "Cannot connect to host" (see above).
There were no clerks
found based on your
criteria.
Select another clerk ID or select all clerks to complete the operation.
We're unable to
connect.
Go to error message “Cannot connect to host” above.
Equipment issues
Issue
Solution
Blank receipts and reports
The terminal appears to be
printing receipts and reports but
the paper is blank.
The paper roll is installed backward.
To re-install the paper roll, refer to Install the paper roll on page 7.
Issue
Solution
Terminal does not allow you to
manually enter card numbers.
The option to manually key in the card number is not available for card
present (face-to-face) transactions. If tapping, inserting, and swiping the
card all fail, ask the customer for another card or other form of payment.
If the customer is not present at your business location (for example,
Internet orders, telephone orders), you can perform a card-not-present
transaction. To find out more, go to the V400c Online Operating Manual
available at moneris.com/support-v400c.
If the terminal does not display an error message but is not functioning correctly, review this list of equipment
issues to find suggested solutions.
Issues are shown in alphabetical order.
Other issues
Moneris V400c Terminal: Reference Guide 55
Page 58

At Moneris, help is always here for you 24/7.
Merchant support
Merchant support
Page 59

If you need assistance with your payment processing
solution, we’re here to help, 24/7.
We’re only one click away.
Visit moneris.com/support-v400c to:
download additional copies of this guide and other resources
consult the Moneris V400c Online Operating Manual in WebHelp format to understand all the options
on your terminal and how to use them.
Visit shop.moneris.com to purchase point-of-sale supplies and receipt paper
Visit insights.moneris.com for business and payment news, trends, customer success stories, and quarterly
reports & insights
Need us on-site? We’ll be there.
One call and a knowledgeable technician can be on the way. Count on minimal disruptions to your business as
our Field Services provide assistance with your payment terminals.
Can’t find what you are looking for?
Call Moneris Customer Care (available 24/7) toll-free at 1-866-319-7450. We’ll be happy to help.
You can also send us a secure message 24/7 by logging in to Merchant Direct® at
moneris.com/mymerchantdirect.
Moneris V400c Terminal: Reference Guide 57
Page 60

MONERIS, MONERIS BE PAYMENT READY & Design and MERCHANT DIRECT are registered trade-marks of Moneris Solutions Corporation. Mastercard is a
registered trademark, and the circles design is a trademark of Mastercard International Incorporated. INTERAC is a registered trade-mark of Interac Inc.
AMERICAN EXPRESS is a registered trade-mark of American Express Company. VISA is a trademark owned by Visa International Service Association and
used under license. All other marks or registered trade-marks are the property of their respective owners.
© 2019 Moneris Solutions Corporation, 3300 Bloor Street West, Toronto, Ontario, M8X 2X2. All Rights Reserved. This document shall not wholly or in part,
in any form or by any means, electronic, mechanical, including photocopying, be reproduced or transmitted without the authorized consent of Moneris
Solutions Corporation. This document is for informational purposes only. Neither Moneris Solutions Corporation nor any of its affiliates shall be liable for
any direct, indirect, incidental, consequential or punitive damages arising out of use of any of the information contained in this document. Neither Moneris
Solutions Corporation or any of its affiliates nor any of our or their respective licensors, licensees, service providers or suppliers warrant or make any
representation regarding the use or the results of the use of the information, content and materials contained in this document in terms of their
correctness, accuracy, reliability or otherwise.
Your gift card processing is governed by your agreement for gift card services with Moneris Solutions Corporation. Your loyalty card processing is governed
by your agreement for loyalty card services with Moneris Solutions Corporation. Your DCC processing is governed by your agreement for Dynamic Currency
Conversion services with Moneris Solutions Corporation. Your credit and/or debit card processing is governed by the terms and conditions of your
agreement(s) for merchant credit/debit card processing services with Moneris Solutions Corporation. It is your responsibility to ensure that proper card
processing procedures are followed at all times. Please refer to the Moneris Merchant Operating Manual (available at: moneris.com/support) and the
terms and conditions of your applicable agreement(s) for credit/debit processing or other services with Moneris Solutions Corporation for details.
V400c Ref Guide EN (Apr 2019)
 Loading...