

Page 1

TRANSELECT (V2000)
MERCHANT OPERATING MANUAL
For Terminal Software Version 7.52
Document Release Date: July 27, 2007
Document Version:1.1
Page 2

Copyright © Moneris Solutions, 2007.
All rights reserved. No part of this publication may be reproduced, stored in retrieval system, or
transmitted, in any form or by any means, electronic, mechanical, photocopying, recording, or
otherwise, without the prior written permission of Moneris Solutions.
Page 3

Table of Contents
CHAPTER 1: About Your Terminal 1
Equipment Care 2
Terminal Key Board 2
PINPad Key Functions 3
CHAPTER 2: Terminal Features and Procedures 5
Standard Features 5
POS Administrative (Admin) Card 5
Cardholder Conflicts 5
Code 10 Authorization 5
Credit Transaction Pre-Authorization 6
Printer Problems 6
Securing Your Terminal 7
Stored Credit and Debit Transactions 7
Training Mode 7
Card Masking 7
Optional Features 8
Balance Prompt 8
Invoice Number 8
Optional Signature Line On Credit Card Transactions 8
Purchasing Card 9
Reprint Transaction 9
Third Party Card Processing 9
Tip Processing 9
Clerk Subtotalling 9
Clerk ID 10
Clerk Subtotals Reported As Group 10
Multiple Terminal Reporting 11
Terminal Name 11
Multiple Terminal Reporting In Group 11
CHAPTER 3: Processing Credit Transactions 13
Entering Credit Card Information 13
Processing Credit Card Purchase Transactions 14
Processing Credit Card Purchase Transactions (Back Up Procedure) 15
Correcting/Voiding Credit Card Purchase 16
Processing Credit Card Refund 17
Correcting/Voiding Credit Card Refund 19
Moneris TRANSELECT (V2000) Merchant Operating Manual v.1.1 i
Page 4

Table of Contents
Processing Pre-Authorized Credit Transaction 20
Completing A Pre-Authorized Credit Transaction 21
Processing Credit Card Advice Transaction 22
CHAPTER 4: Processing Debit Transactions 23
Entering Debit Card Information 23
Processing Debit Card Purchases 23
Processing Debit Purchase (without Tip Entry) 24
Processing Debit Purchase with Tip Entry 25
Correcting/Voiding Debit Card Purchase 26
Processing Debit Card Refund 27
Correcting/Voiding Debit Card Refund 29
CHAPTER 5: Processing E-commerce And Mail / Telephone Order
Transactions 31
Processing Transactions with E-Commerce and MOTO Enabled 32
E-commerce Purchase 32
MOTO Purchase 33
Processing Transactions with Only E-Commerce Enabled 34
Processing Transactions with Only MOTO Enabled 35
CHAPTER 6: Processing ERNEX Transactions 37
Ernex Features 37
Clerk IDs 37
Gift Card Validation Code (CVC) 37
Stored Transactions 37
Card Masking 38
ERNEX Admin Functions 38
Balancing and Closing Your Terminal with Ernex 38
Initializing with ERNEX 38
Re-initialization with ERNEX 39
Host Communication Test with ERNEX (ADMIN 58) 40
Performing ERNEX Gift Card Transactions 41
Gift Card Activation 41
Gift Card Activation with CASH PAYMENT 41
Gift Card Activation with DEBIT, CREDIT or GIFT CARD PAYMENT 42
Gift Card Purchase Transactions 43
Split Tender Purchase with Gift Card 44
Split Tender Purchase - Gift Card with Second Gift Card Payment 45
Split Tender Purchase - Gift Card with CASH Payment 46
Gift Card Inquiry (ADMIN 55) 46
ii Moneris TRANSELECT (V2000) Merchant Operating Manual v.1.1
Page 5

Table of Contents
Deactivating a Gift Card (ADMIN 51) 47
Gift Card General Void (ADMIN 56) 48
Performing Ernex Loyalty Card and Combination Card Transactions 48
Loyalty Card Activation (ADMIN 51) 49
Loyalty Purchase Transactions 50
Loyalty Purchase - Combination Card 50
Purchase - Loyalty Card and Debit or Credit Card 51
Purchase - Loyalty Card and Cash
or Loyalty Card ONLY Transaction 51
Pre-Authorization with a Loyalty Transaction 52
Pre-authorization Completion/Advice 53
Refunds with a Loyalty Card 54
Refund - Loyalty Card and ANY Debit or Credit Card 54
Refund - Loyalty Card and Cash OR
Loyalty Card Only 55
Loyalty Redemption (ADMIN 54) 56
Cardholder Inquiry (ADMIN 55) 56
Loyalty Card General Void (ADMIN 56) 57
Deactivating Loyalty Cards (ADMIN 51) 57
End-of-Day Procedures 58
Print Stored Transactions (ADMIN 60) 58
Transaction Inquiry List (ADMIN 66) 59
Merchant Subtotals Inquiry (ADMIN 95) 60
Batch Close (ADMIN 99) 61
CHAPTER 7: Balancing & Closing Your Terminal 63
Deposit Procedures 63
Option 1: Batch Closing 63
Option 2: Non-Batch Closing 64
CHAPTER 8: Processing Administrative Functions 65
Initializing Your Terminal (Initialization - ADMIN 01) 65
Logging On (ADMIN 02) 66
Logging Off (ADMIN 03) 67
Processing Transactions In Training Mode (ADMIN 05) 67
Exiting Training Mode 68
Configuring Your Terminal (ADMIN 08) 68
Some Notes on 3201 Communication 68
Setting Up Third Party Host Communication Parameters (ADMIN 10) 71
Setting Up Third Party Card (ADMIN 11) 73
Setting Up the Printer (ADMIN 14) 74
Setting Up Dial Communications (ADMIN 15) 75
Moneris TRANSELECT (V2000) Merchant Operating Manual v.1.1 iii
Page 6

Table of Contents
Printing Configuration Parameters (ADMIN 16) 77
Printing Stored Transactions (ADMIN 60) 77
Performing Transaction Inquiry (ADMIN 66) 79
Performing Credit and Debit Deposit Totals Inquiry (ADMIN 77) 81
Setting Up Multiple Terminal Transaction (ADMIN 80) 81
Processing Multiple Terminal Reporting (ADMIN 85) 82
Setting Up Clerk Subtotalling (ADMIN 83) 83
Maintaining Clerk ID (ADMIN 84) 85
Adding a Clerk ID 85
Removing a Clerk ID 86
Setting Default Clerk ID (ADMIN 81) 86
Processing Clerk Subtotalling Inquiry (ADMIN 82) 87
Processing Credit and Debit Transaction Subtotals (ADMIN 95) 89
Closing Batch Transaction [Close Batch] (ADMIN 99) 90
CHAPTER 9: Troubleshooting 93
Error Messages 93
Helpful Hints On Balancing Problems 96
Batch Not Balanced 96
Clerk Subtotalling And Multiple Terminal Reporting 96
Warning Messages For Clerk Subtotalling And Multiple Terminal
Reporting 96
Helpful Hints On Communication Problems 97
Communication Problem Using A Datapac 3201 Line 97
Quatro Is Not Working 97
Communication Problem Using A Datapac 3101 Dial Line 97
Helpful Hints On Hardware Problems 98
Changing Terminal Language 98
Forwarding Printer Paper 98
Printer Lights Not On 98
Printer Paper-Low Light On 98
PINPad Display Screen Blank 98
Printer Ready Light Flashing 98
Reprint A Transaction 98
Rotary To Touch Tone 98
Touch Tone To Rotary 98
iv Moneris TRANSELECT (V2000) Merchant Operating Manual v.1.1
Page 7

Merchant and T erminal Information
Merchant Name:
Merchant Location:
Moneris Merchant ID Number:
Initialization Telephone Number:
DATAPAC 3201 (Polled) Communication Information:
Moneris Solutions Poll Code:
Third Party Poll Code:
Call the Moneris Merchant Service Centre at
1-866-319-7450 (toll-free long distance)
for Information and Assistance with
• Balancing your terminal
• Problems with your equipment
• Processing financial transactions
• Processing non-financial transactions
• Security features - merchant responsibility or liability concerns
• Settlement processing
• Setting up your terminal
• Ordering terminal supplies
Available 24 Hours a Day, 7 Days a Week
Contact Moneris Authorization at:
1-833-802-2637 (toll-free long distance)
for assistance with:
• Voice authorizations
• Code 10 situations
Moneris TRANSELECT (V2000) Merchant Operating Manual v.1.1 v
Page 8

Merchant and Terminal Information
Terminal Supplies
It is recommended that merchants obtain their POS stationery and paper
rolls from Moneris to ensure that these supplies comply with the applicable
specifications. Contact the Moneris Merchant Service Centre (see above)
to obtain additional supplies for your terminal.
Additional Documentation
To download additional copies of this Merchant Operating Manual, visitwww. moneris.com/merchant/manuals/index.html and select Transelect.
T o download a copy of theT ranselect Quick Reference Guide for Debit and
CreditProcedures, visit www.moneris.com/merchant/qrguides and select
Transelect.
vi Moneris TRANSELECT (V2000) Merchant Operating Manual v.1.1
Page 9

CHAPTER 1: About Y our T erminal
This section of the manual will introduce you to your terminal. It tells you
about the components of the terminal, how to care for the terminal, the terminal keyboard, and PINPad key functions. The Transelect terminal connects to the POINT OF SALE (POS) payment service provided by
Moneris. Your TRANSELECT includes a terminal, a printer, and a PINPad (if you process Interac Direct Payment/Debit transactions).
Note: Throughout this document Interac Direct Payment or IDP will be
referred to as “Direct Card Transaction”.
The Terminal can be set-up to accept and process:
• Credit Cards - VISA, MasterCard, American Express (AMEX), JCB,
and Diners Club/enRoute
• Interac Direct Payment/Debit Cards
• Ernex Gift and Loyalty Cards
The Printer connects to the terminal and to a power outlet. The printer provides:
• Transaction records on two-part paper or one-part, double-copy paper.
IMPORTANT: T o main tain compliance with card masking requirements,
the printer must print the receipt at least twice (even if
you use two-part paper). See section 8.8: Setting Up
the Printer (ADMIN 14) for instructions.
• Journal listings of transactions, totals, etc.
Note: Retain an unmasked copy of all approved credit and debit receipts for
one year.
If you accept Debit Cards, a PINPad is required with your Transelect Terminal. The PINPad consists of a display window for prompts and messages, and a keypad.
Note: Since your customers PIN (the Personal Identification Number) is
required for all Debit transactions and is confidential, it will not
appear on the display on either your PINPad or terminal. Please
respect your customer’s privacy when they key in their PIN.
Moneris TRANSELECT (V2000) Merchant Operating Manual v.1.1 1
Page 10

CHAPTER 1: About Your Terminal
1.1: Equipment Care
IMPORTANT: You must use the exact power adaptor and cable pro-
vided with the terminal by Moneris Solutions. Failure to
do so may affect the operability of, or cause damage to
the terminal and Moneris Solutions shall have no liability
whatsoever for a failure to follow these instructions.
IMPORTANT: Misuse of equipment could result in replacement liability.
• Avoid spilling liquids on components
• Do not expose components to extreme temperatures
• To ensure the warranty on equipment, it is recommended that merchants obtain their POS stationery and paper rolls from Moneris.
• For instructions on changing paper and ribbons, refer to your printer
manual
• For equipment failure, contact Moneris Solutions Merchant Service
Centre
• Avoid unnecessary movement of the terminal to prevent accidental disconnection of any of the cables
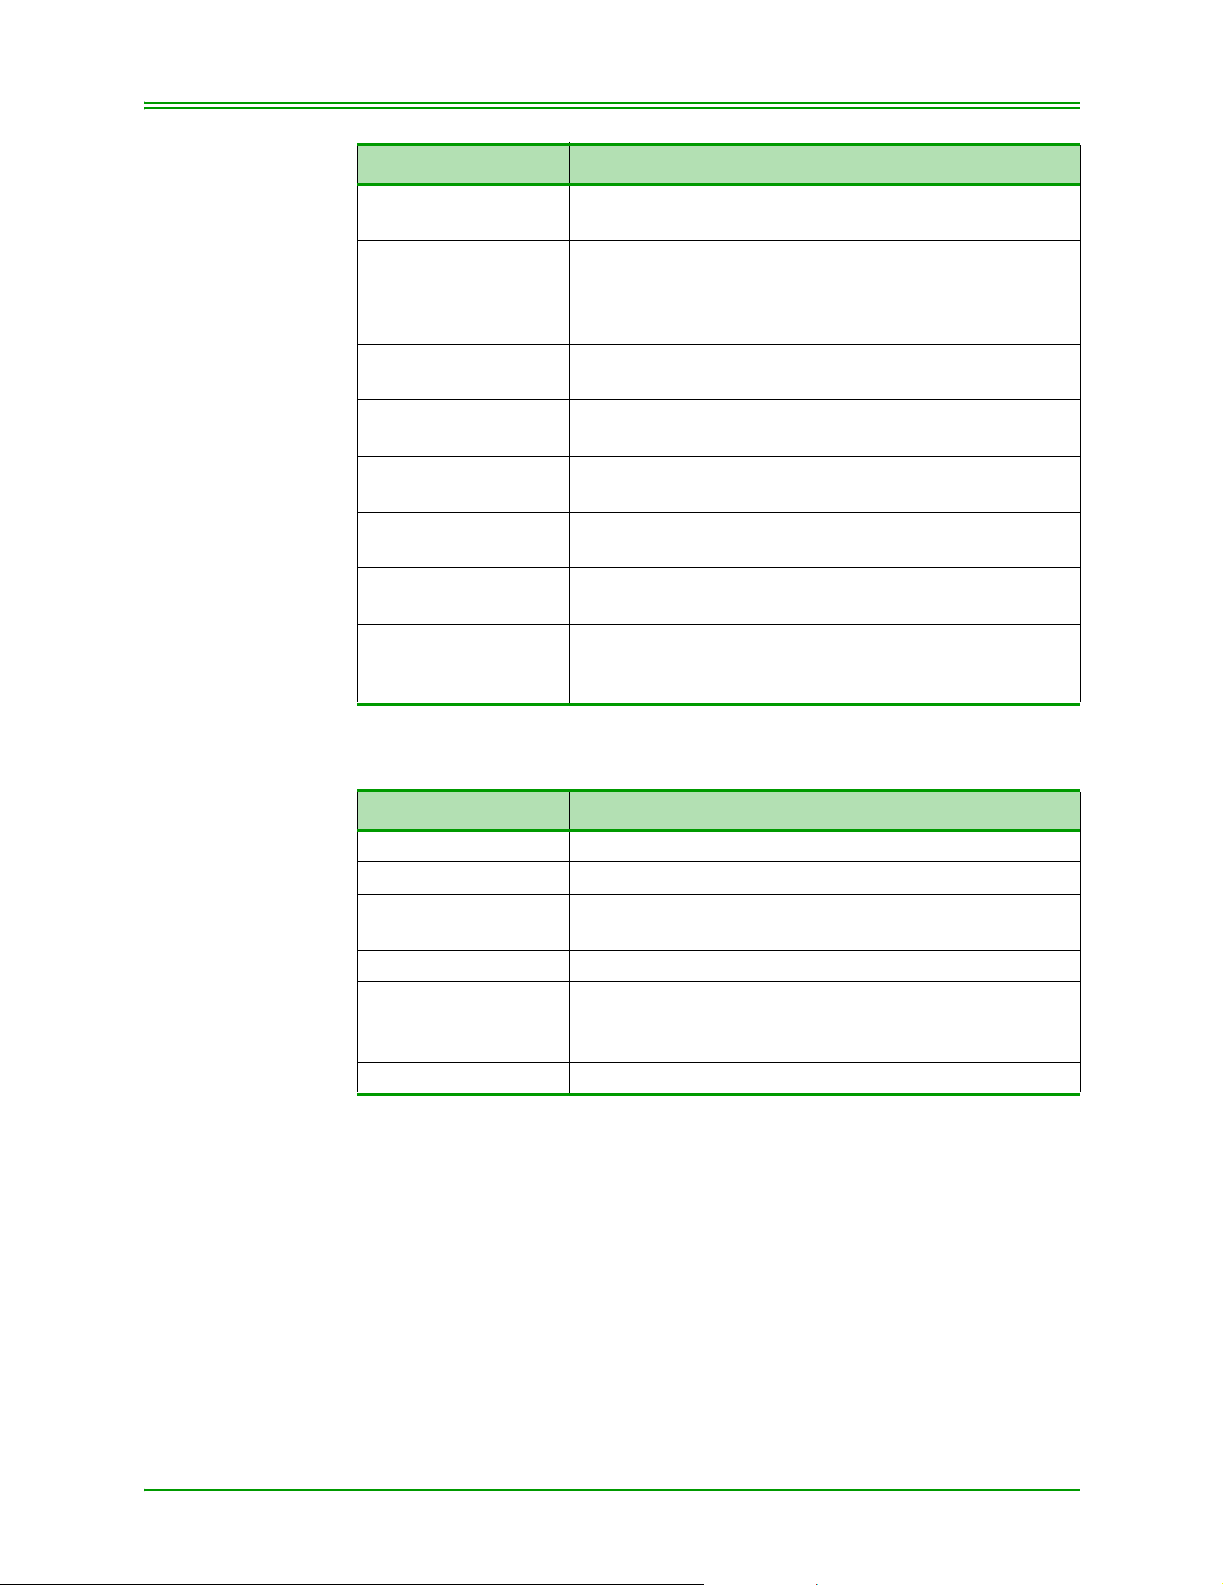
1.2: Terminal Key Board
KEY EXPLANATION
A, B, C Use these keys to respond to prompts for various
ADMIN Press this key before all administrative functions.
ADVICE To complete a Pre-Authorized or Voice Authorized
ALPHABETIC To access an alphabetic character, press the number
CANCEL/EXIT To reset the terminal to the ready state after completing
DELETE To delete the last character keyed on the keyboard.
ENTER Press on completion of input and in response to the
NUMERIC KEYS 0-9 To key in a numeric response to a prompt. The decimal
PP LANG Press the SHIFT (T) key and then the PP LANG key to
(including Credit and Debit Card) transactions. The
arrows below the keys allow you to scroll up and down
or sideways when additional information is available.
Credit transaction.
key that contains the desired letter and the n the SHIFT
(T) key; continue pressing the SHIFT (T) key until the
desired letter displays on the terminal.
a transaction, or to cancel a transaction already in
progress.
display on the terminal.
automatically inserts on dollar amount keyed. Example:
$145.27 – key in 14527
change the language on the PINPad from English to
French or vice versa.
2 Moneris TRANSELECT (V2000) Merchant Operating Manual v.1.1
Page 11
CHAPTER 1: About Your Terminal
KEY EXPLANATION
PRE-AUTH Press this key to obtain authorization only on Credit
Card Transaction.
PURCHASE If the magnetic strip is not working on a Credit Card
transaction, press the PURCHASE key before manually keying the Credit Card Number. Also used for ecommerce and mail/ tel order transactions.
PUR CORR/VOID Use this key to reverse a purchase transaction pro-
cessed incorrectly on a Credit or Debit card.
REFUND Use this key to refund Credit and Debit Card transac-
tions.
REF CORR/VOID Use this key to reverse a REFUND transaction pro-
cessed incorrectly on a Credit or Debit Card.
RETRY To re-try certain declined transactions. This key is only
available when the Retry prompt, displays.
SHIFT (T) To access alphabetic characters on the keyboard and
the functions listed below the keys.
T LANG Press the SHIFT (T) key and then the T LANG key to
change the language on the terminal from English to
French or vice versa.
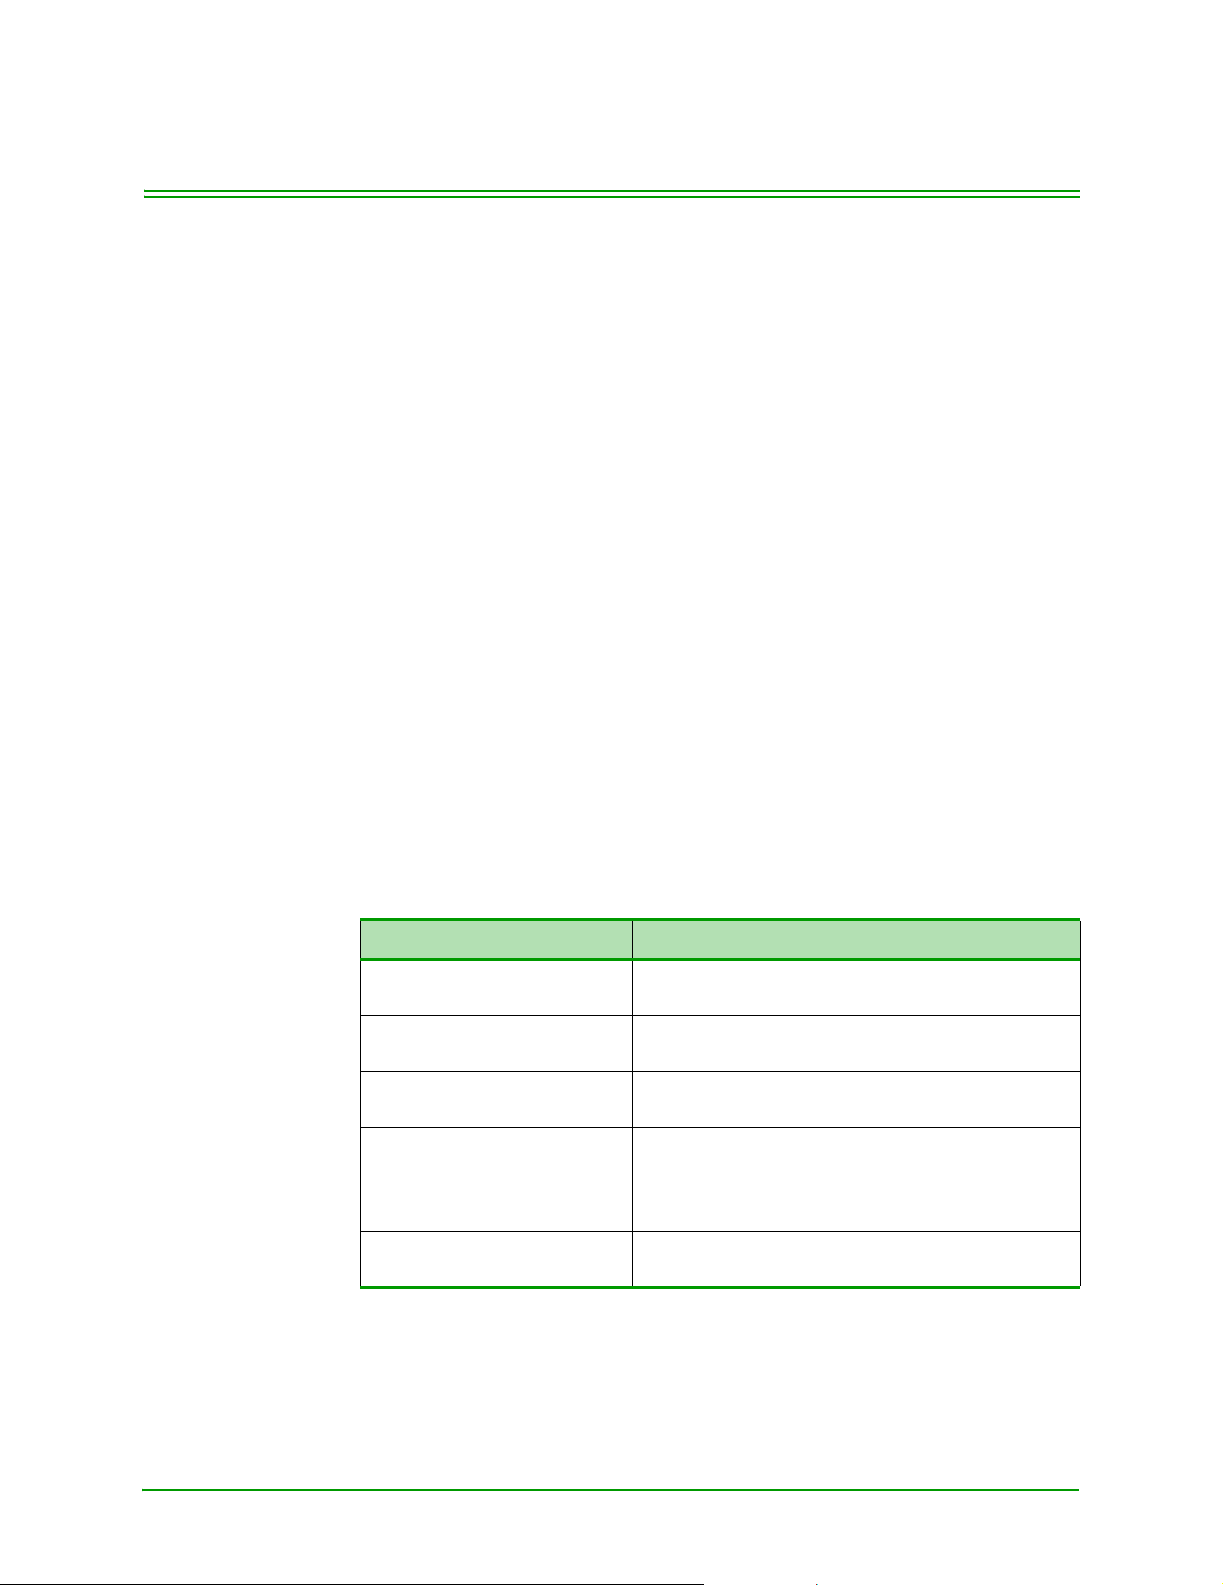
1.3: PINPad Key Functions
KEYS EXPLANATION
CHQ To select chequing account.
SAV/EP To select savings account.
NUMERIC Keys
(0 - 9)
CANCEL/ANNUL To cancel a transaction.
CORR To clear the display of data so the customer may re-key
OK To approve the transaction, amount, and PIN.
To key in a confidential Personal Identification Number
(PIN).
information or if no data has been input, to revert to the
previous prompt.
Moneris TRANSELECT (V2000) Merchant Operating Manual v.1.1 3
Page 12

CHAPTER 1: About Your Terminal
4 Moneris TRANSELECT (V2000) Merchant Operating Manual v.1.1
Page 13

CHAPTER 2: T erminal Features and Procedures
2.1: Standard Features
2.1.1: POS Administrative (Admin) Card
The POS Administrative (ADMIN) Card allows personnel to access various terminal functions and complete various financial transactions against
the merchant’s deposit account. If you (the merchant) accept only credit
cards, a POS Administrative Card may not be required.
IMPORTANT: You, the mer chant, ar e solely r esponsible for the security and
care of all of your POS Administrative Cards at all times. If
your POS Administrative Card is lost, stolen, or damaged
(or if you suspect it may be lost or stolen) call the Moneris
Merchant Service Centre immed iatel y.
All financial transactions completed with a POS
Administrative Card are subject to the guidelines of the
“Debit Card Merchant Agreement” with Moneris. The
Agreement contains important provisions regarding your
responsibility for POS Administrative Card security and
your liability for financial transactions made with a POS
Administrative Card.
2.1.2: Cardholder Conflicts
Merchants should not attempt to resolve or compensate Debit Cardholder
disputed transactions. Direct the Cardholder to their Financial Institution.
2.1.3: Code 10 Authorization
If you feel that a customer, card or transaction is suspicious and needs
investigating call the Authorization Centre and ask for a Code 10. This will
immediately alert the operator without alarming your customer. The operator will ask you some “Yes/No” questions and then provide instructions.
Here are some examples of situations in which you would call for a Code
10.
• If the signatures on the card and the signature on the POS receipt, do
not seem to match.
• If the card has been tampered with
• If the name on the card is inconsistent with the person’s gender
• If the customer is purchasing an unusual number of expensive items
• If the customer’s purchases seem randomly selected, with little regard
for size, quality or value
Moneris TRANSELECT (V2000) Merchant Operating Manual v.1.1 5
Page 14

CHAPTER 2: Terminal Features and Procedures
• If the customer seems nervous or signs slowly with uncertainly.
2.1.4: Credit Transaction Pre-Authorization
Use the Pre-Authorization transaction to obtain an authorization “only”
against a Credit Card’s “open to buy”. This transaction does not result in a
charge to the cardholder or a deposit to your account. Traditionally Preauthorization transactions are used in hotels, restaurants and car rental
environments where the final amount of the sale is unknown.
To process a Pre-Authorization transaction, refer to 3.6: Processing PreAuthorized Credit Transaction on page 20.
To complete a Pre-Authorized or Voice Authorized transaction and process
a charge against a Credit Card, refer to 3.7: Completing A Pre-Authorized
Credit Transaction on page 21 or 3.8: Processing Credit Card Advice
Transaction on page 22.
Note: If the amount of the final transaction is substantially less than the Pre-
Authorization amount. Contact the Voice Authorization Department of
the appropriate Credit Card Company and ask them to release the
amount previously authorized against the cardholder “Open To Buy”.
2.1.5: Printer Problems
If your printer is not working and you are unable to print a customer
receipt, contact Moneris Solutions Merchant Services to report the problem
and process the transaction as follows:
For Debit transactions - process the transaction through your terminal
and manually prepare a receipt (in duplicate) with full details including:
• Date of the transaction
• Amount of transaction
• Cardholder’s Card number
• The account type selected (Chequing or Savings)
Provide one copy of the manual receipt to your customer and retain one
copy for your records, or reverse the transaction and accept another form of
payment.
For Credit transactions - Process the transaction through your terminal
and manually prepare a Sales Draft with full details, including:
•an imprint of the Credit Card (Account number , Issue/Expiry Date and
Cardholder Name must be legible)
• date of transaction
• amount of transaction
• cardholder signature
• authorization number
6 Moneris TRANSELECT (V2000) Merchant Operating Manual v.1.1
Page 15

CHAPTER 2: Terminal Features and Procedures
Provide one copy of the Sales Draft to your customer and retain one copy
for your records.
Note: If you processed transactions through your terminal when your printer
was not working, do not process them again when your printer is back
in operation.
2.1.6: Securing Your Terminal
To minimize the risk of unauthorized transactions being processed through
your (the merchant’s ) terminal after business hours, log the terminal OFF at
the end of each business day (after a “Closed Batch” transaction) refer to
8.3: Logging Off (ADMIN 03) on page 67.
At the start of the next business day, Log your terminal ON - refer to 8.2:
Logging On (ADMIN 02) on page 66.
Your POS ADMIN Card is required to “LOGON” to your terminal.
2.1.7: Stored Credit and Debit Transactions
Your Transelect terminal can store 500 APPROVED Credit and Debit
transaction records. The oldest transaction will drop off, once the memory
of the terminal reaches capacity. If your terminal is replaced, the memory
cannot be transferred to the replacement terminal and is therefore lost.
Refer to 8.11: Printing Stored Transactions (ADMIN 60) on page 77 and
8.12: Performing Transaction Inquiry (ADMIN 66) on page 79. To clear
your terminals stored transaction memory, refer to 8.1: Initializing Your
Terminal (Initialization - ADMIN 01) on page 65.
2.1.8: Training Mode
Your Transelect terminal is able to simulate CREDIT and DEBIT CARD
financial transactions in Training Mode. Transactions processed in Training Mode will not affect your customer’s accounts or your business
accounts. Financial settlement does NOT occur for transactions processed
while your terminal is in training mode. For instructions on entering Training Mode, refer to 8.4: Processing Transactions In T raining Mode (ADMIN
05) on page 67.
2.1.9: Card Masking
To reduce the risk of fraudulent card use, only a portion of the cardholder's
card number is printed on the cardholder receipt. The remainder of the card
number is masked, i.e., an '*' is printed for each remaining digit in the card
number. Debit card, credit card (including private label), gift card and loyalty card numbers are masked.
Moneris TRANSELECT (V2000) Merchant Operating Manual v.1.1 7
Page 16

CHAPTER 2: Terminal Features and Procedures
Note: Remember to give the cardholder the MASKED copy of the receipt and
keep the unmasked copy for your records. The unmasked copy is
required to resolve charge-back issues quickly.
For debit card numbers, the first 10 digits of the card are printed in clear.
From the 11th digit onwards, asterisks are printed in the place of the real
digits, e.g.: 0123456789******.
For credit card, gift card and loyalty card numbers, only the last four digits
are printed in clear, the rest are replaced with an asterisk, e.g.:
*************1234.
To further reduce fraudulent card use, the credit card, gift card and loyalty
card expiry dates are not printed on the cardholder copy of the receipt.
Your printer must be configured to print a minimum of 2 copies of the
receipt (even if you use 2-part paper) to maintain compliance with card
masking requirements. See section 8.8: Setting Up the Printer (ADMIN
14) for instructions.
2.2: Optional Features
The following features are optional and can be activated in each of your
terminals.
2.2.1: Balance Prompt
This feature enables you to “flag” your Closed Batch Transaction (ADMIN
99) with an “Out of Balance” condition. This feature is used solely for your
“in house” record keeping and is not reported to Moneris.
This feature is activated in the ADMIN 08 –Configuring The Terminal.
2.2.2: Invoice Number
This feature enables you to key in an INVOICE number with every Credit
and Debit financial transaction. An Invoice number can be from 1 to 7
numbers or letters. If this feature is activated, you have the option of keying an INVOICE NUMBER with every transaction or bypassing it by
pressing ENTER when prompted. This feature is activated while configuring your terminal. Refer to 8.5: Configuring Your Terminal (ADMIN 08)
on page 68.
2.2.3: Optional Signature Line On Credit Card Transac-
tions
This feature enables you to turn off/on the Cardholder Signature Line for
all Credit Transactions. This option can only be turned OFF in business
environments where a Credit Card is not presented e.g. Mail Order Busi-
8 Moneris TRANSELECT (V2000) Merchant Operating Manual v.1.1
Page 17

CHAPTER 2: Terminal Features and Procedures
nesses. This feature is activated while configuring your terminal. Refer to
8.5: Configuring Your Terminal (ADMIN 08) on page 68.
2.2.4: Purchasing Card
If this feature is activated and programmed in your terminal, the Customer
Reference Number (if keyed) will be printed on every Purchasing Card
Receipt. The terminal will prompt for tax amount, if you do not wish to key
in the amount of tax key in 0 when prompted. This feature is activated
while configuring your terminal. Refer to 8.5: Configuring Your Terminal
(ADMIN 08) on page 68.
2.2.5: Reprint Transaction
To reprint the last transaction after the terminal has returned to the
"READY" prompt, press SHIFT (T) key and then the RETRY key. The
word *DUPLICATE* will be printed on the top and bottom lines of the
Receipt.
You can also print a duplicate of the last financial transaction by pressing
ENTER on the terminal prior to pressing the CANCEL/EXIT key.
Note: The card number is masked on reprinted receipts.
2.2.6: Third Party Card Processing
This feature enables you to process Third Party transactions (e.g. JCB).
Contact your Moneris Solutions Sales Representative for further details.
Third Party processing parameters are keyed in ADMIN 10 and ADMIN
11; refer to CHAPTER 8: Processing Administrative Functions for using
administrative functions.
2.2.7: Tip Processing
This feature enables you to customize your terminal to process tip amount
on all card purchase (Credit, Debit, Third Party cards) transactions traditionally used in restaurant environments. You must have a PINSmart PINPad to enable your terminal process tip on Debit card transactions. The
feature is enabled while configuring your terminal. Refer to Section 8.5:
Configuring Your Terminal (ADMIN 08) on page 68.
2.2.8: Clerk Subtotalling
This feature provides you with the option of obtaining Subtotals of an individual or group of employees on one or more terminals. This feature is activated using ADMIN functions 81, 82, 83 and 84; refer to CHAPTER 8:
Processing Administrative Functions.
Moneris TRANSELECT (V2000) Merchant Operating Manual v.1.1 9
Page 18

CHAPTER 2: Terminal Features and Procedures
Clerk ID’ s are keyed in the terminal and retained on the Moneris Host. This
enables you to obtain financial totals and the number of transactions processed on all of your terminals by a specific Clerk or group of Clerks.
2.2.9: Clerk ID
While setting up Clerk Subtotalling, you will select how the Clerk ID is to
be keyed. You can set the Clerk ID to Default on a specific terminal, or you
may choose the option of keying the Clerk ID at the start of every transaction either manually or by swiping a magnetic stripe card. In the Clerk ID
field, you can key in 1 - 6 characters using numbers or letters. It is be the
employer’s responsibility to obtain Magnetic Stripe Card - refer Guidelines
below.
Note: The Addition and deletion of Clerk ID's is controlled by the Merchant
and may have direct impact on Clerk Subtotal reports. Therefore,
Moneris is unable to guarantee accurate reporting between Clerk
Subtotals and totals reported in your Close Batch transactions. Also
note that the terminal can be configured to ask for Clerk ID for every
transaction performed (see ADMIN 83 in Section 8 for how to do this)
A total of two hundred and fifty-five (255) clerk ID’s can be attached to
your Merchant Location.
The following are guidelines for Magnetic Stripe Cards with Clerk ID’s:
• The Clerk ID field can be extracted from the magnetic stripe data on a
card.
• The standard for these cards is "ISO/IEC 7813 IDentification cards Financial Transaction Cards"
• The ID can be extracted from either Track 1 or Track 2 and your terminal will need to be set up accordingly; refer to Setting Up Clerk Subtotalling (ADMIN 83) in Section 8.
There are several Manufactures of Magnetic Stripe Cards, the following
are just a few; SCS-Security Card Systems Inc., NBS-National Business
Systems, B. A. Custom Cards and Bicybec.
Provide the card Manufacturer with the following information:
• Track 1 and 2: Uses the last 6 digits of the first field on the track
• Name: Uses the first 6 characters of the name field on track 1
2.2.10: Clerk Subtotals Reported As Group
More than one Clerk ID can be defined as a “GROUP” (GRP). A group
represents more than one Clerk ID that shares a common starting characters (Pre-fix). The number of common starting characters in a group can
vary from 1 to 5. For example, Clerk ID’s 1, 11, 111, can be keyed as a
10 Moneris TRANSELECT (V2000) Merchant Operating Manual v.1.1
Page 19

CHAPTER 2: Terminal Features and Procedures
GRP PRE-FIX with the number 1. All Clerk ID's that begin with the number 1 will be reported.
2.2.11: Multiple Terminal Reporting
Multiple Terminal Closing - Using one transaction, at any of your termi-
nals, you can close one terminal, a group of terminals or all of your terminals (attached to the same merchant number). This feature is activated in
ADMIN 80 and 85; refer to Section 8.
Multiple Deposit Totals - Use this transaction if you close your terminals
more than once per day . This transaction provides you with the grand totals
of all closed batches for the day.
The Multiple Terminal Close transaction (ADMIN 85) does not compare
totals stored in the terminals memory with totals stored in Moneris’ Host
Computer. Therefore, ensure that your receipts balance to the total of your
Multiple Closed Batch.
Note: The standard Terminal Close transaction (ADMIN 99) compares
terminal totals stored in the terminals memory with totals stored in
Moneris’ Host Computer.
2.2.12: Terminal Name
Key in your terminal name, 1 - 6 characters using numbers or letters. The
same terminal name cannot be used on more than one terminal. You can
identify up to 100 different Terminal Names (this would require 100 different Terminals).
2.2.13: Multiple Terminal Reporting In Group
More than one terminal can be defined as a "GROUP” (GRP). A group represents more than one Terminal ID that shares a common starting characters (Pre-fix). The number of common starting characters in a group can
vary from 1 to 5. For example, Terminal names, “FRONT 1, FRONT 2",
can be keyed as GRP PRE-FIX with the letter F. All Terminals that begin
with the letter “F” will then report Deposit totals and / or will be closed as a
group.
Moneris TRANSELECT (V2000) Merchant Operating Manual v.1.1 11
Page 20

CHAPTER 2: Terminal Features and Procedures
12 Moneris TRANSELECT (V2000) Merchant Operating Manual v.1.1
Page 21
CHAPTER 3: Processing Credit T ransactions
This section outlines how to process Credit card transactions. Before you
can process transactions, you must configure your terminal (see Section 8).
To reduce the risk of fraudulent card use, only a portion of the cardholder's
card number is printed on the cardholder receipt. The remainder of the card
number is masked. For credit card numbers, only the last four digits are
printed in clear, the rest are replaced with an asterisk, e.g.:
*************1234.
3.1: Entering Credit Card Information
There are two methods for entering Credit card information into the
Transelect terminal:
• manually keying in the Credit card information on the terminal keypad.
• swiping the Credit card on the magnetic stripe reader (MSR)
Manually Entering the Credit Card Information
If the terminal’s MSR cannot read the magnetic stripe on the customer card
or the card is not available, manually key in the details of the Credit card.
The following instructions are for a Credit Purchase. To perform a manually entered CREDIT REFUND or CORRECTION transaction, simply
press the REFUND or CORRECTION key in the first step as appropriate.
TERMINAL DISPLAY: OPERATOR'S ACTION
READY
SWIPE CUSTOMER CARD
PURCHASE
SWIPE CUSTOMER CARD
ENTER EXPIRY DATE
MMYY
PLEASE TAKE AN
IMPRINT OF THE CARD
ENTER CLERK ID To continue the transaction go to the ENTER
Press the PURCHASE key.
Manually key in the card number and press
ENTER.
Key in the expiry date (MMYY) and press
ENTER.
Using the imprinter and a paper sales draft provided with your terminal, take an imprint of the
Credit card. Make sure the account number and
expiry date are clear and readable.
CLERK ID prompt in the appropriate section.
Moneris TRANSELECT (V2000) Merchant Operating Manual v.1.1 13
Page 22

CHAPTER 3: Processing Credit Transactions
Swiping the Credit Card
Simply swipe the Credit card’s magnetic stripe through th e magnetic stripe
reader (MSR) on the terminal. The MSR will read the information on the
stripe, then display the card number and prompt you to press ENTER to
confirm that the card number displayed matches the number on the front of
the card.
The instructions in this chapter use the SWIPE CUSTOMER CARD
method for entering the card data.
3.2: Processing Credit Card Purchase Transactions
This transaction electronically authorizes and captures credit card purchases. Settlement to your business account occurs electronically for all
closed batches. If your terminal’s e-commerce and mail/tel order func-
tions are configured, refer to Processing E-commerce And Mail / Telephone Order Transactions.
When a Credit Card is swiped through the terminal’s magnetic stripe
reader, the card number encoded on the magnetic stripe appears on the terminal display. To avoid charge-backs, ensure that the number displayed on
the terminal is the same as the number embossed on the card. Contact Moneris Solutions Authorization Department immediately if there is a discrepancy between the two numbers.
TERMINAL DISPLAY OPERATOR'S ACTION
READY
SWIPE CUSTOMER CARD
################
PRESS ENTER TO CONT
PURCHASE
ENTER CLERK ID
PURCHASE
ENTER INVOICE NUMBER
PURCHASE
ENTER AMOUNT
Swipe customer card
Press ENTER
Key in your Clerk ID and press ENTER.
Note: This is an OPTIONAL prompt.
It only appears if the Clerk ID prompt
has been enabled in Admin 83.
Key in the invoice number and press ENTER
OR
Press ENTER to leave this blank.
Note: This is an OPTIONAL prompt.
It only appears if the Invoice
Numbers prompt has been enabled
in Admin 08.
Key in amount of Purchase (without the decimal point) and press ENTER
14 Moneris TRANSELECT (V2000) Merchant Operating Manual v.1.1
Page 23

CHAPTER 3: Processing Credit Transactions
TERMINAL DISPLAY OPERATOR'S ACTION
DIALLING
CALL ANSWERED
SENDING / RECEIVING
PROCESSING
PRINTING
APPROVED ######
PROVIDE TRANS RECORD
READY
SWIPE CUSTOMER CARD
Please wait
The cardholder must sign the unmasked copy
of the receipt.
Give the masked copy of the receipt to your
customer and retain the signed, unmasked
copy for your records.
###### = Authorization number
Press the CANCEL/EXIT key to return to
READY prompt
3.2.1: Processing Credit Card Purchase T ransactions (Back
Up Procedure)
Use the following procedure to complete a purchase transaction when you
are unable to process the transaction through your terminal due to System
or Hardware Problems.
1. Prepare a paper Sales Draft with full details, including:
•An imprint of the Credit Card (Account number , Issue/Expiry Date
and Cardholder Name must be legible)
• date of transaction
• cardholder signature
• authorization number *
* If the amount of the transaction exceeds your “Downtime floor limit”
established by Moneris, obtain a “Voice Authorization” by calling the
Moneris Authorization centre.
2. Once the cardholder has signed the Sales Draft, compare the signature
to that located on the signature panel of the card. (Immediately report
discrepancies in signature and name to the Voice Authorization Department of the applicable Credit Card Company).
3. Provide the cardholder with their copy of the receipt and retain the
“Merchant copy” for your records.
4. Contact Moneris Solutions Merchant Services to report the problem
(telephone number listed in the front of this manual).
5. Once your T ranselect terminal is operational, the purchase transactions,
which occurred while your terminal was not available, must be manually processed through the Transelect terminal as “ADVICE” transac-
Moneris TRANSELECT (V2000) Merchant Operating Manual v.1.1 15
Page 24

CHAPTER 3: Processing Credit Transactions
tions. For processing Advice transactions, refer to Processing Credit
Card Advice Transaction in this Section.
3.3: Correcting/Voiding Credit Card Purchase
Use this transaction to correct a purchase transaction that was keyed incorrectly. Process this transaction for the entire amount of the original incorrect purchase and then re-key the purchase correctly. This transaction
cancels the original purchase if both transactions were processed in the
same batch.
Note: Y our Administrative (ADMIN) Car d is r equir ed to complete a Purchase
Correction/Void transaction.
TERMINAL DISPLAY OPERATOR'S ACTIONS
READY
SWIPE CUSTOMER CARD
PURCHASE VOID
SWIPE ADMIN CARD
PURCHASE VOID
SWIPE CUSTOMERS CARD
################
PRESS ENTER TO CONT
PURCHASE VOID
ENTER CLERK ID
PURCHASE VOID
ENTER INVOICE NUMBER
ENTER ORIGINAL
AUTHORIZATION NUMBER
PURCHASE VOID
ENTER AMOUNT
DIALLING
CALL ANSWERED
SENDING / RECEIVING
PROCESSING
PRINTING
Press PUR CORR/VOID key
Swipe POS ADMIN Card
Swipe Customer Card
Press ENTER
Key in your Clerk ID and press ENTER.
Note: This is an OPTIONAL prompt.
It only appears if the Clerk ID
propman has been enabled in Admin
83.
Key in the invoice number and press ENTER
OR
Press ENTER to leave this blank.
Note: This is an OPTIONAL prompt.
It only appears if the Invoice Numbers
prompt has been enabled in Admin
08.
Key in original Authorization Number from the
Purchase transaction and press ENTER.
Key in the entire amount of the purchase transaction to be voided/corrected (without the decimal point) and press ENTER.
Please Wait
16 Moneris TRANSELECT (V2000) Merchant Operating Manual v.1.1
Page 25

CHAPTER 3: Processing Credit Transactions
TERMINAL DISPLAY OPERATOR'S ACTIONS
APPROVED
PROVIDE TRANS RECORD
READY
SWIPE CUSTOMER CARD
You, the Merchant, sign the masked receipt.
Give the masked copy of the receipt to your
customer and retain the unmasked copy for
your records
Press CANCEL/EXIT key to return to READY
prompt
3.4: Processing Credit Card Refund
Use this transaction to refund the full or partial value of a Purchase transaction.
Note: Your Administrative (ADMIN) Card is required to complete a Refund
transaction.
TERMINAL DISPLAY OPERATOR'S ACTION
READY
SWIPE CUSTOMER CARD
REFUND
SWIPE ADMIN CARD
REFUND
SWIPE CUSTOMER CARD
################
PRESS ENTER TO CONT
REFUND
ENTER CLERK ID
REFUND
ENTER INVOICE NUMBER
ENTER ORIGINAL
AUTHORIZATION NUMBER
REFUND
ENTER AMOUNT
Press REFUND key
Swipe POS ADMIN Card
Swipe Customer Card
Press ENTER
Key in your Clerk ID and press ENTER.
Note: This is an OPTIONAL prompt.
Key in the invoice number and press ENTER
OR
Press ENTER to leave this blank.
Note: This is an OPTIONAL prompt.
Key in original Authorization Number from the
Purchase transaction and press ENTER.
OR
Key in 999999 if the original Authorization
Number is not available and press ENTER.
Key in amount of the transaction being
refunded (without the decimal point) and press
ENTER.
It only appears if the Clerk ID
propman has been enabled in Admin
83.
It only appears if the Invoice Numbers
prompt has been enabled in Admin
08.
Moneris TRANSELECT (V2000) Merchant Operating Manual v.1.1 17
Page 26

CHAPTER 3: Processing Credit Transactions
TERMINAL DISPLAY OPERATOR'S ACTION
DIALLING
CALL ANSWERED
SENDING / RECEIVING
PROCESSING
PRINTING
APPROVED
PROVIDE TRANS RECORD
READY
SWIPE CUSTOMER CARD
Please wait
You, the Merchant, sign the masked receipt.
Give the masked copy of the receipt to your
customer and retain the unmasked copy for
your records
Press CANCEL/EXIT key to return to READY
prompt
18 Moneris TRANSELECT (V2000) Merchant Operating Manual v.1.1
Page 27

CHAPTER 3: Processing Credit Transactions
3.5: Correcting/Voiding Credit Card Refund
Use this transaction to correct a refund transaction that was keyed incorrectly. Process this transaction for the entire amount of the original refund
and then re-process the refund correctly. This transaction cancels the original refund if both transactions were processed in the same batch.
Note: Your Administrative (ADMIN) Card is required to complete a Refund
Correction/Void transaction.
TERMINAL DISPLAY OPERATOR'S ACTION
READY
SWIPE CUSTOMER CARD
REFUND VOID
SWIPE ADMIN CARD
REFUND VOID
SWIPE CUSTOMER CARD
################
PRESS ENTER TO CONT
REFUND VOID
ENTER CLERK ID
REFUND VOID
ENTER INVOICE NUMBER
ENTER ORIGINAL
AUTHORIZATION NUMBER
REFUND VOID
ENTER AMOUNT
DIALLING
CALL ANSWERED
SENDING / RECEIVING
PROCESSING
PRINTING
APPROVED
PROVIDE TRANS RECORD
READY
SWIPE CUSTOMER CARD
Press REF CORR/VOID key
Swipe POS ADMIN Card
Swipe Customer Card
Press ENTER
Key in your Clerk ID and press ENTER.
Note: This is an OPTIONAL prompt.
It only appears if the Clerk ID
propman has been enabled in Admin
83.
Key in the invoice number and press ENTER
OR
Press ENTER to leave this blank.
Note: This is an OPTIONAL prompt.
It only appears if the Invoice Numbers
prompt has been enabled in Admin
08.
Key in the Original Authorization Number from
the Refund transaction and press ENTER
Key in the entire amount of the Refund tran sa ction being Voided and press ENTER.
Please wait
The cardholder must sign the unmasked copy
of the receipt.
Give the masked copy of the receipt to your
customer and retain the signed, unmasked
copy for your records.
Press CANCEL/EXIT key to return to READY
prompt
Moneris TRANSELECT (V2000) Merchant Operating Manual v.1.1 19
Page 28

CHAPTER 3: Processing Credit Transactions
3.6: Processing Pre-Authorized Credit Transaction
Use this transaction to obtain authorization for a purchase transaction
where the final dollar value of the transaction is unknown. E.g. In a restaurant environment, a tip may be added.
This function ONLY provides authorization and does not capture the transaction for deposit. Refer to Section 3.7: Completing A Pre-Authorized
Credit Transaction on page 21 to complete and capture the transaction.
Note: To print a TIP LINE on the Customer Receipt - refer to Section 8.5:
Configuring Your Terminal (ADMIN 08) on page 68.
TERMINAL DISPLAY OPERATOR'S ACTION
READY
SWIPE CUSTOMER CARD
PRE-AUTHORIZATION
SWIPE CUSTOMER CARD
################
PRESS ENTER TO CONT
PRE-AUTHORIZATION
ENTER CLERK ID
PRE-AUTHORIZATION
ENTER INVOICE NUMBER
PRE-AUTHORIZATION
ENTER AMOUNT
DIALLING
CALL ANSWERED
SENDING / RECEIVING
PROCESSING
PRINTING
APPROVED ######
PROVIDE TRANS RECORD
READY
SWIPE CUSTOMER CARD
Press PRE-AUTH key
Swipe Customer Card
Press ENTER
Key in your Clerk ID and press ENTER.
Note: This is an OPTIONAL prompt.
It only appears if the Clerk ID
propman has been enabled in Admin
83.
Key in the invoice number and press ENTER
OR
Press ENTER to leave this blank.
Note: This is an OPTIONAL prompt.
It only appears if the Invoice Numbers
prompt has been enabled in Admin
08.
Key in amount to be authorized (without the
decimal point) and press ENTER.
Please wait
The cardholder must sign the unmasked copy
of the receipt.
Give the masked copy of the receipt to your
customer and retain the signed, unmasked
copy for your records.
Press the CANCEL/EXIT key to return to the
READY prompt.
20 Moneris TRANSELECT (V2000) Merchant Operating Manual v.1.1
Page 29

CHAPTER 3: Processing Credit Transactions
3.7: Completing A Pre-Authorized Cr edit Transaction
Use this transaction to complete a Pre-Authorized transaction previously
processed on your terminal. This transaction captures the transaction for
settlement.
TERMINAL DISPLAY OPERATOR'S ACTION
READY
SWIPE CUSTOMER CARD
FIND ORIGINAL?
YES - A NO – C
ENTER SEQUENCE NO
OF ORIGINAL TRANS
################
PRESS ENTER TO CONT
OLD CLERK ID ####
NEW CLERK ID
ADVICE
ENTER INVOICE NUMBER
OLD AMT. $##.##
ENTER NEW AMOUNT
DIALLING
CALL ANSWERED
SENDING / RECEIVING
PROCESSING
PRINTING
APPROVED ######
PROVIDE TRANS RECORD
READY
SWIPE CUSTOMER CARD
Press ADVICE key
Press A
Key in the last 6 digits of the receipt number and
press ENTER. Do not include the dash from the
Pre-Authorized Transaction Receipt.
Confirm card number displayed on the screen
matches the Card Number on the receipt, then
press ENTER to continue.
Key in your Clerk ID and press ENTER.
OR
Press ENTER to accept the displayed Clerk ID.
Note: This is an OPTIONAL prompt.
It only appears if the Clerk ID propman
has been enabled in Admin 83.
Key in the invoice number and press ENTER
OR
Press ENTER to leave this blank.
Note: This is an OPTIONAL prompt.
It only appears if the Invoice Numbers
prompt has been enabled in Admin 08.
Press ENTER to accept original authorized
amount or key in new amount and press
ENTER
Please wait
If your customer signed the original Pre-Authorized transaction receipt, then your customer is
not required to sign the “ADVICE” receipt. However, you must retain a copy of the ADVICE
receipt.
Press the CANCEL/EXIT key to return to the
READY prompt.
Moneris TRANSELECT (V2000) Merchant Operating Manual v.1.1 21
Page 30

CHAPTER 3: Processing Credit Transactions
3.8: Processing Credit Card Advice Transaction
Use this transaction to complete Credit Purchase transactions that you were
unable to process at the time of the Sale due to System or Terminal problems. This transaction captures the transaction for settlement.
TERMINAL DISPLAY OPERATOR'S ACTION
READY
SWIPE CUSTOMER CARD
FIND ORIGINAL?
YES-A NO-C
ADVICE
ENTER ACCOUNT NO.
ENTER EXPIRY DATE
MMYY
ADVICE
ENTER CLERK ID
ADVICE
ENTER INVOICE NUMBER
ENTER ORIGINAL
AUTHORIZATION NUMBER
ADVICE
ENTER AMOUNT
DIALLING
CALL ANSWERED
SENDING / RECEIVING
PROCESSING
PRINTING
APPROVED ######
PROVIDE TRAN RECORD
READY
SWIPE CUSTOMER CARD
Press ADVICE key
Press C
Key in Cardholder number manually and press
ENTER
Key in the card’s expiry date and press ENTER
Key in your Clerk ID and press ENTER.
Note: This is an OPTIONAL prompt.
It only appears if the Clerk ID
propman has been enabled in Admin
83.
Key in the invoice number and press ENTER
OR
Press ENTER to leave this blank.
Note: This is an OPTIONAL prompt.
It only appears if the Invoice Numbers
prompt has been enabled in Admin
08.
Key in Authorization obtained from “Voice
Authorization” and press ENTER.
If the transaction was below your floor limit and
you did not obtain Voice Authorization, key in
the date when the original transaction was
made (DDMMYY) as your authorization number and press ENTER.
Key in amount of the transaction (without the
decimal point) and press ENTER.
Please wait
Retain a copy of receipt.
Press the CANCEL/EXIT key to return to
READY prompt
22 Moneris TRANSELECT (V2000) Merchant Operating Manual v.1.1
Page 31

CHAPTER 4: Processing Debit T ransactions
This section outlines how to process debit card transactions. Before you
can process any transaction, you must first configure your terminal. Refer
to CHAPTER 8: Processing Administrative Functions.
Note: The debit cardholder must be present for all debit transactions.
To reduce the risk of fraudulent card use, only a portion of the cardholder's
card number is printed on the cardholder receipt. The remainder of the card
number is masked. For debit card numbers, the first 10 digits of the card
are printed in clear . From the 11th digi t onwards, asterisks are printed in the
place of the real digits, e.g.: 0123456789******.
4.1: Entering Debit Card Information
There is only one method for entering Debit card information into the
Transelect terminal:
• swiping the Debit card on the magnetic stripe reader
IMPORTANT: Debit card information can NOT be manually entered on
the Transelect terminal. The Debit card MUST be
swiped.
Swiping the Debit Card
Simply swipe the Debit card’s magnetic stripe through the magnetic stripe
reader (MSR) on the terminal. The MSR will read the information on the
stripe.
4.2: Processing Debit Card Purchases
This transaction electronically authorizes and captures debit card purchases. Settlement to your business account occurs electronically for all
“closed batches”.
Moneris TRANSELECT (V2000) Merchant Operating Manual v.1.1 23
Page 32

CHAPTER 4: Processing Debit Transactions
4.2.1: Processing Debit Purchase (without Tip Entry)
TERMINAL DISPLAY OPERATOR’S ACTION CUSTOMER ACTION
READY
SWIPE CUSTOMER CARD
PURCHASE
ENTER CLERK ID
PURCHASE
ENTER INVOICE NUMBER
PURCHASE
ENTER AMOUNT
*PURCHASE
CONTINUE ON PINPAD
DIALLING
SENDING
RECEIVING
PROCESSING
PRINTING
APPROVED ######
PROVIDE TRANS RECORD
READY
SWIPE CUSTOMER CARD
Swipe Customer Card
Key in your Clerk ID and press
ENTER.
Note: This prompt only
appears if the Clerk ID
prompt has been
enabled in Admin 83.
Key in the invoice number and
press ENTER.
OR
Press ENTER to leave this blank.
Note: This prompt only appears
if the Invoice Number
prompt has been enabled
in Admin 08.
Key in the amount of the Purchase
(without decimal point) and press
ENTER
Give PINPad to customer 1.Verify the transaction type and
amount. If correct, press OK.
2.Select Chequing or Savings
account.
3.Key in your PIN and press OK.
4.Return the PINPad to the
operator.
Note: Press CANCEL at any
time to stop the
transaction.
Press CORR to make
changes to the last entry.
Return Card to customer “PLEASE WAIT FOR MESSAGE”
appears on the PINPad display.
Give the masked copy of the receipt
to your customer and retain the
unmasked copy for your records.
“APPROVED-THANKS
OBTAIN CARD”
is displayed on the PINPad.
Press CANCEL/EXIT key to return
to READY prompt.
###### = the Authorization Number
24 Moneris TRANSELECT (V2000) Merchant Operating Manual v.1.1
Page 33

CHAPTER 4: Processing Debit Transactions
4.2.2: Processing Debit Purchase with Tip Entry
TERMINAL DISPLAY OPERATOR’S ACTION CUSTOMER ACTION
READY
SWIPE CUSTOMER CARD
PURCHASE
ENTER CLERK ID
PURCHASE
ENTER INVOICE NUMBER
PURCHASE
ENTER AMOUNT
*PURCHASE
CONTINUE ON PINPAD
DIALLING
CALL ANSWERED
SENDING/RECEIVING
PROCESSING
PRINTING
Swipe Customer Card
Key in your Clerk ID and press
ENTER.
Note: This prompt appears
only if the Clerk ID
prompt is enabled in
Admin 83.
Key in the invoice number and
press ENTER
OR
Press ENTER to leave this blank.
Note: This prompt appears
only if the Invoice
Numbers prompt is
enabled in Admin 08.
Key in the amount of the purchase
(without decimal point) and press
ENTER
Give the PINPad to customer 1. Verify the transaction type and
amount. If correct, press OK.
2. Enter the tip amount and press
OK
OR
To bypass tip, simply press OK.
3. Verify the Purchase plus Tip
amount. Press OK.
4. Select Chequing or Savings
account.
5. Key in your PIN and press OK.
6. Return the PINPad to the
operator.
Note: Press CANCEL at any
time to stop the
transaction.
Press CORR to make
changes to the last entry.
Return the Debit card to the customer.
“PLEASE WAIT FOR MESSAGE”
appears on the PINPad display.
Moneris TRANSELECT (V2000) Merchant Operating Manual v.1.1 25
Page 34

CHAPTER 4: Processing Debit Transactions
TERMINAL DISPLAY OPERATOR’S ACTION CUSTOMER ACTION
APPROVED ######
PROVIDE TRANS RECORD
READY
SWIPE CUSTOMER CARD
Give the masked copy of the receipt
to your customer and retain the
unmasked copy for your records.
Press CANCEL/EXIT to return to
the READY prompt.
(###### = the Authorization Number)
“APPROVED-THANKS
OBTAIN CARD”
is displayed on the PINPad.
4.3: Correcting/Voiding Debit Card Purchase
Use this transaction to correct a purchase transaction that was keyed incorrectly. Process this transaction for the entire amount of the original purchase transaction and then re-key the purchase correctly.
Note: Your POS Administrative Card (ADMIN) is required to complete a
Purchase Correction/Void transaction
TERMINAL DISPLAY OPERATOR'S ACTION CUSTOMER ACTION
READY
SWIPE CUSTOMER CARD
PURCHASE VOID
SWIPE ADMIN CARD
PURCHASE VOID
SWIPE CUSTOMER CARD
PURCHASE VOID
ENTER CLERK ID
PURCHASE VOID
ENTER INVOICE NUMBER
ENTER ORIGINAL
AUTHORIZATION NUMBER
PURCHASE VOID
ENTER AMOUNT
Press PUR CORR/VOID key
Swipe POS ADMIN Card
Swipe Customer Card
Key in your Clerk ID and press
ENTER.
Note: This prompt appears
only if the Clerk ID
prompt has been
enabled in Admin 83.
Key in the invoice number and
press ENTER
OR
Press ENTER to leave this blank.
Note: This prompt appears only
if the Invoice Numbers
prompt has been enabled
in Admin 08.
Key in Authorization # from purchase transaction being corrected/
voided and press ENTER
Key in the entire amount of the purchase transaction being Corrected/
Voided (without the decimal) and
press ENTER
26 Moneris TRANSELECT (V2000) Merchant Operating Manual v.1.1
Page 35

CHAPTER 4: Processing Debit Transactions
TERMINAL DISPLAY OPERATOR'S ACTION CUSTOMER ACTION
*PURCHASE VOID
CONTINUE ON PINPAD
DIALLING
CALL ANSWERED
SENDING/RECEIVING
PROCESSING
PRINTING
APPROVED######
PROVIDE TRANS RECORD
READY
SWIPE CUSTOMER CARD
Give PINPad to customer 1.Verify the transaction type and
amount. If correct, press OK.
2.Select Chequing or Savings
account.
3.Key in your PIN and press OK.
4.Return the PINPad to the
operator.
Note: Press CANCEL at any
time to stop the
transaction.
Press CORR to make
changes to the last entry.
Return Card to Customer “PLEASE WAIT FOR MESSAGE”
appears on the PINPad display.
Give the masked copy of the receipt
to your customer and retain the
unmasked copy for your records.
Press CANCEL/EXIT key to return
to READY prompt.
“APPROVED-THANKS
OBTAIN CARD”
is displayed on the PINPad.
4.4: Processing Debit Card Refund
Use this transaction to refund full or partial value of a Purchase transaction.
Note: Your POS Administrative Card (ADMIN) is required to complete a
Refund Transaction.
TERMINAL DISPLAY OPERA TOR'S ACT ION CUSTOMER ACTION
READY
SWIPE CUSTOMER CARD
REFUND
SWIPE ADMIN CARD
REFUND
SWIPE CUSTOMER CARD
REFUND
ENTER CLERK ID
Press REFUND key
Swipe POS ADMIN Card
Swipe customer card
Key in your Clerk ID and press
ENTER.
Note: This prompt appears
only if the Clerk ID
prompt has been
enabled in Admin 83.
Moneris TRANSELECT (V2000) Merchant Operating Manual v.1.1 27
Page 36

CHAPTER 4: Processing Debit Transactions
TERMINAL DISPLAY OPERATOR'S ACT ION CUSTOMER ACTION
REFUND
ENTER INVOICE NUMBER
REFUND
ENTER AMOUNT
*REFUND
CONTINUE ON PINPAD
DIALING
CALL ANSWERED
SENDING/RECEIVING
PROCESSING
PRINTING
APPROVED ######
PROVIDE TRANS RECORD
READY
SWIPE CUSTOMER CARD
Key in the invoice number and
press ENTER
OR
Press ENTER to leave this blank.
Note: This prompt appears only
if the Invoice Numbers
prompt has been enabled
in Admin 08.
Key in the amount of the transaction being Refunded (without the
decimal point) and press ENTER
Partial amount of original purchase
may be refunded)
Give PINPad to customer 1.Verify the transaction type and
amount. If correct, press OK.
2.Select Chequing or Savings
account.
3.Key in your PIN and press OK.
4.Return the PINPad to the
operator.
Note: Press CANCEL at any
time to stop the
transaction.
Press CORR to make
changes to the last entry.
Return card to customer “PLEASE WAIT FOR MESSAGE”
appears on the PINPad display.
Give the masked copy of the receipt
to your customer and retain the
unmasked copy for your records.
“APPROVED-THANKS
OBTAIN CARD”
is displayed on the PINPad.
Press CANCEL/EXIT key to return
to READY prompt
28 Moneris TRANSELECT (V2000) Merchant Operating Manual v.1.1
Page 37

CHAPTER 4: Processing Debit Transactions
4.5: Correcting/Voiding Debit Card Refund
Use this transaction to correct a Refund transaction that was keyed incorrectly. Process this transaction for the entire amount of the original Refund
and then re-process the Refund correctly.
Note: Your POS Administrative Card (ADMIN) is required to complete a
Refund Correction/ Void transaction .
TERMINAL DISPLAY OPERATOR ACTION CUSTOMER'S ACTION
READY
SWIPE CUSTOMER CARD
REFUND VOID
SWIPE ADMIN CARD
REFUND VOID
SWIPE CUSTOMER CARD
REFUND VOID
ENTER CLERK ID
REFUND VOID
ENTER INVOICE NUMBER
ENTER ORIGINAL
AUTHORIZATION NUMBER
REFUND VOID
ENTER AMOUNT
*REFUND VOID
CONTINUE ON PINPAD
Press REF CORR/VOID key
Swipe POS ADMIN Card
Swipe customer card
Key in your Clerk ID and press
ENTER.
Note: This prompt appears
only if the Clerk ID
prompt has been
enabled in Admin 83.
Key in the invoice number and
press ENTER
OR
Press ENTER to leave this blank.
Note: This prompt appears only
if the Invoice Numbers
prompt has been enabled
in Admin 08.
Key in the Authorization # from the
refund transaction being Voided/
Corrected and press ENTER
Key in the entire amount of the
refund transactions being Voided/
Corrected (without the decimal
point) and press ENTER being
Give PINPad to customer 1.Verify the transaction type and
amount. If correct, press OK.
2.Select Chequing or Savings
account.
3.Key in your PIN and press OK.
4.Return the PINPad to the
operator.
Note: Press CANCEL at any
time to stop the
transaction.
Press CORR to make
changes to the last entry.
Moneris TRANSELECT (V2000) Merchant Operating Manual v.1.1 29
Page 38

CHAPTER 4: Processing Debit Transactions
TERMINAL DISPLAY OPERATOR ACTION CUSTOMER'S ACTION
DIALLING
CALL ANSWERED
SENDING/RECEIVING
PROCESSING
PRINTING
APPROVED ######
PROVIDE TRANS RECORD
READY
SWIPE CUSTOMER CARD
Return card to customer “PLEASE WAIT FOR MESSAGE”
appears on the PINPad display.
Give the masked copy of the receipt
to your customer and retain the
unmasked copy for your records.
Press CANCEL/EXIT key to return
to READY prompt
“APPROVED-THANKS
OBTAIN CARD”
is displayed on the PINPad.
30 Moneris TRANSELECT (V2000) Merchant Operating Manual v.1.1
Page 39

CHAPTER 5: Processing E-commerce And Mail /
T elephone Order Transactions
Your terminal can process e-commerce and mail/ telephone order (MOTO)
transactions. It has to be enabled, using ADMIN 08 function (see Section
8.5: Configuring Your Terminal (ADMIN 08) on page 68.) This section
outlines the procedure for processing e-commerce and mail/ telephone
order transactions. To process e-commerce and mail/ telephone order transaction follow the following steps depending on your terminal configuration.
Note: E-commerce and Mail/ Tel transactions can only be performed without
swiping a card. It is assumed that the cardholder will not be there. If a
card is swiped, the features cannot be used.
Moneris TRANSELECT (V2000) Merchant Operating Manual v.1.1 31
Page 40

CHAPTER 5: Processing E-comm and MOTO Transactions
5.1: Processing Transactions with E-Commerce and MOTO Enabled
5.1.1: E-commerce Purchase
To process an E-Commerce transaction when both E-Commerce and
MOTO transactions are enabled on your terminal:
TERMINAL DISPLAY OPERATOR'S ACTION
READY
SWIPE CUSTOMER CARD
PURCHASE
SWIPE CUSTOMER CARD
ENTER EXPIRY DATE
MMYY
REGULAR-A E-COMM-B
MAIL/TEL ORDER-C
PURCHASE
ENTER CLERK ID
PURCHASE
ENTER INVOICE NUMBER
PURCHASE
ENTER AMOUNT
DIALLING
CALL ANSWERED
SENDING/RECEIVING
PROCESSING
PRINTING
APPROVED ######
PROVIDE TRANS RECORD
READY
SWIPE CUSTOMER CARD
Press PURCHASE key
Manually key in card number and press ENTER
Key in expiry date (MMYY) and press ENTER
To select e-commerce processing, press B
Key in your Clerk ID and press ENTER.
Note: This is an OPTIONAL prompt. It appears
only if the Clerk ID prompt is enabled in
Admin 83.
Key in the invoice number and press ENTER
OR
Press ENTER to leave this blank.
Note: This is an OPTIONAL prompt. It appears
only if the Invoice Numbers prompt is
enabled in Admin 08.
Key in purchase amount and press ENTER
Please wait
Press CANCEL/EXIT to return to the READY
prompt.
32 Moneris TRANSELECT (V2000) Merchant Operating Manual v.1.1
Page 41

CHAPTER 5: Processing E-comm and MOTO Transactions
5.1.2: MOTO Purchase
T o process a MOT O transaction when both E-Commerce and MOT O transactions are enabled on your terminal:
TERMINAL DISPLAY OPERATOR'S ACTION
READY
SWIPE CUSTOMER CARD
PURCHASE
SWIPE CUSTOMER CARD
ENTER EXPIRY DATE
MMYY
REGULAR-A E-COMM-B
MAIL/TEL ORDER-C
SINGLE–A RECURRING–
MORE OPTIONS-C
If C (MORE OPTIONS) is selected
INSTALLMENT–A
OTHER TYPE–B
MORE OPTIONS-C
If A (SINGLE) or
A (INSTALLMENT) or
B (RECURRING) or
B (OTHER TYPE) is selected:
PURCHASE
ENTER CLERK ID
PURCHASE
ENTER INVOICE NUMBER
PURCHASE
ENTER AMOUNT
DIALLING
CALL ANSWERED
SENDING/RECEIVING
PROCESSING
PRINTING
APPROVED ######
PROVIDE TRANS RECORD
READY
SWIPE CUSTOMER CARD
Press PURCHASE key
Manually key in card number and press ENTER
Key in expiry date (MMYY) and press ENTER
To select mail/ tel order processing, press C
Press A to process a one-time transaction.
B
Press B to process a transaction that occurs on
a regular basis (e.g. monthly).
Press C to view other options.
Press A to process an installment payment.
Press B to process a transaction that does not
fall under the first four options.
Press C to view the first list of options.
Key in your Clerk ID and press ENTER.
Key in the invoice number and press ENTER
OR
Press ENTER to leave this blank.
Key in purchase amount and press ENTER
Please wait
Press CANCEL/EXIT to return to the READY
prompt.
Note: This is an OPTIONAL prompt. It appears
only if the Clerk ID prompt is enabled in
Admin 83.
Note: This is an OPTIONAL prompt. It appears
only if the Invoice Numbers prompt is
enabled in Admin 08.
Moneris TRANSELECT (V2000) Merchant Operating Manual v.1.1 33
Page 42

CHAPTER 5: Processing E-comm and MOTO Transactions
5.2: Processing Transactions with Only E-Commerce Enabled
Note: E-commerce and Mail/ Tel transactions can only be performed without
swiping a card. It is assumed that the cardholder will not be there. If a
card is swiped, the features cannot be used.
TERMINAL DISPLAY OPERATOR'S ACTION
READY
SWIPE CUSTOMER CARD
PURCHASE
SWIPE CUSTOMER CARD
ENTER EXPIRY DATE
MMYY
E-COMMERCE TRANS?
YES – A NO-C
PURCHASE
ENTER CLERK ID
PURCHASE
ENTER INVOICE NUMBER
PURCHASE
ENTER AMOUNT
DIALLING
CALL ANSWERED
SENDING/RECEIVING
PROCESSING
PRINTING
APPROVED ######
PROVIDE TRANS RECORD
READY
SWIPE CUSTOMER CARD
Press PURCHASE key
Manually key in card number and press ENTER
Key in expiry date (MMYY) and press ENTER
To process an e-commerce transaction, press A
Note: To process a normal purchase transaction,
press C.
Key in your Clerk ID and press ENTER.
Note: This is an OPTIONAL prompt. It appears
only if the Clerk ID prompt is enabled in
Admin 83.
Key in the invoice number and press ENTER
OR
Press ENTER to leave this blank.
Note: This is an OPTIONAL prompt. It appears
only if the Invoice Numbers prompt is
enabled in Admin 08.
Key in purchase amount and press ENTER
Please wait
Press CANCEL/EXIT to return to the READY
prompt.
34 Moneris TRANSELECT (V2000) Merchant Operating Manual v.1.1
Page 43

CHAPTER 5: Processing E-comm and MOTO Transactions
5.3: Processing Transactions with Only MOTO Enabled
Note: E-commerce and Mail/ Tel transactions can only be performed without
swiping a card. It is assumed that the cardholder will not be there. If a
card is swiped, the features cannot be used.
TERMINAL DISPLAY OPERATOR'S ACTION
READY
SWIPE CUSTOMER CARD
PURCHASE
SWIPE CUSTOMER CARD
ENTER EXPIRY DATE
MMYY
MAIL/TELEPHONE ORDER?
YES–A NO-C
SINGLE–A
RECURRING–B
MORE OPTIONS–C
If C (MORE OPTIONS) is selected
INSTALLMENT–A
OTHER TYPE–B
MORE OPTIONS–C
If A (SINGLE) or B (RECURRING) is selected
PURCHASE
ENTER CLERK ID
PURCHASE
ENTER INVOICE NUMBER
PURCHASE
ENTER AMOUNT
DIALLING
CALL ANSWERED
SENDING/RECEIVING
PROCESSING
PRINTING
APPROVED ######
PROVIDE TRANS RECORD
READY
SWIPE CUSTOMER CARD
Press PURCHASE key
Manually key in card number and press ENTER
Key in expiry date (MMYY) and press ENTER
To select mail/ tel order transaction, press A
Note: Press C to process a normal purchase
transaction.
Press A to process a one-time transaction.
Press B to process a transaction that occurs on
a regular basis (e.g. monthly).
Press C to view other options.
Press A to process an installment payment.
Press B to process a transaction that does not
fall under the first four options.
Press C to view the first list of options.
Key in your Clerk ID and press ENTER.
Note: This is an OPTIONAL prompt. It appears
only if the Clerk ID prompt is enabled in
Admin 83.
Key in the invoice number and press ENTER
OR
Press ENTER to leave this blank.
Note: This is an OPTIONAL prompt. It appears
only if the Invoice Numbers prompt is
enabled in Admin 08.
Key in purchase amount and press ENTER
Please wait
Press CANCEL/EXIT to return to the READY
prompt.
Moneris TRANSELECT (V2000) Merchant Operating Manual v.1.1 35
Page 44

CHAPTER 5: Processing E-comm and MOTO Transactions
36 Moneris TRANSELECT (V2000) Merchant Operating Manual v.1.1
Page 45

CHAPTER 6: Processing ERNEX T ransactions
Your Transelect Terminal is capable of processing Loyalty and Gift Card
transactions as well as financial transactions.
Prior to processing a Loyalty or Gift Card, the ERNEX host must be set up
to accept the transaction and your terminal must be set up to process the
transaction.
If you have questions, please contact Ernex at 1-888-376-3999, or at support@ernex.com.
6.1: Ernex Features
6.1.1: Clerk IDs
ERNEX is able to maintain Clerk totals that are independent of terminal
totals or batch totals. Each Clerk can select ERNEX totals or zero their loyalty totals, but they cannot close their batch with ERNEX.
Each Clerk is identified by a 1 - 6 character field. Clerk ID's can contain '0'
- '9' and 'A' - 'Z'. All other characters are not acceptable. Clerk ID's do NOT
need to be configured at ERNEX.
When the Clerk ID prompt is activated, each transaction must include a
Clerk ID (including administrative transactions). ERNEX Clerk ID's can be
used to total transactions by an ID or to identify a clerk in cases where an
employee incentive program is in use. In order to activate Clerk ID's contact Moneris.
6.1.2: Gift Card Validation Code (CVC)
Every Gift Card has a three digit Card Validation Code (CVC) which is
printed on the front or back of the Gift Card. The CVC provides additional
security against fraudulent cards and must be keyed in with every Gift Card
transaction.
6.1.3: Stored Transactions
Your Transelect Terminal can store up to 1000 Approved ERNEX transactions. Once the transactions in the terminal memory reach capacity, the
oldest transaction drops off. If your terminal is replaced, the memory cannot be transferred to the replacement terminal and is therefore lost.
Moneris TRANSELECT (V2000) Merchant Operating Manual v.1.1 37
Page 46

CHAPTER 6: Processing ERNEX Transactions
6.1.4: Card Masking
To reduce the risk of fraudulent card use, only a portion of the cardholder's
card number is printed on the cardholder receipt. The remainder of the card
number is masked, i.e., an '*' is printed for each remaining digit in the card
number.
Note: Remember to give the cardholder the MASKED copy of the receipt and
keep the unmasked copy for your records. The unmasked copy is
required to resolve charge-back issues quickly.
For gift card and loyalty card numbers, only the last four digits are printed
in clear, the rest are replaced with an asterisk, e.g.: *************1234.
To further reduce fraudulent card use, the gift card and loyalty card expiry
dates are not printed on the cardholder copy of the receipt.
Your printer must be configured to print a minimum of 2 copies of the
receipt (even if you use 2-part paper) to maintain compliance with card
masking requirements. See section 8.8: Setting Up the Printer (ADMIN
14) for instructions.
6.2: ERNEX Admin Functions
6.2.1: Balancing and Closing Your Terminal with Ernex
Your terminal performs a Gift and Loyalty close batch in the same manner
as a Financial close batch.
For a Gift and Loyalty close batch request, the application sends an in-balance or out of balance flag to ERNEX. After the terminal has received and
compared between the terminal and the ERNEX host, a balance status will
indicate "batch is in balance" or "batch is out of balance" and is printed on
the report.
Once your E-Gift and/or Loyalty program has been set up with ERNEX,
and you have received your ERNEX terminal identification number, you
must initialize your terminal with ERNEX in order to begin processing Gift
Card and/or Loyalty Card transactions.
6.2.2: Initializing with ERNEX
No receipt is printed with this transaction.
Also if you have more than 1 terminal at your location, each device has to
have 2 different ERNEX terminal IDs.
38 Moneris TRANSELECT (V2000) Merchant Operating Manual v.1.1
Page 47

CHAPTER 6: Processing ERNEX Transactions
TERMINAL DISPLAY OPERATOR ACTIONS
READY
SWIPE CUSTOMER CARD
ENTER ADMIN CODE Enter 57 and press ENTER
ENTER TERMINAL ID Key in ERNEX terminal ID (4 or 5 digit numeric
DIALING/SENDING/
RECEIVING
READY
SWIPE CUSTOMER CARD
Press ADMIN key
number) and press ENTER.
Or to retain displayed terminal ID press
ENTER
Transaction in progress, please wait
Terminal is initialized
6.2.3: Re-initialization with ERNEX
From time to time, your terminal may ask you to re-initialize with ERNEX.
This will occur because there will have been changes made to your program, and you will need to re-initialize with ERNEX to download the new
configuration to your Transelect. The terminal screen will show a message
"Initialization with ERNEX required". You will be able to continue transactions as usual until the end of business on the day the message appears. If
you do not initialize your terminal before the following day, you will no
longer be able to complete any transactions with ERNEX. You MUST initialize your terminal with ERNEX to continue. The idle prompt on the terminal will change to the normal idle prompt as soon as the terminal has
been successfully initialized with ERNEX.
T o re-initialize yo ur terminal with ERNEX, please follow the procedures in
section 6.2.2: Initializing with ERNEX.
IMPORTANT: Ensure you have closed your batch and printed out
your required reports before re-initializing your
terminal with ERNEX. This function will clear and
reset the ERNEX information in your terminal.
Moneris TRANSELECT (V2000) Merchant Operating Manual v.1.1 39
Page 48

CHAPTER 6: Processing ERNEX Transactions
6.2.4: Host Communication Test with ERNEX (ADMIN 58)
This function tests the communication path from the terminal to ERNEX
without the use of a loyalty card.
TERMINAL DISPLAY OPERATOR ACTIONS
READY
SWIPE CUSTOMER CARD
ENTER ADMIN CODE Enter 58 and press ENTER
DIALING/SENDING/
PROCESSING/
RECEIVING
ERNEX APPROVED
READY
SWIPE CUSTOMER CARD
Press ADMIN key
Transaction in progress, please wait
40 Moneris TRANSELECT (V2000) Merchant Operating Manual v.1.1
Page 49

CHAPTER 6: Processing ERNEX Transactions
6.3: Performing ERNEX Gift Card Transactions
6.3.1: Gift Card Activation
We recommend that Gift Cards be activated ONLY when they are sold.
This transaction activates the Gift Card, and completes the payment
thereof. Payment can be made with Cash, a Credit Card, a Debit Card or
another Gift Card.
Every Gift Card number is associated with a three digit Card Validation
Code (CVC).The CVC is printed on the back or front of the card and must
be keyed into the terminal with every Gift Card transaction for security reasons. The CVC keyed into the terminal must match the CVC stored on the
ERNEX host in order for the transaction to be approved. This is a security
feature.
IMPORTANT: A Gift Card MUST be swiped for activation. The Card
number cannot be keyed into the terminal.
6.3.2: Gift Card Activation with CASH PAYMENT
TERMINAL DISPLAY OPERATOR ACTIONS
READY
SWIPE CUSTOMER CARD
ENTER ADMIN CODE Enter 51 and press ENTER
ACTIVATE CARD - A
DEACTIVATE CARD - C
ACTIVATE CARD
SWIPE CARD
ENTER CLERK ID If prompted, key in the Clerk ID and press
ENTER CVC Enter CVC (3 digit number) and pres s ENTER
ENTER AMOUNT
$##.##
DIALING /
SENDING / RECEIVING
BAL OWING $##.##
CARD – A CASH – C
CASH REMITTED
TRANSACTION COMPLETE
Press ADMIN key
Press A to Activate a Gift Card
Swipe Gift Card
ENTER.
If prompted, key in the dollar amount to be
loaded onto the card and press ENTER.
Please wait
Press C
Press ENTER to print the second receipt.
Moneris TRANSELECT (V2000) Merchant Operating Manual v.1.1 41
Page 50

CHAPTER 6: Processing ERNEX Transactions
6.3.3: Gift Card Activation with DEBIT, CREDIT or GIFT CARD PAYMENT
TERMINAL DISPLAY OPERATOR ACTIONS
READY
SWIPE CUSTOMER CARD
ENTER ADMIN CODE Enter 51 and press ENTER
ACTIVATE CARD - A
DEACTIVATE CARD - C
ACTIVATE CARD
SWIPE CARD
ENTER CLERK ID If prompted, key in the Clerk ID and press
ENTER CVC Enter CVC (3 digit number) and press ENTER
ENTER AMOUNT
$##.##
DIALING/SENDING/
RECEIVING
BAL OWING $##.##
CARD – A CASH – C
PURCHASE
SWIPE CUSTOMER CARD
If Credit Card Swiped:
################
PRESS ENTER TO CONT
OR
ENTER LAST 4 DIGITS Enter last four digit s of card number and pr ess
If Debit Card Swiped:
PURCHASE $XX.XX
CONTINUE ON PIN PAD
If Gift Card Swiped:
PURCHASE $XX.XX
ENTER CVC
DIALING/
SENDING / RECEIVING
APPROVED
PROVIDE TRANS RECORD
Press ADMIN key
Press A to Activate a Gift Card
Swipe Gift Card
ENTER.
If prompted, key in the dollar amount to be
loaded onto the card and press ENTER.
Please wait
Press A.
Swipe Debit/Credit Card/Gift Card
Press ENTER to verify Card number
ENTER.
Customer to use Pin Pad
Enter CVC (3 digit number) and press ENTER
Please wait
Press ENTER to print the second receipt.
42 Moneris TRANSELECT (V2000) Merchant Operating Manual v.1.1
Page 51

CHAPTER 6: Processing ERNEX Transactions
6.3.4: Gift Card Purchase Transactions
Use this transaction to process a Purchase using a Gift Card.
IMPORTANT: A Gift Card MUST be swiped to perform this
transaction. The Card Number CANNOT be
manually keyed in to the terminal.
TERMINAL DISPLAY OPERATOR ACTIONS
READY
SWIPE CUSTOMER CARD
PURCHASE
SWIPE CUSTOMER CARD
ENTER CLERK ID If prompted, key in the Clerk ID and press
ENTER INVOICE NO If prompted, key in the Invoice Number and
ENTER CVC Enter CVC and press ENTER
PURCHASE
ENTER AMOUNT
RECEIVING/
PROCESSING/
PRINTING
ERNEX APPROVED Press ENTER to print the second receipt.
Press the PURCHASE key.
Swipe Gift Card
ENTER.
press ENTER.
Enter purchase amount and press ENTER
Please wait
Moneris TRANSELECT (V2000) Merchant Operating Manual v.1.1 43
Page 52

CHAPTER 6: Processing ERNEX Transactions
6.3.5: Split Tender Purchase with Gift Card
This transaction is configurable by ERNEX and if activated allows a customer to pay with a Gift Card and another form of payment.
If the purchase amount is GREATER than the balance available on a Gift
Card, the terminal will display a "Balance Owing" amount and allow for a
second payment with either Cash, Debit Card, Credit Card, or another Gift
Card.
TERMINAL DISPLAY OPERATOR ACTIONS
READY
SWIPE CUSTOMER CARD
PURCHASE
SWIPE CUSTOMER CARD
ENTER CLERK ID If prompted, key in the Clerk ID and press
ENTER INVOICE NO If prompted, key in the Invoice Number and
ENTER CVC Enter CVC (3 digit number) and press ENTER
PURCHASE
ENTER AMOUNT
DIALING/SENDING/
RECEIVING
BAL OWING $##.##
CARD - A CASH - C
PURCHASE
SWIPE CUSTOMER CARD
If Credit Card Swiped:
################
PRESS ENTER TO CONT
OR
ENTER LAST 4 DIGITS Enter last four digit s of card number and pr ess
If Debit Card Swiped:
PURCHASE $XX.XX
CONTINUE ON PIN PAD
DIALING/SENDING/
RECEIVING
APPROVED
PROVIDE TRANS RECORD
Press the PURCHASE key.
Swipe Gift Card
ENTER.
press ENTER.
Enter purchase amount and press ENTER
Please wait
Press A
Swipe Debit/Credit Card
Press ENTER to verify Card number
ENTER.
Customer to use Pin Pad
Please wait
Press ENTER to print the second receipt.
44 Moneris TRANSELECT (V2000) Merchant Operating Manual v.1.1
Page 53

CHAPTER 6: Processing ERNEX Transactions
6.3.6: Split Tender Purchase - Gift Card with Second Gift Card Payment
TERMINAL DISPLAY OPERATOR ACTIONS
READY
SWIPE CUSTOMER CARD
PURCHASE
SWIPE CUSTOMER CARD
ENTER CLERK ID If prompted, key in the Clerk ID and press
ENTER INVOICE NO If prompted, key in the Invoice Number and
ENTER CVC Enter CVC and press ENTER
PURCHASE
ENTER AMOUNT
BAL OWING $##.##
CARD - A CASH - C
PURCHASE
SWIPE CUSTOMER CARD
ENTER CVC Enter CVC (3 digit number) and pres s ENTER
DIALING/SENDING/
RECEIVING
ERNEX APPROVED
PRESS ENTER
Press the PURCHASE key.
Swipe Gift Card
ENTER.
press ENTER.
Enter purchase amount and press ENTER
Press A
Swipe second Gift Card
Please wait
Press ENTER to print the second receipt.
Moneris TRANSELECT (V2000) Merchant Operating Manual v.1.1 45
Page 54

CHAPTER 6: Processing ERNEX Transactions
6.3.7: Split Tender Purchase - Gift Card with CASH Payment
TERMINAL DISPLAY OPERATOR ACTIONS
READY
SWIPE CUSTOMER CARD
PURCHASE
SWIPE CUSTOMER CARD
ENTER CLERK ID If prompted, key in the Clerk ID and press
ENTER INVOICE NO If prompted, key in the Invoice Number and
ENTER CVC Enter CVC and press ENTER
PURCHASE
ENTER AMOUNT
DIALING /
SENDING / RECEIVING
BAL OWING $##.##
CARD - A CASH - C
CASH REMITTED
TRANSACTION COMPLETE
Press the PURCHASE key.
Swipe Gift Card
ENTER.
press ENTER.
Enter purchase amount and press ENTER
Please wait.
Press C
Press ENTER to print the second receipt.
6.3.8: Gift Card Inquiry (ADMIN 55)
Use this transaction to verify a Gift Card status (active or de-activated) and
cash balance available on a Gift Card.
The Gift Card MUST be swiped through the terminal, it cannot be keyed in
manually.
TERMINAL DISPLAY OPERATOR ACTIONS
READY
SWIPE CUSTOMER CARD
ENTER ADMIN CODE Enter 55 and press ENTER
ERNEX INQUIRY
SWIPE CARD
ENTER CLERK ID If prompted, key in the Clerk ID and press
ENTER CVC Enter CVC (3 digit number) and press ENTER
DIALING /
SENDING / RECEIVING
ERNEX INQUIRY
COMPLETE PRESS ENTER
Press ADMIN key
Swipe Gift Card
ENTER.
Please wait
Press ENTER to print the second receipt.
46 Moneris TRANSELECT (V2000) Merchant Operating Manual v.1.1
Page 55
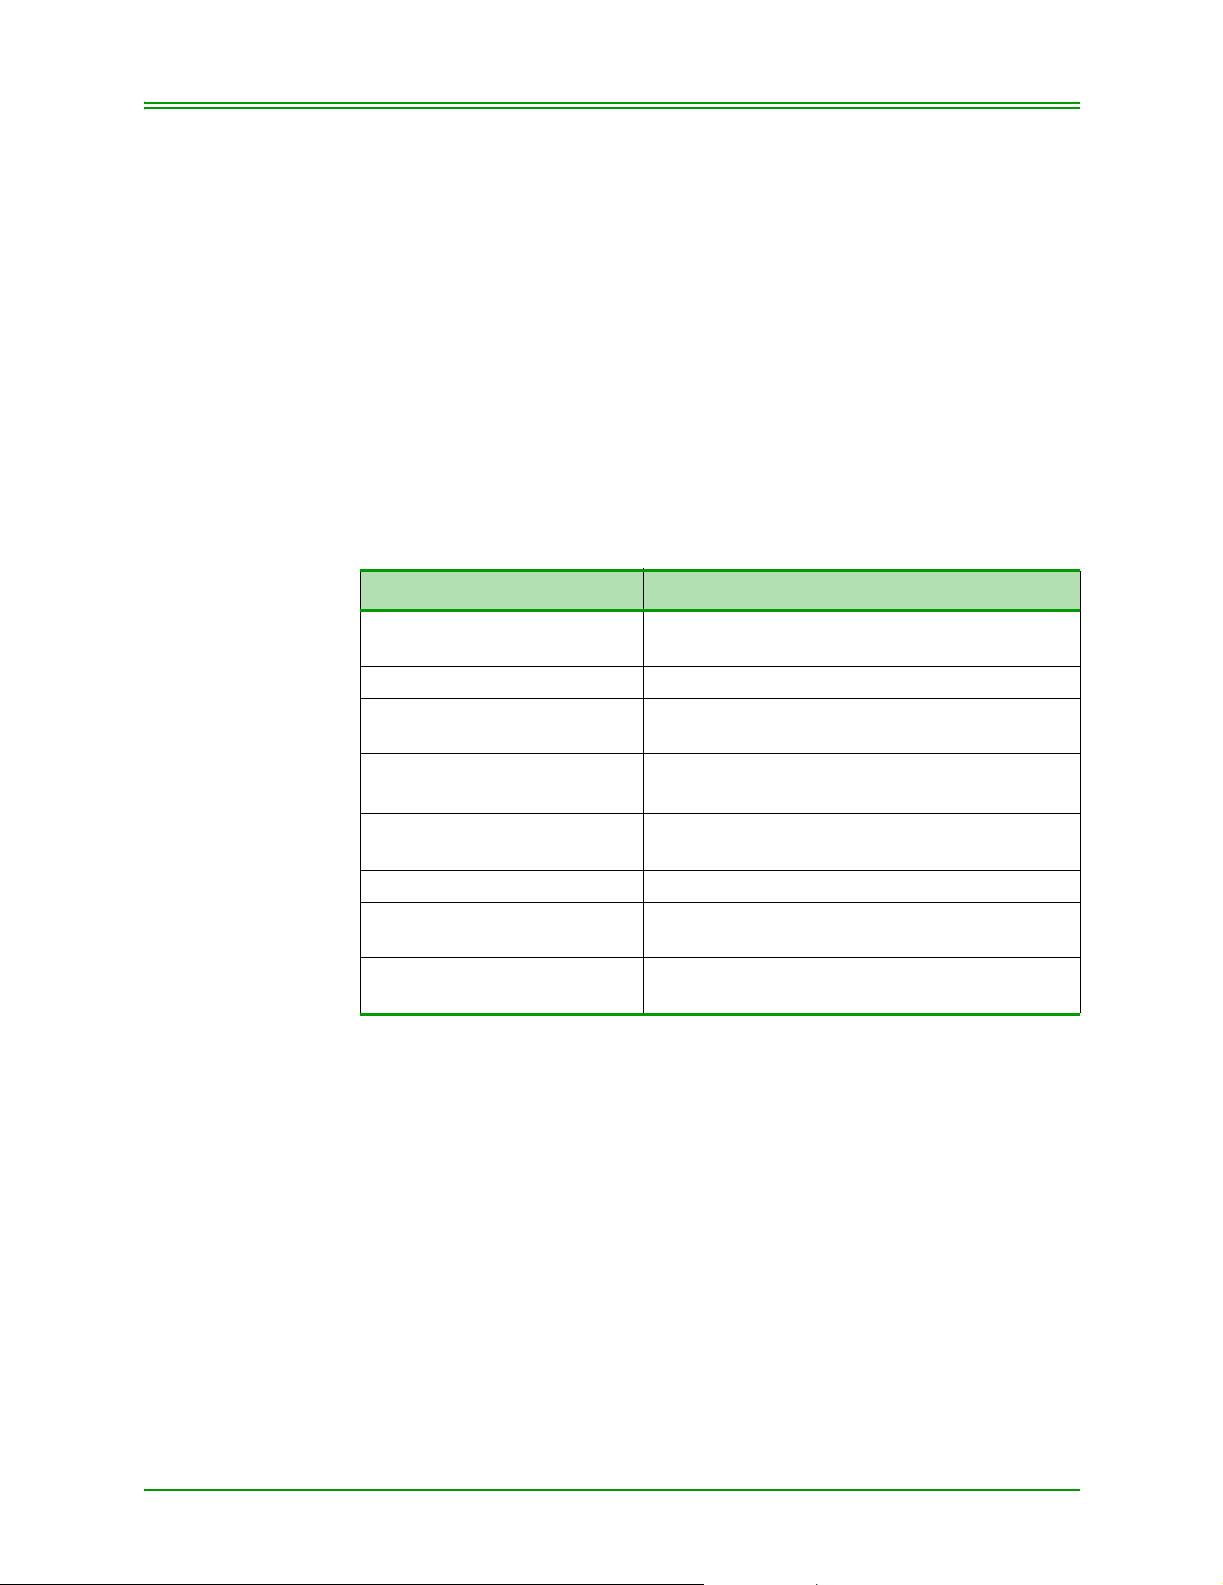
CHAPTER 6: Processing ERNEX Transactions
6.3.9: Deactivating a Gift Card (ADMIN 51)
Use this transaction to deactivate a Gift Card at the terminal. This could be
used when a card is lost, stolen or demagnetized. Cards being deactivated
may be entered manually or swiped through the terminal. This transaction
will print the last available balance on the Gift Card before it was deactivated.
A Gift Card deactivation is the ONLY transaction where the Gift Card
number can be keyed into the terminal, or it can be swiped.
Refer to your Store Manager for your refund or replacement policy.
IMPORTANT: Once a Gift Card has been deactivated the Card can
NEVER be used again. Please be sure you wish to
deactivate the Card before completing the
transaction.
TERMINAL DISPLAY OPERATOR ACTIONS
READY
SWIPE CUSTOMER CARD
ENTER ADMIN CODE Enter 51 and press ENTER
ACTIVATE CARD - A
DEACTIVATE CARD - C
DEACTIVATE CARD
ENTER CARD NUMBER
ENTER CLERK ID If prompted, key in the Clerk ID and press
ENTER CVC Enter CVC and press ENTER
DIALING /
SENDING / RECEIVING
CARD DEACTIVATED
BALANCE $##.##
Press ADMIN key
Press C
Swipe Gift Card if present or
Enter Gift Card number and press ENTER
ENTER.
Please wait
Press ENTER to print the second receipt.
Moneris TRANSELECT (V2000) Merchant Operating Manual v.1.1 47
Page 56

CHAPTER 6: Processing ERNEX Transactions
6.3.10: Gift Card General Void (ADMIN 56)
Use this transaction to void a Gift Card activation and purchase transactions. This function does NOT void the debit/credit portion of the transaction if applicable. This transaction should be used when a Gift Card has
been entered incorrectly. Process this transaction for the entire amount of
the original transaction.
Only transactions in a current batch can be voided. Only one transaction
can be voided at a time.
TERMINAL DISPLAY OPERATOR ACTIONS
READY
SWIPE CUSTOMER CARD
ENTER ADMIN CODE Enter 56 and press ENTER
ERNEX VOID
SWIPE ADMIN CARD
ERNEX VOID
SWIPE CARD
ENTER CLERK ID If prompted, key in the Clerk ID and press
ENTER CVC Enter CVC and press ENTER
ERNEX REFERENCE
NUMBER
DIALING/
PROCESSING/
PRINTING
ERNEX APPROVED
PRESS ENTER
Press ADMIN key
Swipe Admin card
Swipe Gift Card
ENTER.
Enter original ERNEX reference number from
transaction being voided and press ENTER
Please wait
Press ENTER to print the second receipt.
6.4: Performing Ernex Loyalty Card and Combination Card
Transactions
Loyalty Card transactions can be processed with a Debit or Credit transaction, or on their own.
Loyalty points are added to a Loyalty Card with a Purchase transaction and
deducted with a Refund transaction.
A Combination Card is a Card that has a dual function. It acts as a Payment
Card as well as a Loyalty Card. The Card Holder could be awarded points
every time they use their Combination Card for payment.
All Loyalty Card transactions may be swiped or keyed into the terminal.
48 Moneris TRANSELECT (V2000) Merchant Operating Manual v.1.1
Page 57

CHAPTER 6: Processing ERNEX Transactions
6.4.1: Loyalty Card Activation (ADMIN 51)
This transaction is used to activate a Loyalty Card when there is a fee
attached to the Card.
TERMINAL DISPLAY OPERATOR ACTIONS
READY
SWIPE CUSTOMER CARD
ENTER ADMIN CODE Enter 51 and press ENTER
ACTIVATE CARD - A
DEACTIVATE CARD - C
ACTIVATE CARD
SWIPE CARD
DIALING/SENDING/
RECEIVING
If Cash Value on activation
BAL OWING $##.##
CARD - A CASH - C
PURCHASE
SWIPE CUSTOMER CARD
If Credit Card Swiped:
################
PRESS ENTER TO CONT
OR
ENTER LAST 4 DIGITS Enter last four digit s of card number and pr ess
If Debit Card Swiped:
PURCHASE $XX.XX
CONTINUE ON PIN PAD
DIALING/SENDING/
RECEIVING
APPROVED
PROVIDE TRANS RECORD
Press ADMIN key
Press A
Swipe Loyalty Card
Please wait
Press A
Swipe Payment Card
Press ENTER to verify Card number
ENTER.
Customer to use Pin Pad
Please wait
Press ENTER to print the second receipt.
Moneris TRANSELECT (V2000) Merchant Operating Manual v.1.1 49
Page 58

CHAPTER 6: Processing ERNEX Transactions
6.5: Loyalty Purchase Transactions
This transaction is used to award points to a Loyalty Card. A loyalty purchase transaction can be completed with a Loyalty Card, a Combination
Card, a Loyalty Card and a Combination Card, a Loyalty Card and a Credit
Card, a Loyalty Card and a Debit Card, or a Loyalty Card and Cash.
When awarding Loyalty Points with a separate Loyalty Card and a Payment Card, the Loyalty Card MUST be swiped first.
6.5.1: Loyalty Purchase - Combination Card
TERMINAL DISPLAY OPERATOR ACTIONS
READY
SWIPE CUSTOMER CARD
If Credit Card
################
PRESS ENTER TO CONT
ENTER LAST 4 DIGITS Enter last 4 digits of Credit Card number and
PURCHASE
ENTER AMOUNT
DIALING/SENDING/
RECEIVING
APPROVED
PROVIDE TRANS RECORD
PRESS ENTER TO CONT.
ERNEX APPROVED
PRESS ENTER
Swipe Combination Card
Press ENTER to verify Card number
OR
Press ENTER
Enter purchase amount and press ENTER
Please wait
Press ENTER
Press ENTER and then press CANCEL/EXIT
key to return to READY prompt.
50 Moneris TRANSELECT (V2000) Merchant Operating Manual v.1.1
Page 59

CHAPTER 6: Processing ERNEX Transactions
6.5.2: Purchase - Loyalty Card and Debit or Credit Card
The Loyalty Card MUST be swiped first followed by the Debit/Credit
Card.
TERMINAL DISPLAY OPERATOR ACTIONS
READY
SWIPE CUSTOMER CARD
PAYMENT CARD REQ?
YES-A NO-C
SWIPE PAYMENT CARD Swipe Debit or Credit Card
If Credit Card
################
PRESS ENTER TO CONT
ENTER LAST 4 DIGITS Enter last 4 digits of Credit Card number and
PURCHASE
ENTER AMOUNT
If Debit Card Swiped:
PURCHASE $XX.XX
CONTINUE ON PIN PAD
DIALING/SENDING/
RECEIVING
APPROVED
PROVIDE TRANS RECORD
ERNEX APPROVED
PRESS ENTER
Swipe Loyalty Card
Press A
Press ENTER to verify Card number
OR
Press ENTER
Enter purchase amount and press ENTER
Customer to use Pin Pad
Please wait
Press ENTER to print the second receipt.
Press ENTER and then press CANCEL/EXIT
key to return to READY prompt.
6.5.3: Purchase - Loyalty Card and Cash or Loyalty Card ONLY Transaction
TERMINAL DISPLAY OPERATOR ACTIONS
READY
SWIPE CUSTOMER CARD
PAYMENT CARD REQ?
YES-A NO-C
ENTER AMOUNT
$0.00
DIALING/SENDING/
RECEIVING
ERNEX APPROVED
PRESS ENTER
Moneris TRANSELECT (V2000) Merchant Operating Manual v.1.1 51
Swipe Loyalty Card
Press C
Enter purchase amount and press ENTER
Please wait
Press ENTER and then press CANCEL/EXIT
key to return to READY prompt
Page 60

CHAPTER 6: Processing ERNEX Transactions
6.5.4: Pre-Authorization with a Loyalty Transaction
Use this transaction to obtain authorization for a Purchase transaction
where the final dollar value of the transaction is unknown (example: in a
restaurant environment when a tip may be added).
This function provides authorization only.
When completing a Pre-Authorization transaction with a Loyalty Card, the
Loyalty Card MUST be swiped first.
TERMINAL DISPLAY OPERATOR ACTIONS
READY
SWIPE CUSTOMER CARD
PRE-AUTHORIZATION
SWIPE CUSTOMER CARD
PAYMENT CARD REQ?
YES-A NO-C
SWIPE PAYMENT CARD Swipe Credit Card
If Credit Card
################
PRESS ENTER TO CONT
ENTER LAST 4 DIGITS Enter last 4 digits of Credit Card number and
PRE-AUTHORIZATION
ENTER AMOUNT
DIALING/SENDING/
RECEIVING
APPROVED
PROVIDE TRANS RECORD
PRESS ENTER TO CONT
ERNEX APPROVED
PRESS ENTER
Press the PRE-AUTH key
Swipe Loyalty Card
Press A
Press ENTER to verify Card number
OR
Press ENTER
Enter purchase amount and press ENTER
Please wait
Press ENTER.
Press ENTER then press CANCEL/EXIT key
to return to READY prompt.
52 Moneris TRANSELECT (V2000) Merchant Operating Manual v.1.1
Page 61

CHAPTER 6: Processing ERNEX Transactions
6.5.5: Pre-authorization Completion/Advice
Use this transaction to complete a "Pre-Authorized" transaction previously
processed with a Loyalty Card on your terminal.
TERMINAL DISPLAY OPERATOR ACTIONS
READY
SWIPE CUSTOMER CARD
FIND ORIGINAL?
YES-A NO-C
ORIG SEQUENCE NO. OR
ENTER FOR ERN
SWIPE PAYMENT CARD Swipe Credit Card
################
PRESS ENTER TO CONT
ENTER LAST 4 DIGITS Enter last 4 digits of Credit Card number and
PRE-AUTHORIZATION
ENTER AMOUNT
DIALING/SENDING/
RECEIVING
APPROVED
PROVIDE TRANS RECORD
PRESS ENTER TO CONT
ERNEX APPROVED
PRESS ENTER
Press the ADVICE key
Press A
Enter last 6 digits of the original receipt number and press ENTER
Press ENTER to verify Card number
OR
Press ENTER
Enter purchase amount and press ENTER
Please wait
Press ENTER.
Press ENTER then press CANCEL/EXIT key
to return to READY prompt.
Moneris TRANSELECT (V2000) Merchant Operating Manual v.1.1 53
Page 62
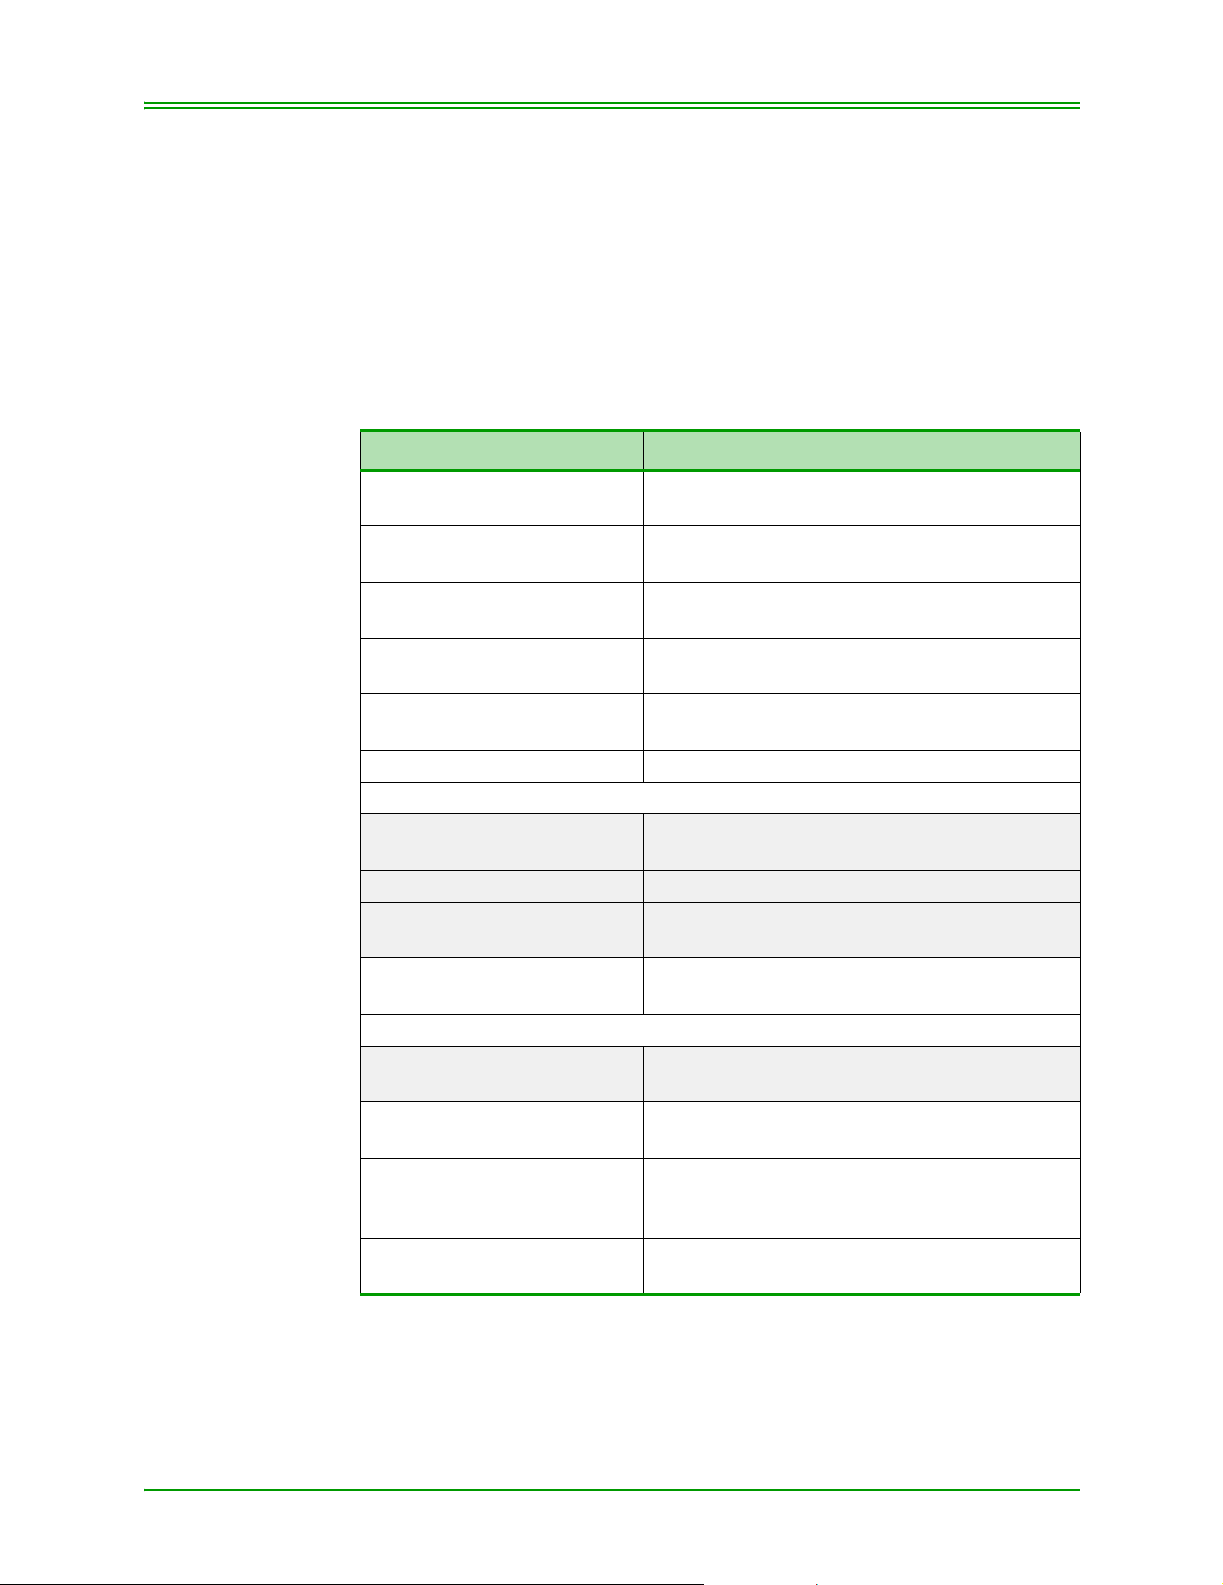
CHAPTER 6: Processing ERNEX Transactions
6.6: Refunds with a Loyalty Card
This transaction is used when a return or refund is granted and where Loyalty Points were awarded on the original Purchase transaction. This transaction will deduct Loyalty Points from the Loyalty Card.
6.6.1: Refund - Loyalty Card and ANY Debit or Credit Card
The Loyalty Card MUST be swiped first, followed by the Credit Card.
TERMINAL DISPLAY OPERATOR ACTIONS
READY
SWIPE CUSTOMER CARD
REFUND
SWIPE ADMIN CARD
REFUND
SWIPE CUSTOMER CARD
ERNEX REFERENCE NO Enter original ERNEX reference nu mber and
PAYMENT CARD REQ?
YES-A NO-C
SWIPE PAYMENT CARD Swipe Payment Card
If Credit Card
################
PRESS ENTER TO CONT
ENTER LAST 4 DIGITS Enter last 4 digits of Credit Card number and
REFUND
ENTER AMOUNT
If Debit Card Swiped:
REFUND $XX.XX
CONTINUE ON PIN PAD
DIALING/SENDING/
RECEIVING
APPROVED
PROVIDE TRANS RECORD
PRESS ENTER TO CONT
ERNEX APPROVED
PRESS ENTER
Press Refund.
Swipe Admin Card
Swipe Loyalty Card
press ENTER
Press A
Press ENTER to verify Card number
OR
Press ENTER
Enter refund amount and press ENTER
Customer to use Pin Pad
Please wait
Press ENTER.
Press ENTER then press CANCEL/EXIT key
to return to READY prompt.
54 Moneris TRANSELECT (V2000) Merchant Operating Manual v.1.1
Page 63

CHAPTER 6: Processing ERNEX Transactions
6.6.2: Refund - Loyalty Card and Cash OR Loyalty Card Only
TERMINAL DISPLAY OPERATOR ACTIONS
READY
SWIPE CUSTOMER CARD
REFUND
SWIPE ADMIN CARD
REFUND
SWIPE CUSTOMER CARD
ERNEX REFERENCE NO Enter original ERNEX reference nu mber and
PAYMENT CARD REQ?
YES-A NO-C
ENTER AMOUNT
$0.00
DIALING/SENDING/
RECEIVING
ERNEX APPROVED
PRESS ENTER
Press Refund.
Swipe Admin Card
Swipe Loyalty Card
press ENTER
Press C
Enter refund amount and press ENTER
Please wait
Press ENTER then press CANCEL/EXIT key
to return to READY prompt.
Moneris TRANSELECT (V2000) Merchant Operating Manual v.1.1 55
Page 64

CHAPTER 6: Processing ERNEX Transactions
6.6.3: Loyalty Redemption (ADMIN 54)
This transaction allows for the redemption of points earned on a Loyalty
Card. Loyalty points can be redeemed by specifying the number of points,
or by the dollar value to be redeemed (depending on your Program set up
with ERNEX).
If your program allows, you may complete a Partial Redemption when a
Card Holder does not have sufficient points to cover a reward. ERNEX will
convert the point's shortage into a dollar balance owing.
If your program is not set up with ERNEX to allow Partial Redemptions,
ERNEX will not approve the transaction and the message "insufficient
points for redemption" will be returned.
If you are not sure of your Redemption tables, ask your Store Manager.
TERMINAL DISPLAY OPERATOR ACTIONS
READY
SWIPE CUSTOMER CARD
ENTER ADMIN CODE Enter 54 and press ENTER.
ERNEX REDEMPTION
SWIPE CARD
ENTER NO. OF POINTS Enter number of points to be redeemed and
DIALING/SENDING/
RECEIVING
ERNEX PRESS ENTER
APPROVED
Press ADMIN key.
Swipe Loyalty/Combo Card
press ENTER
Please wait
Press ENTER then press CANCEL/EXIT key
to return to READY prompt.
6.6.4: Cardholder Inquiry (ADMIN 55)
Use this function to verify the status (active or deactivated) and points balance of a Loyalty Card.
TERMINAL DISPLAY OPERATOR ACTIONS
READY
SWIPE CUSTOMER CARD
ENTER ADMIN CODE Enter 55 and press ENTER.
ERNEX INQUIRY
SWIPE CARD
DIALING/SENDING/
RECEIVING
ERNEX INQUIRY
COMPLETE PRESS ENTER
Press ADMIN key.
Swipe Loyalty Card
Please wait
Press ENTER then press CANCEL/EXIT key
to return to READY prompt.
56 Moneris TRANSELECT (V2000) Merchant Operating Manual v.1.1
Page 65

CHAPTER 6: Processing ERNEX Transactions
6.6.5: Loyalty Card General Void (ADMIN 56)
This function allows you to void the Loyalty portion of a transaction (purchase, refund, pre-authorization, pre-authorization completion; redemption, activation). This function does NOT void the debit/credit part (if any)
of these transactions.
Only a transaction in a current batch can be voided. Only one transaction
can be voided at a time.
TERMINAL DISPLAY OPERATOR ACTIONS
READY
SWIPE CUSTOMER CARD
ENTER ADMIN CODE Enter 56 and press ENTER.
ERNEX VOID
SWIPE ADMIN CARD
ERNEX VOID
SWIPE CARD
ERNEX REFERENCE NO. Enter original ERNEX reference number from
DIALING/SENDING/
RECEIVING
ERNEX PRESS ENTER
APPROVED
Press ADMIN key.
Swipe Admin Card
Swipe Loyalty Card
transaction being voided and press ENTER
Please wait
Press ENTER then press CANCEL/EXIT key
to return to READY prompt.
6.6.6: Deactivating Loyalty Cards (ADMIN 51)
Use this transaction to deactivate a Loyalty Card. This transaction can be
used for lost, stolen or demagnetized cards
Cards can be swiped through the terminal or the card number can be manually entered. Once a Card has been deactivated, it can NEVER be used
again.
Refer to your Store Manager for your refund or replacement policy.
TERMINAL DISPLAY OPERATOR ACTIONS
READY
SWIPE CUSTOMER CARD
ENTER ADMIN CODE Enter 51 and press ENTER.
ACTIVATE CARD - A
DEACTIVATE CARD - C
DEACTIVATE CARD
ENTER CARD NUMBER
DIALING/SENDING/
RECEIVING
Press ADMIN key.
Press C
Swipe Loyalty Card if present OR
Enter Loyalty Card number and press ENTER
Please wait
Moneris TRANSELECT (V2000) Merchant Operating Manual v.1.1 57
Page 66

CHAPTER 6: Processing ERNEX Transactions
TERMINAL DISPLAY OPERATOR ACTIONS
CARD DEACTIVATED
BALANCE XXX
ERNEX PRESS ENTER
APPROVED
6.7: End-of-Day Procedures
6.7.1: Print Stored Transactions (ADMIN 60)
Use this function to print a listing of all APPROVED Financial or ERNEX
transactions by batch or by date. Up to 500 Financial and/or ERNEX transactions can be stored in the terminals memory.
TERMINAL DISPLAY OPERATOR ACTIONS
SWIPE CUSTOMER CARD
ENTER ADMIN CODE Enter 60 and press ENTER
SWIPE ADMIN CARD Swipe POS ADMIN Card
PRINT STORED TRANS
FINAN - A ERNEX - C
ENTER CLERK ID Key in the Clerk ID and press ENTER.
SELECT BY BATCH -A
SELECT BY DATE - C
If A is selected
ENTER BATCH NUMBER Enter Batch number and press ENTER or For
If C is selected
ENTER DATE (YY)MMDD Enter date (YY is optional) and press ENTER
PRINTING
READY
Press ENTER
Press ENTER then press CANCEL/EXIT key
to return to READY prompt.
Press ADMIN key
Press C for all stored ERNEX transactions
Note: This is an OPTIONAL prompt.
It only appears if the Clerk ID
propman has been enabled in Admin
83.
Press A for transactions in a specific batch
Press C for transactions on a specific date
the current open Batch, just press ENTER
or For the current date, just press ENTER
58 Moneris TRANSELECT (V2000) Merchant Operating Manual v.1.1
Page 67

CHAPTER 6: Processing ERNEX Transactions
6.7.2: Transaction Inquiry List (ADMIN 66)
Use this function to print approved transaction held in the terminal's memory which stores up to 500 transactions.
Transactions are separated by type, select Financial or ERNEX transaction.
This transaction reports a specific transaction or several transactions at a
time.
Select transactions by card type, card number, amount, transaction code, or
transaction date.
Transaction codes are as follows:
P Purchase VE Void
PA Pre-Authorization CE Correction
A Pre-Authorization Completion AC Activation
R Refund DA Deactivation
RD Redemption
TERMINAL DISPLAY OPERATOR ACTIONS
READY
SWIPE CUSTOMER CARD
ENTER ADMIN CODE Enter 66 and press ENTER
SWIPE ADMIN CARD Swipe POS ADMIN Card
TRANSACTION INQUIRY
FINAN-A ERNEX-C
ENTER CLERK ID Key in the Clerk ID and press ENTER.
ENTER CARD TYPE Enter L for Loyalty Card transactions
ENTER CARD NUMBER Enter the Card number to list all stored trans-
ENTER AMOUNT Enter the amount to list all stored transactions
Press ADMIN key
Press C for all stored ERNEX transactions
Note: This is an OPTIONAL prompt.
It only appears if the Clerk ID
propman has been enabled in Admin
83.
or
G for Gift Card transactions and press ENTER
actions for Specific Card, and press ENTER,
or
Press ENTER to select all card numbers processed
for a specific amount, and press ENTER,
or
Press ENTER to select all transaction amounts
Moneris TRANSELECT (V2000) Merchant Operating Manual v.1.1 59
Page 68

CHAPTER 6: Processing ERNEX Transactions
TERMINAL DISPLAY OPERATOR ACTIONS
ENTER CODE FOR TRANS Enter a transaction code (refer above) to list all
Stored transa ctions for a specific type, and
press ENTER,
or
just press ENTER to select all transaction
types
ENTER TRANSACTION
DATE (YY)MMDD
PRINT - A
DISPLAY - C
Enter date (YY is optional) to list all transactions stored for a specific date
or
press ENTER to select all dates
Press A to print listing of transactions selected
above
Press C to display selected transactions by
using A or C keys to scroll through.
6.7.3: Merchant Subtotals Inquiry (ADMIN 95)
This function is used to retrieve ERNEX transactions processed through
your terminal since the last closed batch. These transactions are stored on
the ERNEX host.
TERMINAL DISPLAY OPERATOR ACTIONS
READY
SWIPE CUSTOMER CARD
ENTER ADMIN CODE Enter 95 and press ENTER.
DIALING/SENDING/
RECEIVING
PRINTING
Press ADMIN key.
Please wait
60 Moneris TRANSELECT (V2000) Merchant Operating Manual v.1.1
Page 69

CHAPTER 6: Processing ERNEX Transactions
6.7.4: Batch Close (ADMIN 99)
Use this function to close your batch of transactions and obtain the number
and dollar value of financial and ERNEX transactions since your last batch
close.
This transaction compares totals stored in the terminal's memory to totals
stored on the Banks host for Financial transactions and to the ERNEX host
for Loyalty and Gift Card transactions.
A balance status will indicate "batch is in balance" or "batch out of balance" and is printed on the report.
This transaction settles financial transactions to the bank and settles Loyalty and Gift transactions to ERNEX.
TERMINAL DISPLAY OPERATOR ACTIONS
READY
SWIPE CUSTOMER CARD
ENTER ADMIN CODE Enter 99 and press ENTER.
DIALING/SENDING/
RECEIVING
CLOSE - A
EXIT - C
Press ADMIN key.
Please wait
Press A.
Moneris TRANSELECT (V2000) Merchant Operating Manual v.1.1 61
Page 70

CHAPTER 6: Processing ERNEX Transactions
62 Moneris TRANSELECT (V2000) Merchant Operating Manual v.1.1
Page 71

CHAPTER 7: Balancing & Closing Y our T erminal
This section outlines how to balance and close your terminal at the end of
the business day or whenever you wish to do so.
7.1: Deposit Procedures
Your terminal has been set up to close and deposit funds electronically
into your business account in one of the following two ways:
• Option 1: Batch Closing
• Option 2: Non-batch Closing
Most merchants use Option 1; to change options, contact your Moneris
Solutions Sales Representative.
Note: In the event of a missing deposit or a transaction error/dispute, call the
Moneris Merchant Service Centre within 30 days.
7.1.1: Option 1: Batch Closing
Merchant should process a close batch transaction at least once per day
upon your business’ end of day
• ADMIN 99 - Close batch Transaction (see page 90);
OR
• ADMIN 85 - Multiple Terminal Batch Reporting (see page 82).
The first part of a Close Batch Transaction - ADMIN 99 compares
approved transaction totals held in the memory of your terminal with totals
stored in Moneris’ Host Computer. If the two totals do not match, the terminal prints “MONERIS’ AND TERMINAL’ TOTAL DO NOT
MATCH”.
If this happens, follow the procedures below to balance your terminal
before closing your batch.
• Print the Stored T ransaction Journal (ADMIN 60) (see page 77); select
by batch and compare all copies of your (approved) receipts with your
journal print out
• For Credit Card transactions Only - If you have a paper copy of an
APPROVED Credit Transaction (Purchase, Refund, or Correction) that
is not appearing on the Stored Transaction Journal, repeat the transaction manually keying Card and Transaction details. For purchase transactions use the ADVICE function (see page 22).
Moneris TRANSELECT (V2000) Merchant Operating Manual v.1.1 63
Page 72

CHAPTER 7: Balancing & Closing Your Terminal
• If a Credit transaction has been duplicated by the system, proceed to
close the batch and call the Moneris Merchant Service Centre on the
next business day for assistance in correcting this problem.
• Debit Card transactions cannot be corrected in your terminal once the
cardholder has left your premises: For problems balancing Debit transactions, call the Moneris Merchant Service Centre on the next business
day for assistance in correcting the problem.
7.1.2: Option 2: Non-Batch Closing
Moneris automatically closes your terminal’s batch at the end of each business day.
At any time during the day and at the end of your business day (before
11:00 P.M. local time) you can obtain your terminal’s Subtotals by performing an ADMIN 95 (see page 89). To print a detailed listing of all
approved transactions processed in your terminal for the day, refer to Section 8 - ADMIN 60 (see page 77).
Note: If using a Third Party host or service, this option of closing the batch
will NOT close out the third party host or service.
64 Moneris TRANSELECT (V2000) Merchant Operating Manual v.1.1
Page 73

CHAPTER 8: Processing Administrative
Functions
Your terminal has a number of administrative functions that enable and
configure its features. This section lists and explains how you can set up
the various features available on your terminal. You must configure your
terminal before you can use it to perform transactions.
8.1: Initializing Your Terminal (Initialization - ADMIN 01)
ADMIN 01 establishes the initial communication link between your terminal and Moneris. It is not necessary to perform this function on a daily
basis, however, from time to time you may be requested to INITIALIZE
your terminal by Moneris Solutions, Merchant Services.
Note: A maximum of 500 Approved financial transactions can be retained in
the terminal’s memory.
TERMINAL DISPLAY OPERATOR'S ACTIONS
READY
SWIPE CUSTOMER CARD
ENTER ADMIN CODE Key in 01 and press ENTER
RETAIN CURRENT MERCH
SETTINGS? YES-A NO-C
ENTER TERMINAL ID Key in terminal ID (# is located on the und erside
ENTER MERCHANT ID Key in merchant number (supplied to you by
ENTER PRINTER ID Key in printer ID (# is located on the bottom of
Press ADMIN key
Press A to retain values previously keyed. The
terminal will begin dialling and will process the
initialization.
Press C to change or view values previously
keyed and initialize the terminal.
of your Transelect terminal, prefixed with
80######) and press ENTER.
To retain displayed Terminal ID press ENTER.
Moneris, see inside cover of this manual) and
press ENTER.
To retain displayed Merchant ID press ENTER.
the Printer, prefixed with 92.....) and press
ENTER.
To retain displayed Printer ID press ENTER.
Moneris TRANSELECT (V2000) Merchant Operating Manual v.1.1 65
Page 74

CHAPTER 8: Processing Administrative Functions
TERMINAL DISPLAY OPERATOR'S ACTIONS
ENTER PHONE NUMBER Key in Moneris Solution’s Host phone number
and press ENTER (refer "Initialization number"
listed in the front of this manual).
To retain displayed phone number press
ENTER
Note: This prompt will not appear if the
terminal is connected to a 3201 line.
DIALLING
CALL ANSWERED
SENDING / RECEIVING
/ PROCESSING
DO YOU WISH TO CLEAR
STORAGE? YES-A NO-C
READY
PLEASE LOGON
Transaction in progress, Please wait
T o clea r financial transaction stored in terminal’s
memory, press A.
To retain financial transaction stored in terminal’s memory, press C.
8.2: Logging On (ADMIN 02)
ADMIN 02 is required in the following instances:
• When your terminal is first set up
• To logon to your terminal when it has been “logged off”, refer to
ADMIN 03 (see page 67).
• Whenever your terminal is re-initialized
Note: Your POS ADMIN Card is required to process this transaction if your
terminal has been set up to accept Debit Cards.
TERMINAL DISPLAY OPERATOR'S ACTIONS
READY
PLEASE LOGON
ENTER ADMIN CODE Key in 02 and press ENTER
LOGON
SWIPE ADMIN CARD
DIALLING
CALL ANSWERED
SENDING / RECEIVING /
PROCESSING
READY
SWIPE CUSTOMER CARD
Press ADMIN key
Swipe POS ADMIN Card
Transaction in progress, Please wait
66 Moneris TRANSELECT (V2000) Merchant Operating Manual v.1.1
Page 75

CHAPTER 8: Processing Administrative Functions
8.3: Logging Off (ADMIN 03)
Use ADMIN 03 to log off from your terminal. Financial transactions cannot be processed on your terminal when it has been logged off. Therefore,
for security reasons, each terminal should be “logged off” at the end of
each business day (after a “Closed Batch” transaction).
TERMINAL DISPLAY OPERATOR'S ACTIONS
READY
SWIPE CUSTOMER CARD
ENTER ADMIN CODE Key in 03 and press ENTER
DIALLING
CALL ANSWERED
SENDING / RECEIVING /
PROCESSING
READY
PLEASE LOGON
Press ADMIN key
Transaction in progress, Please wait
8.4: Processing Transactions In Training Mode (ADMIN 05)
Use ADMIN 05 to train employees in a simulated environment on Credit
and Debit Card Transactions. Training mode can only be accessed on terminals, which have been configured, initialized and logged on.
Note: Ensure that you exit Training Mode prior to processing actual
customer transactions.
TERMINAL DISPLAY OPERATOR'S ACTIONS
READY
SWIPE CUSTOMER CARD
ENTER ADMIN CODE Key in 05 and press ENTER
CLEAR TRAINING
TOTALS? YES-A NO-C
READY FOR TRAINING
SWIPE CUSTOMER CARD
Press ADMIN key
To clear Training Memory, press A
To retain Training Memory, press C
The device may now be used to simulate live Credit and Debit transactions.
The transactions will not be captured and there will not be any financial
impact to your account.
Moneris TRANSELECT (V2000) Merchant Operating Manual v.1.1 67
Page 76

CHAPTER 8: Processing Administrative Functions
8.4.1: Exiting Training Mode
TERMINAL DISPLAY OPERATOR'S ACTIONS
READY FOR TRAINING
SWIPE CUSTOMER CARD
ENTER ADMIN CODE Key in 05 and press ENTER
READY
SWIPE CUSTOMER CARD
Press ADMIN
Transactions processed in training mode will not effect customer or merchant accounts. Once training has been completed, TRAINING MODE
must be “exited” or real customer transactions will not be validated. The
terminal is ready for regular customer transactions ONLY when the terminal display reads “READY SWIPE CUSTOMER CARD”
8.5: Configuring Your Terminal (ADMIN 08)
Use ADMIN 08 to set general terminal prompts and 3201 Communication
parameters.
8.5.1: Some Notes on 3201 Communication
LAN refers to Local Area Network in-house wiring used to support certain
types of Datapac 3201 communication
For terminals connected to a LAN, the IVI QUATRO (Q1000) device must
be used. Ensure the QUATRO is powered up and connected to the DataPac
(3201) line prior to powering up the terminals. If a LAN ID is keyed in
duplicate (in error), the QUATRO will not operate. In this situation, re-initialize the terminal and key in the correct LAN ID.
The first terminal connected to the LAN ID is 20. This terminal is known
as the “MASTER”. All other terminals connected are referred to as
SLAVES. The next terminal ID after the MASTER would be 21. You can
have up to 16 terminals connected to a LAN. The numbering system used
is as follows:
MASTER: 20
SLAVES: 21, 22, 23, 24, 25, 26, 27, 28, 29, 2A, 2B, 2C, 2D, 2E, 2F.
68 Moneris TRANSELECT (V2000) Merchant Operating Manual v.1.1
Page 77

CHAPTER 8: Processing Administrative Functions
TERMINAL DISPLAY OPERATOR'S ACTIONS
READY
SWIPE CUSTOMER CARD
ENTER ADMIN CODE Key in 08 and press ENTER
ENTER LAN ID • If using dial communication, press ENTER.
ENTER # OF LAN
TERMINALS
ENTER POLL CODE • If using dial communication, press ENTER.
PRE-AUTH TIP LINE?
YES-A NO-C
ENABLE TIP ENTRY?
YES-A NO-C
CR SIGNATURE LINE?
YES-A NO-C
INVOICE NUMBERS?
YES-A NO-C
BALANCED PROMPT?
YES-A NO-C
PURCHASING CARD ON?
YES-A NO-C
Press ADMIN key
Go to the ENTER POLL CODE prompt.
OR
• If terminal connects via a 3201 LAN, key in the
terminal’s LAN ID.
Key in the number of terminals to be connected
to the LAN. This prompt only appears on the
MASTER terminal.
OR
• If using a DATAPAC 3201 line, key in the
applicable POLL CODE (provided by Moneris)
and press ENTER.
• If you want a Tip line to be printed on Preauthorized transaction receipts, press A
• If you do not want a Tip line, press C.
Factory default is set to YES
• If you want to allow your customers to add a
tip to the amount of their Debit Purchases,
press A.
• If not, press C.
• If you want a Signature Line to be printed on
Credit Purchase Transactions, press A -
• If you operate a Mail Telephone Order business, press C.
Factory default is set to YES
• If you want the option of keying an invoice
number with financial transactions, press A -
• If you do not want the option of keying an
invoice number financial transactions, press C
-
Factory default is set to NO
• If you want the option to identify a Closed
Batch as out of balance for internal (in store)
reporting purposes only, press A.
• If you do not want the terminal to prompt “Balanced?” at he end of each, press C -
Closed Batch transaction factory default is set to
NO
To Capture and Send Purchasing Card information, press A
To exit press C
Moneris TRANSELECT (V2000) Merchant Operating Manual v.1.1 69
Page 78

CHAPTER 8: Processing Administrative Functions
TERMINAL DISPLAY OPERATOR'S ACTIONS
Using the C key, scroll the four various tax options
SALES TAX TYPE
PST YES-A NO–C
HST YES-A NO-C
GST ONLY YES-A NO–C
QST YES-A NO-C
If PST was selected above
MERCHANT GST NUMBER
MERCHANT PST NUMBER
If HST was selected above
MERCHANT GST NUMBER Key in applicable GST number and press
If GST ONLY was selected above
MERCHANT GST NUMBER Key in applicable GST number and press ENTER
If QST was selected above
MERCHANT GST NUMBER
MERCHANT QST NUMBER
ACCEPT E-COMMERCE
TRANS? YES-A NO-C
If YES was selected above
ENCRYPTED TRANS - A
NON-ENCRYPTED - C
ACCEPT MAIL / TEL
ORDERS? YES–A NO-C
Note: The card number must be manually keyed in for the e-commerce and
mail / telephone order transactions
When applicable tax collected is displayed on the
terminal, press A
Select PST if you collect Provincial Sales Tax and
Goods and Services Tax
Select HST if you collect Harmonized Sales Tax
Select GST ONLY if you collect Goods and Ser-
vices Tax only
Select QST if you collect Provincial Sales Tax
and Goods and Service Tax in the province of
Quebec
Key in applicable GST number and press ENTER
Key in applicable PST number and press ENTER
to return to READY SWIPE CUSTOMER CARD
ENTER.
to return to READY SWIPE CUSTOMER CARD
Key in applicable GST number and press ENTER
Key in applicable QST number and press ENTER
to return to READY SWIPE CUSTOMER CARD
To select e-commerce, press A
To reject e-commerce, press C
Note: Pressing the ENTER key retains the
current setting. Pressing the CANCEL
key at any time will abort the
transaction. The factory default is NO.
To select encrypted transaction, press A
To select non encrypted transaction, press C
The factory default is NON-ENCRYPTED
To select mail order and telephone transaction,
press A
To reject mail order and telephone transaction,
press C
Note: Pressing the ENTER key retains the
current setting.
70 Moneris TRANSELECT (V2000) Merchant Operating Manual v.1.1
Page 79

CHAPTER 8: Processing Administrative Functions
TERMINAL DISPLAY OPERATOR'S ACTIONS
PRINTER TYPE
SCRIBE YES-A NO-C
STAR YES-A NO-C
EPSON YES-A NO–C
READY
SWIPE CUSTOMER CARD
To select Scribe Printer, press A
To select another type of printer, pr ess C
Moneris Solutions printers are usually the P250
(Scribe, Thermal printer) or Epson (Impact
printer)
Factory default is set to EPSON
8.6: Setting Up Third Party Host Communication Parameters (ADMIN 10)
Use this function to set up communication parameters for processing transactions to a Third Party host.
TERMINAL DISPLAY OPERATOR'S ACTION
READY
SWIPE CUSTOMER CARD
ENTER ADMIN CODE Key in 10 and press ENTER
ENTER HOST NUMBER Key in 1 when setting up details for the 1st
If an existing Host Number was selected:
MODIFY HOST # - A
CLEAR HOST # - C
HOST TYPE
SNS YES-A NO-C
If C (No) was selected:
HOST TYPE
VISA1 YES-A NO-C
ENTER MERCHANT ID Key in Merchant ID provided by Third Party
Press ADMIN key
host, 2 for setting up details for 2nd host etc.,
press ENTER. The terminal can accept 9 different host numbers (1-9).
If you key in a new Host Number, go to the
HOST TYPE prompt.
To make changes to the configuratio n of the
selected Host, press A. Go to the HOST TYPE
prompt.
To delete the Host from the terminal, press C.
Go to the ENTER NEXT HOST NUMBER
prompt.
Press A to select SNS if your Third Party processor operates with SNS format. Go to the
ENTER MERCHANT ID prompt.
Press C, if your Third Party processor uses a
different format.
Press A to select VISA1 if your Third Party
processor operates with VISA1 format
processor and press ENTER
Moneris TRANSELECT (V2000) Merchant Operating Manual v.1.1 71
Page 80

CHAPTER 8: Processing Administrative Functions
TERMINAL DISPLAY OPERATOR'S ACTION
ENTER POLL CODE If using DataPac3201 line, key in the Third
Party Host Poll Code and press ENTER
If Poll Code was keyed, skip to “ENTER
BACKUP PHONE NUMBER” prompt If using
dial communication, press ENTER to continue.
PRIMARY PHONE NUMBER Key in dial phone number ( with area code if
applicable) for Third Party Host and press
ENTER.
PRIMARY NETWORK ID Key in DataPac 3101 Public access number
and press ENTER
The Primary ID is provided by the Third Party
Processor, if not applicable, press ENTER to
continue.
PRIMARY LINE SPEED
300 - A 1200 - C
BACKUP PHONE NUMBER Key in backup phone number (with prefix if
BACKUP NETWORK ID Key in DataPac 3101 Public access number
BACKUP LINE SPEED
300 - A 1200 - C
REGULAR PRE-AUTH - A
HOTEL/RENTAL - C
ENTER NEXT HOST NUMBER Key in next host number to continue OR
If a Host Number was keyed in:
MODIFY HOST # - A
CLEAR HOST # - C
READY
SWIPE CUSTOMER CARD
Press A - if you operate on a 300 baud line
Press C - if you operate on a 1200 baud line
(Majority of terminals operate on a 1200 baud
line)
required) and press ENTER
The backup phone number is provided by the
Third Party Processor, if not applicable, press
ENTER to continue.
and press ENTER
The Primary ID is provided by the Third Party
Processor, if not applicable, press ENTER to
continue.
Press A - if you operate on a 300 baud line
Press C - if you operate on a 1200 baud line
(Most terminals operate on a 1200 baud line)
If you operate a Restaurant or do not process
Pre-authorized transactions. press A
If you operate a Hotel or Car Rental business,
press C
Press CANCEL/EXIT to return to READY
prompt
To change the configuration of the selected
Host, press A. Go to the HOST TYPE prompt.
To delete the Host from the terminal, press C.
Go to the ENTER NEXT HOST NUMBER
prompt.
72 Moneris TRANSELECT (V2000) Merchant Operating Manual v.1.1
Page 81

CHAPTER 8: Processing Administrative Functions
8.7: Setting Up Third Party Card (ADMIN 11)
This function is used to input specific card parameters to be processed by a
Third Party host
Note: ADMIN 10 must be set-up prior to proceeding with setting ADMIN 11.
TERMINAL DISPLAY OPERATOR'S ACTION
READY
SWIPE CUSTOMER CARD
ENTER ADMIN CODE Key in 11 and press ENTER
ENTER CARD NAME Key in the name of the Third Party Card being
ENTER HOST NUMBER Key in 1 digit host number and press ENTER
BIN RANGE 1 - LOW Key in the lowest limit of BIN range #1 and
BIN RANGE 1 - HIGH Key in the highest limit of BIN range #1 and
BIN RANGE 2 - LOW Key in lowest limit of BIN range #2 if applica-
BIN RANGE 2 - HIGH Key in highest limit of BIN range #2 if applica-
Press ADMIN key
accepted using the numeric keyboard, scroll
the alpha characters with the Shift key (T)
and press ENTER.
The exact name to be keyed is provided by the
Third Party Processor. This field will be Printed
on the Customer Receipt.
To change or view previously keyed card
names - press A or C on keyboard
(1-9)
This field identifies which host number pro-
cesses the card
Note: This number coincides with the Host
number previously keyed in ADMIN
10
press ENTER.
The Third Party Processor provides this infor-
mation
press ENTER.
The Third Party Processor provides this infor-
mation
ble and press ENTER.
OR
Press ENTER to leave this blank.
Note: This is only required if the Third
Party Processor advises of multiple
BIN rages for the same card type.
ble and press ENTER
OR
Press ENTER to leave this blank.
Moneris TRANSELECT (V2000) Merchant Operating Manual v.1.1 73
Page 82

CHAPTER 8: Processing Administrative Functions
TERMINAL DISPLAY OPERATOR'S ACTION
BIN RANGE 3 - LOW Key in lowest limit of BIN range #3 if applica-
ble and press ENTER.
OR
Press ENTER to leave this blank.
Note: This is only required if the Third
Party Processor advises of multiple
BIN rages for the same card type.
BIN RANGE 3 - HIGH Key in highest limit of BIN range #3 if applica-
ble and press ENTER
OR
Press ENTER to leave this blank.
VERIFY MOD - 10?
YES–A NO-C
DRAFT CAPTURE?
YES-A NO-C
ENTER NEXT CARD NAME Key in next Third Party Card name to be
READY
SWIPE CUSTOMER CARD
Press A if Mod 10 check is required
Press C if Mod 10 check is not required
The Third Party Processor provides this infor-
mation
If you have arranged for electronic deposit
with the Third Party Provider, press A
If you have arranged for “authorization only ”
with the Third Party Provider, press C
If NO is selected, a receipt will not be printed
on the terminal.
accepted
OR
Press CANCEL/EXIT to return to the READY
prompt
Press ADMIN key
8.8: Setting Up the Printer (ADMIN 14)
This function allows you to set up and change the printer configuration. It
enables trailer messages on printouts as well as the selection of number of
copies to be printed.
TERMINAL DISPLAY OPERATOR'S ACTION
READY
SWIPE CUSTOMER CARD
ENTER ADMIN CODE Key in 14 and press ENTER
TRAILER MESSAGE?
YES–A NO–C
74 Moneris TRANSELECT (V2000) Merchant Operating Manual v.1.1
Press ADMIN key
T o e nable printing trailer on receipt s and key in
the trailer message, press A.
To avoid printing a trailer on receipts, press C.
The “NUMBER OF COPIES” prompt appears.
Page 83

CHAPTER 8: Processing Administrative Functions
TERMINAL DISPLAY OPERATOR'S ACTION
If A is selected
ENG TRAILER MSG 1 Using the keyboard and the Shift key (T) to
access the alphabet, write the message that
you want to be printed on the receipt and
press ENTER.
ENG TRAILER MSG 2 Using the keyboard and the Shif t key (T) write
the second message (if necessary) that you
want to be printed on the receipt and press
ENTER.
OR
Press ENTER to leave this blank.
FR TRAILER MSG 1 Using the keyboard and the Shift key (T) to
access the alphabet, write the French message that you want to be printed on the receipt
and press ENTER.
OR
Press ENTER to leave this blank.
FR TRAILER MSG 2 Using the keyboard and the Shif t key (T) write
the second message (if necessary) that you
want to be printed on the receipt and press
ENTER.
OR
Press ENTER to leave this blank.
NUMBER OF COPIES? A minimum of 2 copies must be selected to
maintain compliance with card masking
requirements.
Key in 2 or 3 and press ENTER. This will
return you to the READY prompt
The factory default is 2 copies.
READY
SWIPE CUSTOMER CARD
8.9: Setting Up Dial Communications (ADMIN 15)
Use this administrative function to configure communication parameters
when using Dial communication.
WARNING: DUE TO DA TA SECURITY ISSUES, TERMINALS USING
DIAL COMMUNICA TIONS MUST USE A TRUE ANALOG
PHONE LINE CONNECTING TO A PUBLIC SWITCHED
TELEPHONE NETWORK. ANALOG TELEPHONE
ADAPTORS (ATAS) AND DIGITAL PHONE SERVICE
OVER IP COMMUNICA TIONS MUST NOT BE USED AS
AN ALTERNATIVE TO DIAL COMMUNICATIONS.
Moneris TRANSELECT (V2000) Merchant Operating Manual v.1.1 75
Page 84

CHAPTER 8: Processing Administrative Functions
.
TERMINAL DISPLAY OPERATOR'S ACTION
READY
SWIPE CUSTOMER CARD
ENTER ADMIN CODE Key 15 and press ENTER
ENTER LOCAL PBX PREFIX If your telephone system requires a prefix to
ENTER LONG DISTANCE
PBX PREFIX
PRIMARY LINE SPEED
300 - A 1200- C
BACKUP LINE SPEED
300 - A 1200- C
LINE AVAILABLE CHECK
YES-A NO-C
TONE DIAL SPEED 0 = 10 tones per second, press ENTER to
STABILIZATION TIMER 0.06 is the standard setting, press ENTER to
CALL PROGRESS CHECK
YES-A NO-C
READY
SWIPE CUSTOMER CARD
Press ADMIN key
dial out, key in the pre-fix and press ENTER
(e.g. 9)
If your telephone system requires a prefix
when dialing long distance, key in the pre-fix
and press ENTER (e.g. 9)
If line speed is 300. press A
If line speed is 1200, press C
To retain existing setting, press ENTER
(Majority of terminals operate with 1200) Factory default is set to 1200
If line speed is 300. press A
If line speed is 1200, press C
To retain existing settings, press ENTER
(Majority of terminals operate with 1200)
Factory default is set to 1200
For the terminal to check for an available line
prior to attempting the call, press A
For the terminal not to check for an available
line prior to attempting the call, press C
To retain existing setting, press ENTER
Factory default is set to YES
continue
1 = 7.7 tones per second
2 = 4 tones per second
Factory default is 0 and should only be
changed if instructed by Moneris Solutions
continue.
Range is 0.06 - 5.00 seconds.
Factory default is 0.06 and should only be
changed if instructed by Moneris Solutions.
To enable the verification of the signal quality
on the phone line, press A
To disable this feature, press C
Note: Set to YES unless otherwise
instructed.
Factory default is set to YES
76 Moneris TRANSELECT (V2000) Merchant Operating Manual v.1.1
Page 85

CHAPTER 8: Processing Administrative Functions
8.10:Printing Configuration Parameters (ADMIN 16)
Use this function to print a listing of all parameters set in ADMIN functions 01, 08, 09, 10, 11, 15, 50, 80 and 83 in your terminal.
TERMINAL DISPLAY OPERATOR'S ACTION
READY
SWIPE CUSTOMER CARD
ENTER ADMIN CODE Key in 16 and press ENTER
PRINTING
READY
SWIPE CUSTOMER CARD
Note: As a precaution should your terminal ever r equir e r eplacing we suggest
you perform an Admin 16 once your terminal is set up. Staple the print
out of your parameters to the inside of this manual for future reference.
Press ADMIN key
8.11:Printing Stored Transactions (ADMIN 60)
Use ADMIN 60 to print a listing of all APPROVED Credit and Debit
financial transactions by batch or by date.
The terminal’s memory retains up to 500 transactions. When capacity is
reached, the oldest transaction drops from memory.
Card numbers can be masked on the report by pressing ENTER at the
SWIPE ADMIN CARD prompt. See section 2.1.9 on page 7 for more
information on card masking.
Note: If your terminal is replaced, its memory is NOT transferred to the
replacement terminal. This will have no financial impact on your
Business Bank Account.
TERMINAL DISPLAY OPERATOR'S ACTION
READY
SWIPE CUSTOMER CARD
ENTER ADMIN CODE Key in 60 and press ENTER
SWIPE ADMIN CARD To print card numbers in full on the report,
Press ADMIN key
swipe your POS Admin Card.
To print masked card numbers on the report,
simply press ENTER.
Moneris TRANSELECT (V2000) Merchant Operating Manual v.1.1 77
Page 86
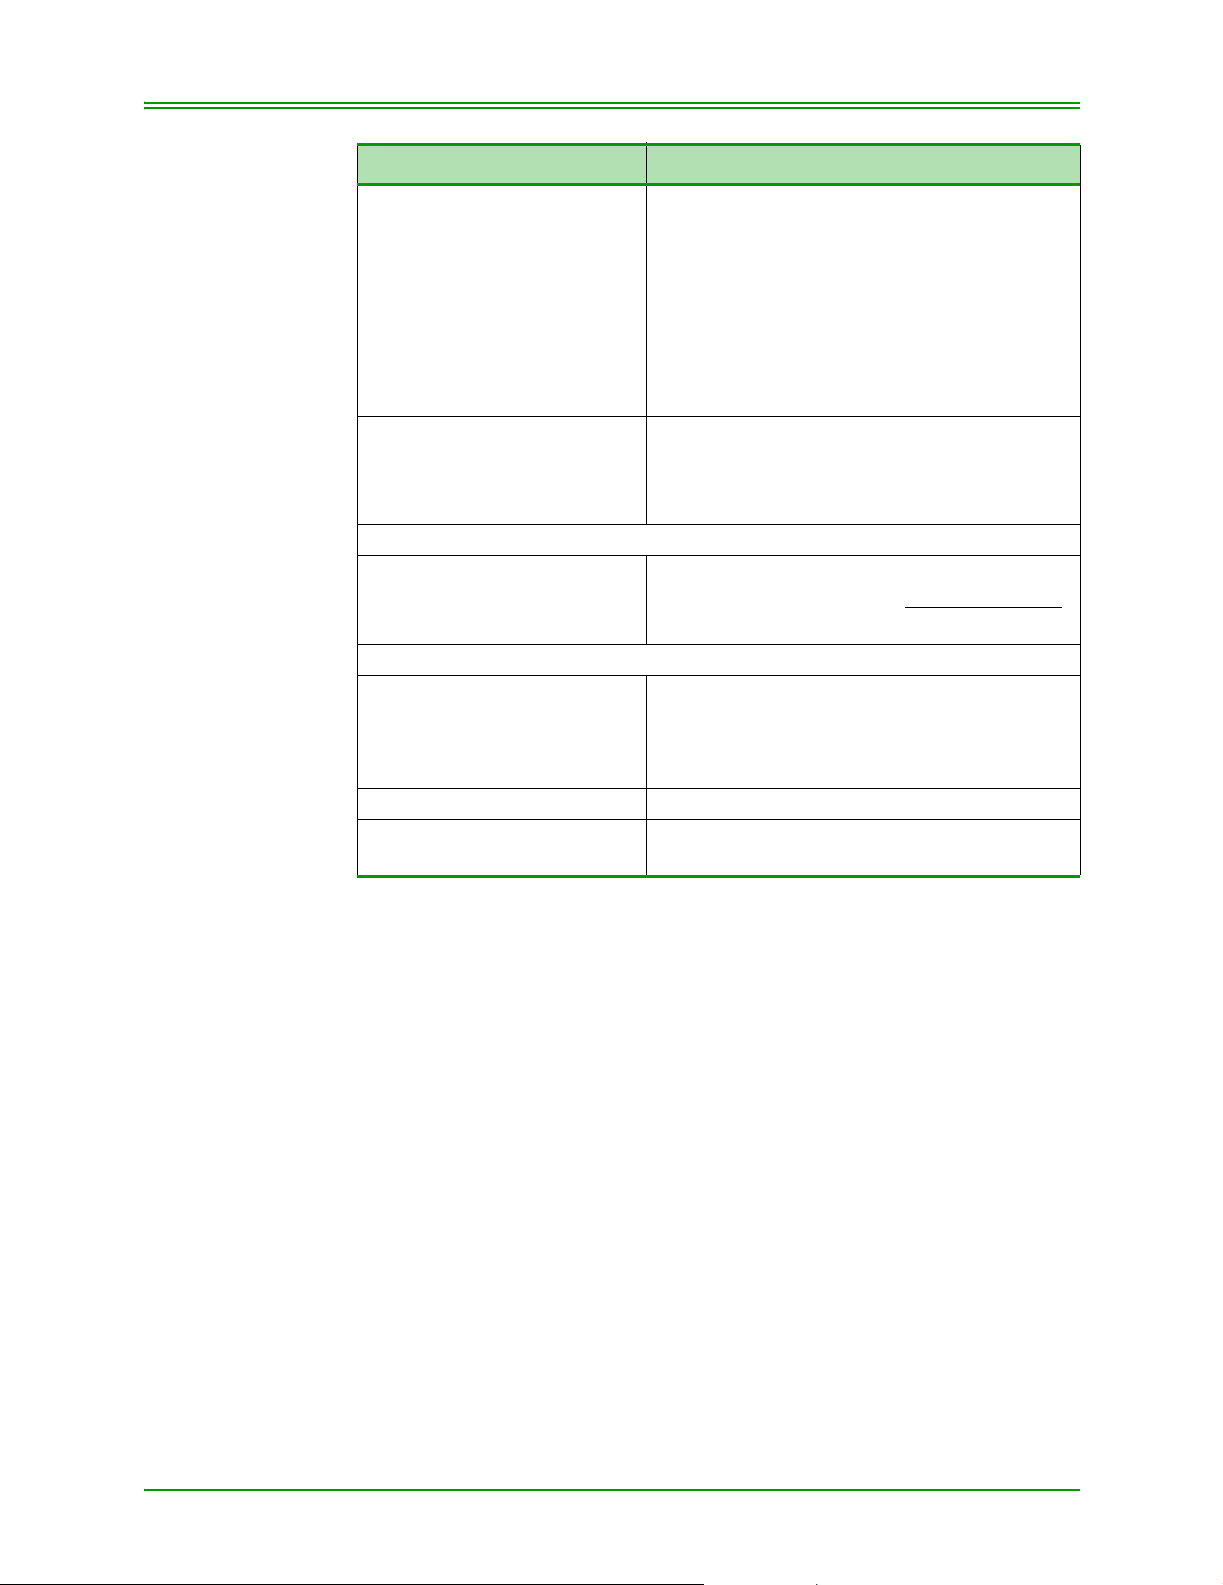
CHAPTER 8: Processing Administrative Functions
TERMINAL DISPLAY OPERATOR'S ACTION
ENTER CLERK ID If you wish to obtain a list of stored transac-
tions for a specific clerk, key in the clerk’s ID
and press ENTER
Note: This is an OPTIONAL prompt. It appears
only if the Clerk ID prompt is enabled in
Admin 83.
OR
To report transactions for all Clerk IDs, press
ENTER.
SELECT BY BATCH – A
SELECT BY DATE - C
If A was selected
ENTER BATCH NUMBER Key in BATCH # and press ENTER
If C was selected
ENTER DATE (YY)MMDD Key in DATE (YY)MMDD (YY is optional) and
For a listing of transactions in a specific batch,
press A
For a listing of transactions on a specific date,
press C
For the current open Batch, just press ENTER
press ENTER.
.
PRINTING Please wait.
READY
SWIPE CUSTOMER CARD
For the current date, just press ENTER
78 Moneris TRANSELECT (V2000) Merchant Operating Manual v.1.1
Page 87

CHAPTER 8: Processing Administrative Functions
8.12:Performing Transaction Inquiry (ADMIN 66)
Use ADMIN 66 to review APPROVED Credit and Debit Card financial
transactions held in the terminal memory. You can review (or print) a specific transaction or several transactions at a time by using the scroll keys (A
and C). The terminal’s memory retains up to 500 transactions. When
capacity is reached, the oldest transaction drops from memory.
Card numbers can be masked on the report by pressing ENTER at the
SWIPE ADMIN CARD prompt. See section 2.1.9 on page 7 for more
information on card masking.
Note: If your terminal is replaced, its memory is NOT transferred to the
replacement terminal. This will have no financial impact on your
Business account.
TERMINAL DISPLAY OPERATOR'S ACTIONS
READY
SWIPE CUSTOMER CARD
ENTER ADMIN CODE Key in 66 and press ENTER
SWIPE ADMIN CARD To print card numbers in full on the report,
ENTER CLERK ID If you wish to obtain a list of stored transac-
ENTER CARD TYPE Press the card type you wish to select:
ENTER CARD NUMBER Key in the card number to list transactio ns pro-
ENTER AMOUNT Key in the amount of the transaction to list all
Press ADMIN key
swipe your POS Admin Card.
To print masked card numbers on the report,
simply press ENTER.
tions for a specific clerk ID, key in clerk’s ID
and press ENTER, or to report transactions for
all clerk IDs press ENTER.
Note: This is an OPTIONAL prompt. It appears
only if the Clerk ID prompt is enabled in
Admin 83.
D=Debit, V=VISA, DI=Diners, M=MasterCard,
A=American Express, JC =JCB and press
ENTER or press ENTER to select all card
types.
cessed for a particular card number and press
ENTER or just press ENTER to select all card
numbers processed.
transactions processed for a specific amount
and press ENTER or just press ENTER to
select all transaction amounts.
Moneris TRANSELECT (V2000) Merchant Operating Manual v.1.1 79
Page 88

CHAPTER 8: Processing Administrative Functions
TERMINAL DISPLAY OPERATOR'S ACTIONS
ENTER CODE FOR TRANS Key in the transaction code to select a particu-
lar type of transaction processed and press
ENTER or just press ENTER to select all
transaction types.
P=Purchase, PC=Purchase Correction/Void,
R=Refund, RC=Refund Correction/Void
A=Advice, PA=Pre-Authorization
ENTER TRANSACTION Key in date (YY)MMDD (YY is optional) to list
transactions processed on a particular date
and press ENTER
OR
Press ENTER for all dates stored
PRINT - A
DISPLAY - C
If A (PRINT) was selected:
PRINTING Please wait while the report prints.
READY
SWIPE CUSTOMER CARD
If C (DISPLAY) was
selected:
AAAAAA
################
DDMMYY $$.$$
READY
SWIPE CUSTOMER CARD
To print listing of transactions selected above,
press A
To display the selected transactions on the terminal screen, press C.
Scroll through the list of transactions using the
A and C keys on your terminal.
Press the CANCEL/EXIT key to return to the
READY prompt.
80 Moneris TRANSELECT (V2000) Merchant Operating Manual v.1.1
Page 89

CHAPTER 8: Processing Administrative Functions
8.13:Performing Credit and Debit Deposit Totals Inquiry (ADMIN 77)
Use ADMIN 77 if you close your Batch more than once per day . This function reports a Grand Total of all closed Batches processed throughout the
day on the same terminal.
TERMINAL DISPLAY OPERATOR'S ACTIONS
READY
SWIPE CUSTOMER CARD
ENTER ADMIN CODE Key in 77 and press ENTER
DIALING
CALL ANSWERED
SENDING / RECEIVING /
PROCESSING
PRINTING
READY
SWIPE CUSTOMER CARD
Press ADMIN
Please wait.
8.14:Setting Up Multiple Terminal Transaction (ADMIN 80)
This transaction is used to enable or disable Multiple Terminal Reporting
on each terminal and to set the Terminal Name.
Note: Your POS Administrative Card is required to process this transaction
TERMINAL DISPLAY OPERATOR'S ACTIONS
READY
SWIPE CUSTOMER CARD
ENTER ADMIN CODE Key in 80 and press ENTER
SWIPE ADMIN CARD Swipe POS ADMIN Card
MULTIPLE TERM TRANS
YES-A NO-C
If A above was selected
MERCHANT TERM NAME Key in 1 - 6 alpha/numbe r cha racters to name
Press ADMIN
To enable Multiple Terminal Reporting, press
A
To disable Multiple Terminal Reporting, press
C. The terminal begins dialling.
your terminal and press ENTER
If you have previously keyed a terminal name
and want to change the name, key over existing name in the terminal and press ENTER.
Moneris TRANSELECT (V2000) Merchant Operating Manual v.1.1 81
Page 90

CHAPTER 8: Processing Administrative Functions
TERMINAL DISPLAY OPERATOR'S ACTIONS
CLOSE BY ADMIN 99
ALLOWED? YES-A NO-C
DIALING
CALL ANSWERED
SENDING
RECEIVING
PROCESSING
READY
SWIPE CUSTOMER CARD
If you want the option of closing the terminal
individually using ADMIN 99, press A
If you do not want the option of closing the terminal individually using ADMIN 99, press C.
The only way to close the terminal now is by
ADMIN 85.
Transaction processing, Please wait
8.15:Processing Multiple Terminal Reporting (ADMIN 85)
This function is used to process a Multiple Terminal Batch Close Transaction:
• Multiple Terminal Batch Close
• Multiple Deposit Totals
This function may be accessed from any terminal that has been set up for
Multiple Terminal Reporting (ADMIN 80). This function does not compare financial totals held on Moneris Solution’ s Hos t Computer with those
held in each terminals memory.
The terminal must be logged on and cannot be in Training Mode to process
these transactions. Terminals can continue to operate while this function is
in progress.
Note: Your POS Administrative Card is required to process this transaction.
TERMINAL DISPLAY OPERATOR'S ACTIONS
READY
SWIPE CUSTOMER CARD
ENTER ADMIN CODE Key in 85 and press ENTER
SWIPE ADMIN CARD Swipe POS ADMIN Card
CLOSE BATCHES?
YES-A NO-C
GET DEPOSIT TOTALS?
YES-A NO-C
Press ADMIN key
To Close one or more terminals, press A
To obtain Deposit Totals without closing the
batch, press C.
To print Grand Totals of all previously closed
batches for the day, press A
To return to the READY prompt without obtain-
ing any totals or closing any batches, press C.
82 Moneris TRANSELECT (V2000) Merchant Operating Manual v.1.1
Page 91

CHAPTER 8: Processing Administrative Functions
TERMINAL DISPLAY OPERATOR'S ACTIONS
Note: If your terminals are closed more than once per day, select “A” to report
the grand total of the closed batches.
If you only close your terminals once a day, select “C”.
SELECT NAME-A GRP-B
ALL-C
If A was selected
MERCHANT TERM NAME Key in the name of the terminal and press
If B was selected
ENTER GROUP PRE-FIX Key in the pre-fix of the group of terminals you
NEXT NAME - A GRP – B
OR PROCESS LIST - C
DIALING
CALL ANSWERED
SENDING / RECEIVING /
PROCESSING
READY
SWIPE CUSTOMER CARD
To close a specific terminal, press A
To close a group of terminals, press B
To close all terminals attached to your Mer-
chant number, press C. The terminal begins
dialling.
ENTER. (This is the name that was entered in
ADMIN 80.)
wish to close and/or obtain reports for and
press ENTER.
To continue closing terminals, press A to key
in next terminal name or press C to key in the
next group name.
Once you have keyed all terminal names and/
or pre-fixes that you wish to Close, press C to
Process.
Transaction processing, Please wait
8.16:Setting Up Clerk Subtotalling (ADMIN 83)
This transaction is used to set up and change Clerk Subtotalling parameters.
Your terminal must be logged on before you can access this function.
Note: Your POS Administrative Card is required to process this transaction
TERMINAL DISPLAY OPERATOR'S ACTIONS
READY
SWIPE CUSTOMER CARD
ENTER ADMIN CODE Key in 83 and press ENTER
SWIPE ADMIN CARD Swipe POS ADMIN Card
Moneris TRANSELECT (V2000) Merchant Operating Manual v.1.1 83
Press ADMIN key
Page 92

CHAPTER 8: Processing Administrative Functions
TERMINAL DISPLAY OPERATOR'S ACTIONS
ENTER MERCHANT ID Key in 13 digit merchant number pr ovided by
Moneris and press ENTER
The first 7 digits of your merchant number
reflect the Moneris Processing Centre you are
attached to:
Eastern Processing Centre 0030100
Western Processing Centre 0030400
Central Processing Centre 0030200
CLERK SUBTOTALLING
ON? YES-A NO-C
PROMPT FOR CLERK ID
YES-A NO-C
Note: If you have selected C, proceed to set the DEF AULT CLERK ID in ADMIN
81
CLERK ENTRY? CARD–A
MANUAL-B EITHER-C
If A (CARD) or C (EITHER) is selected:
CARD DATA LOCATION?
TRK2-A TRK1-B NAME-C
ALLOW CLERK TO ZERO
TOTALS? YES-A NO-C
Note: If C was keyed for a particular Clerk ID, this Clerk ID’s subtotals could
only be reset to zero via ADMIN 82 with the use of the POS ADMIN Card.
READY
SWIPE CUSTOMER CARD
To activate Clerk Subtotalling, press A
To deactivate Clerk Subtotalling, press C
For the terminal to prompt for Clerk ID entry
prior to every transaction, press A
For the terminal not to prompt for Clerk ID
entry prior to every transaction, press C
To key in Clerk ID by Card (with Magnetic
Stripe), press A.
To key in Clerk ID Manually, press B. The
“ALLOW CLERK TO ZERO TOT ALS?” pr ompt
appears.
To key in Clerk ID by Card or Manually, press
C.
Depending on the location of the Clerk ID
data, press A, B or C.
The clerk ID card manufacturer provides this
information.
To allow Clerk’s to reset their subtotals to zero,
press A
To disallow Clerks from resetting their subt otals to zero, press C
This field directly relates to Clerks that print
out their own Subtotals in ADMIN 82.
IMPORTANT: Please clear your totals at
least once a week as the Moneris
Host will clear it automatically when it
reaches 10,000.
84 Moneris TRANSELECT (V2000) Merchant Operating Manual v.1.1
Page 93

CHAPTER 8: Processing Administrative Functions
8.17:Maintaining Clerk ID (ADMIN 84)
Use this function to add or remove Clerk ID’s. Clerk ID’s are maintained
on the Moneris Host, so once a Clerk ID has been added, all terminals
attached to the same Merchant ID number can access any Clerk ID. If a terminal is replaced, the Clerk IDs do NOT have to be re-keyed.
Note: Your POS Administrative Card is required to process this transaction
8.17.1: Adding a Clerk ID
TERMINAL DISPLAY OPERATOR'S ACTIONS
READY
SWIPE CUSTOMER CARD
ENTER ADMIN CODE Key in 84 and press ENTER
SWIPE ADMIN CARD Swipe POS ADMIN Card
ADD CLERK ID?
YES-A NO-C
ENTER CLERK ID Key in Clerk ID to be added and press ENTER
ADD CLERK ID?
YES-A NO-C
REMOVE CLERK ID?
YES-A NO-C
DIALING
CALL ANSWERED
SENDING / RECEIVING
PROCESSING
READY
SWIPE CUSTOMER CARD
Press ADMIN key
To add a Clerk ID, press A.
To add additional Clerk ID’s, press A. The
“ENTER CLERK ID” prompt appears.
Once all required ID’s have been added, press
C.
To process request Press C.
Transaction processing, Please wait
Moneris TRANSELECT (V2000) Merchant Operating Manual v.1.1 85
Page 94

CHAPTER 8: Processing Administrative Functions
8.17.2: Removing a Clerk ID
TERMINAL DISPLAY OPERATOR'S ACTIONS
READY
SWIPE CUSTOMER CARD
ENTER ADMIN CODE Key in 84 and press ENTER
SWIPE ADMIN CARD Swipe POS ADMIN Card
ADD CLERK ID?
YES-A NO-C
REMOVE CLERK ID?
YES-A NO-C
ENTER CLERK ID Key in the Clerk ID to be removed and press
REMOVE CLERK ID?
YES-A NO-C
DIALING
CALL ANSWERED
SENDING / RECEIVING
PROCESSING
READY
SWIPE CUSTOMER CARD
Press ADMIN key
To remove a Clerk ID, press C
To remove a Clerk ID Press A
ENTER.
To remove additional Clerk IDs, press A.
Once all desired IDs have been removed,
press C.
Transaction processing, Please wait
8.18:Setting Default Clerk ID (ADMIN 81)
Use this ADMIN to set up a default CLERK ID. Before setting the default
Clerk ID ensure that:
• the Clerk ID to be used as the default has been added in Section 8.17:
Maintaining Clerk ID (ADMIN 84) on page 85.
• your terminal is set up to accept a default Clerk ID in Section 8.16: Setting Up Clerk Subtotalling (ADMIN 83) on page 83.
TERMINAL DISPLAY OPERATOR'S ACTIONS
READY
SWIPE CUSTOMER CARD
ENTER ADMIN CODE Key in 81 and press ENTER
ENTER CLERK ID Key in Default Clerk ID and press ENTER
READY
SWIPE CUSTOMER CARD
Press ADMIN
86 Moneris TRANSELECT (V2000) Merchant Operating Manual v.1.1
Page 95

CHAPTER 8: Processing Administrative Functions
8.19:Processing Clerk Subtotalling Inquiry (ADMIN 82)
This function is used to obtain Clerk Subtotals individually or by a group.
The terminal can process a request for 20 Subtotals at one time. When the
20th ID is keyed, the terminal will process the transaction and then return to
the ENTER CLERK/GROUP ID prompt so you can continue entering
additional Clerk or Group IDs.
When printing a listing of ALL Clerk IDs, ensure that you have sufficient
paper in your printer. Any Clerk ID that has been added to your Merchant
ID will be reported with this request, including Clerks that have $0.00 subtotals.
If the printer was unable to print Clerk Totals due to a printer failure and
the Clerk Totals were zeroed out, perform an ADMIN 60 transaction. This
will print every transaction from that day, indicating the Clerk ID. An
ADMIN 60 would have to be performed on each terminal.
Note: Y our POS Administrative Card is r equired to process this transaction if
you are inquiring on more than one Clerk ID.
TERMINAL DISPLAY OPERATOR'S ACTIONS
READY
SWIPE CUSTOMER CARD
ENTER ADMIN CODE Key in 82 and press ENTER
SINGLE CLERK - A
MULTIPLE CLERKS - C
If A (SINGLE CLERK) was selected
ZERO CLERK TOTALS?
YES-A NO-C
ENTER CLERK ID Key in the Clerk ID and pr ess ENTER. The ter-
If C (MULTIPLE CLERKS) was selected
SWIPE ADMIN CARD Swipe POS ADMIN Card
ZERO CLERK TOTALS?
YES-A NO-C
Press ADMIN
To obtain a subtotal listing for one Clerk, press
A.
To obtain subtotal listings for two or more
Clerks or a Group of Clerks, press C.
To reset Clerk Totals to zero, press A.
To continue accumulating Clerk Totals, press
C.
The “SELECT CLERK” prompt appears.
minal begins dialling.
To reset Clerk Totals to zero, press A
To continue accumulating Clerk Totals, press
C.
Moneris TRANSELECT (V2000) Merchant Operating Manual v.1.1 87
Page 96

CHAPTER 8: Processing Administrative Functions
TERMINAL DISPLAY OPERATOR'S ACTIONS
SELECT CLERK - A
GRP – B ALL - C
ENTER CLERK ID
OR GROUP PREFIX
(DISPLAY DEPENDENT ON
SELECTION)
NEXT CLERK-A GRP–B
OR PROCESS LIST-C
DIALING
CALL ANSWERED
SENDING / RECEIVING
PROCESSING
PRINTING
READY
SWIPE CUSTOMER CARD
To obtain a printout of subtotals for one Clerk
ID, press A.
To obtain a printout of subtotals for a specific
Group of Clerk IDs, press B.
To obtain a printout of subtotals for all Clerk
IDs, press C.
Enter Clerk ID or Group Prefix and press
ENTER.
To enter an additional Clerk ID, press A
To enter an additional Group of Clerks, press
B
To process the list, press C
Please wait
88 Moneris TRANSELECT (V2000) Merchant Operating Manual v.1.1
Page 97

CHAPTER 8: Processing Administrative Functions
8.20:Processing Credit and Debit Transaction Subtotals (ADMIN 95)
Use this inquiry to obtain the number and dollar value of Credit and Debit
financial transactions processed through your terminal since the last closed
batch. This transaction reports totals stored on the Moneris Host and any
other hosts the terminal communicates with in order to process transactions.
TERMINAL DISPLAY OPERATOR'S ACTIONS
READY
SWIPE CUSTOMER CARD
ENTER ADMIN CODE Key in 95 and press ENTER
ENTER CLERK ID Key in your Clerk ID and press ENTER.
MERCHANT SUB-TOTALS
ALL - A BY HOST - C
If C (BY HOST) was selected:
MONERIS HOST?
YES-A NO-C
OTHER HOST #?
YES-A NO-C
DIALING
CALL ANSWERED
SENDING, RECEIVING
PROCESSING
PRINTING
READY
SWIPE CUSTOMER CARD
Press ADMIN key
Note: This prompt appears only if the Clerk ID
prompt is enabled in Admin 83.
Press A to print a subtotals report for all Hosts.
The terminal begins dialling.
Press C to print a subtotals report for selected
Hosts.
Press A to print a subtotals report for the Moneris Host.
Press C to select a different host (no report will
be printed for the Moneris Host).
Press A to print a subtotals report for the Third
Party Host (HOST #).
Press C to select a different Third Party host
(no report will be printed for this Host).
Note: This prompt appears for each of the
Third Party Hosts configured in
ADMIN 10.
If this is the last Third Party Host, the terminal
begins dialling.
Transaction processing, Please wait
Moneris TRANSELECT (V2000) Merchant Operating Manual v.1.1 89
Page 98

CHAPTER 8: Processing Administrative Functions
8.21:Closing Batch Transaction [Close Batch] (ADMIN 99)
Use this function to close your batch of transactions and obtain the number
and dollar value of Debit and Credit transactions processed through your
terminal since the last closed batch. Batches closed prior to your daily closing time are processed by Moneris Solutions that day.
This transaction compares totals stored in the terminal’s memory to totals
held on the Moneris Host. If a discrepancy is found, your terminal will
report MONERIS AND TERMINAL TOTALS DO NOT MATCH. If this
occurs, call the Moneris Merchant Service Centre on the next business day
for assistance.
Note: You must perform this transa ction in order to have funds deposited to
your business account. Moneris recommends closing your batch(es) at
least once a day to receive value for processed transactions.
Note: If the total value of the Correction/Void transactions is greater than
that of the Purchases then the “Net T otal” will be a negative (indicated
by a minus sign on the report.)
TERMINAL DISPLAY OPERATOR'S ACTIONS
READY
SWIPE CUSTOMER CARD
ENTER ADMIN CODE Key in 99 and press ENTER
ENTER CLERK ID Key in your Clerk ID and press ENTER.
CLOSE BATCH
ALL - A BY HOST - C
MONERIS HOST?
YES-A NO-C
Press ADMIN key
Note: This prompt appears only if the Clerk ID
prompt is enabled in Admin 83.
Press A to close the batch for all Hosts. The
terminal begins dialling.
Press C to close batches for selected Hosts.
Note: This is an OPTIONAL prompt.
It appears only if at least one Third
Party Host has been configured in
ADMIN 10.
Press A to close the batch for the Moneris
Host.
Press C to select a different host (the Moneris
Host batch will not be closed).
Note: This is an OPTIONAL prompt.
It appears only if at least one Third
Party Host has been configured in
ADMIN 10.
90 Moneris TRANSELECT (V2000) Merchant Operating Manual v.1.1
Page 99

CHAPTER 8: Processing Administrative Functions
TERMINAL DISPLAY OPERATOR'S ACTIONS
OTHER HOST #?
YES-A NO-C
DIALING
CALL ANSWERED
SENDING, RECEIVING
PROCESSING
PRINTING
CLOSE - A
EXIT - C
DIALING
CALL ANSWERED
SENDING, RECEIVING
PROCESSING
PRINTING
READY
SWIPE CUSTOMER CARD
Press A to close the batch for the Third Party
Host (HOST #).
Press C to select a different Third Party Host
(this Third Party Host’s batch will not be
closed).
Note: This prompt appears for each of the
Third Party Hosts configured in
ADMIN 10.
If this is the last Third Party Host, the terminal
begins dialling.
Note: This prompt appears only if at least
one Third Party Host has been
configured in ADMIN 10.
Please wait
Press A to close your batch(es) and have the
funds deposited to your business account
Press C to return to the READY prompt without closing your batch(es).
Transaction processing, Please wait
Moneris TRANSELECT (V2000) Merchant Operating Manual v.1.1 91
Page 100

CHAPTER 8: Processing Administrative Functions
92 Moneris TRANSELECT (V2000) Merchant Operating Manual v.1.1
 Loading...