

Page 1
Moneris® iWL255
Reference Guide
08/18
Page 2

Need help?
Web: moneris.com/support-iWL255
Toll-free: 1-866-319-7450
Record your Moneris merchant ID here:
____________________________________
Page 3

Contents
Setting up Your Terminal ..............................................................................................5
Before you get started ................................................................................................................................ 6
Hardware setup.......................................................................................................................................... 8
Charging the battery ................................................................................................................................... 9
Communications setup ............................................................................................................................. 12
Confirming the status indicators ......................................................................................................................12
Configuring the APN setting .............................................................................................................................13
Communications troubleshooting ....................................................................................................................14
Installing or re-installing the SIM card ..............................................................................................................15
Other issues ......................................................................................................................................................16
Initialization and logon ............................................................................................................................. 17
Charging the battery after first initialization/logon .........................................................................................17
Enabling the admin password for manual entry protection ........................................................................ 18
Additional options .................................................................................................................................... 19
Printing the contactless logo on contactless transaction receipts ...................................................................19
Enabling Tip Entry, Cashback, or Invoice Number ............................................................................................19
Changing printer options ..................................................................................................................................19
Changing the terminal language .......................................................................................................................20
Enabling loyalty and gift cards ..........................................................................................................................20
Enabling tip entry (gift cards) ....................................................................................................................................... 20
Using Your Terminal ................................................................................................... 22
Moneris iWL255 ....................................................................................................................................... 23
Terminal keys and hardware ............................................................................................................................24
Wireless communication .......................................................................................................................... 26
3G status indicators ..........................................................................................................................................26
Signal strength indicator ...................................................................................................................................26
Battery use ............................................................................................................................................... 27
Helpful hints .....................................................................................................................................................27
Battery status indicators...................................................................................................................................27
Stand-by mode .................................................................................................................................................28
Power on ...........................................................................................................................................................28
Power off ..........................................................................................................................................................28
Card types ................................................................................................................................................ 29
Magnetic stripe card .........................................................................................................................................29
Chip card ...........................................................................................................................................................29
Contactless card ...............................................................................................................................................29
Cardholder verification ............................................................................................................................. 30
Moneris® iWL255 Reference Guide 1
Page 4

Cardholder verification methods (CVM) ..........................................................................................................30
Cardholder verification limit .............................................................................................................................30
Card entry options .................................................................................................................................... 31
Insert: Chip cards ..............................................................................................................................................31
Wave/Tap: Contactless cards ...........................................................................................................................31
Contactless Transaction Limit (CTL) .............................................................................................................................. 32
Swipe: Magnetic stripe cards ...........................................................................................................................32
Manual card entry ............................................................................................................................................32
Transactions ............................................................................................................................................. 33
General guidelines ............................................................................................................................................33
Admin code shortcuts .......................................................................................................................................33
Purchase [100] ..................................................................................................................................................34
Partially approved Purchase .............................................................................................................................34
Refund [101] / VOID–Purchase [106] / VOID–Refund [107] ............................................................................34
Pre-Authorization [102] ....................................................................................................................................34
Cheque Authorization [105] .............................................................................................................................35
Advice using Sequence Number [103] / Force Post [103] ................................................................................35
Advice List [109] ...............................................................................................................................................35
Balance Inquiry [110] ........................................................................................................................................36
Prompts without tip entry ................................................................................................................................36
Merchant prompts: Purchases/Pre-Auths/Refunds/Voids ........................................................................................... 36
Merchant prompts: Cheque Authorizations ................................................................................................................. 38
Merchant prompts: Advices/Force Posts ..................................................................................................................... 38
Customer prompts ........................................................................................................................................................ 40
Prompts with tip entry .....................................................................................................................................42
Merchant prompts: Purchase with tip enabled ............................................................................................................ 42
Customer prompts on the terminal: Purchase with tip entry enabled......................................................................... 43
Receipts ................................................................................................................................................... 46
Signing credit card receipts ..............................................................................................................................46
Reprinting receipts ...........................................................................................................................................46
Card masking ....................................................................................................................................................46
Contactless transactions ...................................................................................................................................47
Receipts ............................................................................................................................................................47
Pre-Auth receipt ........................................................................................................................................................... 47
Original receipt ............................................................................................................................................................. 47
Partial Approval receipt ................................................................................................................................................ 48
Reports .................................................................................................................................................... 49
Masking on reports ...........................................................................................................................................49
Reprint merchant receipt [66] ..........................................................................................................................49
Clerk subtotals report [82] ...............................................................................................................................49
Current batch totals report [99] .......................................................................................................................50
Merchant sub-totals report [95].......................................................................................................................50
Pre-auth list [62] ...............................................................................................................................................50
Balance inquiry report [94] ...............................................................................................................................51
Configuration report [16] .................................................................................................................................51
Moneris® iWL255 Reference Guide 2
Page 5

Tip totals report [96] ........................................................................................................................................51
Admin functions ....................................................................................................................................... 52
Logon [02] .........................................................................................................................................................52
Logoff [03] ........................................................................................................................................................52
Re-initialization [01] .........................................................................................................................................52
End-of-day process ................................................................................................................................... 53
Merchant close .................................................................................................................................................53
System close .....................................................................................................................................................54
Troubleshooting ....................................................................................................................................... 55
Error messages .................................................................................................................................................55
Equipment issues ..............................................................................................................................................58
Merchant support ....................................................................................................... 60
Moneris® iWL255 Reference Guide 3
Page 6

This page left blank intentionally.
Moneris® iWL255 Reference Guide 4
Page 7

In this section, we go over everything you need to
terminal
Setting up Your Terminal
Setting up
your
know to set up your Moneris iWL255.
You can also view our setup videos online at
moneris.com/support-iWL255.
Moneris® iWL255 Reference Guide 5
Page 8

Before you get started
1. Please confirm that you received the following items in your Welcome Kit.
Moneris® iWL255 Reference Guide 6
Page 9

2. Make sure you have the following information:
Your 13-digit Moneris Merchant ID (found in your Useful Information email).
Settlement responsibility (found in your Useful Information email): System Close (Moneris closes your
batch at the end of each day) or Merchant Close (you are responsible for closing your batch at the end
of each day).
The name of your wireless network provider (found in your Order confirmation email from Moneris).
Optional features e.g. gift cards, loyalty cards, Ernex Terminal ID (found in your Moneris Gift & Loyalty
Welcome letter).
If any of the above required elements are missing, please call Moneris Customer Care toll-free at
1-866-319-7450.
3. Proceed to Hardware setup on page 8.
Moneris® iWL255 Reference Guide 7
Page 10

PRINTER LATCH
(PULLED UP)
Hardware setup
Follow these instructions to set up your terminal hardware.
1. Remove the protective film (if applicable)
a. If your iWL255 terminal has a protective film covering the display screen, peel the film off.
Hint: Peel from the top right to the bottom left corner.
b. Go to step 2 “Install the paper roll” below.
2. Install the paper roll
a. Lift the printer latch up, and then pull back to open the lid and
expose the paper well.
b. Insert the paper roll into the paper well with the loose end
unrolling from the bottom of the roll towards the front of the
terminal.
c. Unroll enough paper to extend at least one inch (2.5 cm) past
the faceplate.
d. Close the lid, and press down to snap it back into place so that
the extended paper is pressed securely between the closed lid
and the top of the faceplate.
Note: The paper should unroll back over the top of the
printer, not unroll over the faceplate.
e. Proceed to Charging the battery on page 9.
Moneris® iWL255 Reference Guide 8
Note: To advance the paper from the printer when the lid is
closed, you must press and hold down the yellow key when
the terminal is powered on. DO NOT attempt to manually
advance the paper by pulling it as this will damage the printer.
Page 11
PO
PORT
TERMINAL
BASE
LEADS
PRONG
Charging the battery
1. Charge the terminal’s internal battery using one of the following methods:
Charge-only base (see below)
Direct-to-terminal charge cable (see page 10)
Recommendations: Always plug the power cable into the power source last to avoid power surges. Use a power
bar equipped with surge protection where possible. Do not use the power cable from your existing terminal, as it
may damage your new terminal.
Important: You must use the exact power adaptor and cables provided by Moneris to work with the Moneris
iWL255 terminal and base. Failure to do so may affect the operability of, or cause damage to, the equipment.
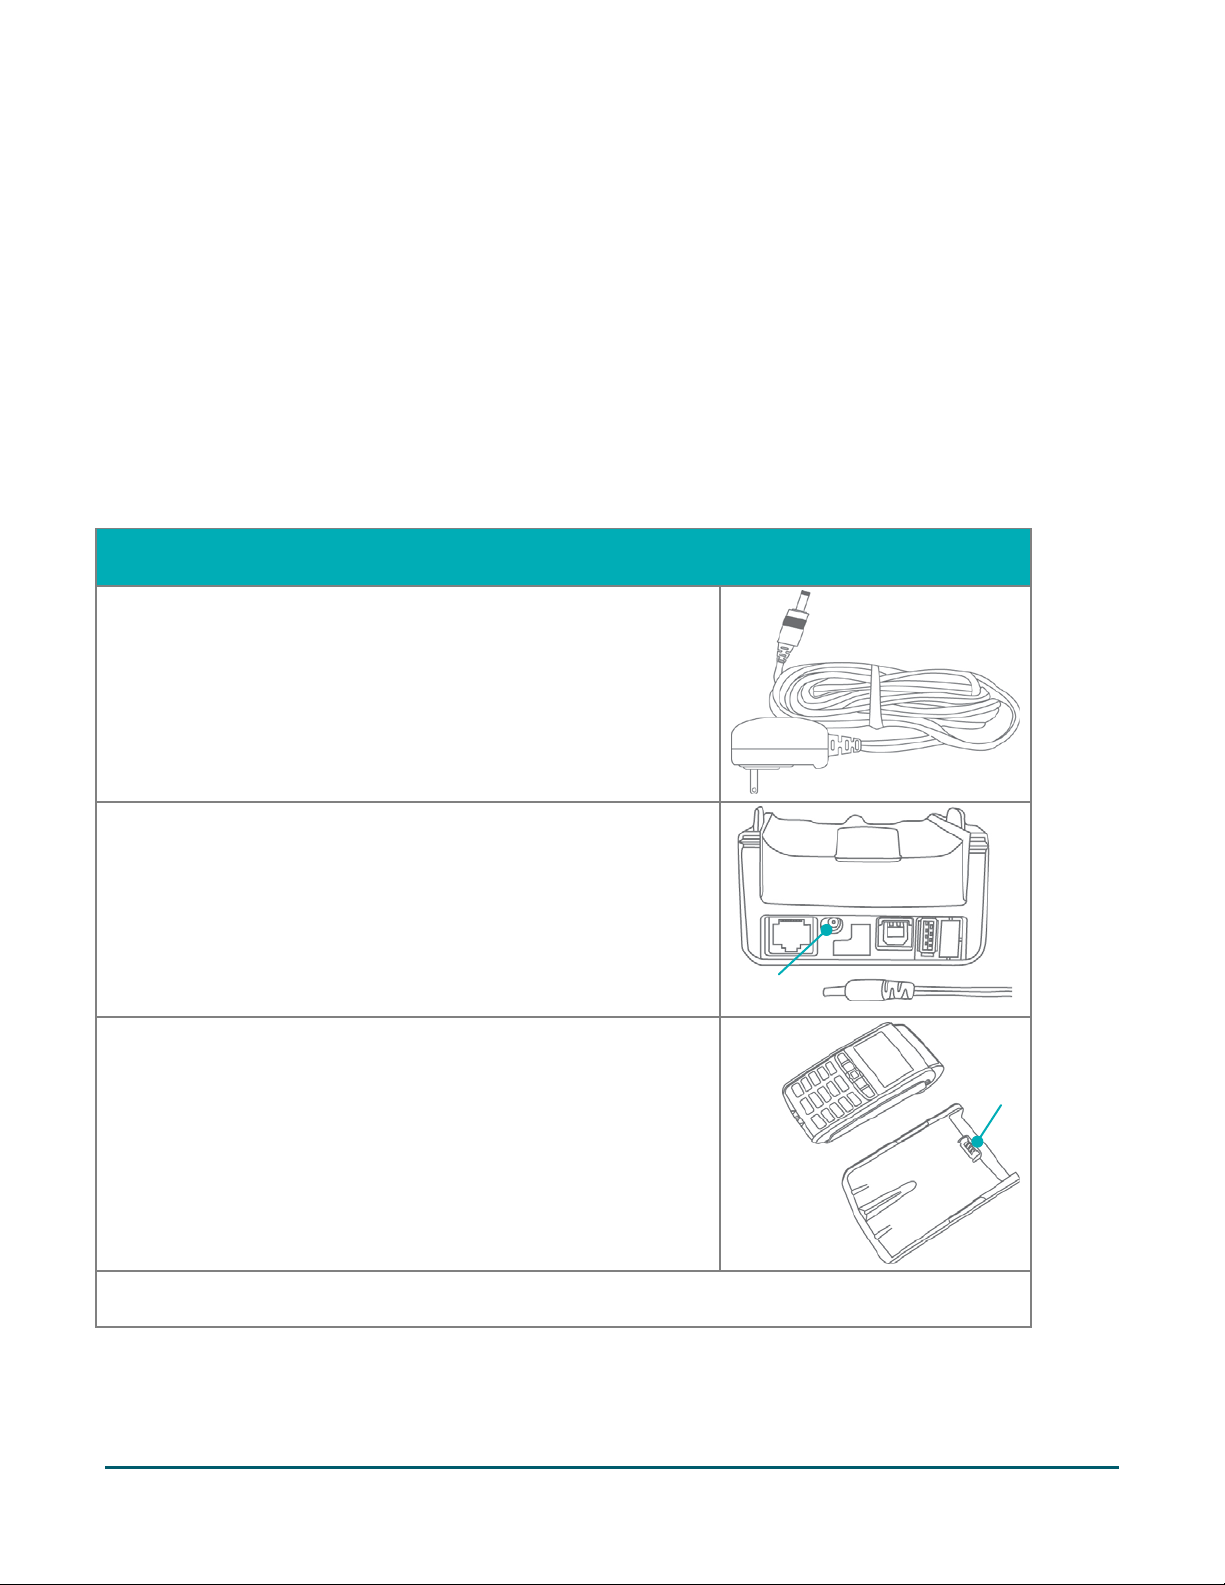
Use the charge-only base
a. Locate the base’s power cable.
b. Insert the power cable connector into the small circular port
(power) at the back of the base.
Note: The back of your base may not appear exactly as
depicted here. The ports, except the power port, may not be
visible or may be capped.
c. Plug the other end of the cable into a working power outlet.
d. Dock the terminal on the base. Ensure that the contacts slot on
the underside of the terminal fits securely over the leads prong
on the base.
e. When the terminal powers on, proceed to step 2 on page 11.
WER
Moneris® iWL255 Reference Guide 9
Page 12
FLAP (CLOSED)
PORT
FLAP
(OPEN)
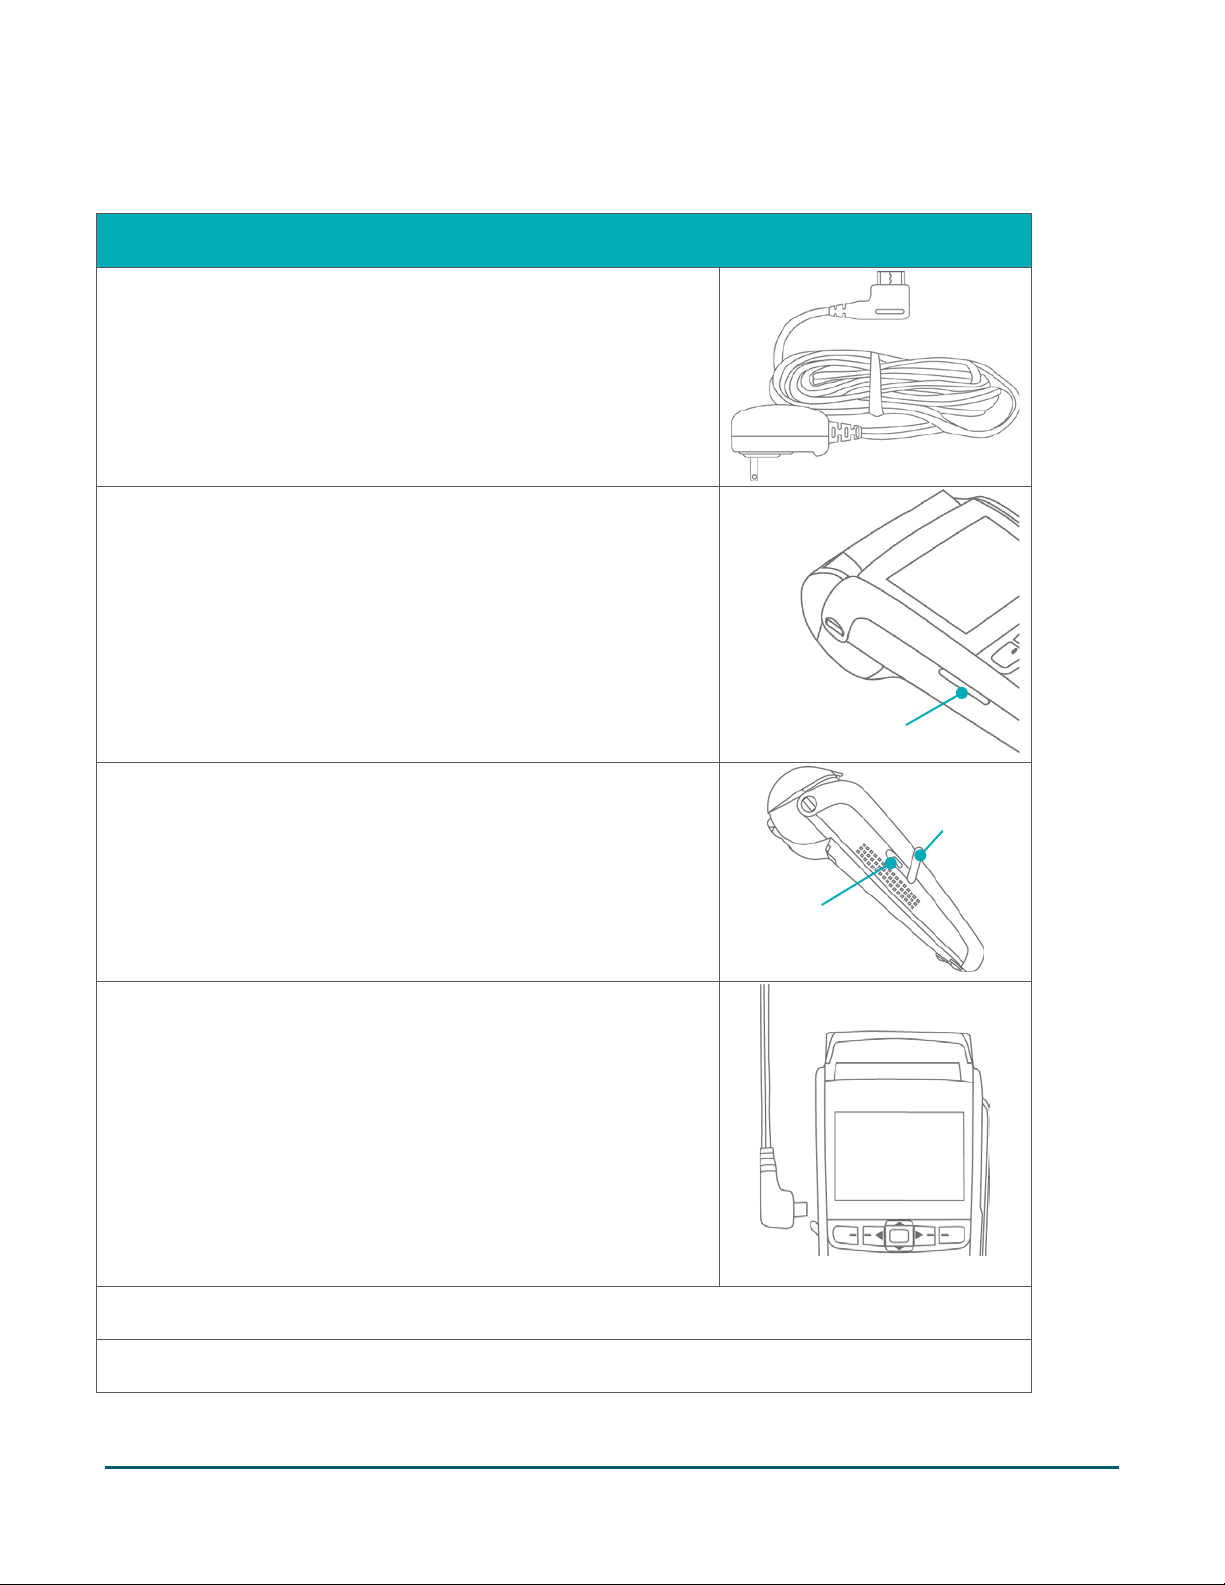
Using the direct-to-terminal charge cable
a. Locate the direct-to-terminal charge cable.
b. Locate the small flap on the left side of the terminal.
c. Gently lift and then shift the flap aside to expose the micro-
USB port.
d. Insert the direct-to-terminal cable connector into the port.
e. Plug the other end of the cable into a working power outlet.
f. When the terminal powers on, proceed to step 2 on page 11.
Moneris® iWL255 Reference Guide 10
Page 13
external power source
external power source
CHARGE LEVEL: 100%
2. Wait for TERMINAL SETUP REQUIRED to appear. (This should take about 60 seconds.)
3. Locate the Battery icon appearing at the top of the terminal screen in the header:
Note: Some or all of the five bars in the icon may be grey depending on the battery's current charge level.
The other icons appearing in the header may be different on your terminal depending on the wireless carrier
that your terminal is currently configured to use.
4. Wait for the Battery icon to indicate a charge of 100% (when this happens, all five bars in the icon will be
coloured, and the bars will cease to blink). This may take about three hours.
Note: The "plug" portion of the icon displays only if the terminal is connected to an external power source.
Terminal IS CONNECTED to
Terminal IS NOT CONNECTED to
CHARGE LEVEL: 100%
5. Once the battery is fully charged, you may undock the terminal from the base (or disconnect the direct-to-
terminal charge cable if used) before continuing the rest of the setup procedures.
6. Proceed to Communications setup on page 12.
Moneris® iWL255 Reference Guide 11
Page 14
Signal Strength Indicator bars: A minimum of three bars should appear.
maximum number is five.)
Communications setup
Your terminal must be configured to communicate with the Moneris host.
Depending on your mobile network provider, do one of the following:
If your SIM card uses the "Bell" network, proceed to Configuring the APN setting on page 13.
If not (i.e., your SIM card uses a network other than "Bell"), no change is required to the default APN setting.
Proceed to Confirming the status indicators below.
If you are not sure which network the SIM card is using, refer to your Confirmation email from Moneris, then
follow one of the appropriate steps above.
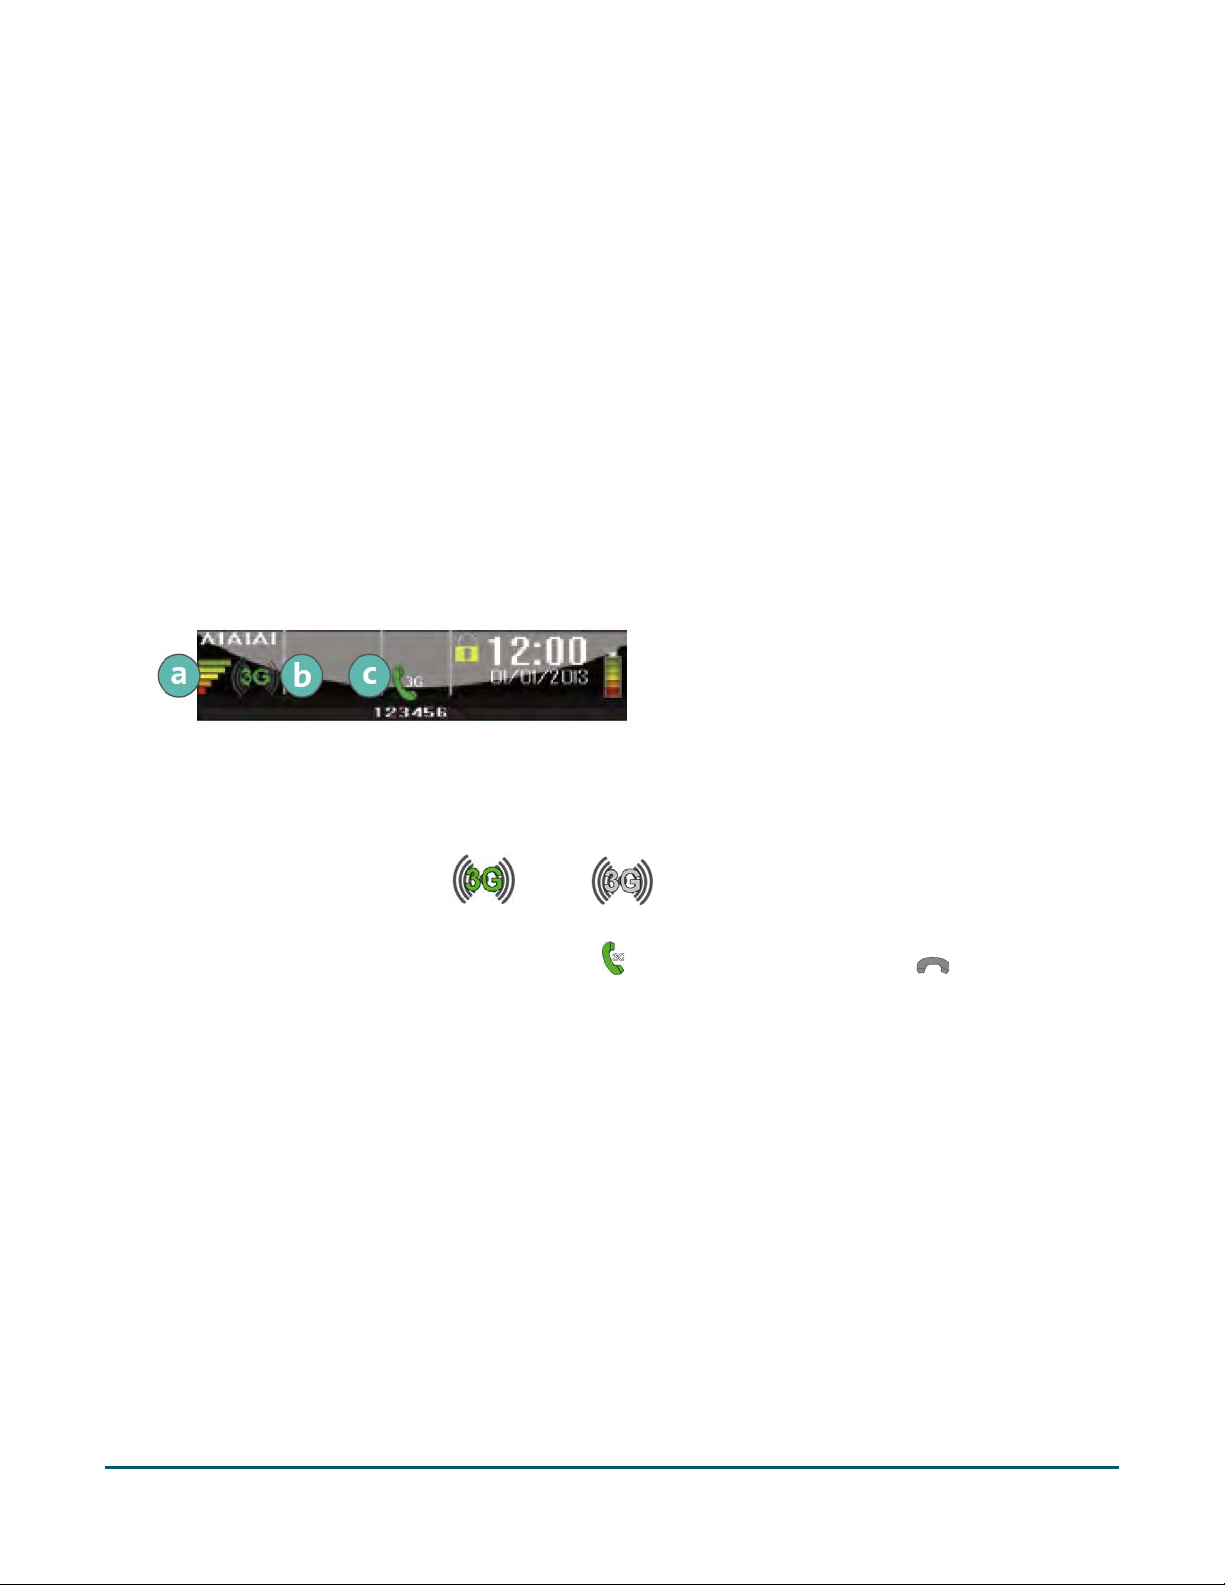
Confirming the status indicators
1. Confirm that the following three icons (a, b, and c) appear at the top of your terminal's screen:
a
b
c
2. Do one of the following depending on what appears on your screen:
If you have confirmed that the screen icons appear as described in step 1, proceed to Initialization and
If your screen icons look different and/or a 3G FAILED... error message appeared during the APN setup
(The number of bars will vary depending on the signal strength in your area. The
3G icon, coloured green or grey .
Handset icon, coloured green and angled or coloured grey and horizontal .
logon on page 17.
(Bell users), or “No SIM” appears, see Communications Troubleshooting on page 14.
Moneris® iWL255 Reference Guide 12
Page 15
Tips for moving through the menus
Press the key to answer “yes” to any questions or to scroll down.
Press the key to answer “no” or to scroll up.
Press the green key to select a menu item or finish entering information and move on to the next step.
Configuring the APN setting
1. Press the Admin key twice.
2. When ENTER ADMIN CODE appears, key in 12, and press the green key.
3. When the 3G SETUP menu appears, press the green key to select APN.
4. Scroll down to MONBLPUB, and press the green key.
5. When the 3G SETUP menu appears, press the red key.
6. When CONNECTING 3G PLEASE WAIT appears, wait while the terminal connects to the 3G wireless network.
7. Do one of the following:
If 3G CONNECTED PRESS OK appears, press the green key. Go to step 8.
If a 3G FAILED... message appears, press the green key. See Communications Troubleshooting on
page 14.
8. When REINITIALIZATION REQUIRED appears, proceed to Confirming the status indicators on page 12.
Moneris® iWL255 Reference Guide 13
Page 16

See the solution in the Other issues table on page 16.
Communications troubleshooting
Error Message Solution
3G FAILED
NO SIM
3G FAILED
PPP ERROR
3G FAILED
CONNECTION
TIMEOUT
3G FAILED
UNKNOWN
ERROR
The SIM card has been installed incorrectly or hasn’t been installed at all.
Note: The text “NO SIM” will also appear on your screen header as shown
here:
There is a mismatch between the installed SIM card and the APN being used.
For Bell carrier setup:
1. Repeat the Configuring the APN setting steps on page 13.
2. If this does not work, follow the solution in the Other issues table on
page 16.
For other carrier setup (i.e., carrier other than Bell):
1. Follow the solution in the Other issues table on page 16.
The terminal could not establish a connection to the 3G network in the
allotted time.
See the 3G FAILED PPP ERROR solution above.
See the 3G FAILED PPP ERROR solution above.
Moneris® iWL255 Reference Guide 14
Page 17
Install the SIM card
SIM CARD (FACE UP)
LATCH 1
LATCH 2
BACK PANEL
(OPEN)
SIM CARD
(FACE UP)
CROSSBAR
SIM CARD (INSERTED IN SLOT)
LATCH 1
LATCH 2
SIM CARD
SLOT
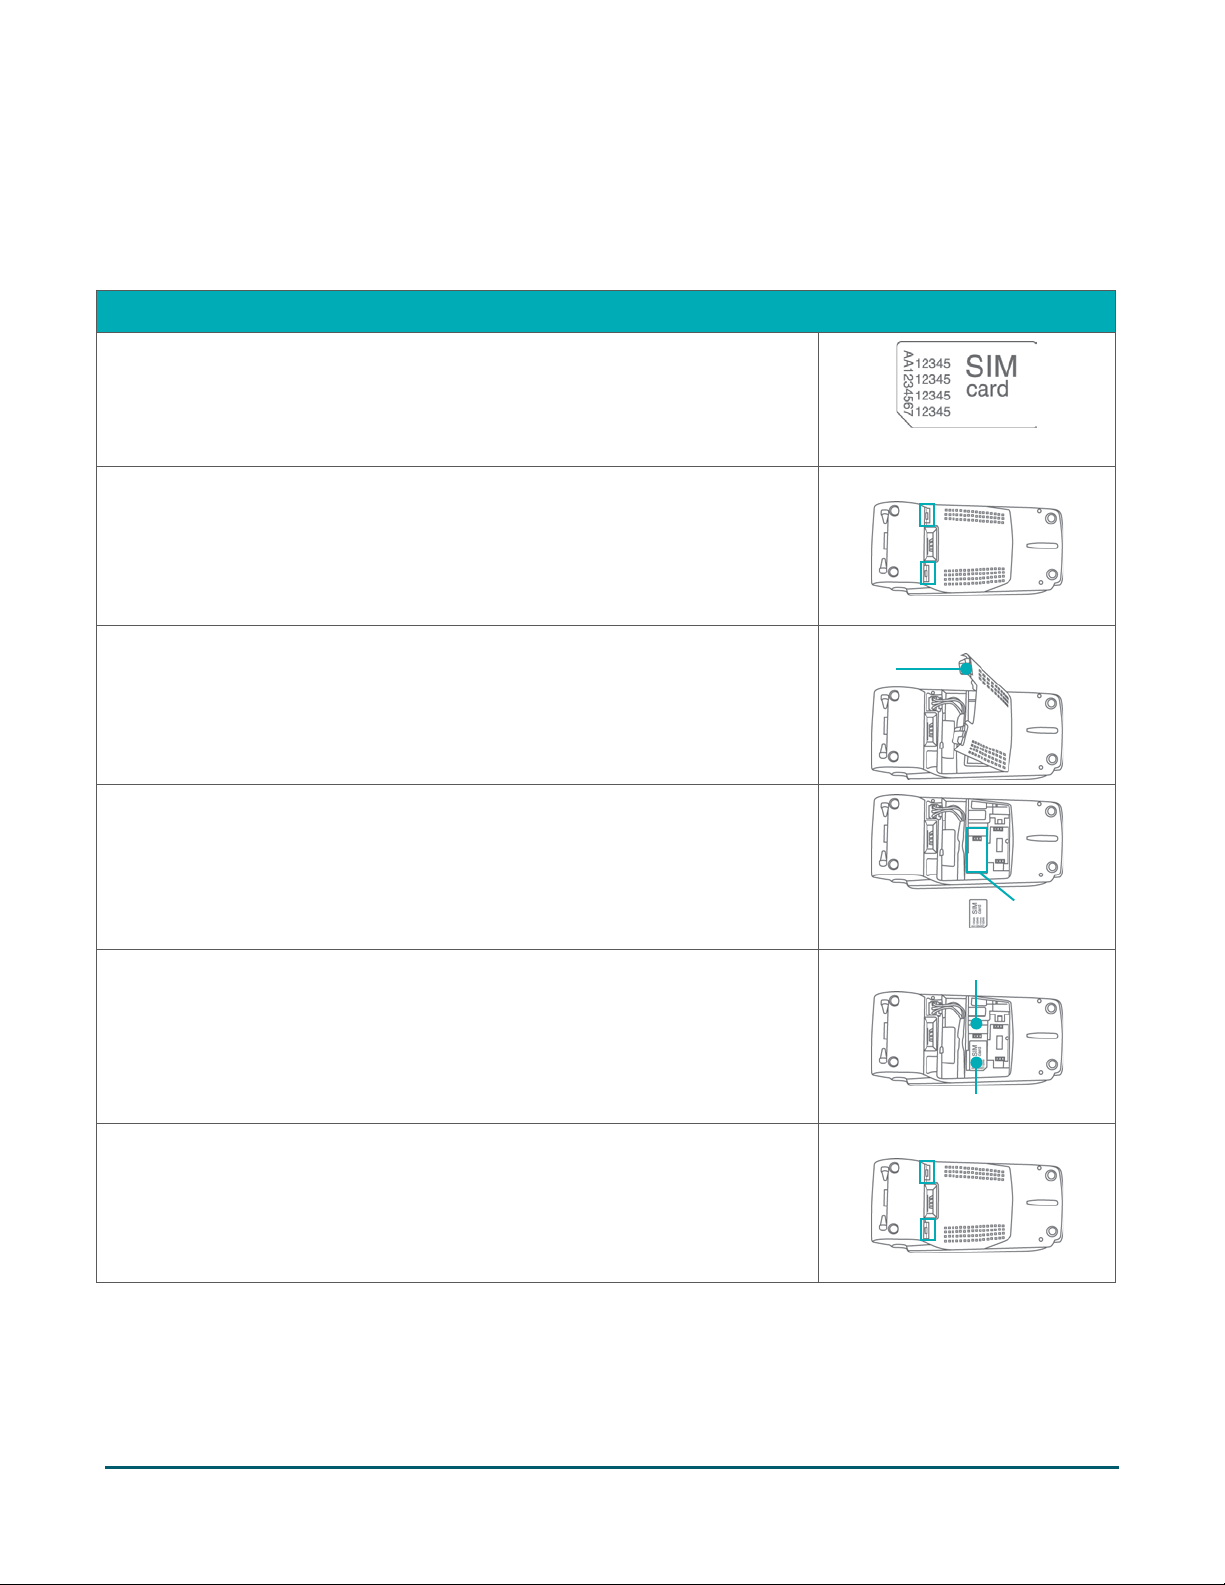
Installing or re-installing the SIM card
Follow these steps, as applicable, to install or re-install the SIM card, or to identify the wireless network provider
printed on the card.
1. Locate the SIM card if it is not yet installed.
2. Take note of the name of the wireless network carrier printed on the SIM
card.
3. Locate the two latches on the back panel.
4. Simultaneously press down on both latches and pull them back to detach
the panel.
5. Locate the SIM card slot (labelled "SIM"), and position the SIM card so
that the name of the wireless network carrier is face up.
6. Slide the SIM card (face up) into the slot so that the card sits securely
under the crossbar.
7. Close the back panel, and press down near the latches until the panel
snaps back into place.
Moneris® iWL255 Reference Guide 15
Page 18
Issue
Solution
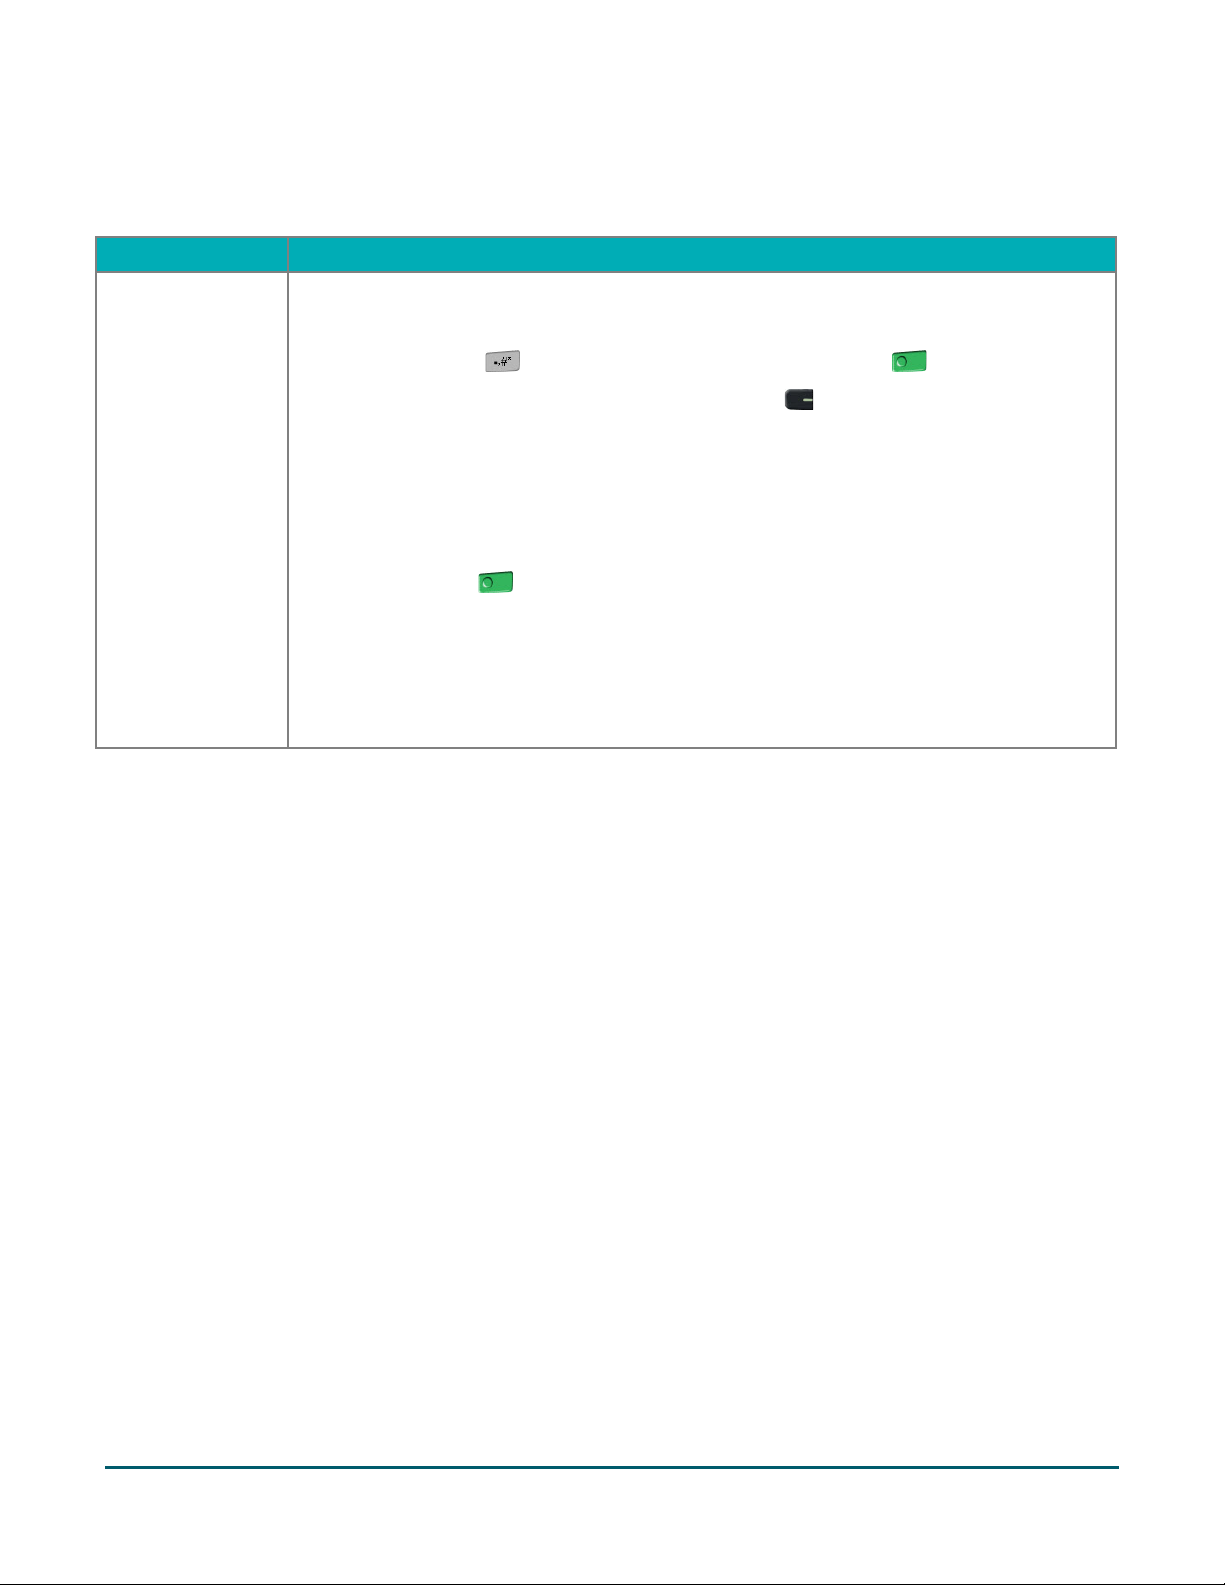
Other issues
The text NO SIM
appears in the
upper left corner
on the screen
header.
OR
One or more of
the terminal's
status indicators
do not appear as
shown on page
12, and the
terminal cannot
connect to the 3G
network.
1. Undock the terminal from the base if used, or disconnect the direct-to-terminal
charge cable if connected to the terminal.
2. Press the Admin key twice, key in 49, and press the green key.
3. When POWER OFF TERMINAL? appears, press the key to select YES.
4. Remove the SIM card. Refer to Installing or re-installing the SIM card on page 15.
5. Ensure that the SIM card is the one that was packaged with your terminal and the
authorized carrier's name is printed on the card.
6. Reinstall the SIM card once you have confirmed that it is the correct card.
7. Press the green key to power on the terminal.
8. Wait for TERMINAL SETUP REQUIRED (or REINITIALIZATION REQUIRED) to appear.
9. Continue in Confirming the status indicators steps on page 12.
Moneris® iWL255 Reference Guide 16
Page 19

Initialization and logon
Before processing any transactions, you must initialize your terminal with the Moneris host and log on.
1. Press the Admin key twice, key in 01, and press the green key.
2. When MERCHANT ID appears, key in your current 13-digit merchant ID, and press the green key.
3. When PHONE NUMBER appears, simply press the green key.
4. Wait while the terminal communicates with the Moneris host. Over the next few moments, the screen will
display SENDING, RECEIVING, and PROCESSING.
• If SWIPE ADMIN CARD appears, swipe one of the POS Admin cards (provided with your new terminal).
5. Wait while the terminal communicates with the Moneris host to log on.
6. If the initialization and logon are successful, the terminal screen should display PURCHASE ENTER AMOUNT.
This will always be your main screen (i.e., the READY screen) when your terminal is ready to be used:
7. To advance the paper from the printer, you must press and hold down the yellow key when the terminal
is powered on.
Note: Once the paper roll is installed and the printer lid is closed, DO NOT attempt to manually advance the
paper by pulling it as this will damage the printer.
8. Before using your terminal, read the Charging the battery after first initialization/logon section below.
9. Your terminal is ready to process transactions.
Charging the battery after first initialization/logon
1. To extend your terminal’s battery life, note the following:
Full charging time after depletion of the initial charge is approximately 3 hours.
Every one or two months allow the battery to discharge completely thereby forcing the terminal to shut
down. (The message LOW BATTERY!!! DOCK TERMINAL will appear just before shutdown.)
2. For information on battery management, refer to page 27.
Moneris® iWL255 Reference Guide 17
Page 20

Enabling the admin password for manual entry protection
The ENABLE PSWD? parameter protects the manual entry of card information on the terminal keypad. By default, a
POS Admin card (shipped with your terminal) must be swiped any time card information is manually entered in order
to continue the transaction. Moneris recommends that you change this parameter by setting up an admin password
to be entered instead of swiping the POS Admin card. To change this parameter and set up an admin password,
follow these steps.
1. Decide on your password:
It must be 5 to 10 numbers.
You cannot use consecutive numbers such as 12345 or 98765, or repeating numbers such as 22233.
You will have 60 seconds to enter it.
2. From the READY screen, press the Admin key twice, key in 22, and press the green key.
3. When SWIPE ADMIN CARD appears, swipe your POS Admin card.
The ENABLE PSWD? prompt appears.
4. Select YES by pressing the key.
The ENTER NEW 5-10 DIGIT ADMIN PSWD prompt appears.
Note: You have 60 seconds to enter the password.
5. Key in the password you decided on in step 1, and press the green key.
The RE-ENTER NEW ADMIN PASSWORD prompt appears.
6. Key in the password again and press the green key.
The message ADMIN PASSWORD SET UP SUCCESSFULLY appears briefly on the terminal, followed by the
SECURITY menu.
7. To return to the READY screen, press the red key twice.
For instructions on how to change the password after you have set it up or what to do if the password is locked,
refer to the iWL255 Long-Range Mobile Operating Manual in WebHelp format at
moneris.com/support-iWL255.
Now you can proceed to configure optional functions on the terminal that control its behavior.
Moneris® iWL255 Reference Guide 18
Page 21

Additional options
There are several options that you can choose to enable on your terminal to enhance its functionality.
Note: All instructions in this section begin at the terminal’s READY screen.
Printing the contactless logo on contactless transaction receipts
When this feature is enabled, the contactless logo will be printed on all contactless transaction receipts.
1. Press the Admin key twice, key in 08, and press the green key.
2. Scroll up to CTLS LOGO, and press the green key.
3. Scroll to ENABLE, and press the green key.
4. Press the red key twice to return to the READY screen.
Enabling Tip Entry, Cashback, or Invoice Number
1. Press the Admin key twice, key in 08, and press the green key.
2. Scroll down to the option that you want to enable (e.g. TIP ENTRY, CASH BACK, or INVOICE NUMBER), and
press the green key.
If you are enabling tip entry, follow these additional steps:
a. Scroll to a tip entry type (TIP BY AMOUNT or TIP BY PERCENT or TIP BY $ AND %), and press the green
key.
b. Press the red key once, and then go to step 4.
3. Enable the option by pressing the key (YES).
4. Press the red key twice to return to the READY screen.
Note: To change the default values for the tip and cash back options, or to enable enhanced tip prompting,
refer to the iWL255 Long-Range Mobile Operating Manual in WebHelp format at
moneris.com/support-iWL255.
Changing printer options
The printer is set up to automatically print the second receipt 10 seconds after it prints the first receipt.
Note: If you don’t want to wait, simply press the green key to print the second receipt immediately.
To change this setting:
1. Press the Admin key twice, key in 14, and press the green key.
2. Scroll down to PRINT DELAY, and press the green key.
3. Key in the number of seconds that the printer should wait before automatically printing the second receipt.
Press the green key.
Moneris® iWL255 Reference Guide 19
Page 22

Note: If you key in 99, the printer will always wait until the green key is pressed before printing the
second receipt.
4. Press the green key to return to the PRINTER CFG menu.
5. Press the red key twice to return to the READY screen.
Note: Shop for point-of-sale supplies and paper online at shop.moneris.com.
Changing the terminal language
1. Press the Admin key twice, key in 04, and press the green key.
2. Scroll to a language, and press the green key.
3. Press the red key twice to return to the READY screen.
Enabling loyalty and gift cards
Didn’t order a loyalty program and gift cards but would like to find out more? Please call us at 1-866-319-7450.
1. Press the Admin key twice, key in 310, and press the green key.
2. Press the green key to select ENABLE ERNEX.
3. Press the key to select YES.
4. Press the green key to select INITIALIZATION.
5. Key in the Ernex Terminal ID (found in your Moneris Gift & Loyalty Welcome Letter) and press the green
key.
6. Wait while the terminal communicates with the Moneris host.
If CLEAR TERMINAL STORAGE? appears, press the key to select YES.
7. The READY screen appears.
8. Your terminal is ready to process loyalty card and gift card transactions. For instructions on performing:
gift card transactions, refer to the Moneris iWL255 Gift Card Program Reference Guide.
loyalty card transactions, refer to the Moneris iWL255 Loyalty Programs Reference Guide.
Enabling tip entry (gift cards)
1. Press the Admin key twice, key in 310, and press the green key.
2. Scroll down to TIP ENTRY, and press the green key.
3. Press the key to select YES.
4. Press the red key to return to the READY screen.
Note: To change the default values for tip entry, or to enable enhanced tip prompting for gift cards, refer to the
iWL255 Long-Range Mobile Operating Manual in WebHelp format at moneris.com/support-iWL255.
Moneris® iWL255 Reference Guide 20
Page 23

In this section, we go over everything you need to
terminal
Using Your Terminal
Using
your
know to use your Moneris iWL255, including how to
perform transactions and end-of-day processes.
Moneris® iWL255 Reference Guide 22
Page 24

Moneris iWL255
Use this handheld, all-in-one terminal to process transactions at the point of sale (POS).
When prompted, you (and sometimes your customer) will key in information on the terminal. If your customer is
required to key in information, pass the terminal to the customer. When the customer has finished keying in the
information, retrieve the terminal and complete the transaction.
Moneris® iWL255 Reference Guide 23
Page 25

Terminal keys and hardware
1 Function keys
Move through the menu items on the display.
Select the option displayed above the key: e.g. if YES displays above the key, press that key to select
YES. If displays above the key, press that key to scroll up.
To select an item, scroll through the list until the item is highlighted (e.g. LOGON vs. LOGON ), and then
press the green key.
2 Power Off key
Press only at the READY screen displaying a $0.00 amount. When POWER OFF TERMINAL? appears,
select YES to power off (the terminal must be off the base).
3 Alphanumeric keys
Key in numbers, letters and punctuation (with the Admin key).
4 Admin key
Go to the MAIN MENU from the READY screen.
Select letters and punctuation (with alphanumeric keys).
5 Red Cancel key
Cancel a transaction.
Move back one menu at a time.
6 Yellow Correct key/Paper feed key
Clear displayed data one character at a time.
Press key (hold down) to advance the receipt paper in the printer
7 Green OK key
Accept displayed data.
Submit data.
Select highlighted menu item.
8 Direct-to-Terminal Charge Cable Port (lift flap)
9 Printer
To advance receipt paper, see label 6 above
10 Keypad
11 Magnetic stripe reader
12 Chip reader
Moneris® iWL255 Reference Guide 24
Page 26

13 Display screen/Contactless reader (internal)
Note: If the terminal’s backlight dims (keys lose their bright glow), press any key. The keys function even if the
backlight is dimmed.
Moneris® iWL255 Reference Guide 25
Page 27

Icon
Description
Wireless communication
The iWL255 Long-Range Mobile terminal uses long-range wireless communications to send and receive
information to and from the Moneris host. The communications indicators (described below) display in the
terminal’s on-screen info header:
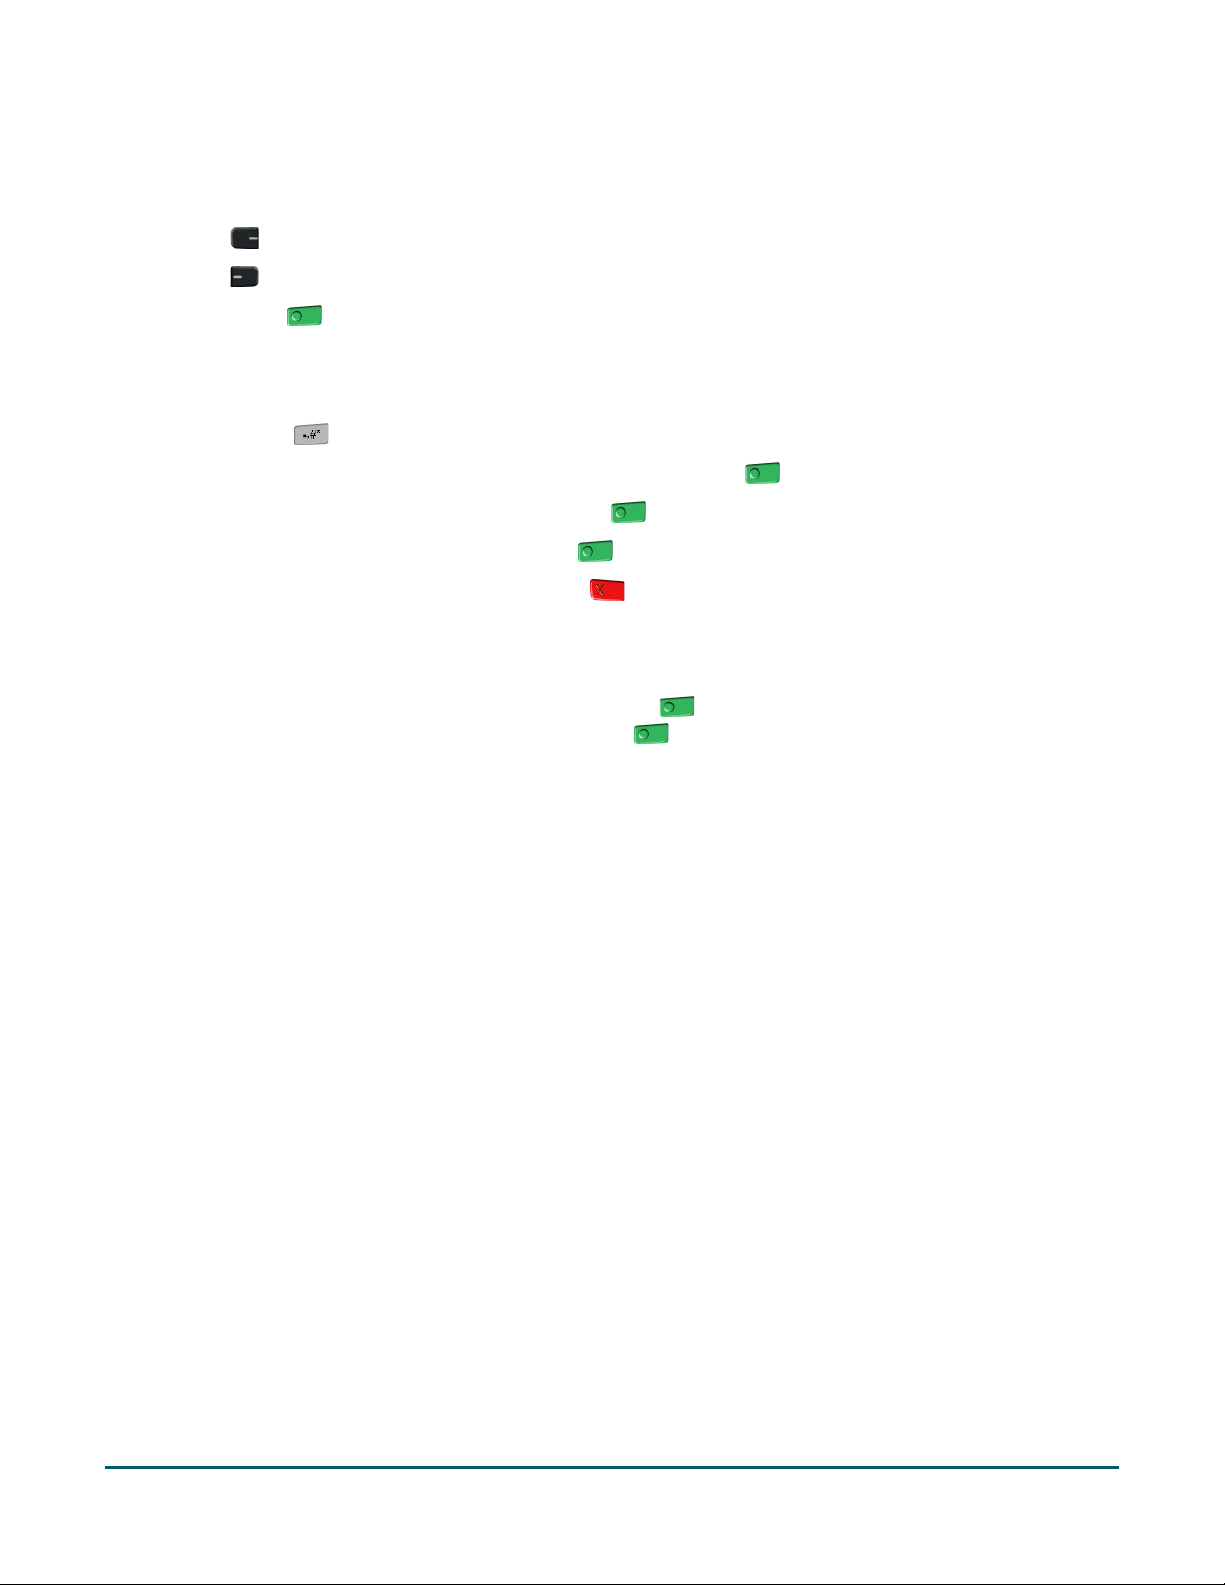
3G status indicators
Icon Description
Terminal is configured to connect to the authorized carrier's 3G wireless network.
Connection to wireless network established.
To test 3G wireless communication:
1. While the terminal is powered on, confirm that the 3G status icons listed above are displayed.
Note: Periodically the two icons may be coloured grey and display like this:
You may still process transactions if this happens.
2. Confirm that there is sufficient signal strength (see Signal strength indicator table below).
Signal strength indicator
5 bars: Terminal is receiving a very strong signal from the network and can process transactions.
4 bars: Terminal is receiving a strong signal from the network and can process transactions.
3 bars: Terminal is receiving a good signal from the network and can process transactions.
2 bars: Terminal is receiving a signal from the network and can process transactions but may take
longer to complete them.
1 bar: The terminal is receiving a weak signal and may not be able to process transactions and/or
print receipts.
0 bars: The terminal is not receiving any signal and CANNOT process transactions.
Moneris® iWL255 Reference Guide 26
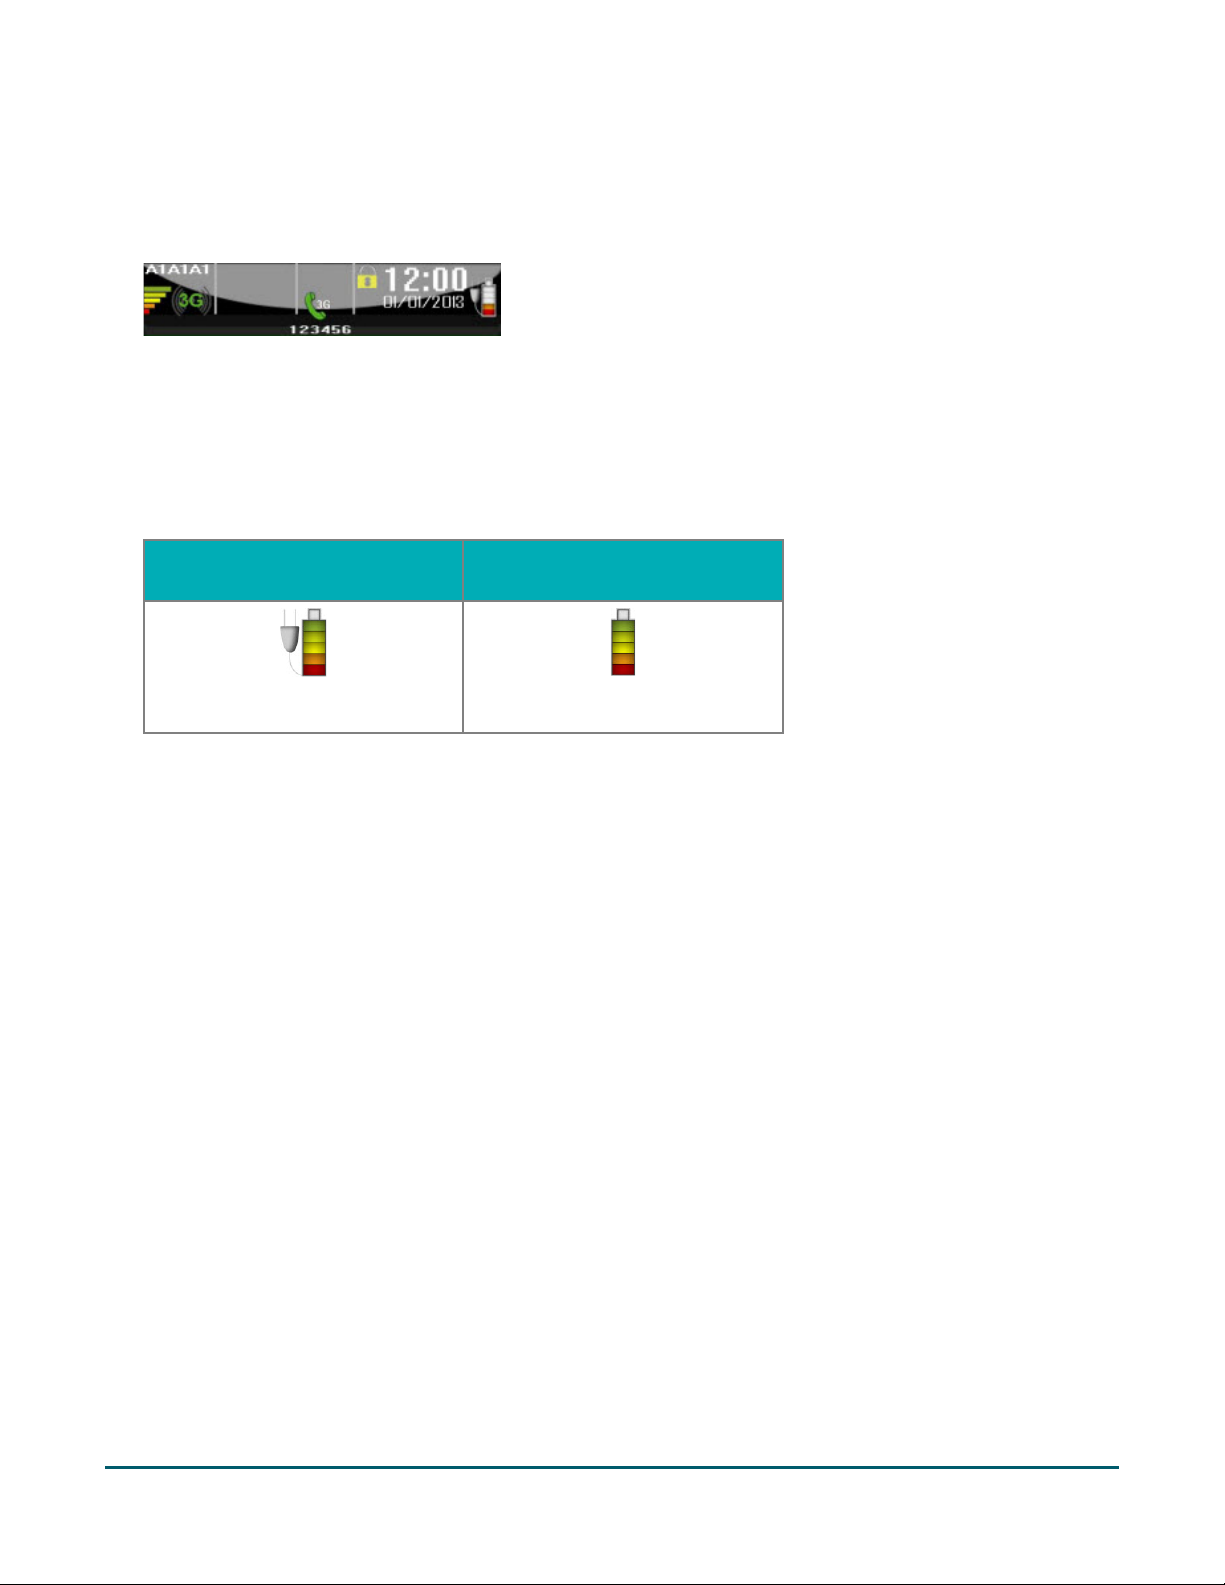
Page 28

Terminal connected to external power source
The "plug" portion of the battery icon appears when the terminal is connected to an
Battery charge level
The coloured bars blink (one level at a time) when the battery is charging.
100%
or less
80%
or less
60%
or less
40%
or less
20%
or less 1
Battery use
To maintain battery charge, use any method below:
Direct-to-terminal charge cable: Connect this cable to the side port (see page 10), and plug the other end
into a working power outlet.
Charge base: Dock the terminal on a powered base.
Helpful hints
Check the battery charge level (see icons below) before use.
Power off the terminal when not in use or being charged.
Battery status indicators
The battery icon displays in the info header. The icon reflects the battery charge status/charge level.
external power source.
charge
1
Recharge the battery as soon as possible. The terminal may power off. (Data will not be lost if this happens.)
2
The terminal will power off unless connected to a power source. (Data will not be lost if the terminal powers
off.)
charge
charge
charge
charge
0%
charge2
Moneris® iWL255 Reference Guide 27
Page 29

Stand-by mode
The terminal goes into Standby mode (the white backlight turns off) when it has not been used for a set time
period. To exit this mode, press any key.
Power on
Press the green key. If the terminal does not power on, connect it to a power source.
Power off
1. Ensure that the terminal is not connected to a power source.
2. From the READY screen, press the Admin key twice, key in 49, and press the green key.
The POWER OFF TERMINAL? prompt appears.
3. Press the key to select YES.
Moneris® iWL255 Reference Guide 28
Page 30

Card types
The Moneris iWL255 supports the following card types and formats. These card types are not mutually exclusive.
A single card can include a magnetic stripe, a chip, and contactless functionality.
Magnetic stripe card
A card with a magnetic stripe
The card is swiped on the magnetic stripe reader
Chip card
A card with a chip
The card is inserted into the chip card reader
Contactless card
In this guide, the term “contactless card” includes:
®
a card with contactless functionality; supported card brands include: Visa
Express
a mobile device, such as a smartphone, tablet or smartwatch
other contactless-enabled items such a key fob or a mobile tag
®
, Discover®, and Interac®
, Mastercard®, American
The card is tapped on the contactless reader.
All contactless card formats and any related software are the responsibility of the cardholder (e.g.,
downloading a digital app from their financial institution).
Cardholders with a mobile device (e.g., smartphone) are responsible for loading their card information into
their digital wallet.
Moneris® iWL255 Reference Guide 29
Page 31

Cardholder verification
Cardholder verification methods (CVM)
Many transactions require cardholder verification. This means your customer must provide proof that they are
the valid cardholder by performing one of the cardholder verification methods below. The terminal will prompt
your customer (or you) for the appropriate CVM.
When verification is required, follow these general guidelines:
For a transaction where a card is swiped, the cardholder signs the merchant copy of the receipt.
For a transaction where a card is inserted, the cardholder enters their PIN on the terminal. In some cases,
the cardholder may need to sign the merchant copy of the receipt.
For a transaction where a card is tapped, the cardholder signs the merchant copy of the receipt.
For a transaction where a mobile device is tapped, the cardholder enters their passcode on their mobile
device. If the cardholder has already entered their passcode, they will not be prompted again during the
transaction.
Cardholder verification limit
This is the maximum dollar amount for performing a tapped credit transaction without cardholder
verification.
To determine the cardholder verification limit for a card, print a Configuration Report (see instructions on
page 51). Look near the end of the report for the CVM LIMITS section, then look under each card type for
the DOMESTIC CVM LIMIT.
If the final transaction amount is greater than the limit specified (in the case of Visa, equal to or greater
than) then the cardholder must perform one of the cardholder verification methods outlined on page 30.
In most cases, this limit does not apply to:
• Credit transactions where the card is swiped or inserted
• Interac Debit transactions where the card is swiped or inserted
These transactions require cardholder verification regardless of the transaction amount.
Moneris® iWL255 Reference Guide 30
Page 32

Card entry options
Insert: Chip cards
1. SWIPE OR INSERT CARD or SWIPE/INSERT/TAPCARD displays on the
terminal.
2. Either you or the customer inserts the card into the terminal’s chip reader.
Note: Unless the terminal prompts otherwise, do not swipe a chip card
even if the card has a magnetic stripe.
3. The customer may be prompted to key in a PIN.
4. The chip card must remain inserted until the REMOVE CARD prompt
displays.
Wave/Tap: Contactless cards
1. SWIPE/INSERT/TAP CARD displays on the terminal.
2. The customer taps their card over the icon that appears on the display
screen.
Note: The customer does not need to enter a PIN on the terminal.
However, if the customer is using a mobile device, they may be directed to
enter a passcode on their smartphone or tablet.
3. Note the following:
Your merchant account must be configured for contactless
functionality.
Only Purchases, Refunds, and Balance Inquiries can be processed using a contactless card.
The transaction amount must be equal to or less than the maximum Contactless Transaction Limit set
for the card (see below).
The card must be within 0.5 in. (1.3 cm) of the screen, but it does not have to touch it.
The card must be tapped or waved by itself (the customer cannot leave the card in their wallet and wave
it in front of the screen).
Moneris® iWL255 Reference Guide 31
Page 33

Contactless Transaction Limit (CTL)
For each card type, there is a limit on the dollar value that can be processed as a contactless transaction.
Credit Cards (and some Debit cards): To determine the CTL for a card, print a Configuration Report (see
instructions on page 51). Look near the end of the report for the CVM LIMITS section, then look under each
card type for the DOMESTIC TXN LIMIT. If this limit shows a value of ‘9999’, then there is no contactless
limit.
Note: If a contactless credit card is tapped for an amount that exceeds its maximum CTL, the terminal will
display CONTACTLESS TRANSACTION LIMIT EXCEEDED (see message on page 56).
Mobile Devices: For Mastercard, look for the MC-M TXN LIMIT. If this limit shows a value of ‘9999’, then
there is no contactless limit for Mastercard on mobile devices. For all other cards, use the DOMESTIC TXN
LIMIT as specified above.
Interac Flash Cards: The maximum CTL is determined by the card and does not appear on any report.
Note: If an Interac Flash card is tapped for an amount that exceeds its maximum CTL, the terminal will
display TAP FAILED PLEASE INSERT OR SWIPE CARD (see message on page 57).
Swipe: Magnetic stripe cards
1. SWIPE CARD or SWIPE OR INSERT CARD or SWIPE/INSERT/TAP CARD
displays on the terminal.
2. Swipe the card on the terminal’s magnetic stripe reader.
Note: If the card has a chip and the terminal is enabled to read chip
cards, the card must be inserted into the chip reader.
Manual card entry
If all available card entry methods fail, you may manually enter the card number for credit cards and some chip
debit cards.
1. SWIPE CARD or SWIPE OR INSERT CARD or SWIPE/INSERT/TAP CARD displays on the terminal.
2. Key in the card number on the terminal, and press the green key.
3. Key in the card’s expiry date (MMYY) on the terminal, and press the green key.
If ENTER ADMIN PASSWORD appears, key in your admin password and press the green key.
If SWIPE ADMIN CARD appears, swipe your POS Admin card on the terminal.
If TAKE MANUAL IMPRINT OF CARD AND PRESS OK appears, take a manual imprint of the card, and press
the green key.
Moneris® iWL255 Reference Guide 32
Page 34

Transactions
All instructions in this section begin at the READY screen. To access the READY screen from any other screen,
press the red key repeatedly until the READY screen appears.
General guidelines
1. Before processing transactions, ensure that the wireless signal strength is at a sufficient level (see Signal
strength indicator on page 26).
2. Determine the transaction to be processed (e.g., Purchase or Refund).
3. Establish the means of payment (credit or debit).
4. Enter the card data on the terminal (see pages 31 - 32).
5. Follow the prompts* (see pages 34 - 43).
6. Process receipts (see pages 46-48).
*Prompts may vary depending on variables such as terminal setup, merchant setup and card type.
Note: Some debit cards may display Cashback and/or Account Selection and PIN prompts after the terminal has
been returned to you; hand the terminal back to the customer to respond to these prompts.
Admin code shortcuts
To bypass scrolling through menus to select a transaction, use the Admin codes to jump directly to a transaction.
Admin codes can be found in this section in square brackets beside the transaction name (e.g. Logon [02] means
the Admin code for logging on is 02).
To use an Admin code:
1. Press the Admin key until ENTER ADMIN CODE appears.
2. Key in the Admin code, and press the green key.
The transaction appears.
To print a list of all Admin codes:
1. Press the Admin key until ENTER ADMIN CODE appears.
2. Key in 40, and press the green key.
The list is printed.
Moneris® iWL255 Reference Guide 33
Page 35

Purchase [100]
Credit or debit purchase of goods or services.
1. If PURCHASE is the default, key in a Purchase amount. (If PURCHASE is not the default: Press the Admin
key, select TRANSACTIONS, select PURCHASE, and then key in a Purchase amount.)
2. Press the green key.
3. Follow the merchant prompts:
If tip entry is disabled, follow the merchant prompts table on page 36.
If tip entry is enabled, follow the merchant prompts table on page 42.
Partially approved Purchase
A Partial Approval of a purchase transaction occurs when a cardholder pays for a purchase with a pre-paid credit
card but the value on the pre-paid card is less than the purchase amount.
The amount on the pre-paid card is approved, i.e. part of the total purchase amount is approved. Prompts are
displayed indicating how much of the purchase amount is still owed (e.g. AMOUNT DUE $5.00). That amount can
then be paid by another tender type, e.g. a credit or debit card.
Refund [101] / VOID–Purchase [106] / VOID–Refund [107]
A Refund credits a customer’s account. A Void cancels the original Purchase or Refund.
Note: Credit card Voids must be processed in the same batch as the original transaction.
1. Press the Admin key, select TRANSACTIONS, and then select the transaction (REFUND or VOID-
PURCHASE or VOID-REFUND).
If SWIPE ADMIN CARD appears, swipe your POS Admin card.
2. Key in the transaction amount, and press the green key.
3. Follow the merchant prompts table on page 36.
Note: To refund or void a partially approved purchase, use the TOTAL PAID amount on the Partial Approval
receipt. See page 48.
Pre-Authorization [102]
Authorization if the final Purchase amount is unknown (e.g. hotel or car rental).
1. If PRE-AUTH is the default, key in a Pre-Auth amount. (If PRE-AUTH is not the default: Press the Admin
key, select TRANSACTIONS, select PRE-AUTH, and then key in a Pre-Auth amount.)
2. Press the green key.
3. Follow the merchant prompts table on page 36.
Note: When the final Purchase amount is known, you must perform an Advice for the final amount using
the same card number (see Advice options starting on page 35).
Moneris® iWL255 Reference Guide 34
Page 36

Cheque Authorization [105]
1. Press the Admin key, select TRANSACTIONS, and select CHEQUE AUTH.
2. Do one of the following:
To do the authorization by credit card, select CREDIT CARD.
To do the authorization by driver’s licence, select DRIVERS LICNCE.
3. Key in the cheque amount, and press the green key.
4. Follow the merchant prompts table on page 38.
5. On the cheque, record the 8-digit APPROVED number then press the green key.
Note: Receipts are not printed. ID types and province/state codes are provided by the authorization service.
Advice using Sequence Number [103] / Force Post [103]
An Advice transaction completes or cancels a Pre-Auth. A Force Post transaction completes a voice-authorized
purchase.
Note: The Advice transaction must be processed on the same terminal as the original Pre-Auth.
1. Press the Admin key, select TRANSACTIONS, and then select P-A ADVICE.
2. Follow the merchant prompts table on page 38.
3. After processing an Advice, the terminal returns to the FIND ORIGINAL TRANSACTION? prompt.
To go back to the READY screen, press the red key twice.
To process another Advice, return to step 2.
Advice List [109]
Completes or cancels a Pre-Auth from a list.
Note: The Advice List (P-A ADVICE LST) will appear only if Tip Reporting is enabled. The Advice must be
processed on the same terminal as the original Pre-Auth.
1. Press the Admin key, select TRANSACTIONS, and then select P-A ADVICE LST.
If SWIPE ADMIN CARD appears, swipe your POS Admin card.
If ENTER CLERK ID appears: To narrow the search by Clerk ID, key in a clerk ID, and press the green
key. Otherwise, press the green key for retrieval regardless of Clerk ID.
2. When ENTER AMOUNT or DATE or BATCH NUMBER appears: To narrow the scope of your search, key in the
required data, and then press the green key. Otherwise, for retrieval regardless of the specified prompt,
simply press the green key without entering the required data.
3. Scroll to the Pre-Auth that you want to complete or cancel (e.g., “PA1234 $#.##”), and press the green
key.
4. Press the key (COMPL), and follow the merchant prompts table on page 38.
Moneris® iWL255 Reference Guide 35
Page 37

Merchant prompt
Merchant action(s)
CLERK ID
press the green key to bypass.
AUTHORIZATION #
47), and press the green key.
SWIPE/INSERT/TAP CARD
4 DIGITS
DATE [MMYY]
SWIPE ADMIN CARD
Swipe your POS Admin card.
5. After processing an Advice:
To go back to the READY screen, press the red key twice.
To process another Advice:
From the ENTER AMOUNT screen, return to step 2, or
From the list of Pre-Auth transactions, return to step 3.
Balance Inquiry [110]
Prints a cardholder receipt indicating the dollar value available on a pre-paid credit card.
1. Press the Admin key, select TRANSACTIONS, and then select BAL INQUIRY.
2. Follow the prompts but note:
The terminal only prints one copy of the balance inquiry receipt: the cardholder copy.
The balance is not displayed on the screen, only an APPROVED message.
Prompts without tip entry
Merchant prompts: Purchases/Pre-Auths/Refunds/Voids
This table lists in order of appearance the prompts (and the actions to take for each) that you might see on the
terminal during a Purchase with tip entry disabled, Pre-Auth, Refund, or Void. For a Purchase with tip entry
enabled, refer to page 42.
Note: Only some of the prompts listed below will appear for any one transaction.
ENTER
ENTER INVOICE NO
ENTER ORIGINAL
SWIPE CARD
or
SWIPE OR INSERT CARD
or
ENTER LAST
Key in your Clerk ID, and press the green key.
Key in an alphanumeric identifier, and press the green key, or simply
Key in the 6-digit AUTH# from the original transaction receipt (see page
Enter the card on the terminal (see pages 31-32 for options).
Key in the last four digits of the card number, and press the green key.
ENTER EXPIRY
Moneris® iWL255 Reference Guide 36
Key in the card’s expiry date (MMYY), and press the green key.
Page 38

Merchant prompt
Merchant action(s)
OTHER
AND PRESS OK
YES NO
AUTHORIZATION #
47), and press the green key.
TO CONTINUE
RETURN TO CLERK
Press the green key on the terminal to continue.
########
PRESS OK
YES NO
REGULAR
MAIL/TEL
SINGLE
RECURRING
INSTALLMENT
TAKE MANUAL
IMPRINT OF CARD
SELECT
<Application name>
YES NO
<Application name>
-OK?
ENTER ORIGINAL
If cardholder is present: Press the green key to select REGULAR.
If cardholder is not present: Scroll to MAIL/TEL, and press the
green key.
Scroll to the option that best describes the transaction, and press the
green key.
Take a manual imprint of the card, and press the green key.
To select the displayed application: Press the key (YES).
To view the next available application on the card: Press the key
(NO).
To use the displayed application, press the key (YES).
Key in the 6-digit AUTH# found on the original transaction receipt (see page
CUSTOMER
PRESS OK
APPROVED
PARTIAL APPROVED
$000.00
AMOUNT DUE
$00.00
CR/DB CASH
UPDATE POINTS
TO LOYALTY CARD?
Pass the terminal to the cardholder (see Customer prompts on terminal on
page 40. If tip entry is enabled, see page 43).
Press the green key, and process any receipt that prints (see page 46).
Press the green key on the terminal to continue.
If cardholder would like to pay a balance due by credit or debit, press
the key (CR/DB).
If they would like to pay by cash, press the key (CASH).
Refer to the Moneris iWL255 Loyalty Programs Reference Guide.
Moneris® iWL255 Reference Guide 37
Page 39

Merchant prompt
Merchant action
LICENCE NUMBER
OR STATE CODE
(YYMMDD)
SWIPE CARD
Enter the card on the terminal (see page 32 for options).
4 DIGITS
DATE [MMYY]
SWIPE ADMIN CARD
Swipe your POS Admin card.
########
NUMBER
receipt (see Pre-Auth Receipt on page 47), and press the green key.
PRESS [OK]
Merchant prompts: Cheque Authorizations
This table lists in order of appearance the prompts on the terminal (and the actions to take for each) for this
transaction.
ENTER DRIVERS
ENTER PROVINCE
ENTER BIRTH DATE
ENTER LAST
ENTER EXPIRY
APPROVED
Key in the cheque-holder’s driver’s licence number, and press the green
key.
Key in the cheque-holder’s 2-digit province/state code, and press the green
key.
Key in the cheque-holder’s birth date (YYMMDD), and press the green
key.
Key in the last four digits of the card number, and press the green key.
Key in the card’s expiry date (MMYY), and press the green key.
Go back to Cheque Authorization on page 35, and continue at step 5 of that
procedure.
Merchant prompts: Advices/Force Posts
This table lists in order of appearance the prompts (and the actions to take for each) that you might see on the
terminal during an Advice or Force Post.
Note: Only some of the prompts listed below will appear for any one transaction.
Merchant prompt
FIND ORIGINAL TRANSACTION?
YES NO
ENTER ORIGINAL SEQUENCE
1234567890123456
Moneris® iWL255 Reference Guide 38
Merchant action
To do an Advice: Press the key (YES).
To do a Force Post: Press the key (NO).
Key in the 6-digit portion of the RECEIPT NUMBER found on the Pre-Auth
Press the green key to confirm the displayed card number.
Page 40

$#.##-OK?
To accept the displayed ID, simply press the green key.
To bypass this prompt, simply press the green key.
AUTHORIZATION #
green key.
NUMBER
Merchant prompt
ENTER AMOUNT
$#.##
ENTER ORIGINAL
AMOUNT
$#.##
Merchant action
Advice:
To complete the Pre-Auth: Key in the amount written on the Total line
(sum of the printed Pre-Auth amount plus written Tip amount if any
(see Pre-Auth Receipt on page 47, and press the green key.
To cancel the Pre-Auth: Press the yellow key (this enters $0.00), and
press the green key.
IVR Auth:
Key in the authorized transaction amount, and press the green key.
Advice:
To complete the Pre-Auth: Key in the printed Pre-Auth amount found
on the receipt (see Pre-Auth Receipt on page 47), and press the green
key.
To cancel the Pre-Auth: Press the yellow key (this enters $0.00), and
press the green key.
IVR Auth:
Key in the authorized transaction amount, and press the green key.
ENTER TIP AMOUNT
$0.00
FINAL AMOUNT
ENTER
CLERK ID
ENTER INVOICE NO
ENTER ORIGINAL
ENTER CARD
Advice:
Key in the amount written on the Tip line (see Pre-Auth Receipt on page
47), and press the green key.
IVR Auth:
Key in the authorized Tip amount, and press the green key.
Press the green key to continue.
Key in your Clerk ID, and press the green key;
or
Key in an alpha/numeric identifier, and press the green key;
or
Key in the (IVR) Auth # written on your paper sales draft, and press the
Key in the card number, and press the green key.
Moneris® iWL255 Reference Guide 39
Page 41

DATE [MMYY]
SWIPE ADMIN CARD
Swipe your POS Admin card.
OTHER
To bypass this prompt, simply press the green key.
#########
NOT FOUND
Pre-Auths stored in the terminal's memory.)
YES NO
TO CONTINUE
Merchant prompt
ENTER EXPIRY
REGULAR
MAIL/TEL
SINGLE
RECURRING
INSTALLMENT
ENTER INVOICE NO
APPROVED
FIND ORIGINAL
TRANSACTION?
YES NO
Merchant action
Key in the card's expiry date (MMYY), and press the green key.
If cardholder is present: Press the green key to select REGULAR.
If cardholder is not present, scroll to MAIL/TEL, and press the green
key.
Scroll to the option that best describes the transaction, and press the green
key.
Key in an alpha/numeric identifier, and press the green key;
or
Press the green key, and process any receipts that print (see page 46).
To process next Advice: Press the key (YES).
To return to READY screen: Press the key (NO), then press the red
key.
TRANSACTION
USE LOYALTY INFO
FROM PRE-AUTH?
Press the green key to return to the READY screen. (There are no other
Refer to the Moneris iWL255 Loyalty Programs Reference Guide.
Customer prompts
This table lists in order of appearance the prompts (and the actions to take for each) that your customer might
see on the terminal during a transaction when tip entry is disabled. For a Purchase with tip entry enabled, refer
to page 43.
Note: Only some of the prompts listed below will appear for any one transaction.
Customer prompt
CUSTOMER
PRESS OK
SELECT LANGUAGE
ENGLISH FRANCAIS
Customer action
Presses the green key.
For English prompts: Presses the key (ENGLISH).
For French prompts: Presses the key (FRANCAIS).
Moneris® iWL255 Reference Guide 40
Page 42

YES NO
-OK?
$AA $BB $CC
$#.##-OK?
key.
RETURN TO CLERK
Returns the terminal to you (see RETURN TO CLERK prompt on page 37).
########
PRESS OK
transaction if the pre-paid card allows this.
APPROVED ######## prompt on page 37).
Customer prompt
SELECT
<Application name>
<Application name>
CASH BACK?
YES NO
SELECT CASH BACK
SELECT CASH BACK
$AA $BB OTHER
PURCHASE
SELECT ACCOUNT
CHEQUING SAVINGS
Customer action
To select the displayed application: Presses the key (YES).
To view the next available application: Presses the key (NO).
Presses the key (YES) to use the displayed application.
To receive cash back: Presses the key (YES).
For no cash back: Presses the key (NO).
Presses the ($AA) or ($BB) or ($CC) key to select a displayed
amount.
To select a displayed amount: Presses the key ($AA) or the key
($BB).
To select another amount: Presses the key (OTHER), keys in
amount, then presses the green key.
Presses the green key to confirm the displayed amount.
For chequing: Presses the key (CHEQUING).
For savings: Presses the key (SAVINGS).
ENTER PIN & OK
APPROVED
PARTIAL APPROVED
Keys in their Personal Identification Number and presses the green
Returns the terminal to you (see APPROVED ######## prompt on page 37).
To confirm the transaction: Presses the key (OK).
$000.00
CANCEL OK
To cancel the partial approval on their pre-paid card: Presses the
key (CANCEL).
AMOUNT DUE
$000.00
CARD BALANCE
$000.00
Presses the green key to confirm the amount due on a partial approval
purchase.
Presses the green key to acknowledge the card balance.
Note: The remaining balance is displayed during a Partial Approval
PRESS OK
REMOVE CARD Removes their card from chip reader and returns the terminal to you (see
Moneris® iWL255 Reference Guide 41
Page 43

CLERK ID
To bypass this prompt, simply press the green key.
TO CONTINUE
4 DIGITS
key.
DATE [MMYY]
OTHER
AND PRESS OK
RETURN TO CLERK
Press the green key on the terminal to continue.
########
Prompts with tip entry
When tip entry is enabled on the terminal, the order of prompts is revised to display customer prompts,
including tip entry, in a more efficient way for the customer. Follow the tables below when performing a
purchase transaction with tipping enabled. For Purchase with tipping disabled, see page 36 for merchant
prompts and page 40 for customer prompts.
Merchant prompts: Purchase with tip enabled
This table lists in order of appearance the prompts (and the actions to take for each) that you might see on the
terminal during a Purchase with tip entry enabled.
Note: Only some of the prompts listed below will appear for any one transaction.
Merchant prompt
ENTER
ENTER INVOICE NO
CUSTOMER
PRESS OK
ENTER LAST
ENTER EXPIRY
REGULAR
MAIL/TEL
SINGLE
RECURRING
INSTALLMENT
Merchant action
Key in your Clerk ID, and press the green key.
Key in an alpha/numeric identifier, and press the green key;
or
Pass the terminal to the cardholder (see Customer prompts on terminal on
page 43).
Key in the last four digits of the card number, and press the green
Key in the card's expiry date (MMYY), and press the green key.
If cardholder is present: Press the green key to select REGULAR.
If cardholder is not present: Scroll to MAIL/TEL, and press the green
key.
Scroll to the option that best describes the transaction, and press the
green key.
TAKE MANUAL
IMPRINT OF CARD
APPROVED
Moneris® iWL255 Reference Guide 42
Take a manual imprint of the card, and press the green key.
Press the green key, and process any receipt that prints (see page 46).
Page 44

PRESS OK
YES NO
To change the language to French, presses the key (FRANCAIS).
$#.##-OK?
% $
AA%
$0.00
Merchant prompt
PARTIAL APPROVED
$000.00
AMOUNT DUE
$00.00
CR/DB CASH
UPDATE POINTS
TO LOYALTY CARD?
Merchant action
Press the green key on the terminal to continue.
If cardholder would like to pay the balance due:
by credit or debit, press the key (CR/DB).
by cash, press the key (CASH).
Refer to the Moneris iWL255 Loyalty Programs Reference Guide.
Customer prompts on the terminal: Purchase with tip entry enabled
This table lists in order of appearance the prompts (and the actions to take for each) that your customers might
see on the terminal during a Purchase when tipping is enabled.
Note: Only some of the prompts listed below will appear for any one transaction.
Customer prompt
CUSTOMER
PRESS OK
TO CONTINUE
Customer action
Presses the green key.
OR
PURCHASE
ADD TIP?
YES NO
ENTER TIP OR
PRESS OK
AA% OTHER
ENTER TIP OR
PRESS OK
PERCENT AMOUNT
ENTER TIP
PERCENTAGE
ENTER TIP AMOUNT
Presses the green key to confirm the displayed amount.
To proceed with entering a tip, presses the key (YES).
To bypass tipping, presses the key (NO).
To enter preset %: Presses the key (AA%).
To enter different Tip amount: Presses the key (OTHER).
To bypass entering Tip: Presses the green key.
To enter Tip: Presses the key (%) or the key ($).
To bypass entering Tip: Presses the green key.
Keys in a percentage (or nothing at all), then presses the green key.
Keys in a dollar amount (or nothing at all), then presses the green key.
Moneris® iWL255 Reference Guide 43
Page 45

$#.##-OK?
INSERER CARTE
PRESENTER CARTE
YES NO
-OK?
$AA $BB $CC
amount.
$#.##-OK?
key.
Customer prompt
SELECT TIP
1 - AA%=$0.00
2 - BB% = $0.00
3 - CC% = $0.00
4 - OTHER
PURCHASE
SWIPE OR INSERT
CARD / GLISSER OU
SWIPE/INSERT/TAP CARD
GLISSER, INSERER, OU
SELECT LANGUAGE
CHOISIR LANGUE
ENGLISH FRANCAIS
SELECT
<Application name>
Customer action
To select the highlighted preset %: Presses the green key.
To select a different pre-set %: Scrolls to the desired % and presses
the green key.
To enter a different amount: Scrolls to OTHER and presses the green
key.
Presses the green key to confirm the displayed amount.
Swipes or inserts the card.
Swipes, inserts, or taps the card. Customer may also tap their mobile
device (e.g. smartphone) or other mobile format.
For English prompts: Presses the key (ENGLISH).
For French prompts: Presses the key (FRANCAIS).
To select the displayed application: Presses the key (YES).
To view the next available application: Presses the key (NO).
<Application name>
CASH BACK?
YES NO
SELECT CASH BACK
SELECT CASH BACK
$AA $BB OTHER
PURCHASE
SELECT ACCOUNT
CHEQUING SAVINGS
ENTER PIN & OK
Presses the key (YES) to use the displayed application.
To receive cash back: Presses the key (YES).
For no cash back: Presses the key (NO).
Presses the ($AA) or ($BB) or ($CC) key to select a displayed
To select a displayed amount: Presses the key ($AA) or the key
($BB).
To select another amount: Presses the key (OTHER), keys in
amount, then presses the green key.
Presses the green key to confirm the displayed amount.
For chequing: Presses the key (CHEQUING).
For savings: Presses the key (SAVINGS).
Keys in their Personal Identification Number and presses the green
Moneris® iWL255 Reference Guide 44
Page 46

RETURN TO CLERK
Returns the terminal to you (see RETURN TO CLERK prompt on page 42).
########
42).
PRESS OK
APPROVED ######## prompt on page 42 ).
Customer prompt
APPROVED
PARTIAL APPROVED
$000.00
CANCEL OK
AMOUNT DUE
$000.00
CARD BALANCE
$000.00
PRESS OK
REMOVE CARD Removes their card from chip reader and returns the terminal to you (see
Customer action
Returns the terminal to you (see APPROVED ######## prompt on page
To confirm the transaction: Presses the key (OK).
To cancel the partial approval on their pre-paid card: Presses the
key (CANCEL).
Presses the green key to confirm the amount due on a partial
approval purchase.
Presses the green key to acknowledge the card balance.
Note: The remaining balance is displayed during a Partial Approval
transaction if the pre-paid card allows this.
Moneris® iWL255 Reference Guide 45
Page 47

Receipts
Signing credit card receipts
Merchant copy
Always retain this copy for your records, but note:
If a signature line is printed, obtain the cardholder’s signature.
You do not need to obtain a signature if any of the following messages are printed:
• VERIFIED BY PIN
• NO SIGNATURE REQUIRED
Cardholder copy
Give this copy to the customer, but note:
If a merchant signature line is printed, sign this copy.
Reprinting receipts
Reprint last customer receipt or last report [29]
Prints a duplicate of the last printout.
1. Press the Admin key, select ADMIN, and select REPRINT.
The receipt or report prints.
Reprint merchant receipt
See Reprint merchant receipt on page 49.
Card masking
To reduce the risk of fraudulent card use, masking and truncation are applied to card numbers printed on
receipts. Masking replaces a card’s numbers with asterisks (e.g., ************1234).
Truncation prints only the last 4 digits of a card (e.g., 1234). The expiry date is not printed on any copy of any
receipt.
Moneris® iWL255 Reference Guide 46
Page 48

Contactless transactions
Receipts can be suppressed for tapped credit transactions that do not require cardholder verification. Refer to
printer configuration in the Moneris iWL255 Long-Range Mobile Operating Manual in WebHelp format located
at moneris.com/support-iWL255.
Receipts are always printed for Interac Flash transactions.
Receipts
These sample receipts will help you to locate the sequence number (for Advices) or the authorization number
(for refunds and voids).
Pre-Auth receipt
Original receipt
Moneris® iWL255 Reference Guide 47
Page 49

Partial Approval receipt
Moneris® iWL255 Reference Guide 48
Page 50

Reports
Masking on reports
To reduce the risk of fraudulent card use, masking and/or truncation is applied to card numbers printed on
reports. The expiry date is not printed.
Reprint merchant receipt [66]
Prints a duplicate of the Merchant Copy receipt.
1. Press the Admin key, select REPORTS, and select TRANS INQUIRY.
If SWIPE ADMIN CARD appears, swipe your POS Admin card.
If ENTER CLERK ID appears, key in your Clerk ID, and press the green key.
2. Identify the transaction (follow the prompts).
When PRINT OR DISPLAY? appears, press the key (DISPLAY), scroll to the transaction, and press the
green key. Then press the key (REPRINT).
Clerk subtotals report [82]
Prints transactions by Clerk ID for one, a group, or all clerks. Transactions are grouped by type and itemized
under card type. Grand total amount(s) also appear for each Clerk ID.
Note: Clerk Subtotalling must be enabled.
1. Press the Admin key, select REPORTS, and select CLERK INQUIRY.
If SWIPE ADMIN CARD appears, swipe your POS Admin card.
2. Select the number of clerks to include:
For one clerk, press the key (SINGLE). When ENTER CLERK ID appears, key in a Clerk ID, and press the
green key.
For a specific group of clerks, press the key (MULTIPLE), then select GROUP. When ENTER GROUP ID
TO BE PROCESSED appears, key in the Group ID and press the green key, then select PROCESS LIST.
For all clerks, press the key (MULTIPLE) then select ALL CLERKS.
The report prints, and the READY screen appears.
Moneris® iWL255 Reference Guide 49
Page 51

Current batch totals report [99]
Prints a report listing transactions by card type for the current batch (terminal) without closing the batch. Grand
totals by transaction type are also included in the report.
1. Press the Admin key, select REPORTS, then select CLOSE BATCH.
If SWIPE ADMIN CARD appears, swipe your POS Admin card.
If ENTER CLERK ID appears, key in your Clerk ID, and press the green key.
CLOSE BATCH appears, and then the report prints.
2. When CLOSE BATCH? appears, press the key (NO) to finish printing without closing the batch.
The report prints, and the READY screen appears.
Merchant sub-totals report [95]
Prints a list of transaction type totals by card type for the current batch from the Moneris host. Grand totals by
transaction type are also included.
1. Press the Admin key, select REPORTS, and select MERCH SUBTOTAL.
If SWIPE ADMIN CARD appears, swipe your POS Admin card.
If ENTER CLERK ID appears, key in your Clerk ID, and press the green key.
The report prints, and the READY screen appears.
Pre-auth list [62]
Prints a list of Pre-Auths and identifies open Pre-Auths that need to be completed or cancelled.
1. Press the Admin key, select REPORTS, then select PRE-AUTH LIST.
2. When SWIPE ADMIN CARD appears, swipe your POS Admin card, or press the green key to continue.
If ENTER CLERK ID appears, key in your Clerk ID, and press the green key.
3. Select OPEN or CLOSED (for completed or cancelled Pre-Auths) or BOTH (for both types).
PRINT DATE OR BATCH? appears.
4. To print the report by date, press the key (DATE). To print the report by batch, press the key
(BATCH).
5. To print the current date or batch, press the
or batch number, and press the
The report prints, and the READY screen appears.
green key.
green key. To select a specific date or batch, key in a date
Moneris® iWL255 Reference Guide 50
Page 52

Balance inquiry report [94]
Prints the number of balance inquiries by card type for the current batch. A grand total of inquiries is displayed
at the bottom of the report.
1. Press the Admin key, select REPORTS, and select BAL INQ REPORT.
2. When SWIPE ADMIN CARD appears, swipe your POS Admin card.
The report prints and the READY screen appears.
Configuration report [16]
This report lists terminal parameters and values.
1. From the READY screen, press the Admin key twice, key in 16, and press the green key.
2. When PRINT TRAILER MESSAGES? appears, press the key (NO).
The report prints.
Tip totals report [96]
Prints a summary of Tip amounts entered on the terminal for transactions in a specified batch or a specified date
range.
Note: If Clerk Subtotalling is enabled, Tip amounts are summarized by Clerk ID.
1. Press the Admin key, select REPORTS, then select TIP TOTALS.
If SWIPE ADMIN CARD appears, swipe your POS Admin card.
If ENTER CLERK ID appears:
to print the Tip total for a specific clerk, key in a Clerk ID;
to print Tip totals for all clerks, press the green key.
The PRINT DATE OR BATCH? prompt appears.
2. For totals by date, press the key (DATE); for totals by batch, press the key (BATCH).
If DATE is selected:
a. When START DATE appears, key in the start date (YYMMDD), and press the green key.
b. When START TIME appears, key in the start time (HHMM, 24-hour clock), and press the green
key.
c. When END DATE appears, key in the end date (YYMMDD), and press the green key.
d. When END TIME appears, key in the end time (HHMM, 24-hour clock), and press the green key.
If BATCH is selected, key in the batch number, and press the green key.
The report prints, and the READY screen appears.
Moneris® iWL255 Reference Guide 51
Page 53

Admin functions
Logon [02]
If PLEASE LOGON appears, you are required to log on.
1. Press the Admin key, select ADMIN, then select LOGON.
If SWIPE ADMIN CARD appears, swipe your POS Admin card.
The READY screen appears within 60 seconds.
Logoff [03]
To ensure unauthorized transactions cannot be processed, log off your terminal at the end of each business day.
1. Press the Admin key, select ADMIN, then select LOGOFF.
The PLEASE LOGON prompt appears within 60 seconds.
Re-initialization [01]
Moneris Customer Care may ask you to re-initialize your terminal if changes have been made to it or your
merchant account.
1. Press the Admin key, select CONFIGURATION, then select INITIALIZATION.
If SWIPE ADMIN CARD appears, swipe your POS Admin card.
If RETAIN CURRENT MERCH SETTINGS? appears, press the key (YES) to keep all parameters set as
they are.
If MERCHANT ID appears, simply press the green key.
If PHONE NUMBER appears, simply press the green key.
2. Wait while the terminal communicates with the Moneris host.
If SWIPE ADMIN CARD appears, swipe your POS Admin card to log on.
3. When the READY screen appears on the terminal, it is ready to process transactions.
Moneris® iWL255 Reference Guide 52
Page 54

End-of-day process
Merchant close
If your merchant account is set up for Merchant Close settlement, you must process a Batch Close transaction in
order to have the funds from your POS transactions deposited to your business account. Here’s how:
Step 1: Print a stored transactions report [60]
1. Press the Admin key, select REPORTS, and select TRANS LIST.
2. When SWIPE ADMIN CARD appears, swipe your POS Admin card, or press the green key to continue.
If ENTER CLERK ID appears, key in a Clerk ID and press the green key to print totals for that Clerk ID,
or simply press the green key to print totals for all Clerk IDs.
The PRINT DATE OR BATCH? prompt appears.
3. Press the key (BATCH) to print the report by Batch.
4. Press the green key to print the report for the current batch.
The PRINT TOTALS ONLY? prompt appears.
5. Press the key (YES) to print only the Terminal Batch Totals (including the Cashback total).
The report prints, and the READY screen appears.
Step 2: Process a close batch transaction [99]
1. Press the Admin key, select REPORTS, and select CLOSE BATCH.
If SWIPE ADMIN CARD appears, swipe your POS Admin card.
If ENTER CLERK ID appears, key in your Clerk ID, and press the green key.
CLOSE BATCH appears, and then the report prints.
2. When CLOSE BATCH? appears, press the key (YES) to close the batch and have funds deposited to your
account.
The terminal finishes printing the report and returns to the READY screen.
Step 3: Confirmation
Confirm that the totals on the Stored Transactions report (printed in step 1) match the totals on the Batch Totals
report (printed in step 2). If they do not match, call Moneris Customer Care toll-free at 1-866-319-7450 the next
business day for reconciliation assistance.
Moneris® iWL255 Reference Guide 53
Page 55

System close
If your merchant account is set up for System Close settlement, Moneris automatically closes your batch for you
at the end of each day. You must verify transaction totals on a daily basis. Here’s how:
Step 1: Print a stored transactions report [60]
See page 53.
Step 2: Print a merchant subtotals report [95]
See page 50.
Note: The Merchant Subtotals report must be printed before 11:00 p.m. local time.
Step 3: Confirmation
Confirm that the totals on the stored transactions report (printed in step 1) match the totals on the merchant
subtotals report (printed in step 2). If they do not match, call Moneris Customer Care toll-free at 1-866-319-7450
within 30 days for reconciliation assistance.
Moneris® iWL255 Reference Guide 54
Page 56

Message
Solution
Press the green key and retry the transaction.
account that has been rendered inactive by the authorized carrier.
Ask for another form of payment.
PLEASE RETRY
Troubleshooting
If an error message appears, first press the green key or the red key to clear the message then retry the
transaction. If the error message reappears and is listed in the table below, follow the instructions in the table. If
the problem is still not resolved, call Moneris Customer Care toll-free at 1-866-319-7450.
Error messages
3G FAILED
CONNECTION
TIMEOUT
3G FAILED
NO SIM
3G FAILED
UNKNOWN ERROR
CARD BLOCKED
REMOVE CARD
CARD NOT
SUPPORTED
CARD PROBLEM Retry the transaction. If the message reappears:
The terminal could not connect to the authorized carrier’s wireless signal
within the allotted time.
The SIM card has been removed or is malfunctioning.
1. Power off the terminal.
2. Re-install the SIM card (see page 15).
3. Power on the terminal.
An unsupported or unauthorized SIM card has been installed, or the
currently installed SIM card is malfunctioning or is registered to an
The chip card cannot be used.
Try swiping the card again.
If this message reappears, request another form of payment.
If credit card was swiped: Key in the card number.
If debit card was swiped: Request another form of payment.
If card was inserted: Swipe the card.
CARD REMOVED The chip card was removed during the transaction.
1. Retrieve the terminal.
2. Press the green key until the READY screen appears.
3. Retry the transaction.
Moneris® iWL255 Reference Guide 55
Page 57

Message
Solution
LIMIT EXCEEDED
INTO READER
Ask for another card and retry.
CHECK PHONE
THEN TAP AGAIN
CHECK PRINTER
CONTACTLESS
TRANSACTION
CUSTOMER —
INSERT CARD
The customer’s mobile device (e.g. smartphone) requires a response. The
customer performs the following actions:
1. Checks their mobile device and responds to any prompts displayed
there, e.g. they may need to enter a passcode on their mobile device.
2. Presses the green key on the terminal or waits for the
SWIPE/INSERT/TAP CARD prompt to re-appear.
3. Taps the mobile device again.
1. Open the printer, and ensure that a paper roll is inside and that it is
properly inserted.
2. Close the printer lid.
3. If required, press and hold down the yellow key to advance the
paper to the desired length.
If the card has a chip, insert it into the chip reader; if the card does not
have a chip, swipe the card.
Insert the chip card into the chip card reader.
DECLINED BY CARD The chip card has declined the transaction.
1. Retrieve the terminal and remove the chip card.
2. Press the green key until the READY screen appears.
3. Request another form of payment.
DECLINED – RETRY
1. Press the key (YES).
TRANSACTION?
2. Retry the transaction.
DO A PURCHASE
WITH CHIP CARD
The chip card cannot be used for a Pre-Auth transaction because the
terminal is not configured to allow this.
1. Retrieve the terminal and remove the chip card.
2. Press the green key until the READY screen appears.
3. Perform a Purchase instead.
ERROR 40# Communication error.
1. Press the green key to return to the READY screen.
2. Retry the transaction.
INVALID CARD
The card that was swiped cannot be used for this transaction.
TYPE
Moneris® iWL255 Reference Guide 56
Page 58

Message
Solution
$1.00 or less (max. total: $3.00).
DOCK TERMINAL
source (via the charge cable) or dock the terminal on a powered base.
Please have the original Purchase receipt available for reference.
REQUIRED
to continue the transaction.
OR SWIPE CARD
INVALID ENTRY In Training mode, ensure the transaction, Cashback, or Tip amount is
LOW BATTERY!!!
NO SUPPORTED
APPLICATIONS
REMOVE CARD
NOT ACCEPTED
REMOVE CARD
NOT COMPLETED
RETURN TO CLERK
REFUND LIMIT
EXCEEDED
REINITIALIZATION
The battery charge is too low. Connect the terminal directly to a power
If card was inserted: Remove card from the chip reader, and swipe it
when prompted.
If card was tapped: If the card has a chip, insert it into the chip reader;
if there is no chip, swipe the card.
1. Remove the chip card from the chip reader.
2. When prompted:
for credit cards: swipe the card on the magnetic stripe reader;
for debit cards: ask for another form of payment.
1. Press the red key to display the communications error.
2. When the READY screen appears, retry the transaction again.
The total value of Refunds performed today is greater than your daily
Refund Limit.
Contact Moneris for a temporary increase in your daily Refund Limit.
Re-Initialize the terminal. See page 52.
SWIPE ADMIN CARD You have manually entered a card number and expiry date while Manual
Card Entry with Admin protection is enabled. Swipe your POS Admin card
TAP FAILED
PLEASE INSERT
TIME-OUT
or
RETRY TERMINAL
TIME-OUT
If the card has a chip, insert it into the chip reader; if the card does not
have a chip, swipe it.
The customer took too long to respond to the prompts.
1. Retrieve the terminal.
2. Press the red key.
3. When the READY screen appears, try the transaction again.
Moneris® iWL255 Reference Guide 57
Page 59

Message
Solution
NOT FOUND
three seconds then the terminal returns to the previous prompt.
from the printer as this will damage the printer.
or
required) to process a transaction.
call Moneris Customer Care.
TIP IS NOT
SUPPORTED FOR
MAIL/TEL
TRANSACTION
Do not enter a tip during a Mail Order/Telephone Order (MOTO)
transaction.
1. Press the green key (or wait for the terminal) to return to the
purchase amount confirmation screen.
2. Respond to the prompts but, this time, do not enter a tip when the tip
prompt appears. Simply leave it blank and press the green key to
continue.
The terminal cannot find a matching transaction. This message appears for
Equipment issues
Issue Solution
You need to advance receipt
paper from the printer.
The battery isn’t charging. If the battery is not fully charged, do one of the following:
While the terminal is powered on, press and hold down the yellow
key until the paper advances to the desired length.
Note: If the lid is closed, DO NOT attempt to manually pull the paper
Direct-to-Terminal Charge Cable: Ensure that the cable is connected
securely to the terminal and plugged into a working power outlet.
One of these battery icons
appears:
The icon's "3G" text is
coloured grey. The handset icon
is also grey and appears to "hang
up" like this: .
The display screen is blank.
Charge Base: Ensure the terminal is securely docked on a powered
base (the base's power cable must be connected to a working power
outlet).
The battery needs to be recharged.
The terminal has been disconnected from the wireless network (this may
happen occasionally).
You may continue to perform transactions as normal. The terminal will
reconnect when it attempts to communicate with the Moneris host (if
The terminal is powered off. Press the green key. If power is not
restored, connect the terminal to a power source. If this does not work,
Moneris® iWL255 Reference Guide 58
Page 60

FAILED
unrolls over the printer. See page 8 for instructions.
Issue Solution
HOST CONNECTION
The receipt paper is coming out
of the printer but nothing is
printed on it.
The paper well won't close. The printer paper roller may have popped out of place.
Call Moneris Customer Care.
The paper roll is incorrectly installed in the paper well.
Ensure that when the paper unrolls, it unrolls towards the top of the
terminal over the printer.
If the paper unrolls over the display screen, remove the paper roll from
the paper well and place the roll back inside the well so that the paper
Press gently but firmly on the loose end of the printer roller to pop it back
into place. Then close the printer lid.
Moneris® iWL255 Reference Guide 59
Page 61

At Moneris, help is always here for you 24/7.
support
Merchant support
Merchant
Moneris® iWL255 Reference Guide 60
Page 62

If you need assistance with your payment processing
solution, we’re here to help, 24/7.
We’re only one click away.
Visit moneris.com/support-iWL255 to:
watch the iWL255 Setup and Installation video
download additional copies of this guide and other resources
consult the Moneris iWL255 WebHelp for detailed information on all of the options available on your
terminal and how to enable them
Visit shop.moneris.com to purchase point-of-sale supplies and receipt paper
Visit moneris.com/insights for business and payment news, trends, customer success stories, and quarterly
reports & insights
Need us on-site? We’ll be there.
One call and a knowledgeable technician can be on the way. Count on minimal disruptions to your business as
our Field Services provide assistance with your payment terminals.
Can’t find what you are looking for?
Call Moneris Customer Care (available 24/7) toll-free at 1-866-319-7450. We’ll be happy to help.
You can also send us a secure message 24/7 by logging in to Merchant Direct® at
moneris.com/mymerchantdirect.
Moneris® iWL255 Reference Guide 61
Page 63

MONERIS, MONERIS BE PAYMENT READY & Design and MERCHANT DIRECT are registered trade-marks of Moneris Solutions Corporation. VISA is a
trademark owned by Visa International Service Association and used under license. Mastercard is a registered trademark, and the circles design is a
trademark of Mastercard International Incorporated. INTERAC is a registered trade-mark of Interac Inc. DISCOVER is a registered trade-mark of Discover
Financial Services. AMERICAN EXPRESS is a registered trade-mark of American Express Company. All other marks or registered trade-marks are the
property of their respective owners.
© 2018 Moneris Solutions Corporation, 3300 Bloor Street West, Toronto, Ontario, M8X 2X2. All Rights Reserved. This document shall not wholly or in part,
in any form or by any means, electronic, mechanical, including photocopying, be reproduced or transmitted without the authorized consent of Moneris
Solutions Corporation. This document is for informational purposes only. Neither Moneris Solutions Corporation nor any of its affiliates shall be liable for
any direct, indirect, incidental, consequential or punitive damages arising out of use of any of the information contained in this document. Neither Moneris
Solutions Corporation or any of its affiliates nor any of our or their respective licensors, licensees, service providers or suppliers warrant or make any
representation regarding the use or the results of the use of the information, content and materials contained in this document in terms of their
correctness, accuracy, reliability or otherwise.
Your gift card processing is governed by your agreement for gift card services with Moneris Solutions Corporation. Your loyalty card processing is
governed by your agreement for loyalty card services with Moneris Solutions Corporation. Your credit and/or debit card processing is governed by the
terms and conditions of your agreement(s) for merchant credit/debit card processing services with Moneris Solutions Corporation. It is your responsibility
to ensure that proper card processing procedures are followed at all times. Please refer to the Moneris Merchant Operating Manual (available at:
moneris.com/support) and the terms and conditions of your applicable agreement(s) for credit/debit processing or other services with Moneris Solutions
Corporation for details.
iWL255 Ref-EN (08/18)
 Loading...