

Page 1

Setting
up Your
Terminal
Moneris® iWL220
®
2
(02/12)
Page 2

1
IMPORTANT: READ FIRST
If this is your first POS terminal with Moneris:
Enclosed you should find your Moneris Visa Merchant
Agreement/Moneris MasterCard Merchant Agreement/
Moneris Debit Card and Terminal Agreement/Terms
and Conditions. If this document is not enclosed,
please do not proceed with this installation. Instead,
contact us at 1-866-319-7450. Once you have obtained
the required document, please proceed with your
installation.
Before you get started
1. Please confirm that you received:
• The Moneris iWL220 terminal and base.
• The power cable.
• The dial and/or Ethernet cables.
• The white POS Admin card.
2. If your terminal will be communicating with the Moneris host
over High-Speed Ethernet, please review the Moneris IP Readiness
Checklist (available at moneris.com/checklist) and ensure that
your Ethernet service is ready to support your terminal.
3. Make sure you have the following information (provided when
Moneris contacted you to confirm your terminal order):
• Your 13-digit Moneris Merchant ID. If you currently have a
9-digit merchant number beginning with a 1, 2 or 4, simply
add 0030 to the beginning (i.e., 123456789 becomes
0030123456789).
• Settlement type: System Close (Moneris automatically settles
your transactions at the end of each day) or Merchant Close
(you are responsible for settlement/close batch at the end
of each day).
• Communications type: Dial or IP/Ethernet (with or without
dial backup).
• Optional features (e.g. gift cards, loyalty cards, Ernex Terminal ID).
Page 3

2
If any of the above required elements are missing, please call the
General Inquiries number below:
General Inquiries: 1-866-319-7450
4. Depending on your requirements, begin setting up the iWL220
base as follows:
• If you want the base to function as a communications base,
begin at step 1 of Hardware setup (on page 3).
• If you want the base to function only as a charge base, begin
at step 3 of Hardware setup (on page 4).
Tips for moving through the menus
• Press the key to say “yes” to any questions and to scroll
down.
• Press the key to say “no” and to scroll up.
• Press the key to select a menu item or finish entering
information and move on to the next step.
Page 4
Hardware setup
3
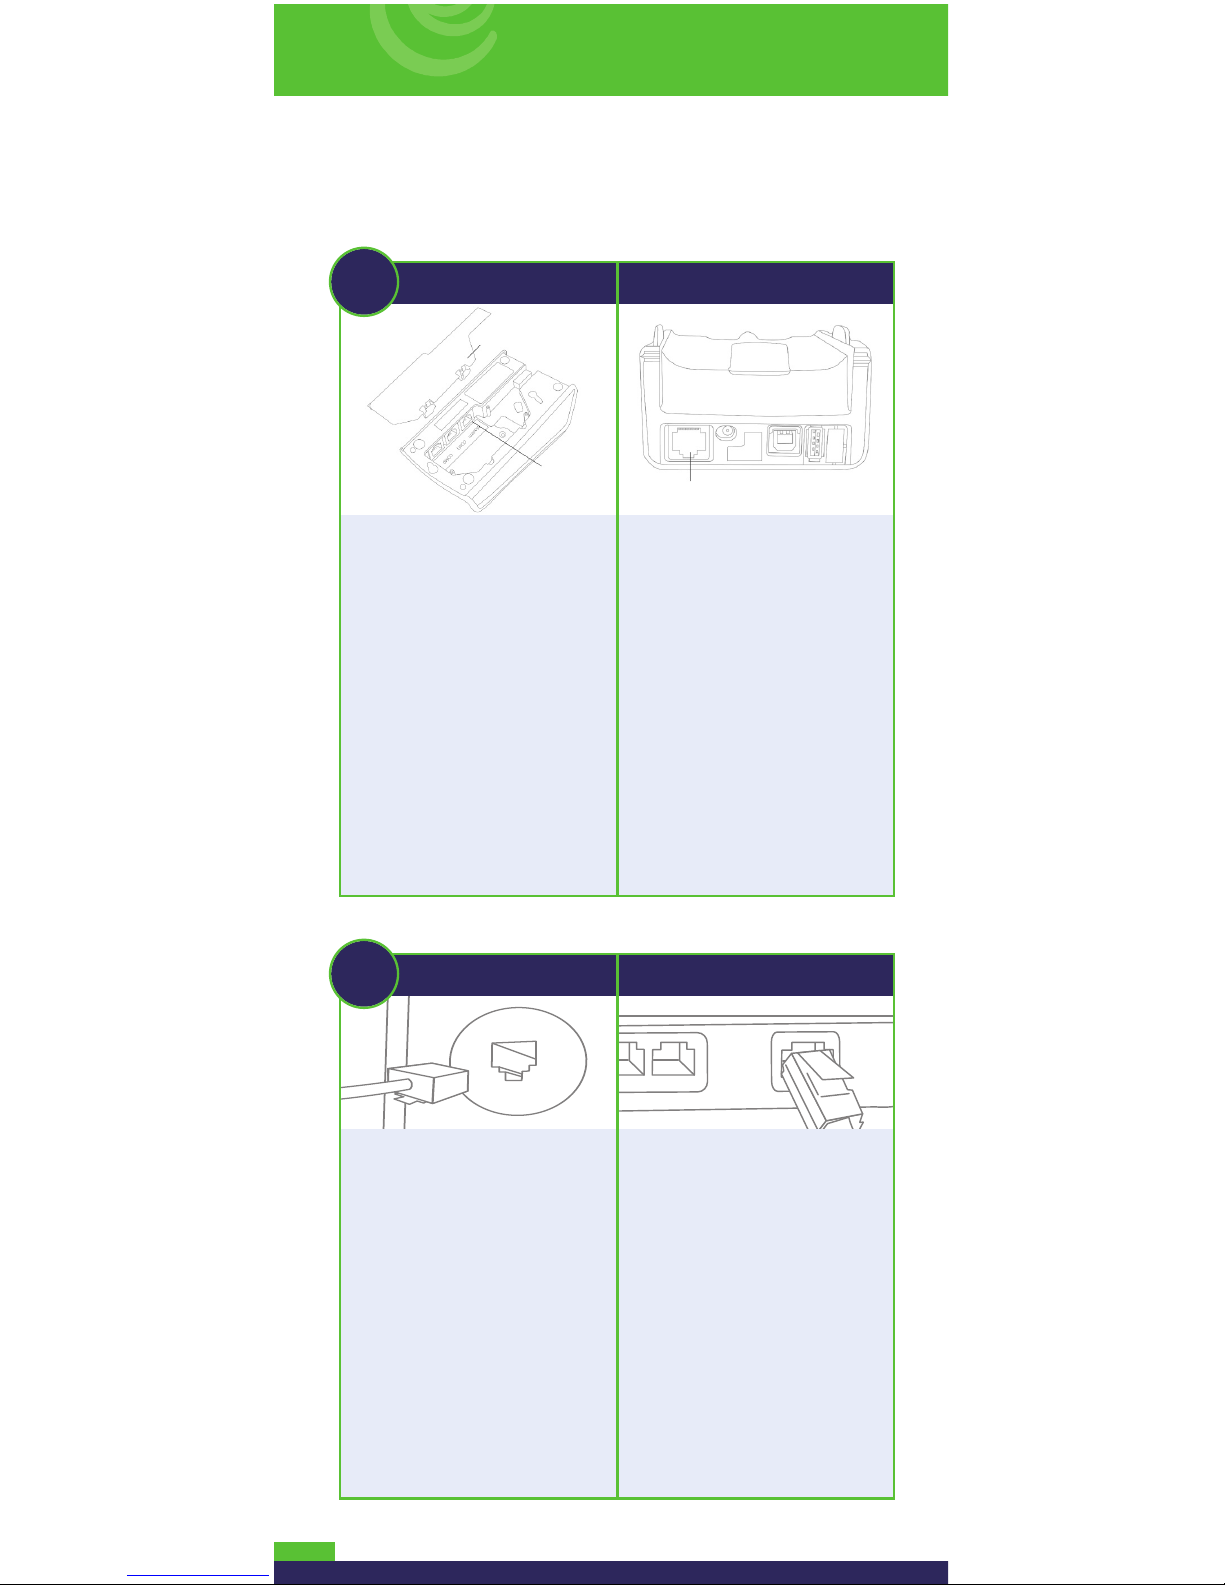
1
Dial Setup High-Speed Ethernet Setup
a. Open the back panel
on the underside of the
base so that the port
compartment is visible.
b. Plug one end of the phone
cable into the MODEM
port located in the
compartment.
c. Flatten the cable in the
compartment space so
that the back panel can
be snapped back into
place.
d. Close the back panel.
Plug one end of the Ethernet
cable into base port shown
here.
2
Dial Setup High-Speed Ethernet Setup
Plug the other end of the dial
cable into an analog phone
jack.
Recommendation: Use a
dedicated phone line for the
terminal. Sharing the line
with another device (e.g. a fax
machine) can cause
communication problems.
If using a splitter, test both
devices and note that the
terminal and other device
cannot use the phone line
together.
Plug the other end of the
Ethernet cable into the router/
switch/hub/internal wiring –
whatever is applicable to the
high-speed Internet service
at your location. (If necessary,
please refer to the Moneris IP
Readiness Checklist available
at moneris.com/checklist.)
Recommendation: Set up also
for dial, which will be used
as backup for IP (follow steps 1
and 2 of the Dial Setup
instructions).
BACK PANEL
DIAL PORT
(MODEM)
ETHERNET PORT
Page 5

4
3
Locate the power cable
(which may be in a white
box), and plug this end of
the power cable into the
small circular base port
shown here.
6
Place the terminal on the
base so that the contacts
slot at the bottom of the
terminal fits securely over
the leads prong on the base.
The terminal will power on.
(The cycle should take
approximately 30 seconds.)
4
Plug the other end of the power cable into a power source.
Recommendations: Always plug the power cable into the
power source last to avoid power surges. Use a power bar
equipped with surge protection where possible. Do not
use the power cable from your existing terminal, as it
may damage your new terminal.
IMPORTANT: You must use the exact power adaptor and
cables provided by Moneris Solutions to work with the
Moneris iWL220 terminal and base. Failure to do so may
affect the operability of, or cause damage to, the equipment.
5
Remove the red tab from the bottom of the terminal to
expose the gold-coloured contacts in the slot.
7
Wait while the terminal powers up. When the screen
says “TERMINAL SETUP REQUIRED” and displays the
and icons, proceed to Register the terminal to
a base on page 5.
POWER PORT
TERMINAL
LEADS PRONG
BASE
Page 6

5
Register the terminal
to a base
Register the terminal to the iWL220 communications base through
which it will communicate with the Moneris Host.
Note: You may register the terminal to the base that you received
with the terminal, or you may register the terminal to a different
iWL220 base if that base is functioning as a communications base.
• If using IP communications: max. five (5) terminals registered
to one (1) base.
• If your terminal will be connected to a restaurant POS system:
max. five (5) terminals registered to one (1) base.
• Every terminal must be registered individually.
• A terminal can only be registered to one communications base at
a time. (To use a different base, register the terminal to that base.)
1. Record the eight-digit Base ID: Look on bottom of the
communications base to which the terminal is to be registered.
The Base ID (8-digit number) is printed on a sticker and appears
as “ID: 12345678”.
2. Place the terminal on the communications base. (Do not
remove the terminal until it has been successfully registered
to the base.)
3. Press the key twice, key in 17 and press the key.
4. Press the key to select REGISTER BASE.
5. Key in the Base ID you recorded in step 1, and press the key.
6. Press the key three times to display the TERMINAL SETUP
REQUIRED screen.
Note: When the icon displays on the screen (in 10-15 seconds), it
means that the terminal has successfully established a link to the
communications base.
7. Proceed to Communications setup in this guide on page 6.
Page 7

6
Communications setup
If you’re using dial as backup for IP or dial only:
If you need to dial a prefix (e.g. 9) to connect to an outside line:
1. Press the key twice, key in 15 and press the key.
2. Press the key to select PREFIX, then key in the Prefix number
(e.g. 9), and press the key.
3. Press the key twice.
4. When the screen says “TERMINAL SETUP REQUIRED,” set up your
IP parameters.
5. Depending on your requirements, proceed to If you’re using
Dynamic IP below or If you’re using Static IP on page 7.
If you’re using Dynamic IP:
1. Press the key twice, key in 08 and press the key.
2. Press the keyto select COMMS TYPE.
3. Scroll down to ETHERNET and press the key.
4. Press the key.
5. When the screen says “TCP HOST CONNECTION OK PRESS OK,”
press the key.
Note: If the screen says “TCP CONNECTION FAILED,” make sure the
communication cables are properly plugged in (router/switch/
hub/internal wiring, etc. If you are not sure, please refer to the
Moneris IP Readiness Checklist available at moneris.com/checklist).
When the icon displays on the “TERMINAL SETUP REQUIRED”
screen, press the key twice, key in 13 and press the key.
Repeat steps 4 and 5.
6. When the screen says “TERMINAL SETUP REQUIRED,” proceed
to Initialization and logon in this guide on page 8.
Page 8

7
If you’re using Static IP:
Contact your Internet Service Provider (ISP) to gather the following
information: terminal’s IP address, Mask ID and Gateway address.
1. Press the key twice, key in 08 and press the key.
2. Press the key to select COMMS TYPE.
3. Scroll down to ETHERNET and press the key.
4. Press the key to select TERMINAL SETUP.
5. Press the key to select TERMINAL TYPE.
6. Scroll down to STATIC and press the key.
7. Press the key to return to the ETHERNET SETUP menu.
8. Scroll down to TERMINAL ADDR and press the key, then key
in the terminal’s IP address and press the key. (To key in
a decimal point, press the 0 (zero) key and then the key.)
9. Scroll down to MASK ID and press the key, then key in the
terminal’s Mask ID, and press the key.
10. Scroll down to GATEWAY and press the key, then key in the
Gateway Address and press the key.
11. Press the key twice.
The “REBOOT TERMINAL” message appears, and then the terminal
reboots.
12. When “TERMINAL SETUP REQUIRED” appears, press the key
twice, key in 13 and press the key.
13. Press the key.
14. When the screen says “TCP HOST CONNECTION OK PRESS OK,”
press the key.
Note: If the screen says “TCP CONNECTION FAILED,” make sure the
communication cables are properly plugged in (router/switch/hub/
internal wiring, etc. If you are not sure, please refer to the Moneris IP
Readiness Checklist available at moneris.com/checklist). Wait for
the icon to display on the “TERMINAL SETUP REQUIRED” screen,
and then repeat steps 12 to 14.
15. When the screen says “TERMINAL SETUP REQUIRED,” proceed
to Initialization and logon on page 8.
Page 9

8
Initialization and logon
1. Press the key twice, key in 01 and press the key.
2. When the terminal prompts for your “MERCHANT ID”, key in your
current 13-digit merchant ID and press the key.
3. When the terminal prompts for the initialization “PHONE
NUMBER”, key in the number as follows and press the key.
4. The terminal will now communicate with the Moneris host.
5. Over the next few moments, the screen will display “SENDING,”
“RECEIVING,” and “PROCESSING.”
6. If “CLEAR TERMINAL STORAGE?” appears, press the key to
select YES.
7. When the initialization is successful, the terminal will display
“PLEASE LOGON.”
8. Press the key twice, key in 02 and press the key, then
swipe one of the white POS Admin cards (provided with your
new terminal).
9. Wait while the terminal communicates with the Moneris host
again.
10. When finished, the screen should display “PURCHASE ENTER
AMOUNT.” This will always be your main screen (i.e., the “READY
screen”) when the terminal is ready to be used.
11. Your terminal is ready to process transactions.
12. Before using the terminal, proceed to Charging the battery below.
Charging the battery
1. Place the terminal on the base, and wait for the icon to
display (indicates 100% charge). A minimum of three hours
is required.
2. Note also the following:
• Full charging time after the initial charge is two hours.
• After the first three times the terminal is used, allow the
battery to fully discharge, and then charge it to its full capacity.
3. For information on managing the rechargeable battery, please
refer to the Using Your Terminal guide in this package.
If your merchant number begins with:
00301
00302
00304
Key in:
1-888-699-7299
1-888-358-8602
1-888-332-8433
Page 10

9
Additional options
Enabling the contactless reader
This option is available only if your merchant account is enabled for
contactless transactions.
1. Press the key twice, key in 08 and press the key.
2. Scroll up to CTLS READER and press the key.
3. Scroll to ENABLE, and press the key.
4. Press the key three times to return to the READY screen.
Enabling the Contactless logo on contactless
transaction receipts
Before following this procedure, complete the Enabling the
contactless reader steps above.
1. Press the key twice, key in 08 and press the key.
2. Scroll up to CTLS LOGO and press the key.
3. Scroll to ENABLE and press the key.
4. Press the key three times to return to the READY screen.
Enabling Tip, Cashback, or Invoice Number
1. Press the key twice, key in 08 and press the key.
2. Use the key to scroll down to the option you want to enable
(e.g. TIP ENTRY, CASH BACK or INVOICE NUMBER), and press
the key.
Note: For Tip Entry, you must then select the card type option
(i.e., DEBIT or DEBIT & CREDIT), press thekey, select a tip entry
type (i.e. by dollar amount, percent, or both), and press the key.
3. Enable the option by pressing the key (YES).
4. The screen will return to the GENERAL PARAMETERS menu.
5. Press the key three times to return to the READY screen.
Note: To change the default values for the tip and cashback options,
refer to the iWL220 Operating Manual. Visit moneris.com/iWL220
to download a copy.
Changing printer options
The printer is set up to automatically print the second receipt 10
seconds after it prints the first receipt.
Note: If you don’t want to wait, simply press the key to print the
second receipt immediately.
To change this setting:
1. Press the key twice, key in 14 and press the key.
2. Scroll down to PRINT DELAY, and press the key.
3. Key in the number of seconds that the printer should wait
before automatically printing the second receipt and press
the key.
Note: If you key in 99, the printer will always wait until the key
is pressed before printing the second receipt.
4. Press the key to return to the PRINTER CFG menu.
5. Press the key twice to return to the READY screen.
Note: Shop for point-of-sale supplies and paper online at
shopmoneris.com
Page 11

10
Changing the terminal language
1. Press the key twice, key in 04 and press the key.
2. Scroll to a language and press the key.
3. Press the key twice to return to the READY screen.
Enabling loyalty and gift cards
Didn’t order a loyalty program and gift cards but would like to find
out more? Please call us at 1-866-MONERIS.
1. Press the key once.
2. Scroll down to ERNEX and press the key.
3. Scroll down to SETUP and press the key.
4. Scroll down to ENABLE ERNEX and press the key.
5. Press the key to select YES.
6. Press the key to select INITIALIZATION.
7. Key in the Ernex Terminal ID (provided to you when Moneris
confirmed your terminal order) and press the key.
8. The terminal will communicate with the Moneris/Ernex host.
9. If “CLEAR TERMINAL STORAGE?” appears, press the key to
select YES.
10. Press the key to return to the READY screen.
11. Your terminal is ready to process loyalty card and gift card
transactions.
• For instructions on performing gift card transactions, please
refer to the Moneris iWL220 Using Your Terminal for Gift guide.
• For instructions on performing loyalty card transactions,
please refer to the Moneris iWL220 Using Your Terminal for
Loyalty guide.
Enabling tip entry (gift cards)
1. Press the key twice, key in 310, and press the key.
2. Scroll down to TIP ENTRY and press the key.
3. Press the key to select YES.
4. Press the key to return to the READY screen.
Note: To change the default values for Tip Entry (gift cards), refer
to the iWL220 Operating Manual. Visit moneris.com/iWL220
to download a copy.
Settlement options
For detailed instructions, please refer to the Moneris iWL220 Using
Your Terminal guide included in this package.
Online statements and reports
Check your monthly statement online using Moneris Merchant
Direct. Merchant Direct provides 24/7 access to daily card
transaction data (available by 7 a.m. the next morning and stored
for six months) and monthly consolidated statements (available
by the third day of the next month and stored for up to two years).
For detailed instructions, please refer to the Thank You for Your
Business guide and the Merchant Operating Manual included in
this package.
Page 12

® Moneris and the Moneris Solutions design are registered trademarks of
Moneris Solutions Corporation. All other marks or registered trademarks
are the marks or registered trademarks of their respective owners.
© 2012 Moneris Solutions, 3300 Bloor Street West, Toronto, Ontario, M8X 2X2.
All Rights Reserved. This manual shall not wholly or in part, in any form or by
any means, electronic, mechanical, including photocopying, be reproduced
or transmitted without the authorized consent of Moneris Solutions.
For informational services only. Neither Moneris Solutions Corporation
(“Moneris”) nor any of its affiliates shall be liable for any direct, indirect,
incidental, consequential or punitive damages arising out of use of any
of the information contained in this guide.
Neither Moneris or any of its affiliates nor any of our or their respective
licensors, licensees, service providers or suppliers warrant or make
any representation regarding the use or the results of the use of the
information, content and materials contained in this guide in terms
of their correctness, accuracy, reliability or otherwise.
Your credit and/or debit card processing is separately governed by the
Terms and Conditions of your Moneris VISA Merchant Agreement, your
Moneris MasterCard Merchant Agreement and/or your Moneris Debit
Card and Terminal Agreement (collectively, the “Merchant Agreements”),
as applicable with Moneris. It is the merchant’s responsibility to ensure
that proper card processing procedures are followed at all times. Please
refer to your Merchant manuals and the Terms and Conditions of your
Merchant Agreement(s) for details. The Moneris Merchant Operating Manual
is available for free download at moneris.com/en/Support/Downloads/
MerchantManuals.aspx.
iWL220-SYT-E (02/12)
®
For more information
• On performing transactions and end-of-day settlement
procedures, please refer to the Moneris iWL220 Using Your
Terminal guide in this package.
• On all of the options available on your terminal and how
to enable them, please refer to the Moneris iWL220 Operating
Manual. Visit the Moneris iWL220 product webpage at
moneris.com/iWL220 to download a copy.
 Loading...