

Page 1
Manual
English/Svensk
Monark 827 X
Cardio Care 827 X
Page 2

Page 3

© 2008 MONARK EXERCISE AB, Vansbro, Sweden
Contents 3
Monark Exercise AB 4
Product information 5
Operating instruction 6
Workload device 6
Cycle adjustments 6
Computer specifications 7
Service 10
Warranty 10
Service check 10
Maintenance 10
Connection 11
Brake force spring adjustment 11
Replacement of brake belt 11
Crank bearing 11
Flywheel bearing 11
Brake belt contact surface 12
Freewheel sprocket 12
Chain 1/2“ x 1/8“ 13
Exercising 14
Spare parts 16
Innehållsförteckning 19
Monark Exercise AB 20
Produktinformation 21
Funktionsbeskrivning 22
Belastningsreglering 22
Cykelinställningar 22
Elektronisk mätare 23
Service 26
Garanti 26
Regelbunden servicekontroll 26
Underhåll 26
Anslutning 27
Inställning belastningsfjäder 27
Bromsbandsbyte 27
Bromshjulslagring 27
Vevlager 27
Bromsbana 28
Frigångskrans 28
Kedja 1/2” x 1/8” 29
Träningstips 30
Reservdelslista 32
Contents
Contents
Page 4

Monark Cardio Care 827 X
4
Monark Exercise AB
Monark Exercise AB
Monark has 100 years’ experience of bicycle production. The Monark tradition
has yielded know-how, experience, and a real feel for the product and quality. Since
the early 1900s, Monark’s cycles have been living proof of precision, reliability,
strength and service. That is one of the reasons why we are now the word leader in cycle ergometers and the market leader in Scandinavia in transport cycles.
We manufacture, develop and market ergometers and exercise bikes, transport bikes
and specialised bicycles. Our largest customer groups are within health care, sports
medicine, public authorities, industry and postal services.
For more information: www.monark.net
Page 5

Monark Cardio Care 827 X
5
Product information
Product information
Congratulation to your new Exercise
cycle.
Monark Cardio Care 827 X is designed to be
used for exercise and rehabilitation. This model
has a computer/electronic meter with 12 different
training programs. The exercise cycle provides a
constant workload independant of pedal speed
when training in WATT mode.
Model Cardio Care 827 X is equipped with a
display showing Speed in km/h, Distance in km,
exercise Time in minutes, heart rate in beats per
minute and workload in watts.
NOTE that 827 X is an exercise cycle that can’t
be calibrated. It is not for testing when the display just shows an estimate value.
Features
Large, well-balanced flywheel 22kg (48 lbs)•
Adjustable saddle with quick release lever•
Adjustable handlebar with quick release •
lever
Stable frame, solid steel tube•
Powder painted•
Wheels for easy transport•
Electronic display with training programs•
Handgrip pulse•
Width
500 mm (20”) at handlebar
620 mm (24”) at support tubes
Length
1120 mm (44”)
Height
1260 mm (50”) at the display
800-1120 mm (32-44”) at seat
Weight
49 kg (108 lbs)
For complete directions please read the part
”Computer specifications”.
NOTE!
The use of Cardio Care 927 X can be fysically
strenuous. Always consult a doctor before beginning an exercise program and stop immediatelt if
feeling faint or dizzy.
Page 6
Monark Cardio Care 827 X
6
Operating instruction
Operating instruction
Workload device
Model Cardio Care 827 X has an electronic
workload device which consists of a computer
and servo system in combination with a heavy
flywheel and a brake belt system. Changing the
workload is easily done using the display. Use the
display to choose from a preset training program,
heart rate program for manual mode. For complete instructions on how to use the device please
read chapter, ”Computer spercifications”.
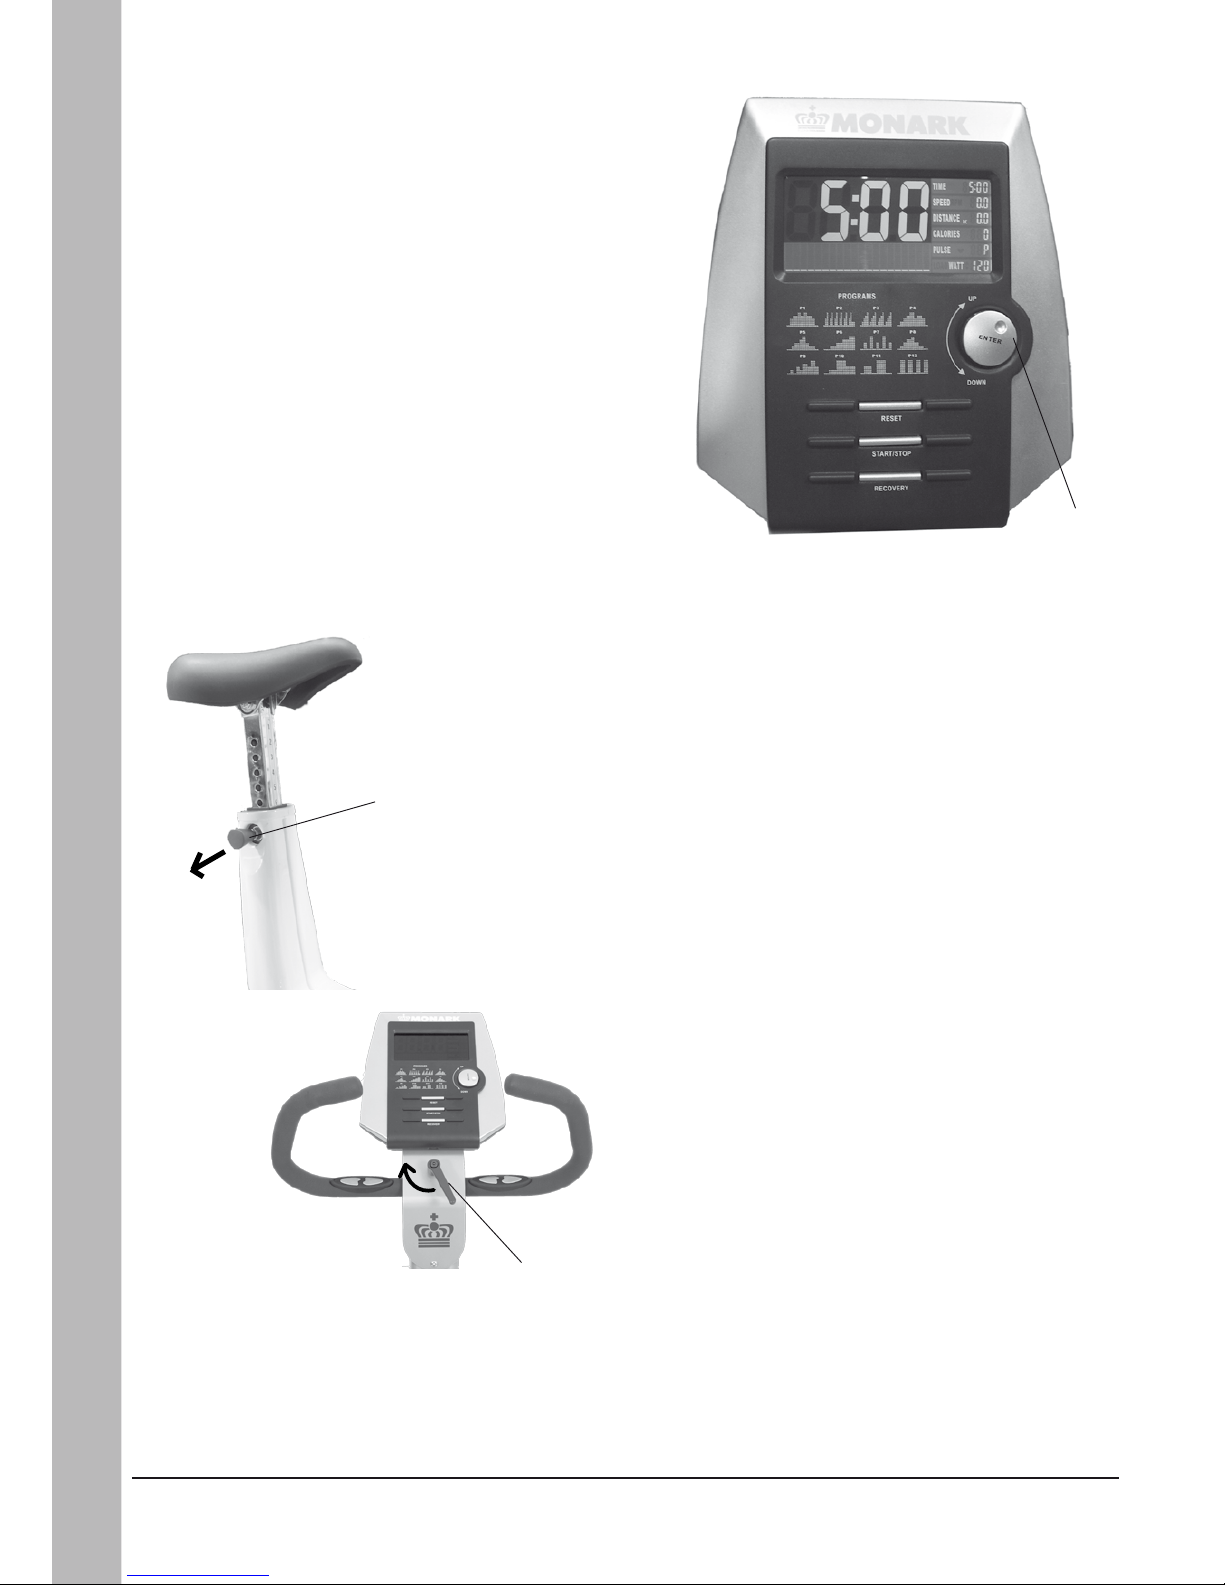
Cycle adjustments
Seat height should be adjusted to a comfortable
position. A suitable height is a slightly bent knee
when the middle of the fot is straight above the
pedal axle with the pedal in its lowest position.
To adjust the seat hight turn the quick release
knob on the seat tube and pull untill the seat post
is loose. See fig: Adjustments.
The handlebar setting shall give a comfortable
position when cycling. During longer exercise
sessions it can be recommended to change handlebar position. To adjust the handlebar loosen
the quick release lever. See fig: Adjustments.
Fig: Adjustments.
1) Quick release bolt
2) Quick release lever
Fig: Display
1) Workload device
1
1
2
Page 7

Monark Cardio Care 827 X
7
Operating instruction
Fig. 1
Fig. 2
Fig. 3
Fig. 4
Fig. 5
Fig. 6
Fig. 7
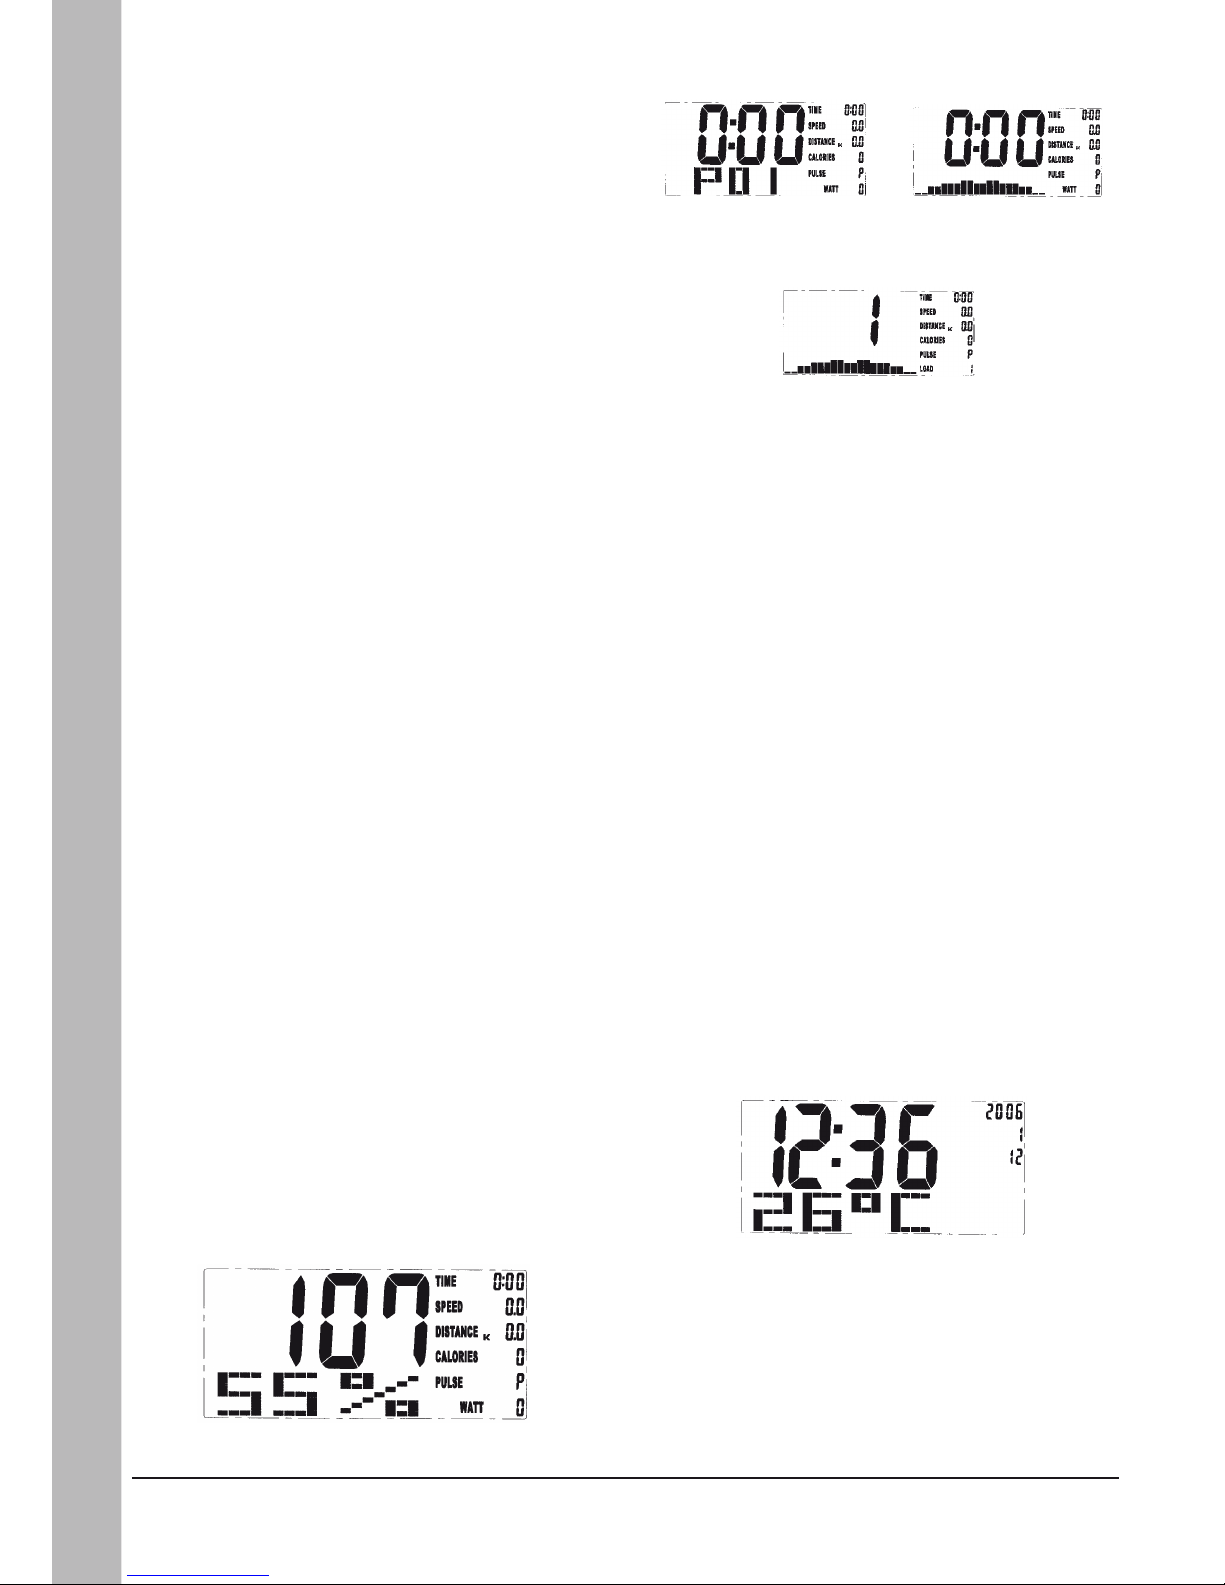
Computer specifications
At power on LCD will display all segments for 2
seconds with a beep sound. Fig. 1.
Adjust up and down to set year, month, day and
clock. Press ENTER after each setting. Fig. 2.
After settings display will enter standby mode.
MAN (manual) is glittering in the sleep mode
(fig. 3). You may turn Up or Down button to
select training mode MANUAL, PROGRAM,
USER PROGRAM, H.R.C. or WATT (fig. 3 - 7)
and press ENTER to confirm. The computer will
enter MANUAL mode for training if no selection
is done.
Training in MANUAL mode
In MANUAL mode you may turn UP and DOWN
button to select load level from 1 to 16. The preset level is 1.
After load level is selected you may preset function values for TIME, DISTANCE, CALORIES
and PULSE by turning the UP and DOWN button and press ENTER to confirm.
Press START to begin training.
Page 8
Monark Cardio Care 827 X
8
Operating instruction
Fig. 11
Fig. 12
Fig. 9
Fig. 8
Fig. 10
Training in PROGRAM mode
In PROGRAM mode you may turn UP or DOWN
button to select program P01, P02, P03 and so
on up to P12. The selected program will show up
on screen for 2 seconds and then display program
profile accordingly. Fig. 8 and 9.
LOAD 1 (preset value) is glittering after training program is selected. You may turn UP and
DOWN button to select level from 1 to 16 and
press ENTER to confirm. Fig. 10.
Work load level can be adjusted during training.
Training in USER PROGRAM mode
After USER PROGRAM is selected you may set
preferred program profile by turning UP and
DOWN button and press ENTER for each flashing column. There are 20 segments for setting.
If you want to quit during setting you may hold
on ENTER button for 2 seconds to quit. The
previous setting will be saved for unfinished segments.
Training i H.R.C. mode
Age is flashing after entering the H.R.C. mode.
You may set your age by turning UP and DOWN
button. The computer will calculate preset heart
rate value automatically according to your age
setting. Screen will show heart rate percentage 55%, 75%, 90% and target heart rate. You
may select heart rate percentage by turning UP/
DOWN button and press ENTER button for
training. Fig. 11.
Training in WATT mode
The preset watt value 120 is flashing on screen
in WATT setting mode. Turn UP/DOWN button
and then press ENTER to set target value from
10 to 350. Press START button to begin training.
NOTE!
Stopped training or no signal for over 4 minutes
will turn screen off. After hold on ENTER for
2 seconds screen will display room temperature,
clock and calendar. Fig. 12.
When computer displays abnormal segments,
please turn it off and then turn it on again.
Page 9

Monark Cardio Care 827 X
9
Operating instruction
Buttons
ENTER: To set function value for TIME, DIST, CAL, PULSE in sleep mode.
RESET: Return to main function mode in STOP mode and clear all preset function
values to zero.
START/STOP: To start or stop training.
RECOVERY: To test heart rate recovery status.
UP/DOWN: To select training mode and adjust function value up/down.
Functions
TIME: Count up: No preset target, Time will count up from 00:00 to maximum
99:59 where each increment is 1 second.
Count down: If training with preset Time, Time will count down from
preset to 00:00.
Each preset increment or decrement is 1 minute between 99:00 and 1:00.
SPEED: Display current training speed from 0.0 to maximum 99.9 km/h.
RPM: Displays current training rotation per minute.
DISTANCE: Count up: No preset target, Distance will count up from 0.00 to maximum
99.90 km with each increment 0.1 km.
Count down: If training with preset target, Distance will count down from
preset to 0.00. Each preset increment or decrement is 0.1 km between
0.00 to 99.90.
CALORIES: Count up: No preset target, Calories will count up from 0 to maximum
990 with 1 cal increment.
Count down:If training with preset target, Calories will count down from
preset value to 0. Each preset increment or decrement is 10 cal from 0 to
990 cal.
PULSE: To display your current heart beat figures soon after the pulse sensor has
been touched.
WATT: Display of current training watt figures.
RECOVERY: After exercising for a period of time, Press RECOVERY button and keep hol
ding on handgrips. All function display will stop except TIME starts coun-
ting down from 00:60 to 00:00. Screen will display your heart rate reco-
very status with the F!, F2 up to F6. F1 is the best and F6 is the worst.
User may keep exercisiong to improve the heart rate recovery status.
(Press the RECOVERY button again to return to main display.)
TEMPERATURE: Screen will display room temperature in sleep mode.
CALENDER: Screen will display year/month/day in sleep mode.
CLOCK: Screen will display time in sleep mode.
Maintenance
Do not expose the computer to direct sunlight or exstremely high temperatures. Do not use solvents
when cleaning, just a dry cloth.
Error message E1: Something wrong with the servo system.
Page 10
Monark Cardio Care 827 X
10
Service
Fig: Serial number (1)
1
Service
Warranty
As on any quality product there may be an exceptional fault due to material or manufacture.
If such a fault should arise on your Ergometer,
contact your place of purchase to inquire about
repair.
Monark products and parts are guaranteed
against defects in materials and workmanship
for a period of one year from the initial date of
purchase of the unit.
Parts found to need replacement due to normal
wear and tear, such as brake belts, are not covered. This guarantee covers parts only, not labor
costs associated with the repair. This guarantee
does not apply to cases of abuse or vandalism,
nor does it extend to any injury or loss to person
or property caused directly or indirectly by any
Monark products.
In the event of a defect in material or workmanship during the warranty period, Monark Exercise will repair or replace (at its option) the product. Monark Exercise will do so at its expense
for the cost of materials but not for labor or shipping.
Service check & maintenance
To keep your Ergometer in good shape you should
make a regular service.
Keep your Ergometer clean and properly lub-•
ricated.
Periodically wipe the surface with a rust pre-•
ventative, especially when it has been cleaned
and the surface is dry. This is done to protect
the chrome and zinc parts as well as the painted parts.
When cleaning and lubricating be sure to •
check that all screws and nuts are properly
tightened.
Be sure that all moving parts as crank and •
flywheel are working normal and that no
abnormal play or sound excsists. I.e. play in
bearings causes fast wearing and with that
follows a highly reduced lifetime.
Check now and then that both pedals are •
firmly tightened. If not the threading in the
pedal arms will be damaged. Also check that
pedal arms are firmly tightened on the crank
axle, tighten if necessary. When the Ergometer is new it is important to tighten the pedals
after 5 hours of pedaling.
Check that the chain is snug and there is no •
play in the pedal crank
Be sure that the pedals are moving smoothly, •
and that pedal axle is clear of dirt and fibers
Check that the pedal crank is secure to the •
crank axle
Check that pedals, chain and freewheel sp-•
rocket are lubricated
Check that the handlebars and seat adjust-•
ment screws are lubricated
Be sure that the brake belt does not show sig-•
nificant signs of wear
Please note: The production number of your
Ergometer is placed according to fig: Serial
number.
Page 11
Monark Cardio Care 827 X
11
Service
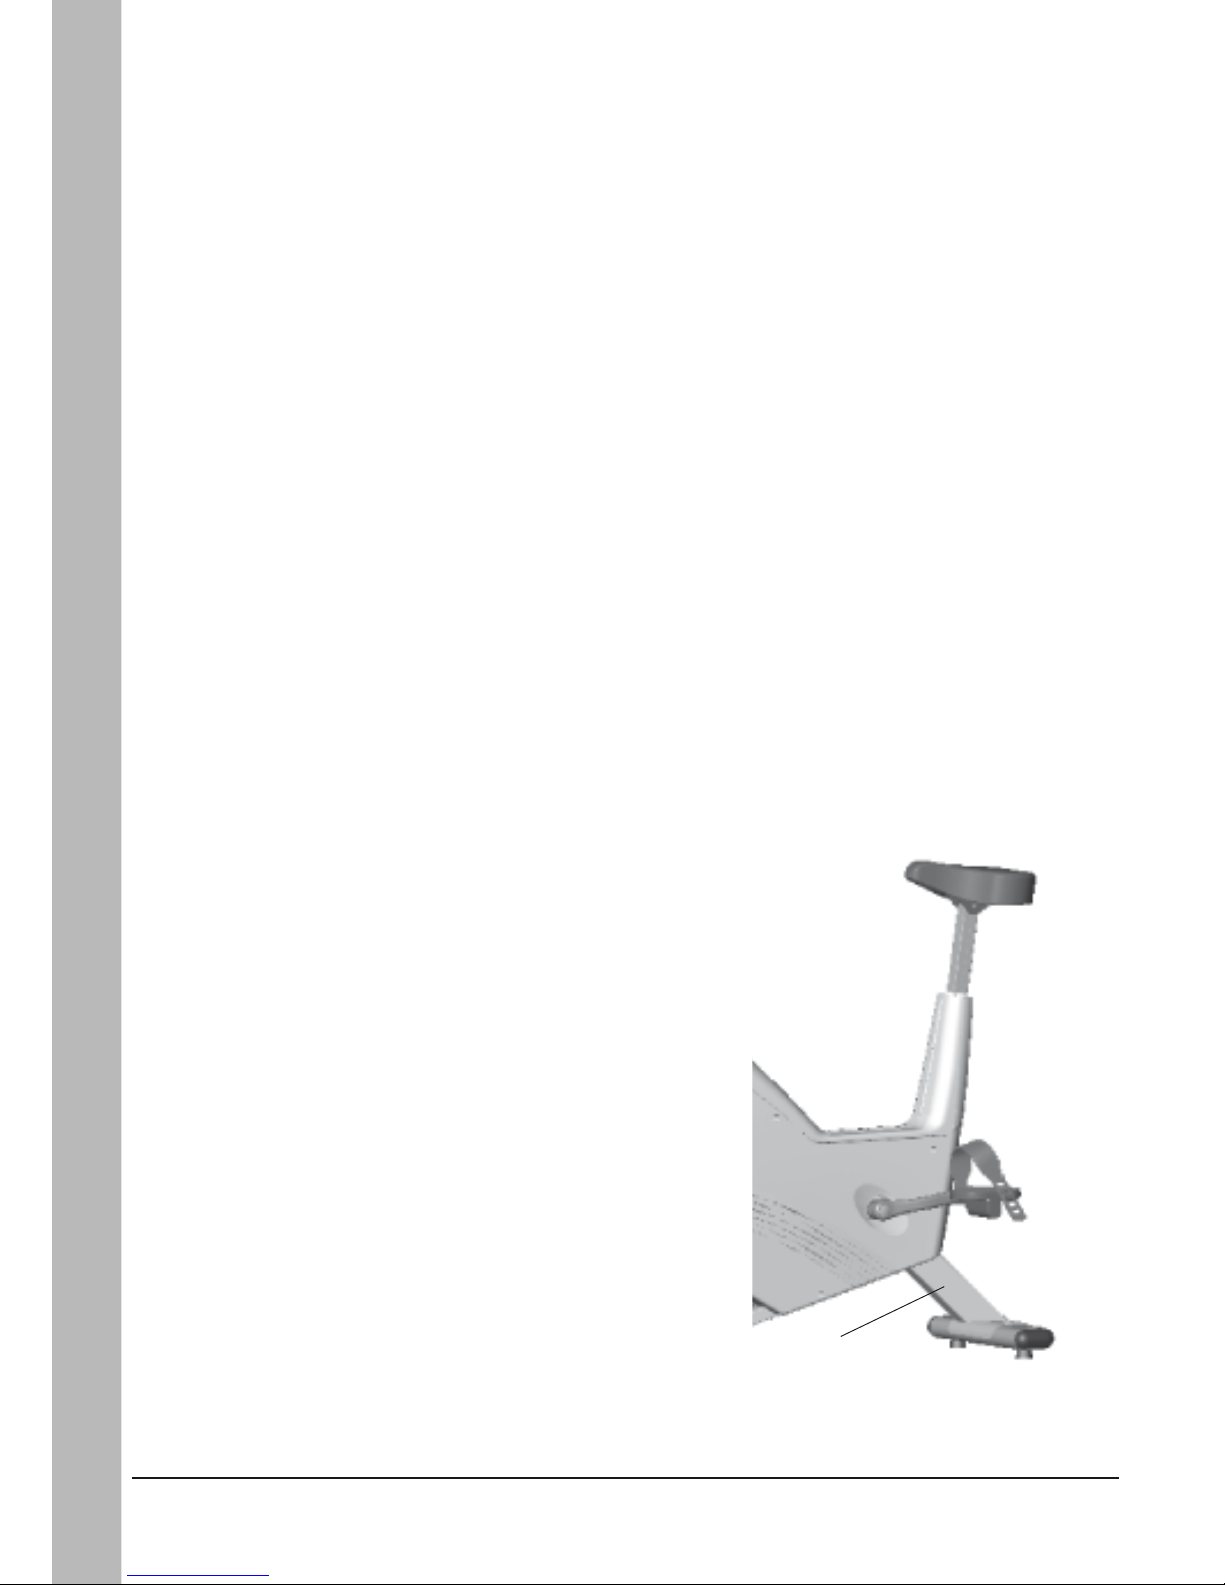
Connection
The exercise bike is powered with the supplied
wall adaptor. The small round connector at the
end of the adaptor cord is put into the bike connector located at the far back on the left cover.
Replacement of brake belt
Loosen the belt tension as much as possible.
Remove the left cover. Loosen the brake belt at
both ends and replace with a new one.
See fig: Brake belt.
Assamble the bike in reverse order.
NOTE: When replaceing the brake belt it is recommended to clean the brake surface. See
”Brake belt contact surface”.
Crank bearing
The crank bearing is long term greased and needs
normally no supplementary lubrication. If problem arises, please contact your Monark dealer.
Flywheel bearing
The bearings in the flywheel are lifetime greased
and require normally no maintenance. If problem
arises, please contact your Monark dealer.
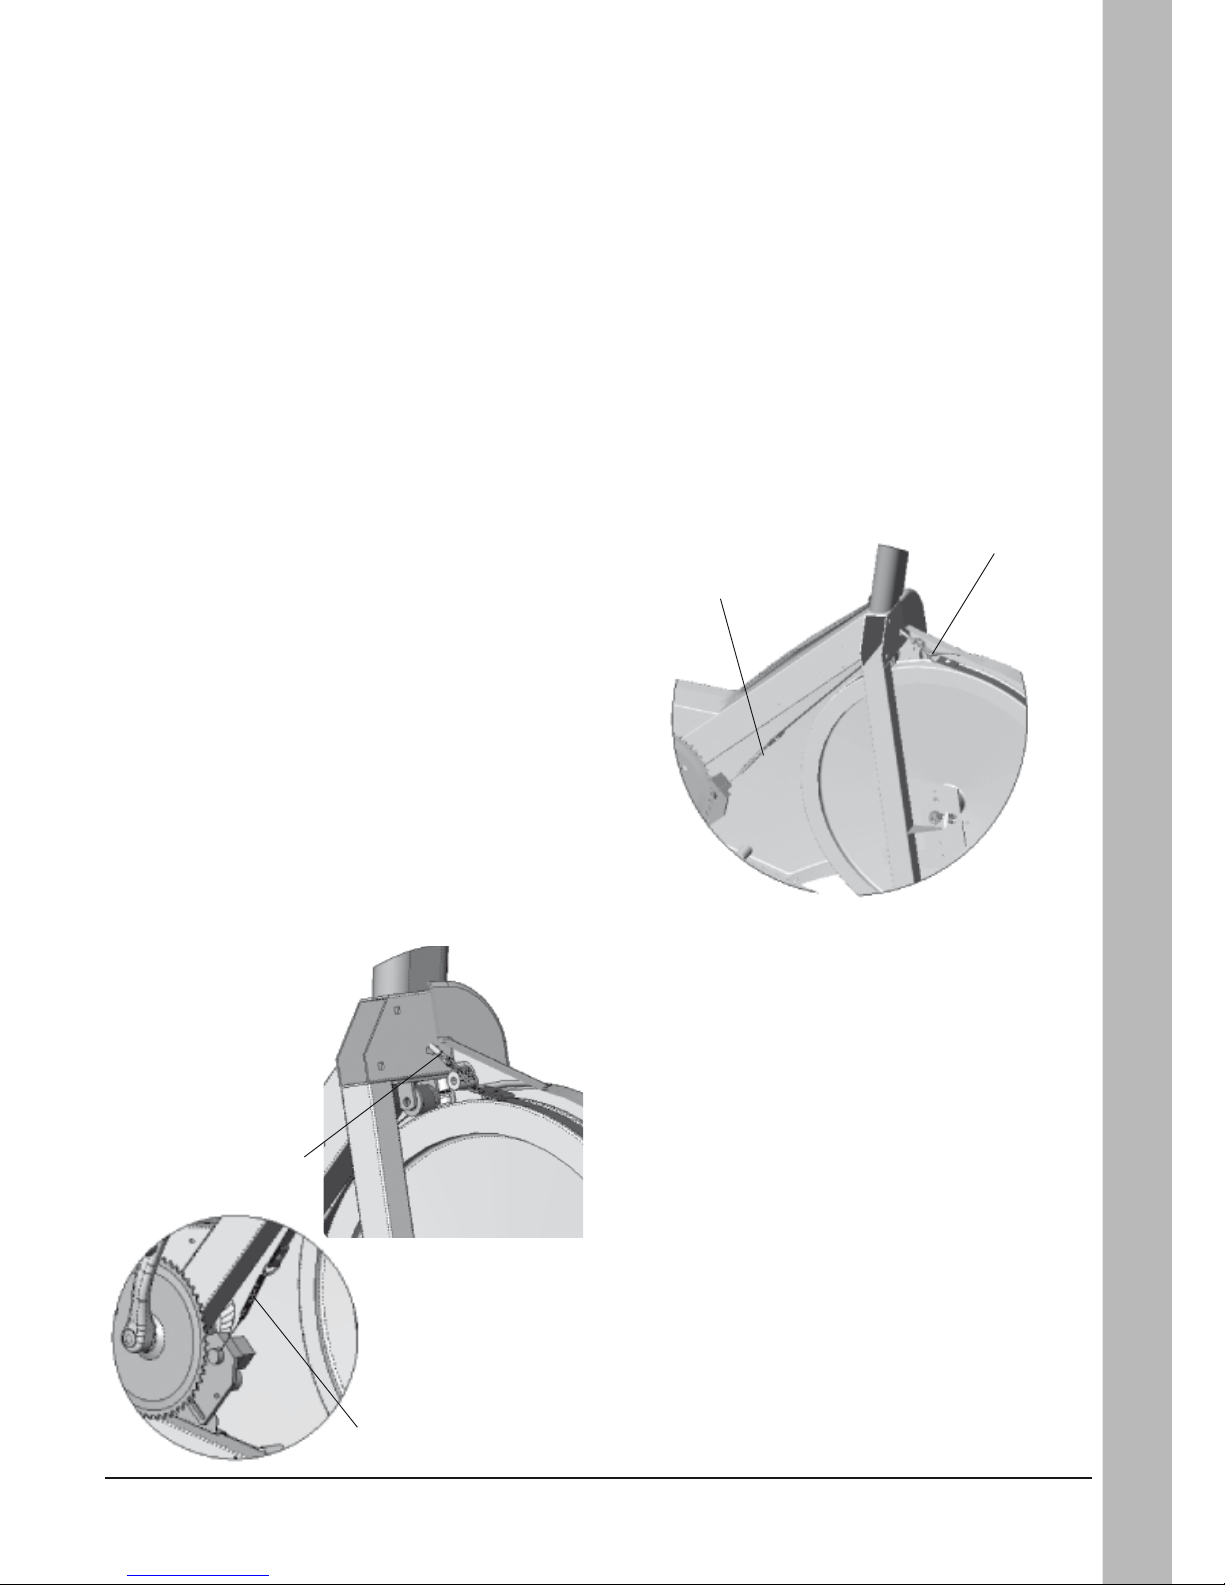
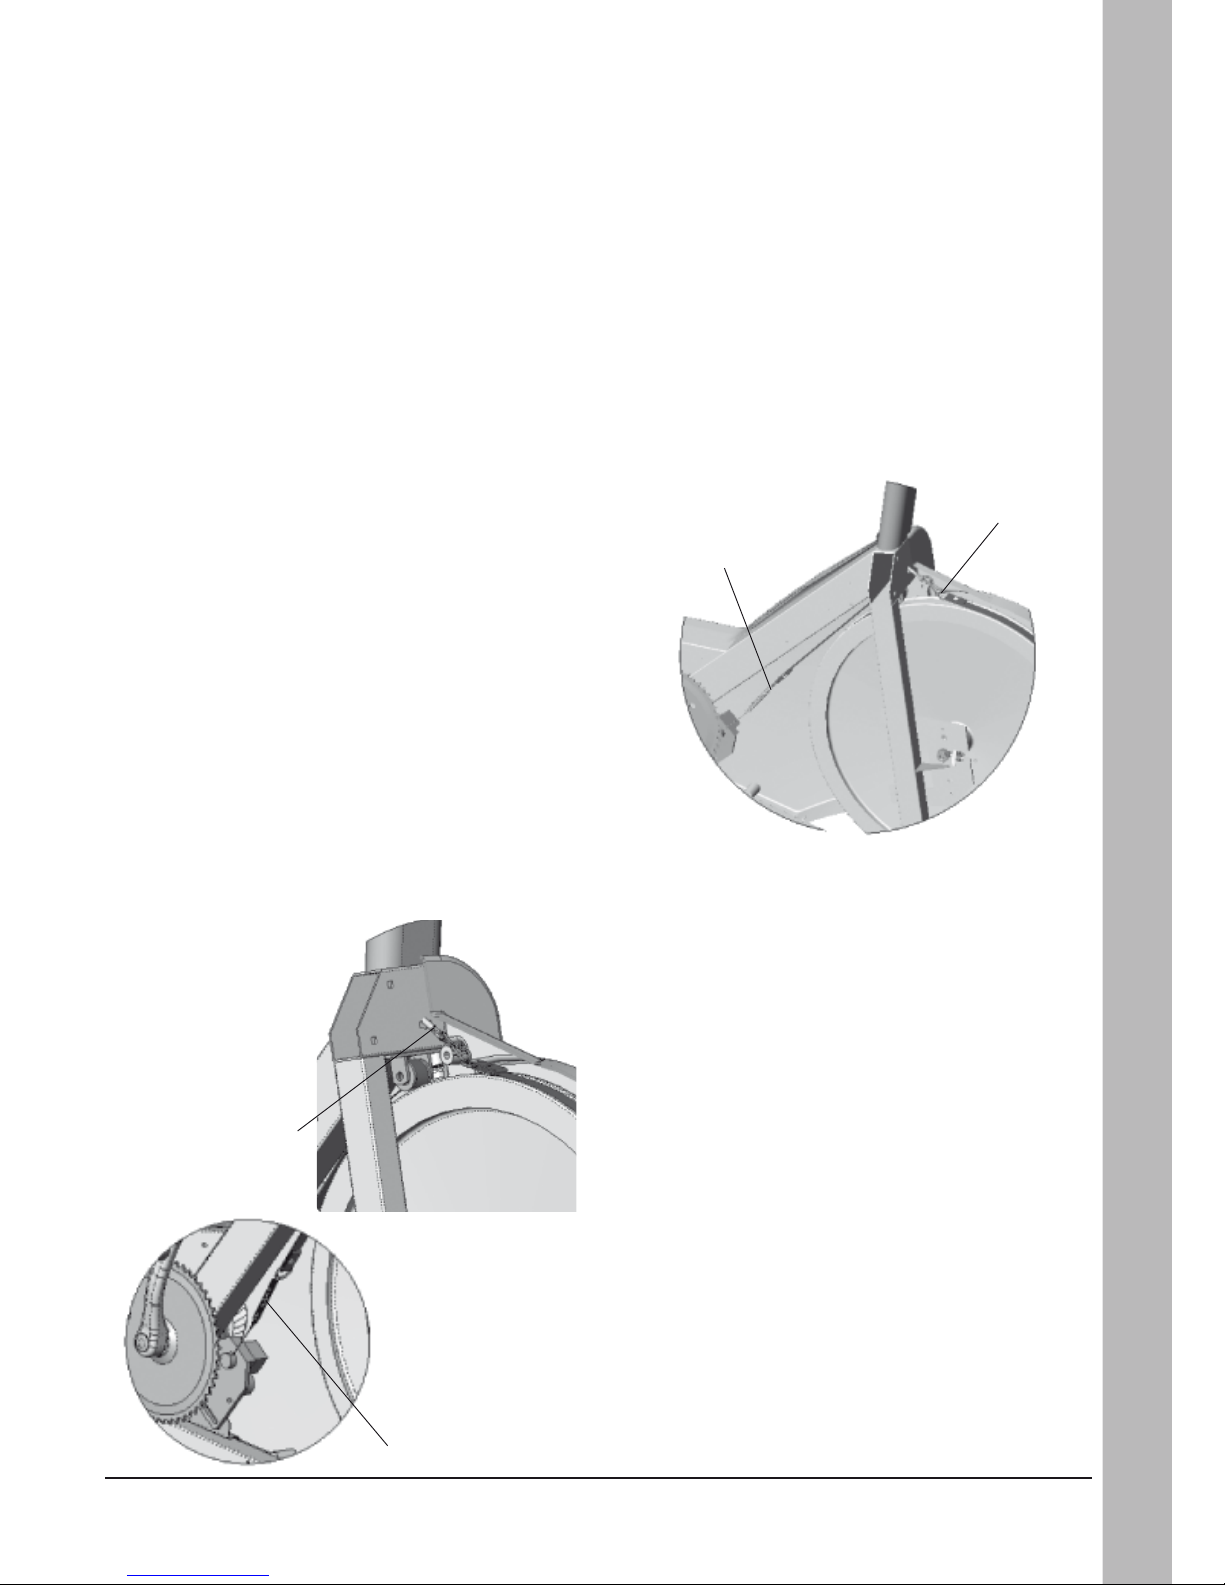
Brake force spring adjustment
After a service where the bike has been taken
apart, partly or completely, and put together
again, the following check should be performed
to be sure the workload is adjusted according to
the display.
Remove the left cover, if not already done.
Connect power adaptor. On the console adjust
WATT to level 2 (LOAD 2). The spring should
now be hanging straight but not streched.
If spring is too long or too short adjust with the
adjustment screw at the other end of the brake
belt until correct state is reached. See fig. Spring,
adjustment screw. Lock the adjustment screw and
put on the cover again. The bike is now ready for
use.
NOTE that 827 X is an exercise cycle that can’t
be calibrated. It is not for testing when the display just shows an estimate value.
Fig: Spring,
adjustment screw
1) Spring
2) Adjustment screw
1
2
Fig: Brake belt
1,2) Loosen hooks
1
2
Page 12

Monark Cardio Care 827 X
12
Service
Freewheel sprocket
When replacing of the freewheel sprocket remove
left and right frame cover. Dismantle the chain as
described in part
”Chain 1/2” x 1/8” ”.
Loosen the axle nuts and lift off the flywheel.
Remove the axle nut, washer, chain adjuster and
spacer on the freewheel side. Place the special
remover (part No. 9100-14) in the adapter and
place the spacer and axle nut outside. See fig:
Special remover.
NOTE: Do not tighten the axle nut completely. It
must be possible to loosen the adapter-sprocket
half a turn.
The sprocket should be ludbricated with a few
drops of oil once a year. Tolt the cycle somewhat
to make it easier for the oil to reach the ball bearing. See fig: Lubrication.
Brake belt contact surface
The brake belt should be regularly checked to ensure that it has not suffered execessive wear. If it
looks worn it should be replaced.
Deposits of dirt on the brake belt and on the contact surface may cause the unit to operate unevenly and will also wear down the brake belt.
The brake belt contact of the flywheel surface
should then be grind off with fine sand paper and
any dust removed with a clean dry cloth.
Remove left cover. Set the tension device to minimum load/tension. Take off the brake belt to
the side. Grind with a fine sand paper. See fig:
Brake belt contact surface. Grinding is easier to
perform if a second individual cautiously and carefully pedals the cycle.
Irregularities on the brake belt contact surface
are removed by means of a fine sand paper or an
abrasive cloth. Otherwise unnecessary wear on
the brake belt may occur and the unit can become noisy.
Always keep the brake belt contact surface clean
and dry. No lubricant is allowed to be used. We
recommend to replace the brake belt when cleaning the contact surface. As regards assembly and
adjustment of the brake belt, see ”Replacement
of brake belt”.
Fig: Brake belt contact surface
Fig: Lubrication
Fig: Hub assembly
Fig: Special remover
(part no: 9100-14)
Page 13

Monark Cardio Care 827 X
13
Service
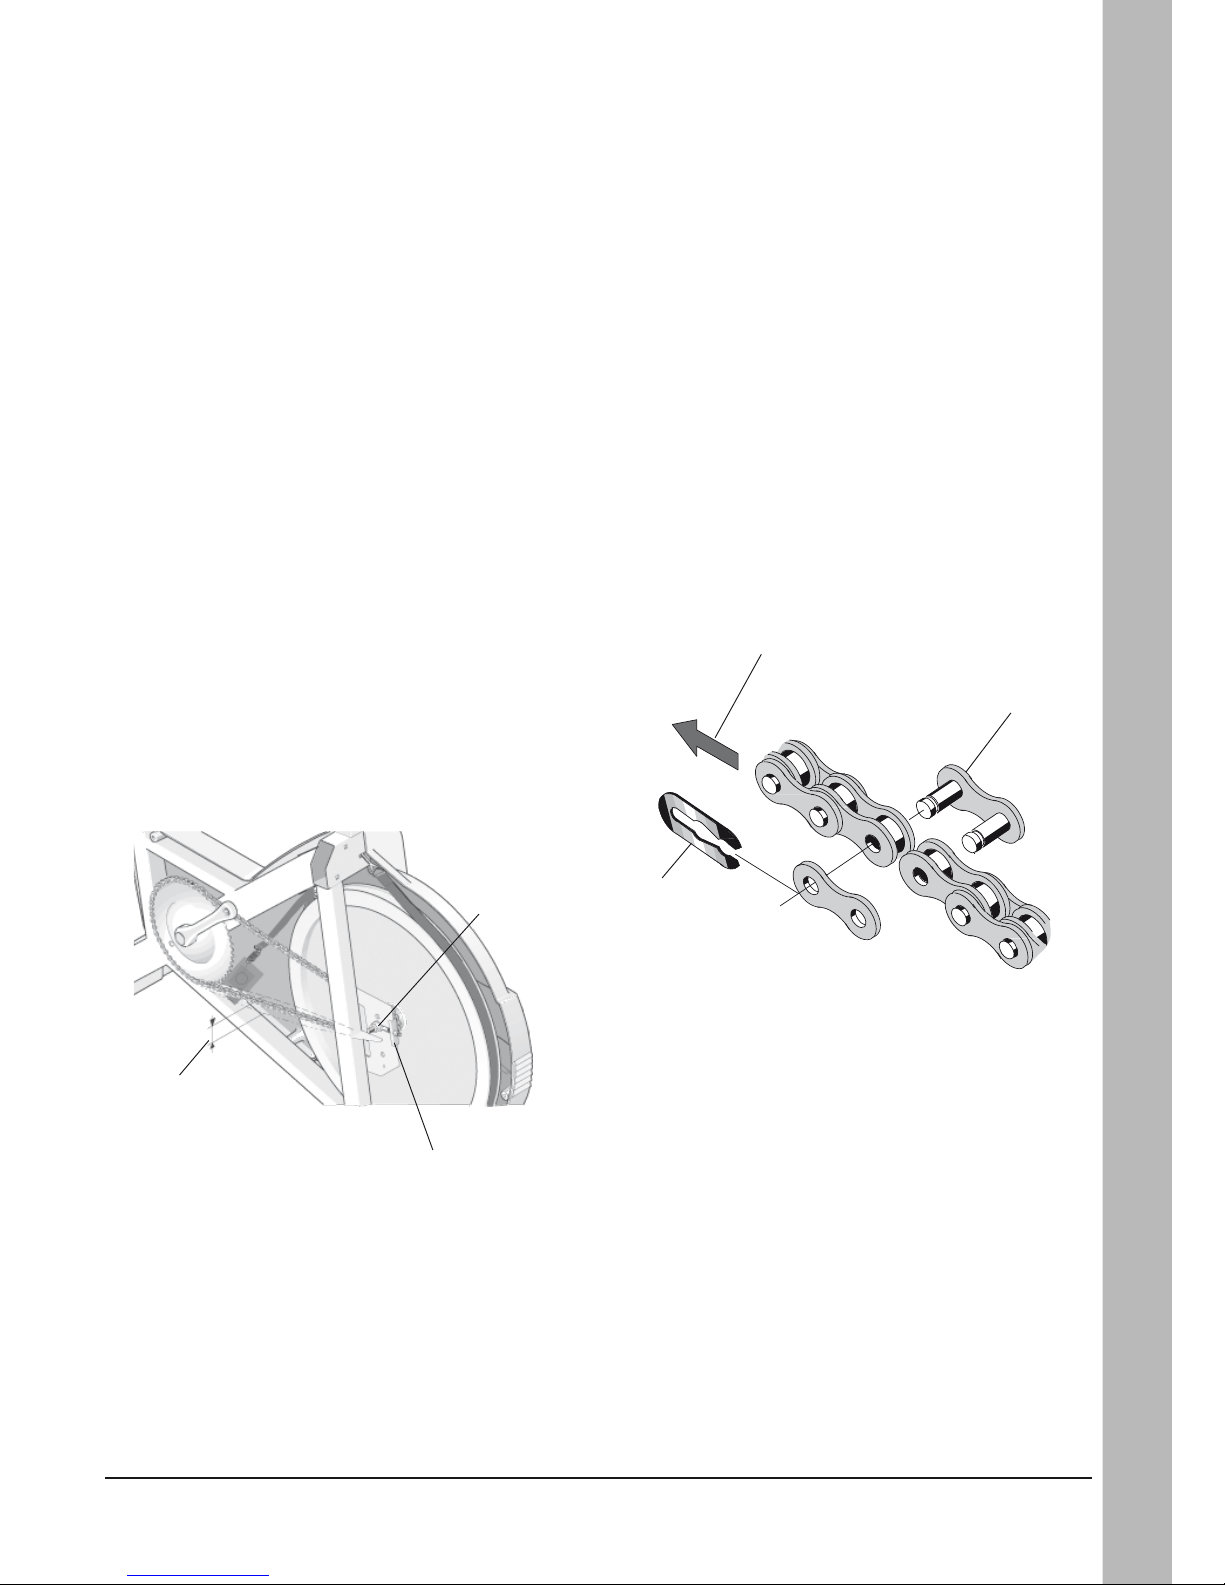
Chain 1/2“ x 1/8“
It is strongly recommended to keep the chain
clean. Dirt built up on the chain will cause excess
wear. A chain lubricant and solvent for normal
road bikes may be used.
Check the lubrication and tension of the chain at
regular intervals. In the middle of its free length
the chain should have a minimum play of 5 mm.
See fig: Chain adjustments. When the play in the
chain is about 20 mm (3/4 inch) the chain must
be tightened otherwise it will cause unnormal
wear of the chin and chainwheels. Because of this
it is always recommende to keep the chain play
as little as possible. When the chain has become
so long that it can no longer be tightened with the
chain adjusters it is worn out and shall be replaced with a new one.
Remove left and right frame cover. To adjust the
chain the hub nuts should be loosened. Loosening or tightening the nuts on the chain adjusters will then move the hub and axle forward
or backward. Adjust according to above recommendation. Then tighten the nuts on the hub axle
again. See fig: Chain adjustments.
Loosen the chain adjuster as much as possible.
Dismantle the chainlock and remove the chain.
Put on a new chain and assemble the chain lock.
The spring of the chain lock should be assembled
with the closed end in the movement direction
of the chain. Use a pair of tongs for dismantling
and assembling the spring. See fig: Chain repla-
cement.
Adjust chain adjusters to a chainplay according
to above. Tighten axle nuts firmly. Put on frame
covers again.
NOTE: At assembly the flywheel has to be parallell with the center line of the frame
otherwise the chain and chainwheels makes a lot
of noise and wears out rapidly.
Fig: Chain adjustments
1) Chain adjuster
2) Axel nut
3) Chain play
Fig: Chain replacement
4) Lock spring
5) Movement direction
6) Chain lock
4
6
5
1
3
2
Page 14

Monark Cardio Care 827 X
14
Exercising
The human body is built for action – not for rest.
Once upon a time this was a necessity: the struggle for survival demanded good physical condition.
But optimal function can only be achieved by regularly exposing the heart, circulation, muscles,
tendons, skeleton and nervous system to some
loading, i.e. training.
In the old days the body got its exercise both in
work and at leisure. In our modern society, however, machines have taken over an ever increasing share of the tasks which were formerly accomplished with muscular power alone. Our life
has at an accelerated tempo been dominated by
sitting, riding and lying. Thus, the natural and
vital stimulation that tissues and internal organs
receive through physical exercise has largely disappeared. Certain tissues such as muscles, bone
and blood and also a number of bodily functions
can adapt to inactivity – and to stress. Studies
have proved that if you use 30 minutes for exercise like brisk walking, running, bicycling,
swimming or skiing 2-3 times a week, your condition has been improved by some 15 per cent
after a few months. The efficiency of the heart
muscle will increase and joints and muscles grow
in strength. The capillary density increases in the
trained muscle and their enzymatic activities are
enhanced. The body adapts to the new demands.
The perceived exertion at a given rate of exercise
becomes reduced.
With increased physical activity fatness is concentrated, the appetite functions “safer”, you can eat
more without risk for overweight and thereby the
risk of lack of important essential food nutrients
decreases. For many individuals the effect of habitual physical activity also improves the wellbeing and it is a good feeling to have a potential to
cope with straining situations.
What kind of exercise to choose?
You should have fun when exercising. Choose
something you find pleasure in doing regularly.
To get a good effect out of the training you should
choose a form of exercise that engages large muscle groups. Then the demand of increased blood
flow and oxygen transport will be so great that
heart will increase its pump capacity. Jogging, calesthenics, aerobic dancing, bicycling, swimming,
skiing and walking are excellent examples of exercises meeting this requirement.
In a few months you can get 10-15 years younger
If you cycle 30 minutes a few times a week you
can lower your condition age with 10-15 years!
Scientifically this is described as a reduction on
the biological age. Externally, you are your usual
self. Internally, however, you feel much younger.
In other words: You can work harder. You feel
more alert and healthy. Your ability to handle
stress and problems increases. There are few
better ways to improve your physical condition
than to cycle. It does not over-tax your joints.
It builds up your condition progressively and at
your own pace – and you can make your training
fit weather conditions.
Do I loose weight when I Cycling?
Yes! You do lose calories. A few miles on your
bike every day over one year, you will have lost
the equivalent of 20 pounds of body fat. You will
achieve best results if you combine exercise with
healthier eating. A little less sugar, less butter on
your bread or less fat in your frying pan. And a
few miles on your bike every day. In a year you
will have lost 20 pounds.
Do I get stronger?
Cycling strengthens the muscles of the back, abdomen and legs. Daily chores become easier. Cycling also makes your heart stronger. Your pulse
rate gets lower even when you exert yourself a
little extra. Regular exercise also has a favourable influence on high blood pressures.
Exercising
Page 15

Monark Cardio Care 827 X
15
How do I train?
Warm up 3-5 minutes with a low pedal resis-1.
tance. Pedal about 12 mph (20 km/h).
Increase the resistance until you feel the train-2.
ing “somewhat hard”. Keep the speed for 2-5
minutes. Get off the Exercise cycle and rest a
few minutes. Cycle again and then rest. Train
at your own pace and with a comfortable
pedal resistance. After a few weeks you can
increase the resistance.
Before ending, pedal a few minutes with a 3.
light resistance, in order to step down your
training.
Total time about 30 minutes.
Strength training:
Give yourself a thorough warm-up.1.
Pedal with a heavy resistance for 5-10 se-2.
conds, then rest 45-60 seconds. Repeat this
5-10 times.
It is a good idea to combine your cycle training
with gymnastics for 5 minutes, as this will give
you a physiologically well-balanced form of
training.
Elderly people and physically weak persons
should consult a doctor before starting their
training.
Exercising
Page 16

Monark Cardio Care 827 X
16
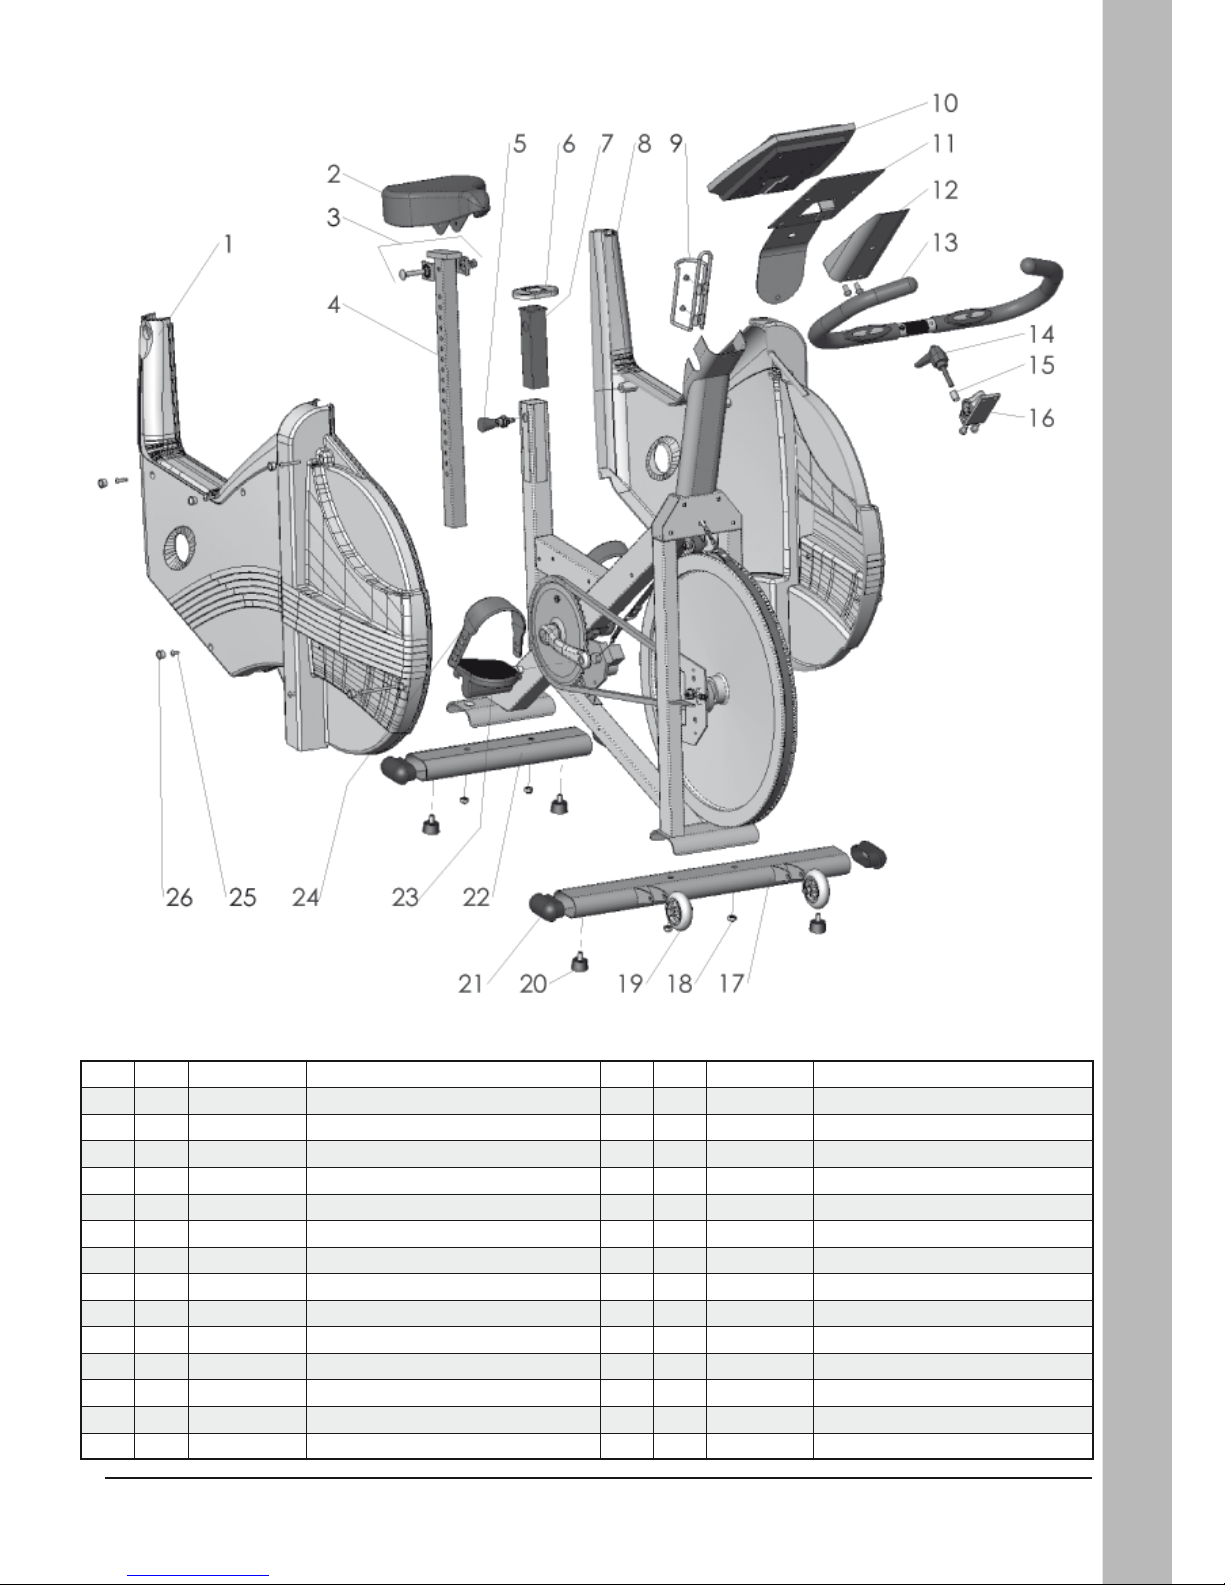
Spare parts
Spare parts
Pos. Ant. Art.nr. Beskrivning Pos. Ant. Art.nr. Beskrivning
1 1 9300-3 Flywheel 18 3 5843 Locking nut M6
2 1 9300-24 Wheel suspension complete set 19 1 9327-39 Motor wire
3 1 9300-18 -Chain adjuster (pair) 20 1 9328-172 Motor
4 3 19001-6 -Sprocket 21 3 14323 Screw M6x16
5 1 9106-13 -Connection 22 1 9328-178 Adapter
6 1 9000-12 -Bearing 6001-2z 23 1 9328-177 Cabel to adapter
7 1 9106-14 -Axle 24 1 9326-164 Magnet
8 1 9300-17 -Bush, 23mm 25 2 8523-2 Dust cover for crank
9 1 9306-41 Brake belt, complete 26 2 8523-115 Screw M8x20
10 1 9306-40 -Brake belt 27 1 9300-430 Steel crank set, complete
11 1 9327-53 -Spring 28 1 1079-116 Chain 116 l
12 1 14358 Screw M8x40 29 1 8966-175 BB cartridge bearing
13 1 9328-43 Roller 30 1 9326-166 Sensor holder
14 1 9327-75 Roller bracket 31 1 9328-176 Sensor with 300 mm cabel
15 1 5844 Locking nut M8 32 1 8966-176 Support casing for BB-bracket
16 1 9328-175 Cabel 1700mm to computer 33 1 9302-5 Frame
17 1 9327-42 Motor attachment
Page 17

Monark Cardio Care 827 X
17
Spare parts
Pos. Ant. Art.nr. Beskrivning Pos. Ant. Art.nr. Beskrivning
1 1 9327-34 Frame cover, right 15 1 9326-89 Spacer 17 mm
2 1 4994-5 Saddle complete 16 1 9327-69 Handlebar clamp, complete
3 1 9300-114 Saddle bracket complete 17 1 9301-17 Support tube, long
4 1 9300-138 Saddle post 18 4 5844 Locking nut M8
5 1 9305-118 Locking pin complete 19 1 9000-37 Transport wheel compl. (pair)
6 1 9300-123 Top cover 20 4 9328-26 Rubber foot
7 1 9300-115-1 Bushing f. saddle post 21 4 9328-51 Plastic cap, blue
8 1 9327-35 Frame cover, left 22 1 9301-18 Support tube, short
9 1 8116-7 Bottle holder 23 1 9300-220 Pedal (pair)
10 1 9328-171 Computer 24 1 9300-207 Footstraps (pair)
11 1 9327-73 Computer plate 25 1 9327-150 Screw set
12 1 9327-74 Cover 26 10 9306-12 Plastic cup, white
13 1 9327-78 Handlebar, complete 1 9327-151 Controll gauge
14 1 9100-280 Lever M8, complete
Page 18

Notes:
.............................................................................................................................................................
.............................................................................................................................................................
.............................................................................................................................................................
.............................................................................................................................................................
.............................................................................................................................................................
.............................................................................................................................................................
.............................................................................................................................................................
.............................................................................................................................................................
.............................................................................................................................................................
.............................................................................................................................................................
.............................................................................................................................................................
.............................................................................................................................................................
.............................................................................................................................................................
.............................................................................................................................................................
.............................................................................................................................................................
.............................................................................................................................................................
.............................................................................................................................................................
.............................................................................................................................................................
.............................................................................................................................................................
.............................................................................................................................................................
.............................................................................................................................................................
.............................................................................................................................................................
.............................................................................................................................................................
.............................................................................................................................................................
.............................................................................................................................................................
.............................................................................................................................................................
.............................................................................................................................................................
.............................................................................................................................................................
.............................................................................................................................................................
.............................................................................................................................................................
.............................................................................................................................................................
Page 19

© 2008 MONARK EXERCISE AB, Vansbro, Sweden
Contents 3
Monark Exercise AB 4
Product information 5
Operating instruction 6
Workload device 6
Cycle adjustments 6
Computer specifications 7
Service 10
Warranty 10
Service check 10
Maintenance 10
Connection 11
Brake force spring adjustment 11
Replacement of brake belt 11
Crank bearing 11
Flywheel bearing 11
Brake belt contact surface 12
Freewheel sprocket 12
Chain 1/2“ x 1/8“ 13
Exercising 14
Spare parts 16
Innehållsförteckning 19
Monark Exercise AB 20
Produktinformation 21
Funktionsbeskrivning 22
Belastningsreglering 22
Cykelinställningar 22
Elektronisk mätare 23
Service 26
Garanti 26
Regelbunden servicekontroll 26
Underhåll 26
Anslutning 27
Inställning belastningsfjäder 27
Bromsbandsbyte 27
Bromshjulslagring 27
Vevlager 27
Bromsbana 28
Frigångskrans 28
Kedja 1/2” x 1/8” 29
Träningstips 30
Reservdelslista 32
Innehållsförteckning
Innehållsförteckning
Page 20

Monark Cardio Care 827 X
20
Monark Exercise AB
Monark har 100 års erfarenhet av cykeltillverkning. En tradition som gett kunskap,
erfarenhet, och känsla för produkt och kvalitet. Sedan början av 1900-talet har Monarks cyklar varit ett levande bevis på exakthet, pålitlighet, hållfasthet och service.
Det är en av anledningar till att vi idag är världsledande på Ergometercyklar och
marknadsledande i Skandinavien på Transportcyklar.
Vi tillverkar, utvecklar och marknadsför ergometer och träningscyklar, transport
och specialcyklar. Våra största kundgrupper hittar vi inom sjukvård, idrottsmedicin,
myndigheter, industri och postverksamhet.
För mer information: www.monarkexercise.se
Monark Exercise AB
Page 21

Monark Cardio Care 827 X
21
Produktinformation
Vi gratulerar till din nya motionscykel.
Monark Cardio Care 827 X är framtagen för
att på ett enkelt sätt kunna användas för träning
och rehabilitering. Denna modell har en digital
motivationselektronik med 12 olika förprogrammerade träningsprogram. Cykeln är varvtalsoberoende, d.v.s. att effekten bibehålls oavsett tramphastighet vid träning i läge WATT. Mätaren visar
diverse parametrar såsom hastighet, distans, träningstid i minuter, hjärtfrekvens i slag per minut
och arbetsbelastning i watt.
Observera att 827 X är en träningscykel som inte
är kalibrerbar. Den kan inte utföra tester då mätaren bara visar ett ungefärligt värde.
Produktinformation
Fakta
Stort välbalanserat svänghjul på ca 22 kg•
Höj- och sänkbar sadel med snabblåsning•
Justerbart styre•
Stabil ram•
Pulverlackerad•
Praktiska transporthjul•
Elektronisk mätare med träningsprogram•
Sensorer i handtagen för pulsmätning•
Bredd
500 mm vid styre
620 mm vid stödben
Längd
1120 mm
Höjd
1260 mm vid mätare
800-1120 mm vid sadel
Vikt
49 kg
För mer ingående beskrivning av datorn/mätarens
funktion läs avsnitt under funktionsbeskrivning.
OBS!
Då användning av Cardio care 827 X kan innebära ansenlig fysisk påfrestning rekommenderas
personer som inte är vana vid konditionsträning
alt. ej känner sig helt friska att först kontakta en
läkare för rådgivning.
Page 22

Monark Cardio Care 827 X
22
Funktionsbeskrivning
Belastningsreglering
Genom cykling tillförs rörelseenergi till bromshjulet som bromsas upp med ett bromsband
vilket löper runt större delen av bromshjulets
bromsbana. Bromsbandet drivs runt av en motor
som är kopplad till den elektroniska mätaren.
Ändring av bromseffekten sker genom att med
hjälp av ENTER knappen på mätaren öka eller
minska bromsbandets spänning mot bromshjulet. Se fig: Display.
Cykelinställningar
Sadelhöjden ställs in så att man sitter bekvämt.
Lämplig höjd kan vara att ha knäet lätt böjt när
fotbladet är mitt över pedalaxeln samtidigt som
pedalen är i bottenläge. Vid justering av sadelhöjden ta tag i snabblåset på sadelstolpen och dra
den utåt. Se fig: Justeringar.
Styrets inställning skall ge en bekväm körställning. Vid längre körning kan det vara lämpligt
att någon gång under träningen ändra styrinställning. Genom att lossa på styrets låsvred justeras
styret. Se fig: Justeringar.
Funktionsbeskrivning
Fig: Justeringar
1) Snabblås, sadel
2) Låsvred, styre
Fig: Display
1) Belastningsreglering
1
1
2
Page 23

Monark Cardio Care 827 X
23
Funktionsbeskrivning
Elektronisk mätare
Vid påslag visas alla LCD segment under 2 sekunder samtidigt som ett pip hörs.
Se fig. 1.
Display visar enligt fig 2. Vrid ratt för att ställa
in år/månad/dag och klocka. Tryck ENTER efter
varje inställning. Skärmen kommer efter inställning att gå över i Standby läge. Se fig. 3.
MAN visas i vänteläge, (fig. 3). Vrid inställningsratt för att välja träningsprogram MANUAL ,
PROGRAM , USER, H.R.C. eller WATT (se fig.
3 - 7) och tryck ENTER för att välja. Datorn
kommer att välja MANUAL om inget annat val
görs.
Träning i läge MANUAL
I läge MANUAL vrid ratten för att välja belastningsnivå från 1 - 16.
Efter att belastningsnivå valts ställ in träningstiden genom att vrida ratten samt därefter trycka
ENTER. Tryck START för att börja träningen.
Page 24

Monark Cardio Care 827 X
24
Funktionsbeskrivning
Träning i läge PROGRAM
I läge PROGRAM tryck ENTER och vrid rattknapp för att välja program P01, P02 osv upp till
P12. Valt program visas på skärmen i 2 sekunder,
se fig. 8, och därefter visar skärmen träningsprofilen enligt fig. 9.
LOAD 1 visas efter det att träningsprogram valts.
Vrid kanppen för att välja nivå från 1 - 16 och
tryck ENTER. Se fig. 10.
Bealstningsnivå kan ändras under träning.
Träning i läge USER PROGRAM
Efter att USER PROGRAM valts kan träningsprofil väljas genom att vrida på programratten
och därefter trycka ENTER för varje blinkande
kolumn. Det finns 20 segment som kan ställas in.
Skall programmering avslutas innan alla segment
gåtts igenom tryck på ENTER knappen under
minat 2 sekunder för att avsluta. Tidigare inställning kommer att sparas för ej ändrade segment.
Träning i H:R:C: läge
Ålder 25 blinkar efter det att H.R.C. träning
valts. Ålder kan ställas in genom att vrida inställningsratt till önskad ålder. Tryck ENTER. Datorn räknar automatiskt ut lämplig träningspuls
i förhållande till inställd ålder. Skärmen visar
55%, 75%, 90% samt målpuls. Välj pulsnivå %
genom att vrida på ratten till önskat läge samt
därefter ENTER. Se fig. 11.
Fig. 11
Fig. 12
Träning i läge WATT
Startläge 120 watt blinkar på skärmen. Vrid inställningsratten till önskad effekt från 10 - 350
watt. Tryck START knappen och börja träningen.
OBS!
Om träningen avslutas och datorn inte får någon
insignal på 4 minuter kommer skärmen att släckas och istället visa rumstemperatur, klocka och
datum. Tryck på ENTER i 2 sekunder. Se fig.
12.
Om datorn visar konstiga segment bryt strömmen och sätt på datorn igen.
Fig. 9
Fig. 8
Fig. 10
Page 25

Monark Cardio Care 827 X
25
Funktionsbeskrivning
Knappar
ENTER: Ställer in värde för TIME, DIST, CAL, PULSE.
RESET: Återgår till STOP läge och nollställer alla värden.
START/STOP: Startar eller stoppar träning.
RECOVERY: Test av pulsåterhämtnings status.
UP: För att välja träningsnivå och justera upp värden.
DOWN: För att välja träningsnivå och justera ner värden.
Funktioner
TIME: Uppräkning: Om ingen tid ställts in räknas denna upp från 00:00 till max.
99:59 varje sekund.
Nerräkning: Om tid ställts in räknas denna ner från inställt värde ner till
00:00.
Inställning kan göras från 1:00 till 99:00 med 1 minuts intervall.
SPEED: Visar aktuell hastighet från 0.0 till max. 99.9 km/h.
RPM: Visar pedalvarv per minut.
DISTANCE: Uppräkning: Om ingen dist. ställts in kommer denna att räknas upp från
0.00 till 99.90 km med 0.1 km intervall.
Nerräkning: Om dist. ställts in kommer denna att räknas ner från inställt
värde till 0.00 med 0.1 km intervall.
CALORIES: Uppräkning: Om inget värde cal. ställts in kommer detta att räknas upp
från 0 till 990 med 1 cal. intervall.
Nerräkning: Om ett värde på cal. ställts in kommer detta att räknas ner
från inställt värde till 0 med 10 cal. intervall.
PULSE: Visar aktuell pulsfrekvens strax efter det att pulshandtagen börjar
användas.
WATT: Visar aktuell effekt i watt.
RECOVERY: Efter träning tryck på RECOVERY knappen och fortsätt att hålla i
pulshandtagen. Alla visningsfunktioner stoppas utom TIME vilken startar
nerräkning från 00:60 till 00:00. Skärmen visar därefter ett
återhämtningsvärde från F1 upp till F6 där F1 är bäst resultat och F6 är
sämst. Upprepad träning ger bättre värde.
Tryck RECOVERY igen för att gå till normal display igen.
TEMPERATURE: Skärmen visar rumstemperatur i viloläge.
CALENDER: Skärmen visar år,månad o dag i viloläge.
CLOCK: Skärmen visar klocka i viloläge.
Skötsel
Utsätt inte den elektroniska mätaren för direkt solljus eller extremt höga temperaturer. Använd inga
lösningsmedel vid rengöring, utan endast torr trasa.
Page 26

Monark Cardio Care 827 X
26
Service
Fig: Tillverkningsnummer (1)
1
Service
Garanti
Även på en kvalitetsprodukt kan det vid enstaka fall uppstå material- och fabrikationsfel. Om
ett sådant fel skulle uppstå på Din motionscykel
skall Du, enligt konsumentköplagen alt. köplagen, vända Dig till det ställe där den är inköpt.
Regelbunden servicekontroll & Underhåll
För att hålla Din ergometer i gott skick bör
den underhållas och genomgå en regelbunden
service.
Håll alltid ergometern ren och välsmord. •
Ytbehandla då och då med något rostskydds-•
medel, speciellt när den är rengjord och ytorna torra. Främst bör man skydda kromade
och zinkade delar men även lackerade delar
mår bra av samma skydd.
I samband med rengöring och smörjning kon-•
trollera också att alla skruvar och muttrar är
ordentligt åtdragna.
Försäkra dig om att alla rörliga delar såsom •
vevaxel och svänghjul fungerar normalt och
att inget onormalt glapp finns. Glapp i t.ex.
lager orsakar snabb förslitning och därmed
kraftigt reducerad livslängd.
Kontrollera med jämna mellanrum att peda-•
lerna fortfarande är ordentligt åtdragna. Om
inte kommer gängorna i veven att skadas.
Kontrollera även att vevarmarna är ordentligt fastdragna på vevaxelns fyrkantsfattning.
Efterdrag vid behov. När Ergometern är ny är
det viktigt att efterdra pedalerna efter 5 timmars användning.
Kontrollera att kedjan går jämnt och att det •
inte finns något glapp i vevlagringen
Se till att pedalarmarna sitter ordentligt fast •
på vevaxeln
Känn efter så att pedalerna roterar mjukt och •
att pedalaxeln är ren från diverse smuts
Se till att pedaler, kedja och frigångskrans är •
smorda
Kontroller att• bromshjulet ligger i centrum
och roterar jämnt
Se till att tryckbrickan ligger kvar vid sadel-•
låsningen
Se efter att bromsbandet inte visar på stora •
förslitningskador
OBS! Ergometerns tillverkningsnummer är placerat enligt fig: Tillverkningsnummer.
Page 27
Monark Cardio Care 827 X
27
Service
Anslutning
Cykeln drivs med den medlevererade adaptern
som ansluts till ett vanligt vägguttag. Det runda
kontaktdonet i ändan på adapterns sladd sätts i
cykelns kontaktdon som sitter i bakändan på den
vänstra kåpan.
Bromshjulslagring
Lagren i bromshjulet är livstidssmorda och fordrar normalt inga åtgärder.
Om fel i lagren misstänks eller konstateras, vänd
Er till fackman för byte.
Vevlager
Vevlagringen är typ kasettvevlager och fordrar
normalt inga åtgärder.
Om fel i lagringen konstateras eller misstänks
vänd Er till fackman för byte.
Bromsbandsbyte
Vid byte av bromsband, demontera vänster ramkåpa genom att lossa skruvarna.
Se till att det inte är något motstånd på. Lossa
bromsbandet från infästningen i båda ändar och
montera därefter nytt bromsband i omvänd ordning. Sätt åter på skyddet.
Se fig: Bromsband.
I samband med byte av bromsband bör bromsbanan rengöras.
1
2
Inställning belastningsfjäder
Efter en större service där cykeln plockats isär
helt eller delvis kan följande inställning göras för
att få cykeln att ge ungefär rätt belastning i förhållande till vad som står i displayen.
Demontera vänster kåpa om så inte redan gjorts.
Koppla på ström till cykeln. Ställ in mätaren på
belastningsnivå 2 (LOAD 2). I detta läge ska fjädern hänga rakt men ej utsträckt.
Är fjädern för kort eller lång, justera vid spännskruven i andra ändan på bromsbandet tills rätt
förhållanden erhållits. Se Fig: Bel.fjäder, juster-
skruv. Lås justerskruven och sätt på kåpan igen.
Cykeln är nu klar att användas.
Observera att 827 X är en träningscykel som inte
är kalibrerbar. Den kan inte utföra tester då mätaren bara visar ett ungefärligt värde.
Fig: Bel.fjäder,
justerskruv
1) Belsatningsfjäder
2) Justerskruv
1
2
Fig: Bromsband
1,2) Infästning
Page 28

Monark Cardio Care 827 X
28
Service
Frigångskrans
Vid byte av frigångskrans, demontera höger och
vänster ramkåpa. Demontera kedja enligt avsnitt
”Kedja”.
Lossa axelmuttrarna och lyft av hjulet. Tag av
axelmutter, bricka, kedjesträckare och hylsa på
frigångskranssidan. Placera avdragare (vårt art
nr 9100-14) i anslutning och placera hylsa och
axelmutter utanför.
Se fig: Avdragare
OBS! Axelmuttern får ej dras åt helt. Anslutning
– frigångskrans skall kunna lossas ett halvt varv.
Byt ut frigångskrans-anslutning och montera
igen enligt ovanstående punkter men i omvänd
ordning.
Frigångskransen bör smörjs med olja någon gång
per år. Luta cykeln något så att oljan lättare rinner in i lagringen.
Se fig: Smörjning.
Bromsbana
Smutsbeläggning på bromsband och bromshjulets bromsbana kan ge ryck i belastningsanordningen. Bromshjulets bromsbana bör då slipas
med fin slipduk, och sedan torkas med en trasa
eller dylikt.
Demontera vänster kåpa. Vrid spännreglaget
till min belastning och kräng av remmen. Slipa
därefter bromsbanan med en fin slipduk. Se fig:
Bromsbana. Slipning kan lättare genomföras om
någon sitter och trampar försiktigt på cykeln.
Ojämnheter i bromsbanan tas också bort med ett
fint slippapper eller slipduk. I annat fall slits bandet onödigt hårt, samtidigt som oljud uppstår.
Håll alltid bromsbanan torr och ren. Något
smörjmedel får absolut inte användas. Bromsbandet bör regelbundet kontrolleras med avseende på slitage. Om det ser slitet ut bör det bytas
ut, se ”Bromsbandsbyte”.
Fig: Bromsbana
Fig: Avdragare
(art nr: 9100-14)
Fig: Smörjning
Fig: Navmontage
Page 29
Monark Cardio Care 827 X
29
Service
Fig: Kedjejustering
1) Kedjesträckare
2) Hjulaxelmutter
3) Kedjespel
Fig: Kedjebyte
4) Låsbricka
5) Kedjans rörelseriktning
6) Kedjelås
4
6
5
1
3
2
Kedja 1/2” x 1/8”
Kontrollera med jämna mellanrum att kedjan
är rätt spänd och lagom smord. På mitten av
sin fria längd bör kedjan ha ett spel på ca 10
mm. Se fig:Kedjejustering. Vid cirka 20 mm:
s spel bör kedjan sträckas. I annat fall orsakas
onormal förslitning både på kedja och kedjehjul. På grund av detta rekommenderas att alltid hålla spelet så nära minimum som möjligt.
När kedjan har blivit så lång att den inte längre
kan sträckas med kedjesträckarna är den utsliten
och skall bytas ut mot en ny.
Demontera vänster alt. höger ramkåpa. Demontera kedjan genom att lossa kedjelåset. Använd
tång för att ta loss låsfjädern.
Se fig: kedjebyte.
Vid inställning av kedjan lossas axelmuttrarna.
Nav och axel flyttas därefter framåt eller bakåt
genom att lossa eller skruva åt kedjesträckarnas
muttrar. Drag därefter fast muttrarna på navaxeln igen. Se fig: Kedjejustering.
Kedjelåsets fjäder skall monteras med den slutna
änden i kedjans rörelseriktning. Använd tång för
att montera låsfjädern.
Se fig: Kedjebyte.
OBS! Hjulet måste riktas in parallellt med ramens centrumlinje. Oljud kan annars uppstå från kedjan då den kan ha tendens
att hänga upp sig på drevens kuggtoppar.
Montera därefter de demonterade detaljerna enligt ovanstående men i omvänd ordning.
Page 30

Monark Cardio Care 827 X
30
Träningstips
Människokroppen är byggd för aktivitet - inte
för att vila. Kampen för tillvaron har krävt god
rörelseförmåga. Men för fullgod funktion måste
hjärta, blodomlopp, muskler, skelett och nervsystem regelbundet utsättas för belastning, en träning.
Förr i tiden fick kroppen motion både i arbetet och under fritiden. I det moderna samhället
har maskinerna alltmer övertagit de arbetsmoment som tidigare klarades med muskelkraft.
Vi har kommit in i en tillvaro dominerad av sittande, åkande eller liggande. Den naturliga och
viktiga stimulans som vävnader och inre organ
får genom fysiskt arbete har därmed bortfallit.
Många av kroppens vävnader har den inbyggda
egenskapen att i hög grad anpassas till inaktivitet
och aktivitet. Detta gäller muskler, ben och blod.
Den fysiska arbetsförmågan kan härigenom påverkas i såväl negativ som positiv riktning. Undersökning på GIH:s fysiologiska institution har
visat, att om man avsätter 30 minuter för motionsträning i form av löpning, cykling, simning
eller skidåkning 2-3 gånger per vecka, har konditionen förbättrats 15-20% efter ett par månader. Hjärtmuskelns pumpförmåga ökar och leder
och muskler tillväxer i styrka. Kroppen anpassar
sig till de nya kraven. Reservkrafterna kommer
och man känner sig mindre trött och sliten. Med
ökad fysisk aktivitet motverkas fetma, aptiten
fungerar ”säkrare”, man kan äta mer utan risk
för övervikt och därmed minskar risken för brist
på viktiga näringsämnen. För många innebär
motionens träningseffekt också att den psykiska
balansen ökar. Känslan av att orka mer gör ofta
att man lättare bibehåller humör och uthållighet
i pressade situationer.
Vilken typ av träning passar mig?
För det första ska Du ha roligt, då Du motionerar. Du skall alltså välja något som Du gläder Dig
åt att få utöva regelbundet.
För att få en god träningseffekt skall Du välja en
motionsform som engagerar stora muskelgrupper. Först när det sker, blir kravet på ökad blodtransport, och därmed kravet på levererat syre,
så stort att hjärtat utsätts för ett arbete som ökar
pumpförmågan. Löpning, cykling, simning, skidåkning och gång är utmärkta exempel på grenar
som fyller detta krav.
Om ett par månader kan du bli 10-15 år yngre
Om Du cyklar 30 minuter ett par gånger i veckan
kan Du sänka Din konditionsålder med 10-15
år! Forskarna kallar det att den biologiska åldern minskar. Utanpå är man som vanligt, men
invärtes känner man sig mycket yngre. Eller med
andra ord:
Du orkar mer. Du känner Dig piggare och friskare. Du får lättare att hantera stress och problem.
Att cykla är något av det bästa Du kan göra för
att öka konditionen. Det är skonsamt mot lederna. Det bygger successivt upp Din kondition i en
takt som Du själv bestämmer.
Går jag ner i vikt när jag cyklar?
Helt säkert är att Du förbrukar massor av kalorier. Hög eller låg fart spelar ingen större roll. Det
är antalet kilometer som avgör. Bästa resultatet
får Du förstås om Du kombinerar motionen med
lite vettigare kostvanor: Lite mindre socker. Lite
mindre matfett på smörgåsen och fett på köttbiten. Lättmjölk i stället för vanlig mjölk. Och så
några kilometer på cykeln varje dag. På ett år har
Du säkert förlorat 10 kg.
Blir jag starkare?
Cyklingen stärker rygg-, buk- och benmusklerna. Du orkar mera i vardagslivet och på jobbet.
Cyklingen stärker också hjärtat. Din puls blir
lägre även när Du anstränger Dig lite extra. Dessutom har regelbunden träning en gynnsam inverkan på högt blodtryck.
Träningstips
Page 31

Monark Cardio Care 827 X
31
Hur tränar jag bäst?
Konditionsträning:
1. Värm upp i 3-5 minuter med lätt motstånd.
Cykla med cirka 60 trampvarv per minut.
2. Cykla med större motstånd men fortfarande
med cirka 20 km/h. Håll på 2-5 minuter. Kliv av
cykeln och vila några minuter. Cykla igen, vila.
Träna i Din egen takt med lagom trampmotstånd.
Efter några veckor kan Du öka motståndet.
Styrketräning:
1. Värm upp ordentligt.
2. Cykla med tungt motstånd i 5-10 sekunder.
Vila 45-60 sekunder. Upprepa 5-10 gånger.
Äldre och fysiskt svaga bör tala med en läkare
innan de börjar träna.
Träningstips
Page 32

Monark Cardio Care 827 X
32
Pos. Ant. Art.nr. Beskrivning Pos. Ant. Art.nr. Beskrivning
1 1 9300-3 Bromshjul 18 3 5843 Låsmutter M6
2 1 9300-24 Bromshjulsupphängning, kpl.sats 19 1 9327-39 Motorwire
3 1 9300-18 -Kedjesträckare (par) 20 1 9328-172 Motor
4 3 19001-6 -Frikrans 21 3 14323 Skruv M6x16
5 1 9106-13 -Anslutning 22 1 9328-178 Adapter
6 3 9000-12 -Kullager 6001-2z 23 1 9328-177 Kabel till adapter
7 1 9106-14 -Navaxel 24 1 9326-164 Magnet
8 9300-17 -Distanshylsa, 23 mm 25 2 8523-2 Dammkapsel
9 1 9306-41 Bromsband komplett 26 2 8523-115 Skruv M8x1x20
10 1 9306-40 -Bromsrem 27 1 9300-430 Vevsats, kpl.
11 1 9327-53 -Fjäder 28 1 1079-116 Kedja 116 l m lås
12 1 14358 Skruv M8x40 29 1 8966-175 Kasettvevlager
13 1 9328-43 Rulle 30 1 9326-166 Sensorfäste
14 1 9327-75 Rullfäste 31 1 9328-176 Sensor m 300 mm kabel
15 1 5844 Låsmutter M8 32 1 8966-176 Adapter t. Shimanovevlager
16 1 9328-175 Kabel 1700mm till mätare 33 1 9302-5 Ram
17 1 9327-42 Motorfäste
Reservdelslista
Reservdelslista
Page 33
Monark Cardio Care 827 X
33
Pos. Ant. Art.nr. Beskrivning Pos. Ant. Art.nr. Beskrivning
1 1 9327-34 Ramkåpa, höger 15 1 9326-89 Distans 17 mm
2 1 4994-5 Sadel komplett 16 1 9327-69 Klove komplett
3 1 9300-114 Sadelklamma komplett 17 1 9301-17 Stödrör långt
4 1 9300-138 Sadelstolpe 18 4 5844 Låsmutter M8
5 1 9305-118 Snabblås, sadelstolpe komplett 19 1 9000-37 Transporthjul
6 1 9300-123 Toppkåpa sadelstolpe 20 4 9328-26 Stödfot
7 1 9300-115-1 Sadelrörsbussning 21 4 9328-51 Ändavslutning
8 1 9327-35 Ramkåpa, vänster 22 1 9301-18 Stödrör kort
9 1 8116-7 Flaskställ 23 1 9300-220 Pedal (par)
10 1 9328-171 Mätare 24 1 9300-207 Fotrem (par)
11 1 9327-73 Displayplatta 25 1 9327-150 Skruvsats
12 1 9327-74 Displaylock 26 10 9306-12 Täckpropp
13 1 9327-78 Styre, komplett 1 9327-151 Kontrollmått
14 1 9100-280 Snabblås styre M8
Reservdelslista
Page 34

Anteckningar:
.............................................................................................................................................................
.............................................................................................................................................................
.............................................................................................................................................................
.............................................................................................................................................................
.............................................................................................................................................................
.............................................................................................................................................................
.............................................................................................................................................................
.............................................................................................................................................................
.............................................................................................................................................................
.............................................................................................................................................................
.............................................................................................................................................................
.............................................................................................................................................................
.............................................................................................................................................................
.............................................................................................................................................................
.............................................................................................................................................................
............................................................................................................................................................
............................................................................................................................................................
............................................................................................................................................................
............................................................................................................................................................
............................................................................................................................................................
............................................................................................................................................................
............................................................................................................................................................
............................................................................................................................................................
............................................................................................................................................................
............................................................................................................................................................
............................................................................................................................................................
.............................................................................................................................................................
.............................................................................................................................................................
.............................................................................................................................................................
.............................................................................................................................................................
.............................................................................................................................................................
Page 35

.............................................................................................................................................................
.............................................................................................................................................................
.............................................................................................................................................................
.............................................................................................................................................................
.............................................................................................................................................................
.............................................................................................................................................................
.............................................................................................................................................................
.............................................................................................................................................................
.............................................................................................................................................................
.............................................................................................................................................................
.............................................................................................................................................................
.............................................................................................................................................................
............................................................................................................................................................
............................................................................................................................................................
............................................................................................................................................................
............................................................................................................................................................
............................................................................................................................................................
............................................................................................................................................................
............................................................................................................................................................
............................................................................................................................................................
............................................................................................................................................................
............................................................................................................................................................
.............................................................................................................................................................
.............................................................................................................................................................
.............................................................................................................................................................
.............................................................................................................................................................
.............................................................................................................................................................
.............................................................................................................................................................
.............................................................................................................................................................
.............................................................................................................................................................
.............................................................................................................................................................
Page 36

432 82 Varberg Tel +46 (0)281-59 49 40 Fax +46 (0)340-804 85
780 50 Vansbro Tel +46 (0)281-59 49 40 Fax +46 (0)281-719 81
www.monarkexercise.se
 Loading...