

Page 1

TC9840ENAD Rev. AC 3/01 1999 Monarch Marking Systems, Inc. All rights reserved.
9825,9850 and MonarchNet are trademarks of Monarch Marking Systems, Inc.
Windows and NT are registered trademarks of Microsoft in the U.S. and other countries.
NetWare is a registered trademark of Novell, Inc. in the United States and other countries.
HP Jet Admin and HP Web Jet Admin are trademarks of Hewlett-Packard, Inc.
Other products are trademarks or registered trademarks of their respective companies and are hereby
acknowledged.
ETHERNET INFORMATION
Monarch offers an internal Ethernet connectivity solution. The
MonarchNet
Ethernet Print Server makes it easy to setup and configure
printers on a network. It allows you to consistently configure your printers
through the network. You can also remotely manage and download
upgraded print batches, formats, printer configurations, and fonts.
The MonarchNet print server supports the Monarch
9840 (version 6.5 or
greater) or Monarch
9825/9850 (version 1.0 or greater) printer linked to an
Ethernet connection.
The print server supports multiple network protocols for users with
Telnet/FTP, Windows
95/98/2000 or Windows NT, TCP/IP (including
lpr/lpd, Bootp, DHCP, and HP JetDirect
), Novell NetWare and NDS, and
SNMP. All protocols are simultaneously active.
When turning on the printer or after sending a ^PR
(printer reset) immediate command, wait at least eight (8)
seconds before sending data to the print server. Any
data sent to the print server before the 8-second interval
may be lost.
Page 2
2
Setting Up the Print Server
For the 9840 printer:
To use the Ethernet print server (with the 9840 printer), upper DIP switch 8
must be turned ON. This enables the bi-directional communication.
Do not plug any cables into the parallel port when using
the Ethernet port.
A printer with an Ethernet port cannot use the parallel port. However, the
serial port is still active.
For the 9825 and 9850 printer:
From the Main menu, select Setup, Port Settings, then Parallel Comm.
Then, follow these steps:
1. Press l or r until you see
PARALLEL COMM
Port r
2. Press Enter/Pause. You will see the current setting, for example
PORT
l Internal
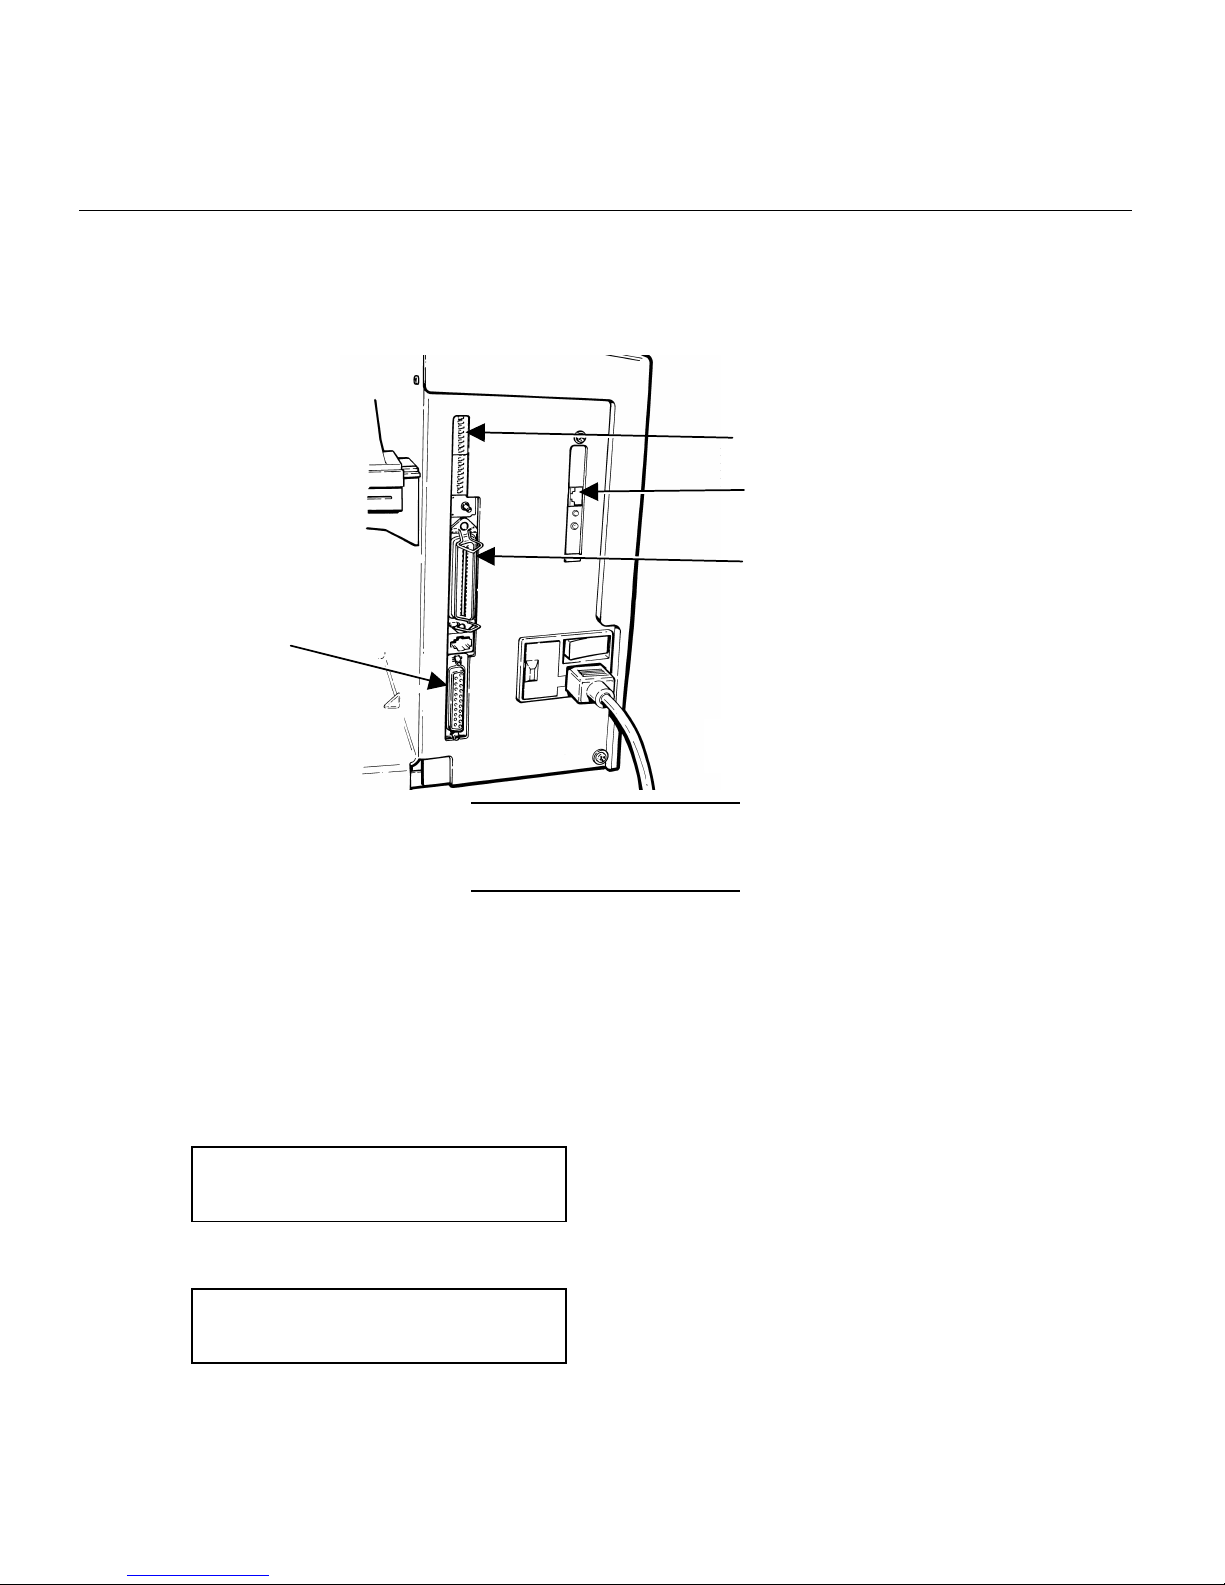
Upper DIP Switches
Ethernet Port
Parallel Port
Serial Port
9840 Printer Pictured
Page 3

3
3. Press Enter/Pause to select the internal port. After setting the port to
internal, change the MODE to enable bi-directional communications.
4. Press l or r until you see
PARALLEL COMM
l Mode
5. Press Enter/Pause. You will see
MODE
Compatible r
6. Press r to display the other option, IEEE1284 and press Enter/Pause.
This selects IEEE1284 for bi-directional Ethernet communications.
(Compatible mode is used with a computer connection and a parallel
cable.)
Configuring the Print Server
Software is available on Monarch's Web site (www.monarch.com) to
configure the print server or you can order part number TC9840ENCD for the
MonarchNet
Utilities compact disc. It can also be configured using HP Jet
Admin
or HP Web JetAdmin software.
A Technical Reference Manual, which includes additional Ethernet set-up
and configuration information, is also available on our Web site. You can
also order part number TC9800ENTR for a printed copy of the Technical
Reference Manual.
When turning on the printer or after sending a ^PR
(printer reset) immediate command, wait at least eight (8)
seconds before sending data to the print server. Any
data sent to the print server before the 8-second interval
may be lost.
Page 4

4
Printing a Configuration Label
Configuration information prints automatically if the Ethernet print server
senses a hardware error. To print configuration information on demand,
press the Test button on the side of the Ethernet print server unit or use the
configuration utility provided for your network operating system.
The configuration label prints in MPCL format.
The configuration label is best displayed using
4” wide by 6” long labels. If the label is too small, some
information may print outside the label edges.
Monarch Marking Systems
General
Serial Number: 1949614
Ethernet Address: 0040681DBFAE
Speed: 10Mbps
F/W Version: 6.3b (A024A)
Cable Type: 10 BASET
Link Status: Good
Polarity: Normal
Rx Packets: 4243
Rx Packet Unavail: 2
Rx Packet Errors: 0
Checksum Errors: 0
Tx Packets: 272
Tx Packet Errors: 0
Tx Packet Retries: 0
Error
Netware: None
TCP/IP: None
Netware: ENABLED
Mode: Unknown
Print Server Name: MMS1949614
SAP Interval: 1 Minute
Frame Format: Ethernet 802.3
TCP/IP: ENABLED
System Name: MMS1949614
Web Address: http://10.1.155.162
IP Address: 10.1.155.162
IP Address Source: DHCP (10.1.10.41)
Subnet Mask: 255.255.0.0
Default Gateway: 0.0.0.0
Timeout Checking: Enabled
Jet Admin: ENABLED
Port Configuration
Name:
Printer Status: Online
Connected To: printer
Error None
 Loading...