

Page 1

Monarch 94 01®/9402
®
Options
Memory Card
Operator’s Handbook
Monarch Marking Systems
TC9401MC Rev. A 9/94 ©1990-1994 Monarc h M arking S ystems, Inc. All ri ghts reserved.
Page 2

Each produ ct and program carries a respective w r i tten
warrant y, the only warranty on which the customer can rely.
Monarch reserves the right to make changes in the produ ct
and the programs and their availability at any time and without
notice. Although Monarch has made every effort to provide
complete and accurate information in this manual, Monarch
shall not be liable for any om i ssions or inaccuracies. Any
update will be incorporated in a later edition of this manual.
WARNING
This equipm ent has been tested and found to comply with the li m its f or
a Class A digital device, pursuant to Part 15 of the FCC Rules. These
limits are designed to provide rea sonable protection against harmful
interfe re nce w hen the equipment is op erated in a commercial
environm ent . This equipment gener at es, uses, and can radi at e radio
frequen cy energy and, if not instal led and used in accordance with the
instruct i on m anual, may cause har m fu l interference to radi o
communi cat i ons. Operation of this equi pm ent in a residential ar ea is
likely to caus e harmf ul interfe ren c e in whic h case the user will be
required t o correct the inter fe rence at his own expense.
CANADIAN D.O.C. WARNING
This digital apparatus does not exceed the Class A limits for radio
noise emis si ons from digital appar atus set out in the Radio I nterference
Regulations of the Canadian Department of Communications.
Le présent appareil numériqu e n’ ém et pas de bruits radioéle ct ri ques
dépassant l es l i m i tes applicables aux appareils numérique s de l a
classe A prescrites dans le Réglement sur le brouillage radioélectr i que
édicte par l e m i ni st ère des Communicati ons du Canada.
WARNING
The power cord is intended to serve as the disconnect de vi ce. The
socket-outlet shall be near the equipment and shal l be easi l y accessible
WARNUG
Der Stromv ersorgungskabel di ent al s abschaltvorricht ung. D ie
Steckdose soll in der Nahe der Einhe it und liecht zunganglic h liegen.
Trademarks
Monarch, 9401, and 9402 are registered trademarks of Monarch Marking Systems,
Inc.
Page 3

Table of Contents
Using the Memory Card..........................................................1
Write-prot ect Switch......................................................1
Inserting a Memory Card................................................3
Copying a Memory Card...............................................4
Deleting from a Memory Card.......................................6
Deleting All the Formats on a Memory Card..... 6
Deleting One Format at a Time.........................7
Battery...........................................................................9
Removing the Insu latin g Tab.............................9
Changing the Batt ery .......................................11
i
Page 4

9401/9402 Memory Card Operator’s Handbook
ii
Page 5

Using the Memory Card
A memory card is a device used to store formats, check digit
algorithms, and MPCL packets. You can copy information
from a computer t o a mem ory card. For i nformation about
• check digit algorithms
• MPCL packets
• copying a format from a computer to a memory card
refer to your System Administrator’s Guide.
To use a format from a memory card, insert the card in the
printer. You can insert the card before you turn on the printer,
or when you want to use a format. You’ll see a me ssage as
the printer loads the formats stored on the card.
Write-protect Switch
The write-protect switch prevents the printer from
• cop yi ng infor m ation from the me m or y c a r d
• writing inf orm ation to the memory card
• deleting information from the memory card.
The printer can still read information from a memory card
when the write-protect switch is on.
1
Page 6
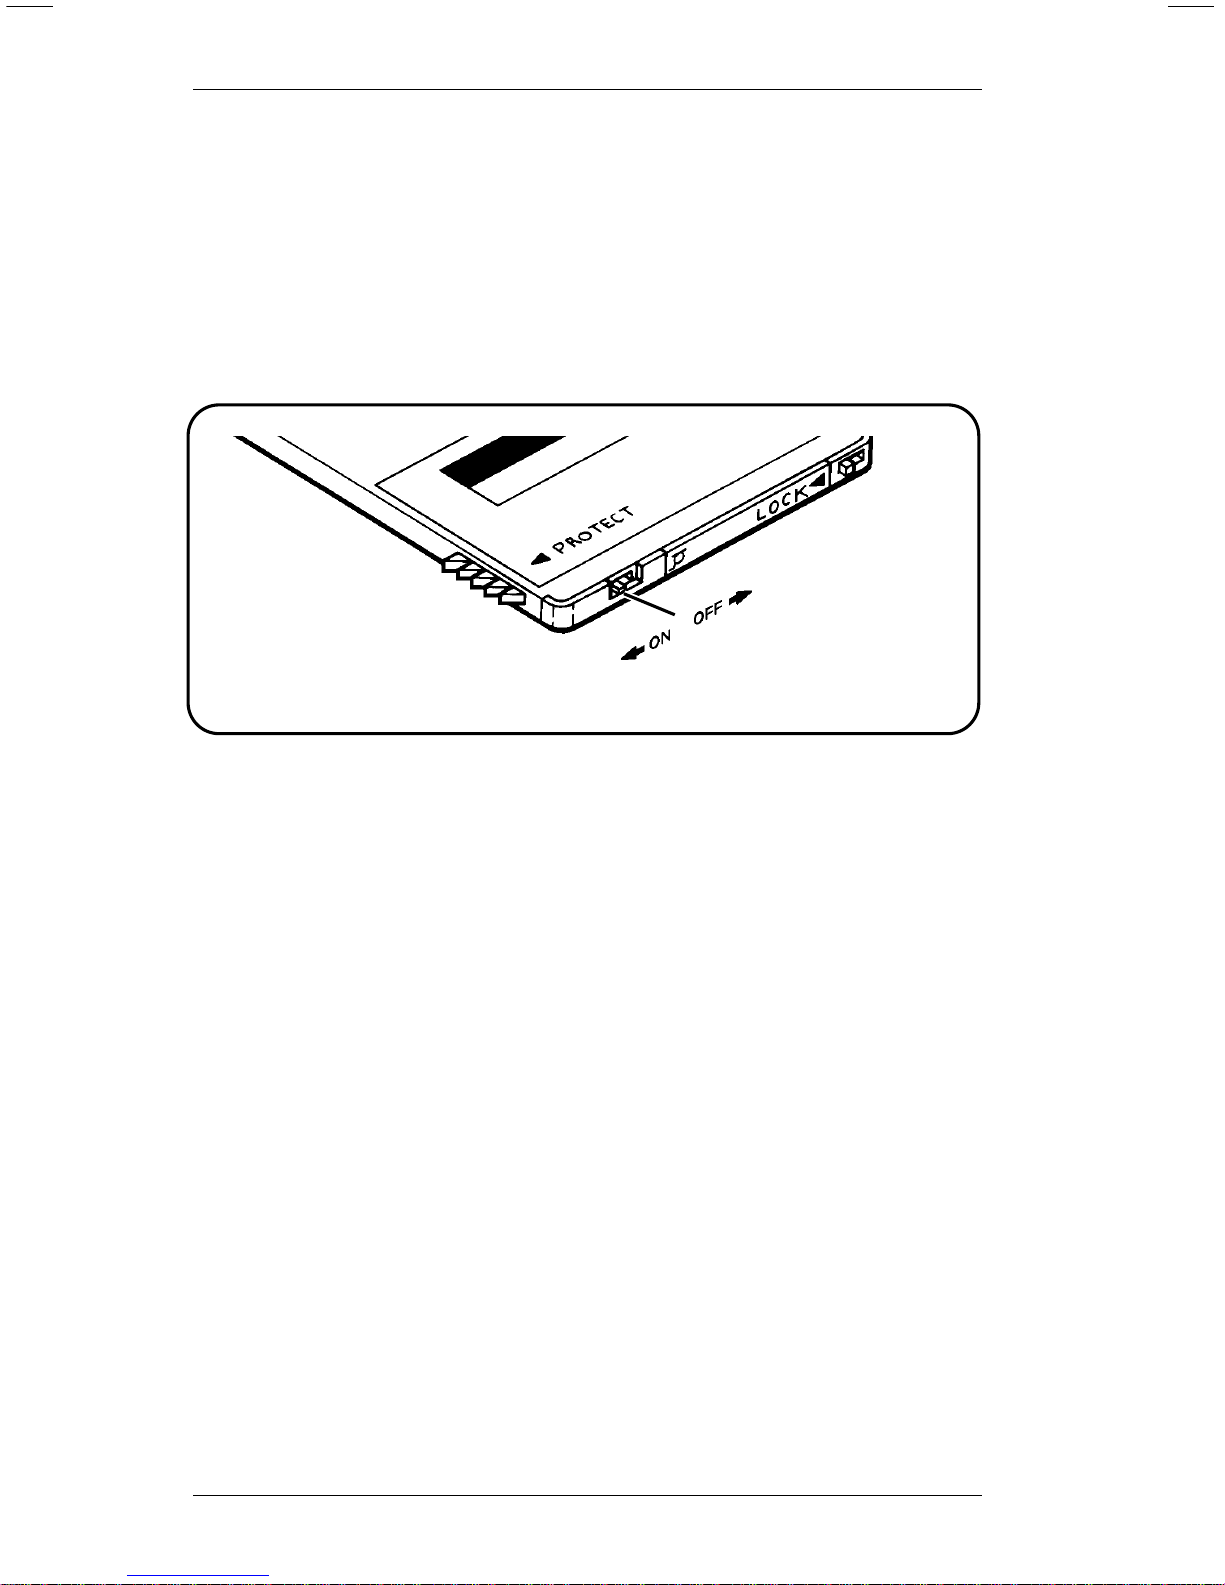
The switch i s loc ated on the edge of the card next to the
battery co ver.
• The write-protect switch should be On for storing the
memory card or printing with it.
• The write-protect switch must be Off to copy or delete
information on the memory card.
Figu re 1
9401/9402 Memory Card Operator’s Handbook
2
Page 7
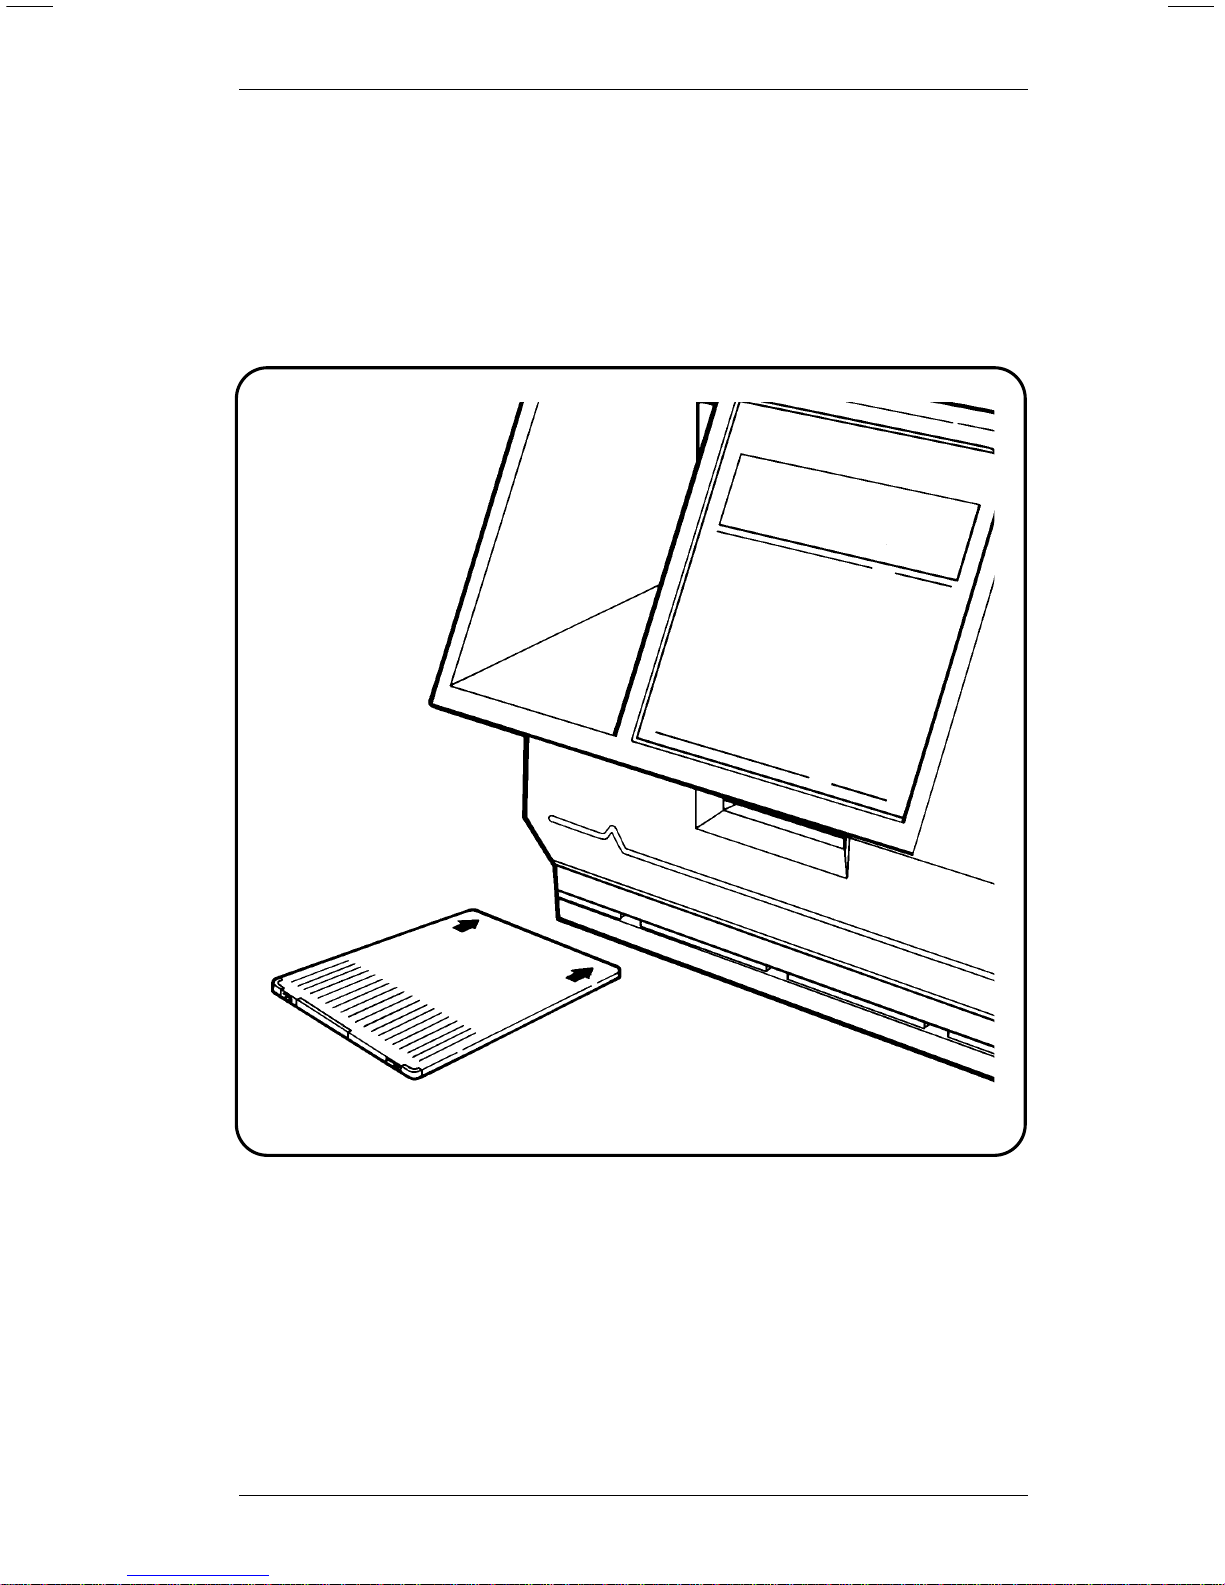
Inserting a Memory Card
1. Be sure the write-protect switch is in the correct position.
2. Pos i tion the card with the Monarch® logo facing up, and
the arrows pointing away from you.
3. Insert the card into the memory card slot in the front of the
printer , below the key pad.
4. Push the c ard forward until it won’t go any farther.
Figure 2
Using the Memory Card
3
Page 8
Copying a Memory Card
You can copy formats from one memory card to another.
To copy a memory card, you need
• the source card (the memory card with the formats you
want to copy), and
• the target card (a memor y card you want to copy the
formats to).
CAUTION
The Card Copy function erases any formats on the target
card.
To copy a memory card, perform the following procedure:
1. Turn the write-protect switch Off on both cards.
2. Select Memory Card from the Main menu. You’ll see
Enter password:
_ _ _ _ _ _ _ _
3. Type the password and press
6
(refer to your System
Administrator’s Guide for information about passwords).
You’ll see
MEMORY CARD
< Card Delete
4. Press 1 until you see
MEMORY CARD
Card Copy >
9401/9402 Memory Card Operator’s Handbook
4
Page 9
5. Press
6
. You’ll see
Load Source Card
Press ENTER._
6. If you have not already done so, insert the source card in
the printer.
7. Press
6
. You’ll see
Reading Card
Please Wait ..._
When the printer finishes reading formats, it displays
Load Target Card
Press ENTER._
8. Remo ve the source card from the printer.
9. Insert the target card.
10. Press
6
. You’ll see
Writing Card
Please Wait ..._
A memory card can hold more data than the printer can
proces s at one tim e. If the mem ory card you are copying
holds a large volume of data, the printer prompts you to
repeat steps 6-10 again. When the Card Copy function is
complete, you’ll see
Copy Complete
Press ENTER._
Using the Memory Card
5
Page 10
11. Remove the target card and press
6
. You’ll see
MEMORY CARD
Card Copy >
12. Turn the write- protect switch on both cards On to protect
the formats .
13. Press
8
to exit to the Main menu.
Deleting from a Memory Card
You can delete formats from a memory card one at a time or
all at once.
NOTE: Be sure you are using the correct memory card
before deleting any formats.
Deleting All th e Fo rmat s on a Memor y Card
1. Turn the write-protect switch Off and insert the memory
card in the printer.
2. Select Memory Card from the Main menu. You’ll see
Enter password:
_ _ _ _ _ _ _ _
3. Type the password and press
6
(refer to your System
Administrator’s Guide for information about passwords).
You’ll see
MEMORY CARD
< Card Delete
9401/9402 Memory Card Operator’s Handbook
6
Page 11
4. Press
6
. You’ll see
CARD DELETE
All >
5. Press
6
. You’ll see
Are you sure?
< Yes
Do one of the following:
• To exit without deleting any formats, press
1
and
6
.
• To delete all the formats on the card, press
6
.
6. When the printer finishes deleting formats, it displays
MEMORY CARD
< Card Delete
NOTE: If the printe r does n ot display this message, the
formats were not deleted. Be sure the
write-protect switch is Off.
7. Remove the memory card.
8. To exit to the Main m enu, press
8
.
Deleting One Format at a Time
1. Turn the write-protect switch Off and insert the memory
card in the printer.
2. Select Memory Card from the Main menu. You’ll see
Enter password:
_ _ _ _ _ _ _ _
Using the Memory Card
7
Page 12
3. Type the password and press
6
(refer to your System
Administrator’s Guide for information about passwords).
You’ll see
MEMORY CARD
< Card Delete
4. Press
6
. You’ll see
CARD DELETE
All >
5. Press 2 until you see the name of the format you want to
delete. Then press
6
. You’ll see
Are you sure?
< Yes
You can
• press
1
and
6
to exit without deleting any formats
• press
6
to delete th e form a t.
6. When the printer finishes deleting the format, it displays
MEMORY CARD
< Card Delete
NOTE: If the printe r does n ot display this message, the
format was not del eted. Be sure the write-protect
switch is Off.
7. Remove the memory card.
8. Push the write-protect switch to On to protect any formats
still on the card.
9. Press
8
to exit to the Main menu.
9401/9402 Memory Card Operator’s Handbook
8
Page 13

Battery
The memory card uses a 3-volt lithium battery , type BR2325.
Battery sh el f li fe is approximately five years, wi th an active life
of six months. The battery cover is located on the edge of the
card.
CAUTION
If you remove the battery cover from a memory card the
formats will be erased.
NOTE: To avoi d l osing formats, it is a good idea to kee p
copies of your memory cards. Refer to "Copying
a Memory Card."
Removing the Insula ting Tab
New memory cards have an insulating tab t o pr event drain on
the batter y bef ore you use the card. You m ust r em ove thi s t ab
before using the card.
Figure 3
Tab
Using the Memory Card
9
Page 14

To remove the insulating tab from the battery, perform the
following procedure:
1. Hold the mem ory card with the Monarch logo faci ng up
and the arrows pointing away from you.
2. Push the battery lock to the left (opposite the direction of
the arrow on the bat tery cover) to unlock it.
3. Slide the battery and cover out of the memory card.
4. Remove the insulating tab from the battery cover.
5. Replace the battery in the cover with the battery brand
name facing up and s l i de the battery and cover into the
memory card as shown.
NOTE: You cannot insert the battery cover in the memory
card unles s it is in the correct position.
6. Push the bat tery lock to the right (the direction the arrow is
pointing) to lock it.
Figure 4
Battery
Cover
Battery
Unlocked
9401/9402 Memory Card Operator’s Handbook
10
Page 15

Changing the Battery
CAUTION
If any of the following conditions occur, the battery may
explode:
• a 3-volt lithi um battery, t ype BR2325 is not used
• the batter y is inc orrectly replace d
1. Hold the mem ory card with the Monarch logo faci ng up
and the arrows pointing away from you.
2. Push the battery lock to the left (opposite the direction of
the arrow on the bat tery cover) to unlock it.
3. Slide the battery and cover out of the memory card.
4. Place a new battery in the cover with the battery brand
name facing up and s l i de the battery and cover into the
memory card.
5. Push the bat tery lock to the right (the direction the arrow is
pointing) to lock it.
Using the Memory Card
11
Page 16

9401/9402 Memory Card Operator’s Handbook
12
Page 17

Page 18

Published by the Technical Communications Department.
Printed in U.S.A.
For supplies, service, or assistance call:
TOLL FREE:
1-800-543-6650 (In the U.S .A.)
1-800-263-4650 (In Canada)
Page 19

Monar ch 9401™/9402™
Options
Using a Scanner with
9401/9402 Printers
Monarch Marking Systems
A Pi tney Bowes Company
TC9401SC 6/90 ©1990 Monarch Marking Systems, Inc. All rights reserved.
Page 20

Each produ ct and program carries a respective w r i tten
warrant y, the only warranty on which the customer can rely.
Monarch reserves the right to make changes in the produ ct
and the programs and their availability at any time and without
notice. Although Monarch has made every effort to provide
complete and accurate information in this manual, Monarch
shall not be liable for any om i ssions or inaccuracies. Any
update will be incorporated in a later edition of this manual.
CAUTION
This equipm ent can interfere with radio communication . The
equipment complies with li m it s f or a Class A computing dev ic e
pursuant to FC C Ru le s, Subpart J, Part 15, which provide reasonable
protecti on against such interf erence when operated i n a com m ercial
environm ent. Operation in a residential area can cau se i nt e r ference
which the us er mu st correct at their own exp ense.
Trademarks
HP Smartwand is a trademark of Hew lett-Packard Com pany .
Nippondenso is a trademark of Nippondenso Co. LTD.
Photographic Sciences is a trademark of P hotographic Sci ences Corporatio n.
M576 3, M5764, M6097, M6098, M9401, and M9402 are tr ademarks of Monarch
Marking Systems, Inc.
Page 21

Ta ble of Contents
Using a Scanner........................................................................1
Connecting the Scanner................................................1
Selecting the Scanne r...................................................2
Selecting Auto Ent er......................................................4
i
Page 22

9401/9402 Operator’s Handbook
ii
Page 23

Overview
You can attach a scanner to a 9401 or 9402 printer . Using the
scanner, you can automatically enter bar code information in
your formats.
Here is the lis t of scanners you can attach to the 9401/ 9402.
• Monarch M6098
• Monarch M5763
• Monarch M5764
• Nippondenso Scanner
For information about using the scanner, refer to the
instruct i ons th at ca me with it.
Connecting the Scanner
Connect th e scanner cable to the connector on the bac k o f the
printer as shown.
Connect Scanner
Cable Here
Figu re 1
1
Page 24

Setting the Printer
1. From the Main Menu, press 1 or 2 until you see
MAIN MENU
< Setup >
2. Press
6
. You’ll see
SETUP
Supply >
3. Press 2 until you see
SETUP
< Port Settings >
4. Press
6
. You’ll see
PORT SETTINGS
User Comm >
5. Press 2 until you see
PORT SETTINGS
< Scanner
6. Press
6
. You’ll see the last selectio n, for example
SCANNER
< Auto Enter
9401/9402 Scanner Operator’s Handbook
2
Page 25

7. Press 1 until you see
SCANNER
< Scanner Type
8. Press
6
. You’ll see the last selectio n, for example
SCANNER TYPE
< HP Smartwand >
The options for Scanner T ype are listed below.
If you have this type Select this scanner model
No Scanner None
M6098 HP Smar tw and
Nippondenso Nippondenso
M5763 Photo Sci ences
M5764 Photo Sci ences
9. Press 1 or 2 to display the correct scanner type,
then press
6
. You’ll see
SCANNER
< Scanner Type
10. Press
8
twice if you want to return to the Setup menu.
Setting Up the Scanner
3
Page 26

Selecting the Data Entry Mode
There are two ways to enter data on the 9401/9402 wi th a
scanner.
• In Auto Enter mode, the printer reads a successful scan,
then immediately goes to the next prompt.
• When not in Auto Enter mode, the operator must press
6
to proceed to the next prompt after s canning.
1. From the Main Menu, press 1 or 2 until you see
MAIN MENU
< Setup >
2. Press
6
. You’ll see
SETUP
Supply >
3. Press 2 until you see
SETUP
< Port Settings >
4. Press
6
. You’ll see
PORT SETTINGS
User Comm >
5. Press 2 until you see
PORT SETTINGS
< Scanner
9401/9402 Scanner Operator’s Handbook
4
Page 27

6. Press
6
. You’ll see the last selectio n, for example
SCANNER
Scanner Type >
7. Press 2 until you see
SCANNER
Auto Enter >
8. Press
6
. You’ll see the last selectio n, for example
AUTO ENTER
< Yes
The options for Auto Enter are
Yes At data entry, the printer displays the pro m pt fo r the
next field immediately after a success ful scan.
No At data entry, the operator must press
6
after
scanning the data. Then the printer displays a
prompt for the next field.
9. Press 1 or 2 to display the option you want, then
press
6
. You’ll see
SCANNER
< Auto Enter
10. Press
8
twice if you want to return to the Setup menu.
Setting Up the Scanner
5
Page 28

Setting the M5763/M5764 Scanner
The M5763 and M5764 scanners require specific settings to
work with the 9401/9402 printer.
Before you begi n using this scanner, scan the three bar codes
below in the order shown.
1. This bar code resets the scanner to
default settings (ZA).
2. This bar code s ets inverse polarity on
the scanner (CD).
3. This bar code enables full continuous
power on the scanner (@A).
Refer to your scanner manual for details on these and other
settings and tests.
Models 5763/5764: TC5763OI
TC5764AD
Model 6098: TC6098AD
9401/9402 Scanner Operator’s Handbook
6
Page 29

Page 30

For supplies, service, or assistance call:
TOLL FREE:
1-800-231-7700 (Service)
1-800-543-6650 (Retail Sales)
1-800-243-4015 (Industrial Sales)
Printed in U.S.A.
Page 31

Monar ch 921™
Supply Dereele r
Operating Instructions
Monarch Marking Systems
A Pi tney Bowes Company
TC0921OI 6/91 ©1991 Monarch Marking Systems, Inc. All rights reserved.
Page 32

Page 33

Overview
The 921 Supply Dereeler holds large diameter supply rolls for
9401/9402 printers. You can use up to 9.5" diameter rolls with
4.0" diame ter c ores.
Installing the Dereeler is simple:
• position i t behind the printer
• install a new p rint er back cove r
• place the supply roll on the supply reel
• feed the supply through the back cover and into the
printhead.
Complete ins tallation and operati ng i nstructions are given on
the following pages.
1
Page 34

921 Operating Instructions
2
Page 35

Installation
1. Turn off the printer power switch and unplug the power
cord.
2. Open th e pri nter top cover.
3. Remo ve t he st andard supply roll.
4. Unsnap the back cover from the printer housing as shown.
5. Snap th e new back cover (with feed slot) it into place on
the printer.
Back
Cover
3
Page 36

6. Position the Dereeler in back of the printer. Lift up the
back of the printer and place the printer rear feet in th e
Dereeler mounting holes as shown.
7. Route any cables on the back of the printer to the right or
left below the Dereeler base.
Mounting
Holes
Supply
Supply
Guide
Feed Slot
921 Operating Instructions
4
Page 37

Loading Supplies
1. Place the supply roll on the supply reel .
NOTE: Maximum s upply width is 2.5 inches.
2. Fee d the s uppl y around the outside of the Dereeler supply
guide and int o the fe ed slot of the printer back cover as
shown.
3. Conti nue feeding the supply through t he pri nthead and out
the exit chute (Refer to your Equipment Manual if
necessary).
4. Close the p r i nter cover.
5. Plug i n the pow er cord.
6. Turn on the power switch.
Feed Slot
5
Page 38

921 Operating Instructions
6
Page 39

Operation
When using large diameter supply rolls, operate the printer as
you normally would with the following exceptions:
1. For ribbon operation, it may be necessary to replace the
ribbon before the supply runs out.
2. For backing paper take-up operation, it may be necessary
to shut off the printer and remove the accumulated backing
paper.
7
Page 40

921 Operating Instructions
8
Page 41

Each produ ct and program carries a respective w r i tten
warrant y, the only warranty on which the customer can rely.
Monarch reserves the right to make changes in the produ ct
and the programs and their availability at any time and without
notice. Although Monarch has made every effort to provide
complete and accurate information in this manual, Monarch
shall not be liable for any om i ssions or inaccuracies. Any
update will be incorporated in a later edition of this manual.
Page 42

Printed in U.S.A.
For supplies, service, or assistance call:
TOLL FREE:
1-800-231-7700 (Service)
1-800-543-6650 (Retail Sales)
1-800-243-4015 (Industrial Sales)
 Loading...