

Page 1

DC6000 DATA RECORDER
USER MANUAL & REFERENCE GUIDE
REV 1.10.2 JAN 2012
Page 2

Warnings and Safety Precautions
1.0 TABLE OF CONTENTS & GENERAL INFORMATION:
1.0 Table of Contents & GENERAL INFORMATION: ................................... ii
1.1 Trademarks ..................................................................................................................... vii
1.2 Symbols ........................................................................................................................... vii
1.3 Warning and Safety Notice ............................................................................................. vii
2.0 Overview .................................................................................................. 1
2.1 General Description .......................................................................................................... 1
2.2 System Overview .............................................................................................................. 2
2.3 Recorder Front .................................................................................................................. 4
2.3.1 Display Area .................................................................................................................................................... 4
2.3.2 Media Door ...................................................................................................................................................... 5
2.3.3 Status Indicator ................................................................................................................................................ 5
2.3.4 IR COMM Port ................................................................................................................................................. 5
2.3.5 Stylus ............................................................................................................................................................... 5
2.4 Recorder Rear Panel ......................................................................................................... 6
2.4.1 Power Supply .................................................................................................................................................. 6
2.4.2 Analog Inputs ................................................................................................................................................... 6
2.4.3 Input/Output Module ........................................................................................................................................ 7
2.4.4 Computer Interface ................................................................................................ ................................ .......... 7
2.5 Files ................................................................................................................................... 8
2.5.1 Configuration Files ........................................................................................................................................... 8
2.5.2 Data Files ........................................................................................................................................................ 9
2.5.3 Activity Configuration Files .............................................................................................................................. 9
2.5.4 Miscellaneous Log Files .................................................................................................................................. 9
2.6 Exhibitor Software ............................................................................................................ 9
2.7 QUICK START GUIDE ..................................................................................................... 10
2.8 Keyboarding .................................................................................................................... 11
2.9 Help .................................................................................................................................. 11
2.10 Activity Lights ................................................................................................................. 11
2.11 Security............................................................................................................................ 11
2.11.1 Security Levels .............................................................................................................................................. 12
2.11.2 Remote Access Passwords ........................................................................................................................... 12
3.0 Installation and Wiring .......................................................................... 13
3.1 Equipment Handling ....................................................................................................... 13
3.1.1 Initial Inspection ............................................................................................................................................. 13
3.1.2 Unpacking Procedure .................................................................................................................................... 13
3.1.3 Detected Damage .......................................................................................................................................... 13
I. Page ii 1/06/2012 REV 1.10.2
Page 3

Warnings and Safety Precautions
3.1.4 Equipment Return .......................................................................................................................................... 13
3.1.5 Storage .......................................................................................................................................................... 13
3.1.6 Part Numbering.............................................................................................................................................. 14
3.2 Environment and Location ............................................................................................. 15
3.3 Installation ....................................................................................................................... 15
3.3.1 Panel Mounting .............................................................................................................................................. 16
3.4 Wiring Specifications and Procedures .......................................................................... 18
3.4.1 Power Requirements ..................................................................................................................................... 18
3.4.2 Power Connections ........................................................................................................................................ 18
3.4.3 Signal Input Wiring......................................................................................................................................... 19
3.4.4 Analog Inputs ................................................................................................................................................. 20
3.4.4.1 Thermocouple Inputs ........................................................................................................................................... 20
3.4.4.2 Resistance Temperature Detector (RTD) Inputs ................................................................................................... 20
3.4.4.3 Linear Inputs ........................................................................................................................................................ 20
3.4.4.4 Potential Free Contacts ........................................................................................................................................ 20
3.4.4.5 Frequency ............................................................................................................................................................ 21
3.5 Relay Output, Contact Input ........................................................................................... 22
3.6 Ethernet ........................................................................................................................... 22
3.7 USB Connection .............................................................................................................. 23
3.8 Audio Connection ........................................................................................................... 23
3.9 Mouse and Keyboard Connection ................................................................................. 23
3.10 24Vdc Isolated Output (Option) ...................................................................................... 24
3.11 Isolated Serial Interface (Option) ................................................................................... 24
4.0 Functional Description ......................................................................... 25
4.1 Display Elements ............................................................................................................ 25
4.1.1 Live Display Area ........................................................................................................................................... 25
4.1.2 Task Bar ........................................................................................................................................................ 25
4.2 Utility Setup Menu ........................................................................................................... 26
4.3 Alarm, Event and Activity Logs ...................................................................................... 28
4.4 Record Session ............................................................................................................... 28
4.5 Configuration Manager ................................................................................................... 29
4.6 Sending Email ................................................................................................................. 30
4.7 User Login ....................................................................................................................... 31
4.8 Display Utilities ............................................................................................................... 31
4.8.1 Display Brightness ......................................................................................................................................... 31
4.8.2 Background Color .......................................................................................................................................... 32
4.9 Channel Reset ................................................................................................................. 32
4.10 Special Events ................................................................................................................. 32
I. Page iii 1/06/2012 REV 1.10.2
Page 4

Warnings and Safety Precautions
4.10.1 Record on Alarm ............................................................................................................................................ 32
4.10.2 Record on External Event .............................................................................................................................. 32
4.10.3 Email on Alarm Event .................................................................................................................................... 33
4.11 Turning the unit off ......................................................................................................... 33
4.12 Annotating Trends .......................................................................................................... 34
4.12.1 Drawing on the Screen .................................................................................................................................. 34
4.12.2 Adding a Text Message ................................................................................................................................. 35
4.13 Browsing Historic Data ................................................................................................... 35
4.13.1 Zoom and Compress Data ............................................................................................................................. 36
4.13.2 View Memos and Bitmaps ............................................................................................................................. 36
4.13.3 Using the Cursor ............................................................................................................................................ 37
4.13.4 Using Browser Jump To ................................................................................................................................ 37
4.14 Browsing Annotations .................................................................................................... 38
4.15 Saving Files to Remote FTP Servers. ............................................................................ 38
5.0 Recorder Setup ..................................................................................... 39
5.1 Input Channels ................................................................................................................ 39
5.1.1 Master Channel Setup ................................................................................................................................... 39
5.1.2 Channel Setup ............................................................................................................................................... 40
5.1.2.1 MIN MAX AVG RESET ........................................................................................................................................ 41
5.1.3 Channel Type Setup ................................ ................................................................ ...................................... 42
5.1.3.1 Linear Input .......................................................................................................................................................... 42
5.1.3.2 Resistance Input .................................................................................................................................................. 42
5.1.3.3 Thermocouples and RTDs ................................................................................................................................... 43
5.1.3.4 Calculated Input ................................................................................................ ................................................... 44
5.1.3.5 Conditional Input ................................................................ ................................ .................................................. 46
5.1.3.6 Gated Timer ......................................................................................................................................................... 46
5.1.3.7 Totalizer ............................................................................................................................................................... 47
5.1.3.8 Frequency/Pulse Count ........................................................................................................................................ 48
5.1.3.9 Moving Average ................................................................................................ ................................................... 50
5.1.3.1 Energy ................................................................................................................................................................. 51
5.1.3.2 EnergySteam ....................................................................................................................................................... 52
5.2 Display Builder ................................................................................................................ 53
5.2.1 Building the Display ....................................................................................................................................... 53
5.2.2 Editing ............................................................................................................................................................ 54
5.2.3 Rotate List ..................................................................................................................................................... 55
5.3 Widgets ............................................................................................................................ 56
5.3.1 Digital Displays .............................................................................................................................................. 56
5.3.1.1 Digital Display Setup ............................................................................................................................................ 56
5.3.1.2 Displaying Min, Max or Average Values ............................................................................................................... 57
5.3.2 Bar Graphs .................................................................................................................................................... 58
I. Page iv 1/06/2012 REV 1.10.2
Page 5

Warnings and Safety Precautions
5.3.2.1 Bar Graph Setup ................................................................ ................................ .................................................. 58
5.3.3 Trends ........................................................................................................................................................... 60
5.3.4 Trend Setup ................................................................................................................................................... 61
5.3.4.1 Trend Setup Window ............................................................................................................................................ 61
5.4 Alarms ............................................................................................................................. 63
5.4.1 Alarm Master Setup ................................................................ ................................ ....................................... 64
5.4.1.1 Alarm Setup ......................................................................................................................................................... 65
5.5 Digital Input/Output......................................................................................................... 66
5.5.1 Digital Output Setup ....................................................................................................................................... 67
5.5.2 Digital Input Setup ......................................................................................................................................... 68
5.6 Record Setup................................................................................................................... 70
5.6.1 Select Channels............................................................................................................................................. 71
5.6.2 Media and Filename ...................................................................................................................................... 71
5.6.3 Record Rate .................................................................................................................................................. 71
5.6.4 What to Record .............................................................................................................................................. 71
5.6.4.1 Point type – Max Min Average. ............................................................................................................................. 71
5.6.5 Timed Record ................................................................................................................................................ 72
5.6.6 Split Files ....................................................................................................................................................... 72
5.6.7 Triggered Record ........................................................................................................................................... 72
5.6.8 Media Alarm .................................................................................................................................................. 73
5.7 System Administrative Menu ......................................................................................... 74
5.7.1 Temperature Compensation .......................................................................................................................... 76
5.7.2 System Setup ................................................................................................................................................ 76
5.7.2.1 Mouse Pointer ...................................................................................................................................................... 76
5.7.2.2 Config Auto Save ................................................................................................................................................. 76
5.7.2.3 Pop up Keyboard ................................................................................................................................................. 76
5.7.2.4 FTP Server Enable ............................................................................................................................................... 77
5.7.2.5 Modbus Settings .................................................................................................................................................. 77
5.7.2.6 NTP Time Server ................................................................................................................................................. 77
5.7.2.7 Unit Tag ............................................................................................................................................................... 77
5.7.2.8 Menu Timeout ...................................................................................................................................................... 77
5.7.2.9 50/60 Hz Filter ...................................................................................................................................................... 77
5.7.2.10 System Alarm Setup ............................................................................................................................................ 78
5.7.3 Date/Time Setting .......................................................................................................................................... 78
5.7.4 User Setup (Password Management) ............................................................................................................ 80
5.7.5 System Activity Logs ...................................................................................................................................... 81
5.7.6 File Explorer .................................................................................................................................................. 82
5.7.7 Network Settings............................................................................................................................................ 82
5.7.8 Web User Manager ........................................................................................................................................ 83
5.7.9 Email / FTP Settings ...................................................................................................................................... 84
5.7.9.1 FTP Remote Setup .............................................................................................................................................. 84
I. Page v 1/06/2012 REV 1.10.2
Page 6

Warnings and Safety Precautions
5.7.10 Set ActiveSync Password .............................................................................................................................. 85
5.7.11 Registry ......................................................................................................................................................... 86
5.7.12 Languages ..................................................................................................................................................... 86
5.7.13 System ReFlash ............................................................................................................................................ 86
6.0 Communication ..................................................................................... 88
6.1 World Wide Web .............................................................................................................. 88
6.2 Web Based FTP Manager ............................................................................................... 90
6.3 Ethernet Protocols .......................................................................................................... 92
6.3.1 OPC Server ................................................................................................................................................... 92
6.3.2 Modbus Server .............................................................................................................................................. 93
6.3.2.1 Modbus Status Registers ..................................................................................................................................... 93
6.3.2.2 Modbus Data Registers ........................................................................................................................................ 93
6.4 USB Connections ............................................................................................................ 95
6.5 WiFi Connection .............................................................................................................. 96
6.6 Utility Programs .............................................................................................................. 98
6.6.1 FTP Manager ................................................................................................................................................. 98
6.6.2 Remote Control............................................................................................................................................ 101
6.6.2.1 Remote Display .................................................................................................................................................. 101
6.6.2.2 Remote Manager ............................................................................................................................................... 102
7.0 Instrument Care and Maintenance ..................................................... 103
7.1 Touch Screen ................................................................................................................ 103
7.2 Cleaning Instructions ................................................................................................... 103
7.3 Calibration ..................................................................................................................... 103
7.3.1 Calibrating Linear Voltage Inputs: ................................................................................................................ 104
7.3.1.1 Set Channel ...................................................................................................................................................... 104
7.3.1.2 Zero Cal ............................................................................................................................................................ 104
7.3.1.3 Full Cal .............................................................................................................................................................. 104
7.3.1.4 Store Cal ................................................................................................ ........................................................... 105
7.3.2 Calibrating the RTD Current Source ................................................................ ............................................ 105
7.3.2.1 Zero Cal RTD ..................................................................................................................................................... 105
7.3.2.2 Current Cal RTD ................................................................................................................................................ 105
7.3.3 Calibrating Frequency: ................................................................................................................................. 105
Appendix A – Technical Specifications ....................................................... 107
Appendix B – Digital Input Voltage Adjustment .......................................... 111
B.1 ANALOG MODULE: ....................................................................................................... 111
B.2 DIGITAL IO MODULE: ................................................................................................... 112
Appendix C – Manual Revisions .................................................................. 113
I. Page vi 1/06/2012 REV 1.10.2
Page 7

Warnings and Safety Precautions
Refer to manual for instructions see Section 1.3 below.
Caution - Risk of electric shock
Earth (ground) terminal
Directive 2002/96/EC WEEE: Waste Electrical and Electronic Equipment
NOTE
The contents of this manual are correct at the time of issue. The contents may change at any time without prior
notification. This is due to continuous developments to the recorder and its functionality.
1.1 Trademarks
Microsoft, MS-DOS, Windows, Windows 2000, Windows XP and Windows CE are all registered trademarks
of Microsoft Corporation.
CompactFlash™ and CF (logo) are trademarks of the Compact Flash Association (CFA).
For the purpose of the manual the ™ and ® symbols will not follow their own trademark names or registered
trademark names.
Company names and Product names mentioned in this manual are trademarks or registered trademarks of
their individual owners.
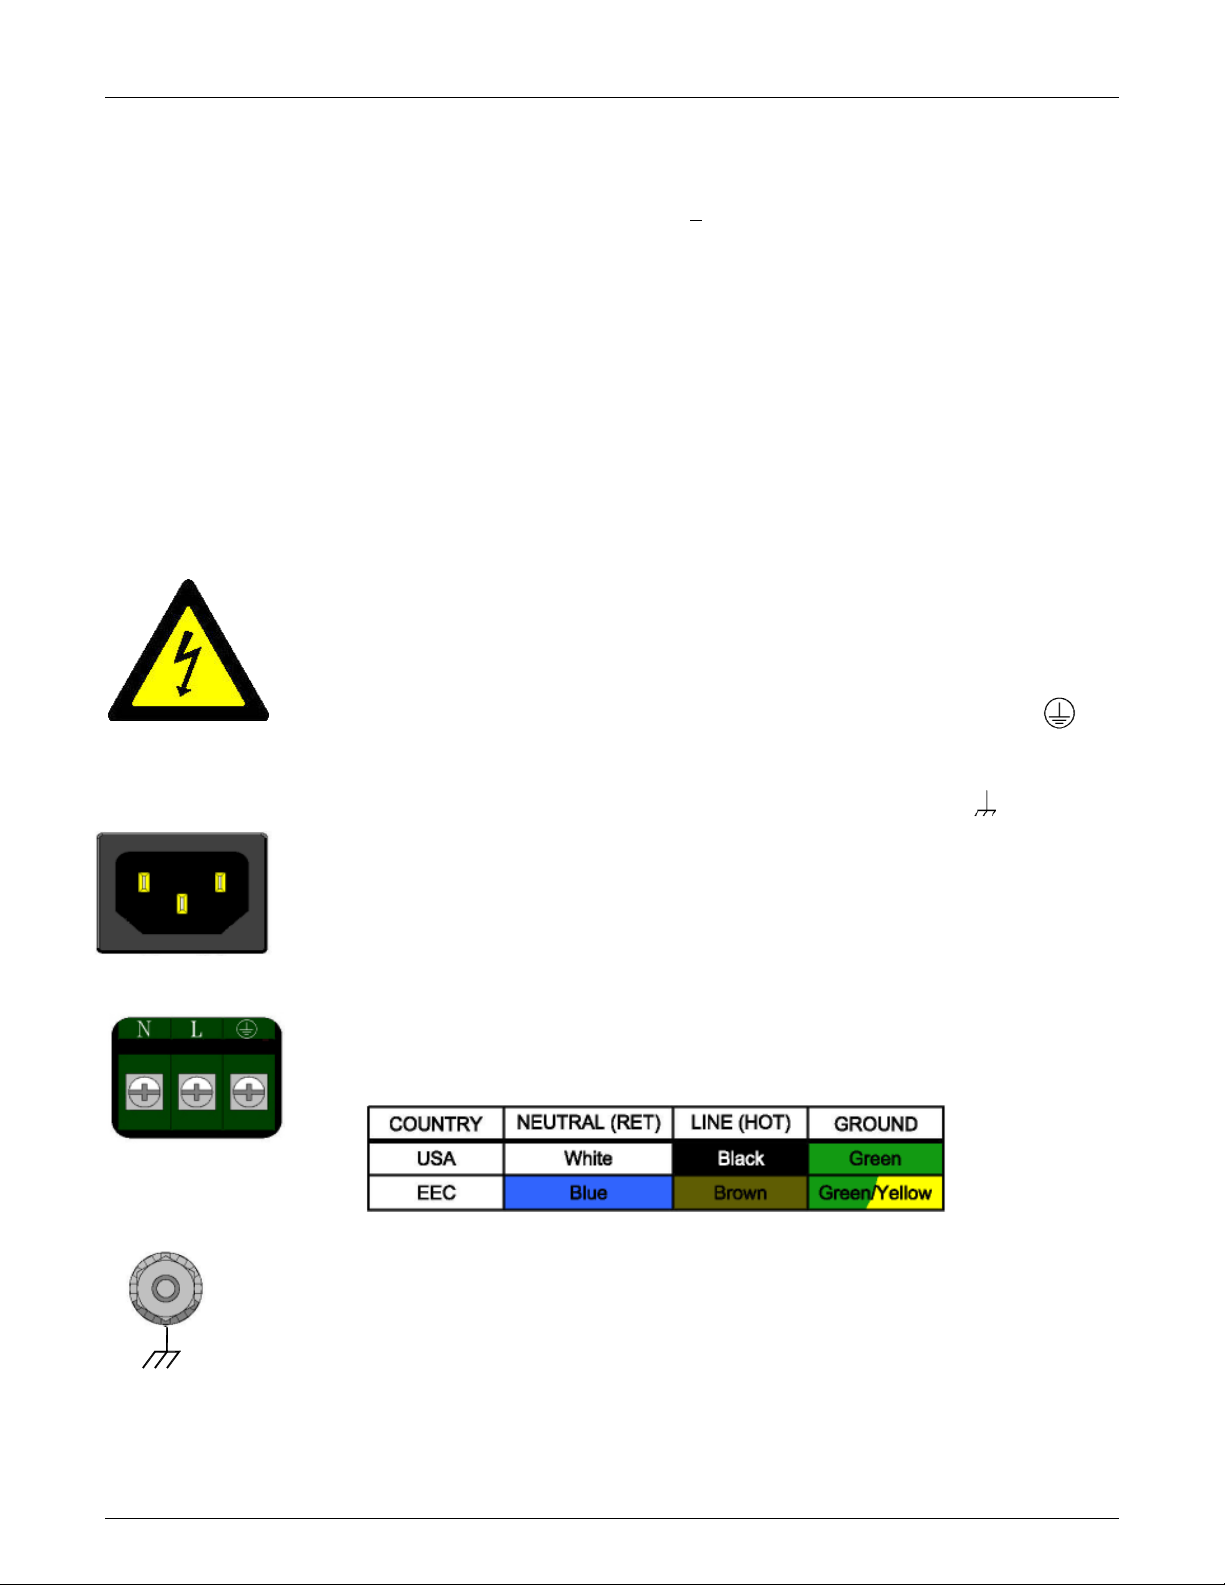
1.2 Symbols
One or more of the following symbols may appear on the recorder labeling.
1.3 Warning and Safety Notice
This Safety Notice has been included to emphasize the DANGER OF HAZARDOUS VOLTAGES on
the REAR TERMINAL PANEL of your instrument. USE EXTREME CAUTION WHEN INSTALLING
OR SERVICING your instrument. Please read the warnings below and the entire contents of
Section 3 – “Installation and Wiring” within this manual before attempting to install or service your
instrument.
1. Before any connections are made to the recorder, ensure the protective earth terminal is connected to a
protective conductor. The chassis ground terminal is indicated thus -
WARNING
This warning sign on the unit cautions the user to read this manual to determine the nature
of the hazard and any precautions which should be taken.
Any interruption of the protective conductor inside or outside the recorder, or disconnection of the
protective earth terminal is likely to make the recorder dangerous under some fault conditions.
Intentional interruption is prohibited.
NOTE: In order to comply with the requirements of safety standard EN61010, the recorder must have
one of the following as a disconnecting device, located within easy reach of the operator, and be
labeled as the disconnecting safety device:
A switch or circuit breaker which complies with the requirements of IEC 60947-1 and IEC 60947-3
I. Page vii 1/06/2012 REV 1.10.2
Page 8
Warnings and Safety Precautions
A separable coupler which can be disconnected without the use of a tool
A separable plug, without a locking device, to mate with a socket outlet in the building
2. The protective earth terminal must remain connected (even if the recorder is isolated from the mains
supply) if any of the measuring, communications, or relay terminals are connected to hazardous voltages.
3. Whenever it is likely that protection has been impaired, the recorder should be made inoperative and
secured against operation. Contact the factory for assistance.
4. Any adjustment, maintenance and repair of the opened recorder under voltage should be avoided as
far as possible and, if inevitable, should be carried out only by a skilled person who is aware of the hazard
involved. All repairs should be carried out only by authorized service personnel or returned to an
authorized repair center.
5. Where conductive pollution such as condensation or conductive dust is present, adequate air
conditioning, filtering and/or sealing must be installed.
6. Signal and supply voltage wiring should be kept separate from one another. Where this is
impractical, shielded cables should be used for the signal wiring.
7. This unit contains a Nickel Metal Hydride (NiMH) battery pack which must be disposed of
properly. Replace only with the same type of battery pack. Replacement should be done only
by a factory certified technician.
WARNING: Non-rechargeable batteries may explode or leak when charged.
8. Input Terminal (CHAN 1 – CHAN 6 or CHAN 1 – CHAN 12) voltages NOT TO EXCEED 30Vdc. Max
transient voltage not to exceed 50Vdc. This equipment is intended for use in Measurement
Category I. This Equipment is NOT intended for use in Measurement Categories II, III and IV
9. If the equipment is used in a manner not specified by the manufacturer, the protection provided
by the equipment might be impaired or inadequate.
For Technical support or additional information contact the Manufacturer:
Monarch Instrument
15 Columbia Drive
Amherst, NH 03031
Tel 603-883-3390 Email: support@monarchinstrument.com
In order to comply with EU Directive 2002/96/EC on Waste Electrical and Electronic Equipment
(WEEE): This product may contain material which could be hazardous to human health and the
environment. DO NOT DISPOSE of this product as unsorted municipal waste. This product needs to
be RECYCLED in accordance with local regulations, contact your local authorities for more
information. This product may be returnable to your distributor for recycling - contact the distributor
for details.
I. Page viii 1/06/2012 REV 1.10.2
Page 9

Section 2 - Overview
2.0 OVERVIEW
This manual applies to Firmware version 1.0.025 and above. This section gives a system overview of the recorder
and the basic elements involved.
2.1 General Description
The recorder is an 18 channel unit capable of measuring 6 or 12 Signal inputs which can be a combination of linear
inputs – voltages up to 24 Vdc or current up to 50 mAdc, thermocouples, RTDs, or Frequency. Those channels not
associated with real inputs can be assigned as gated timers, totalizers, calculated or conditional inputs which are
referred to as virtual channels. The recorder is extremely versatile and can be configured in many different ways to
suit the user’s environment. The user can also install an optional digital input/output module providing up to 12
potential free contact closures and up to 6 opto-isolated digital inputs that can be set to silence alarms, reset
contacts and start recordings.
The recorder’s firmware is based on the Windows CE embedded operating system providing advanced
connectivity and features. The system is Ethernet aware and runs as a secure web server providing browser
accessibility via web pages and as an ftp server. It also runs an OPC (Open Connectivity) and Modbus over
Ethernet server allowing connectivity to a large selection of third party Data Access Specification compliant
software and the companion Exhibitor Software, providing real time data update over Ethernet and off line data
analysis. The recorder can be set up to send emails in the event of an alarm. See Section 4.10.3 Email on Alarm
Event for more details.
The recorder can save data, alarms and events to a number of sources. The primary storage medium is to
compact flash card that can be locked in the unit. Alternatively the unit can record to internal memory or to remote
FTP servers. Data is saved in an ADO (ActiveX Data Objects) database and is encrypted for security purposes.
Internal memory can be expanded using a Secure Digital (SD) Card that plugs into the rear of the device.
The recorder is security enabled. If password protection is turned on, the unit requires the user to log in to
operate. There are three classes of operators with different access rights – administrator, manager and user. All
operations are logged to the alarm and event log and user privileges can be set to expire by date. The unit can be
set to automatically log users out after a preset time.
In order to use the recorder the user has to set up various parameters to customize the unit to the environment.
This set up is referred to as the configuration. Once configured, the settings can be saved to a configuration file. A
number of default configurations are provided and any of these can be loaded as a default.
I. Page 1 1/06/2012 REV 1.10.2
Page 10
Section 2 - Overview
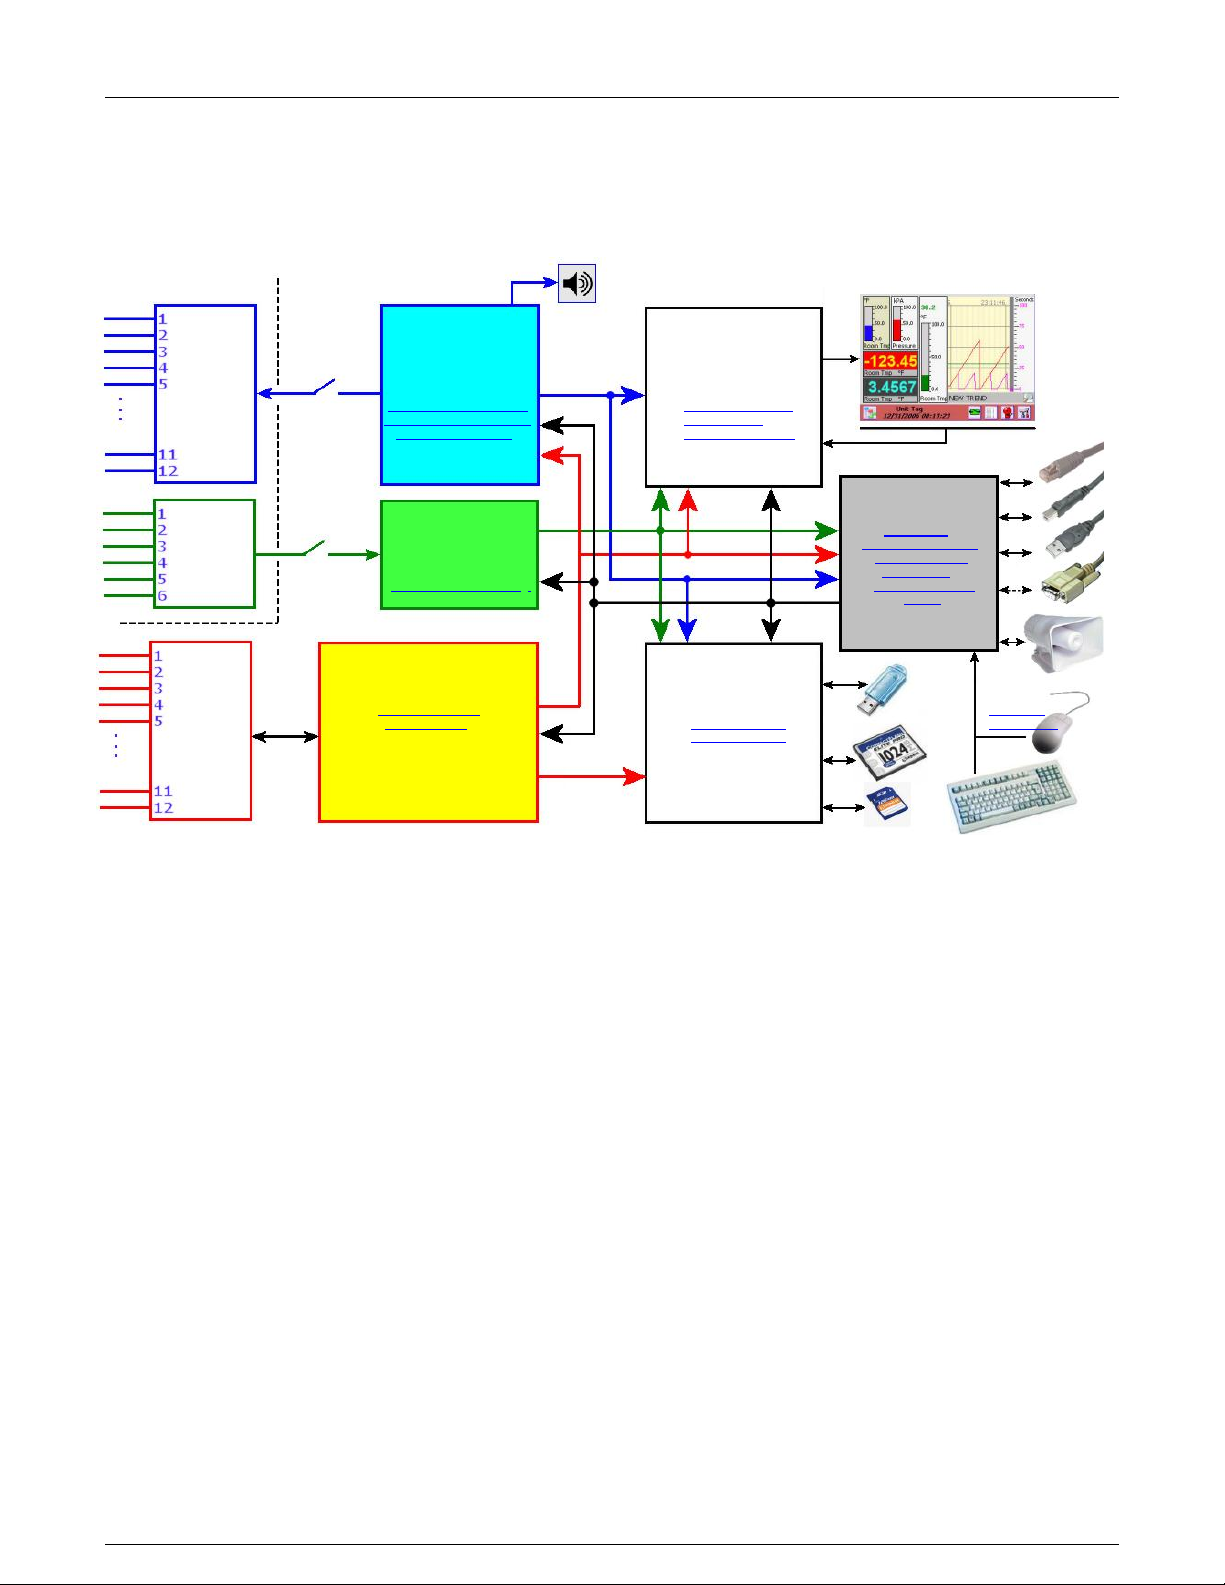
Figure 2-1 System Overview
DIGITAL
INPUTS
ANALOG
INPUTS
RELAY
OUTPUTS
MASTER
ENABLE
MASTER
DATA
MANAGER
DIGITAL
MANAGER
ALARM
MANAGER
DISPLAY &
KEYBOARD
MANAGER
DATA
STORAGE
MANAGER
SYSTEM
MANAGER
USB A/B
RS232/485
AUDIO IO
2.2 System Overview
Refer to the figure below:
ALARM MASTER SETUP DISPLAY BUILDER
DIGITAL OUTPUT SETUP ROTATE LIST
ALARM EVENT LOG WIDGET CONTROL
SYSTEM SETUP
LANGUAGE
SYSTEM SECURITY
ENABLE
EMAIL
The recorder block diagram shows the major elements of the unit.
The Analog Inputs module scans the live inputs (6 or 12 channel) at a rate of 10 times per second per channel,
converting the analog inputs to digital values and applying a time stamp to the digitized data. The Data Manager
collects this data at a rate of 120 samples per second from the Analog Inputs module and processes it in real
time applying any scaling or linearization as required by user programming, and holds it in a buffer for use by the
rest of the system. This process has the highest priority and runs irrespective of whatever other activity is going
on in the recorder. Data is fed on demand to the following:
Data Storage Manager receives data at a rate set by the user for recording to the media. The media is selected
by the user – compact flash, USB device or internal memory (SD card). The data is buffered till there is a suitable
amount and is then flushed to the selected media.
Display & Keyboard Manager receives data at a rate to satisfy the displays setup by the user, trends, digital or
bar graphs.
Alarm Event Manager receives all data required to do comparison to any user set up alarm. If any alarm is
exceeded the Alarm Event Manager will perform the required user set action, including sounding the alarm,
closing any contacts, updating the display, initiating an email and making an entry in the log.
System Manager receives all data required to keep the various communications servers up to date. This includes
the web, Modbus and OPC servers, and ftp data files.
EVENT
INPUT
DIGITAL INPUT SETUP … .. CONFIGURATION
CHANNEL SETUP MOUSE &
CALIBRATION RECORD SETUP KEYBOARD
FILE EXPLORER
ETHERNET
I. Page 2 1/06/2012 REV 1.10.2
Page 11

Section 2 - Overview
The Data Manager is also controls the Analog Inputs calibration process. This is a privileged operation and
allows an administrator to recalibrate the conversion factors and offsets on the various inputs and their associated
ranges. All units are shipped fully calibrated with a default set of calibration parameters stored in non-volatile
memory which may be recalled at any time.
The Data Storage Manager is used to set up the recording parameters required by the user. Recordings can be
started by the user or can be triggered to start as a result of an external event, an alarm condition or at a preset
time, once or on a daily basis. Files can be split into manageable sizes and archived to a remote server. There is
also a File Explorer. This is a privileged operation which enables an administrator to rename, copy or delete files
and move files between the various media.
The Alarm Event Manager is used to set up the various alarms on the channels and route events to the
(optional) relay outputs. Various alarm types can be set. The operation of the (optional) relay contacts are also
defined here. This module processes data in real time checking it against the preset alarm conditions and reacting
accordingly as described above. There is a (soft) master enable switch which allows the user to configure alarms
without affecting the actual (optional) relay contacts.
The Digital Input Manager is used to define the operation of the (optional) isolated digital inputs and process
these inputs according to the user set conditions when they occur. Digital inputs can be used to reset timers or
totalizers, acknowledge and reset alarms, force events or start recording. There is a (soft) Master enable switch
which allows the user to configure the (optional) digital inputs without affecting the actual operation of the
recorder.
The Display & Keyboard Manager controls the content of the graphic display and interprets the input on the
display touch screen and passes this information to where it is required. The user can create an infinite number of
visual screens using a combination of widgets – bar graphs, trends or digital displays. All the other modules
communicate with the Display Manager to provide status information to the user.
The System Manager controls the overall operation of the recorder and prioritizes events as required. It also
manages system security and handles the administrative tasks such as importing or exporting configurations. It
services external requests (via the communication ports), controls the email and configures the unit at startup. It
also deals with any peripherals and routes the information accordingly.
I. Page 3 1/06/2012 REV 1.10.2
Page 12
Section 2 - Overview
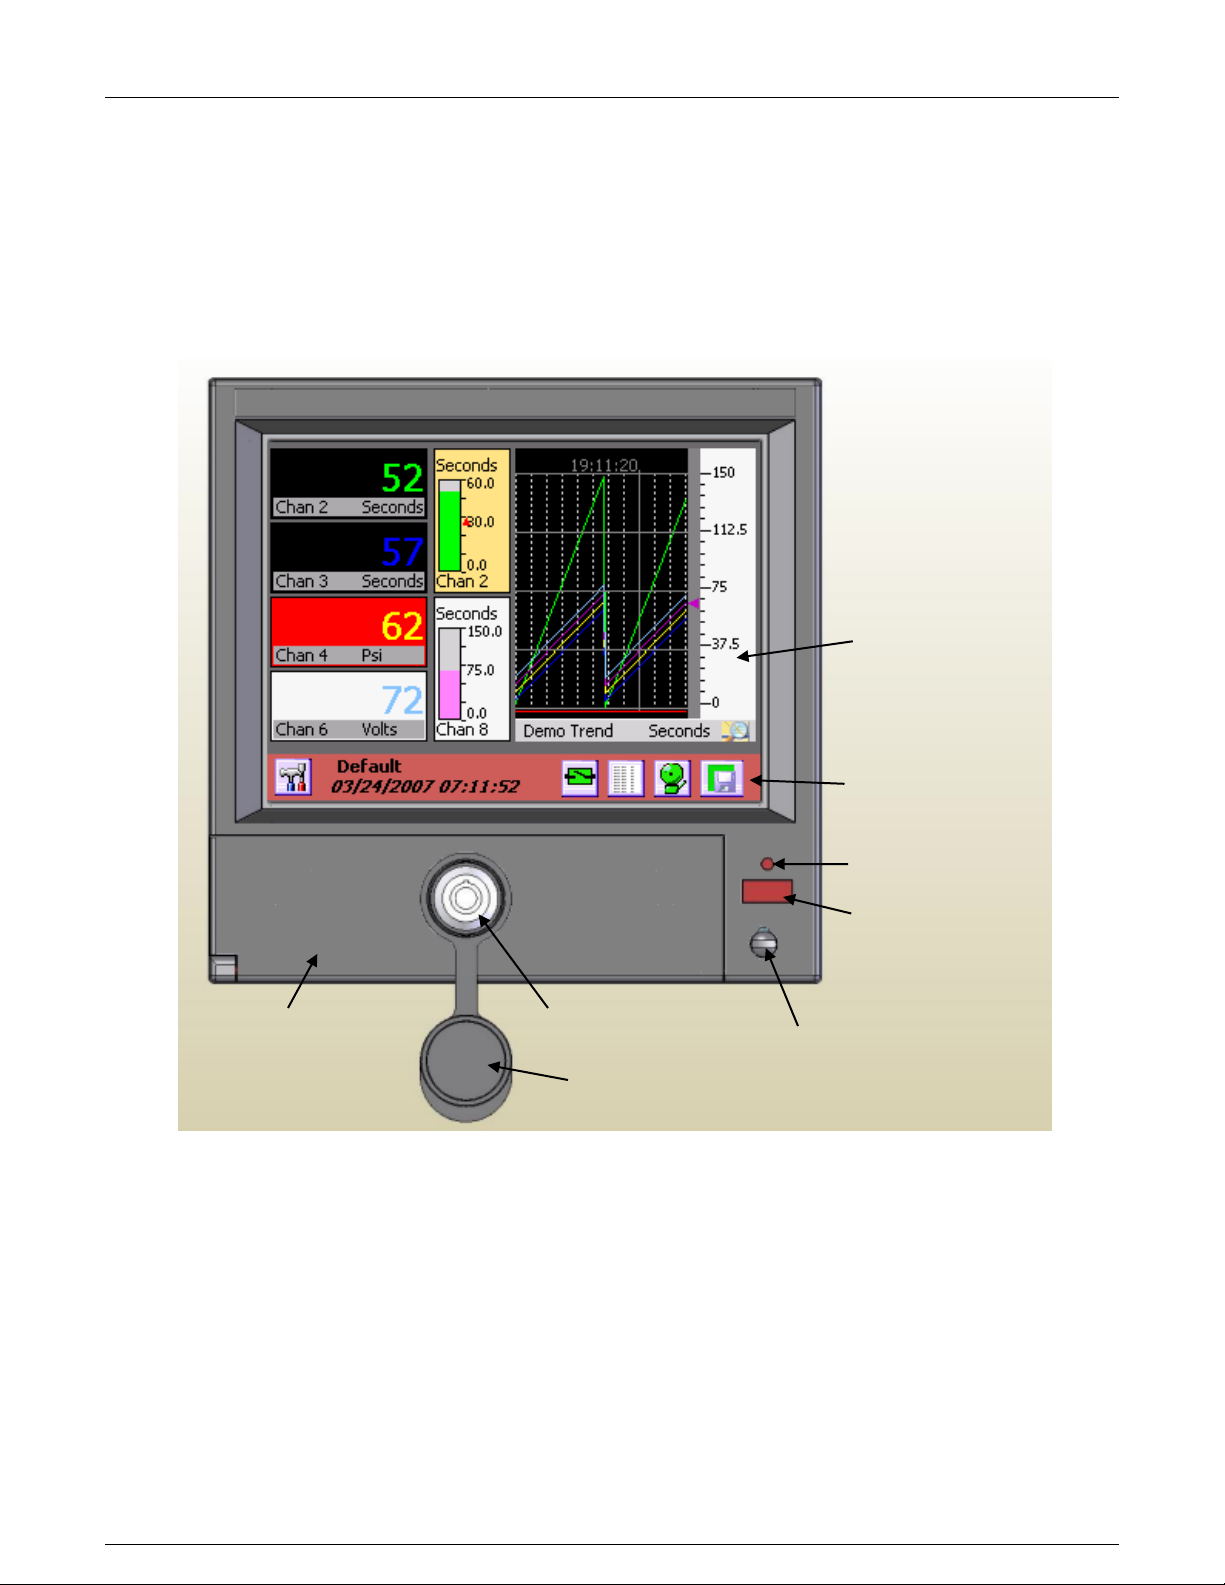
Figure 2-2 Recorder Front View
DISPLAY AREA
STATUS
INDICATOR
IR COMM PORT
STYLUS
MEDIA DOOR
LOCK
WATERPROOF
LOCK COVER
TASK BAR
2.3 Recorder Front
Figure 2-2 shows the front view of the recorder. The recorder has a ¼ VGA color display with touch screen.
Below the display are a lockable media door, status indicator, IR COMM port and stylus used for data entry on the
display.
The recorder is intended to be panel mounted and if mounted correctly using the supplied gasket, the unit is
waterproof to IP65 when the media door is closed and the waterproof lock cover is in place.
I. Page 4 1/06/2012 REV 1.10.2
2.3.1 Display Area
The recorder has a ¼ VGA color display (320 x 240 pixels) and can display 24 million colors. The display has
a touch screen over it and is fully interactive. The screen consists of two distinct areas – the task bar with
icons along the bottom of the screen and the live display which is that area above the task bar showing the
live data in either trend, bar graph or digital display widgets. A full description of this is given in Section 3.0.
Page 13

Section 2 - Overview
Figure 2-3 Media Door Contents
RESET
BUTTON
COMPACT
FLASH CARD
CARD EJECT
BUTTON
USB A
SOCKET
2.3.2 Media Door
The media door is opened by turning the key in the lock ¼ turn clockwise and pulling the door out and down.
Note that in order to meet the water resistance specification (IP65) the door must be closed and locked and
the waterproof lock cover must be snapped over the lock.
Opening the media door exposes the
compact flash card socket and the USB
port. The compact flash card is intended
as the principal recording media,
however the unit will record to a USB
device or to internal memory.
The compact flash card fits into the
socket as shown right. The card eject
button must fold over to the right once
the card is in place. To eject the card, lift
the eject button, press it to pop the card
out then fold it back over. Grab the card
along the left and right edges between
the thumb and forefinger and remove.
To the left of the card slot is a small
opening. Set back behind this opening is the system reset button. Under normal operation there should be no
need to use this. Using this button may cause loss of data.
2.3.3 Status Indicator
The status indicator is lit when the unit is powered on and blinks during shut down or when the unit is running
off the internal batteries. The internal batteries allow the unit to survive short power interruptions (< 15
seconds) or brown outs, during which time the display blanks and the status indicator blinks.
2.3.4 IR COMM Port
The IR COMM port is an Infrared send/receive port which allows connection to compatible Infrared devices.
Future Option.
2.3.5 Stylus
The stylus is used to do data entry on the touch screen. It is stored in the bottom right of the recorder front
panel. To remove it, depress the exposed top and turn ¼ turn counter clockwise. The stylus is sprung loaded
and will pop out of its docking location. CAUTION: Control removal of the stylus as it is spring loaded.
To return it to its docking location, insert the pointer end into the hole, fully depress it and give it a ¼ turn
clockwise.
I. Page 5 1/06/2012 REV 1.10.2
Page 14
Section 2 - Overview
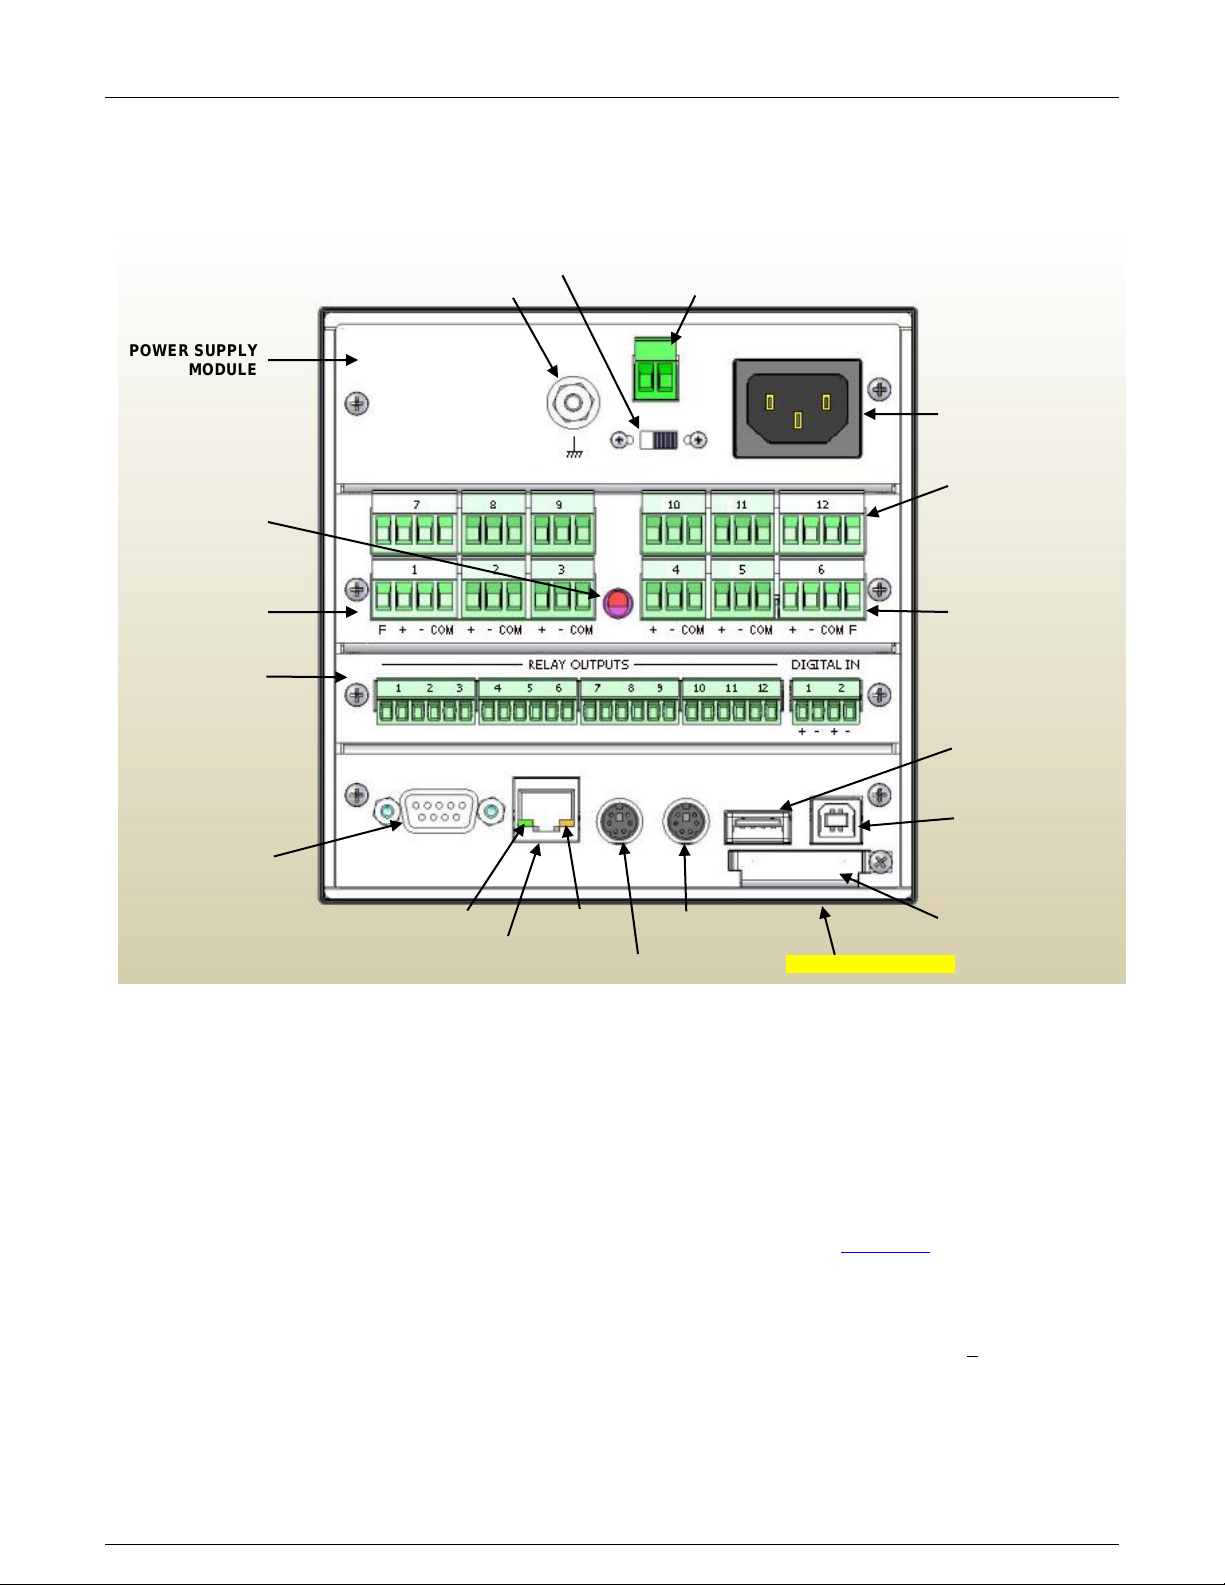
AC POWER
INPUT
24 VDC OUTPUT OPTION
SYSTEM GROUND LUG
BATTERY DISCONNECT
ANALOG INPUTS
CHANNELS 7 – 12
(OPTIONAL)
ANALOG INPUTS
CHANNELS 1 – 6
INPUT/OUTPUT
MODULE
(OPTIONAL)
USB TYPE A
(MASTER)
USB TYPE B
(SLAVE)
MEMORY
EXPANSION SLOT
MOUSE/KEYBOARD
CONNECTOR
USB SELECT SWITCH (UNDER)
AUDIO CONNECTOR
SPEED LED
ETHERNET RJ-45
CONNECTOR
ACTIVITY LED
RS-232/RS-485
DB9 CONNECTOR
(OPTIONAL)
AMBIENT
TEMPERATURE
SENSOR
ANALOG INPUT
MODULE
POWER SUPPLY
MODULE
OFF ON
BATTERY BACKUP
POWER SUPPLY
MODULE
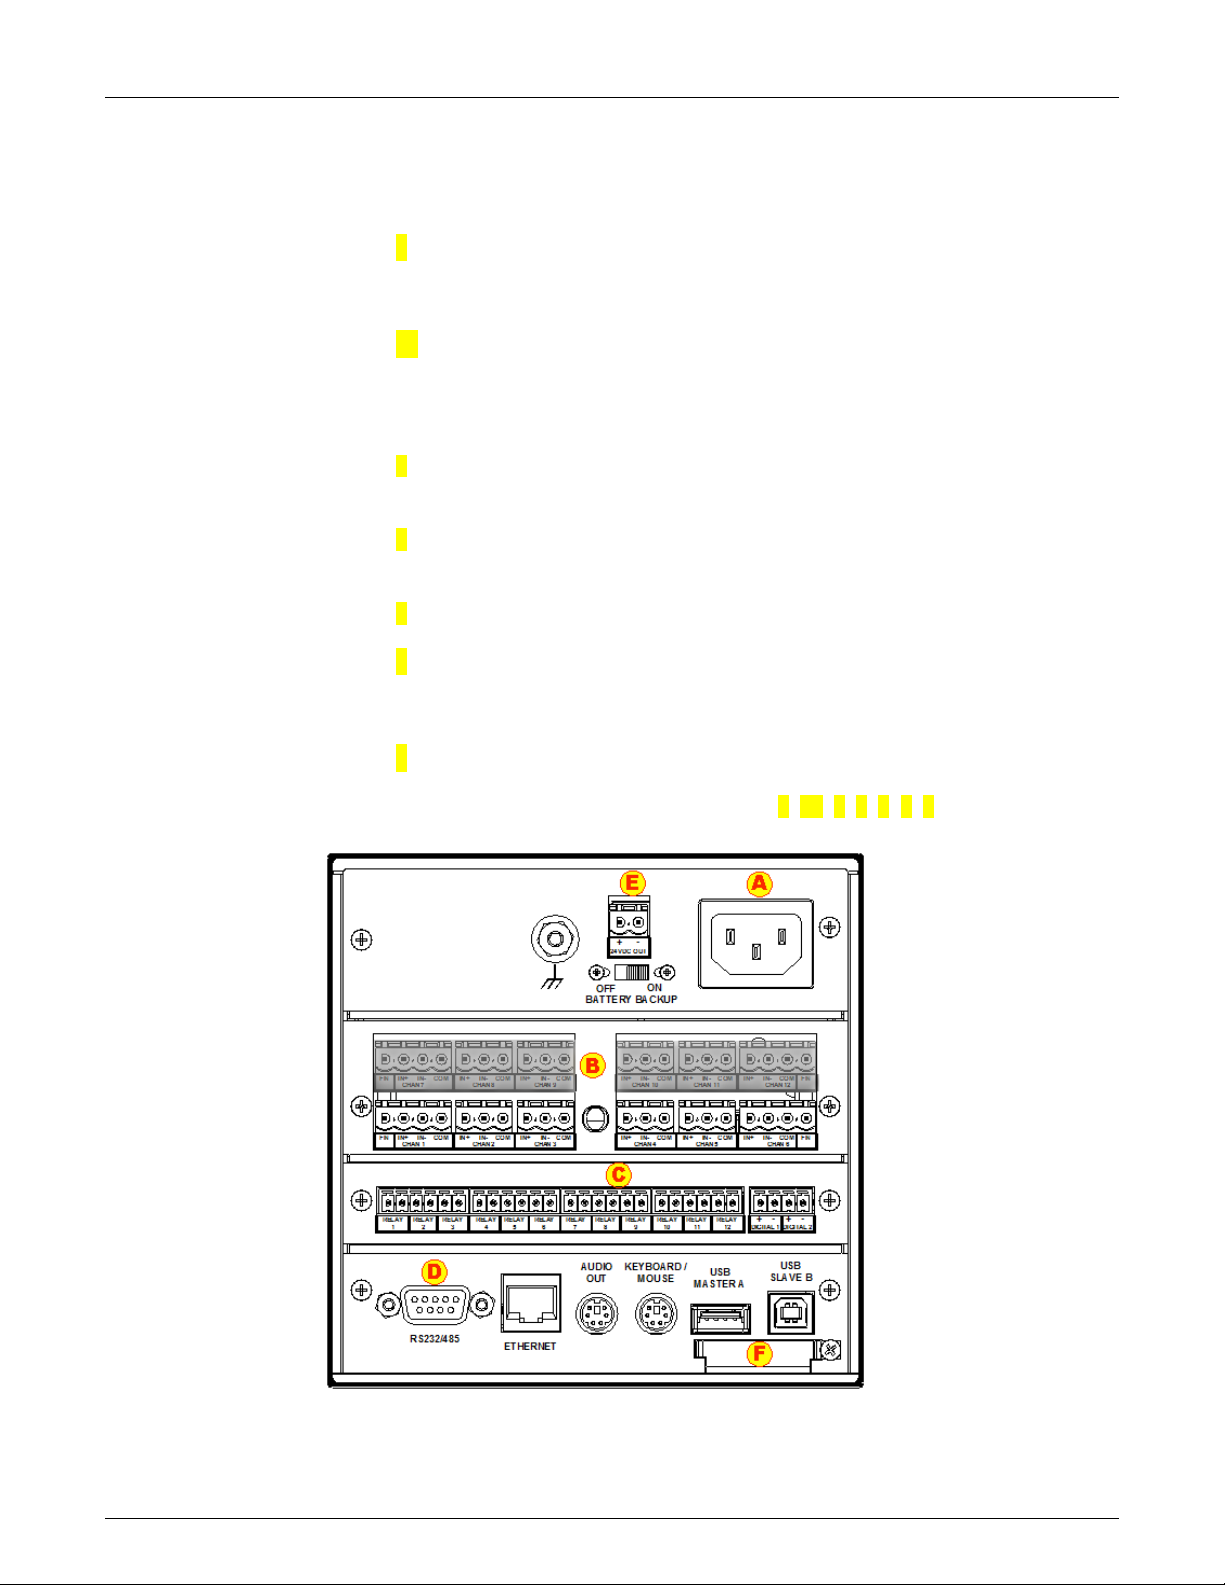
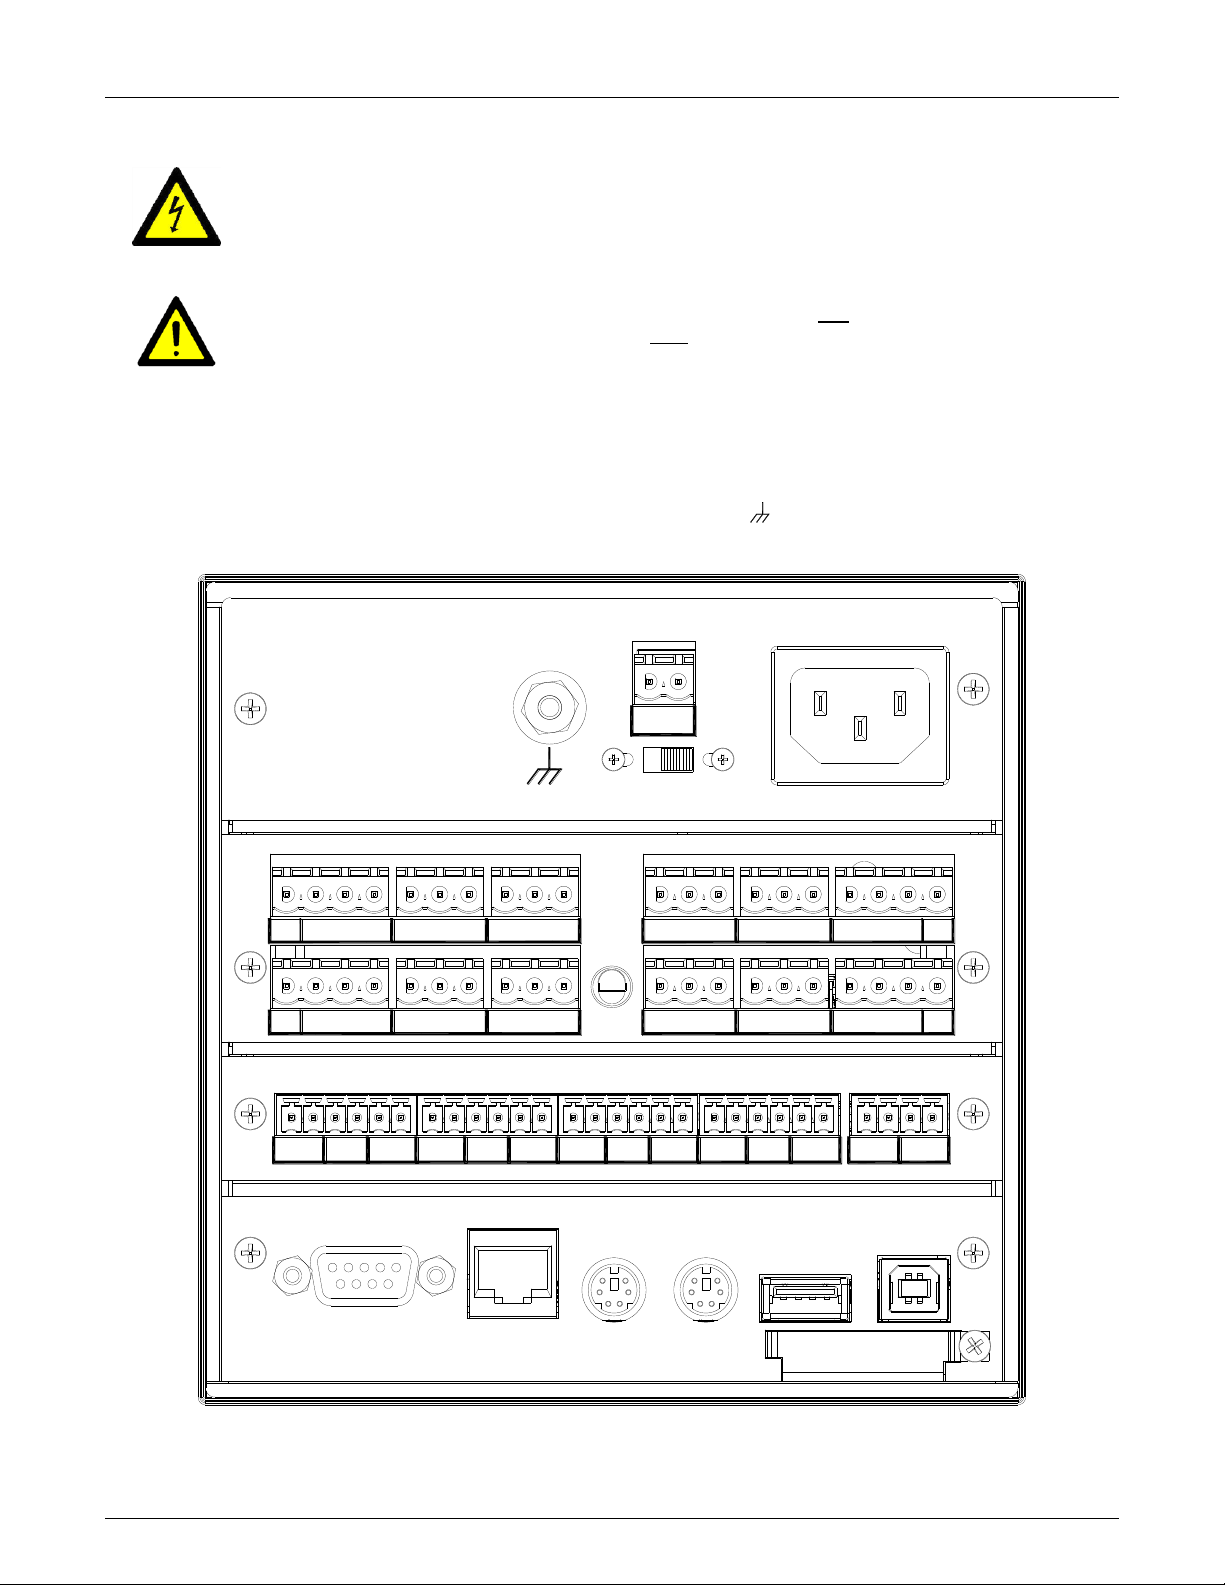
Figure 2-4 Recorder Rear Panel
2.4 Recorder Rear Panel
The rear panel of the recorder is shown below:
2.4.1 Power Supply
The power supply module is at the top of the recorder rear panel. The rear panel of the universal AC version
is shown in above. On the right is the AC power input socket that takes a standard IEC connector. Screw
terminals are available as an option, as is a DC power supply module. To the left is the optional 24 Volt dc
output option which provides isolated voltage to power external sensors (100mA). Below this is the battery
disconnect switch. The battery is used to enable the system to shut down correctly and survive short power
outages or brown outs. It should be disconnected for storage or shipping purposes. The system-grounding
lug is used to properly ground the recorder on installation. NOTE: See Section 3 for installation and
connection details.
2.4.2 Analog Inputs
The analog input module is available with either 6 or 12 inputs and accepts dc inputs up to +25 volts. These
inputs are isolated from each other and ground and are truly differential. In addition channels 1, 6, 7 and 12
have an isolated frequency inputs which allows the unit to measure frequency to 10,000 Hz. Between the
terminal blocks is the ambient temperature sensor for thermocouple compensation.
I. Page 6 1/06/2012 REV 1.10.2
USB SWITCH
Page 15

Section 2 - Overview
2.4.3 Input/Output Module
The input/output module is optional and provides potential free relay contacts and isolated digital inputs.
2.4.4 Computer Interface
The bottom of the rear panel is the computer interface. At the bottom right hand corner is a small cover
secured by a screw. This is the internal memory expansion slot – it takes standard secure digital memory
cards.
Above this are the two USB ports – the type A port (to the left) is a master port and the type B port is a slave
port. These are mutually exclusive ports and the user needs to select which port will be active. This is done by
using the small slide switch on the underside of the unit – indicated but not shown in Figure 2-4 above. Slide
the switch toward whichever connector is being used. The Type of port selected, A or B depends on what is to
be connected to it.
To the left of these connectors are two mini-din style connectors. The mouse / keyboard connector allows the
use of an external PS2 PC style mouse directly or a PS2 PC style keyboard using an available adapter board
which will accommodate both mouse and keyboard together. The audio connector is to the left and allows the
audio output from the unit to be fed to an external amplifier.
The Ethernet connector is the standard RJ45 type and allows a 100 Mbps (megabits per second) connection
to be made to the network. There are two indicator LEDs, the one on the right shows connection speed either
10 Mbps unlit or 100 Mbps when lit. The led on the left is the activity led and it blinks when the link is active
and data is being transmitted.
On the left is the optional RS232/RS485 legacy connector. This is a factory installed option. Normally there is
a blanking panel over the opening.
I. Page 7 1/06/2012 REV 1.10.2
Page 16
Section 2 - Overview
2.5 Files
2.5.1 Configuration Files
The recorder has hundreds of options and settings that need to be set up by the user. Things like input types,
point tags, displays, record information and so-on. Once set up, this information is saved in the internal
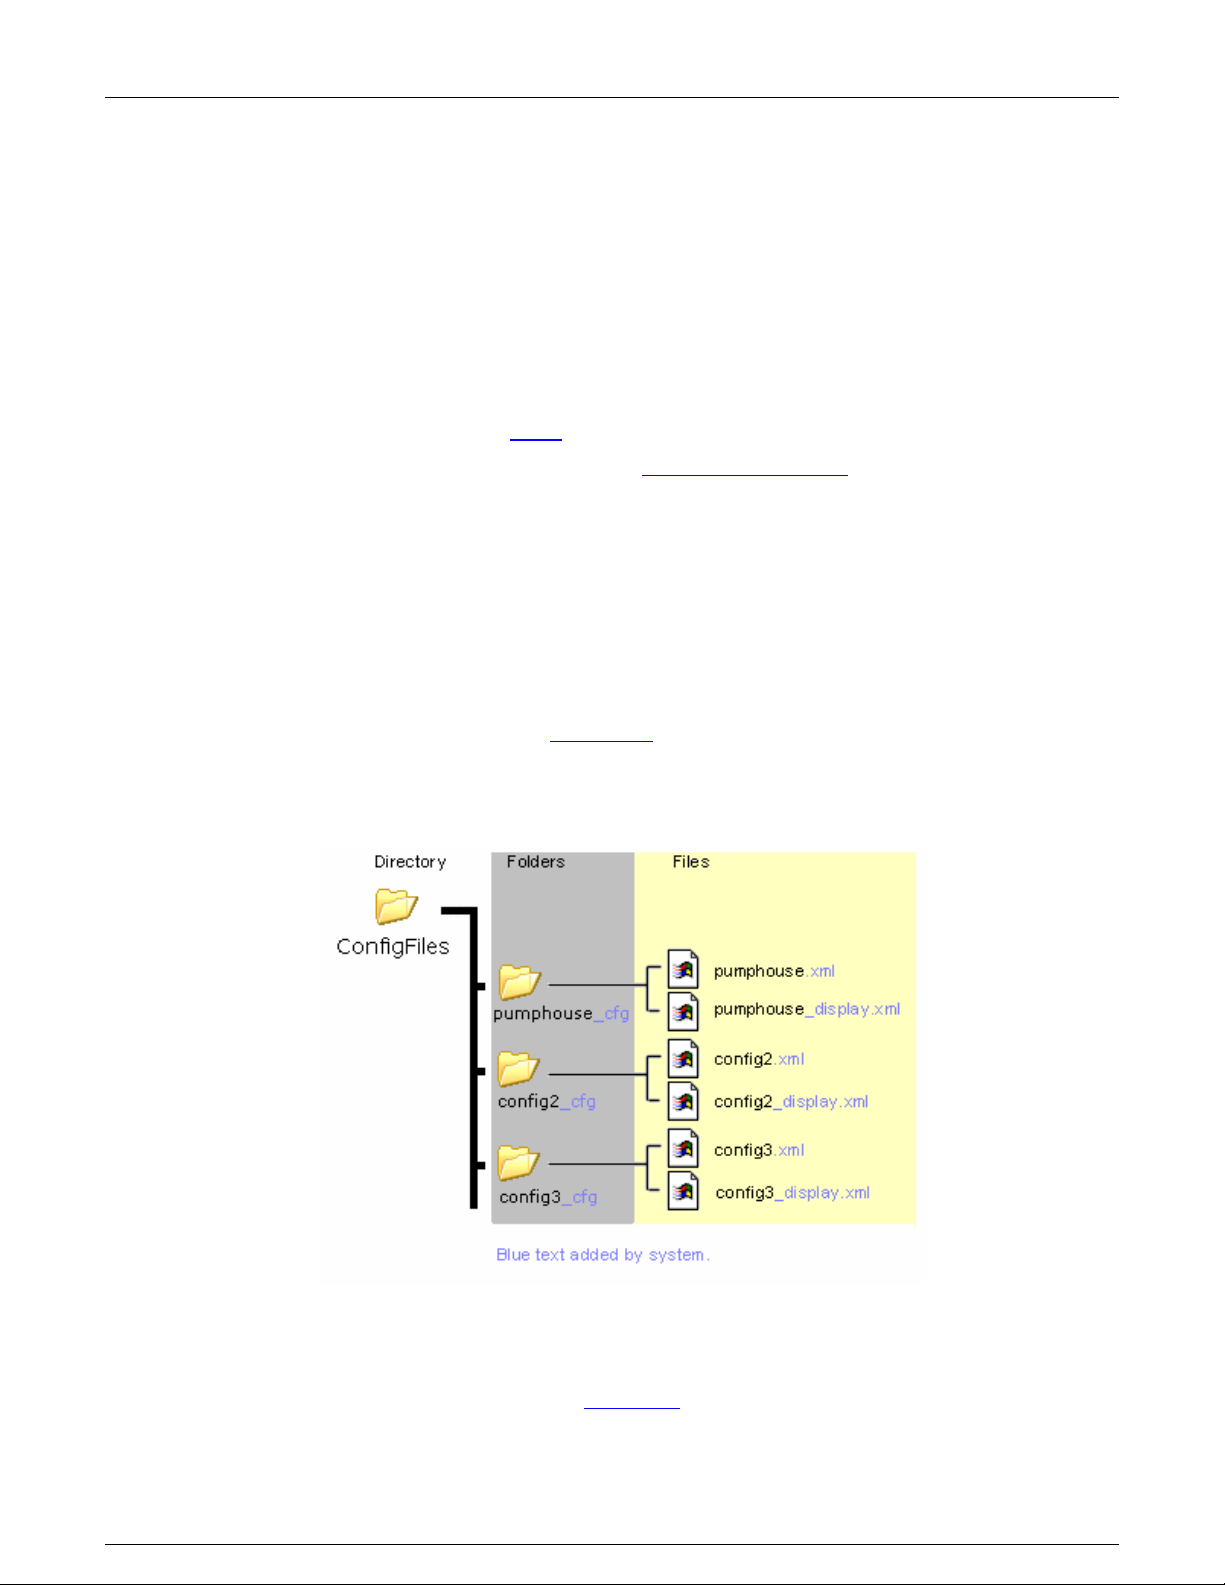
memory (SD Card) as a user named configuration file in a special directory called ConfigFiles. Each unique
configuration is stored in a sub-folder within the ConfigFiles directory. The system appends “_cfg” to each
folder name created which in turn contains the actual configuration files. The files are in an xml format and
bear the extension “.xml”. Currently there are two independent but related files – one for the physical settings
of the recorder – input types, record setup, alarms and so on and has the filename given by the user with the
file type “.xml” and one for the displays as set up by the user which has the filename given by the user but has
“_display.xml” added by the system. See below.
When a user saves or loads a configuration using the Configuration Manager the system takes care of the
details and defaults to the ConfigFiles directory.
When saving the configuration, the user enters a filename and accepts the entry – for example the filename
could be “pumphouse”. The Recorder will then create a folder in the ConfigFiles directory called
“pumphouse_cfg” and in this folder it will create the two configuration files, “pumphouse.xml” for the physical
settings and “pumphouse_displays.xml” for the display information.
When loading a configuration, the Configuration Manager will show a list of all the subfolders (Configurations)
in the ConfigFiles directory (without the “_cfg” adder) so the user can recognize the configuration files. When
a configuration is selected, the system loads the two files from this subfolder.
At the recorder, this folder and split file structure is totally transparent and configurations can be loaded using
names assigned by the user. When using the file explorer to move configuration files it is important to note
that you need to move, save or copy the subfolder in the ConfigFiles directory. This will keep all associated
file with that configuration together.
The structure is as follows:
.
Eg: To copy the “pumphouse” configuration to a different media you need to go to the ConfigFiles directory
and copy the FOLDER “pumphouse_cfg”.
In the root of the internal memory (SD card) are two files – config.xml and displays.xml. These are the default
configuration files used by the system. When you quick-save a configuration, this is where it saves to. You
should not transport these files but rather save the configuration as mentioned above.
I. Page 8 1/06/2012 REV 1.10.2
Page 17

Section 2 - Overview
2.5.2 Data Files
When data is recorded, the unit creates a folder in the root directory of the selected media with the name
given in the Record Setup menu. This folder contains all files generated during the record session. The
primary data file is in this folder and has the extension “.dat”. So if you set up to record to the compact flash
card and name the file “session1” the recorder will create a folder on the compact flash card (CF CARD)
named “session1”. In this folder will be a file “session1.dat” which is an ActiveX Data Object File (ADO) and is
the primary database containing all the recorded channel data as well as alarm and event data for the record
session if this has been enabled. The file size is dynamic and depends on how many channels are being
recorded, the record rate (samples/second) and how active the data is (static data results in reduced file size.
It is not unusual for active data recorded at high speeds to result in large files. Any annotations should be
saved in this folder (they save as “.bmp” files) to keep all record session information together. The “.dat” files
can be transported or moved using the FTP manager, and can be analyzed on the PC using the Exhibitor
software.
2.5.3 Activity Configuration Files
The activity configuration files are saved when the Activity Log check box is checked in the System Activity
Logs Archive Menu. The Activity Configuration Logs are stored in the Activity Folder in internal memory (SD
Card). These files are used for FDA 21 CFR Part 11 compliance. The files are created whenever a user logs
on or logs off. Using the Exhibitor software an administrator can print out a report of all changes made by that
user during the time they were logged into the recorder. The files created are in the form: user-datesequence-“start config” and user-date-sequence-“end config” and are xml types.
These files can be exported or delected from the recorder using the System Activity Logs Archive Menu
The Administrator should purge these files periodically to free up space.
2.5.4 Miscellaneous Log Files
The recorder saves alarm, event and activity information in the root of the internal memory (SD Card) in log
files AlarmFile.Log and EventFile.log. These files are described in Section 4.3 and are encrypted. They can
be decrypted and printed using the Exhibitor program running on the PC. These files can be exported or
delected from the recorder using the System Activity Logs Archive Menu
2.6 Exhibitor Software
The Exhibitor software is a program that runs on the PC that allows a user to plot and print data recorded on
the recorder. This data may be retrieved remotely, displayed in graphic or tabular format or be exported in
various formats including ExcelTM format. Additionally it allows a user to view Event and Alarm Logs and
analyse data, search for highlights and parse data for minimums or maximums. It can also be used to gather
data in real time from remote recorders, create real time widget displays, print reports and configure remote
recorders. A lite version of the software is provided with each recorder and can be upgraded to various
capabilities.
I. Page 9 1/06/2012 REV 1.10.2
Page 18

Section 2 - Overview
Okay or
Accept
Cancel
Exit
Reset or
Refresh
Setup
Edit
Color
(Foreground)
Background
Color
2.7 QUICK START GUIDE
The recorder ships in a fully functional mode, but may not be set up the way you would want to use it and needs
to be configured before it is used.
There are several areas that need to be configured to customize the unit to the user’s needs. This unique
combination of settings is referred to as the system configuration and is saved in a file called the configuration
file which is physically named config.xml. This file is reasonably human readable and is in XML (Extensible
Markup Language) format. This file resides in the recorder’s internal memory and is portable. On start-up the
recorder loads this file and configures itself accordingly. There can be numerous configuration files in the
recorder, however only one can be called config.xml. See the Configuration Manager on page 29. If no
configuration file is present at startup, the unit will create one which will have minimal functionality.
The most basic setup needs to define the inputs, create a display and set up a recording. You may need to set
the time and calibrate the touch screen. The setup can then be extended to include alarms, contact outputs
(requires an optional digital I/O module), digital inputs, various display options, and conditional events (like
recording on alarm or sending emails).
The first thing to do is to browse this manual to get some idea of the features of the unit. The following will steer
you to various sections based on a quick set up. Help is available at each screen and you should see the section
on keyboarding before you start anything.
Naming the Recorder: You should give the recorder a unique name to identify it such as “Soap Plant Boiler”.
This is known as the Unit Tag and is entered in the System Setup window.
Analog Setup: You will then need to set up the analog inputs to meet the requirements of the signals you will be
measuring. The recorder has universal inputs capable of measuring a variety of signals from millivolts to Volts,
Current, Resistance, Thermocouples, RTDs and on some channels, Frequency. All channels can also be
assigned as virtual channels, that is they do not have a direct live inputs, but can be Calculated channels, Timers,
Totalizers or Conditional. The analog inputs are set up in the Master Channel Setup menu. Each channel can be
uniquely programmed and has a Channel Tag to identify the channel, eg. “Pump 6”. These settings will apply to
any display objects or widgets that use this channel.
Display Creation: Once the inputs are set up you need some way of displaying the data. This is done on the live
display. To appreciate what this entails check out the section on Display Elements and Widgets. Then use the
Display Builder to create the actual display. This builder allows you to place the widgets on the screen and
customize each and give the display a name. In order to have the display come up on the screen you need to
move it to the Rotate List.
Recording Data: To record data you need to use the Record Setup dialog to select which channels to record,
what to record, at what rate and where to save it. Data can be saved to internal memory, compact flash card or
USB flash drive.
At this point you are ready to connect your signals, watch the data live and record it.
To record the data you must have set up the recorder as mentioned above.
Icon Buttons: There are several buttons with icons used on the recorder. Specific ones are described in the
respective sections. Generic ones are shown below.
I. Page 10 1/06/2012 REV 1.10.2
Page 19

Section 2 - Overview
Figure 2-5 On-screen Keyboard
Figure 2-6 On-screen Help
Figure 2-7 Activity Lights
2.8 Keyboarding
While it is possible to connect a standard keyboard and
mouse to the recorder, one may not be readily available
in which case data is entered using the pop-up keyboard
as shown right.
When you enter a recorder setup screen where it is
necessary to type in data, the instant you tap the input
field box the keyboard pops up. Entry is made by tapping
the keys firmly with the stylus. As each key is pressed it
inverts its color. The Shift key allows a one time
uppercase letter to be entered and pressing the CAP key
will lock the keyboard in uppercase. The keyboard can be
moved by pressing in the gray area where it says Input
Panel and dragging it out the way in the event you need
to access an entry point behind the current location.
2.9 Help
Help is available on most set up screens by
tapping the help icon (shown left) on the right of
the blue name bar near the bottom of the screen – see
Figure 2-5 above. This will bring up a help text file which
deals specifically with the subject at hand.
The scroll bar at the right of the screen can be used
to browse through the file.
Tap the DONE button to exit.
2.10 Activity Lights
At the bottom right of the display are three small square activity ‘lights’, the top one being white, the middle green
and the bottom black.
These have no purpose for the user other than “feel good” indicators to
indicate everything is working internally. The white block is the analog
subsystem activity and blinks at around 3 Hz. The green block indicates
internal data execution and the black block is the internal watchdog and
blinks at a rate around once every 3 seconds.
2.11 Security
The recorder has several levels of password to protect the various functions and prevent unauthorized access to
the unit. Access can also to limited access and control who can make changes, who can access and who can
administer the unit.
I. Page 11 1/06/2012 REV 1.10.2
Page 20

Section 2 - Overview
2.11.1 Security Levels
There are three security levels for gaining direct access to the recorder. Security levels are only active if
security is enabled.
The three levels are
Administrator: Has access to all levels of the recorder menus and systems.
Manager: Has restricted access. A Manager cannot set up any base level parameters, but can use
existing setups to create alarms, displays and the like.
User: Can use the recorder only as set up by the Administrator or Manager. A User cannot
change any parameters. A User needs to log in to accept alarms.
User management is an Administrative only function and is controlled in the System Administrative Menu.
Here the Administrator can set usernames and passwords, disable users, set user expiry times and force a
user to be logged out after a specific time. The number of log in attempts can also be set before the current
user is disabled.
All users need to log in to the unit to perform any functions. At each log in the recorder makes a note of the
time and user name and will also log any failed attempts at login. Each user has a unique username and
password. Users may change their passwords at any time at the log in screen.
The unit also saves a copy of the configuration file when the user logs in and when the user logs out. This
way a complete activity log can be generated (by the accompanying Exhibitor software comparing the two
configuration files) and all parameters changed can be reported.
2.11.2 Remote Access Passwords
The user can access the recorder remotely using various methods. Each method is protected by a unique
password. The passwords need to be set up by the Administrator in the System Administrative Menu as
follows:
USB Access: Password optional. When accessing the unit via the USB Connection using ActiveSyncTM or
VistaTM Mobile Manager the Administrator can set an optional password which needs to be entered from the
remote computer before access is allowed. This password is set in the Set ActiveSync Password menu.
HTTP Access: Password required. When accessing the web server using the Ethernet and a browser the
user has to provide a password. There are two levels of password Admin and User. Users can view the web
pages but only Admin can perform remote functions. These passwords are set in the Web User Manager and
the Administrator user name HAS to be Admin.
FTP Access: Password Required. This is the same password used for system access. User access is
permitted and restricted – files can be downloaded. Admin access is unlimited.
Remote Control over Ethernet: Password Required. These are the same user names and passwords set for
recorder front panel access through the User management option described above.
All access user names and passwords can be set to be the same provided the administrator user name is
Admin. However you do have to set these up at the various locations referred to above.
I. Page 12 1/06/2012 REV 1.10.2
Page 21

Section 3 – Installation
3.0 INSTALLATION AND WIRING
This section provides information and procedures on installing and wiring the recorder. Included are handling
procedures, installation and wiring specifications, and instructions for both standard and optional equipment.
3.1 Equipment Handling
3.1.1 Initial Inspection
Exercise care when unpacking the instrument from the shipping carton. The instrument is packed in a
shockproof foam retainer to prevent damage during normal transit. If damage to the shipping carton is
evident, ask the carrier’s representative to be present when the instrument is unpacked.
3.1.2 Unpacking Procedure
To unpack your recorder, first remove the foam retainer and instrument from the shipping carton. Then,
carefully remove the instrument from the foam retainer.
3.1.3 Detected Damage
If damage is detected after unpacking the instrument, re-pack the instrument and return it to the factory as
described in the following section.
3.1.4 Equipment Return
Before returning a damaged or malfunctioning instrument to the factory for repairs, contact the sales
organization from which you purchased the instrument. A Return Merchandise Authorization number must be
obtained from the factory before returning an instrument for any reason.
3.1.5 Storage
For prolonged storage before installation, re-pack the recorder in the shipping container. Cushion the
recorder with foam molding or an equivalent and store in a cool, dry area. It is not recommended to store the
recorder for more than one year. If longer storage time is required, contact the factory for additional storage
information.
I. Page 13 1/06/2012 REV 1.10.2
Page 22
Section 3 – Installation
Figure 3-0 Rear Panel showing ordering options
100 – 240 Vac 35VA
3.1.6 Part Numbering
The part number for the recorder is in the format as follows (See Fig 3.0 below for option location):
DC6 –A –B –C –D –E –F –G where each of the letters A through G has a meaning as follows:
A Input Power: 1 - 100 to 240Vac 50/60Hz with cable and plug (Default - shown below)
2 - 18 – 30Vdc with Screw Terminals
3 - 100 to 240 Vac 50/60Hz with Screw Terminals
B Input Channels: 06 – 6 Channels of Analog input (single row of connectors – default)
12 - 12 Channels of Analog input (dual row of connectors)
C Output Options: 0 – None (Blank panel covers hole.)
1 - 6 Form A relay contacts 0.5A @ 200Vdc, 2 Control Inputs
2 - 12 Form A relay contacts 0.5A @ 200Vdc, 2 Control Inputs. (Shown below)
D Serial Comms: 0 – None (Blank panel covers hole.)
1 – RS232/RS485 (9 Pin D sub) Serial Port (shown below)
E Transmit Power: 0 – None (Blank panel covers hole.)
1 – 24Vdc 100mA isolated power output
F Int. Memory: 1 – 512 Megabyte SD Card
2 – 1 Gigabyte SD Card
3 – 2 Gigabyte SD Card
G FDA Compliance: 0 – Standard Unit
1 – FDA 21CFR11 Compliant Unit
The unit shown below in rear view has the part number DC6 –1–06–2–1–1–1–0. (The additional 6
channels as would be in a 12 channel input recorder are shown grayed out).
I. Page 14 1/06/2012 REV 1.10.2
Page 23
Section 3 – Installation
3.2 Environment and Location
The instrument is intended to operate in the following environment:
Indoor Use Only
Installation Category II per IEC 664
Pollution Degree Level II per IEC61010-1
Measurement Category I per IEC61010-1
Altitude up to 2,000 m
Temperature -10 °C to +50 °C operating per IEC61010-1
Humidity Maximum relative humidity 80% for temperatures up to
31°C decreasing linearly to 50% relative humidity at 40°C
AC Mains Supply 100 - 240 Vac ~ +10% 50/60 Hz 35 VA
NOTE: The recorder is designed to be panel mounted and as such should be considered as fixed
equipment or permanently connected. If permanently connected, disconnection from the supply
must be possible via a customer supplied switch or circuit breaker rated at 120V or 240V
(dependent on local voltage supply) 5A minimum when connected to an AC supply or 30V 2A
minimum when connected to a DC supply. This disconnection device must disconnect all
current-carrying conductors. It must be included in the panel installation and should be clearly
marked, in close proximity to the Recorder and easily accessible to the operator.
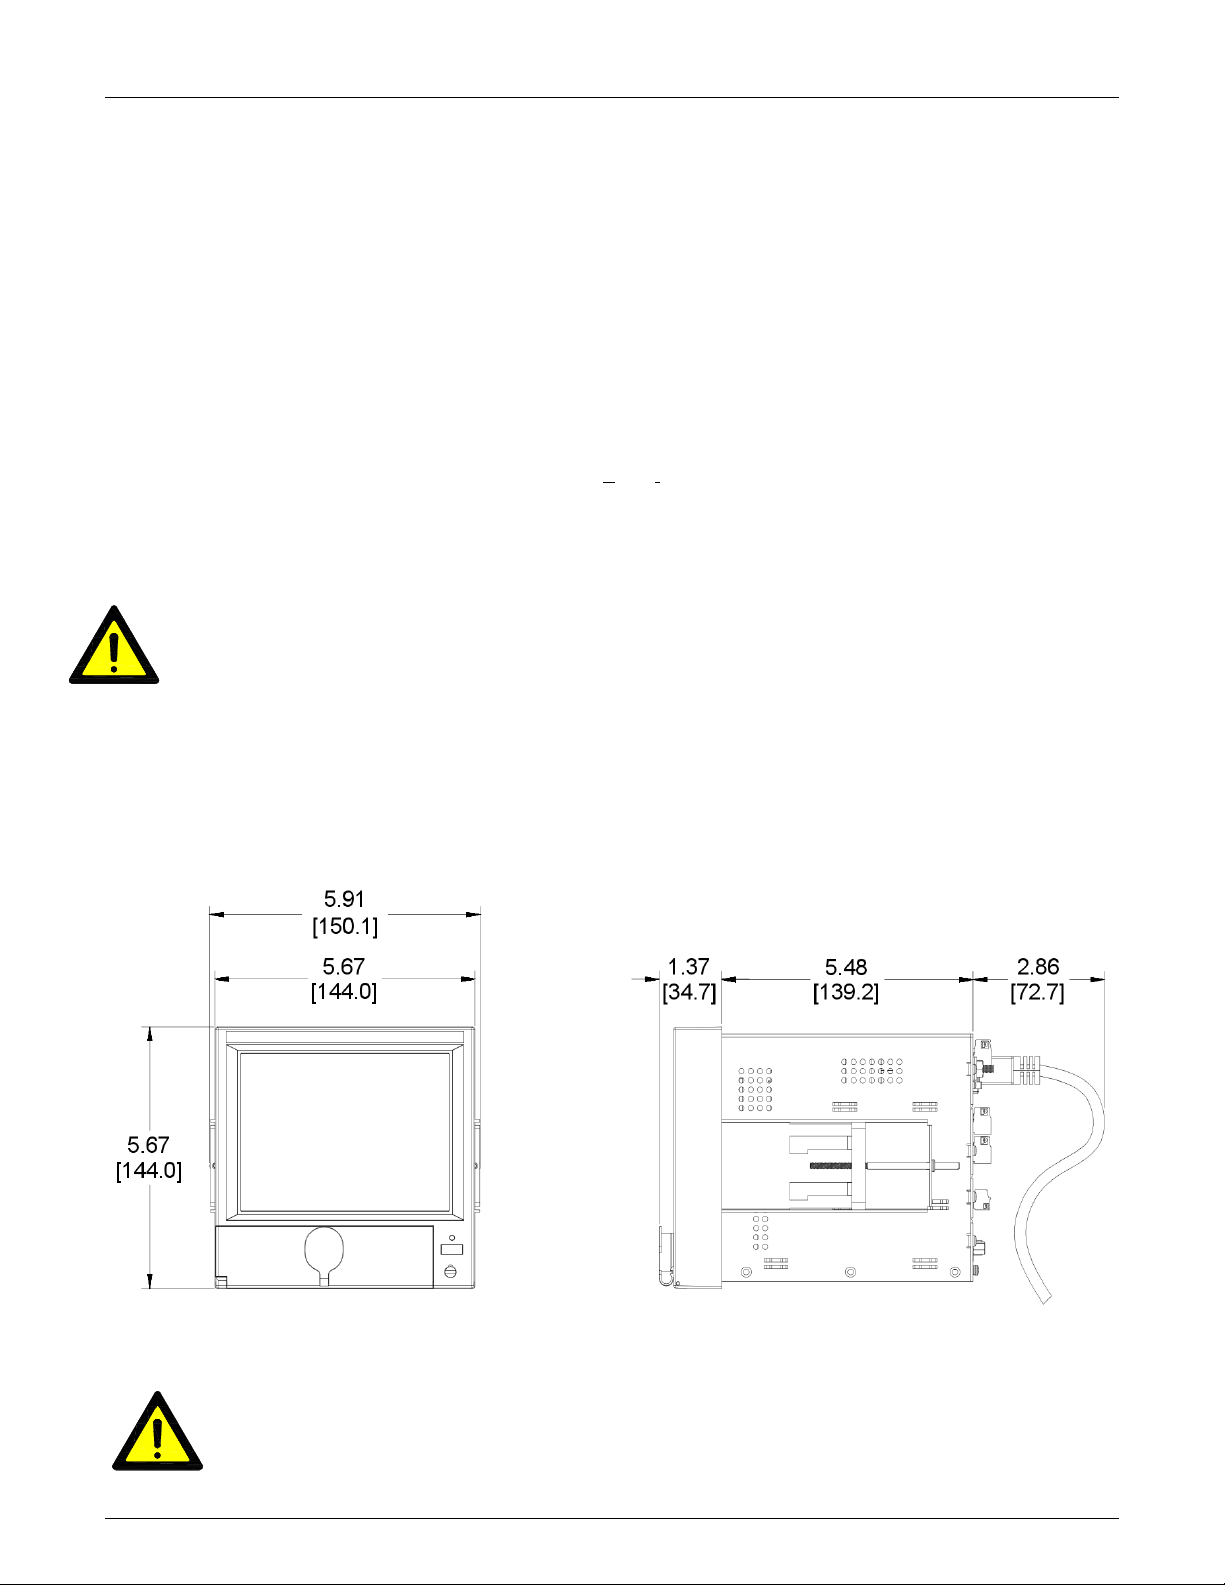
3.3 Installation
The recorder is sized to fit in a standard DIN panel cutout of 5.43” x 5.43” [138 mm x 138 mm] and requires a
minimum of 6.5” [188.2 mm] behind panel depth not including power and input source cable space needed.
Actual dimensions are shown below.
Figure 3-1 Recorder Dimensions in Inches [mm]
WARNING: Do not use this instrument in any manner inconsistent with these operating
instructions or under any conditions that exceed the environmental specifications stated.
I. Page 15 1/06/2012 REV 1.10.2
Page 24

Section 3 – Installation
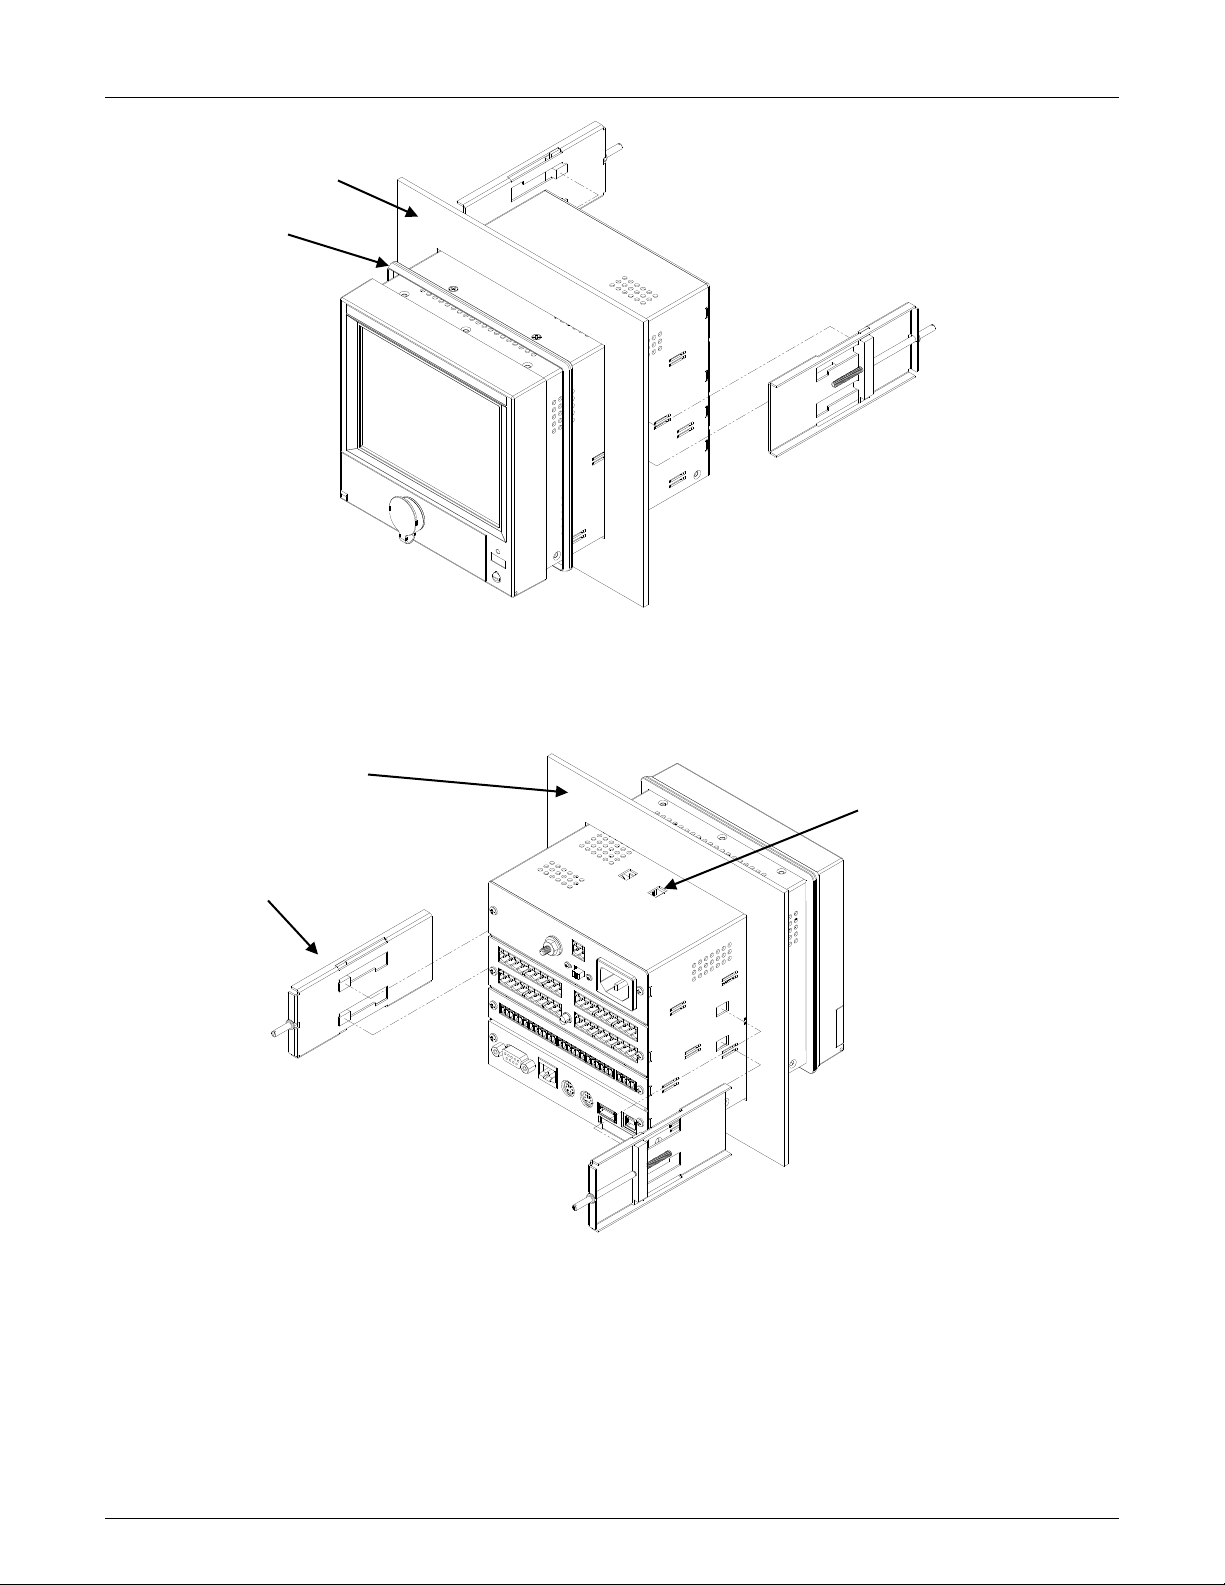
3.3.1 Panel Mounting
The recorder should be mounted in a vertical panel to ensure proper operation. Note that the locking bars can
be used on the sides or top and bottom of the unit depending on available space. Ensure you have the proper
clearances and proceed as follows:
3.3.1.1 Cut a panel opening 5.43” x 5.43” [138 mm x 138 mm]. Units can be mounted as close as 0.6”
[15.2mm] between opening cutouts
Figure 3-2 Front Panel Cut Out
3.3.1.2 Remove any packaging material from the recorder. Always handle the unit carefully to avoid
damaging the LCD display or scratching the display surface.
3.3.1.3 Remove the locking bars from the recorder enclosure and ensure the gasket is not twisted on the
enclosure.
3.3.1.4 Insert the recorder rear end first, into the panel opening from the front of the panel as shown in
Figure 3-3. Ensure that the gasket is between the front bezel of the recorder and the front panel.
3.3.1.5 With the recorder held firmly in place against the panel, install one of the locking bar assemblies
by sliding the locking bar notch into the slot on the side (or top) of the recorder enclosure as
shown in Figure 3-4.
3.3.1.6 Using a slotted screwdriver, tighten the screw until the locking bar is just pressing against the
panel.
3.3.1.7 Install the other locking bar assembly into the slot on the opposite side (or bottom) of the recorder
enclosure and tighten as before.
3.3.1.8 Using the screwdriver, tighten both screws so that the recorder is held firmly in place. Do not over
tighten.
3.3.1.9 Use the supplied silver “stickers” to seal the unused locking bar slots on the top and bottom or
sides of the unit
I. Page 16 1/06/2012 REV 1.10.2
Page 25
Section 3 – Installation
Figure 3-3 Front Panel Insertion
Figure 3-4 Rear View Panel Insertion
Panel Back
Locking Bar Assembly
Seal unused slots
Panel Front
Gasket
I. Page 17 1/06/2012 REV 1.10.2
Page 26
Section 3 – Installation
Figure 3-5
Figure 3-6
Figure 3-7
3.4 Wiring Specifications and Procedures
3.4.1 Power Requirements
The recorder operates on any voltage from 100 to 240 Vac +10%, 50/60 Hz enabling it to be used in most
countries. The maximum apparent power required by the unit is 35 VA.
3.4.2 Power Connections NOTE: The recorder is designed to be panel mounted and as such should be considered as fixed
equipment or permanently connected. If permanently connected, disconnection from the supply must
be possible via a customer supplied switch or circuit breaker rated at 120V or 240V (dependent on
local voltage supply) 5A minimum when connected to an AC supply or 30V 2A minimum when
connected to a DC supply. This disconnection device must disconnect all current-carrying
conductors. It must be included in the panel installation and should be clearly marked, in close
proximity to the Recorder and easily accessible to the operator.
All connections to the recorder are made to the Rear Terminal Panel. Any wiring carrying hazardous voltages
must conform to all applicable local and national safety codes. AC Mains connection is via an internationally
accepted IEC 320 AC mains connector or screw terminal (Figure 3-5 and Figure 3-6).
WARNING Ensure all mains power is turned off before proceeding with
installation. This unit is provided with a mating connector for the ac power
socket or with a compatible three wire grounded cable which may be
terminated with a plug. Always ensure the ground wire (green or green and
yellow) or ground pin of the plug, is connected to a low impedance safety
ground (earth) within the ac power distribution system you are using.
Always use the recommended mating connector and an approved three wire
cable to connect this unit to the ac mains. Always provide a low impedance
safety ground wire to the ground lug on the rear panel marked
Figure 3-5 shows the IEC 320 AC mains connector on the rear of the recorder. The center
pin is the ground termination. If a mating plug is provided, it will be marked with the Ground,
LINE (L) or hot, and NEUTRAL (N) or return. In the United States, an approved cable with
integral plug (NEMA 5-15 P) is provided. In some instances, a cable with no plug may be
provided. In this instance, the user must connect an approved plug to the cable prior to
connecting to the AC source.
Figure 3-6 shows the screw terminal power connections on the rear of the recorder. The
right terminal is ground, the center terminal is LINE (L) or hot and the left terminal is
NEUTRAL (N) or return. The wire color codes are as follows:
Figure 3-7 shows the ground lug on the rear panel. This screw terminal must be connected to
an earth wire which in turn is connected to the ground or earth of the AC power distribution
system.
I. Page 18 1/06/2012 REV 1.10.2
This unit is equipped with an AC mains fuse internally. If this fuse should blow, it generally
indicates a serious problem with the recorder. THE FUSE SHOULD NOT BE REPLACED BY
AN OPERATOR. The fuse is a quick acting 5 x 20mm type - 2.0 Amps 250 VAC (~).
Page 27
Section 3 – Installation
COMIN-IN+
CHAN 9
COMIN-IN+
CHAN 8
COMIN-IN+FIN
CHAN 7
CHAN 3CHAN 2CHAN 1
IN+ IN- COMIN+ IN- COMFIN IN+ IN- COM
CHAN 12
IN+ IN- COM FINCOMIN-IN+
CHAN 11CHAN 10
IN+ IN- COM
FINCOMIN-IN+
CHAN 6CHAN 5
IN+ IN- COMCOMIN-IN+
CHAN 4
24VDC OUT
+
-
ON
OFF
BATTERY BACKUP
RELAY 1RELAY
2
RELAY
3
RELAY
4
RELAY 5RELAY
6
RELAY
7
RELAY 8RELAY 9RELAY
10
RELAY 11RELAY
12
DIGITAL 1 DIGITAL 2
+ +
-
-
RS232/485
ETHERNET
AUDIO
OUT
KEYBOARD /
MOUSE
90 - 240 VAC 35 VA
USB
MASTER A
USB
SLAVE B
Figure 3.8 – Rear Panel
3.4.3 Signal Input Wiring
Hazardous potentials may exist on signal input terminals which are floating with respect
to case ground. These hazardous potentials may be on the rear terminal panel of your
instrument. Any voltage potential at the signal source will exist on the instrument’s
respective signal input terminal (i.e. power generator stator winding). The analog inputs
The recorder accepts up to twelve direct inputs. Input connection is via plug in screw terminal connectors on
the rear panel. Inputs can be mixed in any combination of thermocouple, RTD, milliamps, millivolts, volts or
contact inputs. In addition, channels 1 and 6 (and optionally 7 and 12) can accept frequency inputs via an
additional terminal. There is a common ground lug marked with a for connection of signal cable shields
or screens.
can sustain up to 1500 Volts with respect to the chassis ground.
This instrument is intended for use in Measurment Category I – CAT I. The maximum
voltage on the signal input terminals is not to exceed 30V - - - (Volts DC. ) The maximum
transient voltage is not to exceed 50V - - - .This equipment is not intended for use in
Measurement Categories II, III and IV.
I. Page 19 1/06/2012 REV 1.10.2
Page 28
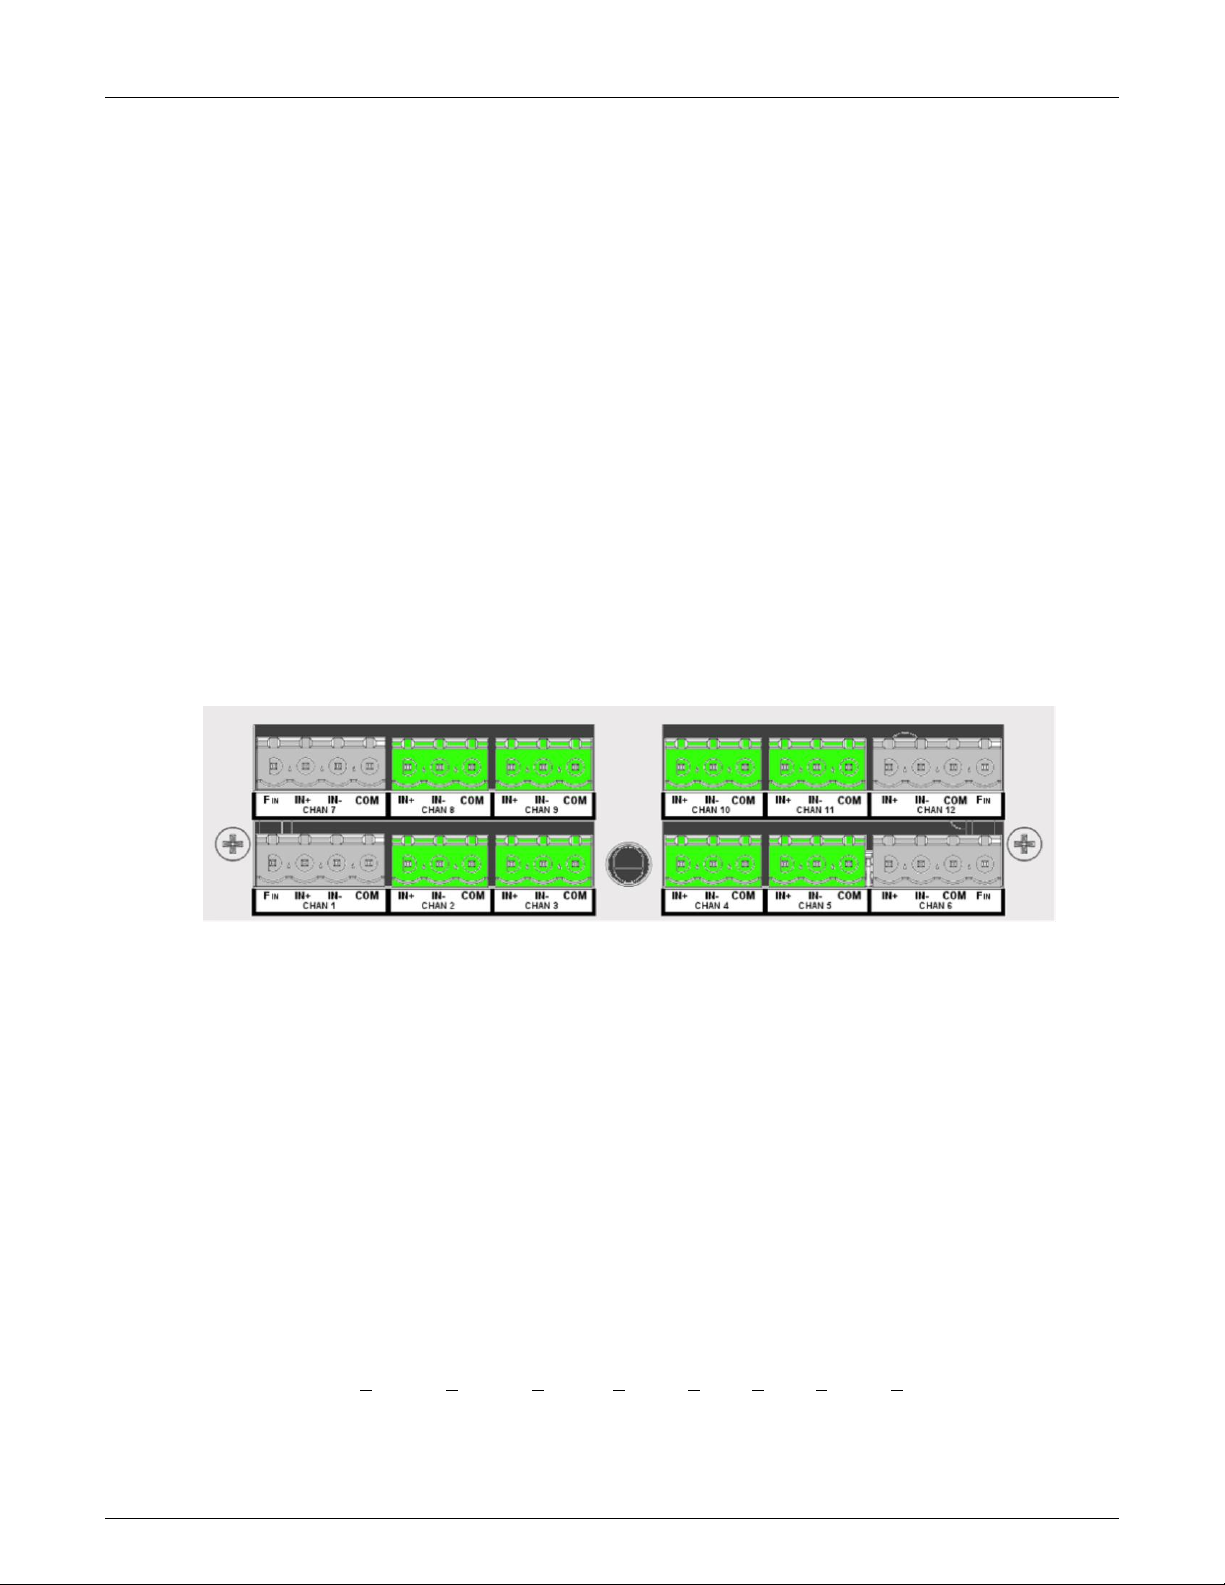
Section 3 – Installation
Figure 3-9 Analog Input Module (12 Channels shown)
Read the following procedures prior to connecting inputs to the terminals.
WARNING: Ensure the power is off before connecting signal inputs to the unit.
The plug in screw terminal connectors are of the clamping screw variety, putting even pressure on the signal
wire. It is therefore not necessary to terminate the wires with lugs, however you may do so if you wish. The
maximum gauge wire that can be accommodated is 14 AWG or 2.5 mm². You will need a small screwdriver
and a pair of wire cutters and strippers. The use of shielded twisted lead wire is recommended to minimize
electromagnetically induced noise.
WARNING: All unused inputs must have + and - contacts commoned together.
CAUTION: Never run signal and power or control wiring together in the same conduit. This is to
prevent possible recording error due to induced signals between lines. If running cables
is inevitable, use shielded cable where possible and properly ground the shield. Route
signal wires away from power wires at the rear panel.
NOTE: Ground cable shields at one end only to eliminate the possibility of interference due to
ground loop currents. When grounded transducers are used, the shield should be
grounded at the sensor end only.
3.4.4 Analog Inputs
The Analog Input board can have 6 or 12 channels (12 shown below). Each Input is truly differential and
has a positive (IN+) and negative (IN-) input and an RTD Common (COM) for RTD current return and
Frequency input Common ONLY. Channels 1 and 6 (and optionally 7 and 12) have a Frequency Input
(FIN) which is common with the COMmon input. All inputs are isolated to 350 Vac from each other and
1500 Vac from the chassis ground.
3.4.4.1 Thermocouple Inputs
Thermocouple Input connections are made as shown in Figure 3-10 T/Cs. The ambient temperature
compensator is between inputs 3 and 4.
3.4.4.2 Resistance Temperature Detector (RTD) Inputs
Two or three wire RTDs may be used for connection with cable compensation of up to ±50 ohms. The
“COM” Terminal is the common current return (Wire 3). Four wire RTDs can be used – simply do not
connect the second + wire. Two wire RTDs require a jumper between (IN-) and (COM). Refer to Figure
3-10
3.4.4.3 Linear Inputs
Maximum input not to exceed 30Vdc. Linear Inputs are divided into two types:
Current inputs: 4-20 milliamps, 0-20 milliamps and 10-50 milliamps, using an external 50 ohm
shunt (0.1% 0.5W).
Voltage inputs: +125mV, +250mV, +500mV +1.00V, +3.0V, +6.0V, +12.0V, +24.0V DC.
3.4.4.4 Potential Free Contacts
Normally open/closed contact inputs.
I. Page 20 1/06/2012 REV 1.10.2
Page 29
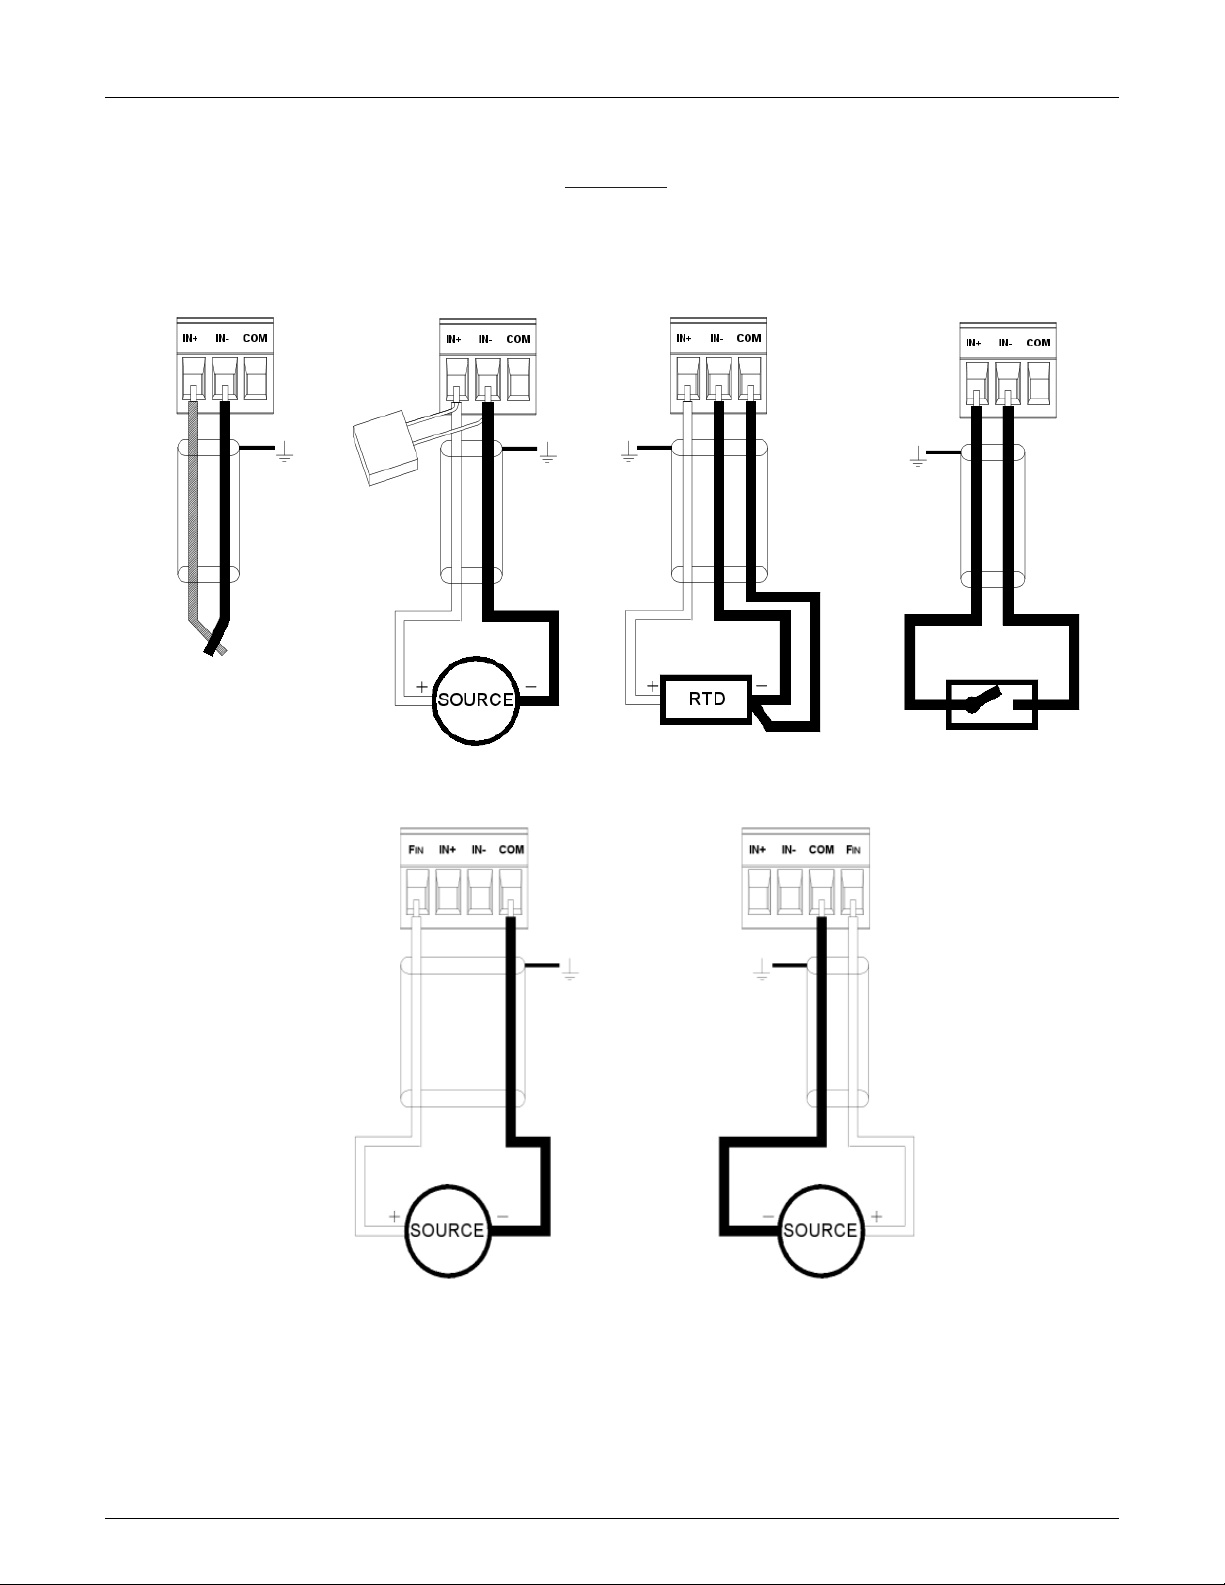
Section 3 – Installation
Figure 3-10 Analog Inputs - Wiring Detail
CHAN 1, 7 FREQUENCY/PULSE INPUT CHAN 6, 12 FREQUENCY/PULSE INPUT
THERMOCOUPLE VOLTAGE AND CURRENT RTDs CONTACTS
NOTE: RESISTOR FOR CURRENT ONLY
50 Ω 0.1%
0.5W
3.4.4.5 Frequency
Available on channels 1, 6, 7 and 12 only. Default input is for 12 to 24V DC @ 20mA max. The inputs can
be jumpered internally for 5 to 12V dc. See Appendix B for details.
I. Page 21 1/06/2012 REV 1.10.2
Page 30
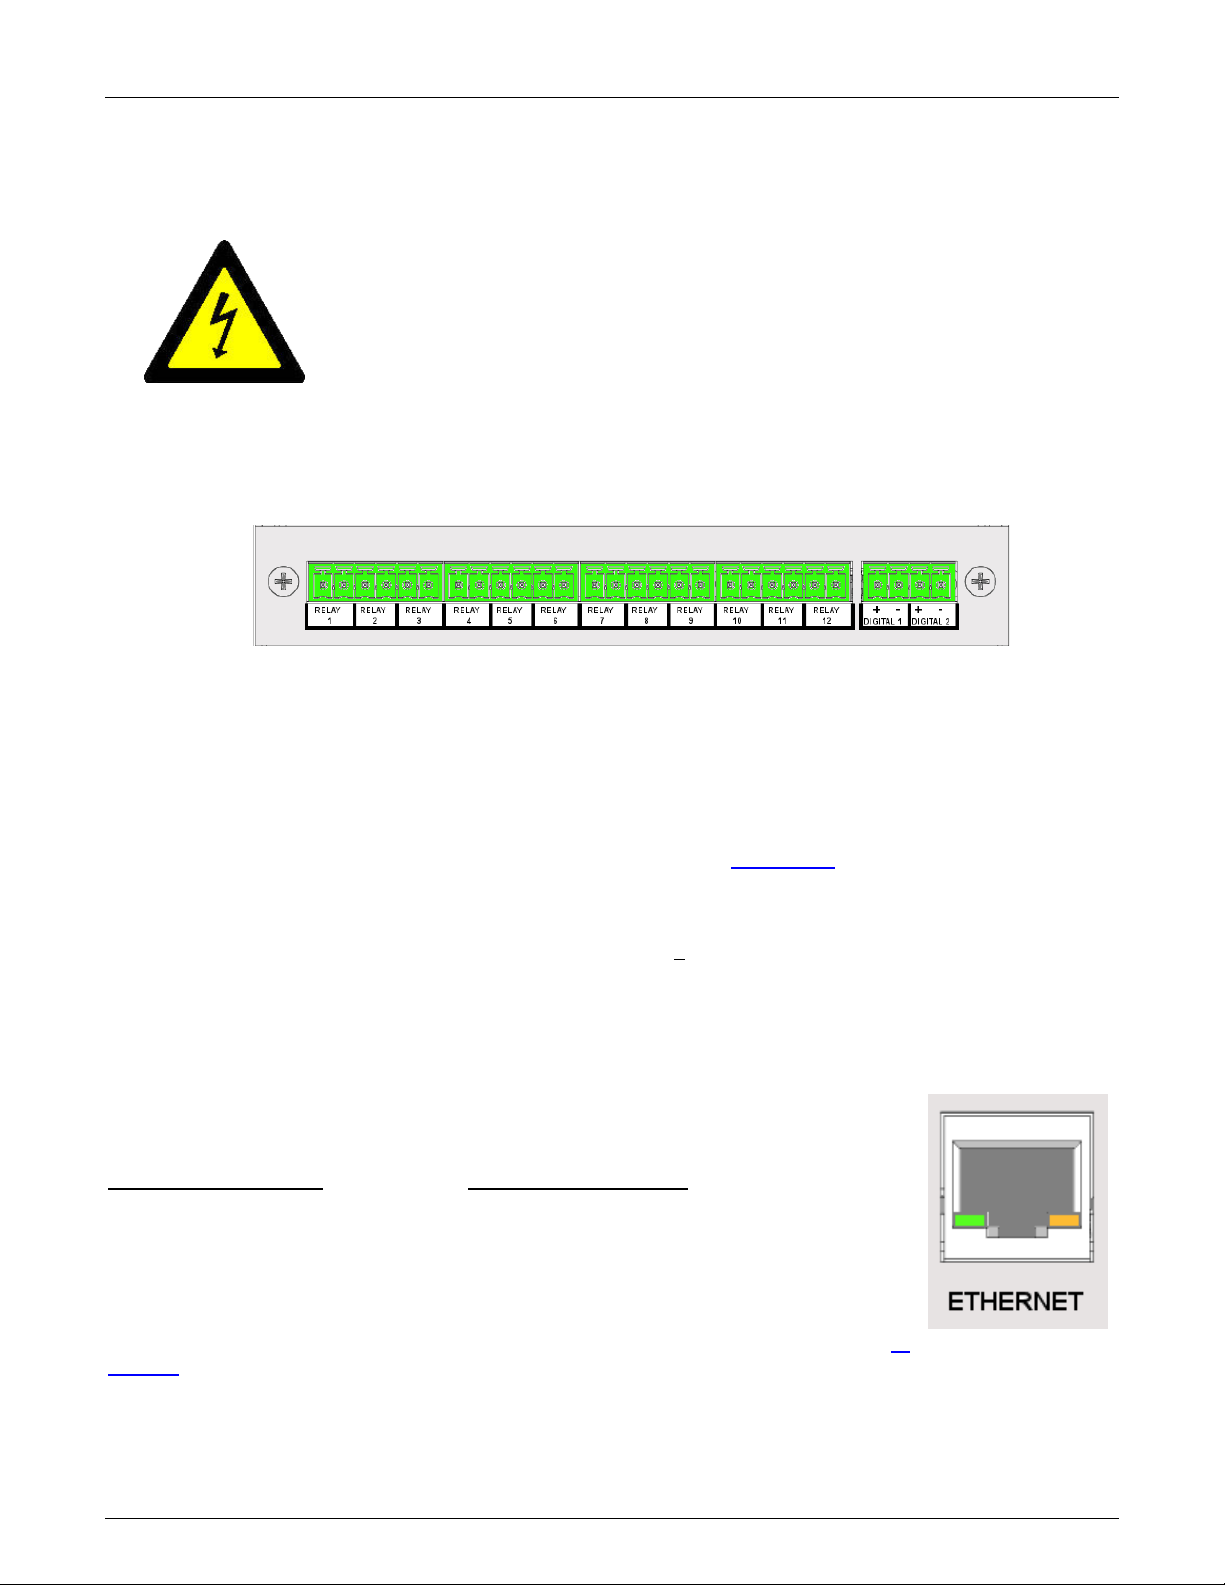
Section 3 – Installation
Figure 3-11 Digital I/O Module 12 Contacts Out, 2 In
Figure 3-12
3.5 Relay Output, Contact Input
WARNING
To prevent the possibility of electrical shock, use extreme caution when wiring
contact output connections. Hazardous potentials may exist on contact output
terminals which are floating with respect to instrument ground. These hazardous
potentials may be exposed on the rear terminal panel of your instrument. Any
voltage potentials at the contact circuit will exist on the instrument’s respective
contact output terminals (i.e. line-powered circuits).
The Recorder may be equipped with an optional Digital Input Output Board which has a combination of up to
12 potential free Form A (Single Pole Normally Open) or Form C (Single Pole Double Throw) relay contacts
and up to 6 opto-isolated digital inputs. The combination depends on the option chosen. An example is shown
below.
This module has 12 Potential Free Form A Normally Open (NO) connections. Connection is two wire and
there is no polarity. Maximum switching voltage is 200 Vdc and 0.5 Amp at a Maximum of 25 Watts (Voltage
x Current <25W) per contact. The potential free relay contacts are protected internally with 270 volt Metal
Oxide Varistors (MOVs) to prevent contact arcing.
There are two optically isolated digital inputs which accept 12 to 24 volt DC inputs (These can be jumpered
internally on the circuit board for 5 to 12 volt DC operation – see Appendix B). The inputs are polarity aware
and are marked plus (+) and minus (-) accordingly. Check the specification of the specific module in your unit
for full specifications.
Note: The digital inputs are samples at a 1 second interval (+0.1sec), therefore any signal must be present for
at least 1.1 seconds in order to be recognized.
3.6 Ethernet
The 10BaseT Ethernet option allows direct connection to the LAN or WAN and the
standard TCP/IP protocol enables the transfer of data over the Internet. The RJ45
Connection for the Ethernet is as follows:
Receive Differential Pair Transmit Differential Pair
3 RX- 7 TX 6 RX+ 8 TX+
Two LEDs on the rear panel show Ethernet activity. The Amber Link Speed LED indicates
10 or 100 (On) MBpS and the Green RxTx LED indicates communication activity. The IP
address needs to be set before this port will function
I. Page 22 1/06/2012 REV 1.10.2
Page 31

Section 3 – Installation
Figure 3-13
Figure 3-14
Figure 3-15
3.7 USB Connection
There are two USB (Universal Serial Bus) Connectors on the rear panel.
One is a Type A Master connector; the other is a Type B Slave
connector. Only one can be active at any time – the active connector is
selected by a slide switch on the under side of the recorder close to the
back panel. The switch is set below the surface. Slide the switch toward
the connector you want active – A or B BEFORE powering up the unit.
Use standard shielded USB connector cables to connect to your USB
device (Host PC to USB B – Slave Device to USB A Host port).
Note: Maximum cable length should not exceed 5m (15 feet).
3.8 Audio Connection
The audio output connector is a 6 pin mini din socket that permits connection to the
recorders audio lines. Connections are as follows:
Pin Direction Description
1 Out Audio Common
2 In Microphone Input
3 Out Line Output – Left
5 Out Line Output – Right
4 In Line Input - Left
6 In Line Input - Right
An adapter is available that converts the Mini Din to 3 Standard Phone Jacks for
Microphone In, Line In and Line Out.
3.9 Mouse and Keyboard Connection
The keyboard / mouse connector is a 6 pin mini din socket that permits connection to an
external mouse and/or keyboard. A standard PS2 mouse will plug directly into this socket, a
PS2 keyboard needs an adapter. Connections are as follows:
Pin Direction Description
4 Out +V for Keyboard/Mouse
3 Out Supply Common for Keyboard/Mouse
1 In/Out Mouse Data Line
5 In Mouse Clock Line
2 In/Out Keyboard Data Line
6 In Keyboard Clock Line
An adapter is available that converts the single Mini Din Socket to two separate sockets, one for the mouse and
one for the keyboard.
I. Page 23 1/06/2012 REV 1.10.2
Page 32
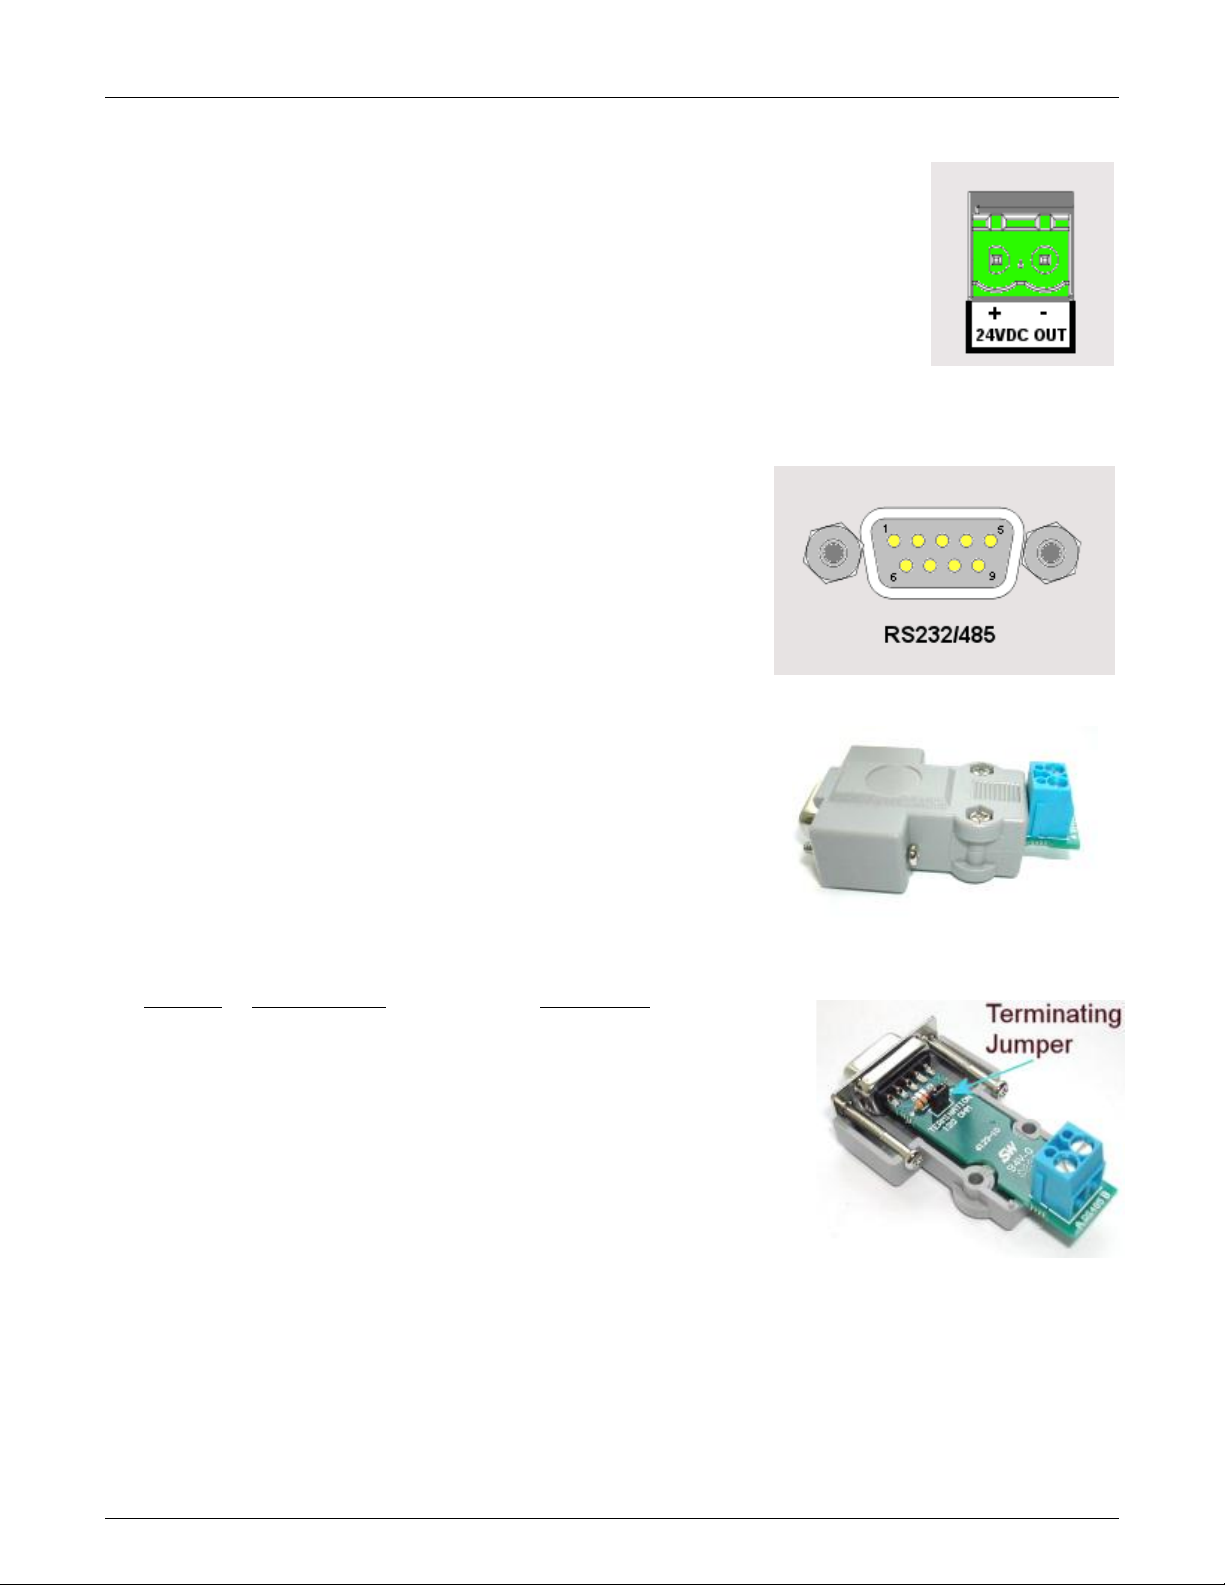
Section 3 – Installation
Figure 3-16
Figure 3-17 Serial I/O
Fig 3-18 RS485 Adapter
Fig 3-19 RS485 120 Ohm Jumper
3.10 24Vdc Isolated Output (Option)
The Isolated 24Vdc Output is an option that provides 24 Volts DC @ 100 milliamps to
power external (current loop) sensors. The output is isolated to 1000 volts from all internal
voltages and ground. The output is also protected against short circuit.
The output is polarized and is marked for positive (+) and negative (-). This option is field
installable.
3.11 Isolated Serial Interface (Option)
A standard DB9 Female connector is required for the RS232 to connect
to an IBM PC compatible computer using a null modem cable. The
RS232 interface can support cable runs up to 50 feet [16 m]. The RS485
connection is via two wire (twisted pair) cable (a DB9 Female adapter
connector is required) and can support cable runs up to 4000 feet [1300
m].
The RS232 and RS485 connections are mutually exclusive and are
selected using pin 1 of the DB9 connector – see right.
The interface is isolated from internal circuitry to 500 volts. The RS485
requires a 120 ohm terminating resistor if it is the last unit on the drop. All
Serial Interface connections are made through the DB9 female
connector. An adapter connector is included that brings out the RS485
connections to a set of screw terminals and has the terminating resistor on
the board. The RS485 connection is marked A and B for duplex 2 wire
connection. A is + and B is -.
If the terminating resistor is required it is necessary to open the adapter
shell and insert the jumper to enable the termination.
The connections to the DB9 female connector are as follows:
DB9 PIN CONNECTION DIRECTION
1 Mode Select (see below) In
2 RxD Receive Data In
3 TxD Transmit Data Out
4 DTR Data Terminal Ready Out
5 Common Out
7 RTS Request To Send Out
8 CTS Clear to Send In
6 RS485 A+ Bidirectional
9 RS485 B- Bidirectional
The mode select pin (pin 1) must be left unconnected for RS232 operation
or must be grounded (to pin 5) for RS485 communication. Use the provided
adapter for RS485 communication.
NOTE: If pins 7 and 8 on the DB9 connector are NOT used they must be wired together. i.e. Connect the RTS
and CTS lines together.
I. Page 24 1/06/2012 REV 1.10.2
Page 33
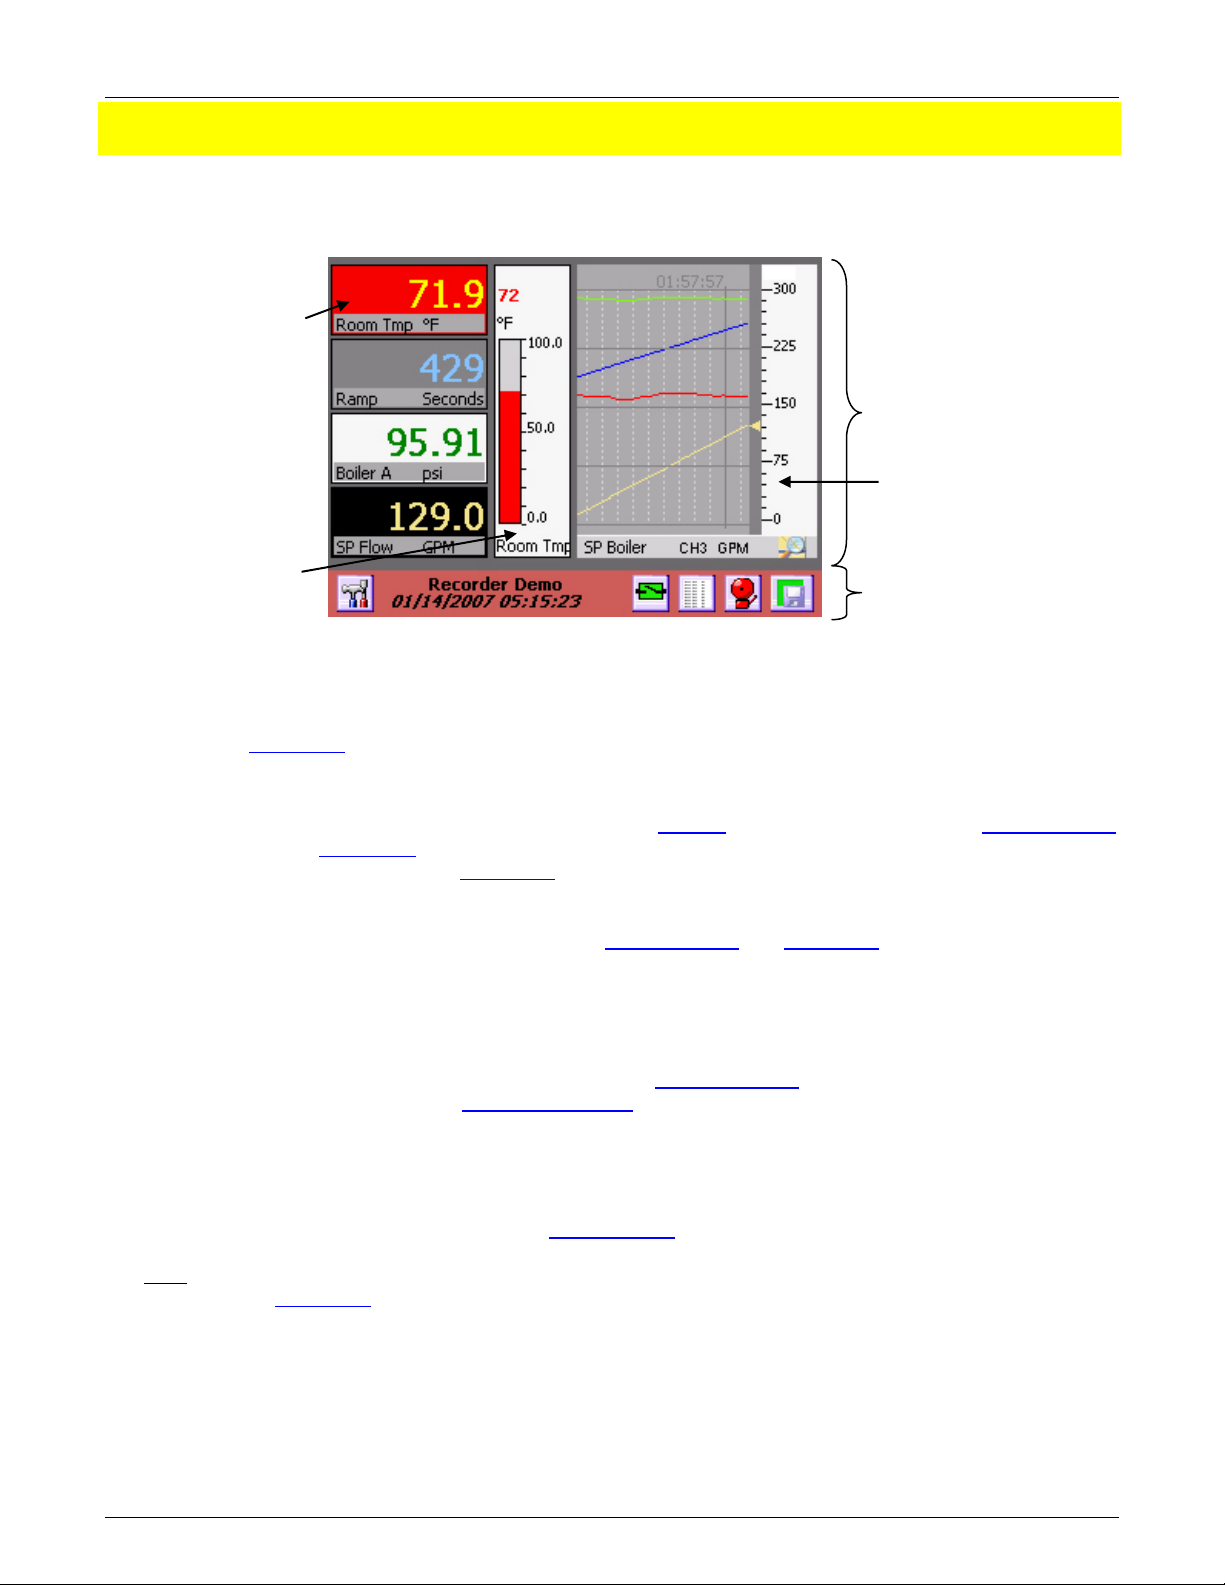
Section 4 – Functional Description
Digital
Display
Bar Graph
Trend
Figure 4-1 Typical Display
Live Display
Area
Task Bar
4.0 FUNCTIONAL DESCRIPTION
4.1 Display Elements
A Typical display on the recorder is shown above. The actual content of the window will vary according to what
has been set up by the user. The display has two parts to it - the Task Bar along the bottom of the screen and the
Live Display Area which is the rest of the screen. On power up the Live Display Area will show the default screen
as set up in the Rotate List.
4.1.1 Live Display Area
The Live Display Area shows combinations of trends and widgets as set up by the user in the Display Builder
and enabled in the Rotate List Setup. Tapping the Task Bar along the bottom of the screen will bring up the
next Display View as defined in the Rotate List.
There are three basic styles of widgets viewable in the display –bar graphs, digital displays and trends. For
additional information on creating Live Displays see Display Builder and Rotate List in Section 4.
The display is “active” and much of the display area will react to taps on the screen. Tapping the Task Bar will
cause the live display to move to the next display, assuming you have set up more than one in the Rotate
List. Double tapping the Digital Display or the scale on the Bar Chart and Trends will take you to the widget
setup for that particular widget. Tapping the bar below the Trend will advance the scale to the next channel.
Double-tapping the actual Trend area will take you to the screen annotate function. Double Tapping the lower
area of the Digital Display will allow display of max, min or average values
4.1.2 Task Bar
The Task Bar is the reddish colored bar at the bottom of the screen. It contains a number of button icons and
two lines of information. The label “Recorder Demo” is the Unit Tag and can contain up to 24 characters to
uniquely identify the recorder. It is set in the System Setup Menu. Below the Unit Tag is the Date and Time
Display, which shows the current date and time the recorder is using. Tapping any part of the Task Bar that is
NOT a button will cause the Live Display to rotate through the various views as created by the user and
enabled in the Rotate List.
I. Page 25 1/06/2012 REV 1.10.2
Page 34
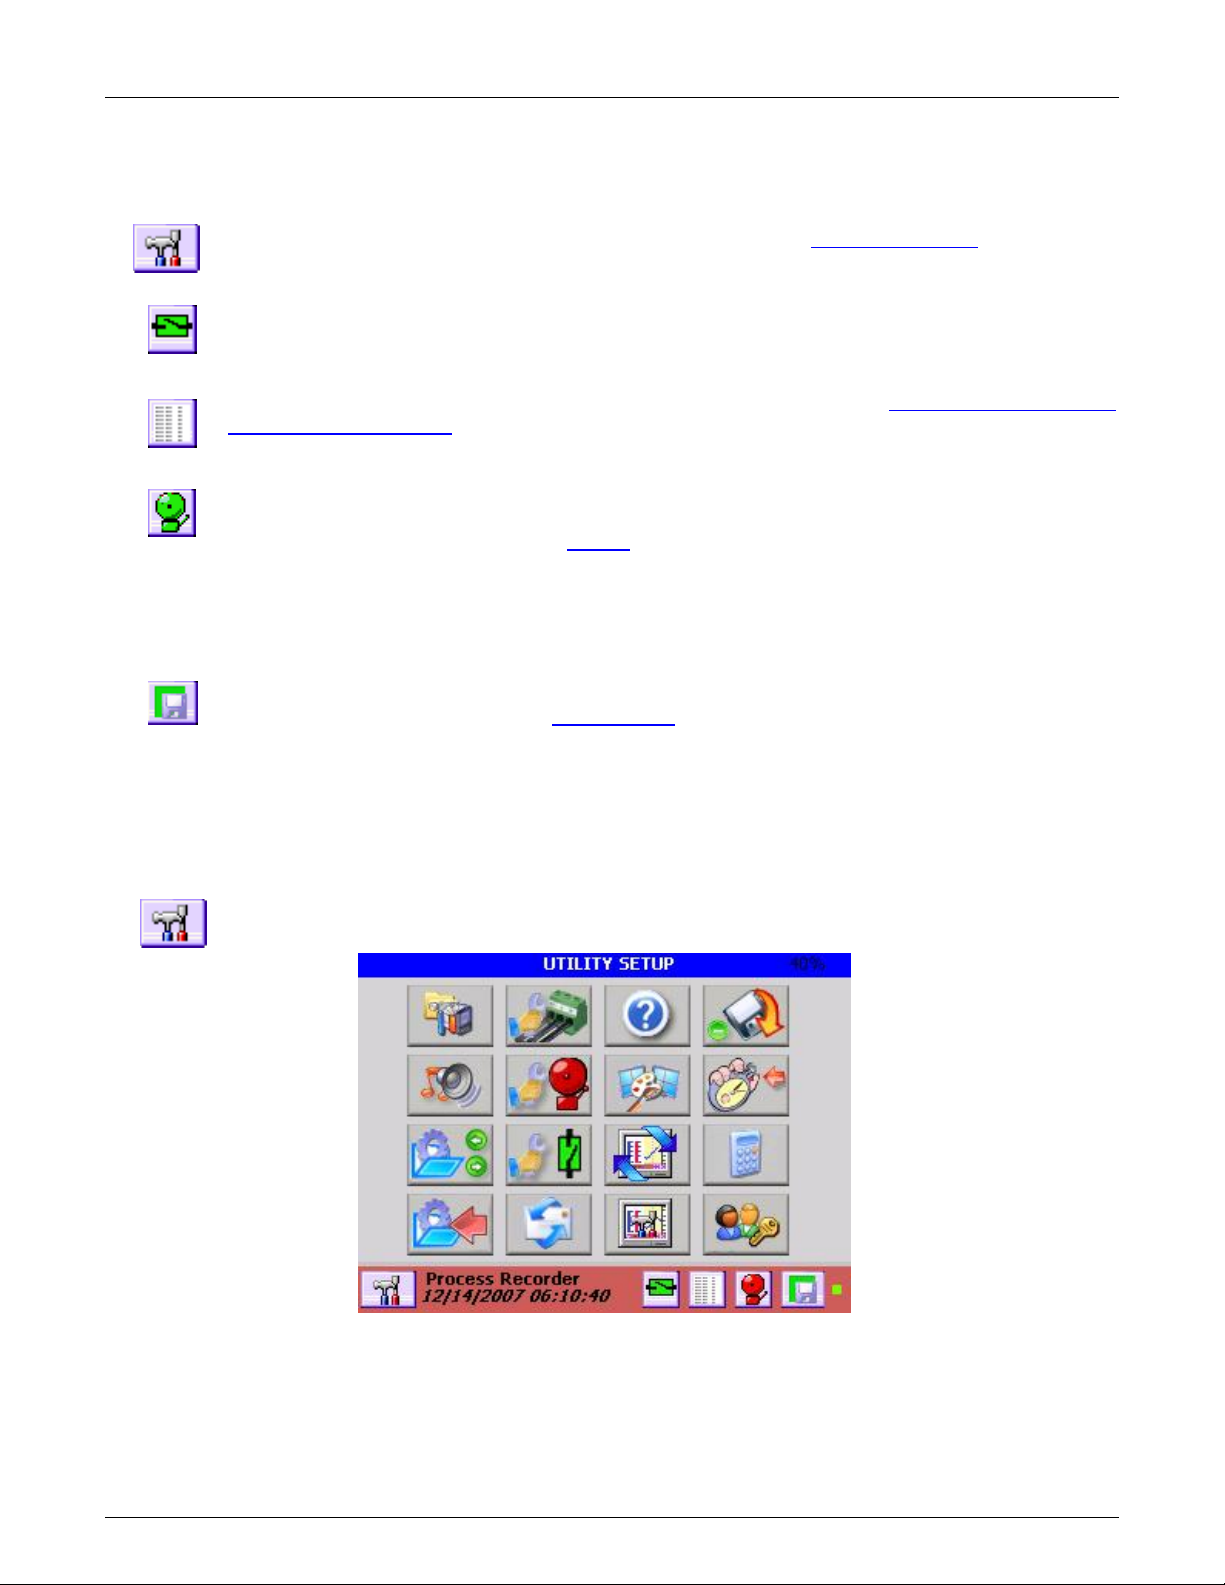
Section 4 – Functional Description
Figure 4-2 Utility Setup Menu
There are 5 button icons in the Task Bar. They vary according to the status of the recorder. They are from left
to right:
Utility Setup Menu Button – This button takes the user to the Utility Setup Menu. Here the user
can configure and control the recorder.
Alarm Contacts Reset Button – This icon shows the status of the optional output contacts. If any
contact is active, this icon will be red and show the contact closed. Pressing this icon will reset any
latched output contact that is reset enabled. User must be logged in to use if security is enabled..
Alarm Log Button – Pressing this button changes the Live Display to the Event Log then the Alarm
Log then the Activity Log. The icon will change to reflect a graphic display when the next press will
return to the live display. If security is enabled only the administrator can view the Activity Log.
Alarm Accept Button – This icon indicates the status of the recorder alarms and acts as the Alarm
Accept button. Pressing this button silences the audible alarm tone. If security is enabled the user
must be logged in to use. Refer to the Alarms section for more detail.
When GREEN it indicates that there are no alarms present.
When AMBER it indicates there are no alarms but the audible Alarm Tone has been muted.
When RED it indicates there are alarms present OR the alarms have been disabled.
Record Icon – This icon indicates the recorder record mode. It changes according to what the
current record status is. Refer to the Record Setup section for more detail.
The GREEN background indicates that the recorder is currently NOT recording.
The AMBER background indicates that the recorder is currently ARMED but is NOT recording.
The RED background indicates that the recorder is currently RECORDING. It will blink slowly.
4.2 Utility Setup Menu
Tapping the Utility Setup Menu Icon on the left of the Task Bar brings up the Utility Setup Menu as
shown below. Tapping the icon a second time returns to the original display.
The Utility Setup Menu provides the user with several options. The number in the right hand corner of the blue bar
at the top of the menu is the system memory resource usage as a percentage of available. It does not include
added memory. It should be less than 80% for proper operation. Menu choices are as follows:
I. Page 26 1/06/2012 REV 1.10.2
Page 35
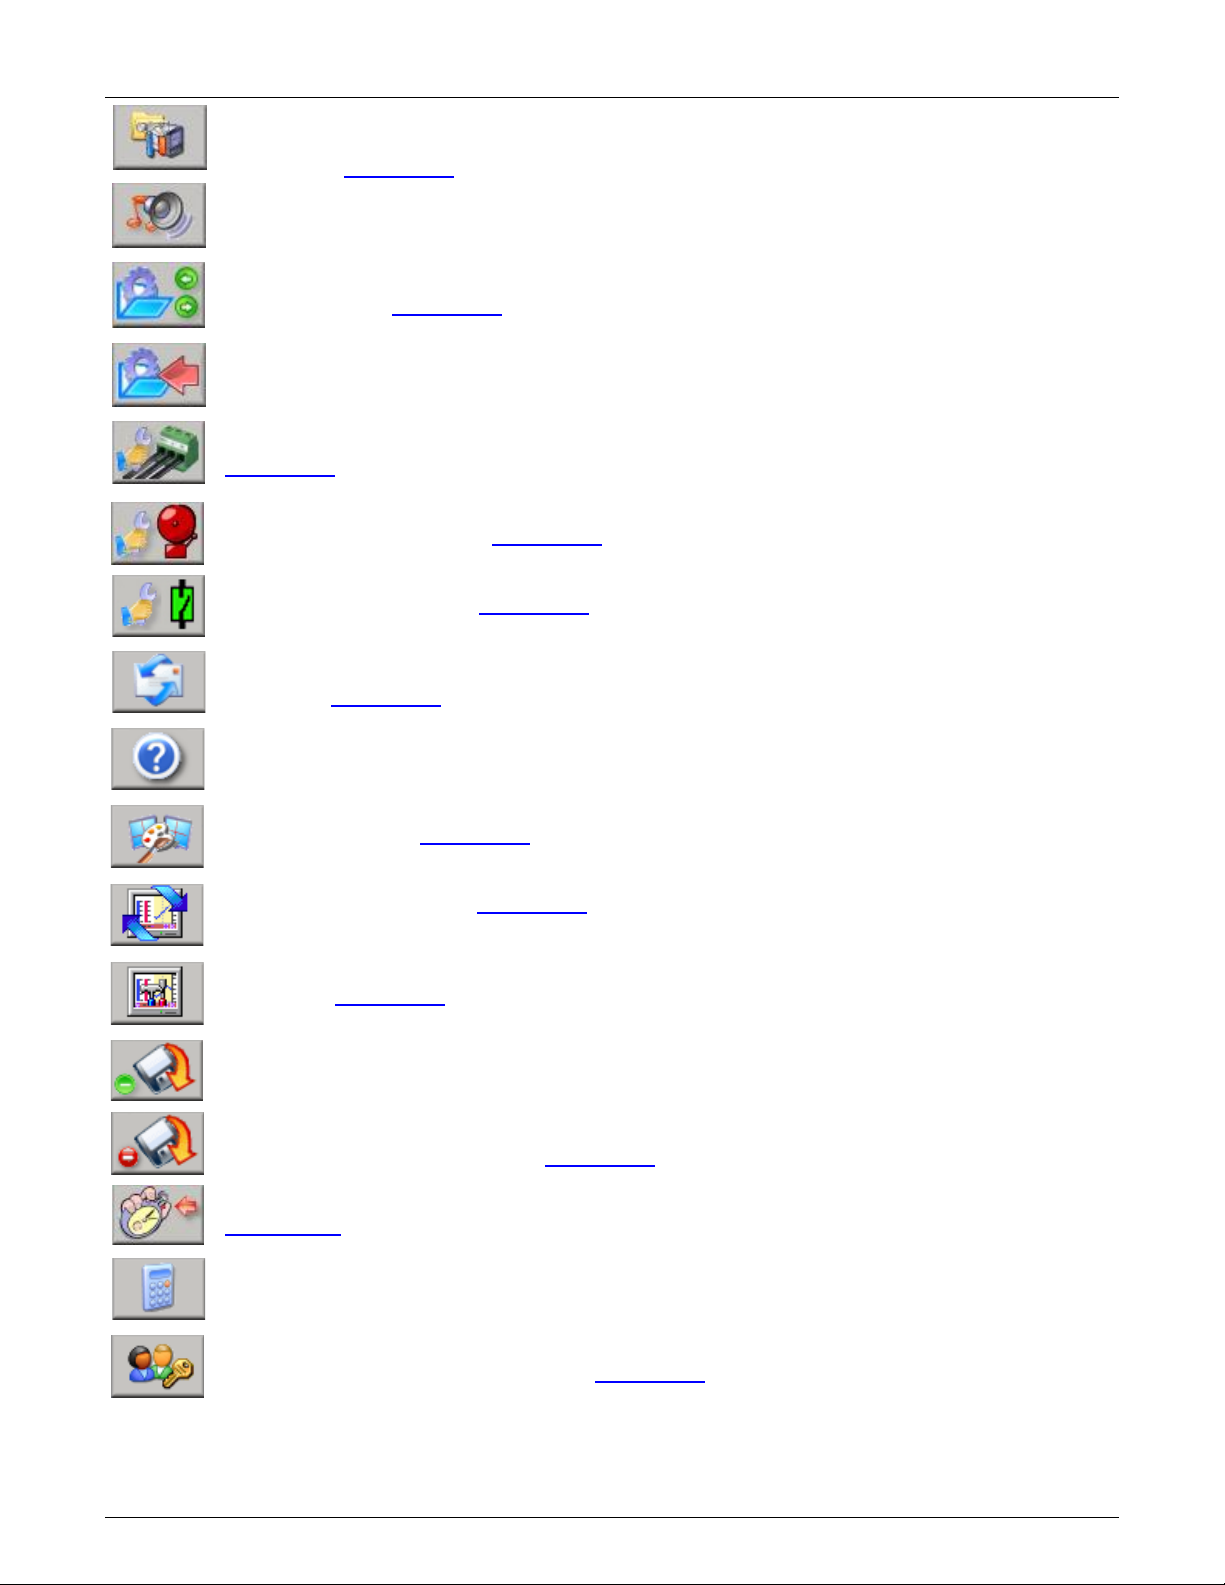
Section 4 – Functional Description
System Admin Menu– Allows the administrator (if security is enabled) to enter the system
administration menu. This allows the recorder to be configured at the base level (passwords,
security etc.) Details Here
Sound Level Adjust – Allows the user to adjust the sound level of alarms and prompts. Use the
slider bar to adjust the volume – audible feedback is provided. The keyboard can also be muted.
Configuration Manager – Allows the permitted user to import (load), export (save) or clear the
configuration files. Details Here
Quick Save Configuration – Press this button to do a quick save of the configuration.
Master Channel (Input) Setup – Allows the administrator to set up and define the input channels.
Details Here
Master Alarm Setup – Allows the administrator or manager to set up and define the alarms
associated with the channels. Details Here
Digital I/O Setup – Allows the administrator to set up the digital outputs (relay contacts) and the
digital inputs for the system. Details Here
Send Email – Allows the user to send an email provided the unit has been configured to do so. Log
in required. Details Here
System Information – Allows the user to see the status of the recorder – firmware versions, user
logged in, unit tag and IP Address.
Display Builder – Allows the user to create live displays using widgets. Log in required
Manager/Admin only. Details Here.
Rotate List – Allows the user to decide which displays appear on the live display when the task bar
is pressed. Log in required. Details Here.
Display Utilities – Allows the administrator to adjust the display back light and background color.
Admin only. Details Here.
Record Setup – Allows the user to start and stop recording and set up recording parameters -
media type, channels, file name, record rate and what to record. Log in required.
If the unit is currently recording the menu icon will have the red dot – pressing the button will allow
the user to stop recording. If the unit is not recording the menu icon will have the green dot –
pressing the button will allow the user to start recording, arm recording or if privileges allow, to set up
the recording. Manager/admin only. Details Here.
Channel Reset – Allows the user to reset any timer, totalizer or calculated channel back to zero.
Details Here.
Calculator – Allows the user to pop up and use a simple calculator.
User Login – Allows users to log in to the system. Asks for a user name and password. If a user is
already logged in it will ask if the user wishes to log out. Once logged in a user can operate without
being asked for a password at each step. Details Here.
I. Page 27 1/06/2012 REV 1.10.2
Page 36

Section 4 – Functional Description
Figure 4-3 Alarm Event Log
4.3 Alarm, Event and Activity Logs
While viewing a live display, pressing the Events
button (left) on the task bar brings up the Event
and Alarm logs as shown right.
Each time this button is pressed it will move through a
series of logs – Event -> Alarm -> Activity. Note that the
Activity Log can only be viewed if the user has
administrative privileges.
When in the Event log (Activity Log for
Administrators) the icon changes to that on the
left. Press this button to return to the live display.
The Logs are a record of all alarms, events and activities
that occur in the recorder. The Activity Log is a record of
all operator entries. Each entry is annotated with the
date and time the event occurred together with a
description of the alarm, event or activity. If security is enabled the user’s name will be logged along with the
event. The alarms and events are listed in chronological order with the latest entry at the top of the list. As each
new entry appears at the top of the list, the rest scroll down. Use the scroll bar to view past events. The Logs
display the latest 512 entries of the unlimited entries that are located on the internal memory card as AlarmFile.log
EventFile.log and LogFile.log. The files are encrypted but can be read by the accompanying software. These files
can be archived using the System logfile menu.
These files will be automatically archived when they reach 1Meg in size. The old file will be saved as xxx and the
existing file will be cleared
The files may also be saved to a specific location using the Save As button (Admin only)
The files can be cleared using the Clear button (Admin only).
The files should be cleared periodically for the sake of efficiency and space.
4.4 Record Session
A record session commences once a file name has been defined in the Record Setup menu and remains open
until a new name is assigned. This file name is the name of the data file that will be recorded to the media and
will contain all the data, alarm and event information as programmed. The recorder will create a folder on the
designated media with the same name as the file name. This folder will contain the data file as well as all ancillary
files associated with this recording – for example annotation bit map dumps. These files may be referenced by the
data file during playback on the PC and should not be separated. When copying or moving use the entire folder
not the files.
Folder: Mydata
Data File: Mydata.dat Bitmap Files Text Files Related Files
Other files that may be associated with the session are the configuration file ‘config.xml’ and the Event log
‘LogFile.log’ and ‘LogFileHist.log’. These files reside on the root directory of the internal memory (SD Card) and
can be copied to the media upon which the session folder resides by selecting the Archive System Files option.
I. Page 28 1/06/2012 REV 1.10.2
Page 37
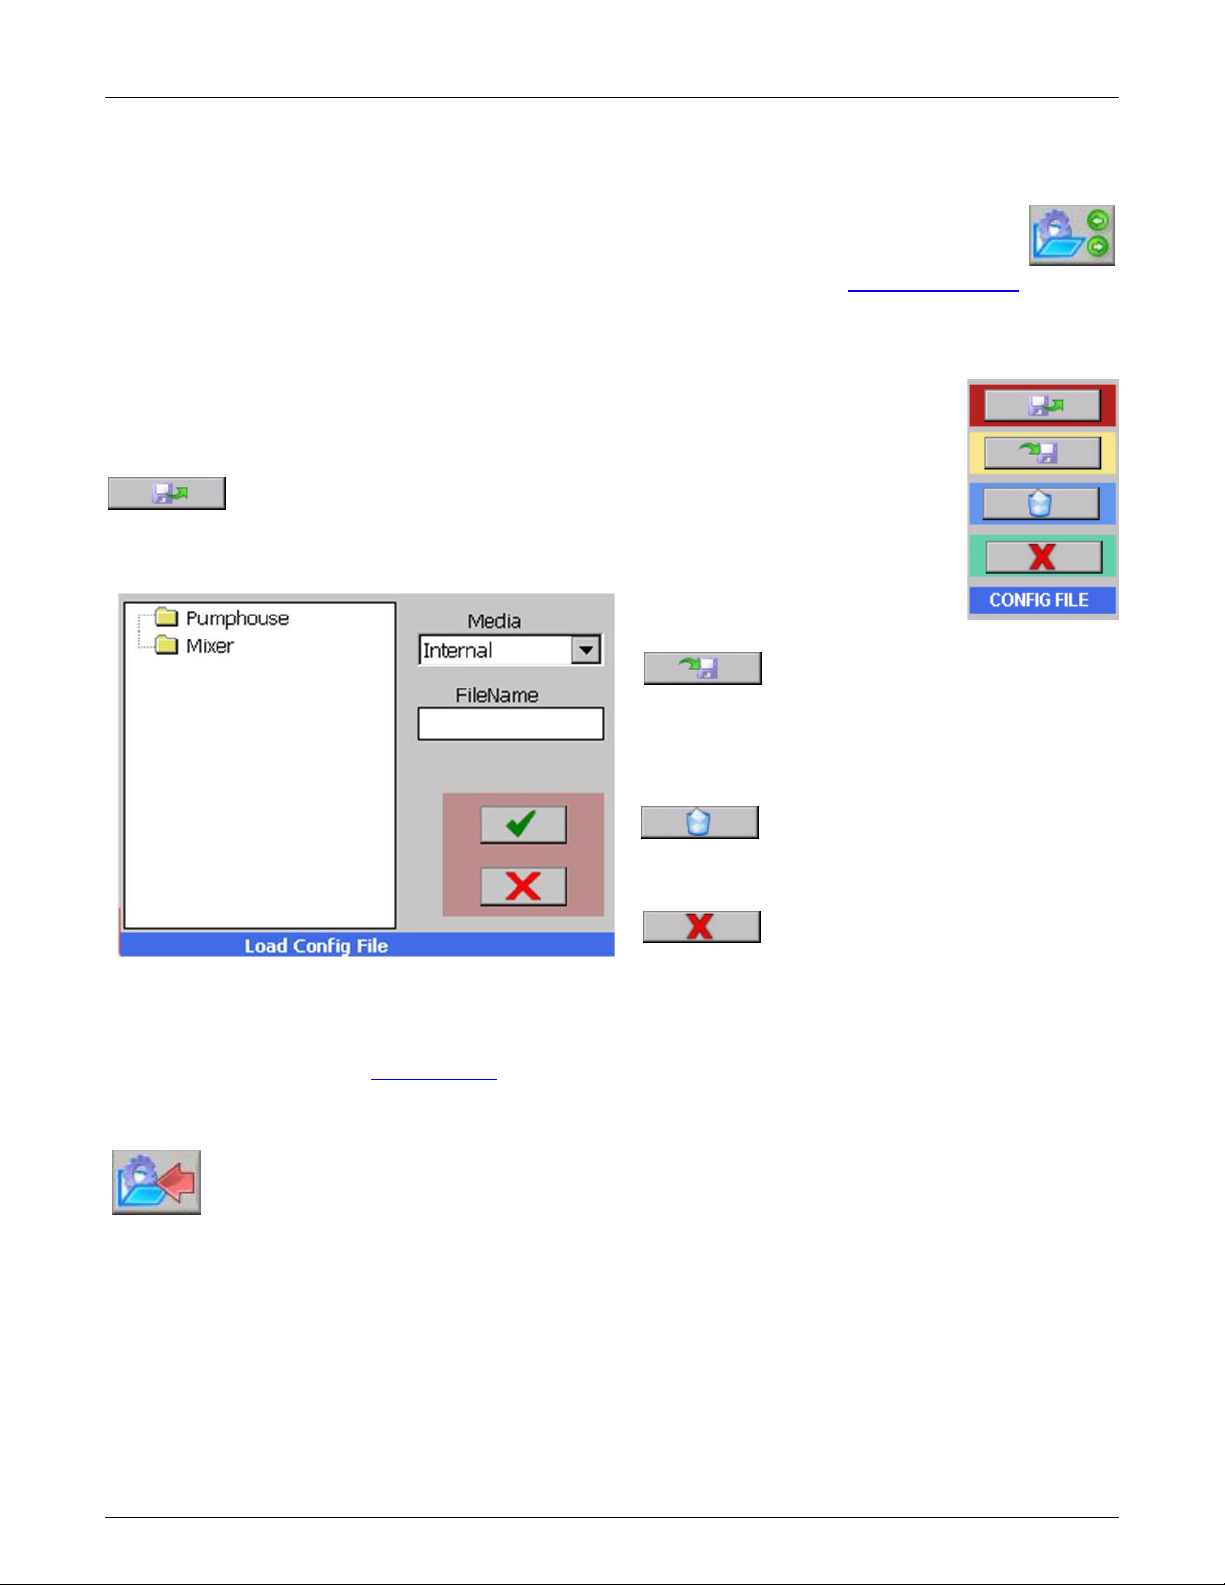
Section 4 – Functional Description
Figure 4-4 Load Configuration
4.5 Configuration Manager
The Configuration Manager is entered from the System Admin Menu by pressing the icon shown at
the right. This is a privileged option and allows the administrator to load, save or clear the
configuration file. The configuration files are in a folder of the same name in the ConfigFiles directory
and contain all the set up elements of the recorder and is transportable. See Configuration Files for detail.
Configuration files are in xml format and are human readable and can be edited by any xml editor. There must
always be a config.xml/displays.xml file in the internal memory to ensure proper operation of the unit. This is the
file loaded at start up. If a config.xml file is not found, the unit will start up but will not be fully
configured.
Pressing the icon shown will pop up the Config.File window as shown on the right. Select the
operation you require:
Load: This enables the user to load a new configuration. A file browse window
will pop up (below) showing the configuration files available Select the
configuration you want by tapping on it and press okay. Note: This will load the new config
file and the recorder will restart. The old configuration settings will be overwritten.
Save: This enables the current
settings to be written out to the
existing config.xml (the file will be overwritten) or you
can assign a new name and location for it. Note: This
new configuration will not load on startup unless it is
called config.xml and resides in internal memory.
Clear: This will clear the configuration
file and set it to a minimally functional
set of parameters. Use this option if you want to start
over configuring the unit.
Cancel: This allows you to exit
without doing anything.
NOTE: There is an option to save the CONFIG file automatically any time a change is made to the file by the
User. This can be set in the System Setup menu. If the user finds this too time consuming, this option may be
disabled. The responsibility is then on the user to SAVE THE CONFIG FILE.
The User can perform a QUICK SAVE CONFIG at any time by pressing the Save Config Button on
the Utility Setup Menu shown left.
I. Page 29 1/06/2012 REV 1.10.2
Page 38

Section 4 – Functional Description
Figure 4-6 E-mail Window
4.6 Sending Email
Sending email can be done in two ways – initiated by the user or initiated by an alarm condition. The email
settings have to first be set up in the System Admin Menu. This is where the default recipient and routing
information is entered. To send an email on an alarm condition it is necessary to set up the alarms accordingly
and make sure that the system is enabled to allow emails to be sent.
NOTE: In order to send email it is necessary to have the IP address set by DHCP and email settings must be
correctly set in E-mail Setup.
To send an email manually it is necessary to enter the System Admin Menu and tap the email icon
shown on the left. This will bring up the email window shown below.
The data in this window has to be filled in as follows:
To: This is the recipient’s email address. To send the email to more
than one person add additional addresses separated by “;”. NOTE:
The device needs to be set up for DHCP in the network settings in
order to email named domains eg @yahoo.com otherwise absolute
ip addresses need to be used eg @ 70.10.1.20.
From: This is where you enter your name or anything you want to
appear in the email “From” field.
Note: The To and From entered here override the settings in the
System Setup.
Subject: Enter text to appear in the email Subject field.
Tap in the text box and type any message you want. Note: You will
have to drag the keyboard out the way.
Once you have all the data entered, tap the Send button (shown left). If for some reason the email
cannot be sent, an error message will be displayed. To exit without sending the email, tap the Exit button
below the Send button.
This space intentionally left blank.
I. Page 30 1/06/2012 REV 1.10.2
Page 39
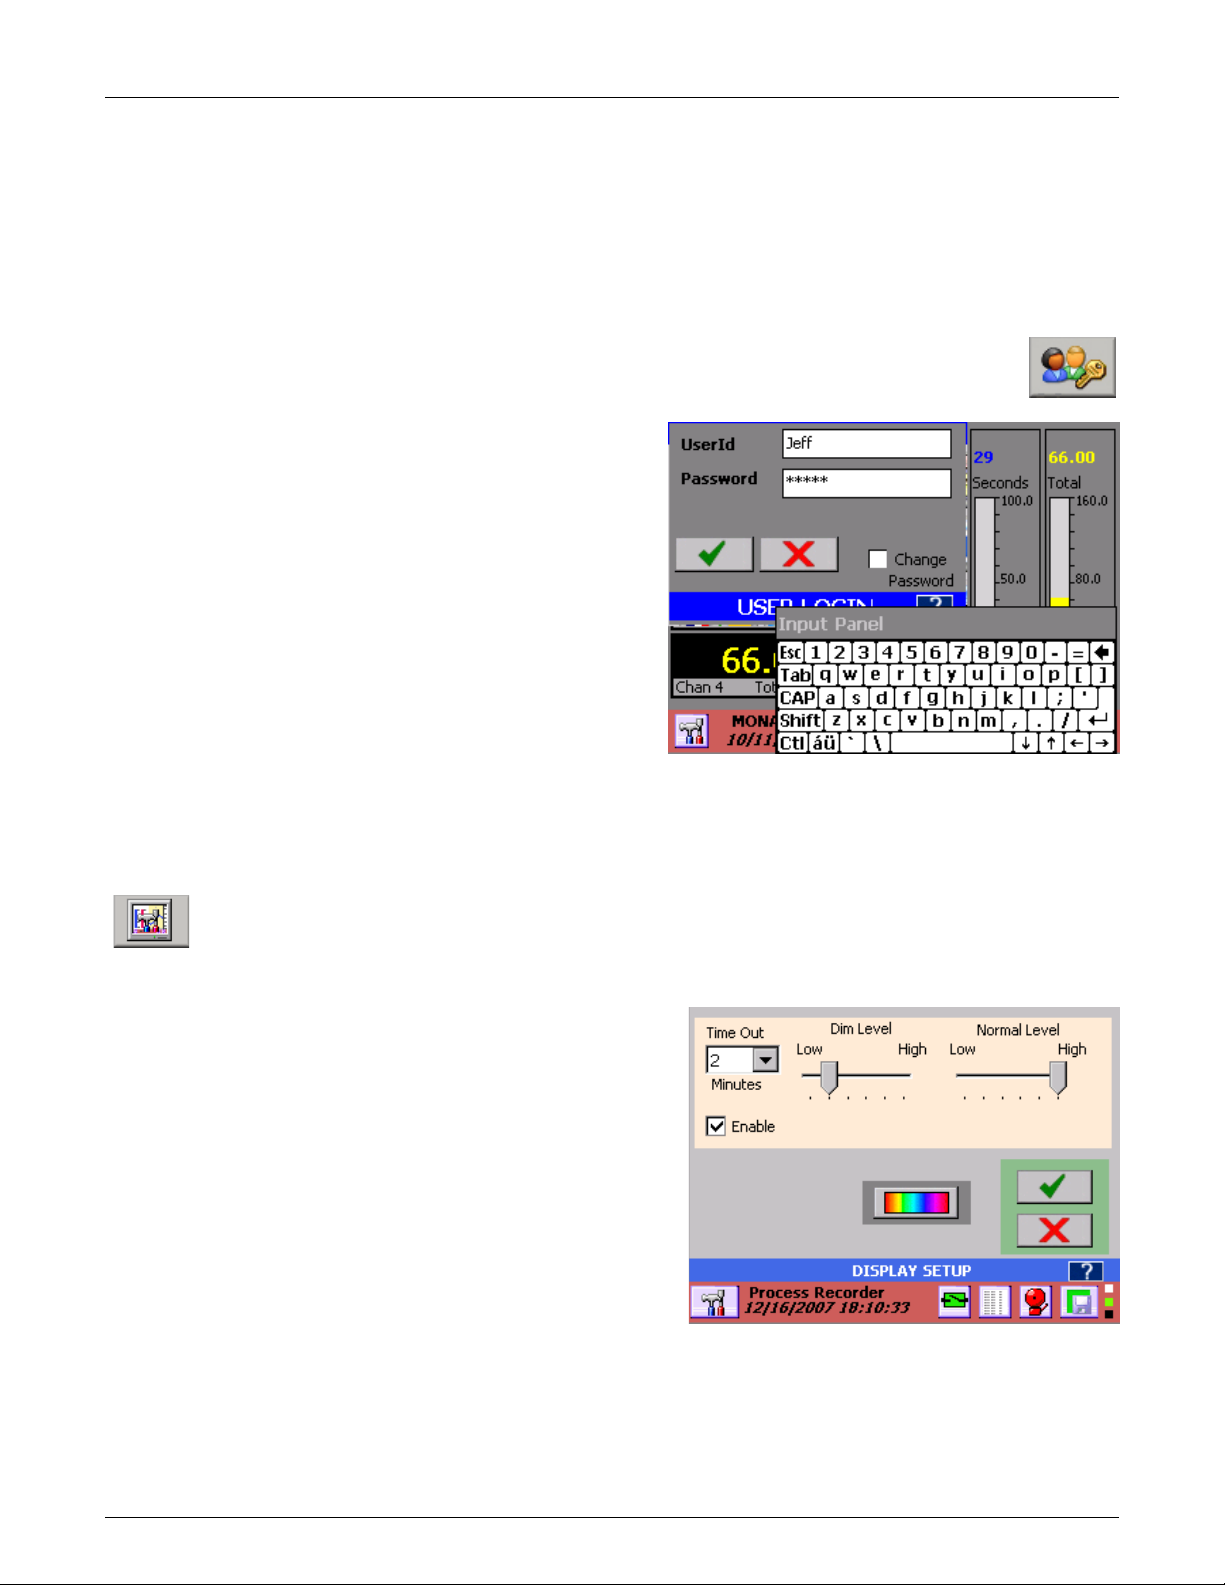
Section 4 – Functional Description
Figure 4-7 Log In
Figure 4-8 Display Setup
4.7 User Login
If password protection is enabled, the user will have to log in to be able to use many of the functions of the recorder.
There are various levels of protection and access to functions is based on user privileges. These levels are:
User: Can operate the recorder but cannot change any settings or configuration.
Manager: Can operate and configure the unit, but cannot change basic settings.
Administrator: Can operate the unit, and change all configurations and settings.
If password protection is NOT enabled then all users have administrative privileges. Log in is done
via the System Utility Menu using the log in icon shown right. This will bring up the login dialog box
shown below right.
Note: If a user is not logged in and attempts to access a
protected function, this log in dialog box will pop up at each
instance. Logging in allows a user to navigate the unit
without having to deal with this at each attempt to do
anything. Once logged in a user remains logged in until they
log out or their log in time expires, however they will be
required to enter their password.
Enter the User ID and Password using the keyboard and
tap OK (Check mark). Check the “Change Password” box if
you wish to change your password.
To Log Out tap the Log In icon and you will be asked if you
want to log out. Tap the Yes button.
Logging in or out is recorded in the Activity Log.
4.8 Display Utilities
The Display Utility menu allows the user to control the display brightness and background color. Enter
this dialog by tapping the icon shown left, in the System Utility Menu.
4.8.1 Display Brightness
The display brightness can be set at varying levels, either
continuously or can be set to dim after a preset time. Refer
to 3-11. There are two sliders – Dim Level and Normal
Level.
The Dim Level is the level the display will dim to after the
Time Out, which is selected in the dropdown box to the left
of the Dim Level slider bar. It is shown as 2 minutes in
Figure 4-8. In order for the Dim Level Time Out to be active
you need to check the Enable box. To set the Dim Level
place the stylus on the slider bar and drag the pointer or
tap the slider bar. The display brightness will alter in real
time. Select the required level.
The Normal Level setting will be the default brightness of
the display. To change the brightness, place the stylus on
the slider bar and drag the pointer or tap the slider bar. The
display brightness will alter in real time. Select the required level.
After the preset period of inactivity, the display will dim to the Dim Level setting. Any screen touch activity will
restore the normal level of brightness.
I. Page 31 1/06/2012 REV 1.10.2
Page 40
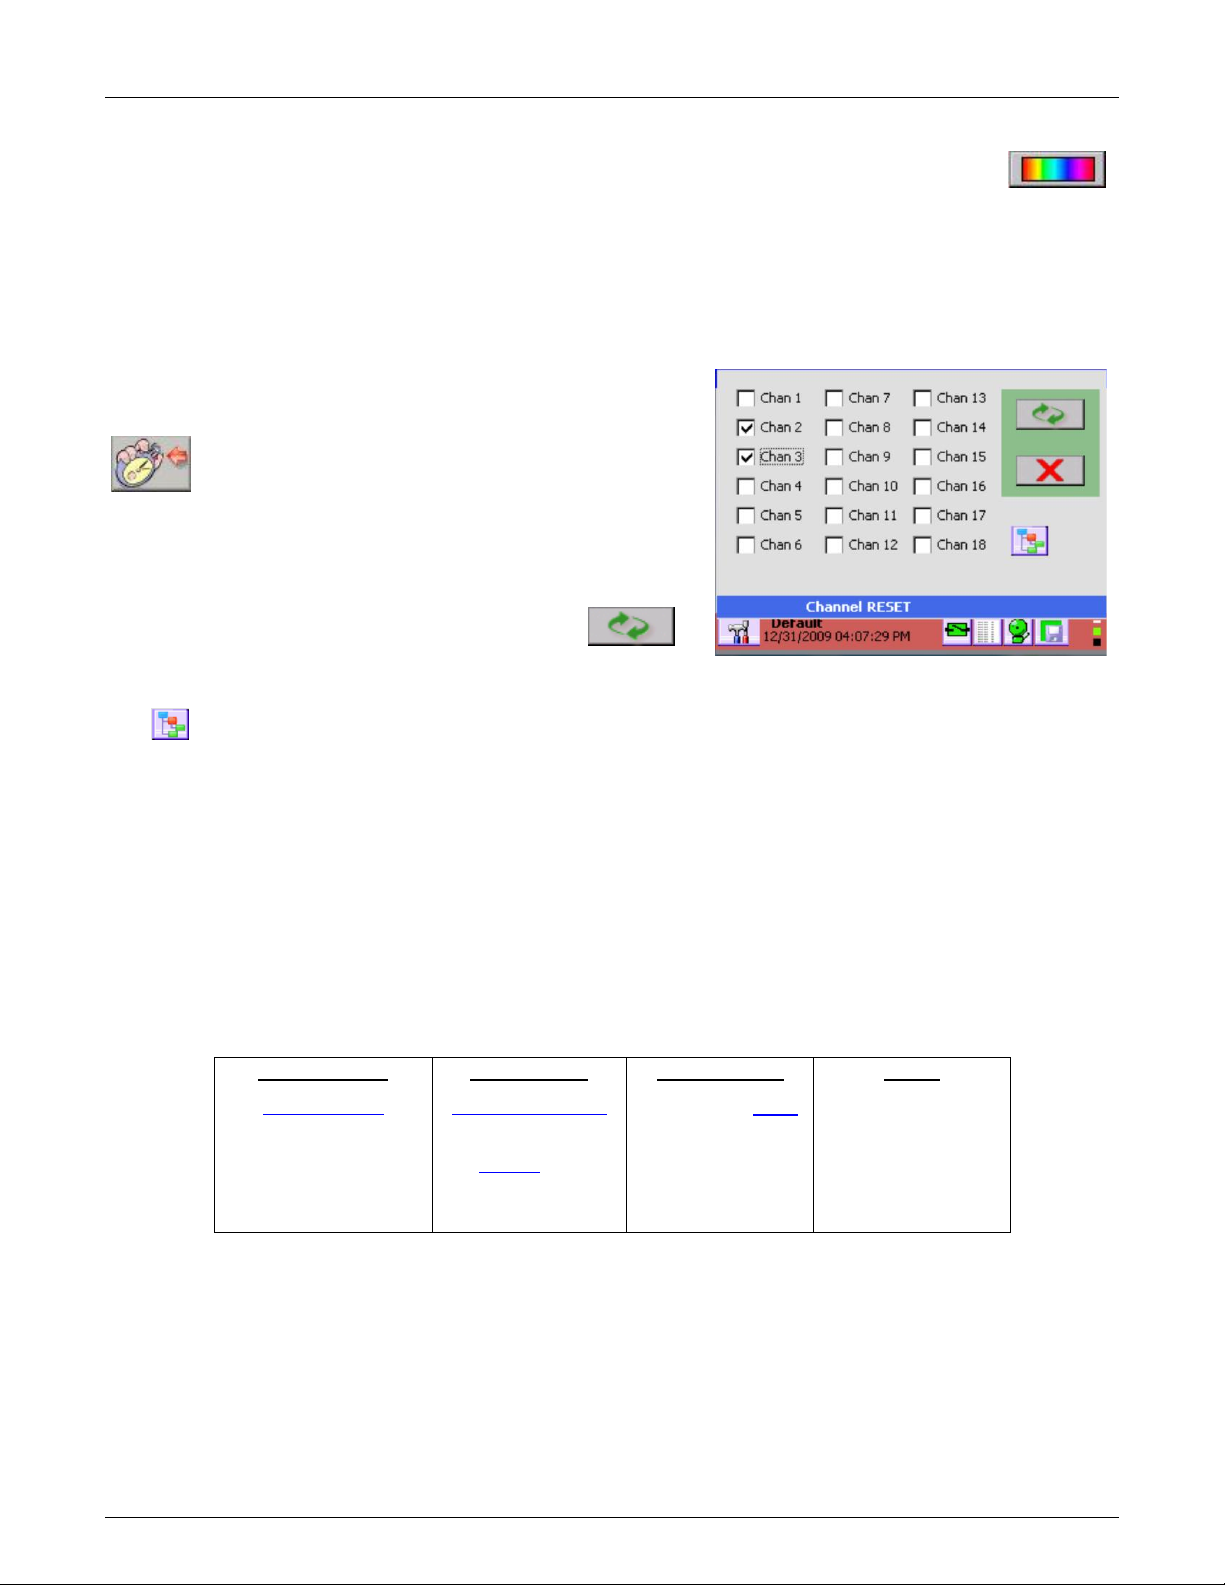
Section 4 – Functional Description
Record Setup
Alarm Trigger
checkbox is checked
Alarm Setup
Record checkbox
is checked
Master and
Channel enable
must be checked
Record Mode
The Record ARM
button has been
pressed
Alarm
The specified alarm
must be in an
alarm condition
4.8.2 Background Color
The background color is the default color for all screen inactive areas, (between widgets and
around the edge of the screen). It can be set by pressing the “BackGround” button shown right
and in Figure 4-8 above.
This will pop up the color selection dialog. Choose the background color required.
Tap Okay to save the settings or Cancel X to quit without saving the changes. If saved, the display will now
be at the brightness level set in the Normal Level.
4.9 Channel Reset
From time to time it may be necessary to reset
totalizers timers or calculated channels. This is done
from the System Utility menu by pressing the Reset
button shown left. This also clears the max, min and average
values for the digital displays.
This brings up the reset dialog box (shown right) which shows all
channels. Check the channels you wish to reset and press the
Reset button - The checked channels will be
cleared and set back to zero and the dialog will
close. Exit the dialog at anytime without resetting channels by
pressing the Cancel button X.
Figure 4-9 Channel Reset
Pressing this button resets all the channels
4.10 Special Events
There are several “Special Events” that can be programmed into the unit. These are dealt with here:
4.10.1 Record on Alarm
The recorder can be set up to record on an alarm condition. This requires setting the alarm and enabling the
record option. The Channel and Master enable boxes must be checked. The record menu must be set up to
record on alarm and the unit must be set into Record Arm mode.
The following conditions for record on alarm must be met for a recording to start.
When the alarm is active the unit will start recording. It will continue to record for a minimum of 30 seconds or
until the alarm condition is removed.
4.10.2 Record on External Event
The recorder can be set up to record on an external event condition. This requires the optional Digital I/O
option and the Digital Input to be used must be set to the record option and must be enabled. The record
menu must be set up to record on external trigger and that trigger must be specified. The unit must then be
set into Record Arm mode.
The following conditions for record on external event must be met for a recording to start.
I. Page 32 1/06/2012 REV 1.10.2
Page 41

Section 4 – Functional Description
Record Setup
External Trigger
checkbox is checked
The trigger source is
selected
Digital Input Setup
Digital Input set to
Record and enabled
(Must be same input
as selected in
Record Setup)
Record Mode
The Record
ARM button has
been pressed
Digital Input
The specified
digital input must
be activated
System Setup
SMTP email
information has been
setup
There must be a
functional Ethernet
connection
Alarm Setup
Notify is checked
Alarm Enable is
checked
Alarm Master Setup
Channel Enable checked
Master Enable checked
Notify Enable checked
Alarm
The specified
alarm must be in
an alarm condition
When the external event is active the unit will start recording. It will continue to record for a minimum of 30
seconds or until the external event is removed.
4.10.3 Email on Alarm Event
The recorder can be set up to send an email on an alarm event. Any alarm can be programmed to Notify a
recipient of the event. The email will be sent to the default address entered into the System Setup Menu. It is
also necessary to set up the smtp information in the System Menu. Finally, in the Alarm Setup menu the
channel must be enabled along with the Notify Enable and the Master enable.
Always make sure the email is functional by manually sending an email otherwise if the alarm triggers an
email which cannot be sent, the recorder will try then simply discard it.
The following conditions for email on Alarm event must be met for an email to be sent.
4.11 Turning the unit off
When power is removed from the unit it does not turn off immediately. There is a battery backup in the power
supply that runs the unit for a couple of minutes to ensure that all systems shut down properly and all data files
are closed and secured. Once the recorder senses the power has been removed it shuts off the display and blinks
the LED status indicator on the lower right of the front panel, to show that it is in the battery backup mode. It waits
approximately 30 seconds to ensure that the power failure is not intermittent or simply a brown out, then
commences the shut down procedure. If power should return during this period then the recorder resumes
operation normally. When the recorder completes the shutdown process, it turns the battery off and the unit is
OFF.
There are a few cautionary measures that need to be taken:
1. Ensure that the backup battery switch on the rear panel is in the ON position when using the unit and
DO NOT USE THIS SWITCH TO TURN OFF THE UNIT.
2. If the unit has been off for a lengthy period, the battery may require up to 72 hours to fully charge.
3. If you RESET the unit using the button recessed behind the media door, you may lose data if you do not
STOP RECORDING and SAVE THE CONFIGURATION FILE.
I. Page 33 1/06/2012 REV 1.10.2
Page 42

Section 4 – Functional Description
Browsing existing annotations
Annotating a new message
Exit and do nothing
Figure 4-12.2 Annotation Screen
Figure 4-12.1 Live Trend
Figure 4-12.3 Place Text
4.12 Annotating Trends
At any time while a live trend is visible, the user may
annotate the chart by double tapping the point on the trend at
which an annotation is to be added. This will pop up a small
window as shown right which gives the option of
Tap the Annotation button to get to the annotation screen.
There are two methods of annotation.
Drawing or writing on the screen and saving a bitmap
file (.bmp) in the record session folder.
Adding a text message which is embedded in the
data file.
4.12.1 Drawing on the Screen
Once you tap the Annotation button the Annotate Dialog
shown right, appears.
There are several icons on the screen which function as
follows:
Tap this icon to append a text message to the
trend. This brings up the Text Memo Editor - see
Section 4.12.2
Tap this icon to select the color of the pen to be
used to write on the screen. The block below the
icon shows the current pen color. (black)
Tap this Place Text icon to place the text in the text
dialog box. It is necessary to first enter text in the
box (which contains the words “JACK HIT RESET” in
Figure 4-12.2.) After tapping the icon, tap the position on
the screen where you want the text to be place. The text is
placed to the right of your tap position.
Save – Brings up the a dialog box which allows
the user to name the bitmap file and save it in
the record session folder (default) as a .bmp file. This
picture may be emailed. A place holder is added to the
live trend.
Cancel – Quits the annotate session and
returns to the live display.
Print – Allows the user to print to the system
printer, if installed.
Clear – Removes all annotation from the
screen
To draw on the screen, select the pen color as detailed above then, using the stylus, draw on the screen. Add
any text in the text box and place it on the screen using the place text icon as detailed above. This allows the
I. Page 34 1/06/2012 REV 1.10.2
Page 43

Section 4 – Functional Description
Figure 4-13.1 Live Trend
Figure 4-13.2 Browse Display
Figure 4-12.4 Text Message Editor
Attach button - embed text in the file.
Cancel button - abort the operation.
Clear button – clear current text.
user to annotate clearly and precisely on the screen (see Figure 4-12.3 above) and save the picture
accordingly. An indication on the live trend indicates that a bitmap has been saved.
4.12.2 Adding a Text Message
Enter the Text Message Editor by tapping the icon shown on
the Annotate Screen - Figure 4-12.2. The Text Message
Editor is shown in Figure 4-12.4. Any message can be
entered in the text box as shown.
Once the message has been entered it can be placed
using the Attach button.
An indication on the live trend indicates that a text
message has been saved.
4.13 Browsing Historic Data
It is possible to browse through historic data that may no
longer be visible on the live trend. To do this you need to
tap the browse button (left) on the bottom right of the live trend
display as shown on the right.
This will bring up the Browse Display window (See Figure 4-
13.2), which essentially freezes the current display (live data is
still updating in the background) and retrieves data from a buffer
holding the historic data through the time the browse button was
tapped. Note the “envelope” icon on the trend indicating an
embedded memo or bitmap file. Tap this
icon ONCE to view the contents – see below.
On the Browse Display it is possible to limit the number of traces
on the display or add markers to easily identify points on the
traces. The Browse Display will open and show the last current
data. Use the slider bar to navigate back through historic data.
Data can be expanded or contracted using the Zoom % drop
down menu and the user can jump to memos, specific times and
max or min values.
The controls available are as follows:
Markers On – The trace is actually made up of distinct
points with an interpolated line between them. Tapping
this icon will place markers on the actual points on the trace. This
helps identify the actual data points on the trend. This can be
seen in Figure 4-13.4 below.
Markers Off – Tapping this icon will remove the markers
from the traces. This icon will only be visible if the
markers are currently on.
Cursor – Tapping this icon turns on the cursor which
allows unique identification of the points.
Go – Proceed to the (next) instance of the ‘jump to” drop down dialog (memo in Figure 4-13.3). Jump
options are memo, time, Ymax and Y min. See below.
Go from Start – Start at the beginning of data (most recent) and proceed to the next instance of the ‘jump
to” drop down dialog (memo in Figure 4-13.3)
I. Page 35 1/06/2012 REV 1.10.2
Page 44

Section 4 – Functional Description
Figure 4-13.4 Zoom with point markers
Figure 4-13.5 Compress no point markers.
Figure 4-13.3 Trace Setup
Trace Setup – Tapping this icon will bring up the Trace
Setup screen (see Figure 4-13.3), which enables the
user to shut off traces on the display. Those traces not on the
original trend will be grayed out. Check the box next to the trace
you want displayed, uncheck it to remove the trace from the
browse trend. Traces can be turned on or off at any time.
Slider Bar – The Slider Bar is used to scroll back and forth
through the data buffer. Sliding to the
left brings up older data, sliding to the
right brings up newer data. To move, press the slider with the
stylus (or finger) and drag, or tap the bar to the left or right of
the slider.
Exit - Returns to live data.
Note: The browser will always be in the form of a horizontal
trend even if the live trend is vertical.
When in the browser, double-tapping the trend display area will take you to the Annotate Dialog window. Here the
user can markup the current view and save it or print it. This permits annotating historic data which may have
been missed on the live trend.
4.13.1 Zoom and Compress Data
Using the Zoom % drop down menu the user can select to zoom (numbers > 100) or compress
(numbers <100) the time axis of data on the screen. Simply select the zoom value and the trend
display will recalculate and display the compressed or zoomed data. 100% Zoom is the normal
representation on the trend. It may take some time to recalculate the view depending on the zoom level.
Figure 4-13.4 below, shows data zoomed 5 times with the point markers turned on. Figure 4-13.5 shows data
compressed 5 times without point markers. The slider bar will navigate through the data at the zoom level
selected.
4.13.2 View Memos and Bitmaps
At any time in the browse window, when an embedded memo or bitmap flag is visible, the respective
memo or bitmap can be viewed by tapping the envelope icon ONCE. Note that double tapping the screen will
go to the Annotate dialog window.
The text memos will show in a pop up window on the trend browse screen as shown in Figure 4-13.6 below.
The bitmaps will show in a new window, provided the bitmap is available – see Figure 4-13.7. If you removed,
renamed or deleted the .bmp file, you will get an error message. When you are done viewing the memo, tap
the “OK” button. On the bitmap tap the check mark (Done) button. If the memo or bitmap was attached while
recording a file, these items will be available for review on the PC software.
I. Page 36 1/06/2012 REV 1.10.2
Page 45

Section 4 – Functional Description
Fig 4-13.6 Memo View
Fig 4-13.7 Bitmap View
Fig 4-13.8 Cursor Mode
4.13.3 Using the Cursor
Available only in the “Browse” mode. Pressing
the cursor button will bring up a cursor on the
browse screen. A window will pop up on the right
hand side of the screen showing the time and active
channel values directly under the cursor.
The upper slider bar scrolls through the data buffer.
The lower slider bar moves the cursor.
4.13.4 Using Browser Jump To
Future feature.
I. Page 37 1/06/2012 REV 1.10.2
Page 46

Section 4 – Functional Description
Figure 3-14.1 Live Trend
4.14 Browsing Annotations
It is possible to view attached messages and bitmaps
directly from the live trend window by double tapping
anywhere on the trend.
This will bring up the
Browse/Annotate selection box
(shown left). The drop down
menu shows the times of all
attached memos or bitmaps in
the buffer with the latest one first. Select the time of the
attachment you wish to view then press the attachment
(envelope) button..
The memo or bitmap will be displayed as shown in View
Memos above
4.15 Saving Files to Remote FTP Servers.
The recorder can be set up to upload files to a remote FTP server while recording. The user can upload files
manually or can select a daily or weekly automatic upload of files. Configuration and Log files can also be
uploaded. The recorder can be set to upload recorded files in real time based on the Split Files setup.
Files can be split as frequently as every hour at which time the file will be uploaded to the server. The unit can be
set to erase the files once they have been backed up to the remote FTP server. The setup is described in the
Email and FTP server setup.
The Exhibitor software can be used to stitch split files together to create a contiguous file of data.
I. Page 38 1/06/2012 REV 1.10.2
Page 47

Section 5 – Recorder Setup
Figure 5-1 Master Channel Setup
5.0 RECORDER SETUP
The recorder can be fully customized and needs to be set up by the user. The setup is saved in configuration
files, which can be saved and loaded by the user. Several configurations are shipped with the unit and can be
used as a starting point or the user can start with a clean slate and create a unique configuration.
5.1 Input Channels
The recorder has 18 channels that need to be configured and set up. The setup for the channels requires defining
the inputs. Channels 1 to 12 (channels 7 to 12 are optional) can be live inputs – analog or digital. Channels 13 to
18 or any other channel not assigned to a live input can be a virtual channel. Unused channels should be set as
unassigned. The channels can be:
Analog: Linear – Voltage or Currents, Resistance, Thermocouples, RTD’s
Square Root Extraction - Voltage or Currents
Digital: Logic input (Dry Contacts).
Frequency Input. Channels 1,6,( optionally 7,12) can accept frequency inputs (Frequency,
Period, Count, Pulse Width, Duty Cycle)
Virtual: All channels not assigned above can be Computational, Conditional, Gated Timers or
Totalizer channels. Although not directly linked to live inputs, these channels can be indirectly
associated with live inputs through the computational and conditional options.
5.1.1 Master Channel Setup
The Master Channel Setup window is a one stop
shop to quickly set up all the channels or get a
general overview of channel setup. If passwords
are enabled the user has to log in as Administrator
in order to access. NOTE: You cannot use this
option if the unit is in the record mode – you need to
stop the recording first (See Section Record Setup).
To access the Master Channel Setup window:
Press the Utility Setup Menu icon on the
bottom left of the Task Bar.
Then press the Master Channel Setup
icon.
NOTE: It takes the recorder a while to build the
setup display as shown right.
The Master Channel Setup dialog window shows the current setup of all the channels and allows the user to
edit each of them individually. The checkboxes show whether the channel and its alarms are enabled.
You can see the current settings for Input Type, Range and Engineering Units. For example in Figure 5-1,
Channel 2 is set up as a Gated Timer with engineering units of Seconds. The channel is enabled and the
alarms are disabled.
Tap the double arrow button to view the other 12 channels. In order to change the setups it is
necessary to use the setup button. Pressing the setup button takes you to the individual
channel setup menu. When you have completed the channel setups press the done button to return.
I. Page 39 1/06/2012 REV 1.10.2
Page 48
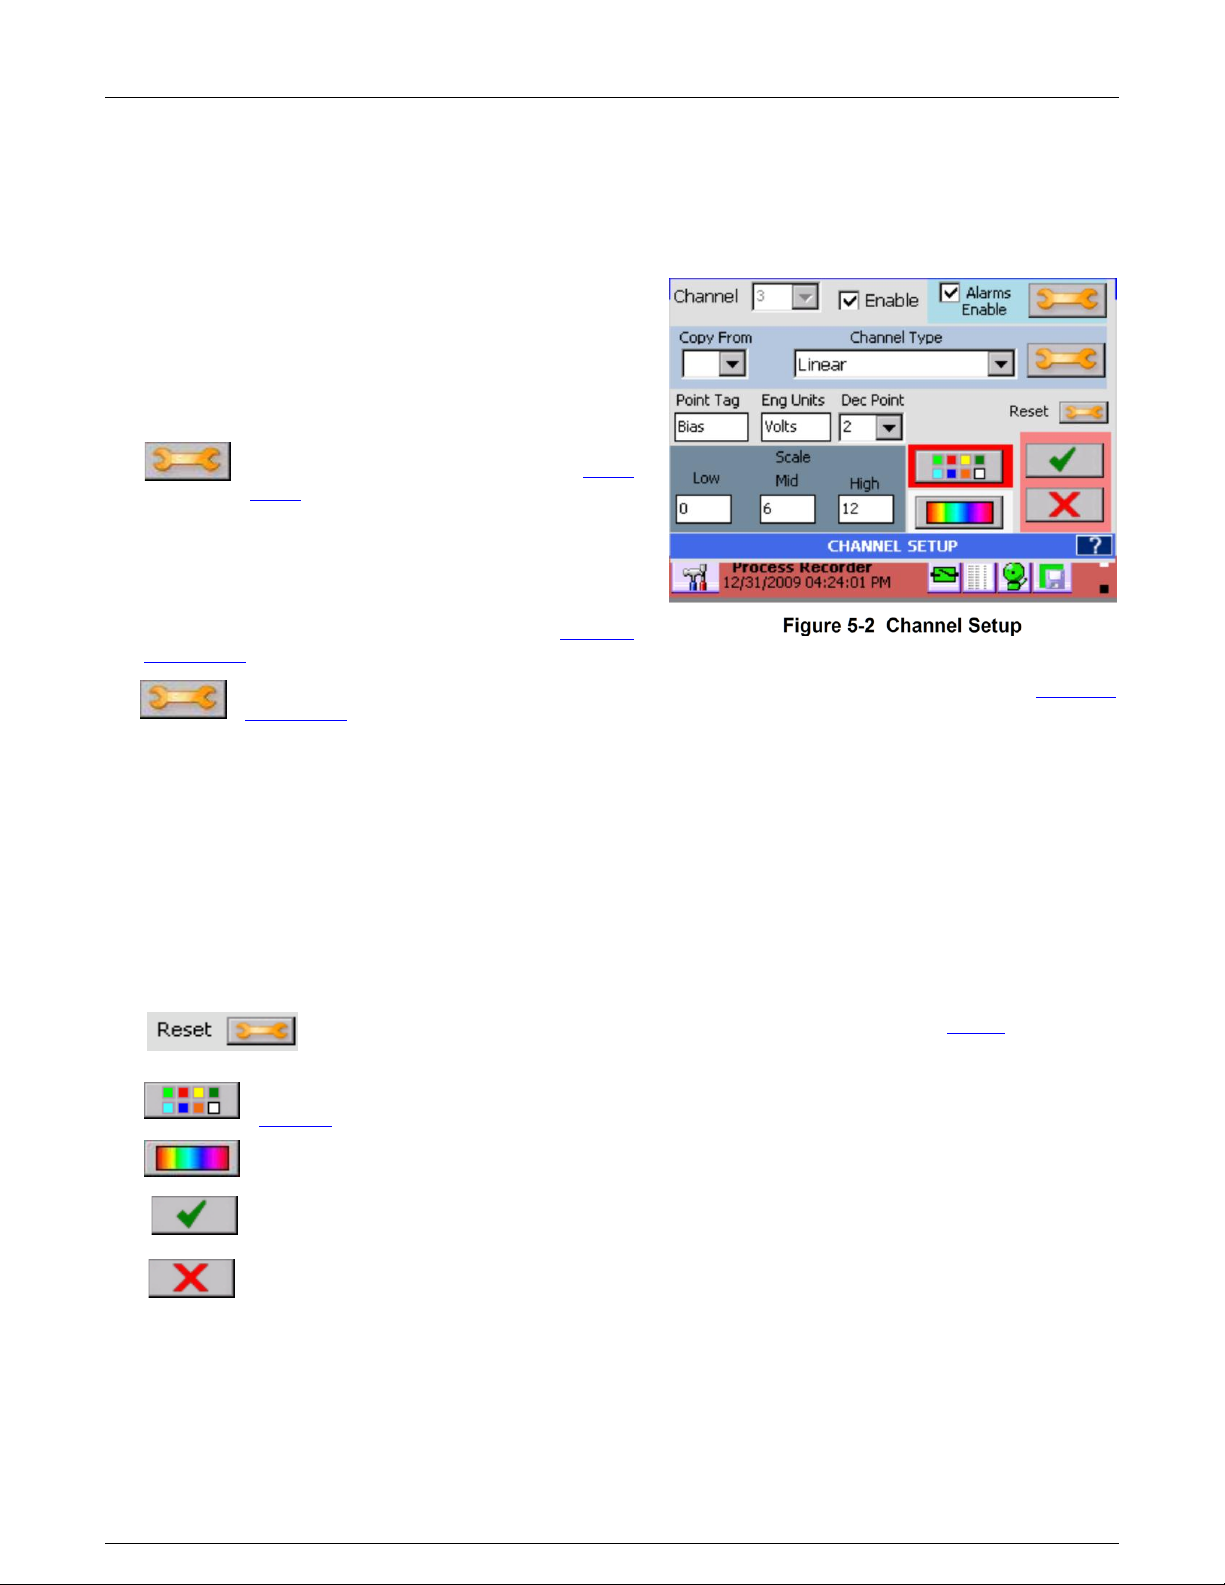
Section 5 – Recorder Setup
5.1.2 Channel Setup
Pressing the setup button from the Master Channel Setup window takes you to the Channel Setup dialog
window as shown in Figure 5-2. The user can copy an existing channel to this one or set up a new channel
including the channel type and range, the point tag, engineering units and assign colors. Values set here will
be the default for any widget attached to this channel.
Channel: Use this pull down item to select the channel
to be edited.
Enable Checkbox: Use this to enable or disable the
selected channel.
Alarms Enable Checkbox: Use this to enable or
disable alarms for this channel.
(Alarms) Setup: Used to set up the
alarms for the selected channel. See Alarm
Setup for detail
Copy From: Choose a channel from the pull down
item list to copy all its setup parameters to the current
channel set up.
Channel Type: Choose the channel type from the pull
down item list. Further setup is required. See Channel
Type Setup.
(Channel Type) Setup: Use this button to further set up the channel type selected. See Channel
Type Setup.
Point Tag: Enter up to nine alphanumeric characters to uniquely identify the channel. Up to 8 characters can
be entered.
Eng units: Enter up to eight alphanumeric characters to indicate the engineering units for the channel. Up to
7 characters can be entered. Note: Setting up the channel will default to engineering units for the type
selected.
Dec Pt.: Decimal Points – Select number of places after the decimal point to display.
Scale: This is used to customize the scale on trends and bar charts to something other than the default. For
example in Figure 5-2 above, the Linear 12 volt range has been selected. The scales will default to 0, 6, 12 as
shown. If the input range of interest were 5 to 10 volts you could set the low, mid and high scales to 5, 7.5 and
10 respectively.
Use this button to set the Average, Maximum and Minimum Reset. See below.
Colors: Use this to set up the channel colors for the digits, bar and trend in the widgets. See
Widgets for more detail
BackGround: Use this button to set up the channel background colors for the bar and digit
widgets.
Apply: Save these changes and exit.
Cancel: Exit without saving the changes.
I. Page 40 1/06/2012 REV 1.10.2
Page 49

Section 5 – Recorder Setup
Fig 5.3 – Min Max Avg Reset Setup
5.1.2.1 MIN MAX AVG RESET
Each channel calculates the MINimum, MAXimum and AVeraGe values of the input value. In addition
calculated channels can use a combination of maximums, minimums and averages. How and when these
values are reset can become quite complex. Individual channel resets of these values
are set using the Reset setup dialog by pressing the button shown right. This will
bring up the Min Max Avg Reset dialog box. This enables the Min, Max or Avg values
to be reset periodically, upon an external event or upon an alarm event.
Auto Reset Enable: If this box is unchecked the
Min, Max, Avg will calculate continuously unless
External Reset Enable is checked. If the Auto
Reset Enable box is checked then the values will
reset at the Reset Interval.
Ext. Reset Enable: This is the External Reset
enable. If this box is checked the max, min, avg
values will be reset by an external event via the
digital inputs Note: an optional digital I/O card
must be present in the system AND the
designated input must be input is enabled. The
digital input needs to be programmed as a
MinMaxAvg type. Select the External input to use
from the drop down menu.
Reset Intrvl: This is the Reset Interval. This is the
time in days, hours, minutes and seconds between timer resets when Auto Reset is checked. In the
example the min, max or avg will be reset every 1 hour.
Reset Sync: If the Sync Enabled checkbox the max, min or avg will reset the first time it reaches the
set time. This allows the user to synchronize the reset to a known time. This also allows several channels
to be synchronized together if the Reset Sync time is set to the same for all. This time is ignored if the
enable box is not checked.
Reset Print: When this box is checked the max, min avg reset information will be appended to the
alarm/event log each time the values reset.
Power Up Reset: When this box is checked the value (max, min or avg) will be reset on power up,
otherwise it will continue from the last value saved before power down.
Monthly Reset: When this box is checked the value (max, min or avg) will be reset at the start of each
new month
Reset on Alarm – If Alm Reset Enable is checked the Min, Max,
Avg values will be reset by the Alarm condition selected. In this
case when Channel 1 Alarm 1 is active.
I. Page 41 1/06/2012 REV 1.10.2
Page 50
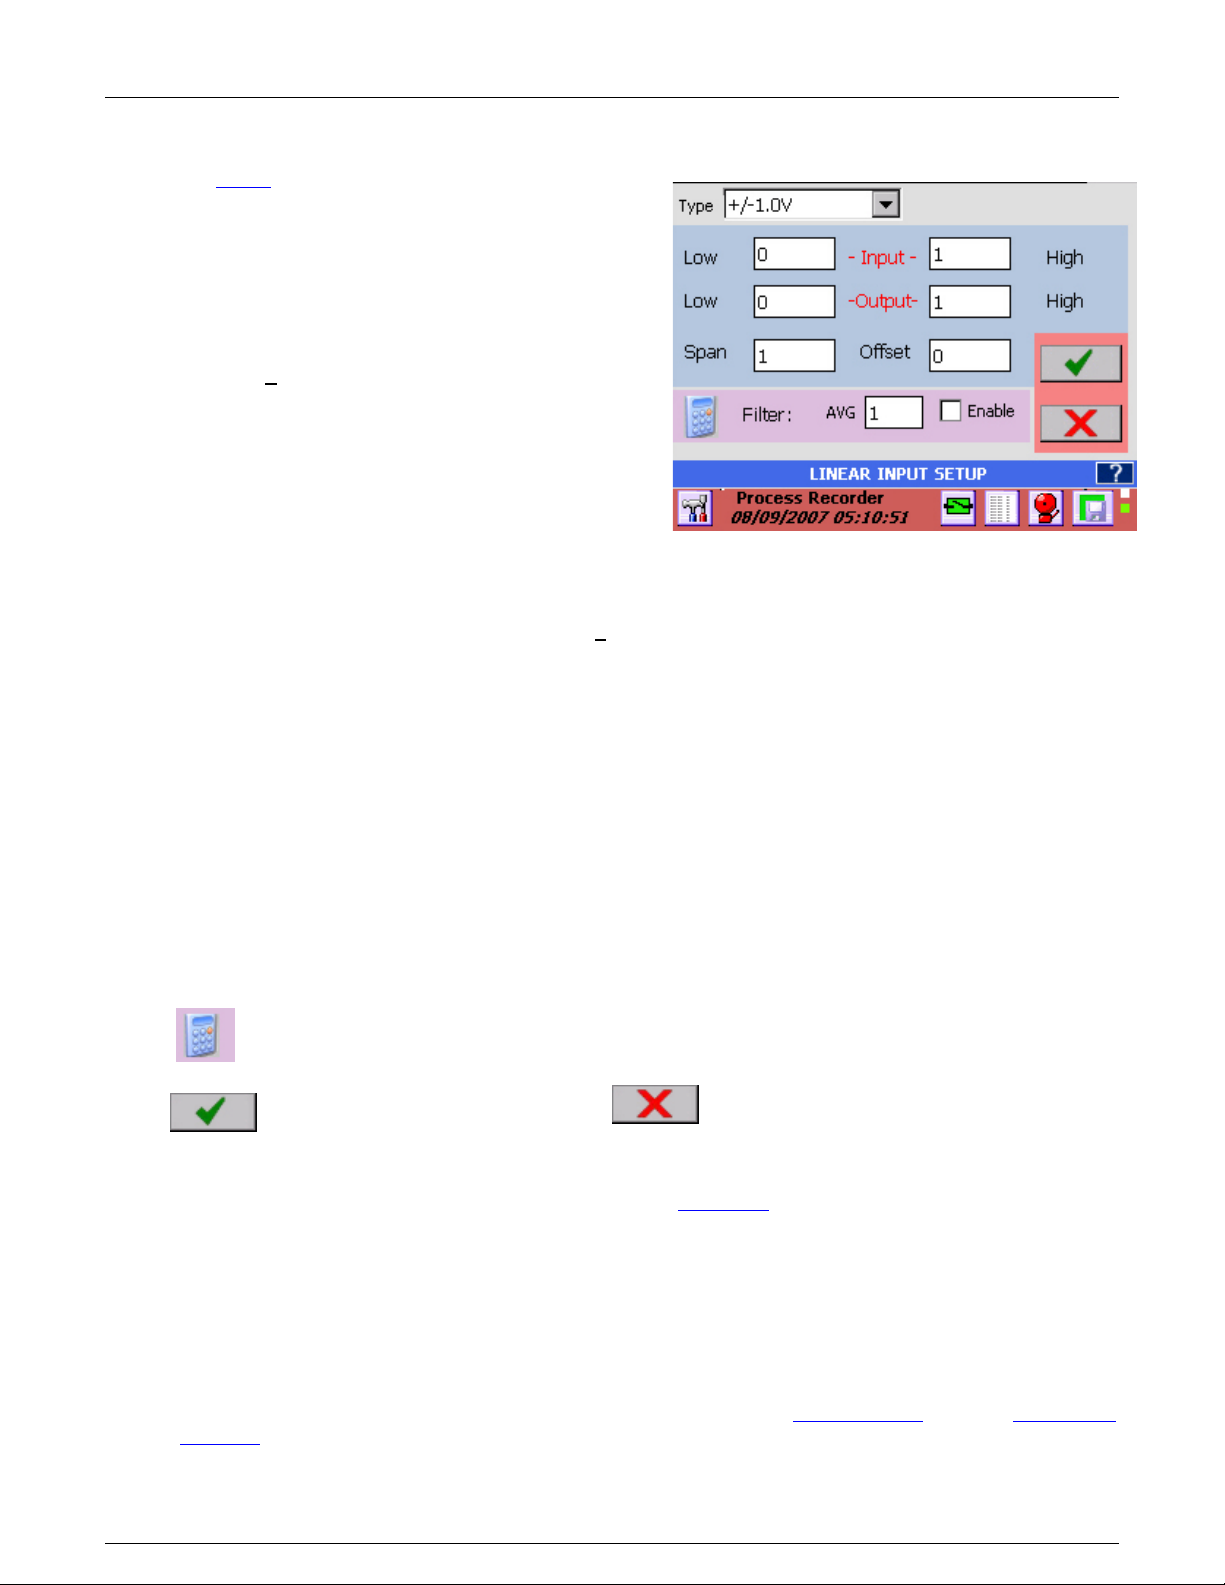
Section 5 – Recorder Setup
Figure 5-4 Linear Input Setup
Apply: Save the values and exit
Cancel: Exit without making any changes.
5.1.3 Channel Type Setup
The Channel Type Setup dialog window is dependent upon the type of input selected in the Channel Setup
window above.
5.1.3.1 Linear Input
For Linear Voltage and Current the dialog box is
shown in right. For other input types it will differ.
Select the Type from the pull down item list. The
following ranges are available.
Voltage: + 125mV, 250mV, 500mV, 1V, 3V, 6V, 12V
and 24V full scale.
Current: 4-20mA, 0-20mA and 10-50mA. NOTE :
When selecting currents it is necessary to provide a
terminating resistor of 50 ohms at 0.1% across the
terminal inputs.
Dry Contacts: This option is for use with potential
free contacts - used for logic inputs. Display will show OPEN or CLOSED accordingly.
Input/Output Ranges: Figure 5-3 shows the +1.0 Volt input range for the analog input. The Input and
Output ranges LOW and HIGH values set the scaling for the channel. They default to the zero and high
values for the range so that the channel reads the full scale range. As shown when the input is zero the
output will read zero, and when the input is 1 volt the output will read 1. If the Output - HIGH was set to
100 then the output would be 0 to 100 for an input of 0 to 1V. The input is effectively multiplied by the
(Output High)/(Input High).
Span: The span is a correction value that is multiplied by the full scale input and applied linearly across
the range. The default is 1.
Offset: The offset is an adder (subtractor) that is added or subtracted to the output. Thus in the equation
y = ax + b, y is the final output, x is the input value, a is the span multiplier and b is the offset. The default
is 0.
Filter: The filter is applied to the inputs when the Enable check box is checked. The filter performs a
running average of n samples, where n is the numeric value set in the AVG box from 1 to 100.
Calculator: This will bring up a simple calculator that allows the user to do computations to
calculate the scaling factors if needed.
5.1.3.2 Resistance Input
The Resistance setup dialog window is similar to that in Figure 5-3 above. Resistance measurement uses
a constant current source through the load, measures the voltage and computes:
Resistance = Current x Voltage.
There are three resistance ranges which are selected via the pull down menu.
Resistance Ranges: 100 ohm, 500 ohm and 5000 ohm
The resistor (or load) is connected like a 3 wire RTD – See Section 3.0 Installation. Use the Output Low
and High to scale the resistance to the engineering unit of choice.
I. Page 42 1/06/2012 REV 1.10.2
Page 51

Section 5 – Recorder Setup
Fig 5.5 Thermocouple Setup
5.1.3.3 Thermocouples and RTDs
Thermocouple and RTD setup is similar to the Linear setup except that the Input and Output scaling
cannot be altered. Note that the displayed scales can be set independently for each widget – See
Widgets for more detail.
Select the Thermocouple or RTD type from the drop
down Type menu. The default Engineering Units is
Degrees F. To select Degrees C check the degC
check box.
Thermocouple inputs require ambient temperature
compensation. There is a built in temperature
compensator on the rear of the unit or if the
thermocouple is to be a long distance from the input,
external compensation can be used. This external
compensation can be any input channel. To use the
internal compensator select Int. from the Tcomp
dropdown box. To use external compensation select
Ext.C or Ext.F for Centigrade or Fahrenheit and then
select the Reference Channel to use. This channel
needs to be set up correctly for the external
compensation – thermocouple, cureent loop transmitter etc that will read in the temperature units chosen.
To disable compensation slelect Tcomp as none - the unit will then display uncompensated
Thermocouple values.
Apply Span and Offset as needed and select Filter type as detailed in Section 5.1.3.1. above.
Note: For thermocouples, the internal ambient temperature compensation can be adjusted in 0.5°
increments in the Temperature Compensation menu of the Admin Setup Menu.
I. Page 43 1/06/2012 REV 1.10.2
Page 52
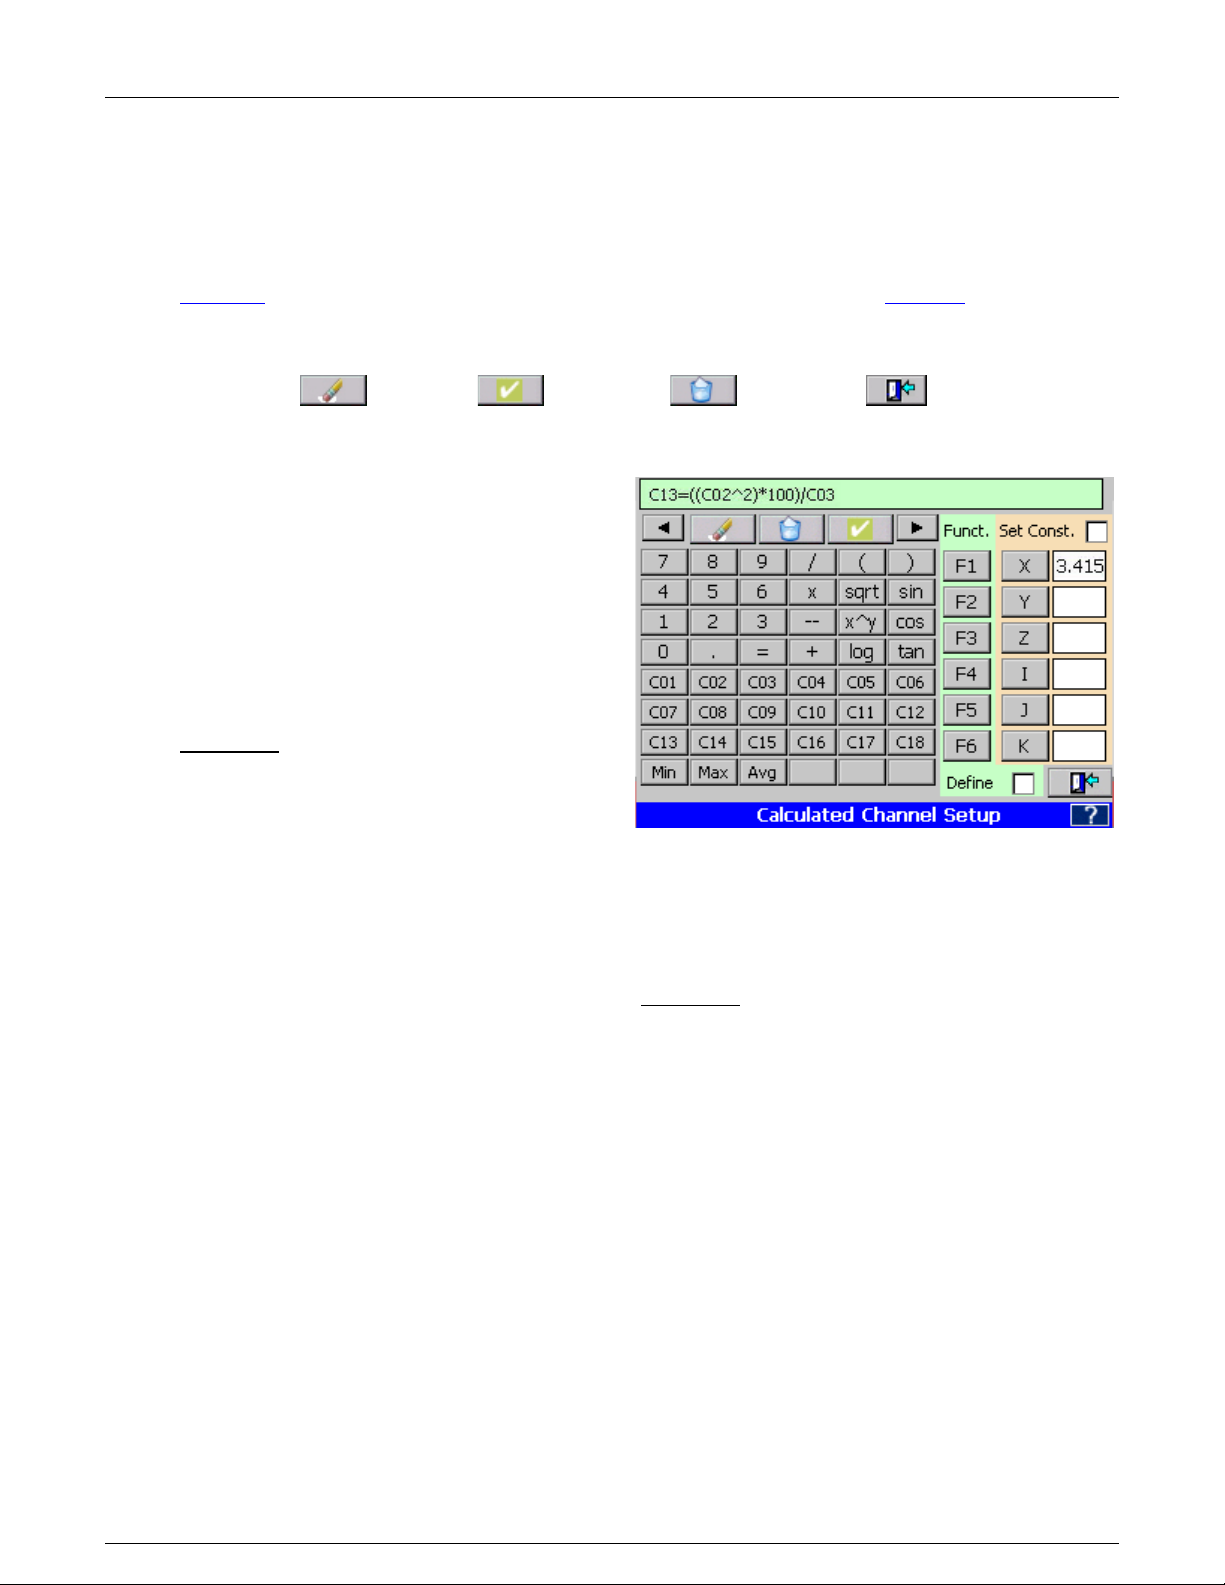
Section 5 – Recorder Setup
Delete Button
Test Button
Clear Button
Exit Button
Figure 5-6 Calculated Channel Setup
5.1.3.4 Calculated Input
Any of the eighteen channels can be a calculated channel. A calculated channel gets its value from a
series of calculations, which may be based on one or more live channels. Setting a live input channel to
be a calculated channel will disable the live input. It is recommended that the virtual channels (Channel 7
to 18 in a 6 input unit or Channels 13 to 18 in a 12 channel unit) be assigned as calculated channels.
The Calculated Channel Setup dialog window has some powerful options. The user can set up 6
constants (X,Y,Z,I,J,K) to be used in the calculation and can define up to 6 functions (F1 to F6). The
calculation can contain live inputs (C01 to C06 – Channels 1 to 6 for a 6 channel unit, or C01 to C12 –
Channels 1 to 12 for a 12 channel unit), or other defined channels C01 to C18. The icons are defined as
Constants: This allows the user to set a
constant value, eg 3.41592 to a variable, say X,
then use this in an equation by simply selecting
the X. This is useful for coefficients and the like.
To set the constant, check the Set Const. box,
then touch any of the entry boxes to the right of
the constant buttons. Use the numeric keys to
enter the value. The ◄ and ► buttons will move
the cursor, the Del button will delete the
character to the left of the cursor and Clear
button will erase all digits. When complete
UNCHECK the Set Const. box. You can now use
the constants by simply selecting the button. In
the example shown right, pressing the X button
will insert X into the equation, which is equivalent
to 3.41592.
Functions: This allows the user to define up to six functions for use in the calculations. To set up a
function, check the Define box, then press the Function button, say F1. The input line will show F1=,
continue to enter your formula using the available buttons. The ◄ and ► buttons will move the cursor, the
Delete button will delete the character to the left of the cursor and Clear button will erase all digits. Once
you have entered the function press the Enter button. (The Test button will change to Enter when you
first select a Function key.) When you are done UNCHECK the Define box. You can now test your
function or use it in the calculated channel.
Calculations: The calculations entered here will be assigned to the channel being set up. The
calculations can use any of the 18 channels (C01 to C18), any of the six functions, any of the six
constants, and the math functions. Make use of the parenthesis buttons to ensure your formula is
interpreted correctly. The ◄ and ► buttons will move the cursor, the Del button will delete the character
to the left of the cursor and Clear button will erase all digits. Once complete, it is necessary to test the
function for accuracy by pushing the Test button. This will bring up the Test dialog as shown below. Once
the calculation has been fully tested, press the Done button to return to the Calculated Channel Setup
window and then press the Exit button.
Min, Max, Avg: The functions Min, Max and Avg use the MINimum, MAXimum or AVeraGe of a channel
input in the calculation. The Average is a weighted average = (last value + current value)/2. The format is
MAX(C02)+MIN(C03) for the maximum value of channel 2 plus the minimum value of channel 3.
I. Page 44 1/06/2012 REV 1.10.2
Page 53

Section 5 – Recorder Setup
Figure 5-7 Test Dialog Window
Test Dialog: This window enables you to test your
calculation after the recorder has compiled it. The
original calculation is shown in the top line. There
are entry boxes to enable you to set actual values for
the channel variables. Once you have entered data,
pressing the Calculate button will display the
answer in the line above it. This test dialog
can also be used to evaluate functions or
any other expression entered.
If the answer is as expected or you need to go back
and alter the formula press the Exit
button.
Once the calculation has been tested correctly, return to the main setup window and press the Exit
button.
I. Page 45 1/06/2012 REV 1.10.2
Page 54

Section 5 – Recorder Setup
Figure 5-9 Gated Timer Setup
Figure 5-8 Conditional Channel Setup
5.1.3.5 Conditional Input
Any of the eighteen channels can be a
conditional channel. A conditional channel gets
its value from a true or false test of conditions
which may be based on a live channel. Setting
a live input channel to be a conditional channel
will disable the live input. It is recommended
that the virtual channels (Channel 7 to 18 in a 6
input unit or Channels 13 to 18 in a 12 channel
unit) be assigned as conditional channels.
Basically the user sets up a condition which
can have two possible outcomes, one if the
condition is true and another if the condition is
false.
The Conditional Channel Setup dialog window
requires three inputs: the condition to be
tested, the result if true, and the result if false.
See Figure 5-8.
C01 through C18 represent channels 1 to 18, some of which may be live channels. The Conditional
Channel Setup window also allows up to six constants to be set and used. See constants above.
Once data has been entered, the expression needs to be tested as shown above before exiting by
pressing the Exit button. In the example of Figure 5-8, Channel 13 is being programmed to indicate zero
to 100 for a 4 – 20 milliamp input on Channel 1 with any input less than 4 milliamps showing zero.
5.1.3.6 Gated Timer
The Gated timer Calculated point type allows a
timer (measuring in seconds) to be controlled by a
‘gate’ from a logic point. For example, if a point is
measuring temperature and you wanted to know
the total amount of time the temperature measured
by this point is above or below a certain level, a
Conditional point can be programmed to be TRUE
only when the temperature is above or below a set
level. A Gated timer point can then be programmed
to be turned ON only when the Conditional point is
in the TRUE state. The Gated timer point will then
only be timing when the temperature is above or
below a set level. The timer will continue to
accumulate time (in seconds) each time it is turned
on. The Gated timer point can be reset at
programmable time intervals and alarms can be
set to alarm if the timer total goes above a
programmed time interval in seconds.
The Gated Timer Setup dialog window is shown in above right. There are several options:
Auto Reset: If this box is unchecked the Timer will run continuously unless External Reset is enabled. If
the Auto Reset box is checked then the timer will reset at the reset interval.
Ext. Reset Enable: This is the External Reset. If this box is checked the timer will be reset by an external
event via the digital inputs Note: an optional digital I/O card must be present in the system AND the
designated input must be programmed as a timer reset for this to work.
I. Page 46 1/06/2012 REV 1.10.2
Page 55

Section 5 – Recorder Setup
Figure 5-10 Totalizer Setup
Ext Reset Point: This indicates which external digital input will reset the Timer when Ext. Reset Enable
above is checked and the digital input is enabled. The digital input needs to be programmed as a Timer
Reset type.
Reset Intrvl: This is the Reset Interval. This is the time in days, hours, minutes and seconds between
timer resets when Auto Reset is checked.
Reset Sync: If the Sync Enabled checkbox the Timer will reset the first time it reaches the set time.
This allows the user to synchronize the reset to a known time. This also allows several channels to be
synchronized together if the Reset Sync time is set to the same for all. This time is ignored if the enable
box is not checked.
Base Point: This is the actual source for the timer control. The channel selected from the drop down
menu should be set up for the correct input and in the correct units. If the timer is to free run DO NOT
select any Base Point
Reset Print: When this box is checked the timer reset information will be appended to the alarm/event
log each time the timer resets.
Power Up Reset: When this box is checked the Totalizer will start from zero each time the unit powers
up, otherwise it will carry on where it left of before.
5.1.3.7 Totalizer
The Totalize calculation keeps a running total of the value of a (base) point sampled at a programmed
rate. This will continue until the programmed reset interval time is reached at which time the value is
logged on the Alarm/Event log window (if Reset Print is enabled), is reset to zero, and the totalization
calculation begins again. However, a Low flow cutoff provision prevents totalization on flow rates that
meet or fall below the cutoff point. The data will also be recorded to disk if Alarm/Event logging is
enabled. The Totals are non-volatile unless the Auto reset option is active.
The Totalize Setup dialog window is shown right. There
are several options:
Auto Reset: If this box is unchecked the Totalizer will
run continuously unless External Reset is enabled. If
the Auto Reset box is checked then the totals will reset
at the reset interval once the start time has been met.
Ext. Reset Enable: This is the External Reset. If this
box is checked the total will be reset by an external
event via the digital inputs Note: an optional digital I/O
card must be present in the system AND the designated
input must be programmed as a totalizer reset for this to
work.
Reset Point: This indicates which external digital input
will reset the Totalizer when Ext. Reset Enable above is
checked and the digital input is enabled. The digital input needs to be programmed as a Totalizer Reset
type.
Reset Intrvl: This is the Reset Interval. This is the time in days, hours, minutes and seconds between
total resets when Auto Reset is checked. The example above will reset the Total every 5 minutes.
Reset Sync: If the Sync Enabled checkbox is checked the
Total will reset the first time it reaches the set time. This
allows the user to synchronize the reset to a known time. This also allows several channels to be
synchronized together if the Reset Sync time is set to the same for all. This time is ignored if the enable
box is not checked.
I. Page 47 1/06/2012 REV 1.10.2
Page 56

Section 5 – Recorder Setup
Figure 5-12 Frequency Setup
Apply: Save the values and exit
Cancel: Exit without making any changes
Figure 5-11 Frequency Select
Reset Print: When this box is checked each time the total is reset, the information will be
appended to the alarm/event log (time and total).
Flow Rate /: The Flow Rate will be displayed per second, minute, hour or day
depending what is selected in this drop down menu.
Cut Off Level: This is the low and high flow cut off levels. If the input value of the
base point is less than or equal to the low value or greater than or equal to the high
value, it will not be totaled. This prevents erroneous totalizing in the event of sensor
failure.
Base Point: This is the actual source for the totalization. The channel selected
from the drop down menu should be set up for the correct input and in the correct
units.
Total Reset on Alarm – If checked the Total will be reset by the Alarm
condition selected. In this case when Channel 1 Alarm 1 is active, the
Total will be reset.
5.1.3.8 Frequency/Pulse Count
Channels 1, 6, 7 and 12 can be used to measure
frequency. Frequency is applied to a separate
isolated input. Inputs are TTL compatible and can
take signals up to 12 volts. There are two options for
frequency that can be selected: Frequency – which
measure actual frequency in Hz and may be scaled
accordingly. Pulse Count – which counts pulse
transitions on the inputs and may be scaled
accordingly. In addition alarm and reset features can
be applied.
5.1.3.8.1 Frequency
Select Frequency from the setup menu. The Input
High and Low and Output High and Low can be
used to scale the frequency. For example: to have
the readings be in revolutions per minute (RPM) set
the input to 0 and 1000 for low and high respectively
and the output to 0 and 60000.
Neg. Edge Trigger: Checking this box will cause
frequency to be measured on the Negative Edge of
the input waveform as opposed to the default
positive edge.
Filter: The filter is applied to the inputs when the
Enable check box is checked. The filter performs a
running average of n samples, where n is the
numeric value set in the AVG box from 1 to 100.
Calculator: This will bring up a calculator
that allows computations to calculate the
scaling factors.
I. Page 48 1/06/2012 REV 1.10.2
Page 57

Section 5 – Recorder Setup
Apply: Save the values and exit
Cancel: Exit without making any changes
Figure 5-13 Pulse Count Setup
Figure 5-14 Pulse Count Reset Setup
5.1.3.8.2 Pulse Count
Select Pulse Count from the setup menu. The
options for Input and Output scaling and Negative
Edge Triggering are as above. There is an additional
setup setting indicated by the setup icon. Pressing
this button will bring up the Reset
The Pulse Count keeps a running total until a reset
event occurs. This can be a programmed reset
interval time, external reset or alarm reset. At this
point the count total is logged in the Alarm/Event log
window (if Reset Print is enabled) and the count is
reset to zero, begins again. The data will also be
recorded to disk if Alarm/Event logging is enabled.
The count total is non-volatile unless the Auto reset
option is active. The Pulse Count Reset dialog
window is shown in Figure 5-14. There are several
options:
Auto Reset: If this box is unchecked the Count will
run continuously unless External Reset is enabled.
If the Auto Reset box is checked then the totals will
reset at the reset interval once the start time (Reset
Sync) has been met.
Options for the Pulse Count.
Ext. Reset Enable: This is the External Reset. If
this box is checked the count will be reset by an
external event via the digital inputs Note: an
optional digital I/O card must be present in the
system AND the designated input must be
programmed as a count reset for this to work.
Reset Point: This indicates which external digital
input will reset the Totalizer when Ext. Reset Enable
above is checked and the digital input is enabled.
The digital input needs to be programmed as a Count Reset type.
Reset Intrvl: This is the Reset Interval. This is the time in days, hours, minutes and seconds between
total resets when Auto Reset is checked. The example above will reset the Total every 5 minutes.
Reset Sync: If the Sync Enabled checkbox is checked the
Count will reset the first time it reaches the set time. This
allows the user to synchronize the reset to a known time. This also allows several channels to be
synchronized together if the Reset Sync time is set to the same for all. This time is ignored if the enable
box is not checked.
Reset Print: When this box is checked each time the total is reset, the information will be
appended to the alarm/event log (time and total).
Total Reset on Alarm: – If checked the Total will be reset by the
Alarm condition selected. In this case when Channel 1 Alarm 1 is
active, the Total will be reset.
I. Page 49 1/06/2012 REV 1.10.2
Page 58

Section 5 – Recorder Setup
Apply: Save the values and exit
Cancel: Exit without making any changes
Fig 5.15 – Moving Average Setup
5.1.3.9 Moving Average
The Moving Average (sometimes referred to as the Rolling Average) is a special instance of a calculated
channel. It calculates the average of the input value over a user set period of time known as the Moving
Average Interval. The average is maintained over this period on an ongoing basis until reset. If the
interval is set at 1 hour then the value displayed is always the average of the last (or most current) 1 hour.
The sample interval for the average is always 1 minute, so in the case of a Moving Average Interval of 1
hour the value will be the average of the most recent
60 samples.
Select a Channel Type of Moving Avg. This will bring
up the Moving Average dialog window.
Ext. Reset Enable: This is the External Reset. If
this box is checked the count will be reset by an
external event via the digital inputs Note: an
optional digital I/O card must be present in the
system AND the designated input must be
programmed as a count reset for this to work.
Ext Input: This indicates which external digital
input will reset the Moving Average when Ext.
Reset Enable above is checked and the digital
input is enabled. The digital input needs to be
programmed as a Count Reset type.
Moving Avg Intvl: This is the average time period in days, hours and minutes over which the average
is calculated. Note that the Sample interval defaults to 1 minute so a 1 hour moving average interval will
contain 60 samples, a 1 day interval will contain 1440 samples.
Reset Sync: If the Sync Enabled checkbox is checked the Count will reset the first time it reaches
the set time. This allows the user to synchronize the reset to a known time. This also allows several
channels to be synchronized together if the Reset Sync time is set to the same for all. This time is
ignored if the enable box is not checked.
Reset Print: When this box is checked each time the total is reset, the information will be appended to
the alarm/event log (time and total).
Power Up Reset: If checked the average will be reset when the unit is powered up otherwise it will
carry on from where it left off when the unit was powered down
Base Point: This is the actual source for the average. The channel selected
from the drop down menu should be set up for the correct input and in the
correct units.
Sample Intvl: This is the sample interval (not the average interval). It is defaulted to 1 minute and
cannot be changed.
I. Page 50 1/06/2012 REV 1.10.2
Page 59

Section 5 – Recorder Setup
Apply: Save the values and exit
Cancel: Exit without making any changes
5.1.3.1 Energy
This is another case of a special calculation channel for calculating energy in hot or chilled water
systems. (For Steam see below). It uses external inputs to measure process input and output
temperatures and flow and uses look up tables (Enthalpy Steam Tables) and mathematics to compute the
energy. The formula is basically
Energy = Mass Flow x Enthalpy
Where Mass Flow is the Flow x Density and the Enthalpy is the difference in Enthalpy between inlet and
outlet temperatures. This calculation is for hot/chilled water based systems and uses density calculation
for water and the Keenan and Keyes Steam tables to derive the Enthalpy.
Select a channel type of Energy. This will bring up the
Energy Setup dialog box. There are three external
inputs required by the system – two temperatures and
flow, these need to be set up beforehand on the
individual channels referenced. An additional
temperature to control density can be used - see below:
Flow: Select the channel the flow meter is on and the
units the flow is measured in using the drop down
menus. Choices for flow are GPM, m3/hr and ft3/min – if
these are not your flow measurements you need to
prescale this input accordingly.
Supply/Return Temps: Select the channels for
temperature measurement of the inlet and outlet points
for system temperatures. Temperatures can be in either °F or °C. The unit will adapt for hot or chilled
water systems accordingly.
Fig 5.16 – Energy Setup
Energy Units: Select the resulting units for display – options are BTUs, Watts or Joules at varying rates.
Density: The density is that of the water and it is depends on the pressure and temperature. It can be
calculated or manually entered. In order to calculate it you need to enter the following before calculating:
Pressure: Enter the water pressure in the units selected (Check PSI or bar or kPA)
Temperature: The temperature can be entered manually or can come from an input channel.
To calculate the density once the pressure and temperature have been entered press the
calculate button. If manually entering the density select the engineering units from the drop
down menu.
From the drop down menu choose MAN to manually enter the temperature or
choose an input channel to be used for temperature and select the engineering
units (degF or degC).
I. Page 51 1/06/2012 REV 1.10.2
Page 60

Section 5 – Recorder Setup
Apply: Save the values and exit
Cancel: Exit without making any changes
5.1.3.2 EnergySteam
This calculated channel computes energy from Steam rather than water. It requires an external steam
mass flow transmitter connected to an analog input channel. It uses external inputs to measure process
input and output temperatures and mass flow and uses look up tables (Enthalpy Steam Tables) and
mathematics to compute the energy. The formula is basically
Energy = Mass Flow x Enthalpy
Where the Enthalpy is the difference in between inlet and outlet temperatures. This calculation is for
Steam based systems and uses the Keenan and Keyes Steam tables to derive the Enthalpy
Select a channel type of EnergySteam. This will bring up
the Steam Energy Setup dialog box. There are three
external inputs required by the system – two temperatures
and mass flow, these need to be set up beforehand on the
individual channels referenced.
Mass Flow: Select the channel the mass flow meter is on
and the units the mass flow is measured in using the drop
down menus. Choices are grams, kilograms (kg), pounds
(lb), Metric Ton (mton = 1000kg), Short Ton (ston (US) =
2000 lb) Long Ton (lton (UK) = 2240 lb) at a rate of
seconds, minutes, hours or days – if these are not your
flow measurements you need to prescale this input
accordingly.
Fig 5.17 – Steam Energy Setup
Supply/Return Temps: Select the channels for temperature measurement of the inlet and outlet points
for system temperatures. Temperatures can be in either °F or °C. The unit will take the absolute
temperature difference.
Energy Units: Select the resulting units for display – options are BTUs, Watts or Joules at varying rates.
I. Page 52 1/06/2012 REV 1.10.2
Page 61

Section 5 – Recorder Setup
Figure 5-2-1 Standard Display
Figure 5-2-2 Display Builder, Load Display
5.2 Display Builder
The Display Builder allows the user to customize the
Graphical User Interface (GUI) or display screen using
widgets to display data in various ways. The standard
display on the recorder is shown on the right and
consists of the Task Bar at the bottom of the screen and
a display showing live or calculated data from various
sources. In this case the display is a combination of
vertical bar graphs, digital displays and a trend. These
are the widgets and each can be customized as
required either during setup or by double-tapping the
widget.
The user can create numerous displays with any
combination of widgets that will fit the screen. Each
display can be named and saved, and the user can
decide which displays are active and are in the Rotate
List for viewing purposes. The displays are created in
the Display Builder dialog window accessible from the
Utility Setup Menu.
5.2.1 Building the Display
To build a display:
Press the Utility Setup Menu icon on the bottom left of the Task Bar (shown left). Then
press the Display Builder icon to launch the Display Builder dialog window. (shown right).
The Display Builder consists of a palette on which the user can place widgets to create a display. The palette
is a grid of blocks 6 across by 8 down. Each widget is a finite size consisting of 2 or more blocks – see below
for details. The buttons to the right allow the user to select the widget types while the drop down selection box
below defines the size and style of the widget type selected. Button functions are as follows:
The user can load an existing display to modify or
start with a clean palette. To do this press the Load
button and a window will pop up as shown in Figure
5-2-2. Browse for a display name or enter it in the
space provided and press Apply. See below for
Editing options.
Starting with a clean page, widgets (bars, Digital
windows, Trends) need to be placed.
To place a widget, select one of the buttons to the
right. Once a button is selected it is necessary to
select the widget size and style from the drop down
selector. Once selected, the user can continue to
place this style of widget by tapping a block in the
grid until there is no space left or an alternate widget
style is selected. Widget sizes relate to grid blocks.
I. Page 53 1/06/2012 REV 1.10.2
Page 62

Section 5 – Recorder Setup
Figure 5-2-3 Display Builder
Widgets are selected as follows:
Place Digital display either full size (2x2) or half size (2x1).
Place Bar Graphs - horizontal full (6x1) or half (3x1) or vertical full (1x8) or half (1x4).
Place Trends - horizontal full (6x8), two-thirds (4x8) or half (3x8) and vertical full (6x8) or half
(6x4).
Place graphics or set background colors
When placing a widget the system will attempt to put it at the block you tap if space is available. It will move it
to fit, otherwise you will get an error tone and nothing will be placed.
As widgets are placed on the palette they need to be defined. They have to be associated with a channel,
have colors defined, and have scales set where necessary. This can be done as the widget is placed or can
be edited using the Edit buttons. For details on configuring the widgets see the setup information for Digital
Display, Bar Charts or Trends below.
Widgets already placed can be moved or deleted. The display can be named or renamed and saved and the
whole process can be aborted by pressing the Cancel button.
5.2.2 Editing
Once widgets are placed the following buttons can be used to edit the display:
Delete: Will delete a widget. Press the
Delete button then tap the widget you want
to delete.
Edit: Allows a widget to be edited. Press the
Edit button then tap the widget you want to
edit. The widget edit window will pop up – see below.
Move: Allows a widget to be moved. Press
the Move button then tap the widget. It will
be “lifted” off the palette. Tap the new location you want
to move the widget to.
Clear All: Will completely clear the palette
of all widgets.
Save: Saves the display with the name
entered into the save dialog box.
Alternatively, select an existing display name and
overwrite it.
Load: Loads an existing display which can be modified. Use the dialog box to select existing
displays.
Cancel: Discard all settings and exit.
Exit: Exit with settings intact.
I. Page 54 1/06/2012 REV 1.10.2
Page 63

Section 5 – Recorder Setup
Figure 5-2-4 Rotate List Setup
5.2.3 Rotate List
The Rotate List allows the user to decide which
display views will be active. Under normal viewing
conditions, the user can rotate through the displays
by pressing anywhere on the Task Bar where there is
no button. Each time the Task Bar is pressed the next
display will be loaded.
The Rotate List Setup dialog window as shown right
allows the user to select which displays will be active
and set the order in which they display.
To access the Rotate List Setup dialog window:
Press the Utility Setup Menu icon on the
bottom left of the Task Bar.
Then press the Rotate List icon to launch
the Rotate List dialog window as shown in
Figure 5-2-4.
The Rotate List Setup dialog window has two columns: the Rotate List column contains the active displays
that will be viewed; the Displays column contains all the current displays in the system.
The display view at the top of the Rotate List (Test in the example) is the default display that will show when
the unit is powered up. Subsequent displays in the list will show each time the Task Bar is pressed, in the
order listed.
To remove all displays from the Rotate List press the Double Right arrow button.
To remove a display from the Rotate List, highlight it then press the Right arrow button.
To add a display to the Rotate List, highlight it in the Displays column and press the Left arrow
button.
To change the order in the Rotate List, highlight a display name by tapping it then use the up arrow
button to move that display upwards.
To DELETE a display in the Displays column, highlight it by tapping the display name; then press
the Delete button. Note: Once a display is deleted there is no way to recover it.
Auto Rotate: If this box is checked then the displays will automatically rotate in the order listed in the Rotate
List from top to bottom. Each display will remain for 30 seconds before the next one shows.
To exit without changing anything, press the Cancel button (X). To exit and keep any changes, press the
Accept button (). Upon exit the unit has to rebuild the display list. The status of the rebuild is indicated
below the Delete button.
I. Page 55 1/06/2012 REV 1.10.2
Page 64
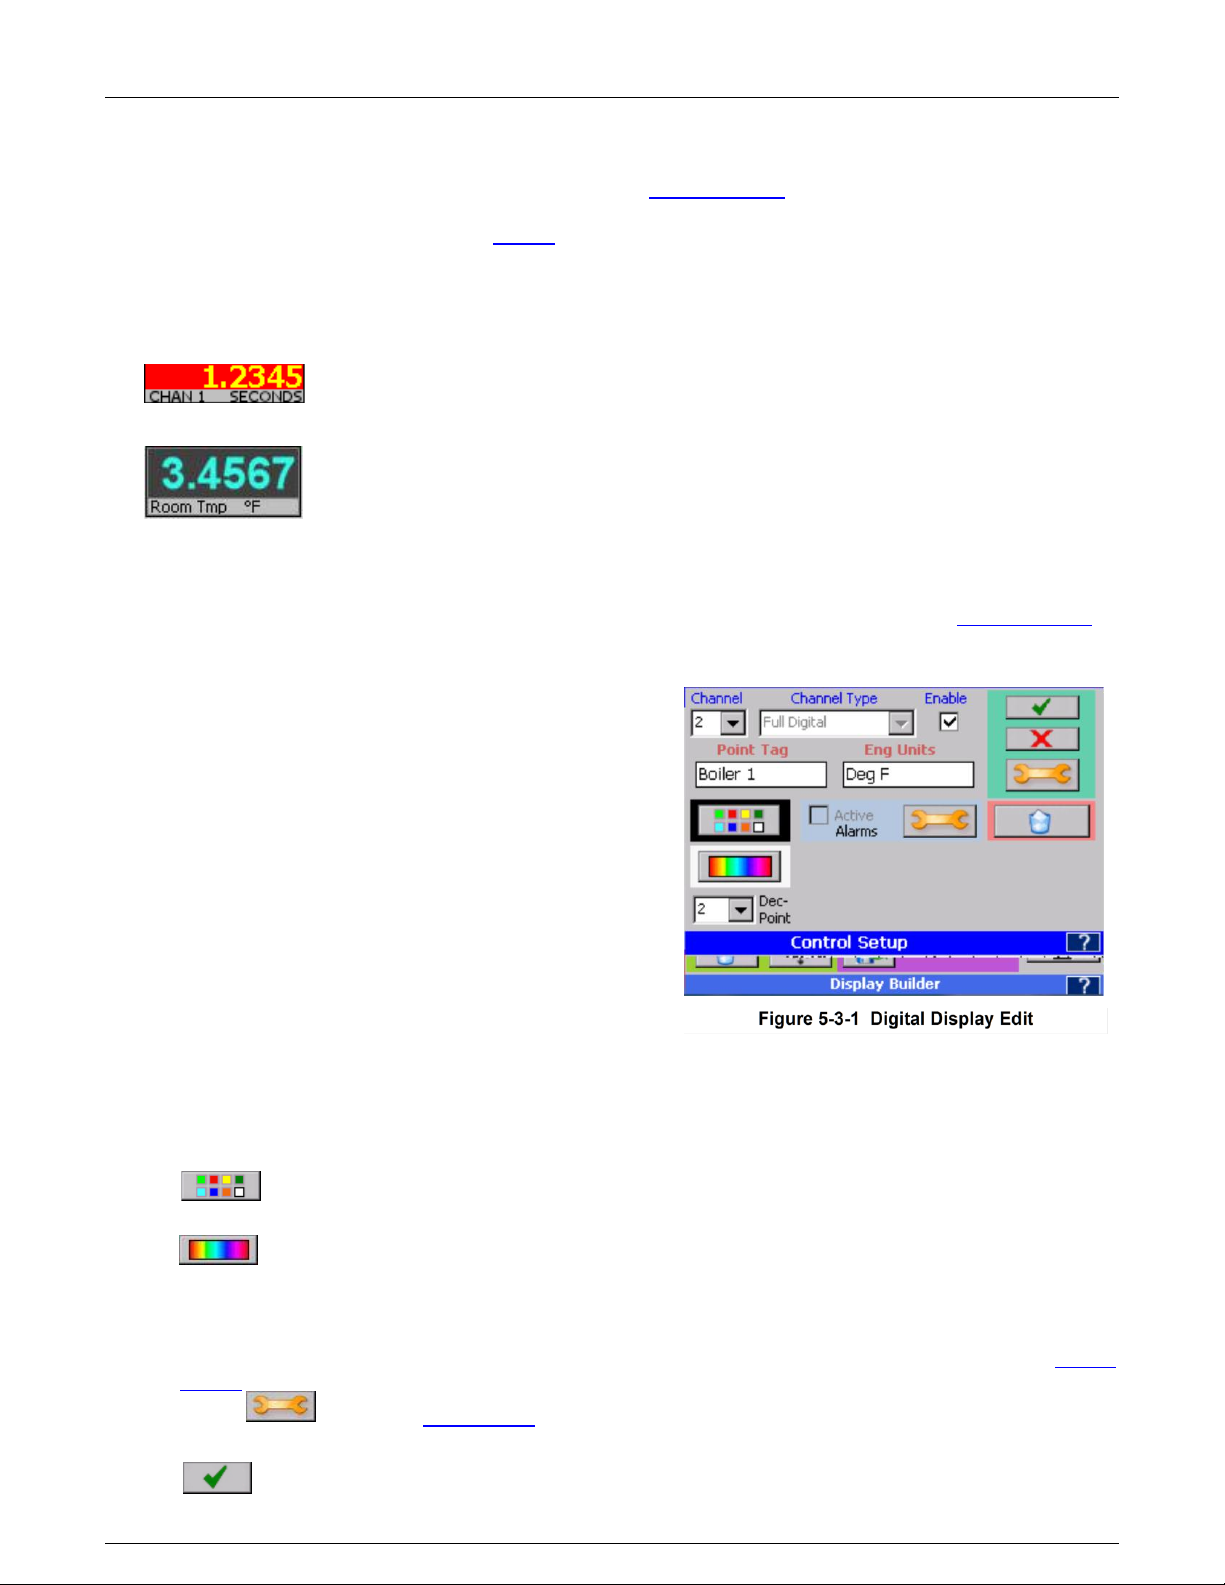
Section 5 – Recorder Setup
5.3 Widgets
A widget is a graphic element that a user interacts with or is used to build graphical user interfaces or GUIs. In the
case of the recorder, the user constructs a GUI using the Display Builder using widgets. There are two basic
types of widgets – Bars and Digital Displays. Trends, while treated as a widget in the Display Builder, are an
autonomous class and are dealt with in the Trends section below.
5.3.1 Digital Displays
There are two types of digital displays: full size and half size. Up to 12 full size and 24 half size digital displays
can be placed on the GUI.
The half size digital display widget is 2 blocks across by 1 block tall. It shows the Point
Tag – up to 8 characters and the Engineering Units up to 7 characters. It can display up
to 10 digits of data.
The full size digital display widget is 2 blocks across by 2 blocks tall. It shows the
Channel Tag – up to 8 characters and the Engineering Units up to 7 characters. It can
display up to six large digits or eight smaller digits of data.
5.3.1.1 Digital Display Setup
The Digital Display Edit dialog window will pop up when setting up a display using the Display Builder or
can be invoked at any time by double-tapping the Digital Display widget on the screen.
The dialog box shows the Channel Number (2) and
the Channel Type (Full Digital). The user can use
this dialog to change appearance parameters of the
Digital Display Widget or can proceed beyond to
fully set up or edit the channel information.
Channel: Shows the current Channel assigned to
the widget. The user can change the assignment by
selecting a different channel from the drop down list.
Channel type: Shows the current widget style for
the channel. For information only.
Enable: When checked the Digital Display is active,
when unchecked it is off and the Display will show
OFF.
Point Tag: This is a description for the channel point
and defaults to the Channel Setup value. It can be changed for this Digital Display. User can enter up to 8
characters
Eng Units: This is the Engineering Units for the channel and defaults to the Channel Setup value. It can
be changed for this Digital Display. User can enter up to 8 characters
Color: Used to set the color of the DIGITS in the Digital Display Widget and defaults to the
Channel Setup value. It can be changed for this Digital Display.
Background Color: Used to set the Background color for the Digital Display Widget and
defaults to the Channel Setup value. It can be changed for this Digital Display.
Dec Pt.: Decimal Points – Select number of places after the decimal point to display on the Digital
Display Widget.
Alarms: When the Active box is checked the alarms are active for this channel (2) provided the Master
Enable is set. When not checked the alarms are deactivated for this channel. Pressing the Alarm Setup
button opens the Alarm Setup dialog window. This allows changes to be made to the channel
alarm settings which will affect ALL widgets using this channel. This is a protected option.
Apply: Pressing this button will exit and save any changes made.
I. Page 56 1/06/2012 REV 1.10.2
Page 65

Section 5 – Recorder Setup
Exit: Pressing this button will exit without saving any changes made in THIS dialog box ONLY. If
you used the Setup or Alarms buttons to make changes to the channel information, these are Global and
WILL be saved.
Setup: Pressing this button opens the Channel Setup window. This allows changes to be
made to the channel settings which will affect ALL widgets using this channel. This is a
protected option.
Delete: Pressing this button will DELETE the Digital Display Widget. This will remove it from
the display.
5.3.1.2 Displaying Min, Max or Average Values
The Digital Display widgets show the instantaneous channel value but can be
changed at any time to display minimum, maximum or average values. To
change the reading double tap in the lower line of the digital display widget
indicated right.
This will pop up a drop down menu that allows the user to select the display
mode as follows.
INST. = Instantaneous – display the data as it is read – default (real time
display)
MIN. Minimum - will display the minimum (lowest) value ever measured.
MAX. Maximum – will display the maximum (highest) value ever measured
AVG. Average – will perform a weighted average on all input samples at 10
samples/sec and average them as (last value + current value)/2 and
display this. Note – you can use the Filter on each channel to provide
additional averaging.
The display indicated the current display mode in the lower left of the display
widget using the characters above - with the exception that NO indicator
is shown for real time (instantaneous) value. Maximum value is shown displayed
right.
I. Page 57 1/06/2012 REV 1.10.2
Page 66
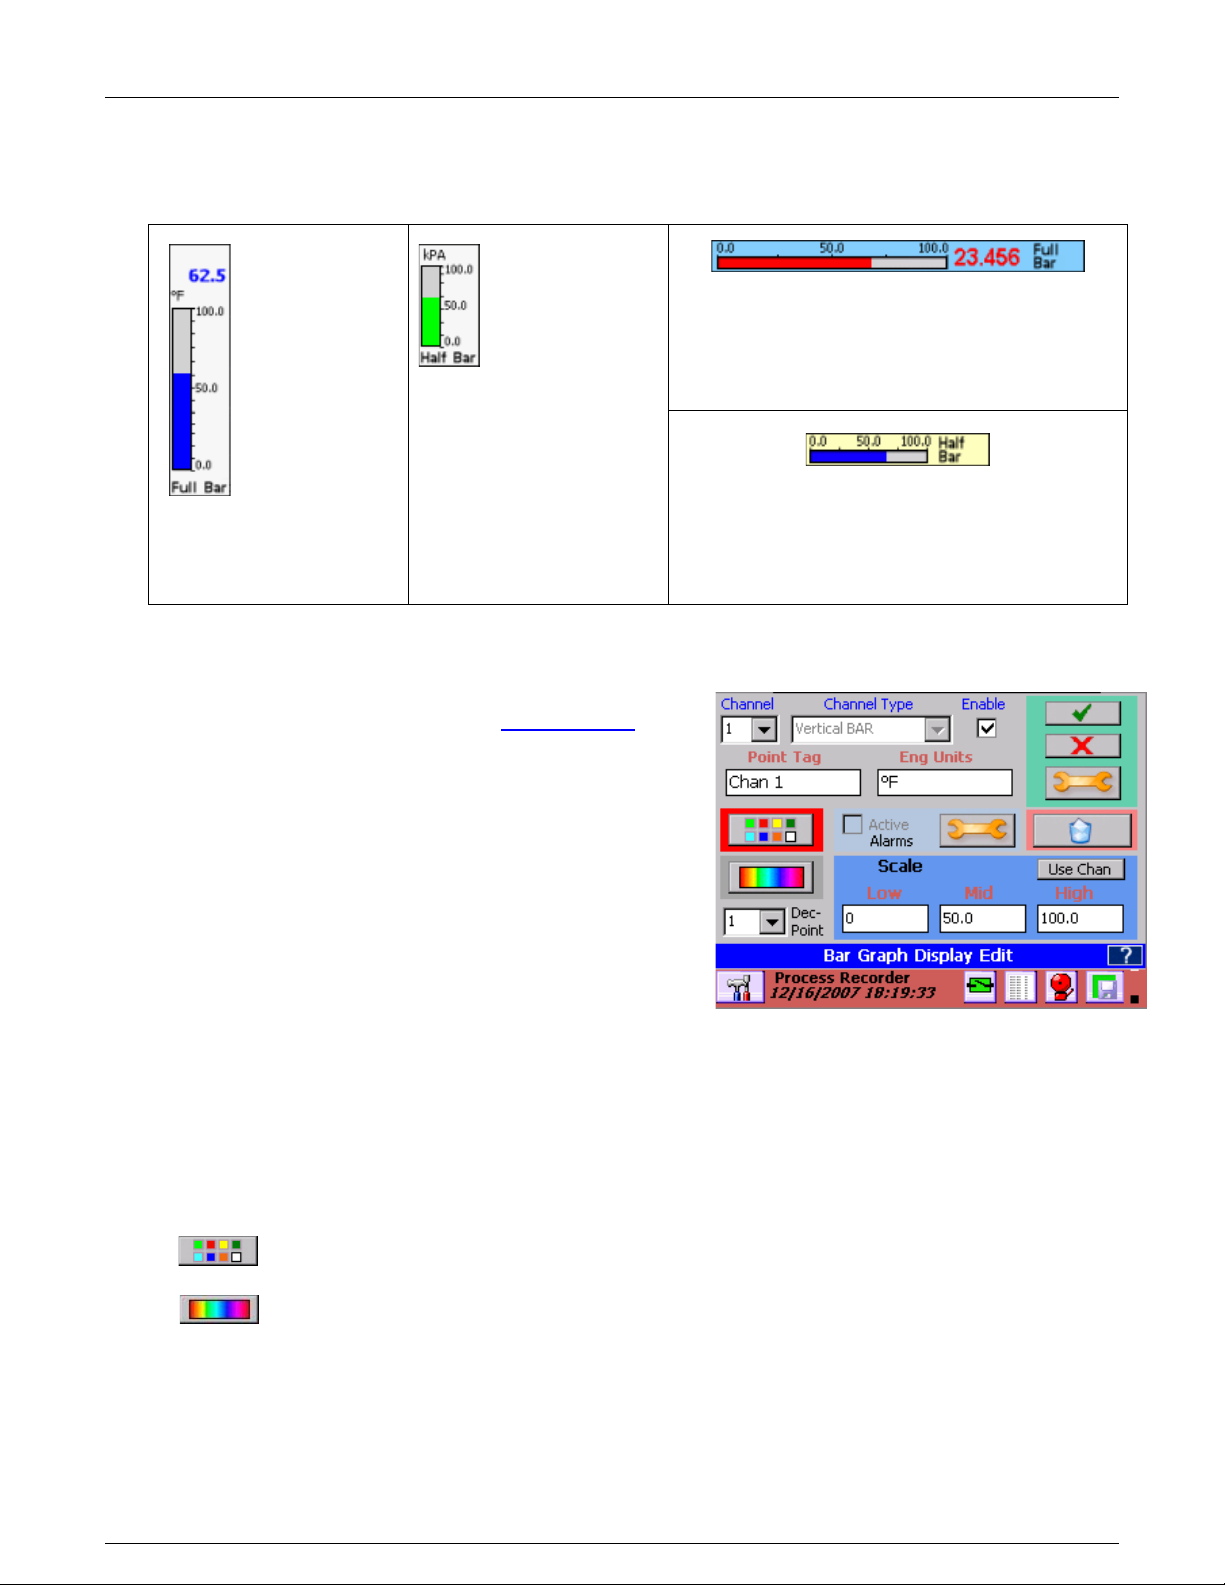
Section 5 – Recorder Setup
The full size
vertical bar
widget is 1 block
across by 8
blocks tall. It
shows up to 8
characters of
Channel Tag
and Engineering
units. It has a 5
character Digital
readout
The half size
vertical bar
widget is 1 block
across by 4
blocks tall. It
shows up to 8
characters of
Channel Tag and
Engineering
units. It has a 5
character Digital
readout
The full size horizontal bar widget is 6 blocks
across by 1 block tall. It shows up to 8 characters
of Channel Tag and Engineering units. It has a 5
character Digital readout
The full size horizontal bar widget is 3 blocks
across by 1 block tall. It shows up to 8 characters
of Channel Tag and Engineering units. It has no
Digital readout
Figure 5-3-2 Bar Graph Display Edit
5.3.2 Bar Graphs
There are four types of bar graph widgets, two horizontal and two vertical with full size and half size versions
of each. Up to 8 full size horizontal and 16 half size horizontal bar graphs can be placed on the GUI. Up to 6
full size vertical and 12 half size vertical bar graphs can be placed on the GUI.
5.3.2.1 Bar Graph Setup
The Bar Graph Display Edit dialog window will pop up
when setting up a display using the Display Builder or can
be invoked at any time by double-tapping the scale on the
bar graph widget on the screen.
The dialog box shows the Channel Number (2) and the
Channel Type (Horizontal BAR Full). The user can use
this window to change appearance parameters of the Bar
Graph widget or can proceed beyond to fully set up or edit
the channel information.
Channel: Shows the current Channel assigned to the
widget. The user can change the assignment by selecting
a different channel from the drop down list.
Channel Type: Shows the current widget style for the
channel. For information only.
Enable: When checked the Bar Graph is active, when unchecked it is off and the Display will show OFF.
Point Tag: This is a description for the channel point and defaults to the Channel Setup value. It can be
changed for this Bar Graph. User can enter up to 8 characters
Eng Units: This is the Engineering Units for the channel and defaults to the Channel Setup value. It can
be changed for this Bar Graph. User can enter up to 7 characters
I. Page 58 1/06/2012 REV 1.10.2
Dec Pt.: Decimal Points – Select number of places after the decimal point to display on the Bar Graph
widget.
Scale: This is used to customize the local scale on the Bar Chart widget. In the above example, the input
is a J Type Thermocouple which has an actual scale of -346 to 2192 °F. For this bar chart it has been set
to 0 to 150 to show more detail at the points of interest. It can be changed at any time and only affects
this widget.
Color: Used to set the color of the BAR in the Bar Graph widget and defaults to the Channel
Setup value. It can be changed for this Bar Graph.
BackGround Color: Used to set the Background color for the Bar Chart and defaults to the
Channel Setup value. It can be changed for this Bar Graph.
Page 67

Section 5 – Recorder Setup
Use Chan: This button will fetch the original scale values from the Channel Setup information and insert it
in the scale information. In the above example it will populate the scale with original thermocouple values.
Once scales are set they remain constants with the widget. Any change to the channel will not update the
scales (It will update everything else). The user can update the scales on this widget with this Use
Chan(nel) button.
Alarms: When the Active box is checked the alarms are active for this Channel (2) provided the Master
Enable is set, when not checked the alarms are deactivated for this channel. Pressing the Alarms button
opens the Alarm Setup dialog window. This allows changes to be made to the channel alarm settings
which will affect ALL widgets using this channel. This is a protected option.
Apply: Pressing this button will exit and save any changes made.
Exit: Pressing this button will exit without saving any changes made in THIS dialog box ONLY. If you
used the Setup or Alarms buttons to make changes to the channel information, these are Global and
WILL be saved.
Setup: Pressing this button opens the Channel Setup window. This allows changes to be made
to the channel settings which will affect ALL widgets using this channel. This is a protected
option.
Delete: Pressing this button will DELETE the Bar Chart widget. This will remove it from the
display.
Cancel: Discard all settings and exit.
Accept: Exit with settings intact.
I. Page 59 1/06/2012 REV 1.10.2
Page 68
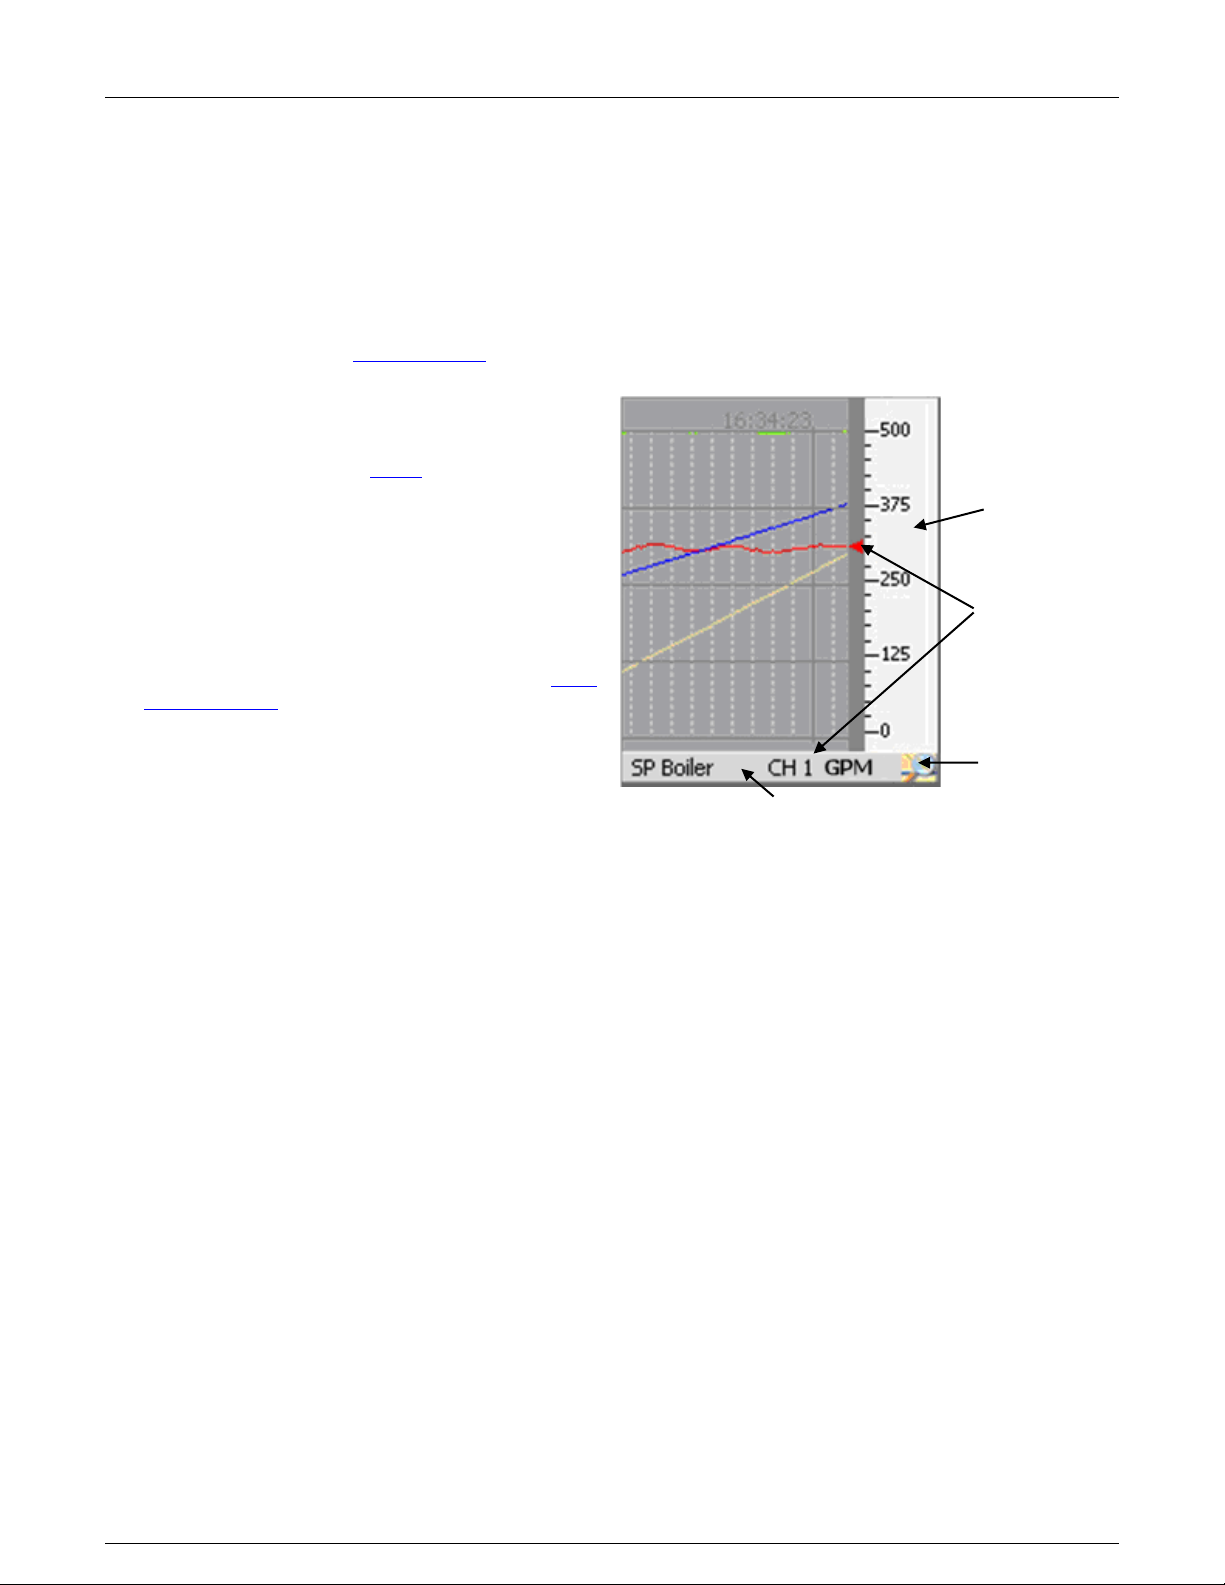
Section 5 – Recorder Setup
TREND SETUP
ACTIVE AREA
BROWSE
BUTTON
SCALE ROTATE
ACTIVE AREA
CHANNEL
IDENTIFIERS
Figure 5-3-3 Trend View
5.3.3 Trends
Trends are the most informative and complex of all the widgets. Trends show multiple channels of data with
respect to time. The user can have multiple trend displays with different combinations of channels. Each
channel can have its own scale or all channels can share the same scale.
Trends are available in vertical or horizontal format. Vertical trend lines move from top to bottom while
horizontal trend lines move from right to left. Vertical trends are available as full size (6 across x 8 down) or
half size (6 across x 4down). Horizontal trends are available as full size (6 across x 8 down), 2/3 size (4 cross
x 8 down) or half size (3across x 8 down). Trends can be used in conjunction with any other widgets on the
display as set up in the Display Builder.
The Trend View has a number of active elements.
The Trend Setup active area is the scale as shown
right. Double tapping this area will pop-up the
Trend Scale Setup – see below.
The name bar below the trend is the Scale Rotate
active area. Tapping this bar will force the scale to
move to that of the next channel. The channel
identifiers show which channel scale is currently
visible and what the engineering units are.
The Browse button on the right of the name bar
below the trend allows the user to go to the trend
browse screen. Here the user can scroll through
historic data, zoom, measure, annotate and save
or print images of the trend.
Trends can have up to 18 channels on a display
although this could be extremely cluttered. Since it
is possible to create multiple trend displays, or
even displays with two (half) trends it would be
better to group smaller numbers of channels
together on their own display and cycle between them.
Channels on a single trend display can all share the same scale or can each have a separate scale. When
channels have individual scales, the scale on the trend itself will change at a predetermined interval, allowing
each channel scale to “have a turn” for a period of time known as the dwell time. Thus if the dwell time were
10 seconds, every 10 seconds the next scale would appear and the scales would cycle around. As each scale
appears, those trend lines associated with that scale will have pointers to the immediate left of the scale in
horizontal trends or below in vertical trends. This associates the trend line with the scale. The scale rotation
can be stopped and a single scale can be set continuously – see Trend Setup below.
I. Page 60 1/06/2012 REV 1.10.2
Page 69
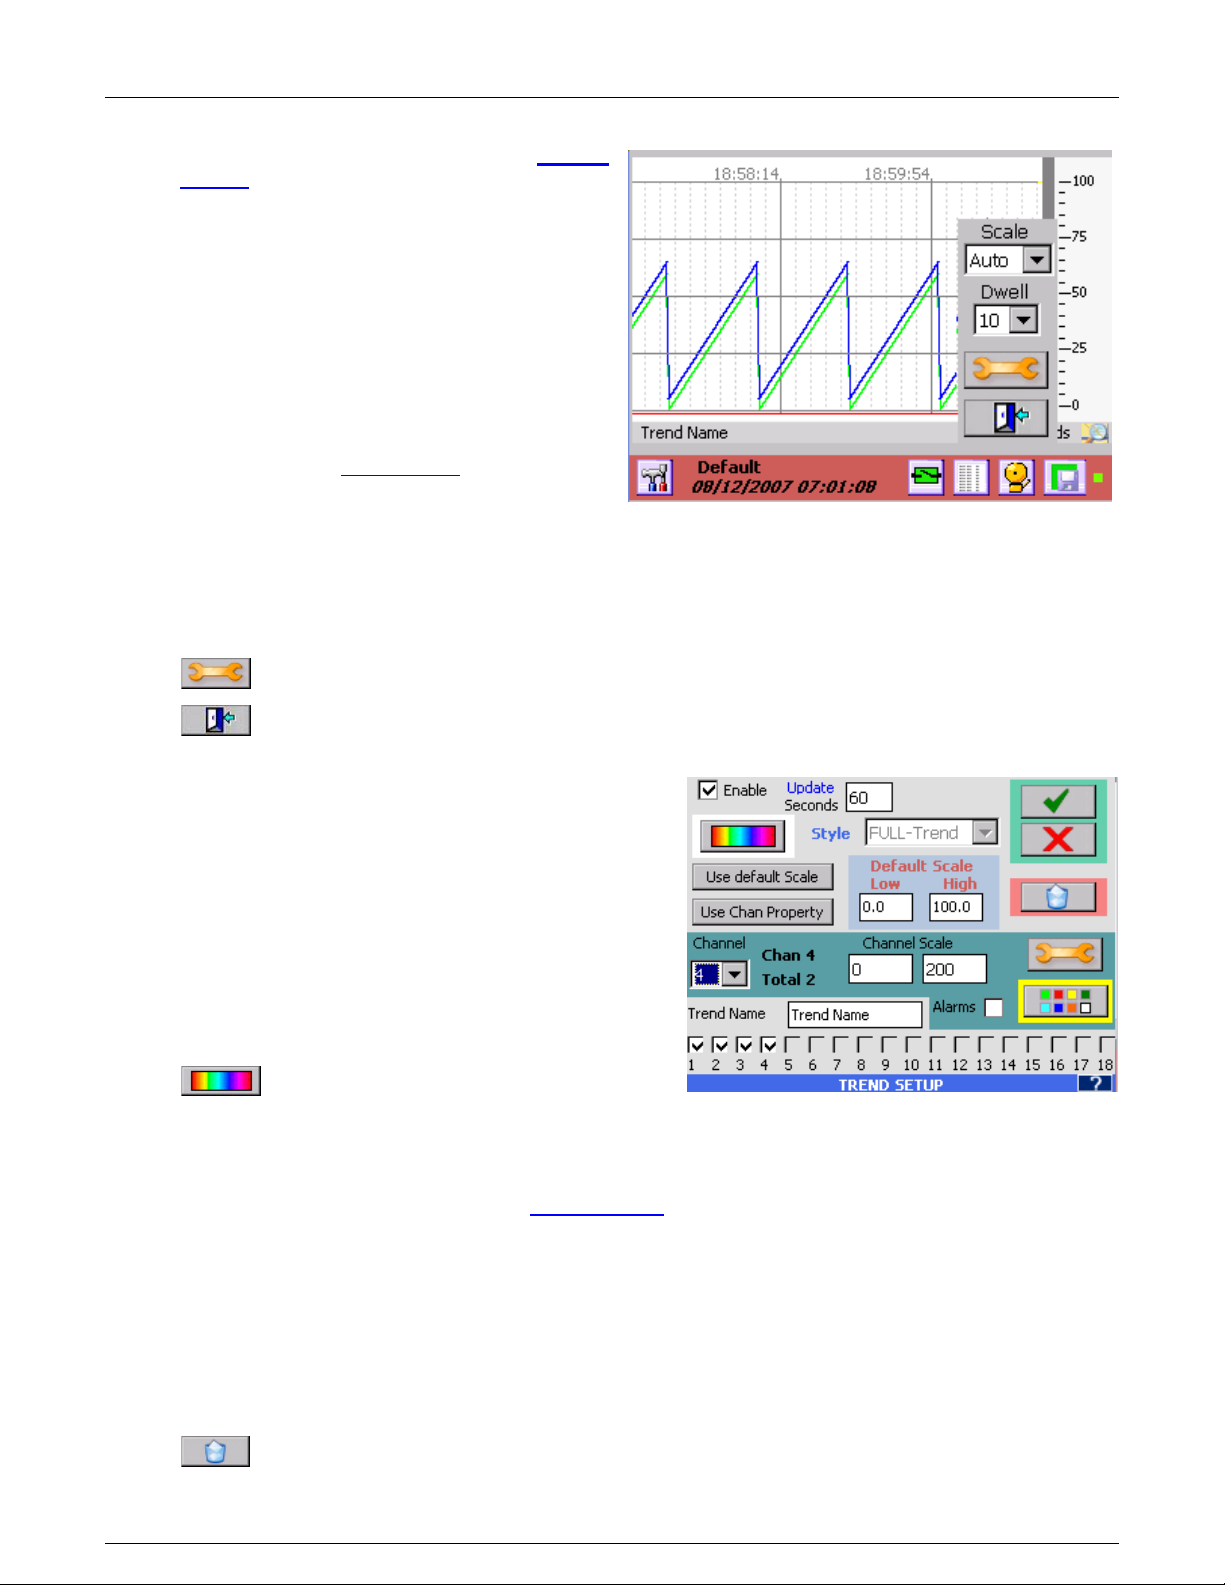
Section 5 – Recorder Setup
Figure 5-3-4 Trend Scale Setup
Figure 5-3-5 Trend Setup
5.3.4 Trend Setup
Trend setup can be done from the Display
Builder or can be edited at any time by double-
tapping the scale of the Trend display. Doubletapping the Trend display scale will pop up the
Trend Scale Setup window as shown right.
There are a couple of options at this point.
Scale: This is the Channel Scale rotate select.
When set to AUTO the scales will rotate
sequentially through all scales of channels on
display. As each channel is active the channel
pointer will appear on the column immediately
left of the scales and the Channel number and
engineering units will display on the bar below
the trend. See Figure 5-3-3. When set to
MANual the first channel will have its scale
displayed and will not rotate. Scales can be
rotated by pressing the bar below the trend.
Setting Scale to ALL puts up all channel indicators and the scale is permanently set at 0 to 100 %. No
Channel number is displayed on the bar.
Dwell: This is the time period in seconds that a displayed scale will remain in view before switching to the
next. Only applies if AUTO is selected for Scale above.
Setup: Opens Trend Setup window - see below.
Exit: Returns to Trend display.
5.3.4.1 Trend Setup Window
The Trend Setup dialog window is shown in at right.
Multiple channel information as well as general Trend
display information is set up on this screen.
Enable: If this box is checked the Trend is enabled, if
this box is unchecked the Trend is disabled and will
indicate OFF in the Trend Name area.
Update: This is the screen update rate in seconds and
determines the “speed” of the Trends. A new point is
added (and the trend advances by 1 pixel) each
Update Rate which can be 0.10 seconds to 9999
seconds (10 times a second to once every 2.7 hours)
Background Color: This is the background
color of the chart. Set it so that it contrasts
with the colors set for the Trends. Black Trends on a
black background will not be visible.
Style: This is an indication of the Trend style and is for information only. It cannot be altered here. If you
need a bigger or smaller Trend use the Display Builder.
Use default Scale: This takes the user defined Default Scale (see below) and applies it to the currently
selected channel (Channel 4 in above example). This will populate the Channel Scale with the default
values. Note: Setting the channel to the Default Scale does not normalize the Trend for that scale, but
rather shows only that part of the trend that falls within the default scale. For example, if a channel had an
input scale of 0 to 200 and it was forced to use the default scale of 0 to 100, as long as the input was
between 1 and 100 the trend would be on the display, the moment the input went above 100 it would
essentially flat line against the top of the display.
Default Scale: The user can enter the Low Scale and High Scale values to use as the default scale.
Delete: Delete this trend. Caution – this will remove the trend from the unit.
I. Page 61 1/06/2012 REV 1.10.2
Page 70

Section 5 – Recorder Setup
Use Channel Scale: This loads the preset channel scale from the channel setup configuration and
makes it the current setting for the Channel Scale.
Channel: Select the channel number to customize. The channel will only appear on the Trend if it is
checked in the list at the bottom of the screen.
Channel Scale: This is the Low Scale (to the left) and High Scale (to the right) that will be used for this
channel on the Trend display. These can be preset by selecting “Use Channel Scale” or “Use default
Scale” as defined above, or they can be totally customized by tapping in the respective box and entering
the value required.
Active: If this box is checked the channel will appear on the Trend, if this box is unchecked the channel
will not be displayed on the Trend.
Setup: Pressing this button opens the Channel Setup window. This allows changes to be made
to the channel settings which will affect ALL trends and widgets using this channel.
Alarms: Enable alarms for this channel if checked, disable them if unchecked. The Master Enable and
Channel enable must be active in order for alarms to work.
Color: Set the color for this channel on this Trend only.
Trend Name: Enter up to 20 characters to uniquely identify the Trend display. This appears on the
bottom left of the display screen – see Figure 5-3-4 .
Channel List: Use these checkboxes to add or remove channels from the Trend. Channels are enabled
with their system setup parameters as set in Channel Setup. These parameters can be overridden as
described above.
Cancel: Discard all settings and exit.
Accept: Exit with settings intact.
I. Page 62 1/06/2012 REV 1.10.2
Page 71

Section 5 – Recorder Setup
5.4 Alarms
A total of five Alarms can be set for each channel programmed. These five Alarms can be any combination of
numerous Alarm types (limits). The Alarm dead band (also known as hysteresis) and Alarm delay can also be
programmed for each Alarm type. In addition a custom event message can be created for entry into the alarm
event log and can be set up to be emailed to the user.
For all inputs other than Linear Dry Contact or Conditional, the Alarm types are: None, High, Low, Rate, or
Abnormal.
For Linear Dry Contacts and Conditional Inputs the Alarm types are: None, True (or Open), False (or Close) or
Abnormal.
The Alarm types are described below:
None No alarm set
High Set High alarms (up to five). Alarm will occur if input is greater than the Alarm set point.
Low Set Low alarms (up to five). Alarm will occurs if input is less than the Alarm set point.
Rate Set Rate alarms (up to five). Alarm will occur if the input changes by more than the set
point value in the specified time.
Abnormal Set alarms for Abnormal conditions (TCBO, Overflow, invalid etc.)
True (Open) Set alarm if condition is True or Open as defined (Conditional inputs and Dry Contacts
ONLY)
False (Close) Set alarm if condition is False or Closed as defined (Conditional inputs and Dry Contacts
ONLY)
If you try to program an alarm with an illegal condition, for example, setting a Linear Voltage input alarm to
“Type=False”, you will get an error.
The Alarm status is shown in the Task Bar at the bottom of the screen. This icon also doubles as the Alarm
Acknowledge button. This icon changes color as shown below:
- No alarms. Indicator is Green
- No Alarms – Alarm Muted. Indicator is Amber
- Alarm condition or Alarms disabled. Indicator is Red.
Any channel that has an alarm condition and is displayed as a digital display or bar chart, will blink its
displayed value or indicate ‘alarm” as long the alarm condition exists. Bar charts will also indicate
alarm set points where possible using small arrow icons - ▲ for high alarm and ▼ for low alarm as
shown on the right.
Alarms will also be recorded in the Alarm/Event Log with a time and date stamp, the channel and
alarm and the event message if any.
Alarms are acknowledged by pressing the Alarm Acknowledge button (Alarm Status Indicator icon) in
the Task Bar. This will silence the alarm – the status indicator will continue to show status as indicated
above. The acknowledge event will be logged into the alarm/event log. If security is enabled (see
password setup), the user has to be logged in order to accept an alarm and the username will be
added to the alarm/event log acknowledge event.
Alarms will also activate relay outputs if this option is installed and set up. See Section 5.5 Digital Input/Output for
details.
I. Page 63 1/06/2012 REV 1.10.2
Page 72
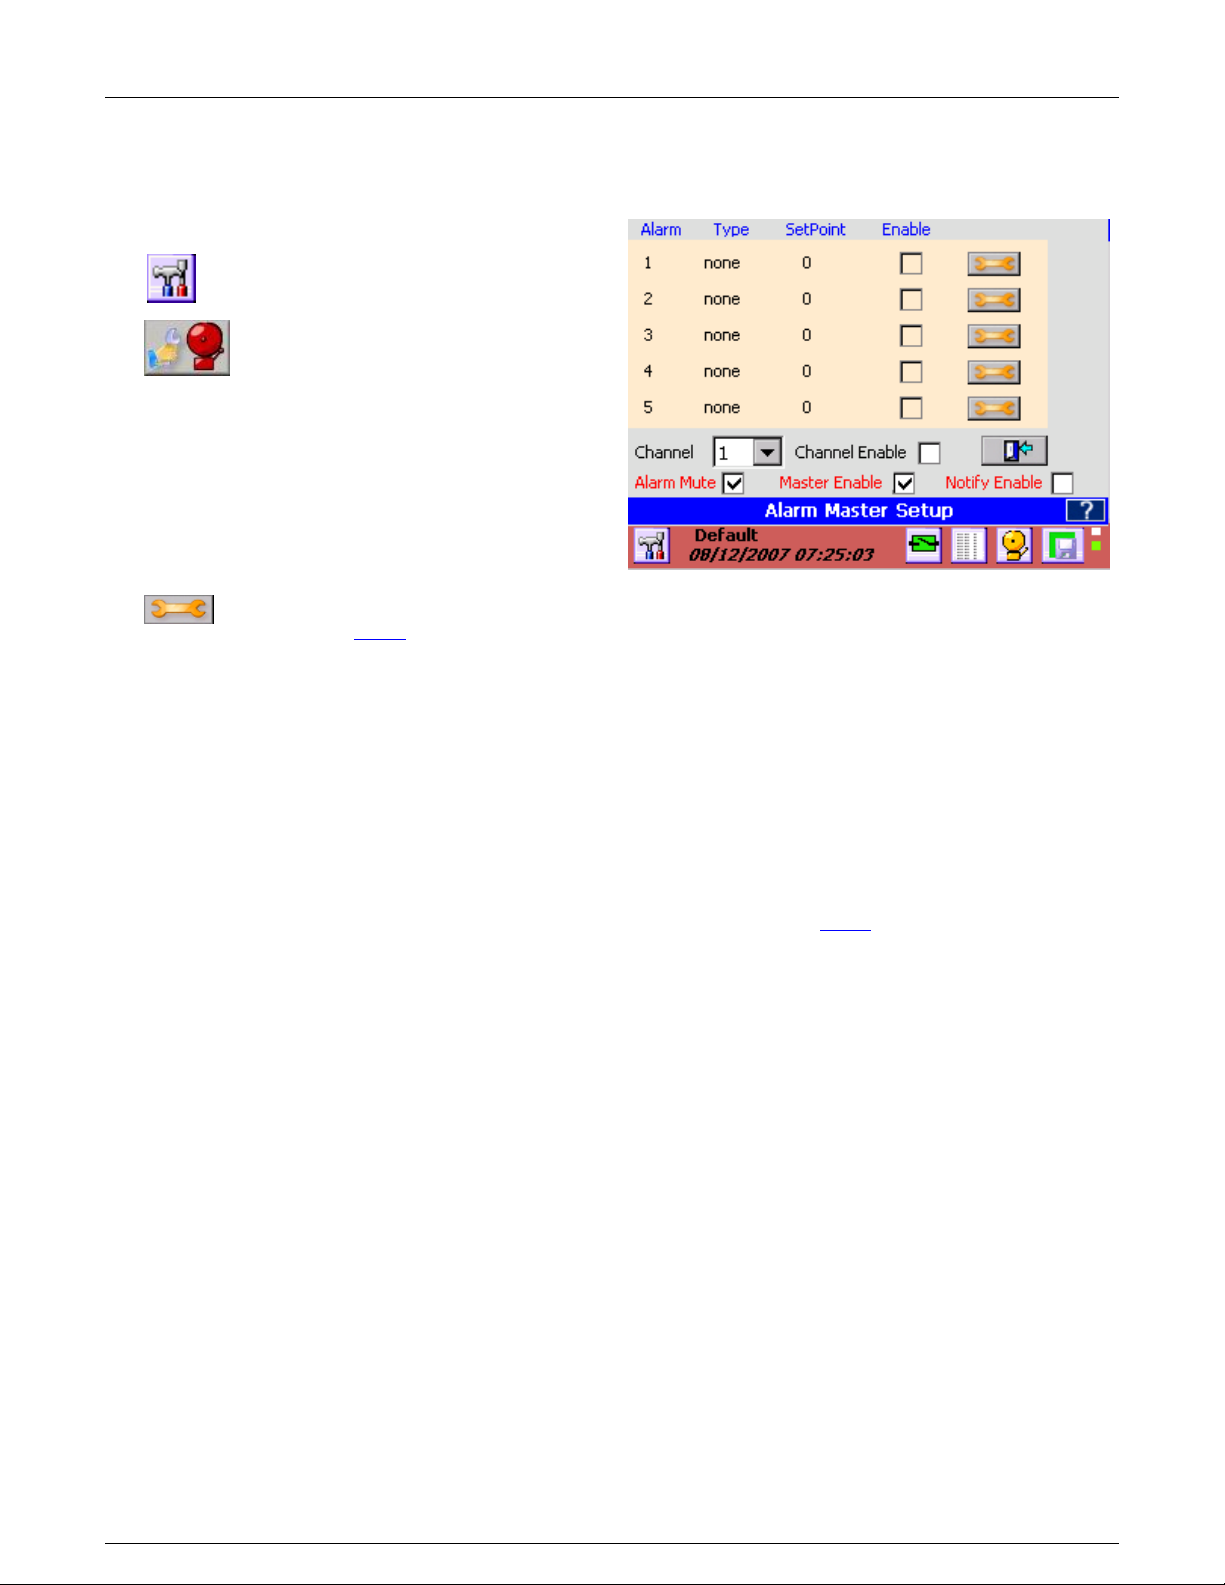
Section 5 – Recorder Setup
Figure 5-4-1 Alarm Master Setup
5.4.1 Alarm Master Setup
Alarm setup can be done through the Alarm Master Setup or can be done on an “as you go” basis through the
Channel Setup menu when defining or editing widgets.
To access the Alarm Master Setup dialog window:
Press the Utility Setup Menu icon on the
bottom left of the Task Bar.
Then press the Alarm Master Setup
icon to launch the Alarm Master Setup
dialog window as shown right.
This is the primary Alarm Setup dialog window. It
gives an overview of the 5 alarms for the selected
channel, showing the Type, SetPoint and whether
the alarm is enabled. The setup button allows each
alarm to be modified. Note that the enable
checkbox for each alarm channel is the status only,
if you need to change this you have to press the
setup button.
Setup: Proceed to set up the individual
alarms – see below.
Channel: Below the overview is the Channel selection drop down box. This shows the current alarm setup
and allows the user to select any of the 18 channels. If you enter the setup from a specific channel, you
cannot change the channel.
Channel Enable: When checked, the alarms that are enabled for the channel will be active. When
unchecked, alarms for this channel are disabled. For an alarm to be active, the individual alarm must be
enabled AND the Channel Enable must be checked. (also see next)
Alarm Mute: When unchecked the alarms will function normally but the alarm will not sound – it will be
muted. The alarm status indicator will be amber.
Notify Enable: This enables or disables any email activity initiated by the Notify option in the Alarm Setup.
When unchecked no emails will be sent.
Master Enable: This enables or disables ALL ACTIVE alarms on ALL Channels. When unchecked, no alarms
will work and the alarm status indicator will be red continuously.
Exit: Pressing this button will exit the window, applying whatever changes have been made.
I. Page 64 1/06/2012 REV 1.10.2
Page 73

Section 5 – Recorder Setup
Figure 5-4-2 Alarm Setup
5.4.1.1 Alarm Setup
Pressing the setup button above takes you to the individual Alarm Setup dialog window shown
below right.
The window will show the default Channel and
Alarm setup based upon entry conditions – eg
Channel 2 Alarm 1. The user can change the
Alarm Number and the window will refresh and
show the setup for that alarm.
Channel: The current channel that the alarm
setup refers to. (1 to 18). Defaults to source.
Alm No: The current alarm for the current
channel. (1 to 5)
Alarm Type: This drop down selection box
allows the user to select one of the available
alarm types. The Alarm types are: For Linear,
Frequency and Calculated inputs - None, High,
Low, Rate, or Abnormal. For Dry Contacts and
Conditional Inputs the alarm types are - None,
True (or Open), False (or Close) or Abnormal. Any unused alarm must be set to None.
Enable Checkbox: If checked this alarm is enabled, if unchecked this alarm is disabled. Note: to ensure
that any alarms on this channel are active it is necessary to check the Channel Enable AND Master
Enable in the Alarm Master Setup.
Notify Checkbox: If checked the system will attempt to send an email about this alarm condition
provided the email smtp information is correctly setup.
Record Checkbox: If checked this alarm will trigger a recording to start if the record setup has been
configured this way. See Section 5.6 Record Setup.
Setpoint: This is the value in the same engineering units as the channel that the alarm condition is tested
against – also known as the threshold. In the above example, when the input is greater than (high alarm)
350, the alarm will be true. See the definition of other alarm conditions above.
Dead band: This value is the hysteresis for the alarm. Once the alarm is true (active) this value is
subtracted from the setpoint and becomes the new setpoint for the alarm reset. In the above example the
dead band is 10 so once an alarm is active, the input needs to drop below 340 (new threshold) to no
longer be true or active. This prevents chatter about the alarm setpoint. Once the alarm is reset, no longer
true, the setpoint is restored to the original value so the next alarm has to exceed 350 to once again be
active. Note: The dead band cannot exceed the setpoint.
Delay: Enter the time in seconds from the point that the alarm condition becomes true (input exceeds
setpoint) till it is actually reported as an alarm. If the alarm condition is reset (drops below the threshold)
during this delay period, the alarm will not be reported. This feature prevents an alarm condition if the
process is stable apart from a quick aberration that is recoverable.
Rate of Change: Enter the time in seconds (up to a maximum of 600) over which the input cannot
change by more than the setpoint. For example, if the setpoint was 10 and the rate of change is 5
seconds, if the input changes by more than 10 in 5 seconds an alarm will occur. If the setpoint is positive
the rate of change is measured on increasing changes, if the setpoint is negative, the rate of change is
measure on decreasing changes.
Event Message: Enter a message in the entry box (up to a maximum of 20 characters) that will be
appended to the alarm/event log message if the check box to the left is checked. This message will also
be appended to the email if the notify box is checked (see above).
I. Page 65 1/06/2012 REV 1.10.2
Page 74

Section 5 – Recorder Setup
Audio File: The recorder can play a .wav file (PCM type only) instead of the standard alarm sound.
These audio files must be saved in the system internal memory (SD Card). The drop down box shows
available files. Select the file to be played or none to use the default sound.
Contact: This is the relay output contact that will be activated when the alarm is true. You need to have
an optional digital I/O board in the system which needs to be set up correctly. The contact has to be
enabled. If no contact output is required, set this to None. If you need to set up the contact, press the
Setup button alongside the contact number to get to the Digital Output Setup window.
5.5 Digital Input/Output
The Digital Input/Output features require an optional card which is plugged into the rear of the recorder. This card
will have some combination of up to 12 relays (outputs) and 6 opto-isolated inputs, depending on model number.
Check the specifications of the card you have for the output ratings and type of the relays and the input voltage of
the opto-isolated inputs.
In order to make use of the Digital Input/Output capabilities of the recorder, these need to be setup and initialized
before use. Setup can be done through the Utility Setup Menu when defining or editing widgets.
The status of the digital outputs is indicated by the icon on the Task Bar which also doubles as the Alarm Reset
button. The Alarm Reset button will drop out any contacts that are latched and no longer in alarm, or any alarm
that is set to drop out on reset. The status is indicated as follows:
- Relay outputs all reset – safe condition
- One or more relay outputs active – alarm condition
The relay outputs can be configured in a number of ways. It is up to the user to ensure that connection and
external circuitry agree with what is set up in the relay configuration menus. The output types are as follows:
Normal: The relays are normally not energized but will energize in an alarm condition and return to normal
when the alarm clears, or will clear when the Acknowledge button is pressed if this option is set.
Latching: The relays are normally not energized but will energize in an alarm condition and will NOT return to
normal when the alarm clears, until the Acknowledge button is pressed or unless the Acknowledge button is
pressed if this option is set.
Reflash: The Reflash option programs the relays to momentarily open and reclose each time an additional
alarm that is programmed to close the contacts is acquired.
Failsafe: This is an option that can be applied to each relay output. The Failsafe option allows the relay
outputs to function as Failsafe Contacts. This reverses the logic so a contact which is normally OPEN will be
energized normally CLOSED. The Failsafe contact will drop out in the event of a power failure and indicate an
alarm.
The digital inputs are opto-coupled led types. They typically operate from 3 to 12 volts DC but can be wired for
higher input voltages. Each input has an isolated positive (+) and negative (-) connection. Check the information
that came with the card for further details.
I. Page 66 1/06/2012 REV 1.10.2
Page 75
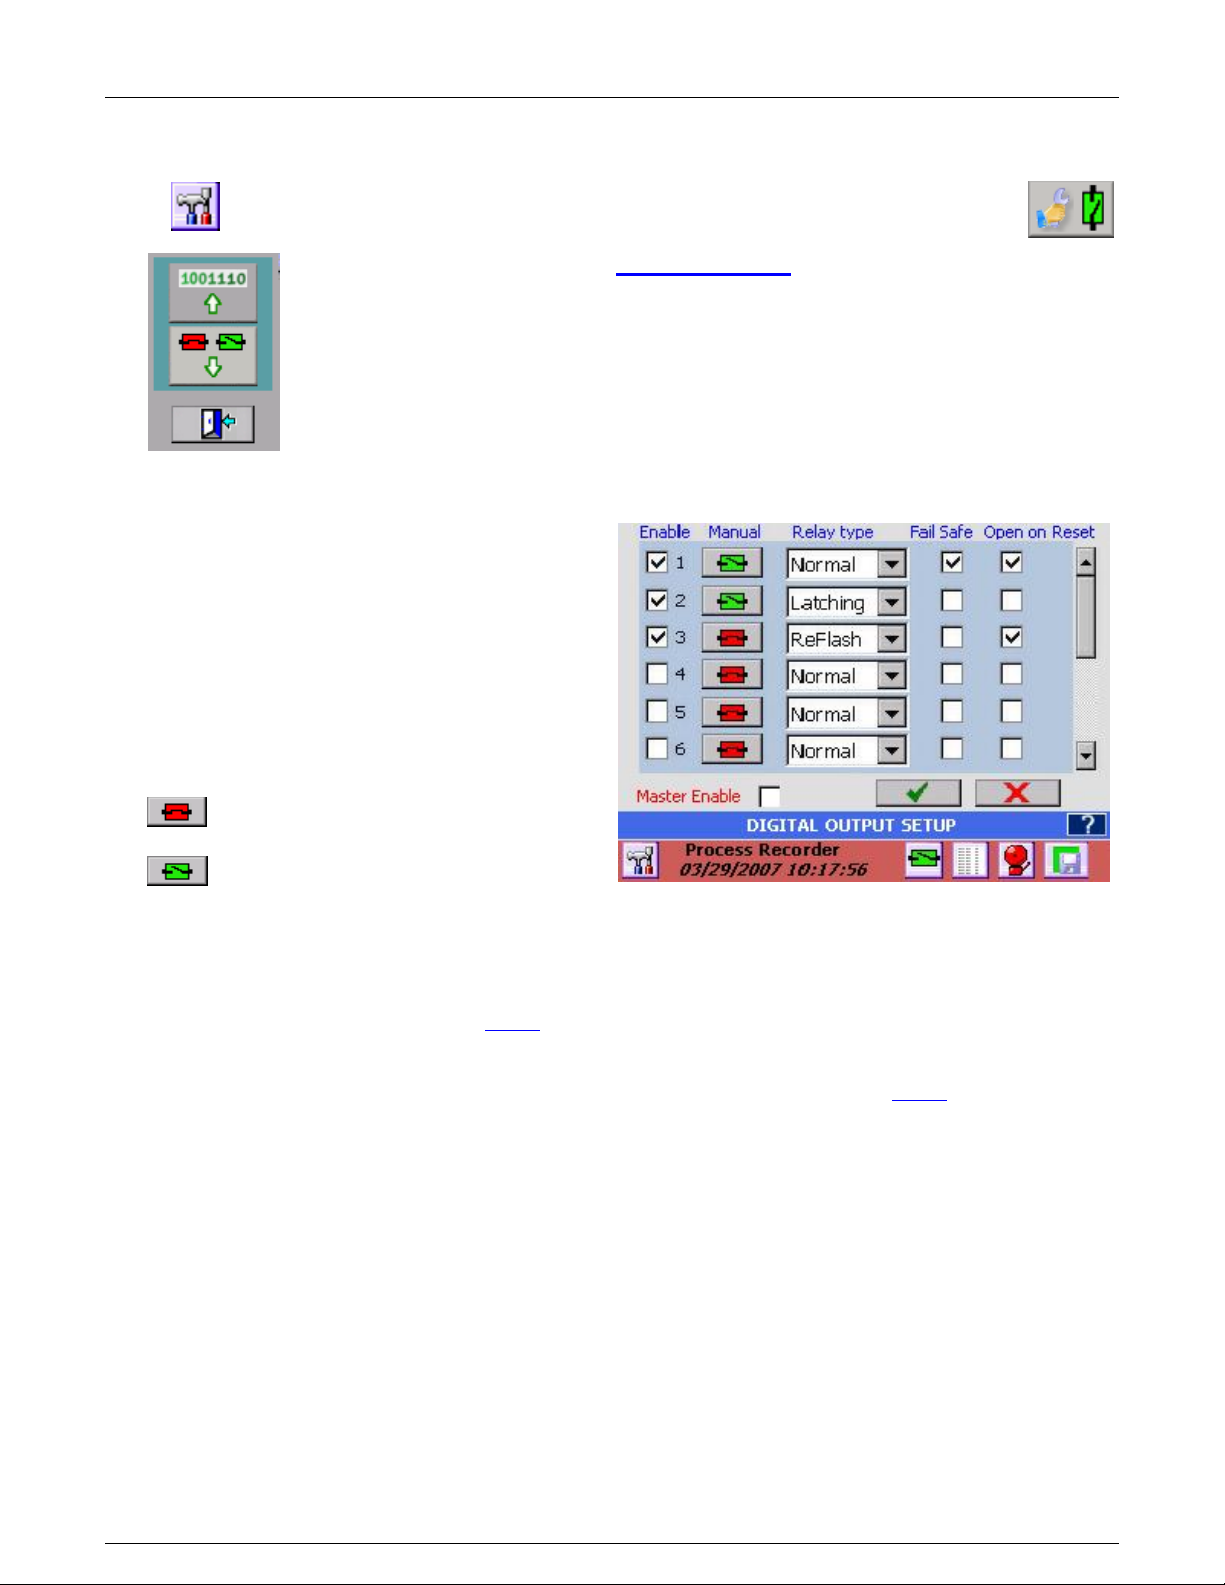
Section 5 – Recorder Setup
Figure 5-5-1 Digital Output Setup
5.5.1 Digital Output Setup
To access the Digital Output Setup dialog window:
Press the Utility Setup Menu icon on the bottom left of the Task Bar. Then Press the
Digital I/O Setup icon which will bring up the digital IO selection dialog shown left.
The Top Button will take you to the Digital Input setup; the lower button will take you to the
Digital Output setup.
Select the Digital Output setup button to launch the Digital Output Setup dialog window as
shown in Figure 5-5-1. This dialog window provides complete control over the setup of the
digital relay outputs. No assumption is made about the type of relay output or its
capabilities; these must be checked by the user from the hardware specifications of the card
installed in the recorder.
There can be a maximum of 12 output relays. The scroll bar can be used to view contacts 7 to 12.
Enable: This checkbox is used to enable
individual output relays. If it is checked, the output
is active, if it is not, the output is disabled. Note
that the Master Enable checkbox MUST be
checked to allow any output to function. If a Digital
IO card is not present in the recorder or there are
less than 12 relays on it, you will not be able to
check the enable box of relays not present in the
system.
Manual: These buttons enable the user to override
the current status of the relay outputs in real time.
Set – activates the relay
Reset - deactivates the relay.
The icon on the button changes to indicate the current status of the output relay. The Master Enable must be
checked in order for this to operate on the outputs.
Relay Type: This drop down selection box allows the user to define the relay type as Normal, Latching or
Reflash. The descriptions are detailed above.
Fail Safe: Check this box if you want this output relay to be fail safe. This reverses the logic so a contact
which is normally OPEN will be energized normally CLOSED. Full details are shown above.
Open on Reset: Check this option if you want the Alarm Reset button to reset the contacts irrespective.
Under normal circumstances a contact will not drop out until the alarm condition clears. If the Open on Reset
box is checked, the contact will drop out when the Alarm Reset button is pressed irrespective of the alarm
condition. This may be useful if the contact is used as an alarm klaxon.
Master Enable: This checkbox must be checked for the output relays to function. If it is not checked, none of
the relays will operate.
I. Page 67 1/06/2012 REV 1.10.2
Page 76

Section 5 – Recorder Setup
Figure 5-5-2 Digital Input Setup
5.5.2 Digital Input Setup
To access the Digital Input Setup dialog window:
Press the Utility Setup Menu icon on the bottom left
of the Task Bar.
Press the Digital I/O Setup icon (left) and then
select Digital Input button (below left) to launch the
Digital Input Setup dialog window.
The Digital Input Setup window dialog box is shown
to the right. It provides complete control over the
setup of the digital inputs. There can be a maximum
of 6 inputs depending on which digital io card is installed in
the recorder. Note – If there is no Digital IO board in the unit
the enable functions will be grayed out.
Enable: This checkbox is used to enable individual inputs. If
it is checked, the input is active, if it is not, the input is
disabled and acts as though there were no stimulus on the
inputs – it appears as off (false) to the system. Note that the Master Enable checkbox MUST be checked to
allow any input to function. If a Digital IO card is not present in the recorder or there are less than 6 inputs on
it, you will not be able to check the enable box of inputs not present in the system. (see status below)
Input Function: This drop down selection box allows the user to define the input type and its use. The
options are:
None: No function selected
Alm Ack: Alarm Acknowledge – functions as the Alarm Acknowledge button in parallel with the
screen icon. This will silence the local recorder alarm tone
Alm Rst: Alarm Reset – functions as the Alarm Reset button in parallel with the screen icon to
drop out any eligible relay outputs.
Alm Both: Functions as both the Alarm Acknowledge and Alarm Reset button, equivalent to pushing one
then the other.
Event: Forces an event in the alarm/event log and prints the message in the Event Message box.
Timer Rst: Timer Reset – acts as the External Timer Reset for any timer channel that has been
programmed to be reset externally.
Total Rst: Totalizer Reset - acts as the External Totalizer Reset for any totalizer channel that has been
programmed to be reset externally.
Count Rst: Pulse Count Reset – acts as the External Pulse Count Reset for any Pulse count channel
that has been programmed to be reset externally
Record: Record enable – will cause the recorder to start recording as long as the external input is active
provided the record setup has been programmed to enable this function.
Report: Print Report – will cause a status report
MinMaxAvg: Min, Max, Avg (Average) Reset – acts as the External Min, Max, Avg Reset for any
calculated channel that has been programmed to be reset externally.
Status: Shows the current real time status of the digital inputs. If the status box is green, that input is not
active. If the status box is red, that input is currently active. If the status box is amber, that input is not
available.
Event Message: Enter the event message that will be printed in the alarm event log (and the recorded file if
enabled) in this Box. The message may be up to 20 characters in length.
I. Page 68 1/06/2012 REV 1.10.2
Page 77

Section 5 – Recorder Setup
Master Enable: When checked this allows external events to be recognized by the system. When unchecked
ALL external events are ignored. This allows setup without the possibility of an external event triggering the
system unexpectedly. It can also disable external events temporarily without having to reprogram inputs.
Print on Demand: This button brings up the channel selector which allows selection of which
channels will have a status printout when the input is active. The printout is serial ASCII and
outputs through the (optional) serial port only. It can be used to communicated with a remote controller or
print to a serial printer.
This space intentionall left blank
I. Page 69 1/06/2012 REV 1.10.2
Page 78

Section 5 – Recorder Setup
Record Now - Start Recording immediately
Record Arm - Enable recording when any trigger condition is true.
Record Setup – Setup record parameters as shown below.
Cancel – Exits back to the Utility Setup Menu
Figure 5.6.1 Record Setup
5.6 Record Setup
There are several ways to start a recording. The recording can be started manually by the user, by an external
event, by an alarm event or on a time schedule. Each of these methods has to be enabled in the record setup as
well as at the source (Digital Input Setup or Alarm Setup).
The record status is indicated by an icon on the extreme right of the Task Bar as shown below:
The recorder is currently not recording and is not set to trigger.
The recorder is currently recording. This icon will blink slowly.
The recorder is armed but is not actually recording. It will start recording when an event takes place.
To access the Record Setup dialog window press the Utility Setup Menu icon on the bottom left of the
Task Bar.
If the Record Setup icon has a red circle in the bottom left hand corner (as
shown left), the recorder is currently in record mode and the Record Setup
window is not available. Instead if this button is pressed the recorder will pop up
a dialog box asking if you want to stop recording.
If the recorder is not currently recording, the Record Setup icon will have a green
circle in the bottom left hand corner (as shown left). When this icon is pressed a
Record dialog box will pop-up (shown right). The options are:
Note: If recording has not been set up you cannot start to
record. If the unit is recording, the dialog box will require that
you stop recording. Access to the Record Setup menu
requires log in if access protection is enabled.
The Record Setup dialog window (as shown right) contains a
lot of options that need to be set. This includes which
channels to record, what to record, the record sample rate,
the file name and location, and what events will start
recording.
There are two pages of record setup parameters. The
second page is accessed by clicking the setup button above
the accept button
I. Page 70 1/06/2012 REV 1.10.2
Page 79

Section 5 – Recorder Setup
Figure 5.6.2 Record Setup - Max Min Avg
5.6.1 Select Channels
To select which channels to record simply check them at the top of the window. The channels are numbered
1 through 18. In the screen shown Channels 1 through 8 will be recorded.
5.6.2 Media and Filename
Media: Select the media and file name to record to. Choices are:
CF Card which is the Compact Flash card and is the recommended removable
media.
Internal Memory is the optional internal Secure Digital Card. It is effectively non
removable.
USB HD and USB HD2 are the USB Hard Drives (Thumb Drives or USB Flash Drives) either in the front
behind the media door (USB HD) or at the rear (USB HD2) – the rear USB socket requires mechanical
selection. If the media chosen is not available an error message will pop-up indicating “Media not
Present”. Once available media has been selected the amount of available free space will be indicated
below the Media selection drop down box as Space: NNN Mb where NNN is the actual amount of free
space on the selected storage media.
FileName: Enter a file name or select an existing file to append to. Files have the file type of .dat which will be
automatically appended if not entered. Clicking the FileName window will bring up the File Dialog for the
media chosen. Note that the filename entered will actually create a session folder and all related files will be
stored in this folder (sub files created by file break up, captured screens).
5.6.3 Record Rate
Select the sample rate using the Hours, Minutes and Seconds drop
down lists. The fastest sample rate is 10 times a second (0,1 seconds),
the slowest rate is once a day. The example here shows a sample
interval of once per minute. Note: file size is proportional to sample rate – the faster the sample rate the
bigger the file.
5.6.4 What to Record
Select what to record and how – Points is the actual data, check the box to record
the actual point data. Alarms will record all alarm conditions and Events are nonalarm activities such as Record Start time. Check the box alongside each item you
want recorded onto the media.
5.6.4.1 Point type – Max Min Average.
The point type allows the user to set up how each point is recorded – maximum, minimum,
average or instantaneous (default). Click the min/max button to go to the next page.
Each point enabled to record will be shown with a drop down menu alongside. To record
anything other than the instantaneous value choose the following from the drop down list.
INST. = Instantaneous – save the data as it is read at
the record interval
MIN. Minimum - will monitor the minimum (lowest)
of all samples at 10/samples/sec and record the
minimum value over the record rate interval.
MAX. Maximum – will monitor the maximum
(highest) of all samples at 10/samples/sec and record
the maximum value over the record rate interval.
AVG. Average – will perform a weighted average on
all samples at 10 samples/sec and average them as
(last value + current value)/2. Note – you can use the
Filter on each channel to provide additional averaging.
I. Page 71 1/06/2012 REV 1.10.2
Page 80

Section 5 – Recorder Setup
Figure 5.6.2 - Record Setup Page 2
5.6.5 Timed Record
The unit can be set to start recording at a specific time and
date and stop recording at a specific time and date. To do this
check the Start Time checkbox and set the Date and Time
below it. If only the Start Time is checked this will act like a
delayed record start. If you want the recording to stop at a
specific time and date check the Stop Time check box and set the Date and Time below it. Note that the stop
time needs to be greater than the start time and the start time needs to be greater than the current time. If
you want the recording to start and stop on a daily basis check the Daily checkbox and the stop and start
time dates will be ignored and the unit will start and stop recording every day at the specified times .
There are more setup options on the second setup page accessed via the setup button.
5.6.6 Split Files
This option allows the user to split recorded data files
automatically into a sequence of smaller files. Files can be
split into 1 to 24 hour segments. At
each time point the current data file
is closed and a new file is opened. A
date time stamp is appended to the file name. This way
smaller files can be quickly downloaded (over the Ethernet)
or uploaded to the FTP Server if required. Select the split
files time from the drop down menu from 1 to 24 hours.
To disable Split Files – select NEVER.
5.6.7 Triggered Record
There are various options that will start a recording, other than manually by the operator. The alarm triggered
events are listed below. In order to enable these events three steps are required.
Enable the event in this Record Setup dialog.
1. Set up the record trigger sources – alarms or digital inputs (External Trigger), in their respective setup
dialogs, or time in this dialog.
2. Arm the record mode by pressing the Record Setup icon (shown right) from the Utility Setup
Menu.
3. Then press Record Arm on the pop-up window.
Alm Trig: This is the Alarm Trigger Record enable. If this box is checked, any
alarm that has been set up to start recording in an alarm condition (alarm
record checkbox checked) will activate recording when the recording is armed
and the alarm record checkbox is check and the alarm is active. Once recording starts the minimum record
time will be the duration of the alarm condition plus thirty seconds. The Alarm must be set up appropriately.
Ext Trig: This is the External Trigger Record enable. If this box is checked, any external input that has been
set up to start recording (input defined as record) will activate recording when the recording is armed and the
input has been defined as record and the digital input is active. Once recording starts the minimum record
time will be thirty seconds or the duration of the alarm condition whichever is greater.
Once set up do not forget to Arm the recorder. Do not simply start recording as this will override any triggered
settings.
I. Page 72 1/06/2012 REV 1.10.2
Page 81

Section 5 – Recorder Setup
5.6.8 Media Alarm
The media alarm can be used to alert the user that the
media is nearing capacity and needs to be exchanged.
The alarm needs to be setup before the enable
checkbox is checked. The setup of the media alarms is
similar to the setup for any alarm.
Enable Checkbox: If checked the media alarm is
enabled; if unchecked the alarm is disabled. Note: to ensure that the media alarm will activate it is necessary
to check the Master Enable in the Alarm Master setup.
Notify Checkbox: If checked the system will attempt to send an email about this alarm condition provided the
email is correctly setup.
Setpoint: Alarm when Media is XX % full. This is the value in percent full at which the alarm will activate.
Select a value from the pull down menu from 60 to 100%.
Event Message: Enter a message in the entry box (up to a maximum of 20 characters) which will be
appended to the alarm/event log message if the Print check box is checked. This message will also be
appended to the email if the notify box is checked (see above).
Audio File: The recorder can play a .wav file (PCM type only) instead of the standard alarm sound. These
audio files must be saved in the system internal memory (SD Card). The drop down box shows available files.
Select the file to be played or leave blank to use the default sound.
Contact: This is the relay output contact that will be activated when the alarm is true. You need to have an
optional digital IO board in the system which needs to be set up correctly. The
contact has to be enabled. If no contact output is required, set this to None. If you
need to set up the contact, press the Setup button alongside the contact
number to get to the digital output setup window.
Use the Accept or Cancel button to Return as required.
I. Page 73 1/06/2012 REV 1.10.2
Page 82

Section 5 – Recorder Setup
Fig 5.7 – System Admin Menu
5.7 System Administrative Menu
The Administrative Menu is entered from the Utility Setup Menu by pressing the icon shown at the
right. This is a privileged option and will pop-up a new set of icons as shown below:
The icons have the following functions:
Exit – Return to Utility Setup Menu
Analog Calibration – Allows the administrator to perform calibration on the analog inputs.
Calibration will affect the performance of the recorder if not done properly. See Section 6.3 for
details
Temperature Compensation – Allows the Administrator to adjust thermocouple ambient
temperature compensation. Details Here
Touch Screen Calibration – Allows the administrator to calibrate the touch screen. Tap the “X” until
it disappears then tap anywhere on the screen to exit.
System Setup – Allows the administrator to set up system parameters such as device name and
email information. Details Here
Date / Time Setup – Allows the administrator to set the unit’s date and time parameters. Details Here
User Administration – Allows the administrator to add or remove users, assign passwords, set
timeouts and expiration dates and set user privileges. Details Here
File Explorer – Allows the administrator to move, copy, or rename files. User can move files from
compact flash to USB drive for example. Manager/Admin only. Details Here
Ethernet IP Address Setup – Allows the administrator to set the Units IP address. Detail Here
Web User Management – Allows the administrator to add or remove web users. Details Here
Email/FTP Setup – Allows the administrator to set up email/FTP parameters. Details Here
I. Page 74 1/06/2012 REV 1.10.2
Page 83

Section 5 – Recorder Setup
Set ActiveSync Password – Allows the administrator to set the password for USB connection via
ActiveSync. Detail Here
System Activity Logs Archive – Allows the Administrator to archive or delete system activity logs.
Details Here
Save or Clear Registry – Allows the administrator to save or clear the system registry. Details Here
Load Language - Allows the administrator to load alternate languages provided the language files
are available. Details Here
Reflash Firmware – Allows the system firmware to be updated. This is potentially destructive
operation if the procedure is not followed properly. Details Here
I. Page 75 1/06/2012 REV 1.10.2
Page 84

Section 5 – Recorder Setup
Fig 5.7.2.1 – System Setup
5.7.1 Temperature Compensation
This is the Ambient Temperature Compensation adjust and is used to compensate for
adverse environments when using thermocouples. This feature is entered from the system
admin menu by pressing the icon shown right.
At the terminal blocks where the thermocouples connect to the recorder there is a new thermocouple junction
introduced which can affect the reading. There is a sensor there measuring the ambient temperature at the
terminals and is used to compensate for any offset that may result. In certain circumstances the ambient
temperature may not be able to adequately compensate for external temperatures resulting in an error in the
readings.
Selecting this option from the menu will pop up the Ambient Temp
Compensation box shown right. This box can be moved by tapping and
holding the blue bar while dragging the window. The user can view the
live thermocouple data while adjusting the compensation and can see
the actual compensation value in the box below the Deg-F checkbox.
Use the Offset dropdown box to adjust the reading by up to +3 degrees
in 0.5° increments in either Centigrade if the Deg. F checkbox is unchecked or Fahrenheit if the Deg. F
checkbox is checked.
Update button - make the adjustment.
Done button - exits the window.
5.7.2 System Setup
The System Setup allows the administrator to adjust some basic settings of the unit like Unit Tag.
This feature is entered from the system admin menu by pressing the icon shown right. This will
bring up the System Setup dialog box.
The options are as follows:
5.7.2.1 Mouse Pointer
Check this Enable checkbox if you plan on using an
external mouse or other pointing device. This will
keep the mouse pointer or cursor visible at all
times. Note: This setting only takes effect AFTER
you power down the unit and restart it.
5.7.2.2 Config Auto Save
Check this Enable checkbox to have the
Configuration file saved automatically each time a
change is made to the unit configuration. If you are
setting the system up for the first time you can
disable this feature by unchecking this box so the
process is a little quicker, however DO NOT
FORGET TO SAVE THE CONFIGURATION using
the Quick Save button in the Utility Setup Menu.
5.7.2.3 Pop up Keyboard
Check this enable checkbox to have the keyboard pop up when selecting options that require data entry.
Uncheck this box if using an external (USB or PS2) keyboard
I. Page 76 1/06/2012 REV 1.10.2
Page 85

Section 5 – Recorder Setup
5.7.2.4 FTP Server Enable
Check this checkbox to allow the use of FTP (File transfer) remotely. Uncheck this box to disable the use
of remote FTP for security reasons
5.7.2.5 Modbus Settings
This is only applicable if the serial port option is installed in the unit or if Modbus
does not imply that 255 units can be on line at a time. The limit is usually 32 to 64 for serial connection.
The Baud Rate is the serial communication speed which must match that of the host controller. This can
be set from 9600 to 115200 baud. The ID and baud rate do not affect the Modbus TCP – Ethernet –
connection. The timeout is the amount of time the device will wait before disconnecting and releasing the
line. It should be set for 2 to 5 seconds
5.7.2.6 NTP Time Server
Note that you DO NOT NEED to use this unless you want to synchronize a number of units spread about
on different networks. The unit will connect and synchronize to any network server it finds on the Ethernet
at startup time.
TCP is to be used. Modbus is a communication protocol which runs over RS232
(single unit), RS485 (multiple units) or Ethernet TCP. The ID uniquely identifies the
device in a multidrop environment and can be set from 1 to 255. Note that this
NTP is Network Time Protocol. The Recorder has the ability to go out over the
internet and get a time update from one of several NTP time servers if the Time
Server Checkbox is checked.
There needs to be a valid IP address for NTP to work in the IP entry box. A list of NIST Internet Time
Servers can be found at (among others) http://tf.nist.gov/service/time-servers.html . If the Time Server
Enable box is checked the unit will synchronize its time at startup and every 12 hours thereafter. Note:
The NTP setting is only recognized at start up. It is necessary to Save the Configuration and restart the
unit (you can, with caution use the reset button.)
5.7.2.7 Unit Tag
The Unit Tag identifies the recorder. It appears in the task bar and all data files. Enter up to 22
characters. The unit tag is “Process Recorder” in the figure above.
5.7.2.8 Menu Timeout
The Menu Timeout sets the time in seconds after which any menu visible on the screen will collapse and
the display will revert back to the live display. Select 60 to 300 seconds from the dropdown box.
5.7.2.9 50/60 Hz Filter
In noisy environments the AC mains frequency interference can affect the readings on the most sensitive
(millivolt) ranges when running at sample rates asynchronous to the AC mains frequency. If the sample
rate can be made to run synchronously with the AC mains frequency, the noise effect of that frequency is
minimized because the recorder has differential inputs and samples at the same place on AC wave for
every sample. This does however place a limit on what the sample rates can be. The common
denominator for 50 and 60 Hz is a sample rate of 16.66 samples per second to eliminate the AC hum.
This means that the fastest sample rate to meet this requirement is around 1.5 to 2.2 samples per second
depending on the number of analog input channels in the recorder. Checking the box will activate the filter
but will limit the maximum sample rate irrespective of what is selected elsewhere. This is usually not an
issue for thermocouples and RTDs which are typically the most affected by AC noise.
I. Page 77 1/06/2012 REV 1.10.2
Page 86

Section 5 – Recorder Setup
Fig 5.7.3.1 – Date / Time Format
Fig 5.7.2.8 – System Alarm Setup
5.7.2.10 System Alarm Setup
The System Alarm Setup allows the user to enable certain system parameters to generate an
alarm condition. To access the submenu click the button shown right.
This will bring up the System Alarm Setup Dialog box
shown right. There are several options that can be
checked, each can have a relay contact associated with it
(requires the Relay option), selected from the drop down
selection menu alongside the alarm condition. The
following system items can be checked to enable an
alarm.
Analog Board Fail – the unit can no longer take readings.
Resource Level Too High – could result in missing data
Security Alert – unauthorized access attempted
FTP Error – unit could not access a remote FTP server
Power Fail – AC mains fails
E-mail Fail – unit is unable to send email
If the “Send E-mail Alert” box is checked the unit will attempt to send an email on any checked alarm
condition.
Once the changes have been made press the accept button to exit or the cancel button
to quit without saving the changes.
5.7.3 Date/Time Setting
Tapping the Date/Time icon shown left will bring up the Date/Time dialog. Here the user can set
the current Date, Time and Time Zone as well as the date format
There are two parts to setting the time and date. The first
window allows changing the date format and time indication.
To set the actual time and date press the Date/Time icon that
appears on the top left of the first window.
Date Format: Select the required date format from the pull
down menu – mm/dd/yyyy, dd/mm/yyyy or dd month, year.
The time can be shown in 12 or 24 hour (military) formats.
Check the 24 Hour Format check box for 24 hour format;
uncheck it for 12 hour format.
Note: If DHCP is selected and a time server is available the
unit will get the current time from the network on start up or first
connection to the network. Similarly if the NTP server option is
set it will override the date time settings
To change the time, time zone, date or daylight savings time (DST) click the Date/Time icon
This will bring up the Date/Time window shown below right or to exit at this point press the accept button
to exit or the cancel button to quit without saving the changes.
I. Page 78 1/06/2012 REV 1.10.2
Page 87

Section 5 – Recorder Setup
Fig 5.7.3.2 – Date / Time Setup
Time: To change the time – tap on the hour, min, secs
accordingly then adjust using the up and down arrow keys.
Daylight Savings: To enable daylight savings (USA) check
the daylight savings box
Date: To change the date – select the date on the calendar.
Use the left or right arrows to change the month.
Alternatively by tapping the month a menu will pop up
allowing the month to be selected. If you tap the year as set
of up/down arrows will appear to allow the year to be set.
Time Zone: Select the time zone by tapping the drop down
menu button and selecting the time zone you are in.
Once the time and date have been set tap the APPLY button
then tap the OK button. To simply cancel any settings tap the
X button. This will take you back to the previous menu.
Once the changes have been made press the accept button to exit or the cancel button to
quit without saving the changes.
I. Page 79 1/06/2012 REV 1.10.2
Page 88

Section 5 – Recorder Setup
Fig 5.7.4 - USER SETUP
5.7.4 User Setup (Password Management)
The recorder can be protected by various levels of passwords. If password protection is not enabled, the user
can move about freely without having to enter user names or passwords. If passwords are enabled the
recorder has three levels of protection:
Administrator: Has access to all levels of the recorder menus and systems.
Manager: Has restricted access. A Manager cannot set up any base level parameters, but can use
existing setups to create alarms, displays and the like.
User: Can use the recorder only as set up by the Administrator or Manager. Cannot change
any parameters. Needs to log in to accept alarms.
The administrator can create or remove users and assign privileges, access restrictions and passwords as
needed.
The recorder user manager / password protection is managed in the User Management dialog
window entered from the system admin menu by pressing the icon shown left. If security is enabled,
only the Administrator can access this function.
The Password Management dialog window can be used
to edit existing users or create new users. Existing users
are shown in the user list.
Security Enable: If this box is checked security is
enabled and active. If unchecked, security is disabled and
passwords are not required.
User: Enter the name of a new user here. If a user is
selected from the list it will automatically populate this
window.
Active: This checkbox will enable the specified user if
checked or disable the user if unchecked.
Level: This drop down box sets the user access level to User, Manager or Administrator. See descriptions of
user level above.
Auto Logout: This drop down box enables an auto logout time to be set from 0 (never) to 30 minutes. If a
time is selected, this user will be automatically logged out of the system after the specified time of inactivity.
This is a security measure to prevent leaving the recorder open if a user forgets to log out.
Expires: Set a date on which this user’s privileges expire. After this date the administrator will have to renew
the expiry date.
Old Password: In order to change a password the original (or old) password must be entered here.
Password: Enter the user’s password here. It can be any combination of characters and is case sensitive. If
a user is selected from the user list this box will be automatically populated.
Add: Once user, password, and other parameters are entered this button will ADD the user to the
list. The user will be prompted to re-enter the password to accept the entry.
Update: Select a user from the list, make any changes required and press UPDATE to modify the
user. The user will be prompted to re-enter the password to accept the entry if the password was
changed
I. Page 80 1/06/2012 REV 1.10.2
Page 89

Section 5 – Recorder Setup
Delete: Select a user from the list and press DELETE to remove the user permanently.
OK: Accepts the changes and exits.
Cancel: Exits the dialog without making changes.
5.7.5 System Activity Logs
This feature allows the user to export the internal system activity
logs to removable media for archiving for analysis purposes or
delete them to clean up the system.
From the Admin menu tap the System Activity Log
Archive button shown here.
Activity Log Enable – when this box is checked the unit will
track all activity that takes place in the recorder, whether directly
from the front panel or remotely over the Ethernet
There are four files/folders that can be exported or deleted:
Alarm, Event and Activity logs are described in Section 4.3
above. Activity Data is the configuration files that are generated
when a user logs in or out and are used to track changes made
to the system configuration.
To erase the logs, select those you wish to erase by checking the boxes alongside them and
press the erase button shown right.
Fig 5.7.5.1 – System Activity Logs
Caution: This process is permanent. Always save the files to removable media before erasing if you require
this information.
To export/save the logs check the boxes alongside the files you wish to export/save and press
the save file button shown right. This will bring up the Log File Save dialog window shown
below.
Media – Use this dropdown menu to select the desired
destination media.
Folder - Choose an existing folder or name a new one in this
text box. Note you will be creating a folder into which all the
files/folder you selected will be saved.
OK: Saves the files/folder and exits. When the save
is complete a popup box will appear. Select OK
Cancel: Exits the dialog without saving.
Fig 5.7.5.2 – Log File Save
I. Page 81 1/06/2012 REV 1.10.2
Page 90

Section 5 – Recorder Setup
Fig 5.7.7 – Network IP Address
Figure 5.7.6 - File Explorer
5.7.6 File Explorer
The File Explorer is similar to the Windows explorer and is used for browsing the files on the
recorder. The File Explorer is accessed via the System Admin Menu by pressing the
Explorer icon shown right. Tap the icon - this will bring up a small popup window
shown left. If you need a keypad (eg if you plan to rename a file) press the keypad button then
Continue, otherwise just press continue. This will bring up the browser screen shown below. Note
the screen you see may differ depending on how you have selected the View.
The window shows all folders and media devices in the
recorder. The internal memory is the SD Card. There may
also be icons for the USB HD (Hard Drive) or the CF Card.
Note: Do not move or delete any system files or
folders as this will affect the recorder operation.
System files will be restored on system reset. To navigate
to the next level double tap the icon to access that folder
or device.
Use the View menu to select how the folders are
presented. You can choose large or small icons or a file
list with details. (Large icon view shown)
Use the scroll bars to move about the list if it should
exceed the size of the window.
Files can be copied (from Compact Flash to USB for
example) by selecting (tapping) the file and using the Edit
menu to Copy it then navigate to the destination and use the Edit menu to Paste it. Always select (tap) the
file before using the menus to perform a function.
Note: To rename files you need an external (USB or PS2) keyboard connected to the recorder.
When the operations are complete, tap the cancel icon [X] in the top right corner to exit.
5.7.7 Network Settings
Tapping the Ethernet IP Address Setting icon
in the System Admin Menu (left) will bring up
the Network IP Address dialog window.
If you wish to specify an IP address, enter the
information in the IP, Subnet, Gateway, WINS, DNS and
Domain text boxes. Check with your IT person if you are
unsure what to enter here. WINS and DNS are required
in order to effectively send email from the recorder.
Alternatively you can select the “Use DHCP” check box.
This allows the network server to automatically assign a
free IP address to the recorder and all the necessary
network information.
Note: If DHCP is checked the recorder will get the time
from the network time server on start up (or upon
connection) irrespective of what the unit’s current time is set to.
The units actual IP address, whether user specified or server assigned can be checked in the System
Information window.
I. Page 82 1/06/2012 REV 1.10.2
Page 91
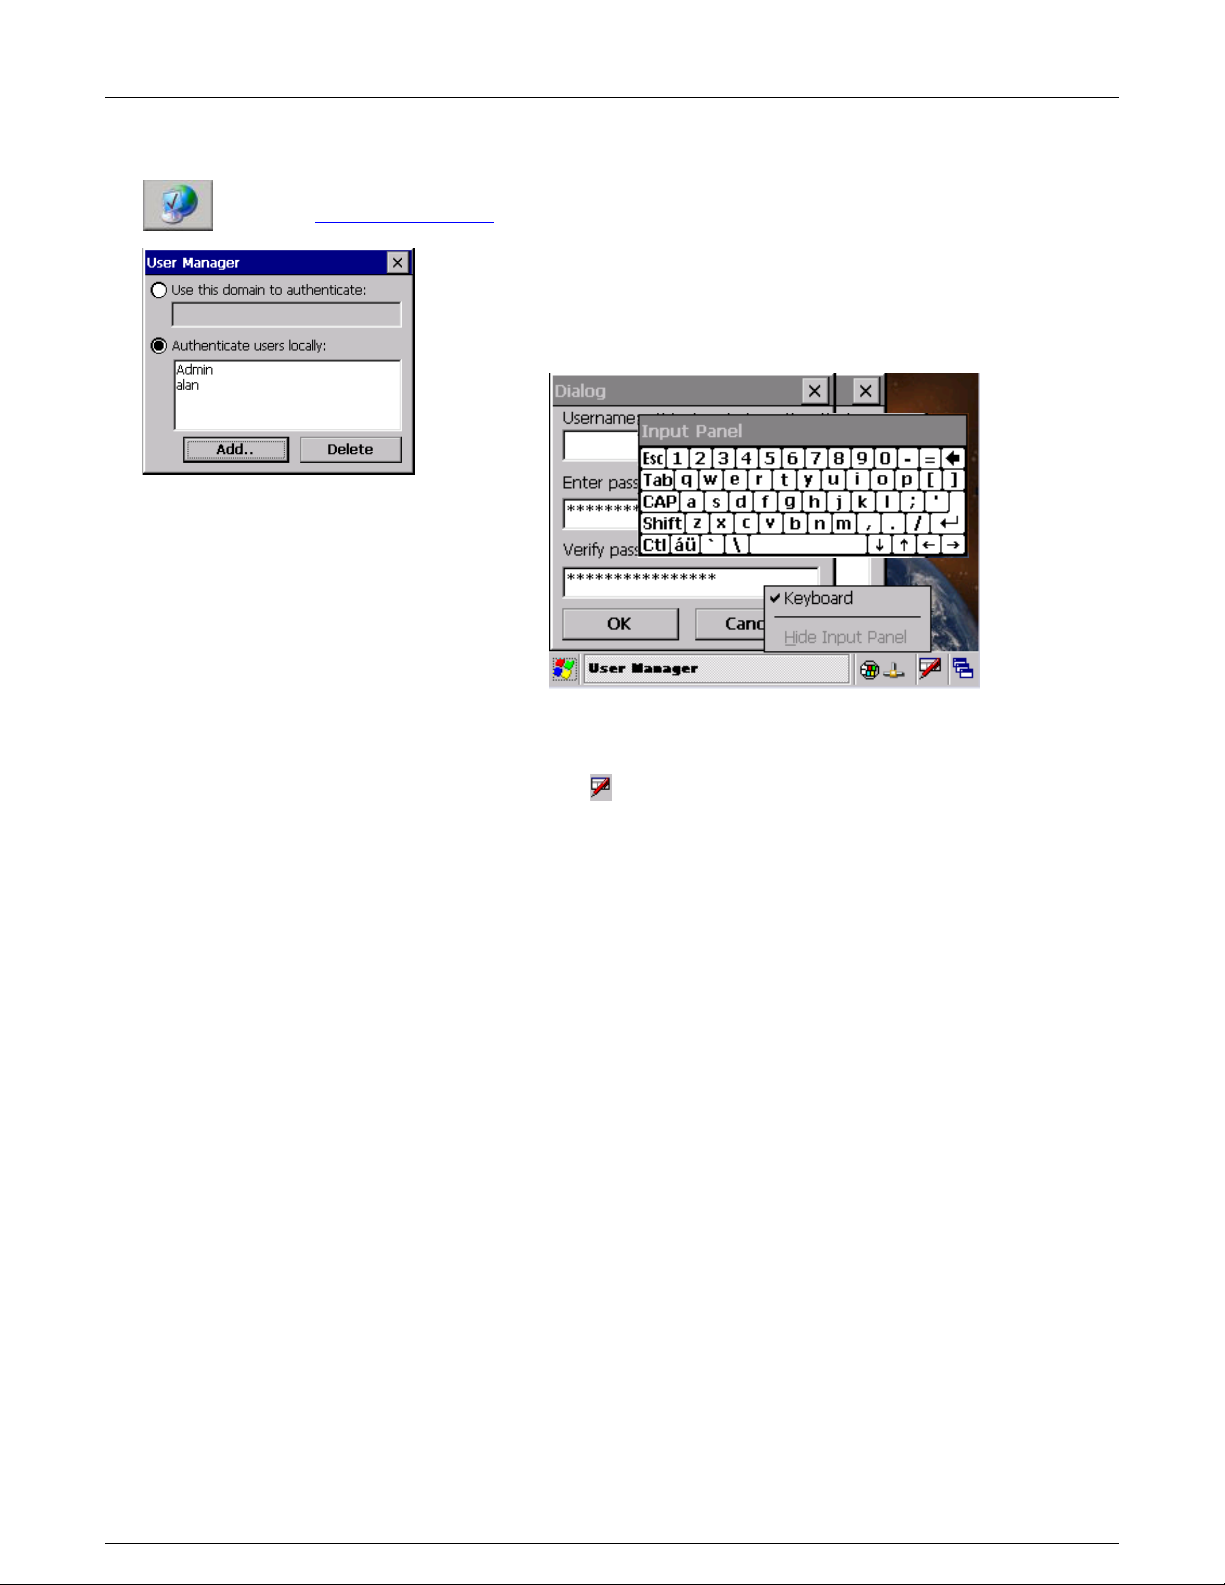
Section 5 – Recorder Setup
Fig 5.7.8 – Web User Admin
5.7.8 Web User Manager
This allows the administrator to add users for web access (via a browser). This feature is entered
from the system admin menu by pressing the icon shown right
The User Manager pop up dialog appears as shown left. As a minimum there
needs to be a user named Admin for remote administration. Add remote
users as needed by selecting “Authenticate users locally” and tapping the
Add button. This will pop up a Dialog box shown below where you can enter
Username and Passwords.
If there is no keyboard it needs to be launched manually. Do this by tapping the very bottom of the screen
which will bring up the Task Bar. Tap the
keyboard icon and then tap the Keyboard menu item
as shown above.
You will have to drag the keyboard around (By dragging the Input Panel header area. Enter the user name
and password (repeat in Verify password) as requested and tap the OK button.
It is necessary to remove the keyboard before exiting. Tap the bottom of the screen once more to bring up
the task bar. Tap the keyboard icon then “Hide Input Panel”.
Due to the small screen size you will need to drag the keyboard around to enable you to enter all the data
needed.
Once completed, exit the User Manager by tapping the [X] in the top right corner.
I. Page 83 1/06/2012 REV 1.10.2
Page 92

Section 5 – Recorder Setup
Figure 5.7.9-1 Email Setup
Figure 5.7.9-2 FTP Remote setup
5.7.9 Email / FTP Settings
This allows the administrator to set up the
email and ftp (remote server) parameters. This
feature is entered from the system admin menu
by pressing the icon shown left
In order to send email you need to have a To and From email
address and an SMTP Server address, User name and
password. SMTP is Simple Mail Transfer Protocol and is the
standard for email transmission across the Internet. The
defaults for emails are set here as follows:
From: The default name that will appear in the “From” field of
the email that is sent. It needs to be a real email address.
To: The default address of the recipient that the email will be
sent to.
SMTP IP address: This is the address of the SMTP mail
server that the email will be sent to so that it can be rerouted to the recipient. It can be an address like
192.168.0.104 or it can be the name of the server. Example of this would be smtp.gmail.com or
smtp.yahoo.com. Note: If the network connection is not set for DHTML then only numeric IP Addresses will
work.
SMTP user id: This is the user id needed to authenticate to the mail server. (your mail server login name)
SMTP password: This is the user password needed to authenticate to the mail server
OK: Accept changes and exit.
Cancel: Exits the dialog without saving.
5.7.9.1 FTP Remote Setup
The recorder can be set to upload files to a remote FTP server either on
demand or at user preset intervals. In order to do this the FTP Remote
must be set up and the Ftp Client must be enabled by checking the box.
To set up the FTP Remote press the Setup button.
Access to the FTP Server needs to be set up using a
Logon ID and Password and the IP Address of the
server needs to be entered in the FTP Server IP text
box in the format 123.456.789.012. This is the IP
address of the host machine on which the FTP server
is running. The connection can be checked by
pressing the Test button. If ok you will get an “Ftp Log
In Successful” message.
The update times need to be set and the files to be
uploaded need to be checked - Log Files and/or
Config Files.
Select whether the files are to be uploaded Daily or
Weekly. From the drop down menus select the Day for
weekly upload and the Time of day. The Log Files and
Configuration files can be sent by checking the
respective boxes. Data files are sent using the split files options.
Clear after backup: Check this box to delete the files from the recorder once they have been backed up
to the FTP server
I. Page 84 1/06/2012 REV 1.10.2
Page 93

Section 5 – Recorder Setup
Fig 5.7.9 – USB ActiveSync Password
Figure 5.7.9-3 FTP File Transfer List
Enable Data File backup when split: Check this box to send split files to the FTP server. The upload
times are set by the File Split option in the Record Setup menu. As each split file is closed it is uploaded
to the FTP server and the prior file is deleted if the clear after backup box is checked.
Press the Send Files button to select files to manually upload. This will bring up the file selection
dialog box. Use this to select which files to upload (now) to the FTP Server.
Files need to be added to list to be uploaded to the
server. Files are added one at a time.
Remove File from List – select file by cliking on it
then press this button to remove it from the list.
Remove all Files from List
Add files to the list. Press this button to browse
and select files to add to the upload list.
Upload files. Press this button to send the files to
the FTP server.
Once the files have been uploaded press the accept
button to exit or the cancel button to quit
at any time without sending the files.
5.7.10 Set ActiveSync Password
This allows the administrator to set up the password for allowing PC to USB on the recorder,
connection via Activesync. This feature is entered from the system admin menu by pressing the icon
shown right
The unit can be synched to a PC via the USB B Slave port
using ActiveSync – see Communications. There is no
username, but a password needs to be entered in order to
make the connection. Enter the password in the location
shown here and check the Enable checkbox.
Once the changes have been made press the accept
button to exit or the cancel button to quit
without saving the changes.
Note: These changes will be in effect the next time you
restart the unit. It is necessary to Save the Configuration
and restart the unit (you can, with caution use the reset
button.)
I. Page 85 1/06/2012 REV 1.10.2
Page 94

Section 5 – Recorder Setup
Figure 5.7.11 – Language Screen
5.7.11 Registry
The Registry option allows the user to clear or save the registry. The Registry holds system base
setup values not in the configuration file and needs to be saved if system setup changes have
been made – for example recalibrating the stylus, or may need to be cleared if upgrading the
firmware. This feature is entered from the system admin menu by pressing the icon shown right.
This will bring up the dialog box shown on the left. The user has three choices. The top button
will save the registry settings to system nonvolatile memory. The middle button will clear the
registry and set it to factory default values – Note: Do not clear the registry unless required
to do so by a system firmware upgrade. The lower button allows the user to exit without
affecting the Registry.
5.7.12 Languages
The languages option allows the users to customize the unit language for the local country by
loading preconfigured language files. This
feature is entered from the system admin menu
by pressing the icon shown right.
This will bring up the language dialog screen. NOTE:
Loading a new language will unload the existing
configuration file.
Select the pull down menu to display a list of available
languages. The recorder will check the internal memory for
the language file. The user needs to load the language file
“MultiLanguage.CSV” onto the root of the internal memory
card. This is a spreadsheet style file with English in the first
column and alternative languages in subsequent columns. It
is (and needs to be) in Comma Separated Variable format.
This language file can be edited using a standard spreadsheet editor such as ExcelTM and any language can
be added following a simple set of rules – See Appendix C
Note: Save the file as .CSV and NOT .XLS format.
Select the language of choice and press the okay button. The recorder will change to the new
language on the fly. The default language is English.
5.7.13 System ReFlash
This option allows the administrator to upgrade the system firmware. Once started this operation
cannot be reversed. Choosing to proceed will require a system reset even if you cancel the
operation.
DO NOT RESET the unit, DO NOT REMOVE POWER and DO NOT PRESS THE ABORT BUTTON while
this operation is in process as it WILL MAKE THE UNIT INOPERABLE.
Before proceeding you need the image file that will be loaded. This file is called NK.bin and is
available from your service center or can be downloaded from the web. Ensure that you need to
update the firmware; often firmware upgrades will involve clearing the Registry,
new configuration and language files. Read the text file that accompanies any
firmware upgrade release. Load the file (NK.bin) onto removable media – compact
flash drive or USB thumb drive, and insert this into the recorder before starting this
procedure.
Select the reflash icon shown left from the System Admin Menu. Read and accept the
warning notice shown right and proceed with caution.
You then need to accept or skip erasing the registry – this information will be in the release notes with the
firmware. In some instances, failure to erase the registry will cause the unit to malfunction after reflash.
I. Page 86 1/06/2012 REV 1.10.2
Page 95

Section 5 – Recorder Setup
Figure 5.7.12 – Reflash File Dialog
Once beyond this step the file dialog box shown below right will appear.
Select the media from the Media dropdown box.
Note that CF Card is the compact flash card - USB
HD is the front USB port - USB HD2 is the rear USB
port and Internal is the system memory AND
SHOULD NOT BE USED TO REFLASH the unit.
Browse to the file NK.BIN that you previously loaded
onto a USB Drive or Compact Flash card and select
it or enter the name into the FileName space.
Press the Accept Button This will replace the
entire contents of non-volatile memory with a new
image. This is equivalent to formatting the hard drive
on your PC and reinstalling everything. DO NOT
RESET and DO NOT REMOVE POWER while this
operation is in process. Once you select this
option a file browse window will pop up. Navigate to
the file NK.BIN and press okay. A window will pop
up showing the progress of a series of operations. When completed you will be required to Reset or Power
Cycle the recorder to restart the system. Remove the AC mains cable and reinsert it or push the reset button
to restart. The unit will have to then be set up from new. See Section 2.7 QUICK START GUIDE.
I. Page 87 1/06/2012 REV 1.10.2
Page 96

Section 6 - Communication
Fig 6.1.1 – Permission Box
6.0 COMMUNICATION
There are various ways to communicate remotely with the recorder. The Ethernet port can be used to communicate on
a network or via the World Wide Web (Both HTTP and FTP protocols). There are various means of doing this as
simply as using a web browser, or using third party software using either the OPC (Open Connectivity) protocol or
Modbus™ both of which are supported by the recorder. The slave USB port on the rear of the unit can be used to
communicate with a local PC using Microsoft’s ActiveSync™. An optional isolated serial port is available which
supports the RS232 and RS485 standards.
In order to run the web services you need to know the IP Address of the recorder. This will have been set in the
Network Settings and may be user assigned or assigned by the network using DHCP. To see the local IP Address use
the System Information button in the Setup menu. If the recorder is on a wide area network you will have to use this
Internet Address to access the unit.
The recorder reserves “ports” or sub-addresses which it uses for various services. Some of these are global standards
others are specifically reserved. This is important if you are going to make the unit accessible globally and have a
firewall or other router between the recorder and the outside world. Typically one would use a feature of the router
known as port forwarding, the exact method is router specific and if this is what you want to do, contact your IT
department or consult the router manual. The ports used by the recorder are as follows:
Port 21 FTP server
Port 80 HTTP Server
Port 135 DCOM TCP
Port 500-510 Various Server Functions
Each application that accesses the recorder has its own unique settings so as to not run afoul of Windows Security
settings, firewalls etc. These are dealt with below.
The available Exhibitor software is an extremely versatile program that supports the recorder and can replay recorded
data files in various formats, export to Excel™, view and save real time data, upload and download files, configure
recorders and allow the user to control all aspects of the recorder remotely.
6.1 World Wide Web
The recorder has a web server that supports both http and ftp requests. This enables a user to view the current status
of a remote recorder in real time and upload or download files using the World Wide Web and your browser (The
software is optimized for Internet ExplorerTM Version 6 or higher). In order to use this service it is necessary to enable
ActiveX on the browser and download Sun’s JavaTM Engine – the program will prompt for this.
The user needs to set up users and passwords locally at the recorder. To access the web server, any user name and
password set up in the web user manager dialog will work. To access the ftp area the user name has to be Admin
and the corresponding password as set up must be entered.
The minimum system requirements for using Browser ftp are as follows:
Operating Systems: Windows 98/2000/XP/ME, Mac OS 8.x, 9.x, 10.x,
Linux, Unix
Browser: Internet Explorer, Netscape Navigator, Opera. Mozilla, Safari,
Firefox
Browser Java VM: Java 1.1 or above
To start, open your browser and type the IP address into the address bar. If you
are asked about running active content – check the “allow blocked content” option
– this site uses ActiveX. This will bring up the permission box shown right. Enter a
valid user name and password and press OK.
If the password is correct this will bring up the live data page as shown below:
I. Page 88 1/06/2012 REV 1.10.2
Page 97

Section 6 - Communication
Figure 6.1.2 – Index Page
Figure 6.1.3 – View Recorder Page
The recorder name is shown in bold at the top of the page – “Process Recorder”. If any channel is in alarm this name
will be in red as shown, otherwise it will be in blue. Each channel data is shown as a digital panel indicator. The actual
value is shown in the center in large digits. Below this are the unit tags (in blue) and the engineering units. Above to
the right of each panel display is the physical channel number. In the event that a channel is in Alarm, this will be
shown in the upper left in large red letters as in the case of Channel 2. The live data updates every 3 to 5 seconds.
There are a number of buttons below the live data display. “Chan 7-12” and “Chan 1-12” show those channels – 7 to
12 or all channels 1 to 12. “View Recorder” shows the actual recorder display as seen at the recorder itself as shown
below. This updates every 5 seconds.
I. Page 89 1/06/2012 REV 1.10.2
Page 98

Section 6 - Communication
Figure 6.2.1 – FTP Launch Page
6.2 Web Based FTP Manager
The “File Manager” Button brings up the FTP launch
window. Note that you need internet access to run the
FTP File Manager and the Java Engine must be
present. If you are communicating through a firewall or
router Port 21 must be enabled. Click the big button to
proceed. If internet access is not available you can run
the local Recorder File Manager by clicking on the
“here” link. This is a standalone Windows only program
on the installation disk. It needs to be installed in
accordance with the instructions.
The FTP Manager is used to transfer files between your
local PC and a remote recorder. FTP is short for File
Transfer Protocol a standard for file transfer over the
internet.
If you proceed to the browser based FTP File Manager you will need to have or get the JavaTM file in order for the
program to work.
If you do not have the JavaTM program you will not see the FTP Manager but will see the Java
button. Click this to go the Java.com site and click the free download button. This may take
time depending on your connection speed.
some
Once downloaded, you may get several warning notices or
security warnings. You need to accept or run the programs in
order for the site to operate properly.
Once the program has been downloaded and installed
you should not see these messages the next time you
run the web browser.
If installed correctly or if it already exists you will see a
popup box asking for a user name and password.
Note that you need to enter the Admin password to
access the FTP File Manager as shown below.
You will always see the Java download engine loading the application before you are
asked for the password to access the recorder FTP server. Remember this is the
Admin password which may be different to the User password.
You may also need to adjust your security settings – In internet Explorer this is done
under Tools – Internet Options – Security. The setting should be “Medium”. If you are
not comfortable with this you need to use custom settings.
You may be prompted each time you access the web server to allow the content to run. Accept this and continue.
If everything is installed correctly and you enter the correct password you should see the FTP File Manager shown
below.
The FTP Manager allows for file manipulation between the local PC (computer) and the remote recorder. It functions
much like Windows ExplorerTM and allows files to be uploaded or downloaded between devices, allows files to be
renamed, moved, copied and deleted. This program limits access to the certain folders and all media in the recorder to
prevent accidental deletion of system files that could stop the recorder from operating. Proceed with CAUTION.
I. Page 90 1/06/2012 REV 1.10.2
Page 99

Section 6 - Communication
Figure 6.2.2 – FTP File Manager Page
The red numbers are used for reference purposes only and do not appear in the actual browser window. The parts of the screen are
as follows:
1. Current local directory - Displays the full path of your current local directory on your computer. It has the heading “Local File
System” . To the left is a drop down box allowing selection of local drives. To the right is the current path –
c:\my_work_files.
The icon to the right of the path is to go up in the directory tree. A single left mouse click
2. Local file listing - Displays files and child folders in your current local directory. The current active file or folder is highlighted
in blue.
3. Local toolbar - Buttons for performing actions on your local directory. Simply left click to perform the function (on the
highlighted file or folder if applicable). Functions are as shown on the buttons.
4. Current remote recorder directory - Displays the path of the current remote recorder directory. It has the IP address of the
connected recorder as heading – 192.168.1.193 in this example. The current path points to the folder /1-7-2008 on the
Compact Flash Card (CF Card). Note that the recorder has a device structure rather than drives – i.e CF Card and USB HD
rather than D: and E: . The file icon to the right of the path is to go up in the directory tree.
5. Remote file listing - Displays files and child folders on the current remote recorder directory.
6. Remote toolbar - Buttons for performing actions on your remote recorder directory. Always proceed WITH CAUTION when
making changes to the remote recorder
7. This is the pop-up windows that is activated when you right click the mouse over a file or folder item. It works on the remote
as well as the local file listings. Always proceed WITH CAUTION when making changes to the remote recorder
8. Upload / Download/Help - These buttons allow you to upload and download files or sees this help information.
9. Back – takes you back to the browser functions for live data – note the browser back button may not do this if you have been
active in the file manager. If you have a popup blocker hold the CTRL key before clicking the help button.
10. This is the connection to the Java web site to allow download of the Java Engine that runs this program. It may be the only
thing you see if Java is not installed.
activates.
I. Page 91 1/06/2012 REV 1.10.2
Page 100

Section 6 - Communication
6.3 Ethernet Protocols
6.3.1 OPC Server
The Recorder supports The OPC Standard (Open Connectivity over Open Standards). It is a standard used to
move real-time data from PLCs, DCSs, and other control devices to HMIs and other display clients.
The recorder is compliant with OPC Data Access 3.0, 2.0, and 1.0a standards and also supports OPC
Security 1.0.
The OPC standard is supported by the associated software suite available for PC which interfaces to
the recorder to provide remote real time data access as well as other third party OPC software
clients. Refer to the Exhibitor manual for details
I. Page 92 1/06/2012 REV 1.10.2
 Loading...