

Page 1
Monarch
®
1103®-1110
®
Labelers
Operating Instructions
©2007 Paxar Americas, Inc. All rights reserved.
Printed in U.S.A.
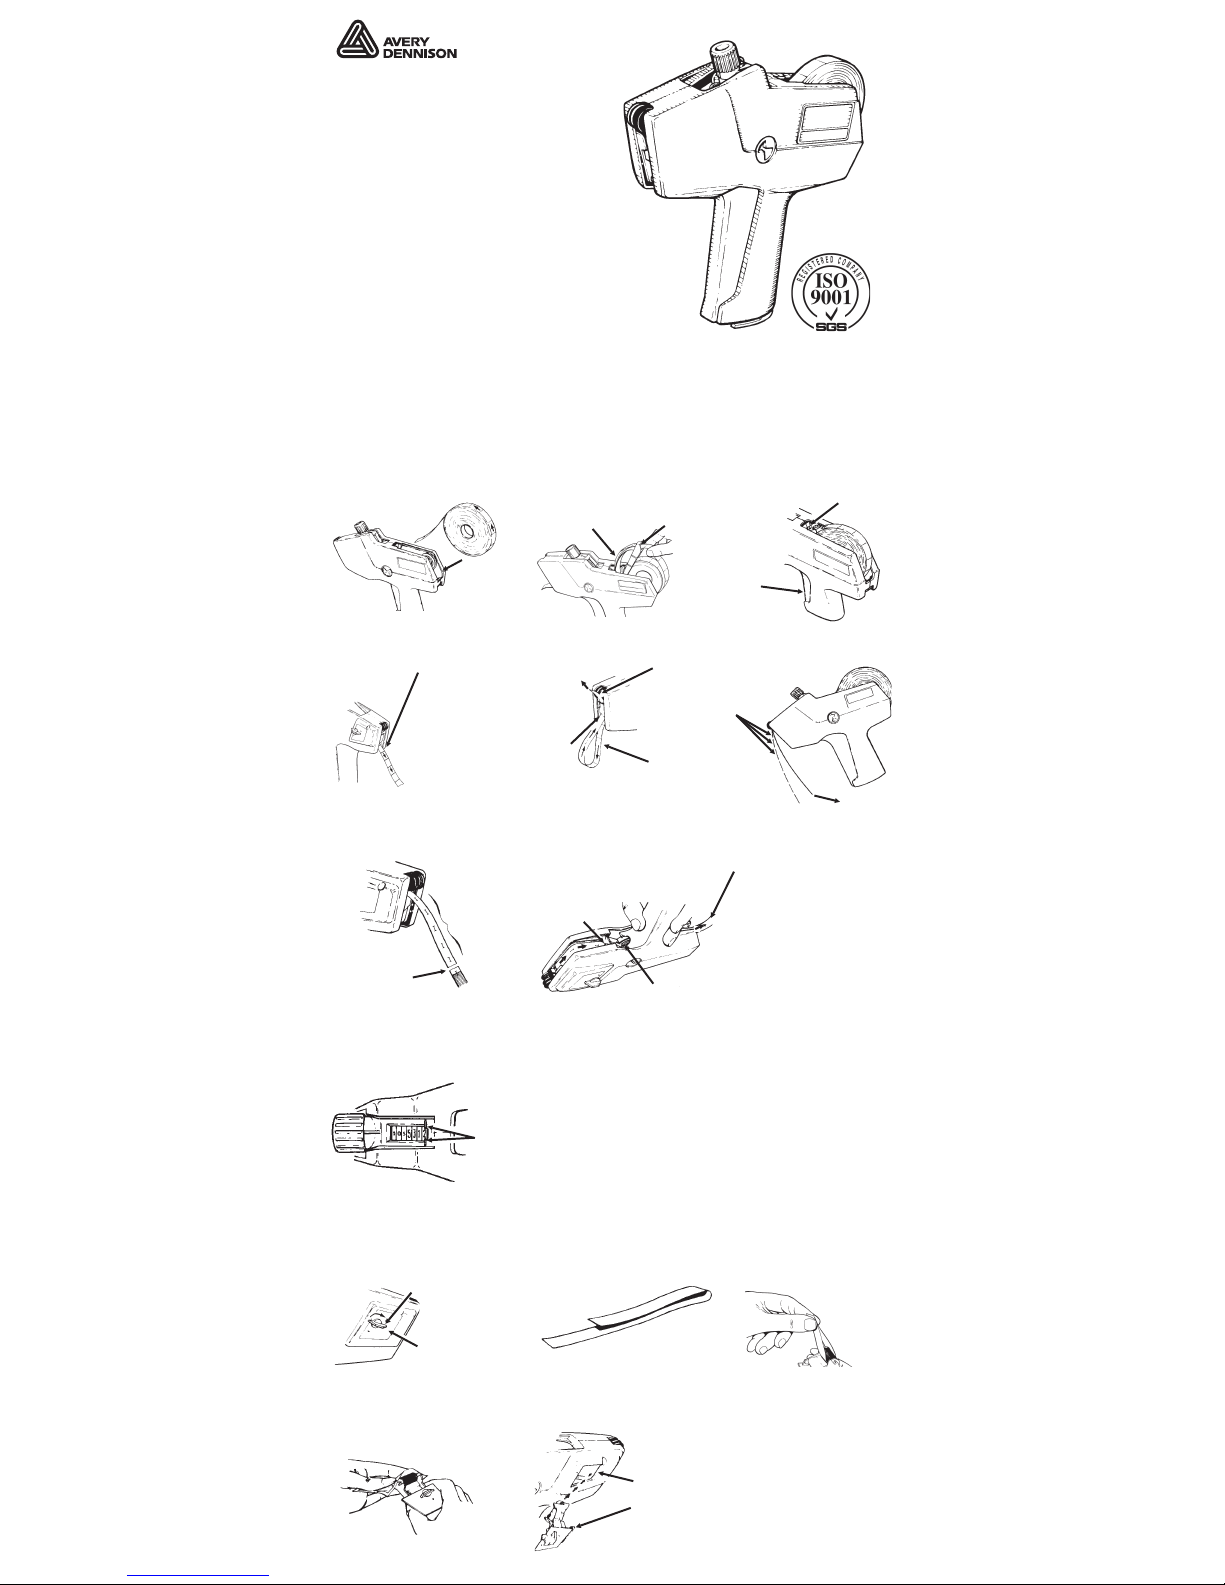
LOADING LABELS & SETTING PRINT BANDS
LOADING LABELS
1
If labeler has no label guide: Snap
label roll between hubs. Tear off
and discard first twelve labels and
backing paper.
2
Squeeze and hold
operating lever half way,
and feed label strip under brake
wheels.
3
Continue feeding label
strip until about twelve
labels come out here. Release
operating lever.
4
a. Feed label strip up under
plate until two labels come
out here.
5
Grasp label strip and pull
briskly toward operating
lever,
6
Tear backing paper as
shown.
7
Completely squeeze operating
lever, exposing feedwheel.
Insert backing paper into slot. When
paper bows up, maintain finger
pressure and release operating
lever.
8
Squeeze operating lever
several times until backing
paper exits labeler. If backing
paper does not become taut and
exit at rear, remove backing
paper from slot and repeat steps
6 and 7.
SETTING PRINT BANDS
1
Pull knob until indicators point to
desired band.
2
Turn knob until indicators point
to desired character or blank.
3
Set all bands and push
knob in all the way.
n
Make sure the character you
select is not a print character
(UPSIDE DOWN). You
should be able to read the
character correctly through
the band window.
INKING
1
Turn latch to release ink roll
door and carefully pull it
completely out of labeler.
2
Fold a piece of scrap backing
paper.
3
Insert folded backing paper
between ink roll and
carrier. Pull to snap old ink roll
free.
4
Cut off end of new ink roll
pouch. Using pouch to protect
fingers, slide carrier into pouch and
snap new ink roll into carrier (one side
at a time).
5
Insert ink roll into ink door
opening. Tilt ink door
and press in...
6
Latch ink roll door securely.
Hang for
easy reference.
INKING
Brake
Wheel
Loop
Plate
b. Squeeze operating
lever halfway and rewind
label roll until loop is
removed.
separating
labels
from
backing
paper.
Discard
separated
labels.
Straight tear
between I-cuts
Backing paper
without labels
Slot
Feedwheel
Indicators
Ink Roll Door
Latch
Lip
to place
hinge tab
under lip.
Operating
Lever
Guide Slot
Label Guide
â
If labeler has label guide: Snap
label roll between hubs. Tear off
and discard first twelve labels and
backing paper. Then, insert label
strip into guide slot as shown.
Page 2
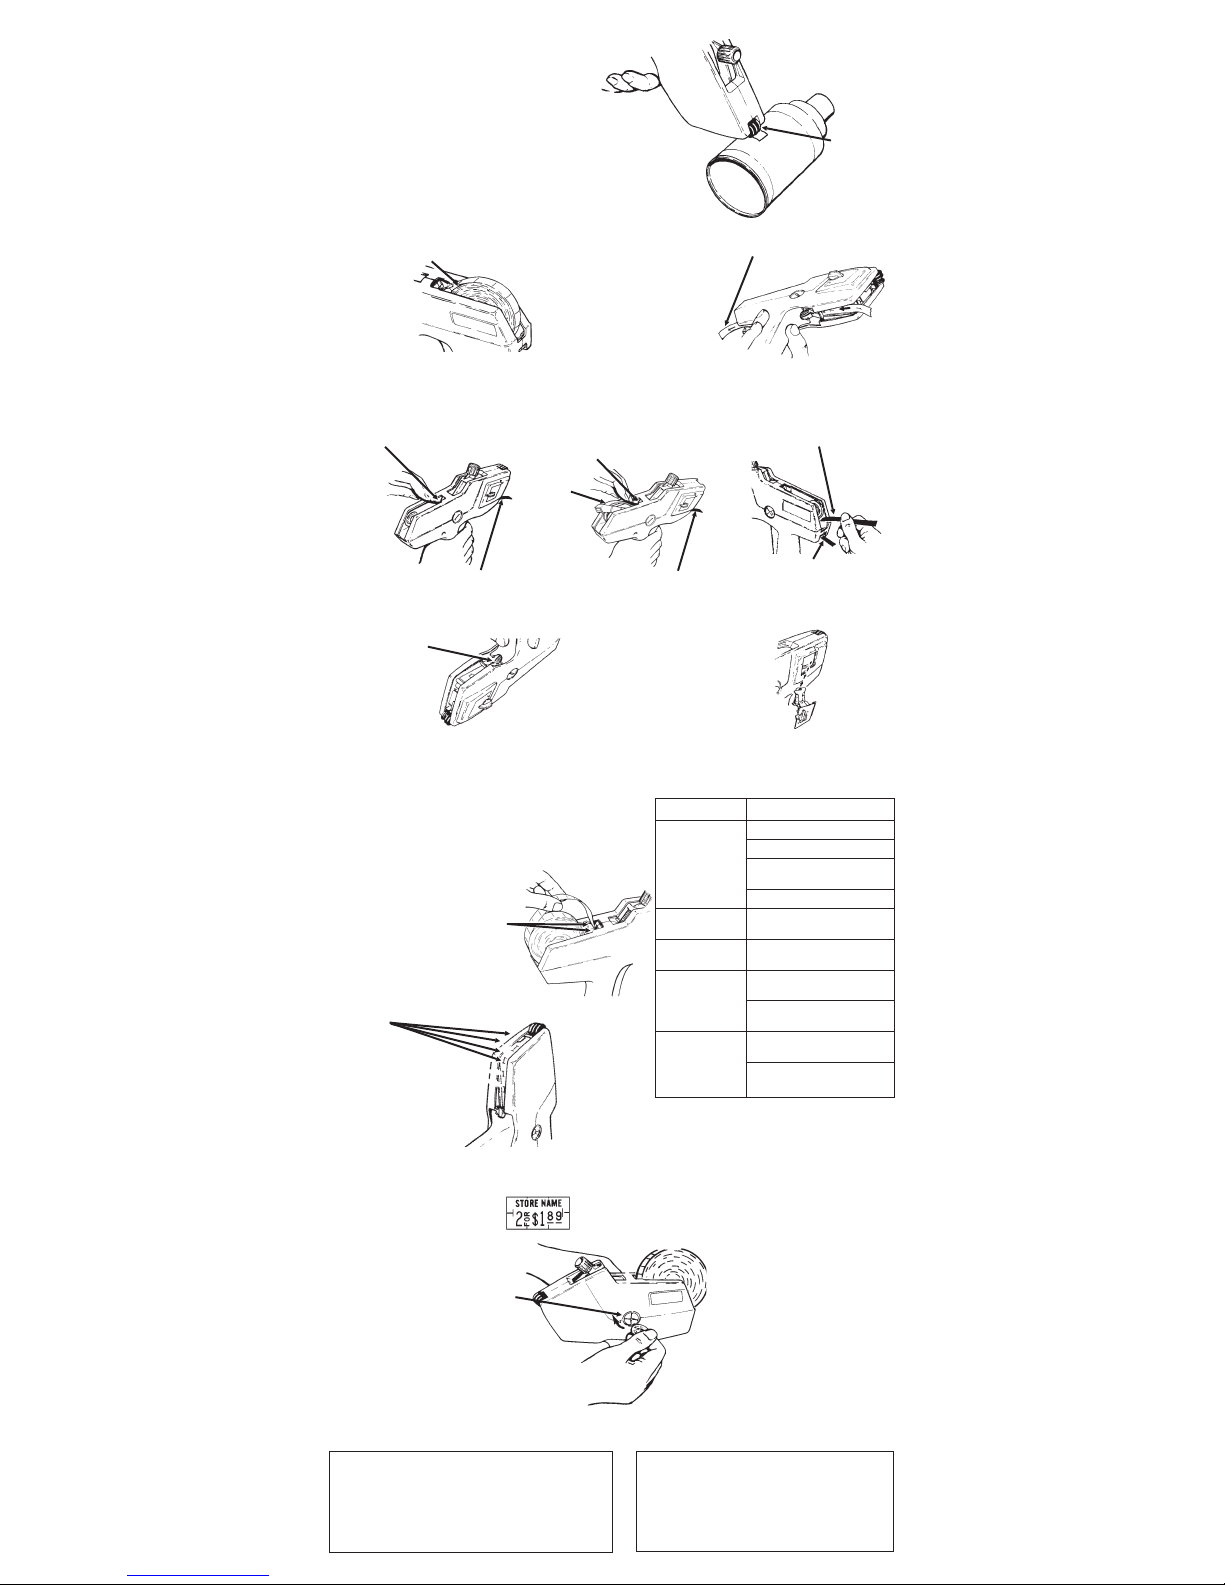
OPERATION
1
Squeeze operating lever completely.
2
Release operating lever completely.
3
Apply label to item being marked as shown.
n
A wiping motion works best, DO NOT POUND
labeler when applying labels.
REMOVING SUPPLIES
1
Tear label strip and carefully remove label roll.
2
Squeeze and release operating lever until
backing paper exits here.
MAINTENANCE
1
If labeler has no label guide:
Remove label roll. Squeeze
operating lever half way and feed label
removal strip under brake wheels...
If labeler has label guide:
Remove label roll. Squeeze
operating lever half way and feed
label removal strip over label guide,
under brake wheels...
2
To clear backing paper
track, insert label removal
strip here, using corner to
remove stray labels.
3
Squeeze operating lever to turn feedwheel
for inspection. Remove stray labels with corner
of label removal strip.
4
Remove ink door and inspect door opening for
stray labels. Remove stray labels with corner of
label removal strip.
OPERATION, REMOVING SUPPLIES & MAINTENANCE
LUBRICATION TROUBLESHOOTING
Monarch Lubricant 086989 is recommended.
Lubricate as shown below with labeler loaded
when:
a. slow or hesitant feeding occurs.
b. adhesive buildup is seen.
c. feedwheel tears backing paper.
d. ink roll is changed.
If none of the above eliminates the problem, return
labeler to an Authorized Paxar Service Center.
PRINT LOCATION ADJUSTMENT AVAILABLE SUPPLIES
Print location is correct when
all characters are fully visible on
the printed label. Dial characters
for every position when testing
location.
1
Place small coin in slot of each
disk (one on each side of labeler)
as shown.
2
Hold coin steady in slot labeled
HOLD, and turn other coin very
slowly clockwise until one click is heard.
3
Print sample label and check for
correct print location.
4
Repeat steps 1, 2, and 3 until print
is correctly located. If correct print
location is passed, continue adjustment
until correct print location reappears.
Rollers
Label
Guide
and out the front of labeler.
Feedwheel
Problem Solution
Labels will not
feed.
Reload per instructions.
Check for correct supplies.
Follow MAINTENANCE
instructions.
Check for correct print location.
Print incorrectly
located.
Adjust per PRINT LOCATION
ADJUSTMENT instructions.
Printing smeared
or distorted.
Print several labels (15-20) until
excess ink is used up.
Printing too light
(all over).
Install new ink roll per INKING
instructions.
Squeeze operating lever harder
during operation.
Slow hesitant
feeding. Labeler
tends to ‘hang up’
when operating
lever is released.
Follow MAINTENANCE
instructions.
Lubricate per instructions.
TC1000OI Rev. DE 10/07 LUBRICATION, TROUBLESHOOTING & PRINT LOCATION
Visit www.paxar.com for sales, service, supplies, information,
and telephone numbers of our locations throughout the world.
TOLL FREE:
1-800-543-6650 (In the U.S.A.)
1-800-363-7525 (In Canada)
Tear
and out the front of labeler.
Insert label removal strip here
to loosen labels.
LUBRICATE:
One drop
each side of
label chute.
LUBRICATE:
One drop each spot on
backing paper. Spread
with finger.
DO
NOT OVER
LUBRICATE!
Warranties
PRODUCT WARRANTY STATEMENTS MAY
VARY FROM COUNTRY TO COUNTRY.
PLEASE CONTACT THE AUTHORIZED PAXAR
REPRESENTATIVE IN YOUR COUNTRY
FOR DETAILS.
000940 Holster (Vinyl)
000935 Label Scraper
(w/ handle, Pkg of 20)
M00PLS01 Label Scraper
(w/o handle Pkg of 10)
119919 Maintenance Kit
08394601 Black Ink Roll
Page 3

Monarch
®
1103®-1110
®
Etiqueteuses
Mode d’emploi
©2007 Paxar Americas, Inc. Tous droits réservés.
Imprimé aux Etats-Unis.
CHARGEMENT DES ETIQUETTES
1
Si l’étiqueteuse ne possède pas de
guide pour charger les étiquettes: faites
glisser le rouleau d’étiquettes entre les axes.
Déchirez et jetez les douze premières étiquettes
et le papier support.
2
Appuyer et maintenir la gâchette
à mi-chemin et faites passer la
bande d’étiquettes sous les roues de
freinage.
3
Continuez à faire avancer la
bande d’étiquettes jusqu’à ce qu’environ
douze étiquettes sortent par ici. Relâchez
la gâchette.
4
Faites avancer la bande
d’étiquettes sous la plaque jusqu’à ce
que deux étiquettes sortent par ici.
Appuyer et maintenir la gâchette
à mi-chemin. Ré-embobinez la bande
d’étiquettes jusqu’à ce que la boucle
disparaisse.
5
Prenez la bande d’étiquettes
et tirez d’un coup sec en direction
de la gâchette,
6
Déchirez le papier support selon
l’illustration.
7
Appuyez complètement sur la
gâchette, laissant apparaître ainsi le
rouleau d’alimentation. Insérez le papier dans
la fente. Lorsque le papier se courbe vers le
haut, maintenez une pression de vos doigts,
puis relâchez la gâchette.
8
Appuyez plusieurs fois sur la
gâchette, jusqu’à ce que le papier
support soit sorti de l’étiqueteuse. Si le
papier support n’est pas assez tendu et
sort par l’arrière, retirez le papier support et
répétez les étapes 6 et 7.
RÉGLAGE DES BANDES D’IMPRESSION
1
Tirez sur le bouton jusqu’à ce que les
indicateurs soient pointés vers la bande
voulue.
2
Tournez le bouton jusqu’à ce que les
indicateurs soient pointés vers le
caractère voulu.
3
Réglez toutes les bandes et
appuyez sur le bouton jusqu’au
bout.
n
Veillez à ce que le caractère
choisi ne soit pas un caractère
d’impression (RENVERSE). Vous
devriez pouvoir lire correctement le
caractère par la fenêtre de la bande.
MISE EN PLACE DU ROULEAU D’ENCRE
1
Tournez la fermeture pour
dégager la porte du rouleau d’encre,
celle-ci doit être soigneusement et
entièrement sortie de l’étiqueteuse.
2
Pliez un bout de papier support qui
ne sera pas utilisé.
3
Insérez le papier support plié
entre le rouleau d’encre et le
porte-rouleau.Tirez pour libérer le
rouleau d’encre usagé.
4
Coupez l’extrémité du sachet du rouleau
d’encre neuf. En protégeant vos doigts à
l’aide sachet, faites glisser le logement
dans le sachet et insérez le rouleau d’encre
neuf dans son logement (un côté à la fois).
5
Insérez le rouleau d’encre dans
l’ouverture de la porte pour l’encre.
Faites incliner cette porte et appuyez vers
l’intérieur...
6
Refermez bien la porte du
rouleau d’encre.
Si l’étiqueteuse a un guide d’étiquettes :
placez le rouleau d’étiquettes entre les
axes. Déchirez et jetez les douze
premières étiquettes et le papier support.
Puis, insérez la bande d’étiquettes dans la
fente de guidage, selon les instructions.
Fente de
guidage
Guide
d’étiquettes
Gâchette
pour placer
l’onglet articulé
sous la languette.
â
Suspendre pour
une consultation plus pratique.
Roues
de
freinage
Boucle
Plaque
séparant les
étiquettes du
papier support
Jetez les
étiquettes
décollées.
Déchirez en ligne
droite entre les
découpures en I
Papier
support sans
Fente
Rouleau d’alimentation
Indicateur
Porte du rouleau
d’encre
Fermeture
Languett
ENCRAGE
Page 4

FONCTIONNEMENT
1
Appuyez complètement sur la gâchette.
2
Relâchez complètement la gâchette.
3
Appliquez l’étiquette sur le produit à marquer
selon l’illustration.
n
Pour une efficacité optimale, procédez par mouvements
de balayage. NE DONNEZ PAS DE COUPS violents avec
l’étiqueteuse lors de la pose d’étiquettes.
RETRAIT DES ETIQUETTES
1
Déchirez la bande d’étiquettes et retirez soigneusement
le rouleau d’étiquettes.
2
Appuyez sur la gâchette, puis relâchez-la jusqu’à
ce que le papier support sorte par ici.
ENTRETIEN
1
Si l’étiqueteuse n’a pas de guide
d’étiquettes : retirez le rouleau
d’étiquettes. Appuyez sur et faites passer la
bande de retrait des étiquettes sous les roues
de freinage. . .
2
Appuyez sur le levier de
fonctionnement pour faire tourner
le rouleau d’alimentation et procéder à
son inspection. Retirez les étiquettes
dispersées avec le coin de la bande de
retrait des étiquettes.
3
Appuyez sur la gâchette pour faire tourner le rouleau
d’alimentation et procéder à son inspection. Retirez les
étiquettes dispersées avec le coin de la bande de retrait des
étiquettes.
4
Retirez la porte du rouleau d’encre et inspectez
son ouverture pour vérifier qu’il n’y a pas d’étiquettes
égarées. Retirez les étiquettes dispersées avec le coin de la
bande de retrait des étiquettes.
FONCTIONNEMENT, RETRAIT DES ETIQUETTES & ENTRETIEN
LUBRIFICATION RESOLUTION DES PROBLEMES
Le lubrifiant Monarch est conseillé. Lubrifiez selon
les instructions figurant ci-dessous (lorsque
l’étiqueteuse est chargée) si :
a. l’alimentation des étiquettes est lente et incertaine.
b. une accumulation de colle est constatée.
c. le rouleau d’alimentation déchire le papier de support.
d. le rouleau d’encre est changé.
AJUSTEMENT DE L’EMPLACEMENT DE L’IMPRESSION
L’emplacement choisi pour l’impression
est correct quand tous les caractères
sont entièrement visibles sur l’étiquette
imprimée. Composez l’impression des
caractères pour chaque position quand
vous testez l’emplacement.
1
Placez une petite pièce de monnaie
dans la fente de chaque disque (un de
chaque côté de l’étiqueteuse) selon les
instructions.
2
Gardez la pièce de monnaie en place
dans la fente portant l’inscription HOLD et
tournez doucement l’autre pièce dans le sens
des aiguilles d’une montre jusqu’à ce que vous
entendiez un déclic.
3
Imprimez l’étiquette d’essai et vérifiez
que l’emplacement de l’impression est
correct.
4
Répétez les étapes 1, 2 et 3 jusqu’à ce
que l’impression soit correctement située.
Si vous avez dépassé le bon emplacement de
l’impression, continuez le réglage jusqu’à ce
que l’emplacement correct réapparaisse.
Rouleaux
et par l’avant de l’étiqueteuse.
Guide
d’étiquettes
Si l’étiqueteuse a un guide d’étiquette :
retirez le rouleau d’étiquettes. Appuyez
sur la gâchette jusqu’à mi-parcours et
faites passer la bande de retrait
d’étiquettes sur le guide de l’étiqueteuse,
sous les roues de freinage. . .
Rouleau
d’alimentation
LUBRIFICATION, RESOLUTION DES PROBLEMES, EMPLACEMENT
DE L’IMPRESSION ET ETIQUETTES
Déchire
et par l’avant de l’étiqueteuse.
Insérez ici la bande de retrait des
étiquettes pour dégager les étiquettes.
LUBRIFICATION : une
goutte à chaque
endroit sur le papier.
NE PAS LUBRIFIER
DE MANIERE
EXCESSIVE !
LUBRIFICATION
: une goutte de
chaque côté de
la glissière.
Problème Remède
Les étiquettes ne passent
pas.
Rechargez selon les instructions.
Vérifiez que les étiquettes utilisées
soient adéquates.
Suivez les instructions d’ENTRETIEN.
Vérifiez le bon emplacement de
l’impression.
Impression située de
manière incorrecte.
Réglez selon les instructions
d’AJUSTEMENT DE
L’EMPLACEMENT D’IMPRESSION.
Impression tachée ou
déformée.
Imprimez plusieurs étiquettes (15-20)
jusqu’à ce que l’excédent d’encre soit
épuisé.
Impression trop pâle
(partout).
Installez un nouveau rouleau d’encre
selon les instructions concernant
l’ENCRAGE.
Appuyez plus fortement sur la
gâchette de l’utilisation.
Alimentation lente et
incertaine. L’étiqueteuse à
tendance à “raccrocher”
lorsque la gâchette est
relâchéz.
Suivez les instructions d’ENTRETIEN.
Lubrifiez selon les instructions.
Impossible d’imprimer. Retirez la porte du rouleau d’encre et
vérifiez qu’il n’y a pas d’étiquettes
dispersées selon les instructions
d’ENTRETIEN.
Paxar propose un service de maintenance
dans le monde entier. Pour toute information
concernant les accessoires, les
consommables ou les conditions de garantie,
contactez votre revendeur local ou visitez:
www.paxar.com
 Loading...