

Page 1
BEDIENUNGSANLEITUNG
INSTRUCTION MANUAL
MODE D’EMPLOI
ISTRUZIONI PER L’USO
GEBRUIKSAANWIJZING
MANUAL DE INSTRUCCIONES
INSTRUKCJA OBSŁUGI
BRUKSANVISNING
SIKKERHEDSOPLYSNINGER
TURVALLISUUDESTA
®
TFT-1700COL
Best.-Nr. 18.0390
TFT-LCD-FARBMONITOR
TFT LCD COLOUR MONITOR
TFT-1900COL
Best.-Nr. 18.0400
Page 2

2
Bevor Sie einschalten …
Wir wünschen Ihnen viel Spaß mit Ihrem neuen
Gerät von MONACOR. Bitte lesen Sie die Bedienungsanleitung vor dem Betrieb gründlich durch.
Nur so lernen Sie alle Funktionsmöglichkeiten
kennen, vermeiden Fehlbedienungen und schützen sich und Ihr Gerät vor eventuellen Schäden
durch unsachgemäßen Gebrauch. Heben Sie die
Anleitung für ein späteres Nachlesen auf.
Der deutsche Text beginnt auf der Seite 4.
D
A
CH
Avant toute installation …
Nous vous souhaitons beaucoup de plaisir à utiliser cet appareil MONACOR. Lisez ce mode
d'emploi entièrement avant toute utilisation. Uniquement ainsi, vous pourrez apprendre l’ensemble des possibilités de fonctionnement de
l’appareil, éviter toute manipulation erronée et
vous protéger, ainsi que l’appareil, de dommages
éventuels engendrés par une utilisation inadaptée. Conservez la notice pour pouvoir vous y
reporter ultérieurement.
La version française se trouve page 14.
Antes de la utilización …
Le deseamos una buena utilización para su nuevo aparato MONACOR. Por favor, lea estas instrucciones de uso atentamente antes de hacer
funcionar el aparato. De esta manera conocerá
todas las funciones de la unidad, se prevendrán
errores de operación, usted y el aparato estarán
protegidos en contra de todo daño causado por
un uso inadecuado. Por favor, guarde las instrucciones para una futura utilización.
El texto en español empieza en la página 29.
Før du tænder …
Tillykke med dit nye MONACOR produkt. Læs
sikkerhedsanvisningerne nøje før ibrugtagning,
for at beskytte Dem og enheden mod skader, der
skyldes forkert brug. Gem manualen til senere
brug.
Sikkerhedsanvisningerne findes på side 45.
DK
Before switching on …
We wish you much pleasure with your new
MONACOR unit. Please read these operating
instructions carefully prior to operating the unit.
Thus, you will get to know all functions of the unit,
operating errors will be prevented, and yourself
and the unit will be protected against any
damage caused by improper use. Please keep
the operating instructions for later use.
The English text starts on page 9.
Voor u inschakelt …
Wij wensen u veel plezier met uw nieuwe apparaat van MONACOR. Lees deze gebruikershandleiding grondig door, alvorens het apparaat
in gebruik te nemen. Alleen zo leert u alle functies kennen, vermijdt u foutieve bediening en behoedt u zichzelf en het apparaat voor eventuele
schade door ondeskundig gebruik. Bewaar de
handleiding voor latere raadpleging.
De Nederlandstalige tekst vindt u op pagina 24.
E
GB
I
S
Prima di accendere …
Vi auguriamo buon divertimento con il vostro
nuovo apparecchio di MONACOR. Leggete
attentamente le istruzioni prima di mettere in
funzione l'apparecchio. Solo così potete conoscere tutte le funzionalità, evitare comandi sbagliati e proteggere voi stessi e l'apparecchio da
eventuali danni in seguito ad un uso improprio.
Conservate le istruzioni per poterle consultare
anche in futuro.
Il testo italiano inizia a pagina 19.
Innan du slår på enheten
Vi önskar dig mycket glädje med din nya
MONACOR produkt. Läs igenom Instruktionerna
innan enheten tas i bruk. Detta för att undvika
problem då enheten används samt undvika skador på enheten eller de personer som använder
den. Spar bruksanvisningen för framtida bruk.
Den svenska texten börjar på sidan 40.
FIN
Ennen kytkemistä …
Toivomme Sinulle paljon miellyttäviä hetkiä uuden
MONACOR laitteen kanssa. Ennen laitteen käyttöä Sinua huolellisesti tutustumaan turvallisuusohjeisiin. Näin vältyt vahingoilta, joita virheellinen laitteen käyttö saattaa aiheuttaa. Ole hyvä ja
säilytä käyttöohjeet myöhempää tarvetta varten.
Turvallisuusohjeet löytyvät sivulta 45.
F
B
CH
NL
B
Przed uruchomieniem …
Życzymy zadowolenia z nowego produktu
MONACOR. Dzięki tej instrukcji obsługi będą
państwo w stanie poznać wszystkie funkcje
tego urządzenia. Stosując się do instrukcji unikną państwo błędów i ewentualnego uszkodzenia urządzenia na skutek nieprawidłowego
użytkowania. Prosimy zachować instrukcję.
Tekst polski zaczyna się na stronie 34.
PL
Page 3
+
–
IN IN OUT OUTIN IN OUT IN OUT OUTINININ
DC 12V AUDIO 1 VIDEO 1 S-VIDEO AUDIO 2 VIDEO 2VGA PC AUDIO
5
3
1
2
3
4
6
➀
78 910111213141516 171819
➁
Page 4
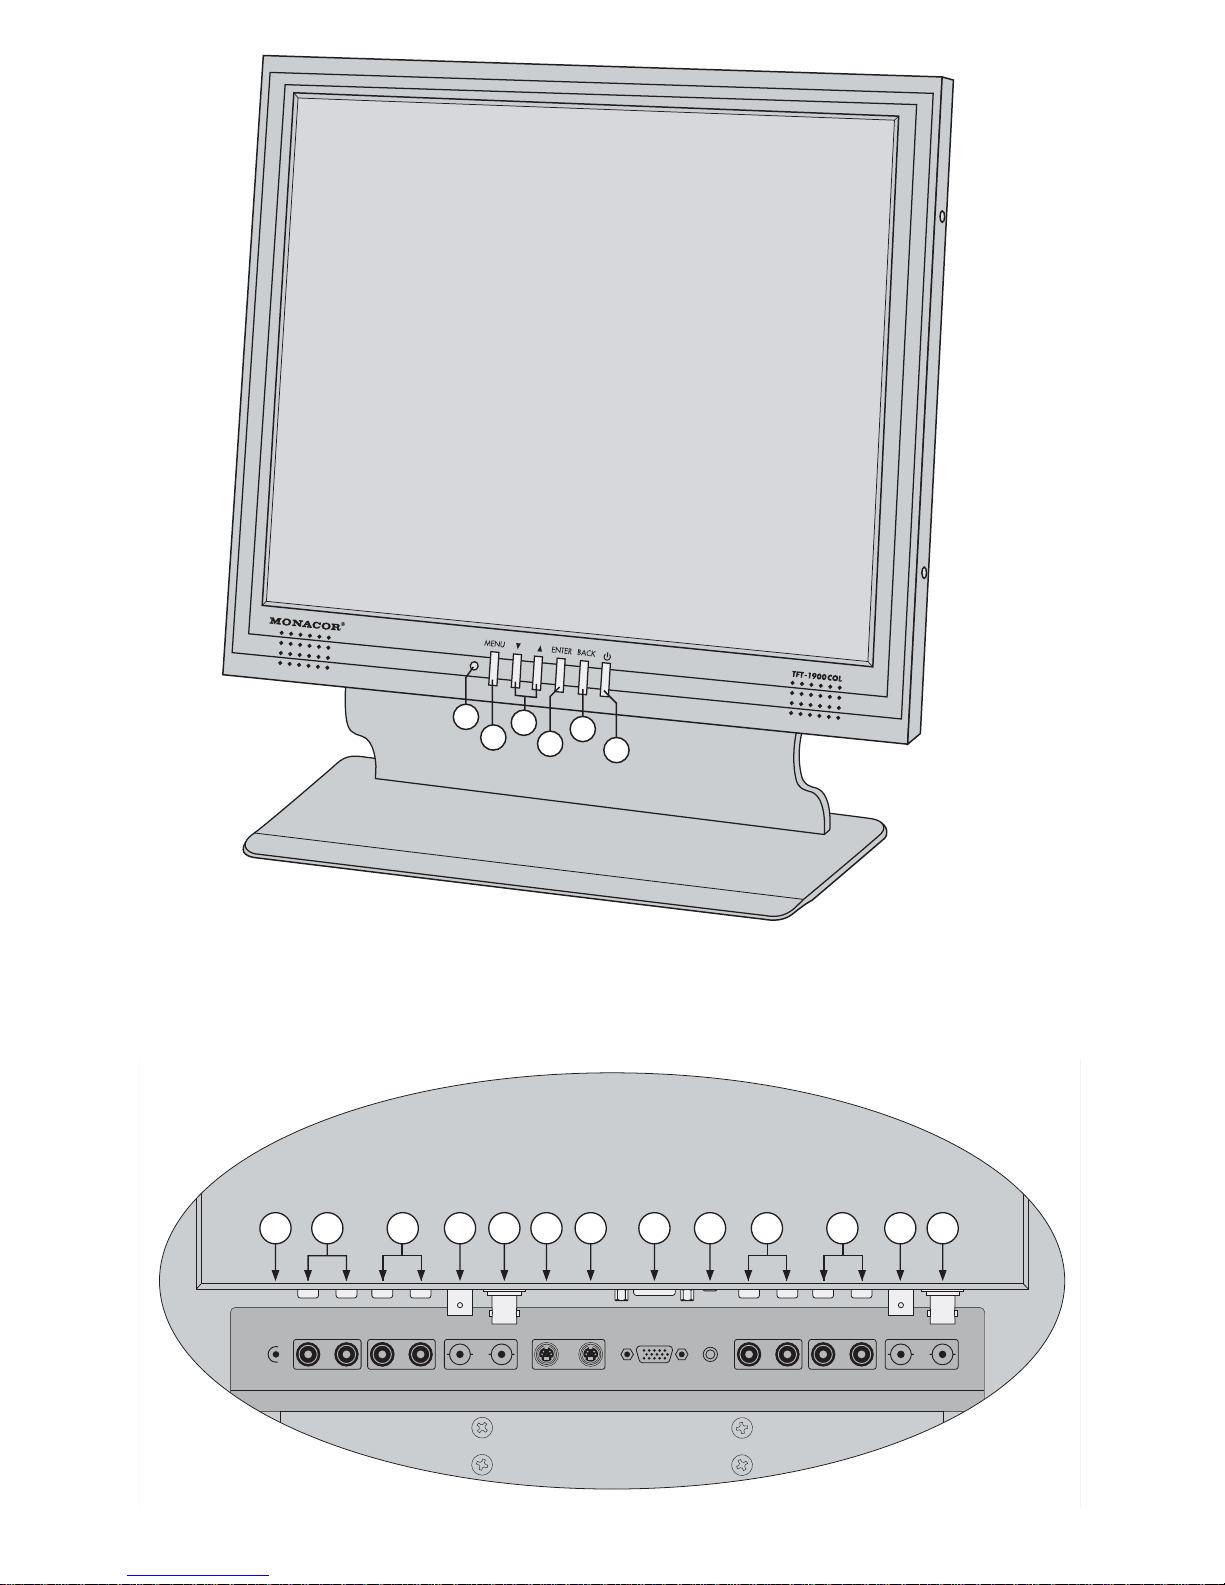
Bitte klappen Sie die Seite 3 heraus. Sie sehen
dann immer die beschriebenen Bedienelemente
und Anschlüsse.
1 Übersicht der Bedienelemente (Front)
und Anschlüsse (Rückseite)
1 Betriebsanzeige: rot = Stand-by (Bereitschaft)
grün = Monitor eingeschaltet
2 Taste MENU zum Aufrufen und Verlassen des Bild-
schirmmenüs
3 Pfeiltasten
Funktion bei nicht aufgerufenem Bildschirmmenü:
Taste
▼ zur automatischen Bildjustierung bei
PC-Betrieb;
Taste
▲ zum Umschalten zwischen den Signal-
quellen an den BNC-Eingangsbuchsen VIDEO1
(10) und VIDEO2 (18)
Funktion bei aufgerufenem Bildschirmmenü:
Tasten „Abwärts“
▼ und „Aufwärts“ ▲, um im
Bildschirmmenü zu navigieren und für Betriebsparameter Werte abzusenken bzw. zu erhöhen
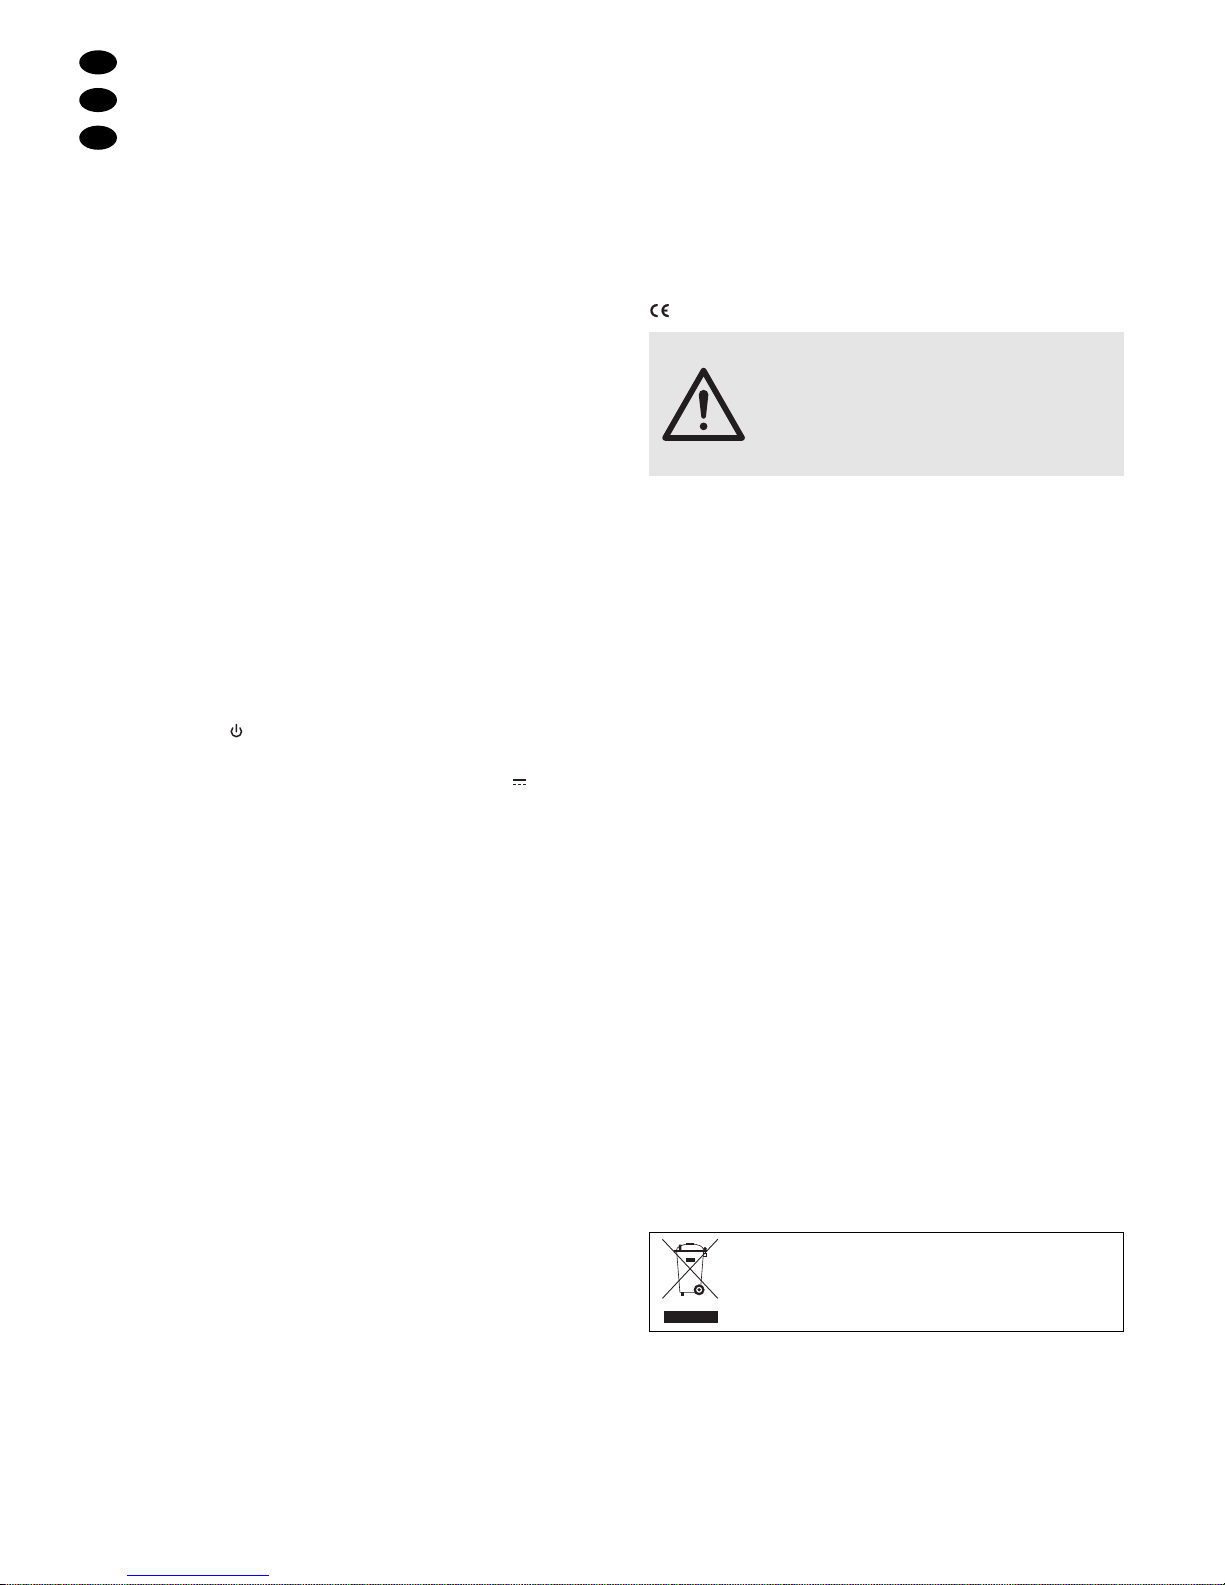
4 Taste ENTER, um im Bildschirmmenü angewählte
Menüseiten und Menüpunkte zu aktivieren und um
einige Menüeinstellungen zu bestätigen
5 Taste BACK, um im Bildschirmmenü auf die jeweils
nächsthöhere Menüebene zurückzuspringen
6 Taste , um den Monitor einzuschalten oder auf
Stand-By (Bereitschaftsmodus) zu schalten
7 Buchse für die Stromversorgung (12V ) über das
beiliegende Netzgerät
8 Audio-Eingang AUDIO 1 (Cinch, stereo) zum An-
schluss an den Audioausgang der am Eingang
VIDEO 1 (10) oder S-VIDEO (12) angeschlossenen Signalquelle
9 Audio-Ausgang AUDIO 1 (Cinch, stereo) zum Wei-
terleiten des durchgeschleiften Signals des Eingangs AUDIO1 (8) an ein weiteres Gerät
10 Video-Eingang VIDEO1 (BNC) zum Anschluss
einer Signalquelle, die ein FBAS-Videosignal liefert
11 Video-Ausgang VIDEO 1 (BNC) zum Weiterleiten
des durchgeschleiften Signals des Eingangs
VIDEO1 (10) an ein weiteres Gerät
12 Video-Eingang S-VIDEO (Mini-DIN, 4-polig) zum
Anschluss einer Signalquelle, die ein S-Video-Signal liefert
13 Video-Ausgang S-VIDEO (Mini-DIN, 4-polig) zum
Weiterleiten des durchgeschleiften Signals des
Eingangs S-VIDEO (12) an ein weiteres Gerät
14 15-poliger D-Sub-Anschluss VGA zum Anschluss
an den VGA-Ausgang eines PCs
15 3,5-mm-Stereo-Klinkenbuchse PC AUDIO zum An-
schluss an den Audio-Ausgang eines PCs
16 Audio-Eingang AUDIO 2 (Cinch, stereo) zum An-
schluss an den Audio-Ausgang der am Eingang
VIDEO2 (18) angeschlossenen Signalquelle
17 Audio-Ausgang AUDIO 2 (Cinch, stereo) zum Wei-
terleiten des durchgeschleiften Signals des Eingangs AUDIO2 (16) an ein weiteres Gerät
18 Video-Eingang VIDEO2 (BNC) zum Anschluss
einer Signalquelle, die ein FBAS-Videosignal liefert
19 Video-Ausgang VIDEO 2 (BNC) zum Weiterleiten
des durchgeschleiften Signals des Eingangs
VIDEO2 (18) an ein weiteres Gerät
2 Hinweise für den sicheren Gebrauch
Die Geräte (Monitor und Netzgerät) entsprechen allen
erforderlichen Richtlinien der EU und sind deshalb mit
gekennzeichnet.
Beachten Sie auch unbedingt folgende Punkte:
●
Die Geräte sind nur zur Verwendung im Innenbereich geeignet. Schützen Sie sie vor Tropf- und
Spritzwasser, hoher Luftfeuchtigkeit und Hitze (zulässiger Einsatztemperaturbereich 0–50°C).
●
Stellen Sie keine mit Flüssigkeit gefüllten Gefäße,
z.B. Trinkgläser, auf die Geräte.
●
Die im Monitor entstehende Wärme muss durch
Luftzirkulation abgegeben werden. Decken Sie die
Lüftungsöffnungen am Gehäuse nicht ab.
●
Nehmen Sie den Monitor nicht in Betrieb und ziehen
Sie den Netzstecker des Netzgeräts sofort aus der
Steckdose, wenn:
1. sichtbare Schäden am Monitor, am Netzgerät
oder am Netzkabel vorhanden sind,
2. nach einem Sturz oder Ähnlichem der Verdacht
auf einen Defekt besteht,
3. Funktionsstörungen auftreten.
Lassen Sie die Geräte in jedem Fall in einer Fachwerkstatt reparieren.
●
Ziehen Sie den Netzstecker des Netzgerätes nie an
der Zuleitung aus der Steckdose, fassen Sie immer
am Stecker an.
●
Verwenden Sie für die Reinigung nur ein trockenes,
weiches Tuch, niemals Chemikalien oder Wasser.
●
Werden die Geräte zweckentfremdet, falsch angeschlossen, nicht richtig bedient oder nicht fachgerecht repariert, kann keine Haftung für daraus resultierende Sach- oder Personenschäden und keine
Garantie für die Geräte übernommen werden.
3 Einsatzmöglichkeiten
Dieser TFT -LCD-Farbmonitor mit extrem kurzer Reaktionszeit und sehr kontrastreicher Bildwiedergabe ist
besonders für den Einsatz in Überwachungssystemen
geeignet, kann aber auch für andere Zwecke genutzt
Sollen die Geräte endgültig aus dem Betrieb genommen werden, übergeben Sie sie
zur umweltgerechten Entsorgung einem
örtlichen Recyclingbetrieb.
WARNUNG Das Netzgerät wird mit lebensgefährlich
hoher Netzspannung versorgt. Nehmen
Sie deshalb niemals selbst Eingriffe am
Gerät vor. Durch unsachgemäßes Vorgehen besteht die Gefahr eines elektrischen Schlages.
D
A
CH
4
Page 5
werden, z.B. als PC-Monitor oder für Multimedia-Anwendungen.
Bis zu 4 Signalquellen (z.B. Überwachungskamera, Videorekorder, PC, DVD-Player) lassen sich an
den Monitor anschließen. Durchschleifausgänge ermöglichen die Weiterleitung der Eingangssignale an
weitere Geräte. Über ein Bildschirmmenü kann der
Monitor optimal auf die Bedürfnisse der jeweiligen
Anwendung eingestellt werden.
4 Aufstellung
Um störende Reflexionen zu vermeiden, den Monitor
über den an der Rückseite befestigten Standfuß so
platzieren, dass kein Licht direkt auf die Bildschirmoberfläche strahlt. Um einen günstigen Blickwinkel zu
erhalten, kann der Monitor leicht nach vorn oder hinten
geneigt werden.
5 Anschluss
5.1 Geräte mit FBAS- oder S-Videosignal
5.1.1 Signalquellen anschließen
1) Es können 2 Signalquellen, die FBAS-Videosignale
(Composite Video) liefern, z. B. Überwachungska-
meras, Videorecorder, angeschlossen werden:
– Den Videoausgang der ersten Quelle an die
BNC-Eingangsbuchse VIDEO1 (10) und den
Videoausgang der zweiten Quelle an die BNCEingangsbuchse VIDEO2 (18).
– Den Audio-Ausgang der ersten Quelle an die
Cinch-Eingangsbuchsen AUDIO1 (8) anschließen und den Audio-Ausgang der zweiten Quelle
an die Cinch-Eingangsbuchsen AUDIO2 (16).
[rot = rechter Kanal, weiß = linker Kanal]
2) An die 4-polige Mini-DIN-Eingangsbuchse S-VIDEO
(12) kann der Videoausgang einer Signalquelle, die
ein S-Videosignal liefert, z.B. Digitalrekorder, DVD-
Player, angeschlossen werden. Den Audioausgang
der Quelle an die Cinch-Eingangsbuchsen AUDIO1
(8) anschließen (rot = rechter Kanal, weiß = linker
Kanal).
5.1.2 Durchschleifausgänge
Über die Durchschleifausgänge ist es möglich, das
jeweilige Eingangssignal weiterzuleiten z.B. an einen
weiteren Monitor oder an ein Aufzeichnungsgerät:
– Audio-Ausgang AUDIO1 (9) und Video-Ausgang
VIDEO1 (11) zum Durchschleifen der Signale des
Audio-Eingangs AUDIO1 (8) und des Video-Ein-
gangs VIDEO1 (10)
–Video-Ausgang S-VIDEO (13) zum Durchschleifen
des Signals des Video-Eingangs S-VIDEO (12)
– Audio-Ausgang AUDIO 2 (17) und Video-Ausgang
VIDEO2 (19) zum Durchschleifen der Signale des
Audio-Eingangs AUDIO 2 (16) und des Video-Ein-
gangs VIDEO2 (18)
Den jeweiligen Ausgang mit dem entsprechenden Ein-
gang des nachfolgenden Geräts verbinden.
5.2 PC
Den VGA-Ausgang des PCs an die 15-polige D-SubBuchse VGA (14) anschließen und seinen Audio-Ausgang an die 3,5-mm-Klinkenbuchse PC AUDIO (15).
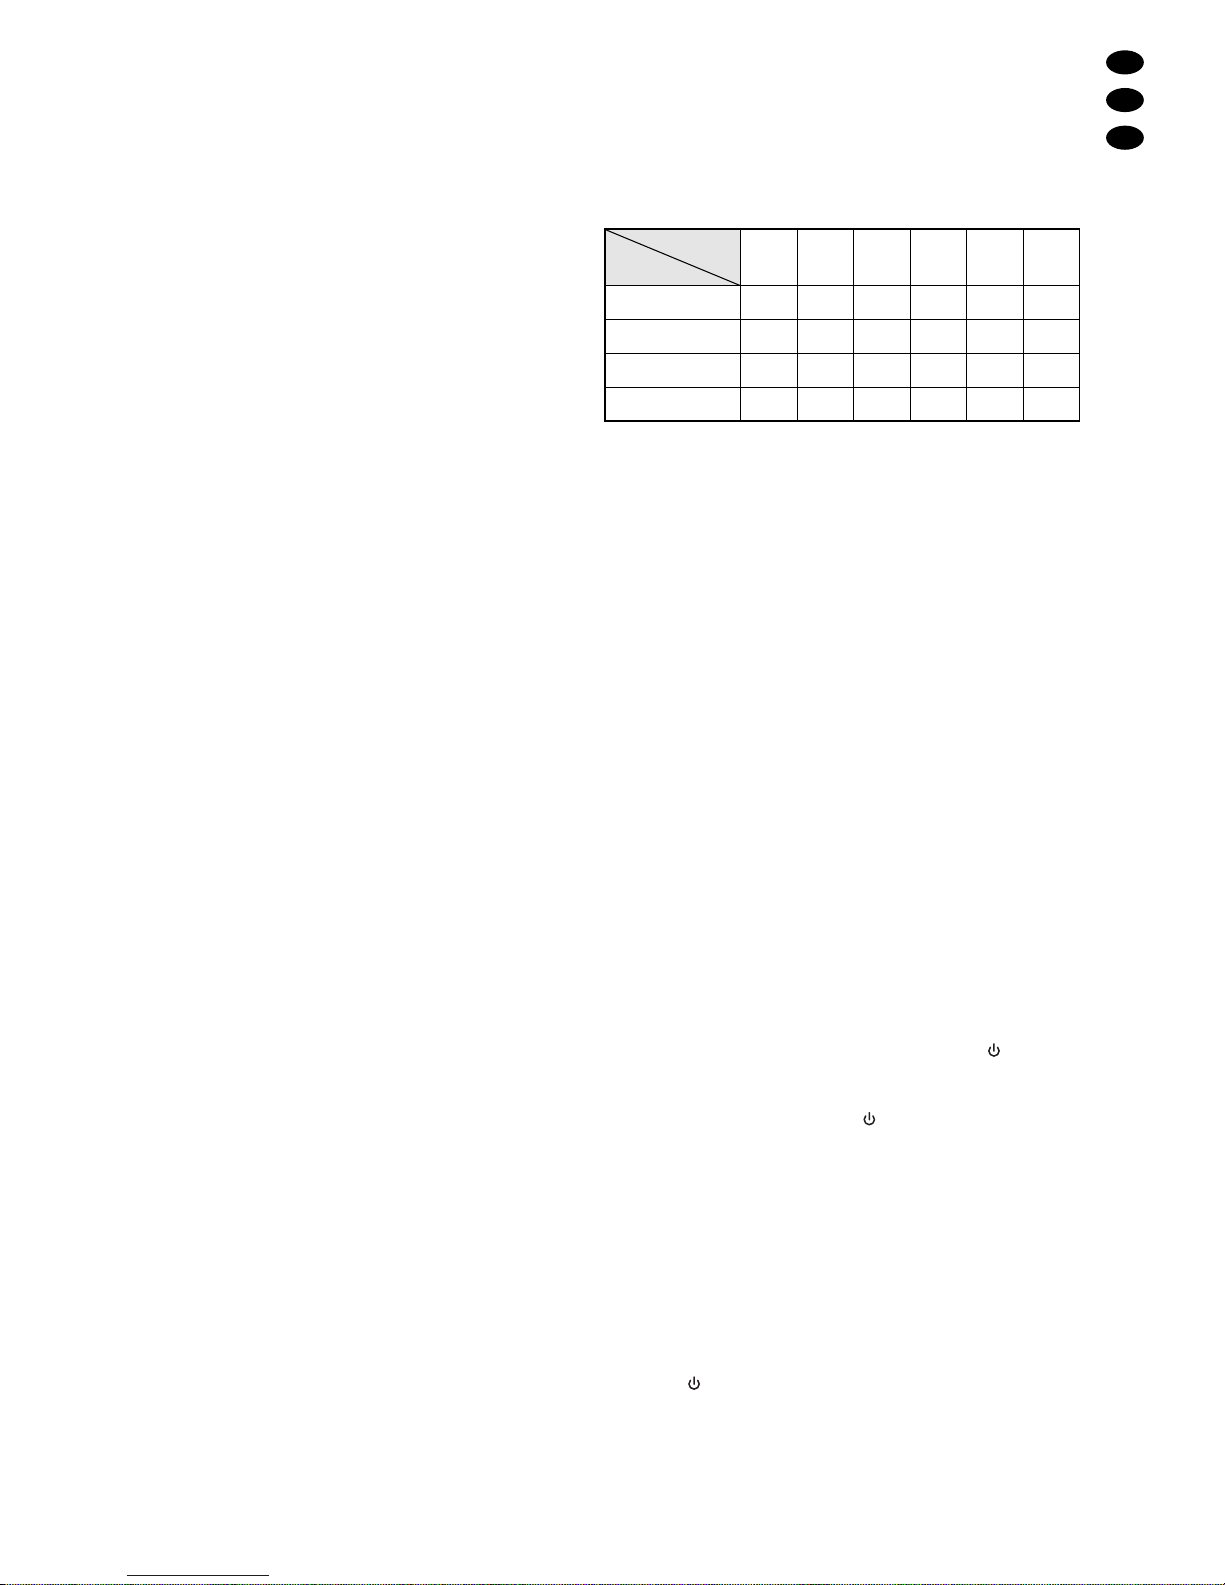
Wichtig: Auflösung und Bildfrequenz der PC-Grafikkarte müssen auf den Monitor abgestimmt sein. Folgende Kombinationen sind kompatibel:
Für eine optimale Bildwiedergabe sollte die PC-Grafikkarte auf eine Auflösung von 1280 x 1024 und eine
Bildfrequenz von 60Hz eingestellt sein.
5.3 Stromversorgung
Nach dem Anschluss aller Geräte das beiliegende
Netzgerät mit der Buchse DC 12V (7) verbinden und
über das mitgelieferte Netzkabel an eine Steckdose
(100–240V~/50–60Hz) anschließen.
Hinweis:Der Monitor verbraucht auch im Stand-by-Betrieb einen geringen Strom. Wird er längere Zeit nicht
genutzt, sollte das Netzgerät von der Stromversorgung
getrennt werden, um Energie zu sparen.
6 Inbetriebnahme
Nach dem Anschluss der Stromversorgung schaltet
der Monitor ein [Betriebsanzeige (1) leuchtet grün] und
gibt Bild und Ton der zuletzt gewählten Signalquelle
wieder. Links oben im Bild wird kurz ihre Kennzeichnung eingeblendet:
BNC1: Quelle am Eingang VIDEO1 (10)
BNC2: Quelle am Eingang VIDEO2 (18)
S-VIDEO: Quelle am Eingang S-VIDEO (12)
PC: Quelle am Eingang VGA (14)
Zum Beenden der Wiedergabe die Taste (6) drücken. Der Monitor schaltet dann auf Stand-by (Bereitschaftsmodus), die Betriebsanzeige leuchtet rot. Zum
Einschalten wieder die Taste drücken.
Hinweis bei fehlendem Videosignal/Bildverlust
Der Monitor gibt den T on einer Quelle nur wieder , wenn
er auch ein Videosignal von ihr erhält. Erhält der eingeschaltete Monitor kein Videosignal von der gewählten
Quelle, wird für ca. 15 Sek. „NO SIGNALOR SIGNAL
LOSS“ eingeblendet. Dann schaltet der Monitor auf
Standby, die Betriebsanzeige blinkt rot.
a Sobald von der Quelle wieder ein Videosignal vor-
liegt, schaltet sich der Monitor automatisch ein.
b Zum manuellen Beenden des Bildverluststatus die
Taste einmal drücken (Monitor im Stand-By, Be-
triebsanzeige leuchtet kontinuierlich rot). Durch ein
zweites Drücken der Taste kann der Monitor wieder
eingeschaltet und innerhalb von 15 Sek. auf eine
andere Quelle umgeschaltet werden (→ Kapitel 7,
Punkt B und Kapitel 7.1.4.).
D
A
CH
5
Frequenz
Auflösung
60 Hz
640 x 480 √
800 x 600 √
1280 x 1024 √
1024 x 768 √
66 Hz
√
√
70 Hz
√
√
72 Hz
√
√
√√
75 Hz
√
√
85 Hz
√
√
√√
Page 6

7 Bedienung
Der Monitor wird mit den Tasten MENU (2), ▼ und ▲
(3),ENTER (4) und BACK (5) über ein Bildschirmmenü
eingestellt. Außerhalb des Menüs können die Pfeiltasten für folgende Einstellungen verwendet werden:
A Um bei PC-Betrieb die automatische Bildkorrektur
zu aktivieren, die Taste
▼ drücken.
[Sollte der automatische Bildabgleich nicht das gewünschte Ergebnis bringen, lässt sich das Bild über
das Menü auch manuell justieren → Kap. 7.1.3.]
B Um zwischen den Signalquellen an den BNC-Ein-
gängen VIDEO1 (10) und VIDEO2 (18) umzuschalten, die Taste
▲ drücken.
[Der S-Video-Eingang (12) und der PC-Eingang
(14) können nur über das Menü angewählt werden
→ Kap. 7.1.4.]
7.1 Einstellungen im Bildschirmmenü
Zum Aufrufen des Menüs die Taste MENU drücken.
Das Menü besteht aus 5 Menüseiten:
BILD (PICTURE) Bildeinstellungen
TON (SOUND) Toneinstellungen
EINSTELLEN (INSTALL) Bild optimieren (nur bei PC-Betrieb)
QUELLE (SOURCE) Wahl der Signalquelle
SONDERFKT (FEATURES) Sonderfunktionen
Mit den Tasten „Abwärts“
▼ und „Aufwärts“ ▲ können
die Seiten nacheinander angewählt werden.
Das Menü kann in 6 Sprachen angezeigt werden. Zum
Umschalten der Sprache → Kapitel 7.1.5, Menüpunkt
„Sprache (Language)“. Die folgenden Kapitel beziehen sich auf das Menü in deutscher Sprache.
Hinweis: Das Menü blendet sich automatisch aus,
wenn innerhalb einer festgelegten Zeitdauer
keine Taste mehr betätigt wird. Zum Einstellen der Zeitdauer → Kapitel 7.1.5, Menüpunkt „OSD Zeituhr (OSD Timer)“.
7.1.1 Menüseite BILD
Auf dieser Menüseite werden Bildeinstellungen vorgenommen. Die Seite zeigt unterschiedliche Einstelloptionen, abhängig von der Signalquelle:
Menüversion A: Menüversion B:
für Quellen an den Eingängen für einen PC am VGA-Eingang
VIDEO und S-VIDEO
Um Einstellungen auf der Menüseite durchführen zu
können, die Taste ENTER drücken: Die Seite ist aktiviert und der 1. Menüpunkt angewählt (blau markiert).
Mit den Tasten
▼ und ▲ lassen sich die einzelnen
Menüpunkte der Seite anwählen.
Menüpunkte zum Einstellen der Parameter
„Helligkeit“, „Kontrast“, „Farbweiß“*/„Rot“,
„Farbsättigung“/„Grün“, „Schärfe“/ „Blau“
Ist der jeweilige Menüpunkt angewählt, die Taste
ENTER drücken, um ihn zu aktivieren. Unten im
Bild wird der Einstellbereich grafisch angezeigt. Mit
der Taste
▼ oder ▲ den Wert für den Parameter
einstellen (Taste
▼: Wert reduzieren, Taste ▲: Wert
erhöhen). Zum Zurückkehren auf die Menüseite die
Taste BACK oder ENTER drücken.
Menüpunkt „Smart Bild“ (nur in Menüversion A)
Ist der Menüpunkt „Smart Bild“ angewählt, die T aste
ENTER drücken, um ihn zu aktivieren. Es werden
drei Optionen für die Bildeinstellung angeboten:
„PP-Werte“: Standardeinstellung mit den Kontrast-
und Helligkeitseinstellungen des Menüs
„Intensiv“: für ein klareres, kontrastreicheres Bild;
Kontrast und Helligkeit sind vorgegeben
„Weich“: für ein „weicheres“ Bild, z. B. für Filme;
Kontrast und Helligkeit sind vorgegeben
Die Option mit der Taste
▼ oder ▲ anwählen und
mit der Taste ENTER bestätigen. Zum Zurückkehren auf die Menüseite die Taste BACK drücken.
Menüpunkt „Bildformat“ (nur in Menüversion A)
Ist der Menüpunkt „Bildformat“ angewählt, die Taste
ENTER drücken, um ihn zu aktivieren. Es werden
4 Optionen für die Bilddarstellung angeboten:
„Breitbild“: Standardeinstellung für Bilder im 4 :3-
Format; das Bild füllt den Bildschirm ganz aus.
„Zoom“: Das Bild wird vertikal gestreckt, um es et-
was vergrößert abzubilden, dafür ist der obere
und untere Bildrandbereich nicht mehr sichtbar
„Seitenrand“: das Bild füllt den Bildschirm nicht in
seiner gesamten Breite aus, links und rechts
erscheinen schwarze Seitenränder
„14:9“: Einstellung für Bilder im 14:9-Format;
Bilder im 4:3-Format werden bei dieser Einstellung oben und unten angeschnitten
Die Option mit der Taste
▼ oder ▲ anwählen und
mit der Taste ENTER bestätigen. Zum Zurückkehren auf die Menüseite die Taste BACK drücken.
Menüpunkt „Vollbild“ (nur in Menüversion B)
Füllt das Bild nicht den gesamten Bildschirm aus,
wird es bei der Einstellung „Ein“ automatisch auf
Bildschirmgröße aufgezogen. Das Seitenverhältnis
wird dabei angepasst. Mit der Taste ENTER kann
zwischen „Ein“ und „Aus“ umgeschaltet werden.
Menüpunkt „Color Temp“
Ist „Color Temp“ angewählt, kann mit der Taste
ENTER zwischen den Farbtemperaturen 6500K
und 9300K umgeschaltet werden und so die
gewünschte Farbdarstellung ausgewählt werden.
Menüpunkt „Rückstellung“
Um die Werte für die ersten 5 Menüpunkte dieser
Seite auf die Werkseinstellungen zurückzusetzen,
den Menüpunkt „Rückstellung“ anwählen und die
Taste ENTER drücken.
Um den Einstellmodus für diese Seite zu verlassen,
die Taste BACK drücken. Dann mit der Taste
▼ oder ▲
eine andere Seite anwählen oder zum Verlassen des
Menüs die Taste BACK oder MENU drücken.
BILD
" Helligkeit 13
Kontrast 17
Rot 0
Grün 0
Blau 0
Vollbild : Ein
Color Temp : 6500
Rückstellung
BILD
" Helligkeit 0
Kontrast 0
Farbweiß* 0
Farbsättigung 0
Schärfe 4
Smart Bild
Bildformat
Color Temp : 6500
Rückstellung
D
A
CH
6
*Farbtoneinstellung – nur bei NTSC-Signalquellen nötig
Page 7

7.1.2 Menüseite TON
Auf dieser Menüseite werden Einstellungen zur Tonwiedergabe vorgenommen.
Um Einstellungen auf der Menüseite durchführen zu
können, die Taste ENTER drücken: Die Seite ist aktiviert und der 1. Menüpunkt angewählt (blau markiert).
Mit den Tasten
▼ und ▲ lassen sich die einzelnen
Menüpunkte der Seite anwählen.
Menüpunkte zum Einstellen der Parameter
„Lautstärke“, „Balance“, „Höhen“, „Bass“
Ist der jeweilige Menüpunkt angewählt, die Taste
ENTER drücken, um ihn zu aktivieren. Der Einstell-
bereich wird grafisch angezeigt. Mit der Taste
▼
oder ▲ den Wert für den Parameter einstellen:
Bei „Lautstärke“, „Höhen“ und „Bässe“:
Taste ▼ zum Reduzieren des Wertes,
Taste
▲ zum Erhöhen des Wertes
Bei „Balance“:
Taste ▼ zum „Verschieben“ des Tons nach links,
Taste
▲ zum „Verschieben“ des Tons nach rechts,
bei Wert „0“ ist das Lautstärkeverhältnis Links/
Rechts ausgeglichen.
Zum Zurückkehren auf die Menüseite die Taste
BACK oder ENTER drücken.
Menüpunkt „Lautsprecher“
Mit der Taste ENTER kann zwischen „Ein“ (Laut-
sprecher eingeschaltet) und „Aus“ (Lautsprecher
ausgeschaltet) umgeschaltet werden.
Menüpunkt „Raumklang“
Ist die Funktion „Raumklang“ eingeschaltet, ent-
steht ein räumlicher Klangeffekt bei der Tonwieder-
gabe. Mit der Taste ENTER kann zwischen „Ein“
und „Aus“ umgeschaltet werden.
Um den Einstellmodus für diese Seite zu verlassen,
die Taste BACK drücken. Dann mit der Taste
▼ oder ▲
eine andere Seite anwählen oder zum Verlassen des
Menüs die Taste BACK oder MENU drücken.
7.1.3 Menüseite EINSTELLEN
– Menüeinstellungen nur bei PC-Betrieb möglich –
Bei PC-Betrieb kann das Bild über Einstellungen auf
dieser Menüseite optimiert werden.
Um Einstellungen auf der Menüseite durchführen zu
können, die Taste ENTER drücken: Die Seite ist aktiviert und der 1. Menüpunkt angewählt (blau markiert).
Mit den Tasten
▼ und ▲ lassen sich die einzelnen
Menüpunkte der Seite anwählen.
Menüpunkt „Autom. Justage“
(Diese Funktion entspricht der Funktion der T aste
▼
bei nicht aufgerufenem Menü → Kap. 7, Punkt A.)
Wird bei angewähltem Menüpunkt die T aste ENTER
gedrückt, findet für die Dauer von einigen Sekunden
ein automatischer Bildabgleich statt. Manuell eingestellte Werte für die übrigen Menüpunkte dieser
Seite werden dabei korrigiert.
Sollte die automatische Bildjustierung nicht das gewünschte Ergebnis bringen, das Bild durch Einstellen der folgenden Parameter optimieren.
Menüpunkte zum Einstellen der Parameter
„Phase“, „Position-H“, „Position-V“
für eine manuelle Bildjustierung
Ist der jeweilige Menüpunkt angewählt, die Taste
ENTER drücken, um ihn zu aktivieren. Unten im
Bild wird der Einstellbereich grafisch angezeigt. Mit
der Taste
▼ oder ▲ den Wert für den Parameter
einstellen:
Bei „Phase“:
Mit der Taste
▼ oder ▲ den Wert einstellen, bei
dem die optimale Bildschärfe erreicht wird.
Bei „Position-H“:
Taste
▼ zum Verschieben des Bilds nach rechts,
Taste
▲ zum Verschieben des Bilds nach links.
Bei „Position-V“:
Taste
▼ zum Verschieben des Bilds nach unten,
Taste
▲ zum Verschieben des Bilds nach oben.
Zum Zurückkehren auf die Menüseite die Taste
BACK oder ENTER drücken.
Um den Einstellmodus für diese Seite zu verlassen,
die Taste BACK drücken. Dann mit der Taste
▼ oder ▲
eine andere Seite anwählen oder zum Verlassen des
Menüs die Taste BACK oder MENU drücken.
7.1.4 Menüseite QUELLE
Auf dieser Menüseite lässt sich die Signalquelle auswählen. Bei Aufruf der Seite zeigt der Cursor auf die
aktuell angewählte Quelle.
Um Einstellungen auf der Menüseite durchführen zu
können, die Taste ENTER drücken: Die Seite ist aktiviert und die angewählte Quelle blau hervorgehoben.
Mit der Taste
▼ oder ▲ aus den 4 möglichen Quellen
die gewünschte auswählen:
„BNC1“: Quelle am Eingang VIDEO1 (10)
„BNC2“: Quelle am Eingang VIDEO2 (18)
„S-VIDEO“: Quelle am Eingang S-VIDEO (12)
„PC“: Quelle am Eingang VGA (14)
Zum Bestätigen der Auswahl die Taste ENTER drücken. Das Menü wird dann verlassen und der Monitor
wechselt auf die gewählte Quelle.
Soll die Auswahl stattdessen verworfen werden, die
Taste BACK drücken, um den Einstellmodus für diese
Seite zu verlassen. Dann mit der Taste
▼ oder ▲ eine
andere Seite anwählen oder zum Verlassen des Menüs die Taste BACK oder MENU drücken.
QUELLE
" BNC1
BNC2
S-VIDEO
PC
EINSTELL
" Autom. Justage
Phase 31
Position-H 96
Position-V 99
TON
" Lautstärke 50
Balance 0
Höhen 22
Bass 22
Lautsprecher : Ein
Raumklang : Aus
D
A
CH
7
Page 8

7.1.5 Menüseite SONDERFKT
Diese Menüseite bietet Einstelloptionen für folgende
Funktionen:
– Menüsprache
– Film-Modus (nicht bei PC-Betrieb)
– Timergesteuertes Ausblenden des Menüs
–Timergesteuertes Umschalten auf Stand-by-Betrieb
Um Einstellungen auf der Menüseite durchführen zu
können, die Taste ENTER drücken: Die Seite ist aktiviert und der 1. Menüpunkt angewählt (blau markiert).
Mit den Tasten
▼ und ▲ lassen sich die einzelnen
Menüpunkte der Seite anwählen.
Menüpunkt „Sprache“
Ist der Menüpunkt „Sprache“ angewählt, die Taste
ENTER drücken, um ihn zu aktivieren. Es werden
6 Sprachen für das Bildschirmmenü angeboten:
„ENGLISH“ (Englisch),
„DEUTSCH“
„FRANÇAIS“ (Französisch)
„ITALIANO“ (Italienisch)
„ESPAÑOL“ (Spanisch)
„NEDERLANDS (Niederländisch)
Die Sprache mit der Taste
▼ oder ▲ auswählen und
zum Bestätigen der Auswahl und Zurückkehren auf
die Menüseite die Taste ENTER drücken. Zum
Zurückkehren auf die Menüseite ohne die Einstellung zu ändern, die Taste BACK drücken.
Menüpunkt „Film-Modus“ (bei PC-Betrieb nicht wählbar)
Diese Funktion ist für die Wiedergabe von Videomaterial mit bewegten Bildern, wie z.B. Filme, geeignet. Für Überwachungsanwendungen, in denen
die Bildinhalte weniger häufig wechseln, sollte aufgrund einer besseren Bildqualität die Funktion ausgeschaltet werden. Mit der Taste ENTER kann zwischen „Ein“ und „Aus“ umgeschaltet werden.
Menüpunkt „OSD Zeituhr“
Über diesen Menüpunkt wird die Zeitdauer festgelegt, nach deren Verstreichen das Bildschirmmenü
sich automatisch ausblendet, sofern keine weitere
Taste gedrückt wird. Ist der Menüpunkt angewählt,
die Taste ENTER drücken, um ihn zu aktivieren.
Der Einstellbereich wird grafisch angezeigt. Mit der
Taste
▼ oder ▲ kann zwischen 3 Sek., 5 Sek.,
10 Sek., 20 Sek. und 30 Sek. gewählt werden
(Taste
▼: Wert reduzieren, Taste ▲: Wert erhöhen).
Zum Zurückkehren auf die Menüseite die Taste
BACK oder ENTER drücken.
Menüpunkt „Autom. Absc.“
Über diesen Menüpunkt kann eine Zeitdauer festgelegt werden, nach deren Verstreichen der Monitor automatisch auf Stand-by-Betrieb schaltet. Ist
der Menüpunkt angewählt, die Taste ENTER drücken, um ihn zu aktivieren. Der Einstellbereich wird
grafisch angezeigt. Mit der Taste
▼ oder ▲ kann
zwischen 0 Min. (Funktion deaktiviert), 30 Min.,
60 Min., 90 Min. und 120 Min. gewählt werden
(Taste
▼: Wert reduzieren, Taste ▲: Wert erhöhen).
Zum Zurückkehren auf die Menüseite die Taste
BACK oder ENTER drücken.
Hinweis: Nach einer automatischen Umschaltung
auf Stand-by wird die Einstellung immer
auf „0 Min.“ zurückgesetzt.
Menüpunkte „Default 1“ und „Default 2“
Diese Menüpunkte haben für den Anwender keine
Funktion. Sie sind nur für den Service bestimmt.
Um den Einstellmodus für diese Seite zu verlassen,
die Taste BACK drücken. Dann mit der Taste
▼ oder ▲
eine andere Seite anwählen oder zum Verlassen des
Menüs die Taste BACK oder MENU drücken.
8Technische Daten
Bildschirmdiagonale
Modell TFT-1700COL: . . 43 cm (17")
Modell TFT-1900COL: . . 48 cm (19")
Blickwinkel: . . . . . . . . . . . . . hor. 160°, vert. 160°
Farbsystem: . . . . . . . . . . . . . PAL/NTSC (autom. Umschaltung)
Auflösung: . . . . . . . . . . . . . . 1280 x 1024 Pixel
Kontrast. . . . . . . . . . . . . . . . . 500 : 1
Reaktionszeit: . . . . . . . . . . . 6 ms/2 ms (Tr/Tf)
Anzahl der Farben: . . . . . . . 16,2 Millionen
Helligkeit: . . . . . . . . . . . . . . . 260 cd/m
2
Ein- und Ausgänge
Video: . . . . . . . . . . . . . . . 1 Vss/75 Ω
Audio: . . . . . . . . . . . . . . . 350 mV/470 kΩ
Einsatztemperatur: . . . . . . . . 0 – 50 °C
Stromversorgung: . . . . . . . . 12 V /4 A über beilieg. Netzgerät
an 100 – 240 V~/50 – 60 Hz/50 VA
Maße (ohne Fuß), Gewicht
Modell TFT-1700COL: . . 345 x 393 x 70 mm, 5,9 kg
Modell TFT-1900COL: . . 430 x 380 x 70 mm, 6,9 kg
Anschlüsse
Eingänge (Video): . . . . . . 2 x BNC (Composite Video)
1 x 4-pol. Mini-DIN (S-Video)
1 x 15-pol. D-Sub (VGA)
Eingänge (Audio): . . . . . . 2 x Cinch, stereo
1 x 3,5-mm-Klinke, stereo
Ausgänge (Video): . . . . . 2 x BNC (Composite Video)
1 x 4-pol. Mini-DIN (S-Video)
Ausgänge (Audio): . . . . . 2 x Cinch, stereo
Änderungen vorbehalten.
SONDERFKT
" Sprache
Film-Modus : Aus
OSD Zeituhr 5 Sek.
Autom. Absc. 0 Min.
Default 1
Default 2
D
A
CH
8
Diese Bedienungsanleitung ist urheberrechtlich für MONACOR®INTERNA TIONALGmbH & Co. KG geschützt.
Eine Reproduktion für eigene kommerzielle Zwecke – auch auszugsweise – ist untersagt.
Page 9
Please unfold page 3. Then you can always see the
operating elements and connections described.
1 Operating Elements (Front) and
Connections (Rear)
1 Power LED: red = stand-by
green = monitor switched on
2 Button MENU for calling and exiting the on-screen
menu
3 Arrow keys
function when the on-screen menu is not called:
button
▼ for automatic picture adjustment with
PC operation
button
▲ for switching between the signal
sources at the BNC input jacks VIDEO 1 (10)
and VIDEO2 (18)
function with the on-screen menu called:
buttons “Down”
▼ and “Up” ▲ to navigate in the
on-screen menu and to reduce or to increase
values for operating parameters
4 Button ENTER to activate menu pages and menu
items selected in the on-screen menu and to confirm some menu adjustments
5 Button BACK to go back to the respectively next
higher menu level in the on-screen menu
6 Button to switch on the monitor or to switch to
stand-by
7 Jack for the power supply (12V ) via the supplied
power supply unit
8 Audio input AUDIO1 (phono, stereo) for connection
to the audio output of the signal source connected
to the input VIDEO1 (10) or S-VIDEO (12)
9 Audio output AUDIO 1 (phono, stereo) to pass on
the fed-through signal of the input AUDIO 1 (8) to
another unit
10 Video input VIDEO1 (BNC) for connection of a sig-
nal source which supplies a composite signal
11 Video output VIDEO1 (BNC) to pass on the fed-
through signal of the input VIDEO1 (10) to another
unit
12 Video input S-VIDEO (mini DIN, 4-pole) for connec-
tion of a signal source which supplies an S-Video
signal
13 Video output S-VIDEO (mini DIN, 4-pole) to pass
on the fed-through signal of the input S-VIDEO (12)
to another unit
14 15-pole D-Sub connection VGA for connection to
the VGA output of a PC
15 3.5mm stereo jack PC AUDIO for connection to the
audio output of a PC
16 Audio input AUDIO 2 (phono, stereo) for connec-
tion to the audio output of the signal source connected to the input VIDEO 2 (18)
17 Audio output AUDIO 2 (phono, stereo) to pass on
the fed-through signal of the input AUDIO2 (16) to
another unit
18 Video input VIDEO2 (BNC) for connection of a sig-
nal source which supplies a composite video signal
19 Video output VIDEO 2 (BNC) to pass on the fed-
through signal of the input VIDEO2 (18) to another
unit
2 Safety Notes
The units (monitor and power supply unit) correspond
to all required directives of the EU and are therefore
marked with .
It is essential to observe the following items:
●
The units are suitable for indoor use only. Protect
them against dripping water and splash water, high
air humidity , and heat (admissible ambient temperature range 0–50°C).
●
Do not place any vessels filled with liquid, e.g. drinking glasses, on the units.
●
The heat being generated in the monitor must be
carried off by air circulation. Therefore, the air vents
at the housing must not be covered.
●
Do not set the monitor into operation, or immediately disconnect the mains plug of the power supply unit
from the mains socket if
1. there is visible damage to the monitor, the power
supply unit, or the mains cable,
2. a defect might have occurred after a drop or similar accident,
3. malfunctions occur.
The units must in any case be repaired by skilled
personnel.
●
Never pull the mains cable of the power supply unit
to disconnect the mains plug from the mains socket,
always seize the plug.
●
For cleaning only use a dry, soft cloth, by no means
chemicals or water.
●
No guarantee claims for the units and no liability for
any resulting personal damage or material damage
will be accepted if the units are used for other purposes than originally intended, if they are not correctly connected, operated, or not repaired in an
expert way.
●
Important for U.K. Customers!
The wires in the mains lead of the power supply unit
are coloured in accordance with the following code:
green/yellow = earth, blue = neutral, brown = live
As the colours of the wires in the mains lead of this
appliance may not correspond with the coloured
markings identifying the terminals in your plug, proceed as follows:
1. The wire which is coloured green and yellow must
be connected to the terminal in the plug which is
marked with the letter E or by the earth symbol
or coloured green or green and yellow.
2. The wire which is coloured blue must be connected to the terminal which is marked with the
letter N or coloured black.
WARNING The power supply unit is supplied with
hazardous mains voltage. Leave servicing to skilled personnel only. Inexpert
handling or modification of the unit may
cause an electric shock hazard.
GB
9
Page 10
GB
10
3. The wire which is coloured brown must be connected to the terminal which is marked with the
letter L or coloured red.
Warning – This appliance must be earthed.
3 Applications
This TFTLCD colour monitor with extra short response
time and very high-contrast picture reproduction is
especially suitable for applications in surveillance systems, however, it can also be used for other purposes,
e.g. as a PC monitor or for multimedia applications.
Up to 4 signal sources (e. g. surveillance camera,
video recorder, PC, DVD player) can be connected to
the monitor. Feed-through outputs allow to pass on the
input signals to other units. Via an on-screen menu the
monitor can be adjusted in an optimum way to the
requirements of the respective application.
4 Setting-up
To prevent disturbing reflections, place the monitor via
the base fixed to its rear side so that no light directly
falls on the screen surface. To obtain a favourable
viewing angle, the monitor can slightly be inclined forward or backward.
5 Connection
5.1 Units with composite signal or S-Video signal
5.1.1 Connecting the signal sources
1) Two signal sources may be connected which supply
composite video signals, e.g. surveillance cam-
eras, video recorders:
– Connect the video output of the first source to the
BNC input jack VIDEO1 (10) and the video output of the second source to the BNC input jack
VIDEO2 (18).
– Connect the audio output of the first source to the
phono input jacks AUDIO1 (8) and the audio output of the second source to the phono input jacks
AUDIO 2 (16) [red = right channel, white = left
channel].
2) The video output of a signal source which supplies
an S-Video signal, e.g. digital recorder , DVD player,
may be connected to the 4-pole mini DIN input jack
S-VIDEO (12). Connect the audio output of the
source to the phono input jacks AUDIO1 (8) [red =
right channel, white = left channel].
5.1.2 Feed-through outputs
Via the feed-through outputs it is possible to pass on
the respective input signal e.g. to another monitor or to
a recorder:
– audio output AUDIO 1 (9) and video output VIDEO1
(11) to feed through the signals of audio input
AUDIO 1 (8) and of video input VIDEO1 (10)
– video output S-VIDEO (13) to feed through the
signal of video input S-VIDEO (12)
– audio output AUDIO2 (17) and video output
VIDEO2 (19) to feed through the signals of audio
input AUDIO2 (16) and of video input VIDEO2 (18)
Connect the respective output to the corresponding
input of the following unit.
5.2 PC
Connect the VGAoutput of the PC to the 15-pole D-Sub
jack VGA (14) and its audio output to the 3.5mm jack
PC AUDIO (15).
Important: Resolution and picture frequency of the PC
graphics card have to be adapted to the monitor. The
following combinations are compatible:
For an optimum picture reproduction the PC graphics
card should be adjusted to a resolution of 1280 x 1024
and a picture frequency of 60Hz.
5.3 Power supply
After connection of all units, connect the supplied
power supply unit to the jack DC 12V (7) and to a socket
(100–240V~/50 – 60 Hz) via the supplied mains cable.
Note:The monitor has a low current consumption even
in stand-by operation. If it is not used for a longer time,
the power supply unit should be disconnected from the
power supply to save energy.
6 Setting into Operation
After connection of the power supply the monitor is
switched on [power LED (1) shows green] and reproduces picture and sound of the signal source last selected. On the top left of the picture its identification is
shortly inserted:
BNC1: source at the input VIDEO1 (10)
BNC2: source at the input VIDEO2 (18)
S-VIDEO: source at the input S-VIDEO (12)
PC: source at the input VGA (14)
To stop the reproduction, press the button (6). Then
the monitor is switched to stand-by, the power LED
shows red. To switch on press the button .
Note if video signal is missing/video loss
The monitor only reproduces the sound of a source if it
receives a video signal from this source. If the monitor
switched on does not receive a video signal from the
selected source, “NO SIGNAL OR SIGNAL LOSS” is
inserted for approx. 15 seconds. Then the monitor is
switched to stand-by, the power LED flashes red.
If the units are to be put out of operation
definitively, take them to a local recycling
plant for a disposal which is not harmful to
the environment.
Frequency
Resolution
60 Hz
640 x 480 √
800 x 600 √
1280 x 1024 √
1024 x 768 √
66 Hz
√
√
70 Hz
√
√
72 Hz
√
√
√√
75 Hz
√
√
85 Hz
√
√
√√
Page 11

a As soon as a video signal is present again from the
source, the monitor is switched on automatically.
b For stopping the video loss state manually, press
the button once (monitor in stand-by, power LED
shows red continuously). By a second pressing of
the button the monitor can be switched on again
and switched over to another source within 15seconds (→ chapter 7, item B and chapter 7.1.4).
7 Operation
Adjust the monitor with the buttons MENU (2), ▼ and
▲ (3), ENTER (4), and BACK (5) via the on-screen
menu. Outside this menu use the arrow buttons for the
following adjustments:
ATo activate the automatic picture correction in case
of PC operation, press the button
▼.
[If the automatic picture adjustment should not
supply the desired result, the picture can also be
manually adjusted via the menu
→ chapter 7.1.3.]
BTo switch between the signal sources at the BNC
inputs VIDEO 1 (10) and VIDEO 2 (18), press the
button
▲.
[The S-Video input (12) and the PC input (14) can
only be selected via the menu
→ chapter 7.1.4.]
7.1 Adjustments in the on-screen menu
To call the menu, press the button MENU.
The menu consists of 5 menu pages:
PICTURE picture adjustments
SOUND sound adjustments
INSTALL optimizing the picture (only with PC operation)
SOURCE selection of the signal source
FEATURES special functions
With the buttons “Down”
▼ and “Up” ▲ the pages can
successively be selected.
The menu can be displayed in 6 languages. To select
the language
→ chapter 7.1.5, menu item “Language”.
The following chapters refer to the menu in English.
Note: The menu is automatically extinguished if no but-
ton is pressed within a defined time. T o adjust the
time
→ chapter 7.1.5, menu item “OSD Timer”.
7.1.1 Menu page PICTURE
On this menu page picture adjustments are made. The
page shows different options of adjustment, depending
on the signal source:
Menu version A: Menu version B:
for sources at the inputs for a PC at the VGA input
VIDEO and S-VIDEO
To be able to make adjustments on the menu page,
press the button ENTER: The page is activated and
the first menu item selected (blue marking). With the
buttons
▼ or ▲ it is possible to select the individual
menu items of the page.
Menu items to adjust the parameters
“Brightness”, “Contrast”, “Tint”*/“Red”,
“Colour”/“Green”, ”Sharpness”/“Blue”
If the respective menu item is selected, press the
button ENTER to activate it. In the lower screen
area the adjusting range is graphically displayed.
Adjust the value for the parameter with the button
▼
or ▲ (button ▼: to reduce value, button ▲: to increase value). To return to the menu page, press
the button BACK or ENTER.
Menu item “Smart Picture” (in menu version A only)
If the menu item “Smart Picture” is selected, press
the button ENTER to activate it. Three options are
offered for the picture adjustment:
“Personal”: standard adjustment with the contrast
adjustment and brightness adjustment of the
menu
“Rich”: for a clear, high-contrast picture; contrast
and brightness are defined
“Soft”: for a “softer” picture, e.g. for films; contrast
and brightness are defined
Select the option with the button
▼ or ▲and confirm
with the button ENTER. To return to the menu page,
press the button BACK.
Menu item “Picture Format” (in menu version A only)
If the menu item “Picture Format” is selected, press
the button ENTER to activate it. Four options for the
picture reproduction are offered:
“Wide Screen”: standard adjustment for pictures in
the 4:3 format; the picture completely covers the
screen.
“Zoom”: the picture is vertically extended for a
slightly enlarged reproduction, however, the upper and lower margins are not visible any more.
“Side Bar”: the picture does not cover the screen in
its complete width, black side bars appear on the
left and right
“14:9”: adjustment for pictures in the 14:9 format;
for this adjustment, pictures in the 4:3 format are
cut above and below
Select the option with the button
▼ or ▲and confirm
with the button ENTER. To return to the menu page,
press the button BACK.
Menu item “Full Screen” (in menu version B only)
If the picture does not cover the complete screen, it
is automatically enlarged to screen size with the
adjustment “On”. The aspect ratio is matched. It is
possible to switch between “On” and “Off ” with the
button ENTER.
Menu item “Color Temp”
If “Color Temp” is selected, it is possible to switch
between the colour temperatures 6500K and
9300K with the button ENTER and thus select the
desired colour reproduction.
PICTURE
" Brightness 13
Contrast 17
Red 0
Green 0
Blue 0
Full Screen : On
Color Temp : 6500
Default
PICTURE
" Brightness 0
Contrast 0
Tint* 0
Colour 0
Sharpness 4
Smart Picture
Picture Format
Color Temp : 6500
Default
GB
11
*Tint adjustment – only necessary for NTSC signal sources
Page 12

GB
12
Menu item “Default”
To reset the values for the first 5 menu items on this
page to the factory settings, select the menu item
“Default” and press the button ENTER.
To exit the adjusting mode for this page, press the but-
ton BACK. Then select another page with the button
▼
or ▲ or press the button BACK or MENU to exit the
menu.
7.1.2 Menu page SOUND
Sound reproductions are adjusted on this menu page.
To make adjustments on the menu page, press the button ENTER: The page is activated and the first menu
item selected (blue marking). The individual menu items
of the page can be selected with the buttons
▼ and ▲.
Menu items for adjusting the parameters
“Volume”, “Balance”, “Treble”, “Bass”
If the respective menu item is selected, press the
button ENTER to activate it. The adjusting range is
graphically displayed. Adjust the value for the pa-
rameter with the button
▼ or ▲:
For “Volume”, “Treble”, and “Bass”:
button
▼ to reduce the value,
button
▲ to increase the value
For “balance”:
button
▼ to “displace” the sound to the left,
button
▲ to “displace” the sound to the right,
for value “0” the volume ratio Left /Right is bal-
anced.
To return to the menu page, press the button BACK
or ENTER.
Menu item “Speaker”
With the button ENTER it is possible to switch
between “On” (speakers switched on) and “Off”
(speakers switched off).
Menu item “Surround”
If the function “Surround” is switched on, there is a
surround sound effect when the sound is reproduced. With the button ENTER it is possible to
switch between “On” and “Off”.
To exit the adjusting mode for this page, press the button BACK. Then select another page with the button
▼
or ▲ or press the button BACK or MENU to exit the
menu.
7.1.3 Menu page INSTALL
– Menu adjustments only possible with PC operation –
In case of PC operation the picture can be optimized
via adjustments on this menu page.
To be able to make adjustments on this menu page,
press the button ENTER: The page is activated and
the first menu item selected (blue marking). With the
buttons
▼ and ▲ it is possible to select the individual
menu items of the page.
Menu item “Auto-Adjustment”
(This function corresponds to the function of the
button
▼ when the menu is not called → chapter 7,
item A.)
If the button ENTER is pressed with the menu item
selected, an automatic picture adjustment takes
place for the duration of some seconds. Manually
adjusted values for the remaining menu items of
this page are corrected.
If the automatic picture adjustment should not lead
to the desired result, optimize the picture by adjusting the following parameters.
Menu items for adjusting the parameters
“Phase”, “H-Position”, “V-Position”
for a manual picture adjustment
If the respective menu item is selected, press the
button ENTER to activate it. In the lower screen area
the adjusting range is graphically displayed. Adjust
the value for the parameter with the button
▼ or ▲:
For “Phase”:
With the button
▼ or ▲ adjust the value for which
the optimum picture sharpness is obtained.
For “H-Position”
button
▼ to displace the picture to the right,
button
▲ to displace the picture to the left.
For “V-Position”:
button
▼ to displace the picture downward,
button
▲ to displace the picture upward.
To return to the menu page, press the button BACK
or ENTER.
To exit the adjusting mode for this page, press the button BACK. Then select another page with the button
▼
or ▲ or press the button BACK or MENU to exit the
menu.
7.1.4 Menu page SOURCE
The signal source can be selected on this menu page.
When the page is called, the cursor points to the
source currently selected.
To be able to make adjustments on the menu page,
press the button ENTER: The page is activated and
the selected source highlighted in blue. With the button
▼ or ▲ select the desired source from the 4 possible
sources:
“BNC1”: source at the input VIDEO1 (10)
“BNC2”: source at the input VIDEO2 (18)
“S-VIDEO”: source at the input S-VIDEO (12)
“PC”: source at the input VGA (14)
To confirm the selection, press the button ENTER.
Then the menu is exited and the monitor changes to
the selected source.
SOURCE
" BNC1
BNC2
S-VIDEO
PC
INSTALL
" Auto-Adjustment
Phase 31
H-Position 96
V-Position 99
SOUND
" Volume 50
Balance 0
Treble 22
Bass 22
Speaker : On
Surround : Off
Page 13

For cancelling the selection instead, press the button BACK to exit the adjusting mode for this page.
Then select another page with the button
▼ or ▲ or
press the button BACK or MENU to exit the menu.
7.1.5 Menu page FEATURES
This menu page offers adjusting options for the following functions:
– menu language
– film mode (not for PC operation)
– timer-controlled extinguishing of the menu
– timer-controlled switching to stand-by operation
To be able to make adjustments on the menu page,
press the button ENTER: The page is activated and
the first menu item selected (blue marking). With the
buttons
▼ and ▲ the individual menu items of the page
can be selected.
Menu item “Language”
If the menu item “Language” is selected, press the
button ENTER to activate it. 6 languages for the on-
screen menu are offered:
“ENGLISH”
“DEUTSCH” (German)
“FRANÇAIS” (French)
“ITALIANO” (Italian)
“ESPAÑOL” (Spanish)
“NEDERLANDS” (Dutch)
Select the language with the button
▼ or ▲ and
press the button ENTER to confirm the selection
and to return to the menu page. To return to the
menu page without changing the adjustment, press
the button BACK.
Menu item “Film Mode”
(cannot be selected with PC operation)
This function is suitable for the reproduction of
video material with moving pictures, e.g. films. For
surveillance applications in which the picture con-
tents change less frequently , the function should be
switched off to obtain a better picture quality. With
the button ENTER it is possible to switch between
“On” and “Off”.
Menu item “OSD Timer”
Via this menu item the duration is defined, after its
expiring the on-screen menu is automatically extin-
guished if no other button is pressed. If the menu
item is selected, press the button ENTER to acti-
vate it. The adjusting range is graphically displayed.
With the button
▼ or ▲ it is possible to select be-
tween 3 sec., 5 sec., 10 sec., 20 sec., and 30 sec.
(button
▼: to reduce value, button ▲: to increase
value). To return to the menu page, press the button
BACK or ENTER.
Menu item “Sleep Timer”
Via this menu item the duration is defined, after its
expiring the monitor is automatically switched to
stand-by operation. If the menu item is selected,
press the button ENTER to activate it. The adjusting
range is graphically displayed. With the button
▼ or
▲ it is possible to select between 0 min. (function
deactivated), 30 min., 60 min., 90 min., and 120min.
(button
▼: to reduce value, button ▲: to increase
value). To return to the menu page, press the button
BACK or ENTER.
Note: After switching to stand-by automatically, the
adjustment is always reset to “0 Min.”.
Menu items “Default 1” and “Default 2”
These menu items have no function for the user.
They are only meant for the service.
To exit the adjusting mode for this page, press the button BACK. Then select another page with the button
▼
or ▲ or press the button BACK or MENU to exit the
menu.
8 Specifications
Screen diagonal
model TFT-1700COL: . . . 43 cm (17")
model TFT-1900COL: . . . 48 cm (19")
Viewing angle: . . . . . . . . . . . hor. 160°, vert. 160°
Colour system: . . . . . . . . . . . PAL/ NTSC (autom. switching)
Resolution: . . . . . . . . . . . . . . 1280 x 1024 pixels
Contrast: . . . . . . . . . . . . . . . 500 : 1
Response time: . . . . . . . . . . 6 ms/ 2 ms (Tr/Tf)
Number of colours: . . . . . . . . 16.2 millions
Brightness: . . . . . . . . . . . . . . 260 cd/ m
2
Inputs and outputs
video: . . . . . . . . . . . . . . . 1 Vpp/75 Ω
audio: . . . . . . . . . . . . . . . 350 mV/470 kΩ
Ambient temperature: . . . . . 0 – 50°C
Power supply: . . . . . . . . . . . 12 V / 4 A via supplied power
supply unit connected to
100 – 240 V~/50 – 60 Hz/50 VA
Dimensions (w/o base), weight
model TFT-1700COL: . . . 345 x 393 x 70 mm, 5.9 kg
model TFT-1900COL: . . . 430 x 380 x 70 mm, 6.9 kg
Connections
inputs (video): . . . . . . . . . 2 x BNC (composite video)
1 x 4-pole mini DIN (S-Video)
1 x 15-pole D-Sub (VGA)
inputs (audio): . . . . . . . . . 2 x phono, stereo
1 x 3.5 mm jack, stereo
outputs (video): . . . . . . . . 2 x BNC (composite video)
1 x 4-pole mini DIN (S-Video)
outputs (audio): . . . . . . . . 2 x phono, stereo
Subject to technical modification.
FEATURES
" Language
Film Mode : Off
OSD Timer 5 Sec.
Sleep Timer 0 Min.
Default 1
Default 2
GB
13
All rights reserved by MONACOR®INTERNATIONAL GmbH & Co. KG. No part of this instruction manual may
be reproduced in any form or by any means for any commercial use.
Page 14
Ouvrez le présent livret page 3 de manière à visualiser les éléments et branchements.
1 Eléments (face avant) et branchements
(face arrière)
1 Témoin de fonctionnement :
rouge = Stand-By (mode veille)
vert = moniteur allumé
2 Touche MENU pour appeler ou quitter le menu écran
3 Touches flèche :
fonction si le menu écran n’est pas appelé :
touche
▼ pour un réglage automatique d’image
en mode PC ;
touche
▲ pour commuter entre les sources de
signal aux prises d’entrée BNC VIDEO 1 (10) et
VIDEO 2 (18)
fonction si le menu écran est appelé :
touches “vers le bas”
▼ et “vers le haut” ▲ pour
naviguer dans le menu écran et pour diminuer
ou augmenter les valeurs des paramètres de
fonctionnement
4 Touche ENTER pour activer les pages et les points
de menu sélectionnés sur le menu écran et pour
confirmer certains réglages de menu
5 Touche BACK pour revenir à la plage de menu
immédiatement supérieure dans le menu écran
6 Touche pour allumer le moniteur ou pour passer
en mode Stand-By (mode veille)
7 Prise pour l’alimentation (12 V ) via le bloc sec-
teur livré
8 Entrée audio AUDIO 1 (RCA, stéréo), pour bran-
cher à la sortie audio de la source de signal reliée
à l’entrée VIDEO1 (10) ou S-VIDEO (12)
9 Sortie audio AUDIO 1 (RCA, stéréo), pour diriger le
signal repiqué de l’entrée AUDIO 1 (8) vers un
autre appareil
10 Entrée vidéo VIDEO 1 (BNC) pour brancher une
source de signal délivrant un signal vidéo composite (FBAS)
11 Sortie vidéo VIDEO 1 (BNC) pour diriger le signal
repiqué de l’entrée VIDEO1 (10) vers un autre
appareil
12 Entrée vidéo S-VIDEO (mini DIN 4 pôles) pour bran-
cher une source de signal délivrant un signal S-Vidéo
13 Sortie vidéo S-VIDEO (mini DIN 4 pôles) pour diri-
ger le signal repiqué de l’entrée S-VIDEO (12) vers
un autre appareil
14 Prise Sub-D 15 pôles VGA pour brancher à la sor-
tie VGA d’un PC
15 Prise jack 3,5 stéréo femelle PC AUDIO pour bran-
cher à la sortie audio d’un PC
16 Entrée audio AUDIO 2 (RCA, stéréo), pour bran-
cher à la sortie audio de la source de signal reliée
à l’entrée VIDEO2 (18)
17 Sortie audio AUDIO2 (RCA, stéréo) pour diriger le
signal repiqué de l’entrée AUDIO2 (16) vers un
autre appareil
18 Entrée vidéo VIDEO 2 (BNC) pour brancher une
source de signal délivrant un signal vidéo composite (FBAS)
19 Sortie vidéo VIDEO2 (BNC) pour diriger le signal
repiqué de l’entrée VIDEO2 (18) vers un autre
appareil.
2 Conseils d’utilisation et de sécurité
Les appareils (moniteur et bloc secteur) répondent à
toutes les directives nécessaires de l’Union Européenne et portent donc le symbole .
Respectez scrupuleusement les points suivants :
●
Les appareils ne sont conçus que pour une utilisation en intérieur. Protégez-les de tout type de projections d’eau, des éclaboussures, d’une humidité d’air
élevée et de la chaleur (plage de température de
fonctionnement autorisée : 0–50°C).
●
En aucun cas, vous ne devez poser d’objet contenant du liquide ou un verre sur l’appareil.
●
La chaleur dégagée dans le moniteur doit être évacuée par une circulation d’air correcte. En aucun
cas, les ouïes de ventilation du boîtier ne doivent
être obturées.
●
Ne faites jamais fonctionner le moniteur et débranchez immédiatement le bloc secteur lorsque :
1. des dommages sur le moniteur, le bloc secteur ou
le cordon secteur apparaissent,
2. après une chute ou accident similaire, l’appareil
peut présenter un défaut.
3. des défaillances apparaissent.
Dans tous les cas, les dommages doivent être
réparés par un technicien spécialisé.
●
Ne débranchez jamais le bloc secteur en tirant sur le
cordon secteur ; retirez toujours le cordon secteur en
tirant la prise.
●
Pour nettoyer l’appareil, utilisez uniquement un chiffon sec et doux, en aucun cas de produits chimiques
ou d’eau.
●
Nous déclinons toute responsabilité en cas de dommages matériels ou corporels résultants si les
appareils sont utilisés dans un but autre que celui
pour lequel ils ont été conçus, s’ils ne sont pas correctement branchés, utilisés ou réparés par une personne habilitée ; en outre, la garantie deviendrait
caduque.
Lorsque les appareils sont définitivement
retirés du service, vous devez les déposer
dans une usine de recyclage à proximité pour
contribuer à son élimination non polluante.
AVERTISSEMENT Le bloc secteur est alimenté par
une tension élevée et dangereuse. Ne touchez jamais l’intérieur
de l’appareil, en cas de mauvaise manipulation, vous pourriez
subir une décharge électrique.
F
B
CH
14
Page 15

3 Possibilités d’utilisation
Ce moniteur couleur TFT LCD avec un temps de réaction extrêmement court et une restitution d’image riche
en contraste est particulièrement bien adapté pour une
utilisation dans des systèmes de vidéosurveillance,
mais il peut être utilisé à d’autres fins, par exemple
comme moniteur de PC ou applications multimédia.
On peut relier jusqu’à 4 sources de signal (par exemple caméra de surveillance, magnétoscope, PC, lecteur DVD) au moniteur. Les sorties pour repiquage
permettent de diriger les signaux d’entrée vers d’autres appareils. Via un menu écran, le moniteur peut
être réglé de manière optimale pour répondre aux
besoins de chaque type d’utilisation.
4 Positionnement
Pour éviter les reflets gênants, placez le moniteur sur le
pied fixé sur la face arrière de telle sorte qu’aucune
lumière ne soit directement dirigée vers la surface de
l’écran. Pour obtenir un angle plus agréable, le moniteur
peut être légèrement incliné vers l’avant ou l’arrière.
5 Branchement
5.1 Appareils avec signal vidéo composite
ou S-Vidéo
5.1.1 Branchement de sources de signal
1) On peut relier 2 sources de signal délivrant des si-
gnaux vidéo composite (FBAS) p.ex. des caméras
de surveillance, magnétoscopes :
– Reliez la sortie vidéo de la première source à la
prise d’entrée BNC VIDEO 1 (10) et la sortie
vidéo de la seconde source à la prise d’entrée
BNC VIDEO 2 (18).
– Reliez la sortie audio de la première source aux
prises d’entrée RCA AUDIO 1 (8) et la sortie
audio de la seconde source aux prises d’entrée
RCA AUDIO 2 (16) [rouge = canal droit, blanc =
canal gauche].
2) La sortie vidéo d’une source de signal délivrant un
signal S-Vidéo, par exemple un enregistreur
numérique, un lecteur DVD, peut être reliée à la
prise d’entrée mini DIN 4 pôles S-VIDEO (12).
Reliez la sortie audio de la source aux prises d’entrée RCAAUDIO 1 (8) [rouge = canal droit, blanc =
canal gauche].
5.1.2 Sorties pour repiquage
Via les sorties pour repiquage, il est possible de diriger
chaque signal d’entrée par exemple vers un autre
moniteur ou un enregistreur :
– Sortie audio AUDIO 1 (9) et sortie vidéo VIDEO 1
(11) pour repiquer les signaux de l’entrée audio
AUDIO1 (8) et de l’entrée vidéo VIDEO1 (10)
– Sortie vidéo S-VIDEO (13) pour repiquer le signal
de l’entrée vidéo S-VIDEO (12)
– Sortie audio AUDIO2 (17) et sortie vidéo VIDEO 2
(19) pour repiquer les signaux de l’entrée audio
AUDIO2 (16) et de l’entrée vidéo VIDEO2 (18)
Reliez la sortie respective à l’entrée correspondante
de l’appareil suivant.
5.2 PC
Reliez la sortie VGA du PC à la prise Sub-D 15 pôles
VGA (14) et sa sortie audio à la prise jack 3,5 PC
AUDIO (15).
Important : la résolution et la fréquence d’images de la
carte graphique du PC doivent être réglées sur le moniteur. Les combinaisons suivantes sont compatibles :
Pour une restitution optimale d’image, la carte graphique du PC devrait être réglée sur une résolution de
1280 x 1024 et une fréquence d’images de 60Hz.
5.3 Alimentation
Une fois tous les appareils reliés, connectez le bloc
secteur livré à la prise DC 12V (7) et le cordon secteur
livré à une prise secteur (100–240V~/50–60Hz).
Conseil : le moniteur a une faible consommation
même en mode veille. En cas de non utilisation prolongée, il convient de débrancher le bloc secteur de
l’alimentation pour économiser l’énergie.
6 Fonctionnement
Une fois l’alimentation connectée, le moniteur s’allume
[le témoin de fonctionnement (1) brille en vert] et restitue l’image et le son de la dernière source de signal
sélectionnée. En haut à gauche sur l’image, sa désignation est brièvement affichée :
BNC1 : source à l’entrée VIDEO 1 (10)
BNC2 : source à l’entrée VIDEO 2 (18)
S-VIDEO : source à l’entrée S-VIDEO (12)
PC : source à l’entrée VGA (14)
Pour terminer la restitution, enfoncez la touche (6).
Le moniteur passe en mode Stand-By (mode veille), le
témoin de fonctionnement brille en rouge. Pour rallumer, appuyez à nouveau sur la touche .
Conseils en cas de signal vidéo manquant
ou de perte d’image
Le moniteur ne restitue le son de la source que s’il a
reçu un signal vidéo de la source ; si le moniteur
allumé ne reçoit pas de signal vidéo de la source
sélectionnée, le message “NO SIGNAL OR SIGNAL
LOSS” s’affiche pendant 15 secondes environ. Ensuite, le moniteur passe en veille, le témoin de fonctionnement clignote en rouge.
a Dès qu’un signal vidéo vient à nouveau de la sour-
ce, le moniteur s’allume automatiquement.
b Pour terminer manuellement le statut de perte d’i-
mage, enfoncez une fois la touche (moniteur en
veille, le témoin de fonctionnement continue à briller en rouge). Par une seconde pression sur la touche, le moniteur peut être rallumé et être commuté
sur une autre source en l’espace de 15 secondes
(→ chapitre 7, point B et chapitre 7.1.4).
F
B
CH
15
Fréquence
Résolution
60 Hz
640 x 480 √
800 x 600 √
1280 x 1024 √
1024 x 768 √
66 Hz
√
√
70 Hz
√
√
72 Hz
√
√
√√
75 Hz
√
√
85 Hz
√
√
√√
Page 16

7 Utilisation
Le moniteur se règle avec les touches MENU (2), ▼ et
▲ (3), ENTER (4) et BACK (5) via un menu écran. En
dehors du menu, les touches flèche peuvent être utilisées pour les réglages suivants :
A Pour activer la correction automatique d’image en
mode PC, enfoncez la touche
▼.
[Si la compensation automatique ne donnait pas le
résultat escompté, l’image peut être réglée manuellement via le menu : → chapitre 7.1.3].
B Pour commuter entre les sources de signal aux en-
trées BNC VIDEO1 (10) et VIDEO2 (18), enfoncez
la touche
▲.
[L’entrée S-Vidéo (12) et l’entrée PC (14) ne peuvent être sélectionnées que via le menu : → chapi-
tre 7.1.4].
7.1 Réglages sur le menu cran
Pour appeler le menu, enfoncez la touche MENU.
Le menu se compose de 5 pages :
IMAGE (PICTURE) réglages de l’image
SON (SOUND) réglages du son
INSTALLER (INSTALL) optimiser l’image
(uniquement en mode PC)
SOURCE sélection de la source de signal
OPTIONS (FEATURES) fonctions particulières
Avec les touches “vers le bas”
▼ et “vers le haut” ▲, les
pages peuvent être sélectionnées les unes après les
autres.
Le menu peut être affiché en 6 langues. Pour commuter la langue, → chapitre 7.1.5,point “Langage (Language)”. Les chapitres suivants se réfèrent au menu
en français.
Conseil : le menu s’efface automatiquement si aucune
touche n’est activée dans un intervalle de
temps donné. Pour régler la durée de l’intervalle, → chapitre 7.1.5, point “OSD Tempor.
(OSD Timer)”.
7.1.1 Page du menu IMAGE
Sur cette page du menu, on effectue les réglages d’image. La page montre différentes options de réglage,
en fonction de la source de signal :
Version A du menu : Version B du menu :
Pour des sources aux entrées pour un PC à l’entrée VGA
VIDEO et S-VIDEO
Pour pouvoir effectuer les réglages sur la page de
menu, enfoncez la touche ENTER : la page est activée
et le point 1 est sélectionné (repéré en bleu). Avec les
touches
▼ et ▲, chaque point du menu de la page peut
être sélectionné.
Points du menu pour régler les paramètres
“Luminosité”, “Contraste”, “Teinte” * /“Rouge”,
“Couleur”/“Vert”, “Netteté”/“Bleu”
Si le point correspondant du menu est sélectionné,
enfoncez la touche ENTER pour l’activer. En bas
sur l’image, la plage de réglage est indiquée graphiquement. Avec la touche
▼ ou ▲, réglez la
valeur pour le paramètre (touche
▼ : pour diminuer
la valeur, touche
▲ : pour augmenter la valeur).
Pour revenir à la page de menu, enfoncez la touche
BACK ou ENTER.
Point du menu “Smart Image”
(uniquement en version A du menu)
Si le point “Smart Image” est sélectionné, enfoncez
la touche ENTER pour l’activer ; 3 options de réglage d’image sont proposées :
“Préférentiel” : réglage standard avec les réglages
de contraste et de luminosité du menu
“Intense” pour une image claire, riche en contraste :
le contraste et la luminosité sont définis
“Douce” pour une image “plus douce” p. ex. pour
des films : le contraste et la luminosité sont définis
Sélectionnez l’option avec la touche
▼ ou ▲ et con-
firmez avec la touche ENTER. Pour revenir à la
page de menu, enfoncez la touche BACK.
Point du menu “Format Image”
(uniquement en version A du menu)
Si le point “Format Image” est sélectionné, enfoncez la touche ENTER pour l’activer ; 4 options de
visualisation d’image sont proposées :
“Plein écran” : réglage standard pour des images
au format 4:3 ; l’image remplit tout l’écran
“Zoom” : l’image est étirée verticalement pour l’affi-
cher un peu agrandie : pourtant, le bord supérieur
et le bord inférieur de l’image ne sont plus visibles
“Barre latérale” : l’image ne remplit pas l’écran en
totalité dans sa largeur, des bords latéraux noirs
à gauche et à droite apparaissent
“14:9” : réglage pour des images au format 14:9 ;
des images au format 4:3 sont coupées en haut
et en bas avec ce réglage.
Sélectionnez l’option avec la touche
▼ ou ▲ et con-
firmez avec la touche ENTER. Pour revenir sur la
page de menu, enfoncez la touche BACK.
Point du menu “Plein écran”
(uniquement en version B du menu)
Si l’image ne remplit pas tout l’écran, elle est automatiquement étirée, avec le réglage “Marche” à
toute la taille de l’écran. Le rapport de page est
adapté. Avec la touche ENTER, on peut commuter
entre “Marche” et “Arrêt”.
Point du menu “Color Temp”
Si “Color Temp” est sélectionné, on peut commuter
avec la touche ENTER entre les températures de
couleur 6500 K et 9300 K et ainsi sélectionner la
visualisation voulue de couleur.
Point du menu “Réinitialisation”
Pour réinitialiser les valeurs pour les 5 premiers
points du menu de cette page sur les réglages d’usine, sélectionnez le point “Réinitialisation” et
enfoncez la touche ENTER.
IMAGE
" Luminosité 13
Contraste 17
Rouge 0
Vert 0
Bleu 0
Plein écran : Marche
Color Temp : 6500
Réinitialisation
IMAGE
" Luminosité 0
Contraste 0
Teinte* 0
Couleur 0
Netteté 4
Smart Image
Format image
Color Temp : 6500
Réinitialisation
F
B
CH
16
* réglage de couleur – nécessaire uniquement pour des sources
NTSC de signal
Page 17

Pour quitter le mode de réglage pour cette page,
enfoncez la touche BACK. Ensuite, avec la touche
▼
ou ▲, sélectionnez une autre page ou pour quitter le
menu, enfoncez la touche BACK ou MENU.
7.1.2 Page du menu SON
Sur cette page, on peut effectuer les réglages pour la
restitution audio :
Pour pouvoir effectuer les réglages sur la page du
menu, enfoncez la touche ENTER. La page est activée
et le point 1 du menu est sélectionné (repéré en bleu).
Avec les touches
▼ et ▲, chaque point de la page peut
être sélectionné.
Points du menu pour régler les paramètres
“Volume”, “Balance”, “Aigus”, “Graves”
Si le point respectif du menu est sélectionné, enfon-
cez la touche ENTER pour l’activer ; la plage de
réglage s’affiche de manière graphique. Avec la
touche
▼ ou ▲, réglez la valeur pour le paramètre :
Pour “Volume”, “Aigus”, “Graves” :
Touche
▼ pour diminuer la valeur,
Touche
▲ pour augmenter la valeur
Pour “Balance” :
Touche
▼ pour “déplacer” le son vers la gauche,
Touche
▲ pour “déplacer” le son vers la droite,
Avec la valeur “0”, le rapport de volume gauche /
droite est équilibré.
Pour revenir à la page du menu, enfoncez la touche
BACK ou ENTER.
Point du menu “Haut-parleur”
Avec la touche ENTER, on peut commuter entre
“Marche” (haut-parleurs allumés) et “Arrêt” (hautparleurs éteints).
Point du menu “Son surround”
Si la fonction “Son surround” est allumée, un effet
de son dans la pièce est créé lors de la restitution
du son. Avec la touche ENTER, on peut commuter
entre “Marche” et “Arrêt”.
Pour quitter le mode de réglage pour cette page,
enfoncez la touche BACK. Ensuite, avec la touche
▼
ou ▲, sélectionnez une autre page ou pour quitter le
menu, enfoncez la touche BACK ou MENU.
7.1.3 Page de menu INSTALLER
– Réglages possibles uniquement en mode PC –
En mode PC, l’image peut être optimisée via des
réglages sur cette page de menu :
Pour effectuer les réglages sur la page du menu,
enfoncez la touche ENTER : la page est activée et le
point 1 du menu est sélectionné (repéré en bleu). A vec
les touches
▼ et ▲, on peut sélectionner chacun des
points du menu.
Point du menu “Ajustement autom.”
(Cette fonction correspond à la fonction de la touche
▼si le menu n’est pas appelé, → chapitre 7, point A).
Si la touche ENTER est enfoncée avec le point du
menu sélectionné, il y a une compensation automatique de l’image pendant quelques secondes. Les
valeurs réglées manuellement pour les points
restants du menu de cette page sont ainsi corrigées.
Si le réglage automatique d’image ne donnait pas
les résultats escomptés, optimisez l’image par le
réglage des paramètres suivants.
Points du menu pour régler les paramètres
“Phase”, “Position-H”, “Position-V”
pour un réglage manuel de l’image
Si le point correspondant du menu est sélectionné,
enfoncez la touche ENTER pour l’activer. En bas
dans l’image, la plage de réglage est affichée graphiquement. Avec la touche
▼ ou ▲, réglez la
valeur pour le paramètre :
Pour “Phase” :
avec la touche
▼ ou ▲, réglez la valeur pour
laquelle la netteté optimale de l’image est atteinte.
Pour “Position-H” :
touche
▼ pour déplacer l’image vers la droite
touche
▲ pour déplacer l’image vers la gauche
Pour “Position-V” :
touche
▼ pour déplacer l’image vers le bas
touche
▲ pour déplacer l’image vers le haut
Pour revenir à la page du menu, enfoncez la touche
BACK ou ENTER.
Pour quitter le mode de réglage pour cette page,
enfoncez la touche BACK. Ensuite, avec la touche
▼
ou ▲, sélectionnez une autre page ou pour quitter le
menu, enfoncez la touche BACK ou MENU.
7.1.4 Page de menu SOURCE
Sur cette page du menu, on peut sélectionner la source de signal. En appelant la page le curseur indique la
source actuellement sélectionnée.
Pour effectuer les réglages sur la page du menu,
enfoncez la touche ENTER : la page est activée et la
source sélectionnée est mise en avant en bleu. A vec la
touche
▼ ou ▲, sélectionnez la source souhaitée
parmi les quatre :
“BNC1” :source à l’entrée VIDEO 1 (10)
“BNC2” :source à l’entrée VIDEO 2 (18)
“S-VIDEO” :source à l’entrée S-VIDEO (12)
“PC” : source à l’entrée VGA (14)
Pour confirmer la sélection, enfoncez la touche
ENTER. Vous quittez alors le menu, le moniteur passe
sur la source sélectionnée.
Si vous souhaitez rejeter la sélection, enfoncez la
touche BACK pour quitter le mode de réglage pour
SOURCE
" BNC1
BNC2
S-VIDEO
PC
INSTALLER
" Ajustement Autom.
Phase 31
H-Position 96
V-Position 99
SON
" Volume 50
Balance 0
Aigus 22
Graves 22
Haut-parleur : Marche
Son surround : Arret
F
B
CH
17
Page 18

cette page ; ensuite avec la touche ▼ ou ▲, sélectionnez une autre page ou pour quitter le menu, enfoncez la touche BACK ou MENU.
7.1.5 Page de menu OPTIONS
Cette page propose les options de réglage pour les
fonctions suivantes :
– langue du menu
– mode du film (pas en mode PC)
– effacement programmé du menu
– commutation programmée en mode Stand-By
Pour effectuer les réglages sur la page du menu,
enfoncez la touche ENTER : la page est activée et le
point 1 du menu est sélectionné (mis en avant en
bleu). A vec les touches
▼ et ▲, sélectionnez les points
individuels de la page:
Point du menu “Langage”
Si le point du menu “Langage” est sélectionné,
enfoncez la touche ENTER pour l’activer. 6 langues
sont proposées pour le menu d’écran :
“ENGLISH” (anglais),
“DEUTSCH” (allemand)
“FRANÇAIS”
“ITALIANO” (italien)
“ESPAÑOL” (espagnol)
“NEDERLANDS” (hollandais)
Sélectionnez la langue avec la touche
▼ ou ▲ et
pour confirmer la sélection et revenir à la page du
menu, enfoncez la touche ENTER. Pour revenir à la
page du menu sans modifier les réglages, enfoncez
la touche BACK.
Point du menu “Mode Film”
(pas sélectionnable en mode PC)
Cette fonction est adaptée pour la restitution de
matériaux vidéo avec images mobiles par exemple
des films. Pour des applications de surveillance
dans lesquelles les contenus d’image ne changent
pas souvent, il conviendrait de désactiver la fonction en raison d’une meilleure qualité d’image. A vec
la touche ENTER, on peut commuter entre “Marche” et “Arrêt”.
Point du menu “OSD Tempor.”
Avec ce point du menu, on peut déterminer la durée
après laquelle le menu disparaît automatiquement
tant qu’aucune touche n’est enfoncée. Si le point du
menu est sélectionné, enfoncez la touche ENTER,
pour l’activer. La plage de réglage est affichée graphiquement. A vec la touche
▼ ou ▲, on peut sélec-
tionner entre 3 secondes, 5 secondes, 10 secondes, 20 secondes et 30 secondes (touche
▼ : pour
diminuer la valeur, touche
▲, pour augmenter la
valeur) ; pour revenir à la page du menu, enfoncez
la touche BACK ou ENTER.
Point du menu “Sleep Timer”
Avec ce point du menu, on peut déterminer la durée
après laquelle le moniteur passe automatiquement
en mode Stand-By. Si le point du menu est sélectionné, enfoncez la touche ENTER, pour l’activer. La
plage de réglage est affichée graphiquement. Avec
la touche
▼ ou ▲, on peut sélectionner entre 0mn
(fonction désactivée), 30mn, 60mn, 90mn et
120mn (touche
▼ : pour diminuer la valeur, touche
▲: pour augmenter la valeur). Pour revenir à la page
du menu, enfoncez la touche BACK ou ENTER.
Conseil : après une commutation automatique sur
Stand-By, le réglage est toujours réinitialisé sur “0Min.”.
Points du menu “Default 1” et “Default 2”
Ces points ne sont prévus que pour l’entretien de
l’appareil pas pour l’utilisateur.
Pour quitter le mode réglage pour cette page, enfoncez la touche BACK. Ensuite, avec la touche
▼ ou ▲,
sélectionnez une autre page ou pour quitter le menu,
enfoncez la touche BACK ou MENU.
8 Caractéristiques techniques
Diagonale d’écran
modèle TFT-1700COL : . 43 cm (17")
modèle TFT-1900COL : . 48 cm (19")
Angle : . . . . . . . . . . . . . . . . hor. 160°, vert. 160°
Système couleur : . . . . . . . PAL/ NTSC
(commutation automatique)
Résolution : . . . . . . . . . . . . 1280 x 1024 pixels
Contraste : . . . . . . . . . . . . . 500 : 1
Temps de réaction : . . . . . . 6 ms/ 2 ms (Tr/ Tf)
Nombre de couleurs : . . . . . 16,2 millions
Luminosité : . . . . . . . . . . . . 260 cd/ m
2
Entrées et sorties
Vidéo : . . . . . . . . . . . . . . 1 Vcc/75 Ω
Audio : . . . . . . . . . . . . . . 350 mV/470 kΩ
Température fonc. : . . . . . . 0 – 50°C
Alimentation : . . . . . . . . . . . 12 V /4 Apar bloc secteur livré relié
à 100 –240 V~/ 50 – 60Hz/50 VA
Dimensions (sans pied), poids
modèle TFT-1700COL : . 345 x 393 x 70 mm, 5,9 kg
modèle TFT-1900COL : . 430 x 380 x 70 mm, 6,9 kg
Branchements
Entrées (Vidéo) : . . . . . . 2 x BNC (Composite Video)
1 x mini DIN 4 pôles (S-Video)
1 x Sub-D 15 pôles (VGA)
Entrées (Audio) : . . . . . . 2 x RCA, stéréo,
1 x jack 3,5 stéréo
Sorties (Vidéo) : . . . . . . . 2 x BNC (Composite Video)
1 x 4-pol. Mini DIN (S-Video)
Sorties (Audio) : . . . . . . . 2 x RCA, stéréo
Tout droit de modification réservé.
OPTIONS
" Langage
Mode Film : Arret
OSD Tempor. 5 Sec.
Sleep Timer 0 Min.
Default 1
Default 2
F
B
CH
18
Notice d’utilisation protégée par le copyright de MONACOR®INTERNATIONAL GmbH & Co. KG. Toute reproduction même partielle à des fins commerciales est interdite.
Page 19

Vi preghiamo di aprire completamente la pagina 3.
Così vedrete sempre gli elementi di comando e i
collegamenti descritti.
1 Elementi di comando (fronte)
e collegamento (retro)
1 Spia di funzionamento: rosso = stand-by
verde = monitor acceso
2 Tasto MENU per chiamare ed abbandonare il menù
sullo schermo
3 Tasti freccia
Funzione senza che il menù sia stato chiamato:
Tasto
▼ per la regolazione automatica dell’im-
magine durante il funzionamento con PC;
Tasto
▲ per cambiare fra le sorgenti di segnali
alle prese d’ingresso BNC VIDEO1 (10) e
VIDEO 2 (18)
Funzione con il menù chiamato:
Tasti “Giù”
▼ und “Su” ▲ , per muoversi nel
menù sullo schermo e per abbassare o aumentare i parametri di funzionamento
4 Tasto ENTER, per attivare le pagine e le voci scel-
te del menù e per confermare alcune impostazioni
del menù
5 Tasto BACK, per tornare al livello superiore del
menù sullo schermo
6 Tasto , per accendere il monitor oppure per pas-
sare alla modalità di stand-by
7 Presa di alimentazione (12V ) tramite l’alimenta-
tore in dotazione
8 Ingresso AUDIO1 (RCA, stereo) per il collegamen-
to con l’uscita audio della sorgente collegata all’ingresso VIDEO1 (10) o S-VIDEO (12)
9 Uscita AUDIO1 (RCA, stereo) per inoltrare il segna-
le dell’ingresso AUDIO1 (8) ad un altro apparecchio
10 Ingresso VIDEO1 (BNC) per il collegamento di una
sorgente con segnale composito
11 Uscita VIDEO 1 (BNC) per inoltrare il segnale
dell’ingresso VIDEO1 (10) ad un altro apparecchio
12 Ingresso S-VIDEO (Mini-DIN, 4 poli) per il collega-
mento di una sorgente con segnale S-Video
13 Uscita S-VIDEO (Mini-DIN, 4 poli) per inoltrare il
segnale dell’ingresso S-VIDEO (12) ad un altro
apparecchio
14 Contatto VGA D-sub a 15 poli per il collegamento
con l’uscita VGA di un PC
15 Presa jack stereo 3,5mm PC AUDIO per il collega-
mento all’uscita audio di un PC
16 Ingresso AUDIO2 (RCA, stereo) per il collegamen-
to all’uscita audio della sorgente collegata all’ingresso VIDEO2 (18)
17 Uscita AUDIO2 (RCA, stereo) per inoltrare il segna-
le dell’ingresso AUDIO2 (16) ad un altro apparecchio
18 Ingresso VIDEO2 (BNC) per il collegamento di una
sorgente con segnale composito
19 Uscita VIDEO2 (BNC) per inoltrare il segnale
dell’ingresso VIDEO2 (18) ad un altro apparecchio
2Avvertenze di sicurezza
Gli apparecchi (monitor e alimentatore) sono conformi
a tutte le direttive richieste dell’UE e pertanto portano
la sigla .
Si devono osservare assolutamente anche i seguenti
punti:
●
Gli apparecchi sono previsti solo per l’uso all’interno
di locali. Proteggerli dall’acqua gocciolante e dagli
spruzzi d’acqua, da alta umidità dell’aria e dal calore (temperatura d’impiego ammessa fra 0 e 50°C).
●
Non depositare sugli apparecchi dei contenitori
riempiti di liquidi, p.es. bicchieri.
●
Dev’essere garantita la libera circolazione dell’aria
per dissipare il calore che viene prodotto all’interno
del monitor. Non coprire in nessun modo le fessure
d’aerazione.
●
Non mettere in funzione il monitor e staccare subito
la spina dell’alimentatore dalla presa di rete se:
1. il monitor, l’alimentatore o il cavo rete presentano
dei danni visibili;
2. dopo una caduta o dopo eventi simili sussiste il
sospetto di un difetto;
3. gli apparecchi non funzionano correttamente.
Per la riparazione rivolgersi sempre ad un’officina
competente.
●
Staccare il cavo rete afferrando la spina, senza tirare il cavo.
●
Per la pulizia usare solo un panno morbido, asciutto;
non impiegare in nessun caso prodotti chimici o
acqua.
●
Nel caso d’uso improprio, di collegamenti sbagliati,
d’impiego scorretto o di riparazione non a regola
d’arte degli apparecchi, non si assume nessuna responsabilità per eventuali danni consequenziali a
persone o a cose e non si assume nessuna garanzia per gli apparecchi.
3 Possibilità d’impiego
Questo monitor TFT-LCD a colori con reazione estremamente breve e con riproduzione molto contrastata
dell’immagine è particolarmente adatto per l’impiego in
sistemi di sorveglianza, ma può essere usato anche
per altri scopi, p.es. come monitor per PC oppure per
applicazioni multimediali.
Al monitor si possono collegare fino a 4 sorgenti di
segnali (p. es. telecamera di sorveglianza, videoregistratore, PC, lettore DVD). Le uscite passanti permettono l’inoltro dei segnali d’ingresso ad ulteriori apparecchi. Con il menù sullo schermo, il monitor può essere regolato in modo ottimale per le necessità delle
varie applicazioni.
Se si desidera eliminare l’apparecchio definitivamente, consegnarlo per lo smaltimento ad un’istituzione locale per il riciclaggio.
AVVERTIMENTO L’alimentatore funziona con peri-
colosa tensione di rete. Non
intervenire mai personalmente al
suo interno! La manipolazione
scorretta può provocare una scarica elettrica pericolosa.
I
19
Page 20

4 Collocamento
Per escludere dei riflessi fastidiosi, posizionare il monitor, per mezzo della base fissata sul retro, in modo tale
che la superficie dello schermo non venga toccata dalla
luce diretta. Per migliorare l’angolo di visione, il monitor
può essere inclinato leggermente in avanti e indietro.
5 Collegamento
5.1 Apparecchi con segnale composito
o S-Video
5.1.1 Collegare le sorgenti di segnali
1) Si possono collegare due sorgenti che forniscono
un segnale video composito, p.es. telecamere da
sorveglianza, videoregistratori:
– Collegare l’uscita video della prima sorgente con
la presa BNC d’ingresso VIDEO1 (10) e l’uscita
video della seconda sorgente con la presa BNC
d’ingresso VIDEO2 (18).
– Collegare l’uscita audio della prima sorgente con
le prese RCA d’ingresso AUDIO 1 (8) e l’uscita
audio della seconda sorgente con le prese RCA
d’ingresso AUDIO2 (16).
[rosso = canale destro, bianco = canale sinistro]
2) Alla presa d’ingresso mini-DIN a 4 poli S-VIDEO
(12) si può collegare l’uscita video di una sorgente
che fornisce un segnale S-Video, p. es. registratore
digitale, lettore DVD. Collegare l’uscita audio della
sorgente con le prese RCA d’ingresso AUDIO1 (8)
[rosso = canale destro, bianco = canale sinistro].
5.1.2 Uscite passanti
Per mezzo delle uscite passanti è possibile inoltrare il
segnale d’ingresso p. es. ad un altro monitor o a un
registratore:
– Uscita AUDIO 1 (9) e uscita VIDEO 1 (11) per far
passare i segnali dell’ingresso AUDIO1 (8) e dell’ingresso VIDEO1 (10)
– Uscita S-VIDEO (13) per far passare il segnale
dell’ingresso S-VIDEO (12).
– Uscita AUDIO2 (17) e uscita VIDEO 2 (19) per far
passare i segnali dell’ingresso AUDIO2 (16) e
dell’ingresso VIDEO2 (18)
Collegare la relativa uscita con l’ingresso corrispondente dell’apparecchio a valle.
5.2 PC
Collegare l’uscita VGAdel PC con la presa VGAD-sub
a 15 poli (14) e l’uscita audio con la presa jack 3,5mm
PC AUDIO (15).
Importante: La risoluzione e la frequenza dell’immagine della scheda grafica del PC devono essere regolate secondo l’impostazione del monitor. Le seguenti
combinazioni sono compatibili:
Per una riproduzione ottimale dell’immagine, la scheda grafica del PC dovrebbe essere regolata con la
risoluzione di 1280 x 1024 e con la frequenza di 60Hz.
5.3 Alimentazione
Dopo aver collegato tutti gli apparecchi, collegare l’alimentatore in dotazione con la presa DC 12V (7) e
inserire il cavo rete in dotazione in una presa di rete
(100–240V~/50–60Hz).
N.B.: Il monitor consuma un po’ di corrente anche nella
modalità di stand-by . Se non viene usato per un periodo prolungato, è opportuno staccare l’alimentatore
dalla rete per risparmiare l’energia.
6 Messa in funzione
Dopo il collegamento dell’alimentazione, il monitor si
accende [la spia di funzionamento (1) si accende di
color verde] e riproduce l’immagine e il suono della
sorgente selezionata per ultima. In alto a sinistra si
vede brevemente l’indicazione della sorgente:
BNC1: sorgente all’ingresso VIDEO1 (10)
BNC2: sorgente all’ingresso VIDEO2 (18)
S-VIDEO: sorgente all’ingresso S-VIDEO (12)
PC: sorgente all’ingresso VGA (14)
Per terminare la riproduzione premere il tasto (6). Il
monitor attiva la modalità di stand-by e la spia di funzionamento diventa rossa. Per riaccendere il monitor
premere di nuovo il tasto .
Se manca il segnale video/perdita dell’immagine
Il monitor riproduce l’audio di una sorgente solo se
riceve da essa un segnale video. Se il monitor acceso
non riceve nessun segnale video dalla sorgente selezionata, si vede per 15 secondi ca. “NO SIGNAL OR
SIGNAL LOSS”. Allora il monitor attiva la modalità di
stand-by e la spia di funzionamento lampeggia di color
rosso.
a Non appena la sorgente fornisce nuovamente un
segnale video, il monitor si accende automaticamente.
b Per terminare manualmente lo stato di perdita
dell’immagine, premere una volta il tasto (monitor
in stand-by, la spia rimane rossa). Con una seconda pressione del tasto, il monitor può essere acceso nuovamente, e entro 15 secondi è possibile
selezionare un’altra sorgente (→ capitolo 7, punto B
e capitolo 7.1.4.).
7 Funzionamento
Il monitor viene regolato con i tasti MENU (2), ▼ e ▲
(3), ENTER (4) e BACK (5) per mezzo di un menù sullo
schermo. Al di fuori del menù, i tasti freccia possono
essere usati per le seguenti regolazioni:
A Per attivare la correzione automatica dell’immagine
durante il funzionamento con il PC, premere il
tasto
▼.
[Se la correzione automatica dell’immagine non
dovesse sortire il risultato desiderato, l’immagine
può essere regolata anche manualmente per
mezzo del menù → cap. 7.1.3.]
I
20
Frequenza
Risoluzione
60 Hz
640 x 480 √
800 x 600 √
1280 x 1024 √
1024 x 768 √
66 Hz
√
√
70 Hz
√
√
72 Hz
√
√
√√
75 Hz
√
√
85 Hz
√
√
√√
Page 21

B Per cambiare fra le sorgenti agli ingressi BNC
VIDEO 1 (10) e VIDEO 2 (18), premere il tasto
▲ .
[L’ingresso S-Video (12) e l’ingresso PC (14) possono essere selezionati solo per mezzo del menù
→ cap. 7.1.4.]
7.1 Impostazioni nel menù sullo schermo
Per chiamare il menù premere il tasto MENU.
Il menù è composto da 5 pagine:
IMMAGINE (PICTURE) regolazioni dell’immagine
SUONO (SOUND) regolazioni del suono
INSTALLARE (INSTALL) ottimizzare l’immagine
(solo con funzionamento con PC)
SORGENTE (SOURCE) selezione della sorgente dei segnali
FUNZIONI (FEATURES) funzioni speciali
Con i tasti “Giù”
▼ e “Su” ▲ si possono scegliere, una
dopo l’altra, le pagine.
Il menù può essere visualizzato in 6 lingue. Per cam-
biare lingua → capitolo 7.1.5, voce “Lingua (Language)”. I seguenti capitoli si riferiscono al menù in lingua
italiana.
N. B.: Il menù si spegne automaticamente se per un
determinato lasso di tempo non si preme nessun tasto. Per impostare tale lasso di tempo
→ capitolo 7.1.5, voce “OSD Timer”.
7.1.1 Pagina IMMAGINE
A questa pagina si effettuano le regolazioni dell’immagine. La pagina indica differenti opzioni di regolazioni,
a seconda della sorgente dei segnali:
Menù versione A: Menù versione B:
per sorgenti agli ingressi per un PC all’ingresso VGA
VIDEO e S-VIDEO
Per poter effettuare delle impostazioni alla pagina del
menù premere il tasto ENTER: la pagina è ora attivata
ed è selezionata la prima voce (segnalata in blu). Con
i tasti
▼ e ▲ si possono scegliere le singole voci del
menù di quella pagina.
Voci del menù per impostare i parametri
“Luminosità”, “Contrasto”, “Tinta”*/“Rosso”,
“Colore”/“Verde”, “Nitidezza”/“Blu”
Se è selezionata la relativa voce, premere il tasto
ENTER per attivare tale voce. Nella parte bassa
dell’immagine è indicato graficamente il range di
regolazione. Con il tasto
▼ o ▲ impostare il valore
per il parametro (tasto
▼: ridurre il valore, tasto ▲ :
aumentare il valore). Per ritornare alla pagina del
menù premere il tasto BACK o ENTER.
Voce del menù “Smart Picture”(solo nel menù versione A)
Se è selezionata la voce “Smart Picture”, premere il
tasto ENTER per attivare tale voce. Vengono offerte tre opzioni per la regolazione dell’immagine:
“Personale”: impostazione standard con le regola-
zioni di contrasto e luminosità dal menù
“Arricchita”: per un’immagine più chiara, più contra-
stata; contrasto e luminosità non possono essere
scelti
“Tenue”: per un’immagine più “morbida”, p.es. per
filmini; contrasto e luminosità non possono essere scelti
Scegliere l’opzione con il tasto
▼ o ▲ e confermare
con il tasto ENTER. Per ritornare alla pagina del
menù premere il tasto BACK.
Voce del menù “Formato immagine”
(solo nel menù versione A)
Se è selezionata la voce “Formato immagine”, premere il tasto ENTER per attivare tale voce. Vengono offerte 4 opzioni per la rappresentazione dell’immagine:
“Schermo largo”: impostazione standard per imma-
gini nel formato 4:3; l’immagine riempie l’intero
schermo.
“Zoom”: l’immagine risulta tirata verticalmente per
renderla più grande. In compenso non si vedono
più i bordi superiore ed inferiore dell’immagine
“Barra laterale”: l’immagine non riempie lo schermo
in tutta la sua larghezza; a destra e a sinistra si
vedono dei bordi neri
“14:9”: impostazione per immagini nel formato
14:9; con questa impostazione, le immagini del
formato 4:3 risultano tagliate in alto e in basso
Scegliere l’opzione con il tasto
▼ o ▲ e confermare
con il tasto ENTER. Per ritornare alla pagina del
menù premere il tasto BACK.
Voce del menù “Schermo intero”
(solo nel menù versione B)
Se l’immagine non riempie l’intero schermo, con
l’impostazione “Acc.” (acceso) viene automaticamente portata alle dimensioni dello schermo. Le
proporzioni si adattano al formato dello schermo.
Con il tasto ENTER si può cambiare fra “Acc.” e
“Spen.” (spento).
Voce del menù “Color Temp”
Se è selezionata la voce “Color Temp”, con il tasto
ENTER si può cambiare la temperatura cromatica
fra 6500K e 9300K per ottenere così una rappresentazione desiderata dei colori.
Voce del menù “Default”
Per riportare i valori delle prime 5 voci del menù di
questa pagina alle impostazioni di fabbrica, selezionare la voce del menù “Default” e premere il
tasto ENTER.
Per uscire dalle impostazioni di questa pagina, premere il tasto BACK. Quindi, con il tasto
▼ o ▲ scegliere
un’altra pagina oppure, per uscire dal menù, premere
il tasto BACK o MENU.
IMMAGINE
" Luminosità 13
Contrasto 17
Rosso 0
Verde 0
Blu 0
Schermo intero : Acc.
Color Temp : 6500
Default
IMMAGINE
" Luminosità 0
Contrasto 0
Tinta* 0
Colore 0
Nitidezza 4
Smart Picture
Formato Immagine
Color Temp: 6500
Default
I
21
*Impostazione della tonalità cromatica – necessaria solo con una sorgente NTSC
Page 22

7.1.2 Pagina SUONO
Aquesta pagina si effettuano le regolazioni per la riproduzione audio.
Per poter effettuare delle impostazioni alla pagina del
menù premere il tasto ENTER: la pagina è ora attivata
ed è selezionata la prima voce (segnalata in blu). Con
i tasti
▼ e ▲ si possono scegliere le singole voci del
menù di quella pagina.
Voci del menù per impostare i parametri
“Volume”, “Bilanciamento”, “Alti”, “Bass”
Se è selezionata la relativa voce del menù, premere il tasto ENTER per attivare tale voce. Il range di
regolazione è indicato graficamente. Con il tasto
▼
o ▲ impostare il valore per il parametro:
per “Volume”, “Alti” e “Bass”:
tasto ▼: ridurre il valore,
tasto
▲ : aumentare il valore.
Per “Bilanciamento”:
tasto ▼ per “spostare” il suono a sinistra,
tasto
▲ per ”spostarlo” a destra,
con il valore “0” , il rapporto destro/sinistro è equilibrato.
Per ritornare alla pagina del menù premere il tasto
BACK o ENTER.
Voce del menù “Altoparlante”
Con il tasto ENTER si può cambiare fra “Acc.” (altoparlante acceso) e “Spen.” (altoparlante spento).
Voce del menù “Modo surround”
Se è attivata la funzione “Modo surround”, durante
la riproduzione audio, il suono riempie tutto l’ambiente. Con il tasto ENTER si può cambiare fra
“Acc.” (acceso) e “Spen.” (spento).
Per uscire dalle impostazioni di questa pagina, premere il tasto BACK. Quindi, con il tasto
▼ o ▲ scegliere
un’altra pagina oppure, per uscire dal menù, premere
il tasto BACK o MENU.
7.1.3 Pagina INSTALLARE
(Impostazioni del menù possibili solo durante il funzionamento con il PC)
Durante il funzionamento con il PC, l’immagine può
essere ottimizzata con le impostazioni di questa pagina.
Per poter effettuare delle impostazioni alla pagina del
menù premere il tasto ENTER: la pagina è ora attivata
ed è selezionata la prima voce (segnalata in blu). Con
i tasti
▼ e ▲ si possono scegliere le singole voci del
menù di quella pagina.
Voce del menù “Registrazione”
(Questa funzione corrisponde alla funzione del
tasto
▼ quando il menù non è stato chiamato →
cap. 7, punto A.)
Se con la voce selezionata si preme il tasto
ENTER, per alcuni secondi si effettua una regolazione automatica dell’immagine. I valori impostati
manualmente per le altre voci di questa pagina vengono così corretti.
Se la regolazione automatica non dovesse sortire il
risultato desiderato, l’immagine può essere ottimizzata con i seguenti parametri.
Voci del menù per impostare i parametri
“Fase”, “Posizione-H”, “Posizione-V”
per una regolazione manuale dell’immagine
Se è selezionata la relativa voce del menù, premere il tasto ENTER per attivare tale voce. Nella parte
bassa dell’immagine è indicato graficamente il
range di regolazione. Con il tasto
▼ o ▲ impostare
il valore per il parametro:
per “Fase”:
con il tasto
▼ o ▲ impostare il valore con il quale
si ottiene la nitidezza ottimale.
Per “Posizione-H”:
tasto
▼ per spostare l’immagine a destra,
tasto
▲ per spostarla a sinistra.
Per “Posizione-V”:
tasto
▼ per spostare l’immagine in basso,
tasto
▲ per spostarla in alto.
Per ritornare alla pagina del menù premere il tasto
BACK o ENTER.
Per uscire dalle impostazioni di questa pagina, premere il tasto BACK. Quindi, con il tasto
▼ o ▲ scegliere
un’altra pagina oppure, per uscire dal menù, premere
il tasto BACK o MENU.
7.1.4 Pagina SORGENTE
A questa pagina si può selezionare la sorgente dei
segnali. Chiamando la pagina, il cursor indica la sorgente attuale.
Per poter effettuare delle impostazioni alla pagina del
menù premere il tasto ENTER: la pagina è ora attivata
e la sorgente selezionata è segnalata in blu. Con il
tasto
▼ o ▲ si può scegliere la sorgente desiderata fra
le 4 disponibili:
“BNC1”: sorgente all’ingresso VIDEO 1 (10)
“BNC2”: sorgente all’ingresso VIDEO 2 (18)
“S-VIDEO”: sorgente all’ingresso S-VIDEO (12)
“PC”: sorgente all’ingresso VGA (14)
Per confermare la scelta premere il tasto ENTER. Si
esce dal menù e il monitor passa alla sorgente selezionata.
Se invece si desidera annullare la selezione, premere il tasto BACK per uscire dalle impostazioni di
questa pagina. Quindi, con il tasto
▼ o ▲ scegliere
un’altra pagina oppure, per uscire dal menù, premere
il tasto BACK o MENU.
SORGENTE
" BNC1
BNC2
S-VIDEO
PC
INSTALLARE
" Registrazione
Fase 31
Posizione-H 96
Posizione-V 99
SUONO
" Volume 50
Bilanciamento 0
Alti 22
Bass 22
Altoparlante : Acc.
Modo surround : Spen.
I
22
Page 23

I
23
La MONACOR®INTERNA TIONALGmbH & Co. KG si riserva ogni diritto di elaborazione in qualsiasi forma delle
presenti istruzioni per l’uso. La riproduzione – anche parziale – per propri scopi commerciali è vietata.
7.1.5 Pagina FUNZIONI
Questa pagina offre le opzioni di regolazioni per le
seguenti funzioni:
– lingua del menù
– modalità filmini (non con PC)
– spegnimento temporizzata del menù
– cambio temporizzato nella modalità stand-by
Per poter effettuare delle impostazioni alla pagina del
menù premere il tasto ENTER: la pagina è ora attivata
ed è selezionata la prima voce (segnalata in blu). Con
i tasti
▼ e ▲ si possono scegliere le singole voci del
menù di quella pagina.
Voce del menù “Lingua”
Se è selezionata la voce “Lingua”, premere il tasto
ENTER per attivare tale voce. Vengono of ferte 6 lingue per il menù sullo schermo:
“ENGLISH” (inglese),
“DEUTSCH” (tedesco)
“FRANÇAIS” (francese)
“ITALIANO”
“ESPAÑOL” (spagnolo)
“NEDERLANDS” (olandese)
Scegliere la lingua con il tasto
▼ o ▲ e per ritornare
alla pagina del menù confermando la scelta premere il tasto ENTER. Per ritornare alla pagina del
menù senza modificare l’impostazione premere il
tasto BACK.
Voce del menù “Modo Della Pellicola” (non disponibile
con PC)
Questa funzione è adatta per la riproduzione di
materiale video con immagini in movimento, come
p.es. di filmini. Per le applicazioni di sorveglianza,
dove i contenuti delle immagini non cambiano così
spesso, per via della migliore qualità delle immagini è consigliabile disattivare questa funzione. Con il
tasto ENTER si può cambiare fra “Acc.” (acceso) e
“Spen.” (spento).
Voce del menù “OSD Timer”
Con questa voce si determina il tempo che passa
prima che il menù sullo schermo si spenga automaticamente se non viene premuto nessun tasto.
Se è selezionata questa voce, premere il tasto
ENTER per attivarla. Il range di regolazione è indicato graficamente. Con il tasto
▼ o ▲ si può
scegliere fra 3sec., 5sec., 10sec., 20sec. e
30sec. (tasto
▼: ridurre il valore, tasto ▲ : aumen-
tare il valore). Per ritornare alla pagina del menù
premere il tasto BACK o ENTER.
Voce del menù “Timer Speg.”
Con questa voce si determina il tempo che passa
prima che il monitor passi automaticamente nella
modalità di stand-by . Se è selezionata questa voce,
premere il tasto ENTER per attivarla. Il range di
regolazione è indicato graficamente. Con il tasto
▼
o ▲si può scegliere fra 0 min. (funzione disattivata),
30min., 60min., 90min. e 120min. (tasto
▼: ridur-
re il valore, tasto
▲ : aumentare il valore). Per ritor-
nare alla pagina del menù premere il tasto BACK o
ENTER.
N.B.: Dopo un cambio automatico in stand-by,
l’impostazione viene sempre resettata su
“0min.”.
Voci del menù “Default 1” e “Default 2”
Queste voci sono senza funzione per l’utente. Sono
riservate all’assistenza tecnica.
Per uscire dalle impostazioni di questa pagina, premere il tasto BACK. Quindi, con il tasto ▼ o ▲ scegliere
un’altra pagina oppure, per uscire dal menù, premere
il tasto BACK o MENU.
8 Dati tecnici
Diagonale dello schermo
Modello TFT-1700COL: . 43 cm (17")
Modello TFT-1900COL: . 48 cm (19")
Angolo di visione: . . . . . . . . . orizz. 160° , vert. 160°
Sistema colori: . . . . . . . . . . . PAL/NTSC (cambio automatico)
Risoluzione: . . . . . . . . . . . . . 1280 x 1024 pixel
Contrasto . . . . . . . . . . . . . . . 500 : 1
Reazione: . . . . . . . . . . . . . . . 6 ms/2 ms (Tr/Tf)
Numero colori: . . . . . . . . . . . 16,2 milioni
Luminosità: . . . . . . . . . . . . . . 260 cd/ m
2
Ingressi e uscite:
Video: . . . . . . . . . . . . . . . 1 Vpp/75 Ω
Audio: . . . . . . . . . . . . . . . 350 mV/470 kΩ
Temperatura d’esercizio: . . . 0 – 50 °C
Alimentazione: . . . . . . . . . . . 12 V /4 A tram. alimentatore in
dotaz. con
100 – 240 V~/50 – 60 Hz/50 VA
Dimensioni (senza base), peso
Modello TFT-1700COL: . 345 x 393 x 70 mm, 5,9 kg
Modello TFT-1900COL: . 430 x 380 x 70 mm, 6,9 kg
Collegamenti
Ingressi (Video): . . . . . . . 2 x BNC (video composito)
1 x mini-Din 4 poli (S-Video)
1 x D-sub 15 poli (VGA)
Ingressi (Audio): . . . . . . . 2 x RCA, stereo
1 x jack stereo 3,5 mm
Uscite (Video): . . . . . . . . 2 x BNC (video composito)
1 x mini-Din 4 poli (S-Video)
Uscite (Audio): . . . . . . . . 2 x RCA, stereo
Con riserva di modifiche tecniche.
FUNZIONI
" Lingua
Modo Della Pellicola : Spen.
OSD Timer 5 Sec.
Timer Speg. 0 Min.
Default 1
Default 2
Page 24

Vouw bladzijde 3 helemaal open, zodat u steeds
een overzicht hebt van de bedieningselementen en
de aansluitingen.
1 Overzicht van de bedieningselementen
(front) en aansluitingen (achterzijde)
1 POWER-LED: rood = stand-by (bedrijfsgereedheid)
groen = monitor ingeschakeld
2 Toets MENU om het beeldschermmenu op te roe-
pen en te verlaten
3 Pijltoetsen
Functie bij niet opgeroepen beeldschermmenu:
Toets
▼ voor automatische beeldregeling bij pc-
gebruik;
Toets
▲ om te wisselen tussen de signaalbron-
nen op de BNC-ingangsjacks VIDEO 1 (10) en
VIDEO 2 (18)
Functie bij geactiveerd beeldschermmenu:
Toetsen “Omlaag”
▼ en “Omhoog” ▲ om in het
beeldschermmenu te navigeren en voor bedrijfsparameters waarden te verlagen resp. te verhogen
4 Toets ENTER om in het beeldschermmenu gese-
lecteerde menupagina’s en menu-items te activeren en om enkele menu-instellingen te bevestigen
5 Toets BACK om in het beeldschermmenu naar het
betreffende hogere menuniveau terug te keren
6 Toets om de monitor in te schakelen of in stand-
by (gereedheidsmodus) te schakelen
7 Bus voor de voedingsspanning (12 V ) via de bij-
geleverde netadapter
8 Audio-ingang AUDIO1 (cinch, stereo) voor de
aansluiting op de audio-uitgang van de signaalbron
die op de ingang VIDEO1 (10) of S-VIDEO (12) is
aangesloten
9 Audio-uitgang AUDIO1 (cinch, stereo) om het
doorgestuurde signaal van de ingang AUDIO1 (8)
naar een volgend apparaat door te sturen
10 Video-ingang VIDEO 1 (BNC) voor het aansluiten
van een signaalbron die een FBAS-videosignaal
levert
11 Video-uitgang VIDEO 1 (BNC) om het doorgestuur-
de signaal van de ingang VIDEO (1 (10) naar een
volgend apparaat door te sturen
12 Video-ingang S-VIDEO (Mini-DIN, 4-polig) voor het
aansluiten van een signaalbron die een S-Videosignaal levert
13 Video-uitgang S-VIDEO (Mini-DIN, 4-polig) om het
doorgestuurde signaal van een ingang S-VIDEO
(12) naar een volgend apparaat door te sturen
14 15-polige D-Sub-connector VGA voor het aan-
sluiten op de VGA-uitgang van een pc
15 3,5mm-stereostekkerbus PC AUDIO voor het
aansluiten op de audio-uitgang van een pc
16 Audio-ingang AUDIO 2 (cinch, stereo) om de sig-
naalbron die op de ingang VIDEO2 (18) is aangesloten aan te sluiten op de audio-uitgang
17 Audio-uitgang AUDIO2 (cinch, stereo) om het
doorgestuurde signaal van de ingang AUDIO 2 (16)
naar een volgend apparaat door te sturen
18 Video-ingang VIDEO 2 (BNC) voor het aansluiten
van een signaalbron die een FBAS-videosignaal
levert
19 Video-uitgang VIDEO2 (BNC) om het doorgestuur-
de signaal van de ingang VIDEO 2 (18) naar een
volgend apparaat door te sturen
2Veiligheidsvoorschriften
De apparaten (monitor en netadapter) zijn allemaal in
overeenstemming met de EU-Richtlijnen en dragen
daarom het -kenmerk.
Let bij ingebruikname ook zeker op het volgende:
●
De apparaten zijn enkel geschikt voor gebruik binnenshuis. Vermijd druip- en spatwater, uitzonderlijk
warme plaatsen en plaatsen met een hoge vochtigheid (toegestaan omgevingstemperatuurbereik:
0–50°C).
●
Plaats geen bekers met vloeistof zoals drinkglazen
enz. op de apparatuur.
●
De warmte die in de monitor ontstaat, moet door
ventilatie worden afgevoerd. Dek daarom de ventilatieopeningen van de behuizing niet af.
●
Schakel de monitor niet in en trek onmiddellijk de
stekker van de adapter uit het stopcontact, wanneer:
1. de monitor, de adapter of het netsnoer zichtbaar
beschadigd is,
2. er een defect zou kunnen optreden nadat het
apparaat bijvoorbeeld gevallen is,
3. het apparaat slecht functioneert.
De apparaten moeten in elk geval hersteld worden
door een gekwalificeerd vakman.
●
Trek de stekker van de netadapter nooit met het
snoer uit het stopcontact, maar met de stekker zelf.
●
Verwijder het stof met een droge, zachte doek.
Gebruik zeker geen chemicaliën of water.
●
In geval van ongeoorloofd of verkeerd gebruik, verkeerde aansluiting, foutieve bediening of van herstelling door een niet-gekwalificeerd persoon vervalt
de garantie en de verantwoordelijkheid voor hieruit
resulterende materiële of lichamelijke schade.
3Toepassingen
Deze TFT-LCD-kleurmonitor met extreem korte reactietijd en een beeldweergave met zeer hoog contrast is
in het bijzonder geschikt voor gebruik in bewakingssystemen. Hij kan echter ook voor andere doeleinden wor-
Wanneer de apparaten definitief uit bedrijf
worden genomen, bezorg ze dan voor verwerking aan een plaatselijk recyclagebedrijf.
WAARSCHUWING De netspanning van de netadap-
ter is levensgevaarlijk. Open het
apparaat niet, want door onzorgvuldige ingrepen loopt u het risico van elektrische schokken.
NL
B
24
Page 25

den gebruikt, b.v. als pc-monitor of voor multimediatoepassingen. Er kunnen tot 4 signaalbronnen (b.v.
bewakingscamera, videorecorder, pc, dvd-speler) op
de monitor worden aangesloten. Doorvoeruitgangen
maken het doorsturen van de ingangssignalen naar
volgende apparaten mogelijk. Via een beeldschermmenu kan de monitor optimaal op de behoeften van de
betreffende toepassing worden ingesteld.
4 Opstelling
Om storende reflecties te vermijden, plaatst u de monitor via de aan de achterzijde van het apparaat bevestigde steunvoet zo dat er geen licht rechtstreeks op
het schermoppervlak valt. Voor een gunstige kijkhoek
kan de monitor makkelijk naar voor of naar achter worden gekanteld.
5 Aansluiting
5.1 Apparaten met FBAS- of S-videosignaal
5.1.1 Signaalbronnen aansluiten
1) U kunt twee signaalbronnen die FBAS-videosignalen (Composite Video) leveren, b.v. bewakingscamera’s, videorecorders, aansluiten:
– De video-uitgang van de eerste bron op de BNC-
ingangsjack VIDEO 1 (10) en de video-uitgang
van de tweede bron op de BNC-ingangsjack
VIDEO 2 (18).
– De audio-uitgang van de eerste bron op de cinch-
ingangsjacks AUDIO1 (8) aansluiten en de
audio-uitgang van de tweede bron op de cinchingangsjacks AUDIO2 (16).
[rood = rechter kanaal, wit = linker kanaal]
2) Op de 4-polige mini-DIN-ingangsjack S-VIDEO (12)
kan de video-uitgang van een signaalbron, die een
S-videosignaal levert, b.v. digitale recorder, dvdspeler worden aangesloten. Sluit de audio-uitgang
van de bron aan op de cinch-ingangsjacks AUDIO1
(8) [rood = rechter kanaal, wit = linker kanaal].
5.1.2 Doorvoeruitgangen
Via de doorvoeruitgangen kan het betreffende
ingangssignaal worden doorgestuurd, b.v. naar een
volgende monitor of naar een registratieapparaat:
– Audio-uitgang AUDIO1 (9) en video-uitgang
VIDEO1 (11) voor het doorsturen van de signalen
van de audio-ingang AUDIO1 (8) en van de videoingang VIDEO 1 (10)
–Video-uitgang S-VIDEO (13) voor het doorsturen
van het signaal van de video-ingang S-VIDEO (12)
– Audio-uitgang AUDIO2 (17) en video-uitgang
VIDEO2 (19) voor het doorsturen van de signalen
van de audio-ingang AUDIO 2 (16) en van de videoingang VIDEO2 (18)
Verbind de betref fende uitgang met de overeenkomstige ingang van het volgende apparaat.
5.2 Pc
Sluit de VGA-uitgang van de pc aan op de 15-polige
D-Sub-connector VGA (14) en de audio-uitgang ervan
op de 3,5mm-stekkerbus PC AUDIO (15).
Belangrijk: Resolutie en beeldfrequentie van de grafische kaart in de pc moeten op de monitor zijn afgestemd. Volgende combinaties zijn compatibel:
Voor een optimale beeldweergave moet de grafische
kaart op een resolutie van 1280 x 1024 en op een
beeldfrequentie van 60Hz zijn ingesteld.
5.3 Voedingsspanning
Nadat alle apparaten zijn aangesloten, verbindt u de
bijgeleverde netadapter met de bus DC 12V (7) en sluit
u het via het bijgeleverde netsnoer aan op een stopcontact (100–240V~/50–60Hz).
Aanwijzing: Ook in de stand-bymodus verbruikt de
motor nog een geringe hoeveelheid stroom. Bij langere buitenbedrijfstelling neemt u de netadapter best uit
het stopcontact om energie te sparen.
6 Ingebruikneming
Na het aansluiten van de voedingsspanning schakelt
de monitor in [POWER-LED (1) licht groen op] en
stuurt hij beeld en geluid van de laatst geselecteerde
signaalbron door. Links boven in beeld wordt uw naam
even weergegeven:
BNC1: bron op de ingang VIDEO 1 (10)
BNC2: bron op de ingang VIDEO 2 (18)
S-VIDEO: bron op de ingang S-VIDEO (12)
PC: bron op de ingang VGA (14)
Om de weergave te beëindigen, drukt u op de toets
(6). De monitor schakelt dan naar stand-by (gereedheidsmodus), de POWER-LED licht rood op. Om in te
schakelen, drukt u opnieuw op de toets .
Opmerking bij ontbrekend videosignaal/beeldverlies
De monitor geeft het geluid van een bron alleen weer,
wanneer hij er ook een videosignaal van ontvangt. Als
de ingeschakelde monitor geen videosignaal van de
geselecteerde bron ontvangt, wordt gedurende ca.
15 sec. “NO SIGNAL OR SIGNAL LOSS” op het
scherm weergegeven. Dan schakelt de monitor naar
stand-by, de POWER-LED knippert rood.
a Zodra van de bron opnieuw een videosignaal
beschikbaar is, schakelt de monitor automatisch in.
b Om de beeldverliesstatus manueel te beëindigen,
drukt u eenmaal op de toets (monitor in stand-by,
POWER-LED licht continu rood op). Door een
tweede keer op de toets te drukken, kunt u de monitor opnieuw inschakelen en binnen de 15 seconden
naar een andere bron omschakelen (→ hoofdstuk
7, punt B en hoofdstuk 7.1.4.).
NL
B
25
Frequentie
Resolutie
60 Hz
640 x 480 √
800 x 600 √
1280 x 1024 √
1024 x 768 √
66 Hz
√
√
70 Hz
√
√
72 Hz
√
√
√√
75 Hz
√
√
85 Hz
√
√
√√
Page 26

7 Bediening
De monitor wordt via een beeldschermmenu met de
toetsen MENU (2),
▼ en ▲ (3), ENTER (4) en BACK
(5) ingesteld. Buiten het menu kunnen de pijltoetsen
voor volgende instellingen worden gebruikt:
A Met de toets
▼ activeert u bij pc-gebruik de auto-
matische beeldcorrectie.
[Mocht de automatische beeldregeling niet het
gewenste resultaat opleveren, kan het beeld via het
menu ook manueel worden ingesteld → hoofdstuk
7.1.3.]
B Met de toets
▲ wisselt u tussen de signaalbronnen
op de BNC-ingangen VIDEO1 (10) en VIDEO2 (18).
[De S-video-ingang (12) en de pc-ingang (14) kunnen alleen via het menu worden geselecteerd →
hoofdstuk 7.1.4.]
7.1 Instellingen in het beeldschermmenu
Om het menu op te roepen, drukt u op de toets MENU.
Het menu bestaat uit 5 menupagina’s:
BEELD (PICTURE) Beeldinstellingen
GELUID (SOUND) Geluidsinstellingen
INSTALLEREN (INSTALL) Beeld optimaliseren
(alleen bij pc-gebruik)
BRON (SOURCE) Keuze van de signaalbron
DIVERSEN (FEATURES) Bijzondere functies
Met de toetsen “Omlaag”
▼ en “Omhoog” ▲ kunnen de
pagina’s na elkaar worden geselecteerd.
Het menu kan in 6 talen worden weergegeven. Om te
taal te wijzigen, raadpleeg → hoofdstuk 7.1.5, menuitem “Taal (Language)”. In de volgende hoofdstukken
wordt het Nederlandstalige menu besproken.
Aanwijzing: Het menu verschijnt automatisch op het
scherm, wanneer gedurende een bepaalde tijd niet meer op een toets is gedrukt.
Om de tijdsduur in te stellen, raadpleeg →
hoofdstuk 7.1.5, menu-item ”OSD Timer”.
7.1.1 Menupagina BEELD
Op deze menupagina worden beeldinstellingen vastgelegd. De pagina toont verschillende instelmogelijkheden, afhankelijk van de signaalbron:
Menuversie A: Menuversie B:
voor bronnen op de ingangen voor een pc op de VGA-ingang
VIDEO en S-VIDEO
Druk op de toets ENTER om instellingen op de menupagina te kunnen doorvoeren: De pagina is geactiveerd en het eerste menu-item is geselecteerd
(blauw gemarkeerd). Met de toetsen
▼ en ▲ kunnen
de afzonderlijke menu-items worden geselecteerd.
Menu-items om de parameters in te stellen
“Helderheid”, “Kontrast”, “Tint”*/“Rood”,
“Kleur”/“Groen”, “Scherpte”/“Blauw”
Als het gewenste menu-item geselecteerd is, drukt
u op de toets ENTER om het te activeren.
Onderaan op het scherm wordt het instelbereik grafisch weergegeven. Stel met de toets
▼ of ▲ de
waarde voor de parameters in (toets
▼: waarde ver-
lagen, toets
▲ : waarde verhogen). Om terug te
keren naar de menupagina drukt u op de toets
BACK of ENTER.
Menu-item “Beeld type” (alleen in menuversie A)
Als het menu-item ”Beeld type” geselecteerd is, drukt
u op de toets ENTER om het te activeren. Er worden
drie opties getoond om het beeld in te stellen:
“Persoonlijk”: standaardinstelling met de contrast-
en helderheidsinstellingen van het menu
“Kontrast Rijk”: voor een helder, contrastrijk beeld;
contrast en helderheid zijn vooraf ingesteld
“Zacht”: voor een “zachter” beeld, b.v. voor films;
contrast en helderheid zijn vooraf ingesteld
Selecteer de optie met de toets
▼ of ▲ en bevestig
met de toets ENTER. Om terug te keren naar de
menupagina drukt u op de toets BACK.
Menu-item “Beeld Formaat” (alleen in menuversie A)
Als het menu-item “Beeld Formaat” geselecteerd is,
drukt u op de toets ENTER om het te activeren. Er
worden vier opties getoond om het beeld in te stellen:
“Breedbeeld”: standaardinstelling voor beelden in
4:3-formaat; het beeld vult het volledige scherm
op.
“Zoom”: het beeld wordt verticaal uitgerekt om
het iets vergroot weer te geven; hierbij is een deel
van het beeld boven- en onderaan niet meer
zichtbaar
“Zij-panelen”: het beeld vult het beeldscherm niet
voor de volledige breedte op; links en rechts verschijnen zwarte zijpanelen
“14:9”: instelling voor beelden in 14:9-formaat;
beelden in 4:3-formaat worden bij deze instelling
boven- en onderaan afgesneden
Selecteer de optie met de toets
▼ of ▲ en bevestig
met de toets ENTER. Om terug te keren naar de
menupagina drukt u op de toets BACK.
Menu-item “Volledig Beeldscherm”
(alleen in menuversie B)
Als het beeld niet het volledige beeldscherm vult,
wordt het bij de instelling “Aan” automatisch tot op
het beeldschermformaat uitgevuld. De zijdeverhouding wordt hierbij aangepast. Met de toets ENTER
kan tussen “Aan” en “Uit” worden gewisseld.
Menu-item “Color Temp”
Als het item “Color Temp” geselecteerd is, kunt u
met de toets ENTER wisselen tussen de kleurtemperaturen 6500 K en 9300 K om zo de gewenste
kleurweergave vast te leggen.
Menu-item “Fabrieks Instellingen”
Om de fabrieksinstellingen (standaardwaarden)
voor de eerste vijf menupunten van deze pagina te
herstellen, selecteert u het menu-item “Fabrieks
Instellingen” en drukt u op de toets ENTER.
BEELD
" Helderheid 13
Kontrast 17
Rood 0
Groen 0
Blauw 0
Volledig Beeldscherm : Aan
Color Temp : 6500
Fabrieks Instellingen
BEELD
" Helderheid 0
Kontrast 0
Tint* 0
Kleur 0
Scherpte 4
Beeld type
Beeld Formaat
Color Temp : 6500
Fabrieks Instellingen
NL
B
26
* Kleurinstelling – alleen nodig bij NTSC-signaalbron
Page 27

Om de instelmodus voor deze pagina te verlaten, drukt
u op de toets BACK. Selecteer daarna met de toets
▼
of ▲ een andere pagina of druk op de toets BACK of
MENU om het menu te verlaten.
7.1.2 Menupagina GELUID
Op deze menupagina worden instellingen voor de
geluidsweergave vastgelegd.
Druk op de toets ENTER om instellingen op de menupagina te kunnen doorvoeren: De pagina is geactiveerd en het eerste menu-item is geselecteerd
(blauw gemarkeerd). Met de toetsen
▼ of ▲ kunnen de
afzonderlijke menu-items worden geselecteerd.
Menu-items om de parameters in te stellen
“Volume”, ”Balans”, “Hoge tonen”, “Bass”
Als het gewenste menu-item geselecteerd is, drukt
u op de toets ENTER om het te activeren. Het
instelbereik wordt grafisch weergegeven. Met de
toets
▼ of ▲de waarde voor de parameter instellen:
Bij “Volume”, “Hoge tonen” en “Bass”:
Toets ▼ om de waarde te verlagen,
Toets
▲ om de waarde te verhogen
Bij “Balans”:
Toets
▼ om het geluid naar links te “verschuiven”,
toets
▲om het geluid naar rechts te “verschuiven”,
bij waarde “0” is de volumeverhouding Links/
Rechts in evenwicht.
Om terug te keren naar de menupagina drukt u
op de toets BACK of ENTER.
Menu-item “Luidspreker”
Met de toets ENTER kan tussen “Aan” (luidspreker
ingeschakeld) en “Uit” (luidspreker uitgeschakeld)
worden gewisseld.
Menupunt “Surround”
Als de functie “Surround” ingeschakeld is, ontstaat
een ruimtelijk klankeffect bij de geluidsweergave.
Met de toets ENTER kan tussen “Aan” en “Uit” worden gewisseld.
Om de instelmodus voor deze pagina te verlaten, drukt
u op de toets BACK. Selecteer daarna met de toets
▼
of ▲ een andere pagina of druk op de toets BACK of
MENU om het menu te verlaten.
7.1.3 Menupagina INSTALLEREN
– Menu-instellingen alleen bij pc-gebruik mogelijk –
Bij pc-gebruik kan het beeld door instellingen op deze
menupagina worden geoptimaliseerd.
Druk op de toets ENTER om instellingen op de menupagina te kunnen doorvoeren: De pagina is geac-
tiveerd en het eerste menu-item is geselecteerd
(blauw gemarkeerd). Met de toetsen
▼ of ▲ kunnen de
afzonderlijke menu-items worden geselecteerd.
Menu-item “Automatisch Instellen”
(Deze functie komt overeen met de functie van de
toets
▼ bij niet opgeroepen menu → hoofdstuk 7,
punt A.)
Als bij geselecteerd menu-item op de toets ENTER
wordt gedrukt, wordt het beeld gedurende enkele
seconden automatisch geregeld. Manueel ingestelde waarden voor de overige menu-items van deze
pagina worden hierbij gecorrigeerd.
Mocht de automatische beeldafregeling niet het
gewenste resultaat opleveren, dan optimaliseert u
het beeld door de volgende parameters in te stellen.
Menu-items om de parameters in te stellen
“Fase”, “H-positie”, “V-positie”
voor een manuele beeldafregeling
Als het gewenste menu-item geselecteerd is, drukt
u op de toets ENTER om het te activeren.
Onderaan op het scherm wordt het instelbereik grafisch weergegeven. Met de toets
▼ of ▲ de waarde
voor de parameter instellen:
Bij “Fase”:
stel met de toets
▼ of ▲ de waarde in bij welke de
optimale beeldscherpte wordt bereikt.
Bij “H-positie”:
Toets
▼ om het beeld naar rechts te verschuiven,
toets
▲ om het beeld naar links te verschuiven.
Bij “V-positie”:
Toets
▼ om het beeld naar beneden te verschui-
ven, toets
▲ om het beeld naar boven te ver-
schuiven.
Om terug te keren naar de menupagina drukt u op
de toets BACK of ENTER.
Om de instelmodus voor deze pagina te verlaten, drukt
u op de toets BACK. Selecteer daarna met de toets
▼
of ▲ een andere pagina of druk op de toets BACK of
MENU om het menu te verlaten.
7.1.4 Menupagina BRON
Op deze menupagina kunt u de signaalbron selecteren. Bij het oproepen van de pagina, geeft de cursor de
momenteel geselecteerde bron aan.
Druk op de toets ENTER om instellingen op de menupagina te kunnen doorvoeren: De pagina is geactiveerd en de geselecteerde bron is blauw gemarkeerd. Selecteer met de toets
▼ of ▲ de gewenste
bron uit de vier mogelijkheden:
“BNC1”: bron op de ingang VIDEO 1 (10)
“BNC2”: bron op de ingang VIDEO 2 (18)
“S-VIDEO”: bron op de ingang S-VIDEO (12)
“PC”: bron op de ingang VGA (14)
Druk op de toets ENTER om uw selectie te bevestigen.
U verlaat dan het menu en de monitor schakelt naar de
geselecteerde bron.
BRON
" BNC1
BNC2
S-VIDEO
PC
INSTALLEREN
" Automatisch Instellen
Fase 31
H-Positie 96
V-Positie 99
GELUID
" Volume 50
Balans 0
Hoge tonen 22
Bass 22
Luidspreker : Aan
Surround : Uit
NL
B
27
Page 28

Mocht de keuze echter worden verworpen, druk
dan op de toets BACK om de instelmodus voor deze
pagina te verlaten. Selecteer daarna met de toets
▼ of
▲ een andere pagina of druk op de toets BACK of
MENU om het menu te verlaten.
7.1.5 Menupagina DIVERSEN
Deze menupagina biedt instelmogelijkheden voor volgende functies:
– Menutaal
– Filmmodus (niet bij pc-gebruik)
– Timergestuurd verdwijnen van het menu
– Timergestuurd omschakelen naar stand-bymodus
Druk op de toets ENTER om instellingen op de menupagina te kunnen doorvoeren: De pagina is geactiveerd en het eerste menu-item is geselecteerd
(blauw gemarkeerd). Met de toetsen
▼ of ▲ kunnen de
afzonderlijke menu-items worden geselecteerd.
Menupunt “Taal”
Als het menu-item “Taal” geselecteerd is, drukt u op
de toets ENTER om het te activeren. U kunt voor
het beeldschermmenu kiezen uit zes talen:
“ENGLISH” (Engels),
“DEUTSCH” (Duits)
“FRANÇAIS” (Frans)
“ITALIANO” (Italiaans)
“ESPAÑOL” (Spaans)
“NEDERLANDS”
Selecteer de taal met de toets
▼ of ▲; om uw se-
lectie te bevestigen en naar de menupagina terug
te keren, drukt u op de toets ENTER. Om naar de
menupagina terug te keren zonder de instelling te
wijzigen, drukt u op de toets BACK.
Menu-item “Film Mode” (bij pc-gebruik niet selecteerbaar)
Deze functie is geschikt voor het weergeven van
videomateriaal met bewegende beelden, bijvoor-
beeld films. Voor bewakingstoepassingen waarbij
de beelden minder frequent veranderen, moet de
functie omwille van een betere beeldkwaliteit wor-
den uitgeschakeld. Met de toets ENTER kan tussen
“Aan” en “Uit” worden gewisseld.
Menu-item “OSD timer”
Via dit menu-item wordt de tijdsduur bepaald na
welke het beeldschermmenu automatisch uitscha-
kelt als er niet op een andere toets wordt gedrukt.
Als het menu-item geselecteerd is, drukt u op de
toets ENTER om het te activeren. Het instelbereik
wordt grafisch weergegeven. Met de toets
▼ of ▲
kunt u kiezen uit 3sec., 5sec., 10sec., 20sec. en
30sec. (toets
▼: waarde verlagen, toets ▲ : waarde
verhogen). Om terug te keren naar de menupagina
drukt u op de toets BACK of ENTER.
Menu-item “Sleep Timer”
Via dit menu-item kunt u een tijdsduur instellen, na
welke de monitor automatisch naar de standbymodus schakelt. Als het menu-item geselecteerd is,
drukt u op de toets ENTER om het te activeren. Het
instelbereik wordt grafisch weergegeven. Met de
toets
▼ of ▲ kunt u kiezen uit 0min (functie uitge-
schakeld), 30min, 60min, 90min en 120min (toets
▼: waarde verlagen, toets ▲ : waarde verhogen).
Om terug te keren naar de menupagina drukt u op
de toets BACK of ENTER.
Aanwijzing: Na een automatische omschakeling
naar stand-by wordt de instelling
steeds op “0min” gereset.
Menu-items “Default 1” en “Default 2”
Deze menu-items hebben voor de gebruiker geen
functie. Ze zijn uitsluitend voor de service bedoeld.
Om de instelmodus voor deze pagina te verlaten, drukt
u op de toets BACK. Selecteer daarna met de toets
▼
of ▲ een andere pagina of druk op de toets BACK of
MENU om het menu te verlaten.
8Technische gegevens
Beeldschermdiagonaal
Model TFT-1700COL: . . . 43 cm (17")
Model TFT-1900COL: . . . 48 cm (19")
Kijkhoek: . . . . . . . . . . . . . . . hor. 160°, vert. 160°
Kleursysteem: . . . . . . . . . . . PAL/NTSC (autom. omschakeling)
Resolutie: . . . . . . . . . . . . . . . 1280 x 1024 pixels
Contrast. . . . . . . . . . . . . . . . 500 : 1
Responstijd: . . . . . . . . . . . . . 6 ms/2 ms (Tr/Tf)
Aantal kleuren: . . . . . . . . . . . 16,2 miljoen
Helderheid: . . . . . . . . . . . . . . 260 cd/ m
2
In- en uitgangen:
Video: . . . . . . . . . . . . . . . 1 Vss/75 Ω
Audio: . . . . . . . . . . . . . . . 350 mV/470 kΩ
Omgevingstemperatuur: . . . 0 – 50°C
Voedingsspanning: . . . . . . . . 12 V /4 A via. bijgelev.
netadapter op
100 – 240 V~/50 – 60 Hz/50 VA
Afmetingen (zonder voet),
gewicht
Model TFT-1700COL: . . . 345 x 393 x 70 mm, 5,9 kg
Model TFT-1900COL: . . . 430 x 380 x 70 mm, 6,9 kg
Aansluitingen
Ingangen (video): . . . . . . 2 x BNC (Composite Video)
1 x 4-pol. mini-DIN (S-Video)
1 x 15-pol. D-Sub (VGA)
Ingangen (audio): . . . . . . 2 x cinch, stereo
1 x 3,5 mm-jack, stereo
Uitgangen (video): . . . . . . 2 x BNC (Composite Video)
1 x 4-pol. mini-DIN (S-Video)
Uitgangen (audio): . . . . . 2 x cinch, stereo
Wijzigingen voorbehouden.
DIVERSEN
" Taal
Film Mode : Uit
OSD Timer 5 Sec.
Sleep Timer 0 Min.
Default 1
Default 2
NL
B
28
Deze gebruiksaanwijzing is auteursrechterlijk beschermd voor MONACOR®INTERNA TIONALGmbH & Co. KG.
Reproductie voor eigen commerciële doeleinden – ook bij wijze van uitzondering – is niet toegestaan.
Page 29

Por favor despliegue la página 3. Entonces usted
podrá ver los elementos operativos y conexiones
descritos.
1 Elementos operativos (Parte delantera)
y conexiones (Parte trasera)
1 LED de encendido: rojo = stand by,
verde = monitor encendido
2 Botón MENU para seleccionar y abandonar el
menú en pantalla
3 Teclas flecha
función cuando el menú en pantalla no está selec-
cionado:
botón
▼ para ajuste de imagen automático con
funcionamiento PC
botón
▲ para conmutar entre las fuentes de
señal en los jacks de entrada BNC VIDEO1 (10)
y VIDEO2 (18)
función con el menú en pantalla seleccionado:
botones “Down”
▼ y “Up” ▼ para navegar en el
menú en pantalla y para reducir o incrementar
valores para parámetros operativos
4 Botón ENTER para activar las páginas del menú y
los puntos del menú seleccionados en el menú en
pantalla y para confirmar algunos ajustes de menú
5 Botón BACK para volver al nivel de menú respec-
tivamente superior en el menú en pantalla
6 Botón para encender el monitor o conmutar a
stand-by
7 Jack para la alimentación (12V ) mediante la
unidad de alimentación entregada
8 Entrada audio AUDIO1 (phono, estéreo) para cone-
xión a la salida audio de la fuente de señal conectada a la entrada VIDEO1 (10) o S-VIDEO (12)
9 Salida audio AUDIO 1 (phono, estéreo) para pasar
la señal de alimentación de la entrada AUDIO1 (8)
a otra unidad
10 Entrada vídeo VIDEO 1 (BNC) para conexión de
una fuente de señal que suministra una señal de
vídeo compuesta
11 Salida vídeo VIDEO 1 (BNC) para pasar la señal de
alimentación de la entrada VIDEO 1 (10) a otra
unidad
12 Entrada vídeo S-VIDEO (mini DIN, 4 polos) para
conexión de una fuente de señal que suministra
una señal S-Vídeo
13 Salida vídeo S-VIDEO (mini DIN, 4 polos) para
pasar la señal de alimentación de la entrada
S-VIDEO (12) a otra unidad
14 Conexión D-Sub 15 polos VGA para conexión a la
salida VGA de un PC
15 Jack estéreo 3,5mm PC AUDIO para conexión a la
salida audio de un PC
16 Entrada audio AUDIO2 (phono, estéreo) para
conexión a la salida audio de la fuente de señal
conectada a la entrada VIDEO2 (18)
17 Salida audio AUDIO2 (phono, estéreo) para pasar
la señal de alimentación de la entrada AUDIO2
(16) a otra unidad
18 Entrada vídeo VIDEO 2 (BNC) para conexión de
una fuente de señal que suministra una señal de
vídeo compuesta
19 Salida vídeo VIDEO2 (BNC) para pasar la señal de
alimentación de la entrada VIDEO 2 (18) a otra
unidad
2 Notas de seguridad
Las unidades (monitor y unidad de alimentación) corresponden a todas las directivas requeridas por la UE
y por ello están marcadas con .
Es esencial que observe los puntos siguientes:
●
Las unidades sólo están indicadas para su uso en
interior. Protéjalas contra goteos y salpicaduras de
agua, humedad elevada del aire, y calor (rango de
temperatura ambiente admisible 0– 50°C).
●
No coloque ningún recipiente con líquido sobre las
unidades, por ejemplo vasos de bebida.
●
La existencia de calor generado en el monitor debe
ser expulsado mediante circulación de aire. Por lo
tanto no deben cubrirse las aberturas de ventilación
en la caja.
●
No ponga el monitor en marcha, o desconecte inmediatamente la toma de red de la unidad de alimentación del enchufe de red si
1. se percibe un daño en el monitor, la unidad de alimentación, o el cable de red,
2. ha ocurrido un defecto tras una caída o accidente
similar,
3. ocurren fallos.
Las unidades deben ser reparadas en todo caso por
personal especializado.
●
No tire nunca del cable de red de la unidad de alimentación para desconectar la toma de red del
enchufe de red, agarre siempre la toma.
●
Para limpiar use sólo un paño seco y suave, no use
productos químicos o agua.
●
No se aceptará ninguna reclamación para las unidades ni se asumirá ninguna responsabilidad por ningún
daño personal o patrimonial resultante si se usan las
unidades con un fin distinto al que fue originalmente
concebido, si no están correctamente conectadas,
utilizadas o si no se reparan de manera experta.
3 Aplicaciones
Este monitor color TFT LCD con tiempo de respuesta
extra corto y reproducción de imagen con contraste muy
alto está especialmente indicado para aplicaciones en
Si las unidades deben ser retiradas del funcionamiento definitivamente, llévelas a una
planta de reciclaje local para una disposición no perjudicial para el medio ambiente.
ADVERTENCIA La unidad de alimentación se ali-
menta con un voltaje de red peligroso. Deje el mantenimiento sólo
al personal especializado. Una
manipulación inexperta o una modificación de la unidad pueden causar un peligro de shock eléctrico.
E
29
Page 30

sistemas de vigilancia, sin embargo, también puede ser
usado para otros fines, por ejemplo como un monitor
PC o para aplicaciones multimedia.
Pueden conectarse al monitor hasta 4 fuentes de
señal (por ejemplo cámara de vigilancia, grabador
vídeo, PC, reproductor DVD). Las salidas de alimentación permiten pasar las señales de entrada a otras
unidades. Mediante un menú en pantalla se puede
ajustar el monitor a las necesidades de la aplicación
respectiva de una manera óptima.
4 Establecimiento
Para prevenir reflejos perturbadores, coloque el monitor mediante la base fijada a su parte trasera de manera que no caiga luz directamente en la superficie de la
pantalla. Para obtener un ángulo de visión favorable,
el monitor puede inclinarse ligeramente hacia delante
o hacia atrás.
5 Conexión
5.1 Unidades con señal compuesta
o señal S-Vídeo
5.1.1 Conexión de las fuentes de señal
1) Se pueden conectar dos fuentes de señal que
suministren señales de vídeo compuestas, p.ej.
cámaras de vigilancia, grabadores de vídeo:
– Conecte la salida vídeo de la primera fuente al
jack de entrada BNC VIDEO 1 (10) y la salida
vídeo de la segunda fuente al jack de entrada
BNC VIDEO2 (18).
– Conecte la salida audio de la primera fuente a los
jacks de entrada phono AUDIO 1 (8) y la salida
audio de la segunda fuente a los jacks de entrada phono AUDIO 2 (16) [rojo = canal derecho,
blanco = canal izquierdo].
2) La salida vídeo de una fuente de señal que sumi-
nistra una señal S-Vídeo, por ejemplo grabador
digital, reproductor DVD, puede ser conectada al
jack de entrada DIN mini 4 polos S-VIDEO (12).
Conecte la salida audio de la fuente a los jacks de
entrada phono AUDIO 1 (8) [rojo = canal derecho,
blanco = canal izquierdo].
5.1.2 Salidas de alimentación
Mediante las salidas de alimentación es posible pasar
la señal de entrada respectiva, por ejemplo, a otro
monitor o a otro grabador:
– salida audio AUDIO 1 (9) y salida vídeo VIDEO 1
(11) para alimentar las señales de entrada audio
AUDIO1 (8) y de entrada vídeo VIDEO 1 (10)
– salida vídeo S-VIDEO (13) para alimentar la señal
de entrada vídeo S-VIDEO (12)
– salida audio AUDIO2 (17) y salida vídeo VIDEO 2
(19) para alimentar las señales de entrada audio
AUDIO2 (16) y de entrada vídeo VIDEO2 (18)
Conecte la salida respectiva a la entrada correspondiente de la unidad siguiente.
5.2 PC
Conecte la salida VGA del PC al jack D-Sub 15 polos
VGA (14) y su salida audio al jack 3,5mm PC AUDIO
(15).
Importante: La resolución y frecuencia de imagen de la
tarjeta gráfica de PC tienen que estar adaptadas al
monitor. Son compatibles las combinaciones siguientes:
Para una reproducción de imagen óptima la tarjeta
gráfica del PC debería ajustarse a una resolución de
1280 x 1024 y una frecuencia de imagen de 60Hz.
5.3 Alimentación
Tras conectar todas las unidades, conecte la unidad
de alimentación entregada al jack DC 12V (7) y al
enchufe (100–240V~ / 50– 60 Hz) mediante el cable
de red entregado.
Nota: El monitor tiene un consumo de corriente bajo
incluso en funcionamiento stand-by . Si no se usa durante mucho tiempo, la unidad de alimentación debería
desconectarse de la alimentación para ahorrar energía.
6 Puesta en marcha
El monitor se enciende tras la conexión de la alimentación [el LED de encendido (1) aparece en verde]
y reproduce la imagen y sonido de la última fuente de
señal seleccionada. Arriba a la izquierda de la imagen
se inserta brevemente su identificación:
BNC1: fuente en la entrada VIDEO1 (10)
BNC2: fuente en la entrada VIDEO2 (18)
S-VIDEO: fuente en la entrada S-VIDEO (12)
PC: fuente en la entrada VGA (14)
Para parar la reproducción, presione el botón (6).
Luego el monitor está conmutado a stand-by, el LED
de encendido aparece en rojo. Para encender presione el botón otra vez.
Fíjese si la señal vídeo se pierde/pérdida de vídeo
El monitor sólo reproduce el sonido de una fuente si
recibe una señal vídeo de esa fuente. Si el monitor
encendido no recibe una señal vídeo de la fuente seleccionada, se inserta “NO SIGNAL OR SIGNAL LOSS”
durante aprox. 15 segundos. Luego el monitor conmuta a stand-by, el LED de encendido parpadea en rojo.
aTan pronto como haya presente una señal de vídeo
otra vez desde la fuente, el monitor se enciende
automáticamente.
b Para parar manualmente el estado de pérdida de
vídeo, presione el botón una vez (monitor en
stand-by , el LED de encendido aparece en rojo continuamente). Presionando otra vez el botón el monitor puede encenderse otra vez y cambiarse a otra
fuente al cabo de 15 segundos (→ capítulo 7,
punto B y capítulo 7.1.4).
E
30
Frecuencia
Resolución
60 Hz
640 x 480 √
800 x 600 √
1280 x 1024 √
1024 x 768 √
66 Hz
√
√
70 Hz
√
√
72 Hz
√
√
√√
75 Hz
√
√
85 Hz
√
√
√√
Page 31

7 Funcionamiento
Ajuste el monitor con los botones MENU (2), ▼ y ▲(3),
ENTER (4), y BACK (5) mediante el menú en pantalla.
Fuera de este menú use los botones de flecha para los
ajustes siguientes:
A Para activar la corrección de imagen automática en
caso de funcionamiento PC, presione el botón
▼. [Si
el ajuste de imagen automático no diera el resultado deseado, la imagen también puede ser ajustada
manualmente mediante el menú → capítulo 7.1.3.]
B Para conmutar entre las fuentes de señal en las
entradas BNC VIDEO 1 (10) y VIDEO 2 (18), presione el botón
▲.
[La entrada S-Vídeo (12) y la entrada PC (14) sólo
puede ser seleccionada mediante el menú → capítulo 7.1.4.]
7.1 Ajustes en el menú en pantalla
Para seleccionar el menú, presione el botón MENU.
El menú consiste en 5 páginas de menú:
IMAGEN (PICTURE) ajustes de imagen
SONIDO (SOUND) ajustes de sonido
INSTALAR (INSTALL) optimizar la imagen (sólo con
funcionamiento con PC)
FUENTE (SOURCE) selección de la fuente de
señal
PARTICULARIDADES (FEATURES) funciones especiales
Con los botones “Down”
▼ y “Up” ▲ las páginas pue-
den ser seleccionadas sucesivamente.
El menú puede mostrarse en 6 idiomas. Para selec-
cionar el idioma → capítulo 7.1.5, punto del menú
“Idioma (Language)”. Los capítulos siguientes se refieren al menú en español.
Nota: El menú se apaga automáticamente si no se pre-
siona ningún botón durante un tiempo definido.
Para ajustar el tiempo → capítulo 7.1.5, punto
del menú “Temp. OSD (OSD Timer)”.
7.1.1 Página del menú IMAGEN
En esta página del menú se hacen ajustes de imagen.
La página muestra diferentes opciones de ajuste
dependiendo de la fuente de señal:
Versión del menú A: Versión del menú B:
para fuentes en las entradas para un PC en la entrada VGA
VIDEO y S-VIDEO
Para poder hacer ajustes en la página del menú, presione el botón ENTER: La página se activa y el primer
punto del menú seleccionado (señal azul). Con los
botones
▼ y ▲ es posible seleccionar los puntos de
menú individuales de la página.
Puntos de menú para ajustar los parámetros
“Brillo”, “Contraste”, “Tono” */“Rojo”,
“Color”/“Verde”, “Definición”/“Azul”
Si se selecciona el punto del menú respectivo, presione el botón ENTER para activarlo. En la parte
más baja de la pantalla aparece gráficamente el
rango de ajuste. Ajuste el valor para el parámetro
con el botón
▼ o ▲ (botón ▼: para reducir el valor,
botón
▲: para aumentar el valor). Para volver a la
página del menú, presione el botón BACK o ENTER.
Punto del menú “Ajustes imagen”
(sólo en versión de menú A)
Si se selecciona el punto del menú “Ajustes imagen”, presione el botón ENTER para activarlo. Se
ofrecen tres opciones para el ajuste de imagen:
“Personal”: ajuste estándar con el ajuste de con-
traste y ajuste de brillo del menú
“Intenso”: para una imagen clara, de alto contraste;
se definen el contraste y el brillo
“Suave”: para una imagen “más suave”, por ejemplo
para películas; se definen el contraste y el brillo
Seleccione la opción con el botón
▼ o ▲ y confirme
con el botón ENTER. Para volver a la página del
menú, presione el botón BACK.
Punto del menú “Formato pantalla”
(sólo en la versión del menú A)
Si el punto del menú “Formato pantalla” está seleccionado, presione el botón ENTER para activarlo.
Para la reproducción de imágenes se ofrecen cuatro opciones:
“Panorámica”: ajuste estándar para imágenes en el
formato 4:3; la imagen cubre completamente la
pantalla.
“Zoom”: la imagen se extiende verticalmente para
una reproducción ligeramente alargada, sin
embargo, los márgenes superior e inferior ya no
son más visibles.
“Barra lateral”: la imagen no cubre la pantalla en su
anchura completa, aparecen barras laterales
negras a la derecha y a la izquierda
“14:9”: ajuste para imágenes en el formato 14:9;
para este ajuste, se cortan imágenes en el formato 4:3 por arriba y por abajo
Seleccione la opción con el botón
▼ o ▲ y confirme
con el botón ENTER. Para volver a la página del
menú, presione el botón BACK.
Punto del menú “Pantalla entera”
(sólo en la versión de menú B)
Si la imagen no cubre la pantalla entera, se aumenta automáticamente a tamaño de pantalla con el
ajuste “Act.” (encendido). Se ajusta el aspecto relación. Es posible conmutar entre “Act.” y “Desact.”
(apagado) con el botón ENTER.
Punto del menú “Color Temp”
Si se selecciona “Color Temp”, es posible conmutar
entre las temperaturas de color 6500 K y 9300 K
con el botón ENTER y de este modo seleccionar la
reproducción de color deseada.
Punto del menú “Ajuste estándar”
Para reajustar los valores para los 5 primeros puntos del menú en esta página para los ajustes de
fábrica, seleccione el punto del menú “Ajuste estándar” y presione el botón ENTER.
IMAGEN
" Brillo 13
Contraste 17
Rojo 0
Verde 0
Azul 0
Pantalla entera : Act.
Color Temp : 6500
Ajuste estándar
IMAGEN
" Brillo 0
Contraste 0
Tono* 0
Color 0
Definición 4
Ajustes Imagen
Formato pantalla
Color Temp : 6500
Ajuste estándar
E
31
*Ajuste de tono – necesario sólo para fuentes de señal NTSC
Page 32

Para abandonar el modo de ajuste para esta página,
presione el botón BACK. Luego seleccione otra página con el botón
▼ o ▲ o presione el botón BACK o
MENU para abandonar el menú.
7.1.2 Página del menú SONIDO
Las reproducciones de sonido se ajustan en esta página del menú.
Para hacer ajustes en la página del menú, presione el
botón ENTER: La página está activada y el primer
punto del menú seleccionado (marca azul). Los puntos
de menú individuales de la página pueden ser seleccionados con los botones
▼ y ▲.
Puntos de menú para ajustar los parámetros
“Volumen”, “Balance”, “Agudos”, “Bajos”
Si el punto del menú respectivo está seleccionado,
presione el botón ENTER para activarlo. El rango
de ajuste se muestra gráficamente. Ajuste el valor
para el parámetro con el botón
▼ o ▲:
Para “Volumen”, “Agudos”, y “Bajos”:
botón
▼ para reducir el valor,
botón
▲ para aumentar el valor
Para “Balance”:
botón
▼ para “desplazar” el sonido a la izquierda,
botón
▲ para “desplazarlo” a la derecha,
para el valor “0” la razón de volumen Izquierda /
Derecha se equilibra.
Para volver a la página del menú, presione el botón
BACK o ENTER.
Punto del menú “Altavoces”
Con el botón ENTER es posible conmutar entre
“Act.” (altavoces encendidos) y “Desact.” (altavoces apagados).
Punto del menú “Tipo de surr.”
Si la función “Tipo de surr.” está encendida, hay un
efecto de sonido surround cuando se reproduce el
sonido. Con el botón ENTER es posible conmutar
entre “Act.” (encendido) y “Desact.” (apagado).
Para abandonar el modo de ajuste para esta página,
presione el botón BACK. Luego seleccione otra página con el botón
▼ o ▲ o presione el botón BACK o
MENU para abandonar el menú.
7.1.3 Página del menú INSTALAR
(Ajustes de menú posibles sólo con funcionamiento PC)
En caso de funcionamiento PC la imagen puede ser
optimizada mediante ajustes en esta página del menú.
Para poder hacer ajustes en esta página del menú,
presione el botón ENTER: La página se activa y se
selecciona el primer punto del menú (marca azul). Con
los botones
▼ y ▲ es posible seleccionar los puntos
del menú individuales de la página.
Punto del menú “Ajuste automático”
(Esta función corresponde a la función del botón
▼
cuando no se selecciona el menú → capítulo 7,
punto A.)
Si se presiona el botón ENTER con el punto del
menú seleccionado, tiene lugar un ajuste de imagen automático durante algunos segundos. Los
valores ajustados manualmente para los puntos del
menú restantes de esta página se corrigen.
Si el ajuste de imagen automático no condujera al
resultado deseado, optimice la imagen ajustando
los parámetros siguientes.
Puntos del menú para ajustar los parámetros
“Fase”, “Posición-H”, “Posición-V”
para un ajuste de imagen manual
Si se selecciona el punto del menú respectivo, presione el botón ENTER para activarlo. En la zona de
la pantalla más baja se muestra gráficamente el
rango de ajuste. Ajuste el valor para el parámetro
con el botón
▼ o ▲:
Para “Fase”:
Con el botón
▼ o ▲ ajuste el valor por el que se
obtiene la nitidez de imagen óptima.
Para “Posición-H”:
botón
▼ para desplazar la imagen a la derecha,
botón
▲ para desplazar la imagen a la izquierda.
Para “Posición-V”:
botón
▼ para desplazar la imagen hacia abajo,
botón
▲ para desplazar la imagen hacia arriba.
Para volver a la página del menú presione el botón
BACK o ENTER.
Para abandonar el modo de ajuste para esta página,
presione el botón BACK. Luego seleccione otra página con el botón
▼ o ▲ o presione el botón BACK o
MENU para abandonar el menú.
7.1.4 Página del menú FUENTE
La fuente puede ser seleccionada en esta página del
menú. Cuando se selecciona la página, el cursor
señala a la fuente seleccionada corrientemente.
Para poder hacer ajustes en la página del menú, presione el botón ENTER: La página se activa y la fuente
seleccionada se ilumina en azul. Con el botón
▼ o ▲
seleccione la fuente deseada de 4 fuentes posibles:
“BNC1”: fuente en la entrada VIDEO 1 (10)
“BNC2”: fuente en la entrada VIDEO 2 (18)
“S-VIDEO”:fuente en la entrada S-VIDEO (12)
“PC”: fuente en la entrada VGA (14)
Para confirmar la selección, presione el botón ENTER.
Luego se abandona el menú y el monitor cambia a la
fuente seleccionada.
Para cancelar la selección en cambio, presione el
botón BACK para abandonar el modo de ajuste para
FUENTE
" BNC1
BNC2
S-VIDEO
PC
INSTALAR
" Ajuste Automático
Fase 31
Posición-H 96
Posición-V 99
SONIDO
" Volumen 50
Balance 0
Agudos 22
Bajos 22
Altavoces : Act.
Tipo de surr. : Desact.
E
32
Page 33

esta página. Luego seleccione otra página con el
botón
▼ o ▲ o presione el botón BACK o MENU para
abandonar el menú.
7.1.5 Página del menú PARTICULARIDADES
Esta página del menú ofrece opciones de ajuste para
las funciones siguientes:
– lenguaje del menú
– modo película (no para funcionamiento PC)
– apagado del menú controlado por temporizador
– conmutación controlada por temporizador para fun-
cionamiento stand-by
Para poder hacer ajustes en la página del menú, presione el botón ENTER: La página se activa y se selecciona el primer punto del menú (marca azul). Con los
botones
▼ y ▲ pueden seleccionarse los puntos del
menú individuales de la página.
Punto del menú “Idioma”
Si se selecciona el punto del menú “Idioma”, presione el botón ENTER para activarlo. Se ofrecen 6
idiomas para el menú en pantalla:
“ENGLISH” (Inglés)
“DEUTSCH” (Alemán)
“FRANÇAIS” (Francés)
“ITALIANO” (Italiano)
“ESPAÑOL”
“NEDERLANDS” (Holandés)
Seleccione el idioma con el botón
▼ o ▲ y presione
el botón ENTER para confirmar la selección y para
volver a la página del menú. Para volver a la página del menú sin arriesgar el ajuste, presione el
botón BACK.
Punto del menú “Modo película”
(no puede ser seleccionado con el modo PC)
Esta función está indicada para la reproducción de
material vídeo con imágenes en movimiento, por
ejemplo películas. Para aplicaciones en vigilancia
en que los contenidos de imagen cambian menos
frecuentemente, la función debería ser apagada
para obtener una calidad de imagen mejor. Con el
botón ENTER es posible conmutar entre “Act.”
(encendido) y “Desact.” (apagado).
Punto del menú “Temp. OSD”
Mediante este menú se define la duración, tras su
finalización, si no se presiona otro botón, se extingue automáticamente el menú en pantalla. Si se
selecciona el punto del menú, presione el botón
ENTER para activarlo. El rango de ajuste se muestra gráficamente. Con el botón
▼ o ▲ es posible
seleccionar entre 3seg., 5seg., 10seg., 20seg., y
30 seg. (botón
▼: para reducir el valor, botón ▲:
para aumentar el valor). Para volver a la página del
menú, presione el botón BACK o ENTER.
Punto del menú “Temp. stand by”
Mediante este punto del menú se define la duración,
tras su finalización el monitor conmuta automáticamente a funcionamiento stand-by. Si se selecciona
el punto del menú, presione el botón ENTER para
activarlo. El rango de ajuste aparece gráficamente.
Con el botón
▼ o ▲ es posible seleccionar entre
0min. (función desactivada), 30min., 60min.,
90min., y 120 min. (botón
▼: para reducir el valor,
botón
▲: para aumentar el valor). Para volver a la
página del menú, presione el botón BACK o ENTER.
Nota: Tras conmutar a stand-by automáticamente,
el ajuste siempre se reajusta a “0 Min.”
Puntos de menú “Default 1” y “Default 2”
Estos puntos de menú no tienen función para el
usuario. Sólo se refieren al servicio.
Para abandonar el modo de ajuste para esta página,
presione el botón BACK. Luego seleccione otra página con el botón
▼ o ▲ o presione el botón BACK o
MENÚ para abandonar el menú.
8 Características técnicas
Diagonal de pantalla
modelo TFT-1700COL: . . 43 cm (17")
modelo TFT-1900COL: . . 48 cm (19")
Ángulo de visión: . . . . . . . . . hor. 160°, vert. 160°
Sistema de color: . . . . . . . . . PAL/NTSC (conmutación autom.)
Resolución: . . . . . . . . . . . . . 1280 x 1024 píxeles
Contraste: . . . . . . . . . . . . . . 500 : 1
Tiempo de respuesta: . . . . . 6 ms/2 ms (Tr/ Tf)
Número de colores: . . . . . . . 16,2 millones
Brillo: . . . . . . . . . . . . . . . . . . 260 cd/ m
2
Entradas y salidas
vídeo: . . . . . . . . . . . . . . . 1 Vpp/ 75 Ω
audio: . . . . . . . . . . . . . . . 350 mV/470 kΩ
Temperatura ambiente: . . . . 0 – 50 °C
Alimentación: . . . . . . . . . . . . 12 V /4 A mediante unidad de
alimentación entregada conectada
a 100 – 240 V~/50 – 60Hz/50 VA
Dimensiones (sin base), peso
modelo TFT-1700COL: . . 345 x 393 x 70 mm, 5,9 kg
modelo TFT-1900COL: . . 430 x 380 x 70 mm, 6,9 kg
Conexiones
entradas (vídeo): . . . . . . . 2 x BNC (vídeo compuesto)
1 x DIN mini 4 polos (S-Vídeo)
1 x D-Sub 15 polos (VGA)
entradas (audio): . . . . . . . 2 x phono, estéreo
1 x 3,5 mm jack, estéreo
salidas (vídeo): . . . . . . . . 2 x BNC (vídeo compuesto)
1 x 4-pole mini DIN (S-Vídeo)
salidas (audio): . . . . . . . . 2 x phono, estéreo
Sujeto a modificaciones técnicas.
PARTICULARIDADES
" Idioma
Modo película: Desact.
Temp. OSD 5 Seg.
Temp. stand by 0 Min.
Default 1
Default 2
E
33
Manual de instrucciones protegido por el copyright de MONACOR®INTERNATIONAL GmbH & Co. KG. Toda
reproducción mismo parcial con fines comerciales está prohibida.
Page 34

Na stronie 3 znajdują się schematy elementów
sterujących i gniazd połączeniowych opisanych
poniżej.
1 Elementy sterujące (panel przedni) i
gniazda połączeniowe (panel tylny)
1 Wskaźnik LED zasilania:
czerwony = stan pogotowia
zielony = monitor włączony
2 Przycisk MENU, służy do przywoływania i
wychodzenia z menu na ekranie
3 Klawisze - strzałki
funkcje przy nieaktywnym menu na ekranie:
przycisk
▼automatyczna regulacja obrazu przy
pracy na komputerze osobistym
przycisk
▲ służy do przełączania źródeł
dźwięku na gniazdach wejściowych BNC:
VIDEO 1 (10) i VIDEO2 (18)
funkcje przy aktywnym menu na ekranie:
przyciski “Down”
▼ i “Up” ▲ służą do porusza-
nia się po menu na ekranie oraz do zmniejszenia i zwiększenia wartości parametrów operacyjnych
4 Przycisk ENTER służy do aktywacji stron oraz
pozycji wybranych w menu na ekranie, jak i do
potwierdzania ustawień menu
5 Przycisk BACK umożliwia powrót do kolejnego,
wyższego poziomu menu na ekranie
6 Przycisk służy do włączania monitora lub
przełączenia na stan pogotowia
7 Gniazdo zasilania (12 V ) przez zasilacz (w kom-
plecie)
8 Wejście audio AUDIO 1 (chinch, stereofoniczne)
służy do podłączenia do wyjścia audio źródła
sygnału, podłączonego do wejścia VIDEO 1 (10)
lub S-VIDEO (12)
9 Wyjście audio AUDIO 1 (chinch, stereofoniczne)
do przesyłania sygnału przepustowego z wejścia
AUDIO 1 (8) do kolejnego urządzenia
10 Wejście wideo VIDEO 1 (BNC) służy do podłącze-
nia źródła sygnału, który dostarcza całkowity
sygnał wizji
11 Wyjście wideo VIDEO 1 (BNC) do przesyłania
sygnału przepustowego z wejścia VIDEO 1 (10)
do kolejnego urządzenia
12 Wejście wideo S-VIDEO (mini DIN, 4-pinowe)
służy do podłączenia źródła sygnału dostarczającego sygnał S-Video
13 Wyjście wideo S-VIDEO (mini DIN, 4-pinowe)
służy do przesyłania sygnału przepustowego z
wejścia S-VIDEO (12) do kolejnego urządzenia
14 15-pinowe złącze D-Sub VGA umożliwia
podłączenie do wyjścia VGA komputera osobistego
15 Gniazdo stereo 3,5mm PC AUDIO umożliwia
podłączenie do wyjścia audio komputera osobistego
16 Wejście audio AUDIO 2 (chinch, stereofoniczne)
umożliwia podłączenie do wyjścia audio źródła
sygnału podłączonego do wejścia VIDEO 2 (18)
17 Wyjście audio AUDIO 2 (chinch, stereofoniczne)
umożliwia przesyłanie sygnału przepustowego z
wejścia AUDIO 2 (16) do kolejnego urządzenia
18 Wejście wideo VIDEO 2 (BNC) służy do podłącze-
nia źródła sygnału, który dostarcza całkowity
sygnał wizji
19 Wyjście wideo VIDEO 2 (BNC) umożliwia
przesyłanie sygnału przepustowego z wejścia
VIDEO 2 (18) do kolejnego urządzenia
2 Bezpieczeństwo użytkowania
Ponieważ urządzenia (monitor i zasilacz) spełniają
wszelkie normy obowiązujące w Unii Europejskiej,
zostały oznaczone symbolem .
Należy przestrzegać następujących zaleceń:
●
Urządzenia przeznaczone są do użytku jedynie
wewnątrz pomieszczeń. Należy chronić je przed
bezpośrednim kontaktem z wodą, działaniem wilgoci oraz wysokiej temperatury (dopuszczalna
temperatura otoczenia pracy: 0 –50 °C).
●
Na obudowie urządzenia nie wolno stawiać pojemników z płynem (np. szklanek).
●
Należy zapewnić swobodną cyrkulację powietrza,
aby zapobiec przegrzaniu urządzenia. Nie wolno
zasłaniać otworów wentylacyjnych znajdujących
się w obudowie.
●
Należy wyłączyć monitor oraz niezwłocznie wyjąć z
gniazda wtyczkę sieciową zasilacza, jeśli:
1. istnieje widoczne uszkodzenie monitora, zasilacza, kabla zasilania
2. mogło nastąpić uszkodzenie urządzenia w wyniku jego upuszczenia itp.,
3. urządzenie działa nieprawidłowo
Urządzenie należy wówczas dostarczyć do naprawy w autoryzowanym punkcie serwisowym.
●
Nie wolno odłączać urządzenia z gniazda sieciowego ciągnąc za kabel zasilania, należy zawsze
chwytać za wtyczkę.
●
Do czyszczenia urządzenia należy używać suchej,
miękkiej tkaniny. Nie wolno stosować wody ani
chemicznych środków czyszczących.
●
Producent ani dostawca nie ponoszą odpowiedzialności za wynikłe szkody (uszkodzenie sprzętu
lub obrażenia użytkownika), jeśli urządzenie
używano niezgodnie z przeznaczeniem, nieprawidłowo podłączono, obsługiwano bądź poddano
nieautoryzowanej naprawie.
Po całkowitym zakończeniu eksploatacji
urządzenia należy oddać je do punktu utylizacji odpadów, aby uniknąć zanieczyszczenia środowiska naturalnego.
UWAGA Urządzenie zasilane jest prądem elek-
trycznym 230 V~. Obsługę techniczną
urządzenia należy zlecić specjaliście.
Nieostrożne obchodzenie się z urządzeniem może spowodować porażenie
prądem elektrycznym.
PL
34
Page 35

3 Zastosowanie
Monitor kolorowy TFT LCD charakteryzuje się bardzo
krótkim czasem odpowiedzi i wysokokontrastową
reprodukcją obrazu. Monitor ten jest idealny do
systemów monitoringu, znajduje również zastosowanie np. jako monitor komputera osobistego lub jako
monitor w systemach multimedialnych. Do monitora
można podłączyć maksymalnie 4 źródła sygnału (np.
kamerę systemu monitorowania, magnetowid, komputer osobisty, odtwarzacz DVD). Wyjścia przepustowe umożliwiają przesył sygnałów wejściowych do
innych urządzeń. Za pomocą menu na ekranie można
optymalnie dostosować ustawienia urządzenia do
wymagań użytkownika.
4 Ustawienie
Za pomocą podstawy przymocowanej z tyłu urządzenia należy ustawić monitor tak, aby światło nie padało
bezpośrednio na powierzchnię ekranu, aby uniknąć
powstawania odbić. Można pochylić monitor do
przodu lub do tyłu, aby uzyskać optymalny kąt
widoczności.
5 Podłączenie
5.1 Urządzenia z całkowitym sygnałem wizji
lub sygnałem S-Video
5.1.1 Podłączenie źródeł sygnału
1) Można podłączyć dwa źródła sygnału, dostarczające całkowity sygnał wizji, np. kamery systemów
monitorowania, magnetowidy:
– Należy podłączyć wyjście wideo pierwszego
źródła do gniazda wejściowego BNC VIDEO 1
(10) a wyjście wideo drugiego źródła do gniazda
wejściowego BNC VIDEO 2 (18).
– Należy podłączyć wyjście audio pierwszego
źródła do gniazd wejściowych typu chinch
AUDIO 1 (8) a wyjście audio drugiego źródła do
gniazd wejściowych typu chinch AUDIO 2 (16)
[czerwony = prawy kanał, biały = lewy kanał].
2) Wyjście wideo źródła sygnału, które dostarcza
sygnał S-Video, np. rejestrator cyfrowy, odtwarzacz DVD, można podłączyć do 4-pinowego
gniazda wejściowego mini DIN S-VIDEO (12).
Należy podłączyć wyjście audio źródła sygnału do
gniazd wejściowych typu chinch AUDIO 1 (8)
[czerwony = prawy kanał, biały = lewy kanał].
5.1.2 Wyjścia przepustowe
Przez wyjścia przepustowe można przesłać sygnał
wejściowy np. do innego monitora lub rejestratora:
– wyjście audio AUDIO 1 (9) i wyjście wideo VIDEO1
(11) umożliwiają przesyłanie sygnału z wejścia
audio AUDIO 1 (8) i wejścia wideo VIDEO1 (10)
– wyjście wideo S-VIDEO (13) umożliwia przesyłanie
sygnału z wejścia wideo S-VIDEO (12)
– wyjście audio AUDIO 2 (17) i wyjście wideo VIDEO 2
(19) umożliwiają przesyłanie sygnału z wejścia
audio AUDIO 2 (16) i wejścia wideo VIDEO2 (18)
Należy podłączyć dane wyjście z odpowiednim
wejściem urządzenia.
5.2 PC
Należy podłączyć wyjście VGA komputera osobistego do 15-pinowego gniazda D-Sub VGA (14) a
wyjście audio do gniazda 3,5 mm PC AUDIO (15).
Uwaga: Rozdzielczość i częstotliwość obrazu karty
graficznej komputera osobistego należy dostosować
do monitora. Następujące połączenia są kompatybilne:
Aby otrzymać optymalną reprodukcję obrazu, należy
dostosować kartę graficzną komputera osobistego
do rozdzielczości 1280 x 1024 a częstotliwość obrazu do 60 Hz.
5.3 Zasilanie
Gdy wszystkie urządzenia zostaną już podłączone,
należy podłączyć zasilacz (w komplecie) do gniazda
DC 12V (7), następnie za pomocą kabla zasilania
(także w komplecie) do gniazda sieci elektrycznej
(100 –240 V~/50– 60 Hz).
Uwaga: Monitor ma niewielki pobór prądu nawet
wstanie pogotowia. Jeśli przez dłuższy czas monitor
nie jest używany, należy odłączyć zasilacz z gniazda
sieci elektrycznej, aby uniknąć niepotrzebnego
poboru energii elektrycznej.
6 Przygotowanie do pracy
Po podłączeniu zasilacza monitor włącza się [wskaźnik zasilania LED (1) świeci się na zielono] i następuje
odtwarzanie obrazu i dźwięku ostatnio wybranego
źródła sygnału. W lewym górnym rogu obrazu widnieje jego identyfikacja:
BNC1: źródło na wejściu VIDEO 1 (10)
BNC2: źródło na wejściu VIDEO 2 (18)
S-VIDEO: źródło na wejściu S-VIDEO (12)
PC: źródło na wejściu VGA (14)
Aby zatrzymać odtwarzanie, należy nacisnąć przycisk
(6). Następuje przełączenie monitora w stan pogotowia, wskaźnik LED zasilania świeci się na czerwono.
Aby ponownie włączyć odtwarzanie, należy nacisnąć
przycisk .
Uwaga: jeśli nie ma sygnału wideo
Monitor odtwarza dźwięk ze źródła sygnału tylko jeśli
otrzymuje sygnał wideo z tego źródła. Jeśli włączony
monitor nie otrzyma sygnału wideo z wybranego
PL
35
Częstotliwość
Rozdzielczość
60 Hz
640 x 480
√
800 x 600
√
66 Hz
√
√
70 Hz
√
√
72 Hz
√
√
√
1280 x 1024
√
√
75 Hz
√
1024 x 768
√
√
85 Hz
√
√
√√
Page 36

źródła, przez około 15 sekund będzie widoczny
komunikat “NO SIGNAL OR SIGNAL LOSS”.
Następnie monitor przełącza się w stan pogotowia,
wskaźnik LED zasilania miga na czerwono.
a Gdy ponownie pojawi się sygnał wideo z danego
źródła, monitor automatycznie się włączy.
b Aby ręcznie zatrzymać stan braku sygnału wideo,
należy raz nacisnąć przycisk (monitor w stanie
pogotowia, wskaźnik LED zasilania świeci się na
czerwono). Kolejne naciśnięcie przycisku spowoduje ponowne włączenie monitora i przełączenie
na inne źródło w ciągu 15 sekund (→ rozdział 7,
punkt B oraz rozdział 7.1.4).
7 Obsługa
Za pomocą menu na ekranie należy wprowadzić ustawienia monitora, używając przycisków MENU (2),
▼ i
▲ (3), ENTER (4) oraz BACK (5). Aby wprowadzić
ustawienia poza menu na ekranie, należy używać
przycisków – strzałek:
A Aby włączyć automatyczną korekcję obrazu przy
pracy na komputerze osobistym, należy nacisnąć
przycisk
▼.
[Jeśli automatyczna regulacja obrazu nie przyniesie oczekiwanego efektu, można wprowadzić
ręczne ustawienia obrazu za pomocą menu →
rozdział 7.1.3.]
B Aby przełączyć źródło sygnału na wejściach BNC
VIDEO 1 (10) i VIDEO 2 (18), należy nacisnąć przycisk
▲.
[Wejście S-Video (12) i wejście komputera osobistego (14) można wybrać jedynie przez menu →
rozdział 7.1.4.]
7.1 Ustawienia w menu na ekranie
Aby przywołać menu, należy nacisnąć przycisk
MENU.
Menu składa się z 5 stron:
PICTURE ustawienia obrazu
SOUND ustawienia dźwięku
INSTALL optymalizacja obrazu (tylko przy pracy
na komputerze osobistym)
SOURCE wybór źródła sygnału
FEATURES funkcje dodatkowe
Kolejne strony wybiera się za pomocą przycisków
“Down”
▼ i “Up” ▲.
Do wyboru jest sześć języków menu. Wybór języka
→ rozdział 7.1.5, pozycja menu “Language”. Kolejne
rozdziały dotyczą menu w języku angielskim.
Uwaga: Menu automatycznie wygasa, jeśli w ciągu
określonego czasu nie nastąpi wciśniecie
przycisku. Ustawianie czasu → rozdział
7.1.5, pozycja menu “OSD Timer”.
7.1.1 Strona menu PICTURE
Ta strona menu służy do wprowadzania ustawień
reprodukcji obrazu. Na stronie ukazują się różne
opcje ustawień, w zależności od źródła sygnału:
Wersja A menu: Wersja B menu:
źródła na wejściach VIDEO i S-VIDEO komputer osobisty na wejściu VGA
Aby wprowadzać ustawienia na stronie menu, należy
nacisnąć przycisk ENTER: nastąpi aktywacja strony,
wybrana zostanie pierwsza pozycja menu (oznaczona na niebiesko). Za pomocą przycisków
▼i ▲można
wybrać poszczególne pozycje menu na tej stronie.
Pozycje menu dla wprowadzania ustawień parametrów
“Brightness” (jaskrawość)
“Contrast” (kontrast)
“Tint” (odcień)*/“Red” (czerwony)
“Colour” (nasycenie koloru)/“Green” (zielony)
“Sharpness” (ostrość)/“Blue” (niebieski)
Aby wybrać odpowiednią pozycję menu należy
nacisnąć przycisk ENTER. W dolnej części ekranu
zostanie wyświetlony zakres ustawień w postaci
graficznej. Należy ustawić odpowiednią wartość
dla danego parametru za pomocą przycisku
▼ lub
▲ (przycisk ▼: zmniejszenie wartości, przycisk ▲:
zwiększenie wartości). Aby powrócić do strony
menu, należy nacisnąć przycisk BACK lub ENTER.
Pozycja menu “Smart Picture” (tylko w wersji A menu)
Aby wybrać pozycję menu “Smart Picture”, należy
nacisnąć przycisk ENTER. Dostępne są trzy opcje
ustawień obrazu:
“Personal”: ustawienie standardowe z możli-
wością regulacji kontrastu i jaskrawości menu
“Rich”: czysty, wysokokontrastowy obraz; kontrast
i jaskrawość są określone
“Soft”: “miękki” obraz, np. w przypadku filmów;
kontrast i jaskrawość są określone
Należy wybrać odpowiednią opcję za pomocą
przycisku
▼ lub ▲ i potwierdzić wybór za pomocą
przycisku ENTER. Aby powrócić do strony menu,
należy nacisnąć przycisk BACK.
Pozycja menu “Picture Format” (tylko w wersji A menu)
Aby wybrać pozycję menu “Picture Format”,
należy nacisnąć przycisk ENTER. Dostępne są
cztery opcje reprodukcji obrazu:
“Wide Screen”: ustawienie standardowe dla obra-
zu w formacie 4 : 3; obraz całkowicie pokrywa
powierzchnię ekranu.
“Zoom”: obraz jest rozciągnięty w poziomie dla
nieco powiększonej reprodukcji, nie widać jednak górnego i dolnego marginesu.
PICTURE
" Brightness 13
Contrast 17
Red 0
Green 0
Blue 0
Full Screen : On
Color Temp : 6500
Default
PICTURE
" Brightness 0
Contrast 0
Tint* 0
Colour 0
Sharpness 4
Smart Picture
Picture Format
Color Temp : 6500
Default
PL
36
* Wprowadzanie ustawień odcienia – konieczne tylko dla źródeł
sygnału NTSC
Page 37

“Side Bar”: obraz nie pokrywa powierzchni ekranu
na całej długości, z lewego i prawego boku
widoczne są czarne pasy.
“14 : 9”: ustawienie dla obrazu w formacie 14 : 9; w
tym ustawieniu obraz w formacie 4: 3 zostaje
ucięty od góry i od dołu.
Należy wybrać odpowiednią opcję za pomocą
przycisku
▼ lub ▲ i potwierdzić wybór za pomocą
przycisku ENTER. Aby powrócić do strony menu,
należy nacisnąć przycisk BACK.
Pozycja menu “Full Screen” (tylko w wersji B menu)
Jeśli obraz nie pokrywa całej powierzchni ekranu,
zostanie automatycznie powiększony do rozmiaru
ekranu za pomocą ustawienia “On” (włączony).
Nastąpi dopasowanie współczynnika kształtu. Za
pomocą przycisku ENTER można włączać i
wyłączać (“Off”) tę funkcję.
Pozycja menu “Color Temp”
Po włączeniu funkcji “Color Temp” można ustawić
temperaturę barwową w zakresie 6500 K i 9300 K
za pomocą przycisku ENTER. Funkcja ta
umożliwia wybór odpowiedniej reproducji barwy.
Pozycja menu “Default”
Aby zresetować wartości dla pierwszych pięciu
pozycji menu na tej stronie do ustawień fabrycznych, należy wybrać pozycję menu “Default” i
nacisnąć przycisk ENTER.
Aby wyjść z trybu wprowadzania ustawień na tej stronie, należy nacisnąć przycisk BACK. Następnie należy
wybrać inną stronę za pomocą przycisku
▼lub ▲, albo
wyjść z menu, naciskając przycisk BACK lub MENU.
7.1.2 Strona menu SOUND
Ta strona menu służy do wprowadzania ustawień
reprodukcji dźwięku.
Aby wprowadzić ustawienia na stronie menu, należy
nacisnąć przycisk ENTER: nastąpi aktywacja strony i
wybór pierwszej pozycji menu (oznaczona na niebiesko). Poszczególne pozycje menu na tej stronie
należy wybrać za pomocą przycisku
▼ i ▲.
Pozycje menu do wprowadzania ustawień parametrów:
“Volume” (poziom głośności)
“Balance” (kompensacja)
“Treble” (tony wysokie)
“Bass” (tony niskie)
Aby wybrać odpowiednią pozycję menu, należy
nacisnąć przycisk ENTER. Widoczny będzie zakres ustawień w postaci graficznej. Za pomocą
przycisku
▼ lub ▲ należy ustawić wartość danego
parametru:
Ustawienia “Volume”, “Treble” i “Bass”:
przycisk
▼ – zmniejeszenie wartości,
przycisk
▲ – zwiększenie wartości
Ustawienie “Balance”:
przycisk
▼ – “przesunięcie” dźwięku w lewo,
przycisk
▲ to “przesunięcie” dźwięku w prawo,
dla wartości “0” stosunek poziomu głośności
kanału lewego i prawego jest w stanie równowagi.
Aby wrócić do strony menu, należy nacisnąć przycisk BACK lub ENTER.
Pozycja menu “Speaker”
Za pomocą przycisku ENTER można włączyć
głośniki (“On”) lub wyłączyć (“Off”).
Pozycja menu “Surround”
Włączenie funkcji “Surround” powoduje powstanie efektu dźwięku ”surround”. Za pomocą przycisku ENTER można włączyć tę funkcję (“On”) lub
wyłączyć (“Off”).
Aby wyjść z trybu wprowadzania ustawień na tej stronie, należy nacisnąć przycisk BACK. Następnie należy
wybrać inną stronę za pomocą przycisku
▼lub ▲, albo
wyjść z menu, naciskając przycisk BACK lub MENU.
7.1.3 Strona menu INSTALL
(wprowadzanie ustawień możliwe jedynie przy
obsłudze przez komputer osobisty)
W przypadku obsługi przez komputer osobisty można
zoptymalizować obraz za pomocą ustawień na tej
stronie menu.
Aby wprowadzić ustawienia na tej stronie menu,
należy nacisnąć przycisk ENTER: nastąpi aktywacja
strony i wybór pierwszej pozycji menu (oznaczona na
niebiesko). Poszczególne pozycje menu na tej stronie należy wybrać za pomocą przycisku
▼ i ▲.
Pozycja menu “Auto-Adjustment”
(Funkcja ta odpowiada funkcji przycisku
▼ gdy
menu nie zostało przywołane → rozdział 7, punkt A.)
Gdy wciśnięty zostanie przycisk ENTER przy
wybranej pozycji menu, przez kilka sekund
następuje automatyczna regulacja obrazu.
Wartości pozostałych pozycji menu na tej stronie
ustawionych ręcznie są korygowane.
Jeśli automatyczna regulacja obrazu nie przyniesie oczekiwanego efektu, można zoptymalizować
obraz, wprowadzając ustawienia parametrów opisanych poniżej.
Pozycje menu do wprowadzania ustawień parametrów
“Phase”, “H-Position”, “V-Position”
ręczne wprowadzanie ustawień obrazu
Aby wybrać odpowiednią pozycję menu, należy
nacisnąć przycisk ENTER. W dolnej części ekranu
widoczny będzie zakres ustawień w postaci graficznej. Wartości parametrów ustawia się przy
użyciu przycisków
▼ i ▲:
“Phase”:
Za pomocą przycisku
▼ lub ▲ można ustawić
wartość, przy której otrzymuje się optymalną
ostrość obrazu.
INSTALL
" Auto-Adjustment
Phase 31
H-Position 96
V-Position 99
SOUND
" Volume 50
Balance 0
Treble 22
Bass 22
Speaker : On
Surround : Off
PL
37
Page 38

“H-Position”:
przycisk
▼ umożliwia przesunięcie obrazu w
prawo, przycisk
▲ przesunięcie obrazu w lewo.
“V-Position”:
przycisk ▼ służy do przesunięcia obrazu w dół,
przycisk
▲ do przesunięcia obrazu w górę.
Aby powrócić do strony menu, należy nacisnąć
przycisk BACK lub ENTER.
Aby wyjść z trybu wprowadzania ustawień na tej stronie, należy nacisnąć przycisk BACK. Następnie należy
wybrać inną stronę za pomocą przycisku
▼lub ▲, albo
wyjść z menu, naciskając przycisk BACK lub MENU.
7.1.4 Strona menu SOURCE
Na tej stronie menu można wybrać źródło sygnału.
Gdy strona ta zostanie przywołana, kursor wskazuje
aktualnie wybrane źródło sygnału.
Aby wprowadzić ustawienia na tej stronie menu,
należy nacisnąć przycisk ENTER: nastąpi aktywacja
strony i wybór pierwszej pozycji menu (oznaczona na
niebiesko). Poszczególne pozycje menu na tej stronie należy wybrać za pomocą przycisku
▼ i ▲.
Do wyboru są 4 źródła:
“BNC1”: źródło na wejściu VIDEO 1 (10)
“BNC2”: źródło na wejściu VIDEO 2 (18)
“S-VIDEO”: źródło na wejściu S-VIDEO (12)
“PC”: źródło na wejściu VGA (14)
Aby potwierdzić wybór, należy nacisnąć przycisk
ENTER. Nastąpi wyjście z menu i monitor przełączy
się na wybrane źródło sygnału.
Aby anulować wybór, należy nacisnąć przycisk
BACK – nastąpi wyjście z trybu wprowadzania ustawień na tej stronie. Następnie należy wybrać inną
stronę za pomocą przycisku
▼ lub ▲, albo wyjść z
menu, naciskając przycisk BACK lub MENU.
7.1.5 Strona menu FEATURES
Na tej stronie menu dostępne są opcje wprowadzania
ustawień dla następujących funkcji:
– język menu
– tryb filmu (nie dotyczy obsługi przez komputer
osobisty)
– wygaszanie menu sterowane zegarem
– przełączanie w stan pogotowia sterowane zegarem
Aby wprowadzić ustawienia na tej stronie menu,
należy nacisnąć przycisk ENTER: nastąpi aktywacja
strony i wybór pierwszej pozycji menu (oznaczona na
niebiesko). Poszczególne pozycje menu na tej stronie należy wybrać za pomocą przycisku
▼ i ▲.
Pozycja menu “Language”
Aby wybrać pozycję menu “Language”, należy
nacisnąć przycisk ENTER. Do wyboru jest 6
języków menu na ekranie:
“ENGLISH” (angielski)
“DEUTSCH” (niemiecki)
“FRANÇAIS” (francuski)
“ITALIANO” (włoski)
“ESPAÑOL” (hiszpański)
“NEDERLANDS” (niderlandzki)
Należy wybrać język za pomocą przycisku
▼lub ▲,
następnie nacisnąć przycisk ENTER aby potwierdzić wybór i wrócić do strony menu. Aby powrócić
do strony menu bez zmiany ustawień, należy
nacisnąć przycisk BACK.
Pozycja menu “Film Mode”
(nie może być wybrana przy obsłudze przez komputer osobisty)
Funkcja ta jest przeznaczona do odtwarzania
materiału wideo z obrazem filmowym, np. filmu.
Jeśli monitora używa się w systemie zabezpieczającym, gdzie rzadko następuje zmiana obrazu,
należy wyłączyć tę funkcję w celu osiągnięcia
lepszej jakości obrazu. Za pomocą przycisku
ENTER funkcję tę można włączyć (“On”) lub
wyłączyć (“Off”).
Pozycja menu “OSD Timer”
Za pomocą tej pozycji menu można określić czas,
po którego upływie menu na ekranie automatycznie znika, jeśli nie zostanie wciśnięty żaden przycisk. Aby wybrać tę pozycję menu, należy nacisnąć przycisk ENTER. Zakres ustawień zostanie
wyświetlony w postaci graficznej. Za pomocą
przycisku
▼ lub ▲ należy wybrać odpowiednią
wartość czasową: 3 s., 5 s., 10 s., 20 s. lub 30 s.
(przycisk
▼: zmniejszenie wartości, przycisk ▲:
zwiększenie wartości). Aby powrócić do strony
menu, należy nacisnąć przycisk BACK lub ENTER.
Pozycja menu “Sleep Timer”
Za pomocą tej pozycji menu można określić czas,
po którego upływie monitor automatycznie
przełącza się w stan pogotowia. Aby wybrać tę
pozycję menu, należy nacisnąć przycisk ENTER.
Zakres ustawień zostanie wyświetlony w postaci
graficznej. Za pomocą przycisku
▼ lub ▲ należy
wybrać odpowiednią wartość czasową: 0min.
(funkcja nieaktywna), 30 min., 60 min., 90min. lub
120 min. (przycisk
▼: zmniejszenie wartości, przy-
cisk
▲: zwiększenie wartości). Aby powrócić do
strony menu, należy nacisnąć przycisk BACK lub
ENTER.
Uwaga: Po automatycznym przełączeniu w stan
pogotowia, ustawienie resetuje się do
“0 Min.”.
Pozycje menu “Default 1” i “Default 2”
Te pozycje menu są przeznaczone jedynie dla
obsługi technicznej urządzenia przez pracowników autoryzowanego punktu serwisowego.
Aby wyjść z trybu wprowadzania ustawień na tej stronie, należy nacisnąć przycisk BACK. Następnie należy
wybrać inną stronę za pomocą przycisku
▼lub ▲, albo
wyjść z menu, naciskając przycisk BACK lub MENU.
FEATURES
" Language
Film Mode : Off
OSD Timer 5 Sec.
Sleep Timer 0 Min.
Default 1
Default 2
SOURCE
" BNC1
BNC2
S-VIDEO
PC
PL
38
Page 39

8 Dane techniczne
Przekątna ekranu
model TFT-1700COL: . . . . 43 cm (17")
model TFT-1900COL: . . . . 48 cm (19")
Kąt widoczności: . . . . . . . . . poz. 160°, pion. 160°
System: . . . . . . . . . . . . . . . PAL/NTSC (autom. przełączanie)
Rozdzielczość: . . . . . . . . . . . 1280 x 1024 pikseli
Kontrast: . . . . . . . . . . . . . . . 500 :1
Czas odpowiedzi: . . . . . . . . . 6 ms/2 ms (Tr/Tf)
Liczba barw: . . . . . . . . . . . . 16,2 milionów
Jaskrawość: . . . . . . . . . . . . 260 dk/m
2
Wejścia i wyjścia
wideo: . . . . . . . . . . . . . . 1 Vpp/75 Ω
audio: . . . . . . . . . . . . . . 350 mV/470 kΩ
Temperatura otoczenia: . . . . 0 – 50°C
Zasilanie: . . . . . . . . . . . . . . . 12 V /4 A przez zasilacz (w kom-
plecie) podłączony do
100 –240 V~/50 – 60Hz/50 VA
Wymiary (bez podstawy), waga
model TFT-1700COL: . . . . 345 x 393 x 70 mm, 5,9 kg
model TFT-1900COL: . . . . 430 x 380 x 70 mm, 6,9 kg
Złącza
wejścia (wideo): . . . . . . . 2 x BNC (całkowity sygnał wizji)
1 x 4-pinowe mini DIN (S-Video)
1 x 15-pinowe D-Sub (VGA)
wejścia (audio): . . . . . . . . 2 x chinch, stereofoniczne
1 x gniazdo 3,5 mm, stereofoniczne
wyjścia (wideo): . . . . . . . . 2 x BNC (całkowity sygnał wizji)
1 x 4-pinowy mini DIN (S-Video)
wyjścia (audio): . . . . . . . . 2 x chinch, stereofoniczne
Z zastrzeżeniem możliwości zmiany.
PL
39
Instrukcje obsługi są chronione prawem copyright for MONACOR®INTERNATIONAL GmbH & Co. KG. Przetwarzanie całości lub części instrukcji dla osobistych korzyści finansowych jest zabronione.
Page 40

Ha sidan 3 uppslagen för att åskådliggöra hänvisningarna i texten.
1 Funktioner (framsida)
och anslutningar (baksida)
1 Funktionsdiod: röd = viloläge
grön = aktiv
2 Knapp MENU för att ta fram och dölja skärmmenyer
3 Piltangenter
Funktion när skärmmenyn inte är aktiverad:
Knapp
▼ för automatisk bildjustering med PC
Knapp
▲ för växling mellan signalkällor på BNC-
anslutningen VIDEO 1 (10) och VIDEO 2 (18)
Funktion när skärmmenyn är aktiverad
Knappar “ner”
▼ och “upp” ▲ för att navigera
skärmmenyn eller öka och minska värden för
funktioner
4 Knapp ENTER för att aktivera menysidor och
menyobjekt som väljs i denna meny samt bekräfta
vissa inställningar.
5 Knapp BACK för till nästa högre menynivå i skärm-
menyn.
6 Knapp för att slå på eller av monitorn (stand-by)
7 Anslutning för strömförsörjningen (12V ) med
den medföljande nätdelen
8 Ljudingång AUDIO1 (phono, stereo) för anslutning
av ljudutgång från signalkälla som ansluts till
ingången VIDEO1 (10) eller S-VIDEO (12)
9 Ljudutgång AUDIO1 (phono, stereo) för att leda
signalen från ingången AUDIO1 (8) till annan
enhet
10 Videoingång VIDEO1 (BNC) för anslutning av sig-
nalkälla som har en kompositsignal
11 Videoutgång VIDEO 1 (BNC) för att leda signal till
ingången VIDEO1 (10) på yttre enhet
12 Videoingång S-VIDEO (mini-din 4-polig) för anslut-
ning av signalkällor som har stöd för S-Videosignaler
13 Videoutgång S-VIDEO (mini-din 4-polig) för att leda
signalen från ingången S-VIDEO (12) till annan
enhet
14 15-polig D-subkontakt VGA för anslutning till VGA-
utgången på PC
15 3,5mm stereoanslutning PC AUDIO för anslutning
av ljudet från PC
16 Audioingång AUDIO 2 (phono, stereo) för anslut-
ning till ljudutgången från signalkälla som ansluts
till ingång VIDEO2 (18)
17 Audioutgång AUDIO 2 (phono, stereo) för att leda
signalen från ingången AUDIO 2 (16) till annan
enhet
18 Videoingång VIDEO2 (BNC) för anslutning av sig-
nalkälla som stödjer en kompositvideosignal
19 Videoutgång VIDEO2 (BNC) för att leda signalen
från ingång VIDEO2 (18) till annan enhet
2 Säkerhetsföreskrifter
Enheterna (monitor och nätdel) uppfyller Samtliga EUdirektiv och har därför försetts med symbolen .
Ge även akt på följande
●
Enheten är endast avsedd för inomhusbruk. Skydda
den mot droppande vatten och vattenstänk, hög luftfuktighet och hög värme. Arbetstemperatur 0– 50
grader C.
●
Placera aldrig vattenfyllda kärl (främst glas) på
enheterna.
●
Värmen som alstras vid användning leds bort genom
självcirkulering av luften, täck därför inte över kylhålen på enheten.
●
Tag omedelbart ut kontakten ur elurtaget om något
av följande fel uppstår.
1. Enheterna eller elsladden har synliga skador.
2. Enheterna är skadade av fall eller dylikt.
3. Enheterna har andra felfunktioner.
Enheterna skall alltid repareras på verkstad.
●
Dra inte ut kontakten genom att dra i sladden, utan
ta tag i kontaktkroppen.
●
Rengör endast med en ren och torr trasa, använd
aldrig vätskor i någon form då dessa kan rinna in och
orsaka kortslutning.
●
Om enheterna används på annat sätt än som avses,
upphör alla garantier att gälla. Detsamma gäller om
egna eller oauktoriserade ingrepp gjorts i enheterna.
I dessa fall tas heller inget ansvar för eventuell
skada på person eller materiel.
3 Användningsområden
Denna TFT LCD färgmonitor med extra kort svarstid
och mycket hög kontraståtergivning är särskilt lämpad
för övervakningsinstallationer, men kan även användas för andra ändamål. Tex. som PC-monitor eller multimediaapplikationer. Upp till 4 signalkällor (övervakningskamera, PC, DVD-spelare, videobandspelare)
kan anslutas till monitorn. Signalgenomgångar gör det
möjligt att leda signalen vidare till andra enheter. Via
skärmmenyer kan monitorn ställas in optimalt för varje
användningsområde.
4 Inkoppling
För att undvika störande reflexer bör monitorn ställas
på sin sockel där minst ljus faller in i skärmen utifrån.
För att få optimal vinkel på skärmen kan denna lutas
något framåt eller bakåt.
Om enheterna skall kasseras skall dom
lämnas till återvinning.
VARNING Nätdelen använder hög spänning internt
(230V~). Överlåt därför all service till
elutbildad personal. Felaktiga ingrepp
kan ge upphov till elskador på person
och materiel.
S
40
Page 41

5 Anslutning
5.1 Enheter med kompositsignal eller S-vs signal
5.1.1 Anslutning av signalkällor
1) 2 signalkällor kan anslutas som har stöd för kompositsignaler, övervakningskameror och videoinspelare
– Anslut videoutgången från den primära enheten
till BNC-anslutningen VIDEO 1(10) och videoutgången från den sekundära enheten till BNCanslutningen VIDEO2 (18).
– Anslut ljudutgången från den första enheten till
phonoingångarna AUDIO 1 (8) och ljudutgången
från den andra enheten till phonoingångarna
AUDIO2 (16) [röd är höger kanal och vit är vänster kanal].
2) Videoutgången från en signalkälla som stödjer en
S-Videosignal, främst Digital inspelningsenhet,
DVD-spelare od kan anslutas till den 4-poliga MiniDIN-anslutningen S-VIDEO (12). Anslut ljudutgången till phonoingången AUDIO 1 (8) [röd är höger
kanal och vit är vänster kanal].
5.1.2 Genomgående utgångar
Via de genomgående utgångarna är det möjligt att
leda respektive insignal till annan enhet som monitor
eller inspelningsenhet.
– Ljudutgången AUDIO1 (9) och videoutgången
VIDEO 1 (11) för att leda signalerna från ingångarna AUDIO1 (8) och VIDEO1 (10)
–Videoutgång S-VIDEO (13) för att leda signalen
från ingång S-VIDEO (12)
– Audioutgång AUDIO2 (17) och videoutgång VIDEO2
(19) för att leda signalen från ingång AUDIO2 (16)
och ingång VIDEO2 (18)
Anslut respektive utgång till lämplig ingång på efterföljande enhet.
5.2 PC
Anslut VGA-utgången från pc:n till den 15-poliga kontakten D-sub VGA (14) och ljudutgången till 3,5 mm
anslutningen PC AUDIO (15).
Viktigt: Upplösning och vertikalfrekvensen kan behöva justeras för att passa monitorn. Följande kombinationer är kompatibla:
För optimal bildåtergivning skall grafikkortet i PC:n
ställas in på 1280 x 1024 pixels med en vertikalfrekvens på 60Hz.
5.3 Strömförsörjning
När alla enheter är anslutna, anslut den medföljande
nätdelen till ingången DC 12V (7) och till elurtaget
(100 till 230V~, 50/60Hz).
OBS: Monitorn har en liten effektförbrukning även i
stand-byläget. Om den inte skall användas på en längre tid skall nätdelen tas ur elurtaget för att undvika
onödiga energiförluster.
6 Inkoppling
Efter anslutning av nätdelen slås monitorn och dioden
Power LED (1) lyser grön. Bilden visas från vald signalkälla. I bildens övre vänstra hörn visas kort vilken
signalkälla som visas:
BNC1 Signalkälla VIDEO1 (10)
BNC2 Signalkälla VIDEO2 (18)
S-VIDEO Signalkälla S-VIDEO (12)
PC Signalkälla VGA ingång
För att bryta bildvisningen, tryck på knappen (6).
Detta ställer monitorn i standby och dioden LED visar
rött sken. För att starta monitorn igen, tryck på knappen .
OBS Om videosignalen saknas eller tappas
Monitorn återger bara ljudet från en källa om den får en
videosignal från denna källa. Om den påslagna monitorn inte får en videosignal från den valda källan så
kommer “NO SIGNAL OR SIGNAL LOSS” att visas i
ca: 15 sekunder. Därefter går monitorn över till Stand
By-läget. Strömlampan blinkar då rött.
a Så snart en videosignal ansluts slås monitorn på
automatiskt.
b För att avbryta förlusten av bild manuellt, tryck en
gång på knappen (monitor stand by, powerlampan visar fast rött sken). Genom att trycka på knappen en andra gång så kan monitorn startas igen
och slås över till en annan källa inom 15 sekunder
(→ kapitel 7, paragraf B och kapitel 7.1.4).
7 Manövrering
Ställ in monitorn med knappen MENU (2), ▼ och ▲ (3),
ENTER (4) och BACK (5) med skärmmenyfunktionen.
Utanför denna meny, tryck på piltangenterna för att
ställa in följande
A Aktivering av automatiska skärmjusteringar då
skärmen används med en PC. Tryck på knappen
▼.
(Om bilden inte blir tillfredsställande kan den även
ställas in manuellt via skärmmenyn → kapitel 7.1.3.)
B För att växla mellan olika signalkällor på BNCingån-
garna VIDEO1 (10) och VIDEO2 (18), tryck på
knappen
▲.
[S-Videoingången (12) och PC-ingången (14) kan
väljas via meny → kapitel 7.1.4.]
S
41
Frekvens
Upplösning
60 Hz
640 x 480 √
800 x 600 √
1280 x 1024 √
1024 x 768 √
66 Hz
√
√
70 Hz
√
√
72 Hz
√
√
√√
75 Hz
√
√
85 Hz
√
√
√√
Page 42

7.1 Inställningar med skärmmenyn
Aktivera funktionen med knappen MENU.
Menyn innehåller 5 sidor
PICTURE Bildjusteringar
SOUND Ljudjusteringar
INSTALL Optimering av bild (endast med PC)
SOURCE Val av signalkälla
FEATURES Specialfunktioner
Med knapparna
▼ “Ner” och ▲ “Upp” kan sidval göras.
Menyn kan visas på 6 språk. Välj önskat språk med
→ kapitel 7.1.5 , Menytext “Language”. Följande kapi-
tel refererar till menyn på engelska.
OBS: Menyn försvinner automatiskt inom ett visst tids-
intervall. Inställning av visningstiden görs under
→ kapitel 7.1.5, Menytext “OSD T imer”.
7.1.1 Menysida PICTURE
Bildinställningar görs på denna sida. Sidan visar olika
inställningar beroende på ansluten signalkälla.
Menyversion A: Menyversion B:
För signalkällor på ingångarna För PC ansluten till VGA ingången
VIDEO och S-VIDEO
För att göra inställningar på denna sida, tryck först på
knappen ENTER: Sidan aktiveras och första menyobjektet markeras med blått. Med knapparna
▼ och ▲
kan valfri funktion väljas på sidan.
Menyval för inställning av parametrar
“Brightness” (Ljusstyrka)
“Contrast” (Kontrast)
“Tint” (Färgnyans)*/“Red” (Röd)
“Colour” (Färgstyrka)/“Green” (Grön)
“Sharpness” (Skärpa)/“Blue” (Blå)
Om respektiv funktion väljs, tryck på knappen
ENTER för att aktivera den. I den nedre delen av
skärmen visas inställningarna för vald funktion.
Ställ in värdet för vald parameter med knapparna
▼
och ▲ (▼ knappen för att minska värdet, ▲ knappen
för att öka värdet.). För att återgå till föregående
meny, tryck på knappen BACK eller ENTER.
Menyval “Smart picture” (endast i menyversionen A)
Om menyvalet “Smart Picture” väljs, tryck på knappen ENTER för att aktivera denna. 3 olika lägen finns.
“Personal”: Standardinställningar för kontrast och
skärpa.
“Rich”: Ger en klar högupplöst bild av kontrast och
skärpa.
“Soft”: Ger en mjukare bild anpassad för tex. Film-
visning.
Välj funktion med knapparna
▼ och ▲ och bekräfta
med knappen ENTER. För att återgå till tidigare
meny, tryck på knappen BACK.
Menyval “Picture Format” (endast i menyversionen A)
Om menyvalet “Picture Format” väljs, tryck på
knappen ENTER för att aktivera denna. Fyra valmöjligheter finns.
“Wide Screen”: Standardinställningar för bilden i
4:3 format. Bilden täcker då hela skärmens yta.
“Zoom”: Bilden förstoras på höjden för en lätt för-
storad bildvisning. Dock blir över och underkant
inte synliga i skärmen då detta läge används.
“Side Bar”: Bilden täcker inte hela ytan utan lämnar
en svart kant på båda sidor om bilden som visas.
“14:9”: Bilden visas i 14:9 format. Då denna
inställning används är bilden från 4:3 format
klippt i över och underkant.
Välj önskad funktion med knapparna
▼ eller ▲ och
bekräfta med knappen ENTER. För att återgå till
tidigare menyer tryck på knappen BACK.
Menyval “Full Screen” (endast i menyversion B)
Om bilden inte täcker hela skärmen, förstoras den
automatiskt om funktionen “On” (på). Aspekten
bredd/höjd korrigeras automatiskt. Till/frånslag
sker med knappen ENTER.
Menyval “Color Temp”
Om “Color Temp” väljs, kan växling mellan 2 färgtemperatulägen väljas. 6500K och 9300K med
knappen ENTER.
Menyval “Default”
För att återställa värdena för de första 5 menyvalen
till fabriksinställningarna, välj menyval “Default” och
tryck ENTER.
För att avsluta inställningarna på denna menysida,
tryck på knappen BACK. Välja sedan en annan sida
med knappen
▼ eller ▲ eller tryck på knappen BACK
eller MENU för att avsluta menyn.
7.1.2 Menysida SOUND
Ljudåtergivningen kan ställas in i denna meny.
För att ändra inställningarna på denna sida, tryck på
knappen ENTER: Menyerna aktiveras första menyvalet markeras med blått. Individuella menyobjekt kan
väljas med knapparna
▼ och ▲.
Menyval för inställning av värden
“Volume” (Volym)
“Balance” (Balans)
“Treble” (Diskant)
“Bass” (Bas)
Aktivera önskat menyval med knappen ENTER.
Inställningarna visas grafiskt på skärmen. Ställ in
värden med knapparna
▼ eller ▲.
För “Volume”, “Treble” och “Bass”:
Knapp
▼ för att minska värdet.
Knapp
▲ för att öka värdet.
För “Balance”:
Tryck på knapp ▼ för att flytta ljudet till vänster
SOUND
" Volume 50
Balance 0
Treble 22
Bass 22
Speaker : On
Surround : Off
PICTURE
" Brightness 13
Contrast 17
Red 0
Green 0
Blue 0
Full Screen : On
Color Temp : 6500
Default
PICTURE
" Brightness 0
Contrast 0
Tint* 0
Colour 0
Sharpness 4
Smart Picture
Picture Format
Color Temp : 6500
Default
S
42
* färgton inställning – Endast med NTSC signalkällor
Page 43

och knapp ▲ för att flytta ljudet till höger. I läge “0”
är balansen i mitten.
Tryck på knappen BACK eller ENTER för att återgå
till tidigare menyer.
Menyval “Speaker”
Högtalarna kan aktiveras (“On”) eller inaktiveras
(“Off”) med knappen ENTER under detta menyval.
Menyval “Surround”
Om funktionen “Surround” är aktiverad, så blir det
en omgivande ljudeffekt när ljudet återges. Med
knappen ENTER aktiveras eller inaktiveras denna
funktion “On” (på) eller “Off” (av).
För att avsluta inställningarna på denna menysida,
tryck på knappen BACK. Välja sedan en annan sida
med knappen
▼ eller ▲ eller tryck på knappen BACK
eller MENU för att avsluta menyn.
7.1.3 Menysida INSTALL
– denna funktion är tillgänglig endast med PC –
Då en PC används kan bilden optimeras med inställningarna i denna meny.
För att göra ändringar i denna meny , tryck på knappen
ENTER: Sidan aktiveras och första punkt markeras
med blått. Välj menypunkt som skall ändras med
knappen
▼ eller ▲.
Menyval “Auto-Adjustment”
(Denna funktion motsvarar funktionen av knappen
▼ när menyn inte är aktiverad med → kapitel 7
punkt A.)
Om knappen ENTER trycks in då detta menyval är
aktiverat, så startas en automatisk bildjustering
som tar ett par sekunder. Manuellt justerade värden
för de övriga menypunkterna under denna meny
rättas till.
Om den automatiska bildjusteringen inte leder till
önskat resultat så går det att optimera bilden
genom att justera följande parametrar.
Menyval för parametrar
“Phase”, “H-Position”, “V-Position”
för manuell bildinställning
För respektive menyval, tryck ENTER för att aktivera funktionen. I den nedre skärmdelen visas en
grafisk uppställning. Tryck på knappen
▼ eller ▲ för
att ändra inställt värde.
För “Phase”:
Tryck på knappen
▼ eller ▲för att ändra värde för
optimal bildskärpa.
För “H-Position”:
Tryck på k nappen
▼ för att flytta bilden till höger
och på knappen
▲ för att flytta bilden till vänster.
För “V-Position”:
Tryck på knappen
▼ för att flytta bilden nedåt och
på knappen
▲ för att flytta bilden uppåt.
För att återgå till menysidan tryck på knappen
ENTER eller BACK.
För att avsluta inställningarna på denna menysida,
tryck på knappen BACK. Välja sedan en annan sida
med knappen
▼ eller ▲ eller tryck på knappen BACK
eller MENU för att avsluta menyn.
7.1.4 Menysida SOURCE
Signalkällan kan väljas med denna menysida. När
sidan aktiveras visar menypekaren på källan som
används för tillfället.
För att göra inställningar på denna sida, tryck på knappen ENTER: sidan aktiveras och vald källa visas med
blå färg. Välj önskad källa med knappen
▼ eller ▲ mel-
lan följande 4 källor.
“BNC1”: Signalkälla från VIDEO 1 (10)
“BNC 2”: Signalkälla från VIDEO2 (18)
“S-VIDEO”: Signalkälla från S-VIDEO (12)
“PC”: Signalkälla från ingång VGA (14)
Bekräfta vald källa med knappen ENTER. Menyn avslutas och vald signalkälla används.
För att avbryta val av signalkälla, tryck på knappen
BACK. För att välja annan menysida, tryck på knappen
▼ eller ▲eller tryck på knappen BACK eller MENU för
att avsluta menyn.
7.1.5 Menysida FEATURES
Denna meny innehåller inställningar för följande funktioner:
– Menyspråk
– Film läge (Ej för PC)
– Timerinställning för menyåterställning
– Timerinställning för stand-by
För att aktivera menyn, tryck på knappen ENTER:
Sidan aktiveras och första menyvalet markeras med blå
färg. Välj önskad funktion med knappen
▼ eller ▲.
Menyval “Language”
Då menyval ”Language” väljs, tryck ENTER för att
aktivera funktionen. 6 språk visas.
“ENGLISH” (Engelska)
“DEUTSCH” (Tyska)
“FRANÇAIS” (Franska)
“ITALIANO” (Italienska)
“ESPAÑOL” (Spanska)
“NEDERLANDS” (Holländska)
Välj önskat språk med knappen
▼ eller ▲ och
därefter ENTER för att bekräfta val och återgå till
menysidan. För att återgå till menysidan utan att
ändra inställningar, tryck på knappen BACK.
Menyval “FILM MODE” (Inte tillgängligt vid PC användning)
Funktionen är lämplig för återgivning av videomaterial med rörliga bilder. (Film od.) För övervaknings-
FEATURES
" Language
Film Mode : Off
OSD Timer 5 Sec.
Sleep Timer 0 Min.
Default 1
Default 2
SOURCE
" BNC1
BNC2
S-VIDEO
PC
INSTALL
" Auto-Adjustment
Phase 31
H-Position 96
V-Position 99
S
43
Page 44

användning där bilden inte ändras så ofta, funktionen skall vara avstängd för att erhålla högre bildkvalitet. Växla funktionsläge “On” eller “Off” med
knappen ENTER.
Menyval “OSD Timer”
I denna meny ställs tiden som visning på skärmen
skall vara aktiv. Då tiden går ut åtegår skärmen till
att enbart visa den normala bilden om ingen annan
knapp trycks in. Välj detta menyval och tryck på
ENTER för att aktivera. Inställningarna visas grafisk
i skärmen. Välj tidsintervall med knappen
▼ eller ▲.
Valbara tider är 3 sekunder, 5 sekunder, 10 sekunder, 20 sekunder och 30 sekunder (minska värdet
med knappen
▼ och öka värdet med knappen ▲)
För att återgå till menysidan, tryck på knappen
BACK eller ENTER.
Menyval “Sleep Timer”
I denna meny ställs tiden när skärmen skall övergå
till stand-by . Välj detta menyval och tryck på ENTER
för att aktivera. Inställningarna visas grafiskt i skärmen. Ändra värdet med knappen
▼ eller ▲. Tidsin-
tervallerna är 0 minuter = inte aktiverad, 30 minuter,
60 minuter, 90 minuter, 120 minuter. Öka värdet
med knappen
▲ och minska värdet med knappen
▼. Återgå till menysidan med knappen BACK eller
ENTER.
OBS: Då stand-by funktionen aktiveras återställs
tiden till “0 Min.”.
Menyval “Default 1” och “Default 2”
Dessa funktioner är endast avsedda för serviceinställningar och saknar användarfunktion.
För att avsluta inställningarna för denna menysida,
tryck på knappen BACK. För att välja en annan menysida, tryck på knappen
▼ eller ▲ eller BACK eller
MENU för att lämna menyn.
8 Specifikationer
Skärm diagonal
Modell TFT-1700COL: . . 43 cm (17")
Modell TFT-1900COL: . . 48 cm (19")
Visningsvinkel: . . . . . . . . . . . hor. 160 grader, vert. 160 grader
Färgsystem: . . . . . . . . . . . . . PAL/NTSC (automatisk avkänning)
Upplösning: . . . . . . . . . . . . . 1280 x 1024 Pixels
Kontrast: . . . . . . . . . . . . . . . . 500 : 1
Svarstid: . . . . . . . . . . . . . . . . 16,2 millisek
Färgupplösning: . . . . . . . . . . 24 bitar = 16,2 miljoner nyanser
Ljusstyrka: . . . . . . . . . . . . . . 260 cd/Kvm
Ingångar och utgångar
Video: . . . . . . . . . . . . . . . 1 Vpp/75 Ω
Audio: . . . . . . . . . . . . . . . 350 mV/470 Ω
Arbetstemperatur: . . . . . . . . 0 – 50 grader C.
Strömförsörjning: . . . . . . . . . 12 V / 4 A med medföljande
nätadapter ansluts till
100 – 240 V~/50 – 60 Hz/50 VA
Dimensioner
(utan monteringsfot), vikt
Modell TFT-1700COL: . . 345 x 393 x 70 mm, 5,9 kilo
Modell TFT-1900COL: . . 430 x 380 x 70 mm, 6,9 kilo
Anslutningar:
Ingångar video: . . . . . . . . 2 x BNC (Komposit video)
1 x 4-polig mini-DIN (S-VIDEO)
1 x 15-polig D-sub (VGA)
Ingångar audio: . . . . . . . . 2 x phono, stereo
1 x 3,5 mm telejack, stereo
Utgångar video: . . . . . . . . 2 x BNC (Komposit video)
1 x 4-polig mini-DIN (S-VIDEO)
Utgångar audio: . . . . . . . 2 x phono, stereo
Rätt till ändringar förbehålles tillverkaren.
S
44
Alla rättigheter är reserverade av MONACOR®INTERNATIONAL GmbH & Co. KG. Ingen del av denna instruktionsmanual får eftertryckas i någon form eller på något sätt användas i kommersiellt syfte.
Page 45

TFT LCD farvemonitor
Læs nedenstående sikkerhedsoplysninger opmærksomt igennem før ibrugtagning af enheden. Bortset fra
sikkerhedsoplysningerne henvises til den engelske
tekst.
Sikkerhedsanvisning
Enhederne (monitor og strømforsyning) overholder
alle nødvendige EU direktiver og er derfor mærket
med .
Læs følgende punkter omhyggeligt:
●
Enhederne er kun egnet til indendørs brug. Beskyt
enhederne mod vand, høj luftfugtighed og varme (tilladt temperatur område 0–50°C).
●
Placer aldrig f. eks. glas med væske på monitoren
eller strømforsyningen.
●
Den varme den opstår i monitoren transporteres
væk ved hjælp af luftcirkulation. Tildæk derfor aldrig
ventilationshullerne i kabinettet.
●
Tænd ikke for monitoren eller fjern øjeblikkeligt
strømstikket hvis
1. der er synlige tegn på skader på monitoren,
strømforsyningen eller strømkablet,
2. monitoren har været tabt,
3. monitoren ikke virker korrekt.
Overlad venligst al service og reparation til autoriseret personel.
●
Træk aldrig i kablet for at fjerne strømkablet fra kontakten. Tag altid fat i selve stikket.
●
Brug aldrig kemikalier eller vand til aftørring af monitoren. Brug kun en tør, blød klud.
●
Al garanti og ansvar overfor personskade bortfalder
hvis monitor og strømforsyning anvendes på anden
vis end oprindeligt tiltænkt, hvis det tilsluttes forkert,
bruges forkert eller bliver repareret af uautoriseret
personel.
Hvis enhederne skal bortskaffes for bestandigt, skal de afleveres på den lokale genbrugsplads, så enhederne kan skrottes på
en miljøvenlig måde.
ADVARSEL Strømforsyningen tilsluttes stærkstrøm
(230 V). Overlad venligst al service til
autoriseret personel. Uautoriseret reparation og modifikation kan medføre
elektrisk stød.
FIN
45
TFT LCD värimonitori
Ole hyvä ja huomioi joka tapauksessa seuraavat turvallisuuteen liittyvät seikat ennen laitteen käyttöä. Laitteen toiminnasta saa lisätietoa tarvittaessa tämän laitteen muunkielisistä käyttöohjeista.
Turvallisuudesta
Nämä yksiköt (monitori ja virtalähde) täyttävät kaikki
niihin kohdistuvat EU-direktiivit ja niille on myönnetty
merkintä.
Huomioi seuraavat seikat:
●
Nämä laitteet soveltuvat käytettäviksi ainoastaan
sisätiloissa. Suojele laitetta kosteudelta, vedeltä ja
kuumuudelta (sallittu ympäröivä lämpötila 0–50°C).
●
Älä sijoita laitteen päälle mitään nestettä sisältävää,
kuten vesilasia tms.
●
Monitorin ilmanvaihtoaukkoja ei saa peittää, ettei
monitorin kehittämän lämmön haihtuminen esty.
●
Älä käytä laitetta ja kytke virtalähde välittömästi irti
verkkovirrasta, jos:
1. laitteessa, virtalähteessä tai sen johdossa on
havaittavissa vaurio,
2. laitteiden putoaminen tai vastaava vahinko on
saattanut aiheuttaa vaurion,
3. laitteessa esiintyy toimintahäiriöitä.
Kaikissa näissä tapauksissa laite tulee toimittaa valtuutettuun huoltoliikkeeseen.
●
Älä koskaan vedä verkkovirtajohtoa irti pistorasiasta
itse johdosta vetämällä.
●
Käytä puhdistamiseen pelkästään kuivaa, pehmeää
kangasta. Älä käytä kemikaaleja tai vettä.
●
Myös valmiustilassa ollessaan monitori kuluttaa jonkin verran sähköä. Energian säästämiseksi monitori
tulee kytkeä pois päältä kun laite on käyttämättömänä pidemmän aikaa.
●
Laitteen takuu raukeaa, eikä valmistaja, maahantuoja tai myyjä ota vastuuta mahdollisista välittömistä
tai välillisistä vahingoista, jos laitetta (tai sen virtalähdettä) on käytetty muuhun kuin alkuperäiseen
käyttötarkoitukseen, laitetta on taitamattomasti käytetty tai kytketty , tai laitetta on huollettu muussa kuin
valtuutetussa huollossa.
Kun laite poistetaan lopullisesti käytöstä,
huolehdi, että laite hävitetään asianmukaisesti jätteenkäsittelylaitoksessa.
VAROITUS Liitettävä virtalähde toimii hengenvaa-
rallisella jännitteellä. Jätä huoltotoimet
valtuutetulle huoltoliikkeelle. Epäpätevä
huolto ja käsittely saattavat aiheuttaa
sähköiskun vaaran.
DK
Page 46

Copyright©by MONACOR INTERNATIONAL GmbH & Co. KG, Bremen, Germany. All rights reserved. A-0609.99.01.06.2006
®
 Loading...