

Page 1

Bedienungsanleitung
Instruction Manual
Mode d’emploi
Istruzioni per l’uso
Gebruiksaanwijzing
Handleiding
Manual de instrucciones
Manual de instruções
Brugsanvisning
Bruksanvisning
Käyttöohje
®
TDD-2000
Best.-Nr. 21.0070
Stereo-Doppel-Cassetten-Deck
Stereo Double Tape Deck
Page 2

2
Bevor Sie einschalten ...
Wir wünschen Ihnen viel Spaß mit Ihrem
neuen MONACOR Gerät. Dabei soll Ihnen
diese Bedienungsanleitung helfen, alle
Funktionsmöglichkeiten kennenzulernen.
Die Beachtung der Anleitung vermeidet
außerdem Fehlbedienungen und schützt
Sie und Ihr Gerät vor eventuellen Schäden durch unsachgemäßen Gebrauch.
Den deutschen Text finden Sie auf den
Seiten 4
-
13.
Before you switch on ...
We wish you much pleasure with your new
MONACOR unit. With these operating instructions you will be able to get to know
all functions of the unit. By following these
instructions false operations will be avoided, and possible damage to you and your
unit due to improper use will be prevented.
You will find the English text on the pages
4
-
12.
Prima di accendere ...
Vi auguriamo buon divertimento con il Vostro nuovo apparecchio MONACOR. Le
istruzioni per l’uso Vi possono aiutare a
conoscere tutte le possibili funzioni. E rispettando quanto spiegato nelle istruzioni,
evitate di commettere degli errori, e così
proteggete Voi stessi, ma anche l’apparecchio, da eventuali rischi per uso improprio.
Il testo italiano lo potete trovare alle pagine 14
-
22.
Avant toute mise en service ...
Nous vous remercions d’avoir choisi un
appareil MONACOR et vous souhaitons
beaucoup de plaisir à l’utiliser. Cette notice a pour objectif de vous aider à mieux
connaître les multiples facettes de l’appareil et à vous éviter toute mauvaise manipulation.
La version française se trouve pages
14–22.
Voordat u inschakelt ...
Wij wensen u veel plezier met uw nieuw
toestel van MONACOR. Met behulp van
bijgaande gebruiksaanwijzing kunt u alle
functiemogelijkheden leren kennen. Door
deze instructies op te volgen zal een
slechte werking vermeden worden, en zal
een eventueel letsel aan uzelf en schade
aan uw toestel tengevolge van onzorgvuldig gebruik worden voorkomen.
U vindt de nederlandstalige tekst op de
pagina’s 23–31.
Antes de pôr em funcionamento ...
Agradecemos-lhe por ter escolhido um
aparelho MONACOR. Com estas instruções ficará habilitado a conhecer e utilizar todas as funções desta unidade. Seguindo-as, evita possíveis manipulações
defeituosas.
A versão em idioma português pode ser
encontrada nas páginas 32–40.
Antes de cualquier instalación
Tenemos de agradecerle el haber adquirido un equipo MONACOR y le deseamos
un agradable uso. Este manual quiere
ayudarle a conocer las multiples facetas
de este equipo y evitar cualquier uso inadecuado.
La versión española se encuentra en las
páginas 23–31.
D
A
CH
GB
NL
B
F
B
CH
E
I
P
Inden De tænder for apparatet ...
Vi ønsker Dem god fornøjelse med Deres
nye MONACOR apparat. Denne brugsanvisning giver mulighed for at lære alle apparatets funktioner at kende. Følg vejledningen for at undgå forkert betjening og for
at beskytte Dem og Deres apparat mod
skade på grund af forkert brug.
Den danske tekst finder De på side 32–40.
Förskrift
Vi önskar dig mycket nöje med din nya
TDD-2000. Om du först läser instruktionerna kommer du att få glädje av enheten
under lång tid. Kunskap om alla funktioner
kan bespara dig mycket besvär med enheten i framtiden.
Du finner den svenska texten på sidan
41–48.
Ennen virran kytkemistä ...
Toivomme, että uusi MONACOR-laitteesi
tuo sinulle paljon iloa ja hyötyä. Tämä
käyttöohje esittää sinulle kaikki uuden laitteesi toiminnot. Seuraamalla sitä vältät virhetoiminnot ja niistä johtuvat mahdolliset
vahingot sinulle tai laitteellesi.
Löydät suomenkieliset käyttöohjeet sivuilta 41–49.
DK
S
FIN
®
Page 3
LINE OUT
PLAY
LINE IN
REC
L
R
SYSTEM
CONTROL
230 V~/50 Hz
POWER
STEREO DOUBLE CASSETTE DECK TDD-2000
®
ON OFF
IC LOGIC TRANSPORT CONTROL
REC/PLAY 1
AUTO TAPE SELECTOR
AUTO REVERSE
RESET 1
INTRO CHECK BLANK SCAN
RECORD PAUSE
EJECT
• • •
TIMER
REC OFF PLAY
• • •
DIRECTION
AUTO REVERSE
RESET 2
REC MUTESYNC REV
RECORD PAUSE
EJECT
IC LOGIC TRANSPORT CONTROL
REC/PLAY 2
HIGH SPEED DUBBING
MICPHONES
AUTO (NOR) DUBBING (HIGH) CARS
PARALLEL
REC
BALANCE
LR
MIN MAX
• • •
DOLBY NR
B OFF C
REC LEVEL
DOLBY B • C NR HX PRO
dB -∞ 30 20 10 6 3 03+6
L
R
PLAY
3
123 4 5
➀
32 33 34 35
6 7 8 9 10 11 12 13 14 15
➂
INTRO CHECK BLANK SCAN
RECORD PAUSE
REC MUTESYNC REV
RECORD PAUSE
AUTO (NOR) DUBBING (HIGH) CARS
PARALLEL
REC
16 17 18 19 20 21 22 23
24
25
26
24
25
27 28 29 30 31 27 28 29 30 31
➁
C-90
Seite / Side 1
C-90
Seite / Side 1
➄
ab
➃
Page 4

Bitte klappen Sie die Seite 3 heraus. Sie sehen
dann immer die beschriebenen Bedienelemente
und Anschlüsse.
Inhalt Seite
1 Hinweise für den sicheren Gebrauch . . . . 4
2 Übersicht der Bedienelemente und
Anschlüsse . . . . . . . . . . . . . . . . . . . . . . . . . 4
3 Gerät anschließen . . . . . . . . . . . . . . . . . . .6
4 Wiedergabe . . . . . . . . . . . . . . . . . . . . . . . . . 6
4.1 Welche Kassetten sind geeignet? . . . . . . . . 6
4.2 Ein- und Ausschalten . . . . . . . . . . . . . . . . . . 6
4.3 Kassette abspielen . . . . . . . . . . . . . . . . . . . . 6
4.4 Vor- und Rücklauf/mit automatischem
Start der Wiedergabe . . . . . . . . . . . . . . . . . . 7
4.5 Titel anwählen . . . . . . . . . . . . . . . . . . . . . . . 7
4.6 Wiederholtes Abspielen eines Titels . . . . . . 7
4.7 Anspielen aller Titel . . . . . . . . . . . . . . . . . . . 8
4.8 Lange Pausen automatisch überspringen . . 8
5 Aufnahme . . . . . . . . . . . . . . . . . . . . . . . . . . 8
5.1 Kassetten vor unbeabsichtigtem
Überspielen sichern . . . . . . . . . . . . . . . . . . . 8
5.2 Einfache Kassettenaufnahme . . . . . . . . . . . 8
5.3 Neustart der Aufnahme bei einem Fehler . . 9
5.4 Nach einem Titel eine 4-Sekunden-Pause
einfügen . . . . . . . . . . . . . . . . . . . . . . . . . . . . 9
5.5 Parallelaufnahme . . . . . . . . . . . . . . . . . . . . . 9
5.6 Kassette kopieren (Dubbing) . . . . . . . . . . . . 9
5.7 CD-Spieler startet Kassettenaufnahme . . .10
5.8 Automatische CD-Aufnahme auf Kassette .10
6 Betrieb mit einer Schaltuhr oder über
den Timer des Receivers DSR-2000 . . . . 11
7 Pflege . . . . . . . . . . . . . . . . . . . . . . . . . . . . 11
7.1 Richtige Lagerung von Kassetten . . . . . . . 11
7.2 Reinigung von Tonkopf und Bandführung . 11
7.3 Tonkopf entmagnetisieren . . . . . . . . . . . . . 11
8 Beseitigung von Störungen . . . . . . . . . . 11
9 Technische Daten . . . . . . . . . . . . . . . . . . .13
Das Dolby-Rauschunterdrückungssystem wurde
unter der Lizenz von Dolby Laboratories Licensing
Corporation hergestellt. „DOLBY“ und das DoppelD-Symbol sind Warenzeichen der Dolby Laboratories Licensing Corporation.
1 Hinweise für den sicheren Gebrauch
Dieses Gerät entspricht der EU-Richtlinie Nr.
89/336/EWG für elektromagnetische Verträglichkeit.
Das Gerät wird mit lebensgefährlicher Netzspannung (230V~) versorgt. Nehmen Sie deshalb niemals selbst Eingriffe im Gerät vor. Durch unsachgemäßes Vorgehen besteht die Gefahr eines
elektrischen Schlages. Außerdem erlischt beim
Öffnen des Gerätes jeglicher Garantieanspruch.
Beachten Sie für den Betrieb auch unbedingt die folgenden Punkte:
•
Das Gerät ist nur zur Verwendung in Räumen geeignet.
•
Wenn das Gerät von einem kühlen Ort in einem
warmen Raum gestellt wird, entsteht Kondensationsfeuchtigkeit am Gerät. Das beeinträchtigt die
Funktion. Darum das Gerät erst in Betrieb nehmen, wenn es die gleiche Temperatur hat wie die
Umgebungsluft.
•
Betreiben Sie das Gerät nur bei Temperaturen
über 5°C.
•
Schützen Sie das Gerät vor Hitze, Feuchtigkeit,
Staub und direktem Sonnenlicht.
•
Betreiben Sie das Gerät nicht in der Nähe von Objekten, die ein Magnetfeld ausstrahlen, z. B. Magnete, Motoren, Lautsprecher, Fernsehgeräte usw .
•
Das Gerät nicht in Betrieb nehmen und sofort den
Netzstecker ziehen, wenn:
1. sichtbare Schäden am Gerät oder an der Netzanschlußleitung vorhanden sind,
2. nach einem Sturz oder ähnlichem der Verdacht
auf einen Defekt besteht,
3. Funktionsstörungen auftreten.
Das Gerät in jedem Fall zur Reparatur in eine
Fachwerkstatt geben.
•
Eine beschädigte Netzanschlußleitung darf nur
durch den Hersteller oder eine autorisierte Fachwerkstatt ersetzt werden.
•
Den Netzstecker nie an der Zuleitung aus der
Steckdose ziehen.
•
Wird das Gerät zweckentfremdet, falsch bedient
oder nicht fachgerecht repariert, kann für eventuelle Schäden keine Haftung übernommen werden.
•
Zum Reinigen des Gehäuses nur ein trockenes
Staubtuch verwenden, auf keinen Fall Chemikalien oder Wasser.
2 Übersicht der Bedienelemente und
Anschlüsse
2.1 Frontseite und Fernbedienung
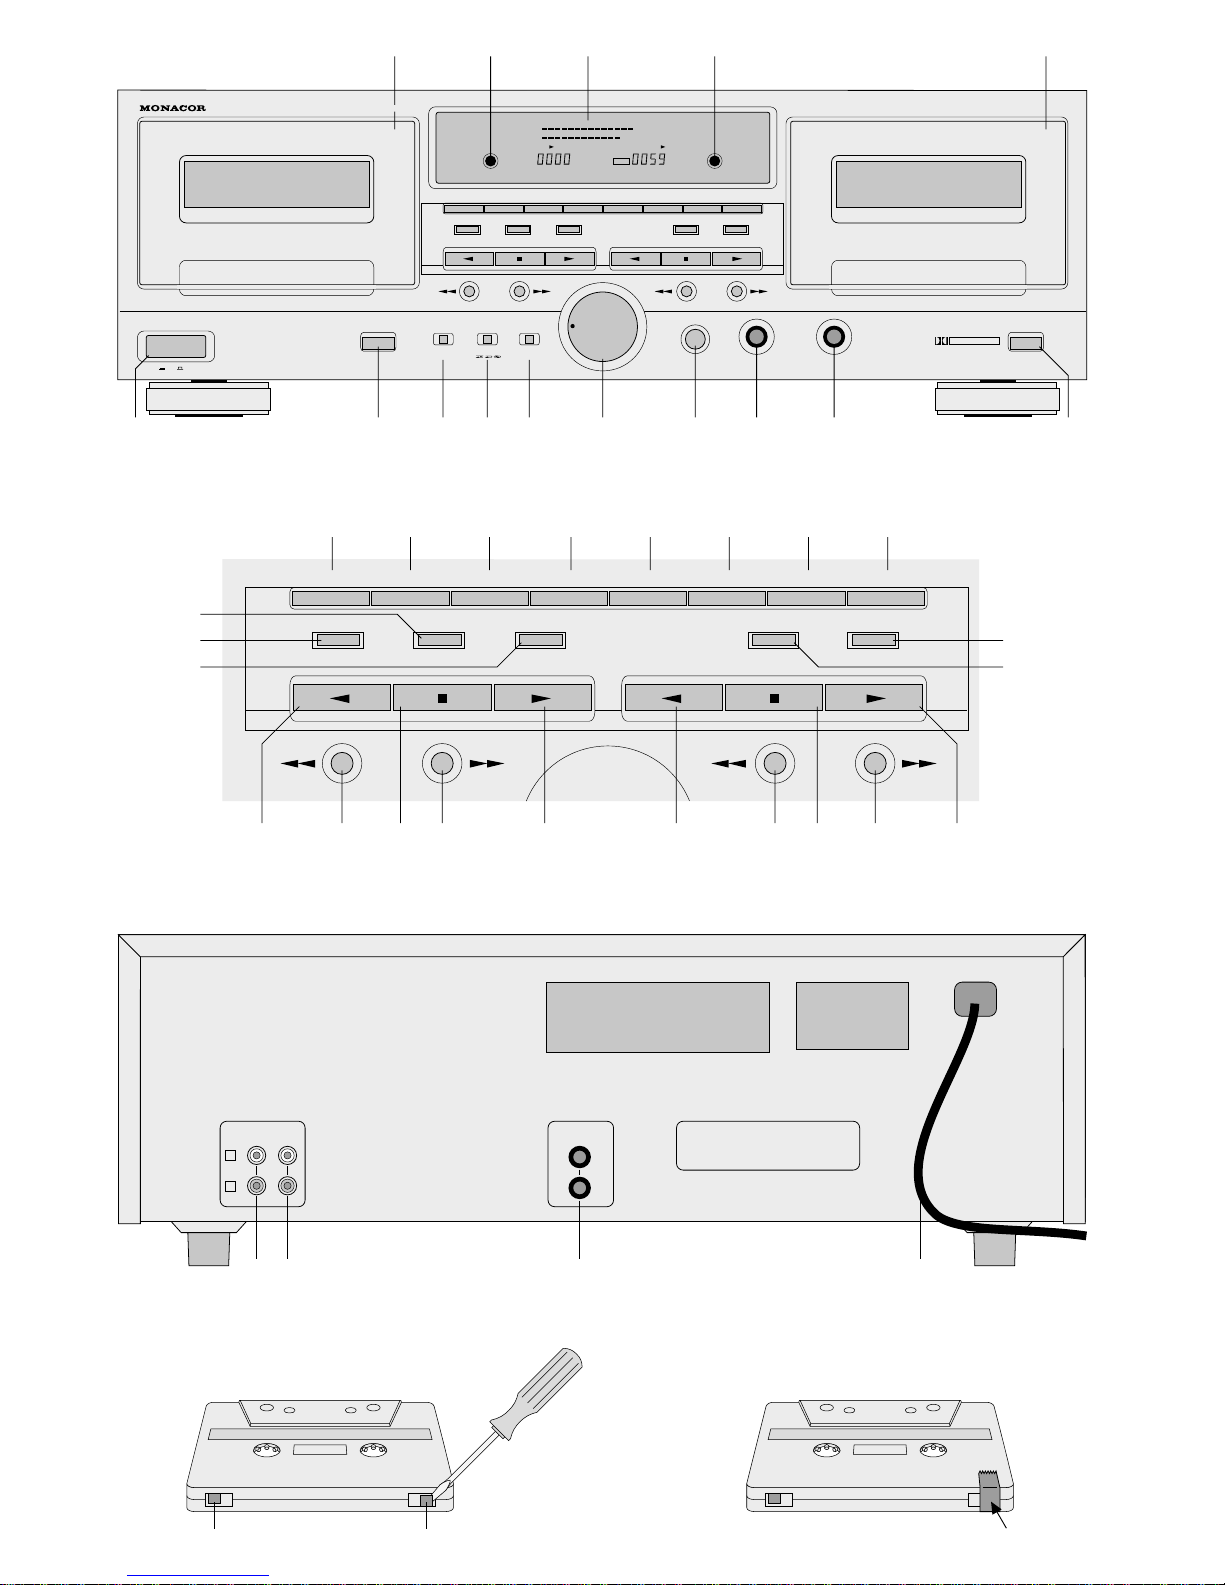
1 Kassettenfach für Laufwerk 1
2 Rückstelltaste des Zählwerks für Laufwerk 1 auf
„0000“
3 Display mit Pegelanzeige
4 Rückstelltaste des Zählwerks für Laufwerk 2 auf
„0000“
5 Kassettenfach für Laufwerk 2
6 Ein-/Ausschalter
7 Taste zum Öffnen des Kassettenfachs 1
8 Schiebeschalter für den Timer, nur in Verbindung
mit dem MONACOR-Receiver DSR-2000:
OFF = Timer ausgeschaltet
REC = Timer schaltet auf Aufnahme
PLAY= Timer schaltet auf Wiedergabe
VORSICHT: Steht der Schalter auf REC oder
PLAY, startet sofort eine Aufnahme bzw. die Wiedergabe, wenn der Recorder mit dem Ein-/ Ausschalter (6) in Betrieb genommen wird!
9 Wahlschalter für das automatische Aufnehmen
oder Abspielen beider Kassettenseiten bzw. beider Laufwerke:
Please unfold page 3. Then you can always see
the operating elements and connections described.
Contents Page
1 Safety notes . . . . . . . . . . . . . . . . . . . . . . . . 4
2 Operating elements and connections . . . 4
3 Connection . . . . . . . . . . . . . . . . . . . . . . . . . 6
4 Replay . . . . . . . . . . . . . . . . . . . . . . . . . . . . . 6
4.1 Which cassettes are suitable? . . . . . . . . . . . 6
4.2 Switching on and off . . . . . . . . . . . . . . . . . . . 6
4.3 Playing a cassette . . . . . . . . . . . . . . . . . . . . 6
4.4 Rewinding the cassette forwards or back-
wards/with automatic start of the replay . . . 7
4.5 Select title . . . . . . . . . . . . . . . . . . . . . . . . . . 7
4.6 Repeated replay of a title . . . . . . . . . . . . . . . 7
4.7 Short monitoring of all titles . . . . . . . . . . . . . 7
4.8 Automatic skipping of long pauses . . . . . . . 8
5 Recording . . . . . . . . . . . . . . . . . . . . . . . . . . 8
5.1 Secure cassette against unintentional dub-
bing . . . . . . . . . . . . . . . . . . . . . . . . . . . . . . . 8
5.2 Simple cassette recording . . . . . . . . . . . . . . 8
5.3 New start of the recording in case of a fault . 8
5.4 Insert a 4-second pause after a title . . . . . . . 8
5.5 Parallel recording . . . . . . . . . . . . . . . . . . . . . 9
5.6 Cassette dubbing . . . . . . . . . . . . . . . . . . . . . 9
5.7 CD player starts cassette recording . . . . . . . 9
5.8 Automatic CD recording on cassette . . . . . 10
6 Operation with a switch clock or via the
timer of the receiver DSR-2000 . . . . . . . . 10
7 Care . . . . . . . . . . . . . . . . . . . . . . . . . . . . . . 11
7.1 Correct storing of cassettes . . . . . . . . . . . . 11
7.2 Cleaning of sound head and tape guidance 11
7.3 Demagnetize sound head . . . . . . . . . . . . . 11
8 Troubleshooting . . . . . . . . . . . . . . . . . . . . 11
9 Specifications . . . . . . . . . . . . . . . . . . . . . . 12
The Dolby noise reduction system has been manufactured under license of Dolby Laboratories Licensing Corporation. “DOLBY”, and the double symbole
are trade-marks of Dolby Laboratories Licensing
Corporation.
1 Safety Notes
This appliance corresponds to the EC Directives No.
89/336/EWG for electromagnetic compatibility.
This unit uses lethally high voltage (230 V~). To
prevent a shock hazard do not open the cabinet.
Leave servicing to authorized skilled personnel
only. Any guarantee claim expires if the unit has
been opened.
For the operation also watch in any case the following items:
•
The unit is only suitable for indoor use.
•
If the unit is placed from a cool place to a warm
room, condensating humidity comes into being.
This impairs the function. Therefore only set the
unit into operation if it has the same temperature
as the ambient air.
•
Only operate the unit with temperatures above 5°C.
•
Protect the unit from heat, humidity, dust, and direct sun radiation.
•
Do not operate the unit near objects radiating a
magnet field, e.g. magnets, motors, speakers, TV
sets, etc.
•
Do not set the unit into operation and immediately
take the mains plug out of the mains socket if:
1. damage at the unit or mains cable can be seen.
2. a defect might have occurred after a drop or
similar accident.
3. there are malfunctions.
The unit must in any case be repaired by authorized skilled personnel.
•
A damaged mains cable must only be repaired by
the manufacturer or authorized skilled personnel.
•
Never pull the mains plug out of the mains socket
by means of the mains cable.
4
GB
D
A
CH
•
If the unit is used for purposes other than originally
intended, if it is operated in the wrong way or not
repaired by authorized skilled personnel, there is
no liability for possible damage.
•
For the cleaning of the housing only use a dry cloth
for dust removing, by no means chemicals or water.
•
Important for U.K. Customers!
The wires in this mains lead are coloured in accordance with the following code:
blue = neutral
brown = live
As the colours of the wires in the mains lead of this
appliance may not correspond with the coloured
markings identifying the terminals in your plug,
proceed as follows:
1. The wire which is coloured blue must be connected to the terminal in the plug which is marked
with the letter N or coloured black.
2. The wire which is coloured brown must be connected to the terminal which is marked with the letter L or coloured red.
2 Operating Elements and Connections
2.1 Front panel and remote control
1 Cassette compartment for deck 1
2 Reset button of the counter indicator for deck 1 to
"0000"
3 Display with level indication
4 Reset button of the counter indicator for deck 2 to
"0000"
5 Cassette compartment for deck 2
6 POWER switch
7 Button to open the cassette compartment 1
8 Sliding switch for the timer, only in connection
with the MONACOR receiver DSR-2000:
OFF = timer is switched off
REC = timer is prepared to switch to recording
PLAY= timer is prepared to switch to replay
CAUTION: If the switch is set to REC or PLAY,
Page 5
immediately the recording starts resp. the replay
if the recorder is set into operation with the
POWER switch (6).
9 Selector switch for the automatic recording or play-
ing of both cassette sides resp. both tape decks:
= recorder stops after replay resp. record-
ing of one cassette side
= while replaying both cassette sides are
automatically played one after the other
up to 5 times, for the recording both
cassette sides are used one after the
other
= while replaying both cassette sides on
both decks are automatically played
one after the other up to 5 times, while
recording, both cassette sides on both
decks are used one after the other.
10 Selector switch for Dolby noise reduction
B = Dolby B, is used in most home systems.
For cassettes recorded with Dolby B.
C = Dolby C, improved Dolby B system. Dolby
C should be selected for the recording of
a cassette if the cassette will be replayed
on a unit with Dolby C and of course for all
cassettes already recorded with Dolby C.
OFF = Dolby switched off. For cassettes record-
ed without Dolby.
11 Control for the recording level
12 Balance control for the recording
13
1
/4" jack for medium impedance stereo head-
phones (impedance > 8Ω) with a volume control
141/4" jack for a mono microphone. If a microphone
is connected, the recording input REC (32) is
switched off.
15 Button to open the cassette compartment 2
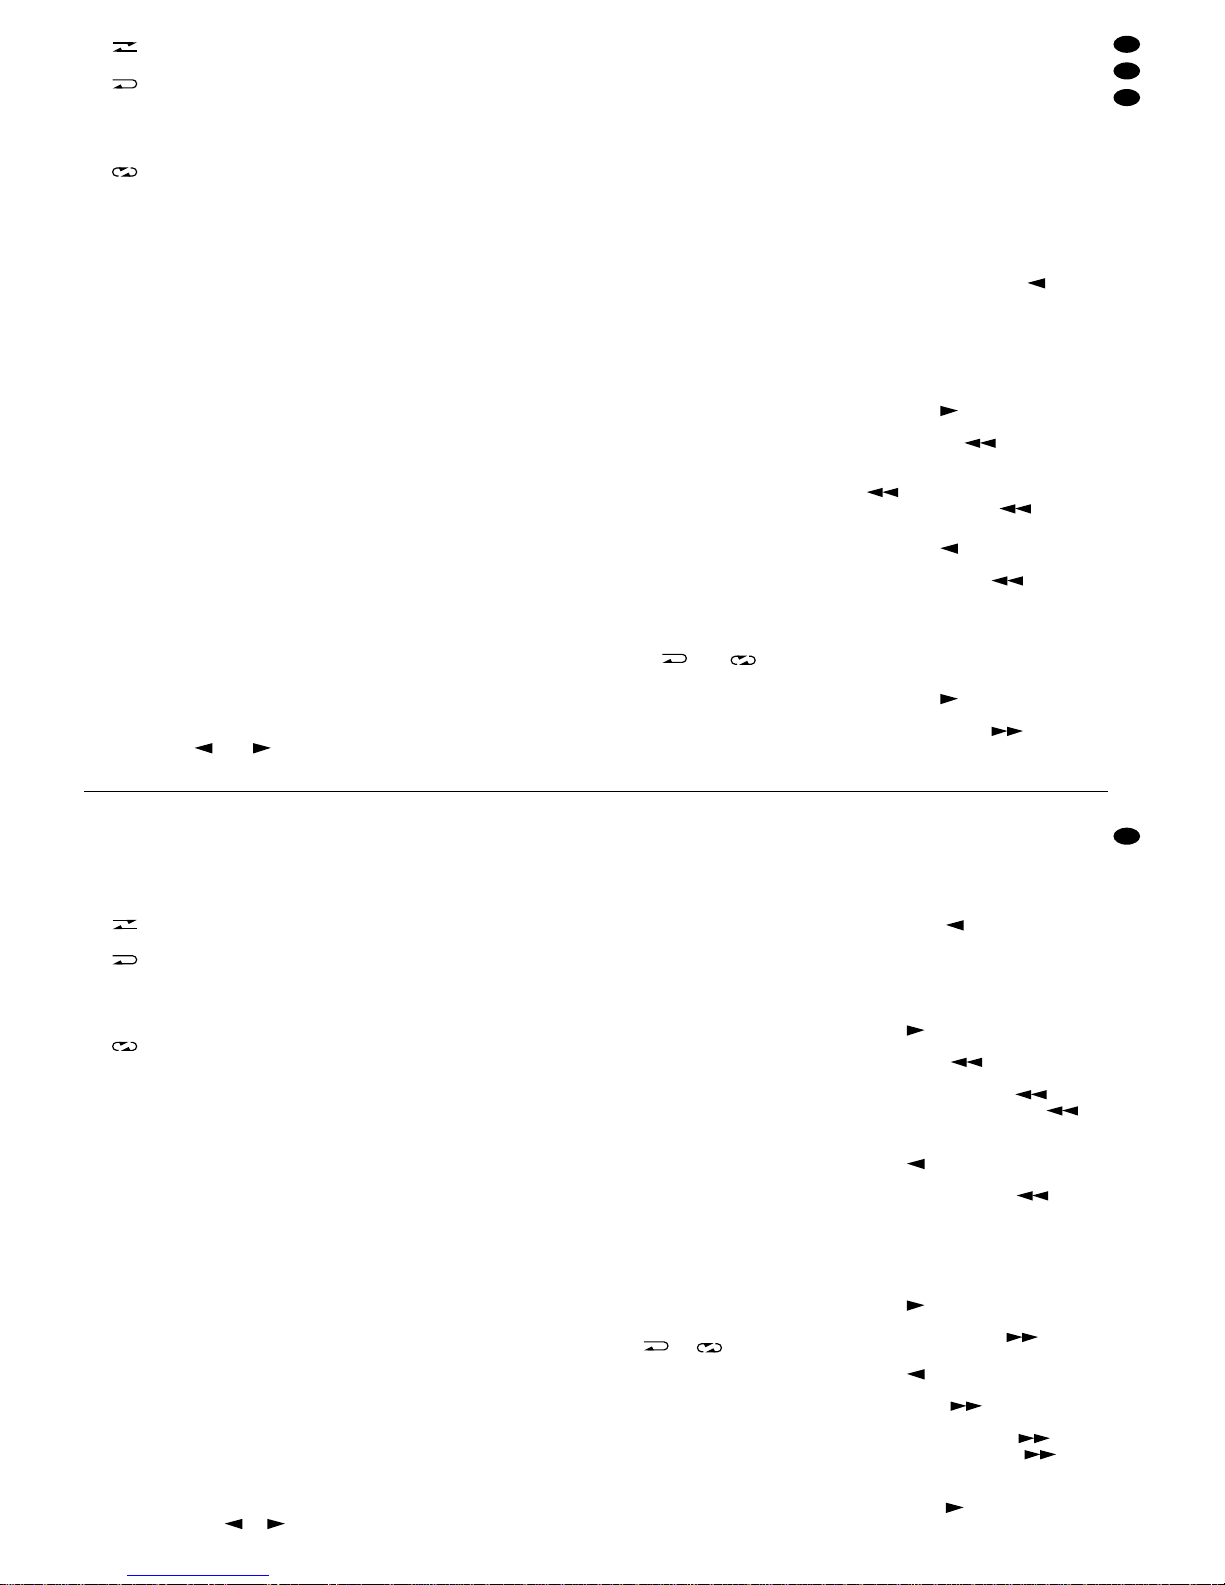
16 Button INTRO CHECK for short playing of all ti-
tles on one cassette side for 10 seconds each. To
play the titles, at first the replay must be switched
on with the button or and then the button
INTRO CHECK must be pushed.
17 Button BLANK SCAN for skipping of pauses be-
tween individual titles which are longer than
10 seconds. This function can only be activated
while replaying.
18 Button AUTO, can be pushed before dubbing
cassettes to rewind the original or the recording
cassette back to the tape beginning. The function
is only activated if after pushing the button AUTO
also one of the dubbing buttons for cassette dubbing has been pushed: button NOR (19) or button
HIGH (20).
19 Button DUBBING (NOR) for cassette dubbing at
normal speed. For this the recording cassette
must be inserted into deck 2 with the empty bobbin to the right.
20 Button DUBBING (HIGH) for cassette dubbing at
double speed. For this the recording cassette
must be inserted into deck 2 with the empty bobbin to the right.
21 Button CARS for CD recording with automatic
level adjustment (CARS = Computer Aided CD
Recording System). This function is only possible
in connection with the MONACOR CD player CD2000 and MONACOR HiFi Receiver DSR-2000
matching the recorder.
22 Button SYNC REV for dubbing of cassettes of
different lengths. At teh beginning of both sides of
the recording cassette exactly the same titles are
recorded as there are on the original cassette.
This function can only be activated if the switch
DIRECTION (9) is in position or .
23 Button REC MUTE for recording a 4-second
pause (without tone) between two titles. The
function can only be activated while recording or
in stand-by recording mode. After the 4-second
pause the unit is switched to recording stand-by
mode again.
24 Button PAUSE to interrupt the replay or record-
ing. After pushing the button again, the tape action continues.
25 Button RECORD to switch on the stand-by
recording mode. To start the recording, then the
button PAUSE (24) must be pushed.
26 Button PARALLEL REC for the same recording in
parallel on both decks to obtain two original recordings.
27 Replay with playing direction to the left.
By pushing the button again while replaying,
the actual title can be repeated as many times as
this button is pushed (max. 8times).
28 Rewinding with playing direction to the left
While replaying with this button other titles can be
selected.
While replaying with playing direction to the
right:
By pushing the button the cassette is rewound to the beginning of the actual title. To select the previous title, the button must be
pushed twice. By pushing the button several times always one title further back is rewound.
While replaying with playing direction to the
left:
With every pushing of the button one title
further back is rewound.
29 Stop
30 Rewinding with playing direction to the right
While replaying, with this button other titles can
be selected.
While replaying with playing direction to the
right:
With every pushing of the button one title is
rewound further forward.
While replaying with playing direction to the
left:
By pushing the button the cassette is rewound back to the beginning of the actual title. To
select the previous title, the button must be
pushed twice. By pushing the button several
times, always one title further back is rewound.
31 Replaying with playing direction to the right.
By pushing the button again while replaying,
the actual title can be repeated as many times as
this button is pushed (max. 8times).
5
GB
D
A
CH
= Recorder stoppt nach der Wiedergabe
bzw. Aufnahme einer Kassettenseite
= bei der Wiedergabe werden beide Kas-
settenseiten automatisch nacheinander
bis zu 5mal abgespielt,
bei der Aufnahme werden beide Kassettenseiten nacheinander bespielt
= bei der Wiedergabe werden beide Kas-
settenseiten auf beiden Laufwerken
automatisch nacheinander bis zu 5mal
abgespielt,
bei der Aufnahme werden beide Kassettenseiten auf beiden Laufwerken
nacheinander bespielt
10 Wahlschalter für Dolby-Rauschunterdrückung:
B = Dolby B, wird in den meisten Heimgeräten
verwendet. Für Kassetten, die mit Dolby B
aufgenommen wurden.
C = Dolby C, verbessertes Dolby B System.
Dolby C sollte zur Aufnahme einer Kassette gewählt werden, wenn die Kassette
auch wieder auf einem Gerät mit Dolby C
abgespielt wird und natürlich für alle mit
Dolby C aufgenommenen Kassetten.
OFF = Dolby ausgeschaltet. Für Kassetten, die
ohne Dolby aufgenommen wurden.
11 Regler für den Aufnahmepegel
12 Balanceregler für die Aufnahme
13 6,3 mm-Klinkenbuchse für einen mittelohmigen
Stereo-Kopfhörer (Impedanz > 8Ω) mit eigenem
Lautstärkereger
14 6,3 mm-Klinkenbuchse für ein Mono-Mikrofon.
Beim Anschluß eines Mikrofons wird der Aufnahmeeingang REC (32) abgeschaltet.
15 Taste zum Öffnen des Kassettenfachs 2
16 Taste INTRO CHECK zum Anspielen aller Titel
für je 10Sekunden auf einer Kassettenseite. Zum
Anspielen der Titel muß zuerst die Wiedergabe
mit der Taste oder eingeschaltet und an-
schließend die Taste INTRO CHECK gedrückt
werden.
17 Taste BLANK SCAN zum Überspringen von Pau-
sen zwischen einzelnen Titeln, die länger als
10Sekunden sind. Diese Funktion kann nur
während der Wiedergabe aktiviert werden.
18 Taste AUT O, kann vor dem Kopieren von Kasset-
ten gedrückt werden, um die Original- und die
Aufnahmekassette zurück an den Bandanfang zu
spulen. Die Funktion wird erst dann aktiviert,
wenn nach dem Betätigen der Taste AUTO auch
einer der Dubbing-Tasten für das Kassettenkopieren gedrückt wird: Taste NOR (19) oder Taste
HIGH (20).
19 Taste DUBBING (NOR) zum Kassettenkopieren
mit normaler Geschwindigkeit. Die Aufnahmekassette muß dazu in das Laufwerk 2 mit der
leeren Spule nach rechts eingelegt werden.
20 Taste DUBBING (HIGH) zum Kassettenkopieren
mit doppelter Geschwindigkeit. Die Aufnahmekassette muß dazu in das Laufwerk 2 mit der
leeren Spule nach rechts eingelegt werden.
21 Taste CARS zur CD-Aufnahme mit automatischer
Pegeleinstellung (CARS = Computer Aided CD
Recording System = computerunterstütztes CDAufnahmesystem). Diese Funktion ist nur in
Verbindung mit dem zum Recorder dazugehörigen MONACOR CD-Spieler CD-2000 und
MONACOR HiFi-Receiver DSR-2000 möglich.
22 Taste SYNC REV zum Kopieren von Kassetten
unterschiedlicher Längen. Dabei werden am Anfang beider Seiten der Aufnahmekassette exakt
die gleichen Titel aufgespielt, wie sie auf der Originalkassette vorhanden sind. Diese Funktion
kann nur aktiviert werden, wenn der Schalter
DIRECTION (9) auf der Position oder
steht.
23 Taste REC MUTE zur Aufnahme einer 4-Sekun-
den-Pause (ohne Ton) zwischen zwei Titeln. Die
Funktion kann nur während der Aufnahme oder
bei Aufnahmebereitschaft aktiviert werden. Nach
der 4-Sekunden-Pause schaltet das Gerät wieder auf Aufnahmebereitschaft.
24 Taste PAUSE zum Unterbrechen der Wieder-
gabe oder Aufnahme. Nach erneutem Tastendruck läuft das Band weiter.
25 Taste RECORD zum Einschalten der Aufnahme-
bereitschaft. Zum Starten der Aufnahme muß
anschließend die Taste PAUSE (24) gedrückt
werden.
26 Taste PARALLEL REC für die gleiche Aufnahme
parallel auf beiden Laufwerken, um zwei Originalaufnahmen zu erhalten.
27 Wiedergabe mit Laufrichtung nach links.
Durch erneutes Drücken der Taste während
der Wiedergabe kann der momentan gespielte
Titel so oft wiederholt werden, wie diese Taste
betätigt wird (max. 8mal).
28 Umspulen mit Laufrichtung nach links.
Während der Wiedergabe können mit dieser
Taste andere Titel angewählt werden.
Bei der Wiedergabe mit Laufrichtung nach
rechts:
Beim Drücken der Taste wird an den Anfang des gerade laufenden Titels zurückgespult.
Zum Anwählen des davorliegenden Titels muß
die Taste zweimal betätigt werden. Durch
mehrfaches Drücken der Taste wird immer
ein Titel weiter zurückgespult.
Bei der Wiedergabe mit Laufrichtung nach
links:
Mit jedem Betätigen der T aste wird ein T itel
weiter vorgespult.
29 Stop
30 Umspulen mit Laufrichtung nach rechts.
Während der Wiedergabe können mit dieser
Taste andere Titel angewählt werden.
Bei der Wiedergabe mit Laufrichtung nach
rechts:
Mit jedem Betätigen der T aste wird ein T itel
weiter vorgespult.
Page 6
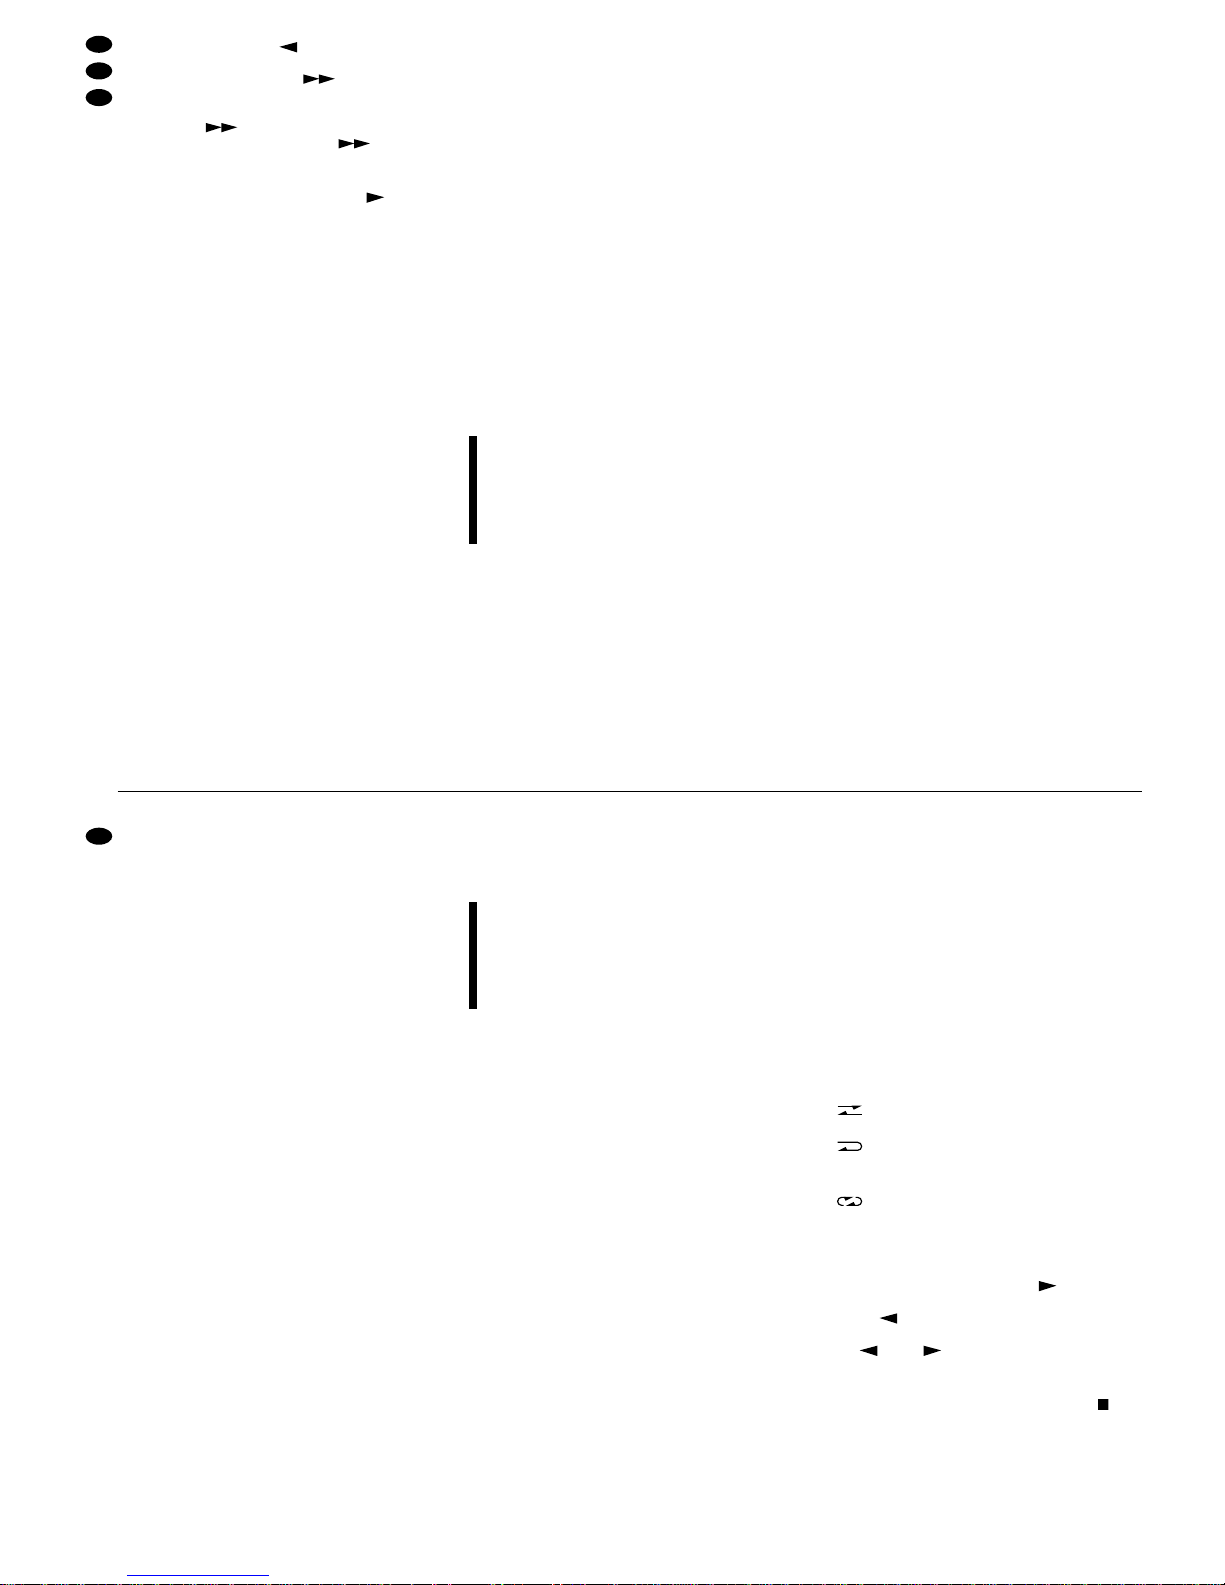
2.2 Rear panel
32 Cinch jacks for the audio inputs Recording
Left/Right
33 Cinch jacks for the audio outputs Replay
Left/Right
34 3,5 mm jacks for the system control of matching
units
35 Mains connection 230 V~/50 Hz
3 Connection
1) Connect the audio jacks PLAY (33) via cinch ca-
bles with the corresponding inputs (TAPE PLAY)
at the receiver or amplifier. Watch the colour coding of the jacks and plugs (red = right channel,
white = left channel).
2) Connect the audio input jacks REC (32) via cinch
cables with the corresponding outputs (TAPE
REC) at the receiver or amplifier.
3) The system control allows an extensive function
control of all components with connection of units
matching the recorder (MONACOR HiFi receiver
DSR-2000 and MONACOR CD player CD-2000).
For example the receiver is automatically
switched to the corresponding unit if the CD
player or the tape deck is switched to start. Also
an automatic level adjustment with CD recordings
on the tape deck is possible: the CD is shortly
played, the recorder adjusts the recording level
prior to the recording start, and after that the CD
starts from the beginning, the recording starts
-
a
fully automatic function!
To be able to use the system control, plug the
enclosed control cable with the 3.5 mm plugs into
one of the jacks SYSTEM CONTROL at the recorder (34) or receiver.
4) Only after all units have been connected with
each other, connect the mains plug into the
socket (230V~/50Hz).
5) If required, connect medium impedance stereo
headphones (impedance > 8 Ω) to the
1
/4" jack
PHONES (13). If the headphones are not provided with a volume control of their own, a separate stereo headphones cable control (e.g.
MONACOR HEC-60) must be inserted.
ATTENTION: Never adjust the headphones volume very high. Permanent high volumes may
damage the hearing! The hearing gets accustomed to high volumes which after some time do
not seem to be so high any more. Therefore do
not increase a high volume further after getting
used to it.
4 Replay
4.1 Which cassettes are suitable?
In general all cassettes of a tape length up to 90minutes playing time (C-90) can be used. No C-120 cas-
settes (120 minutes) should be used because the
tape is very thin. It may easily tear or unwind itself.
Furthermore do not use continuous cassettes.
They may damage the mechanics of the recorder.
Cassettes with a normal, chromiumdioxyd, or
metal tape are suitable. The best quality results are,
however, obtained with metal tapes. By markings at
the cassette the recorder automatically recognizes
the tape type and is switched over accordingly.
4.2 Switching on and off
1) Prior to switching on always set the sliding switch
TIMER (8) to position OFF. Otherwise after
switching on, the replay resp. the recording im-
mediately starts. In this case the cassette record-
ing may be erased!
Switch on the recorder with the POWER switch
(6).
2) After the operation always close the cassette
compartments to protect them against impurities,
and switch off the unit with the POWER switch (6).
3) After switching off always wait some seconds be-
fore switching on again.
4.3 Playing a cassette
1) Insert a cassette: If necessary, tighten the cassette tape by turning a bobbin. Open the cassette
compartment with the button EJECT (7 resp. 15).
Insert the cassette so that the openings for the
tape show downwards. Carefully close the cassette compartment by pushing at the upper edge.
If desired, set the counter indicator with the button
RESET (2 res. 4) to zero.
2) Set the sliding switch DOLBY NR (10) to the position by which the cassette has been recorded:
OFF = recorded without Dolby NR
B = recorded with Dolby B
C = recorded with Dolby C
3) Set the sliding switch DIRECTION (9) to the desired function:
= the recorder stops after the replay of one
cassette side.
= both sides of the cassette are automati-
cally replayed one after the other up to
5times.
= at first both cassette sides of one deck
are replayed, then automatically both
cassette sides of the other deck. This is
repeated up to 4 times (in each deck a
cassette must be inserted of course).
4) Start the replay with the button if the empty
bobbin of the cassette is at the right or with the
button if the empty bobbin is at the left. If a
cassette is not fully rewound, by pushing the button resp. one or the other cassette side
can be played.The display always shows the respective direction.
5) If the replay is to be stopped, push button .
6) To remove the cassette, push the button EJECT
(7 resp. 15), but only in case the cassette has
been stopped!
6
GB
D
A
CH
Bei der Wiedergabe mit Laufrichtung nach
links:
Beim Drücken der Taste wird an den Anfang des gerade laufenden Titels zurückgespult.
Zum Anwählen des davorliegenden Titels muß
die Taste zweimal betätigt werden. Durch
mehrfaches Drücken der Taste wird immer
ein Titel weiter zurückgespult.
31 Wiedergabe mit Laufrichtung nach rechts.
Durch erneutes Drücken der Taste während
der Wiedergabe kann der momentan gespielte
Titel so oft wiederholt werden, wie diese Taste
betätigt wird (max. 8mal).
2.2 Rückseite
32 Cinchbuchsen für die Audioeingänge Aufnahme
Links/ Rechts
33 Cinchbuchsen für die Audioausgänge Wieder-
gabe Links/ Rechts
34 3,5 mm-Klinkenbuchsen für die System-Steue-
rung dazugehöriger Geräte
35 Netzanschluß 230 V~/50 Hz
3 Gerät anschließen
1) Die Audio-Ausgangsbuchsen PLAY (33) über
Cinch-Kabel mit den entsprechenden Eingängen
(TAPE PLAY) am Receiver oder Verstärker verbinden. Dabei auf die farbige Kennzeichnung der
Buchsen und Stecker achten (rot = rechter Kanal,
weiß = linker Kanal).
2) Ebenso die Audio-Eingangsbuchsen REC (32)
über Cinch-Kabel mit den entsprechenden Ausgängen (TAPE REC) am Receiver oder Verstärker verbinden.
3) Die System-Steuerung ermöglicht bei Anschluß
von zum Recorder dazugehöriger Geräte
(MONACOR HiFi-Receiver DSR-2000 und
MONACOR CD-Spieler CD-2000) eine umfangreiche Funktionssteuerung aller Komponenten.
Zum Beispiel schaltet der Receiver automatisch
auf das entsprechende Gerät um, wenn der CDSpieler oder das Tape-Deck auf Start geschaltet
wird. Auch ist eine automatische Pegeleinstellung
bei CD-Aufnahmen auf dem Tape-Deck möglich:
die CD wird kurz angespielt, der Recorder stellt
den Aufnahmepegel vor dem Aufnahmestart ein,
und anschließend startet die CD vom Anfang, die
Aufnahme beginnt
-
alles automatisch!
Um die System-Steuerung nutzen zu können,
das beiliegende Steuerkabel mit den 3,5mm-Klinkensteckern in einer der Buchsen SYSTEM CONTROL am Recorder (34) und am Receiver stekken.
4) Erst nachdem alle Geräte miteinander verbunden
sind, den Netzstecker in die Steckdose (230V~/
50Hz) stecken.
5) Ein mittelohmiger Stereo-Kopfhörer (Impedanz
>8Ω) kann bei Bedarf an die 6,3 mm-Klinken-
buchse PHONES (13) angeschlossen werden.
Besitzt der Kopfhörer keinen eigenen Lautstärkeregler, muß ein getrennter Stereo-KopfhörerKabelregler (z.B. MONACOR HEC-60) dazwischengesteckt werden.
ACHTUNG: Stellen Sie die Kopfhörerlautstärke
nie sehr hoch ein. Hohe Lautstärken können auf
Dauer das Gehör schädigen! Das menschliche
Ohr gewöhnt sich an große Lautstärken und empfindet sie nach einiger Zeit nicht mehr so hoch.
Darum eine hohe Lautstärke nach der Gewöhnung nicht weiter erhöhen.
4 Wiedergabe
4.1 Welche Kassetten sind geeignet?
Grundsätzlich können alle Kassetten mit einer Bandlänge von bis zu 90 Minuten Spieldauer (C-90) verwendet werden. Es sollten keine Kassetten C-120
(120Minuten) genommen werden, weil das Band
sehr dünn ist. Es kann leicht reißen oder „Bandsalat“
verursachen.
Außerdem sollten keine Endloskassetten verwendet werden. Sie können die Mechanik des Recorders
beschädigen.
Als Bandsorte sind Kassetten mit Normal-,
Chromdioxyd- oder Reineisenband geeignet. Die
besten Qualitätsergebnisse werden jedoch nur mit
dem Reineisenband erreicht. Durch Markierungen
an der Kassette erkennt der Recorder automatisch
die Bandsorte und nimmt eine entsprechende Umschaltung vor.
4.2 Ein- und Ausschalten
1) Vor dem Einschalten immer den Schiebeschalter
TIMER (8) in Position OFF stellen. Anderenfalls
startet nach dem Einschalten sofort die Wieder-
gabe bzw. die Aufnahme. Die Kassette kann da-
bei gelöscht werden!
Den Recorder mit dem Ein-/Ausschalter POWER
(6) einschalten.
2) Nach dem Betrieb immer die Kassettenfächer
schließen, damit die Kassettenschächte vor Ver-
schmutzung geschützt sind, und das Gerät mit
dem Ein-/Ausschalter POWER (6) abschalten.
3) Nach dem Ausschalten immer erst einige Sekun-
den mit dem Wiedereinschalten warten.
4.3 Kassette abspielen
1) Kassette einlegen: Das Kassettenband eventuell
durch Drehen einer Spule straffen. Das Kasset-
tenfach mit der Taste EJECT (7 bzw. 15) öffnen.
Die Kassette so einlegen, daß die Öffnungen für
das Band nach unten zeigen. Das Kassettenfach
durch Drücken an der oberen Kante behutsam
schließen. Bei Bedarf das Zählwerk mit der Taste
RESET (2 bzw. 4) auf Null stellen.
2) Den Schiebeschalter DOLBY NR (10) auf die Po-
sition stellen, mit der die Kassette aufgenommen
wurde:
OFF = ohne Dolby NR aufgenommen
B = mit Dolby B aufgenommen
C = mit Dolby C aufgenommen
Page 7
3) Den Schiebeschalter DIRECTION (9) auf die gewünschte Funktion stellen:
= Der Recorder stoppt nach der Wieder-
gabe einer Kassettenseite.
= Auf der Kassette werden beide Seiten
automatisch nacheinander bis zu 5mal
abgespielt.
= Zuerst werden beide Kassettenseiten
eines Laufwerks abgespielt, dann automatisch beide Kassettenseiten des
anderen Laufwerks. Dieser Vorgang wiederholt bis sich 4mal. (In beiden Laufwerken muß dazu natürlich je eine Kassette eingelegt werden!)
4) Mit der Taste die Wiedergabe starten, wenn
die leere Spule der Kassette rechts ist oder mit
der Taste , wenn die leere Spule links ist. Bei
einer nicht ganz zurückgespulten Kassette kann
durch Betätigen der Taste bzw. die eine
oder andere Kassettenseite abgespielt werden.
Im Display wird stets die jeweilige Bandlaufrichtung angezeigt.
5) Soll die Wiedergabe gestoppt werden, Taste
drücken.
6) Zum Entnehmen der Kassette die Taste EJECT(7
bzw. 15) drücken, aber immer nur bei gestoppter
Kassette!
4.4 Kassette vor- oder zurückspulen/
mit automatischem Start der Wiedergabe
Nachdem die Kassette mit der Taste gestoppt
wurde, kann mit den Tasten und das
Band vor- bzw. zurückgespult werden. Ob vor- oder
zurückgespult wird, ist von der Laufrichtung bei der
Wiedergabe abhängig.
Bei der Wiedergabe mit Laufrichtung nach rechts:
= Rückspulen
= Vorspulen
Bei der Wiedergabe mit Laufrichtung nach links:
= Vorspulen
= Rückspulen
Soll nach dem Umspulen die Wiedergabe automatisch vom Kassettenanfang starten, die entsprechende Taste zweimal drücken. Während des Umspulen blinkt im Display „PLAY“ zur Kontrolle.
Achtung: Beim Betätigen der T aste oder
während der Wiedergabe wird zum Titelanfang zurückgespult bzw. zum nächsten Titel vorgespult
(siehe nächstes Kapitel 4.5 „Titel anwählen“).
4.5 Titel anwählen
Während die Wiedergabe läuft, kann mit den Tasten
und ein anderer Titel angewählt werden. Der Recorder spult zum gewählten Titel und
startet dort automatisch die Wiedergabe. Nach dem
Betätigen der Taste bzw. zeigt das Display „SP“ und die Anzahl der Titel, die vor- oder
zurückgespult werden. Maximal können bis zu 20
Titel vor- oder zurückgespult werden. Damit diese
Funktion genutzt werden kann, muß zwischen den
einzelnen Titeln eine Pause von mindestens 4 Sekunden liegen, damit der Recorder die einzelnen
Titel erkennt.
1) Bei der Wiedergabe mit Laufrichtung nach
rechts:
Mit jedem Betätigen der Taste wird ein Titel
weiter vorgespult.
Beim Drücken der Taste wird an den An-
fang des gerade laufenden Titels zurückgespult.
Zum Anwählen des davorliegenden Titels muß
die Taste zweimal betätigt werden. Durch
mehrfaches Drücken der Taste wird immer
ein Titel weiter zurückgespult.
2) Bei der Wiedergabe mit Laufrichtung nach
links:
Beim Drücken der Taste wird an den An-
fang des gerade laufenden Titels zurückgespult.
Zum Anwählen des davorliegenden Titels muß
die Taste zweimal betätigt werden. Durch
mehrfaches Drücken der Taste wird immer
ein Titel weiter zurückgespult.
Mit jedem Betätigen der Taste wird ein Titel
weiter vorgespult.
Technischer Hinweis
Das IPSS (Intelligentes Programm Such System)
steuert die Titelanwahl sowie die Funktionen, die in
den folgenden Kapiteln beschrieben sind:
-
Wiederholtes Abspielen eines Titels
-
Anspielen aller Titel
-
Lange Pausen überspringen
Voraussetzung für diese Funktionen sind Pausen
von mindestens 4 Sekunden zwischen den einzelnen Titeln. Bei eigenen Aufnahmen können mit der
T aste REC MUTE (23) solche Pausen eingefügt werden (siehe Kapitel 5.4 „Nach einem Titel eine 4-Sekunden-Pause einfügen“).
Das IPSS kann nicht richtig arbeiten:
1. bei Aufnahmen mit Sprache oder Geräuschen, die
Unterbrechungen von mehr als 4 Sekunden haben
2. bei Titeln mit sehr leisen Passagen oder Passagen ohne Ton von mehr als 4 Sekunden (z.B. bei
klassischer Musik)
3. bei Kassetten, die zwischen den einzelnen Titeln
Störgeräusche haben
4. bei Kassetten, auf denen die Pausen zwischen
den einzelnen Titeln kürzer als 4Sekunden sind
5. bei Kassetten mit extrem leisen Aufnahmen
6. bei Aufnahmen, bei denen ein Überblendregler
(Crossfader) verwendet wurde und dadurch keine
Pausen zwischen den Titeln vorhanden sind
4.6 Wiederholtes Abspielen eines Titels
Soll der gerade gespielte Titel wiederholt werden, die
entsprechende T aste für die Wiedergabe so oft betätigen, wie der Titel wiederholt werden soll (max. 8mal):
die Taste (31) bei der Wiedergabe mit Laufrichtung nach rechts (wie im Display angezeigt)
die Taste (27) bei der Wiedergabe mit Laufrichtung nach links
Das Display zeigt „AP“ und die Anzahl der Wiederholungen. Der Recorder spult nach dem Ende des
gerade gespielten Titel an dessen Anfang zurück
und startet die Wiedergabe. Dieser Vorgang wiederholt sich entsprechend oft der gewählten Anzahl. Die
4.4 Rewinding the cassette forwards or backwards/with automatic start of the replay
After stopping the cassette with the button , the
tape can be rewound forwards and backwards with
the buttons and . It depends on the direction while replaying if the cassette is to rewind forwards or backwards.
While replaying with direction to the right:
= rewinding backwards
= rewinding forwards
While replaying with direction to the left:
= rewinding forwards
= rewinding backwards
If the replay is automatically to start from the cassette beginning after rewinding, push the corresponding button twice. While rewinding, in the display
"PLAY" is blinking as a control.
Attention: By pushing the button or
while replaying, it is rewound back to the beginning
of the title resp. forwards to the next title (see next
chapter 4.5 "Select title").
4.5 Select title
While replaying, with the buttons and
another title can be selected. The recorder rewinds
to the selected title and automatically starts the replay there. After pushing the button resp.
the display shows "SP" and the number of the
titles which are rewound forwards or backwards. Up
to max. 20 titles can be rewound forwards or backwards. To be able to use this function, between the
individual titles there must be a pause of at least 4
seconds so that the recorder recognizes the individual titles.
1) While replaying with direction to the right:
With every pushing of the button one title
further is rewound.
With pushing the button the cassette is
rewound to the beginning of the actual title. To select the previous title, the button must be
pushed twice. By pushing the button several
times, always one title is rewound further back.
2) While replaying with direction to the left:
By pushing the button the cassette is re-
wound back to the beginning of the actual title. To
select the previous title, the button must be
pushed twice. By pushing the button several times, always one title is rewound further
back.
With every pushing of the button one title is
rewound forwards.
Technical note
The IPSS (Intelligent Programme Search System)
controls the title selection as well as the functions described in the following chapters:
-
repeated replaying of one title
-
short monitoring of all titles
-
skipping of long pauses
Pauses of at least 4seconds between the individual
titles are the pre-condition for these functions. With
your own recordings with the button REC MUTE (23)
such pauses can be inserted (see chapter 5.4 "Insert
a 4-second pause after a title").
The IPSS cannot work correctly:
1. in case of recordings with speech or noise which
have interruptions of more than 4seconds
2. in case of titles with very low level passages or
passages without any tone of more than 4 seconds (e.g. with classical music)
3. in case of cassettes which have an interfering
noise between the individual titles
4. in case of cassettes on which the pauses between the individual titles are shorter than 4 seconds
5. in case of cassettes with extremely low level recordings
6. in case of recordings for which a cross fader has
been used and which therefore do not have any
pauses between the titles
4.6 Repeated replay of a title
If the actual title is to be replayed, push the corresponding replay button as many times as the title is
to be repeated (max. 8times):
the button (31) while replaying with direction to
the right (as displayed)
the button (27) while replaying with direction to
the left
The display shows "AP" and the number of repeats.
The recorder rewinds after the end of the actual title
back to the beginning of this title and starts the replay. This procedure is repeated as many times as
selected. The function is switched off by pushing the
button (29) or PAUSE (24).
If the repeat function does not work correctly,
watch the technical note at the end of chapter 4.5
"Select title".
4.7 Short monitoring of all titles
All titles of one cassette side can shortly be played
one after the other for 10 seconds.
1) Start the replay with the button resp. .
2) After starting the replay, push the button INTRO
CHECK (16). The display now does not show the
4-digit counter indicator but the 2-digit number of
the monitored titles.
3) The recorder rewinds to the next title and shortly
starts to play it, then to the next title etc.
4) If the switch DIRECTION (9) is in position or
, at the end of one cassette side it is automatically switched to normal replay of the other
cassette side resp. to normal replay of the other
deck. If also here a short monitoring of the titles is
to be carried out, push the button INTRO CHECK
again.
5) While replaying the title, the short monitoring can
be stopped with the button INTRO CHECK. Then
the replay continues as normally.
If the short monitoring does not work correctly, watch
the technical note at the end of chapter 4.5 "Select
title".
7
GB
D
A
CH
Page 8
Funktion wird beim Betätigen der Taste (29) oder
PAUSE(24) ausgeschaltet.
Funktioniert die Wiederholfunktion nicht richtig, ist
der technische Hinweis am Ende des Kapitels 4.5
„Titel anwählen“ zu beachten.
4.7 Anspielen aller Titel
Alle Titel einer Kassettenseite können nacheinander
für 10Sekunden angespielt werden.
1) Die Wiedergabe mit der Taste bzw. starten.
2) Nach dem Starten der Wiedergabe die Taste
INTRO CHECK (16) betätigen. Das Display zeigt
jetzt nicht das vierstellige Zählwerk, sondern zwei-
stellig die Anzahl der angespielten Titel.
3) Der Recorder spult zum nächsten Titel und spielt
ihn an, danach zum nächsten Titel usw.
4) Wenn der Schalter DIRECTION (9) in Position
oder steht, wird automatisch am Ende
einer Kassettenseite auf normale Wiedergabe der
anderen Kassettenseite geschaltet bzw. auf normale Wiedergabe des anderen Laufwerks. Soll
auch hier ein Anspielen der Titel erfolgen, ist die
Taste INTRO CHECK erneut zu drücken.
5) Das Anspielen kann, während der Titel spielt, mit
der Taste INTRO CHECK beendet werden. Die
Wiedergabe läuft dann normal weiter.
Funktioniert das Anspielen nicht richtig, ist der technische Hinweis am Ende des Kapitels 4.5 „Titel anwählen“ zu beachten.
4.8 Lange Pausen automatisch überspringen
Sind zwischen den Titel Pausen von länger als
10Sekunden, können diese durch automatisches
Vorspulen übersprungen werden.
1) Die Wiedergabe mit der Taste bzw. starten.
2) Die Taste BLANK SCAN (17) drücken. Das Display
signalisiert „BLANK SCAN“.
3) Ist die Wiedergabe an eine längere Pause angelangt, zeigt das Display „SP00“, und der Vorlauf
spult bis zum nächsten Titelanfang. Dort start die
Wiedergabe erneut.
4) Durch ein zweites Mal Drücken der Taste BLANK
SCAN oder beim Betätigen der Taste (29) bzw.
PAUSE (24) wird die Funktion wieder abgeschaltet.
Funktioniert das automatische Überspringen von langen Pausen nicht richtig, ist der technische Hinweis am
Ende des Kapitels 4.5 „Titel anwählen“ zu beachten.
5 Aufnahme
5.1 Kassetten vor unbeabsichtigtem Über-
spielen sichern
Damit selbst aufgenommene Kassetten nicht unbeabsichtigt überspielt bzw. gelöscht werden können,
sollten die Laschen (a) und (b) herausgebrochen
werden (Abb.4). Bei bespielt gekauften Kassetten ist
das schon durch den Hersteller erfolgt. Die Lasche
(b) sichert die Seite, deren Beschriftung nach Abb. 4
oben zu sehen ist (bei diesem Beispiel Seite 1). Zum
Sichern von nur einer Seite muß also die entsprechende Lasche herausgebrochen werden.
Damit eine gesicherte Kassette bei Bedarf doch
wieder überspielt werden kann, muß ein fester Klebestreifen über die Stelle der vorherigen Lasche geklebt werden (Abb.5).
5.2 Einfache Kassettenaufnahme
1) Kassette einlegen und an den Anfang spulen oder
an die Stelle, wo die Aufnahme beginnen soll.
Das Zählwerk mit der Taste RESET (2 bzw. 4) auf
Null stellen. Das erleichtert bei Bedarf das Wiederfinden des Aufnahmeanfangs.
2) Den Schiebeschalter DOLBY NR (10) auf die Position stellen, mit der die Kassette aufgenommen
werden soll. Dabei ist zu berücksichtigen, welche
Möglichkeiten der Recorder hat, auf dem die Kassette später abgespielt werden soll. Die besten
Qualitätsergebnisse werden mit Dolby C erzielt.
OFF = Aufnahme ohne Dolby NR
B = Aufnahme mit Dolby B
C = Aufnahme mit Dolby C
3) Den Schiebeschalter DIRECTION (9) auf die gewünschte Funktion stellen:
= Der Recorder stoppt nach der Aufnahme
einer Kassettenseite.
= Beide Kassettenseiten werden automa-
tisch nacheinander aufgenommen.
= Zuerst werden beide Kassettenseiten
eines Laufwerks aufgenommen, dann
automatisch beide Kassettenseiten des
anderen Laufwerks. (In beiden Laufwerken muß dazu natürlich je eine Kassette eingelegt werden!)
4) Am Receiver bzw. Verstärker das Gerät anwählen, von dem aufgenommen werden soll. Bei
einer Mikrofonaufnahme ein Mikrofon an die
Buchse MIC (14) anschließen. Der Aufnahmeeingang REC (32) wird dadurch abgeschaltet.
5) Taste RECORD (25) drücken. Der Recorder steht
auf Aufnahmebereitschaft. Das Display signalisiert „REC“ und das Pausensymbol . (Beim Betrieb mit dem MONACOR HiFi-Receiver DSR2000 ist jetzt an diesem der Eingangswähler
INPUT SELECT gegen Verstellen verriegelt.)
6) Mit dem Regler REC LEVEL (11) den Pegel und
mit dem Regler BALANCE (12) die Balance der
Aufnahme so einstellen, daß bei den lautesten
Passagen in der Pegelanzeige das Segment 0dB
aufleuchtet. Bei den meisten Aufnahmen kann
der Regler BALANCE in der Mittelstellung (rastet
ein) bleiben. Nur bei schlechten Originalaufnahmen ist eine Korrektur erforderlich.
7) Ist im Display eine andere Bandlaufrichtung als
gewünscht angezeigt, die Laufrichtung mit der
Taste bzw. ändern.
Achtung: Wird die Taste gedrückt, die mit der angezeigten Laufrichtung übereinstimmt, startet sofort die Aufnahme!
8) Mit der Taste PAUSE (24) die Aufnahme starten.
Durch erneutes Drücken dieser Taste kann die
Aufnahme unterbrochen werden.
9) Zum Beenden der Aufnahme die Taste (29)
drücken.
4.8 Automatic skipping of long pauses
If there are pauses between the titles of more than
10seconds, these can be skipped by automatic forward rewinding.
1) Start the replay with the button resp. .
2) Push the button BLANK SCAN (17). "BLANK
SCAN" is displayed.
3) If the replay has reached a longer pause, the display shows "SP00", and the cassette is advanced
to the next title beginning. There the replay starts
again.
4) By pushing the button BLANK SCAN a second
time or by pushing the button (29) resp.
PAUSE (24), the function is switched off again.
If the automatic skipping of long pauses does not
work correctly, watch the technical note at the end of
chapter 4.5 "Select title".
5 Recording
5.1 Secure the cassette against unintentional
dubbing
To prevent unintentional dubbing resp. erasing of
cassettes recorded by yourself, the lugs (a) and (b)
should be broken away (fig. 4). Cassettes recorded
for sale are already protected by the manufacturer
against unintentional dubbing. The lug (b) secures
the side whose lettering is facing upwards according
to fig. 4 (in this case side 1). To secure one side only,
break away the corresponding lug.
T o be able to use a protected cassette for dubbing
again, if required, a firm adhesive strip must be attached over the place of the previous lug (fig. 5).
5.2 Simple cassette recording
1) Insert the cassette and rewind it to the beginning
or to the place where to start the recording. Set
the counter indicator with the button RESET (2
resp. 4) to zero. This makes it easier to find the
start of the recording again.
2) Set the sliding switch DOLBY NR (10) to the position by which the cassette is to be recorded.
Watch the facilities of the recorder on which the
cassette is to be played later. The best quality results are obtained with Dolby C.
OFF = recording without Dolby NR
B = recording with Dolby B
C = recording with Dolby C
3) Set the sliding switch DIRECTION (9) to the desired function:
= the recorder stops after recording one
cassette side.
= both cassette sides are automatically re-
corded one after the other.
= At first both cassette sides of one deck
are recorded, then automatically both
cassette sides of the other deck. (In each
deck a cassette must be inserted, of
course!)
4) At the receiver resp. amplifier select the unit from
which it is to be recorded. With a microphone recording connect a microphone to the jack MIC
(14). By this the recording input REC (32) is
switched off.
5) Push the button RECORD (25). The recorder is in
stand-by mode. The display signalizes "REC" and
the pause symbol . (In case the MONACOR HiFi
receiver DSR-2000 is used, the input selector
switch INPUT SELECT of this unit is now locked
against misadjustment.)
6) With the control REC LEVEL (11) adjust the level
and with the control BALANCE (12) the balance
of the recording so that with the passages of highest volume in the level indication the segment
0 dB lights up. For most recordings the control
BALANCE can remain in the mid-position (locks
in). Only with poor original recordings a correction
is necessary.
7) If another direction of the tape than desired is displayed, change the direction with the button
resp. .
Attention: If the button which corresponds to the
displayed direction is pushed, the recording starts
immediately!
8) Start the recording with the button PAUSE (24).
By pushing this button again, the recording can
be interrupted.
9) To stop the recording, push the button (29).
5.3 New start of the recording in case of a fault
The cassette can automatically be rewound back to
the starting point of the recording if e.g. a title is disliked.
1) While the recording is still going on, push the button
(with recording direction to the right) resp.
(with recording direction to the left).
2) The recording stops, and the recorder rewinds
back to the beginning of the recording. There the
recording starts again.
5.4 Insert a 4-second pause after a title
Between the individual titles there must be pauses of
at least 4 seconds so that the IPSS (Intelligent Programme Search System) can work correctly (also
see "T echnical note" at the end of the chapter "Select
title"). With your own recordings with the button REC
MUTE (23) automatically a 4-second pause can be
inserted.
There are two ways:
1. while recording
While the recording is still going on, push the but-
ton REC MUTE (23) at the end of the title. A
pause of 4 seconds is added at the end of the title,
even if a recording signal is displayed in the level
indication. While inserting the pause in the display
"REC" is blinking. Then the recorder is switched
to recording stand-by mode. With the button
PAUSE (24) the recording can be started for the
next title.
2. after a recording
At the end of the title push the button PAUSE (24).
With the button RECORD (25) switch to the
stand-by mode. Push the button REC MUTE (23),
8
GB
D
A
CH
Page 9
5.3 Neustart der Aufnahme bei einem Fehler
An den Startpunkt der Aufnahme kann automatisch
zurückgespult werden, wenn z.B. der Titel nicht gefällt.
1) Noch während die Aufnahme läuft, die Taste
(bei Aufnahmerichtung nach rechts) bzw.
(bei Aufnahmerichtung nach links) betäti-
gen.
2) Die Aufnahme stoppt, und der Recorder spult an
den Anfang der Aufnahme zurück. Dort die Aufnahme erneut starten.
5.4 Nach einem Titel eine 4-Sekunden-Pause
einfügen
Damit das IPSS (Intelligentes Programm Such System) richtig arbeiten kann, müssen zwischen den
einzelnen Titeln Pausen von mindesten 4 Sekunden
sein (siehe auch „Technischer Hinweis“ am Ende
des Kapitels 4.5 „Titel anwählen“). Bei eigenen Aufnahmen kann mit der Taste REC MUTE (23) automatische eine 4-Sekunden-Pause eingefügt werden.
Dazu gibt zwei Möglichkeiten:
1. noch während der Aufnahme
Während die Aufnahme noch läuft, nach dem
Ende des Titels die Taste REC MUTE (23) drükken. Es wird eine Pause von 4 Sekunden an das
Ende des Titels gehängt, auch wenn die Pegelanzeige ein Aufnahmesignal anzeigt. Während des
Einfügens der Pause blinkt im Display die Anzeige „REC“. Danach schaltet der Recorder auf
Aufnahmebereitschaft. Mit der Taste PAUSE(24)
kann dann die Aufnahme für den nächsten Titel
gestartet werden.
2. nach einer Aufnahme
Am Ende des Titels die Taste PAUSE (24) drükken. Mit der Taste RECORD (25) auf Aufnahmebereitschaft schalten. Die Taste REC MUTE (23)
betätigen, und die Pause wird angehängt. Danach schaltet der Recorder wieder auf Aufnahmebereitschaft zurück. Mit der Taste (29) die Aufnahmebereitschaft ausschalten.
5.5 Parallelaufnahme
Es kann die gleiche Aufnahme parallel auf beiden
Laufwerken erfolgen, um so zwei Originalaufnahmen
zu erhalten.
1) Kassetten einlegen und an den Anfang spulen
oder an die Stelle, wo die Aufnahme beginnen
soll.
2) Den Schalter DOLBY NR (10) in die gewünschte
Position schieben (siehe Kapitel 5.2 „Einfache
Kassettenaufnahme“).
3) Den Schiebeschalter DIRECTION (9) auf die gewünschte Funktion stellen:
= Der Recorder stoppt nach der Aufnahme
einer Kassettenseite.
oder
= Beide Kassettenseiten werden automa-
tisch nacheinander aufgenommen.
4) Am Receiver bzw. Verstärker das Gerät anwählen, von dem aufgenommen werden soll.
5) Mit der Taste RECORD (25) am Laufwerk 1 oder
2 auf Aufnahmebereitschaft schalten. Mit dem
Regler REC LEVEL (11) den Pegel und mit dem
Regler BALANCE (12) die Balance der Aufnahme
einstellen.
6) Die Aufnahmebereitschaft mit der Taste (29)
ausschalten.
7) Ist im Display eine andere Bandlaufrichtung als
gewünscht angezeigt, die Laufrichtung für jedes
Laufwerk mit der Taste bzw. ändern, und
anschließend sofort die Taste drücken.
8) Die Parallelaufnahme mit der Taste PARALLEL
REC (26) starten.
9) Für eine Unterbrechung der Aufnahme die Taste
PAUSE (24) am Laufwerk 2 betätigen. Zum Beenden der Aufnahme die Taste (29) am Laufwerk 1 oder 2 drücken.
5.6 Kassette kopieren (Dubbing)
1) Die zu kopierende Kassette in das Laufwerk 1
einlegen und die Aufnahmekassette in das Laufwerk 2. Die leere Spule der Kassetten muß sich
jeweils auf der rechten Seite befinden, da das Kopieren mit der Laufrichtung nach rechts startet.
2) Aufnahmepegel und Balance können zum Kopieren nicht geregelt werden. Auch hat der Schalter
DOLBY NR dabei keine Funktion. Das Kopieren
erfolgt mit den gleichen Einstellungen, wie die zu
kopierende Kassette aufgenommen wurde.
3) Den Schiebeschalter DIRECTION (9) auf die gewünschte Funktion stellen:
= Der Recorder stoppt nach dem Kopieren
einer Kassettenseite.
oder
= Beide Kassettenseiten werden automa-
tisch nacheinander kopiert.
4) Wenn eine oder beide Kassetten nicht an den
Bandanfang zurückgespult sind, vor dem Kopieren die Taste AUTO (18) drücken. Im Display
blinkt dann die Anzeige „HIGH DUB, NORM
DUB“. Nach dem Betätigen einer der Tasten
DUBBING (19 bzw. 20) erfolgt zuerst ein automatisches Zurückspulen.
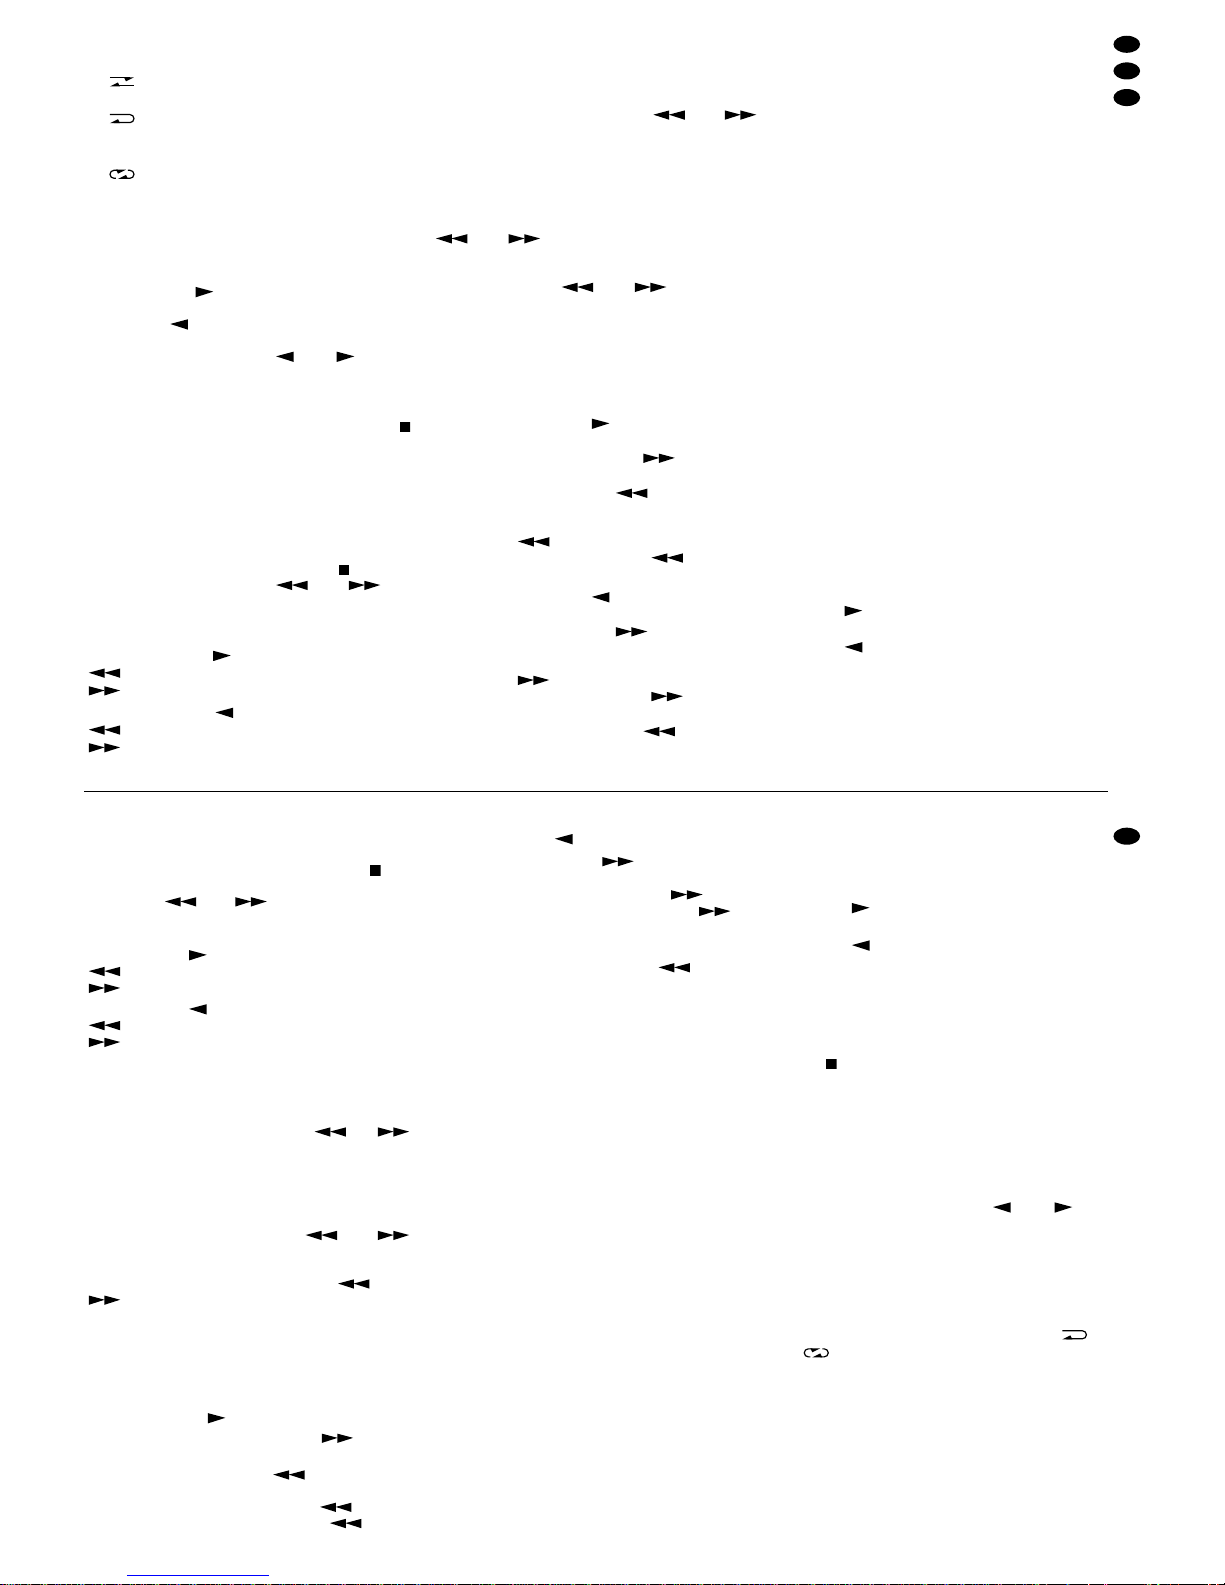
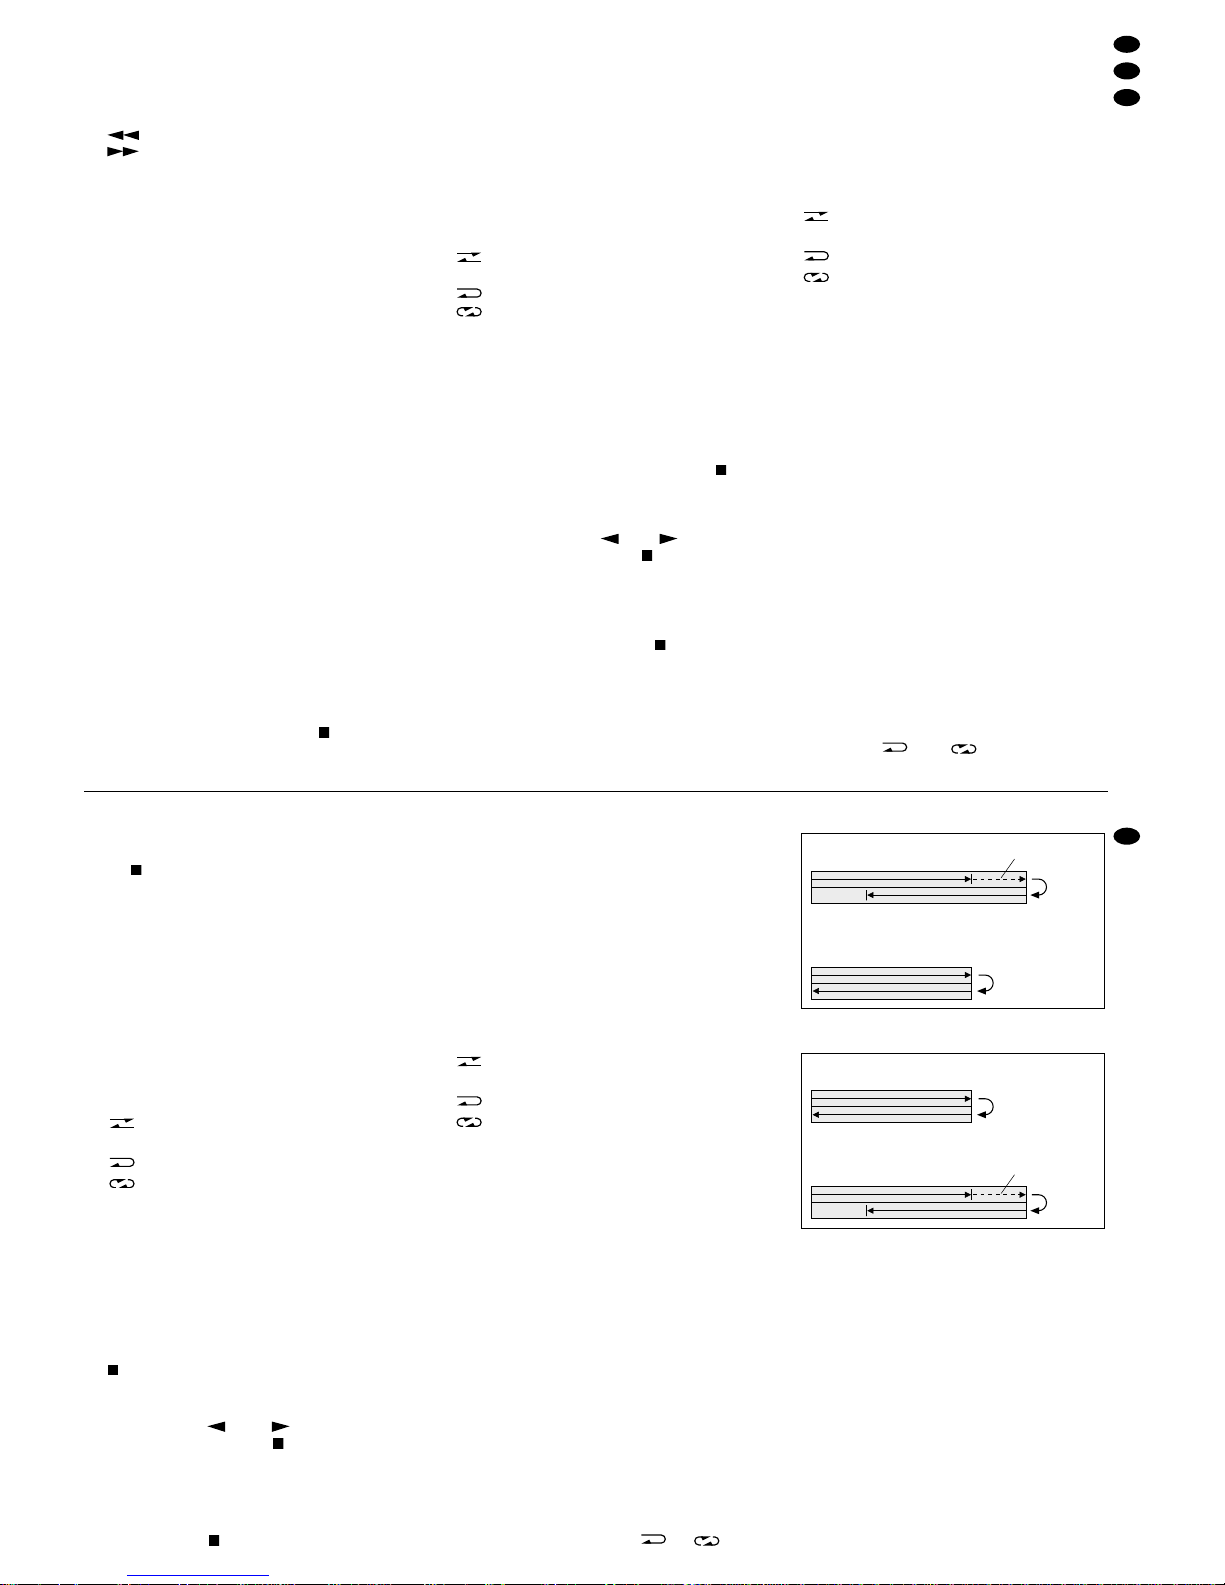
5) Sollen beide Kassettenseiten kopiert werden,
aber die Spieldauer der zu kopierenden Kassette
ist kürzer oder länger als die der Aufnahmekassette, kann trotzdem das Kopieren auf der zweiten Seite mit dem gleichen Titel beginnen wie auf
der zu kopierenden Kassette. Während des Kopiervorgangs spult der Recorder dann die entsprechende Kassette vor. Ist die Spieldauer der
Aufnahmekassette kürzer als die der zu kopierenden Kassetten (Abb. 6), fehlen natürlich die letzten Titel auf jeder Seite. Ist die Spieldauer der
Aufnahmekassette länger (Abb. 7), befindet sich
am Ende jeder Seite ein entsprechend langer Bereich ohne Aufnahme. Zum Aktivieren dieser
Funktion die Taste SYNC REV (22) drücken. Das
Display signalisiert „SYNC REV“ (Synchro Reverse Dubbing). Diese Funktion kann nur aktiviert
werden, wenn der Schalter DIRECTION (9) auf
der Position oder steht.
and the pause is added. After that the recorder is
switched back to recording stand-by. With the button (29) switch off the recording stand-by.
5.5 Parallel recording
The same recording can be made on both decks to
obtain two original recordings by this way.
1) Insert the cassettes and rewind them to the beginning or to the place where to start the recording.
2) Slide the switch DOLBY NR (10) to the desired
position (see chapter 5.2 "Simple cassette recording").
3) Set the sliding switch DIRECTION (9) to the desired function:
= the recorder stops after the recording of
one cassette side
or
= Both cassette sides are automatically re-
corded one after the other.
4) Select the unit at the receiver resp. amplifier from
which it is to be recorded.
5) With the button RECORD (25) at deck 1 or 2
switch to recording stand-by. With the control
REC LEVEL (11) adjust the level and with the
control BALANCE (12) the balance of the recording.
6) Switch off the recording stand-by with the button
(29).
7) If the display shows another direction of the tape
than desired, change the direction for each deck
with the button resp. , and after that immediately push the button .
8) Start the parallel recording with the button PARALLEL REC (26).
9) For an interruption of the recording push the button PAUSE (24) at deck 2. To stop the recording,
push the button (29) on deck 1 or 2.
5.6 Cassette dubbing
1) Insert the cassette in the deck 1 for dubbing and
the recording cassette in deck 2. The empty bobbin of the cassettes must be at the right side as
the dubbing starts with the direction to the right.
2) Recording level and balance cannot be controlled
for dubbing. Also the switch DOLBY NR does not
have any function. Dubbing is made with the
same adjustments which have been used for recording the cassette to be dubbed.
3) Set the sliding switch DIRECTION (9) to the desired function:
= the recorder stops after dubbing one cas-
sette side.
or
= the dubbing of both cassette side auto-
matically takes place.
4) If one or both cassettes are not rewound back to
the tape beginning, push the button AUTO (18)
prior to dubbing. In the display "HIGH DUB,
NORM DUB" is blinking. After pushing one of the
buttons DUBBING (19 resp. 29) at first an automatic rewinding back takes place.
5) If dubbing of both cassette sides is desired, but
the playing time of the dubbing cassette is shorter
or longer than the recording cassette, dubbing on
the second side can be started with the same title
as on the dubbing cassette. While dubbing the recorder rewinds the corresponding cassette forwards. If the playing time of the recording cassette is shorter than of the dubbing cassette
(fig. 6), of course the last titles of each side are
missing. If the playing time of the recording cassette is longer (fig. 7), at the end of each side
there is a corresponding tape length without any
recording. To activate this function push the button SYNC REV (22). The display signalizes
"SYNC REV" (Synchro Reverse Dubbing). This
function can only be activated if the switch
DIRECTION (9) is in position or .
Recording cassette is shorter
➅
Recording cassette is longer ➆
6) After these preparations start the dubbing with
one of the buttons DUBBING:
Button NOR (19) for dubbing at normal speed, to
be recommended with high-quality recordings
and in case of cassettes with high recording level.
Button HIGH (20) for dubbing at double speed.
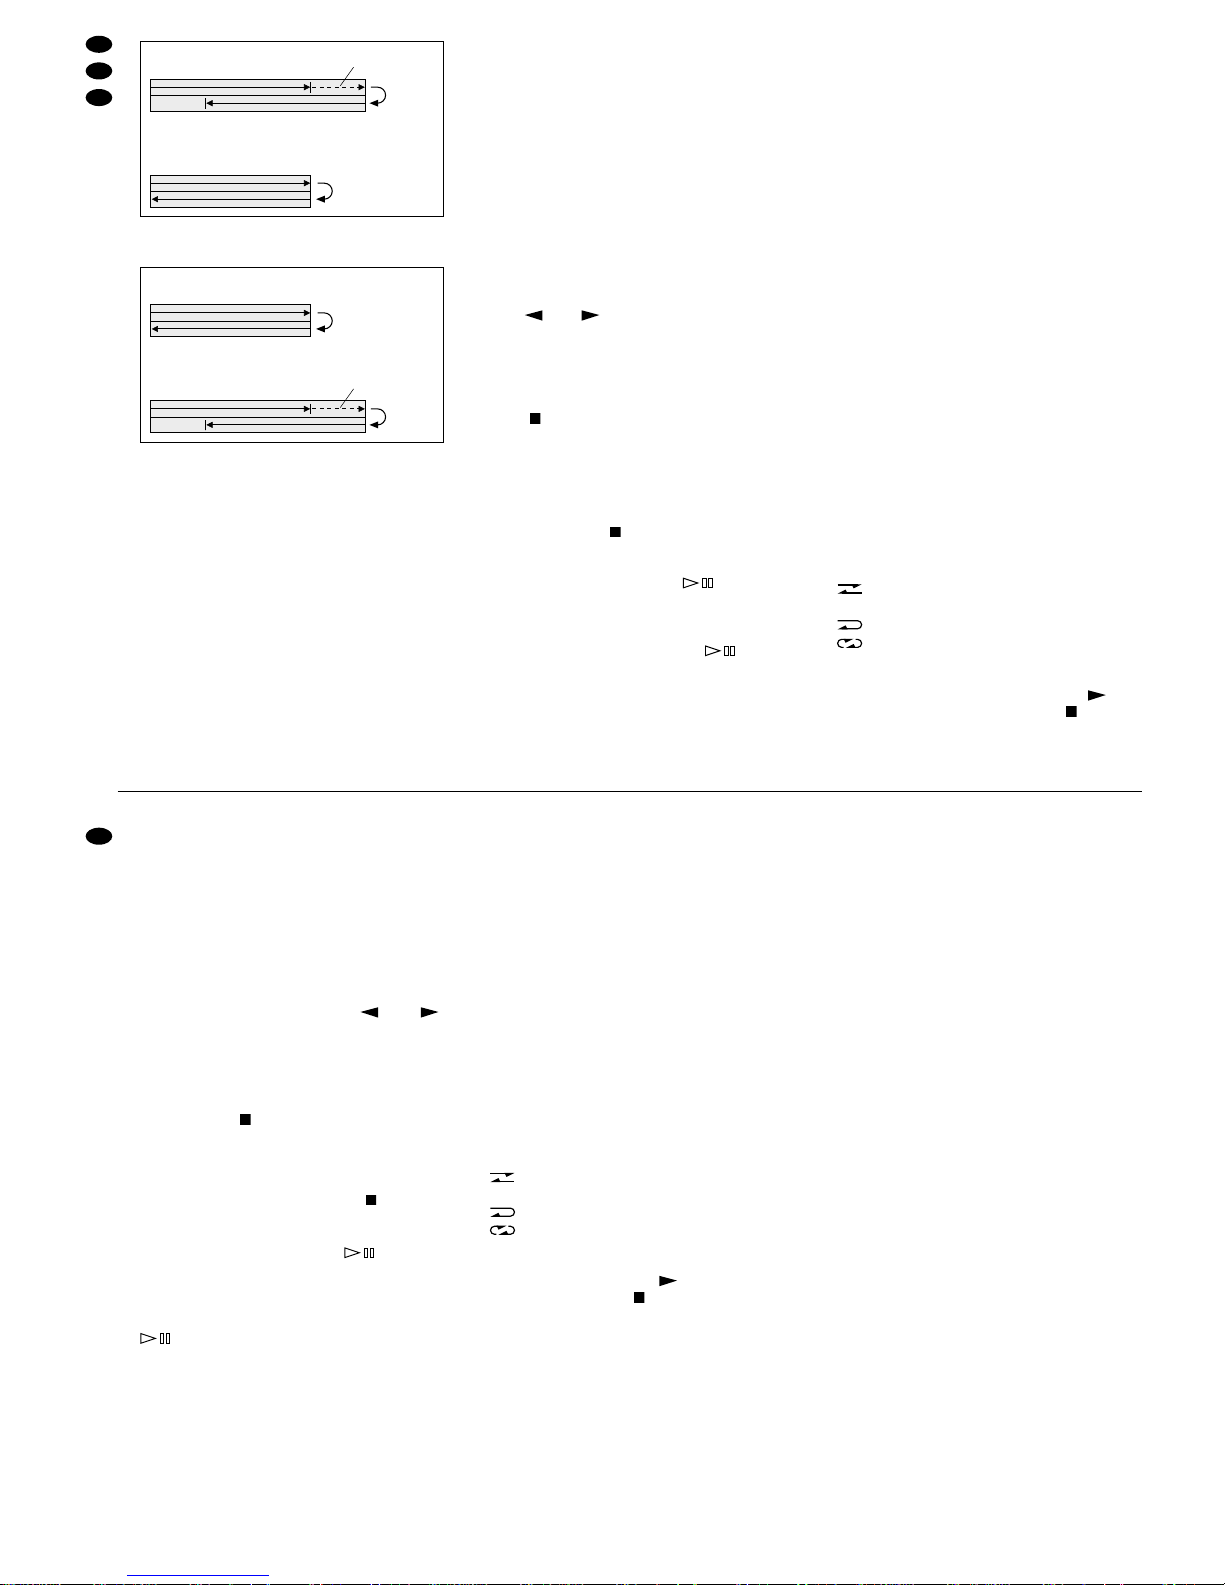
5.7 CD player starts cassette recording
While the CD player CD-2000 and HiFi receiver
DSR-2000 matching the recorder are in operation,
by starting the CD replay the cassette recording can
automatically be started at the same time.
1) The recorder, the HiFi receiver, and the CD player
must be connected with each other with the enclosed control cables (also see chapter 3
"Connection")
Replay deck 1
Recording deck 2 rewinding forward
page 1
page 2
page 1
page 2
Stop
Recording deck 2
Replay deck 1 rewinding forward
page 1
page 2
page 1
page 2
Stop
9
GB
D
A
CH
Page 10
Aufnahmekassette ist kürzer ➅
Aufnahmekassette ist länger ➆
6) Nach diesen Vorbereitungen das Kopieren mit
einer der Tasten DUBBING starten:
Taste NOR (19) für das Kopieren mit normaler
Geschwindigkeit, zu empfehlen bei hochwertigen
Aufnahmen und bei Kassetten mit hohem Aufnahmepegel.
Taste HIGH (20) für das Kopieren mit doppelter
Geschwindigkeit.
5.7 CD-Spieler startet Kassettenaufnahme
Beim Betrieb des zum Recorder dazugehörigen
CD-Spielers CD-2000 und des HiFi-Receivers DSR2000 kann durch Starten der CD-Wiedergabe gleichzeitig die Kassettenaufnahme automatisch mit gestartet werden.
1) Der Recorder, der HiFi-Receiver und der CDSpieler müssen miteinander durch die beiliegenden Steuerkabel verbunden sein (siehe auch Kapitel 3 „Gerät anschließen“).
2) Kassette(n) einlegen. Sind zwei Kassetten eingelegt, wird immer mit dem Laufwerk 2 zuerst gestartet.
3) Die Schalter DIRECTION (9) und DOLBY NR (10)
in die gewünschte Position schieben (siehe Kapitel 5.2 „Einfache Kassettenaufnahme“).
4) Die Taste RECORD (25) drücken, die CD anspielen und den Aufnahmepegel mit dem Regler REC
LEVEL (11) einstellen sowie die Balance für die
Aufnahme mit dem Regler BALANCE (12).
5) Ist im Display eine andere Bandlaufrichtung als
gewünscht angezeigt, die Laufrichtung mit der
Taste bzw. ändern.
Achtung: Wird die Taste gedrückt, die mit der angezeigten Laufrichtung übereinstimmt, startet sofort die Aufnahme!
6) Den CD-Spieler stoppen.
7) Am Recorder die Aufnahmebereitschaft mit der
Taste (29) ausschalten und die Taste RECORD (25) erneut drücken. Dieser Bedienschritt
ist besonders wichtig. Wird er nicht durchgeführt,
kann die Aufnahme nicht mit dem CD-Spieler zusammen starten!
Es ist auch darauf zu achten, daß am HiFi-Receiver der CD-Spieler angewählt ist. Wenn nicht, am
Recorder die Taste (29) drücken, am Receiver
den CD-Spieler anwählen und dann die T aste RECORD (25) betätigen.
8) Am CD-Spieler mit der Taste oder durch
Eintippen der gewünschten Titelnummer die Wiedergabe starten. Gleichzeitig schaltet der Recorder auf Aufnahme.
9) Die Aufnahme kann mit der Taste am CDSpieler unterbrochen werden (der Recorder
schaltet nach einigen Sekunden auf Aufnahmebereitschaft) und auch wieder fortgeführt werden.
Die Aufnahme wird am Ende der CD automatisch
beendet oder durch Drücken der Taste STOP am
CD-Spieler.
5.8 Automatische CD-Aufnahme auf Kassette
(CARS)
Durch CARS (Computer Aided CD Recording
System = computerunterstütztes CD-Aufnahmesystem) kann eine CD-Aufnahme mit automatischer
Pegeleinstellung auf Kassette erfolgen. Dabei werden alle Titel der CD im Schnellauf angespielt und
der optimale Aufnahmepegel eingestellt. Am Kassettenanfang wird eine 8-Sekunden-Pause eingefügt.
Die CD startet dann erneut von Anfang an, und
gleichzeitig beginnt die Aufnahme
-
alles automatisch! Diese Funktion ist nur in Verbindung mit dem
zum Recorder dazugehörigen MONACOR CD-Spieler CD-2000 und dem MONACOR HiFi-Receiver
DSR-2000 möglich.
1) Der Recorder, der HiFi-Receiver und der CD-
Spieler müssen miteinander durch die beiliegenden Steuerkabel verbunden sein (siehe auch Kapitel 3 „Gerät anschließen“).
2) Mit der Taste EDIT auf der Fernbedienung des
CD-Spielers die Editierfunktion zum Auswählen
von Titeln und der Länge der Aufnahmekassette
aufrufen (siehe Bedienungsanleitung des CDSpielers).
3) Kassette mit der leeren Spule nach rechts einle-
gen und eventuell an den Bandanfang zurückspulen.
4) Den DOLBY NR (10) in die gewünschte Position
schieben (siehe Kapitel 5.2 „Einfache Kassettenaufnahme“).
5) Den Schiebeschalter DIRECTION (9) auf die ge-
wünschte Funktion stellen:
= Der Recorder stoppt nach der Aufnahme
einer Kassettenseite.
oder
= Beide Kassettenseiten werden automa-
tisch nacheinander aufgenommen.
6) Im Display muß die Bandlaufrichtung nach rechts
angezeigt sein. Wenn nicht, die Taste (31)
drücken und danach sofort die Taste (29).
7) Die Taste CARS (21) betätigen. Der automatische
Aufnahmevorgang beginnt. Die Pegeleinstellung
Wiedergabe Laufwerk 1
Aufnahme Laufwerk 2 Vorspulen
Seite 1
Seite 2
Seite 1
Seite 2
Stop
Aufnahme Laufwerk 2
Wiedergabe Laufwerk 1 Vorspulen
Seite 1
Seite 2
Seite 1
Seite 2
Stop
2) Insert cassette(s). If two cassettes are inserted,
always at first deck 2 is started.
3) Slide the switch DIRECTION (9) and DOLBY NR
(10) to the desired position (see chapter 5.2 "Simple cassette recording").
4) Push the button RECORD (25), shortly start to
play the CD, and adjust the recording level with
the control REC LEVEL(11) as well as the balance
for the recording with the control BALANCE (12).
5) If another tape direction than desired is displayed,
change the direction with the button resp. .
Attention: If the button is pushed which corresponds to the displayed direction, the recording
starts immediately!
6) Stop the CD player.
7) Switch off the recording stand-by at the recorder
with the button (29) and push the button RECORD (25) again. This operation step is of special importance. If it is not carried out, the recording cannot start together with the CD player!
Also watch that the CD player is selected at the
HiFi receiver. If not, push the button (29) at the
recorder, select the CD player at the receiver and
then push the button RECORD (25).
8) Start the replay with the button at the CD
player or by inserting the desired title number. At
the same time the recorder is switched to recording mode.
9) The recording can be interrupted with the button
at the CD player (after some seconds the
recorder is switched to recording stand-by) and
also be continued again. The recording is automatically stopped at the end of the CD or by pushing the button STOP at the CD player.
5.8 Automatic CD recording on cassette
(CARS)
By CARS (Computer Aided CD Recording System) a
CD can be recorded with automatic level adjustment
on a cassette. Hereby all titles of the CD are shortly
monitored with advance/reverse run. and the optimum recording level is adjusted. At the cassette be-
ginning a 8-second pause is inserted. The CD starts
again from the beginning, and at the same time the
recording starts
-
a fully automatic function! This
function is only possible in connection with the
MONACOR CD player CD-2000 and the MONACOR
HiFi receiver DSR-2000 matching the recorder.
1) The recorder, the HiFi receiver, and the CD player
must be connected with the enclosed control cables (also see chapter 3 "Connection").
2) With the button EDIT on the remote control of the
CD player call up the edit function to select titles
and the length of the recording cassette (see instruction manual of the CD player).
3) Insert cassette with the empty bobbin to the right
and rewind back to the tape beginning, if necessary.
4) Slide the DOLBY NR (10) to the desired position
(see chapter 5.2 "Simple cassette recording").
5) Set the sliding switch DIRECTION (9) to the de-
sired function:
= The recorder stops after recording of one
cassette side
or
= Both cassette sides are automatically re-
corded one after the other.
6) The display must show the tape direction to the
right. If not, push the button (31) and after that
immediately the button (29).
7) Push the button CARS (21). The automatic
recording starts. Thereby the level adjustment
can take up to 3
1
/
2 minutes according to the CD.
8) After the recording the CD player and the re-
corder are switched to Stop. If it is desired to stop
before, push the button STOP at the CD player.
6 Operation with a Switch Clock or via
the Timer of the Receiver DSR-2000
In connection with a switch clock or with the HiFi receiver DSR-2000 matching the recorder the replay or
a recording can automatically be started at a time
selected before.
1) Connect the mains plug of the recorder in the
switch clock resp. in the power supply jack at the
rear panel of the receiver DSR-2000.
2) In case of an operation with a switch clock also all
other units (e.g. amplifier, receiver) must get their
power supply via the switch clock. The switch
clock must at first be set to ON for the pre-adjustment of the HiFi system (independent of the adjusted switching time).
3) Switch on all necessary units with their power
switches.
4) If at the HiFi system also the MONACOR CD
player CD-2000 is connected, no CD must be in
the CD player. Otherwise with switching on the
timer the replay starts from the CD player resp.
the CD is recorded on the cassette.
5) Insert cassette(s). If two cassettes are inserted, at
first always deck 2 is started. The empty bobbin of
the cassette must be at the right side because it is
always started with direction to the right.
6) Slide the switch DIRECTION (9) and DOLBY NR
(10) to the desired position (see chapter 4.3
"Playing a cassette" resp. 5.2 "Simple cassette
recording").
7) For an automatic replay slide the switch TIMER
(8) in position PLAY. Adjust the desired volume at
the receiver.
8) For an automatic recording adjust the station at
the tuner/receiver from which it is to be recorded.
Push the button RECORD (25) at the recorder.
Adjust with the control REC LEVEL (11) the level
and with the control BALANCE (12) the balance
of the recording. Slide the switch TIMER (8) in position REC. Then the volume of the amplifier can
be set to minimum.
9) Select the switching time at the receiver DSR2000 resp. at the switch clock. Switch off the receiver resp. set the switch clock to automatic
operation. As soon as the selected time is reached, the HiFi system is switched on and the replay resp. recording is started.
10
GB
D
A
CH
Page 11

kann dabei je nach CD bis zu 31/2 Minuten beanspruchen.
8) Nach der Aufnahme schaltet der CD-Spieler und
der Recorder auf Stop. Soll vorher gestoppt werden, die Taste STOP am CD-Spieler drücken.
6 Betrieb mit einer Schaltuhr oder über
den Timer des Receivers DSR-2000
In Verbindung mit einer Schaltuhr oder mit dem zum
Recorder dazugehörigen HiFi-Receiver DSR-2000
kann die Wiedergabe oder eine Aufnahme zu einer
vorher wählbaren Zeit automatisch gestartet werden.
1) Den Netzstecker des Recorders in die Schaltuhr
bzw. in die Stromversorgungsbuchse auf der
Rückseite des Receivers DSR-2000 stecken.
2) Beim Betrieb mit einer Schaltuhr müssen auch
alle anderen Gerät (z.B. Verstärker, Receiver)
ihre Stromversorgung über die Schaltuhr erhalten. Die Schaltuhr muß für die Voreinstellung der
HiFi-Anlage zuerst auf Ein geschaltet werden (unabhängig von der eingestellten Schaltzeit).
3) Alle erforderlichen Geräte mit ihren Ein-/Ausschalter einschalten.
4) Ist an der HiFi-Anlage auch der MONACOR CDSpieler CD-2000 angeschlossen, darf sich keine
CD in dem CD-Spieler befinden. Anderenfalls
startet beim Einschalten des Timers die Wiedergabe vom CD-Spieler bzw. es wird die CD auf
Kassette aufgenommen.
5) Kassette(n) einlegen. Sind zwei Kassetten eingelegt, wird immer mit dem Laufwerk 2 zuerst gestartet. Die leere Spule der Kassette muß sich
dabei auf der rechten Seite befinden, weil immer
mit der Laufrichtung nach rechts gestartet wird.
6) Die Schalter DIRECTION (9) und DOLBY NR (10)
in die gewünschte Position schieben (siehe Kapitel 4.3 „Kassette abspielen“, bzw. 5.2 „Einfache
Kassettenaufnahme“).
7) Soll eine automatische Wiedergabe erfolgen,
den Schalter TIMER (8) in Position PLAY schie-
ben. Am Verstärker die gewünschte Lautstärke
einstellen.
8) Soll eine automatische Aufnahme erfolgen, am
Tuner/ Receiver den Sender einstellen, vom den
aufgenommen werden soll. Am Recorder die
Taste RECORD (25) drücken. Mit dem Regler
REC LEVEL (11) den Pegel und mit dem Regler
BALANCE (12) die Balance der Aufnahme einstellen. Den Schalter TIMER (8) in Position REC
schieben. Die Lautstärke des Verstärkers kann
anschließend auf Minimum gestellt werden.
9) Die Schaltzeit am Receiver DSR-2000 bzw. an
der Schaltuhr wählen. Den Receiver ausschalten
bzw. die Schaltuhr auf Automatikbetrieb stellen.
Ist die gewählte Zeit erreicht, wird die HiFi-Anlage
eingeschaltet und die Wiedergabe bzw. Aufnahme gestartet.
7 Pflege
7.1 Richtige Lagerung von Kassetten
Kassetten müssen vor Hitze, Feuchtigkeit und direktem Sonnenlicht geschützt sein. Außerdem dürfen
sie nicht in die Nähe von Magnetfeldern kommen,
weil dadurch die Tonqualität leidet oder die Aufnahmen sogar gelöscht werden. Bei der Lagerung ist
das besonders wichtig, da auch schwache Magnetfelder bei längerer Einwirkzeit die Kassettenaufnahmen negativ beeinflussen. Darum Kassetten nicht in
der Nähe von elektrischen Geräten, Lautsprechern
und magnetischen Gegenständen lagern.
7.2 Reinigung von Tonkopf und Bandführung
Jedes Band einer Kassette hat einen gewissen Abrieb, der sich auf dem Tonkopf und an der Bandführung absetzt. Darunter leidet die Tonqualität bei
der Wiedergabe und erst recht bei der Aufnahme, da
eine schlechte Aufnahme auch nach der Reinigung
nicht besser werden kann.
Im Fachgeschäft sind zahlreiche Reinigungssets
und Reinigungskassetten erhältlich, wie z.B.
MONACOR KC-01 oder AHC-09. Damit sollte der
Tonkopf und die Bandführung in regelmäßigen Abständen gereinigt werden. Die Reinigungskassetten
brauchen lediglich wie eine normale Musikkassette
eingelegt werden. Der Recorder wird dann auf Wiedergabe geschaltet. Die Reinigung erfolgt durch die
Kassette automatisch. Bei den Reinigungssets muß
eine Reinigung per Hand erfolgen. Dabei ist besondere Vorsicht geboten, um nicht Beschädigungen an
Tonkopf und Bandführung zu verursachen.
7.3 Tonkopf entmagnetisierten
Mit der Zeit wird jeder Tonkopf magnetisch. Auch
darunter leidet die T onqualität. Darum sollte bei jeder
Reinigung von T onkopf und Bandführung gleichzeitig
ein Entmagnetisierung erfolgen. Das wird am einfachsten mit einer Entmagnetisierungskassette (z.B.
MONACOR DEM-115) erreicht.
8 Beseitigung von Störungen
8.1 Kein Ton bei Wiedergabe zu hören
1) Cinch-Kabel sind nicht ganz eingesteckt oder
falsch angeschlossen.
➪ Stecker ganz hineinstecken oder richtig
anschließen, siehe Kapitel 3 „Gerät anschließen“.
2) Tonkopf ist verschmutzt.
➪Tonkopf reinigen, siehe Kapitel 7.2 „Reinigung
von Tonkopf und Bandführung“.
3) Kassettenband ist beschädigt.
➪Andere Kassette verwenden.
4) Kassette ist unbespielt.
➪Bespielte Kassette einlegen.
8.2 Band läuft nicht beim Drücken einer der
Tasten für Wiedergabe oder Umspulen
1) Kassettenklappe nicht richtig geschlossen.
➪Klappe richtig schließen.
2) Die Taste wurde sofort nach dem Schließen der
Kassettenklappe gedrückt.
➪ Einige Sekunden nach dem Schließen der
Klappe mit dem Betätigen von Tasten warten.
7 Care
7.1 Correct storing of cassettes
Cassettes must be protected against heat, humidity,
and direct sun radiation. Furthermore they must not
be placed near magnet fields because by that the
sound quality suffers or the recording may even be
erased. For the storing this is especially important as
also weak magnet fields have a negative effect on
the cassette recordings if these are influenced for a
longer time. Therefore do not store cassettes near
electrical units, speakers, and magnetic objects.
7.2 Cleaning of sound head and tape guidance
Each tape of a cassette has a certain abrasion which
is deposited on the sound head and at the tape guidance. While replaying the tone quality is impaired
and especially while recording, as a poor recording
even after cleaning cannot be improved.
At the retailers many cleaning sets and cleaning
cassette can be obtained, like e.g. MONACOR
KC-01 or AHC-09. By this the sound head and the
tape guidance should be cleaned at regular intervals.
The cleaning cassettes only need to be inserted like
a normal music cassette. The recorder is then
switched to replay. The cassette is automatically
cleaned. With the cleaning sets the cleaning must
manually be carried out. Be especially careful in
order not to cause damage at the sound head and
the tape guidance.
7.3 Demagnetize the sound head
After some time every sound head becomes magnetic. Also this has a negative effect on the sound quality. Therefore with every cleaning of sound head and
tape guidance a demagnetizing should take place.
This is easily done with a demagnetizing cassette
(e.g. MONACOR DEM-115).
8 Troubleshooting
8.1 While replaying no sound can be heard
1) Cinch cables are not fully inserted or wrongly
connected.
➪Insert the plugs fully or connect them correctly,
see chapter 3 "Connection".
2) Sound head is dirty.
➪ Clean sound head, see chapter 7.2 "Cleaning
of sound head and tape guidance".
3) Cassette tape is damaged.
➪Use other cassette.
4) Cassette is not recorded.
➪Insert recorded cassette.
8.2 Tape does not run with pushing one of the
buttons for replay or rewinding
1) Cassette compartment is not correctly closed.
➪Close it correctly.
2) The button has immediately been pushed after
closing the cassette compartment.
➪ Wait some seconds after closing the compart-
ment before pushing the buttons.
3) The button has immedately been pushed after
switching on with the button POWER.
➪ Wait some seconds after switching on before
pushing the buttons.
4) No cassette has been inserted.
➪ Insert cassette.
5) The tape is damaged, maybe even torn.
➪Use other cassette.
6) The tape has played to the end.
➪Push button for the other direction or insert the
cassette the other way round.
8.3 The functions title selection, title repeat,
short monitoring of title and skipping of
long pauses do not work correctly
1) Between the individual titles there is no pause of
at least 4 seconds, see technical note at the end
of the chapter 4.5 "Select title".
➪ With your own recordings insert a pause of at
least 4 seconds after each title, see chapter 5.4
"Insert a 4-second pause after a title".
8.4 Automatic CD recording (CARS) does not
work
1) Cassette is not inserted in deck 2.
➪Insert cassettes in deck 2.
2) In the CD player no CD is inserted.
➪Insert CD.
3) The CD is dirty.
➪Clean the CD.
4) The control cables with the 3.5 mm plugs are not
fully inserted into the jacks SYSTEM CONTROL.
➪Fully insert the plugs.
8.5 The cassette dubbing does not stop at the
end on both decks at the same time
1) The tape lengths of both cassettes are not exactly
the same.
➪ No measures are necessary, as due to tole-
rances.
8.6 Cassette compartment cannot be opened
with the button EJECT
1) Deck is switched to replay, recording, or rewind-
ing.
➪At first stop deck with button .
8.7 Dull replay without high frequencies
1) Sound head is dirty.
➪ Clean sound head, see chapter 7.2 "Cleaning
of sound head and tape guidance".
8.8 Replay is distorted
1) The level (volume) for the recording has been too
high.
➪ For the recording only turn the control REC
LEVEL (11) so far that with passages of the highest volume in the level indication the segment
0dB lights up.
8.9 No recording possible, if the button RECORD
is pushed
1) Recording lock due to safety lug of the cassette
broken away (fig. 4).
➪Use other cassette or replace the safety lug by
a firm adhesive strip (fig. 5).
11
GB
D
A
CH
Page 12

3) Die Taste wurde sofort nach dem Einschalten mit
dem Schalter POWER betätigt.
➪ Einige Sekunden nach dem Einschalten mit
dem Betätigen von Tasten warten.
4) Keine Kassette eingelegt.
Kassette einlegen.
5) Das Band ist beschädigt, eventuell gerissen.
➪Andere Kassette verwenden.
6) Das Band ist zu Ende gelaufen.
➪ Taste für die andere Laufrichtung betätigen
oder Kassette anders herum einlegen.
8.3 Die Funktionen Titelanwahl, Titelwiederho-
lung, Titelanspielen und lange Pausen überspringen arbeiten nicht richtig
1) Zwischen den einzelnen Titel ist keine Pause von
mindestens 4 Sekunden, siehe technischen Hinweis am Ende des Kapitels 4.5 „Titel anwählen“.
➪ Bei eigenen Aufnahmen nach jedem Titel eine
Pause von mindestens 4Sekunden einfügen,
siehe Kapitel 5.4 „Nach einem Titel eine 4-Sekunden-Pause einfügen“.
8.4 Automatische CD-Aufnahme (CARS) funk-
tioniert nicht
1) Kassette ist nicht in Laufwerk 2 eingelegt.
➪Kassetten in Laufwerk 2 einlegen.
2) Im CD-Spieler ist keine CD eingelegt.
➪CD einlegen.
3) Die CD ist verschmutzt.
➪ CD säubern.
4) Die Steuerkabel mit den 3,5 mm-Klinkensteckern
sind nicht ganz in die Buchsen SYSTEM CONTROL eingesteckt.
➪Stecker ganz hineinstecken.
8.5 Das Kassettenkopieren stoppt am Ende auf
beiden Laufwerken nicht gleichzeitig
1) Die Bandlänge beider Kassetten ist nicht exakt
gleich.
➪ Keine Maßnahme erforderlich, da durch Tole-
ranzen bedingt.
8.6 Kassettenklappe kann nicht mit der Taste
EJECT geöffnet werden
1) Laufwerk ist auf Wiedergabe, Aufnahme oder
Umspulen geschaltet.
➪Zuerst Laufwerk mit Taste stoppen.
8.7 Dumpfe Wiedergabe ohne Höhen
1) Tonkopf ist verschmutzt.
➪Tonkopf reinigen, siehe Kapitel 7.2 „Reinigung
von Tonkopf und Bandführung“.
8.8 Wiedergabe ist verzerrt
1) Aufnahme wurde mit zu großem Pegel (Laut-
stärke) gemacht.
➪Bei der Aufnahme den Reger REC LEVEL (11)
nur so weit aufdrehen, daß bei den lautesten Passagen in der Pegelanzeige das Segment 0 dB
aufleuchtet.
8.9 Keine Aufnahme möglich, wenn die Taste
RECORD gedrückt wird
1) Aufnahmesperre durch herausgebrochener Si-
cherungslasche der Kassette (Abb. 4).
➪ Andere Kassette verwenden oder die Siche-
rungslasche durch einen festen Klebestreifen ersetzen (Abb.5).
2) Kassettenklappe nicht richtig geschlossen.
Klappe richtig schließen.
3) Der Regler REC LEVEL (11) steht auf Minimum.
➪Aufnahmepegel richtig einstellen.
4) Am Receiver DSR-2000 ist TAPE 1 oder 2 ange-
wählt.
➪ Am Recorder Taste (29) drücken und am
Receiver gewünschte Musikquelle anwählen.
5) Das Band ist zu Ende gelaufen.
➪ Taste für die andere Laufrichtung betätigen
oder Kassette anders herum einlegen.
8.10 Hohe Störgeräusche
1) HiFi-Anlage wird durch andere elektrische Geräte
gestört.
➪ Störende Geräte ausschalten oder von der
HiFi-Anlage entfernter aufstellen.
2) Aufnahmepegel (Lautstärke) zu gering.
➪Bei der Aufnahme den Reger REC LEVEL (11)
so weit aufdrehen, daß bei den lautesten Passagen in der Pegelanzeige das Segment 0 dB aufleuchtet.
3) Eine mit Dolby aufgenommene Kassette wird
ohne Dolby abgespielt.
➪Schalter DOLBY NR (10) auf Position B oder C
stellen.
4) Tonkopf ist magnetisiert.
➪ Tonkopf entmagnetisieren, siehe Kapitel 7.3
„Tonkopf entmagnetisieren“.
8.11 Ton vibriert
1) Antriebswelle und/oder Andruckrolle sind verschmutzt.
➪Reinigung durchführen, siehe Kapitel 7.2 „Rei-
nigung von Tonkopf und Bandführung“.
2) Band ist nicht richtig aufgewickelt.
➪ Band durch Drehen einer Kassettenspule
straffen, und Kassette einmal komplett vor- und
wieder zurückspulen.
3) Band ist beschädigt.
➪Andere Kassette verwenden.
8.12 Aufnahme oder Wiedergabe startet sofort
nach dem Einschalten
1) Der Schalter TIMER (8) steht in Position REC
oder PLAY.
➪Auf Position OFF stellen.
8.13 Keine Bedienung möglich oder sonstige
Fehlfunktionen
1) Störungen haben den Mikroprozessor beeinflußt.
➪ Recorder ausschalten und den Netzstecker
aus der Steckdose ziehen. Einen Moment warten
und Netzstecker wieder einstecken. Gerät einschalten.
2) Cassette compartment not correctly closed.
➪close it correctly.
3) The control REC LEVEL (11) is in minimum position.
➪Correctly adjust recording level.
4) At the receiver DSR-2000 TAPE 1 or TAPE 2 is
selected.
➪ Push button (29) at the recorder and select the
desired music source at the receiver.
5) The tape has reached the end.
➪ Push button for the other direction or insert
cassette the other way round.
8.10 High interfering noise
1) HiFi system is interfered by other electrical units.
➪ Switch off interfering units or place them fur-
ther away from the HiFi system.
2) Recording level (volume) too low.
➪ While recording turn up the control REC
LEVEL (11) so far that with passages of the highest volume in the level indication the segment
0dB lights up.
3) A cassette recorded with Dolby is played without
Dolby.
➪Set switch DOLBY NR (10) to position B or C.
4) Sound head is magnetized.
➪ Demagnetize sound head, see chapter 7.3
"Demagnetize sound head".
8.11 Wow and flutter
1) Drive shaft and/or pressure roll are dirty.
➪ Carry out cleaning, see chapter 7.2 "Cleaning
of sound head and tape guidance".
2) Tape is not correctly wounded.
➪ Tighten tape by turning one cassette bobbin,
and rewind the cassette completely forwards and
backwards for one time.
3) Tape is damaged.
➪Use other cassette.
8.12 Recording or replay starts immediately after
switching on
1) The switch TIMER (8) is in position REC or PLAY.
➪Set to position OFF.
8.13 No operation possible or other malfunctions
1) Interferences have influenced the microprocessor.
➪ Switch off the recorder and remove the mains
plug out of the socket. Wait a moment and
connect the mains plug again. Switch on the unit.
9 Specifications
Track arrangement: . . . . . . 4 tracks/2-channel ste-
reo
Recording system: . . . . . . RF bias (105 kHz)
Motors: . . . . . . . . . . . . . . . 2 DC motors, electroni-
cally stabilized
Rewinding time (C-60): . . . approx. 110s
Frequency range
Normal tape: . . . . . . . . . 20
-
15000Hz, ±3dB
CrO
2
tape: . . . . . . . . . . . 20-16000Hz, ±3dB
Metal tape: . . . . . . . . . . . 20
-
16000Hz, ±3dB
THD: . . . . . . . . . . . . . . . . . < 0.6%
S/N ratio (metal tape)
with Dolby C: . . . . . . . . . 71 dB
with Dolby B: . . . . . . . . . 61dB
without Dolby: . . . . . . . . 53dB
Wow and flutter: . . . . . . . . 0.08% (Wrms)
±0.22% (DIN)
Micro input MIC: . . . . . . . . 2.5 mV/18 kΩ
Line input REC: . . . . . . . . . 77.5 mV/50kΩ
Line output PLAY: . . . . . . . 500 mV/2kΩ
Power supply: . . . . . . . . . . 230 V~/50 Hz/15VA
Dimensions (WxHxD): . . 440 x 146 x 270mm
Weight: . . . . . . . . . . . . . . . 4.6 kg
According to the manufacturer.
Subject to technical change.
12
GB
D
A
CH
Page 13

9 Technische Daten
Spurlage: . . . . . . . . . . . . . . Vierspur/2-Kanal-
Stereo
Aufnahmesystem: . . . . . . . HF-Vormagnetisierung
(105kHz)
Motoren: . . . . . . . . . . . . . . 2 Gleichstrommotoren,
elektronisch geregelt
Umspulzeit (C-60): . . . . . . ca. 110s
Frequenzbereich
Normalband: . . . . . . . . . 20
-
15000Hz, ±3dB
CrO
2
Band: . . . . . . . . . . 20-16000Hz, ±3dB
Reineisenband: . . . . . . . 20
-
16000Hz, ±3dB
Klirrfaktor: . . . . . . . . . . . . . < 0,6%
Störabstand (Reineisenband)
mit Dolby C: . . . . . . . . . . 71 dB
mit Dolby B: . . . . . . . . . . 61 dB
ohne Dolby: . . . . . . . . . . 53 dB
Gleichlaufschwankungen: . 0,08 % (WRMS),
±0,22% (DIN)
Mikro-Eingang MIC: . . . . . 2,5 mV/18 kΩ
Line-Eingang REC: . . . . . . 77,5mV/50 kΩ
Line-Ausgang PLAY: . . . . . 500 mV/2kΩ
Stromversorgung: . . . . . . . 230 V~/50 Hz/15VA
Abmessungen (BxHxT): . 440 x 146 x 270 mm
Gewicht: . . . . . . . . . . . . . . 4,6kg
Laut Angaben des Herstellers.
Änderungen vorbehalten.
13
D
A
CH
Page 14

Ouvrez le livret page 3 de manière à visualiser les
éléments et branchements.
Table des matières Page
1 Conseils d’utilisation . . . . . . . . . . . . . . . . 14
2 Eléments et branchements . . . . . . . . . . . 14
3 Branchements des appareils . . . . . . . . . 16
4 Lecture . . . . . . . . . . . . . . . . . . . . . . . . . . . 16
4.1 Quel type de cassettes? . . . . . . . . . . . . . . 16
4.2 Marche/Arrêt . . . . . . . . . . . . . . . . . . . . . . . 16
4.3 Lecture de cassettes . . . . . . . . . . . . . . . . . 16
4.4 Avance et retour rapides/Démarrage
automatique de la lecture . . . . . . . . . . . . . . 16
4.5 Sélection de titres . . . . . . . . . . . . . . . . . . . 17
4.6 Répétition d’un titre . . . . . . . . . . . . . . . . . . 17
4.7 Lecture du début de tous les titres . . . . . . . 17
4.8 Suppression des pauses trop longues
entre chaque titre . . . . . . . . . . . . . . . . . . . . 17
5 Enregistrement . . . . . . . . . . . . . . . . . . . . .18
5.1 Protection des cassettes . . . . . . . . . . . . . . 18
5.2 Enregistrement . . . . . . . . . . . . . . . . . . . . . . 18
5.3
Reprise de l’enregistrement après une erreur
18
5.4 Insertion d’une pause de 4 secondes après
un morceau . . . . . . . . . . . . . . . . . . . . . . . . 18
5.5 Enregistrement parallèle . . . . . . . . . . . . . . 18
5.6 Copie de cassettes . . . . . . . . . . . . . . . . . . 19
5.7 Démarrage de l’enregistrement d’une
cassettes depuis le lecteur de CD . . . . . . . 19
5.8 Enregistrement automatique d’un
CD sur une cassette . . . . . . . . . . . . . . . . . 20
6 Fonctionnement avec un programma-
teur ou à partir du programmateur du
récepteur DSR-2000 . . . . . . . . . . . . . . . . . 20
7 Entretien . . . . . . . . . . . . . . . . . . . . . . . . . . 21
7.1 Stockage correct des cassettes . . . . . . . . . 21
7.2
Nettoyage de la tête de lecture et des guides
21
7.3 Démagnétisation de la tête de lecture . . . . 21
8 Problèmes et solutions . . . . . . . . . . . . . . 21
9 Caractéristiques techniques . . . . . . . . . . 22
Le système Dolby de suppression des bruits a été
conçu sous la licence ”Dolby Laboratories Licensing
Corporation”. ”DOLBY” et le symbole du double D
sont des symboles déposés par ”Dolby Labora-
tories Licensing Corporation”.
1 Conseils d'utilisation
Cet appareil, répond aux normes européennes
89/336/EWG relatives à la Compatibilité Electro-Magnétique.
Le TDD-2000 est alimenté par une tension de
230 V~. Ne touchez jamais à l'intérieur de l'appareil car, en cas de mauvaise manipulation, vous
pourriez subir une décharge électrique mortelle.
En outre, l'ouverture de l'appareil annule toute garantie.
Pour une utilisation optimale et sûre de votre appareil,
respectez scrupuleusement les points suivants:
•
Cet appareil n'est conçu que pour une utilisation
en intérieur.
•
S'il est déplacé d'un lieu froid vers un lieu chaud,
de la condensation se forme, modifiant le fonctionnement de l'appareil. Nous vous recommandons de ne le mettre en marche que lorsqu'il est à
température ambiante.
•
Ne faites fonctionner le lecteur que sous des
températures supérieures à +5°C.
•
Protégez l'appareil de la chaleur, de l'humidité, de
la poussière et de la lumière directe du soleil.
•
Ne le faites pas fonctionner à proximité d'appareils
dégageant un champ magnétique (aimants, hautparleurs, télévisions …)
•
Ne faites pas fonctionner l'appareil et débranchezle immédiatement dans les cas suivants:
1. l'appareil ou le cordon secteur présente des
dommages.
2. après une chute …, l'appareil présente un défaut.
3. des disfonctionnements apparaissent.
Dans tous les cas, les dommages doivent être
réparés par un technicien spécialisé.
•
Tout cordon secteur endommagé ne doit être remplacé que par le constructeur ou un technicien habilité.
•
Ne retirez jamais le cordon secteur de la prise en
tirant dessus.
•
Si l'appareil est utilisé dans un but autre que celui
pour lequel il a été conçu, s'il n'est pas réparé par
une personne habilitée, l'utilisateur perd tout droit
de garantie.
•
Pour nettoyer l'appareil, utilisez un chiffon sec, en
aucun cas de produits chimiques ou d'eau.
2 Eléments et branchements
2.1 Face avant et télécommande
1 Compartiment cassettes du lecteur 1
2 Remise à zéro du compteur du lecteur 1 (0000)
3 Affichage avec indication des niveaux
4 Remise à zéro du compteur du lecteur 2 (0000)
5 Compartiment cassettes du lecteur 2
6 Interrupteur général Marche/Arrêt
7 Touche d’ouverture du compartiment cassettes 1
8 Potentiomètre/programmateur, uniquement s’il
est relié au récepteur MONACOR DSR-2000:
OFF = programmateur déconnecté
REC = le programmateur commute sur ”enregis
trement”
PLAY= le programmateur commute sur ”lecture”
ATTENTION: si le potentiomètre est sur REC ou
PLAY, l’appareil démarre aussitôt par une
lecture/ enregistrement s’il a été mis en marche
avec l’interrupteur général (6).
9 Potentiomètre de sélection: pour lire ou enregis-
trer automatiquement les deux faces d’une cassette/les deux lecteurs:
= l’appareil s’arrête après la lecture/enre-
gistrement d’une face
Vi preghiamo di aprire completamente la pagina
3. Così vedrete sempre gli elementi di comando e
i collegamenti descritti.
Indice Pagina
1 Avviso di sicurezza . . . . . . . . . . . . . . . . . 14
2 Elementi di comando e collegamenti . . . 14
3 Collegare l’apparecchio . . . . . . . . . . . . . 15
4 Riproduzione . . . . . . . . . . . . . . . . . . . . . . 16
4.1 Quali cassette sono adatte? . . . . . . . . . . . 16
4.2 Accendere e spegnere . . . . . . . . . . . . . . . . 16
4.3 Riprodurre una cassetta . . . . . . . . . . . . . . . 16
4.4 Avvolgimento veloce avanti/indietro con
avvio automatico della riproduzione . . . . . . 16
4.5 Selezionare un titolo . . . . . . . . . . . . . . . . . 17
4.6 Riproduzione ripetuta di un titolo . . . . . . . . 17
4.7 Riprodurre l’inizio di ogni titolo . . . . . . . . . . 17
4.8 Saltare automaticamente le lunghe pause . 17
5 Registrazione . . . . . . . . . . . . . . . . . . . . . . 17
5.1 Proteggere le cassette dalla cancellazione
accidentale . . . . . . . . . . . . . . . . . . . . . . . . . 17
5.2 Registrazione semplice . . . . . . . . . . . . . . . 18
5.3 Riavvio della registrazione dopo errore . . . 18
5.4 Inserire una pausa di 4 secondi dopo
un titolo . . . . . . . . . . . . . . . . . . . . . . . . . . . 18
5.5 Registrazione parallela . . . . . . . . . . . . . . . 18
5.6 Copiare una cassetta (Dubbing) . . . . . . . . 19
5.7 Registrazione dal lettore CD . . . . . . . . . . . 19
5.8 Registrazione automatica dal CD (CARS) . 20
6 Funzionamento con un timer o con il
timer del Receiver DSR-2000 . . . . . . . . . 20
7 Manutenzione . . . . . . . . . . . . . . . . . . . . . . 20
7.1 Sistemazione corretta delle cassette . . . . . 20
7.2 Pulizia delle testine e della guida nastro . . 20
7.3 Smagnetizzare le testine . . . . . . . . . . . . . . 21
8 Eliminazione di disturbi . . . . . . . . . . . . . .21
9 Dati tecnici . . . . . . . . . . . . . . . . . . . . . . . . 22
Il sistema Dolby di soppressione del fruscio è stato
realizzato con licenza della Dolby Laboratories Licensing Corporation. ”DOLBY” e il simbolo della
doppia D sono marchi registrati della Dolby Laboratories Licensing Corporation.
1 Avviso di sicurezza
Questo apparecchio corrisponde alla norma UE
89/336/CEE sulla compatibilità elettromagnetica.
L'apparecchio funziona con tensione di rete di
230V~. Non intervenire mai al suo interno; la manipolazione scorretta può provocare delle scariche
pericolose. Se l'apparecchio viene aperto, ogni diritto di garanzia viene a decadere.
Durante l'uso si devono osservare assolutamente i
seguenti punti:
•
L'apparecchio è previsto solo per l'uso all'interno di
locali.
•
Spostando l'apparecchio da un luogo fresco in un
ambiente caldo si provoca della condensa sull'apparecchio stesso, compromettendone la funzionalità. Pertanto conviene mettere l'apparecchio in
funzione solo quando avrà raggiunto la temperatura ambiente.
•
Far funzionare l'apparecchio solo con temperature
oltre i +5°C.
•
Proteggere l'apparecchio da calore, umidità, polvere e luce diretta del sole.
•
Non far funzionare l'apparecchio vicino a oggetti
che emettono campi magnetici, come magneti,
motori, altoparlanti, televisori ecc.
•
Non mettere in funzione l'apparecchio e staccare
subito la spina rete se:
1. l'apparecchio o il cavo rete presentano dei danni
visibili;
2. dopo una caduta o dopo eventi simili sussiste il
sospetto di un difetto;
3. l'apparecchio non funziona correttamente.
Per la riparazione rivolgersi sempre ad una officina
competente.
•
Il cavo rete, se danneggiato, può essere sostituito
solo dal costruttore o da un laboratorio autorizzato.
•
Staccare il cavo rete afferrando la spina, senza tirare il cavo.
•
Nel caso di uso improprio, di impiego scorretto o di
riparazione non a regola d'arte non si assume nessuna responsabilità per eventuali danni.
•
Per la pulizia usare solo un panno asciutto; non
impiegare in nessun caso prodotti chimici o acqua.
2 Elementi di comando e collegamenti
2.1 Pannello frontale e telecomando
1 Vano cassetta per la sezione 1
2 Tasto di azzeramento del contatore della se-
zione1 (”0000”).
3 Display con indicazione del livello
4 Tasto di azzeramento del contatore della se-
zione2 (”0000”).
5 Vano cassetta per la sezione 2
6 Interruttore ON/OFF
7 Tasto per aprire il vano cassetta 1
8 Interruttore per il timer, solo in collegamento con
il receiver MONACOR DSR-2000:
OFF = timer spento
REC = il timer attiva la registrazione
PLAY= il timer attiva la riproduzione
ATTENZIONE: Se al momento dell’accensione
del recorder con l’interruttore (6), il timer è in posizione REC o PLAY, si avvia subito rispettivamente la registrazione o la riproduzione.
9 Selettore per la registrazione o la riproduzione
automatica dei due lati della cassetta o delle due
sezioni:
14
I
F
B
CH
Page 15
= lecture: les deux faces de la cassette
sont lues automatiquement l’une à la
suite de l’autre et ce 5 fois de suite.
enregistrement: les deux faces de la
cassette sont enregistrées l’une après
l’autre.
= lecture: les deux faces de la cassette
sont lues automatiquement sur les deux
lecteurs l’une à la suite de l’autre et ce 5
fois de suite.
enregistrement: les deux faces de la
cassette sont enregistrées l’une après
l’autre sur les deux lecteurs.
10 Sélecteur du mode Dolby:
B = Dolby B, le plus fréquemment utilisé. Con-
vient pour les cassettes enregistrées avec
le système Dolby B
C = Dolby C, système Dolby B amélioré. Il
convient de le sélectionner pour enregistrer une cassette lorsque celle-ci doit ensuite être enregistrée en Dolby C et bien
sûr, pour toutes les cassettes enregistrées en Dolby C.
OFF = Système Dolby déconnecté. Pour les cas-
settes enregistrées sans système Dolby.
11 Potentiomètre rotatif de réglage des niveaux
d’enregistrement
12 Potentiomètre rotatif de réglage de balance pour
l’enregistrement
13 Prise jack 6,35 pour brancher un casque stéréo
moyenne impédance (impédance >8Ω) avec
réglage de volume intégré.
14 Prise jack 6,35 pour brancher un micro mono.
Dans ce cas, l’entrée REC (32) est déconnectée.
15 Touche d’ouverture du compartiment cassettes 2
16 Touche INTRO CHECK: lecture du début des tit-
res d’une face pendant 10 secondes. Pour ce
faire, démarrez la lecture avec la touche
ou puis appuyez sur la touche INTRO
CHECK.
17 Touche BLANK SCAN: permet de sauter des
pauses entre chaque titre supérieures à 10 secondes. Elle ne peut être activée que lors de la
lecture.
18 Touche AUTO: en l’enfonçant au début de la
copie, on peut rembobiner la cassette source et
la cassette cible au début. Elle n’est activée que
lorsque la touche AUTO et une des touches de
copie NOR (19) ou HIGH (20) sont enfoncées.
19 Touche DUBBING (NOR): copie d’une cassette à
vitesse normale. Insérez la cassette cible dans le
lecteur 2, flèche de déroulement dirigée vers la
droite.
20 Touche DUBBING (HIGH): copie d’une cassette
à vitesse doublée. Insérez la cassette cible dans
le lecteur 2, flèche de déroulement dirigée vers la
droite.
21 Touche CARS: enregistrement de CD avec
réglage automatique des niveaux (CARS = Computer Aided CD Recording System = système
d’enregistrement de CD assisté par ordinateur).
Cette fonction n’est disponible que si vous utilisez le double lecteur de CD MONACOR CD2000 et le récepteur HiFi MONACOR DSR-2000.
22 Touche SYNC REV: pour copier des cassettes de
durées différentes. Au début des deux faces de la
cassette cible, les mêmes titres que ceux de la
cassette source, sont lus. Cette fonction ne peut
être activée que si le sélecteur de direction (9) est
sur ou .
23 Touche REC MUTE: insertion d’une pause de 4
secondes (aucun bruit) entre deux titres. Elle ne
peut être activée que pendant l’enregistrement
ou sa préparation. Après une pause de 4 secondes, l’appareil est à nouveau prêt à enregistrer.
24 Touche PAUSE: pour interrompre la lecture ou
l’enregistrement. Une nouvelle pression permet
de reprendre la lecture.
25 Touche RECORD: prépare l’enregistrement.
Pour le démarrer, appuyez ensuite sur la touche
PAUSE (24).
26 Touche PARALLEL REC: enregistrement iden-
tique et parallèle sur les deux lecteurs pour conserver deux originaux.
27 Lecture: direction vers la gauche. Par une nou-
velle pression lors de la lecture, on peut
répéter le titre en cours tant que cette touche est
activée (8 fois maximum).
28 Rembobinage vers la gauche; pendant la lecture,
vous pouvez, avec cette touche, sélectionner
d’autres titres.
Lecture, direction vers la droite :
En appuyant sur la touche , l’appareil rem-
bobine au début du morceau en cours de lecture.
Pour sélectionner le morceau juste précédent,
appuyez deux fois sur la touche . A chaque
nouvelle pression sur cette touche, vous accédez
au morceau précédent.
Lecture, direction vers la gauche :
À chaque pression sur la touche , vous
avancez d’un titre.
29 Touche STOP
30 Bobinage vers la droite. Pendant la lecture, vous
pouvez choisir d’autres titres:
Lecture vers la droite
À chaque pression de la touche , vous
avancez d’un titre
Lecture vers la gauche
En appuyant sur la touche , vous revenez
au début du morceau en cours de lecture. Pour
choisir le morceau précédent, enfoncez deux fois
la touche . A chaque nouvelle pression sur
cette touche, vous reculez d’un titre.
31 Lecture: direction vers la droite: par une nouvelle
pression sur la touche lors de la lecture, vous
pouvez répéter le titre en cours tant que cette
touche est activée (8 fois maximum).
2.2 Face arrière
32 Prises RCA pour les entrées audio Enregistre-
ment Droite/Gauche
= il recorder si ferma dopo la riprodu-
zione/registrazione di un lato della cassetta
= durante la riproduzione, i due lati della
cassetta saranno riprodotti automaticamente fino a 5 volte di seguito,
la registrazione si effettua sui due lati,
uno dopo l’altro
= durante la riproduzione, i due lati delle
cassette delle due sezioni saranno riprodotti automaticamente fino a 5 volte
di seguito,
la registrazione si effettua nelle due sezioni sui due lati, uno dopo l’altro.
10 Selettore per il sistema Dolby
B = Dolby B, usato nella maggior parte degli
apparecchi non professionali. Per cassette registrate con Dolby B.
C = Dolby C, un sistema migliorato rispetto al
Dolby B. Da usare se la cassetta sarà riprodotta con un apparecchio con Dolby C,
e naturalmente con tutte le cassette registrate con Dolby C.
OFF = Sistema Dolby spento: per cassette regi-
strate senza Dolby.
11 Regolatore per livello registrazione
12 Regolatore bilanciamento per registrazione
13 Presa jack 6,3 mm per cuffia stereo a media im-
pedenza (> 8Ω) con regolazione volume autonoma
14 Presa jack 6,3 mm per microfono mono. Colle-
gando un microfono, l’ingresso di registrazione
REC (32) viene disattivato.
15 Tasto per aprire il vano cassetta 2
16 Tasto INTRO CHECK per riprodurre per 10 se-
condi l’inizio di ogni brano su un lato della cassetta. Per ascoltare l’inizio dei titoli occorre prima
attivare la riproduzione con i tasti o e
quindi premere il tasto INTRO CHECK.
17 Tasto BLANK SCAN per saltare le pause fra i sin-
goli titoli se più lunghe di 10 secondi. La funzione
può essere attivata solo durante la riproduzione.
18 Tasto AUTO, da premere prima di copiare, per ri-
portare le due cassette all’inizio. La funzione
viene attivata solo se dopo aver premuto il tasto
AUTO si preme uno dei tasti dubbing per copiare
la cassetta: NOR (19) o HIGH (20).
19 Tasto DUBBING (NOR) per copiare una cassetta
a velocità normale. La cassetta di destinazione
deve essere sistemata nella sezione 2, con la bobina vuota a destra.
20 Tasto DUBBING (HIGH) per copiare una cassetta
a velocità doppia. La cassetta di destinazione
deve essere sistemata nella sezione 2, con la bobina vuota a destra.
21 Tasto CARS per la registrazione da CD con rego-
lazione automatica del livello (CARS = Computer
Aided CD Recording System = sistema di registrazione da CD con l’ausilio del computer). La
funzione è possibile solo insieme al lettore
CD MONACOR CD-2000 e al receiver hi-fi
MONACOR DSR-2000.
22 Tasto SYNC REV per copiare cassette di
lunghezza differente. Con questa funzione, all’inizio della cassetta di destinazione si registrano
esattamente gli stessi titoli della cassetta originale. La funzione può essere attivata solo se l’interruttore DIRECTION (9) è in posizione o
.
23 Tasto REC MUTE per registrare una pausa di 4
secondi fra due titoli. La funzione può essere attivata solo durante la registrazione o quando l’apparecchio è in attesa di registrazione. Dopo l’intervallo di 4 secondi, l’apparecchio ritorna di
nuovo in attesa di registrazione.
24 Tasto PAUSE per interrompere la riproduzione o
la registrazione. Per ripartire, premere di nuovo il
tasto.
25 Tasto RECORD per mettere l’apparecchio in at-
tesa di registrazione. Per avviare la registrazione,
premere successivamente il tasto PAUSE (24).
26 Tasto PARALLEL REC per creare due registra-
zioni originali nelle due sezioni.
27 Riproduzione verso sinistra
Premendo durante la riproduzione ancora il tasto
per ogni pressione del tasto il titolo attuale
viene ripetuto una volta (mass. 8).
28 Riavvolgere a sinistra
Durante la riproduzione, con questo tasto si possono selezionare altri titoli.
Nel caso di riproduzione a destra:
Premendo il tasto , il nastro ritorna all’inizio
del titolo attuale. Per selezionare il titolo precedente, premere due volte. Premendo più
volte il tasto , si torna indietro sempre di un
titolo.
Nel caso di riproduzione a sinistra:
Premendo il tasto , il nastro avanza di un titolo.
29 Stop
30 Riavvolgere a destra
Durante la riproduzione, con questo tasto si possono selezionare altri titoli.
Nel caso di riproduzione a destra:
Premendo il tasto , il nastro avanza di un titolo.
Nel caso di riproduzione a sinistra:
Premendo il tasto , il nastro ritorna all’inizio
del titolo attuale. Per selezionare il titolo precedente, premere due volte. Premendo più
volte il tasto , si torna indietro sempre di un
titolo.
31 Riproduzione verso destra
Premendo durante la riproduzione di nuovo il
tasto , per ogni pressione del tasto il titolo attuale viene ripetuto una volta (mass. 8).
2.2 Pannello posteriore
32 Prese cinch per ingressi audio registrazione sini-
stra/destra
33 Prese cinch per uscite audio riproduzione sini-
stra/destra
15
I
F
B
CH
Page 16

33 Prises RCA pour les sorties audio Lecture Droi-
te/Gauche
34 Prises jack 6,35 pour brancher les appareils sa-
tellites.
35 Connexion secteur 230 V~/50Hz
3 Branchements d’appareils
1) Reliez par un câble RCA les prises de sortie audio
PLAY (33) aux entrées correspondantes (TAPE
PLAY) du récepteur ou de l’amplificateur . V eillez à
respecter les repères de couleur des fiches et prises (rouge: canal droit, blanc: canal gauche).
2) De même, reliez les prises d’entrée audio REC
(32) aux sorties correspondantes TAPE REC du
récepteur ou de l’amplificateur, en utilisant un
câble RCA.
3) Lorsqu’on relie les divers éléments CD-2000,
TDD-2000 au récepteur DSR-2000, on obtient
une vaste gamme de fonctions. Ainsi, le récepteur
commute automatiquement sur l’appareil correspondant lorsqu’on allume le lecteur CD ou K7. Il
est également possible de procéder à une adaptation automatique des niveaux lorsqu’on enregistre un CD sur le lecteur de K7: le CD est lu
brièvement, le TDD-2000 régle le niveau d’enregistrement avant que celui-ci ne commence,
puis la lecture du CD débute et par là même, l’enregistrement; tout est automatique! Reliez le récepteur et le lecteur de cassettes en utilisant le
cordon jack 3,5 aux prises SYSTEM CONTROL
(34).
4) Une fois que l’ensemble des branchements est
effectué, reliez l’appareil au secteur 230V~/
50Hz.
5) Vous pouvez relier un casque stéréo moyenne
impédance (impédance >8Ω) à la prise jack 6,35
PHONES (13). Si le casque ne dispose pas de
réglage propre de volume, utilisez un cordon prolongateur avec réglage de volume (i.e. HEC-60).
ATTENTION: ne réglez pas le volume du casque
trop fort. Des volumes trop élevés peuvent, à la
longue, causer des troubles de l’audition. L’oreille
humaine s’habitue à des volumes élevés et avec
le temps, ne les perçoit pas de la même manière.
C’est pourquoi nous conseillons de ne plus modifier le volume d’écoute une fois que votre oreille
s’y est habituée.
4 Lecture
4.1 Quel type de cassettes?
En règle générale, tous les types de cassettes d’une
durée de 90 minutes (C-90) peuvent être utilisés.
N’utilisez pas de cassettes C-120, leur film est très
fin et peut facilement se déchirer et s’enrouler.
N’utilisez pas non plus de cassettes sans fin, elles
peuvent endommager la mécanique de l’appareil.
Nous vous conseillons d’utiliser des cassettes normales, fer ou chrome, la meilleur qualité de restitution revenant aux cassettes fer. Grâce aux repères
sur la cassette, l’appareil reconnaît le type de bande
et s’adapte automatiquement.
4.2 Marche/Arrêt
1) Avant d’allumer votre appareil, vérifiez que le potentiomètre TIMER (8) est bien sur OFF. Dans le
cas contraire, la lecture ou l’enregistrement démarre dès la mise en marche et la cassette peut
être effacée!
Allumez le lecteur avec l’interrupteur Marche/
Arrêt POWER (6).
2) Après toute utilisation, fermez toujours le compartiment cassettes afin de protéger les alvéoles de
la poussière et éteignez votre lecteur avec l’interrupteur POWER (6).
3) Attendez toujours quelques secondes avant de
remettre votre appareil en marche.
4.3 Lecture de cassettes
1) Mise en place de la cassette: tendez la bande en
faisant tourner une dent crantée. Ouvrez le compartiment cassettes en appuyant sur la touche
EJECT (7/15), insérez la cassette, la partie visible
de la bande vers le bas. Fermez le compartiment
en appuyant doucement sur la porte du compartiment. Mettez éventuellement le compteur à zéro
avec la touche RESET (2/4).
2) Mettez le potentiomètre DOLBY NR (10) sur la
position d’enregistrement voulue:
OFF = enregistrement sans Dolby
B = enregistrement avec Dolby B
C = enregistrement avec Dolby C
3) Mettez le potentiomètre DIRECTION (9) sur la
fonction voulue:
l’appareil s’arrête après la lecture d’une
face
les deux faces de la cassette sont lues
automatiquement l’une après l’autre, 5
fois au maximum
les deux faces d’une cassette (lecteur 1
par exemple) sont lues, puis celles de la
cassette du lecteur 2. Cette fonction se
répète 4 fois de suite au plus. (Veillez
bien sûr à mettre une cassette dans chaque lecteur).
4) Démarrez la lecture avec la touche si la cassette se déroule vers la droite, et avec la touche
si elle se déroule vers la gauche. Si une cassette n’est pas complètement rembobinée, il est
possible de lire une ou l’autre face de la cassette
en appuyant sur la touche ou . L’affichage
indique le sens de lecture.
5) Appuyez sur la touche pour arrêter la lecture.
6) Appuyez sur la touche EJECT (7/15) pour éjecter
la cassette; attention: celle-ci doit toujours être à
l’arrêt.
34 Prese jack 3,5 mm per il pilotaggio degli appa-
recchi facenti parte del sistema
35 Collegamento rete 230 V~/50Hz.
3 Collegare l’apparecchio
1) Collegare le prese audio d’uscita PLAY (33) con i
relativi ingressi (TAPE PLAY) del receiver o
dell’amplificatore, usando un cavo con connettori
cinch. Occorre rispettare i segni colorati su spine
e prese (rosso = canale di destra, bianco = canale
di sinistra).
2) Collegare quindi le prese d’ingresso audio REC
(32) con le relative uscite (TAPE REC) del receiver o dell’amplificatore, usando un cavo con connettori cinch.
3) Si possono pilotare molte funzioni dei componenti
collegati, se questi fanno parte del sistema (p. es.
Receiver hi-fi MONACOR DRS-2000 e Lettore
CD MONACOR CD-2000). Il receiver commuta
automaticamente sul relativo apparecchio, se il
lettore CD o la piastra CC vengono avviati. Nel
caso di registrazione di un CD è possibile una regolazione automatica del livello: il CD viene riprodotto brevemente, il recorder regola il livello di registrazione prima dell’avvio della registrazione, il
CD parte dall’inizio, e la registrazione inizia
-
il
tutto automaticamente!
Per poter sfruttare il pilotaggio del sistema, inserire le spine jack 3,5mm del cavo di comando
in una delle prese SYSTEM CONTROL del recorder (34) e nel receiver.
4) Dopo aver collegato tutti gli apparecchi, inserire la
spina rete nella presa (230V~/50 Hz).
5) Se si desidera, si può collegare una cuffia stereo
a media impedenza (>8Ω) alla presa jack 6,3mm
PHONES (13). Se la cuffia è senza regolazione
del volume, prima della cuffia si deve sistemare
un regolatore stereo separato (p. es. MONACOR
HEC-60).
ATTENZIONE: Mai tenere molto alto il volume
nelle cuffie. A lungo andare, il volume eccessivo
può procurare danni all’udito! L’orecchio si abitua
agli alti volumi e dopo un certo tempo non se ne
rende più conto. Non aumentare il volume successivamente.
4 Riproduzione
4.1 Quali cassette sono adatte?
In linea di massima, si possono usare tutte le cassette di lunghezza fino a 90 minuti (C-90). Non si
dovrebbero usare cassette del tipo C-120 (120
minuti), perché il nastro è molto sottile, si strappa o si
aggroviglia facilmente.
Inoltre, si sconsigliano le cassette senza fine,
che potrebbero danneggiare la meccanica del registratore.
Come tipo di nastro sono adatti nastri normali, al
biossido di cromo o metallici a ferro puro. I migliori risultati si ottengono solo con i nastri al ferro. Il recorder riconosce dalla cassette il tipo di nastro ed esegue automaticamente le relative regolazioni.
4.2 Accendere e spegnere
1) Prima di accendere l’apparecchio, mettere l’inter-
ruttore TIMER (8) sempre in posizione OFF. Altri-
menti, il registratore si avvia subito con la riprodu-
zione o con la registrazione con pericolo di
cancellare la cassetta!
Per accendere/spegnere premere il tasto
POWER (6).
2) Dopo l’uso, richiudere sempre i vani cassette per
proteggerli dallo sporco, e spegnere l’appa-
recchio con il tasto POWER (6).
3) Dopo aver spento l’apparecchio, aspettare alcuni
secondi prima di riaccenderlo.
4.3 Riprodurre una cassetta
1) Inserire una cassetta. Se necessario tendere
bene il nastro facendo girare a mano una delle
bobine della cassetta. Aprire il vano cassetta con
il tasto EJECT (7 o 15). Inserire la cassetta in
modo tale che le aperture previste per il nastro si
trovino rivolte verso il basso. Chiudere delicatamente il vano cassetta premendo contro il bordo
superiore. Se necessario rimettere a zero il contatore con il tasto RESET (2 o 4).
2) Portare il selettore DOLBY NR (10) nella posizione con cui registrare la cassetta:
OFF = registrazione senza Dolby
B = registrazione con Dolby B
C = registrazione con Dolby C
3) Portare il selettore DIRECTION (9) nella posizione desiderata:
= il registratore si ferma dopo la riprodu-
zione di un lato
= si riproducono i due lati, uno dopo l’altro,
fino a cinque volte
= si riproducono prima di due lati di una
cassetta, quindi i due lati dell’altra cassetta. Tale procedura si ripete automaticamente fino a quattro volte (naturalmente, in tutte e due le sezioni
dev’essere inserita una cassetta!).
4) Con il tasto si avvia la riproduzione, se la bobina vuota della cassetta si trova a destra, e con il
tasto , se la bobina vuota si trova a sinistra. Se
la cassetta non è completamente ribobinata, premendo o si può riprodurre a scelta uno
dei due lati. Il display indica la direzione attiva.
5) Per fermare la riproduzione, premere il tasto .
6) Per togliere la cassetta, premere il tasto EJECT (7
o 15), ma solo con la cassetta ferma!
4.4 Avvolgimento veloce avanti/indietro con
avvio automatico della riproduzione
Dopo aver fermato la cassetta con il tasto , con i
tasti o si può riavvolgere il nastro in
16
I
F
B
CH
Page 17

4.4
Avance/retour rapide (bobinage/rembobinage)/démarrage automatique de la lecture
Une fois que vous avez arrêté la cassette (touche
), vous pouvez utiliser les touches ou
pour bobiner ou rembobiner, tout dépend du sens de
déroulement de la cassette.
Lecture vers la droite:
= rembobinage
= bobinage
Lecture vers la gauche:
= bobinage
= rembobinage
Si, après le rembobinage la lecture doit commencer
automatiquement au début de la cassette, appuyez
deux fois sur la touche correspondante. PLAY clignote pendant le rembobinage.
Attention: si, pendant la lecture, vous appuyez sur la
touche ou , l’appareil revient au début
du morceau ou passe au titre suivant (voir chapitre
4.5: sélection des titres).
4.5 Sélection des titres
Lors de la lecture, il est possible de sélectionner un
autre titre avec les touches ou . L’appareil bobine jusqu’au titre voulu et démarre automatiquement la lecture. Lorsque vous appuyez sur les
touches ou , l’affichage indique ”SP”, le
nombre de titres que l’on peut faire défiler dans un
sens ou dans l’autre (20 titres maximum). Afin de
pouvoir utiliser cette fonction, il faut insérer une
pause de 4 secondes au moins entre chaque titre
afin que l’appareil les reconnaisse.
1) Lecture vers la droite
en appuyant sur la touche , on avance d’un
titre
en appuyant sur la touche , on rembobine
au début du morceau en cours. Pour sélectionner
le morceau précédent, appuyez deux fois sur la
touche . A chaque nouvelle pression sur
cette touche, on recule d’un titre.
2) Lecture vers la gauche
en appuyant sur la touche , on rembobine
au début du morceau en cours. Pour sélectionner
le morceau précédent, appuyez deux fois sur la
touche . A chaque nouvelle pression sur
cette touche, on recule d’un titre.
En appuyant sur la touche , on avance d’un
titre
Conseil technique
Le système IPSS (Intelligent Programme Search System: système intelligent de recherche de programme) commande la sélection des titres et les
fonctions décrites dans les paragraphes suivants :
-
répétition d’un titre
-
lecture du début des titres
-
suppression des trop longues pauses
Pour pouvoir utiliser ces fonctions, il faut insérer des
pauses de 4 secondes au moins entre chaque titre.
Si vous effectuez vos propres enregistrements, vous
pouvez insérer ces pauses en utilisant les touches
REC MUTE (23) (voir chapitre 5.4).
Ce système IPSS ne travaille pas correctement dans
les cas suivants:
1. lors de l’enregistrement de paroles ou de bruits
qui ont des interruptions supérieures à 4 secondes.
2. pour des titres avec des passages très lents ou
des passages sans son de plus de 4 secondes
(par exemple, la musique classique).
3. pour des cassettes comportant, entre chaque
titre, des interférences.
4. pour des cassettes sur lesquelles les pauses
entre chaque titre sont inférieures à 4 secondes.
5. pour des cassettes avec des enregistrements très
bas.
6. pour des enregistrements où on a utilisé un
fondu-enchaîné et donc supprimé toute pause
entre les morceaux.
4.6 Répétition d’un titre
Si vous souhaitez répéter le titre venant d’être lu, appuyez sur la touche de lecture correspondante
autant de fois que de répétitions souhaitées (8 au
plus):
touche (31) pour une lecture vers la droite
touche (27) pour une lecture vers la gauche
L’affichage indique ”AP” et le nombre de répétitions.
Ala fin du titre en cours, l’appareil rembobine jusqu’à
son début et démarre la lecture. Ce processus se reproduit selon le nombre de répétitions sélectionnées.
Cette fonction est déconnectée en appuyant sur la
touche (29) ou PAUSE (24).
Si la fonction répétition ne marche pas correctement,
reportez-vous aux conseils techniques figurant à la
fin du chapitre 4.5.
4.7 Lecture de l’ensemble des titres
Il est possible de lire les débuts de tous les titres
d’une face les uns après les autres pendant 10 secondes.
1) Démarrez la lecture avec la touche ou .
2) Appuyez ensuite sur la touche INTRO CHECK
(16). L’affichage n’indique plus un nombre à 4
chiffres mais, sur deux positions, le numéro des titres lus.
3) L’appareil avance jusqu’au titre suivant, le lit puis
passe au prochain et ainsi de suite.
4) Lorsque le commutateur DIRECTION (9) est sur
ou , on passe automatiquement à la fin
de la face, en lecture normale de l’autre face ou
de l’autre lecteur; appuyez une nouvelle fois sur
la touche INTRO CHECK pour lire le début des
titres de cette seconde face.
5) Il est possible d’arrêter la lecture de l’introduction
en appuyant sur la touche INTRO CHECK, la lecture se poursuit normalement.
En cas de problème, reportez-vous aux conseils
techniques, chapitre 4.5.
avanti o indietro. La direzione dell’avvolgimento veloce dipende dalla direzione di riproduzione.
Nel caso di riproduzione a destra:
= avvolgimento indietro
= avvolgimento avanti
Nel caso di riproduzione a sinistra:
= avvolgimento avanti
= avvolgimento indietro
Se dopo l’avvolgimento, la riproduzione deve partire
automaticamente dall’inizio della cassetta, premere
due volte il relativo tasto. Durante l’avvolgimento, la
scritta PLAYlampeggia sul display.
Attenzione: Se si azionano i tasti o du-
rante la riproduzione, si ritorna all’inizio del titolo o si
avanza al prossimo titolo (vedere capitolo 4.5 ”Selezionare un titolo”).
4.5 Selezionare un titolo
Durante al riproduzione, con i tasti o si
può selezionare un altro titolo. Il registratore salta al
titolo selezionato ed avvia automaticamente la riproduzione. Dopo aver azionato il tasto o ,
il display indica ”SP” con il numero dei titoli da saltare. Si possono saltare fino a 20 titoli. Per potere
sfruttare questa funzione, fra i singoli titoli deve esserci un intervallo non inferiore ai 4 secondi per permettere al recorder di riconoscere i singoli titoli.
1) Nel caso di riproduzione a destra:
Premendo il tasto , il nastro avanza di un ti-
tolo
Premendo il tasto , il nastro ritorna all’inizio
del titolo attuale. Per selezionare il titolo precedente, premere due volte. Premendo più
volte il tasto , si torna indietro sempre di un
titolo.
2) Nel caso di riproduzione a sinistra:
Premendo il tasto , il nastro ritorna all’inizio
del titolo attuale. Per selezionare il titolo precedente, premere due volte. Premendo più
volte il tasto , si torna indietro sempre di un
titolo.
Con ogni pressione del tasto , il nastro
avanza di un titolo.
Nota tecnica
Il sistema IPSS (Intelligent Program Search System
= Sistema intelligente di ricerca del programma) pilota la selezione dei titoli nonché le funzioni descritte
nei seguenti capitoli:
-
Riproduzione ripetuta di un titolo
-
Riproduzione dell’inizio di ogni titoli
-
Saltare lunghi intervalli
Queste funzioni sono possibili solo se fra i singoli titoli si trovano delle pause non inferiori ai 4 secondi.
In determinate registrazioni, con il tasto REC MUTE
(23) si possono inserire pause di quel genere (vedere capitolo 5.4 ”Inserire una pausa di 4 secondi
dopo un titolo”).
L’IPSS non può lavorare correttamente:
1. con le registrazioni parlate e con rumori che prevedono interruzioni superiori ai 4 secondi
2. nei titoli con brani a bassissimo volume e con
brani senza suono per più di 4 secondi (p. es.
nella musica classica)
3. con le cassette che presentano rumori di disturbo
fra i singoli titoli
4. con le cassette dove gli intervalli fra i singoli titoli
sono più brevi di 4 secondi
5. con le cassette con registrazione a volume particolarmente basso
6. con le registrazioni effettuate con crossfader che
non presentano quindi intervalli fra i titoli.
4.6 Riproduzione ripetuta di un titolo
Se il titolo attuale dev’essere ripetuto, premere il
tasto relativo tante volte, quante volte si desidera ripeterlo (mass. 8V):
il tasto (31) durante la riproduzione a destra
(come indica il display)
il tasto (27) durante la riproduzione a sinistra.
Il display indica ”AP” e il numero delle ripetizioni. Alla
fine del titolo attuale, il recorder torna all’inizio del ti-
tolo ed avvia la riproduzione. La procedura si ripete
secondo il numero programmato di ripetizioni. Premendo il tasto (29) o PAUSE (24), la funzione
viene disattivata.
Se la funzione di ripetizione non funziona correttamente leggere attentamente la nota tecnica alla fine
del capitolo 4.5 ”Selezionare un titolo”.
4.7 Riprodurre l’inizio di ogni titolo
L’inizio di ogni titolo di un lato può essere riprodotto,
uno dopo l’altro, per 10 secondi.
1) Avviare la riproduzione con il tasto o .
2) Dopo l’avvio azionare il tasto INTRO CHECK
(16). Il display indica non più il contatore a 4 cifre,
ma il numero a 2 cifre dei titoli riprodotti.
3) Il recorder salta al prossimo titolo, ne riproduce l’inizio, poi passa al titolo successivo ecc.
4) Se il selettore DIRECTION (9) è in posizione
o , alla fine del lato della cassetta si ritorna alla riproduzione normale rispettivamente
dell’altro lato della cassetta o dell’altra sezione.
Se anche qui è richiesta la riproduzione degli inizi,
occorre premere di nuovo il tasto INTRO CHECK.
5) La riproduzione degli inizi può essere terminata
durante la riproduzione di un titolo, premendo
semplicemente il tasto INTRO CHECK. Si torna
alla riproduzione normale.
Se la funzione di riproduzione degli inizi non funziona correttamente leggere attentamente la nota
tecnica alla fine del capitolo 4.5 ”Selezionare un titolo”.
4.8 Saltare automaticamente le lunghe pause
Se fra i titoli si trovano lunghi intervalli di più di 10 secondi, questi si possono saltare automaticamente.
1) Avviare la riproduzione con o .
2) Premere il tasto BLANK SCAN (17). Il display indica ”BLANK SCAN”.
3) Se la riproduzione è arrivata ad un lungo intervallo, il display indica ”SP00” e l’avanzamento ve-
17
I
F
B
CH
Page 18

4.8 Suppression des trop longues pauses
entre chaque morceau
Si, entre les titres, les pauses sont supérieures à 10
secondes, il est possible de les éviter en bobinant rapidement.
1) Démarrez la lecture avec la touche ou .
2) Appuyez sur la touche BLANK SCAN (17), l’affich-
age indique ”BLANK SCAN”.
3) Si la lecture arrive à une pause plus longue, l’af-
fichage indique ”SP00”, l’appareil bobine la cassette jusqu’au début du titre suivant. La lecture reprend alors.
4) Par une seconde pression sur la touche BLANK
SCAN ou la touche (29) ou PAUSE (24), la
fonction est déconnectée.
En cas de problème, reportez-vous aux conseils
techniques, chapitre 4.5.
5 Enregistrement
5.1 Protection de la cassette pour éviter tout
effacement
Pour ne pas enregistrer, par inadvertance, sur une
cassette déjà enregistrée et tout effacer, coupez les
protections (a) et (b) (schéma 4). Les cassettes
achetées dans le commerce sont déjà protégées. La
languette (b) protège la face dont l’inscription
(schéma 4) est sur la face supérieure (dans le cas
présent, la face 1). Coupez donc uniquement la languette correspondant à la face à sauvegarder. S’il
est nécessaire de réutiliser une cassette protégée,
mettez, à l’emplacement de la languette, un morceau de papier collant (schéma 5).
5.2 Enregistrement
1) Insérez la cassette, rembobinez-la au début ou à
l’endroit où vous souhaitez faire débuter l’enregistrement. Mettez le compteur à zéro (touche
RESET 2 / 4), cela facilite la recherche du début
d’enregistrement.
2) Mettez le potentiomètre DOLBY NR (10) sur la
position d’enregistrement voulue. Il faut respecter
les possibilités de lecture de l’appareil qui sera ultérieurement utilisé. Les meilleurs rendus se font
avec un enregistrement en Dolby C.
OFF = enregistrement sans Dolby
B = enregistrement avec Dolby B
C = enregistrement avec Dolby C
3) Mettez le commutateur DIRECTION (9) sur la
fonction souhaitée:
= l’appareil s’arrête après l’enregistrement
d’une face
= les deux faces sont enregistrées auto-
matiquement l’une après l’autre
= les deux faces d’un lecteur sont enregis-
trées puis celles du second lecteur (pensez à mettre une cassette dans chaque
lecteur).
4) Sur le récepteur DSR-2000 ou l’amplificateur,
sélectionnez l’appareil à partir duquel l’enregistrement doit être effectué. Pour un enregistrement
avec un micro, branchez un micro à la prise MIC
(14), l’entrée d’enregistrement REC (32) est alors
coupée.
5) Enfoncez la touche RECORD (25), l’appareil est
prêt à enregistrer, l’affichage indique ”REC” et le
symbole pause . Dans le cas où vous conjuguez
le TDD-2000 et le DSR-2000, le sélecteur d’entrée INPUT SELECT de ce dernier est verrouillé.
6) Réglez le niveau et la balance de l’enregistrement
avec les réglages REC LEVEL (11) et BALANCE
(12) de sorte que, pour les passages les plus
forts, le segment ”0 dB” sur l’affichage s’allume.
Pour la majorité des enregistrements, le réglage
BALANCE peut rester sur la position médiane.
Une correction n’est nécessaire que si les originaux sont de mauvaise qualité.
7) Si l’affichage indique un sens de lecture différent
de celui souhaité, modifiez-le avec les touches
ou .
Attention: si vous appuyez sur la touche qui cor-
respond au sens de lecture indiqué, l’enregistrement démarre tout de suite.
8) Commencez l’enregistrement en appuyant sur la
touche PAUSE (24); une nouvelle pression arrête
l’enregistrement.
9) Appuyez sur la touche (29) pour terminer l’enregistrement.
5.3 Reprise de l’enregistrement en cas d’er-
reur
On peut rembobiner au point de départ de l’enregistrement, par exemple, si le titre ne convient pas.
1) pendant l’enregistrement, appuyez sur la touche
= sens d’enregistrement vers la droite
= d’enregistrement vers la gauche
2) l’enregistrement s’arrête, l’appareil rembobine au
début de l’enregistrement. Vous pouvez alors relancer un enregistrement.
5.4 Insertion d’une pause de 4 secondes
après un titre
Afin que le système IPSS puisse fonctionner correctement, une pause de 4 secondes au moins entre
chaque titre doit exister. (voir paragraphe 4.5, conseils techniques). Utilisez la touche REC MUTE (23)
pour insérer automatiquement cette pause lors de
vos enregistrements.
Il existe deux façons de procéder:
1. pendant l’enregistrement
Ala fin du titre, appuyez sur la touche REC MUTE
(23), une pause de 4 secondes est ajoutée à la fin
du morceau, même si l’affichage de niveau indique un signal d’enregistrement. ”REC” clignote
pendant l’insertion de la pause. Appuyez ensuite
sur la touche PAUSE (24) pour démarrer l’enregistrement du titre suivant.
2. après l’enregistrement
Appuyez sur la touche PAUSE (24) à la fin d’un
titre, puis mettez l’appareil prêt à enregistrer en
appuyant sur la touche RECORD (25). Appuyez
sur REC MUTE (23), la pause est insérée. Une
loce porta il nastro all’inizio del prossimo titolo,
per riavviare quindi la riproduzione.
4) Premendo il tasto BLANK SCAN una seconda
volta o azionando i tasti (29) o PAUSE (24), si
disattiva la funzione.
Se la funzione di salto automatico delle lunghe
pause non funziona correttamente leggere attentamente la nota tecnica alla fine del capitolo 4.5 ”Selezionare un titolo”.
5 Registrazione
5.1 Proteggere le cassette dalla cancellazione
accidentale
Per evitare che le cassette registrate possano essere cancellate accidentalmente, occorre spezzare
le linguette (a) e (b) (fig. 4). Nelle cassette preregistrate, il produttore ha già provveduto in tal senso. La
linguetta (b) protegge quel lato la cui scrittura si può
leggere nella figura 4 (nell’esempio il lato 1). Per proteggere un solo lato basta spezzare la relativa linguetta.
Per poter effettuare delle registrazioni su una cas-
setta con linguette spezzate basta incollarvi sopra un
robusto nastro adesivo (fig. 5).
5.2 Registrazione semplice
1) Inserire una cassetta e riportarla all’inizio o al
punto dove la registrazione deve iniziare. Azzerare il contatore con il tasto RESET (2 o 4). Così è
più facile ritrovare il punto d’inizio della registrazione.
2) Portare il selettore DOLBY NR (10) nella posizione con cui registrare la cassetta, tenendo
conto delle possibilità del registratore sul quale riprodurre poi la cassetta. I migliori risultati si ottengono con Dolby C.
OFF = registrazione senza Dolby
B = registrazione con Dolby B
C = registrazione con Dolby C
3) Portare il selettore DIRECTION (9) nella posizione desiderata:
= il registratore si ferma dopo la registra-
zione di un lato
= si registrano i due lati, uno dopo l’altro
= si registrano prima i due lati di una cas-
setta, quindi i due lati dell’altra cassetta
(naturalmente, in tutte e due le sezioni
dev’essere inserita una cassetta!).
4) Sul receiver o sull’amplificatore selezionare l’apparecchio, da cui registrare. Nel caso di registrazione da microfono, collegare un microfono alla
presa MIC (14). In tal modo si disattiva l’ingresso
di registrazione REC (32).
5) Premere il tasto RECORD (25). Il registratore è
ora in tattesa di registrazione. Il display segnala
”REC” e il simbolo di pausa (nel caso di funzionamento insieme al receiver hi-fi MONACOR
DSR-2000, il selettore di ingresso INPUT SELECT è bloccato).
6) Con il regolatore REC LEVEL (11) si regola il livello e con BALANCE (12) si regola il bilanciamento della registrazione in modo tale che con i
passaggi più forti si accenda il segmento 0 dB.
Per la maggiore parte delle registrazioni, il regolatore del bilanciamento può rimanere nella posizione centrale (con scatto). Solo se l’originale è
scadente, occorre correggerne la posizione.
7) Se il display indica una direzione diversa da
quella desiderata, cambiarla con i tasti o .
Attenzione: Se si preme il tasto che corrisponde
alla direzione indicata, la registrazione parte immediatamente!
8) Con il tasto PAUSE (24) avviare la registrazione.
Premendo di nuovo, si può interrompere la registrazione.
9) Per terminare la registrazione, premere il tasto
(29).
5.3 Riavvio della registrazione dopo errore
Si può ritornare automaticamente all’inizio della registrazione, p. es. quando non si è contenti della registrazione.
1) Mentre la registrazione è in corso, premere il
tasto (registrazione verso destra) oppure
(registrazione verso sinistra).
2) La registrazione si ferma e il registratore torna
automaticamente all’inizio della registrazione.
Adesso può ripartire la nuova registrazione.
5.4 Inserire una pausa di 4 secondi dopo un
titolo
Perché il sistema IPSS di ricerca dei programmi
possa lavorare correttamente, fra i singoli titoli ci devono essere intervalli non inferiori ai 4 secondi (vedere anche Nota tecnica alla fine del capitolo 4.5
”Selezionare un titolo”). Nelle registrazioni proprie, si
può aggiungere automaticamente una pausa di 4 secondi premendo il tasto REC MUTE (23).
Esistono due possibilità:
1. Durante la registrazione
Mentre la registrazione è in corso, alla fine del titolo premere il tasto REC MUTE (23) per inserire
una pausa di 4 secondi, anche se l’indicatore di livello indica un segnale di registrazione. Durante
l’inserimento della pausa, l’indicazione ”REC” del
display lampeggia. Dopo, il registratore è di
nuovo in attesa di registrazione. Con il tasto
PAUSE (24) si avvia la registrazione del titolo successivo.
2. Dopo la registrazione
Alla fine del titolo premere il tasto PAUSE (24).
Con il tasto RECORD (25) preparare la registrazione. Azionare il tasto REC MUTE (23) per inserire la pausa. Il recorder torna ad essere pronto
per la registrazione. Con il tasto (29) si disattiva l’attesa di registrazione.
5.5 Registrazione parallela
Si può effettuare una registrazione contemporaneamente nelle due sezioni per ottenere due originali.
18
I
F
B
CH
Page 19

fois l’opération terminée, l’appareil est à nouveau
prêt à enregistrer, arrêtez-le en appuyant sur la
touche (29).
5.5 Enregistrement parallèle
Il est possible d’effectuer le même enregistrement en
parallèle sur les deux lecteurs de manière à conserver deux originaux.
1) insérez les cassettes, rembobinez-les au début
ou à l’endroit où l’enregistrement doit débuter.
2) mettez le commutateur DOLBY NR (10) sur la position voulue (voir chapitre 5.2)
3) mettez le commutateur DIRECTION (9) sur la
fonction voulue:
= l’enregistreur s’arrête à la fin d’un face
d’une cassette.
ou
= les deux faces sont automatiquement
enregistrées l’une après l’autre.
4) Sélectionnez sur le récepteur (DSR-2000) ou
l’amplificateur, l’appareil à partir duquel s’effectue
l’enregistrement.
5) Avec la touche RECORD (25), allumez la fonction
enregistrement sur le lecteur 1 ou 2. Réglez les
niveaux et la balance d’enregistrement [réglages
REC LEVEL (11)/BALANCE (12)].
6) Coupez la fonction enregistrement en appuyant
sur la touche (29).
7) Si, sur l’affichage, apparaît un sens de défilement
de la bande différent de celui souhaité, modifiez le
sens de lecture de chaque lecteur avec la touche
ou puis appuyez tout de suite après sur la
touche (29).
8) Démarrez l’enregistrement parallèle en appuyant
sur la touche PARALLELREC (26).
9) Pour interrompre l’enregistrement, enfoncez la
touche ”PAUSE” (24) sur le lecteur 2, pour l’arrêter, enfoncez la touche (29) sur le lecteur
1ou2.
5.6 Copie de cassettes
1) Mettez la cassette source (à copier) dans le lecteur 1 et la cassette cible (d’enregistrement) dans
le lecteur 2. Toutes deux doivent être rembobinées à gauche pour que le sens de la copie soit
la droite.
2) Il n’est pas possible de régler le niveau et la balance, le commutateur DOLBY NR n’a aucune
fonction. La copie se fait avec les réglages de la
cassette source.
3) Mettez le potentiomètre DIRECTION (9) sur la
fonction souhaitée:
= l’enregistreur s’arrête après la copie
d’une face
ou
= les deux faces sont copiées automa-
tiquement l’une après l’autre
4) Si une ou les deux cassettes ne sont pas rembobinées au début, appuyez sur la touche AUTO
(18) avant de lancer la copie. La diode ”HIGH
DUB, NORM DUB” clignote. Lorsque vous appuyez sur une des touches DUBBING (19/20), la
cassette se rembobine automatiquement.
5) Si les deux faces doivent être copiées, mais si la
durée de la cassette source est inférieure ou
supérieure à la durée de la cassette cible, la copie
peut, malgré tout, commencer sur la seconde
face avec le même titre que la cassette source.
Lors de la copie, l’appareil bobine la cassette correspondante. Si la durée de la cassette cible est
inférieure à celle de la cassette source (schéma
6), il manque, sur chaque face, les derniers titres.
Si la durée de la cassette cible est supérieure
(schéma 7), à chaque fin de face, il y a une plage
sans enregistrement. Pour activer cette fonction,
appuyez sur la touche SYNC REV (22), l’affichage indique ”SYNC REV” (Synchro Reverse
Dubbing); cette fonction ne peut être activée que
si le commutateur DIRECTION (9) est sur
ou .
Cassette d’enregistrement est inférieure
➅
Cassette d’enregistrement est supérieure ➆
6) Une fois ces étapes terminées, commencez la
copie avec une des touches DUBBING:
Touche NOR (19): pour la copie à vitesse normale: recommandé pour un enregistrement de
grande qualité et des cassettes ayant un niveau
d’enregistrement élevé.
Touche HIGH (20): copie à vitesse double
5.7 Démarrage de l’enregistrement depuis le
lecteur CD
Lorsque on utilise l’ensemble CD-2000 (lecteur CD)
et DSR-2000 (récepteur HiFi), on peut démarrer simultanément à la lecture d’un CD, l’enregistrement
sur le TDD-2000.
1)
Reliez ces trois appareils entre eux (voir chapitre 3).
Lecture lecteur 1
Enregistrement lecteur 2 bobiner
page 1
page 2
page 1
page 2
Stop
Enregistrement lecteur 2
Lecture lecteur 1 bobiner
page 1
page 2
page 1
page 2
Stop
1) Inserire le cassette e riportarle all’inizio o al punto
dove la registrazione deve iniziare.
2) Portare il selettore DOLBY NR (10) nella posizione desiderata (vedere capitolo 5.2 ”Registrazione semplice”).
3) Portare il selettore DIRECTION (9) nella posizione desiderata:
= il registratore si ferma dopo la registra-
zione di un lato
oppure
= si registrano uno dopo l’altro i due lati
delle cassette.
4) Sul receiver o sull’amplificatore selezionare l’apparecchio, da cui registrare.
5) Premere il tasto RECORD (25) nella sezione 1 o
2. Con il regolatore REC LEVEL (11) si regola il livello e con BALANCE (12) si regola il bilanciamento della registrazione.
6) Con il tasto (29) si può disattivare lo stato di attesa di registrazione.
7) Se il display indica una direzione diversa da quella desiderata, cambiarla per ogni sezione con i tasti o e quindi premere subito il tasto .
8) Avviare la registrazione parallela con il tasto
PARALLELREC (26).
9) Per interrompere la registrazione premere il tasto
PAUSE (24) nella sezione 2. Per terminare la registrazione premere il tasto (29) della sezione
1 o 2.
5.6 Copiare una cassetta (Dubbing)
1) Inserire la cassetta da copiare nella sezione 1 e la
cassetta di destinazione nella sezione 2. La parte
vuota delle cassette si deve trovare sul lato destro, poiché la copiatura parte verso destra.
2) Il livello e il bilanciamento non possono essere regolati nel processo di copiatura. Anche il selettore
DOLBY NR non ha nessuna funzione. La copiatura avviene con le regolazioni con cui è stata registrata la cassetta da copiare.
3) Portare il selettore DIRECTION (9) sulla funzione
desiderata:
= il registratore si ferma dopo la registra-
zione di un lato
oppure
= si registrano uno dopo l’altro i due lati
delle cassette.
4) Se una o entrambe le cassette non sono riavvolte
sino all’inizio, occorre premere il tasto AUTO (18)
prima di copiare. Sul display lampeggia quindi
l’indicazione ”HIGH DUB, NORM DUB”. Dopo
aver azionato uno dei tasti DUBBING (19 o 20), i
nastri vengono dapprima riavvolti.
5) Se si desidera copiare i due lati, ma se la durata
della cassetta da copiare è inferiore a quella di
destinazione, la copiatura sul secondo lato comincerà sempre con lo stesso titolo come sulla
cassetta d’origine. Durante il processo di copiatura, il recorder fa avanzare la cassetta. Se la durata della cassetta di destinazione è inferiore a
quella originale (fig. 6), mancheranno ovviamente
gli ultimi titoli di ogni lato. Se la durata della cassetta di destinazione è superiore (fig. 7), alla fine
di ogni lato si trova una zona muta. Per attivare
questa funzione premere il tasto SYNC REV (22).
Il display segnala ”SYNC REV” (Synchro Reverse
Dubbing). La funzione può essere attivata solo se
il selettore DIRECTION (9) si trova in posizione
o .
Cassetta di destinazione con durata inferiore
➅
Cassetta di destinazione con durata superiore ➆
6) Dopo questi preparativi avviare la copiatura con
uno dei tasti DUBBING:
Tasto NOR (19) per la copiatura a velocità normale. Consigliabile nelle registrazioni delicate e
con le cassette con segnale forte.
Tasto HIGH (20) per la copiatura a doppia velocità.
5.7 Registrazione dal lettore CD
Se si fa funzionare insieme il lettore CD-2000 e il receiver hi-fi DSR-2000, con l’avvio della riproduzione
del CD si può far partire automaticamente anche la
registrazione su cassetta.
1) Il registratore, il receiver ed il lettore CD devono
essere collegati con l’apposito cavo di pilotaggio
(vedere anche il capitolo 3 ”Collegare l’apparecchio”).
2) Inserire la/le cassetta/e. Con due cassette, si
parte sempre dalla sezione 2.
3) Portare i selettori DIRECTION (9) e DOLBY NR
(10) nella posizione desiderata (vedere capitolo
5.2 ”Registrazione semplice”).
4) Premere il tasto RECORD (25), far partire l’inizio
del CD e regolare il livello con REC LEVEL (11) e
il bilanciamento con BALANCE (12).
5) Se il display indica una direzione diversa da
quella desiderata, cambiarla con i tasti o .
Attenzione: Se si preme il tasto che corrisponde
Riproduzione sezione 1
Registrazione sezione 2 avanzamento
lato 1
lato 2
lato 1
lato 2
Stop
Registrazione sezione 2
Riproduzione sezione 1 avanzamento
lato 1
lato 2
lato 1
lato 2
Stop
19
I
F
B
CH
Page 20

2) Mettez la (les) cassette(s) en place; si vous utilisez deux cassettes, il faut toujours commencer
par le lecteur 2.
3) Mettez les commutateurs DIRECTION (9),
DOLBY NR (10) sur la position voulue (voir chapitre 5.2).
4) Appuyez sur la touche RECORD (25), la lecture
du CD commence, réglez le niveau avec le
réglage REC LEVEL (11) et la balance d’enregistrement avec BALANCE (12).
5) Si l’affichage indique un autre sens de lecture que
celui voulu, modifiez-le avec les touches ou
.
Attention: si vous enfoncez la même touche que
le sens de lecture, l’enregistrement commence
tout de suite.
6) Arrêtez le lecteur CD
7) Sur le TDD-2000, appuyez sur les touches (29)
puis RECORD (25). Cette étape est importante, si
vous ne procédez pas ainsi, l’enregistrement ne
commence pas en même temps que le CD.
Veillez également à ce que sur le DSR-2000, le
lecteur CD soit sélectionné. Si ce n’est pas le cas,
appuyez sur la touche (29), sélectionnez le
CD-2000 sur le récepteur HiFi puis appuyez sur la
touche ”RECORD” (25).
8) Démarrez sur le lecteur CD la lecture soit avec la
touche ou en tapant le numéro du titre souhaité. Le TDD-2000 démarre simultanément l’enregistrement.
9) Vous pouvez interrompre l’enregistrement avec la
touche sur le lecteur CD (le lecteur de K 7
passe en mode prêt à l’enregistrement après
quelques secondes) ou le reprendre. L’enregistrement s’arrête automatiquement à la fin du CD
ou en appuyant sur la touche STOP du lecteur de
CD.
5.8 Enregistrement automatique d’un CD sur
une cassette (CARS)
Le système CARS (CARS = Computer Aided CD Recording System = système d’enregistrement de CD
assisté par ordinateur) permet d’enregistrer un CD
sur une cassette avec une adaptation automatique
des niveaux. Tous les titres du CD défilent rapidement, le niveau optimal d’enregistrement est réglé.
Une pause de 8 secondes est insérée au début de la
cassette. Le CD redémarre au début, l’enregistrement démarre simultanément, tout est automatique.
Cette fonction n’est possible que lorsqu’on conjugue
les trois appareils DSR-2000, CD-2000, TDD-2000.
1) Ces trois appareils doivent être reliés entre eux
(voir chapitre 3).
2) Sélectionnez la fonction ”Edition” avec la touche
EDIT de la télécommande du lecteur CD et indiquez la longueur de la cassette d’enregistrement
(cible) (voir notice d’utilisation du lecteur CD, CD-
2000).
3) Insérez une cassette, sens de lecture vers la droite, rembobinez-la si nécessaire.
4) Mettez le commutateur DOLBY NR (10) sur la position voulue (voir chapitre 5.2)
5) Mettez le commutateur DIRECTION (9) sur la position voulue:
= l’enregistreur s’arrête après l’enregistre-
ment d’une face
ou
= les deux faces sont enregistrées auto-
matiquement l’une après l’autre.
6) Sur l’affichage, le sens de lecture vers la droite
doit apparaître; si ce n’est pas le cas, appuyez sur
la touche (31) puis sur la touche (29).
7) Enfoncez maintenant la touche CARS (21): le
processus d’enregistrement automatique commence. L’adaptation des niveaux peut nécessiter,
selon le CD, jusqu’à 3
1
/2 minutes.
8) Une fois l’enregistrement terminé, le lecteur CD et
le TDD-200 se mettent sur STOP. Si vous souhaitez arrêter avant la fin, appuyez sur la touche
STOP du lecteur CD.
6 Fonctionnement avec une minuterie
ou à partir du programmateur du récepteur HiFi DSR-2000
Grâce au programmateur du DSR-200 ou à une minuterie, vous pouvez faire débuter la lecture ou l’enregistrement automatiquement à un moment donné.
1) Mettez la prise secteur du TDD-2000 dans le programmateur ou la prise d’alimentation du DSR2000 (sur la face arrière).
2) Si vous utilisez un programmateur distinct, tous
les autres appareils (amplificateur, récepteur),
doivent être alimentés par le programmateur.
Pour effectuer le préréglage de la chaîne HiFi,
mettez tout d’abord le programmateur sur ON.
3) Allumez tous les appareils reliés avec leurs interrupteurs Marche/Arrêt respectifs.
4) Si le lecteur CD, CD-2000, fait partie de la chaîne
HiFi, aucun CD ne doit se trouver dans le lecteur.
Sinon, lorsque vous allumez le programmateur, le
CD est lu et peut donc s’enregistrer sur la cassette.
5) Mettez la (les) cassette(s) dans le compartiment.
Si vous utilisez deux cassettes, il faut toujours
commencer par le lecteur 2. La cassette doit être
rembobinée, prête à tourner vers la droite.
6) Mettez les commutateurs DIRECTION (9) et
DOLBY NR (10) sur la position voulue (voir chapitre 5.2)
7) Mettez le commutateur TIMER (8) sur la position
PLAYsi vous souhaitez une lecture automatique.
Réglez le volume sur l’amplificateur.
8) Si vous souhaitez un enregistrement automa-
tique, réglez sur le tuner/récepteur l’émetteur à
partir duquel l’enregistrement doit être effectué.
Appuyez sur la touche RECORD (25) du TDD2000, réglez le niveau et la balance d’enregistrement [touches REC LEVEL (11)
-
BALANCE
(12)]. Mettez maintenant l’interrupteur TIMER (8)
sur la position REC. Vous pouvez mettre le volume de l’amplificateur sur le minimum.
alla direzione indicata, la registrazione parte immediatamente!
6) Fermare il lettore CD.
7) Sul registratore, disattivare l’attesa di registrazione con il tasto (29) e ripremere il tasto RECORD (25). Questa operazione è molto importante. In caso di mancanza, la registrazione non
potrà partire insieme con il lettore CD!
Controllare che sul receiver sia selezionato il lettore CD. Altrimenti premere il tasto (29) del registratore, selezionare il lettore CD sul receiver e
quindi azionare il tasto RECORD (25).
8) Avviare la riproduzione del lettore CD con il tasto
oppure impostando il numero del titolo desiderato. Nello stesso tempo, il registratore entra
in funzione di registrazione.
9) La registrazione può essere interrotta dal lettore
CD con il tasto (il registratore, dopo alcune
secondi, si mette in posizione di attesa di registrazione) e fatta ripartire con lo stesso tasto. La
registrazione termina automaticamente alla fine
del CD oppure se si preme il tasto STOP sul lettore CD.
5.8 Registrazione automatica dal CD (CARS)
Con il CARS (Computer Aided CD Recording System = sistema di registrazione da CD con l’ausilio
del computer) si può registrare una cassetta dal CD
con regolazione automatica del livello. Di tutti i titoli si
riproduce l’inizio per regolare il livello ottimale. All’inizio della cassetta si inserisce una pausa di 8 secondi. Il CD parte di nuovo dall’inizio, e nello stesso
tempo inizia la registrazione
-
il tutto automaticamente! La funzione è possibile solo insieme al lettore
CD MONACOR CD-2000 e al receiver hi-fi MONACOR DSR-2000.
1) Il registratore, il receiver ed il lettore CD devono
essere collegati con l’apposito cavo di pilotaggio
(vedere anche il capitolo 3 ”Collegare l’apparecchio”).
2) Con il tasto EDIT sul telecomando del lettore CD
chiamare la funzione di editing per selezionare i
titoli e la durata della cassetta di destinazione (vedere le istruzioni del lettore CD).
3) Inserire la cassetta con la parte vuota a destra e
eventualmente riavvolgerla.
4) Portare il selettore DOLBY NR (10) nella posizione desiderata (vedere capitolo 5.2 ”Registrazione semplice”).
5) Portare il selettore DIRECTION (9) nella posizione desiderata:
= il registratore si ferma dopo la registra-
zione di un lato
oppure
= si registrano uno dopo l’altro i due lati
delle cassette.
6) Sul display dev’essere indicata la direzione verso
destra. Altrimenti premere il tasto (31) e
quindi subito il tasto (29).
7) Premere il tasto CARS (21). La registrazione automatica inizia. La regolazione del livello può impiegare, a seconda del CD, fino a tre minuti e
mezzo.
8) Alla fine della registrazione, il lettore CD e il registratore si fermano. Per fermarli prima, premere il
tasto STOP sul lettore CD.
6 Funzionamento con un timer o con il
timer del Receiver DSR-2000
Con un timer oppure con il timer del receiver hi-fi
DSR-2000 è possibile avviare al riproduzione o la registrazione in un’ora prestabilita.
1) Inserire il cavo rete del registratore nel timer o
nella presa di alimentazione sul retro del receiver
DSR-2000.
2) Se si usa un timer esterno, anche gli altri apparecchi (p. es. amplificatore, receiver) devono essere collegati con lo stesso timer. Per poter regolare l’impianto hi-fi, mettere il timer su ON
(indipendentemente dall’ora programmata).
3) Accendere tutti gli apparecchi con i loro interruttori di rete.
4) Se nell’impianto hi-fi è collegato anche il lettore
CD-2000, non ci deve essere nessun CD nel lettore. Altrimenti, al momento dell’avvio si registrerebbe il CD.
5) Inserire la/le cassetta/e. Con due cassette, si
parte sempre dalla sezione 2. La parte vuota della
cassetta deve trovarsi sulla destra, perché si
parte sempre verso destra.
6) Portare i selettori DIRECTION (9) e DOLBY NR
(10) nella posizione desiderata (vedere capitolo
4.3 ”Riprodurre una cassetta” e 5.2 ”Registrazione semplice”).
7) Nel caso di riproduzione automatica, mettere il
selettore TIMER (8) in posizione PLAYe regolare
il volume sull’amplificatore.
8) Nel caso di una registrazione automatica, impostare la stazione sul tuner/receiver, da cui registrare. Sul registratore premere il tasto RECORD
(25). Regolare il livello con REC LEVEL (11) e il
bilanciamento con BALANCE(12). Posizionare il
selettore TIMER (8) su REC. Il volume dell’amplificatore può essere messo sul minimo.
9) Impostare l’ora sul receiver DSR-2000 o sul timer.
Spegnere il receiver oppure mettere il timer in
funzione automatica. Al raggiungimento dell’ora
programmata, l’impianto hi-fi si accende e la registrazione o la riproduzione parte.
7 Manutenzione
7.1 Sistemazione corretta delle cassette
Occorre proteggere le cassette dal calore, dall’umidità e dalla luce diretta del sole. Inoltre non devono
trovarsi vicino a campi magnetici per non compromettere la qualità del suono e per non rischiare la
cancellazione. Alungo andare, anche campi magnetici deboli possono influenzare negativamente le
cassette registrate. Pertanto, non tenere le cassette
20
I
F
B
CH
Page 21

9) Sélectionnez sur le DSR-2000 ou le programmateur l’heure de démarrage, éteignez le DSR2000, mettez le programmateur en fonctionnement automatique. A l’heure dite, la chaîne HiFi
s’allume, l’enregistrement/lecture commence.
7 Entretien
7.1 Stockage correct des cassettes
Les cassettes doivent être protégées de la chaleur,
de l’humidité et du rayonnement direct du soleil.En
aucun cas, ne les approchez d’un champ magnétique, la qualité de la bande peut en souffrir ou
les données enregistrées peuvent être effacées. Evitez toujours de les conserver à proximité d’appareils
électriques, haut-parleurs, appareils magnétiques;
même des champs magnétiques faibles peuvent, à
la longue, avoir des effets néfastes sur les enregistrements.
7.2 Nettoyage de la tête de lecture et des
guides
Chaque bande a une certaine usure, qui se répercute sur la tête de lecture et le guide. La qualité sonore de la lecture et encore plus de l’enregistrement,
peut en être affectée; même un nettoyage ne permet
pas d’améliorer un mauvais enregistrement. Divers
ensembles et cassettes de nettoyage sont disponibles dans le commerce, par exemple, MONACOR
KC-01 et AHC-09. Il est indispensable de nettoyer
régulièrement la tête de lecture et le guide de la
bande. Les cassettes de nettoyage se placent dans
le lecteur comme toute autre cassette, mettez ensuite votre TDD-200 sur mode lecture, le nettoyage
s’effectue automatiquement. Les sets de nettoyage
nécessitent une opération manuelle; nous vous recommandons, lors de leur utilisation, la plus grande
prudence pour ne pas endommager les éléments de
l’appareil.
7.3 Démagnétisation de la tête de lecture
Au fil des utilisations, la tête de lecture se magnétise.
La qualité sonore en pâtit; c’est pourquoi il est nécessaire de démagnétiser la tête de lecture lorsque
vous procédez à son nettoyage. Le plus simple est
d’utiliser une cassette de démagnétisation,
MONACOR DEM-115.
8 Problèmes et leurs solutions
8.1 Aucun son lors de la lecture
1) Les cordons RCA ne sont pas correctement branchés
➪ Enfoncez les prises à fond et vérifiez l’ensem-
ble des branchements (voir chapitre 3).
2) La tête de lecture est sale
➪Nettoyez-la (voir chapitre 7.2)
3) La bande de la cassette est abîmée
➪Utilisez une autre cassette
4) La cassette est vierge
➪Insérez une cassette déjà enregistrée
8.2 La bande ne tourne pas lorsqu’on enfonce
une touche ou rembobine
1) Le compartiment cassettes n’est pas correctement fermé
➪Fermez-le
2) La touche a été enfoncée juste après la fermeture
du compartiment cassettes
➪ Attendez quelques secondes avant d’activer
les touches.
3) La touche a été activée juste après la mise en
marche de l’appareil
➪Attendez quelques secondes après l’allumage
pour activer les touches
4) Il n’y a pas de cassette dans le compartiment
➪Insérez une cassette
5) La bande est endommagée, voire déchirée
➪Utilisez une autre cassette
6) La bande est terminée
➪Utilisez les touches de modification du sens de
lecture ou retournez la cassette.
8.3 Les fonctions ”sélection de titres, répétition, saut de longues pauses” ne marchent
pas
1) La pause entre chaque morceau est inférieure à 4
secondes (voir chapitre 4.5)
➪ Insérez, lors de vos enregistrements, une
pause de 4 secondes entre les morceaux (voir
chapitre 5.4).
8.4 L’enregistrement automatique du CD
(CARS) ne fonctionne pas
1) Il n’y a pas de cassette dans le lecteur 2
➪Insérez une cassette dans le lecteur 2
2) Il n’y a pas de CD dans le lecteur CD-2000
➪Insérez un CD
3) Le CD est sale
➪Nettoyez-le
4) Les cordons de commande ne sont pas totalement
enfoncés dans les prises SYSTEM CONTROL
➪Enfoncez-les correctement
8.5 La copie de cassettes ne s’arrête pas en
même temps sur les deux lecteurs
1) La longueur des deux bandes n’est pas tout à fait
la même
➪ Aucune solution particulière, tout est fonction
de la tolérance de chaque cassette.
8.6 Impossibilité d’ouvrir le compartiment cassettes avec la touche EJECT
1) Le lecteur est sur lecture, enregistrement ou bobi-
nage
➪Arrêtez le lecteur en appuyant sur la touche (9)
8.7 Lecture sans aigus
1) La tête de lecture est sale
➪Nettoyez-la (voir chapitre 7.2).
vicino ad apparecchi elettrici, altoparlanti ed oggetti
magnetici.
7.2 Pulizia delle testine e delle guide nastro
Ogni nastro di una cassetta perde delle particelle
che si depositano sulla testina e sulle guide nastro
con conseguente riduzione della qualità nella ripresa
e soprattutto nella registrazione. Infatti, una registrazione scadente non migliora neanche dopo la pulizia.
Nel commercio si trovano numerosi kit e cassette
di pulizia, come p. es. MONACOR KC-01 o AHC-09.
Le testine e le guide nastro dovrebbero essere pulite
regolarmente con questi prodotti. Le cassette di pulizia di inseriscono come le cassette normali. Si mette
il registratore in funzione di riproduzione e la pulizia
viene effettuata automaticamente. Nel caso dei kit di
pulizia, la pulizia avviene manualmente. Occorre
procedere con molta cautela per non danneggiare le
testine o le guide nastro.
7.3 Smagnetizzare le testine
A lungo andare, ogni testina si magnetizza compromettendo la qualità del suono. Insieme ad ogni pulizia si dovrebbe quindi effettuare anche una smagnetizzazione. Il modo più semplice è quello con una
cassetta di smagnetizzazione (p.es. MONACOR
DEM-115).
8 Eliminazione di disturbi
8.1 Non si sente niente durante la riproduzione
1) Il cavo cinch non è inserito bene o è inserito male.
➪ Inserire bene la spina o inserirla corretta-
mente, vedere capitolo 3 ”Collegare l’appa-
recchio”.
2) Testina sporca
➪ Pulire la testina, vedere capitolo 7.2 ”Pulizia
delle testine e dalle guide nastro”
3) Nastro danneggiato
➪Usare un’altra cassetta.
4) Cassetta vergine
➪Inserire una cassette registrata.
8.2 Il nastro non si muove quando si preme uno
dei tasti per la riproduzione o per l’avvolgimento
1) Vano cassetta non chiuso bene.
➪Chiudere bene il vano cassetta.
2) Il tasto è stato premuto subito dopo aver chiuso il
vano cassetta.
➪ Aspettare alcuni secondi dopo la chiusura,
prima di azionare i tasti.
3) Il tasto è stato azionato subito dopo l’accensione
con POWER.
➪ Aspettare alcuni secondi dopo l’accensione,
prima di azionare i tasti.
4) Non è inserita nessuna cassetta.
➪Inserire una cassetta.
5) Il nastro è danneggiato, eventualmente è strap-
pato.
➪Usare un’altra cassetta
6) Il nastro è giunto alla fine.
➪Azionare il tasto per cambio direzione o girare
la cassetta.
8.3 Le funzioni selezione e ripetizione dei titoli,
riproduzione degli inizi dei titoli e salto delle
pause lunghe non funzionano correttamente
1) Fra i singoli titoli non c’è nessuna pausa superiore
ai 4 secondi, vedere Nota tecnica alla fine del capitolo 4.5 ”Selezionare un titolo”.
➪Nelle proprie registrazioni inserire dopo ogni ti-
tolo una pausa non inferiore a 4 secondi, vedere
capitolo 5.4 ”Inserire una pausa di 4 secondi dopo
un titolo”.
8.4 La registrazione automatica da CD (CARS)
non funziona
1) Non c’è nessuna cassetta nella sezione 2.
➪Inserire una cassetta nella sezione 2.
2) Non c’è nessun CD nel lettore CD.
➪Inserire CD.
3) Il CD è sporco.
➪Pulire il CD
4) I cavi di pilotaggio con il jack 3,5 mm non sono inseriti bene nelle prese SYSTEM CONTROL.
➪Inserire bene le spine.
8.5 Alla fine del dubbing, le due cassette non si
fermano contemporaneamente
1) La durata delle due cassette non è perfettamente
uguale.
➪ Non è richiesto nessun intervento, trattandosi
di tolleranze normali.
8.6 Il vano cassetta non si apre con il tasto
EJECT
1) Il nastro si trova in funzione di riproduzione, registrazione o avvolgimento.
➪Fermare il nastro con il tasto .
8.7 Riproduzione cupa, senza alti
1) Testina sporca.
➪ Pulire la testina, vedere capitolo 7.2 ”Pulizia
delle testine e delle guide nastro”
8.8 Riproduzione distorta
1) Registrazione con livello (volume) troppo alto.
➪ Durante la registrazione aprire REC LEVEL
(11) solo al punto che con i passaggi più forti, l’indicazione arrivi al segmento 0dB.
8.9 Non è possibile nessuna registrazione pre-
mendo il tasto RECORD
1) Blocco della registrazione con linguetta di protezione spezzata (fig. 4).
➪ Usare un’altra cassetta o applicare un nastro
adesivo robusto (fig. 5).
2) Vano cassetta non chiuso bene.
➪Chiuderlo bene
3) REC LEVEL (11) sul minimo.
➪Regolare bene il livello.
4) Sul receiver DSR-2000 è selezionato TAPE 1 o 2
➪Sul registratore premere il tasto (29) e sele-
zionare la sorgente desiderata sul receiver.
21
I
F
B
CH
Page 22

8.8 la lecture est déformée
1) L’enregistrement a été effectué avec un niveau
sonore (volume) trop élevé
➪ Lors de l’enregistrement, positionnez le
réglage REC LEVEL (11) de telle sorte que, pour
les passages les plus forts, le segment 0 dB sur
l’affichage s’allume.
8.9 Impossibilité d’enregistrer même si la
touche RECORD est enfoncée.
1) Les languettes de protection de la cassette ont
été cassées, empêchant tout enregistrement
(schéma 4).
➪ Utilisez d’autres cassettes ou remplacez la
languette en fixant un morceau de papier adhésif
à sa place (schéma 5).
2) Le compartiment cassettes n’est pas correctement fermé
➪fermez-le
3) Le réglage REC LEVEL (11) est sur le minimum
➪ réglez correctement le niveau d’enregistre-
ment
4) Sur le récepteur DSR-2000, TAPE 1 ou 2 est
sélectionné
➪ Appuyez sur la touche (29) du TDD-2000 et
sélectionnez sur le récepteur DSR-2000 la source
voulue.
5) La bande est terminée
➪ Utilisez les touches de direction de lecture ou
retournez la cassette.
8.10 Interférences fortes
1) La chaîne HiFi est gênée par des appareils électriques
➪ Débranchez les appareils en cause ou éloi-
gnez-les suffisamment de la chaîne HiFi.
2) Le volume d’enregistrement est trop faible
➪ Lors de l’enregistrement, positionnez le
réglage REC LEVEL (11) de telle sorte que, pour
les passages les plus forts, le segment 0 dB sur
l’affichage s’allume.
3) Une cassette enregistrée avec système Dolby est
lue sans Dolby
➪ Mettez le commutateur DOLBY NR (10) sur B
ou C.
4) La tête de lecture est magnétisée
➪Démagnétisez-la (voir chapitre 7.3).
8.11 La tête de lecture vibre
1) L’axe d’entraînement et/ou les rouleaux sont
sales
➪ Procédez au nettoyage du système (chapitre
7.2)
2) La bande n’est pas correctement enroulée
➪ Tendez la bande en tournant une des dents
crantées puis bobinez et rembobinez entièrement
la cassette.
3) La bande est endommagée
➪Utilisez une autre cassette
8.12 L’enregistrement ou la lecture commence
dès la mise en marche
1) Le sélecteur TIMER (8) est sur REC ou PLAY.
➪Mettez-le sur position OFF
8.13 Aucune utilisation possible, disfonctionne-
ments
1) Des problèmes ont endommagé le microprocesseur
➪ Débranchez l’appareil, retirez la prise du sec-
teur. Patientez un moment puis rebranchez et rallumez l’appareil.
9 Caractéristiques techniques
Voies: . . . . . . . . . . . . . . . . 4 voies/stéréo
2 canaux
Système d’enregistrement: HF- (105 kHz)
Moteurs: . . . . . . . . . . . . . . 2 moteurs courant con-
tinu, régulés électroni-
quement
Durée de rembobinage
(C-60): . . . . . . . . . . . . . . . . 110 secondes environ
Bande passante
bande normale: . . . . . . . 20
-
15000Hz, ±3dB
bande CrO
2
: . . . . . . . . . . 20-16000Hz, ±3dB
bande fer: . . . . . . . . . . . 20
-
16000Hz, ±3dB
Taux de distorsion: . . . . . . < 0,6%
Rapport signal sur bruit (bande fer)
avec Dolby C: . . . . . . . . 71 dB
avec Dolby B: . . . . . . . . 61 dB
sans Dolby C: . . . . . . . . 53 dB
Pleurage et scintillement: . 0,08 % (WRMS),
±0,22% (DIN)
Entrée micro MIC: . . . . . . . 2,5 mV/18 kΩ
Entrée Line REC: . . . . . . . 77,5mV/50kΩ
Sortie Line PLAY: . . . . . . . 500mV/2kΩ
Alimentation: . . . . . . . . . . . 230 V~/50Hz/15 VA
Dimensions (LxHxP): . . . 440 x 146 x 270 mm
Poids: . . . . . . . . . . . . . . . . 4,6kg
D'après les données du constructeur.
Tout droit de modification réservé.
5) Il nastro è giunto alla fine.
➪Azionare il tasto per cambio direzione o girare
la cassetta.
8.10 Forti rumori
1) Impianto hi-fi disturbato da apparecchi elettrici.
➪ Spegnere gli apparecchi che disturbano o col-
locarli a maggiore distanza.
2) Livello di registrazione troppo basso.
➪ Durante la registrazione aprire REC LEVEL
(11) al punto che con i passaggi più forti, l’indicazione arrivi al segmento 0dB.
3) Una cassetta registrata con Dolby viene riprodotta senza Dolby.
➪ Interruttore DOLBY NR (10) su posizione
B o C.
4) La testina a magnetizzata
➪ Smagnetizzare la testina, vedere capitolo 7.3
”Smagnetizzare la testina”.
8.11 Suono con vibrazioni
1) Albero e/o capstan sono sporchi.
➪ Eseguire pulizia, vedere capitolo 7.2 ”Pulizia
delle testine e delle guide nastro”.
2) Il nastro non è avvolto bene.
➪ Tendere il nastro facendo girare una delle bo-
bine della cassetta e riavvolgere la cassetta in
avanti e indietro.
3) Il nastro è danneggiato.
➪Usare un’altra cassetta.
8.12 Riproduzione o registrazione partono sub-
ito dopo l’accensione
1) L’interruttore TIMER (8) è in posizione REC o
PLAY.
➪Posizionarlo su OFF.
8.13 Non è possibile far funzionare l’appa-
recchio, altri disturbi.
1) Il microprocessore è stato influenzato da disturbi.
➪Spegnere il registratore e staccare il cavo dalla
rete. Aspettare un attimo e rimettere la spina rete.
Riaccendere l’apparecchio.
9 Dati tecnici
Sistema di piste: . . . . . . . . 4 piste/2 canali stereo
Sistema di registrazione: . . Premagnetizzazione
HF (105kHz)
Motori: . . . . . . . . . . . . . . . . 2 motori CC, regola-
zione elettronica
Tempo di riavvolgimento: . ca. 110sec.
Risposta di frequenza
Normale: . . . . . . . . . . . . 20
-
15000Hz, ±3dB
CrO
2
: . . . . . . . . . . . . . . . 20-16000Hz, ±3dB
Metal: . . . . . . . . . . . . . . . 20
-
16000Hz, ±3dB
Fattore di distorsione: . . . . < 0,6 %
Rapporto S/R
con Dolby C: . . . . . . . . . 71dB
con Dolby B: . . . . . . . . . 61 dB
senza Dolby: . . . . . . . . . 53 dB
Wow and flutter: . . . . . . . . 0,08% (WRMS)
±0,22 % (DIN)
Ingresso micro MIC: . . . . . 2,5 mV/18 kΩ
Ingresso Line REC: . . . . . . 77,5 mV/50kΩ
Uscita Line PLAY: . . . . . . . 500 mV/2kΩ
Alimentazione: . . . . . . . . . 230V~/50Hz/15VA
Dimensioni (lxhxp) . . . . . 440 x 146 x 270 mm
Peso: . . . . . . . . . . . . . . . . . 4,6 kg
Dati forniti dal costruttore.
Con riserva di modifiche.
22
I
F
B
CH
Page 23

Vouw bladzijde 3 helemaal open, zodat u steeds
een overzicht hebt van de bedieningselementen
en de aansluitingen.
Inhoud Pagina
1 Veiligheidsvoorschriften . . . . . . . . . . . . . 23
2 Bedieningselementen en aansluitingen 23
3 Aansluiting van het toestel . . . . . . . . . . . 25
4 Werking . . . . . . . . . . . . . . . . . . . . . . . . . . . 25
4.1 Welke cassettes zijn geschikt? . . . . . . . . . 25
4.2 In- en uitschakelen . . . . . . . . . . . . . . . . . . . 25
4.3 Afspelen van een cassette . . . . . . . . . . . . . 25
4.4 Terug- of doorspoelen van de
cassette/met automatische start . . . . . . . . 26
4.5 Selecteren van een track . . . . . . . . . . . . . . 26
4.6 Herhaald afspelen van een track . . . . . . . . 26
4.7 Korte voorafluistering van alle tracks . . . . . 26
4.8 Automatisch skippen van lange pauzes . . . 27
5 Opname . . . . . . . . . . . . . . . . . . . . . . . . . . .27
5.1 Beveiligen van de cassette tegen
ongewenste opname . . . . . . . . . . . . . . . . . 27
5.2 Eenvoudige cassette-opname . . . . . . . . . . 27
5.3 De opname opnieuw starten na een fout . . 27
5.4 Inlassen van een pauze van
4 seconden na iedere track . . . . . . . . . . . . 27
5.5 Parallelle opname . . . . . . . . . . . . . . . . . . . 28
5.6 Cassette kopiëren (dubbing) . . . . . . . . . . . 28
5.7 De CD-speler start de cassette-opname . . 29
5.8 Automatische CD-opname op cassette . . . 29
6 Werking met een schakelklok of met
de timer van de receiver DSR-2000 . . . . 29
7 Onderhoud . . . . . . . . . . . . . . . . . . . . . . . . 30
7.1 Correct opbergen van de cassettes . . . . . . 30
7.2 Reinigen van de afleeskop en de
bandgeleider . . . . . . . . . . . . . . . . . . . . . . . 30
7.3 Demagnetiseren van de afleeskop . . . . . . 30
8 Foutopsporing . . . . . . . . . . . . . . . . . . . . . 30
9 Technische gegevens . . . . . . . . . . . . . . . 31
Het Dolby-ruisonderdrukkingssysteem is ontwikkeld
onder licentie van Dolby Laboratories Licensing Corporation. "DOLBY" en het dubbele symbool zijn
handelsmerken van Dolby Laboratories Licensing
Corporation.
1 Veiligheidsvoorschriften
Dit toestel is in overeenstemming met de EU-richtlijn
nr. 89/336/EWG voor elektromagnetische compatibiliteit.
De netspanning waarmee dit toestel gevoed
wordt, is levensgevaarlijk! Open het toestel niet,
want door onzorgvuldige ingrepen loopt u het risico van een elektrische schok. Onderhoud dient
te gebeuren door een gekwalificeerd vakman. Bovendien vervalt elke garantie bij het eigenhandig
openen van het toestel.
Let bij ingebruikname eveneens op het volgende:
•
Het toestel is enkel geschikt voor gebruik binnenshuis.
•
Wanneer het toestel van een koude naar een
warme plaats wordt verplaatst, ontstaat vochtigheid door condensatie. Dit is slecht voor de werking. Schakel daarom het toestel pas in wanneer
het dezelfde temperatuur heeft als de omgeving.
•
Gebruik het toestel enkel bij temperaturen boven
5°C.
•
Bescherm het toestel tegen trillingen, rechtstreeks
zonlicht, hoge vochtigheid en stof.
•
Plaats het toestel niet naast bronnen die een magnetisch veld uitstralen zoals magneten, motoren,
luidsprekers, TV-toestellen enz.
•
Schakel het toestel niet in en trek onmiddellijk de
stekker uit het stopcontact wanneer:
1. het netsnoer zichtbaar beschadigd is.
2. er een defect zou kunnen optreden nadat het
toestel bijvoorbeeld gevallen is.
3. het toestel slecht functioneert.
Het apparaat moet in elk geval hersteld worden
door een gekwalificeerd vakman.
Si desea ver los elementos operativos y las conexiones descritas referirse a la página 3.
Contenidos Pagina
1 Consejos de uso . . . . . . . . . . . . . . . . . . . 23
2 Elementos y conexiones . . . . . . . . . . . . . 23
3 Conexión de los equipos . . . . . . . . . . . . 24
4 Lectura . . . . . . . . . . . . . . . . . . . . . . . . . . . 25
4.1 Qué tipo de cassettes usar? . . . . . . . . . . . 25
4.2 Marcha/Paro . . . . . . . . . . . . . . . . . . . . . . . 25
4.3 Lectura de cassettes . . . . . . . . . . . . . . . . . 25
4.4 Avance y retroceso rápido/con arranque
automático de lectura . . . . . . . . . . . . . . . . . 25
4.5 Selección de títulos . . . . . . . . . . . . . . . . . . 25
4.6 Repetición de un título . . . . . . . . . . . . . . . . 26
4.7 Monitorización corta de todos los títulos . . 26
4.8 Anulación automática de las pausas
demasiado largas entre títulos
5 Grabación . . . . . . . . . . . . . . . . . . . . . . . . . 26
5.1 Protección de los cassettes . . . . . . . . . . . . 26
5.2 Grabación . . . . . . . . . . . . . . . . . . . . . . . . . 26
5.3 Volver a grabar en caso de error . . . . . . . . 27
5.4 Inserción de una pausa de 4 segundos
después de un título . . . . . . . . . . . . . . . . . . 27
5.5 Grabación paralela . . . . . . . . . . . . . . . . . . . 27
5.6 Copia de cassettes . . . . . . . . . . . . . . . . . . 27
5.7 Arranque de la grabación desde el
lector CD . . . . . . . . . . . . . . . . . . . . . . . . . . 28
5.8 Grabación automática de un CD en un
cassette (CARS) . . . . . . . . . . . . . . . . . . . . 28
6 Funcionamiento con un reloj horario
o desde el programador del receptor
HiFi DSR-2000 . . . . . . . . . . . . . . . . . . . . . 29
7 Mantenimiento . . . . . . . . . . . . . . . . . . . . . 29
7.1 Guardar correctamente los cassettes . . . . 29
7.2 Limpieza de los cabezales de lectura
y las guías . . . . . . . . . . . . . . . . . . . . . . . . . 29
7.3 Desmagnetización de los cabezales. . . . . . 29
8 Problemas y soluciones . . . . . . . . . . . . . 29
9 Características técnicas . . . . . . . . . . . . . 31
El sistema Dolby de supresión de ruidos ha sido realizado con la licencia de "Dolby Laboratories Licensing Corporation". ”DOLBY” y el símbolo de doble D
son símbolos registrados por "Dolby Laborato-
ries Licensing Corporation".
1 Consejos de uso
Este equipo está diseñado según la norma europea
89/336/EWG relativa a la Compatibilidad Electromagnética (CE).
El TDD-2000 funciona con una tensión de 230 V~.
No manipular jamás su interior, pues en caso de
una manipulación incorrecta, podría sufrir una
descarga eléctrica mortal. Además, la apertura del
equipo implica la anulación de cualquier garantía.
Para su puesta en funcionamiento tener en cuenta
los siguientes puntos:
•
El equipo está diseñado para su funcionamiento
en interiores.
•
Si el equipo se mueve de un lugar frío a otro de caluroso, se formará condensación, modificando el
funcionamiento del equipo. Le recomendamos ponerlo en marcha estando a temperatura ambiente.
•
No usar el lector por debajo de temperaturas inferiores a 5°C.
•
Proteger el equipo de las vibraciones, de la humedad, del polvo y de la luz directa del sol.
•
No conectar el equipo a la red de corriente o sacar
inmediatamente el enchufe de la toma, si:
1. Se observa un deterioro en el cable de alimentación o el equipo.
2. Puede haber sospecharse un problema de funcionamiento, después de haber recibido un golpe
o un accidente similar.
3. No funciona correctamente.
En cualquier caso, las averías deben repararse
por un técnico especialista.
•
El cable de alimentación solo puede repararse por
personal autorizado.
•
No quitar nunca el cable de alimentación de la
toma, estirándolo.
•
Si el equipo se usa para otras finalidades que las
originalmente diseñadas, si se conecta erróneamente o en caso de reparación no lo hace personal autorizado, se perderá el derecho de cualquier
garantía.
•
Para la limpieza usar solo un paño seco, en
ningún caso productos químicos o agua.
2 Elementos y conexiones
2.1 Cara delantera y mando a distancia
1 Colocación de cassettes del lector 1
2 Puesta a cero del contador del lector 1 (0000)
3 Pantalla con indicación de niveles
4 Puesta a cero del contador del lector 2 (0000)
5 Colocación de cassettes del lector 2
6 Interruptor general Marcha/Paro
7 Tecla de obertura de la colocación cassettes 1
8 Conmutador/programador, únicamente si está
conectado al receptor MONACOR DSR-2000:
OFF = programador desconectado
REC = el programador se conecta con grabación
PLAY= el programador se conecta en lectura
ATENCIÓN: si el conmutador está en REC o
PLAY, el equipo se conecta en lectura/grabación
si está conectado el interruptor general (6).
9 Conmutador de selección: para leer o gravar au-
tomáticamente las dos caras de un cassette o los
dos lectores:
el equipo se para después de la lectura/grabación de una cara.
en modo de lectura las dos caras del
cassette se leen automáticamente una
después de otra, hasta 5 veces seguidas. En modo grabación se gravan las
dos caras del cassette.
23
E
NL
B
•
Een defect netsnoer mag enkel door de fabrikant
of door een gekwalificeerd persoon hersteld worden.
•
Trek de stekker nooit met het snoer uit het stopcontact.
•
In geval van ongeoorloofd of verkeerd gebruik of
van herstelling door een niet-gekwalificeerd persoon vervalt de garantie bij eventuele schade.
•
Verwijder het stof met een droge doek. Gebruik
zeker geen chemicaliën of water.
2 Bedieningselementen en aansluitin-
gen
2.1 Frontpaneel en afstandsbediening
1 Cassettecompartiment van deck 1
2 Reset-toets van de teller van deck 1 (”0000”)
3 Display met aanduiding van het geluidsniveau
4 Reset-toets van de teller van deck 2 (”0000”)
5 Cassettecompartiment van deck 2
6 POWER-schakelaar
7 Toets om cassettecompartiment 1 te openen
8 Schuifschakelaar voor de timer, enkel in verbin-
ding met de receiver DSR-2000 van MONACOR:
OFF = de timer is uitgeschakeld
REC = de timer is geschakeld voor opname
PLAY= de timer is geschakeld voor weergave
OPGELET: Staat de schakelaar in de REC- of
PLAY-stand, dan start de opname resp. het afspelen van zodra de recorder in werking wordt
gesteld met de POWER-schakelaar (6).
9 Keuzeschakelaar voor de automatische opname
of voor het afspelen van beide cassettezijden
resp. beide cassettedecks.
= De recorder stopt na het afspelen resp.
de opname van één cassettezijde.
Page 24

= Bij het afspelen worden beide cassette-
zijden tot 5 keer automatisch na elkaar
afgespeeld. Bij opname worden de beide cassettezijden na elkaar gebruikt.
= Bij het afspelen worden beide kanten
van de twee cassettes tot 5 keer automatisch na elkaar afgespeeld. Bij opname worden de beide cassettezijden
op de twee decks na elkaar gebruikt.
10 Keuzeschakelaar voor de Dolby-ruisonderdruk-
king:
B = Dolby B wordt gebruikt in de meeste huis-
kamersystemen. Voor cassettes die opgenomen zijn met Dolby B.
C = Dolby C verbeterd Dolby B-systeem. Dol-
by C moet geselecteerd worden voor de
opname van een cassette wanneer deze
cassette afgespeeld zal worden op een
toestel met Dolby C. Dolby C moet natuurlijk geselecteerd worden voor al de
cassettes die reeds met Dolby C zijn opgenomen.
OFF = Dolby uitgeschakeld. Voor cassettes op-
genomen zonder Dolby.
11 Regelaar voor het opnameniveau
12 Balansregeling voor de opname
13 6,3-mm-jack voor stereo-hooftelefoons (impe-
dantie > 8Ω) met een volumeregelaar.
14 6,3-mm-jack voor een mono-microfoon. Bij de
aansluiting van een microfoon is de opname-ingang REC (32) uitgeschakeld.
15 Toets om cassettecompartiment 2 te openen
16 INTRO CHECK-toets om al de tracks op één cas-
settezijde telkens voor 10 seconden te laten afspelen. Om deze functie te activeren moet eerst
het afspelen ingeschakeld worden met de toets
of en nadien moet de INTRO CHECK-
toets ingedrukt worden.
17 BLANK SCAN-toets voor overslaan van de pau-
zes langer dan 10 seconden, tussen de individu-
ele tracks. Deze functie kan enkel geactiveerd
worden tijdens het afspelen.
18 AUTO-toets, kan ingedrukt worden voor het ko-
piëren van cassettes om de originele of de opnamecassette terug te spoelen naar het begin. De
functie wordt pas geactiveerd indien na de
AUTO-toets ook één van de kopieertoetsen ingedrukt wordt: de NOR-toets (19) of de HIGH-toets
(20).
19 DUBBING (NOR)-toets voor kopiëren van cas-
settes aan normale snelheid. Hiervoor moet de
opnamecassette in deck 2 geplaatst worden met
de lege spoel aan de rechterkant.
20 DUBBING (HIGH)-toets voor kopiëren van cas-
settes aan dubbele snelheid. Hiervoor moet de
opnamecassette in deck 2 geplaatst worden met
de lege spoel aan de rechterkant.
21 CARS-toets voor CD-opname met de automati-
sche niveau-instelling (CARS = Computer Aided
CD Recording System). Deze functie is enkel
mogelijk in verbinding met de CD-speler CD2000 en de Hifi-receiver DSR-2000 van MONACOR. Deze toestellen zijn op elkaar afgestemd.
22 SYNC REV-toets voor kopiëren van cassettes
van verschillende lengte. Daarbij worden bij het
begin van de beide zijden van de opnamecassette exact dezelfde tracks opgenomen, zoals ze
op de originele cassette staan. Deze functie kan
enkel geactiveerd worden wanneer de DIRECTION-schakelaar (9) in de stand of
staat.
23 REC MUTE-toets voor de opname van een
pauze van 4 seconden (zonder geluid) tussen
twee titels. De functie kan enkel geactiveerd worden tijdens de opname of in de stand-by opnamestand. Na de pauze van 4 seconden wordt het
toestel terug in stand-by geschakeld.
24 PAUSE-toets om het afspelen of de opname te
onderbreken. Druk opnieuw op de toets om de
pauze te beëindingen.
25 RECORD-toets om de opname klaar te zetten.
Om de opname te starten, moet nadien de
PAUSE-toets (24) ingedrukt worden.
26 PARALLEL REC-toets voor een parallelle op-
name om op de beide decks twee dezelfde opnames te verkrijgen.
27 Afspelen met afspeelrichting naar links.
Door de toets opnieuw in te drukken tijdens
het afspelen, kan de huidige track zoveel keer
herhaald worden als de toets ingedrukt wordt
(max. 8 keer).
28 Terugspoelen met de afspeelrichting naar links.
Met deze toets kunnen tijdens het afspelen andere tracks geselecteerd worden.
Afspelen met de afspeelrichting naar rechts:
Bij indrukken van de -toets wordt de cassette teruggespoeld naar het begin van de huidige track. Om de vorige track te selecteren moet
de -toets tweemaal ingedrukt worden. Door
de -toets verschillende keren in te drukken,
wordt telkens een track verder teruggespoeld.
Afspelen met de afspeelrichting naar links:
Telkens de toets ingedrukt wordt, wordt
naar een volgende track doorgespoeld.
29 Stop
30 Terugspoelen met de afspeelrichting naar rechts.
Met deze toets kunnen tijdens het afspelen andere tracks geselecteerd worden.
Afspelen met de afspeelrichting naar rechts:
Telkens de toets ingedrukt wordt, wordt
naar een volgende track doorgespoeld.
Afspelen met de afspeelrichting naar links:
Bij indrukken van de -toets wordt de cassette teruggespoeld naar het begin van de huidige track. Om de vorige track te selecteren moet
de -toets tweemaal ingedrukt worden. Door
de -toets verschillende keren in te drukken,
wordt telkens een track verder teruggespoeld.
31 Afspelen met afspeelrichting naar rechts.
Door de toets opnieuw in te drukken tijdens
het afspelen, kan de huidige track zoveel keer
en modo lectura las dos caras de los
dos cassettes se leen alternativamente
uno después de otro, hasta 5 veces.
Para grabación, las dos caras de los
dos cassettes se gravan uno después
de otro.
10 Selector para reducción de ruido Dolby:
B = Dolby B, el usado con más frecuencia.
Utilizar para los cassettes gravados con
el sistema Dolby B.
C = Dolby C, es el sistema Dolby B mejorado.
Seleccionar esta posición cuando deba
grabarse un cassette en Dolby C y también, para reproducir los cassettes grabados en Dolby C.
OFF = Sistema Dolby desconectado. Seleccio-
nar esta posición para los cassettes grabados sin Dolby.
11 Potenciómetro rotativo de control de los niveles
de grabación.
12 Potenciómetro rotativo de balance para graba-
ción.
13 Toma jack 6,35 con control de volumen, para la
conexión de unos cascos estéreo de media impedancia (> 8Ohmios).
14 Toma jack 6,35 para la conexión de un micro
mono. La entrada REC (32) se desconecta.
15 Tecla de obertura para cassette 2.
16 Tecla INTRO CHECK: lectura de los 10 primeros
segundos de los títulos de una cara. Empezar la
lectura con la tecla o después de apretar
la tecla INTRO CHECK.
17 Tecla BLANK SCAN: Permite saltarse las pausas
entre cada título superiores a 10 segundos. Solo
puede activarse en lectura.
18 Tecla AUTO: Presionando esta tecla antes de
empezar una copia, rebobina el cassette fuente y
el cassette destino al principio. No se activa
hasta que se pulsa la tecla AUTO y una de las
tecla de copia NOR (19) o HIGH (20).
19 Tecla DUBBING (NOR): copia de un cassette a
velocidad normal. Poner el cassette destino en la
platina 2, con la flecha de bobinado hacia la derecha.
20 Tecla DUBBING (HIGH): copia de un cassette a
velocidad doble. Poner el cassette destino en la
platina 2, con la fleche de bobinado hacia la derecha.
21 Tecla CARS: grabación del CD con control au-
tomático de los niveles (CARS = Computer Aided
CD Recording System = sistema de grabación de
CD asistida por ordenador). Esta función solamente puede utilizarse con el doble lector de
CD MONACOR CD-2000 y el receptor HiFi
MONACOR DSR-2000.
22 Tecla SYNC REV: para copia de cassettes de di-
ferente duración. Se gravarán los mismos títulos
al principio de las caras del cassette original y el
de destino. Esta función no podrá activarse si el
selector de DIRECTION (9) está en posición
o .
23 Tecla REC MUTE: inserción de una pausa de 4
segundos (sin ruidos) entre los títulos. Esta función solo puede activarse durante la grabación o
en su preparación. Después de una pausa de 4
segundos, el equipo vuelve a estar preparado
para gravar.
24 Tecla PAUSE para interrumpir la reproducción o
la grabbación. Presionando otra vez esta tecla, la
cinta continua.
25 Tecla RECORD: prepara el modo grabación.
Para empezar la grabación apretar la tecla
PAUSE (24).
26 Tecla PARALLEL REC: grabación idéntica y
paralela en los dos cassettes para conservar dos
originales.
27 Lectura hacia la izquierda.
Presionando otra vez esta tecla durante la
lectura, puede repetir el título, mientras esté activada esta función (max. 8 veces).
28 Rebobinado hacia la izquierda; durante la lec-
tura, con esta tecla, selecciona otros títulos.
Cuando la lectura es hacia la derecha:
Presionando la tecla , el equipo rebobina
hasta el inicio del título en curso, otra pulsación
rebobinará hasta el título precedente. Para presionar la tecla repetidas veces, siempre un
título está rebobinado.
Cuando la lectura es hacia la izquierda:
Presionando la tecla , hará avanzar hasta
el título siguiente.
29 Tecla "STOP"
30 Rebobinado hacia la derecha. Durante la lectura,
puede buscar otros títulos:
Cuando la lectura es hacia la derecha:
Presionando la tecla , hará avanzar hasta
el título siguiente.
Cuando la lectura es hacia la izquierda:
Presionando la tecla , el equipo rebobina
hasta el inicio del título en curso, otra pulsación
rebobinará hasta el título precedente. Para presionar la tecla repetidas veces, siempre un
título está rebobinado.
31 Lectura hacia la derecha.
Presionando otra vez esta tecla durante la
lectura, puede repetir el título, mientras esté activada esta función (max. 8 veces).
2.2 Parte trasera
32 Conectores RCA para las entradas audio Graba-
ción Derecha/Izquierda.
33 Conectores RCA para las salidas audio Lectura
Derecha/Izquierda.
34 Conectores jack 3,5 mm para la conexión de los
equipos satélites.
35 Conexión a la red 230 V~/50Hz
3 Conexión de los equipos
1) Conectar con un cable RCA las conexiones de
salida audio PLAY (33) en las entradas correspondientes (TAPE PLAY) del receptor o del am-
24
E
NL
B
Page 25

herhaald worden als deze toets ingedrukt wordt
(max. 8 keer).
2.2 Achterzijde van het toestel
32 Cinch-jacks voor de opname-ingangen (L/R)
33 Cinch-jacks voor de weergave-uitgangen (L/R)
34 3,5-mm-jacks voor het controlesysteem van de
afgestemde toestellen
35 Netsnoer (230 V~/50Hz)
3 Aansluiting van het toestel
1) Verbind de jacks PLAY (33) via een cinch-kabel
met de overeenkomstige ingangen (TAPE PLAY)
van de receiver of de versterker. Let op de kleurcode van de jacks en de pluggen (rood = rechter
kanaal, wit = linker kanaal).
2) Verbind de jacks REC (32) via een cinch-kabel
met de overeenkomstige uitgangen (TAPE REC)
van de receiver of de versterker.
3) De systeemcontrole maakt bij aansluiting van recordercompatibele toestellen (Hifi-receiver DSR2000 en CD-speler CD-2000 van MONACOR)
een uitgebreide functiecontrole mogelijk. Zo
schakelt bijvoorbeeld de receiver automatisch
naar het overeenkomstige toestel wanneer de
CD-speler of het cassettedeck ingeschakeld
wordt. Een automatische instelling van het niveau
bij opnames van CD naar cassette is eveneens
mogelijk: de CD wordt kort afgespeeld, de recorder stelt het opnameniveau in voordat de opname
start, nadien start de CD opnieuw van bij het
begin en start de opname – een volledig automatische functie!
Om gebruik te kunnen maken van de systeemcontrole, dient men de bijgeleverde controlekabel
met de 3,5 mm-pluggen in één van de SYSTEM
CONTROL-jacks van de recorder EN van de receiver te stoppen.
4) Pas nadat alle toestellen onderling met elkaar
verbonden zijn, kunt u de stekker in het stopcontact pluggen (230V~/50 Hz).
5) Indien gewenst kunt u een stereo-hoofdtelefoon
(impedantie > 8Ω) verbinden met de 6,3-mm-jack
PHONES (13). Wanneer de hoofdtelefoon geen
volumeregeling heeft, moet een gescheiden volumeregeling tussengevoegd worden (bv. de HEC60 van MONACOR).
OPGELET! Stel het volume van de hoofdtelefoon
nooit te hoog in. Langdurige blootstelling aan
hoge volumes kan het gehoor beschadigen. Het
gehoor raakt aangepast aan hoge volumes die na
een tijdje niet meer zo hoog lijken. Verhoog daarom het volume niet nog meer nadat u er gewend
aan bent geraakt.
4 Afspelen
4.1 Welke cassettes zijn geschikt?
In het algemeen kunnen cassettes met een speelduur tot 90 minuten (C-90) gebruikt worden. Casset-
tes van 120 minuten (C-120) mogen niet gebruikt
worden omdat de band zeer dun is. Hij kan gemak-
kelijk scheuren of 'bandsla' veroorzaken.
Gebruik verder geen continue cassettes. Zij
kunnen het mechanisme van de recorder beschadigen.
Cassettes met een normale, chromiumdioxide of
metall-band zijn geschikt. De beste kwaliteit wordt
verkregen met metall-tape. Door aanduidingen op de
cassette herkent het cassettedeck automatisch het
bandtype en schakelt over naar het desbetreffende
type.
4.2 In- en uitschakelen
1) Plaats steeds de schuifschakelaar TIMER (8) in
de OFF-stand alvorens in te schakelen. Zoniet
begint het toestel onmiddellijk te spelen of op te
nemen na het inschakelen ervan. Op die manier
kan een opname verwijderd worden!
Schakel het toestel met de POWER-schakelaar in
(6).
2) Na gebruik dient u de cassettecompartimenten
steeds te sluiten om ze te beschermen tegen vuil.
Schakel het toestel na gebruik uit met de
POWER-schakelaar (6).
3) Na het uitschakelen dient u steeds een aantal seconden te wachten voordat u het toestel opnieuw
inschakelt.
4.3 Afspelen van een cassette
1) Breng een cassette in: Eventueel kunt u de cassetteband aanspannen door de spoel te verdraaien. Open het cassettecompartiment met de
EJECT-toets (7 resp. 15). Plaats de cassette erin
met de openingen voor de cassetteband naar beneden gericht. Sluit voorzichtig het compartiment
door op de bovenkant de duwen. Indien noodzakelijk plaats de teller met de RESET-toets (2
resp. 4) in de nulstand.
2) Selecteer met de schuifschakelaar DOLBY NR
(10) het ruisonderdrukkingssysteem waarmee de
cassette werd opgenomen:
OFF = opgenomen zonder Dolby NR
B = opgenomen met Dolby B
C = opgenomen met Dolby C
3) Plaats de schuifschakelaar DIRECTION (9) in de
gewenste stand:
= De recorder stopt na afspelen van één
cassettezijde.
= Beide kanten worden tot 5 keer automa-
tisch na elkaar afgespeeld.
= Eerst worden de beide kanten van één
deck afgespeeld, nadien automatisch
beide kanten van het andere deck. Dit
wordt 4 keer herhaald (in ieder deck
moet uiteraard een cassette steken).
4) Start het afspelen met de toets wanneer de
lege spoel van de cassette aan de rechterkant is
of met de toets wanneer de lege spoel zich
aan de linkerkant bevindt. Is een cassette niet volledig teruggespoeld, dan kan de cassette zowel
naar links als naar rechts afgespeeld worden. Het
display toont steeds de overeenkomstige richting.
5) Wenst men het afspelen te stoppen, druk dan op
de -toets.
plificador. Respetar los códigos de colores de los
conectores (rojo: canal derecho, blanco: canal izquierdo).
2) Conectar las conexiones de entrada audio REC
(32) con las salidas TAPE REC del receptor o del
amplificador, con una conexión RCA.
3) El máximo control del sistema se obtiene conectando los elementos CD-2000, TDD-2000 al receptor DSR-2000. De esta forma, es posible
conectar directamente la señal del CD o K7,
desde el receptor. También, puede realizarse una
adaptación perfecta de los niveles de grabación
desde el CD-2000 al TDD-2000, para grabaciones de CD a K7, con un proceso automático.
Para conseguir estas facilidades, conectar el
receptor y el lector de cassettes utilizando el
cable con conexiones jack 3,5 en cada una de las
tomas SYSTEM CONTROL (34).
4) Una vez realizadas estas conexiones, conectar el
equipo a la red 230 V~/50 Hz.
5) Puede conectar unos auriculares estéreo de impedancia media (>8Ohmios) en la toma de
6,35mm PHONES (13). Si el auricular no dispone
de control de volumen, utilizar un cable prolongador con reglaje de volumen (por ej. HEC-60).
ATENCION: no regular el volumen de los auriculares muy alto. Los volúmenes altos, pueden a la
larga, causar problemas de audición. El oído humano se acostumbra a los volúmenes altos y con
el tiempo, no los percibe de la misma forma. Es
por esto, que le aconsejamos no modificar el volumen de escucha después de haberse acostumbrado.
4 Lectura
4.1 ¿Qué tipo de cassettes usar?
Como regla general, pueden utilizarse todos los
tipos de cassettes con una duración de 90 minutos
(C-90). No utilizar cassettes C-120 (120 minutos),
su película es muy fina. Es muy fácil que se rompa o
se enrolle. No utilizar nunca cassettes sin fin, pueden estropear la mecánica del equipo.
Le recomendamos utilizar cassettes normales, de
hierro o de dioxido de cromo, la mejor calidad se obtendrá con los cassettes de hierro. Gracias a las
marcas en el cassette, el equipo reconoce el tipo de
cinta y se adapta automáticamente.
4.2 Marcha/Paro
1) Antes de encender su equipo, verificar que el
conmutador TIMER (8) esté en OFF. En caso
contrario, empezará la lectura o grabación, y el
cassette podría borrarse!
Encender el lector con el interruptor Marcha/
Paro POWER (6).
2) Después del uso, cerrar los compartimientos de
los cassettes para protegerlos del polvo y cerrar
el lector con el interruptor POWER (6).
3) Esperar siempre algunos segundos antes de
poner su equipo otra vez en marcha.
4.3 Lectura de cassettes
1) Colocación del cassette: tensar la cinta haciendo
girar alguna diente. Abrir el compartimiento del
cassette apretando la tecla EJECT (7/15), in-
sertar el cassette con la parte visible de la cinta
hacia abajo. Cerrar el compartimiento apretando
suavemente la puerta. Si se desea, poner el con-
tador a cero con la tecla RESET (2/4).
2) Poner el selector "DOLBY NR" (10) en la posición
de grabación deseada:
OFF = grabación sin Dolby NR
B = grabación con Dolby B
C = grabación con Dolby C
3) Poner el selector DIRECTION (9) en la posición
deseada:
el equipo se para después de acabar
una cara
se leen automáticamente las dos caras
del cassette una después de otra, 5
veces como máximo
se leen las dos caras de un cassette (por
ejemplo el 1), y después las del lector 2.
Esta función se repite 4 veces. (Asegurarse poner un cassette en cada lector).
4) Arrancar el lector con la tecla si el cassette
circula hacia la derecha, y con la tecla si circula hacia la izquierda. Si un cassette no está
completamente rebobinado, es posible leer una o
otra cara del cassette apretando la tecla o
. La pantalla indica el sentido de la lectura.
5) Apretar la tecla para detener la lectura.
6) Apretar la tecla EJECT (7/15) para sacar el cassette; atención: el cassette debe estar siempre
parado.
4.4 Avance y retroceso rápido/ con arranque
automático de la lectura.
Una vez que haya parado el cassette [tecla (29)],
puede utilizar las teclas o para bobinar
o rebobinar, dependiendo del sentido de lectura del
cassette.
Lectura hacia la derecha:
: bobinado atrás
: bobinado adelante
Lectura hacia la izquierda:
: bobinado adelante
: bobinado atrás
Si, después del rebobinado debe empezar la lectura
automáticamente desde el principio del cassette,
apretar dos veces en la tecla correspondiente.
"PLAY" parpadea durante el rebobinado.
Atención: si durante la lectura, aprieta en la tecla
o , la cinta retrocede al principio del título o pasa al título siguiente (ver capítulo 4.5: selección de títulos).
4.5 Selección de títulos
Durante la lectura, puede seleccionarse otro título
con las tecla y . La cinta rebobina hasta
el título deseado y empieza automáticamente la reproducción. Cuando pulsa las teclas o ,
la pantalla indica "SP", el número de títulos que se
25
E
NL
B
Page 26

6) Om een cassette te verwijderen, drukt u op de
EJECT-toets (7 resp. 15). Doe dit alleen wanneer
de cassette gestopt is.
4.4 Terug- of doorspoelen van de cassette/
met automatische start
Nadat de cassette gestopt is met de -toets, kan de
cassette terug- of doorgespoeld worden met de toetsen en . Afhankelijk van de afspeelrichting wordt de cassette terug dan wel doorgespoeld.
Met de afspeelrichting naar rechts:
= terugspoelen
= doorspoelen
Met de afspeelrichting naar links:
= doorspoelen
= terugspoelen
Wenst u dat de cassette automatisch start na het
door- of terugspoelen, druk dan tweemaal op de
overeenkomstige toets. Tijdens het spoelen flikkert
"PLAY" op het display.
Opgelet: Bij het indrukken van de toets of
tijdens het afspelen, wordt de cassette tot het
begin van de huidige track resp. tot het begin van de
volgende track (zie hoofdstuk 4.5. "Selecteren van
een track") gespoeld.
4.5 Selecteren van een track
Tijdens het afspelen kan met de toetsen en
een andere track geselecteerd worden. De recorder gaat op zoek naar de geselecteerde track en
begint automatisch te spelen. Na indrukken van de
toets resp. toont het display "SP" en het
nummer van de tracks die terug- of doorgespoeld
worden. T ot 20 tracks kunnen terug- of doorgespoeld
worden. Om gebruik te kunnen maken van deze
functie, moet tussen de verschillende tracks een
pauze zijn van minstens 4 seconden zodat de recorder de individuele tracks kan onderscheiden.
1) Bij het afspelen met de afspeelrichting naar
rechts:
Bij iedere druk op de toets wordt één track
doorgespoeld.
Bij één druk op de toets wordt terugge-
sprongen naar het begin van de huidige track.
Om de vorige track te selecteren, moet de toets
tweemaal ingedrukt worden. Door de toets
verschillende keren in te drukken, wordt
een overeenkomstig aantal tracks teruggedraaid.
2) Bij het afspelen met de afspeelrichting naar
links:
Bij één druk op de toets wordt teruggesprongen naar het begin van de huidige track.
Om de vorige track te selecteren, moet de toets
tweemaal ingedrukt worden. Door de toets
verschillende keren in te drukken, wordt
een overeenkomstig aantal tracks verder teruggedraaid.
Bij iedere druk op de toets wordt één track
doorgespoeld.
Technische opmerking
Het IPSS (Intelligent Program Search System) regelt
de track-keuze alsook de functies beschreven in de
volgende hoofdstukken:
– Herhaald afspelen van een track
– Korte voorbeluistering van alle tracks
– Overslaan van lange pauzes
Pauzes van minstens 4 seconden tussen de verschillende tracks vormen de voorwaarde voor de
werking van dit systeem. Bij uw eigen opnames kunt
u met de REC MUTE-toets (23) dergelijke pauzes inlassen (zie hoofdstuk 5.4. "Inlassen van een pauze
van 4 seconden na iedere track").
Het IPSS kan niet correct werken in geval van:
1. spraak- of geluidopnames met onderbrekingen
langer dan 4 seconden.
2. tracks met heel stille passages of passages zonder geluid langer dan 4 seconden (bv. bij klassieke muziek).
3. cassettes die een storende ruis vertonen tussen
de verschillende tracks.
4. cassettes met pauzes tussen de verschillende
tracks van minder dan 4 seconden.
5. cassettes met opnames op een extreem laag niveau.
6. opnames waarbij een crossfader gebruikt werd
en waardoor er dus geen pauze is tussen de verschillende tracks.
4.6 Herhaald afspelen van een track
Wanneer de huidige track herhaald moet worden,
druk dan de overeenkomstige afspeeltoets zoveel
keer in als de track herhaald moet worden (max. 8
keer):
De toets (31) tijdens afspelen met de richting
naar rechts
De toets (27) tijdens afspelen met de richting
naar rechts
Het display toont "AP" en het aantal herhalingen. Het
cassettedeck keert na het einde van de huidige track
terug naar het begin en start de herhaling. Deze
functie wordt zoveel keer herhaald als ze geselecteerd werd. Schakel de functie uit met de toets
(29) of met PAUSE (24).
Wanneer de herhaalfunctie niet correct werkt, hou
dan rekening met de technische opmerking op het
einde van hoofdstuk 4.5. "Selecteren een track".
4.7 Korte voorbeluistering van alle tracks
Alle tracks van één cassettezijde kunnen gedurende
10 seconden kort na elkaar afgespeeld worden.
1) Start het afspelen met de toets resp. .
2) Druk na het starten van de weergave op de
INTRO CHECK-toets (16). Het display toont nu
het nummer van de voorbeluisterde tracks.
3) De recorder spoelt door naar de volgende track,
speelt er een fragment van, nadien naar de volgende track enz.
4) Bevindt de DIRECTION-schakelaar zich in de
stand of , dan wordt op het einde van
de ene cassettezijde automatisch overgeschakeld naar de normale weergave van de andere
cassettezijde resp. naar de normale weergave
van het andere deck. Wenst u ook hier een korte
voorbeluistering van de tracks, druk dan opnieuw
op de INTRO CHECK-toets.
puede mover en un sentido o otro (20 títulos como
máximo). Para utilizar esta función, deberá existir
una pausa de 4 segundos como mínimo entre cada
título, para que el equipo los reconozca.
1) Lectura hacia la derecha:
apretando la tecla , se avanza un título
apretando la tecla , se rebobina al inicio del
título en curso. Para seleccionar el título precedente, apretar dos veces en la tecla . Cada
pulsación de esta tecla, se retrocede un título.
2) Lectura hacia la izquierda:
apretando la tecla , se rebobina al inicio del
título en curso. Para seleccionar el título precedente, apretar dos veces en la tecla . Cada
pulsación de esta tecla, se retrocede un título.
Apretando la tecla , se avanza un título.
Consejo técnico
El sistema IPSS (Intelligent Programme Search System: sistema inteligente de búsqueda de títulos)
controla la selección de los títulos y las funciones descritas en los parágrafos siguientes:
-
repetición de un título
-
lectura del inicio de los títulos
-
eliminación de las pausas demasiado largas
Para poder utilizar estas funciones, deben haber
pausas de 4 segundos como mínimo entre cada título. Si realiza sus propias grabaciones, puede insertar las pausas utilizando las tecla "REC MUTE"
(23) (ver capítulo 5.4).
El sistema IPSS no trabajará correctamente en los
siguientes casos:
1. en grabaciones con palabras o ruidos que realicen interrupciones superiores a 4 segundos.
2. en títulos con zonas muy lentas o zonas sin sonido superiores a 4 segundos (por ejemplo, la
música clásica).
3. en cassettes que entre cada título, incorpore interferencias.
4. en cassettes que entre cada título las pausas son
inferiores a 4 segundos.
5. en cassettes con grabaciones muy bajas.
6. en grabaciones donde se utiliza un mezclado
entre cada título y de esta manera no hay pausas
entre los títulos.
4.6 Repetición de un título
Si desea repetir el título en curso, pulsar la correspondiente tecla tantas veces como títulos quieran repetirse (max. 8 veces):
la tecla (31) cuando la reproducción se realiza
hacia la derecha (como se indica).
la tecla (27) cuando la reproducción se realiza
hacia la izquierda.
La pantalla indica "AP" y el número de repeticiones.
La platina rebobina desde el final del título hasta el
principio, y empieza la reproducción. Este procedimiento se repite tantas veces como se seleccionen.
La función se desconecta pulsando la tecla (29) o
PAUSE (24).
Si la función de repetición no funciona correcta-
mente, referirse al final del capítulo 4.5 "Selección
de títulos".
4.7 Monitorización corta de todos los títulos
Todos los títulos de la cara de un cassette pueden
escucharse durante 10 segundos, uno después de
otro.
1) Empezar la reproducción con la tecla o .
2) Después de empezar, pulsar la tecla INTRO
CHECK (16). La pantalla no indicará el contador
de 4 dígitos pero visualizará el número de títulos
monitorizados en 2 dígitos.
3) La platina rebobinará hasta el próximo título y lo
monitorizará un instante, y así con todos los otros
títulos.
4) Si el conmutador DIRECTION (9) está en posición o , al final de la cara de un cassette se conmutará automáticamente a reproducción normal de la otra cara del cassette o
respectivamente, al otro cassette. Si se desea
que se monitoricen los títulos, pulsar otra vez la
tecla INTRO CHECK.
5) Durante la reproducción del título, puede suspenderse la monitorización con la tecla INTRO
CHECK. La reproducción continuará normalmente.
Si la monitorización no funciona correctamente, referirse al final del capítulo 4.5 "Selección de títulos".
4.8 Anulación automática de las pausas de-
masiado largas entre títulos
Si existen pausas entre títulos de más de 10 segundos, estas pueden anularse con un rebobinado
rápido.
1) Empezar la reproducción con o .
2) Pulsar la tecla BLANK SCAN (17), se indicará
”BLANK SCAN”.
3) Durante una pausa larga, la pantalla indicará
"SP00", y el cassette avanzará hasta el principio
del próximo título. La reproducción empezará de
nuevo, al acabar el espacio en blanco.
4) Pulsando la tecla BLANK SCAN una segunda vez
o pulsando el botón (29) o PAUSE (24), la función se desconecta.
Si la anulación automática de largas pausas no funciona correctamente, referirse al final del capítulo
4.5 "Selección de títulos".
5 Grabación
5.1 Protección de los cassettes
Para no grabar, sin darse cuenta, un cassette ya grabado y evitar borrarlo, cortar las protecciones (a) y
(b) (esquema 4). Los cassettes que se venden ya
viene protegidos. La lengüeta (b) protege la cara con
la inscripción (esquema 4) de la cara superior (en
este caso, la cara 1). Cortar únicamente la lengüeta
de la cara a proteger.
Si es necesario reutilizar un cassette protegido,
poner en lugar de la lengüeta, un trozo de papel adhesivo (esquema 5).
26
E
NL
B
Page 27

5) Tijdens het afspelen van een track kan de korte
voorbeluistering gestopt worden met de INTRO
CHECK-toets. Afspelen verloopt dan normaal.
Wanneer de korte voorbeluistering niet correct werkt,
hou dan rekening met de technische opmerking op
het einde van hoofdstuk 4.5. "Selecteren van een
track".
4.8 Automatisch overslaan van lange pauzes
Wanneer er tussen de tracks pauzes zijn van meer
dan 10 seconden, dan kunnen deze overgeslagen
worden door automatisch verder te spoelen.
1) Start de herhaling met de toets resp. .
2) Druk de BLANK SCAN-toets (17) in. "BLANK
SCAN" verschijnt op het display.
3) Wordt tijdens het afspelen een langere pauze bereikt, dan toont het display "SP00" en loopt de
cassette door naar het begin van de volgende
track. Daar start het afspelen opnieuw.
4) Door een tweede maal op de BLANK SCAN-toets
te drukken of door op de toets (29) resp.
PAUSE (24) te drukken, wordt de functie uitgeschakeld.
Wanneer het automatisch overslaan van lange pauzes niet correct werkt, hou dan rekening met de technische opmerking op het einde van hoofdstuk 4.5.
"Selecteren van een track".
5 Opname
5.1 Beveiligen van de cassette tegen onge-
wenste opname
Om te vermijden dat u over bestaande opnames zou
opnemen of dat u opnames zou uitwissen, moeten
de lipjes (a) en (b) afgebroken worden (fig. 4). Gekochte opgenomen cassettes zijn reeds door de fabricant beschermd tegen ongewenste opname. Het
lipje (b) beschermt de zijde met de letters gericht
naar boven volgens fig. 4 (in dit geval zijde 1). Om
slechts één zijde te beveiligen moet het overeenkomstige lipje afgebroken worden.
Om een beschermde cassette terug geschikt te
maken voor opname, moet een stevig stukje kleefband over de plaats van het oorspronkelijke lipje geplakt worden (fig. 5).
5.2 Eenvoudige cassette-opname
1) Plaats een cassette in het cassettecompartiment
en spoel ze terug tot het begin of tot de plaats
waar de opname moet beginnen. Plaats de teller
in de nulstand met de RESET-toets (2 resp. 4). Dit
maakt het makkelijker om de start van de opname
terug te vinden.
2) Plaats de schuifschakelaar DOLBY NR (10) in die
stand waarmee de cassette opgenomen moet
worden. Let op de mogelijkheden van de recorder
waarmee de cassette later zal afgespeeld worden. De beste resultaten worden bereikt met
Dolby C.
OFF = opname zonder Dolby NR
B = opname met Dolby B
C = opname met Dolby C
3) Plaats de schuifschakelaar DIRECTION (9) in de
gewenste stand:
= De recorder stopt na de opname van één
cassettezijde.
= Beide cassettezijden worden automa-
tisch na elkaar opgenomen.
= Eerst worden de beide cassettezijden
van één deck opgenomen, nadien automatisch de beide zijden op het andere
deck (in ieder deck moet uiteraard een
cassette zitten).
4) Selecteer op de receiver resp. de versterker welke bron opgenomen moet worden. Verbind een
microfoon met de MIC-ingang (14) voor een microfoonopname. Hierdoor wordt de REC-ingang
(32) uitgeschakeld.
5) Druk de RECORD-toets (25) in. De recorder staat
stand-by. Op het display verschijnt "REC" en het
pauzesymbool . (Bij gebruik van de receiver
DSR-2000 van MONACOR wordt de INPUT SE-
LECT-keuzeschakelaar van dit toestel nu geblokkeerd om verkeerde instellingen te vermijden.)
6) Stel met de REC LEVEL-regelaar (11) het opnameniveau in en met de BALANCE-regelaar (12)
de balans van de opname zodat bij passages met
het hoogste volume het 0 dB-segment in de niveau-aanduiding oplicht. Voor de meeste opnames kan de BALANCE-regelaar in de middelste
stand (klikt in) blijven staan. Enkel bij slechte originele opnames is een correctie noodzakelijk.
7) Wanneer op het display niet de gewenste richting
staat aangegeven, verander deze dan met de
toets resp. .
Opgelet: Wanneer u de toets indrukt die overeenkomt met de aangegeven richting op het display,
start de opname onmiddellijk.
8) Start de opname met de PAUSE-toets (24). Door
deze toets opnieuw in te drukken, kunt u de opname onderbreken.
9) Druk dan op de -toets (29) om de opname te
stoppen.
5.3 De opname opnieuw starten na een fout
De cassette kan automatisch teruggespoeld worden
tot het startpunt van de opname wanneer bijvoorbeeld een bepaald nummer ongewenst is.
1) Druk tijdens de opname op de toets (met
opnamerichting naar rechts) resp. (met opnamerichting naar links).
2) De opname stopt en de recorder keert terug naar
het begin van de opname. Daar start de opname
opnieuw.
5.4 Inlassen van een pauze van 4 seconden
na iedere track
Tussen de individuele tracks moet er een pauze zijn
van minstens 4 seconden, zodat het IPSS (Intelligent
Program Search System) correct kan werken (zie
ook "T echnische opmerking" op het einde van hoofdstuk 4.5.). Bij eigen opnames kunt u met de REC
MUTE-toets (23) automatisch een pauze van 4 seconden inlassen.
5.2 Grabación
1) Poner el cassette, rebobinarlo al principio del
lugar donde desee empezar la grabación. Poner
el contador a cero [tecla RESET (2/4)], para facilitar la búsqueda del principio de la grabación.
2) Poner el conmutador DOLBY NR (10) en la posición de grabación que se desee. Deben respetarse las posibilidades de lectura del equipo que
se usará posteriormente. La mejor calidad se obtendrá con una grabación en Dolby C.
OFF = grabación sin Dolby NR
B = grabación con Dolby B
C = grabación con Dolby C
3) Poner el conmutador DIRECTION (9) en la función que se desee:
el equipo se para después de la grabación de una cara
las dos caras se gravan automáticamente una después de otra
las dos caras de los lectores de grabarán
una después de otra (pensar en poner
un cassette en cada lector).
4) En el receptor DSR-2000 o el amplificador, seleccionar el equipo desde el que se efectuará la grabación. Para grabaciones con un micro, conectarlo en la toma MIC (14), la entrada de grabación
REC (32) se desconecta.
5) Apretar la tecla RECORD (25), el equipo está
preparado para grabación, la pantalla indica
"REC" y el símbolo de pausa . En el caso que
use conjuntamente el TDD-2000 y el DSR-2000,
el selector de entrada INPUT SELECT de este último queda anulado.
6) Regular el nivel y el balance de grabación con los
reglajes REC LEVEL (11) y BALANCE (12) de
manera que, para las zonas mas fuertes, se encienda en la pantalla el segmento de 0dB. Para la
mayoría de las grabaciones, el reglaje BALANCE
puede mantenerse en la posición media. Solo es
necesario una corrección si los originales son de
mala calidad.
7) Si la pantalla indica un sentido de lectura diferente al deseado, modificarlo con la teclas o
.
Atención: si presiona en la tecla que corresponde
al sentido de lectura indicado, la grabación empieza inmediatamente.
8) Empezar la grabación presionando la tecla
PAUSE (24); otra presión parará la grabación.
9) Apretar en la tecla (29) para acabar la grabación.
5.3 Volver a grabar en caso de error
Si el título grabado no es necesario, puede rebobinarse al punto de partida de la grabación.
1) Durante la grabación, apretar la tecla:
: sentido de grabación hacia la derecha
: sentido de grabación hacia la izquierda
2) La grabación se para, el equipo rebobina al principio de la grabación. Entonces, puede continuar
la grabación.
5.4 Inserción de una pausa de 4 segundos
después de un título
Para que el sistema IPSS pueda funcionar correctamente, debe existir una pausa de como mínimo 4
segundos entre cada título. (ver párrafo 4.5, consejo
técnico). Utilizar la tecla REC MUTE (23) para colocar automáticamente esta pausa después de sus
grabaciones.
Existen dos formas de proceder:
1. durante la grabación
Al final del título, apretar la tecla REC MUTE (23)
y se colocará una pausa de 4 segundos, aún si el
indicador de nivel indica una señal de grabación.
"REC" parpadea durante la inserción de la pausa.
Presionar la tecla PAUSE (24) para continuar la
grabación del siguiente título.
2. después de la grabación.
Apretar la tecla PAUSE (24) al final de un título,
poner el equipo preparado para grabar presionando la tecla RECORD (25). Presionar REC
MUTE (23), para insertar la pausa. Una vez ter-
minada la operación, el equipo estará otra vez
preparado para gravar. Con la tecla (29) desconectará el modo de grabación.
5.5 Grabación paralela
Puede efectuarse la misma grabación en paralelo
sobre los dos lectores, para conservar dos copias.
1) Insertar los cassettes, rebobinarlos hasta el lugar
donde deba empezar la grabación.
2) Poner el conmutador DOLBY NR (10) en la posición que se desee (ver capítulo 5.2)
3) Poner el conmutador DIRECTION (9) en la función que se desee:
la grabación se parará al final de la cara.
o
las dos caras se grabarán automáticamente una después de otra.
4) Seleccionar en el receptor (DSR-2000) o amplificador, el equipo que se desea efectuar la grabación.
5) Con la tecla RECORD (25), encender la función
de grabación en el lector 1 o 2. Regular los niveles y el balance de grabación [reglajes REC
LEVEL (11)/BALANCE (12)].
6) Desconectar la función grabación con la tecla
(29).
7) Si en la pantalla aparece un sentido de rotación
de la cinta diferente al deseado, modificarlo con
las teclas o , y después apretar la tecla
(29).
8) Empezar la grabación paralela apretando en la
tecla PARALLELREC (26).
9) Para interrumpir la grabación, apretar la tecla
PAUSE (24) en el lector 2. Para anular la grabación presionar la tecla (29) en el lector 1 o 2.
5.6 Copia de cassettes
1) Poner el cassette fuente (original) en el lector 1 y
el cassette destino (copia) en el lector 2. Los dos
deben estar rebobinados a la izquierda, para que
el sentido de la copia sea la derecha.
27
E
NL
B
Page 28

Er zijn twee manieren om dit te doen:
1. Tijdens de opname:
T erwijl de opname bezig is, kunt u de REC MUTEtoets (23) aan het einde van een track indrukken.
Een pauze van 4 seconden wordt ingelast, zelfs
wanneer een opnamesignaal wordt waargenomen op de niveau-indicatie. Terwijl een pauze
wordt ingelast flikkert "REC" op het display. Nadien staat de recorder opnieuw gereed voor opname. Met de PAUSE-toets (24) kan de opname
van de volgende track gestart worden.
2. Na de opname:
Druk op het einde van de track de PAUSE-toets
(24) in. Met de RECORD-toets (25) staat de recorder opnieuw gereed voor opname. Druk de
REC MUTE-toets in (23) en een pauze wordt ingelast. Nadien gaat de recorder automatisch
weer gereed staan voor opname. Met de -toets
(29) wordt de opnamestand uitgeschakeld.
5.5 Parallelle opname
U kunt parallel op beide decks dezelfde opname
maken, zodat u twee originele opnames krijgt.
1) Plaats cassettes in de recorder en spoel terug tot
aan het begin of tot op de plaats waar met de opname moet gestart worden.
2) Verschuif de DOLBY NR-schakelaar (10) naar de
gewenste stand (zie hoofdstuk 5.2. "Eenvoudige
cassette-opname").
3) Plaats de DIRECTION-schakelaar (9) in de gewenste stand:
= De recorder stopt na de opname van één
cassettezijde.
of
= Beide cassettezijden worden automa-
tisch na elkaar opgenomen.
4) Selecteer via de receiver resp. de versterker, de
bron die opgenomen moet worden.
5) Zet het toestel gereed voor opname met de RECORD-toets (25) op deck 1 of 2. Regel het niveau
af met de REC LEVEL-regelaar (11) en de balans
van de opname met de BALANCE-regelaar (12).
6) Schakel de opnamestand uit met de -toets (29).
7) Toont het display een andere dan de gewenste
richting, verander dan de richting voor ieder deck
met de toets resp. , en druk nadien onmiddellijk de -toets.
8) Start de parallelle opname met de PARALLEL
REC-toets (26).
9) Druk voor een onderbreking van de opname op
de PAUSE-toets (24) van deck 2. Druk op de
-toets (29) op deck 1 of 2 om de opname te
stoppen.
5.6 Cassette kopiëren (dubbing)
1) Plaats de te kopiëren cassette in deck 1 en de opnamecassette in deck 2. De lege spoel van de
cassettes moet zich rechts bevinden omdat de
band bij het kopiëren naar rechts loopt.
2) Het opnameniveau en de balans kunnen niet gecontroleerd worden bij het kopiëren. De DOLBY
NR-schakelaar heeft eveneens geen functie. Kopieer met dezelfde instellingen waarmee de op te
nemen cassette opgenomen werd.
3) Plaatst de schuifschakelaar DIRECTION (9) in de
gewenste stand:
= De recorder stopt na het kopiëren van
één cassettezijde
of
= De opname van de beide cassettezijden
gebeurt automatisch.
4) Wanneer één of beide cassettes niet teruggespoeld is naar het begin van de cassette, druk
dan op de AUTO-toets (18) alvorens te kopiëren.
Op het display begint "HIGH DUB, NORM DUB"
te flikkeren. Na indrukken van één van de DUBBING-toetsen (19 resp. 29) wordt eerst automatisch teruggespoeld.
5) Wanneer beide cassettezijden moeten opgenomen worden, maar de speelduur van de te kopiëren cassette is korter of langer dan opnamecassette, dan kan de opname op de tweede zijde
toch met hetzelfde nummer beginnen als op de
originele cassette. Tijdens de opname spoelt de
recorder de desbetreffende cassette door. Wanneer de speelduur van de opnamecassette korter
is dan die van de te kopiëren cassette (fig. 6),
zullen uiteraard de laatste tracks van iedere zijde
ontbreken. Is de speelduur van de opnamecassette langer (fig. 7) dan zal er op beide zijden telkens een stuk zijn zonder opname. Druk op de
SYNC REV-toets (22) om deze functie te activeren. Op het display verschijnt "SYNC REV"
(Synchro Reverse Dubbing). Deze functie kan
enkel geactiveerd worden wanneer de DIRECTION-schakelaar (9) zich in de positie of
bevindt.
Opnamecassette is korter.
➅
Opnamecassette is langer ➆
6) Na deze voorbereidingen start u de opname met
één van de DUBBING-toetsen:
NOR-toets (19) voor opname met normale snelheid, aan te raden voor opnames met een hoge
Replay deck 1
Recording deck 2 rewinding forward
page 1
page 2
page 1
page 2
Stop
Recording deck 2
Replay deck 1 rewinding forward
page 1
page 2
page 1
page 2
Stop
2) No puede regularse el nivel ni el balance, el conmutador DOLBY NR no está activado. La copia
se realiza con los reglajes del cassette original.
3) Poner el conmutador DIRECTION (9) en la función que se desee:
la grabación se para después de copiar
una cara.
o
las dos caras se copian automática-
mente una después de otra.
4) Si uno de los dos cassettes no están rebobinados
hasta el principio, apretar la tecla AUTO (18)
antes de empezar la copia. El diodo "HIGH DUB,
NORM DUB" parpadea. Después de presionar en
una de las teclas DUBBING (19/20), el cassette
se rebobinará automáticamente.
5) Si deben copiarse las dos caras, pero la duración
de la cassette original es inferior o superior a la
duración del cassette destino, la copia de la segunda cara empezará igual que el cassette original. Durante de copiar el recorder bobina adelante el cassette correspondiente. Si la duración
del cassette destino es inferior a la del cassette
original (esquema 6), faltarán en cada cara, los
últimos títulos. Si la duración del cassette destino
es superior (esquema 7), habrá una zona sin gravar al final de cada cara. Para activar esta función
deberá presionarse la tecla SYNC REV (22), la
pantalla indicará "SYNC REV" (Synchro Reverse
Dubbing); esta función no podrá activarse si el
conmutador"DIRECTION (9) está en o
.
Cassette destino está más corto.
➅
Cassette destino está más largo. ➆
6) Una vez terminadas las comprobaciones anteriores, puede empezarse la copia con una de las
teclas DUBBING:
Tecla NOR (19); para copia a velocidad normal:
recomendado para grabaciones de gran calidad i
con cassette con un nivel de grabación alto.
Tecla HIGH (20): copia al doble de velocidad.
5.7 Arranque de la grabación desde el lector
CD
Cuando se utiliza el conjunto CD-2000 (lector CD) y
el DSR-2000 (receptor HiFi), puede arrancar simultáneamente la lectura del CD con la grabación del
TDD-2000.
1)
Conectar los tres equipos entre ellos (ver capítulo 3).
2) Poner el (los) cassette(s) en su lugar; si desea
utilizar dos cassettes, debe empezar siempre por
el número 2.
3) Poner los conmutadores DIRECTION (9) y
DOLBY NR (10) en la posición deseada (ver capítulo 5.2).
4) Apretar la tecla RECORD (25), empezará la lectura del CD, regular el nivel con el reglaje REC
LEVEL (11) y el balance con BALANCE (12).
5) Si la pantalla indica otro sentido de lectura que el
deseado, modificarlo con las teclas o .
Atención: si presiona la misma tecla que el sentido de lectura, la grabación empezará automáticamente.
6) Parar el lector de CD.
7) En el TDD-2000, apretar las teclas (29), y después RECORD (25).
Este paso es especialmente importante, si no se
procede de esta forma, la grabación no empezará
en el mismo momento que el CD.
Vigilar también que en el DSR-2000, esté seleccionado el CD. Si no es así, apretar la tecla
(29), seleccionar el CD-2000 en el receptor HiFi y
presionar la tecla RECORD (25).
8) Arrancar la lectura en el CD-2000 con la tecla
o presionando el número del título que se
desee. El TDD-2000 empezará simultáneamente
la grabación.
9) Puede interrumpir la lectura del CD con la tecla
en el lector de CD (el lector de K7 pasará en
modo de espera de grabación después de algunos segundos), pudiendo continuar después. La
grabación terminará automáticamente al final del
CD o pulsando la tecla STOP del lector de CD.
5.8 Grabación automática de un CD en un
cassette (CARS)
Con el sistema CARS (CARS = Computer Aided CD
Recording System = sistema de grabación de CD
asistido por ordenador) podrá gravar un CD en un
cassette con una adaptación automática de los niveles. Todos los títulos del CD se reproducirán rápida-
Reproduccción lector 1
Grabación lector 2 bobinar adelante
página 1
página 2
página 1
página 2
Stop
Grabación lector 2
Reproducción lector 1 bobinar adelante
página 1
página 2
página 1
página 2
Stop
28
E
NL
B
Page 29

kwaliteit en voor cassettes met een hoog opnameniveau.
HIGH-toets (20) voor opname op dubbele snelheid.
5.7 De CD-speler start de cassette-opname
Bij gebruik van de CD-speler CD-2000 en de Hifi-receiver DSR-2000 waarbij beide toestellen afgestemd
zijn op de recorder, kan door het starten van een CD
tegelijkertijd automatisch gestart worden met een
cassette-opname.
1) De recorder, de receiver en de CD-speler moeten
met de bijgesloten controlekabel met elkaar verbonden worden (zie ook hoofdstuk 3 "Aansluiting
van het toestel").
2) Plaats één of twee cassettes in de compartimenten. Bij gebruik van twee cassettes wordt altijd
eerst met deck 2 gestart.
3) Plaats de DIRECTION- (9) en DOLBY NR-schakelaar (10) in de gewenste stand (zie hoofdstuk
5.2 " Eenvoudige cassette-opname").
4) Druk de RECORD-toets (25) in, start kort de CD,
en stel het opnameniveau in met de REC LEVELregelaar (11) net als de balans voor de opname
met de BALANCE-regelaar (12).
5) Wanneer een andere dan de gewenste richting
getoond wordt, verander dan de richting met de
toets resp. .
Opgelet: Bij het indrukken van de toets die overeenstemt met de getoonde afspeelrichting start
de opname onmiddellijk!
6) Stop de CD-speler.
7) Schakel de opnamestand van de recorder uit met
de toets (29) en druk opnieuw op de RECORD-toets (25). Deze stap is zeer belangrijk.
Wanneer deze niet uitgevoerd wordt, kan de recorder niet samen met de CD-speler starten! Let
er eveneens op dat de CD-speler geselecteerd is
op de receiver. Indien dit niet het geval is, druk
dan op de -toets (29) van de recorder, selecteer
de CD-speler op de receiver en druk nadien op de
RECORD-toets (25).
8) Start het afspelen met de -toets op de CDspeler of door het gewenste tracknummer in te
geven. T egelijkertijd schakelt de recorder naar opnamestand.
9) Met de toets op de CD-speler kan de opname onderbroken worden (na enkele seconden
staat de recorder opnieuw klaar voor opname) en
weer gestart worden. De opname wordt automatisch beëindigd op het einde van de CD of door op
de STOP-toets van de CD-speler te drukken.
5.8 Automatische CD-opname op cassette
(CARS)
Met CARS (Computer Aided CD Recording System)
kan men een CD opnemen waarbij het opnameniveau automatisch op de cassette wordt ingesteld.
Hierbij worden alle tracks van de CD kort voorafgeluisterd en wordt het optimale opnameniveau ingesteld. Bij het begin van de cassette wordt een pauze
van 8 seconden ingelast. De CD start opnieuw van
het begin en tegelijkertijd start de opname - een volledig automatische functie! Deze functie is enkel mogelijk in combinatie met de CD-speler CD-2000 en
de receiver DSR-2000 van MONACOR.
1) De recorder, de Hifi-receiver en de CD-speler
moeten via de bijgeleverde kabel onderling verbonden zijn (zie eveneens hoofdstuk 3 "Aansluiting van het toestel").
2) Selecteer met behulp van de EDIT-toets op de afstandsbediening van de CD-speler, de tracks en
de lengte van de opnamecassette (zie handleiding van de CD-speler).
3) Plaats een cassette in het cassettecompartiment
met de lege spoel naar rechts en spoel terug naar
het begin van de cassette, indien noodzakelijk.
4) Plaats DOLBY NR (10) in de gewenste stand (zie
hoofdstuk 5.2 "Eenvoudige cassette-opname").
5) Plaats de DIRECTION-schakelaar (9) in de gewenste stand:
= De recorder stopt na de opname van één
cassettezijde
of
= Beide cassettezijdes worden automa-
tisch na elkaar opgenomen.
6) Op het display moet de richting naar rechts staan
aangegeven. Indien dit niet het geval is, druk dan
op de toets (31) en onmiddellijk daarna op de
toets (29).
7) Druk op de CARS-toets (21). De automatische
opname start. Afhankelijk van de CD kan de instelling van het opnameniveau tot 3
1
/
2 minuten in
beslag nemen.
8) Na de opname komen de CD-speler en de recorder in de stopstand. Wanneer men vroeger wenst
te stoppen, druk dan op de STOP-toets van de
CD-speler.
6 Werking met een schakelklok of met
de timer van de receiver DSR-2000
In verbinding met een schakelklok of met de receiver
DSR-2000 kan het afspelen of een opname automatisch op een vooraf gekozen tijd gestart worden.
1) Verbind de netstekker van de recorder met de
schakelklok resp. het stopcontact op de achterzijde van de DSR-2000.
2) Bij gebruik van een schakelklok moeten ook alle
andere toestellen (bv. versterker, receiver) hun
voedingsspanning krijgen via de schakelklok.
Voor de voorafregeling van het Hifi-systeem moet
eerst de schakelklok ingeschakeld worden (onafhankelijk van de ingestelde schakeltijd).
3) Schakel al de noodzakelijke toetsellen in met hun
POWER-schakelaars.
4) Wanneer binnen dit systeem ook de CD-speler
CD-2000 van MONACOR aangesloten is, dan
mag er geen CD geladen zijn. Anders zal bij het
inschakelen de CD-speler starten en opgenomen
worden op cassette.
5) Plaats één of twee cassettes in het compartiment.
Bij twee cassettes wordt steeds eerst deck 2 opgestart. De lege spoel van de cassette moet zich
aan de rechterzijde bevinden, aangezien steeds
mente, regulándose el nivel óptimo de grabación.
Para empezar, se incluirá una pausa de 8 segundos
al principio del cassette, después se iniciará la lectura del CD y la grabación empezará simultáneamente, todo automáticamente. Esta función solo
será posible cuando se conectan los tres equipos
DSR-2000, CD-2000 y TDD-2000.
1) Estos tres equipos deberán conectarse entre
ellos por los cables de control incluídos (ver capítulo 3).
2) Seleccionar la función "Edition" con la tecla EDIT
del mando a distancia del lector de CD y indicar la
longitud del cassette destino (copia) (ver manual
de instrucciones del lector de CD, CD-2000).
3) Colocar un cassette, con el sentido de lectura
hacia la derecha, rebobinándola si es necesario.
4) Poner el conmutador DOLBY NR (10) en la posición que se desee (ver capítulo 5.2)
5) Poner el conmutador DIRECTION (9) en la posición que se desee:
la grabación se para después de la grabación de una cara
o
se gravan automáticamente las dos
caras, una después de otra.
6) En la pantalla, debe aparecer el sentido de lectura hacia la derecha; si no, presionar la tecla
(31) y después la tecla (29)
7) Apretar ahora la tecla CARS (21): empezará el
proceso de grabación automático. La adaptación
de los niveles, según el CD, puede necesitar
hasta 3
1
/2 minutos.
8) Una vez terminada la grabación, el lector CD y el
TDD-2000 se pondrán en posición STOP. Si
desea parar antes del final, presionar la tecla
STOP del lector de CD.
6 Funcionamiento con un reloj horario
o desde el programador del receptor
HiFi DSR-2000
Gracias al programador del DSR-2000 o con un reloj
horario, podrá hacer arrancar la lectura o grabación
automáticamente, en un momento determinado.
1) Poner el cable de alimentación del TDD-2000 en
el programador o en la toma del DSR-2000 (en la
parte trasera).
2) Si utiliza un programador diferente, todos los
otros equipos (amplificador, receptor), deberán
alimentarse con el programador. Para efectuar el
prereglaje de la cadena HiFi, conectar a ON el
programador (independiente del tiempo programado).
3) Conectar todos los equipos conectados con sus
respectivos interruptores Marcha/Paro.
4) Si el lector CD, CD-2000, forma parte de la cadena HiFi, no debe encontrarse ningún CD en el
lector. Sino, cuando encienda el programador, el
CD se leerá y podría grabarse en el cassette.
5) Poner el (los) cassette(s) en el compartimiento. Si
desea utilizar dos cassettes, debe empezarse
siempre por el lector 2. El cassette debe estar rebobinado, preparado para girar hacia la derecha.
6) Poner los conmutadores DIRECTION (9) y
DOLBY NR (10) en la posición que deseada (ver
capítulo 4.3 y 5.2)
7) Poner el conmutador TIMER (8) en la posición
PLAY si desea tener una reproducción au-
tomática. Regular el volumen del amplificador.
8) Si los que quiere es una grabación automática,
regular en el sintonizador/receptor la emisora
que se desea gravar. Presionar la tecla RECORD
(25) del TDD-2000, regular el nivel y el balance
de grabación [teclas REC LEVEL (11) y BALANCE (12)]. Ahora, poner el interruptor TIMER
(8) en la posición REC. Puede poner el volumen
del amplificador al mínimo.
9) Seleccionar en el DSR-2000 o en el programador
la hora de conexión, apagar el DSR-2000 y poner
el programador en funcionamiento automático. A
la hora programada, la cadena HiFi se conectará,
y empezará la reproducción o grabación.
7 Mantenimiento
7.1 Guardar correctamente los cassettes
Los cassettes deben protegerse de la calor, la humedad y la radiación directa del sol. En ningún caso,
acercarlos a un campo magnético, puede dañarse la
calidad de la cinta o los datos grabados pueden borrarse. Evitar tenerlos cerca de equipos eléctricos,
altavoces o equipos magnéticos; de igual forma, los
campos magnéticos débiles pueden tener efectos
nefastos en las grabaciones.
7.2 Limpieza de los cabezales de lectura y las
guías
Cada cinta con el uso, repercute en el cabezal de
lectura y la guía de la cinta. La calidad sonora de la
lectura y aún la de grabación, quedarán perjudicadas; existen diferentes opciones y cassettes de limpieza en el mercado, por ejemplo, MONACOR
KC-01 y AHC-09. Es indispensable limpiar regularmente el cabezal y las guías de lectura. Los cassettes de limpieza se colocan en el lector como todos
los otros cassettes, poner enseguida su TDD-2000
en modo lectura, la limpieza se efectuará automáticamente. Los kits de limpieza necesitan un uso manual; le aconsejamos, cuando los utilice, tener
mucho cuidado para no estropear los elementos del
equipo.
7.3 Desmagnetización de los cabezales
Después de muchas horas de uso, el cabezal de lectura se magnetiza, notándose en la calidad sonora;
por esto es necesario desmagnetizar el cabezal de
lectura cuando realiza su limpieza. Lo más simple es
usar un cassette de desmagnetización, MONACOR
DEM-115.
29
E
NL
B
Page 30

opgestart wordt met de afspeelrichting naar
rechts.
6) Plaats de DIRECTION-schakelaar (10) en de
DOLBY NR (10) in de gewenste stand (zie hoofdstuk 4.3. "Afspelen van een cassette" resp. 5.2.
"Eenvoudige cassette-opname").
7) Zet de TIMER-switch in de PLAY-stand (8) voor
automatisch afspelen. Regel het gewenste volume af op de receiver.
8) Voor een automatische opname stelt u op de
tuner/receiver de zender in die opgenomen moet
worden. Druk de RECORD-toets van de recorder
(25) in. Stel het opnameniveau in met de REC
LEVEL-regelaar (11) en de balans van de opname met de BALANCE-regelaar (12). Plaats de
TIMER-schakelaar (8) in de REC-stand. Het volume van de versterker kan nu in de minimumstand geplaatst worden.
9) Kies de schakeltijd op de receiver DSR-2000
resp. op de schakelklok. Schakel de receiver uit
resp. zet de schakelklok klaar voor automatische
werking. Zodra de ingestelde tijd bereikt wordt,
schakelt het Hifi-systeem in en begint het afspelen resp. het opnemen.
7 Onderhoud
7.1 Correct opbergen van de cassettes
De cassettes moeten beschermd worden tegen
warmte, vochtigheid en rechtstreeks zonlicht. Verder
mogen zij niet geplaatst worden naast magnetische
velden, omdat de geluidskwaliteit hieronder lijdt en
de opname zelfs volledig gewist kan worden. Voor
het bewaren is het zeer belangrijk dat ook zwakke
magneetvelden op lange termijn een negatieve invloed hebben op de opnames. Daarom is het aan te
raden om de cassettes niet naast elektrische toestellen, luidsprekers en magnetische objecten te bewaren.
7.2 Reinigen van de afleeskop en de bandgeleider
Iedere band of cassette heeft een zekere slijtage die
zich vastzet op de afleeskop en de bandgeleider. De
geluidskwaliteit lijdt daaronder, zeker tijdens de opname en een slechte opname kan zelfs na onderhoud niet beter gemaakt worden.
Bij de handelaar zijn verschillende onderhoudssets en reinigingscassettes te verkrijgen zoals bijvoorbeeld de KC-01 of AHC-09 van MONACOR.
Daarmee moet de afleeskop en de bandgeleider regelmatig gereinigd worden. Het plaatsen van een
reinigingscassette verloopt net zoals bij een gewone
muziekcassette. De recorder wordt in weergavestand geschakeld. De reiniging gebeurt automatisch
door de cassette. Met de onderhoudssets moet het
reinigen manueel uitgevoerd worden. Ga hierbij
voorzichtig te werk zodat de afleeskop en de bandgeleider niet beschadigd worden.
7.3 Demagnetiseren van de afleeskop
Na een tijd wordt iedere afleeskop magnetisch. Dit
heeft eveneens een negatief effect op de geluidskwaliteit. Daarom moet bij iedere reiniging van de
afleeskop en de bandgeleider een demagnetisering
plaatsvinden. Dit kan gemakkelijk gebeuren met een
demagnetiseringscassette (bijv. de DEM-115 van
MONACOR).
8 Foutopsporing
8.1. Tijdens het afspelen hoort men geen geluid
1) De cinch-kabels zijn niet volledig ingeplugd of zijn
verkeerd aangesloten.
➪ Zorg dat de stekkers volledig ingeplugd zijn of
sluit ze correct aan, zie hoofdstuk 3 "Aansluiting
van het toestel".
2) De afleeskop is vuil.
➪Reinig de afleeskop, zie hoofdstuk 7.2. "Reini-
gen van de afleeskop en de bandgeleider".
3) Cassetteband is beschadigd.
➪Gebruik een andere cassette.
4) De cassette is onbespeeld.
➪Een opgenomen cassette inbrengen.
8.2 De cassette begint niet te draaien bij indrukken van één van de toetsen voor terug of
verder te spoelen.
1) Het cassettecompartiment is niet correct geslo-
ten.
➪Sluit het compartiment correct.
2) De toets werd onmiddellijk na het sluiten van het
compartiment ingedrukt.
➪Wacht na het sluiten van het compartiment en-
kele seconden om de toetsen in te drukken.
3) De toets werd ingedrukt onmiddellijk na het in-
schakelen met de POWER-toets.
➪Wacht na het inschakelen enkele seconden al-
vorens de toetsen in te drukken.
4) Er is geen cassette ingebracht.
➪Breng een cassette in.
5) De band is beschadigd, misschien zelfs ge-
scheurd.
➪Gebruik een andere cassette.
6) De cassette is tot het einde afgespeeld.
➪ Druk de knop in voor de andere richting of
draai de cassette om.
8.3 De functies trackkeuze, herhaling van een
track, korte voorafluistering van een
track en overslaan van lange pauzes werken
niet correct.
1) Tussen de verschillende tracks is er geen pauze
van minstens 4 seconden, zie technische opmerking op het einde van hoofdstuk 4.5. "Selecteren
van een track".
➪ Las bij eigen opnames een pauze in van min-
stens 4 seconden toe na iedere track, zie hoofdstuk 5.4. "Inlassen van een pauze van 4 seconden na iedere track".
8.4 Automatische CD-opname (CARS) werkt
niet
1) Er zit geen cassette in deck 2.
➪Plaats een cassette in deck 2.
8 Problemas y soluciones
8.1 No se escucha ningún sonido
1) Los cables RCA no están correctamente conectados.
➪ presionar las conexiones a fondo y verificar
todas las conexiones (ver capítulo 3).
2) El cabezal de lectura está sucio
➪ limpiarlo (ver capítulo 7.2)
3) La cinta del cassette está estropeada
➪ usar otro cassette
4) La cinta es virgen
➪ usar un cassette pregrabado
8.2 La cinta no gira cuando se pulsa una tecla
de reproducción o rebobinado
1) El compartimiento del cassette no está correctamente cerrado
➪ cerrarlo
2) La tecla se presiona justo después de cerrar el
cassette
➪ esperar algunos segundos antes de activar las
teclas
3) La tecla se presiona justo después de encender
el equipo
➪ esperar algunos segundos después de encen-
der, para activar las teclas
4) No hay cassette en el compartimiento
➪ colocar un cassette
5) La cinta está estropeada o defectuosa.
➪ utilizar otro cassette
6) La cinta ha terminado
➪ utilizar las teclas de modificación del sentido
de lectura o girar el cassette.
8.3 Las funciones "selección de títulos, repetición y salto de largas pausas" no funcionan
1) La pausa entre cada título es inferior a 4 segun-
dos (ver capítulo 4.5)
➪ poner , después de la grabación, una pausa de
4 segundos entre los títulos (ver capítulo 5.4)
8.4 La grabación automática del CD (CARS) no
funciona
1) No hay cassette en el lector 2
➪ poner un cassette en el lector 2
2) No hay ningún CD en el lector CD-2000
➪ poner un CD
3) El CD está sucio
➪ limpiarlo
4) Los cables (3,5 mm) de mando no están bien ins-
ertados en las tomas SYSTEM CONTROL.
➪ insertarlos totalmente
8.5 La copia de cassettes no empieza al mismo
tiempo en los dos lectores
1) La longitud de las dos cintas no es la misma
➪ no hay ninguna solución particular, todo es
función de la tolerancia de cada cassette.
8.6 No puede abrirse el compartimiento del cassette con EJECT
1) El lector está en modo lectura, grabación o rebo-
binado
➪ parar el lector presionando la tecla (29).
8.7 Reproducción sin agudos
1) El cabezal de lectura está sucio
➪ limpiarlo (ver capítulo 7.2).
8.8 La lectura está deformada
1) La grabación se realiza con un nivel sonoro (volu-
men) demasiado elevado
➪ durante la grabación, regular REC LEVEL(11)
de tal forma que, para las zonas más fuertes, se
encienda el indicador 0 dB de la pantalla.
8.9 Imposibilidad de gravar con la tecla RECORD presionada
1) Las lengüetas de protección del cassette están
rotas, impidiendo la grabación (esquema 4)
➪ utilizar otros cassettes o substituir la lengüeta
poniendo un trozo de papel adhesivo en su lugar
(esquema 5).
2) El compartimiento del cassette no está correcta-
mente cerrado
➪ cerrarlo
3) El reglaje REC LEVEL (11) está en el mínimo.
➪ regular correctamente el nivel de grabación
4) En el receptor DSR-2000, está seleccionado
TAPE 1 o TAPE 2.
➪ presionar la tecla (29) del TDD-2000 y se-
leccionar en el receptor DSR-2000 la fuente que
se desee.
5) La cinta ha terminado
➪ utilizar las teclas de dirección de lectura o girar
el cassette.
8.10 Fuertes interferencias
1) La cadena HiFi está interferida por otros equipos
eléctricos.
➪ desconectar los equipos que producen las in-
terferencias o alejarlos suficientemente de la cadena HiFi.
2) El volumen de grabación es demasiado bajo
➪ durante la grabación, poner el reglaje REC
LEVEL (11) de forma que para las zonas de volumen más fuertes, se encienda el segmento de 0
dB en la pantalla.
3) Un cassette gravado con sistema DOLBY NR es
leido sin Dolby
➪ poner el conmutador DOLBY NR (10) en B o C.
4) El cabezal de lectura está magnetizado.
➪ desmagnetizarla (ver capítulo 7.3)
30
E
NL
B
Page 31

2) In de CD-speler ligt geen CD.
➪Leg een CD in de CD-speler.
3) De CD is vuil.
➪Reinig de CD.
4) De kabels met de 3,5 mm-pluggen zijn niet volledig in de SYSTEM CONTROL-jacks geplugd.
➪Maak de verbinding in orde.
8.5 Het kopiëren van een cassette stopt niet ge-
lijktijdig op de beide decks
1) De bandlengte van de beide cassettes is niet
exact dezelfde.
➪ Metingen zijn niet noodzakelijk door toleran-
ties.
8.6 Het cassettecompartiment kan niet geopend
worden met de EJECT-toets
1) Het cassettedeck is aan het afspelen, opnemen
of terugspoelen.
➪Stop eerst het cassettedeck met de -toets
8.7 Doffe weergave zonder hoge tonen
1) De afleeskop is vuil.
➪Reinig de afleeskop, zie hoofdstuk 7.2. "Reini-
gen van de afleeskop en de bandgeleider".
8.8 Het afspelen is vervormd
1) Het opnameniveau was veel te hoog.
➪ Draai voor de opname de REC LEVEL-rege-
laar (11) slechts zo ver open dat enkel bij passages met het hoogste volume het 0 dB-segment
van de niveau-aanduiding oplicht.
8.9 Geen opname mogelijk bij indrukken van de
RECORD-toets
1) De opname wordt belet doordat het beveiligingslipje afgebroken is (fig. 4).
➪ Gebruik een andere cassette of vervang het
beveiligingslipje door een stevige kleefband (fig.
5).
2) Het cassettecompartiment is niet correct gesloten.
➪Sluit het compartiment correct.
3) De REC LEVEL-regelaar (11) staat in de minimumstand.
➪Stel het opnameniveau juist in.
4) Op de DSR-2000 is TAPE 1 of TAPE 2 geselecteerd.
➪ Druk op toets (29) van de recorder en sel-
ecteer de gewenste muziekbron op de receiver.
5) De cassette is ten einde.
➪ Druk de knop in voor de andere richting of
draai de cassette om.
8.10 Luide ruis
1) Het Hifi-systeem wordt gestoord door andere
elektrische toestellen.
➪ Schakel de interfererende toestellen uit of
plaats ze verder weg van het Hifi-systeem.
2) Opnameniveau (volume) te laag.
➪ Draai voor de opname de REC LEVEL-rege-
laar (11) zo ver open dat enkel bij passages met
het hoogste volume het 0 dB-segment van de niveau-aanduiding oplicht.
3) Een cassette opgenomen met Dolby wordt afgespeeld zonder Dolby.
➪Zet de DOLBY NR-schakelaar (10) in de stand
B of C.
4) De afleeskop is gemagnetiseerd.
➪ Demagnetiseer de afleeskop, zie hoofdstuk
7.3. "Demagnetiseren van de afleeskop".
8.11 Wow en flutter
1) De aandrijfas en/of aandrukrol zijn vuil.
➪Voer een reinigingsbeurt uit, zie hoofdstuk 7.2.
"Reinigen van de afleeskop en de bandgeleider."
2) De band is niet correct opgerold.
➪ Span de band aan door eens volledig vooruit
en achteruit te spoelen.
3) De band is beschadigd.
➪Gebruik een andere cassette.
8.12 De opname of het afspelen start onmiddellijk na het inschakelen
1) De TIMER-schakelaar (8) staat in de REC- of
PLAY-stand.
➪Schakel naar de stand OFF.
8.13 Geen werking mogelijk of een slechte functie
1) Interferenties beïnvloeden de microprocessor.
➪ Schakel de recorder uit en trek de netstekker
uit het stopcontact. Wacht een ogenblik en verbind opnieuw met het net. Schakel het toestel in.
9 Technische gegevens
Spoorsysteem: . . . . . . . . . 4 sporen/2 kanaal ste-
reo
Opnamesysteem: . . . . . . . RF bias (105 kHz)
Motoren: . . . . . . . . . . . . . . 2 DC-motoren, elektro-
nisch gestabiliseerd
Terugspoeltijd (C-60): . . . . ongeveer 110s
Frequentiebereik
Normal tape: . . . . . . . . . 20–15000 Hz, ±3dB
CrO
2
tape: . . . . . . . . . . . 20–16000 Hz, ±3dB
Metal tape: . . . . . . . . . . . 20–16000 Hz, ±3dB
THD: . . . . . . . . . . . . . . . . . < 0,6%
Signaal/ruis-verhouding (metal tape)
met Dolby C: . . . . . . . . . 71 dB
met Dolby B: . . . . . . . . . 61dB
zonder Dolby: . . . . . . . . 53dB
Wow en flutter: . . . . . . . . . 0,08% (Wrms)
±0,22% (DIN)
Micro-ingang MIC: . . . . . . . 2,5mV/18kΩ
Lijningang REC: . . . . . . . . 77,5mV/50kΩ
Lijnuitgang PLAY: . . . . . . . 500 mV/2kΩ
Voedingssysteem: . . . . . . . 230V~/50 Hz/15VA
Afmetingen (B x H x D): . . 440 x 146 x 270 mm
Gewicht: . . . . . . . . . . . . . . 4,6kg
Opgemaakt volgens de gegevens van de fabrikant.
Deze behoudt zich het recht voor de technische gegevens te veranderen.
8.11 El cabezal de lectura vibra
1) El eje de mantenimiento y/o las ruedas están sucias.
➪ realizar la sistema del sistema (capítulo 7.2)
2) La cinta no está correctamente enrollada
➪ tensar la cinta girando una de las dientes para
bobinar o rebobinar el cassette por completo.
3) La cinta está estropeada
➪ utilizar otro cassette
8.12 La grabación o la reproducción se conecta
desde la conexión
1) El selector TIMER (8) está en posición REC o
PLAY
➪ ponerlo en posición OFF
8.13 No puede utilizarse, existen disfunciones
1) Los problemas han estropeado el microprocesador.
➪ desconectar el equipo, quitar la toma de la
red. Esperar un momento antes de volver a
conectar y encender el equipo.
9 Características técnicas
Vías: . . . . . . . . . . . . . . . . . 4 vías/2 canales
estéreo
Sistema de grabación: . . . HF - (105 kHz)
Motores: . . . . . . . . . . . . . . 2 motores de corriente
continua regulados
electrónicamente
Duración del rebobinado
(C-60): . . . . . . . . . . . . . . . . 110 segundos aprox.
Banda pasante
cinta normal: . . . . . . . . . 20
-
15000Hz, ±3dB
cinta CrO
2
: . . . . . . . . . . . 20-16000Hz, ±3dB
cinta hierro: . . . . . . . . . . 20
-
16000Hz, ±3dB
Nivel de distorsión: . . . . . . <0,6%
Relación S/R (cinta hierro)
con Dolby C: . . . . . . . . . 71dB
con Dolby B: . . . . . . . . . 61 dB
sin Dolby: . . . . . . . . . . . . 53 dB
Lloro y centelleo: . . . . . . . . 0,08 % (WRMS)
±0,22 % (DIN)
Entrada micro MIC . . . . . . 2,5mV/18kOhmios
Entrada Line REC . . . . . . . 77,5 mV/50kOhmios
Salida Line PLAY . . . . . . . 500mV/2kOhmios
Alimentación . . . . . . . . . . . 230 V~/50Hz/15VA
Dimensiones (LxHxP): . . 440 x 146 x 270 mm
Peso . . . . . . . . . . . . . . . . . 4,6 kg
De acuerdo con el fabricante.
Sujeto a cambios técnicos.
31
E
NL
B
Page 32

É favor desdobrar a página 3. Pode assim ver
sempre os elementos de comando e as respectivas ligações.
Conteúdo Página
1 Recomendações . . . . . . . . . . . . . . . . . . . 32
2 Comandos e Ligações . . . . . . . . . . . . . . . 32
3 Ligação . . . . . . . . . . . . . . . . . . . . . . . . . . . 34
4 Reprodução . . . . . . . . . . . . . . . . . . . . . . . 34
4.1 Quais são as cassetes apropriadas? . . . . . 34
4.2 Ligar e Desligar . . . . . . . . . . . . . . . . . . . . . 34
4.3 Reproduzir uma cassete . . . . . . . . . . . . . . 34
4.4 Rebobinar para a frente e para trás com
arranque automático . . . . . . . . . . . . . . . . . 34
4.5 Selecção de um título . . . . . . . . . . . . . . . . 35
4.6 Repetição de um título . . . . . . . . . . . . . . . . 35
4.7 Controlo rápido de todos os títulos . . . . . . 35
4.8 Eliminação de Pausas Longas . . . . . . . . . . 35
5 Gravação . . . . . . . . . . . . . . . . . . . . . . . . . . 36
5.1 Protecção contra gravações acidentais . . . 36
5.2 Gravação normal . . . . . . . . . . . . . . . . . . . . 36
5.3 Reinicio da gravação em caso de erro . . . 36
5.4 Inserir uma pausa de 4 segundos depois
de um título . . . . . . . . . . . . . . . . . . . . . . . . 36
5.5. Gravação paralela . . . . . . . . . . . . . . . . . . . 36
5.6 Cópia de cassetes . . . . . . . . . . . . . . . . . . . 37
5.7 Arranque da gravação através de CD . . . . 37
5.8 Gravação automática do CD na cassete . . 38
6 Funcionamento com um interruptor
de relógio ou através do relógio do
receptor DSR-2000 . . . . . . . . . . . . . . . . . . 38
7 Cuidados . . . . . . . . . . . . . . . . . . . . . . . . . .39
7.1 Armazenamento correcto das cassetes . . . 39
7.2 Limpeza das cabeças e das guias . . . . . . . 39
7.3 Desmagnetização das cabeças . . . . . . . . . 39
8 Problemas . . . . . . . . . . . . . . . . . . . . . . . . .39
9 Especificações . . . . . . . . . . . . . . . . . . . . . 40
O sistema DOLBY de redução de ruído, foi utilizado
sob licença da empresa Dolby Laboratories Licensing Corporation. "DOLBY" e o duplo simbolo ,
são marcas registadas da Dolby Laboratories Licensing Corporation.
1 Recomendações
Esta unidade está conforme as Directivas EC, NR°
89/366/EWG, para compatibilidade electromagnetica.
Esta unidade usa alta-voltagem (230V~). Para
evitar um choque mortal, não abra a caixa. Entregue a assistência, apenas a pessoal devidamente
autorizado. Além disso, se a unidade for aberta, a
garantia expira.
Para funcionamento, tenha também em atenção os
seguintes itens:
•
Aunidade está preparada para funcionamento somente em interiores
•
Se a unidade foi transportada de um local frio para
uma sala quente, forma-se condensação. Isto prejudica o funcionamento, por isso, só a ponha a
funcionar quando estiver a mesma temperatura do
ambiente.
•
Só deve funcionar com temperaturas superiores
5°C.
•
Proteja-a de vibrações, humidade, pó e luz do sol
directa.
•
Não a coloque em funcionamento, junto de fontes
de ruído, como transformadores ou motores.
•
Não a ponha em funcionamento e retire imediatamente a ficha da tomada se:
1. Se verificar alguma avaria na unidade ou no
cabo de alimentação de corrente
2. Se ocorrer alguma avaria depois de uma queda
ou acidente similar
3. Verificar mau funcionamento
Em qualquer dos casos a unidade só deve ser reparada por pessoal habilitado
•
Um cabo avariado só deve ser reparado pelo fa-
bricante ou pessoal devidamente qualificado.
•
Nunca desligue a ficha da tomada, puxando pelo
cabo de energia
•
Se a unidade for usada para fins diferentes daqueles a que se destina, se for manuseada incorrectamente ou reparada por pessoal não qualificado, não assumiremos qualquer responsabilidade pelos possíveis danos.
•
Para limpeza use apenas um pano seco para remover o pó e nunca água ou produtos químicos
2 Comandos e Ligações
2.1 Painel Frontal e Controlo Remoto
1 Compartimento de cassete para o Deck 1.
2
T ecla para colocar em "0000" o contador do Deck 1.
3 Quadrante com a indicação do nível.
4
T ecla para colocar em "0000" o contador do Deck 2.
5 Compartimento de cassete para o Deck 2.
6 Interruptor de potência.
7 Tecla para abrir o compartimento da cassete 1
8 Comutador para o temporizador, só quando co-
nectado ao receptor MONACOR DSR-2000:
OFF = temporizador desligado
REC = temporizador preparado para arrancar
com uma gravação
PLAY= temporizador preparado para arrancar
com a reprodução
ATENÇÃO: Se o comutador for colocado em
REC ou PLAY, a gravação e reprodução começa
de imediato , se o gravador for colocado em funcionamento com o interruptor POWER (6).
9 Selector comutador para gravação ou repro-
dução automática de ambos os Decks:
= a gravação pára, depois da gravação
ou reprodução de um dos lados da cassete
Slå venligst side 3 ud. De kan nu hele tiden se de
beskrevne betjeningsfunktioner og tilslutninger.
Indholdsfortegnelse Side
1 Gode råd om sikker brug . . . . . . . . . . . . 32
2 Oversigt over betjeningselementer
og tilslutninger . . . . . . . . . . . . . . . . . . . . . 32
3 Tilslutning af apparatet . . . . . . . . . . . . . . 34
4 Afspilning . . . . . . . . . . . . . . . . . . . . . . . . . 34
4.1 Hvilke kassetter er egnede? . . . . . . . . . . . 34
4.2 Tænd/Sluk . . . . . . . . . . . . . . . . . . . . . . . . . 34
4.3 Afspilning af kassette . . . . . . . . . . . . . . . . . 34
4.4 Frem- og tilbagespoling med automatisk
start af afspilning . . . . . . . . . . . . . . . . . . . . 34
4.5 Valg af titler . . . . . . . . . . . . . . . . . . . . . . . . 35
4.6 Gentaget afspilning af en titel . . . . . . . . . . 35
4.7 Kort afspilning af alle titler . . . . . . . . . . . . . 35
4.8 Automatisk fremadspoling (til næste nr.)
ved lange pauser . . . . . . . . . . . . . . . . . . . . 35
5 Optagelse . . . . . . . . . . . . . . . . . . . . . . . . . 36
5.1 Sikring af kassetter mod utilsigtet
overspilning . . . . . . . . . . . . . . . . . . . . . . . . 36
5.2 Enkel kassetteoptagelse . . . . . . . . . . . . . . 36
5.3 Fornyet optagelse efter fejlbetjening . . . . . 36
5.4 Indlæggelse af 4 sekunder pause
efter en titel . . . . . . . . . . . . . . . . . . . . . . . . 36
5.5 Paralleloptagelse . . . . . . . . . . . . . . . . . . . . 36
5.6 Kopiering af kassetter (dubbing) . . . . . . . . 37
5.7 Kassetteoptagelse aktiveret af
CD-afspiller . . . . . . . . . . . . . . . . . . . . . . . . 37
5.8 Automatisk CD-optagelse på kassette . . . . 38
6 Funktion med kontaktur eller med
timeren i DSR-2000 receiveren . . . . . . . . 38
7 Vedligeholdelse . . . . . . . . . . . . . . . . . . . . 38
7.1 Korrekt opbevaring af kassetter . . . . . . . . . 38
7.2 Rengøring af tonehoveder og båndføring . 38
7.3 Afmagnetisering af tonehovedet . . . . . . . . 39
8 Afhjælpning af forstyrrelser . . . . . . . . . . 39
9 Tekniske data . . . . . . . . . . . . . . . . . . . . . . 40
Dolby støjundertrykkelsessystemet fremstilles under
licens fra Dolby Laboratories Licensing Corporation,
og dobbelt D-symbolet er Dolby Laboratories Licensing Corporation's varemærke.
1 Gode råd om sikker brug
Dette apparat opfylder EU-retningslinierne nr.
89/336/EMC for elektromagnetisk kompabilitet.
VIGTIGT!
Der er stærkstrøm i apparatet, derfor må servicering kun udføres af autoriseret personale. Ved ethvert indgreb fra andre end MONACOR DANMARK A/S bortfalder garantien. Udsæt ikke apparatet for fugtighed og høje temperaturer.
Før ibrugtagning skal følgende punkter ubetinget
iagttages.
•
Apparatet er kun egnet til indendørs brug.
•
Når apparatet placeres i et varmt lokale efter at
have været udsat for kulde, opstår der kondensfugtighed i apparatet. Dette skader apparatets
funktion. Tag derfor først apparatet i brug, når det
har nået omgivelsernes temperatur.
•
Brug kun apparatet ved temperaturer over 5°C.
•
Beskyt apparatet mod vibrationer, fugtighed, støv
og direkte sollys.
•
Brug ikke apparatet i nærheden af objekter, der
udstråler magnetfelter, som f.eks. magneter , motorer, højttalere, fjernsynsapparater m.m.
•
Anvend ikke apparatet og træk straks netstikket ud
af kontakten hvis:
1. Der er synlige skader på apparatet eller netkablet,
2. En skade er opstået efter apparatet er tabt eller
tilsvarende hændelse.
3. Der er fejlfunktioner.
Apparatet skal under alle omstændigheder repareres af autoriseret personel.
•
En beskadiget netledning bør kun repareres hos
MONACOR DANMARK A/S eller et autoriseret
værksted.
32
DK
P
•
T ag aldrig netstikket ud af kontakten ved at trække
i ledningen.
•
Hvis apparatet anvendes til andre formål end det
er beregnet til, hvis det betjenes forkert eller ikke
repareres af autoriseret personel, garanteres ikke
for mulige skader.
•
Anvend kun en tør støveklud til rengøring af kabinettet, under ingen omstændigheder kemikalier
eller vand.
2 Oversigt over betjeningselementer
og tilslutninger
2.1 Forside og fjernbetjening
1 Kassetteskuffe for løbeværk 1
2 Nulstiller for tælleværket "0000" til løbeværk 1
3 Display med niveauindikator
4 Nulstiller for tælleværket "0000" til løbeværk 2
5 Kassetteskuffe for løbeværk 2
6 Tænd/sluk knap
7 Knap til åbning af kassetteskuffe 1
8 Skydeomskifter til timer, kun i forbindelse med
MONACOR's receiver DSR-2000:
OFF = timer afbrudt
REC = timer i optagestilling
PLAY= timer i gengivestilling
ADVARSEL: Hvis kontakten står i REC eller
PLAY, startes straks en optagelse henholdsvis
afspilning, når optageren tændes med tænd/sluk
knappen (6)!
9 Omskifter til automatisk optagelse eller afspilning
af begge kassetter.
= Optageren stopper efter afspilning hen-
holdsvis optagelse af en kassetteside
= ved afspilning bliver begge kassetter
automatisk afspillet op til 5 gange efter
hinanden, ved optagelse bliver der optaget på begge kassettesider efter hinanden
Page 33

= durante a reprodução, ambos os lados
da cassete são reproduzidos, um depois do outro até 5 vezes. Na gravação
ambos os lados da cassete são usados
um a seguir ao outro
= durante a reprodução, ambos os lados
da cassete de ambos os decks , são reproduzidos um a seguir ao outro até 5
vezes. Durante a gravação ambos os
lados da cassete de ambos os decks
são usados um depois do outro
10 Comutador selector Dolby para redução do
ruído:
B = O Dolby B na maioria dos sistemas domé-
sticos. Para cassetes gravadas com o
Dolby B
C = O Dolby C, é um sistema melhorado do
Dolby B, que deve ser usado na gravação
de cassetes que venham a ser reproduzidas em unidades com o Dolby C, devendo também, ser usado na reprodução
de cassetes já gravadas com Dolby C
OFF = Desliga o sistema DOLBY. Para cassetes
que foram gravadas sem Dolby.
11 Controlo do nível de gravação.
12 Controlo do balanço para gravação
13 Jack de
1
/4" para auscultadores estéreo de média
impedância (8 Ohms) com controlo de volume.
14 Jack de
1
/4" para microfone mono. Se for ligado a
este Jack um microfone a entrada de gravação
REC (32), fica desligada.
15 Tecla para abrir o compartimento de cassete 2.
16 Tecla INTRO CHECK, para reprodução rápida de
todos os trechos de um dos lados da cassete, durante 10 segundos cada. Para tocar, todos os títulos a reprodução tem de ser ligada com a tecla
ou e então carregar nesta tecla.
17 Tecla BLANK SCAN , para saltar pausas entre tí-
tulos, que excedam 10 segundos. Esta função só
pode ser activada durante a reprodução.
18 Tecla AUTO, deve carregar-se antes de rebo-
binar a cassete a copiar ou a cassete gravada,
até ao principio da fita. Afunção só é activada se
a seguir a premir esta tecla, carregar numa das
teclas de duplicação de cassetes, tecla NOR (19)
ou tecla HIGH (20).
19 Tecla DUBBING (NOR) para cópia á velocidade
normal. Para isso a cassete a gravar deve ser colocada no deck 2, com a bobine do lado direito
vazia.
20 Tecla DUBBING (HIGH) para cópia ao dobro da
velocidade. Para isso a cassete a gravar deve
ser colocada no DECK 2, com a bobine do lado
direito vazia.
21 Tecla CARS para gravação do CD, com ajuste de
nível automático. (CARS = Computer Aided CD
Recording System). Esta função só é possível
em ligação com o leitor de CD MONACOR, CD2000 e o receptor MONACOR HI-FI DSR-2000.
22 Tecla SYNC REV para cópia de cassetes de dife-
rentes comprimentos. São gravadas em cada
lado da cassete exactamente os mesmos títulos
como na cassete original. Esta função só pode
ser activada se o comutador DIRECTION (9)
estiver na posição ou .
23 Tecla REC MUTE para gravação de uma pausa
de 4 segundos, sem som, entre dois títulos. A
função só pode ser activada durante a gravação,
ou em modo de gravação em Stand-By. Depois
de uma pausa de 4 segundos, a unidade é comutada novamente para o modo de gravação em
Stand By.
24 Tecla P AUSE para interromper a gravação ou re-
produção. Carregando novamente nesta tecla inicia-se a marcha.
25 Tecla RECORD para comutar para o modo Re-
cord Stand By. Para iniciar a gravação, depois
disto, deve carregar-se na tecla PAUSE (24).
26 Tecla PARALLEL REC para a mesma gravação
em simultâneo em ambos os decks, para obter
duas gravações originais.
27 Reprodução com leitura para a esquerda
Carregando na tecla novamente durante a
reprodução, o título em leitura pode ser repetido
tantas as vezes, quantas a tecla for carregada
(max. 8 vezes).
28 Rebobinagem com reprodução para a esquerda.
Durante a reprodução, com esta tecla pode seleccionar-se outros títulos.
Durante a reprodução com leitura para a direita:
Carregando na tecla a cassete rebobina
para o principio do título em leitura. Para seleccionar o título anterior é necessário carregar
duas vezes nesta tecla. Carregando na tecla diversas vezes é sempre rebobinado um título
prévio. Quando a reproduzir com leitura para a
esquerda, de cada vez que se carrega na tecla
, é rebobinado um título.
29 Stop
30 Rebobinagem com reprodução para a direita.
Durante a reprodução, com esta tecla pode seleccionar-se outros títulos.
Durante a reprodução com leitura para a direita:
Cada vez que se carrega na tecla é rebobinado um título.
Durante a reprodução com leitura para a esquerda:
Carregando nesta tecla a cassete é rebobinada para o principio do título em leitura. Para
seleccionar o título prévio a tecla deve ser
carregada duas vezes. Carregando diversas
vezes, é sempre rebobinado um título.
31 Reprodução com leitura para a direita.
Carregando na tecla novamente durante a
reprodução, o título em leitura pode ser repetido
tantas vezes, quantas se carregar nesta tecla
(máx. 8 vezes).
2.2 Painel Traseiro
32 Jack para as entradas de audio. Gravação Es-
querda/Direita
= ved afspilning bliver begge kassettesi-
der på begge løbeværker automatisk
afspillet op til 5 gange efter hinanden,
ved optagelse bliver der optaget på
begge kassettesider på begge løbe-
værker efter hinanden
10 Omskifter til Dolby-støjundertrykkelse:
B = Dolby B, anvendes i de fleste apparater til
hjemmebrug. Til kassetter, der er optaget
med Dolby B.
C = Dolby C, forbedret Dolby B system. Dolby
C skal vælges ved optagelse på en kassette, når denne også skal afspilles på et
apparat med Dolby C, og naturligvis ved
alle kassetter, der er optaget med Dolby
C.
OFF = Dolby afbrudt. Til kassetter, der er indspil-
let uden Dolby.
11 Kontrol af optageniveau
12 Balanceknap til optagelse
13 6,3 mm jack-bøsning til en hovedtelefon (impe-
dans > 8Ω) med egen volumenkontrol
14 6,3 mm jackbøsning til en mono-mikrofon. Ved
tilslutning af en mikrofon udkobles optageindgangen REC (32).
15 Knap til åbning af kassetteskuffe 2
16 INTRO CHECK knap til kort aflytning af alle
numre på en kassetteside med 10 sek. for hvert
nummer. For at spille numrene skal gengiveknappen først aktiveres med knappen eller og
derefter skal INTRO CHECK knappen nedtrykkes.
17 BLANK SCAN knap til fremadspoling ved pauser
af mere end 10 sekunders varighed. Denne funktion kan kun anvendes under afspilning.
18 AUTO knap kan nedtrykkes før kopiering af kas-
setter, hvorved både originalbånd og optagebånd
spoles tilbage til båndets begyndelse. Funktionen
aktiveres først, når man efter tryk på AUTO knap-
pen også trykker på en af DUBBING knapperne:
Knap NOR (19) eller knap HIGH (20).
19 DUBBING knap (NOR) til kopiering af kassetter
med normal hastighed. Optagekassetten skal i så
fald ilægges løbeværket med den tomme spole til
højre.
20 DUBBING knap (HIGH) til kopiering af kassetter
med dobbelt hastighed. Optagekassetten skal i
så fald ilægges løbeværket med den tomme
spole til højre.
21 CARS knappen til CD-optagelser med automa-
tisk niveauindstilling (CARS = Computer Aided
CD Recording System = computerstyret CD-optagesystem). Denne funktion kan kun anvendes i
forbindelse med den til optageren hørende
MONACOR CD-afspiller CD-2000 og MONACOR Hifi Receiver DSR-2000.
22 SYNC REV knap til kopiering af kassetter med
forskellig længde. Derved bliver nøjagtig de
samme numre optaget i begyndelsen af begge
sider på optagebåndet, som også er i begyndelsen på originalbåndet. Denne funktion kan kun
aktiveres, hvis DIRECTION knappen (9) er i stilling eller
23 REC MUTE knappen til indlæggelse af en 4 se-
kunders pause mellem to numre. Denne funktion
kan kun aktiveres under optagelse eller i standby optagestilling. Efter pausen skiftes tilbage til
stand-by igen.
24 PAUSE knap til afbrydelse af afspilning eller op-
tagelse. Ved fornyet tryk på knappen kører båndet atter.
25 RECORD knap til "klar til optagelse". For at starte
på en optagelse skal PAUSE knappen ligeledes
nedtrykkes.
26 PARALLEL REC knap til samme optagelse på
begge løbeværker for at opnå to originaloptagelser.
27 Afspilning mod venstre.
Ved fornyet tryk på knappen under afspilning
kan den i øjeblikket afspillede titel gentages så
ofte som knappen nedtrykkes (max. 8 gange).
28 Spoling mod venstre.
Under afspilning kan man vælge andre titler med
denne knap.
Ved afspilning mod højre:
Ved tryk på knappen spoles det aktuelle
nummer tilbage til starten. Hvis det foregående
nummer ønskes, skal knappen nedtrykkes
to gange. Ved yderligere tryk på knappen
spoles hver gang tilbage til et tidligere nummer.
Ved afspilning mod venstre:
Ved hvert tryk på knappen spoles et nummer frem.
29 Stop
30 Spoling med højre fremløbsretning.
Under afspilning kan man vælge andre numre
med denne knap.
Ved afspilning mod højre:
Ved hvert tryk på knappen spoles et nummer frem.
Ved afspilning mod venstre:
Ved tryk på knappen spoles tilbage til starten på det aktuelle nummer. For at vælge det foregående nummer skal knappen nedtrykkes to gange. Ved yderligere tryk på
knappen spoles hver gang et nummer tilbage.
31 Afspilning mod højre.
Ved fornyet tryk på knappen under afspilning
kan den aktuelle titel høres så mange gange,
som knappen nedtrykkes (max. 8 gange).
2.2 Bagsiden
32 Phonobøsninger til audioindgange for optagelse
venstre/højre
33 Phonobøsninger til audioudgange afspilning ven-
stre/højre
34 3,5 mm jackbøsning til systemstyring af til-
hørende apparater.
35 Nettilslutning 230 V~/50Hz.
33
DK
P
Page 34

33 Jack para as saídas de audio. Reprodução Es-
querda/Direita
34 Jack de 3,5 para o sistema de controlo das
unidades ligadas
35 Ligação de corrente 230 V~/50Hz
3 Ligações
1) Ligue os jacks de audio PLAY(33) ás respectivas
entradas (TAPE PLAY) do receptor ou amplificador. Verifique os códigos das cores dos jacks e
fichas (Vermelho = canal direito) (Branco = canal
esquerdo).
2) Ligue os jacks de entrada de audio REC (32) ás
respectivas saídas (TAPE REC) do receptor ou
amplificador.
3) O controlo do sistema, permite uma extensa
função de controlo de todos os componentes das
unidades ligadas ao receptor (MONACOR HI-FI
DSR-2000 e leitor de CD MONACOR CD-2000).
Por exemplo, o receptor é automáticamente ligado à correspondente unidade, se o leitor de CD
ou o DECK de cassetes for posto em funcionamento. É também possível um ajuste automático do nível de gravação do CD no deck de
cassetes. O CD reproduz um pequeno excerto e
o nível é ajustado antes da gravação se iniciar, e
depois disto o CD arranca desde o principio.
Para estar apto a usar o sistema de controlo,
ligue o cabo de controlo com fichas de 3,5 mm
num dos jacks do SYSTEM CONTROL no gravador (34) ou receptor.
4) Depois de todas as unidades se encontrarem ligadas entre si, ligue a ficha de corrente a tomada
do sector na parede (230V~/50 Hz).
5) Se necessário ligue uns auscultadores de
8Ohms de impedância ao jack de
1
/4" PHONES
(13). Se os auscultadores não possuírem controlo de volume, pode usar um cabo de controlo
separado (MONACOR HEC-60).
ATENÇÃO: Nunca ajuste o volume dos auscultadores para valores muito elevados. Um volume
permanente muito elevado pode danificar o aparelho auditivo. O ouvido habitua-se a volumes
elevados, o que ao fim de algum tempo dá a impressão de ser necessário aumentar o volume.
Por isso não aumente mais um volume elevado,
após se ter habituado a ele.
4 Reprodução
4.1 Quais as cassetes apropriadas ?
Em geral podem usar-se cassetes com duração até
90 minutos (C-90). Não deve usar a C-120 (120 minutos), pois a fita é demasiada fina, estica com facilidade e deterióra-se rapidamente. Não use cassetes
continuas, pois podem danificar o mecanismo do
gravador.
As cassetes de dióxido de crómio ou de metal,
são as mais apropriadas. No entanto a melhor qualidade, obtém-se com as cassetes de metal. Através
das marcas existentes na cassete, o gravador reconhece automáticamente a que tipo pertence e comuta
automáticamente de acordo com o tipo de cassete.
4.2 Ligar e Desligar
1) Antes de ligar, coloque sempre o cursor TIME (8)
na posição OFF . De outra forma, ao ligar, a repro-
dução ou gravação começa de imediato. Neste
caso a cassete pode ser apagada.
Ligue o Deck com o interruptor POWER (6).
2) Depois de funcionar feche sempre o comparti-
mento da cassete para o proteger de impurezas e
desligue a unidade no interruptor POWER (6).
3) Quando o desligar e se quiser voltar a ligar ime-
diatamente, aguarde alguns segundos antes de
ligar novamente.
4.3 Reproduzir uma cassete
1) Coloque uma cassete. Se necessário ajuste a fita
rodando a bobine. Abra o compartimento da cas-
sete com a tecla EJECT(7 ou 15). Coloque a cassete com a parte aberta, para baixo. Feche o
compartimento com cuidado. Se necessário, coloque a zero o conta-voltas com a tecla RESET (2
ou 4).
2) Coloque o cursor DOLBY NR (10) na posição correspondente ao sistema usado na gravação:
OFF = gravação sem Dolby NR
B = gravação com Dolby B
C = gravação com Dolby C
3) Coloque o cursor DIRECTION (9), na função desejada:
= o gravador pára depois de reproduzir um
dos lados da cassete
= ambos os lados da cassete são reprodu-
zidos automáticamente, um a seguir ao
outro, até 5 vezes
= primeiro são lidos ambos os lados da
cassete, e então automáticamente os
dois lados da cassete do outro deck. Isto
é repetido 4 vezes. Claro que é necessário colocar uma cassete em cada
Deck.
4) Inicie a reprodução, com a tecla ,se a bobine
vazia da cassete está do lado direito, ou com a
tecla se a bobine vazia está do lado esquerdo. Se uma cassete não estiver totalmente
rebobinada, carregando na tecla ou o
lado de uma ou outra cassete pode ser reproduzido. O mostrador indica sempre a direcção respectiva.
5)
Se quiser parar a reprodução carregue na tecla .
6) Para retirar a cassete carregue na tecla EJECT (7
ou 15), mas apenas no caso da cassete estar já
parada.
4.4 Rebobinagem da cassete nos dois sent-
idos com arranque automático da reprodução
Depois de parar a cassete com a tecla , a fita pode
ser rebobinada num ou noutro sentido, com as
teclas ou .
3 Tilslutning af apparatet
1) Forbind udgangsbøsningerne PLAY (33) via
phonokablet med den tilsvarende indgang (TAPE
PLAY) på receiver eller forstærker. Bemærk farvekoden på ledning og stik (rød = højre kanal,
hvid = venstre kanal).
2) Forbind ligeledes audioindgangsbøsningerne
REC (32) via phonokabel med den tilsvarende
udgang (TAPE REC) på receiveren eller forstærkeren.
3) Systemstyringen muliggør en omfattende styring
af alle komponenter ved tilslutning af de tilhørende enheder (MONACOR Hi-fi receiver
DSR-2000 og MONACOR CD-afspiller CD-2000).
F . eks. skifter receiveren automatisk til det pågældende apparat, når CD-afspilleren eller løbeværket startes. Automatisk niveaukontrol ved CD-optagelser på løbeværket er også mulig: Afspilning
af en CD-plade startes kortvarigt, optageren indstiller sit optageniveau før optagelsen, herefter
startes CD'en fra begyndelsen, optagelsen begynder – altsammen automatisk!
For at drage nytte af systemstyringen, skal det
medfølgende styrekabel med 3,5mm jack-stik
sættes i SYSTEM CONTROL bøsningen på optageren (34) og på receiveren.
4) Først efter at alle enheder er forbundet med hinanden, sættes netstikket i en stikkontakt (230V~/
50Hz)
5) En hovedtelefon (impedans > 8 Ω) kan tilsluttes
6,3 mm jack-bøsningen PHONES (13). Hvis hovedtelefonen ikke har sin egen volumenkontrol, er
det nødvendigt at indskyde en særskilt volumenkontrol (f.eks. MONACOR HEC-60).
BEMÆRK: Skru ikke for højt op for hovedtelefonens lydstyrke. Dette kan skade hørelsen! Det
menneskelige øre vænner sig til høje lydstyrker
og efter nogen tid mærkes det høje lydniveau
ikke. Skru derfor ikke yderligere op for lydniveauet, når De har vænnet Dem til det høje niveau.
4 Afspilning
4.1 Hvilke kassetter er egnede?
Principielt kan man anvende alle kassetter med spilletid op til 90 min (C-90). Der bør ikke anvendes
C-120 kassetter (120 minutter), da båndet er
meget tyndt. Det kan let briste eller forårsage "båndsalat".
Desuden bør endeløse båndkassetter ikke
benyttes. De kan beskadige optagerens mekanik.
Alle båndtyperne normal-, kromdioxid- og metalbånd kan benyttes. Den bedst mulige kvalitet opnås
dog kun med metalbånd. Optageren indstiller sig automatisk til den rigtige båndtype pga. markeringerne
på kassetten.
4.2 Tænd/Sluk
1) Før apparatet tændes, skal skydekontakten
TIMER (8) altid stilles i OFF stilling. Ellers begyn-
der optagelse eller afspilning straks. I så fald kan
et kassettebånd blive slettet!
Tænd optageren med POWER-knappen (6).
2) Luk altid kassetteskuffen efter brug, således at
kassetteskakten er beskyttet mod snavs, og sluk
apparatet med POWER-knappen (6).
3) Efter slukning bør man altid vente nogle sekunder
før apparatet atter tændes.
4.3 Afspilning af en kassette.
1) Ilægning af kassette: Om nødvendigt strammes
kassettebåndet ved at dreje en af spolerne. Åbn
kassetteskuffen med EJECT-knappen (7 henh.
15). Ilæg kassetten således, at åbningen til bån-
det peger nedad. Luk kassetteskuffen forsigtigt
ved at trykke på den øverste kant. Nulstil tælle-
værket med RESET-knappen (2 henh. 4) hvis det
ønskes.
2) Sæt skydekontakten DOLBY NR (10) i den stil-
ling, der svarer til kassettens optagesystem:
OFF = optaget uden Dolby NR
B = optaget med Dolby B
C = optaget med Dolby C
3) Stil skydekontakten DIRECTION (9) i den ønskede stilling:
= optageren stopper efter afspilning af en
kassetteside.
= begge sider af kassetten afspilles efter
hinanden op til 5 gange.
= Først afspilles begge kassettesider på et
løbeværk, herefter automatisk begge
kassettesider på det andet løbeværk.
Dette gentages fire gange. (Der skal naturligvis være ilagt kassette i begge løbeværker!)
4) Med knappen startes afspilning, når den
tomme spole på kassetten er til højre, og med
knappen, når den tomme spole er til venstre.
Hvis en kassette ikke er spolet helt tilbage, kan
den ene eller den anden kassetteside afspilles
ved tryk på eller knappen. Displayet viser
altid den rigtige afspilningsretning.
5) Hvis afspilningen skal stoppes, nedtrykkes
knappen.
6) Ved tryk på EJECT-knappen (7 henh. 15) kan
kassetten udtages, men knappen må kun betjenes, når kassetten er stoppet!
4.4 Frem- og tilbagespoling med automatisk
start af afspilning
Efter at kassetten er stoppet med knappen, kan
båndet spoles frem eller tilbage med knapperne
eller . Det afhænger af afspilningsretnin-
gen, om kassetten skal spoles frem eller tilbage.
Ved afspilning med fremløbsretning mod højre:
= tilbagespoling
= fremadspoling
Ved afspilning med fremløbsretning mod venstre:
= fremadspoling
= tilbagespoling
Hvis afspilningen ønskes begyndt straks efter spoling, nedtrykkes den tilsvarende knap to gange.
Under spolingen blinker for kontrollens skyld ordet
"PLAY".
34
DK
P
Page 35

Reproduzindo para a direita:
= rebobinagem para trás
= rebobinagem para a frente
Reproduzindo para a esquerda
= rebobinagem para a frente
= rebobinagem para a esquerda
Se pretender iniciar a reprodução automáticamente,
depois da rebobinagem, carregue duas vezes na
tecla correspondente. Durante a rebobinagem a
palavra ”PLAY” está a piscar, para controlo.
Atenção: Carregando na tecla ou durante a reprodução, é rebobindada para trás, para o
inicio do respectivo título, ou para a frente, para o
próximo título.
4.5 Selecção de títulos
Com as teclas e pode seleccionar um
outro título durante a reprodução. O gravador rebobina até ao título seleccionado e automáticamente
inicia a reprodução a partir daí. Depois de carregar
na tecla ou o mostrador afixa "SP" e o
número de título que foram rebobinados para a
frente ou para trás. Podem ser rebobinados nos dois
sentidos até 20 títulos. Para usar este função é necessário deixar uma pausa de 4 segundos, pelo
menos entre cada título, para que o gravador reconheça os títulos individuais.
1) Durante a reprodução para direita:
De cada vez que se carrega na tecla , é rebobinado um título.
Carregando na tecla a cassete é rebobinada para o Inicio do título em reprodução.
Para seleccionar o título anterior, a tecla
tem de ser premida duas vezes. Carregando diversas vezes é rebobinado mais um título.
2) Durante a reprodução para esquerda:
Carregando na tecla a cassete rebobina
até ao inicio do título em reprodução. Para seleccionar o título anterior, a tecla tem de ser
premida duas vezes.
Carregando diversas vezes na tecla , é
sempre rebobinado um título, para trás.
Cada pressão na tecla , faz avançar um título para a frente.
Notas Técnicas:
O IPSS (Sistema de Programas Inteligentes), controla a selecção de títulos, assim como as funções
descritas nos próximos capítulos:
-
Reprodução repetida de um título
-
Controlo rápido de todos os títulos
-
Salto sobre longas pausas.
Pausas com pelo menos 4 segundos entre cada título, são uma pré-condição para que estas funções
funcionem. Na sua própria gravação pode inserir
estas pausas, de carregar na tecla REC MUTE (23).
O IPSS não pode funcionar correctamente:
1. No caso da gravações de voz ou ruído, com interrupções superiores a 4 segundos.
2. No caso de títulos com passagens com nível
muito baixo, ou sem nenhum som, por mais de 4
segundos.
3. No caso de cassetes com ruídos de interferências entre os títulos.
4. No caso de cassetes com pausas entre os títulos
inferiores a 4 segundos.
5. No caso de cassetes com nível de gravação extremamente baixo.
6. No caso de gravações em que se utilizam o sistema de potenciómetros cruzados e portanto
não tem pausas entre títulos.
4.6 Reprodução repetida de um título
Se o título em leitura for para ser repetido, carregue
na tecla respectiva, tantas quantas quiser que ele
seja repetido (max 8 vezes):
a tecla (31) durante a reprodução para a direita
a tecla (27) durante a reprodução para a es-
querda
O mostrador indica "AP" e o número de repetições.
O gravador rebobina, no fim do título para o principio
e inicia novamente a reprodução. Esta função repete-se tantas vezes, quantas as seleccionadas. A
função termina carregando na tecla (29) ou
PAUSE (24).
Se a função de repetição não funcionar correctamente, consulte as Notas Técnicas, no final do capítulo 4.5.
4.7 Controlo rápido de todos os títulos
Todos os títulos de um lado da cassete, podem ser
reproduzidos rapidamente, um a seguir ao outro durante 10 segundos.
1) Inicie a reprodução com as teclas ou
2) Depois de iniciar a reprodução, carregue na tecla
INTRO CHECK (16). O mostrador não indica
agora os quatro dígitos do contador, mas os 2 dí-
gitos dos títulos.
3) O gravador rebobina para o Inicio do próximo tí-
tulo, e começa a reprodução curta ,e assim su-
cessivamente para os restantes títulos.
4) Se o comutador DIRECTION (9) está na posição
ou , no final de um lado da cassete, é
automáticamente feita a comutação para reprodução normal do outro lado da cassete, ou para
reprodução normal do outro deck. Se também
aqui quisermos fazer o controlo rápido dos títulos,
carregue na tecla INTRO CHECK novamente.
5) Durante a reprodução do título, o controlo rápido
pode ser interrompido com a tecla INTRO
CHECK. Então a reprodução continua normalmente.
Se o controlo rápido não funcionar correctamente,
consulte as Notas Técnicas, no final do capítulo 4.5.
4.8 Salto automático sobre longas pausas
Se entre os títulos houver pausas com mais de 10
segundos, podem ser ultrapassadas automáticamente por rebobinagem automática.
1) Inicie a reprodução com as teclas ou .
2) Após iniciar-se a reprodução prima a tecla
BLANK SCAN (17), no mostrador aparece
"BLANK SCAN".
Bemærk: Ved berøring af knapperne eller
under afspilningen spoles tilbage til nummerets start henholdsvis frem til den næste titel (se
næste afsnit 4.5 "valg af titel").
4.5 Valg af titel
Man kan med knapperne og vælge et
andet nummer, medens afspilningen er i gang. Båndoptageren spoler til den valgte titel og starter derfra
automatisk afspilning. Ved tryk på knapperne
og viser displayet "SP" og antal numre, der er
spolet frem eller tilbage. Denne funktion virker kun,
såfremt der er en pause på mindst 4 sekunder mellem de enkelte numre, således at optageren kan registrere disse.
1) Ved afspilning med fremløbsretning mod
højre:
Ved hvert tryk på knappen spoles en titel
længere frem.
Ved tryk på knappen spoles tilbage til begyndelsen af det aktuelle nummer. For at vælge
det foregående nummer skal knappen nedtrykkes to gange. Ved yderligere tryk på
knappen spoles tilbage til tidligere numre.
2) Ved afspilning mod venstre:
Ved tryk på knappen spoles tilbage til starten på det aktuelle nummer. For at vælge det foregående nummer skal knappen nedtrykkes to
gange. Ved yderligere tryk på knappen
spoles tilbage til tidligere numre.
Ved hvert tryk på knappen spoles en titel
længere frem.
Tekniske anvisninger
IPSS systemet (Intelligent program søge system)
styrer titelvalget såvel som de funktioner, der er beskrevet i det følgende afsnit:
– Gentaget afspilning af et nummer
– Kortvarig afspilning af begyndelsen på alle numre
– Fremadspoling ved lange pauser.
Forudsætningen for disse funktioner er pauser af
mere end 4 sekunders varighed mellem de enkelte
numre. Ved egne optagelser kan sådanne pauser
indlægges med REC MUTE knappen (23) (se afsnit
5.4 "indføjelse af 4 sekunders pauser").
IPSS systemet kan ikke arbejde korrekt:
1. Ved optagelser med tale eller støj, der har pauser
af mere end 4 sekunders varighed
2. Ved numre med meget stille passager eller passager uden lyd af mere end 4 sekunders varighed
(f.eks klassisk musik)
3. Ved kassetter , der har forstyrrende støj mellem de
enkelte numre
4. Ved kassetter, hvor pauserne mellem de enkelte
numre er kortere end 4 sekunder
5. Ved kassetter med ekstremt stille optagelser
6. Ved optagelser, hvor der er anvendt krydsfading
og derfor ikke er pauser mellem numrene.
4.6 Gentaget afspilning af en titel
Hvis den lige afspillede titel skal gentages, skal den
pågældende knap til afspilning nedtrykkes så mange
gange, som nummeret ønskes gentaget (max. 8
gange):
knappen (31) ved afspilning med fremløbsret-
ning mod højre (som vist på displayet)
knappen (27) ved afspilning med fremløbsret-
ning mod venstre
Displayet viser "AP" og antal gentagelser. Optageren
spoler ved nummerets afslutning tilbage til dets begyndelse og begynder afspilning. Dette gentager sig
det valgte antal gange. Funktionen frakobles ved tryk
på knappen (29) eller PAUSE-knappen (24).
Hvis gentagelsesfunktionen ikke fungerer ordent-
ligt, så læg mærke til de tekniske anvisninger i slutningen af afsnit 4.5 "valg af titler".
4.7 Kort afspilning af alle titler
Alle titler på en kassetteside kan afspilles i 10 sekunders intervaller efter hinanden.
1) Start afspilning med knap henholdsvis .
2) Tryk efter at afspilning er begyndt på knappen
INTRO CHECK (16). Displayet viser nu ikke det
fircifrede tælleværk, men med to cifre antallet af
numre, der afspilles kortvarigt.
3) Optageren spoler til næste nummer, og spiller
kortvarigt, derefter til næste nummer osv.
4) Når kontakten DIRECTION (9) står i stilling
eller , afspilles den anden kassette automatisk ved afslutning af den første kassetteside henholdsvis normal afspilning af det andet løbeværks
bånd. Hvis man også her ønsker kort afspilning af
alle numre, skal man atter nedtrykke INTRO
CHECK knappen.
5) Den kortvarige afspilning af numre kan afbrydes
ved tryk på INTRO CHECK knappen under afspilningen. Herefter fortsættes med almindelig afspilning.
Hvis dette ikke fungerer korrekt, er der tekniske anvisninger i slutningen af afsnit 4.5 "valg af titler".
4.8 Automatisk fremadspoling ved lange pau-
ser
Hvis der mellem numrene er pauser af over 10 sekunders varighed, kan disse springes over ved automatisk hurtig fremspoling.
1) Start afspilning med henholdsvis knappen.
2) Tryk på BLANK SCAN (17) knappen. På displayet
ses ordet "BLANK SCAN".
3) Hvis man er nået til en længere pause under afspilningen, viser displayet "SP00", og der spoles
hurtigt frem til næste nummers begyndelse. Her
begynder afspilningen atter.
4) Ved andet tryk på BLANK SCAN knappen eller
ved tryk på knap (29) henholdsvis PAUSE (24)
frakobles funktionen atter.
Hvis den automatiske fremadspolingsfunktion ved
lange pauser ikke fungerer korrekt, er der tekniske
anvisninger i slutningen af afsnit 4.5 "valg af titler".
35
DK
P
Page 36

3) Se a reprodução atingiu uma pausa longa, o
mostrador indica "SP00", e a cassete avança até
ao inicio do título seguinte. Aí, a reprodução continua novamente.
4) Carregando uma segunda vez na tecla BLANK
SCAN (17), ou na tecla (29) ou PAUSE (24), a
função é desligada.
Se o sistema não funcionar correctamente, consulte
as Notas Técnicas, no final do capítulo 4.5.
5 Gravação
5.1 Proteja a cassete contra gravações aci-
dentais
Para evitar apagar as cassetes gravadas por si, as
patilhas (a) e (b) devem ser partidas (Fig. 4). As cassetes já gravadas para venda, estão protegidas pelo
fabricante. Apatilha (b), protege o lado cuja etiqueta
ou rótulo está virada para cima, de acordo com a
Fig. 4 (neste caso o lado 1). Para proteger apenas
um lado, quebre apenas a patilha correspondente.
Para poder usar novamente em gravação uma
cassete protegida, se necessário, basta colocar fita
adesiva no lugar da patilha.
5.2 Gravação normal de uma cassete
1) Coloque uma cassete e rebobine até ao principio
ou até ao ponto onde queira iniciar a gravação.
Coloque o contador em Zero, com a tecla RESET
(2 ou 4). Isto torna mais fácil, localizar novamente
o inicio da gravação.
2) Coloque o cursor DOLBY NR (10), na posição em
que a cassete vai ser gravada. Veja as possibilidade do gravador em que a cassete irá ser reproduzida. O melhor resultado obtem-se com o
Dolby C.
OFF = gravação sem Dolby NR
B = gravação com Dolby B
C = gravação com Dolby C
3) Coloque o cursor DIRECTION (9), na função desejada:
= o gravador pára depois de gravar um
lado da cassete.
= ambos os lados da cassete são grava-
dos automáticamente, um a seguir ao
outro.
= primeiro são gravados ambos os lados
da cassete de um deck, e em seguida
ambos os lados da cassete do outro
deck. (É necessário que em ambos os
decks, tenham sido colocadas as cassetes.)
4) No receptor ou amplificador seleccione a unidade
através da qual vai fazer a gravação. Numa gravação de microfone ligue o microfone ao Jack
MIC (14). Com isto a entrada de gravação REC
(32) é desligada.
5) Carregue na tecla RECORD (25). O gravador fica
em Stand-By. O mostrador indica "REC" e o simbolo PAUSE . (No caso do receptor MONACOR
DSR-2000, ser usado o comutador de entrada
INPUT SELECT desta unidade, fica bloqueado
contra desajustes)
6) Com o controlo REC LEVEL (11) ajuste o nível e
com o controlo BALANCE (12), o balanço da gravação, de forma que nas passagens de volume
mais elevado, o segmento 0dB acenda. Para
muitas gravações o controlo de BALANCE, pode
permanecer na posição média. Apenas em gravações com baixos níveis é necessário correcção.
7) Se aparecer no mostrador uma direcção não desejada de fita, mude a direcção com as teclas
ou .
Atenção: Se carregar na tecla que corresponde a
direcção indicada no mostrador, a gravação começa de imediato.
8) Inicie a gravação com a tecla PAUSE (24). Carregando novamente nesta tecla, a gravação pode
ser interrompida.
9) Para parar a gravação, carregue na tecla (29)
5.3 Novo inicio de gravação, em caso de erro
A cassete pode ser automáticamente rebobinada
para o principio. se por exemplo, não gostar de um
título.
1) Enquanto decorre a gravação, carregue na tecla:
(com a direcção de gravação para a di-
reita) ou
(com a direcção de gravação para a es-
querda)
2) A gravação pára, e o gravador rebobina para o in-
icio da gravação. Agravação começa novamente.
5.4 Inserir uma pausa de 4 segundos depois
de um título
Entre os títulos devem existir pausas de 4 segundo,
pelo menos, senão o IPSS não pode funcionar correctamente. Com a tecla REC MUTE (23), pode automáticamente inserir uma pausa de 4 segundos
nas suas gravações.
Existem dois métodos:
1. Durante a gravação:
Enquanto se processa a gravação, carregue na
tecla REC MUTE (23) no fim do título. Ao final do
título é acrescentada uma pausa de 4 segundos,
mesmo que exista um sinal de gravação no indicador de nível. Enquanto insere a pausa, no
mostrador aparece a "REC" a piscar. O gravador
está fica comutado para o modo Stand By. Com a
tecla PAUSE (24), pode iniciar a gravação do título seguinte.
2. Depois da gravação:
No fim do título, carregue na tecla PAUSE (24).
Com a tecla RECORD (25), comute para standby. Carregue na tecla REC MUTE (23) e acrescenta-lhe a pausa. Depois disto, a gravação volta
atrás a Stand By. Com a tecla (29) comuta
para gravação em Stand By.
5.5 Gravação Paralela
A mesma gravação pode ser feita em ambos os
Decks para obter duas gravações originais.
5 Optagelse
5.1 Sikring af kassetter mod utilsigtet
overspilning
For at hindre kassetter med egne optagelser i at blive
overspillet eller slettet ved en fejltagelse, skal tappene (a) og (b) brækkes af (billede 4). Ved købte
indspillede bånd er dette gjort i forvejen. Tappen (b)
sikrer den side af båndet, hvis tekst på billede 4 ses
øverst ( i dette eksempel side 1). Til sikring af den anden side skal den tilsvarende tap også brækkes af.
Hvis man ønsker at overspille en sikret kassette,
skal et kraftigt stykke tape placeres over stedet, hvor
tappen sad tidligere (billede 5).
5.2 Enkel kassetteoptagelse
1) Ilæg kassetten og spol til begyndelsen eller til det
sted, hvorfra optagelse skal begynde. Stil tælle-
værket på nul med RESET (2 henh. 4) knappen.
Dette gør det lettere at genfinde stedet, hvor op-
tagelsen er startet.
2) Sæt skydekontakten DOLBY NR (10) i den stil-
ling, der svarer til kassettens optagesystem. Her
skal bemærkes, hvilket muligheder den optager
har, som båndet senere skal afspilles på. Den
bedste afspilning opnås med Dolby C.
OFF = optaget uden Dolby NR
B = optaget med Dolby B
C = optaget med Dolby C
3) Stil skydekontakten DIRECTION (9) i den øns-
kede stilling:
= optageren stopper efter afspilning af en
kassetteside.
= begge sider af kassetten afspilles efter
hinanden op til 5 gange.
= først afspilles begge kassettesider på et
løbeværk, herefter automatisk begge
kassettesider på det andet løbeværk (der
skal naturligvis være ilagt kassette i
begge løbeværker!)
4) Vælg på receiveren henholdsvis forstærkeren
den enhed, fra hvilken der skal optages. Ved mi-
krofonoptagelser skal en mikrofon tilsluttes bøsningen MIC (14). Derved frakobles optageindgangen REC (32).
5) Tryk på RECORD knappen (25). Optageren er nu
klar til optagelse. Displayet viser "REC" og pausesymbolet . (Ved brug med MONACOR Hi-fi receiver DSR-2000 er indgangsvælgeren INPUT
SELECT på denne enhed fastlåst for at hindre
fejlindstilling).
6) Indstil nu lydniveauet med kontrollen REC LEVEL
(11) og balancen med kontrollen BALANCE (12)
således, at segmentet 0dB på niveauindikatoren
lyser op ved de kraftigste lydpassager. V ed de fleste optagelser kan BALANCEkontrollen blive i
den midterste stilling (i klik-stilling). Kun ved
meget dårlige originaloptagelser er en korrektion
nødvendig.
7) Hvis displayet viser en anden fremløbsretning
end den ønskede, ændres retningen med knapperne henholdsvis .
Bemærk: Hvis den knap der svarer til den aktuelle
fremløbsretning nedtrykkes, starter optagelse
med det samme!
8) Begynd optagelsen med PAUSE knappen (24).
Ved fornyet tryk på denne knap kan optagelsen
afbrydes.
9) Tryk på knappen (29) for at afslutte optagelsen.
5.3 Fornyet optagelse efter fejlbetjening
Der kan automatisk spoles tilbage til en optagelses
start, hvis man f.eks ikke kan lide nummeret.
1) Endnu medens optagelsen er i gang, nedtrykkes
knappen (ved optageretning mod højre)
henholdsvis (ved optageretning mod venstre).
2) Optagelsen stopper, og optageren spoler tilbage
til optagelsens start. Her starter optagelsen atter.
5.4 Indlæggelse af 4 sekunders pause efter en
titel
For at IPSS (intelligent program søge system) kan
arbejde korrekt, skal der være mindst 4 sekunders
pause mellem de enkelte numre (se også "tekniske
anvisninger" ved slutningen af afsnit 4.5 "valg af titler"). Ved egne optagelser kan man med REC MUTE
knappen (23) automatisk indlægge en 4 sekunders
pause.
Der er to muligheder:
1. Under selve optagelsen
Medens optagelsen endnu er i gang nedtrykkes
REC MUTE knappen (23) ved nummerets afslutning. En 4 sekunders pause indlægges nu efter
nummeret, også selv om optagesignal kan ses på
niveauindikatoren. Medens pausen indlægges,
blinker tegnet "REC" på displayet. Derefter skifter
optageren til optagestilling. Optagelse af næste
nummer kan da startes ved tryk på PAUSE knappen (24)
2. Efter en optagelse
Ved et nummers afslutning nedtrykkes PAUSE
knappen (24). Sæt maskinen i optagestilling med
knappen RECORD (25). Tryk på REC MUTE
knappen (23), og pausen indlægges. Derefter
skifter optageren atter tilbage til optagestilling.
Med knap (29) frakobles optagestillingen.
5.5 Paralleloptagelse
Man kan optage samme program på begge løbeværker og derved få to originaloptagelser.
1) Ilæg kassetterne og spol til starten eller til det
sted, hvorfra optagelsen skal begynde.
2) Sæt DOLBY NR (10) kontakten i den ønskede stil-
ling (se afsnit 5.2 "Enkel kassetteoptagelse").
3) Stil skydeomskifteren DIRECTION (9) i den øns-
kede stilling:
= Optageren stopper efter optagelse af en
kassetteside
= eller
= begge kassettesider bliver automatisk
indspillet efter hinanden.
36
DK
P
Page 37

1) Coloque as cassetes e rebobine-as até ao principio ou até ao ponto onde pretende iniciar a gravação
2) Deslize o cursor DOLBY NR (10) até ao ponto desejado (Ver capitulo 5.2)
3) Coloque o cursor DIRECTION (9) na função desejada
= a gravação pára depois da gravação de
um lado da cassete
= ou
= ambos os lados da cassete são grava-
dos automáticamente, um após o outro.
4) Seleccione no receptor ou amplificador a unidade
através da qual vai efectuar a gravação
5) Com a tecla RECORD (25) no deck 1 ou 2 comute para gravação em Stand-By. Com o controlo REC LEVEL (11) ajuste o nível e com o controlo BALANCE (12) o balanço da gravação.
6) Desligue o Stand-By com a tecla (29)
7) Se aparecer no mostrador uma direcção não desejada de fita, mude a direcção em cada deck,
com as teclas ou , e imediatamente a seguir carregue na tecla (29)
8) Inicie a gravação paralela com a tecla PARALEL
REC (26).
9) Para interromper a gravação, carregue na tecla
PAUSE (24) no deck 2. Para parar a gravação
carregue na tecla no deck 1 ou 2.
5.6 Cópia de Cassetes
1) Coloque no Deck 1 a cassete a copiar e a cassete
a gravar no Deck 2. Abobine vazia da cassete coloca-se do lado direito, visto a cassete a copiar
começa em direcção ao lado direito.
2) O ajuste o nível e o balanço não podem ser controlados para cópias. Também o comutador
DOLBY NR, não tem aqui qualquer influencia. Os
mesmos ajustes são usados para cópia e gravação.
3) Coloque o cursor DIRECTON (9) na função pretendida:
= a gravação pára depois de copiar um
lado da cassete
=ou
= a cópia dos dois lados da cassete, co-
meça automáticamente.
4) Se ambas as cassetes não foram rebobinadas
para o inicio da fita. carregue na tecla AUTO (18)
antes de proceder a cópia. No mostrador "HIGH
DUB, NORM DUB" começa a piscar. Depois de
carregar numa das teclas de DUBBING (19 ou
29), tem lugar uma rebobinagem automática para
trás.
5) Se se pretender cópias deambos os lados da
cassete, mas a duração da cassete a copiar é
mais curta ou mais longa do que a outra cassete,
pode copiar-se o segundo lado com o mesmo título. Enquanto copia, a gravação rebobina para a
frente. Se o tempo de leitura da cassete a gravar
é mais curto, do que o da cassete a copiar (Fig.6),
claro que ficam a faltar os últimos títulos de cada
lado. Se o tempo de leitura da cassete a gravar é
mais longo (fig.7), no fim de qualquer lado, há um
espaço de fita sem qualquer gravação. Para activar esta função, carregue na tecla SYNC REC
(22). Esta função só pode ser activada se o comutador DIRECTON, estiver na posição ou
.
Cassette de gravação mais curta
➅
Cassette de gravação mais longa ➆
6) Depois destes preparativos, comece a cópia com
uma das teclas DUBBING
Para cópias em velocidade normal, recomendase a tecla NOR (19) com gravações de alta-fidelidade e no caso de cassetes com nível de gravação elevado.
Atecla HIGH (20) para cópias ao dobro da velocidade.
5.7 O leitor de CD arranca com o gravador de
cassetes
Enquanto o leitor de CD. modelo CD-2000 e o receptor HI-FI DSR-2000, estão ligados ao gravador,
podemos iniciar a gravação automáticamente, ao
mesmo tempo, que no CD, carregamos na tecla de
reprodução.
1) O gravador, o receptor e o leitor de CD, devem
estar ligados uns aos outros, com os cabos de
controlo incluídos (Ver capitulo 3 – "LIGAÇOES")
2) Coloque uma cassete. Se forem colocadas duas
cassetes é sempre o Deck 2 que arranca primeiro.
3) Coloque os comutadores DOLBY NR (10) e
DIRECTION (9) na posição pretendida. (Ver Capitulo 5.2 "Gravação normal de uma Cassete")
4) Carregue na tecla RECORD (25) e rapidamente
começa a reproduzir o CD e ajuste o nível de gravação com o controlo REC LEVEL (11). Assim
como o balanço para gravação com o controlo
BALANCE (12)
Deck de Leitura 1
Deck de gravação 2 Rebobinar para a frente
Pista 1
Pista 2
Pista 2
Pista 1
Stop
Deck de gravação 2
Deck de Leitura 1 Rebobinar para a frente
Pista 1
Pista 2
Pista 1
Pista 2
Stop
4) Vælg på receiveren /forstærkeren den enhed, fra
hvilken der skal optages.
5) Skift til optagestilling med RECORD knappen (25)
på løbeværk 1 eller 2. Indstil indspilningsniveauet
med REC LEVEL knappen (11) og balancen med
BALANCE knappen (12).
6) Slå optagestillingen fra med knap (29).
7) Hvis der på displayet ses en anden fremløbsretning end den ønskede, ændres retningen for
hvert løbeværk med knappen henholdsvis
, og nedtryk herefter straks knappen.
8) Begynd paralleloptagelsen med PARALLEL REC
knappen (26).
9) Tryk på PAUSE knappen (24) på løbeværk 2,
hvis en optagelse ønskes afbrudt. Hvis optagelsen ønskes afsluttet, skal knappen (29) på løbeværk 1 eller 2 nedtrykkes.
5.6 Kopiering af kassette (dubbing)
1) Ilæg den kassette der skal kopieres i løbeværk 1,
og optagekassetten i løbeværk 2. Kassettens
tomme spole skal altid befinde sig på højre side,
da kopieringen starter med fremløbsretning mod
højre.
2) Optageniveau og balance kan ikke justeres ved
kopieringen. DOLBY NR kontakten fungerer heller ikke under dubbing. Kopieringen sker med de
samme værdier, som den kopierede kassette er
optaget med.
3) Skydekontakten DIRECTION (9) sættes i den
ønskede stilling:
= Optageren stopper efter kopiering af en
kassetteside.
eller
= begge kassettesider bliver automatisk
kopieret efter hinanden.
4) Når en eller begge kassetter ikke er spolet tilbage
til båndets start, skal knappen AUTO (18) nedtrykkes inden kopieringen. Tegnet "HIGH DUB,
NORM DUB" blinker på displayet. Ved tryk på en
af knapperne DUBBING (19 henh. 20) udføres
først en automatisk tilbagespoling.
5)
Hvis begge kassettesider skal kopieres, men spillelængden for den kopierede kassette er kortere eller
længere end optagekassetten, kan man alligevel begynde den anden kassetteside med det samme
nummer som originalkassetten. Under kopieringen
spoler optageren så den pågældende kassette frem.
Hvis spilletiden på optagekassetten er kortere end
på originalkassetten (billede 6), mangler naturligvis
de sidste numre på hver side. Hvis spilletiden på optagekassetten er længere (billede 7), er der ved slutningen af båndet et tilsvarende langt stykke uden optagelse. For at aktivere denne funktion skal knappen
SYNC REV (22) nedtrykkes. Displayet viser "SYNC
REV" (Synchro Reverse Dubbing). Denne funktion
kan kun aktiveres, når omskifteren DIRECTION (9)
står i stilling eller .
Optagekassette er kortere ➅
Optagekassette er længere ➆
6) Efter disse forberedelser kan kopieringen startes
med en af DUBBING knapperne:
Knap NOR (19) til kopiering med normal hastighed, der anbefales ved værdifulde optagelser og
ved kassetter med højt optageniveau.
Knap HIGH (20) til kopiering med dobbelt hastighed.
5.7 Kassetteoptagelse aktiveret af CD-afspiller
Ved brug af den til optageren hørende CD-afspiller
CD-2000 og Hi-Fi receiveren DSR-2000 kan kassetteoptagelse startes automatisk samtidig med CDafspilning.
1) Optageren, Hi-Fi receiveren og CD-afspilleren
skal være forbundet indbyrdes med de medfølgende styrekabler (se også afsnit 3 "tilslutning af
apparatet").
2) Ilæg kassette(r). Hvis der er to kassetter i maskinen, startes altid først med løbeværk 2.
3) Kontakterne DIRECTION (9) og DOLBY NR (10)
sættes i de ønskede stillinger (se afsnit 5.2 "enkel
kassetteoptagelse").
4) Tryk på RECORD knappen (25), afspil kortvarigt
CD'en og indstil optageniveauet med REC LEVEL
knappen (11) og balancen med BALANCE knappen (12).
5) Hvis der på displayet vises en anden fremløbsretning end den ønskede, ændres retningen med
knapperne henholdsvis .
6) Stop CD-afspilleren.
7) Sluk for optagestillingen med knappen (29) og
tryk atter på RECORD knappen (25). Denne
handling er særlig vigtig. Hvis den ikke er udført,
kan optageren ikke starte samtidig med CD-afspilleren!
Det er også vigtigt, at man har valgt CD-afspilning
på Hi-fi receiveren. Hvis ikke, skal man trykke på
optagerens knap (29), vælge CD-afspilning på
receiveren og herefter trykke på RECORD knappen (25).
8) Begynd afspilning med knappen på CDafspilleren eller ved indtastning af det ønskede
Afspilning løbværk 1
Optagelse løbværk 2 Fremadspoling
Side 1
Side 2
Side 1
Side 2
Stop
Optagelse løbværk 2
Afspilning løbværk 1 Fremadspoling
Side 1
Side 2
Side 1
Side 2
Stop
37
DK
P
Page 38

5) Se aparecer no mostrador uma direcção não desejada de fita, mude a direcção com as teclas
ou .
Atenção: Se carregar na tecla que corresponde a
direcção indicada no mostrador, a gravação começa de imediato.
6) Pare o leitor de CD
7) Desligue o Stand-By da gravação no gravador
com a tecla (29) e carregue na tecla RECORD
(25) novamente. Este passo da operação assume uma elevada importância. Se não fìr efectuado devidamente, o gravador não irá arrancar
em simultâneo com o leitor de CD. Verifique também se o leitor está seleccionado no receptor. Se
não estiver, carregue na tecla (29) no gravador
e então carregue na tecla RECORD (25)
8) Inicie a reprodução no leitor CD com a tecla
ou introduzindo o numero do título desejado. Ao
mesmo tempo o gravador é comutado para gravação.
9) A gravação pode ser interrompida com a tecla
do leitor de CD (alguns segundos depois o
gravador comuta para gravações em Stand-By),
e pode também continuar novamente. O gravador pára automáticamente quando o CD chega
ao fim ou é premida no leitor de CD a tecla STOP.
5.8 Gravação automática de um CD numa
cassete (CARS)
Com o CARS (Sistema Auxiliar de Gravação Computorizado) um CD pode ser gravado numa cassete,
com ajuste automático de nível. Aqui todos os títulos
do CD, podem ser rapidamente controlados em movimentos de avanço/ recuo e é ajustado o melhor
nível de gravação. Introduz-se uma pausa de 8 segundos no inicio da cassete O CD começa agora
desde o inicio, e ao mesmo tempo a gravação começa. Uma função completamente automática. Esta
função só é possível, em conjunto com o leitor
MONACOR CD-2000, e o receptor MONACOR
DSR-2000, ligados ao gravador.
1) O gravador, receptor e leitor de CD's devem ser ligados através dos cabos de controlo incluídos.
(Ver capitulo 3 - Ligaçoes)
2) Com a tecla EDIT do controlo REMOTO do leitor
do CD, chame a função EDIT para seleccionar títulos e o comprimento da cassete.
3) Introduza uma cassete com a bobine vazia á direita e rebobine para trás até ao principio da cassete se necessário.
4) Deslize o cursor DOLBY NR (10), para a posição
desejada
5) Coloque o cursor DIRECTON (9) na função pretendida:
= a gravação pára depois de gravar um
lado da cassete
=ou
= ambos os lados da cassete são grava-
dos automáticamente, um após o outro.
6) O mostrador deve indicar para a direita a direcção da fita, senão carregue na tecla (31) e
imediatamento a seguir na tecla (29).
7) Carregue na tecla CARS (21). A gravação automática começa. Então o ajuste de nível automático, pode demorar até 3
1
/
2 minutos depen-
dendo do CD.
8) Após a gravação quer o leitor de CD, quer o gravador são colocados em STOP, se pretender
parar a gravação em qualquer altura prima a tecla
STOP do leitor de CD's.
6 Funcionamento com um Relogio Co-
mutador ou Através do Temporizador
do Receptor DSR-2000
Através da ligação a um relógio comutador, ou ao receptor DSR-2000, ligados ao gravador, pode iniciarse automáticamente a gravação ou reprodução, á
hora seleccionada anteriormente.
1) Ligue a ficha de corrente do gravador ao relógio
interruptor ou á saída de corrente do painel traseiro do receptor DSR-2000.
2) Em caso de utilização do relógio interruptor,
todas as outras unidades (o amplificador e o receptor), devem ser ligadas ao mesmo relógio interruptor. O relógio deve ser colocado primeiro
em ON, para o pré-ajuste do sistema HI-FI, independente do ajuste do relógio.
3) Ligue todas as unidades necessárias com os
seus interruptores de potencia.
4) Se ao sistema HI-FI, também estiver ligado o CD2000, não deve colocar-se nenhum CD no leitor.
Por outro lado ligando o relógio o leitor de CD, inicia a reprodução do CD e o gravador arranca
com a gravação.
5) Introduza uma cassete, no deck, se forem inseridas duas cassetes, principia sempre pela cassete
colocada no deck 2.
A bobine vazia da cassete deve ser sempre colocada do lado direito, porque ela inicia sempre o
movimento para a direita.
6) Deslize os comutadores DIRECTION (9) e
DOLBY NR (10), para as posições pretendidas
(Ver capitulo 4.3 e 5.2)
7) Para a reprodução automática, deslize o comutador TIMER (8), para a posição PLAY. Ajuste no
receptor o volume de som desejado.
8) Para a gravação automática, ajuste a estação no
sintonizador do receptor a ser gravada. Carregue
na tecla RECORD (25) do gravador. Ajuste o
nível com o controlo REC LEVEL(11) e o balanço
da gravação com o controlo BALANCE (12). Coloque o comutador TIMER (8), na posição REC.
Então pode colocar no mínimo o volume do amplificador.
9) Seleccione a hora de ligar e desligar no comutador do receptor ou no relógio interruptor. Ligue o
receptor ou o relógio, para funcionamento automático. Assim que se atingir o tempo seleccionado o sistema HI-FI, inicia a reprodução ou a
gravação.
nummer. Samtidig skifter optageren til optagestilling.
9) Optagelsen kan afbrydes med knappen på
CD-afspilleren (efter nogle sekunder skifter optageren til stand-by) og kan altid fortsættes igen.
Optagelsen stoppes automatisk når CD'en er færdigspillet eller ved tryk på CD-afspillerens STOP
knap.
5.8 Automatisk CD-optagelse på kassette
(CARS)
Ved hjælp af CARS (Computer Aided CD Recording
System = computerstyret CD optagesystem) kan en
CD optages med automatisk niveaujustering på en
kassette. Alle numre på CD'en afspilles kortvarigt, og
det optimale optageniveau indstilles. Der indlægges
en 8 sekunders pause ved kassettebåndets start.
CD'en starter atter fra begyndelsen, og samtidig begynder optagelsen - alt dette sker automatisk! Denne
funktion er kun mulig i forbindelse med MONACOR
CD-afspiller CD-2000 og MONACOR Hi-fi receiver
DSR-2000, der passer til optageren.
1) Optageren, Hi-fi receiveren og CD-afspilleren
skal forbindes med de medfølgende styrekabler
(se også afsnit 3 "tilslutning af apparatet").
2) Start editeringsfunktionen med EDIT knappen på
CD-afspillerens fjernbetjening for at vælge titler
og kassettebåndlængde (se CD-afspillerens
brugsanvisning).
3) Ilæg kassetten med den tomme spole mod højre
eller spol evt. tilbage til båndstart.
4) Sæt DOLBY NR knappen (10) i den ønskede stilling (se afsnit 5.2 "enkel kassetteoptagelse").
5) Sæt skydekontakten DIRECTION (9) i den ønskede stilling:
= Optageren stopper efter optagelse af en
kassetteside
eller
= begge kassettesider bliver automatisk
optaget efter hinanden.
6) Displayet skal vise fremløbsretning mod højre.
Hvis det ikke er tilfældet, trykker man på
knappen (31) og derefter straks på knappen
(29).
7) Tryk på CARS knappen (21). Den automatiske
optagelse begynder. Herunder kan den automatiske niveauregulering vare op til 3
1
/2 minut af-
hængigt af CD'en.
8) Efter optagelsen skifter CD-afspilleren og optageren til stop. Hvis man ønsker at stoppe tidligere,
nedtrykkes STOP knappen på CD-afspilleren.
6 Funktion med kontaktur eller med ti-
meren i DSR-2000 receiveren
En optagelse eller afspilning kan automatisk ske på
et udvalgt tidspunkt ved hjælp af et kontaktur eller
med Hi-fi receiveren DSR-2000, der passer til optageren.
1) Forbind optagerens netstik til kontakturet henholdsvis til strømforsyningsbøsningen på bagsiden af DSR-2000 receiveren.
2) Ved brug af kontaktur skal også alle andre enheder (f.eks. forstærker, receiver) strømforsynes via
kontakturet. Uret skal først sættes på ON for at
forudindstille Hi-fi systemet (uafhængigt af det
valgte starttidspunkt).
3) Tænd for alle nødvendige enheder med netafbryderne.
4) Hvis MONACOR CD-afspiller CD-2000 også er
tilsluttet Hi-fi systemet, må der ikke være en CD i
apparatet. Ellers vil afspilning eller optagelse fra
CD'en på kassetten begynde, når kontakturet
slutter strømmen.
5) Ilæg kassette(r). Hvis der ilægges to kassetter,
starter løbeværk 2 altid først. Den tomme spole
på kassetten skal vende mod højre, fordi optagelse altid startes mod højre.
6) Sæt DIRECTION (9) kontakten og DOLBY NR
knappen (10) i den ønskede stilling (se afsnit 4.3
"afspilning af kassette" henh. 5.2 "enkel kassetteoptagelse").
7) Skub TIMER kontakten (8) i PLAY-stilling, hvis De
ønsker automatisk afspilning. Reguler til ønsket
lydniveau på receiveren.
8) Hvis De ønsker automatisk optagelse, gøres følgende: Indstil stationen på tuneren/receiveren, fra
hvilken der ønskes optaget. Tryk på RECORD
knappen (25) på optageren. Indstil lydniveau med
REC LEVEL knappen (11) og balancen med BALANCE knappen (12) på optageren. Sæt TIMER
kontakten (8) i stilling REC. Herefter kan forstærkerens volumenkontrol skrues ned til minimum.
9) Vælg starttidspunktet på DSR-2000 receiveren
henholdsvis kontakturet. Sluk receiveren eller
hvis kontaktur anvendes, sættes dette til automatik. Så snart det valgte tidspunkt nås, tænder Hi-fi
systemet, og afspilning henholdsvis optagelse
begyndes.
7 Vedligeholdelse
7.1 Korrekt opbevaring af kassetter
Kassetter skal beskyttes mod varme, fugt og direkte
solstråling. Desuden bør de ikke opbevares i nærheden af magnetfelter, idet lydkvaliteten kan forringes
eller optagelsen evt. blive slettet. Vedrørende opbevaringen er det særlig vigtigt at bemærke, at selv
svage magnetfelter har en negativ indvirkning på optagelserne, hvis dette sker over en længere periode.
Opbevar derfor ikke kassetter i nærheden af elektriske enheder, højttalere og magnetiske objekter.
7.2 Rensning af tonehoved og båndstyr
Under brug af kassetter vil der altid løsrives partikler
fra båndet. Disse afsættes på tonehoved og båndstyr, hvilket forringer lydkvaliteten under afspilning
og særligt ved optagelse, idet en dårlig optagelse
ikke kan reddes ved en efterfølgende rensning.
I detailhandelen fås mange slags rensesæt og
rensebånd, som f.eks. MONACOR KC-01 eller
AHC-09. Tonehoved og båndstyr bør renses med
disse hjælpemidler med regelmæssige intervaller.
38
DK
P
Page 39

7 Cuidados e Manutenção
7.1 Armazenamento Correcto Das Cassetes
As cassetes devem ser protegidas do calor, humidade, e da luz do sol directo. Além disso não devem
ser colocadas próximo de campos magnéticos, pois
a qualidade do som pode ser afectada e serem
mesmo apagadas. Para o armazenamento, isto é
especialmente importante, bem como campos magnéticos fracos, podem ter um efeito negativo na
gravação das cassetes, se estas estiverem expostas
a ele, por longos períodos de tempo. Além disso,
não guarde cassetes, próximo de unidades eléctricas, altifalantes e objectos magnéticos.
7.2 Limpeza das Cabeças de Som e dos Guias
da Fita
A fita das cassetes tem certos compostos abrasivos
que se depositam na cabeça de leitura de som, e
nos mecanismo de guia da fita. Durante a reprodução a qualidade do som é alterada e empobrecida, o mesmo acontecendo especialmente durante
as gravações originando uma má gravação, e
mesmo que as cabeças sejam limpas não pode ser
melhorada.
Nas casas da especialidade podem obter se muitos produtos específicos de limpeza, como por exemplo MONACOR KC-01 ou AHC-09. Com o uso
destes produtos, podemos limpar as cabeças e as
guias em intervalos de tempo regulares. As cassetes
de limpeza , apenas necessitam de ser colocadas
como uma cassete normal de musica. Coloca-se o
gravador na posição de leitura e as cabeças ficam
automáticamente limpas. Com os conjuntos de limpeza, esta operação tem de ser realizada manualmente. Tenha o maior cuidado em não danificar as
cabeças e as guias de transporte da fita.
7.3 Desmagnetização das Cabeças de Som
Depois de algum tempo, as cabeças de som ficam
magnetizadas. Isto têm um efeito negativo na qualidade do som. Portanto com cada limpeza das cabeças, deve proceder-se a sua desmagnetização.
Isto faz-se facilmente com a cassete desmagnetizadora MONACOR DEM-115.
8 Problemas
8.1 Sem Som Na Reprodução
1) Os cabos de ligação não estao inseridos nas
fichas respectivas, ou estão trocados.
2) O som não é claro e límpido.
➪Limpe as cabeças de som e as guias.
3) A cassete está avariada.
➪Use outra cassete.
4) A cassete não está gravada.
➪Coloque uma cassete gravada.
8.2 A fita não anda quando se carrega numa das
teclas de reprodução ou rebobinagem
1) O compartimento da cassete não está bem
fechado.
➪Feche-o correctamente.
2) A tecla foi premida rápido de mais ao fechar o
compartimento.
➪Antes de premir na tecla aguarde alguns seg-
undos depois de fechar o compartimento da cassete.
3) A tecla foi premida rapidamente após carregar na
tecla POWER.
➪Antes de premir na tecla aguarde alguns seg-
undos depois de ligar a unidade.
4) Não tem cassete colocada
➪Introduza a cassete.
5) A fita está avariada, talvez partida.
➪Use outra cassete.
6) A fita rodou até ao fim.
➪ Carregue na tecla para a outra direcção ou
muda a cassete para o outro lado.
8.3 As funções de selecção de títulos, repetição, controlo de saltos de pausas não funcionam correctamente
1) Não há entre os títulos uma pausa de pelo menos
4 segundos.
➪ Nas suas gravações introduza uma pausa de
pelo menos 4 segundos entre títulos.
8.4 O sistema automático de gravação (CARS),
não funciona
1) Não tem cassete no deck 2.
➪Coloque uma cassete no deck 2.
2) O leitor de CD está sem disco.
➪Coloque um CD no leitor.
3) O CD está sujo.
➪Limpe o CD.
4) Os cabos de controlo com fichas de 3,5 mm não
estão completamente inseridos.
➪Introduza as fichas completamente.
8.5 A cassete de cópia não pára nos dois sentidos ao mesmo tempo
1) O comprimento das cassetes não é exactamente
o mesmo.
➪ Não são necessárias medições, pois há sem-
pre tolerâncias.
8.6 Não se consegue abrir o compartimento da
cassete com a tecla EJECT
1) O deck está comutado para reprodução, ou gra-
vação ou rebobinagem.
➪Pare-o com a tecla .
8.7 Reprodução defeituosa sem agudos
1) A cabeça de som está suja.
➪Limpe as cabeças.
8.8 Reprodução distorcida
1) Gravação feita com demasiado nível.
➪Pare a gravação, rode o controlo de nível REC
LEVEL (11) de forma a que as passagens de
maior volume, só acendam no indicador o segmento 0dB.
Rensebåndet skal blot ilægges som en almindelig
kassette. Herefter sættes optageren til afspilning, og
rensningen sker automatisk. Ved brug af rensesæt
skal rengøringen ske manuelt. Man skal være særlig
omhyggelig for at undgå beskadigelser på tonehovedet eller båndstyret.
7.3 Afmagnetisering af tonehovedet
Efter nogen tids brug bliver alle tonehoveder magnetiske. Dette har også en negativ indflydelse på lydkvaliteten. Derfor bør en afmagnetisering ske ved
hver rensning af tonehoved og båndstyr. Dette gøres
nemt med en afmagnetiseringskassette (f.eks. MONACOR DEM-115).
8 Afhjælpning af forstyrrelser
8.1 Ingen lyd høres under afspilning
1) Phonokabler er ikke sat helt ind i bøsningerne
eller er forkert forbundet.
➪ Sæt stikkene helt i eller tilslut dem rigtigt, se
afsnit 3 "tilslutning af apparatet".
2) Tonehovedet er snavset.
➪ Rens tonehovedet, se afsnit 7.2 "rensning af
tonehoved og båndstyr".
3) Båndet i kassetten er beskadiget.
➪Brug en anden kassette.
4) Der er ikke optaget på båndet.
➪Brug en kassette der er indspillet på.
8.2 Båndet kører ikke når en af knapperne til
afspilning eller tilbagespoling aktiveres
1) Kassetteskuffen er ikke lukket rigtigt.
➪Luk den rigtigt.
2) Der er trykket på knappen straks efter kassetteskuffens lukning.
➪ Vent nogle sekunder efter lukning af skuffen
før der trykkes på knapperne.
3) Der er trykket på knappen straks efter aktivering
af POWER-knappen.
➪ Vent nogle sekunder efter opstart af apparatet
før der trykkes på knapperne.
4) Der er ingen kassette ilagt.
➪Ilæg kassette.
5) Båndet er beskadiget, måske iturevet.
➪Brug en anden kassette.
6) Båndet har nået slutningen.
➪Tryk på knappen til den anden fremløbsretning
eller vend kassetten.
8.3 Funktionerne titelvalg, titelgentagelse, kort
aflytning af titler og udeladelse af lange pauser fungerer ikke rigtigt
1) Der er ingen pause af mindst 4 sekunders varig-
hed mellem numrene, se tekniske oplysninger
ved slutningen af afsnit 4.5 "valg af titel".
➪ Indlæg en pause af mindst 4 sekunders varig-
hed efter hver titel i Deres egne optagelser, se
afsnit 5.4 "indlæggelse af 4 sekunders pause
efter en titel".
8.4 Automatisk CD-optagelse (CARS) virker
ikke
1) Der er ingen kassette ilagt løbeværk 2.
➪Ilæg en kassette i løbeværk 2.
2) Der er ingen CD i afspilleren.
➪Ilæg en CD.
3) CD'en er snavset.
➪Rengør CD'en.
4) Styrekablerne med 3,5 mm jackstik er ikke sat
helt på plads i SYSTEM CONTROL bøsningerne.
➪Sæt stikkene på plads.
8.5 Kassette dubbing stopper ikke ved slutningen på samme tid på begge løbeværker
1) Båndlængden på kassetterne er ikke nøjagtig
ens.
➪Ingen forholdsregler er påkrævet, forholdet af-
hænger af tolerancerne.
8.6 Kassetteskuffen kan ikke åbnes med EJECT
knappen
1) Løbeværket er i gengive, optage eller tilbagespo-
lingsstilling.
➪Stop først løbeværket med knappen.
8.7 Klangløs afspilning uden diskant
1) Tonehovedet er snavset.
➪Rengør tonehovedet, se afsnit 7.2 "rensning af
tonehoved og båndstyr".
8.8 Afspilning er forvrænget
1) Optageniveauet har været for højt.
➪ Under optagelse må REC LEVEL knappen
(11) kun skrues så meget op, at niveauindikatoren
ved de kraftigste passager i optagelsen viser
0dB.
8.9 Optagelse er ikke mulig, når RECORD knappen nedtrykkes
1) Sikkerhedstappen mod overspilning på kassetten
er brækket af (billede 4).
➪ Brug en anden kassette eller sæt et kraftigt
stykke tape over hullet (billede 5).
2) Kassetteskuffen er ikke lukket rigtigt.
➪Luk kassetteskuffen.
3) REC LEVEL knappen (11) står i minimumstilling.
➪Indstil niveauet rigtigt.
4) TAPE 1 eller TAPE 2 er valgt på receiveren DSR-
2000.
➪ Tryk på knap (29) på optageren og vælg den
ønskede musikkilde på receiveren.
5) Båndet er løbet ud.
➪Tryk på knappen til den anden fremløbsretning
eller vend kassetten.
8.10 Kraftige forstyrrelser
1) Hi-fi systemet påvirkes af andre elektriske appa-
rater.
➪ Sluk de forstyrrende apparater eller stil dem
længere væk fra Hi-fi systemet.
2) Optageniveauet er for lavt.
➪ Skru REC LEVEL knappen (11) så højt op
39
DK
P
Page 40

8.9 Não grava com a tecla RECORD premida
1) A patilha de segurança da cassete foi quebrada
(Fig. 4).
➪ Use outra cassete ou substitua a patilha por
fita adesiva.
2) O compartimento da cassete não está bem
fechado.
➪Feche-o correctamente.
3) O controlo REC LEVEL (11), está na posição mínima.
➪Ajuste correctamente o nível de gravação.
4) No receptor DSR-2000, está seleccionado TAPE 1
ou TAPE 2.
➪ Carregue na tecla (29) do gravador e sel-
eccione no receptor, a fonte de musica pretendida.
5) A fita chegou ao fim.
➪ Carregue na tecla para mudar de direcção ou
coloque a cassete ao contrário.
8.10 Ruído elevado de interferências
1) O sistema HI-FI é interferido por outras unidades
eléctricas.
➪Desligue as unidades que estao a interferir, ou
coloque-as afastadas do sistema HI-FI.
2) Nível de gravação muito baixo.
➪ Enquanto grava aumente o controlo REC
LEVEL (11), de forma que nas passagens em volume elevado, no indicador de nível acenda o
segmento 0dB.
3) A cassete gravada com Dolby, é reproduzida sem
DOLBY.
➪ Coloque o comutador DOLBY Nr (9) na po-
sição B ou C.
4) A cabeça de som está magnetizada.
➪Desmagnetize a cabeça.
8.11 Flutuação e chiado
1) A correia de transmissão ou o rolete de pressão
estão sujos.
➪Proceda á sua limpeza.
2) A fita não está correctamente enrolada.
➪Aperte a fita , rodando uma das bobines e re-
bobine-a para a frente e em seguida para trás
uma vez.
3) A fita está avariada.
➪Use outra cassete.
8.12 Ao ligar o gravador a gravação ou repro-
dução arrancam imediatamente
1) O interruptor TIMER (8) está em posição REC ou
PLAY.
➪Coloque-o na posição OFF.
8.13 Não funciona ou funciona mal
1) O microprocessador foi afectado por interferências.
➪ Desligue o gravador e retire da tomada do
sector a ficha de alimentação de energia. Aguarde um momento e ligue novamente a ficha a tomada. Ligue a unidade.
9 Especificações
Pistas: . . . . . . . . . . . . . . . . 4 Pistas/2 Canais
estéreo
Sistema de gravação: . . . . RF bias (105kHz)
Motores: . . . . . . . . . . . . . . 2 motores de corrente
continua, estabilizados
electrónicamente
Tempo de rebobinagem
C60: . . . . . . . . . . . . . . . . . aprox. 110 segundos
Resposta de Frequência
Fita Normal: . . . . . . . . . . 20 a 15 000 Hz, ±3dB
Fita de Crómio: . . . . . . . 20 a 16000 Hz, ±3dB
Fita Metal: . . . . . . . . . . . 20 a 16 000 Hz, ±3dB
Distorção: . . . . . . . . . . . . . < 0,6 %
Relação Sinal/Ruído com Fita de Metal
Com DOLBY C: . . . . . . . 71 dB
Com DOLBY B: . . . . . . . 61 dB
Sem DOLBY: . . . . . . . . . 53 dB
Flutuação e chiado: . . . . . . 0,08% (WRMS),
±0,22% (DIN)
Entrada de Micro (MIC): . . 2,5mV/18kOhm
Gravação de Entrada
de Linha (REC): . . . . . . . . 77,5 mv/50kOhm
Reprodução de Saída
de Linha (PLAY): . . . . . . . . 500 mv/ 50kOhm
Alimentação: . . . . . . . . . . . 230V~/50 Hz/15VA
Dimensões: . . . . . . . . . . . . 440 x 146 x 270 mm
Peso: . . . . . . . . . . . . . . . . . 4,6 kg
De acordo com o fabricante.
Dados sujeitos a alterações técnicas.
under optagelse, at niveauindikatoren viser 0 dB
ved de kraftigste passager i musikken.
3) En Dolby indspillet kassette afspilles uden Dolby.
➪ Sæt DOLBY NR kontakten (9) i stilling B eller
C.
4) Tonehovedet er magnetiseret.
➪ Afmagnetiser tonehovedet, se afsnit 7.3 "af-
magnetisering af tonehovedet".
8.11 Wow og flutter
1) Drivakslen og/eller trykrullen er snavset.
➪ Rengør systemet, se afsnit 7.2 "rengøring af
tonehoved og båndstyr".
2) Båndet oprulles ikke korrekt.
➪ Stram båndet ved at dreje på den ene spole,
og spol båndet helt frem og tilbage én gang.
3) Båndet er beskadiget.
➪Ilæg en ny kassette.
8.12 Optagelse eller afspilning begynder straks
efter apparatet tændes
1) TIMER kontakten (8) er i stilling REC eller PLAY.
➪Flyt den til OFF stilling.
8.13 Betjening er ikke mulig eller andre fejlfunktioner
1) Forstyrrelser har påvirket mikroprocessoren.
➪ Sluk optageren og træk netstikket ud af kon-
takten. Vent et øjeblik og forbind netstikket igen.
Tænd apparatet.
9 Tekniske data
Sporsystem: . . . . . . . . . . . Firespors/stereo
Optagesystem: . . . . . . . . . HF-formagnetisering
(BIAS) 105 kHz
Motorer: . . . . . . . . . . . . . . . 2 DC-motorer,
elektronisk reguleret
Spolingstid (C-60): . . . . . . ca. 110 sek.
Frekvensområde
Normalbånd: . . . . . . . . . 20 Hz–15kHz, ±3dB
CrO
2
bånd: . . . . . . . . . . . 20 Hz–16kHz, ±3dB
Metalbånd: . . . . . . . . . . . 20 Hz–16 kHz, ±3dB
Klirfaktor: . . . . . . . . . . . . . . < 0,6 %
Signal/støjforhold
(metalbånd)
med Dolby C: . . . . . . . . . 71 dB
med Dolby B: . . . . . . . . . 61 dB
uden Dolby: . . . . . . . . . . 53 dB
Wow og flutter: . . . . . . . . . 0,08% (WRMS)
±0,22% (DIN)
Mikrofon indgang MIC: . . . 2,5 mV/18 kΩ
Linieindgang REC: . . . . . . 77,5mV/50kΩ
Linieudgang PLAY: . . . . . . 500mV/2 kΩ
Strømforsyning: . . . . . . . . . 230V~/50Hz/15VA
Dimensioner (B x H x D): . 440 x 146 x 270 mm
Vægt: . . . . . . . . . . . . . . . . 4,6kg
Vi forbeholder os ret til, uden forudgående varsel, at
foretage ændringer i ovennævnte data.
40
DK
P
Page 41

Ha sidan 3 uppslagen för att åskådliggöra hänvisningarna i texten.
Innehåll Side
1 Säkerhetsföreskrifter . . . . . . . . . . . . . . . . 41
2 Anslutningar och funktion . . . . . . . . . . . 41
3 Inkoppling . . . . . . . . . . . . . . . . . . . . . . . . . 42
4 Avspelning . . . . . . . . . . . . . . . . . . . . . . . . 43
4.1 Lämpliga kassetter . . . . . . . . . . . . . . . . . . . 43
4.2 Till och frånslag . . . . . . . . . . . . . . . . . . . . . 43
4.3 Avspelning av kassett . . . . . . . . . . . . . . . . 43
4.4 Spolning med autostart/avspelning . . . . . . 43
4.5 Spårval . . . . . . . . . . . . . . . . . . . . . . . . . . . . 43
4.6 Kontinuerlig avspelning av 1 spår . . . . . . . 43
4.7 Kort förlyssning av samtliga spår . . . . . . . . 44
4.8 Snabbspolning vid långa pauser . . . . . . . . 44
5 Inspelning . . . . . . . . . . . . . . . . . . . . . . . . . 44
5.1 Skydda kassetten mot oavsiktlig
inspelning . . . . . . . . . . . . . . . . . . . . . . . . . . 44
5.2 Enkel kassettinspelning . . . . . . . . . . . . . . . 44
5.3 Omstart av kassett vid fel . . . . . . . . . . . . . . 44
5.4 Inlägg av 4 sek paus mellan spår . . . . . . . 44
5.5 Parallell inspelning . . . . . . . . . . . . . . . . . . . 45
5.6 Kassettkopiering . . . . . . . . . . . . . . . . . . . . 45
5.7 Automatisk insp. med CD-styrning . . . . . . . 45
5.8 Automatisk CD-inspelning på kassett . . . . 46
6 Funktion med extern timer eller
inbyggd timer i DSR-2000 . . . . . . . . . . . . 46
7 Skötsel . . . . . . . . . . . . . . . . . . . . . . . . . . . 46
7.1 Kassettförvaring . . . . . . . . . . . . . . . . . . . . . 46
7.2 Rengöring kassettmekanism och
tonhuvud . . . . . . . . . . . . . . . . . . . . . . . . . . 46
7.3 Avmagnetisering . . . . . . . . . . . . . . . . . . . . 47
8 Felsökning . . . . . . . . . . . . . . . . . . . . . . . . 47
9 Specifikationer . . . . . . . . . . . . . . . . . . . . . 48
Dolby brusreduceringssystem används med tillstånd
av The Dolby corporation. Dubbel D symbolen
och namnet ”DOLBY” är skyddade varumärken.
1 Säkerhetsföreskrifter
Denna enhet är utformad med hänsyn till EG-direktiv
Nr.89/336/EWG avseende elektromagnetiska störfält.
Enheten använder hög spänning internt. Öppna
därför aldrig locket utan överlåt all service till utbildad personal på auktoriserad verkstad. Alla anspråk på garanti upphör att gälla vid egen eller icke
auktoriserade ingrepp i enheten.
Vid användning, ge akt på följande.
•
Enheten är endast avsedd för inomhusbruk.
•
Placera enheten i jämn temperatur, annars kan
kondens bildas i enheten och därmed försämra
funktionen. Om enheten tas in från ett utrymme
med låg temperatur till ett utrymme med högretemperatur skall enheten stå i minst 2 timmar så
att ev. kondens hinner försvinna.
•
Arbetstemperatur 5 till 35°C.
•
Skydda enheten från extrem värme, kyla och hög
luftfuktighet.
•
Koppla inte in enheten nära störningsbenägna apparater t.ex. tv elmotorer o.d.
•
Ta omedelbart ut kontakten om .
1. Synlig skada finns på sladden.
2. Apparaten är skadad av fall eller dylikt.
3. Apparaten har felfunktioner.
Lämna i så fall enheten till verkstad.
•
Skadad elsladd skall bytas på verkstad.
•
Dra aldrig ut elsladden ur väggurtaget genom att
dra i sladden utan dra i kontaktkroppen
•
Om enheten används på annat sätt än som avses,
upphör all garanti att gälla. Detsamma gäller om
enheten lämnas till icke auktoriserad verkstad för
service.
•
Rengör endast med en torr och mjuk trasa. An-
vänd aldrig vatten eller vätskor i någon form då
dessa kan rinna in i enheten och orsaka kortslutning.
2 Anslutningar och funktion
2.1 Front panel och fjärrkontroll
1 Kassettlucka för kassett 1
2 Nollställningsknapp av räkneverk för kassett 1
(”0000”)
3 Display med nivåmätare
4 Nollställningsknapp av räkneverk för kassett 2
(”0000”)
5 Kassettlucka för kassett 2
6 Strömbrytare
7 Lucköppnare för kassett 1
8 Skjutomkopplare för timer
(endast tillsammans med DSR-2000)
OFF = timer frånslagen
REC = timer förberedd för inspelning
PLAY= timer förberedd för avspelning
OBS! Om omkopplaren står i läge PLAY eller
REC startar in resp. avspelning omedelbart vid
påslag av strömmen (6).
9 Omkopplare för automatisk in/avspelning av
båda sidor på en kassett eller båda kassettenheterna.
= Enheten stannar efter in/avspelning av
en kassettsida.
= Vid avspelning av båda kassettsidorna
spelas båda sidor kontinuerligt upp till 5
ggr efter varandra
= Vid avspelning av båda kassettenhe-
terna spelas båda sidor på båda
decken i en följd upp till 5 ggr efter varandra
Avaa sivu 3, josta näet lukiessasi eri osien ja
liitäntöjen sijainnit.
Sisältö Sivu
1 Turvallisuusohjeet . . . . . . . . . . . . . . . . . . 41
2 Osat ja liitännät . . . . . . . . . . . . . . . . . . . . 41
3 Kytkentä . . . . . . . . . . . . . . . . . . . . . . . . . . 43
4 Soitto . . . . . . . . . . . . . . . . . . . . . . . . . . . . . 43
4.1 Mitkä kasetit ovat sopivia? . . . . . . . . . . . . . 43
4.2 Virran kytkeminen . . . . . . . . . . . . . . . . . . . 43
4.3 Kasettien soitto . . . . . . . . . . . . . . . . . . . . . 43
4.4 Kelaus eteenpäin ja taaksepäin, soiton
automaattinen käynnistys alkuun
kelauksen jälkeen . . . . . . . . . . . . . . . . . . . 43
4.5 Kappalehaku . . . . . . . . . . . . . . . . . . . . . . . 44
4.6 Soivan kappaleen toisto . . . . . . . . . . . . . . . 44
4.7 Kappaleiden esittely . . . . . . . . . . . . . . . . . . 44
4.8 Automaattinen pitkien taukojen ohitus . . . . 44
5 Äänitys . . . . . . . . . . . . . . . . . . . . . . . . . . . 45
5.1 Suojaa kasetti, jotta et äänitä sille
vahingossa . . . . . . . . . . . . . . . . . . . . . . . . . 45
5.2 Tavallinen äänitys . . . . . . . . . . . . . . . . . . . . 45
5.3 Äänityksen aloittaminen uudestaan
virheen sattuessa . . . . . . . . . . . . . . . . . . . . 45
5.4 Tauon (4 sekuntia) lisäys
kappaleen perään . . . . . . . . . . . . . . . . . . . 45
5.5 Rinnakkaisäänitys (kahdelle kasetille) . . . . 45
5.6 Kopiointiäänitys (kasetilta kasetille) . . . . . . 46
5.7 CD-soittimen aloittama äänitys . . . . . . . . . 46
5.8 Automaattinen CD-levyn äänitys (CARS) . 47
6 Käyttö erillisellä ajastimella tai viritinvah-
vistimen DSR-2000 omalla ajastimella . . 47
7 Ylläpito . . . . . . . . . . . . . . . . . . . . . . . . . . . 48
7.1 Kasettien oikea säilytys . . . . . . . . . . . . . . . 48
7.2 Äänipään ja nauhanohjaimen puhdistus . . 48
7.3 Äänipään demagnetointi . . . . . . . . . . . . . . 48
8 Missä vika? . . . . . . . . . . . . . . . . . . . . . . . . 48
9 Tekniset tiedot . . . . . . . . . . . . . . . . . . . . . 49
Dolby-kohinanvaimennusjärjestelmä on valmistettu
Dolby Laboratories Licensing Corporationin luvalla.
"DOLBY" ja Dolby-symboli ovat Dolby Laboratories Licensing Corporationin tavaramerkkejä.
1 Turvallisuusohjeet
Tämä laite vastaa EU:n direktiiviä 89/336/EWG elektromagneettisesta yhteensopivuudesta.
Tämä laite käyttää hengenvaarallista käyttöjännitettä (230V~). Sähköiskun välttämiseksi koteloa ei
saa avata. Vain hyväksytty huolto saa huoltaa laitteen. Laitteen takuu raukeaa, jos laite on avattu.
Huomioi käytössä myös seuraavat asiat:
•
Laite on tarkoitettu käytettäväksi vain sisätiloissa.
•
Kun laite tuodaan kylmästä tilasta lämpimään, siihen tiivistyy kosteutta joka haittaa laitteen toimintaa. Käynnistä siksi laite vasta, kun se on ehtinyt
lämmetä ympäröivän ilman lämpöiseksi.
•
Käytä laitetta vain yli 5°C lämpötilassa.
•
Suojaa laite kuumuudelta, kosteudelta, pölyltä ja
suoralta auringonvalolta.
•
Älä käytä laitetta magneettisten häiriölähteiden
lähellä (kuten magneetit, moottorit, kaiuttimet, televisio, jne).
•
Älä käynnistä laitetta ja irrota laite välittömästi verkosta, jos:
1. laitteessa tai verkkojohdossa on näkyvä vika,
2. laite on voinut vaurioitua pudotuksessa tai vastaavassa tilanteessa,
3. laite toimii väärin.
Kaikissa näissä tapauksissa laitteen saa korjata
vain hyväksytty huolto.
•
Vaurioitunut verkkojohto täytyy antaa hyväksytyn
huollon korjattavaksi.
•
Älä koskaan irroita verkkoliitintä johdosta
vetämällä. Vedä aina itse liittimestä.
•
Jos laitetta käytetään muuhun kuin alunperin tarkoitettuun käyttöön, jos sitä on käytetty ohjeiden
vastaisesti, tai jos sitä on huoltanut muu kuin
hyväksytty huolto, valmistaja tai myyjä eivät vastaa mahdollisesta vahingosta.
•
Puhdista laite pyyhkimällä puhtaalla, kuivalla kangaspalalla. Älä käytä kemikaaleja tai vettä.
2 Käyttökytkimet ja liitännät
2.1 Etupaneeli ja kauko-ohjain
1 1-nauhurin kasettipesä
2 RESET 1-näppäin, jolla 1-nauhurin nauhalaskuri
nollataan (”0000”)
3 Tasomittari
4 RESET 2-näppäin, jolla 2-nauhurin nauhalaskuri
nollataan (”0000”)
5 2-nauhurin kasettipesä
6 Virtakytkin (POWER)
7 EJECT-näppäin, avaa 1-kasettipesän
8 TIMER-valintakytkin ajastimelle, toimii yhdessä
MONACOR in viritinvahvistimen DSR-2000
kanssa:
OFF = ajastin ei ole käytössä
REC = ajastin on valmiina kytkemään
äänityksen päälle
PLAY= ajastin on valmiina kytkemään
soiton päälle
HUOMIO: Jos kytkin on asennossa REC tai
PLAY, äänitys tai soitto alkaa välittömästi kun
laite kytketään päälle virtakytkimellä (6).
9 DIRECTION-valintakytkin, jolla valitaan millä ta-
valla laite käyttää kasetin kahta puolta ja edelleen
kumpaakin kasettipesää äänityksessä ja toistossa:
= nauhuri pysähtyy, kun yksi kasetin puoli
on soitettu tai äänitetty (siis tavallinen
soitto tai äänitys).
= soitossa nauhuri soittaa kasetin molem-
mat puolet peräkkäin, toisten tätä yhteensä enintään 5 kertaa. Äänityksessä
41
FIN
S
Page 42

10 Omkopplare för dolby brusreducering:
B = Dolby B används i de flesta hemsystem,
för kassetter som spelats in med dolby B
C = Dolby C förbättrad Dolby B. Skall använ-
das om deck för avspelning har Dolby C
samt för kassetter inspelade med Dolby
C.
OFF = utan Dolby för kassetter som spelats in
utan brusreducering.
11 Nivåkontroll för inspelning
12 Balanskontroll för inspelning
13 Telejack för hörlursanslutning min 8 ohm med ni-
våkontroll
14 Telejack för mikrofon. Då en mik ansluts denna
ingång stängs4 REC-ingång (32) av.
15 Öppnare för kassettlucka 2.
16 INTRO-CHECK. För kort avspelning av samtliga
titlar på en kassett (10 sekunder). Avspelningen
startas med knapparna eller . Därefter
trycks intro-checkknappen ned.
17 BLANK SCAN. Används för att spola förbi tomma
avsnitt på kassettband. Alla tomrum längre än 10
sek. spolas förbi.
18 AUTO. Används för att spola tillbaks en kassett
efter kopiering mellan båda enheterna. Funktionen aktiveras efter att kopieringen påbörjats i
normal eller högfart.
19 Kopiering i normal hastighet. OBS! att inspelning
sker på deck 2
20 Kopiering i dubbel hastighet. OBS! att inspelning
sker på deck 2.
21 CARS = Computer Aided CD-Recording System.
Används för att automatiskt ge rätt nivå på kassett vid inspelning från CD-skiva. OBS! Denna
funktion fungerar endast med MONACOR CDspelare CD-2000 och MONACOR receiver DSR-
2000.
22 SYNC REV. Används för att kopiera mellan 2 kas-
setter med olika längd (speltid). Samma titlar
spelas in på båda sidor av kassetten som på originalkassetten. Denna funktion aktiveras då omkopplaren DIRECTION (9) är aktiv i läge enkel
eller dubbel inspelning . dvs inspel-
ning sker på båda sidor i en följd.
23 REC MUTE. Ger en 4 sek. tyst pause mellan 2 in-
spelade spår. Fungerar endast vid inspelning
eller insp. pause. Efter 4 sek. återgår decket till
inspelning pause.
24 PAUSE. Används för att stanna/ starta kassetten
vid in/avspelning.
25 RECORD (Inspelning). Enknapps inspelning.
Decket går till rec.pause läge. För att starta inspelning, tryck på pauseknappen.
26 PARALLELL REC (Parallell inspelning). Ger 2
lika inspelningar samtidigt på båda decken.
27 Avspelning åt vänster. Tryck på knappen vid
avspelning. Det spelade spåret kan upprepas så
många ggr. som knappen trycks in (max 8 ggr).
28 Återspolning vid avspelning åt höger.
Vid avspelning åt höger kan andra spår väljas för avspelning.
Med kan det spelade spåret fås att börja
från början. För att välja tidigare spår skall
tryckas ned så många gånger som det antal spår
man önskar spola förbi. Dock max 8 spår.
29 Stoppknapp
30 Bakåtspolning vid drift åt höger. Under avspel-
ning kan andra spår väljas.
Under avspelning åt med avspelning åt
höger.
Med varje tryck på spolas ett spår framåt
på kassetten.
Vid avspelning åt .
Vid tryck på spolas ett spår bakåt det första
till början på spåret.
Vid upprepade tryck på knappen backar kassetten till tidigare spelade spår för uppspelning.
31 Avspelning åt höger
Genom att trycka på knappen under avspelning kan det spelade spåret repeteras så många
gånger som man trycker på knappen. Dock högst
8 ggr.
2.2 Bakpanel beskrivning
32 RCA kontakter för anslutning av audiosignaler
REC vänster och höger
33 RCA kontakter för anslutning av audiosignaler
PLAYvänster och höger
34 3,5 mm kontakt för anslutning av systemkontrol-
len
35 Strömsladd för 230 V~/50Hz
3 Anslutning
1) Anslut kontakterna PLAY (33) till TAPE PLAY på
förstärkaren färgkod = röd/höger vit/vänster.
2) Anslut kontakterna REC (32) till TAPE REC på
förstärkaren.
3) Systemkontrollen ger möjlighet till utökade funktioner för enheterna DSR-2000 CD-2000 och
TDD-2000. Med ansluten systemkabel växlar förstärkaren till CD läge när en CD spelas och till
Tape när en kassett spelas. Dessutom kan automatisk inspelningsnivå ställas in vid inspelning av
CD-skivor till band CD-skivas spelas en kort
stund och decket ställer in optimal nivå. Därefter
spolas bandet till början och inspelningen börjar.
Anslut endast systemkabeln till avsedda uttag
på de anslutna enheterna på Decket (34) och förstärkaren.
4) Då alla enheter är anslutna, stoppa in väggkontakten i väggurtaget.
5) Om så önskas kan hörlurar 8 ohm anslutas till uttaget på fronten (13) PHONES. Om hörlurarna
inte har egen volymkontroll bör MONACOR HEC60 anslutas till hörlurarna.
OBS! Hög volym i hörlurar kan skada hörseln permanent. Örat vänjer sig vid höga ljud efter en
stund men risken för hörselskada består trots det.
Var därför försiktig vid lyssning med hörlurar.
kasetin molemmat puolet käytetään
peräkkäin (yhden kerran).
= soitossa nauhuri soittaa kasetin molem-
mat puolet peräkkäin ensin toisessa kasettipesässä, ja sen jälkeen toisessa.
Nauhuri toistaa tätä yhteensä enintään
5 kertaa. Äänityksessä kasetin molemmat puolet käytetään peräkkäin ensin
toisessa kasettipesässä, ja sen jälkeen
toisessa.
10 DOLBY NR-valintakytkin Dolby-kohinanvaimen-
timelle:
B = Dolby B, joka on käytössä useimmissa
kotilaitteissa. käytä tätä Dolby B:llä äänitetyille kaseteille.
C = Dolby C, parannettu versio Dolby B:stä.
Käytä tätä äänitykseen jos myöhemmin
kuuntelet äänitystä Dolby C:llä varustetulla laitteella, ja tietenkin myös Dolby
C:llä äänitettyjen kasettien soittoon.
OFF = Dolby pois päältä. Kaseteille jotka on ää-
nitetty ilman Dolbya.
11 REC LEVEL-säädin äänitystasolle
12 BALANCE-säädin kanavatasapainolle, ääni-
tyksiä varten
13 PHONES-liitäntä stereokuulokkeille (impedanssi
>8Ω) joissa on oma äänenvoimakkuuden säätö,
1
/4" jakki.
14 Mic-liitäntä monomikrofonille,
1
/4" jakki. Kun mikrofoni kytketään, äänitystulo REC (32) kytkeytyy
pois käytöstä.
15 EJECT-näppäin, avaa 2-kasettipesän
16 INTRO CHECK-näppäin , joka esittelee
lyhyesti kaikki kappaleet yhdellä kasetin puolella.
Toiminnon voi käynnistää vain kun soitto on
päällä.
17 BLANK SCAN-näppäin, jolla nauhuri ohittaa au-
tomaattisesti kappaleiden välissä olevat yli 10 sekunnin pituiset tauot. Toiminnon voi kytkeä päälle
vain kun soitto on käynnissä.
18 AUTO-näppäin, jolla tarvittaessa saa automaatti-
sesti kelattua kasetit alkuun ennen kopiointiäänitystä. Ensin painetaan AUTO-näppäintä, ja sitten
käynnistetään kopiointiäänitys näppäimellä
(NOR) DUBBING (19) tai (HIGH) DUBBING (20).
Kasetit kelautuvat alkuun heti tämän jälkeen.
19 (NOR) DUBBING-näppäin, joka käynnistää ko-
piointiäänityksen normaalinopeudella. Äänittävän
kasetin täytyy olla kasettipesä 2:ssa siten, että
tyhjä kela osoittaa oikealle.
20 (HIGH) DUBBING-näppäin, joka käynnistää ko-
piointiäänityksen kaksinkertaisella nopeudella.
Äänittävän kasetin täytyy olla kasettipesä 2:ssa
siten, että tyhjä kela osoittaa oikealle.
21 CARS-näppäin, joka äänittää kokonaisen CD-
levyn ja säätää äänitystason automaattisesti.
Tämä onnistuu vain jos käytössä on MONACORin CD-soitin CD-2000 ja viritinvahvistin DSR-
2000. (CARS = Computer Aided CD Recording
System)
22 SYNC REV-näppäin, jos kopiointiäänityksen ka-
setit eivät ole samanpituisia. Kun SYNC REV on
toiminnassa, äänittävän kasetin kummankin puolen alkuun äänittyy sama kappale kuin äänitettävässä kasetissa, riippumatta kasettien pituudesta. DIRECTION-valintakytkimen (9) tulee olla
asennossa tai .
23 REC MUTE-näppäin, joka lisää 4 sekunnin tauon
kahden kappaleen väliin. Nauhurin täytyy olla
joko äänityksellä tai äänityksen taukotilassa. T auon lisäyksen jälkeen nauhuri palaa äänityksen
taukotilaan.
24 PAUSE-näppäin, joka keskeyttää soiton tai ääni-
tyksen. Kun PAUSE-näppäintä painetaan uudelleen, toiminta jatkuu.
25 RECORD-näppäin, jolla nauhuri siirtyy ääni-
tyksen valmiustilaan. Äänitys aloitetaan tämän
jälkeen painamalla PAUSE-näppäintä.
26 PARALLEL REC-näppäin, joka käynnistää rin-
nakkaisäänityksen. Tällöin molemmat nauhurit
äänittävät samasta lähteestä, ja tuloksena on
kaksi samanlaista alkuperäistä äänitystä.
27 Soittonäppäin , soittosuunta vasemmalle
Jos näppäintä painellaan soiton aikana uudelleen, nauhuri toistaa soivan kappaleen yhtä
monta kertaa kuin näppäintä on painettu
(enintään 8 kertaa).
28 Kelausnäppäin
Soiton aikana tällä voidaan siirtyä suoraan toiseen kappaleeseen.
Kun soittosuunta on oikealle eli :
Yksi näppäimen painallus aloittaa soivan
kappaleen uudelleen. Kahdella näppäimen
painalluksella päästään edelliseen kappaleeseen, ja useampi näppäimen painallus vie
yhtä monta kappaletta taaksepäin.
Kun soittosuunta on vasemmalle eli :
Jokainen näppäimen painallus vie yhden
kappaleen eteenpäin.
29 Pysäytysnäppäin
30 Kelausnäppäin
Soiton aikana tällä voidaan siirtyä suoraan toiseen kappaleeseen.
Kun soittosuunta on oikealle eli :
Jokainen näppäimen painallus vie yhden
kappaleen eteenpäin.
Kun soittosuunta on vasemmalle eli :
Yksi näppäimen painallus aloittaa soivan
kappaleen uudelleen. Kahdella näppäimen
painalluksella päästään edelliseen kappaleeseen, ja useampi näppäimen painallus vie
yhtä monta kappaletta taaksepäin.
31 Soittonäppäin, soittosuunta oikealle
Jos näppäintä painellaan soiton aikana uudelleen, nauhuri toistaa soivan kappaleen yhtä
monta kertaa kuin näppäintä on painettu
(enintään 8 kertaa).
2.2 Takapaneeli
32 REC-äänitystuloliitäntä, RCA-jakit L (vasen) ja R
(oikea)
33 PLAY-lähtöliitäntä, RCA-jakit L (vasen) ja R
(oikea)
42
FIN
S
Page 43

4 Avspelning
4.1 Lämpliga kassetter
Alla normala kassetter med upp till 90 min (C-90)
speltid kan användas. Dock, 120 min (C-120) kas-
setter bör inte användas då plastbasen är så tunn att
bandet riskerar trassla sig i mekaniken i kassettspelaren.
Använd heller inte ändlösa kassetter då dessa
kan skada mekaniken.
Kassetter med normal ferro eller chrome/metalloxid är bäst lämpade. Metallband ger alltid den bästa
kvaliteten men kassettdecket känner själv av vilken
bandtyp som använd och anpassar sig därefter.
4.2 Av- och -påsättning
1) Kontrollera att TIMER (8) rec inte är aktiverad
innan decket slås på. I annat fall kommer decket
att påbörja inspelning direkt vid påslag vilket kan
förstöra tidigare inspelningar.
Slå sedan på decket med strömbrytare (6)
2) Efter avslutad spelning, stäng alltid kassettluckan
för skydda mekanismen från skador och stäng av
decket med strömbrytaren.(6).
3) Vänta alltid ett par sekunder mellan av och pås-
lag.
4.3 Avspelning av kassett
1) Stoppa i en kassett. Om nödvändigt, sträck ban-
det genom att rulla upp det på den ena spolen.
Öppna kassettluckan genom att trycka på knap-
pen EJECT (7/15). Stoppa i kassetten och stäng
luckan. Tryck på luckans övre kant vid stängning
och nollställ räkneverken (2/4).
2) Ställ skjutomkopplaren DOLBY NR i det läge som
motsvarar den Dolbynivå som kassetten är inspe-
lad med.
OFF = Inspelad utan Dolby.
B = Inspelad med Dolby B.
C = Inspelad med Dolby C.
3) Ställ skjutomkopplaren DIRECTION (9) i önsk-
värd riktning.
= Kassettspelaren stannar efter en spelad
bandsida.
= Kassetten spelas fram och baksida up-
prepade ggr. (max 5 ggr.) på det ena
decket
= Först spelas ena kassettens båda sidor
därefter den andra kassettens båda sidor
upprepade ggr. (max 4 ggr.) förutsatt att
båda kassettfacken är laddade med en
kassett.
4) Starta avspelningen med pilen om den
tomma bandtallriken är åt höger och med den
om tallriken är åt vänster. Om bandet inte är helt
uppspolat på en tallrik kan valfri riktning väljas vid
avspelning. För detta används tangenterna
eller . Riktningen visas alltid i displayen.
5) Avspelningen stoppas med tangenten
6) För att ta ut kassetten tryck på knappen EJECT
(7/15). OBS! att kassetten måste stoppas först.
4.4 Spolning av kassett med autostart
Kassetten kan, efter stopp spolas framåt eller
bakåt med autostart. För att aktivera denna funktion,
gör enligt följande.
Vid bandstopp, tryck 2 ggr på eller .
Bandet spolar då till slut på den sida som spelas
fram/bakåt och övergår till avspelning. Om bandet
spolats till slutet av en sida påbörjas avspelning av
den andra sidan om decket är ställt i läge som spelar
båda sidor av kassetten. OBS! denna funktion fungerar inte om kassetten endast spelar av en bandsida och stannar. I detta fall fungerar endast spolning
bakåt med autostart.
OBS! Om tangenterna eller trycks ned 2
ggr under avspelning spolas bandet framåt resp
bakåt 1 spår på kassetten
4.5 Val av spår
Under avspelning är det möjligt att spola fram/bak för
att välja ett annat spår med och tangenterna. Efter 1 tryck på eller visas texten
”SP” i displayen. Varje tryck på eller
visas vid ”SP” max 20 spår kan spolas. OBS! att det
måste vara minst 4 sek tystnad mellan spåren för att
funktionen skall fungera tillfredsställande.
1) Under avspelning åt höger:
Vid varje tryckning på spolas bandet fram
ett spår. Vid varje tryckning på spolas bandet tillbaks till början på det spelade stycket. För
att komma till tidigare spår måste knappen
tryckas ned minst 2 ggr. Vid varje tryckning på
spolas bandet bakåt ytterligare 1 spår.
2) Under avspelning åt vänster:
Vid tryckning på knappen spolas bandet tillbaks till början på det spelade spåret. För att
spola tillbaks flera spår måste tryckas ned
flera ggr. Med tryckning på spolas bandet
fram ett spår. V arje tryckning på spolar fram
bandet ytterligare ett spår
Teknisk information
Funktionen IPSS (Intelligent program söknings system) sköter såväl sökfunktionen vid spelning som
funktionerna angivna nedan.
-
Repeterad avspelning av en titel.
-
Kort avspelning av samtliga spår.
-
Förbispolning av långa pauser.
IPSS fungerar inte med följande.
1. Inspelningar med tal eller ljud har mer än 4 sekunders avbrott.
2. Klassiska inspelningar med många svaga partier
eller tystnad som är längre än 4 sekunder.
3. Kassetter som är inspelade med ljud mellan
spåren.
4. Kassetter som har pauser kortare än 4 sekunder.
5. Kassetter med extremt låg signalnivå.
6. Kassetter som har spelats in med crossfader (discomix) och därför inte har pauser mellan spåren.
4.6 Repetering av spelat spår
Om ett spår skall spelas flera gånger, tryck på respektive playknapp så många ggr. som spåret skall
repeteras. Max 8 ggr.
34 SYSTEM CONTROL-järjestelmäohjauksen li-
itännät yhteensopivia laitteita varten, 3,5mm jakit
35 Verkkojohto laitteen kytkemiseksi 230V~/ 50 Hz-
verkkoon
3 Kytkeminen
1) Yhdistä RCA-johdoilla laitteen PLAY-lähtöliitäntä
(33) vahvistimen vastaavaan tuloliitäntään (TAPE
PLAY). Huomioi liittimien värimerkinnät:
valkoinen = L (vasen), punainen = R (oikea).
2) Yhdistä RCA-johdoilla laitteen REC-tuloliitäntä
(32) vahvistimen vastaavaan lähtöliitäntään
(TAPE REC).
3) Järjestelmäohjaus mahdollistaa yhteisiä toimintoja muiden yhteensopivien laitteiden kanssa
(MONACORin viritinvahvistin DSR-2000 ja CDsoitin CD-2000). Esimerkiksi kun CD-soitin tai kasettinauhuri käynnistetään, vahvistin kytkeytyy
automaattisesti oikealle laitteelle. Toinen esimerkki on automaattinen CD-levyn äänitys: levy
soi lyhyesti, nauhuri säätää äänitystason, CDsoitin ja nauhuri aloittavat äänityksen yhdessä –
täysin automaattisesti.
Yhdistä toinen järjestelmäohjauksen SYSTEM
CONTROL-liitännöistä (34) vahvistimen vastaavaan liitäntään mukana tulleella 3,5mm johdolla,
niin voit käyttää järjestelmäohjausta.
4) Vasta nyt kun kaikki laitteet on kytketty toisiinsa,
yhdistä verkkojohto sähköverkkoon (230V~/
50Hz).
5) Halutessa stereokuulokkeet (impedanssi > 8Ω)
voidaan kytkeä
1
/
4" kuulokejakkiin PHONES (13).
Jos kuulokkeissa ei ole omaa äänenvoimakkuuden säätöä, mukaan täytyy liittää erillinen säädin
kuulokkeita varten (esimerkiksi MONACOR HEC-
60).
VAROITUS: Älä säädä kuulokkeiden äänenvoi-
makkuutta liian kovalle, koska jatkuva kova ääni
voi vahingoittaa kuuloa. Ota huomioon että korva
tottuu kovaan ääneen, joka tuntuu sen jälkeen
todellista hiljaisemmalta. Jos kuuntelet kovaa, älä
enää nosta äänenvoimakkuutta kun olet tottunut
siihen.
4 Soitto
4.1 Mitkä kasetit ovat sopivia?
Yleisesti ottaen kaikki C-kasetit 90 minuutin pituuteen saakka (C-90) ovat sopivia. Älä käytä 120 mi-
nuutin (C-120) kasetteja, koska niiden nauha on
liian ohutta käyttöön ja saattaa katketa.
Älä myöskään käytä ns. päättymättömiä ka-
setteja, koska ne saattavat vahingoittaa nauhurin
koneistoa.
Voit käyttää tavallisia, kromi-, ja metallinauhoja.
Parhaan äänenlaadun saat kuitenkin metallinauhoilla. Nauhuri tunnistaa nauhatyypin automaattisesti kasetissa olevista merkinnöistä, joten tätä ei tarvitse valita erikseen.
4.2 Virran kytkeminen
1) Aina ennen virran kytkemistä aseta ajastimen va-
lintakytkin TIMER (8) asentoon OFF. Muuten
soitto tai äänitys käynnistyy heti kytkemisen jäl-
keen, ja kasettisi saattaa vahingossa pyyhkiytyä
tyhjäksi.
Kytke laite päälle virtakytkimellä (6).
2) Käytön jälkeen sulje aina kasettipesät, jotta niihin
ei mene likaa. Kytke tämän jälkeen laite pois
päältä virtakytkimellä (6).
3) Kun kytket laitteen pois päältä, odota ehdottoma-
sti aina muutama sekunti ennenkuin kytket lait-
teen taas päälle!
4.3 Kasettien soitto
1) Syötä kasetti seuraavalla tavalla. Jos kasetin
nauha on löysällä, kiristä se kiertämällä toisesta
kelasta. Avaa kasettipesä EJECT-näppäimellä (7
tai 15). Laita kasetti sisään niin päin että kasetin
nauha-aukot osoittavat alas. Sulje kasettipesä
työntämällä (varovasti) yläreunasta. Halutessasi
nollaa nauhalaskuri painamalla RESET-näppäintä (2 tai 4).
2) Aseta DOLBY NR-valintakytkin (10) siihen asentoon, millä kasetti on äänitetty:
OFF = äänitetty ilman Dolbya
B = äänitetty Dolby B:llä
C = äänitetty Dolby C:llä
3) Aseta DIRECTION-valintakytkin (9) haluttuun
asentoon:
= nauhuri pysähtyy kun yksi puoli on soi-
tettu.
= nauhuri soittaa kasetin molemmat puo-
let, ja toistaa tätä kunnes koko kasetti on
soinut 5 kertaa
= nauhuri soittaa ensin toisen kasetin mo-
lemmat puolet, ja sitten toisen kasetin
molemmat puolet. Tämä toistuu kunnes
kumpikin kasetti on soinut 5 kertaa.
4) Käynnistä soitto näppäimellä (31) jos kasetin
tyhjä kela on oikealla, tai näppäimellä (27) jos
tyhjä kela on vasemmalla. Jos kasettia ei ole kelattu alkuun, voit soittaa kumpaa tahansa kasetin
puolta painamalla tai (tai kelata alkuun).
Kasetin soittosuunta näkyy koko ajan näytössä.
5) Pysäytä soitto painamalla näppäintä (29).
6) Poista kasetti painamalla EJECT-näppäintä (7 tai
15). Varmista aina, että nauha ei pyöri.
4.4 Kelaus eteenpäin ja taaksepäin, soiton au-
tomaattinen käynnistys alkuun kelauksen
jälkeen
Kun nauha on ensin pysäytetty näppäimellä (29),
sitä voidaan kelata eri suuntiin näppäimillä
(28) ja (30). Riippuu soittosuunnasta kelataanko nauhaa tällöin eteenpäin vai taaksepäin.
Kun soittosuunta on oikealle eli :
näppäin kelaa taaksepäin
näppäin kelaa eteenpäin
Kun soittosuunta on vasemmalle eli :
kelaa taaksepäin
kelaa eteenpäin
43
FIN
S
Page 44

Knapp om spelriktningen är höger (31).
Knapp om spelriktningen är vänster (27).
Displayen visar texten ”AP” och antalet repeteringar.
Kassetten spolas tillbaks från början efter avslutat
spår och sekvensen spelas upp från början, så
många ggr. som playknappen har tryckts in. Funktionen avbryts med stoppknappen .
Om repeteringen inte fungerar som angivits, kon-
trollera avsnittet
4.7 Kort förlyssning av samtliga spår
Alla spåren på en kassettsida kan förlyssnas kort i
10 sekunder.
1) Starta avspelningen med resp. eller .
2) Tryck på knappen INTRO CHECK (16). Displayen
visar nu 2 siffrigt de spår som förlyssnas.
3) Kassetten spolar fram till nästa spår och spelar
detta i 10 sekunder. Därefter spolas nästa spår
fram osv.
4) Om spelriktningen ändras under förlyssning,
övergår decket till normal avspelning av den
andra kassettsidan. Om förlyssning önskas även
på denna sida, tryck på knappen INTRO CHECK.
5) Om funktionen skall avbrytas under pågående
förlyssning, tryck på knappen INTRO CHECK
igen. Kassetten spelas då på normalt sätt med
kontinuerlig avspelning.
Om förlyssningen inte fungerar som den skall, se kapitel 4.5 Val av spår.
4.8 Automatisk spolning förbi tysta avsnitt
Pauser längre än 10 sek kan spolas förbi enligt följande.
1) Starta avspelningen med eller .
2) Tryck på knappen BLANK SCAN (17). Displayen
visar texten ”BLANK SCAN”.
3) Om funktionen hittar en pause längre än 10 sek.
visas texten ”SP00” i displayen och bandet spolas
till närmast avsnitt med ljud varefter avspelningen
fortsätter.
4) Funktionen avbryts med tryck på BLANK SCAN
ellet stopp alt. PAUSE-knappen (29).
Om funktionen blank scan inte fungerar korrekt, se
kapitel 4.5 val av spår.
5 Inspelning
5.1 Skydda kassett från oavsiktlig radering
För att skydda kassetten från oavsiktliga inspelningar/raderingar kan raderskydden (a och b) tas bort
på kassettens baksida (fig. 4). Fabriksinspelade kassetter är normalt skyddade från början. För att
skydda en sida, ta bort plastbiten på kassettens vänstra sida. Detta skyddar den sida som är vänd uppåt
(bandet går åt höger).
Om bandet senare skall spelas över med nytt ma-
terial kan en bit tejp fästas över kassettens baksida
(fig. 5).
5.2 Enkel inspelning
1) Spola tillbaks kassetten till början eller den punkt
där inspelningen skall börja. Nollställ räkneverket
med RESET-knappen (2/4) för att göra det enklare att finna startpunkten för inspelningen vid
avspelning.
2) Ställ omkopplaren DOLBY NR (10) i den position
som motsvarar önskemål om brusreducering.
OFF = ingen brusreducering.
B = Dolby B.
C = Dolby C.
3) Ställ omkopplaren DIRECTION (riktning) efter
önskemål
= Inspelningen stannar efter 1 bandsida.
= Inspelning stannar efter 2 bandsidor.
= Inspelningen fortsätter på deck 2 (förut-
satt att kassetter finns i båda decken).
4) Välj lämplig programkälla på förstärkaren eller
med mikrofon i anslutningen MIC (14) på kassettdecket. Om mikrofon ansluts stängs de normala
signalingångarna av på deckets baksida.
5) Tryck på knappen RECORD (25). Decket är one
touch recording typ och ställs i REC/PAUSE läge.
I displayen visas texten ”REC” och PAUSE . Om
MONACOR receiver DSR-2000 används med
decket kommer funktionen INPUT SELECT att
spärras för att undvika att den inspelade signalen
ändras under pågående inspelning.
6) Med kontrollen REC LEVEL justeras nivån på signalen som skall spelas in så att de högsta nivåerna i materialet inte når över +3 dB VU. Med
kontrollen BALANCE (12) justeras ljudet så att ljudet blir balanserat om inte inspelningen är i extrem stereo med stora skillnader mellan kanalerna. I de flesta fall kan balanskontrollen lämnas
i mittposition.
7) Om bandet spelas in åt fel håll, kontrollera i displayen vilken riktning som valts. Med pilarna
och .
OBS! om playtangenten som motsvarar spelriktningen trycks in startar inspelningen omedelbart.
8) Starta inspelningen med PAUSE tangenten (24).
Med ännu en tryckning på PAUSE tangenten
ställs decket i pauseläge osv.
9) För att stoppa inspelningen, tryck på stoppknappen (29).
5.3 Omstart vid tekniskt fel
Kassetten kan automatisk spolas tillbaks till startpunkten igen (om inspelning inte blir bra o.d.).
1) När inspelning pågår tryck på om bandet
går åt höger.
När inspelning pågår tryck på om bandet
går åt vänster.
2) Inspelningen avbryts och bandet spolar tillbaks till
inspelningens startpunkt varefter inspelningen
börjar om från början.
5.4 Tillägg av 4 sek tystnad mellan spår
Det är möjligt att lägga till 4 sek tystnad mellan inspelade spår för att sökfunktionen Intro check resp
spolning till nästa/föregående spår skall fungera. Se
även tekniskt information i kapitlet välja spår.
Jos painat kelausnäppäintä kahdesti, nauha kelautuu koko matkan (alkuun tai loppuun) ja soitto käynnistyy automaattisesti. Tällöin näytössä vilkkuu teksti
"PLAY" kelauksen aikana.
Huomaa: Jos painat kelausnäppäimiä soiton aikana,
nauhuri kelautuu joko seuraavan tai soivan kappaleen alkuun (katso alla luku 4.5 "Kappalehaku").
4.5 Kappalehaku
Soiton aikana voit siirtyä uuteen kappaleeseen
näppäimillä (28) ja (30). Nauhuri kelautuu automaattisesti valitun kappaleen kohdalle ja
aloittaa soiton. Kelaamisen aikana näytössä näkyy
teksti "SP" ja numerolla kuinka monta kappaletta kelataan eteen- tai taaksepäin (enintään 20 kappaletta). Kappaleiden välillä täytyy olla vähintään 4 sekunnin tauot, jotta nauhuri pystyy erottamaan
kappaleet toisistaan.
1) Kun soittosuunta on oikealle eli :
Jokainen näppäimen painallus vie yhden
kappaleen eteenpäin.
Yksi näppäimen painallus aloittaa soivan
kappaleen uudelleen. Kahdella näppäimen
painalluksella päästään edelliseen kappaleeseen, ja useampi näppäimen painallus vie
yhtä monta kappaletta taaksepäin.
2) Kun soittosuunta on vasemmalle eli :
Jokainen näppäimen painallus vie yhden
kappaleen eteenpäin.
Yksi näppäimen painallus aloittaa soivan
kappaleen uudelleen. Kahdella näppäimen
painalluksella päästään edelliseen kappaleeseen, ja useampi näppäimen painallus vie
yhtä monta kappaletta taaksepäin.
Tekninen huomautus
Kappalehakua ohjaa järjestelmä nimeltään IPSS (Intelligent Program Search System). Se ohjaa myös
toimintoja jotka on esitelty seuraavissa luvuissa:
– Soivan kappaleen toisto
– Kappaleiden esittely
– Automaattinen pitkien taukojen ohitus
Jotta järjestelmä toimisi, kappaleiden välillä täytyy
olla vähintään 4 sekunnin tauot. Voit lisätä omiin äänityksiisi tällaiset tauot REC MUTE-toiminnolla:
katso luku 5.4 "T auon (4 sekuntia) lisääminen kappaleen perään".
IPSS-järjestelmä ei pysty toimimaan kunnolla, jos:
1. nauhalla on puhetta tai ääntä, jossa on yli 4 sekunnin taukoja
2. kappaleissa on hyvin hiljaisia tai täysin äänettömiä, yli 4 sekunnin pituisia kohtia (esim. klassinen
musiikki)
3. kappaleiden välillä kuuluu jotain häiriöääntä
4. kappaleiden väliset tauot ovat alle 4 sekunnin pituisia
5. kasetti on äänitetty hyvin hiljaisella äänitystasolla
6. kappaleiden alut ja loput on häivytetty, jolloin kappaleiden välillä ei ole tunnistettavia taukoja.
4.6 Soivan kappaleen toisto
Jos haluat että soiva kappale toistetaan uudelleen,
painele soittosuuntaa vastaavaa soittonäppäintä niin
monta kertaa kuin haluat kappaleen soivan uudelleen (enintään 8 kertaa):
näppäin (31) jos soittosuunta on oikealle (näkyy
näytössä)
näppäin (27) jos soittosuunta on vasemmalle
(näkyy näytössä)
Näyttöön tulee teksti "AP" ja toistetaan määrä.
Nauhuri soittaa kappaleen loppuun, kelaa uudestaan
alkuun ja soittaa kappaleen uudelleen, yhtä monta
kertaa kuin soittonäppäintä on painettu. Toiminnon
saa lopetettua painamalla joko (29) tai PAUSE
(24).
Jos toisto ei toimi kunnolla, lue tekninen huomautus
luvun 4.5 "Kappalehaku" lopusta.
4.7 Kappaleiden esittely
Voit kuunnella lyhyen 10 sekunnin näytteen kaikista
kappaleista yhdellä kasetin puolella.
1) Käynnistä ensin soitto näppäimellä (27) tai
(31).
2) Paina INTRO CHECK-näppäintä (16). Nelinumeroisen nauhalaskurin näytön tilalle tulee kappalenumeron näyttö kahdella numerolla.
3) Nauhuri kelaa seuraavan kappaleen alkuun, soittaa sitä 10 sekuntia, kelaa taas seuraavaan kappaleeseen, ja niin edelleen.
4) Jos DIRECTION-valintakytkin (9) on asennossa
tai , nauhuri kytkeytyy automaattisesti
soitolle puolen lopussa. Asennossa nauhuri
siirtyy soittamaan kasetin toista puolta, asennossa mahdollisesti myös kasettia toisessa
kasettipesässä. Jos näistä kappaleista halutaan
esittely, täytyy INTRO CHECK-näppäintä painaa
uudelleen.
5) Toiminnon saa lopetettua painamalla INTRO
CHECK-näppäintä uudelleen, jolloin soitto jatkuu
normaalisti.
Jos näytteenotto ei toimi kunnolla, lue tekninen
huomautus luvun 4.5 "Kappalehaku" lopusta.
4.8 Automaattinen pitkien taukojen ohitus
Jos kappaleiden välissä on yli 10 sekunnin taukoja,
ne saadaan ohitettua automaattisella eteenpäinkelauksella.
1) Käynnistä ensin soitto näppäimellä (27) tai
(31).
2) Paina BLANK SCAN-näppäintä (17). Näytössä
näkyy teksti "BLANK SCAN".
3) Kun nauhuri tulee pidemmän tauon kohdalle,
näyttöön tulee teksti "SP00" ja nauhuri kelaa kasetin seuraavan kappaleen kohdalle. Tästä soitto
jatkuu taas.
4) Toiminnon saa pois päältä painamalla uudestaan
BLANK SCAN-näppäintä, tai myös näppäintä
(29) tai PAUSE (24).
Jos ohitus ei toimi kunnolla, lue tekninen huomautus
luvun 4.5 "Kappalehaku" lopusta.
44
FIN
S
Page 45

Detta kan göras på ett av 2 sätt enligt följande:
1. Under inspelning
Då inspelning pågår, tryck på knappen REC
MUTE (23) vid slutet av ett spår. En pause på 4
sek läggs då till mellan spåren som spelas in.
Detta sker även om VU-metrarna visar nivåutstyrning. Texten ”REC” blinkar då pausen läggs till
bandet. Kassetten går därefter över till standby.
Läge och kan startas med pausetangenten.
2. Efter en inspelning
Vid slutet av ett inspelat spår tryck PAUSE (24).
Med RECORD (25) tangenten, slå över till stand
by läge och tryck på knappen REC MUTE (23) så
läggs en 4 sek. pause till på bandet. Efter mutetillägget går kassetten över till stand by läge.
Stoppa funktionen genom att trycka på knappen
stopp (29).
5.5 Parallell inspelning på båda decken
Det är möjligt att spela in 2 likadana kopior på båda
decken samtidigt enligt följande.
1) Stoppa i kassetter i båda decken och se till att de
är spolade helt tillbaka till början på den band sida
som skall bandas. Alt. till den punkt där inspelningen skall börja.
2) Ställ DOLBY NR (10) omkopplaren i det läge som
är lämpligt för inspelningen.
3) Ställ omkopplaren Direction till lämpligt läge.
= Inspelningen stannar efter en sida.
eller
= Inspelningen stannar efter att båda sidor
på båda kassetterna har spelats in.
4) Ställ in den enhet på förstärkaren som skall spelas in (radio ed.)
5) Tryck på knappen RECORD på deck 1 eller 2 (25)
och justera inspelningsnivån. Samt balansen med
kontrollen BALANCE (12).
6) Tryck på knappen stand by (29). Detta kopplar
ur funktionen stand by.
7) Om inspelningsriktningen är fel tryck på knappen
Direction eller och därefter på (stoppknappen).
8) Tryck på knappen PARALLELREC (26).
9) För att pausa inspelningen tryck på knappen
PAUSE (24) på deck 2. För att stoppa inspelningen tryck på knappen stopp (29) på deck 1
eller 2.
5.6 Kassettkopiering
1) Stoppa in kassett som skall kopieras i deck 1 och
masterkassetten i deck 2. Den tomma bandtallriken måste vara till höger då kopieringen startar åt
höger (normal kassettdrift)
2) Inspelningsnivå och balans är urkopplade vid kopiering liksom DOLBY omkopplaren. Nivåerna för
de båda decken är identiska vid kopiering.
3) Ställ omkopplaren DIRECTION (9) i lämpligt läge
= kopieringen stannar efter 1 bandsida.
eller
= kopieringen fortsätter på bandets bak-
sida då framsidan är kopierad.
4) Om den ena kassetten inte tillbakaspolad till början på kassetten, tryck på knappen AUTO (18)
innan kopieringen börjar. Texten ”HIGH DUB,
NORM DUB” visas i displayen. Genom att trycka
på någon av knapparna spolas bandet först tillbaks till bandets början.
5) Om båda sidorna på kassetten skall kopieras
men den ena kassetten har kortare speltid än den
andra Kan baksidan fås att börja med första
spåret från originalkassettens baksida. Under kopieringen spolas den längre kassetten framåt.
Om kassetten för kopian är kortare än originalet
kommer de spår som inte får plats att förloras på
kopian. Om kassetten för kopian är längre kommer ett tomrum att uppstå i slutet på varje bandsida. För att aktivera denna funktion tryck på
knappen SYNC REV (22). Displayen visar texten
”SYNC REV”. Denna funktion fungerar endast om
dubbel inspelning valts. dvs om båda sidor skall
kopieras.
Inspelad kassett är kortare
➅
Inspelad kassett är längre ➆
6) Efter dessa inställningar, tryck på knappen DUBBING:
Knappen NOR (19) kopierar i normal hastighet
vilket rekommenderas vid kopiering av högkvalitetsinspelningar.
Knappen HIGH (20) kopierar i dubbel hastighet.
5.7 CD spelarstyrd inspelning
Då CD-spelaren CD-2000 och recivern DRS-2000
som matchar kassettspelaren används startas kassettspelaren då CD-skivan startas enligt följande.
1) Kassettdecket CD-spelaren och recivern skall
vara ihopkopplade med med kontrollkabeln (se
kapitel 3 Anslutningar).
Spelning på kassettfack 1
Inspelning på kassettfack 2 Spolar fram
Sida 1
Sida 2
Sida 1
Sida 2
Stop
Inspelning på kassettfack 2
Spelning på kassettfack 1 Spolar fram
Sida 1
Sida 2
Sida 1
Sida 2
Stop
5 Äänitys
5.1 Suojaa kasetti, jotta et äänitä sille vahingossa
Jos haluat suojata äänittämäsi kasetin uutta äänitystä vastaan (esimerkiksi jotta et vahingossa äänittäisi
sen päälle kopiointiäänityksellä), katkaise kasetista
suojaliuskat (a) ja (b) (kuva 4). Myynnissä olevat
nauhoitetut kasetit on yleensä jo suojattu valmistajan
toimesta. Kuvassa 4 suojaliuska (b) suojaa puolta
jonka etiketti on näkyvissä (tässä tapauksessa 1puoli). Jos haluat suojata vain toisen puolen, katkaise vain sen puolen suojaliuska.
Jos myöhemmin haluat äänittää suojatulle kasetille uudelleen, peitä suojaliuskan jättämä aukko teipinpalalla (kuva 5).
5.2 Tavallinen äänitys
1) Laita kasetti (kumpaan tahansa) kasettipesään, ja
kelaa se joko alkuun tai kohtaan josta haluat aloit-
taa äänityksen. Nollaa nauhalaskuri RESET-
näppäimellä (2 tai 4), jolloin äänityksen aloitus-
kohta löytyy helposti myöhemmin.
2) Aseta DOLBY NR-valintakytkin (10) haluamaasi
asentoon. Tässä kannattaa ottaa huomioon sen
nauhurin kohinanvaimennin, jolla kasettia tullaan
myöhemmin kuuntelemaan (B, C, vai ei Dolbya?).
Dolby C antaa sinänsä parhaan äänenlaadun.
OFF = äänitys ilman Dolby-kohinanvaimenninta
B = äänitys Dolby B:llä
C = äänitys Dolby C:llä
3) Aseta DIRECTION-valintakytkin haluamaasi
asentoon:
= nauhuri pysähtyy, kun yksi kasetin puoli
on äänitetty
= nauhuri äänittää kasetin molemmat puo-
let peräkkäin
= nauhuri äänittää kasetin molemmat puo-
let ensin toisessa kasettipesässä, sitten
toisessa. (Kummassakin kasettipesässä
pitää tietysti olla kasetti sisällä.)
4) Valitse vahvistimesta, mistä laitteesta äänitetään.
Mikrofoniäänityksissä kytke mikrofoni MIC-jakkiin
(14). Tällöin REC-äänitystulo (32) sulkeutuu.
5) Paina RECORD-näppäintä (25), jolloin nauhuri
siirtyy äänityksen valmiustilaan. Tällöin näytössä
näkyy teksti "REC" ja tauon merkki . (Jos
käytössä on MONACORin viritinvahvistin DSR2000, siitä myös lukittuu äänityslähteen valintakytkin INPUT SELECT, jotta asento ei muuttuisi
vahingossa äänityksen aikana.)
6) Säädä äänitystaso REC LEVEL-säätimellä (11) ja
kanavatasapaino BALANCE-säätimellä (12) siten, että tasomittarin 0 dB-palkki palaa musiikin
voimakkaimmissa kohdissa. Kanavatasapaino
saa yleensä olla keskiasennossaan (napsahduksen kohdalla), säätö on tarpeen vain kehnojen alkuperäisäänitysten kanssa.
7) Jos äänitys halutaan tehdä toiseen suuntaan (toiselle kasetin puolelle) kuin näytössä näkyy, voit
vaihtaa suunnan painamalla uutta suuntaa vastaavaa soittonäppäintä, (27) tai (31).
Huomio: Jos painat näytön suuntaa vastaavaa
soittonäppäintä, äänitys alkaa samantien!
8) Aloita äänitys painamalla PAUSE-näppäintä (24).
Äänityksen saa myös keskeytettyä PAUSEnäppäimestä.
9) Lopeta äänitys painamalla näppäintä (29).
5.3 Äänityksen aloittaminen uudestaan vir-
heen sattuessa
Kasetin saa automaattisesti kelattua takaisin äänityksen aloituskohtaan, esimerkiksi jos mukaan on
tullut kappale jota et halua lopulliseen äänitykseen.
1) Äänityksen ollessa vielä käynnissä, paina kelausnäppäintä (28) jos äänityssuunta on oikealle, tai (30) jos äänityssuunta on vasemmalle.
2) Nauhuri pysäyttää äänityksen, kelaa kasetin äänityksen aloituskohtaan, ja käynnistää äänityksen
uudelleen siitä.
5.4 Tauon (4sekuntia) lisäys kappaleen
perään
Yksittäisten kappaleiden välillä pitää olla vähintään 4
sekunnin tauot, jotta IPSS-järjestelmä pystyy toimimaan kunnolla (lue tekninen huomautus luvun 4.5
"Kappalehaku" lopusta). Voit lisätä omiin äänityksiisi
näitä taukoja automaattisesti REC MUTE-näppäimen (23) avulla.
Tähän on kaksi tapaa:
1) äänityksen aikana
Kun äänitys on käynnissä, paina REC MUTEnäppäintä kappaleen lopussa. Nauhuri lisää kappaleen loppuun 4 sekunnin tauon, myös vaikka
tasomittari näyttäisi samaan aikaan äänityssignaalia. Tauon lisäämisen aikana näytön teksti
"REC" vilkkuu. Lisäyksen jälkeen nauhuri siirtyy
äänityksen valmiustilaan. Voit jatkaa seuraavan
kappaleen äänitystä painamalla PAUSEnäppäintä (24).
2) äänityksen jälkeen
Paina PAUSE-näppäintä (24) kappaleen lopun
kohdalla. Paina sitten RECORD-näppäintä (25),
jolloin nauhuri siirtyy äänityksen valmiustilaan.
Paina REC MUTE-näppäintä (23), ja nauhuri
lisää tauon kappaleen perään. Tämän jälkeen
nauhuri siirtyy takaisin äänityksen valmiustilaan,
jonka saat pois päältä näppäimellä (29).
5.5 Rinnakkaisäänitys (kahdelle kasetille)
Sama äänitys voidaan suorittaa kummassakin kasettipesässä, jolloin saadaan kaksi alkuperäistä äänitystä samasta lähteestä.
1) Laita kasetit sisään, ja kelaa ne joko alkuun tai
kohtaan josta haluat aloittaa äänityksen.
2) Aseta DOLBY NR-valintakytkin (10) haluamaasi
asentoon (katso luku 5.2 "Tavallinen äänitys").
3) Aseta DIRECTION-valintakytkin (9) haluamaasi
asentoon:
= nauhuri pysähtyy kun yksi kasetin puoli
(kummassakin kasettipesässä) on äänitetty
45
FIN
S
Page 46

2) Lägg i kassetten. Om båda decken används
startar alltid deck 2 först.
3) Ställ DOLBY NR (10) omkopplaren i önskat läge
(se kapitel 5.2 enkel inspelning).
4) Tryck på knappen RECORD (25) och starta CD:n.
Ställ in nivån på kassettdecket med kontrollen
REC LEVEL (11) och med balansen med kontrollen BALANCE (12).
5) Om inspelning påbörjas åt fel håll, tryck på knappen eller för att ändra bandriktning.
OBS! Om knappen som är i spelriktningen trycks
in, påbörjas inspelningen omedelbart.
6) Stanna CD-spelaren.
7) Stäng av stand by-läget på decket med stoppknappen (29) och tryck sedan på knappen RECORD igen. Dessa steg är viktiga. Annars kan
inte synkron inspelning göras från CD:n. Kontrollera även att CD är inställt på förstärkaren och
tryck på RECORD (25).
8) Starta CD:n med knappen eller genom att
trycka in numret på det spår som skall börja inspelningen. Detta påbörjar avspelningen och
startar även inspelningen på decket.
9) Inspelningen kan avbrytas med på CD:n.
(efter ett par sekunder – går decket över till stand
by läge). Inspelningen kan också fortsättas med
denna knapp. Inspelningen avslutas med sista
spåret på CD:n eller med STOP knappen.
5.8 Automatisk inspelning av CD på kassett
(CARS)
Med CARS (computer aided CD recording system,
datorstyrd CD inspelning). Är det möjligt att spela in
automatiskt med automatisk inspelningsnivå på kassettdecket. Samtlig spår på CD:n spelas upp kort
och nivån på decket ställs in. I början på kassetten
läggs en 8 sekunders tyst sekvens in. CD:n startas
och samtidigt påbörjas inspelningen på kassettdecket. Denna funktion är endast möjlig med
MONACOR CD-spelare kassettdeck och receiver i
samma serie.
1) Alla enheter (CD-spelare, kassettdeck och receiver) måste vara ihopkopplade med systemkabel
för funktionen skall fungera. Se kapitel 3 Anslutning.
2) Med knappen EDIT på fjärrkontrollen kan antalet
titlar och längden på kassettbandet ställas in. (se
manual för CD-spelaren).
3) Lägg i en kassett med den tomma spolen åt höger
och spola tillbaks bandet till början om så är nödvändigt.
4) Ställ DOLBY omkopplaren i lämplig position. Se
kapitel 5.2 Enkel kassettinspelning.
5) Ställ omkopplaren DIRECTION i lämpligt läge.
= Inspelningen stannar efter en sida.
eller
= Inspelningen stannar efter att båda sidor
på båda kassetterna har spelats in.
6) Displayen skall visa bandriktning åt höger. Om
inte, tryck på knappen (31) och sedan knapp
(29).
7) Tryck på knappen CARS (21). Inspelningen startar automatiskt. Volym justeringen kan ta upp till
3
1
/2 minuter beroende på CD:n.
8) Efter avslutad inspelning stannar både CD-spelare och kassettdeck. Om så önskas kan funktionen avbrytas genom att trycka på STOP knappen
på CD spelaren.
6 Anslutning av en klocktimer eller den
inbyggda timern i DSR-2000
Med en ansluten timer eller den inbyggda timern i
DSR-2000. Kan såväl in som avspelning programmeras till en viss tidpunkt (för väckning ed.).
1) Anslut kontakten till kassettdecket till anslutningen på baksidan av recivern.
2) Om en yttre timer används måste även de övriga
delarna kopplas till samma timer. Timern ställs i
läge on för injustering av anläggningen, och
därefter till läge auto för timerfunktion.
3) Slå på alla inkopplade delar med respektive
strömbrytare.
4) Om CD-2000 är ansluten till systemet skal ingen
CD ligga i CD-luckan vid start annars startar avspelning av CD:n automatiskt vid timertillslag och
spelas in på kassettdecket.
5) Lägg i en/två kassetter efter önskemål.
OBS! att in/avspelning alltid startar på deck 2. Se
till att den tomma bandspolen ligger åt höger då
all autofunktion börjar åt höger.
6) Ställ DOLBY NR omkopplaren i lämpligt läge (10).
Se kapitel 4.3 avspelning av kassett och kapitel
5.2 enkel inspelning.
7) För avspelning med timer ställ omkopplare
TIMER (8) i läge PLAY. Justera volymen på recivern efter behov.
8) För inspelning, ställ in den radiostation som skall
bandas. Tryck på knappen RECORD på decket
(25). Justera inspelningsnivån med REC LEVEL
(12) och balansen med BALANCE (12). Ställ omkopplare TIMER (8) i läge REC och dra ned volymen på recivern så att lagom volym hörs. Speciellt viktigt om avspelning som väckning avses
9) Ställ in önskad tid för start på recivern alternativt
den yttre timern. Stäng av recivern alt. Ställ timern
till automatisk funktion. När inställd tid nås startar
in/avspelningen automatiskt.
7 Vård
7.1 Korrekt lagring av kassetter
Kassetter skall skyddas mot fukt, värme solljus och
kraftiga magnetfält för att fungera tillfredställande.
Placera kassetterna så att dessa inte utsätts för skadeverkan från sådana källor.
7.2 Rengöring av tonhuvud och kapstan
(Tryckrulle och drivaxel)
Varje kassett har sin egen inställning av azimuthkorrigering och kan därför ge ett ojämnt intryck om det
tai
= nauhuri äänittää kasetin molemmat puo-
let (kummassakin kasettipesässä) peräkkäin
4) Valitse vahvistimesta (tai vastaavasta), mistä lähteestä äänitetään.
5) Paina kumman tahansa nauhurin RECORDnäppäintä (25), jolloin nauhurit siirtyvät äänityksen valmiustilaan. Säädä äänitystaso REC
LEVEL-säätimellä (11) ja tarvittaessa kanavatasapaino BALANCE-säätimellä (12).
6) Kytke nauhuri pois äänityksen valmiustilasta
näppäimellä (29).
7) Jos näytössä näkyy eri äänityssuunta kuin halutaan, vaihda suunta painamalla halutun suunnan soittonäppäintä, joko (27) tai (31).
Paina heti perään näppäintä .
8) Käynnistä rinnakkaisäänitys PARALLEL RECnäppäimestä (26).
9) Jos haluat keskeyttää äänityksen, paina 2-nau-
hurin PAUSE-näppäintä (24). Kun haluat lopettaa
äänityksen, paina kumman tahansa nauhurin
näppäintä (29).
5.6 Kopiointiäänitys (kasetilta kasetille)
1) Laita äänitettävä kasetti (se jolta äänitetään)
1-nauhurin kasettipesään, ja äänittävä kasetti (se
jolle äänitetään) 2-nauhurin kasettipesään. Kasettien tyhjien kelojen pitää osoittaa oikealle,
koska kopiointiäänitys alkaa aina tähän suuntaan.
2) Äänitystasoa ja kanavatasapainoa ei voi säätää
kopiointiäänityksessä. Myöskään DOLBY NR-valintakytkimellä (10) ei ole mitään vaikutusta: äänittävälle kasetille tulee samat säädöt kuin äänitettävällä kasetilla on.
3) Aseta DIRECTION-valintakytkin (9) haluttuun
asentoon:
= nauhuri pysähtyy kun yksi kasetin puoli
on kopioitu
tai
= kasetin molemmat puolet kopioidaan
4) Jos jompaakumpaa kaseteista ei ole kelattu alkuun, paina ennen äänityksen käynnistystä
AUTO-näppäintä (18): näytössä vilkkuu teksti
"HIGH DUB, NORM DUB". Kasetit kelautuvat alkuun sitten kun kopiointiäänitys käynnistetään
(NOR) tai (HIGH) DUBBING-näppäimellä (19 tai
20).
5) Jos molemmat puolet halutaan kopioida mutta
käytettävät kasetit ovat eripituisia, SYNC REV-toiminnolla saadaan äänittävän kasetin 2-puolen alkuun aina se kappale joka on äänitettävän kasetin
2-puolen alussa. Tällöin oikea kasetti kelautuu
automaattisesti eteenpäin äänityksen aikana. Jos
äänittävä kasetti on lyhyempi, kummankin puolen
viimeiset kappaleet jäävät puuttumaan (kuva 6).
Jos äänittävä kasetti on pidempi, sen kummankin
puolen loppuun tulee vastaavasti tyhjää tilaa
(kuva 7). Kytke toiminto päälle painamalla SYNC
REV-näppäintä (22). Näyttöön tulee teksti "SYNC
REV" (Synchro Reverse Dubbing). DIRECTIONvalintakytkimen pitää olla asennossa tai
tätä toimintoa varten.
Äänittävä kasetti on lyhyempi
➅
Äänittävä kasetti on pidempi ➆
6) Näiden valmistelujen jälkeen voit aloittaa kopiointiäänityksen jommallakummalla käynnistysnäppäimellä:
(NOR) DUBBING-näppäin (19), jolla äänitys tapahtuu normaalinopeudella. Tätä suositellaan
parempilaatuisiin äänityksiin, ja myös jos äänitettävässä kasetissa on korkea äänitystaso.
(HIGH) DUBBING-näppäin (20), jolla äänitys tapahtuu kaksinkertaisella nopeudella.
5.7 CD-soittimen aloittama äänitys
Jos käytösä on MONACORin CD-soitin CD-2000 ja
viritinvahvistin DSR-2000, äänityksen saa käynnistynään automaattisesti CD-soittimen soittonäppäimestä.
1) Kasettinauhurin, CD-soittimen ja viritinvahvistimen täytyy olla kytkettynä toisiinsa järjestelmäohjaus-liitännöistä (katso luku 3 "Kytkentä").
2) Syötä kasetti (tai kasetit) kasettipesään. Äänitys
alkaa aina 2-nauhurista, jos kummassakin kasettipesässä on kasetti.
3) Aseta DIRECTION-valintakytkin (9) ja DOLBY
NR-valintakytkin (10) haluamaasi asentoon
(katso luku 5.2 "Tavallinen äänitys").
4) Paina RECORD-näppäintä (25), laita CD-levy soimaan lyhyeksi ajaksi ja säädä äänitystaso REC
LEVEL-säätimellä (11). Tarvittaessa säädä myös
kanavatasapaino BALANCE-säätimellä (12).
Äänitettävä 1-nauhuri
Aänittävä 2-nauhuri kelaa eteenpäin
1-puoli
2-puoli
1-puoli
2-puoli
Seis
Äänittävä 2-nauhuri
Äänitettävä 1-nauhuri kelaa eteenpäin
1-puoli
2-puoli
1-puoli
2-puoli
Seis
46
FIN
S
Page 47

inspelande decket inte varit rengjort. Även efter
rengöring kan en sådan kassett uppvisa ojämnheter.
(inspelningen är gjord före rengöring). Rengöringskassetter finns som regel att köpa i varje välsorterad radio/TV-affär. Lämplig rengöringskassett =
MONACOR KC-01 eller AHC-09. Med dessa rengörs
både tomhuvud och kapstan. Det finns även manuella artiklar (tops och kemiskt ren sprit). Med
rengöringkassett behöver bara playknappen tryckas
in varvid rengöringen sker automatiskt av tonhuvuden och kapstan. Manuella rengöringskit kräver mer
tid och lite kunskap om rengöringen
7.3 Avmagnetisering av ton och raderhuvud
Efter en tid blir ton och raderhuvud dels smutsiga av
avlagringar från kassettband, dels magnetiserade av
avlagringarna. Detta leder till att ljudet på kassetterna försämras och i värsta fall kan kassetterna bli
permanent förstörda.
För att undvika detta bör ton och raderhuvud avmagnetiseras var 50:e timme effektiv speltid. För
detta finns MONACOR DEM-115 avmagnetiseringskassett. Man kan även använda en defluxer som
drivs med 230V~/50 Hz.
8 Felsökning
8.1 Inget ljud hörs vid avspelning.
1) Signalkablarna är inte ordentligt isatta i resp. kon-
takter.
➪Sätt i kontakterna ordentligt . (se kapitel 3. ”An-
slutningar”)
2) Tonhuvudet är smutsigt.
➪ Rengör ton och rader huvud. Se kapitel 7.2
”rengöring av ton/rader huvud”.
3) Kassetttapen är förstörd.
➪Använd en annan kassett.
4) Kassetten är inte inspelad.
➪Använd en inspelad kassett.
8.2 Kassetten rör sig inte vid spolning åt något
håll.
1) Kassettluckan är inte ordentligt stängd.
➪Stäng kassettluckan ordentligt.
2) Knappen för spolning har tryckts in för snabbt
efter att luckan har stängts.
➪ Vänta ett par sekunder efter att luckan är
stängd med att trycka på knappen.
3) Spolknappen har tryckt in direkt efter påslag av
enheten.
➪ Vänta ett par sekunder innan knappen trycks
in efter att enheten slås på.
4) Det finns ingen kassett i kassettfacket.
➪Stoppa i en kassett.
5) Kassetten är skadad Ev. trasslad i kassetten.
➪Stoppa i en annan kassett.
6) Kassetten är i endläge (kassetten är slut).
➪Spola tillbaks eller vänd på kassetten.
8.3 Funktionerna skip, title selection, title repeat, och kort förlyssning fungerar inte
1) Det finns inga pauser som funktionen kan känna
av. Se kapitel 4.5 Välj spår.
➪Lägg in en pause på egna inspelningar. Se ka-
pitel 5.4 Lägga till 4 sek tomrum.
8.4 CARS. Automatisk CD inspelning till kassett
fungerar inte
1) Kassetten är inte ilagd i kassett 2.
➪Stoppa i kassetten i kassett 2.
2) Det finns ingen CD i CD spelaren.
➪Ladda CD spelaren med en CD.
3) CD skivan är smutsig.
➪Rengör CD skivan.
4) Kontrollkablarna är inte ordentligt insatta i resp
apparat.
➪Stoppa i kablarna ordentligt.
8.5 Kassetterna stannar inte samtidigt på båda
decken vid kopiering
1) Kassetterna har olika lång speltid.
➪ Ingen. det finns alltid en viss tolerans i längd
på fabrikskassetter.
8.6 Kassettluckan öppnas inte med tryck på
EJECT
1) Decket spelar eller spolar åt något håll.
➪Stoppa decket med stoppknappen (29) och
öppna luckan.
8.7 Tråkiga inspelningar utan ren diskant
1) Ton/rader huvud är smutsiga.
➪ Rengör ton /rader huvud med rengöringskas-
sett. Se kapitel 7.2 rengöring.
8.8 Inspelningen har distorsion
1) Inspelningsnivån har varit för hög, bandet är mät-
tat.
➪Spela in med lägre volym på däcket. = 0 dB VU
skal precis lysa upp.
8.9 Det går inte att trycka in RECORD knappen.
Det hörs ingen inspelning
1) Rader spärren är borttagen på kassetten.
➪Tejpa över hålet eller stoppa in en ny kassett i
kassettfacket.
2) Kassettluckan är inte ordentligt stängd.
➪Stäng luckan ordentligt.
3) Kontrollen REC LEVEL är på miniminivå.
➪Höj nivån så att VU metern visar max 0 dB VU.
4) På recivern har TAPE 1 eller TAPE 2 valts.
➪Tryck på knapp (29) på förstärkaren och välj
lämplig signalkälla för inspelning.
5) Tapen är slut.
➪Tryck på knappen för byte av spelriktning eller
sätt i en ny kassett i kassettfacket.
8.10 Kraftiga störsignaler hörs
1) Systemet störs av andra enheter. T.ex TV o.d.
➪ Stäng av de andra enheterna eller flytta dem
längre från stereon.
5) Jos haluat äänittää toiseen suuntaan (toiselle kasetin puolelle) kuin näytössä näkyy, vaihda suunta painamalla uutta suuntaa vastaavaa soittonäppäintä, (27) tai (31).
Huomio: Älä paina näytössä näkyvän suunnan
soittonäppäintä, koska tällöin äänitys alkaa välittömästi.
6) Pysäytä CD-soitin (soittimen omalla STOPnäppäimellä).
7) Kytke äänityksen valmiustila pois nauhurista
näppäimellä (29) ja paina RECORD-näppäintä
(25) uudelleen. Tämä toimenpide on välttämätön:
ilman sitä CD-soitin ei pysty käynnistämään
nauhurin äänitystä.
Tarkista myös, että CD-soitin on valittuna viritinvahvistimessa. Jos ei ole, paina nauhurin
näppäintä (29), valitse CD-soitin viritinvahvistimesta, ja paina RECORD-näppäintä (25).
8) Käynnistä soitto CD-soittimesta joko näppäimellä
tai syöttämällä kappalenumero suoraan.
Nauhurin äänitys käynnistyy automaattisesti.
9) Voit halutessasi keskeyttää äänityksen painamalla CD-soittimen näppäintä (nauhuri
menee äänityksen valmiustilaan muutaman sekunnin viiveellä) ja jatkaa äänitystä samalla
näppäimellä. Äänitys loppuu automaattisesti CDlevyn lopussa, ja myös kun painat CD-soittimen
STOP-näppäintä.
5.8 Automaattinen CD-levyn äänitys (CARS)
Voit äänittää CD-levyn kasetille myös siten, että
nauhuri huolehtii itse äänitystason säätämisestä.
Tätä kutstutaan CARS-toiminnoksi (Computer Aided
CD Recording System). CD-soitin monitoroi kappaleet pikakelauksella, nauhuri säätää äänitystason ja
lisää 8 sekunnin tauon nauhan alkuun, ja äänitys
alkaa levyn alusta
-
täysin automaattisesti. Tämä
toiminto on mahdollinen vain MONACORin yhteensopivien CD-soittimen CD-2000 ja viritinvahvistimen
DSR-2000 kanssa.
1) Kasettidekin, CD-soittimen ja viritinvahvistimen
täytyy olla kytkettynä toisiinsa järjestelmäohjausliitännöistä (katso luku 3 "Kytkentä").
2) Käynnistä CD-soittimen kaukosäätimen EDITnäppäimellä editointitoiminto, jolla valitaan levyltä
äänitettävät kappaleet ja syötetään äänittävän kasetin pituus (katso CD-soittimen käyttöohjeesta).
3) Syötä kasetti jompaankumpaan kasettipesään
niin, että tyhjä kela osoittaa oikealle. Tarvittaessa
kelaa kasetti alkuun.
4) Aseta DOLBY NR-valintakytkin (10) haluamaasi
asentoon (katso luku 5.2 "Tavallinen äänitys").
5) Aseta DIRECTION-valintakytkin (9) haluamaasi
asentoon:
= Nauhuri pysähtyy kun yksi kasetin puoli
on äänitetty
tai
= Nauhuri äänittää kasetin molemmat puo-
let peräkkäin
6) Näytössä näkyvän soittosuunnan pitää olla oikealle. Jos suunta on vasemmalle, paina
näppäintä (31) ja heti perään näppäintä
(29).
7) Paina CARS-näppäintä (21). Automaattinen äänitys alkaa. Äänitystason säätö voi kestää levystä
riippuen jopa 3
1
/2 minuuttia.
8) Äänityksen jälkeen CD-soitin ja nauhuri pysähtyvät itsestään. Jos haluat lopettaa äänityksen
ennen tätä, paina CD-soittimen STOP-näppäintä.
6 Käyttö erillisellä ajastimella tai viritin-
vahvistimen DSR-2000 omalla ajastimella
Voit säätää soiton tai äänityksen käynnistymään haluamanasi aikana, kun käytät joko erillistä ajastinlaitetta tai yhteensopivan viritinvahvistimen DSR-2000
omaa ajastinta.
1) Kytke laitteet ensin pois päältä virtakytkimistä.
Kytke kasettidekin verkkojohto ajastimeen, tai vastaavasti verkkovirtalähtöön viritinvahvistimen
DSR-2000 takapaneelissa.
2) Kun käytät erillistä ajastinta, myös muiden ajastimella käytettävien laitteiden (kuten viritin ja
vahvistin) täytyy saada verkkovirtansa ajastimen
kautta. Kytke ajastinlaite aluksi päälle (ON-asentoon) aikasäädöstä huolimatta, jotta voit säätää
laitteet valmiiksi ajastinkäyttöä varten.
3) Kytke laitteet päälle virtakytkimistä.
4) Jos käytössä on myös MONACORin CD-soitin
CD-2000, CD-soittimessa ei pidä olla levyä
sisällä. Muuten soitto käynnistyy CD-soittimesta
tai vastaavasti kasetille äänittyy CD-levy, kun ajastimen virta kytkeytyy päälle.
5) Syötä kasetti (tai kasetit) kasettipesään. Soitto tai
äänitys alkaa aina 2-nauhurista, jos kummassakin kasettipesässä on kasetti. Kasetin tyhjän
kelan pitää osoittaa oikealle, koska soitto tai äänitys alkaa aina tähän suuntaan (oikealle).
6) Aseta DIRECTION-valintakytkin (9) ja DOLBY
NR-valintakytkin (10) haluamaasi asentoon
(katso luku 4.3 "Kasetin soitto" tai 5.2 "Tavallinen
äänitys").
7) Soittoa varten aseta TIMER-valintakytkin (8)
asentoon PLAY. Säädä äänenvoimakkuus sopivaksi vahvistimesta.
8) Äänitystä varten etsi ensin virittimestä asema,
jota haluat äänittää. Paina nauhurin RECORDnäppäintä (25). Säädä äänitystaso REC LEVELsäätimellä (11) ja kanavatasapaino BALANCEsäätimellä (12). Nyt aseta TIMER-valintakytkin (8)
asentoon REC. Vahvistimen äänenvoimakkuuden
voi myös nyt säätää pienimpään asentoon.
9) Säädä aika ajastinlaitteesta tai viritinvahvistimesta DSR-2000. Kytke ajastinlaite toimintaan, tai
vastaavasti kytke viritinvahvistin pois päältä. Kun
säädetty aika koittaa, virta kytkeytyy päälle ja
soitto tai äänitys alkaa.
47
FIN
S
Page 48

2) Signalnivån är för låg.
➪ Öka inspelningsnivån med kontrollen (11) så
att VU metern visar max 0dB VU.
3) En kassett med Dolby spelas upp utan Dolby.
➪Koppla in DOLBY NR (10) funktionen med (9).
4) Tonhuvudet är magnetiserat.
➪ Avmagnetisera ton/rader huvudena med av-
magnetiseringkassett.
8.11 Det hörs svaj på kassetterna
1) Kapstan (driv och tryckrulle ) är smutsiga.
➪Rengör med rengöringskassett.
2) Kassetten är inte riktigt uppspolad.
➪ Spola tillbaks kassetten helt i någon riktning
före avspelning.
3) Kassetten är förstörd.
➪Använd en annan kassett.
8.12 In/avspelning börjar direkt vid tillslag av enheten
1) Kassetten är ställd på TIMER (8) REC eller PLAY.
➪Ställ omkopplaren TIMER (8) REC PLAYi OFF
position.
8.13 Inga funktioner finns vid tillslag
1) Mikroprocessorn har tappat minnet.
➪Dra ut väggkontakten och vänta ett par sekun-
der innan den sätts i väggkontakten igen.
9 Specifikationer
Spårkonfiguration: . . . . . . . 4 spår 2 kanalig stereo
Raderfrekvens: . . . . . . . . . RF bias 105kHz
Motorer: . . . . . . . . . . . . . . . 2 st likstömsmotorer,
elektroniskt stabilise-
rade
Spoltid C-60 kassett . . . . . ca. 110 sek.
Frekvensomfång
Normaltape (ferro): . . . . 20
-
15000Hz, ±3dB
Kromtape (CO
2
): . . . . . . 20-16000Hz, ±3dB
Metalltape: . . . . . . . . . . . 20
-
16000Hz, ±3dB
Distortion: . . . . . . . . . . . . . < 0,6 %
Störavstånd
Dolby C: . . . . . . . . . . . . . 71 dB
Dolby B: . . . . . . . . . . . . . 61 dB
Utan Dolby: . . . . . . . . . . 53 dB
Svaj: . . . . . . . . . . . . . . . . . 0,08% (WRMS),
±0,22% (DIN)
Mikingång MIC: . . . . . . . . . 2,5 mV/18 kohm
Line ingång REC: . . . . . . . 77,5 mV/50 kohm
Line utgång PLAY: . . . . . . 500 mV/2 kohm
Strömförsörjning: . . . . . . . . 230 V~/50Hz/15VA
Dimensioner BxHxD: . . . 440 x146 x 270mm
Vikt: . . . . . . . . . . . . . . . . . . 4,6 kg
Enligt tillverkaren.
Reservation för tekniska förändringar.
7 Ylläpito
7.1 Kasettien oikea säilytys
Pidä kasetit suojassa kuumuuudelta, kosteudelta ja
suoralta auringonvalolta. Älä myöskään pidä kasetteja magneettikenttien lähellä, koska äänenlaatu kärsii tästä ja äänitys voi jopa pyyhkiytyä. Säilytyspaikan kannalta tämä on erityisen tärkeää, koska
heikkokin magneettikenttä pystyy vaikuttamaan kasettiin pitkän ajan kuluessa. Tästä syystä älä säilytä
kasetteja sähkölaitteiden, kaiuttimien ja magneettisten esineiden lähellä.
7.2 Äänipään ja nauhanohjaimen puhdistus
Jokaisesta kasetista irtoaa pieniä epäpuhtauksia,
jotka jäävät äänipäähän ja nauhanohjaimeen. Tämä
heikentää äänenlaatua soiton aikana ja ennenkaikkea äänityksen aikana. Huonoa äänitystähän ei soittokoneiston puhdistaminenkaan enää korjaa.
Äänipää ja nauhanohjain tulisi siksi puhdistaa
säännöllisesti. Hyvinvarustetuista liikkeistä on saatavilla puhdistussarjoja ja puhdistuskasetteja, kuten
MONACORin KC-01 tai AHC-09. Puhdistussarjalla
puhdistus suoritetaan itse käsin, ja tällöin täytyy erityisesti varoa vahingoittamasta äänipäätä tai nauhanohjainta. Puhdistuskasetti syötetään kuten tavallinen kasetti ja soitetaan läpi, jolloin kasetti puhdistaa
äänipään ja nauhanohjaimen automaattisesti.
7.3 Äänipään demagnetointi
Äänipää tulee väistämättä magneettiseksi jonkin
ajan kuluttua. Tämä myös heikentää äänenlaatua.
Siksi puhdistuksen yhteydessä tulisi aina myös demagnetoida äänipää. Tämän saa helposti tehtyä demagnetointikasetilla, kuten MONACORin DEM-115.
8 Missä vika?
8.1 Ääntä ei kuulu soiton aikana
1) RCA-liittimet eivät ole kunnolla kiinni tai ne on kyt-
ketty väärin.
➪ Työnnä liittimet kunnolla kiinni tai kytke ne oi-
kein, katso luku 3 "Kytkentä".
2) Äänipää on likainen.
➪Puhdista äänipää, katso luku 7.2 "Äänipään ja
nauhanohjaimen puhdistus".
3) Kasetin nauha on vahingoittunut.
➪Vaihda kasetti.
4) Kasetti on tyhjä.
➪Syötä kasetti jolle on äänitetty.
8.2 Nauha ei kulje, kun painetaan soitto- tai kelausnäppäimiä
1) Kasettipesää ei ole suljettu kunnolla.
➪Sulje se kunnolla.
2) Näppäintä on painettu heti sulkemisen jälkeen.
➪ Paina näppäimiä vasta muutama sekunti sul-
kemisen jälkeen.
3) Näppäintä on painettu heti virran kytkemisen jäl-
keen.
➪ Paina näppäimiä vasta muutama sekunti vir-
ran kytkemisen jälkeen.
4) Kasettipesässä ei ole kasettia.
➪Syötä kasetti.
5) Kasetin nauha on vahingoittunut, mahdollisesti
jopa katkennut.
➪Vaihda kasetti.
6) Kasetti on soinut loppuun.
➪ Paina toisen suunnan näppäintä, tai syötä ka-
setti toisin päin.
8.3 Kappalehaku, kappaleen toisto, kappaleiden esittely tai pitkien taukojen ohitus ei
toimi kunnolla
1) Yksittäisten kappaleiden välillä ei ole 4 sekunnin
taukoja, katso tekninen huomautus luvun 4.5
"Kappalehaku" lopussa.
➪ Lisää omiin äänityksiisi 4 sekunnin tauot kap-
paleiden jälkeen, katso luku 5.4 "Tauon (4 sekuntia) lisäys kappaleen perään".
8.4 Automaattinen CD-levyn äänitys (CARS) ei
toimi
1) Kasetti ei ole 2-kasettipesässä.
➪Syötä kasetti 2-kasettipesään.
2) CD-soittimessa ei ole levyä.
➪Syötä CD-soittimeen levy.
3) CD-levy on likainen.
➪Puhdista CD-levy.
4) Järjestelmäohjauksen johdot eivät ole kunnolla
kytkettyinä 3,5 mm SYSTEM CONTROL-liitäntään.
➪Työnnä liittimet kunnolla kiinni.
8.5 Kopiointiäänitys ei pysähdy samaan aikaan
molemmissa nauhureissa
1) Kasetit eivät ole täsmälleen samanpituisia.
➪ Ei tarvetta toimenpiteisiin, koska johtuu kaset-
tien yksilöeroista.
8.6 Kasettipesä ei aukea EJECT-näppäimellä
1) Nauhurissa on soitto, äänitys tai kelaus päällä.
➪Pysäytä ensin nauhuri näppäimellä .
8.7 Soitto kuulostaa vaimealta, ylä-äänet puuttuvat
1) Äänipää on likainen.
➪Puhdista äänipää, katso luku 7.2 "Äänipään ja
nauhanohjaimen puhdistus".
8.8 Soitto kuulostaa säröytyneeltä
1) Äänitystaso (äänenvoimakkuus) on ollut liian kor-
kea.
➪Äänittäessäsi säädä äänitystaso REC LEVEL-
säätimestä (11) vain niin korkeaksi, että tasomittarin palkki 0dB syttyy voimakkaimmissa kohdissa.
8.9 RECORD-näppäintä on painettu mutta äänitys ei toimi
1) Kasetti on suojattu, eli siitä on katkaistu kyseisen
puolen suojaliuska.
➪ Vaihda kasetti, tai peitä suojaliuskan jättämä
aukko teipinpalalla.
48
FIN
S
Page 49

2) Kasettipesää ei ole suljettu kunnolla.
➪Sulje kasettipesä kunnolla.
3) Äänitystaso säädin REC LEVEL (11) on minimiasennossa.
➪Säädä äänitystaso sopivaksi.
4) Viritinvahvistimessa DSR-2000 on valittu TAPE 1
tai TAPE 2.
➪ Paina nauhurin näppäintä (29) ja valitse
oikea äänityslähde viritinvahvistimesta.
5) Kasetti on lopussa.
➪ Paina toisen suunnan soittonäppäintä, tai
syötä kasetti toisinpäin.
8.10 Korkeaa häiriöääntä kuultavissa
1) Muut sähkölaitteet aiheuttavat häiriötä.
➪ Kytke muut laitteet pois päältä, tai siirrä ne
kauemmaksi.
2) Äänitystaso (äänenvoimakkuus) on liian matala.
➪Äänittäessäsi säädä äänitystaso REC LEVEL-
säätimestä (11) niin korkeaksi, että tasomittarin
palkki 0dB syttyy voimakkaimmissa kohdissa.
3) Dolby-kohinanvaimentimella äänitettyä kasettia
soitetaan ilman Dolbya.
➪Aseta DOLBY NR-valintakytkin (10) asentoon
B tai C.
4) Äänipää on magnetoitunut.
➪ Demagnetoi äänipää, katso luku 7.3 "Ää-
nipään demagnetointi".
8.11 Huojuntaa ja värinää kuultavissa
1) Vetoakseli ja/tai painorulla ovat likaisia.
➪ Puhdista ne, katso luku 7.2 "Äänipään ja nau-
hanohjaimen puhdistus".
2) Nauha ei ole keloilla oikein.
➪ Kiristä nauha kääntämällä toisesta kelasta, ja
kelaa kasetti kertaalleen kokonaan eteen ja
taakse.
3) Nauha on vaurioitunut.
➪Vaihda kasetti.
8.12 Äänitys tai soitto alkaa heti, kun laite kytketään päälle
1) TIMER-valintakytkin (8) on asennossa REC tai
PLAY.
➪Aseta se asentoon OFF.
8.13 Laite ei toimi ollenkaan tai muita toimintahäiriöitä
1) Muut laitteet ovat aiheuttaneet häiriöitä mikropro-
sessoriin.
➪ Kytke kasettidekki pois päältä ja irrota verkko-
johto sähköverkosta. Odota hetki ja kytke verkkojohto takaisin sähköverkkoon. Kytke laite päälle.
9 Tekniset tiedot
Raitajärjestys: . . . . . . . . . . 4-raita/2-kanava stereo
Äänitysjärjestelmä: . . . . . . RF bias (105 KHz)
Moottorit: . . . . . . . . . . . . . 2 tasavirtamoottoria,
elektronisesti vakau-
tettu
Kelausaika (C-60): . . . . . . n. 110s
Taajuusalue
Normaalinauha: . . . . . . 20
-
15000Hz, ±3dB
Krominauha: . . . . . . . . . 20
-
16000Hz, ±3dB
Metallinauha: . . . . . . . . 20
-
16000Hz, ±3dB
THD: . . . . . . . . . . . . . . . . . <0,6%
Signaalikohinasuhde
(metallinauhalla)
Dolby C: . . . . . . . . . . . . 71 dB
Dolby B: . . . . . . . . . . . . 61dB
Ei Dolbya: . . . . . . . . . . . 53dB
Huojunta ja värinä: . . . . . . 0,08 % (Vrms)
±0,22% (DIN)
Mikrofonitulo MIC: . . . . . . 2,5mV/18kΩ
Linjatulo REC: . . . . . . . . . 77,5mV/50kΩ
Linjalähtö PLAY: . . . . . . . . 500mV/2 kΩ
Virtalähde: . . . . . . . . . . . . 230 V~/50Hz/15VA
Mitat (L x K x S): . . . . . . . . 440 x 146 x 270 mm
Massa: . . . . . . . . . . . . . . . 4,6 kg
Tiedot valmistajan antamia.
Muutosoikeus pidätetään.
49
FIN
Page 50

Copyright ® by INTER-MERCADOR GMBH & CO. KG, Bremen, Germany. All rights reserved. 03.96.02
®
 Loading...