

Page 1
ELECTRONICS FOR SPECIALISTS ELECTRONICS FOR SPECIALISTS ELECTRONICS FOR SPECIALISTS ELECTRONICS FOR SPECIALISTS
BEDIENUNGSANLEITUNG
INSTRUCTION MANUAL
MODE D’EMPLOI
ISTRUZIONI PER L’USO
GEBRUIKSAANWIJZING
MANUAL DE INSTRUCCIONES
INSTRUKCJA OBSŁUGI
SIKKERHEDSOPLYSNINGER
SÄKERHETSFÖRESKRIFTER
TURVALLISUUDESTA
Stereo-Mischverstärker
mit MP3-Player / Bluetooth-Empfänger / UKW-Radio
Stereo Mixing Amplifier
with MP3 Player / Bluetooth Receiver / FM Radio
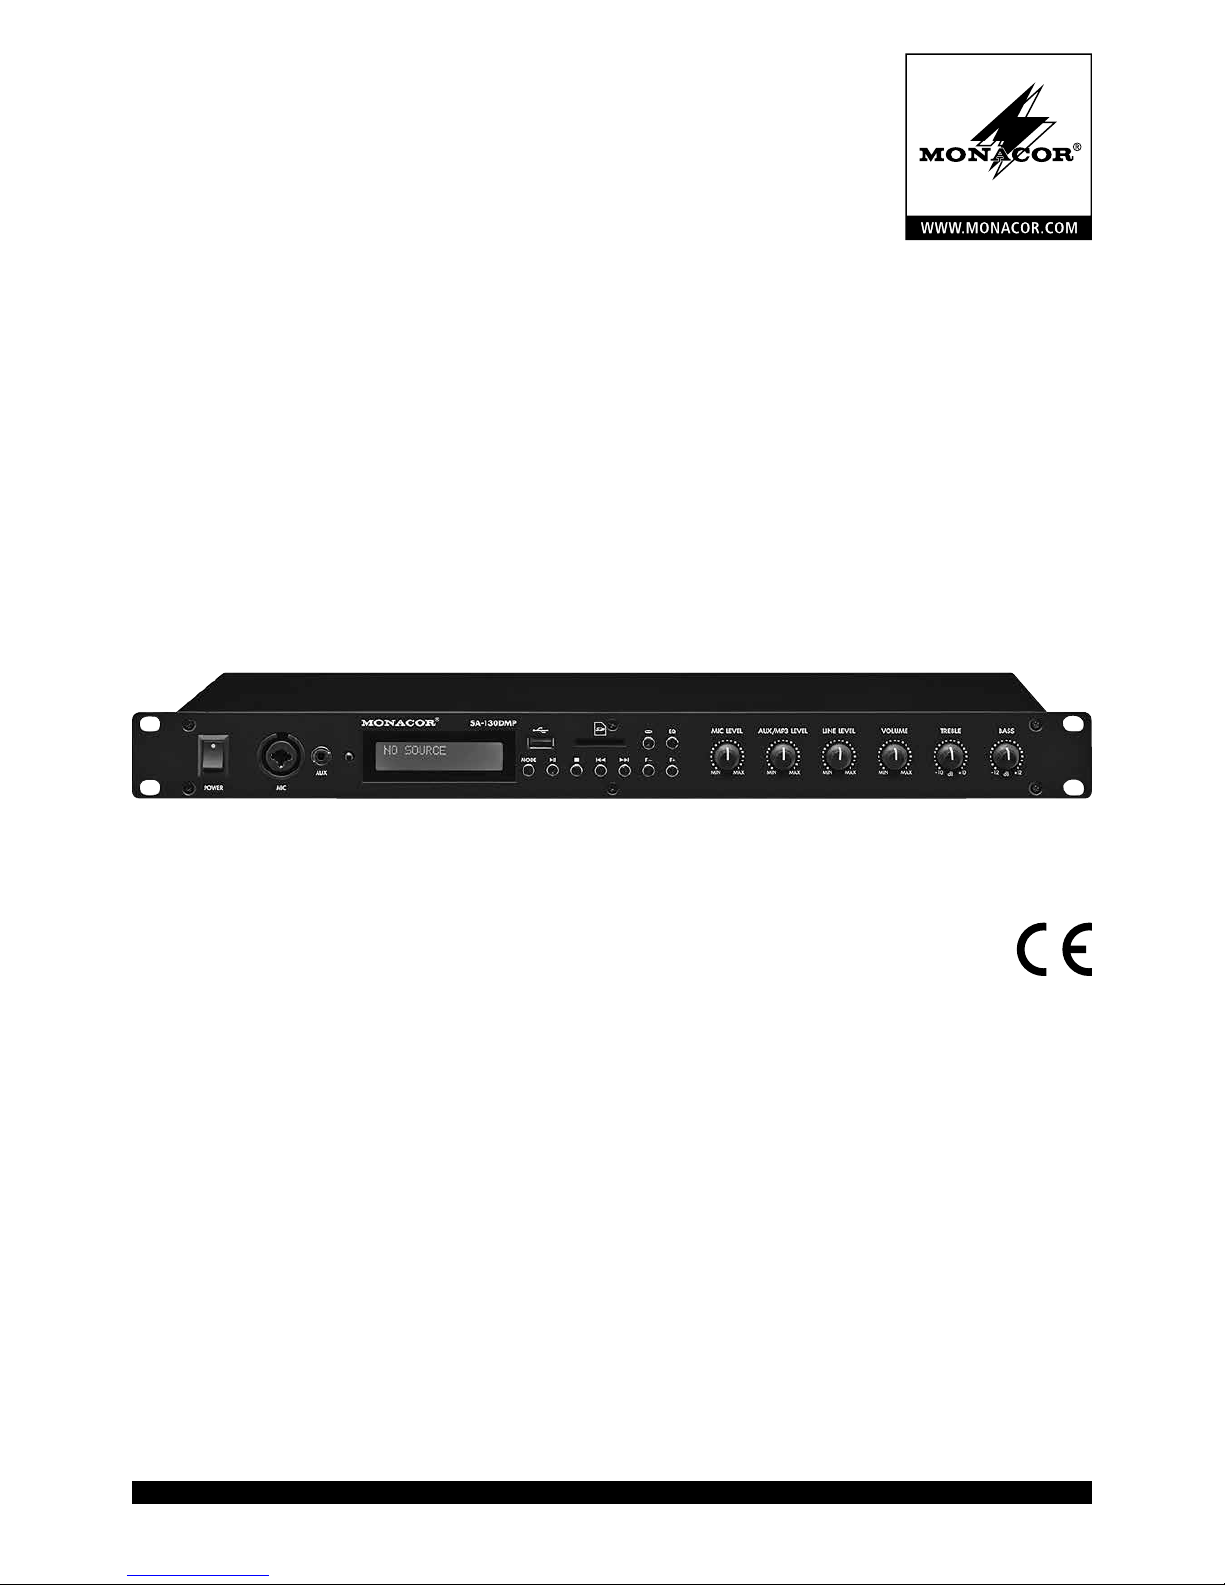
SA-130DMP
Bestell-Nr. • Order No. 25.7760
Page 2

2
Page 3

ELECTRONICS FOR SPECIALISTS ELECTRONICS FOR SPECIALISTS ELECTRONICS FOR SPECIALISTS ELECTRONICS FOR SPECIALISTS
3
Deutsch ........Seite 4
English .........Page 7
Français ........Page 10
Italiano.........Pagina 13
Nederlands .....Pagina 16
Español ........Página 19
Polski ..........Strona 22
Dansk ..........Sida 26
Svenska ........Sidan 26
Suomi..........Sivulta 27
Page 4
4
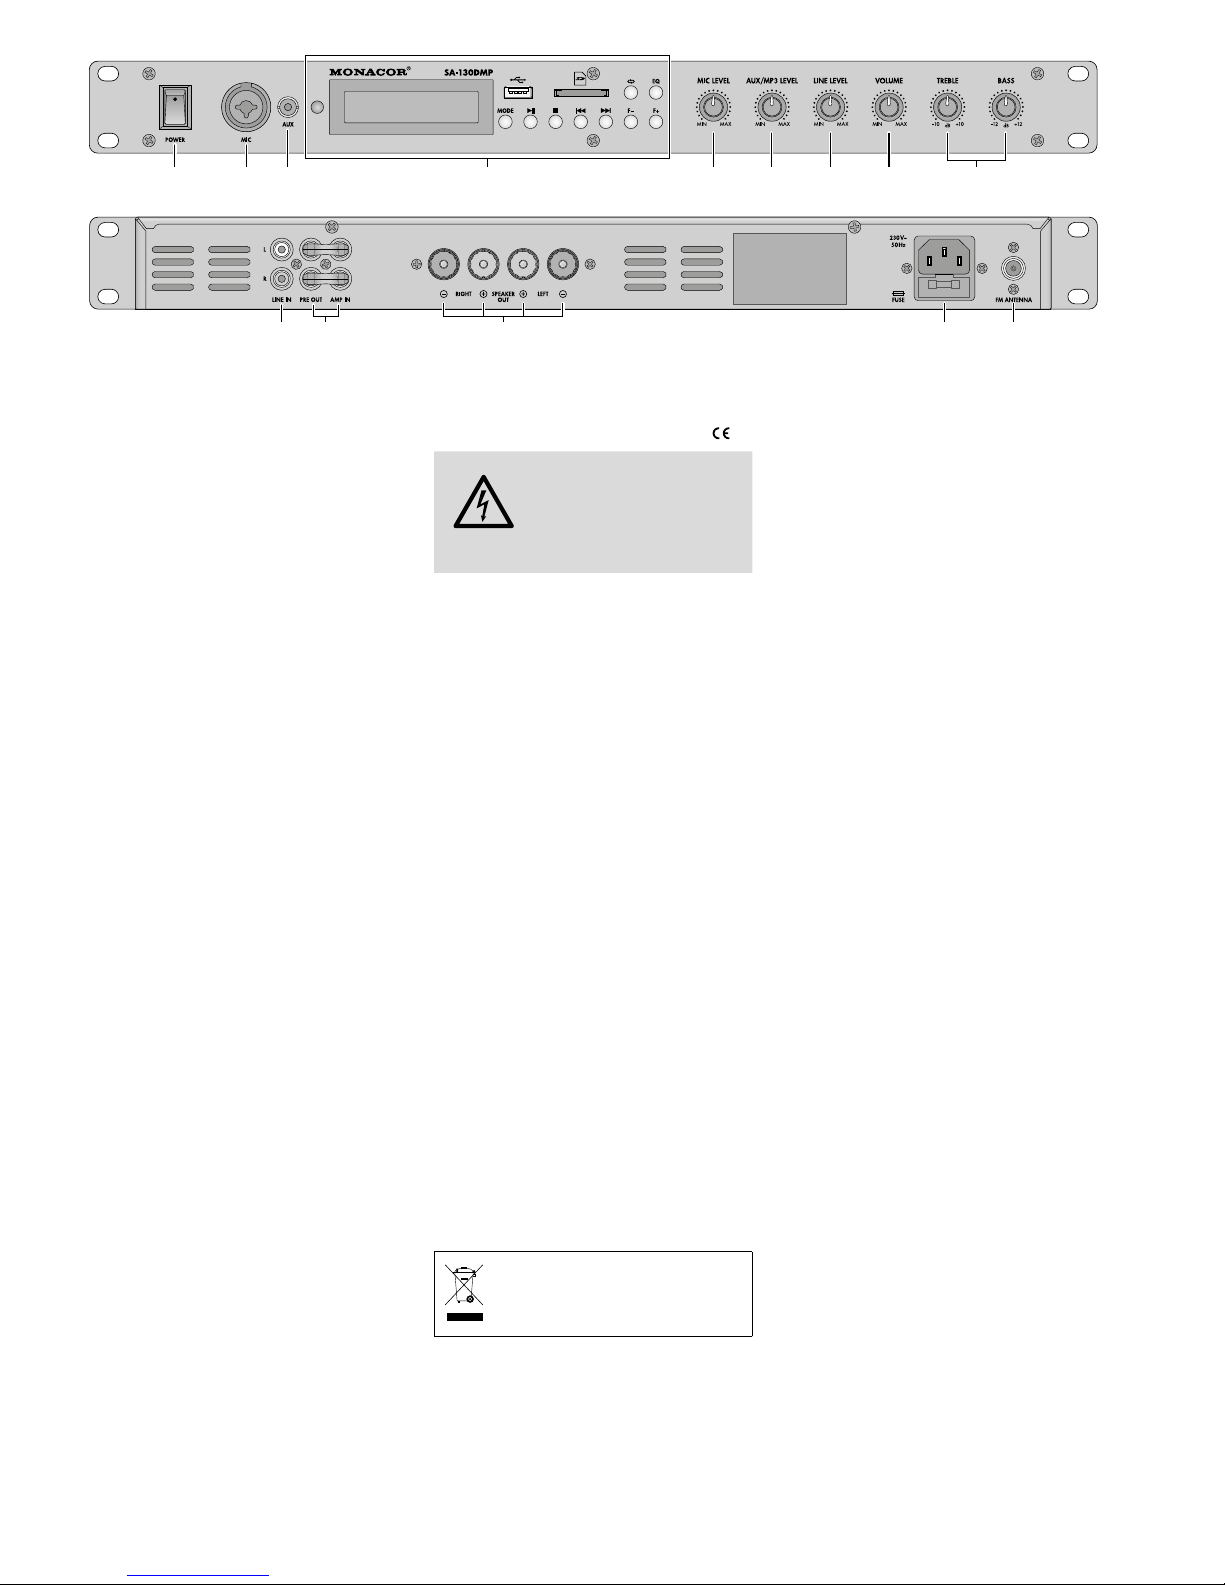
1 2 3 4 5 6 7 8 9
➀
10 13 1411 12
➁
Deutsch
Stereo-Mischverstärker
Diese Bedienungsanleitung richtet sich an Benutzer ohne besondere Fachkenntnisse. Bitte
lesen Sie die Anleitung vor dem Betrieb gründlich durch und heben Sie sie für ein späteres
Nachlesen auf.
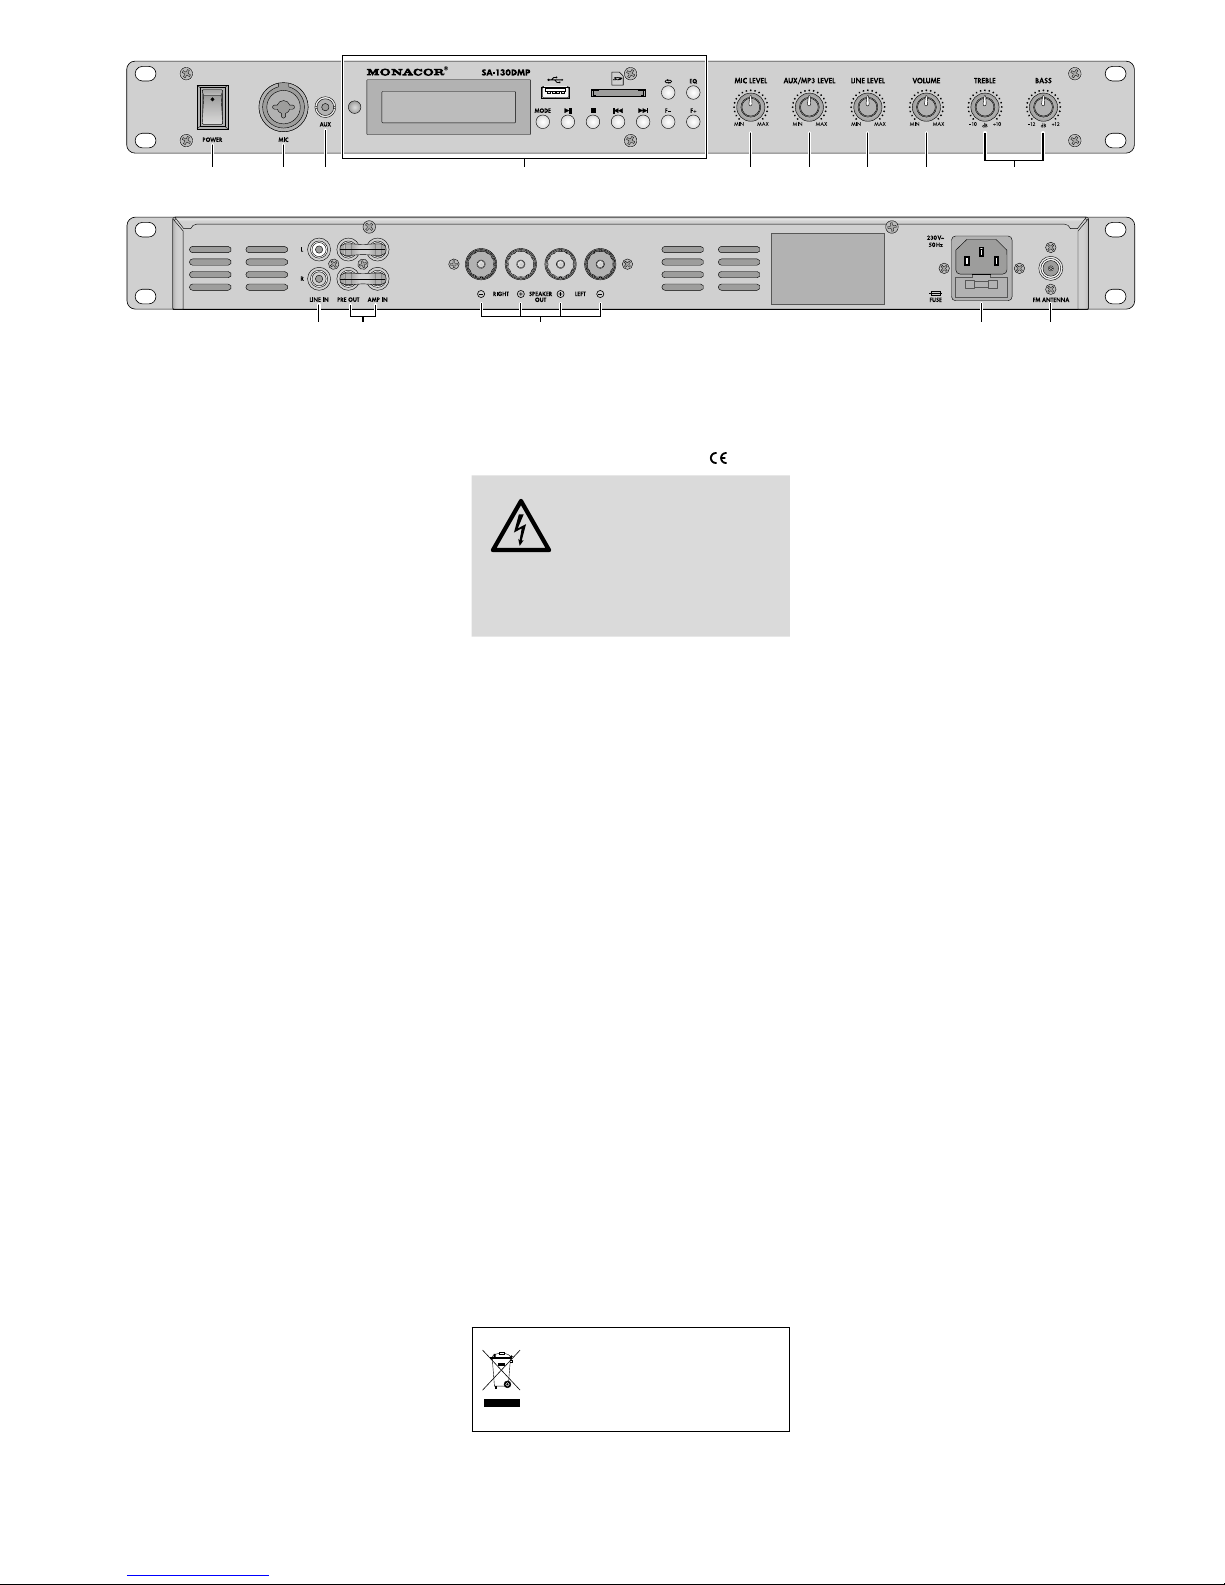
1 Übersicht
1 Ein- /Ausschalter
2 Mono-Eingang zum Anschluss eines Mik-
rofons über einen XLR-Stecker oder einen
6,3-mm-Klinkenstecker
3
Stereo-Eingang (3,5-mm-Klinkenbuchse)
zum Anschluss einer Tonquelle mit Line-Signalpegel, z. B. CD / MP3-Player
Hinweis: Beim Anschluss der Buchse wird die
Kombination „MP3-Player / UKW-Radio / Bluetooth-Empfänger“ (4) stummgeschaltet.
4
Kombination „MP3-Player / UKW-Radio /
Blue tooth-Empfänger“: ☞ Kapitel 6.1
5 Lautstärkeregler für den Eingang MIC (2)
6
Lautstärkeregler für den Eingang AUX
(3) bzw., wenn dieser nicht belegt ist,
für die Kombination„MP3-Player / UKWRadio / Bluetooth-Empfänger“ (4)
7
Lautstärkeregler für den Eingang LINE IN
(10)
8 Gesamtlautstärkeregler
9
Klangregler TREBLE (Höhen) und BASS
(Bässe)
10
Stereo-Eingang (Cinch-Buchsen, Links L /
Rechts R) zum Anschluss einer Tonquelle
mit Line- Signalpegel, z. B. CD / MP3-Player,
Mischpult, Tape-Deck
11 Stereo-Ausgang PRE OUT und Stereo-Ein-
gang AMP IN (Cinch-Buchsen, Links L /
Rechts R) zum Einschleifen eines Geräts
zur Klangbearbeitung ☞ Kapitel 5, Punkt 3
Hinweis: Werden PRE OUT und AMP IN nicht
zum Anschluss eines Geräts genutzt, müssen sie,
wie in der Abb. 2, über die zwei Steckbrücken
miteinander verbunden sein. Anderenfalls ist der
Signalfluss unterbrochen.
12
Lautsprecheranschlüsse (Schraubklemmen
mit 4-mm-Bananenbuchsen)
13 Netzbuchse zum Anschluss an eine Steck-
dose (230 V/ 50 Hz) über das beiliegende
Netzkabel
Darunter befindet sich der Sicherungshalter; eine geschmolzene Netzsicherung
nur durch eine gleichen Typs ersetzen!
14 Anschluss für eine UKW-Antenne
2 Hinweise für den
sicherenGebrauch
Das Gerät entspricht allen relevanten Richtlinien der EU und trägt deshalb das -Zeichen.
WARNUNG
Das Gerät wird mit lebensgefährlicher Netzspannung
versorgt. Nehmen Sie deshalb
niemals selbst Eingriffe daran
vor und stecken Sie nichts in die
Lüftungsöffungen. Es besteht
die Gefahr eines elektrischen
Schlags.
•
Das Gerät ist nur zur Verwendung im Innenbereich geeignet. Schützen Sie es vor Tropfund Spritzwasser und hoher Luftfeuchtigkeit. Der zulässige Einsatztemperaturbereich
beträgt 0 – 40 °C.
•
Stellen Sie keine mit Flüssigkeit gefüllten
Gefäße, z. B. Trinkgläser, auf das Gerät.
•
Die im Gerät entstehende Wärme muss
durch Luftzirkulation abgegeben werden.
Decken Sie darum die Lüftungsöffnungen
nicht ab.
•
Ziehen Sie sofort den Netzstecker aus der
Steckdose,
1. wenn sichtbare Schäden am Gerät oder
am Netzkabel vorhanden sind,
2. wenn nach einem Sturz oder Ähnlichem
der Verdacht auf einen Defekt besteht,
3. wenn Funktionsstörungen auftreten.
Lassen Sie das Gerät in jedem Fall in einer
Fachwerkstatt reparieren.
•
Ziehen Sie den Netzstecker nie am Kabel
aus der Steckdose, fassen Sie immer am
Stecker an.
•
Verwenden Sie zum Reinigen nur ein trockenes, weiches Tuch, niemals Wasser oder
Chemikalien.
•
Wird das Gerät zweckentfremdet, nicht richtig angeschlossen, falsch bedient oder nicht
fachgerecht repariert, kann keine Haftung für
daraus resultierende Sach- oder Personenschäden und keine Garantie für das Gerät
übernommen werden.
Soll das Gerät endgültig aus dem
Betrieb genommen werden, übergeben Sie es zur umweltgerechten Entsorgung einem örtlichen
Recycling betrieb.
3 Einsatzmöglichkeiten
Der Stereo-Verstärker SA-130DMP ist universell
einsetzbar, z. B. in Bars, Veranstaltungsräumen,
Büros. Er verfügt über Anschlussmöglichkeiten für ein Mikrofon und zwei Tonquellen mit
Line-Signalpegel (z. B. Mischpult, CD / MP3Player). Integriert sind außerdem ein MP3Player mit USB-Port und Speicherkartensteckplatz, ein Bluetooth-Empfänger und ein
UKW-Radio.
4 Aufstellung
Der Verstärker ist für den Einschub in ein Rack
(482 mm /19”) vorgesehen, kann aber auch als
Tischgerät verwendet werden. In jedem Fall
muss Luft ungehindert durch alle Lüftungsöffnungen strömen können, damit eine ausreichende Kühlung gewährleistet ist.
4.1 Rackeinbau
Im Rack wird für den Verstärker eine Höhe von
1 HE (1 Höheneinheit = 44,45 mm) benötigt.
Für eine sichere Befestigung reicht die Frontplatte allein nicht aus. Zusätzlich müssen Seitenschienen oder eine Bodenplatte das Gerät
halten.
Die vom Verstärker abgegebene, erhitzte
Luft muss aus dem Rack austreten können. Anderenfalls kommt es im Rack zu einem Hitzestau, wodurch nicht nur der Verstärker, sondern
auch andere Geräte im Rack beschädigt werden
können. Bei unzureichendem Wärmeabfluss in
das Rack eine Lüftereinheit einsetzen.
5 Anschluss
Vor dem Herstellen / Trennen von Anschlüssen
alle beteiligten Geräte ausschalten.
1)
Für den Anschluss eines Mikrofons die
Buchse MIC (2) verwenden: das Mikrofon
über einen 6,3-mm-Klinkenstecker oder
einen XLR-Stecker anschließen.
2)
Für den Anschluss von Stereo-Tonquellen
mit Line-Signalpegel (z. B. CD / MP3-Player,
Tape-Deck, Radio, Mischpult, PC) sind zwei
Eingänge verfügbar:
– die 3,5-mm-Klinkenbuchse AUX (3);
bei Anschluss dieser Buchse wird die
Kombination „MP3-Player / UKW-Radio /
Blue tooth-Empfänger“ stummgeschaltet.
– die Cinch-Buchsen LINE IN (10);
L (weiß) = links, R (rot) = rechts
Page 5
5
Deutsch
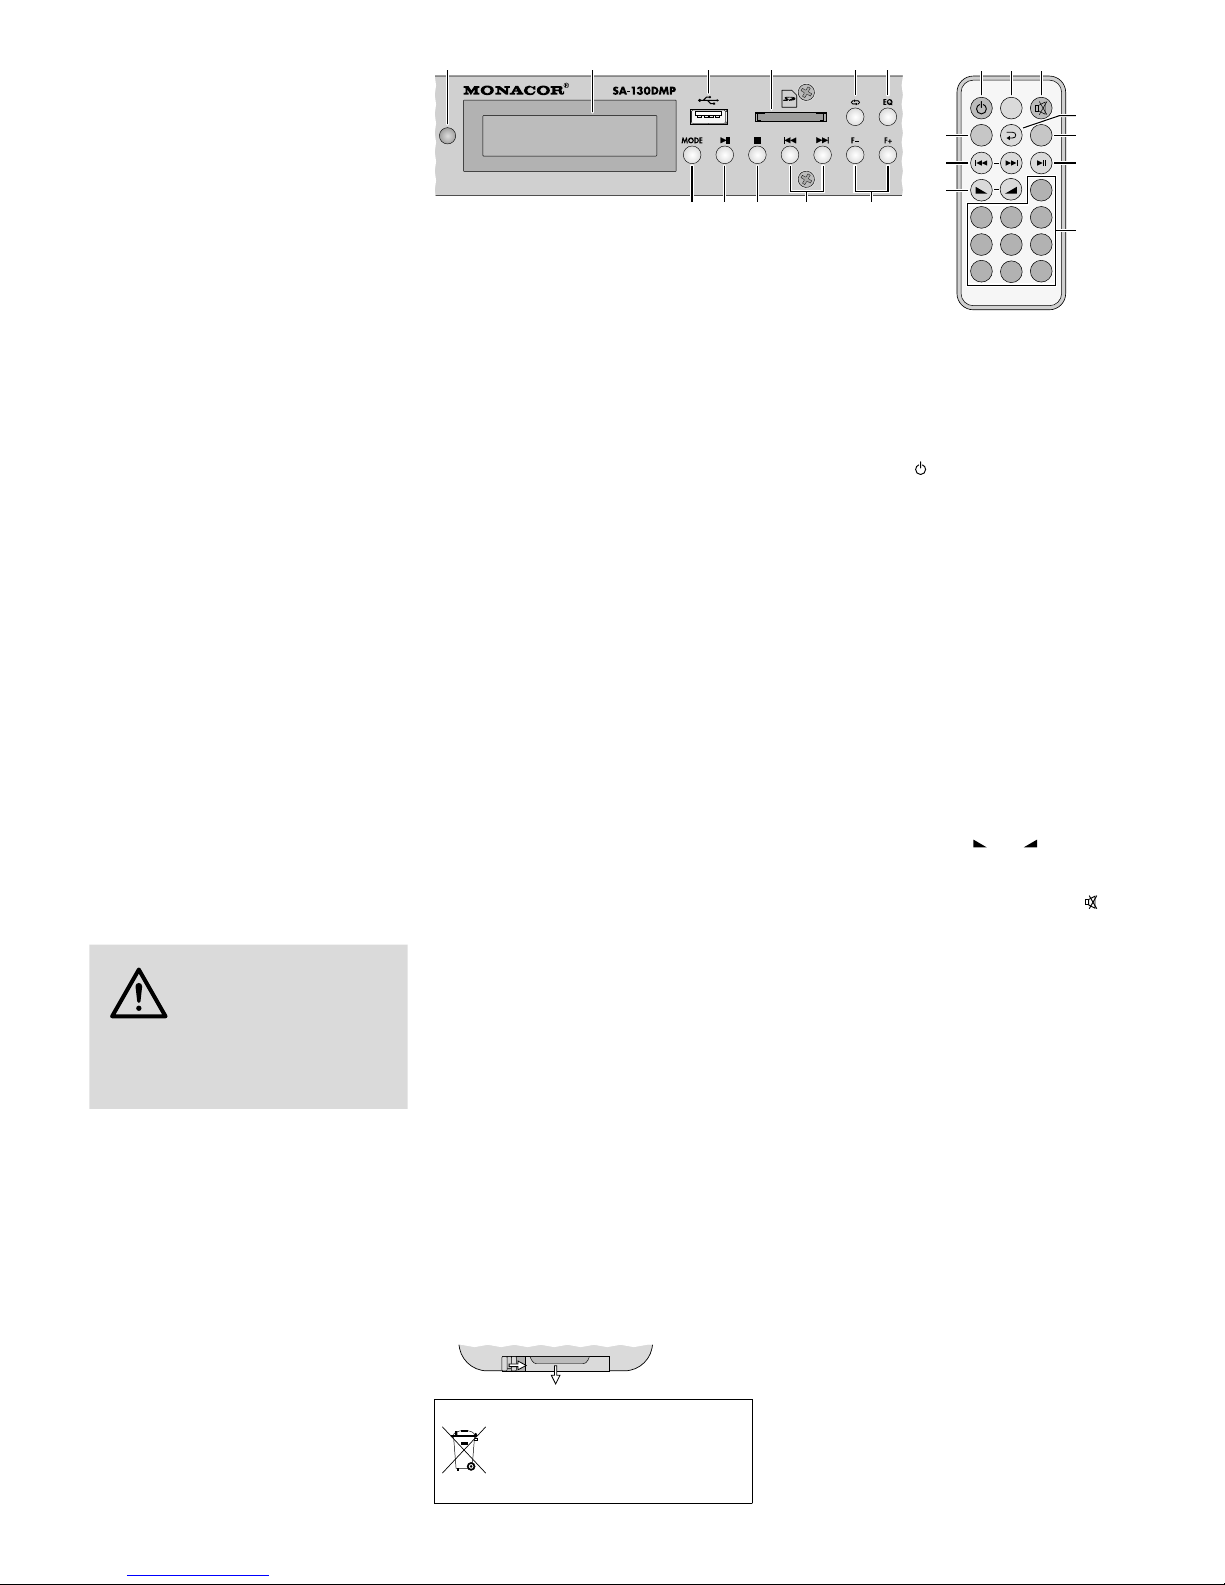
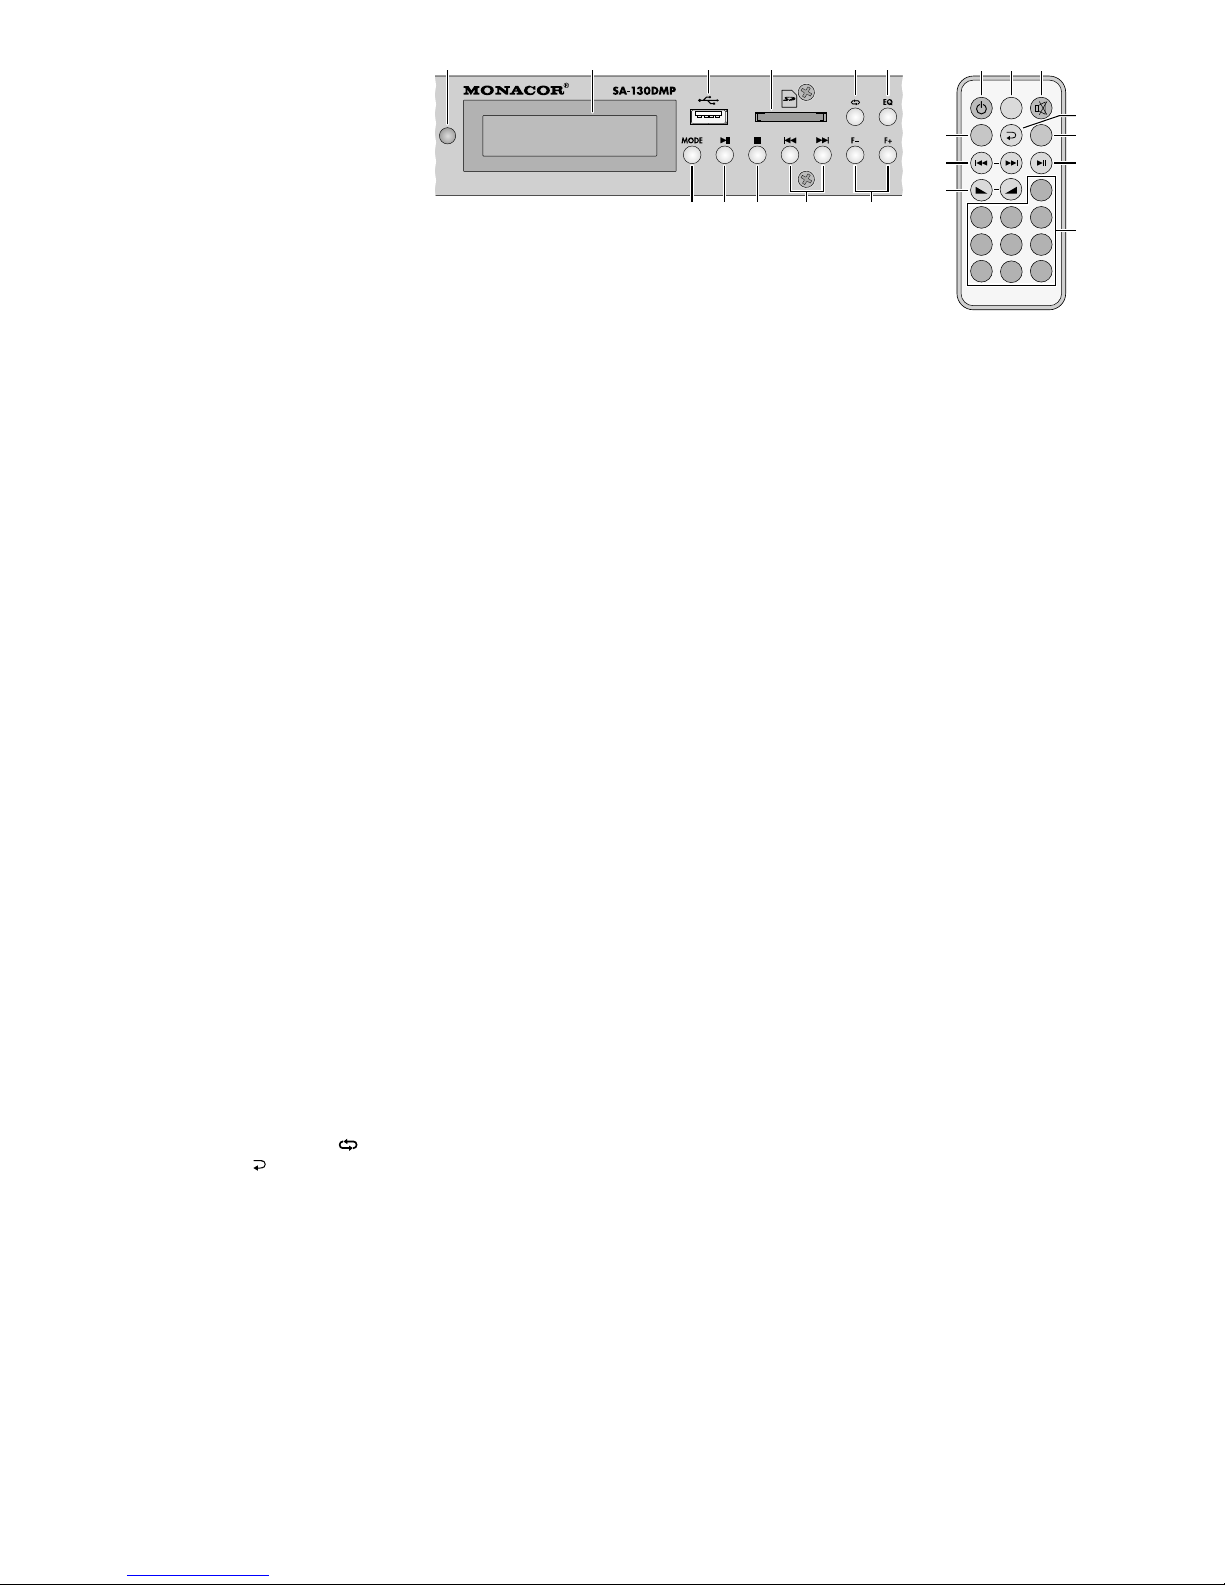
6.1.1 Standby
Um die Kombi nation „MP3-Player / UKW-Radio /
Bluetooth- Empfänger“ auf Standby (Bereitschaft) zu schalten und um sie wieder einzuschalten, die Taste (26) auf der Fernbedienung verwenden oder am Gerät die Taste
MODE (21) länger drücken. Nach dem Einschalten ist der Modus „Player“ aktiv.
6.1.2 Betriebsmodus wählen
Mit der Taste MODE (21) lässt sich umschalten
zwischen den Betriebsmodi:
„Player“„Bluetooth“„Radio“
Sind im Modus „Player“ zwei Speichermedien
angeschlossen, wird beim Drücken der Taste
zunächst auf das andere Speichermedium umgeschaltet, beim nächsten Tastendruck dann in
den Modus „Bluetooth“.
6.1.3 Grundlautstärke einstellen /
Stummschalten(Mute)
Zum Einstellen der Grundlautstärke (Einstellbereich 00 bis 31) die Tasten und (28) auf
der Fernbedienung verwenden oder am Gerät
die Taste I bzw.
I (24) gedrückt halten.
Um den Ton auszuschalten, die Taste
(27) drücken, das Display zeigt MUTE. Um ihn
wieder einzuschalten, die Taste erneut drücken.
Hinweis: Ist die Mute-Funktion aktiviert, wird sie
beim nächsten Einschalten bzw. Wechsel des Betriebsmodus wieder deaktiviert.
6.1.4 Betriebsmodus „Player“
Über den Player lassen sich MP3-Dateien von
SD / SDHC-Speicherkarten und USB-Speichermedien (USB-Stick oder USB-Festplatte mit
eigener Stromversorgung) abspielen. Auch
das Abspielen von WMA- und WAV-Dateien
ist möglich.
– Ein USB-Speichermedium an den USB-Port
(17) anschließen.
– Eine Speicherkarte (FAT16 / FAT32, bis 32 GB)
so weit in den Kartensteckplatz (18) schieben, bis sie einrastet. Dabei muss die abgeschrägte Ecke der Karte nach rechts und zum
Gerät zeigen. Soll die Karte entfernt werden,
sie leicht hineindrücken, so dass sie ausrastet.
Hinweis: Aufgrund der Vielfalt von Speicher-Herstellern und Gerätetreibern kann nicht garantiert
werden, dass alle Speichermedien mit dem Player
kompatibel sind.
Anwahl des Speichermediums:
Sobald ein Speichermedium angeschlossen
wird, ist es angewählt und seine Wiedergabe startet (auch, wenn davor der Modus
– Regler AUX / MP3 LEVEL (6)
für das Gerät am Eingang AUX (3) bzw.,
wenn der Eingang AUX nicht belegt
ist, für die Kombination „MP3-Player /
UKW-Radio / Bluetooth-Empfänger“ (4)
Hinweis: Die Grundlautstärke für die Kombination„MP3-Player / UKW-Radio / Blue toothEmpfänger“ ist zusätzlich einstellbar: siehe Kapitel 6.1.3.
4)
Mit dem Höhenregler TREBLE und dem
Bass regler BASS (9) den Klang einstellen.
6.1 MP3-Player / UKW-Radio /
Bluetooth-Empfänger(Abb. 3)
Die Kombination„MP3-Player / UKW-Radio /
Bluetooth-Empfänger“ schaltet sich bei Inbetriebnahme des SA-130DMP automatisch
ein und befindet sich im Modus „Player“. Das
Display (16) zeigt NO SOURCE, wenn kein
Speichermedium angeschlossen ist. Ist bereits
ein Speichermedium angeschlossen, startet
nach dem Einlesen seine Wiedergabe. Sind
zwei Speichermedien angeschlossen, ist nach
der Inbetriebnahme des SA-130DMP immer
das USB-Medium angewählt.
Die beiliegende Infrarot-Fernbedienung wird
mit Batterie geliefert. Vor dem ersten Betrieb
die Schutzfolie aus dem Batteriehalter ziehen.
Beim Drücken einer Taste auf der Fernbedienung diese immer auf den Infrarot-Sensor (15)
richten. Dabei muss Sichtverbindung zwischen
Fernbedienung und Sensor bestehen.
Nehmen Sie bei längerem Nichtgebrauch
die Batterie sicherheitshalber heraus, damit die
Fernbedienung bei einem eventuellen Auslaufen der Batterie nicht beschädigt wird.
Batterie auswechseln:
1)
Die Verriegelung des Batteriehalters nach
rechts drücken (1. Pfeil in Abb. 4) und den
Halter herausziehen (2. Pfeil).
2) Die verbrauchte Batterie entfernen und die
neue Batterie (3-V-Knopfzelle, Typ CR 2025)
mit dem Pluspol nach oben in den Halter
legen.
3)
Den Halter zurück in die Fernbedienung
schieben.
1. 2.
➃
Batterien dürfen nicht in den Hausmüll geworfen werden. Geben Sie
sie zur umweltgerechten Entsorgung
nur in den Sondermüll (z. B. Sammelbehälter im Einzelhandel).
3)
Über die Stereo-Anschlüsse PRE OUT und
AMP IN (11) ist es möglich, ein Gerät zur
Klangbearbeitung (z. B. Equalizer, Effektgerät) einzuschleifen: Das Signal wird, hinter
dem Regler VOLUME (8) , über PRE OUT
herausgeführt, durchläuft das Gerät zur
Klang bearbeitung und gelangt über AMPIN
auf die Endstufe des SA-130DMP.
a)
Die beiden Steckbrücken (jeweils für den
linken und rechten Kanal), mit denen die
Anschlüsse PRE OUT und AMP IN verbunden sind, entfernen.
b) Den Eingang des einzuschleifenden Ge-
räts an den Ausgang PRE OUT anschließen.
c)
Den Ausgang des einzuschleifenden Geräts an den Eingang AMP IN anschließen.
4)
Zwei Lautsprecher (Mindestimpedanz 4 Ω)
mit den Anschlüssen SPEAKER OUT (12) verbinden: Einen Lautsprecher an den rechten
Kanal RIGHT anschließen, den anderen
Lautsprecher an den linken Kanal LEFT.
Dabei die Polarität beachten (gekennzeichnete Ader der jeweiligen Lautsprecherleitung an „+“ anschließen). Der Anschluss
kann entweder über die Schraubklemmen
oder die Bananenbuchsen erfolgen.
Hinweis: Sollen mehr als zwei Lautsprecher angeschlossen werden, achten Sie darauf, dass die
Lautsprecher-Gesamtimpedanz 4 Ω pro Kanal
nicht unterschreitet, anderenfalls kann der Verstärker beschädigt werden. Wenden Sie sich bei
Fragen zum Anschluss an eine Fachkraft.
5) Wird das eingebaute UKW-Radio genutzt,
eine UKW-Antenne an die Buchse FM ANTENNA (14) anschließen.
6)
Zur Stromversorgung das beiliegende
Netzkabel erst an die Netzbuchse (13) anschließen, dann den Netzstecker des Kabels
in eine Steckdose (230 V / 50 Hz) stecken.
6 Bedienung
VORSICHT
Stellen Sie die Lautstärke nie
sehr hoch ein. Hohe Lautstärken können auf Dauer das
Gehör schädigen!
Das Ohr gewöhnt sich an hohe Lautstärken
und empfindet sie nach einiger Zeit als nicht
mehr so hoch. Darum erhöhen Sie eine hohe
Lautstärke nach der Gewöhnung nicht weiter.
Um Schaltgeräusche zu vermeiden, den Verstärker immer erst nach den angeschlossenen
Geräten einschalten und nach dem Betrieb vor
allen anderen ausschalten.
1)
Vor dem ersten Einschalten den Gesamtlautstärkeregler VOLUME (8) ganz nach
links zurückdrehen.
2)
Den Verstärker mit dem Schalter POWER
(1) einschalten.
3)
Den Regler VOLUME (8) je nach gewünschter Gesamtlautstärke aufdrehen und für
jede Tonquelle, die zu hören sein soll, mit
dem entsprechenden Regler die Lautstärke
individuell einstellen:
– Regler MIC LEVEL (5)
für das Mikrofon am Eingang MIC (2)
– Regler LINE LEVEL (7)
für das Gerät am Eingang LINE IN (10)
21 22 23
1715 16 18 19 20
24
25
➂
7
8
9
4
5 6
21 3
0
MODE
STOP
EQ
26 23 27
19
21 20
22
29
24
28
Page 6
6
Deutsch
Zum Aufrufen eines gespeicherten Senders
seine Stationsnummer mit der Taste I oder
I (24) anwählen oder mit den Zifferntasten
(29) eingeben.
Zum manuellen Einstellen eines Senders
(in 0,1-MHz-Schritten) die Tasten F− und F+
(25) verwenden.
Hinweise zur Anzeige der Stationsnummer:
Das Display zeigt nach einer manuellen Frequenzeinstellung FM:00,
– wenn die eingestellte Frequenz unter keiner Sta-
tionsnummer gespeichert ist
– wenn die eingestellte Frequenz zwar bereits über
den Suchlauf unter einer Stationsnummer gespei-
chert wurde, jedoch schlecht empfangen wird
Beim nächsten Umschalten in den Modus „Radio“
zeigt das Display jedoch nicht
FM:00, sondern die
Sta tionsnummer, deren Frequenz nah an der eingestellten liegt, oder, wenn keine gefunden wurde, die
Stationsnummer1.
7 Technische Daten
Sinus-Ausgangsleistung
an 4 Ω: � � � � � � � � � � � � � � � � 2 × 70 W
Frequenzbereich:
� � � � � � � � � 20 – 20 000 Hz
Störabstand: � � � � � � � � � � � � 90 dB
Klirrfaktor: � � � � � � � � � � � � � � 0,1 %
Eingänge (Anschluss,
Empfindlichkeit / Impedanz)
MIC, mono, symmetrisch: � kombinierte Buchse
XLR / 6,3-mm-Klinke,
1,3 mV/500
Ω
AUX, stereo: � � � � � � � � � � � 3,5-mm-Klinkenbuchse,
190 mV/10 k
Ω
LINE IN, stereo: � � � � � � � � � Cinch-Buchsen
480 mV/20 k
Ω
AMP IN, stereo: � � � � � � � � Cinch-Buchsen
580 mV/22 k
Ω
Klangregelung
Bässe: � � � � � � � � � � � � � � � ±12 dB/ 100 Hz
Höhen: � � � � � � � � � � � � � � � ±10 dB/ 10 kHz
Stromversorgung: � � � � � � � � 230 V/ 50 Hz
Leistungsaufnahme: � � � � � � 350 VA
Einsatztemperatur:
� � � � � � � 0 – 40 °C
Abmessungen (B × H × T): � 482 × 44 × 245 mm,
1 HE
Gewicht: � � � � � � � � � � � � � � � 4,9 kg
Änderungen vorbehalten.
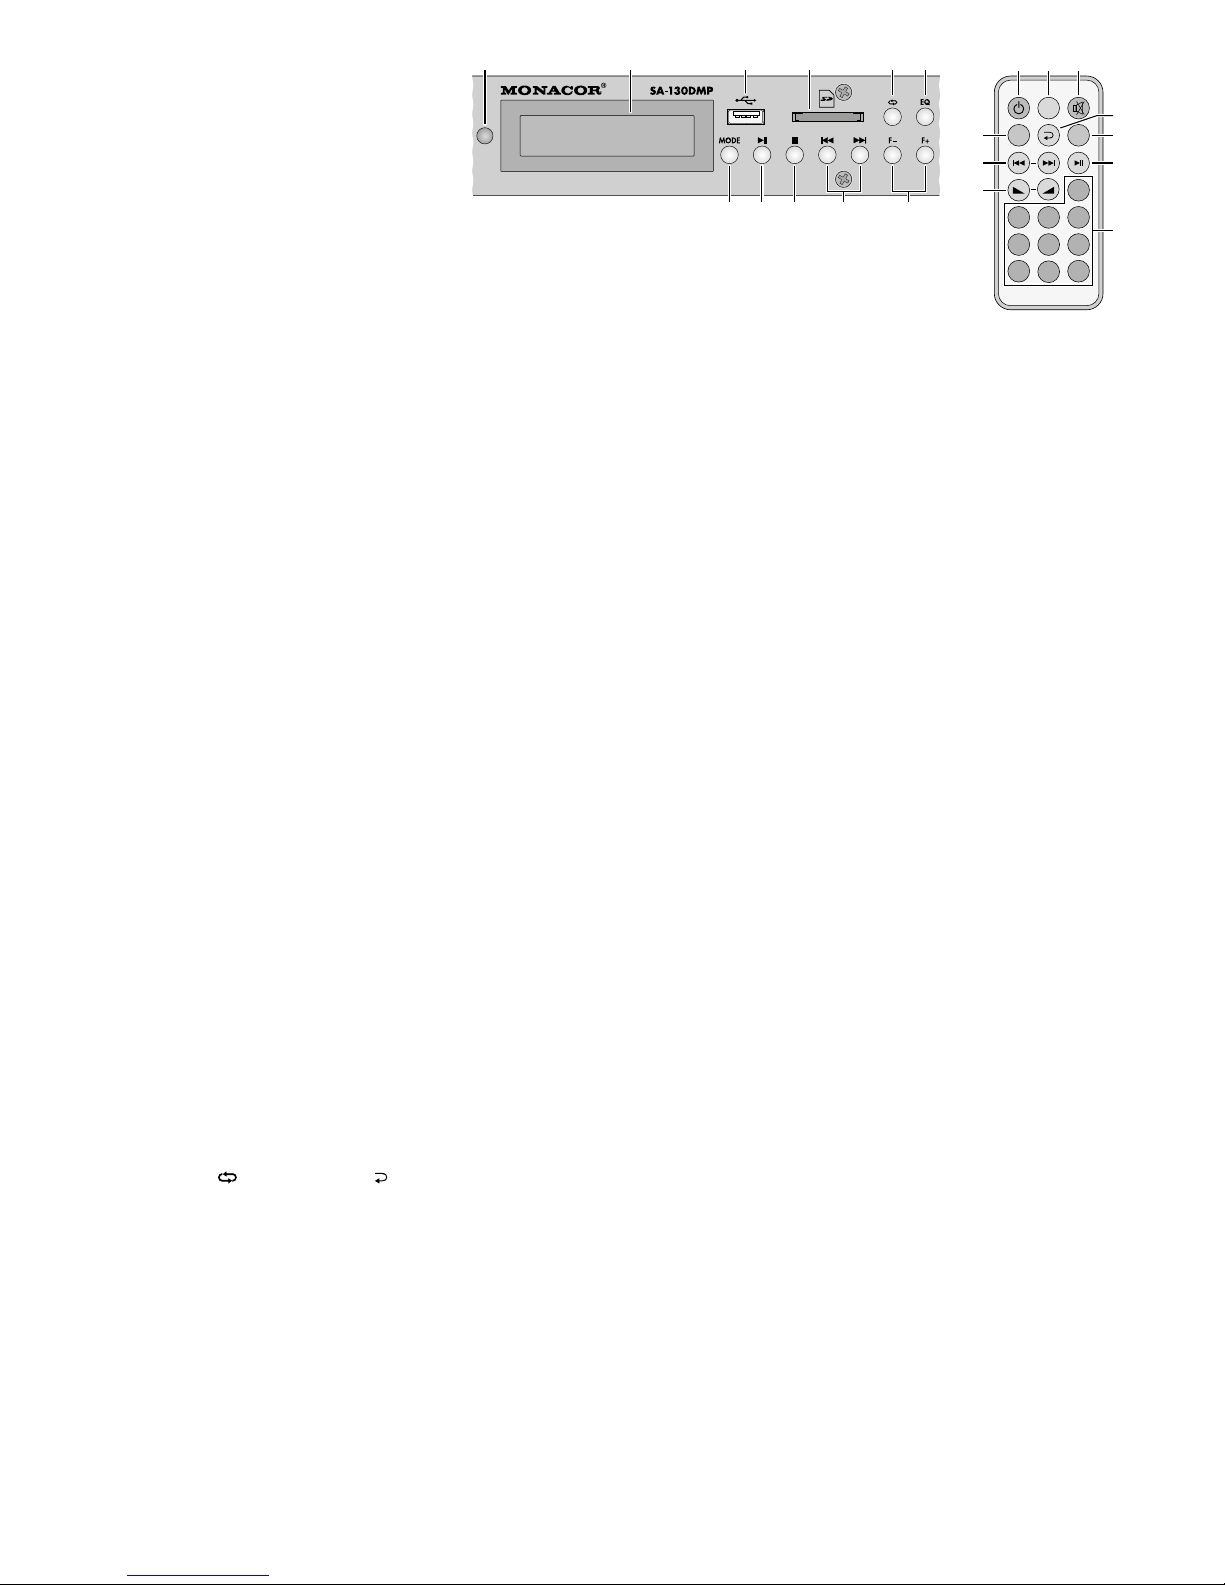
6.1.5 Betriebsmodus „Bluetooth“
Mit dem Bluetooth-Empfänger kann eine Funk
verbindung zu einer Bluetooth-Signalquelle
(z. B. Smartphone, Tablet-PC, Notebook) hergestellt werden, um die dort gespeicherten
Audio-Dateien über den SA-130DMP abzuspielen.
Aufbau einer Bluetooth-Verbindung:
1) Mit der Taste MODE (21) den Betriebsmo-
dus „Bluetooth“ (Anzeige
Bluetooth
im
Display) wählen: Das Display wechselt nach
Initializing. . . auf Disconnected!, um anzuzeigen, dass keine
Bluetooth-Verbindung aufgebaut ist.
2)
An der Bluetooth-Quelle die BluetoothFunktion einschalten.
3)
Der Bluetooth-Empfänger wird auf dem Display der Bluetooth-Quelle mit „Bluetooth“
angezeigt. Die Bluetooth-Quelle mit dem
Bluetooth-Empfänger koppeln (siehe ggf.
Anleitung der Bluetooth-Quelle).
4)
Sobald die Bluetooth-Verbindung aufgebaut ist, zeigt das Display Connected!.
5)
Die Bedienung (Wiedergabe, Pause, Titelanwahl) entweder direkt an der BluetoothQuelle durchführen oder für Wiedergabe /
Pause die Taste
II (22) verwenden und zur
Titelwahl die Tasten
I
und
I
(24) der
Fernbedienung.
6.1.6 Betriebsmodus „Radio“
Mit der Taste MODE (21) den Betriebsmodus
„Radio“ wählen, das Display zeigt:
– die eingestellte UKW-Frequenz in MHz
–
FM: 01
… die Stationsnummer, unter der
die UKW-Frequenz über den
Suchlauf gespeichert wurde
(siehe dazu auch die Hinweise
am Ende dieses Kapitels)
– die eingestellte Grundlautstärke (VOL)
(siehe Kapitel 6.1.3)
Zum Speichern von Sendern die Taste
II
(22) drücken: Ein Sendersuchlauf startet. Die
gefundenen Sendefrequenzen werden automatisch unter Stationsnummern gespeichert.
Ist der Suchlauf beendet, ist die Frequenz der
Sta tionsnummer1 angewählt.
Um einen Suchlauf vorzeitig abzubrechen,
erneut die Taste
II drücken.
„Bluetooth“ oder „Radio“ aktiviert war). Wird
im Modus „Player“ bei zwei angeschlossenen
Medien das angewählte entfernt, wechselt der
Player auf das andere. Zum Umschalten auf das
andere Medium kann auch die Taste MODE
(21) verwendet werden (siehe Kapitel 6.1.2).
Das Display zeigt:
– U für USB-Medium,
S für Speicherkarte
vor dem Buchstaben: das Symbol für Wie-
dergabe, Pause oder Stopp
– die bereits gespielte Zeit des Titels
– den Abspielmodus (
ALL, FOLDER, SINGLE
oder RANDOM): siehe unten
– die Titelnummer und den Dateinamen
Zum Schalten auf Pause die Taste
II
(22)
drücken, zum Stoppen des Abspielens und
Zurückkehren an den Titelanfang die Taste
(23) am Gerät oder STOP (23) auf der Fernbedienung drücken. Zum Fortsetzen des
Abspielens die Taste
II drücken.
Zur Titelanwahl die Tasten I und
I (24)
verwenden oder die Titelnummer über die Zifferntasten (29) eingeben.
Hinweis: Im Abspielmodus
RANDOM
ist der Rücksprung zum vorherigen Titel und die Titelanwahl
über die Zifferntasten nicht möglich. Im Abspielmodus FOLDER lassen sich nur die Titel des aktuellen
Ordners anwählen.
Zur Ordneranwahl die Tasten F− und F+ (25)
verwenden. Um nach einer Ordneranwahl den
gewünschten Titel mit der Taste I oder
I
(24) anzuwählen, so lange warten, bis der
Name des Ordners nicht mehr im Display angezeigt wird. Anderenfalls führt das Drücken
der Taste I/
I zum Sprung auf den vorhe-
rigen / nächsten Ordner.
Für den schnellen Rück- und Vorlauf (nur
während des Abspielens möglich) die Taste
I
oder
I
(24) auf der Fernbedienung gedrückt
halten. Der Vorlauf geht auch über mehrere
Titel, der Rücklauf nur bis zum Titelanfang.
Mit der Taste EQ (20) die gewünschte Equa-
lizer-Einstellung wählen (nur während des
Abspielens möglich). Es kann umgeschaltet
werden zwischen: NORMAL, ROCK, POP,
CLASSIC, JAZZ, COUNTRY.
Hinweis: Beim nächsten Einschalten bzw. Umschalten in den Modus „Player“ wird die Equalizer-Einstellung auf NORMAL zurückgesetzt.
Mit der Taste (19) am Gerät oder (19) auf
der Fernbedienung den Abspielmodus wäh-
len (nur während des Abspielens möglich). Es
kann umgeschaltet werden zwischen:
ALL = alle Titel werden endlos nachein-
ander abgespielt
FOLDER = die Titel des aktuellen Ordners
werden endlos nacheinander abgespielt
SINGLE = der aktuelle Titel wird endlos ab-
gespielt
RANDOM = alle Titel werden endlos in zufälliger
Reihenfolge abgespielt
Hinweis: Beim nächsten Einschalten bzw. Umschalten in den Modus „Player“ wird der Abspielmodus
auf ALL zurückgesetzt. Ebenso, wenn zur Ordnerwahl die Taste F− oder F+ (25) gedrückt wird.
21 22 23
1715 16 18 19 20
24
25
➂
7
8
9
4
5 6
21 3
0
MODE
STOP
EQ
26 23 27
19
21 20
22
29
24
28
Diese Bedienungsanleitung ist urheberrechtlich für MONACOR ® INTERNATIONAL GmbH & Co. KG geschützt.
Eine Reproduktion für eigene kommerzielle Zwecke – auch auszugsweise – ist untersagt.
Page 7
7
English
1 2 3 4 5 6 7 8 9
➀
10 13 1411 12
➁
and also features an MP3 player with USB port
and memory card slot, a Bluetooth receiver and
an FM radio.
4 Setting up the Amplifier
The amplifier is designed for installation into
a rack (482 mm /19”); however, it can also be
placed on a table. In order to ensure sufficient
cooling of the amplifier, air must always be able
to flow freely through all air vents.
4.1 Installation into a rack
For rack installation, the amplifier requires 1RS
(1 rack space = 44.45 mm). The front plate is
not sufficient for fixing the amplifier safely;
additionally use lateral rails or a bottom plate
to secure the amplifier.
The hot air given off by the amplifier must
be dissipated from the rack; otherwise, heat
will accumulate in the rack which may not only
damage the amplifier but also other units in
the rack. In case of insufficient heat dissipation,
install a ventilation unit into the rack.
5 Connection
Prior to connecting /disconnecting, switch off
all units concerned.
1) For the connection of a microphone, use
the jack MIC (2): connect the microphone
via a 6.3 mm plug or an XLR plug.
2)
For the connection of stereo audio sources
with line signal level (e. g. CD / MP3 player,
tape deck, radio, mixer, PC), two inputs are
available:
– 3.5 mm jack AUX (3);
when this jack is connected, the combination “MP3 player / FM radio / Bluetooth
receiver” will be muted.
– RCA jacks LINE IN (10);
L (white) = left, R (red) = right
3) The stereo connections PRE OUT and AMP
IN (11) can be used to insert an audio pro-
cessing unit (e. g. equalizer, effect unit):
The signal, after the control VOLUME (8),
will be routed to the audio processing unit
via the output PRE OUT and returned to the
power amplifier of the SA-130DMP via the
input AMP IN.
a) Remove the two jumpers (one each for
the left channel and the right channel)
that interconnect the output PRE OUT
and the input AMP IN.
2 Safety Notes
The unit corresponds to all relevant directives
of the EU and is therefore marked with .
WARNING The unit uses dangerous mains
voltage. Leave servicing to
skilled personnel and do not
insert anything into the air
vents; inexpert handling may
result in electric shock.
•
The unit is suitable for indoor use only. Protect it against dripping water, splash water
and high air humidity. The admissible ambient temperature range is 0 – 40 °C.
•
Do not place any vessels filled with liquid on
the unit, e. g. a drinking glass.
•
The heat generated inside the unit must be
dissipated by air circulation; therefore, never
cover the air vents.
•
Immediately disconnect the mains plug from
the socket
1.
if the unit or the mains cable is visibly
damaged,
2. if a defect might have occurred after the
unit was dropped or suffered a similar
accident,
3. if malfunctions occur.
In any case the unit must be repaired by
skilled personnel.
•
Never pull the mains cable to disconnect the
mains plug from the socket, always seize
the plug.
•
For cleaning only use a dry, soft cloth; never
use water or chemicals.
•
No guarantee claims for the unit and no liability for any resulting personal damage or
material damage will be accepted if the unit
is used for other purposes than originally
intended, if it is not correctly connected or
operated, or if it is not repaired in an expert
way.
If the unit is to be put out of operation definitively, take it to a local
recycling plant for a disposal which
is not harmful to the environment.
3 Applications
The stereo amplifier SA-130DMP is suitable for
a wide range of applications, e. g. in bars, function rooms and offices. It provides connections
for a microphone and two audio sources with
line signal level (e. g. mixer, CD / MP3 player)
Stereo Mixing Amplifier
These instructions are intended for users without specific technical knowledge. Please read
the instructions carefully prior to operating the
unit and keep them for later reference.
1 Overview
1 POWER switch
2 Mono input to connect a microphone via
an XLR plug or a 6.3 mm plug
3 Stereo input (3.5 mm jack) to connect an
audio source with line signal level, e. g.
CD / MP3 player
Note: When this jack is connected, the combination “MP3 player / FM radio / Bluetooth receiver”
(4) will be muted.
4
Combination “MP3 player / FM radio / Bluetooth receiver”: ☞ chapter 6.1
5 Volume control for the input MIC (2)
6 Volume control for the input AUX (3) or,
when the input AUX is not used, for the
combination “MP3 player / FM radio / Bluetooth receiver” (4)
7 Volume control for the input LINE IN (10)
8 Total volume control
9
Tone controls TREBLE (high frequencies)
and BASS (low frequencies)
10 Stereo input (RCA jacks, L = left / R = right)
to connect an audio source with line signal
level (e. g. CD / MP3 player, mixer, tape deck)
11
Stereo output PRE OUT and stereo input
AMP IN (RCA jacks, L = left / R = right) to
insert a unit for audio processing, ☞ chapter 5, item 3
Note: When PRE OUT and AMP IN are not used
to connect a unit, make sure that they are interconnected by means of the two jumpers as
shown in fig. 2. Otherwise, the signal flow will
be interrupted.
12
Speaker terminals (screw terminals with
4 mm banana jacks)
13
Mains jack for connection to a mains socket
(230 V/ 50 Hz) via the mains cable provided
The fuse holder is underneath this jack;
always replace a blown fuse by one of the
same type!
14 Connection for an FM antenna
Page 8
8
English
6.1.1 Standby
To set the combination “MP3 player / FM radio /
Bluetooth receiver” to the standby mode and
to switch it on again, either use the button
(26) on the remote control or keep the button
MODE (21) at the unit pressed for more than
a second. After switch-on, the mode “Player”
will be active.
6.1.2 Selecting the operating mode
Use the button MODE (21) to switch over between the operating modes:
“Player”“Bluetooth”“Radio”
When two storage media are connected in the
mode “Player”: The first press of the button
MODE will switch to the storage medium currently not selected; the next press of the button
will switch to the mode “Bluetooth”.
6.1.3 Adjusting the basic volume /
Muting
To adjust the basic volume (adjustment range
00 to 31), use the buttons and (28) on
the remote control or keep the button I
or
I (24) at the unit pressed.
To mute the sound, press the button
(27);
MUTE
will appear on the display. To
unmute the sound, press the button again.
Note: When the mute function is activated, it will
be deactivated after the next switch-on or when the
operating mode is changed.
6.1.4 Operating mode “Player”
The player can be used to reproduce MP3 files
from SD / SDHC memory cards and USB storage
media (USB flash drive or USB hard disk with
separate power supply). The reproduction of
WMA files and WAV files is also supported.
– Connect a USB storage medium to the USB
port (17).
– Insert a memory card (FAT16 / FAT32, 32 GB
max.), notched corner facing to the right and
towards the unit, into the card slot (18) until
it engages. To remove the card, push the card
into the slot until it disengages.
Note: Due to the large number of storage device
manufacturers and device drivers, it cannot be guaranteed that all storage media are compatible with
the player.
Selecting the storage medium:
Once a storage medium is connected, it will be
selected and reproduced (even when the mode
“Bluetooth” or “Radio” has been activated). If
two media are connected in the mode “Player”
and the medium selected is then removed, the
– control AUX / MP3 LEVEL (6)
for the unit connected to the input AUX
(3) or, when the input AUX is not used, for
the combination “MP3 player / FMradio /
Bluetooth receiver” (4)
Note: The basic volume of the combination
“MP3player / FM radio / Bluetooth receiver” can
be additionally adjusted: see chapter 6.1.3.
4)
Use the controls TREBLE and BASS (9) to
adjust the tone.
6.1 MP3 player / FM radio /
Bluetooth receiver(fig. 3)
When the SA-130DMP is switched on, the
combination “MP3 player / FM radio / Bluetooth
receiver” will automatically be activated and
go to the mode “Player”. When no storage
medium is connected, NO
SOURCE
will appear
on the display (16). When a storage medium
is already connected, it will be read and then
reproduced. When two storage media are connected, the USB medium will be selected after
the SA-130DMP has been switched on.
The infrared remote control provided with
the amplifier includes the battery required.
Remove the protective film from the battery
holder prior to initial operation. When pressing
a button, always point the remote control to
the infrared sensor (15). Make sure that there
are no obstacles between the remote control
and the sensor.
If the remote control is not used for a
longer period of time, remove the battery as a
precaution so that the remote control will not
be damaged in case the battery should leak.
Replacing the battery:
1) Push the latch of the battery holder to the
right (first arrow in figure 4) and pull out
the holder (second arrow).
2)
Remove the discharged battery and insert the new battery (3 V button cell, type
CR 2025) in the holder, positive pole facing
upwards.
3) Push the holder back into the remote con-
trol.
1. 2.
➃
Never put batteries in the household
waste. To protect the environment,
always take them to a special waste
disposal, e. g. collection container at
your retailer.
b) Connect the input of the unit to be in-
serted to the output PRE OUT.
c)
Connect the output of the unit to be
inserted to the input AMP IN.
4) Connect two speakers (minimum impedance: 4 Ω) to the terminals SPEAKER OUT
(12): Connect one speaker to the channel
RIGHT and the other to the channel LEFT.
Observe the polarity (connect the marked
core of the respective speaker cable to “+”).
Use either the screw terminals or the banana jacks to make the connections.
Note: When connecting more than two speakers,
make sure that the total speaker impedance per
channel is at least 4 Ω; otherwise, the amplifier
may be damaged. Contact an expert if you have
any questions.
5)
When the integrated FM radio is used,
connect an FM antenna to the jack FM
ANTENNA (14).
6)
For power supply, connect the mains cable
provided to the mains jack (13) first and
then to a mains socket (230 V/ 50 Hz).
6 Operation
CAUTION Never adjust the amplifier to a
very high volume. Permanent
high volumes may damage your
hearing!
Your ear will get accustomed to high volumes
which do not seem to be that high after some
time. Therefore, do not further increase a high
volume after getting used to it.
To prevent switching noise, always switch on
the units connected before switching on the
amplifier and always switch off the amplifier
before switching off the other units.
1)
Before switching on the amplifier for the
first time, turn the total volume control
VOLUME (8) to the left stop.
2) Use the POWER switch (1) to switch on the
amplifier.
3) Turn up the control VOLUME (8) to adjust
the total volume desired; for each audio
source to be heard, adjust the volume by
means of the appropriate control:
– control MIC LEVEL (5)
for the microphone connected to the
input MIC (2)
– control LINE LEVEL (7)
for the unit connected to the input LINE
IN (10)
1 2 3 4 5 6 7 8 9
➀
10 13 1411 12
➁
Page 9
9
English
To call up a stored station, either select the
appropriate station number with the button
I
or
I (24) or enter it by means of the
numeric keys (29).
To manually set a station (in steps of 0.1 MHz),
use the buttons F− and F+ (25).
Notes with regard to station number indication:
After manual frequency setting, the display will show
FM:00
– when the frequency set has not been stored as a
station number
– when the frequency set has already been stored as
a station number via station scan and the reception
quality is poor
The next time you switch to the mode “Radio”, the
display will not show
FM:00
, but the station number
whose frequency is close to the frequency set, or, if
no station number is found, station number 1.
7 Specifications
RMS output power at 4 Ω: � � 2 × 70 W
Frequency range:
� � � � � � � � � 20 – 20 000 Hz
S / N ratio: � � � � � � � � � � � � � � 90 dB
THD: � � � � � � � � � � � � � � � � � � 0�1 %
Inputs (connection,
sensitivity / impedance)
MIC, mono, balanced: � � � � combined
XLR / 6�3 mm jack,
1�3 mV/500
Ω
AUX, stereo: � � � � � � � � � � � 3�5 mm jack,
190 mV/10 k
Ω
LINE IN, stereo: � � � � � � � � � RCA jacks,
480 mV/20 k
Ω
AMP IN, stereo: � � � � � � � � RCA jacks,
580 mV/22 k
Ω
Tone control
Low frequencies:� � � � � � � � ±12 dB/ 100 Hz
High frequencies: � � � � � � � ±10 dB/ 10 kHz
Power supply: � � � � � � � � � � � 230 V/50 Hz
Power consumption: � � � � � � 350 VA
Ambient temperature:
� � � � � 0 – 40 °C
Dimensions: (W × H × D): � � 482 × 44 × 245 mm,
1 RS
Weight: � � � � � � � � � � � � � � � � 4�9 kg
Subject to technical modification.
player will automatically switch to the medium
still connected. To switch over between the
media, the button MODE (21) can also be used
(see chapter 6.1.2).
The display will show:
– U for USB medium,
S for memory card
the letter is preceded by the respective sym-
bol for replay, pause or stop
– the time already played of the title
– the replay mode (ALL, FOLDER, SINGLE
or RANDOM): see below
– the number of the title and the file name
To set the replay to pause, press the button
II (22); to stop the replay and to return to
the beginning of the title, press the button
(23) at the unit or STOP (23) on the remote
control. To continue the replay, press the
button
II.
To select a title, either use the buttons
I
and
I (24) or enter the title number by means
of the numeric keys (29).
Note: In the replay mode RANDOM, it is not possible
to go back to the previous title or to select titles
by means of the numeric keys. In the replay mode
FOLDER
, only the titles of the current folder can
be selected.
To select a folder, use the buttons F− and F+
(25). To select a title in the folder by means of
the button I or
I , first wait for the name
of the folder to disappear from the display;
otherwise, you will go to the previous / next
folder when you press I or
I.
For fast reverse and fast forward (functions
only available during replay), keep the button
I
or
I (24) on the remote control pressed.
Fast forward will go beyond the current title;
fast reverse will stop at the beginning of the
current title.
Use the button EQ (20) to select the equalizer
setting desired (function only available during
replay). It is possible to switch over between:
NORMAL, ROCK, POP, CLASSIC, JAZZ,
COUNTRY.
Note: After each switch-on or change to the mode
“Player”, the equalizer setting will be reset to
NORMAL.
To select the replay mode (function only available during replay), use the button (19) at
the unit or the button (19) on the remote
control. It is possible to switch over between:
ALL
= all titles continuously replayed one
after the other
FOLDER = all titles of the current folder con-
tinuously replayed one after the
other
SINGLE = current title continuously replayed
RANDOM
= all titles continuously replayed in
random order
Note: After each switch-on or change to the mode
“Player”, the replay mode will be reset to ALL.
This reset will also be made when the button F− or
F+ (25) is pressed to select a folder.
6.1.5 Operating mode “Bluetooth”
The Bluetooth receiver can be used to establish
a wireless connection to a Bluetooth signal
source (e. g. smartphone, tablet PC, notebook)
and thus to replay the audio files stored on the
signal source via the SA-130DMP.
Establishing a Bluetooth connection:
1)
Use the button MODE (21) to select the
operating mode “Bluetooth” (Blue-
tooth shown on the display): The display
will show Initializing. . . and
then Discon nected! to indicate that
no Bluetooth connection is established
2)
At the Bluetooth source, switch on the Bluetooth function.
3)
On the display of the Bluetooth source,
the Bluetooth receiver will be indicated as
“Bluetooth”. Pair the Bluetooth source with
the Bluetooth receiver (please refer to the
instruction manual of the Bluetooth source,
if required).
4)
Once the Bluetooth connection has been
established, the display will show Con-
nected!.
5)
Use the buttons of the Bluetooth source
for operation (replay, pause, title selection)
or the button
II (22) for replay / pause and
the buttons I and
I (24) on the remote
control for title selection.
6.1.6 Operating mode “Radio”
Use the button MODE (21) to select the operating mode “Radio”. The display will show:
– the FM frequency adjusted (in MHz)
–
FM: 01
… the station number under which
the FM frequency has been stored
by means of the scan function
(also see notes at the end of this
chapter)
– the basic volume adjusted (VOL)
(see chapter 6.1.3)
To store stations, press the button
II
(22):
The station scan will start. The transmission
frequencies found will be automatically stored
as station numbers. When the station scan is
completed, the frequency of station number1
will be selected.
To cancel the scan function at any time,
press the button
II again.
21 22 23
1715 16 18 19 20
24
25
➂
7
8
9
4
5 6
21 3
0
MODE
STOP
EQ
26 23 27
19
21 20
22
29
24
28
All rights reserved by MONACOR ® INTERNATIONAL GmbH & Co. KG. No part of this instruction manual may
be reproduced in any form or by any means for any commercial use.
Page 10

10
Français
1 2 3 4 5 6 7 8 9
➀
10 13 1411 12
➁
CARTONS ET EMBALLAGE
PAPIER À TRIER
3 Possibilités d’utilisation
L’amplificateur stéréo SA-130DMP est adapté
pour une large palette d'applications, par
exemple dans des bars, salles de conférences,
bureaux. Il dispose de possibilités de branchement pour un microphone et deux sources
audio avec niveau de signal ligne (par exemple
table de mixage, lecteur CD / MP3). Un lecteur
MP3 avec port USB et insert pour carte mémoire, récepteur Bluetooth et radio FM sont
également intégrés.
4 Positionnement
L’amplificateur est prévu pour être inséré dans
un rack 482 mm / 19”, il peut également être
posé directement sur une table. Dans tous les
cas, l’air doit pouvoir circuler librement via les
ouïes de ventilation pour assurer un refroidissement suffisant.
4.1 Installation en rack
Dans le rack, une hauteur de 1 unité (1 unité
=44,45 mm) est nécessaire. Pour une fixation
sûre, la face avant ne suffit pas seule. En plus,
des rails latéraux ou une plaque inférieure
doivent maintenir l’appareil.
La chaleur dégagée par l’appareil doit être
évacuée du rack ; sinon, il y a accumulation de
chaleur dans le rack, ce qui pourrait endommager l’amplificateur mais aussi d’autres appareils
se trouvant dans le rack. En cas de dégagement
insuffisant de la chaleur, placez une unité de
ventilation dans le rack.
5 Branchements
Avant d’établir les branchements ou de les
défaire, éteignez tous les appareils concernés.
1) Pour brancher un microphone, utilisez la
prise MIC (2) ; branchez le microphone via
une fiche jack 6,35 ou une fiche XLR.
2) Pour brancher des sources audio avec ni-
veau de signal ligne (par exemple lecteur
CD / MP3, tape deck, radio, table de mixage,
PC), deux entrées sont disponibles :
– prise jack 3,5 AUX (3) ;
si vous utilisez cette prise, le son de la
2 Conseils d'utilisation et
desécurité
L'appareil répond à toutes les directives nécessaires de l'Union européenne et porte donc le
symbole .
AVERTISSEMENT
L'appareil est alimenté par
une tension dangereuse. Ne
touchez jamais l'intérieur
de l'appareil et ne faites
rien tomber dans les ouïes
de ventilation, vous pourriez subir une décharge
électrique.
•
L'appareil n'est conçu que pour une utilisation en intérieur. Protégez-le de tout type
de projections d'eau, des éclaboussures et
d'une humidité d'air élevée. La plage de
température ambiante admissible est de
0 – 40 °C.
•
En aucun cas, vous ne devez poser d'objet
contenant du liquide ou un verre sur l'appareil.
•
La chaleur dégagée par l'appareil doit être
évacuée par une circulation d'air correcte. En
aucun cas les ouïes de ventilation ne doivent
être obturées.
•
Débranchez immédiatement l'appareil du
secteur lorsque :
1.
des dommages visibles apparaissent sur
l'appareil ou le cordon secteur,
2. après une chute ou un cas similaire, vous
avez un doute sur l'état de l'appareil,
3. des dysfonctionnements apparaissent.
Dans tous les cas, les dommages doivent être
réparés par un technicien spécialisé.
•
Ne débranchez jamais l'appareil en tirant
sur le cordon secteur, tenez-le toujours par
la fiche.
•
Pour le nettoyage, utilisez uniquement un
chiffon sec et doux, en aucun cas, de produits chimiques ou d'eau.
•
Nous déclinons toute responsabilité en cas
de dommages matériels ou corporels consécutifs si l'appareil est utilisé dans un but autre
que celui pour lequel il a été conçu, s'il n'est
pas correctement branché ou utilisé ou s'il
n'est pas réparé par une personne habilitée;
de même, la garantie deviendrait caduque.
Lorsque l'appareil est définitivement
retiré du service, vous devez le déposer dans une usine de recyclage adaptée pour contribuer à son élimination
non polluante.
Amplificateur mixeur stéréo
Cette notice s'adresse aux utilisateurs sans
connaissances techniques particulières. Veuillez
lire la présente notice avec attention avant le
fonctionnement et conservez-la pour pouvoir
vous y reporter ultérieurement.
1 Eléments et branchements
1 Interrupteur Marche /Arrêt
2
Entrée mono pour brancher un microphone
via une fiche XLR ou une fiche jack 6,35
3
Entrée stéréo (prise jack 3,5) pour brancher
une source audio avec niveau de signal
ligne, par exemple lecteur CD / MP3
Remarque : Lorsque cette prise est connectée, le
son de la combinaison «Lecteur MP3 / Radio FM /
Récepteur Bluetooth» (4) est coupé.
4
Combinaison «Lecteur MP3 / Radio FM /
Récepteur Bluetooth», ☞ chapitre 6.1
5 Réglage de volume pour l’entrée MIC (2)
6 Réglage de volume pour l’entrée AUX (3)
ou, si elle n’est pas utilisée, pour la combinaison «Lecteur MP3 / Radio FM / Récepteur
Bluetooth» (4)
7 Réglage de volume pour l’entrée LINE IN
(10)
8 Réglage général de volume
9 Egaliseur TREBLE (aigus) et BASS (graves)
10
Entrée stéréo (prises RCA, gauche L /
droiteR) pour brancher une source audio
avec niveau de signal ligne, p. ex. lecteur
CD / MP3, table de mixage, tape deck
11
Sortie stéréo PRE OUT et entrée stéréo AMP
IN (prises RCA, gauche L / droite R) pour
insérer un appareil de traitement du son,
☞
chapitre 5, point 3.
Remarque : Si PRE OUT et AMP IN ne sont pas
utilisées pour brancher un appareil, vous devez,
comme décrit sur le schéma 2, les relier ensemble
avec deux cavaliers. Sinon, le flux de signal est
interrompu.
12
Bornes haut-parleurs (bornes à vis avec
prises banane 4 mm)
13 Prise secteur à brancher, via le cordon sec-
teur livré, à une prise secteur 230 V/ 50 Hz
Le porte-fusible se trouve dessous ; tout
fusible fondu doit impérativement être
remplacé par un fusible de même type.
14 Branchement pour une antenne FM
Page 11

11
6.1.1 Standby
Pour mettre la combinaison «Lecteur MP3 /
Radio FM / Récepteur Bluetooth» sur Standby,
et pour la rallumer, appuyez sur la touche
(26) de la télécommande ou, sur l'appareil,
appuyez longuement sur la touche MODE (21).
Après l'allumage, le mode «Player» est activé.
6.1.2 Sélection du
modedefonctionnement
Avec la touche MODE (21), vous pouvez commuter entre les modes de fonctionnement :
«Player»«Bluetooth»«Radio»
Si, en mode «Player», deux supports de
mémoire sont branchés, en appuyant sur
la touche, vous passez à l'autre support de
mémoire, par une autre pression, vous passez
au mode «Bluetooth».
6.1.3 Réglage du volume /
Coupure du son (Mute)
Pour régler le volume de base (plage de réglage
00 à 31), appuyez sur les touches et (28)
sur la télécommande, ou maintenez la touche
I
ou
I (24) enfoncée sur l'appareil.
Pour couper le son, appuyez sur la touche
(27), l'affichage indique
MUTE
. Pour le réac-
tiver, appuyez à nouveau sur la touche.
Remarque : Si la fonction Mute est activée, elle est
à nouveau désactivée au prochain allumage ou chan
-
gement de mode de fonctionnement.
6.1.4 Mode de fonctionnement «Player»
Via le lecteur, vous pouvez lire des fichiers MP3
de cartes mémoire SD / SDHC et de supports
de mémoire USB (clé USB ou disque dur USB
avec alimentation propre). La lecture de fichiers
WMA et WAV est également possible.
– Branchez un support de mémoire au port
USB (17).
– Insérez une carte mémoire (FAT16 / FAT32,
jusqu'à 32 GO) dans l'insert pour carte
(18) jusqu'à ce qu'elle s'enclenche. Le coin
oblique de la carte doit être vers la droite et
vers l'appareil. Pour retirer la carte, appuyez
légèrement pour qu'elle se désenclenche.
Remarque : En raison de la diversité des fabricants
de supports de mémoire et des drivers d'appareils,
nous ne pouvons assurer que tous les supports de
mémoire soient compatibles avec le lecteur.
Sélection du support de mémoire :
Dès qu'un support de mémoire est relié, il est
sélectionné et sa lecture démarre (également
si le mode «Bluetooth» ou «Radio» est activé).
Si en mode «Player», lorsque deux supports
– réglage AUX / MP3 LEVEL (6)
pour l'appareil à l'entrée AUX (3) ou si
l'entrée AUX n'est pas utilisée, pour la
combinaison «Lecteur MP3 / Radio FM /
Récepteur Bluetooth» (4)
Remarque : Le réglage de volume de base
pour la combinaison «Lecteur MP3 / Radio FM /
Récepteur Bluetooth» est réglable en plus, voir
chapitre6.1.3.
4) Avec le réglage des aigus TREBLE et le réglage des graves BASS (9), réglez la tonalité.
6.1 Lecteur MP3/Radio FM/
Récepteur Bluetooth (schéma 3)
La combinaison «Lecteur MP3 / Radio FM /
Récepteur Bluetooth» s'allume automatiquement lors de la mise en fonction du
SA-130DMP et est en mode «Player». L'affichage (16) indique NO SOURCE si aucun
support de mémoire n'est relié. Si un support
de mémoire est déjà branché, sa lecture démarre une fois le support de mémoire reconnu.
Si deux supports de mémoire sont reliés, le
médium USB est toujours sélectionné après la
mise en fonction du SA-130DMP.
La télécommande infrarouge est livrée avec
sa batterie. Avant la première utilisation, retirez
le film de protection du support de batterie. En
appuyant sur une touche de la télécommande,
orientez-la toujours vers le capteur infrarouge
(15). Il ne doit pas y avoir d'obstacle entre la
télécommande et le capteur.
En cas de non utilisation prolongée, retirez
la batterie de la télécommande, elle pourrait
couler et endommager la télécommande.
Remplacement de la batterie :
1)
Poussez vers la droite le verrouillage du support de batterie (flèche 1 sur le schéma 4)
et retirez le support (flèche 2).
2)
Retirez la batterie usagée et placez une batterie neuve (pile bouton 3 V, type CR 2025),
pôle plus vers le haut, dans le support.
3)
Remettez le support dans la télécommande.
1. 2.
➃
Ne jetez pas les batteries usagés dans
la poubelle domestique. Déposez-les
dans un container spécifique ou
ramenez-les à votre revendeur.
combinaison «Lecteur MP3 / Radio FM /
Récepteur Bluetooth» est coupé.
– prises RCA LINE IN (10) ;
L (blanc) = gauche, R (rouge) = droite
3) Via les connexions stéréo PRE OUT et AMP
IN (11), il est possible d'insérer un appareil
pour le traitement du son (par exemple
égaliseur, appareil à effets) : le signal, après
le réglage VOLUME (8), est dirigé vers l'appareil pour le traitement du son via la sortie
PRE OUT et retourné vers l'amplificateur du
SA-130DMP via l'entrée AMP IN.
a)
Retirez les deux cavaliers (respectivement
pour le canal gauche et le canal droit)
avec lesquels les branchements PRE OUT
et AMP IN sont reliés.
b) Reliez l'entrée de l'appareil à insérer à la
sortie PRE OUT.
c)
Reliez la sortie de l'appareil à insérer à
l'entrée AMP IN.
4)
Reliez deux enceintes (impédance minimale
4 Ω) aux connexions SPEAKER OUT (12) :
reliez une enceinte au canal droit RIGHT
et l'autre au canal gauche LEFT. Veillez à
respecter la polarité (reliez le conducteur
repéré du câble haut-parleur correspondant
au «+»). Le branchement peut se faire soit
via les bornes à vis soit via les prises banane.
Remarque : Si plus de deux enceintes doivent
être reliées, veillez à ce que l'impédance totale des
enceintes ne soit pas inférieure à 4 Ω par canal,
sinon, l'amplificateur peut être endommagé. En
cas de question sur le branchement, contactez
un technicien.
5)
Si vous utilisez la radio FM intégrée,
branchez une antenne FM à la prise FM
ANTENNA (14).
6) Pour l'alimentation, reliez le cordon secteur livré tout d'abord à la prise secteur (13)
puis à une prise secteur 230 V/ 50 Hz.
6 Utilisation
AVERTISSEMENT Ne réglez pas le volume de
l'amplificateur trop fort. Un
volume trop élevé peut, à
long terme, générer des
troubles de l'audition!
L'oreille s'habitue à des volumes élevés et
ne les perçoit plus comme tels au bout d'un
certain temps. Nous vous conseillons donc
de régler le volume et de ne plus le modifier.
Pour éviter tout bruit fort à l'allumage, allumez toujours l'amplificateur après les appareils
reliés, et après le fonctionnement, éteignez-le
avant les autres appareils.
1)
Avant la première utilisation, tournez le
réglage de volume général VOLUME (8)
entièrement à gauche.
2) Allumez l'amplificateur avec l'interrupteur
POWER (1).
3)
Tournez le réglage VOLUME (8), selon le
volume général souhaité, et pour chaque
source audio à écouter, réglez le volume
individuellement avec le réglage correspondant :
– réglage MIC LEVEL (5)
pour le micro à l'entrée MIC (2)
– réglage LINE LEVEL (7)
pour l'appareil à l'entrée LINE IN (10)
Français
21 22 23
1715 16 18 19 20
24
25
➂
7
8
9
4
5 6
21 3
0
MODE
STOP
EQ
26 23 27
19
21 20
22
29
24
28
Page 12

12
Français
Pour appeler une station mémorisée, sélec-
tionnez le numéro avec la touche I ou
I
(24) ou saisissez le numéro avec les touches
numériques (29).
Pour un réglage manuel d'une station (par
paliers de 0,1 MHz), utilisez les touches F− et
F+ (25).
Conseils sur l'affichage du numéro de station :
Après un réglage manuel de fréquence, l'affichage
indique
FM:00
– si la fréquence réglée n'est mémorisée sous aucun
numéro de station
– si la fréquence réglée est déjà été mémorisée via
la recherche sous un numéro de station mais avec
une mauvaise réception
A la prochaine commutation sur le mode «Radio»,
l'affichage n'indique pas
FM:00
, mais le numéro de
station dont la fréquence est proche de la fréquence
réglée ; si aucune n'est trouvée, l’affichage indique
le numéro de station 1.
7 Caractéristiques techniques
Puissance de sortie RMS
sous 4 Ω : � � � � � � � � � � � � � � 2 × 70 W
Bande passante :
� � � � � � � � � 20 – 20 000 Hz
Rapport signal / bruit : � � � � � 90 dB
Taux de distorsion : � � � � � � � 0,1 %
Entrées (branchement,
sensibilité / impédance)
MIC, mono, symétrique : � � prise combo
XLR / jack6,35,
1,3 mV/500
Ω
AUX, stéréo : � � � � � � � � � � prise jack 3,5,
190 mV/10 k
Ω
LINE IN, stereo : � � � � � � � � prises RCA
480 mV/20 k
Ω
AMP IN, stéréo : � � � � � � � � prises RCA
580 mV/22 k
Ω
Egaliseur
Graves : � � � � � � � � � � � � � � ±12 dB/ 100 Hz
Aigus : � � � � � � � � � � � � � � � ±10 dB/ 10 kHz
Alimentation : � � � � � � � � � � � 230 V/ 50 Hz
Consommation : � � � � � � � � � 350 VA
Température fonc� : � � � � � � � 0 – 40 °C
Dimensions (L × H × P) : � � � 482 × 44 × 245 mm,
1 U
Poids : � � � � � � � � � � � � � � � � � 4,9 kg
Tout droit de modification réservé.
6.1.5 Mode de fonctionnement
«Bluetooth»
Avec le récepteur Bluetooth, vous pouvez établir une connexion sans fil avec une source de
signal Bluetooth (p. ex. Smartphone, tablette
PC, portable), pour lire les fichiers audio
stockés sur la source de signal via le SA-130DMP.
Etablissement d'une connexion Bluetooth :
1)
Avec la touche MODE (21), sélectionnez
le mode de fonctionnement «Bluetooth»
(indication
Bluetooth
sur l'affichage):
l'affichage passe après Initiali-
zing...
sur
Discon nected!
pour
indiquer qu'aucune connexion Bluetooth
n'est établie.
2) Sur la source Bluetooth, activez la fonction
Bluetooth.
3) Le récepteur Bluetooth est signalé sur l'affichage de la source Bluetooth par «Bluetooth». Appairez la source Bluetooth avec le
récepteur Bluetooth (voir si besoin la notice
de la source Bluetooth).
4)
Dès que la connexion Bluetooth est établie,
l'affichage indique Connected!.
5) Utilisez les touches de la source Bluetooth
(lecture, pause, sélection de titres) ou la
touche
II
(22) pour lecture / pause et les
touches I et
I (24) de la télécommande
pour la sélection de titres.
6.1.6 Mode de fonctionnement «Radio»
Avec la touche MODE (21), sélectionnez le
mode de fonctionnement «Radio», l’affichage
indique :
– la fréquence FM réglée en MHz
– FM: 01 … le numéro de station dans la-
quelle la fréquence FM a été mémorisée via la recherche (voir les
conseils à la fin de ce chapitre)
– le volume de base réglé (VOL)
(voir chapitre 6.1.3)
Pour mémoriser les stations, appuyez sur
la touche
II (22) : la recherche démarre. Les
fréquences de stations trouvées sont automatiquement mémorisées sous les numéros de station. Si la recherche est terminée, la fréquence
du numéro de station 1 est sélectionnée.
Pour interrompre la recherche avant terme,
appuyez à nouveau sur la touche
II.
sont reliés, le support sélectionné est retiré, le
lecteur commute sur l'autre. Pour commuter
sur l'autre support, vous pouvez également utiliser la touche MODE (21) (voir chapitre 6.1.2).
L'affichage indique :
– U pour support USB,
S pour carte mémoire
Avant les lettres : le symbole pour lecture,
pause ou arrêt
– la durée déjà écoulée du titre
– le mode de lecture (
ALL, FOLDER, SINGLE
ou RANDOM) : voir ci-dessous
– le numéro du titre et le nom du fichier
Pour commuter sur Pause, appuyez sur la
touche
II (22), pour arrêter la lecture et
revenir au début du titre, appuyez sur la touche
(23) sur l'appareil ou sur la touche STOP
(23) sur la télécommande. Pour poursuivre la
lecture, appuyez sur la touche
II.
Pour sélectionner un titre, utilisez les touches
I
et
I
(24) ou tapez le numéro du titre avec
les touches numériques (29).
Remarque : En mode
RANDOM
, le retour au titre
précédent et la sélection de titre via les touches
numériques ne sont pas possibles. En mode
FOLDER
,
seuls les titres du dossier actuel sont sélectionnables.
Pour sélectionner un dossier, utilisez les
touches F− et F+ (25). Pour sélectionner le
titre voulu avec les touches
I
ou
I
(24),
une fois un dossier sélectionné, attendez
jusqu'à ce que le nom du dossier ne soit plus
affiché sur l'affichage. Sinon, en appuyant sur
la touche
I
/
I
, vous revenez au dossier
précédent / suivant.
Pour un retour et une avance rapide (possible uniquement pendant la lecture), maintenez enfoncée la touche I ou
I (24) de la
télécommande. L'avance se fait sur plusieurs
titres, le retour uniquement au début du titre.
Avec la touche EQ (20), sélectionnez le
réglage d'égaliseur souhaité (uniquement
pendant la lecture). Vous pouvez commuter
entre: NORMAL, ROCK, POP, CLASSIC,
JAZZ, COUNTRY.
Remarque : Au prochain allumage ou commutation dans le mode «Player», le réglage de l'égaliseur
revient sur NORMAL.
Avec la touche (19) sur l'appareil ou (19)
sur la télécommande, sélectionnez le mode
de lecture (possible uniquement pendant la
lecture). Vous pouvez commuter entre :
ALL = tous les titres sont lus en continu
les uns après les autres
FOLDER = les titres du dossier en cours sont
lus en continu les uns après les
autres
SINGLE = le titre en cours est lu en continu
RANDOM = tous les titres sont lus en ordre
aléatoire
Remarque : Au prochain allumage ou commutation
dans le mode «Player», le mode de lecture revient sur
ALL. De même si la touche F− ou F+ (25) est activée
pour la sélection de dossier.
21 22 23
1715 16 18 19 20
24
25
➂
7
8
9
4
5 6
21 3
0
MODE
STOP
EQ
26 23 27
19
21 20
22
29
24
28
Notice d’utilisation protégée par le copyright de MONACOR ® INTERNATIONAL GmbH & Co. KG. Toute
reproduction même partielle à des fins commerciales est interdite.
Page 13

13
Italiano
1 2 3 4 5 6 7 8 9
➀
10 13 1411 12
➁
3 Possibilità d'impiego
L'amplificatore stereo SA-130DMP è previsto
per impieghi universali, p. es. in bar, locali per
manifestazioni, uffici. Permette il collegamento
di un microfono e di due sorgenti audio con segnali Line (p. es. mixer, lettore CD/ MP3). Inoltre
sono integrati un lettore MP3 con porta USB e
uno slot per schede di memoria, un ricevitore
Bluetooth e una radio FM.
4 Collocamento
L'amplificatore è previsto per l'inserimento in
un rack (482 mm / 19”), ma può essere sistemato anche su un tavolo. In ogni caso, l'aria
deve poter uscire liberamente attraverso le
fessure di aerazione per garantire un raffreddamento sufficiente.
4.1 Montaggio in un rack
Nel rack, l'amplificatore richiede 1 U (1 unità
d'altezza = 44,45 mm). Per un fissaggio sicuro,
il pannello frontale non è sufficiente. In più, per
sorreggere l’apparecchio servono delle guide
laterali oppure una piastra di fondo.
L'aria riscaldata, emessa dall'amplificatore,
deve poter uscire dal rack. Altrimenti si manifesta un accumulo di calore che può danneggiare non solo l'amplificatore ma anche altri
apparecchi nel rack. Se lo scarico del calore
non è sufficiente occorre utilizzare un ventilatore nel rack.
5 Collegamento
Prima di effettuare /staccare dei collegamenti,
occorre spegnere tutti gli apparecchi coinvolti.
1)
Per il collegamento di un microfono, usare
la presa MIC (2): collegare il microfono per
mezzo di un jack 6,3 mm oppure di un connettore XLR.
2)
Per il collegamento di sorgenti audio stereo
con livello Line (p. es. lettori CD / MP3,
tape-deck, radio, mixer, PC) sono disponibili
due ingressi:
– la presa jack 3,5 mm AUX (3);
collegando la presa, la combinazione
“Lettore MP3 / Radio FM / Ricevitore Bluetooth” (4) viene messa in muto.
– le prese RCA LINE IN (10);
L (bianco) = sinistro, R (rosso) = destro
3) Tramite i contatti stereo PRE OUT e AMP IN
(11) è possibile inserire un apparecchio per
l'elaborazione del suono (p. es. equalizzatore, unità per effetti): A valle del rego-
2 Avvertenze per l'uso sicuro
L’apparecchio è conforme a tutte le direttive
rilevanti dell’UE e pertanto porta la sigla .
AVVERTIMENTO
L’apparecchio è alimentato
con pericolosa tensione di
rete. Non intervenire mai
personalmente al suo interno e non inserire niente
nelle fessure di aerazione!
Esiste il pericolo di una scarica elettrica.
•
L’apparecchio è previsto solo per l’uso all’interno di locali. Proteggerlo dall'acqua gocciolante e dagli spruzzi d'acqua nonché da
alta umidità dell'aria. La temperatura d’esercizio ammessa è 0 – 40 °C.
•
Non depositare sull'apparecchio dei contenitori riempiti di liquidi, p. es. bicchieri.
•
Dev’essere garantita la libera circolazione
dell’aria per dissipare il calore che viene prodotto all’interno dell'apparecchio. Perciò non
coprire le fessure d’aerazione.
•
Staccare subito la spina rete se:
1.
l’apparecchio o il cavo rete presentano
dei danni visibili;
2.
dopo una caduta o dopo eventi simili sussiste il sospetto di un difetto;
3.
l’apparecchio non funziona corretta-
mente.
Per la riparazione rivolgersi sempre ad un’officina competente.
•
Staccare il cavo rete afferrando la spina,
senza tirare il cavo.
•
Per la pulizia usare solo un panno morbido,
asciutto; non impiegare mai acqua o prodotti
chimici.
•
Nel caso d’uso improprio, di collegamenti
sbagliati, d’impiego scorretto o di riparazione non a regola d’arte dell'apparecchio,
non si assume nessuna responsabilità per
eventuali danni consequenziali a persone
o a cose e non si assume nessuna garanzia
per l'apparecchio.
Se si desidera eliminare l'apparecchio
definitivamente, consegnarlo per lo
smaltimento ad un'istituzione locale
per il riciclaggio.
Amplificatore mixer stereo
Queste istruzioni sono rivolte all'utente senza
conoscenze tecniche specifiche. Vi preghiamo
di leggerle attentamente prima della messa in
funzione e di conservarle per un uso futuro.
1 Panoramica
1 Interruttore on /off
2
Ingresso mono per il collegamento di un
microfono tramite un connettore XLR
oppure un jack 6,3 mm
3 Ingresso stereo (presa jack 3,5 mm) per il
collegamento di una sorgente audio con
segnale Line, p. es. lettore CD / MP3
N. B.: Collegando questa presa, la combinazione
“Lettore MP3 / Radio FM/Ricevitore Bluetooth”
(4) viene messa in muto.
4
Combinazione “Lettore MP3 / Radio FM /
Ricevitore Bluetooth”: ☞ Capitolo 6.1
5 Regolatore volume per l'ingresso MIC (2)
6 Regolatore volume per l'ingresso AUX (3)
oppure, se l'ingresso è libero, per la combinazione “Lettore MP3 / Radio FM / Ricevitore
Bluetooth” (4)
7
Regolatore volume per l'ingresso LINE IN
(10)
8 Regolatore volume globale
9
Regolatore toni TREBLE (alti) e BASS (bassi)
10
Ingresso stereo (prese RCA, sinistra L /
destra R) per il collegamento di una sorgente audio con livello Line, p. es. lettore
CD / MP3, mixer, tape-deck
11
Uscita stereo PRE OUT e ingresso stereo
AMP IN (prese RCA, sinistra L /destra R) per
l'inserimento di un apparecchio per elaborare i toni
☞
Capitolo 5, punto 3
N. B.: Se PRE OUT e AMP IN non sono usati per il
collegamento di un apparecchio, devono essere
collegati come si vede in fig. 2, per mezzo di
due ponticelli. Altrimenti, il flusso del segnale
risulta interrotto.
12
Contatti per altoparlanti (morsetti a vite
con prese banana di 4 mm)
13 Presa per il collegamento con una presa di
rete (230 V/ 50 Hz) per mezzo del cavo in
dotazione
Sotto la presa si trova il portafusibile;
sostituire un fusibile difettoso solo con uno
dello stesso tipo!
14 Contatto per un'antenna FM
Page 14

14
Italiano
6.1.1 Standby
Per portare la combinazione “Lettore MP3 /
Radio FM / Ricevitore Bluetooth“ su standby e
per riattivarla, usare il tasto (26) sul telecomando oppure premere in modo prolungato il
tasto MODE (21) sull'apparecchio. Dopo l'accensione è attivo il modo “Player“.
6.1.2 Scegliere il modo di funzionamento
Con il tasto MODE (21) si può cambiare fra i
modi di funzionamento:
“Player“”Bluetooth“”Radio“
Se nel modo “Player“ sono collegati due mezzi
di memoria, premendo il tasto, si passa dapprima all'altro mezzo e con la pressione successiva del tasto si passa al modo “Bluetooth“.
6.1.3 Impostare il volume base /
Messa in muto (Mute)
Per impostare il volume base (campo di regolazione 00 a 31) usare i tasti e (28) del
telecomando oppure tener premuto sull'apparecchio il tasto I o
I (24).
Per disattivare l'audio, premere il tasto
(27), il display indica MUTE. Per riattivarlo,
premere nuovamente il tasto.
N. B.: Se è stata attivata la funzione mute, alla prossima accensione o al cambio del modo di funzionamento, la funzione sarà nuovamente disattivata.
6.1.4 Modo di funzionamento “Player“
Con il Player si possono riprodurre dei file MP3
di schede SD / SDHC e di mezzi USB (chiavetta
oppure disco rigido con alimentazione propria).
È possibile anche la riproduzione di file WMA
e WAV.
– Collegare un mezzo USB con la porta
USB(17).
– Inserire una scheda (FAT16 / FAT32, fino a
32 GB) nello slot (18) fino allo scatto. L’angolo smussato della scheda deve essere
rivolto verso destra e verso l'apparecchio.
Per togliere la scheda, premerla leggermente
indentro per sbloccarla.
N. B.: Dato il gran numero di produttori di memorie
e di driver, non si può garantire che tutti i mezzi di
memoria siano compatibili con il lettore.
Scelta del mezzo di memoria:
Non appena si collega un mezzo di memoria,
viene riconosciuto e si avvia la sua riproduzione (anche se prima è stato attivo il modo
“Bluetooth“ o “Radio“). Se nel modo “Player“
con due mezzi collegati si toglie quello riconosciuto, il lettore passa all'altro mezzo. Per
il volume individualmente per mezzo del
relativo regolatore:
– regolatore MIC LEVEL (5)
per il microfono all'ingresso MIC (2)
– regolatore LINE LEVEL (7)
per l'apparecchio all'ingresso LINE IN (10)
– regolatore AUX / MP3 LEVEL (6)
per l'apparecchio all'ingresso AUX (3)
oppure, se l'ingresso AUX è libero, per la
combinazione “Lettore MP3 / Radio FM /
Ricevitore Bluetooth” (4)
N. B.: Il volume base per la combinazione “Lettore
MP3 / Radio FM / Ricevitore Bluetooth” è impostabile separatamente: vedi capitolo 6.1.3.
4)
Con i regolatori alti TREBLE e bassi BASS (9)
impostare i toni.
6.1 Lettore MP3 /Radio
FM / Ricevitore Bluetooth (fig. 3)
La combinazione “Lettore MP3 / Radio FM / Ricevitore Bluetooth“ si accende automaticamente
con la messa in funzione del SA-130DMP che
si trova allora nel modo “Player“. Il display (16)
indica NO SOURCE, se non è collegato nessun
mezzo di memoria. Se è già collegato un mezzo
di memoria, dopo il caricamento dei dati si
avvia la sua riproduzione. Se sono collegati due
mezzi di memoria, dopo la messa in funzione
del SA-130DMP è sempre scelto il mezzo USB.
Il telecomando a infrarossi in dotazione viene
fornito con la batteria. Prima di usarlo sfilare
la pellicola protettiva dal vano batteria. Premendo un tasto sul telecomando, orientarlo
sempre verso il sensore infrarosso (15). Fra il
telecomando e il sensore non ci devono essere
degli ostacoli.
In caso di mancato uso prolungato conviene togliere la batteria per non danneggiare
il telecomando se la batteria dovesse perdere.
Sostituire la batteria:
1)
Spostare a destra il blocco del portabatteria
(1. freccia in fig. 4) e estrarre il portabatteria
(2. freccia).
2)
Togliere la batteria scarica e inserire una
nuova batteria (bottone 3 V, tipo CR 2025)
con il polo positivo rivolto verso l'alto.
3)
Rispingere il portabatteria nel telecomando.
1. 2.
➃
Non gettare le batterie scariche o
difettose nelle immondizie di casa
bensì negli appositi contenitori (p. es.
presso il vostro rivenditore).
latore VOLUME (8), il segnale viene fatto
uscire tramite PRE OUT, passa attraverso
l'apparecchio per l'elaborazione del suono
e tramite AMP IN arriva allo stadio finale
del SA-130DMP.
a)
Togliere i due ponticelli (uno per il canale sinistro, uno per quello destro) che
collegano i contatti PRE OUT e AMP IN.
b) Collegare l'ingresso dell'apparecchio da
inserire con l'uscita PRE OUT.
c)
Collegare l'uscita dell'apparecchio da
inserire con l'ingresso AMP IN.
4)
Collegare due altoparlanti (impedenza minima 4 Ω) con i contatti SPEAKER OUT (12):
un altoparlante con il canale destro RIGHT,
l'altro con il canale sinistro LEFT, rispettando
la polarità (collegare il conduttore contrassegnato del cavo con “+”). Il collegamento
è possibile o attraverso i morsetti a vite o
attraverso le prese a banana.
N. B.: Se si devono collegare più di due altoparlanti, l'impedenza globale degli altoparlanti non
deve essere inferiore a 4 Ω per canale, altrimenti,
l'amplificatore può subire dei danni. Se avete
delle domande sul collegamento, rivolgetevi a
un esperto.
5)
Se si usa la radio FM integrata, collegare
un'antenna FM con la presa FM ANTENNA
(14).
6) Per l'alimentazione, collegare il cavo rete
in dotazione prima con la presa (13) e quindi
inserire la spina del cavo in una presa di rete
(230 V / 50 Hz).
6 Funzionamento
ATTENZIONE
Mai tenere molto alto il volume.
A lungo andare, il volume eccessivo può procurare danni
all’udito!
L’orecchio si abitua agli alti volumi e dopo un
certo tempo non se ne rende più conto. Perciò
non aumentare il volume successivamente.
Per escludere rumori di commutazione, accendere l'amplificatore sempre dopo gli apparecchi
collegati, e dopo l'uso spegnerlo prima degli
altri apparecchi.
1)
Prima della prima accensione girare il
regolatore globale del volume VOLUME (8)
tutto a sinistra.
2)
Accendere l'amplificatore con l'interruttore
POWER (1).
3) Aprire il regolatore VOLUME (8) a seconda
del volume globale richiesto, e per ogni sorgente audio che si deve sentire, impostare
1 2 3 4 5 6 7 8 9
➀
10 13 1411 12
➁
Page 15

15
Italiano
Per attivare una stazione memorizzata,
scegliere il relativo numero con il tasto
I
o
I
(24) oppure digitarlo con i tasti numerici (29).
Per l'impostazione manuale di una stazione
(a passi di 0,1 MHz) usare i tasti F− e F+ (25).
Note sull'indicazione del numero delle stazioni:
Dopo l'impostazione manuale della frequenza, il
display indica FM:00,
– se la frequenza impostata non è memorizzata con
nessun numero di stazione,
– se la frequenza impostata è già memorizzata tra-
mite la ricerca stazioni con un numero di stazione,
ma se la ricezione non è buona.
Al prossimo cambio nel modo “Radio”, il display
non indica FM:00, bensì il numero della stazione
la cui frequenza si trova vicino a quella impostata
oppure, se non è stata trovata nessuna frequenza, il
numero1 di stazione.
7 Dati tecnici
Potenza efficace con 4 Ω: � � � 2 × 70 W
Gamma di frequenze:
� � � � � 20 – 20 000 Hz
Rapporto S/R: � � � � � � � � � � � 90 dB
Fattore di distorsione: � � � � � 0,1 %
Ingressi (contatto,
sensibilità / impedenza)
MIC, mono, bilanciato: � � � presa combinata
XLR / jack 6,3 mm,
1,3 mV/500
Ω
AUX, stereo: � � � � � � � � � � � presa jack 3,5 mm,
190 mV/10 k
Ω
LINE IN, stereo: � � � � � � � � � prese RCA
480 mV/20 k
Ω
AMP IN, stereo: � � � � � � � � prese RCA
580 mV/22 k
Ω
Regolazione toni
bassi: � � � � � � � � � � � � � � � � ±12 dB/ 100 Hz
alti: � � � � � � � � � � � � � � � � � ±10 dB/ 10 kHz
Alimentazione: � � � � � � � � � � 230 V/ 50 Hz
Potenza assorbita: � � � � � � � � 350 VA
Temperatura d'esercizio:
� � � 0 – 40 °C
Dimensioni (L × H × P): � � � � 482 × 44 × 245 mm,
1 U
Peso: � � � � � � � � � � � � � � � � � � 4,9 kg
Con riserva di modifiche tecniche.
6.1.5 Modo di funzionamento
“Bluetooth“
Con il ricevitore Bluetooth si può creare una
connessione wireless con una sorgente di segnali Bluetooth (p. es. Smartphone, Tablet-PC,
Notebook) per riprodurre tramite il SA-130DMP
i file audio memorizzati su questi dispositivi.
Creazione di una connessione Bluetooth:
1)
Con il tasto MODE (21) scegliere il modo
“Bluetooth“ (indicazione Bluetooth sul
display): Il display, dopo Initializ-
ing... passa a Discon nected! per
segnalare che non esiste nessuna connessione Bluetooth.
2)
Sulla sorgente Bluetooth attivare la funzione
Bluetooth.
3)
Il ricevitore Bluetooth viene indicato con
“Bluetooth” sul display della sorgente Bluetooth. Accoppiare la sorgente Bluetooth con
il ricevitore Bluetooth (vedi eventualmente
le istruzioni della sorgente Bluetooth).
4) Quando esiste la connessione Bluetooth, il
display indica Connected!.
5)
Eseguire i comandi (riproduzione, pausa,
scelta dei titoli) direttamente sulla sorgente
Bluetooth, oppure per riproduzione / pausa
usare il tasto
II (22) e per scelta dei titoli i
tasti I e
I (24) del telecomando.
6.1.6 Modo di funzionamento “Radio”
Con il tasto MODE (21) scegliere il modo
“Radio“, il display indica:
– la frequenza FM impostata in MHz
–
FM: 01
… il numero della stazione, con il
quale la frequenza FM è stata
memorizzata tramite la ricerca
stazioni (vedi in merito le note
alla fine di questo capitolo)
– il volume globale impostato (VOL)
(vedi capitolo 6.1.3)
Per memorizzare le stazioni premere il tasto
II
(22): si avvia la ricerca stazioni. Le frequenze
trovate vengono memorizzate automaticamente con i numeri di stazioni. Al termine
della ricerca è scelta la frequenza della stazione
numero 1.
Per interrompere la ricerca stazioni, pre-
mere nuovamente il tasto
II.
passare all'altro mezzo si può usare anche il
tasto MODE (21) (vedi capitolo 6.1.2).
Il display indica:
– U per un mezzo USB,
S per una scheda di memoria
davanti alla lettera: il simbolo per Riprodu-
zione, Pausa o Stop
– il tempo già riprodotto del titolo
– il modo di riproduzione ( ALL, FOLDER,
SINGLE o RANDOM): vedi in basso
– il numero del titolo e il nome del file
Per passare a Pausa, premere il tasto
II (22),
per arrestare la riproduzione e per ritornare
all'inizio del titolo, premere il tasto (23)
sull'apparecchio o STOP (23) sul telecomando.
Per continuare la riproduzione, premere il
tasto
II.
Per la scelta dei titoli usare i tasti I e
I
(24) oppure digitare il numero del titolo con i
tasti numerici (29).
N. B.: Nel modo di riproduzione
RANDOM
, non sono
possibili il salto indietro al titolo precedente e la scelta
dei titoli tramite i tasti numerici. Nel modo di riproduzione
FOLDER
, si possono scegliere solo i titoli
della cartella attuale.
Per la scelta di una cartella, usare i tasti F− e
F+ (25). Per scegliere il titolo con il tasto I o
I (24) dopo aver scelto la cartella, aspettare
finché il nome della cartella non è più visualizzato sul display. Altrimenti, l'azionamento
del tasto
I
/
I
porta al salto alla cartella
precedente /successiva.
Per l'avanzamento e ritorno veloce (possibile solo durante la riproduzione) tener premuto il tasto I o
I (24) sul telecomando.
L'avanzamento supera più titoli, mentre il
ritorno va solo fino all'inizio del titolo.
Con il tasto EQ (20) scegliere l'impostazione
dell'equalizzatore (possibile solo durante la
riproduzione). Si può passare fra:
NORMAL
,
ROCK, POP, CLASSIC, JAZZ, COUNTRY.
N. B.: Alla prossima accensione o al cambio nel modo
“Player“, l'impostazione dell'equalizer viene resettata
su NORMAL.
Con il tasto (19) sull'apparecchio oppure
con (19) sul telecomando scegliere il modo
di riproduzione (possibile solo durante la riproduzione). Si può cambiare fra:
ALL = tutti i titoli sono riprodotti uno
dopo l'altro e senza fine
FOLDER = i titoli della cartella attuali sono
riprodotti uno dopo l'altro e senza
fine
SINGLE = il titolo attuale viene riprodotto
senza fine
RANDOM
= tutti i titoli sono riprodotti senza
fine in ordine casuale
N. B.: Alla prossima accensione o al cambio nel modo
“Player“, il modo di riproduzione viene resettato su
ALL. Lo stesso succede se per la scelta della cartella
si preme il tasto F− o F+ (25).
La MONACOR ® INTERNATIONAL GmbH & Co. KG si riserva ogni diritto di elaborazione in qualsiasi forma
delle presenti istruzioni per l’uso. La riproduzione – anche parziale – per propri scopi commerciali è vietata.
21 22 23
1715 16 18 19 20
24
25
➂
7
8
9
4
5 6
21 3
0
MODE
STOP
EQ
26 23 27
19
21 20
22
29
24
28
Page 16

16
Nederlands
1 2 3 4 5 6 7 8 9
➀
10 13 1411 12
➁
3 Toepassingen
De stereoversterker SA-130DMP kan universeel
worden gebruikt, bv. in cafés, evenementenruimten, kantoren. Hij is uitgerust met aansluitmogelijkheden voor een microfoon en
twee geluidsbronnen met lijnsignaalniveau
(bv. mengpaneel, cd / mp3-player). Daarnaast
zijn ook een mp3-player met USB-poort en een
geheugenkaartslot, een Bluetooth-ontvanger
en een FM-radio ingebouwd.
4 Opstelling
De versterker is voorzien voor montage in een
19”-rack (482 mm), maar kan ook als tafelmodel gebruikt worden. In elk geval moet er
lucht door alle ventilatieopeningen kunnen
stromen, om voldoende ventilatie van de versterker te verzekeren.
4.1 De montage in een rack
In het rack is voor de versterker een hoogte
van 1 HE nodig (rack-eenheid = 44,45 mm).
De frontplaat alleen is niet voldoende voor een
veilige bevestiging. Het apparaat moet links
en rechts ook door rails of onderaan door een
bodemplaat ondersteund worden.
De lucht die door de versterker wordt afgegeven, moet uit het rack kunnen worden
afgevoerd. Anders hoopt de warmte zich op
in het rack, waardoor niet enkel de versterker
maar ook andere apparaten in het rack kunnen worden beschadigd. Bij een onvoldoende
warmteafvoer moet u in het rack een ventilator
plaatsen.
5 Aansluiting
Schakel alle betrokken apparaten uit, voordat
u de verbindingen tot stand brengt / loskoppelt.
1)
Gebruik voor het aansluiten van een microfoon de bus MIC (2): sluit de microfoon
met een 6,3 mm-stekker of een XLR-stekker
aan.
2)
Voor het aansluiten van stereogeluids-
bronnen met lijnsignaalniveau
(bv.
cd / mp3-player, cassettedeck, radio, mengpaneel, pc) zijn twee ingangen beschikbaar:
– de 3,5 mm-stekkerbus AUX (3);
bij aansluiting van deze bus wordt de
combinatie “mp3-player/ FM-radio / Bluetooth-ontvanger” gedempt.
– de cinch-bussen LINE IN (10);
L (wit) = links, R (rood) = rechts
2 Veiligheidsvoorschriften
Het apparaat is in overeenstemming met alle
relevante EU-Richtlijnen en is daarom gekenmerkt met de -markering.
WAARSCHUWING
De netspanning van het
apparaat is levensgevaarlijk. Open het daarom niet
en zorg dat u niets in de
ventilatieopeningen steekt.
U loopt het risico van een
elektrische schok.
•
Het apparaat is enkel geschikt voor gebruik
binnenshuis. Vermijd druip- en spatwater
en plaatsen met een hoge vochtigheid. Het
toegestane omgevingstemperatuurbereik
bedraagt 0 – 40 °C.
•
Plaats geen bekers met vloeistof zoals drinkglazen etc. op het apparaat.
•
De warmte die in het apparaat ontstaat,
moet door ventilatie afgevoerd worden.
Dek daarom de ventilatieopeningen niet af.
•
Trek onmiddellijk de netstekker uit het stopcontact,
1.
wanneer het apparaat of het netsnoer
zichtbaar beschadigd is,
2.
wanneer er een defect zou kunnen optreden nadat het apparaat bijvoorbeeld
gevallen is,
3.
wanneer het apparaat slecht functioneert.
Het apparaat moet in elk geval hersteld worden door een gekwalificeerd vakman.
•
Trek de stekker nooit met het snoer uit het
stopcontact, maar met de stekker zelf.
•
Verwijder het stof met een droge, zachte
doek. Gebruik zeker geen water of chemicaliën.
•
In geval van ongeoorloofd of verkeerd gebruik, verkeerde aansluiting, foutieve bediening of van herstelling door een niet-gekwalificeerd persoon vervalt de garantie en de
aansprakelijkheid voor hieruit resulterende
materiële of lichamelijke schade.
Wanneer het apparaat definitief uit
bedrijf wordt genomen, bezorg het
dan voor milieuvriendelijke verwerking aan een plaatselijk recyclagebedrijf.
Stereomengversterker
Deze handleiding is bedoeld voor gebruikers
zonder bijzondere vakkennis. Lees de handleiding grondig door, alvorens het apparaat in
gebruik te nemen, en bewaar ze voor latere
raadpleging.
1 Overzicht
1 POWER-schakelaar
2
Mono-ingang voor de aansluiting van
een microfoon via een XLR-stekker of een
6,3 mm-stekker
3
Stereo-ingang (3,5 mm-stekkerbus) voor
aansluiting van een geluidsbron met lijnsignaalniveau, bv. cd / mp3-player
Opmerking: Bij het aansluiten van de bus wordt
de combinatie “mp3-player/ FM-radio / Bluetooth-ontvanger” (4) gedempt.
4
Combinatie “mp3-player/ FM-radio / Bluetooth-ontvanger”: ☞ Hoofdstuk 6.1
5
Volumeregelaar MIC LEVEL voor de ingang
MIC (2)
6
Volumeregelaar voor de ingang AUX (3)
of, als deze niet wordt gebruikt, voor de
combinatie “mp3-player/ FM-radio / Bluetooth-ontvanger" (4)
7
Volumeregelaar voor de ingang LINE IN (10)
8 Totaalvolumregelaar
9
Equalizer TREBLE (hoge tonen) en BASS
(lage tonen)
10
Stereo-ingang (cinch-aansluitingen, LinksL /
Rechts R) voor de aansluiting van een
geluidsbron met lijnsignaalniveau, bv.
cd / mp3-player, mengpaneel, cassettedeck
11 Stereo-uitgang PRE OUT en stereo-ingang
AMP IN (cinch-aansluitingen, Links L /
Rechts R) voor de aansluiting van een apparaat om de klank te bewerken ☞ Hoofdstuk 5, punt 3
Opmerking: Als PRE OUT en AMP IN niet voor
het aansluiten van een apparaat worden gebruikt, moeten ze zoals in afb.2, via de twee
jumpers met elkaar verbonden zijn. Anders
wordt de signaalstroom onderbroken.
12
Luidsprekeraansluitingen (schroefklemmen
met 4 mm-banaanbussen)
13
POWER-jack voor de aansluiting op een
stopcontact (230 V/ 50 Hz) met behulp van
het bijgeleverde netsnoer
Daaronder bevindt zich de zekeringhouder;
vervang een gesmolten zekering uitsluitend
door een zekering van hetzelfde type!
14 Aansluiting voor een FM-antenne
Page 17

17
Nederlands
6.1.1 Stand-by
Om de combinatie “mp3-player/ FM-radio /
Bluetooth-ontvanger” in stand-by (gereed)
te schakelen en om ze opnieuw in te schakelen, gebruikt u toets (26) op de afstandsbediening of houdt u de toets MODE (21) op
het apparaat langer ingedrukt. Na het inschakelen wordt de modus “player” actieve.
6.1.2 De bedrijfsmodus selecteren
Met de toets MODE (21) kunt u omschakelen
tussen de bedrijfsmodi:
“Player”“Bluetooth”“Radio”
Als in de modus “Player" twee opslagmedia
zijn aangesloten, wordt bij het drukken op de
knop eerst naar het andere opslagmedium
geschakeld, bij de volgende drukken naar de
modus “Bluetooth”.
6.1.3 Basisvolume instellen /
dempen(Mute)
Gebruik voor het instellen van het basisvolume
(instelbereik 00 tot 31) de toetsen en
(28) op de afstandsbediening of houd op het
apparaat de toets
I
of
I (24) ingedrukt.
Om het geluid uit te schakelen, drukt u op
de toets (27), op het display verschijnt
MUTE
.
Om het geluid opnieuw in te schakelen, drukt
u opnieuw op de toets.
Opmerking: Als de Mute-functie geactiveerd is,
wordt ze bij de volgende keer inschakelen of wisselen van de bedrijfsmodus opnieuw gedeactiveerd.
6.1.4 De bedrijfsmodus “Player”
Via de player kunt u mp3-bestanden van
SD / SDHC-geheugenkaarten en USB-geheugenmedia (USB-stick of USB-harddisks met
eigen voeding) afspelen. Ook het afspelen van
wma- en wav-bestanden is mogelijk.
– Sluit een USB-opslagmedium aan op de USB-
poort (17).
– Steek een geheugenkaart (FAT16 / FAT32,
tot 32 GB) zo ver in de kaartslot (18) tot ze
vergrendelt. Daarbij moet de afgeschuinde
hoek van de kaart naar rechts en naar het
apparaat zijn gericht. Om de kaart opnieuw
te verwijderen, drukt u ze iets in, zodat ze
ontgrendelt.
Opmerking: Door de verscheidenheid aan opslaggeheugenfabrikanten en besturingsprogramma's
kan niet gegarandeerd worden, dat alle opslagmedia
compatibel zijn met de player.
Het opslagmedium selecteren:
Van zodra een opslagmedium aangesloten
wordt, is het geselecteerd en start het afspelen
ervan (ook als daarvoor de modus “Bluetooth”
– Regelaar AUX / MP3 LEVEL (6)
voor het apparaat op de ingang AUX (3)
of, wanneer de ingang AUX niet gebruikt
wordt, voor de combinatie “mp3-player/
FM-radio / Bluetooth-ontvanger” (4)
Opmerking: Het basisvolume voor de combinatie “mp3-player/ FM-radio / Bluetooth-ontvanger” kan bovendien worden geregeld: zie hoofdstuk6.1.3.
4)
Stel met de regelaar hoge tonen TREBLE
en met de regelaar lage tonen BASS (9) de
klank in.
6.1 Mp3-player/ FM-radio /
Bluetooth-ontvanger (afb. 3)
De combinatie “mp3-player/ FM-radio / Bluetooth-ontvanger” schakelt bij ingebruikname
van de SA-130DMP automatisch en bevindt
zich in de modus “player”. Op het display (16)
verschijnt NO SOURCE, als er geen opslagme-
dium aangesloten is. Als er een opslagmedium
aangesloten is, begint dit na het inlezen af te
spelen. Bij aansluiting van twee geheugen-media is na het inschakelen van de SA-130DMP
steeds het USB-medium geselecteerd.
De bijbehorende infraroodafstandsbedie-
ning wordt met batterij geleverd. Voor de eerste inbedrijfstelling trekt u de beschermfolie uit
de batterijhouder. Richt de afstandsbediening
bij drukken op een toets steeds naar de infraroodsensor (15). Zorg dat er tussen de afstandsbediening en de sensor geen obstakels zijn.
Als de afstandsbediening langere tijd niet
wordt gebruikt, neemt u de batterij er veiligheidshalve uit, zodat de afstandsbediening niet
wordt beschadigd bij eventueel uitlopen van
de batterij.
De batterij vervangen:
1) Druk de vergrendeling van de batterijhou-
der naar rechts (1e pijl in fig. 4), en trek
tegelijkertijd de houder eruit (2e pijl).
2)
Verwijder de oude batterij en plaats de
nieuwe batterij (3V-knoopcel, type CR 2025)
met de positieve pool naar boven in de
houder.
3)
Schuif de houder terug in de afstandsbediening.
1. 2.
➃
Lege batterijen horen niet in het huisvuil. Verwijder ze voor een milieuvriendelijke verwerking uitsluitend als KGA
(bv. de inzamelbox in de detailhandel).
3)
Via de stereo-aansluitingen PRE OUT en
AMP IN (11) kunt u een toestel om klank
te bewerken (bv. equalizer, effectenapparaat) aansluiten: Het signaal wordt na de regelaar VOLUME (8), via PRE OUT uitgevoerd,
door het apparaat voor klankbewerking geleid en via AMP IN naar de eindtrap van de
SA-130DMP gestuurd.
a)
Verwijder de beide jumpers (telkens voor
het linker- en het rechterkanaal), waarmee de aansluitingen PRE OUT en AMP
IN verbonden zijn.
b)
Sluit de ingang van het aan te sluiten
apparaat aan op de uitgang PRE OUT.
c)
Sluit de uitgang van het aan te sluiten
apparaat aan op de ingang AMP IN.
4)
Verbind twee luidsprekers (minimale impedantie 4 Ω) met de aansluitingen SPEAKER
OUT (12): Sluit een luidspreker aan op het
rechterkanaal RIGHT, de andere luidspreker
op het linkerkanaal LEFT. Let daarbij op de
polariteit (sluit gemarkeerde aders van de
respectieve luidsprekerleiding aan op “+”).
De aansluiting kan via de schroefklemmen
of de banaanbussen van de terminal gebeuren.
Opmerking: Als u meer dan twee luidsprekers
wilt aansluiten, zorg er dan voor dat de totale
luidsprekerimpedantie per kanaal niet lager ligt
dan 4 Ω, anders kan de versterker beschadigd geraken. Bij vragen over de aansluiting kunt u contact opnemen met een gekwalificeerd vakman.
5)
Als de ingebouwde FM-radio wordt gebruikt, sluit u een FM-antenne aan op de
bus FM ANTENNA (14).
6)
Als stroomvoorziening sluit u eerst het bijgeleverde netsnoer aan op de POWER-jack
(13) en plugt u vervolgens de netstekker van
het snoer in een stopcontact (230 V / 50 Hz).
6 Bediening
OPGELET Stel het volume nooit erg hoog
in. Langdurige blootstelling aan
hoge volumes kan het gehoor
beschadigen!
Het gehoor raakt aangepast aan hoge volumes die na een tijdje niet meer zo hoog lijken.
Verhoog daarom het volume niet nog meer,
nadat u er gewoon aan bent geraakt.
Om schakelploppen te vermijden, schakelt u
de versterkers steeds pas na de aangesloten
apparaten in en schakelt u hem na gebruik
voor alle andere apparaten uit.
1) Draai de regelaar VOLUME (8) voor het totale volume volledig naar links, alvorens het
apparaat de eerste keer in te schakelen.
2) Schakel de versterker in met de schakelaar
POWER (1).
3)
Draai de regelaar VOLUME (8) open volgens
het gewenste totale geluidsvolume en stel
voor elke geluidsbron die gehoord moet
worden, het volume met de respectieve
regelaar individueel in:
– Regelaar MIC LEVEL (5)
voor de microfoon op de ingang MIC (2)
– Regelaar LINE LEVEL (7)
voor het apparaat op de ingang LINE IN
(10)
21 22 23
1715 16 18 19 20
24
25
➂
7
8
9
4
5 6
21 3
0
MODE
STOP
EQ
26 23 27
19
21 20
22
29
24
28
Page 18

18
Nederlands
Selecteer om een opgeslagen zender op
te roepen, het zendernummer ervan met de
toets I of
I (24) of voer het in met de
cijfertoetsen (29).
Gebruik om een zender handmatig in te
stellen (in stappen van 0,1 MHz) de toetsen
F− en F+ (25).
Aanwijzingen over de weergave van het zendernummer:
Op het display verschijnt na een handmatige instelling van de frequentie de melding
FM:00,
– als de ingestelde frequentie onder geen zender-
nummer is opgeslagen
– als de ingestelde frequentie weliswaar reeds via
de zoekopdracht onder een zendernummer werd
opgeslagen, maar slecht wordt ontvangen
Bij de volgende omschakeling naar de modus
“Radio” geeft het display echter niet FM:00, maar
het zendernummer, waarvan de frequentie dichtbij
de ingestelde frequentie ligt, of, als er geen frequentie werd gevonden, het zendernummer1.
7 Technische gegevens
Uitgangsvermogen RMS
op 4 Ω: � � � � � � � � � � � � � � � � � 2 × 70 W
Frequentiebereik:
� � � � � � � � � � 20 – 20 000 Hz
Signaal/Ruis-verhouding: � � � � 90 dB
THD: � � � � � � � � � � � � � � � � � � � 0,1 %
Ingangen (aansluiting,
gevoeligheid / impedantie)
MIC, mono, symmetrisch: � � gecombineerde bus
XLR / 6,3 mm-stekker,
1,3 mV/500
Ω
AUX, stereo: � � � � � � � � � � � � 3,5 mm-stekkerbus,
190 mV/10 k
Ω
LINE IN, stereo: � � � � � � � � � � Cinch-bussen
480 mV/20 k
Ω
AMP IN, stereo: � � � � � � � � � Cinch-bussen
580 mV/22 k
Ω
Equalizer
Lage tonen: � � � � � � � � � � � � ±12 dB/ 100 Hz
Hoge tonen: � � � � � � � � � � � � ±10 dB/ 10 kHz
Voedingsspanning: � � � � � � � � 230 V/ 50 Hz
Vermogensopname: � � � � � � � � 350 VA
Omgevingstemperatuurbereik:
0 – 40 °C
Afmetingen (B × H × D): � � � � 482 × 44 × 245 mm,
1 HE
Gewicht: � � � � � � � � � � � � � � � � 4,9 kg
Wijzigingen voorbehouden.
6.1.5 Bedrijfsmodus “Bluetooth”
Met de Bluetooth-ontvanger kan een radioverbinding met een Bluetooth-signaalbron (bv.
smartphone, tablet-pc, notebook) tot stand gebracht worden, om de daarop opgeslagen audiobestanden via de SA-130DMP af te spelen.
Een Bluetooth-verbinding opbouwen:
1) Selecteer met de toets MODE (21) de bedrijfsmodus “Bluetooth” (
Bluetooth
op
display): Het display wisselt naar Initi-
alizing... naar Discon nected!,
om aan te geven dat er geen Bluetoothverbinding tot stand is gebracht.
2)
Schakel op de Bluetooth-bron de Bluetooth-functie in.
3) De Bluetooth-ontvanger wordt op het display van de Bluetooth-bron aangeduid met
“Bluetooth”. Koppel de Bluetooth-bron met
de Bluetooth-ontvanger (raadpleeg hiervoor
evt. de handleiding van de Bluetooth-bron).
4)
Zodra de Bluetooth-verbinding tot stand
is gebracht, verschijnt
Connected!
op
het display.
5) Voer de bediening (afspelen, pauze, trackselectie) ofwel direct op de Bluetooth-bron
door of gebruik voor afspelen /pauze de
toets
II
(22) en voor het selecteren van
de track de toetsen I en
I (24) van de
afstandsbediening.
6.1.6 Bedrijfsmodus “Radio”
Selecteer met de toets MODE (21) de bedrijfsmodus “Radio”, op het display verschijnt:
– de ingestelde FM-frequentie in MHz
– FM: 01 … het zendernummer waaronder
de FM-frequentie via de zoekfunctie werd opgeslagen (zie
hiervoor ook de opmerking op
het einde van dit hoofdstuk)
– het ingestelde basisvolume (VOL)
(zie hoofdstuk 6.1.3)
Druk om zenders op te slaan op de toets
II
(22): Er wordt een zenderzoekfunctie gestart.
De gevonden zendfrequenties worden automatisch onder zendernummers opgeslagen. Als de
zoekfunctie beëindigd is, is de frequentie van
het stationsnummer 1 geselecteerd.
Om een zoekfunctie voortijdig af te bre-
ken, drukt u opnieuw op de toets
II.
of “Radio” geactiveerd was). Als in de modus
“Player” met twee aangesloten media het geselecteerde medium verwijderd wordt, wisselt
de speler naar het andere medium. Om naar
het andere medium te schakelen, kunt u ook de
toets MODE (21) gebruiken (zie hoofdstuk 6.1.2).
Op het display verschijnt:
– U voor USB-medium,
S voor geheugenkaart
voor de letter: het symbool voor afspelen,
pauze of stop
– de reeds verstreken speeltijd van de track
– de afspeelmodus ( ALL, FOLDER, SINGLE
of RANDOM): zie hieronder
– het tracknummer en de bestandsnaam
Om naar pauze te schakelen drukt u op toets
II
(22), om het afspelen te stoppen en terug
te keren naar het begin van de track drukt u
op toets
(23) van het apparaat of op STOP
(23) op de afstandsbediening. Druk om het
afspelen voort te zetten op toets
II.
Gebruik om de track te selecteren de toetsen
I
en
I (24) of voer het tracknummer in via
de cijfertoetsen (29).
Opmerking: In de afspeelmodus
RANDOM
kunt u
niet terugkeren naar de vorige track noch de track
via de cijfertoetsen selecteren. In de afspeelmodus
FOLDER
kunt u alleen de tracks van de huidige map
selecteren.
Gebruik om de map te selecteren de toetsen
F− en F+ (25). Om na het selecteren van een
map de gewenste track met de toets I of
I
(24) te selecteren, wacht u tot de naam
van de map niet meer op het display wordt
getoond. Anders zorgt drukken op de toets
I
/
I ervoor dat u naar de vorige / volgende
map springt.
Om snel vooruit en achteruit te zoeken (alleen tijdens het afspelen mogelijk) houdt u de
toets
I
of
I (24) op de afstandsbediening
ingedrukt. Het vooruit zoeken gaat ook over
meerdere tracks, het achteruit zoeken slechts
tot aan het begin van de track.
Selecteer met de toets EQ (20) de gewenste
equalizerinstelling (alleen tijdens het afspelen mogelijk). U kunt omschakelen tussen:
NORMAL, ROCK, POP, CLASSIC, JAZZ,
COUNTRY.
Opmerking: Bij de volgende keer inschakelen of
omschakelen naar de modus “Player” wordt de
equalizerinstelling terug op NORMAL ingesteld.
Selecteer met de toets (19) op het apparaat
of (19) op de afstandsbediening de afspeel-
modus (alleen mogelijk tijdens het afspelen).
U kunt omschakelen tussen:
ALL = alle tracks worden eindeloos na
elkaar afgespeeld
FOLDER = de tracks van de huidige map wor-
den eindeloos na elkaar afgespeeld
SINGLE = de huidige track wordt eindeloos
afgespeeld
RANDOM = alle tracks worden eindeloos in
willekeurige volgorde afgespeeld
Opmerking: Bij de volgende keer inschakelen of
omschakelen naar de modus “Player” wordt de afspeelmodus terug op ALL ingesteld. Idem, als voor
het selecteren van de map op de toets F− of F+ (25)
wordt gedrukt.
21 22 23
1715 16 18 19 20
24
25
➂
7
8
9
4
5 6
21 3
0
MODE
STOP
EQ
26 23 27
19
21 20
22
29
24
28
Deze gebruiksaanwijzing is door de auteurswet be schermd eigendom van MONACOR ® INTERNATIONAL
GmbH & Co. KG. Een reproductie – ook gedeeltelijk – voor eigen commerciële doeleinden is verboden.
Page 19

19
Español
1 2 3 4 5 6 7 8 9
➀
10 13 1411 12
➁
mezclador, lector CD/MP3) y también contiene
un lector MP3 con puerto USB y ranura para
tarjetas de memoria, un receptor Bluetooth y
una radio FM.
4 Colocación del Amplificador
El amplificador está diseñado para instalarse
en un rack (482 mm /19”), pero también puede
colocarse en una mesa. Para que el amplificador se refrigere lo suficiente, el aire ha de
poder circular libremente a través de las rejillas
de ventilación.
4.1 Instalación en un rack
Para la instalación en el rack, el amplificador
necesita 1 U (1 unidad de rack = 44,45 mm).
La tapa frontal por sí sola no es suficiente para
fijarlo con seguridad; utilice también raíles laterales o una placa inferior para asegurar el
aparato.
El aire caliente expulsado por el amplificador debe disiparse del rack; de lo contrario, se
podría acumular el calor en el rack y dañar no
sólo el amplificador sino también los demás
aparatos del rack. Si la disipación del calor no
es suficiente, instale un aparato de ventilación
en el rack.
5 Conexión
Antes de la conexión /desconexión, apague
todos los aparatos.
1)
Para conectar un micrófono, utiliza la toma
MIC (2): conecte el micrófono mediante un
conector jack 6,3 mm o XLR.
2)
Hay dos entradas disponibles para conectar
fuentes de audio estéreo con nivel de
señal de línea
(p. ej. lector CD / MP3, ple-
tina, radio, mezclador, PC):
– Jack 3,5 mm AUX (3);
Cuando se conecte esta toma, se silenciará la combinación “lector MP3 / radio
FM /receptor Bluetooth”.
– Tomas RCA LINE IN (10);
L (blanco) = izquierda, R (rojo) = derecha
3) Las conexiones estéreo PRE OUT y AMP IN
(11) se pueden utilizar para insertar un apa-
rato de procesamiento de audio (p. ej.
ecualizador, aparato de efectos): La señal,
después del control VOLUMEN (8), se direccionará hacia el aparato de procesamiento
de audio a través de la salida PRE OUT y
volverá al amplificador de potencia del
SA-130DMP a través de la entrada AMP IN.
a)
Extraiga los dos jumpers (uno para el
canal izquierdo y otro para el derecho)
2 Notas de Seguridad
El aparato cumple con todas las directivas
relevantes de la UE y por lo tanto está marcado
con el símbolo .
ADVERTENCIA
El aparato utiliza un voltaje
peligroso. Deje el mantenimiento para el personal cualificado y no inserte nunca nada
en las rejillas de ventilación; el
manejo inexperto puede producir una descarga eléctrica.
•
El aparato está adecuado sólo para utilizarlo
en interiores. Protéjalo contra goteos, salpicaduras y humedad elevada. Rango de
temperatura ambiente admisible: 0 – 40 ºC.
•
No coloque ningún recipiente con líquido
encima del aparato, p.ej. un vaso.
•
El calor generado dentro del aparato tiene
que disiparse mediante la circulación del aire;
no tape nunca las rejillas de ventilación.
•
Desconecte inmediatamente el conector de
corriente de la toma si:
1.
El aparato o el cable de corriente están
visiblemente dañados.
2. El aparato ha sufrido daños después de
una caída o accidente similar.
3. No funciona correctamente.
Sólo el personal cualificado puede reparar el
aparato bajo cualquier circunstancia.
•
No tire nunca del cable de corriente para
desconectarlo de la toma, tire siempre del
conector.
•
Utilice sólo un paño suave y seco para la
limpieza; no utilice nunca ni agua ni productos químicos.
•
No podrá reclamarse garantía o responsabilidad alguna por cualquier daño personal o
material resultante si el aparato se utiliza para
otros fines diferentes a los originalmente
concebidos, si no se conecta o se utiliza
adecuadamente o no se repara por expertos.
Si va a poner el aparato definitivamente fuera de servicio, llévelo a la
planta de reciclaje más cercana para
que su eliminación no sea perjudicial
para el medioambiente.
3 Aplicaciones
El amplificador estéreo SA-130DMP está adecuado para un amplio rango de aplicaciones,
p. ej. en bares, salas de actos y oficinas. Ofrece
conexiones para un micrófono y dos fuentes
de audio con nivel de señal de línea (p. ej.
Amplificador Mezclador
paraMegafonía
Estas instrucciones van dirigidas a usuarios
sin ningún conocimiento técnico específico.
Lea atentamente estas instrucciones antes de
utilizar el aparato y guárdelas para usos posteriores.
1 Vista General
1 Interruptor POWER
2
Entrada mono para conectar un micrófono
mediante un conector XLR o jack 6,3 mm
3 Entrada estéreo (jack 3,5 mm) para conec-
tar una fuente de audio con nivel de señal
de línea, p. ej. lector CD / MP3
Nota: Cuando se conecte esta toma, se silenciará la combinación “lector MP3 / radio FM /
receptor Bluetooth” (4).
4
Combinación “lector MP3 / radio FM / receptor Bluetooth”: ☞ apartado 6.1
5
Control de volumen para la entrada MIC (2)
6 Control de volumen para la entrada AUX
(3) o, cuando no se utiliza la entrada AUX,
para la combinación “lector MP3 / radio FM /
receptor Bluetooth” (4)
7 Control de volumen para la entrada LINE
IN (10)
8 Control de volumen total
9
Controles de tono TREBLE (frecuencias
agudas) y BASS (frecuencias graves)
10
Entrada estéreo (tomas RCA, L = izquierda /
R= derecha) para conectar una fuente de
audio con nivel de señal de línea (p. ej. lector CD / MP3, mezclador, pletina)
11
Salida estéreo PRE OUT y entrada estéreo AMP IN (tomas RCA, L = izquierda /
R=derecha) para insertar un aparato para
procesar audio, ☞ apartado 5, objeto 3
Nota: Cuando PRE OUT y AMP IN no se utilicen
para conectar un aparato, asegúrese de que
están interconectados mediante los dos jumpers
de la fig. 2. De lo contrario, se interrumpirá el
flujo de señal.
12 Terminales de altavoz (terminales de rosca
con tomas banana de 4 mm)
13 Toma de corriente para la conexión a un
enchufe (230 V/ 50 Hz) mediante el cable
de corriente entregado
El soporte del fusible está debajo de esta
toma; cambie siempre un fusible fundido
por otro del mismo tipo.
14 Conexión para una antena FM
Page 20

20
Español
6.1.1 Standby
Para ajustar la combinación “lector MP3 / radio
FM / receptor Bluetooth” en el modo standby
y para activarla de nuevo, utilice el botón
(26) del control remoto o mantenga pulsado
el botón MODE (21) del aparato durante más
de 1 segundo. Después de la desconexión, se
activará el modo “Player”.
6.1.2 Selección del
mododefuncionamiento
Utilice el botón MODE (21) para conmutar
entre los modos de funcionamiento:
“Player”“Bluetooth”“Radio”
Cuando se conecten dos medios de almacenamiento en el modo “Player”: La primera pulsación del botón MODE pasará al medio de
almacenamiento no seleccionado; la siguiente
pulsación pasará al modo “Bluetooth”.
6.1.3 Ajustes el volumen básico /Silencio
Para ajustar el volumen básico (rango de ajuste:
00 a 31), utilice los botones y (28) del
control remoto o mantenga pulsado el botón
I
o
I (24) del aparato.
Para silenciar el sonido, pulse el botón
(27); aparecerá MUTE en el visualizador. Para
eliminar el silenciamiento, pulse de nuevo el
botón.
Nota: Cuando se active la función silencio, se desactivará después de la siguiente conexión o cuando
cambie el modo de funcionamiento.
6.1.4 Modo de funcionamiento “Player”
El lector se puede utilizar para reproducir archivos MP3 desde tarjetas de memoria SD / SDHC y
medios de almacenamiento USB (unidad flash
USB o disco duro USB con alimentación separada). También se soporta la reproducción de
archivos WMA y WAV.
– Conecte un medio de almacenamiento al
puerto USB (17).
– Inserte una tarjeta de memoria (FAT16 / FAT32,
32 GB máx.) con la esquina biselada mirando
hacia la derecha y hacia el aparato en la
ranura (18) hasta que encaje. Para extraer
la tarjeta, presione la tarjeta hacia la ranura
hasta que se libere.
Nota: Debido a la gran cantidad de fabricantes de
medios de almacenamiento y de drivers, no podemos
garantizar que todos los medios de almacenamiento
sean compatibles con el lector.
Seleccionar el medio de almacenamiento:
Cuando se conecte un medio de almacenamiento, se seleccionará y se reproducirá (incluso cuando se haya seleccionado el modo
– Control AUX / MP3 LEVEL (6)
Para el aparato conectado a la entrada
AUX (3) o, cuando no se utiliza la entrada
AUX, para la combinación “lector MP3 /
radio FM / receptor Bluetooth” (4)
Nota: El volumen básico de la combinación “lector MP3 / radio FM / receptor Bluetooth” se puede
ajustar adicionalmente: Ver apartado 6.1.3.
4) Utilice los controles TREBLE y BASS (9) para
ajustar el tono.
6.1 Lector MP3/radio FM/
receptorBluetooth (fig. 3)
Cuando se conecte el SA-130DMP, la combinación “lector MP3/radio FM / receptor Bluetooth”
se activará automáticamente y pasará al modo
“Player”. Cuando no se conecte ningún medio
de almacenamiento, aparecerá NO
SOURCE
en el visualizador (16). Cuando se conecte
un medio de almacenamiento, se leerá y se
reproducirá. Cuando se conecten dos medios
de almacenamiento, se seleccionará el medio
USB después de conectar el SA-130DMP.
El control remoto IR entregado con el amplifi-
cador incluye la batería necesaria. Extraiga la lámina protectora del soporte de la batería antes
del primer funcionamiento. Cuando pulse un
botón, dirija siempre el control remoto hacia
el sensor IR (15). Asegúrese de que no hay
obstáculos entre el control remoto y el sensor.
Si el control remoto no se va a utilizar
durante un largo periodo de tiempo, quite la
batería como precaución para que el control
remoto no se dañe si se derrama la batería.
Cambiar la batería:
1) Presione el cierre del soporte de la batería
hacia la derecha (primera flecha de la fig.4)
y extraiga el soporte (segunda flecha).
2)
Extraiga la batería descargada y coloque
la batería nueva (pila botón de 3 V, tipo
CR 2025) en el soporte, con el polo positivo
mirando hacia arriba.
3) Coloque el soporte de nuevo en el control
remoto.
1. 2.
➃
No deposite nunca las baterías gastadas en el contenedor normal. Para
proteger el medioambiente, llévelas
siempre a un contenedor especializado (p. ej. el contenedor selectivo
de su tienda).
que interconectan la salida PRE OUT y la
entrada AMP IN.
b) Conecte la entrada del aparato que hay
que insertar a la salida PRE OUT.
c)
Conecte la salida del aparato que hay
que insertar a la entrada AMP IN.
4)
Conecte dos altavoces (impedancia
mínima: 4 Ω) a los terminales SPEAKER OUT
(12): Conecte un altavoz al canal RIGHT y
el otro al canal LEFT. Preste atención a la
polaridad (conecte el polo marcado del
cable de altavoz a “+”). Utilice los terminales de rosca o las tomas banana para realizar
las conexiones.
Nota: Cuando se conecten más de dos altavoces,
asegúrese de que la impedancia total de los altavoces por canal es de 4 Ω como mínimo; de lo
contrario, podría dañar el amplificador. Contacte
con un técnico si tiene cualquier duda.
5)
Cuando se utilice la radio FM integrada,
conecte una antena FM a la toma FM
ANTENNA (14).
6)
Para la alimentación, conecte primero
el cable de corriente entregado a la toma
de corriente (13) y luego a un enchufe
(230 V/ 50 Hz).
6 Funcionamiento
PRECAUCIÓN
No ajuste nunca el amplificador
en un volumen muy elevado.
Los volúmenes altos permanentes pueden dañar su oído.
Su oído se acostumbrará a los volúmenes altos
que no lo parecen tanto después de un rato.
Por lo tanto, no aumente un volumen alto
después de acostumbrarse a él.
Para prevenir el ruido de conexión, conecte
siempre los demás aparatos antes de conectar
el amplificador y desconéctelo antes que el
resto de aparatos.
1) Antes de conectar el amplificador por primera vez, ajuste el control de volumen total
VOLUME (8) en el tope izquierdo.
2)
Utilice el interruptor POWER (1) para conectar el amplificador.
3) Gire el control VOLUME (8) para ajustar el
volumen total deseado; ajuste el volumen
mediante el control apropiado para cada
fuente de audio que se vaya a escuchar:
– Control MIC LEVEL (5)
Para el micrófono conectado a la toma
MIC (2)
– Control LINE LEVEL (7)
Para el aparato conectado a la entrada
LINE IN (10)
1 2 3 4 5 6 7 8 9
➀
10 13 1411 12
➁
Page 21

21
Español
“Bluetooth” o “Radio”). Si se conectan dos
medios en el modo “Player” y se extrae el
medio seleccionado, el lector cambiará automáticamente al medio que todavía está conectado. Para cambiar entre medios, también se
puede utilizar el botón MODE (21) (ver apartado 6.1.2).
En el visualizador se mostrará:
– U para medido USB,
S para tarjeta de memoria
La letra está precedida por el símbolo respec-
tivo para reproducción, pausa o paro
– El tiempo reproducido de la pista
– El modo de reproducción (
ALL, FOLDER
,
SINGLE o RANDOM): Ver a continuación
– El número de la pista y nombre del archivo
Para poner la reproducción en pausa, pulse
el botón
II (22); para parar la reproducción
y para volver al inicio de la pista, pulse el botón
(23) del aparato o STOP (23) en el control
remoto. Para continuar la reproducción,
pulse el botón
II.
Para seleccionar una pista, utilice los botones
I
y
I (24) o bien entre el número de pista
con los botones numéricos (29).
Nota: En el modo de reproducción RANDOM, no se
puede volver a la pista anterior o seleccionar pistas
con los botones numéricos. En el modo de reproducción FOLDER, sólo se pueden seleccionar las pistas
de la carpeta actual.
Para seleccionar una carpeta, utilice los botones F− y F+ (25). Para seleccionar una pista
de la carpeta con el botón I o
I , primero
espere a que desaparezca del visualizador el
nombre de la carpeta; de lo contrario, pasará
a la carpeta anterior/posterior cuando pulse
I
/
I.
Para retroceder y avanzar rápidamente
(funciones disponibles sólo durante la reproducción), mantenga pulsado el botón
I
o
I (24) del control remoto. El avance rápido
avanzará por la pista actual; el retroceso rápido
parará al inicio de la pista actual.
Utilice el botón EQ (20) para seleccionar el
ajuste de ecualizador deseado (función
sólo disponible durante la reproducción). Se
puede cambiar entre: NORMAL, ROCK, POP,
CLASSIC, JAZZ, COUNTRY.
Nota: Después de cada conexión o cambio en el
modo “Player”, el ajuste del ecualizador volverá a
NORMAL.
Para seleccionar el modo de reproducción
(función disponible sólo durante la reproducción), utilice el botón
(19) del aparato o el
botón (19) del control remoto. Se puede
cambiar entre:
ALL = todas pistas se reproducen conti-
nuamente una tras otra
FOLDER
= todas pistas de la carpeta actual
se reproducen continuamente una
tras otra
SINGLE = la pista actual se repite continua-
mente
RANDOM
= todas las pistas se reproducen con
-
tinuamente en orden aleatorio
Nota: Después de cada conexión o cambio en el
modo “Player”, el modo de reproducción volverá
a
ALL
. Este reajuste también se realizará cuando
el botón F− o F+ (25) se pulse para seleccionar una
carpeta.
escaneo de emisoras, se seleccionará la frecuencia de la emisora número 1.
Para cancelar la función de escaneo en cual-
quier momento, pulse de nuevo el botón
II
.
Para activar una emisora guardada, seleccione el número de emisora apropiado con el
botón
I
o
I (24) o bien entre el número
con los botones numéricos (29).
Para ajustar manualmente una emisora (en
pasos de 0,1 MHz), utilice los botones F− y F+
(25).
Notas referentes a la indicación del número de
emisora:
Después del ajuste manual de la frecuencia, el visualizador mostrará FM:00
– Cuando la frecuencia no se haya guardado como
número de emisora
– Cuando la frecuencia ajustada ya se haya guardado
como número de emisora mediante el escaneo de
emisoras y la calidad de recepción sea pobre
La próxima vez que pase al modo “Radio”, el visualizador no mostrará
FM:00; mostrará el número de
memoria cuya frecuencia está cerca de la frecuencia
ajustada, o si no encuentra ningún número de emisora, el número de emisora 1.
7 Especificaciones
Potencia de salida RMS
a 4 Ω: � � � � � � � � � � � � � � � � � 2 × 70 W
Rango de frecuencias:
� � � � � 20 – 20 000 Hz
Relación sonido /ruido: � � � � � 90 dB
THD: � � � � � � � � � � � � � � � � � � 0,1 %
Entradas (conexión,
sensibilidad / impedancia)
MIC, mono, simétrica: � � � � Combinada XLR / jack
6,3 mm, 1,3 mV/ 500
Ω
AUX, estéreo: � � � � � � � � � � Jack 3,5 mm,
190 mV/10 k
Ω
LINE IN, estéreo: � � � � � � � � Tomas RCA,
480 mV/20 k
Ω
AMP IN, estéreo:� � � � � � � � Tomas RCA,
580 mV/22 k
Ω
Control de tono
Frecuencias graves: � � � � � � ±12 dB /100 Hz
Frecuencias agudas: � � � � � ±10 dB /10 kHz
Alimentación: � � � � � � � � � � � 230 V/50 Hz
Consumo:
� � � � � � � � � � � � � � 350 VA
Temperatura ambiente:
� � � � 0 – 40 °C
Dimensiones: (B × H × P): � � � 482 × 44 × 245 mm, 1 U
Peso: � � � � � � � � � � � � � � � � � � 4,9 kg
Sujeto a modificaciones técnicas.
6.1.5 Modo de funcionamiento
“Bluetooth”
El receptor Bluetooth se puede utilizar para
establecer una conexión inalámbrica con una
fuente de señal Bluetooth (p. ej. smartphone,
tablet, portátil) que permita reproducir archivos de audio guardados en la fuente de señal
mediante el SA-130DMP.
Establecer una conexión Bluetooth:
1)
Utilice el botón MODE (21) para seleccionar
el modo de funcionamiento “Bluetooth”
(se muestra
Bluetooth
en el visualiza-
dor): El visualizador mostrará
Initiali-
zing...
y luego
Discon nected!
para indicar que no se ha establecido una
conexión Bluetooth.
2) Conecte la función Bluetooth de la fuente
Bluetooth.
3) En el visualizador de la fuente Bluetooth, el
receptor Bluetooth se indicará como “Bluetooth”. Empareje la fuente Bluetooth con
el receptor Bluetooth (consulte el manual
de instrucciones de la fuente Bluetooth, si
es necesario).
4)
Cuando se haya establecido la conexión
Bluetooth, en el visualizador aparecerá
Connected!.
5) Utilice los botones de la fuente Bluetooth
para el funcionamiento (reproducción,
pausa, selección de pista) o el botón
II
(22) para reproducción /pausa y los botones I y
I (24) del control remoto para
la selección de pista.
6.1.6 Modo de funcionamiento “Radio”
Utilice el botón MODE (21) para seleccionar
el modo de funcionamiento “Radio”. En el
visualizador se mostrará:
– La frecuencia FM ajustada (en MHz)
– FM: 01 … El número de emisora bajo el que
se ha guardado la frecuencia FM
mediante la función escaneo
(ver también notas al final de
este apartado)
– El volumen básico ajustado (VOL)
(ver apartado 6.1.3)
Para guardar emisoras, pulse el botón
II
(22): Empezará el escaneo de emisoras. Las
frecuencias de transmisión encontradas se
guardarán automáticamente como números
de emisora. Cuando se haya completado el
Manual de instrucciones protegido por el copyright de MONACOR ® INTERNATIONAL GmbH & Co. KG. Toda
reproducción mismo parcial para fines comerciales está prohibida.
21 22 23
1715 16 18 19 20
24
25
➂
7
8
9
4
5 6
21 3
0
MODE
STOP
EQ
26 23 27
19
21 20
22
29
24
28
Page 22

22
Polski
1 2 3 4 5 6 7 8 9
➀
10 13 1411 12
➁
3 Zastosowanie
Wzmacniacz stereo SA-130DMP przeznaczony jest do uniwersalnych zastosowań np.
do nagłośnienia baru, poczekalni lub biura.
Umożliwia podłączenie mikrofonu oraz dwóch
źródeł audio z wyjściem liniowym (np. miksera, odtwarzacza CD / MP3), ponadto posiada
wbudowany odtwarzacz MP3 z portem USB,
czytnikiem kart, odbiornikiem Bluetooth oraz
tunerem FM.
4 Przygotowanie do pracy
Wzmacniacz jest przeznaczony do montażu w
racku (482 mm / 19”), ale może pracować również jako urządzenie wolnostojące. W każdym
przypadku należy zapewnić mu wystarczającą
ilość miejsca wokół otworów wentylacyjnych
pozwalającą na swobodną cyrkulację powietrza.
4.1 Montaż w racku
W celu zamontowania wzmacniacza w stojaku rack, przykręcić dołączone uchwyty montażowe po lewej i prawej stronie obudowy.
Urządzenie ma wysokość 1 U (44,45 mm).
Ciepło generowane podczas pracy urządzenia musi zostać odprowadzone. W przeciwnym razie grozi to uszkodzeniem wzmacniacza
oraz pozostałych urządzeń w stojaku. Należy
zapewnić odpowiednią wentylację, w razie konieczności zamontować w stojaku wentylatory.
5 Podłączanie
Przed przystąpieniem do podłączania lub
zmiany połączeń, należy bezwzględnie wyłączyć wzmacniacz oraz pozostałe urządzenia.
1)
Do podłączania mikrofonu należy wykorzystać gniazdo MIC (2): do gniazda można
podłączyć wtyk 6,3 mm lub wtyk XLR.
2) Do podłączania źródła audio z wyjściem
liniowym (np. odtwarzacza CD / MP3,
tunera, miksera, komputera PC), służą dwa
gniazda wejściowe:
– 3,5 mm AUX (3);
podłączenie urządzenia do tego gniazda
powoduje wyciszenie sygnału z bloku
“Odtwarzacz MP3 / tuner FM / odbiornik
Bluetooth”.
– RCA LINE IN (10);
L (białe) = lewy kanał,
R (czerwony) =prawy kanał
2 Środki bezpieczeństwa
Urządzenie spełnia wszystkie wymagania norm
UE dlatego zostało oznaczone symbolem .
UWAGA
Urządzenie jest zasilane niebezpiecznym napięciem. Wszelkie
naprawy należy zlecić osobie przeszkolonej. Nie wolno
wkładać niczego do otworów
wentylacyjnych. Samodzielne
naprawy lub modyfikacje mogą
spowodować porażenie prądem elektrycznym.
•
Urządzenie przeznaczone jest wyłącznie do
użytku wewnątrz pomieszczeń. Należy chronić je przez wodą, dużą wilgotnością oraz
wysoką temperaturą. Dopuszczalny zakres
wynosi 0 – 40 °C.
•
Na urządzeniu nie należy stawiać żadnych
pojemników z cieczą np. szklanek.
•
Ciepło wytwarzane podczas pracy urządzenia musi być odprowadzane przez otwory
wentylacyjne. W związku z tym nie wolno
ich nigdy zasłaniać.
•
Nie wolno używać urządzenia lub natychmiast odłączyć wtyczkę zasilającą z gniazdka
sieciowego
1.
jeżeli stwierdzono istnienie widocznego
uszkodzenia urządzenia lub kabla zasilającego,
2. jeżeli uszkodzenie urządzenia mogło nastąpić w wyniku upadku lub innego podobnego zdarzenia,
3. jeżeli urządzenie działa nieprawidłowo.
W każdym przypadku, naprawę należy zlecić
specjaliście.
•
Nie wolno odłączać urządzenia z gniazdka
sieciowego ciągnąc za kabel zasilania, należy
zawsze chwytać za wtyczkę.
•
Do czyszczenia należy używać suchej, miękkiej tkaniny. Nie stosować wody ani środków
chemicznych.
•
Producent ani dostawca nie ponoszą odpowiedzialności za wynikłe szkody: uszkodzenie sprzętu lub obrażenia użytkownika, jeśli
urządzenie było używane niezgodnie z ich
przeznaczeniem, nieprawidłowo zamontowane, podłączone lub obsługiwane bądź
poddane nieautoryzowanej naprawie.
Po całkowitym zakończeniu eksploatacji, urządzenie należy oddać do
punktu recyklingu, aby nie zaśmiecać
środowiska.
Wzmacniacz miksujący stereo
Niniejsza instrukcja przeznaczona jest dla użytkowników, którzy nie posiadają wiedzy i doświadczenia technicznego. Przed rozpoczęciem
użytkowania proszę zapoznać się z instrukcją,
a następnie zachować ją do wglądu.
1 Elementy operacyjne
izłącza
1 Włącznik POWER
2 Wejście mono do podłączania mikrofonu
z wtykiem XLR lub 6,3 mm
3 Wejście stereo (gniazdo 3,5 mm) do pod-
łączania źródła audio z wyjściem liniowym
np. odtwarzacza CD / MP3
Uwaga: Podłączenie urządzenia do tego gniazda
powoduje wyciszenie sygnału z bloku “odtwarzacz MP3 / tuner FM / odbiornik Bluetooth” (4).
4 Blok “Odtwarzacz MP3 / tuner FM / odbior-
nik Bluetooth”:
☞
rozdz. 6.1
5 Regulator głośności dla wejścia MIC (2)
6
Regulator głośności dla wejścia AUX (3)
lub, jeżeli wejście AUX nie jest używane,
dla bloku “Odtwarzacz MP3 / tuner FM /
odbiornik Bluetooth” (4)
7
Regulator głośności dla wejścia LINE IN (10)
8 Regulator głośności całkowitej
9 Regulatory barwy dźwięku TREBLE (wyso-
kie tony) oraz BASS (niskie tony)
10
Wejście stereo (gniazda RCA, L = lewy
kanał / R = prawy kanał) do podłączania
to źródła audio z wyjściem liniowym (np.
odtwarzacza CD / MP3, miksera, tunera)
11 Wyjście stereo PRE OUT oraz wejście ste-
reo AMP IN (gniazda RCA, L = lewy kanał /
R= prawy kanał) do podłączania zewnętrznych urządzeń do przetwarzania dźwięku,
☞
rozdz. 5, punkt 3
Uwaga: Jeżeli złącza PRE OUT oraz AMP IN
nie są używane konieczne jest ich połączenie
za pomocą dwóch zworek, zgodnie z rys.2.
W przeciwnym razie nastąpi przerwanie toru
sygnałowego.
12 Terminale głośnikowe (terminale śrubowe
z 4 mm gniazdami bananowymi)
13
Gniazdo zasilania do łączenia z gniazdkiem
sieciowym (230 V/ 50 Hz) za pomocą dołączonego kabla zasilającego.
Pokrywa bezpiecznika znajduje się pod
gniazdem; spalony bezpiecznik wymieniać
na nowy o identycznych parametrach!
14 Złącze dla anteny FM
Page 23

23
Polski
6.1.1 Tryb standby
Aby przełączyć blok “Odtwarzacz MP3 / tuner
FM / odbiornik Bluetooth” w tryb standby oraz
aby włączyć go ponownie, wcisnąć przycisk
(26) na pilocie lub przytrzymać wciśnięty
przycisk MODE (21) na wzmacniaczu. Po włączeniu aktywowany zostanie tryb odtwarzacza
“Player”.
6.1.2 Wybór trybu pracy
Za pomocą przycisku MODE (21) można przełączać się pomiędzy poszczególnych trybami
pracy:
“Player”“Bluetooth”“Radio”
Jeżeli podłączone są równocześnie dwa nośniki w trybie “Player”: pierwsze wciśnięcie
przycisku MODE spowoduje przełączenie na
drugi, nieaktywny nośnik; kolejne wciśnięcie
przycisku spowoduje przełączenie na tryb
“Bluetooth”.
6.1.3 Ustawianie głośności
podstawowej / Wyciszanie
Do ustawiania głośności podstawowej (zakres
regulacji 00 do 31), służą przyciski i (28)
na pilocie lub przyciski
I
lub
I
(24) na urzą-
dzeniu (należy przytrzymać wciśnięty przycisk).
Aby wyciszyć sygnał, wcisnąć przycisk
(27); na wyświetlaczu pojawi się
MUTE
. Aby
wyłączyć wyciszenie, wcisnąć przycisk ponownie.
Uwaga: Funkcja wyciszenia zostaje wyłączona po
wyłączeniu wzmacniacza lub po zmianie trybu pracy.
6.1.4 Tryb “Player”
Odtwarzacz pozwala na odczyt plików MP3
z kart pamięci SD / SDHC oraz nośników USB
(pamięci przenośnej USB lub twardego dysku
USB z własnym zasilaniem). Możliwe jest również odtwarzanie plików WMA oraz WAV.
– Podłączyć nośnik USB do portu USB (17).
– Włożyć kartę pamięci (FAT16 / FAT32, max
32 GB), ściętym rogiem w prawo, w stronę
urządzenia, do czytnika (18) aż zaskoczy. Aby
wyjąć kartę, należy ją najpierw wcisnąć.
Uwaga: Ze względu na dużą ilość producentów nośników, nie gwarantuje się kompatybilności odtwarzacza ze wszystkimi dostępnymi na rynku nośnikami.
Wybór nośnika:
Podłączenie nośnika przy włączonym wzmacniaczu powoduje automatyczne wczytanie
zawartości i rozpoczęcie odtwarzania (nawet
jeżeli ustawiony jest tryb “Bluetooth” lub
“Radio”). Jeżeli podłączone są dwa nośniki
w trybie “Player” i aktualnie wybrany nośnik
jest używane, dla bloku “Odtwarzacz
MP3 / tuner FM / odbiornik Bluetooth” (4)
Uwaga: Możliwe jest dodatkowo ustawienie
podstawowej głośności bloku “Odtwarzacz
MP3 / tuner FM / odbiornik Bluetooth”: patrz
rozdz. 6.1.3
4)
Ustawić żądaną barwę dźwięku regulatorami TREBLE oraz BASS (9).
6.1 Odtwarzacz MP3 / tuner FM /
odbiornik Bluetooth (rys. 3)
Po włączeniu wzmacniacza SA-130DMP, blok
“Odtwarzacz MP3 / tuner FM / odbiornik Bluetooth” zostaje automatycznie aktywowany i
ustawiony w tryb odtwarzacza “Player”. Jeżeli do urządzenia nie podłączono żadnego
nośnika danych, na wyświetlaczu (16) pojawi
się komunikat NO
SOURCE
. Jeżeli podłączono
jakiś nośnik, jego zawartość zostanie automatycznie wczytana, a następnie rozpocznie się
odtwarzanie. Jeżeli równocześnie podłączono
więcej nośników, po włączeniu wzmacniacza
wybrany zostanie zawsze nośnik USB.
Pilot sterujący dostarczany jest wraz z baterią.
Przed rozpoczęciem użytkowania należy wyjąć
folię izolującą z komory bateryjnej na tylnej
stronie pilota. Podczas wciskania przycisku należy kierować pilota na czujnik (15). Pomiędzy
pilotem a wzmacniaczem nie powinny znajdo
-
wać się żadne przeszkody.
Jeżeli pilot nie będzie przez dłuższy czas
używany, należy wyjąć z niego baterie, aby
zapobiec jego uszkodzeniu na skutek wylania
baterii.
Wymiana baterii:
1) Wcisnąć mały pasek na tylnej stronie pilota
(pierwsza strzałka na rysunku 4) i wysunąć
uchwyt na baterię (druga strzałka).
2)
Wyjąć rozładowaną baterię i zastąpić
ją nową (3 V bateria pastylkowa typu
CR 2025), dodatni biegun musi być skierowany w górę.
3)
Ponownie wsunąć uchwyt na baterię do
komory bateryjnej.
1. 2.
➃
Zużyte baterie należy wyrzucać do
specjalnie oznaczonych pojemników,
nie do zwykłych koszy na śmieci.
3)
Poprzez gniazda AMP IN oraz PRE OUT
(11) możliwe jest podłączenie urządzenia
efektowego (np. eliminator sprzężeń, korektora barwy) do obróbki sygnału. Sygnał
zza regulatora VOLUME (8) przesyłany jest
do urządzenia efektowego poprzez wyjście
PRE OUT i powraca z niego do wzmacniacza
SA-130DMP poprzez wejście AMP IN.
a) W tym celu należy odłączyć obie zworki
(dla prawego i lewego kanału) łączące
gniazda PRE OUT oraz AMP IN.
b)
Połączyć wejście urządzenia efektowego
z gniazdem PRE OUT.
c)
Połączyć wyjście urządzenia efektowego
z gniazdem AMP IN.
4)
Do podłączania głośników (minimalna
impedancja: 4 Ω) służą terminale SPEAKER
OUT (12) RIGHT oraz LEFT. Zwrócić uwagę
na odpowiednią polaryzację (oznaczoną
żyłę kabla głośnikowego podłączać do
styku “+”). Terminale umożliwiają zarówno
przykręcanie przewodu, jak i wykorzystanie
wtyków bananowych.
Uwaga: W przypadku podłączania większej
liczby głośników, upewnić się że wypadkowa
impedancja układu nie spada poniżej 4 Ω na
kanał; w przeciwnym razie wzmacniacz może ulec
uszkodzeniu. W razie wątpliwości skontaktować
się z ekspertem lub doświadczonym instalatorem.
5) W przypadku używania wbudowanego tunera FM, podłączyć antenę FM do gniazda
FM ANTENNA (14).
6) Podłączyć kabel zasilający do gniazda zasilania (13) a następnie do gniazdka sieciowego (230 V / 50 Hz).
6 Obsługa
UWAGA
Nigdy nie ustawiać bardzo dużej
głośności wzmacniacza! Stały,
bardzo wysoki poziom dźwięku
może uszkodzić narząd słuchu.
Ucho ludzkie adaptuje się do wysokiego poziomu dźwięku, który po pewnym czasie nie
jest już percepowany jako wysoki. Dlatego
nie wolno przekraczać raz już ustawionego
maksymalnego poziomu głośności.
Aby uniknąć trzasku w głośnikach, należy włączać wzmacniacz po włączeniu pozostałych
urządzeń w systemie, natomiast wyłączać jako
pierwszy.
1)
Przed pierwszym włączeniem wzmacniacza, skręcić regulator głośności całkowitej
VOLUME (8) maksymalnie w lewo.
2)
Włączyć wzmacniacz przełącznikiem
POWER (1).
3) Ustawić regulator VOLUME (8) na żądany
poziom; dla każdego wykorzystywanego
wejścia ustawić odpowiednie poziomy głośności:
– regulator MIC LEVEL (5)
dla mikrofonu podłączonego do wejścia
MIC (2)
– regulator LINE LEVEL (7)
dla źródła audio podłączonego do wejścia
LINE IN (10)
– regulator AUX / MP3 LEVEL (6)
dla źródła audio podłączonego do wej
-
ścia AUX (3) lub, jeżeli wejście AUX nie
21 22 23
1715 16 18 19 20
24
25
➂
7
8
9
4
5 6
21 3
0
MODE
STOP
EQ
26 23 27
19
21 20
22
29
24
28
Page 24

24
Polski
Aby wywołać zapisaną stację, wybrać odpo-
wiedni numer przyciskami
I
oraz
I
(24) lub
wprowadzić odpowiedni numer przyciskami
numerycznymi (29).
Do ręcznego wyszukiwania stacji (z krokiem
0,1 MHz), służą przyciski F– oraz F+ (25).
Uwagi dotyczące numerów stacji:
Po ręcznym wyborze częstotliwości, wyświetlacz
pokaże FM:00
– jeżeli dana częstotliwość nie została zapisana pod
numerem stacji
– jeżeli dana częstotliwość została zapisana pod
numerem stacji, ale odbiór sygnału jest bardzo słaby
Przy kolejnym przełączeniu na tryb “Radio”, wyświe
tlacz nie pokaże już wskazania FM:00, ale numer
stacji najbliższej ustawionej częstotliwości, lub, jeżeli
nie znaleziono stacji - stację numer 1.
7 Specyfikacja
Moc wyjściowa RMS
przy 4 Ω: � � � � � � � � � � � � � � � 2 × 70 W
Pasmo przenoszenia:
� � � � � � 20 – 20 000 Hz
Stosunek S / N: � � � � � � � � � � � 90 dB
THD: � � � � � � � � � � � � � � � � � � 0,1 %
Wejścia (złącze,
czułość / impedancja)
MIC, mono, symetryczne: � combo XLR / 6,3 mm,
1,3 mV/500 Ω
AUX, stereo: � � � � � � � � � � � 3,5 mm, 190 mV/10 kΩ
LINE IN, stereo: � � � � � � � � � RCA, 480 mV/20 kΩ
AMP IN, stereo: � � � � � � � � RCA, 580 mV/22 kΩ
Korektor barwy
Niskie tony: � � � � � � � � � � � ±12 dB/ 100 Hz
Wysokie tony: � � � � � � � � � � ±10 dB/ 10 kHz
Zasilanie: � � � � � � � � � � � � � � 230 V/50 Hz
Pobór mocy: � � � � � � � � � � � � 350 VA
Zakres temperatur:
� � � � � � � 0 – 40 °C
Wymiary: (S × W × D): � � � � � 482 × 44 × 245 mm,
1 U
Waga: � � � � � � � � � � � � � � � � � 4,9 kg
Z zastrzeżeniem możliwości zmian.
6.1.5 Tryb “Bluetooth”
Wbudowany odbiornik Bluetooth pozwala na
nawiązanie bezprzewodowego połączenia ze
źródłem sygnału wyposażonym w nadajnik
Bluetooth (np. smartfonem, tabletem PC, notebookiem) i odtwarzanie plików audio poprzez
wzmacniacz SA-130DMP.
Ustanawianie połączenia Bluetooth:
1)
Za pomocą przycisku MODE (21) wybrać
tryb “Bluetooth” (wskazanie
Bluetooth
na wyświetlaczu): Na wyświetlaczu pojawi
się Initializing. . . a następnie
Discon nected! dla potwierdzenia
braku połączenia Bluetooth z innym urządzeniem.
2)
Aktywować funkcję Bluetooth na źródle
sygnału.
3) Na wyświetlaczu źródła Bluetooth, odbiornik Bluetooth wzmacniacza rozpoznawany
jest jako “Bluetooth”. Sparować źródło Bluetooth z odbiornikiem wzmacniacza (patrz
instrukcja źródła Bluetooth, jeżeli trzeba).
4)
Po nawiązaniu połączenia Bluetooth, na
wyświetlaczu pojawi się wskazanie
Con-
nected!.
5)
Do sterowania odtwarzaniem (odtwarzanie,
pauza, wybór utworów) można wykorzystać
przyciski sterujące na źródle Bluetooth lub
przycisk
II (22) i przyciski I
oraz
I (24)
na pilocie.
6.1.6 Tryb “Radio”
Za pomocą przycisku MODE (21) wybrać tryb
“Radio”. Wyświetlacz pokaże:
– ustawioną częstotliwość pasma FM (w MHz)
–
FM: 01
… numer wybranej stacji FM, pod
którym została zapisana podczas wyszukiwania (patrz także
uwagi na końcu tego rozdziału)
– Podstawową głośność (VOL)
(patrz rozdz. 6.1.3)
Aby zapisać stacje, wcisnąć przycisk
II (22):
rozpocznie się wyszukiwanie stacji radiowych.
Znalezione częstotliwości zostaną automatycznie zapisane pod kolejnymi numerami. Po
zakończeniu wyszukiwania, wybrana zostanie
stacja zapisana pod numerem1.
Aby przerwać skanowanie w dowolnej
chwili, wcisnąć przycisk
II ponownie.
zostanie odłączony, odtwarzacz automatycznie przełączy się na nadal podłączony
nośnik. Do przełączania się między nośnikami
można wykorzystać przycisk MODE (21) (patrz
rozdz.6.1.2).
Na wyświetlaczu widoczne są następujące
informacje:
– U dla nośnika USB,
S la karty pamięci
litera poprzedzona jest symbolem odtwarza-
nia, pauzy lub stop
– miniony czas odtwarzania utworu
– tryb odtwarzania ( ALL, FOLDER, SINGLE
oder RANDOM): patrz niżej
– numer utworu i nazwa pliku
Aby przełączyć odtwarzacz w tryb pauzy,
wcisnąć przycisk
II (22); aby zatrzymać od-
twarzanie i powrócić do początku utworu,
wcisnąć przycisk (23) na urządzeniu lub przycisk STOP (23) na pilocie. Aby kontynuować
odtwarzanie, wcisnąć przycisk
II.
Aby wybrać utwór, posłużyć się przyciskami
I
oraz
I (24) lub wprowadzić numer
utworu przyciskami numerycznymi (29).
Uwaga: W trybie odtwarzania losowego RANDOM,
nie ma możliwości powrotu do poprzedniego utworu
lub wyboru numeru utworu przyciskami numerycznymi. W trybie odtwarzania
FOLDER
, można wybie-
rać wyłącznie utwory z bieżącego folderu.
Aby wybrać folder, posłużyć się przyciskami
F– oraz F+ (25). Do wyboru utworu z folderu
służą przyciski I oraz
I . Należy odczekać
aż nazwa folderu zniknie z wyświetlacza; w
przeciwnym razie, wciśnięcie przycisku
I
/
I
spowoduje przejście do poprzedniego / kolejnego lub folderu.
W celu szybkiego przewijania (funkcja dostępna tylko w trybie odtwarzania), przytrzymać wciśnięty przycisk lub
I (24) na pilo-
cie. Przewijanie do przodu pozwala na przejście
do kolejnego utworu, przewijanie do tyłu
zatrzymuje się na początku bieżącego utworu.
Za pomocą przycisku EQ (20) wybrać żądane
ustawienie korektora (funkcja dostępna tylko
w trybie odtwarzania). Dostępne są ustawienia:
NORMAL, ROCK, POP, CLASSIC, JAZZ
,
COUNTRY.
Uwaga: Po wyłączeniu wzmacniacza lub zmianie
trybu odtwarzacza “Player”, korektor powraca do
ustawienia NORMAL.
Aby wybrać tryb odtwarzania (funkcja
dostępna tylko w trybie odtwarzania), wcisnąć
przycisk (19) na urządzeniu lub przycisk
(19) na pilocie. Dostępne są tryby:
ALL = ciągłe odtwarzanie kolejnych utwo-
rów
FOLDER = ciągłe odtwarzanie kolejnych utwo-
rów z wybranego folderu
SINGLE = ciągłe odtwarzanie jednego utworu
RANDOM = odtwarzanie wszystkich utworów
w kolejności losowej
Uwaga: Po wyłączeniu wzmacniacza lub zmianie
trybu odtwarzacza “Player”, urządzenie powraca
do trybu ALL. Powrót do tego ustawienia następuje
również po wyborze innego folderu za pomocą przycisku F− lub F+ (25).
Instrukcje obsługi są chronione prawem copyright for MONACOR ® INTERNATIONAL GmbH & Co. KG.
Przetwarzanie całości lub części instrukcji dla osobistych korzyści finansowych jest zabronione.
21 22 23
1715 16 18 19 20
24
25
➂
7
8
9
4
5 6
21 3
0
MODE
STOP
EQ
26 23 27
19
21 20
22
29
24
28
Page 25

25
Page 26

26
DanskSvenska
Fjärrkontroll
Om fjärrkontrollen inte ska användas under
en längre tid, ta ur batteriet som en försiktighetsåtgärd, så att fjärrkontrollen ej att skadas
i händelse av att batteriet läcker.
Förbrukade batterier får inte slängas
bland hushållssopor. Lämna alltid in
dem hos uppsamlingsställen (som
t. ex. batteriholkar eller hos er återförsäljare).
•
Drag aldrig ut kontakten genom att dra i
elsladden utan ta tag i kontaktkroppen.
•
Rengör endast med en mjuk och torr trasa,
använd aldrig kemikalier eller vatten vid
rengöring.
•
Om enheten används för andra ändamål
än avsett, om den kopplas in felaktigt, om
den an vänds på fel sätt eller inte repareras
av auktoriserad personal upphör alla garantier att gälla och inget ansvar tas heller för
uppkommen skada på person eller materiel.
OBS!
Justera aldrig en mycket hög
volym. Permanent höga volymer
kan skada hörseln!
Örat vänjer sig vid höga volymer vilka inte
verka vara högt efter en tid. Öka därför inte en
hög volym ytterligare efter att man vänt sig.
Om enheten ska tas ur drift slutgiltigt, ta den till en lokal återvinningsanläggning för en avyttring som inte
är skadligt för miljön.
Ge akt på säkerhetsinformationen innan enheten tas i bruk. Skulle ytterliggare information
behövas kan den återfinnas i Manualen för
andra språk.
Säkerhetsföreskrifter
Denna enhet uppfyller alla relevanta direktiv
inom EU och har därför fått märkning.
VARNING
Enheten använder farlig nätspänning. Gör inga modifieringar i enheten eller stoppa
föremål i ventilhålen. Risk för
elskador föreligger.
•
Enheten är endast avsedd för inomhusbruk.
Skydda enheten mot vätskor, hög luftfuktighet och hög värme (tillåten omgivningstemperatur 0 – 40 °C).
•
Placera inte föremål innehållande vätskor,
t. ex. dricksglas, på enheten.
•
Värmen som alstras vid användning leds bort
ge nom självcirkulering. Täck därför aldrig
över enheten eller ställ den så att luftcirkuleringen försämras.
•
Ta omedelbart kontakten ur eluttaget om
något av följande fel uppstår:
1.
Enheten eller elsladden har synliga skador.
2. Enheten är skadad av fall e. d.
3. Enheten har andra felfunktioner.
Enheten skall alltid lagas på verkstad av utbildad personal.
Fjernbetjening
Hvis fjernbetjeningen ikke skal benyttes i længere tid, skal batteriet fjernes, for at undgå
skader ved eventuelle lækager fra disse.
Brugte batterier må aldrig smides ud
sammen med den øvrige husholdningsaffald. Aflever dem altid i genbrugsstationens battericontainere.
•
Tag aldrig netstikket ud af stikkontakten ved
at trække i kablet, tag fat i selve stikket.
•
Til rengøring må kun benyttes en tør, blød
klud; der må under ingen omstændigheder
benyttes kemikalier eller vand.
•
Hvis enheden benyttes til andre formål, end
den oprindeligt er beregnet til, hvis den ikke
er korrekt tilsluttet, hvis den betjenes forkert,
eller hvis den ikke repareres af autoriseret
personel, omfattes eventuelle skader ikke
af garantien.
ADVARSEL
Der bør aldrig skrues meget højt
op for forstærkerens lydniveau.
Et permanent højt lydniveau
kan skade menneskers hørelse!
Det menneskelige øre vænner sig til et højt
lydniveau, og efter nogen tid opfattes dette
lydniveau ikke som højt. Undlad derfor at øge
volumen efter tilvænning.
Hvis enheden skal tages ud af drift
for bestandigt, skal de afleveres på en
genbrugsstation, for at undgå skader
på miljøet.
Læs nedenstående sikkerhedsoplysninger opmærksomt igennem før ibrugtagning af enheden. Bortset fra sikkerhedsoplysningerne
henvises til den engelske tekst.
Sikkerhedsoplysninger
Denne enhed overholder alle relevante EUdirektiver og er som følge deraf mærket .
ADVARSEL
Dette produkt benytter livsfarlig netspænding. Udfør aldrig
nogen form for modifikationer
på produktet og indfør aldrig
genstande i ventilationshullerne, da du dermed risikere at
få elektrisk stød.
•
Enheden er kun beregnet til indendørs brug.
Be skyt den mod vanddråber og -stænk, høj
luftfugtighed og varme (tilladt omgivelsestemperatur 0 – 40 °C).
•
Undgå at placere væskefyldte genstande,
som f. eks. glas, ovenpå enheden.
•
Varmen, der udvikles i enheden, skal kunne
slippe ud ved hjælp af luftcirkulation. Enhedens ventilationshuller må derfor aldrig
tildækkes.
•
Tag straks stikket ud af stikkontakten i følgende tilfælde:
1. hvis der er synlig skade på enheden eller
netkablet,
2. hvis der kan være opstået skade, efter at
enheden er tabt eller lignende,
3. hvis der forekommer fejlfunktion.
Enheden skal altid repareres af autoriseret
personel.
Alle rettigheder til denne brugsvejledning tilhører MONACOR ® INTERNATIONAL GmbH & Co. KG. Ingen dele
af denne vejledning må reproduceres under ingen omstændigheder til kommerciel anvendelse.
Alla rättigheter är reserverade av MONACOR ® INTERNATIONAL GmbH & Co. KG. Ingen del av denna instruktionsmanual får eftertryckas i någon form eller på något sätt användas i kommersiellt syfte.
Page 27

27
Suomi
Kauko-ohjain
Jos kauko-ohjainta ei käytetä pidempään aikaan, irrota patteri varmuuden vuoksi, jotta
kauko-ohjain ei vaurioituisi mikäli patteri sattuisi vuotamaan.
Käytöstä poistettavat patterit on vietävä niille tarkoitettuihin keräyspisteisiin, eikä niitä saa hävittää muun
sekäjätteen mukana.
•
Käytä puhdistamiseen pelkästään kuivaa,
pehmeää kangasta. Älä käytä kemikaaleja
tai vettä.
•
Laitteen takuu raukeaa, eikä valmistaja, maa
hantuoja tai myyjä ota vastuuta mahdollisista välittömistä tai välillisistä vahingoista,
jos laitetta on käytetty muuhun kuin alkuperäiseen käyttötarkoitukseen, laitetta on
taitamattomasti käytetty tai kytketty tai jos
laitetta on huollettu muussa kuin valtuutetussa huollossa.
HUOMIO
Älä säädä äänenvoimakkuutta
liian suureksi. Pysyvä korkea
äänenvoimakkuus voi vaurioittaa kuuloa!
Korva tottuu suuriin äänenvoimakkuuksiin.
Älä siis lisää äänenvoimakkuutta totuttuasi
siihen.
Kun laite poistetaan lopullisesti käytöstä, vie se paikalliseen kierrätyskeskukseen jälkikäsittelyä varten.
Ole hyvä ja huomioi joka tapauksessa seuraavat
turvallisuuteen liittyvät seikat ennen laitteen
käyttöä. Laitteen toiminnasta saa lisätietoa
tarvittaessa tämän laitteen muunkielisistä
käyttöohjeista.
Turvallisuudesta
Tämä laite täyttää kaikki siihen kohdistuvat
EU-direktiivit ja sille on myönnetty hyväksyntä.
VAROITUS Laite toimii hengenvaarallisella
jännitteellä. Älä koskaan tee
mitään muutoksia laitteeseen
taikka asenna mitään ilmanvaihto aukkoihin, koska siitä
saattaa seurata sähköisku.
•
Tämä laite soveltuu vain sisätilakäyttöön.
Suojele laitetta kosteudelta, vedeltä ja
kuumuudelta (sallittu ympäröivä lämpötila
0 – 40 °C).
•
Älä sijoita laitteen päälle mitään nestettä
sisältävää, kuten vesilasia tms.
•
Laitteessa kehittyvä lämpö poistetaan ilmanvaihdolla. Tämän vuoksi laitteen tuuletusaukkoja ei saa peittää.
•
Irrota virtajohto pistorasiasta, jos:
1. laitteessa tai virtajohdossa on havaittava
vaurio
2.
putoaminen tai muu vastaava vahinko on
saattanut aiheuttaa vaurion
3. laitteessa esiintyy toimintahäiriöitä
Kaikissa näissä tapauksissa laite tulee toimittaa valtuutettuun huoltoliikkeeseen.
•
Älä koskaan irrota virtajohtoa pistorasias ta
johdosta vetämällä.
Kaikki oikeudet pidätetään MONACOR ® INTERNATIONAL GmbH & Co. KG. Mitään tämän käyttöohjeen osaa
ei saa jäljentää miltään osin käytettäväksi mihinkään kaupallisiin tarkoituksiin.
Page 28

MONACOR INTERNATIONAL GmbH & Co. KG • Zum Falsch 36 • 28307 Bremen • Germany
Copyright© by MONACOR INTERNATIONAL. All rights reserved.
A-1806.99.02.12.2016
 Loading...