

Page 1
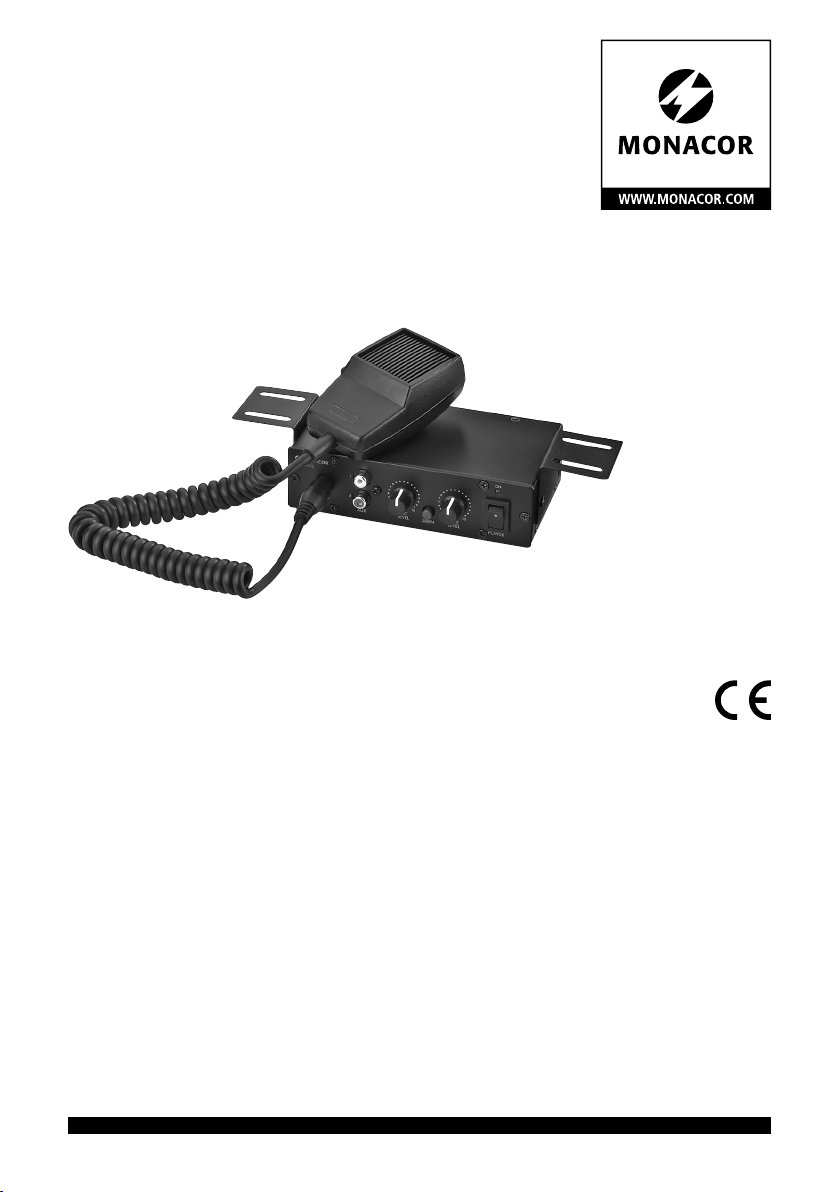
PA-Verstärker
für 12-V-Betrieb
PA Amplifier
for 12 V Operation
PA-102
Bestell-Nr. • Order No. 17.2970
BEDIENUNGSANLEITUNG
INSTRUCTION MANUAL
MODE D’EMPLOI
ISTRUZIONI PER L’USO
GEBRUIKSAANWIJZING
MANUAL DE INSTRUCCIONES
INSTRUKCJA OBSŁUGI
ELECTRONICS FOR SPECIALISTS ELECTRONICS FOR SPECIALISTS ELECTRONICS FOR SPECIALISTS ELECTRONICS FOR SPECIALISTS
Page 2

Deutsch ..........Seite 4
English ...........Page 6
Français ..........Page 8
Italiano...........Pagina 10
Nederlands .......Pagina 12
Español ..........Página 14
Polski ............Strona 16
ELECTRONICS FOR SPECIALISTS ELECTRONICS FOR SPECIALISTS ELECTRONICS FOR SPECIALISTS ELECTRONICS FOR SPECIALISTS
2
Page 3
PA-10 2
ON
MIC
1 12 3
0 10
AUX SIREN
MIC
LEVEL
4 5 6 7 8
12V SPEAKER
OUTPUT
9 10
0 10
AUX
LEVEL
POWER
11 12 13
3
Page 4

PA-Verstärker für 12-V-Betrieb
Diese Anleitung richtet sich an Installateure für
Beschallungsanlagen (Kapitel 1 – 7) und an Be-
Deutsch
diener ohne besondere Fachkenntnisse (Kapitel
1 – 3 und Kapitel 6). Bitte lesen Sie die Anleitung
vor dem Betrieb gründlich durch und heben Sie
sie für ein späteres Nachlesen auf.
Auf der ausklappbaren Seite 3 finden Sie alle
beschriebenen Bedienelemente und Anschlüsse.
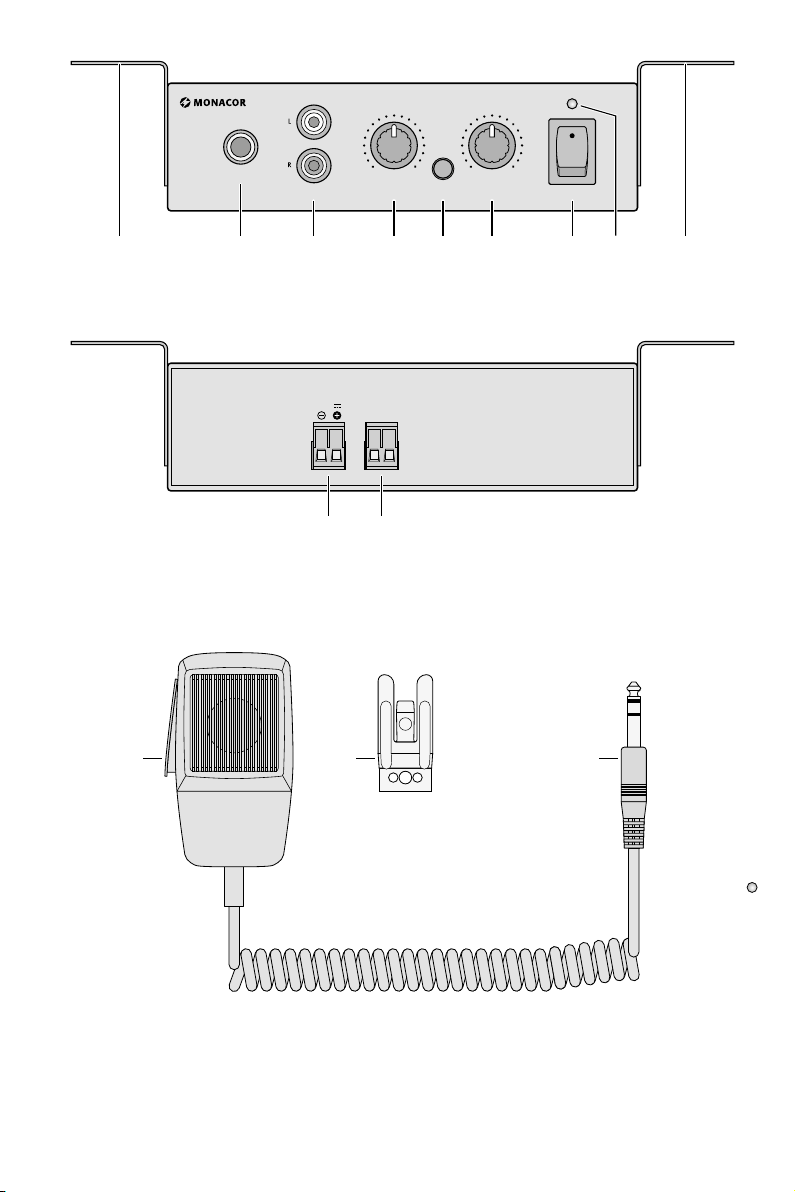
1 Übersicht
1 Montagewinkel
2
Anschlussbuchse MIC (6,3-mm-Klinke,
asym.) für das beiliegende Mikrofon
3 Buchsen AUX (Cinch) zum Anschluss eines
Audiogerätes mit Line-Ausgang (z. B.
MP3- / CD-Spieler, Radio, Kassettenrekorder)
4
Lautstärkeregler MIC LEVEL für das angeschlossene Mikrofon
5
Taste SIREN zum Auslösen der Sirene mit
maximaler Lautstärke
6 Lautstärkeregler AUX LEVEL für ein an den
Buchsen AUX (3) angeschlossenes Gerät
7 Ein- und Ausschalter POWER
8 Betriebsanzeige ON
9
Steckschraubklemme* 12 V ⎓ für die Stromversorgung
10 Steckschraubklemme* SPEAKER OUTPUT
zum Anschluss eines Lautsprechers (Impedanz min. 4 Ω)
11 Sprechtaste
12 Mikrofonhalterung
13
Mikrofonstecker zum Anschluss an die
Buchse MIC (2)
2 Hinweise für den sicheren Gebrauch
Das Gerät entspricht allen relevanten Richtlinien
der EU und trägt deshalb das -Zeichen.
Verwenden Sie das Gerät nur im Innenbereich
•
und schützen Sie es vor Tropf- und Spritzwasser, hoher Luftfeuchtigkeit und Hitze (zulässiger Einsatztemperaturbereich 0 – 40 °C).
Verwenden Sie für die Reinigung nur ein tro-
•
ckenes, weiches Tuch, auf keinen Fall Chemikalien oder Wasser.
Wird das Gerät zweckentfremdet, falsch an-
•
geschlossen, nicht richtig bedient oder nicht
fachgerecht repariert, kann keine Garantie
für das Gerät und keine Haftung für daraus
resultierende Sach- oder Personenschäden
übernommen werden.
Soll das Gerät endgültig aus dem Betrieb genommen werden, übergeben
Sie es zur umweltgerechten Entsorgung einem ört lichen Recyclingbetrieb.
3 Verwendungsmöglichkeiten
Der Verstärker PA-102 ist speziell für den
12-V-Betrieb konzipiert. Er lässt sich sowohl
für Durch sagen als auch zur Musikbeschallung
verwenden. Seine Ausgangsleistung beträgt
maximal 15 W beim Anschluss eines 4-Ω-Lautsprechers.
4 Montage
Für die Montage liegen dem Gerät zwei Winkel(1) bei. Diese können seitlich am Verstärker
festgeschraubt werden (siehe Seite 3). Für das
Mikrofon wird eine Halterung (12) mitgeliefert,
die das Mikrofon bei Nichtgebrauch aufnimmt.
* Die Anschlussklemmen lassen sich zur besseren Hand-
habung von ihrer Steckverbindung abziehen.
4
Page 5

5 Anschlüsse herstellen
Alle Anschlüsse sollten nur durch eine qualifizierte Fachkraft und unbedingt bei ausgeschaltetem Verstärker vorgenommen werden!
1)
Den Stecker (13) des beiliegenden Mikrofons
in die Buchse MIC (2) stecken.
2)
Ein Audiogerät mit Line-Ausgangspegel (z. B.
MP3- / CD-Spieler, Radio, Kassettenrekorder)
kann an die Buchsen AUX (3) angeschlossen
werden.
3) Den Lautsprecher (Impedanz min. 4 Ω) oder
eine Lautsprechergruppe mit einer Gesamtimpedanz von mindestens 4 Ω an die Klemme*
SPEAKER OUTPUT (10) anschließen.
4)
Zuletzt die 12-V-Betriebsspannung (belastbar mit min. 2 A) an die Klemme* 12 V ⎓ (9)
anschließen.
6 Bedienung
VORSICHT Stellen Sie die Lautstärke am Ver-
stärker nie sehr hoch ein. Hohe
Lautstärken können auf Dauer
das Gehör schädigen!
Das Ohr gewöhnt sich an sie und empfindet
sie nach einiger Zeit als nicht mehr so hoch.
Darum eine hohe Lautstärke nach der Gewöhnung nicht weiter erhöhen.
1)
Um eine zu hohe Anfangslautstärke und
eventuelle Schaltgeräusche zu vermeiden, die
Regler MIC LEVEL (4) und AUX LEVEL (6) auf
null drehen. Den Verstärker mit dem Schalter
POWER (7) einschalten. Die Betriebsanzeige
ON (8) leuchtet.
2) Für eine Mikrofondurchsage die Sprechtaste
(11) gedrückt halten und die Lautstärke mit
dem Regler MIC LEVEL einstellen.
Hinweis: Tritt bei einer Durchsage ein Rückkopp-
lungspfeifen auf, den Abstand zwischen dem Lautsprecher und dem Mikrofon vergrößern und / oder
den Lautstärkeregler MIC LEVEL zurückdrehen.
3) Für die Musikwiedergabe von einem an der
Buchse AUX (3) angeschlossenem Gerät die
Lautstärke mit Regler AUX LEVEL einstellen.
4)
Soll die Sirene ertönen, die Taste SIREN (5)
ge drückt halten.
Vorsicht! Die Sirene ertönt immer mit maximaler Lautstärke (nicht einstellbar).
5)
Nach dem Betrieb den Verstärker mit dem
Schalter POWER ausschalten.
7 Technische Daten
Ausgangsleistung an 4-Ω-Lautsprecher
Nennleistung: . . . . . . . . . 10 W
Musikleistung: . . . . . . . . 15 W
Minimale
Lautsprecherimpedanz:
Eingänge
Empfindlichkeit / Impedanz; Anschluss
1 × MIC: . . . . . . . . . . . . . 3,4 mV/ 2,2 kΩ;
1 × AUX: . . . . . . . . . . . . 240 mV/ 11 kΩ; Cinch
Frequenzbereich: . . . . . . . 20 – 20 000 Hz
Störabstand: . . . . . . . . . . . 70 dB
Klirrfaktor: . . . . . . . . . . . . < 0,3 %
Stromversorgung: . . . . . . . 12 V (⎓), 2 A
Einsatztemperatur: . . . . . . 0 – 40 °C
Abmessungen (B × H × T): 151 × 41 × 115 mm
Gewicht: . . . . . . . . . . . . . . 410 g
Änderungen vorbehalten.
. . . 4 Ω
6,3-mm-Klinke,
asym.
Deutsch
Diese Bedienungsanleitung ist urheberrechtlich für MONACOR ® INTERNATIONAL GmbH & Co. KG geschützt. Eine
Reproduktion für eigene kommerzielle Zwecke – auch auszugsweise – ist untersagt.
5
Page 6
PA Amplifier for 12 V Operation
These instructions are intended for installers of
PA systems (chapters 1 – 7) and for users with-
English
out any specific technical knowledge (chapters
1 – 3 and chapter 6). Please read the instructions
carefully prior to operation and keep them for
later reference.
All operating elements and connections
described can be found on the fold-out page 3.
1 Overview
1 Mounting brackets
2 Jack MIC (6.3 mm jack, unbal.) to connect
the microphone provided
3 Jacks AUX (RCA) to connect an audio unit
with line output (e. g. MP3 / CD player, radio,
cassette recorder)
4
Volume control MIC LEVEL for the microphone connected
5 Button SIREN to activate the siren at maxi-
mum volume
6 Volume control AUX LEVEL for a unit con-
nected to the jacks AUX (3)
7 POWER switch
8 Power LED ON
9
Plug-in screw terminal* 12 V ⎓ for power
supply
10 Plug-in screw terminal* SPEAKER OUTPUT
to connect a speaker
(minimum impedance: 4 Ω)
11 Talk button
12 Microphone holder
13 Microphone plug for connection to the jack
MIC (2)
2 Safety Notes
The unit corresponds to all relevant directives of
the EU and is therefore marked with .
The unit is suitable for indoor use only. Protect
•
it against dripping water and splash water,
high air humidity and heat (admissible ambient
temperature range 0 – 40 °C).
For cleaning only use a dry, soft cloth; never
•
use chemicals or water.
No guarantee claims for the unit and no liabil-
•
ity for any resulting personal damage or material damage will be accepted if the unit is used
for other purposes than originally intended, if
it is not correctly connected or operated, or if
it is not repaired in an expert way.
If the unit is to be put out of operation
definitively, take it to a local recycling
plant for a disposal which is not harmful to the environment.
3 Applications
The amplifier PA-102 is specially designed for
12 V operation. It is suitable both for making
announcement and for reproducing music. With
a 4 Ω speaker connected, the output power of
the amplifier is 15 W max.
4 Installation
For installation, two brackets (1) are supplied.
Fasten the brackets with screws to the sides of
the amplifier (see page 3). For the microphone,
a holder (12) is supplied. It will accommodate
the microphone when it is not in use.
* To make handling easier, the connection terminals can
be removed from their plug-in connections.
6
Page 7

5 Connections
Connections should only be made by qualified
experts. Always switch off the amplifier before
connecting!
1)
Connect the plug (13) of the microphone
provided to the jack MIC (2).
2) The jacks AUX (3) can be used to connect an
audio unit with line output level (e. g. MP3 / CD
player, radio, cassette recorder).
3) Connect the speaker (minimum impedance:
4 Ω) or a speaker group with a total impedance of at least 4 Ω to the terminal* SPEAKER
OUTPUT (10).
4)
Finally connect the 12 V operating voltage
(minimum current rating: 2 A) to the terminal*
12 V ⎓ (9).
6 Operation
CAUTION
Your ear will get accustomed to high volumes
which do not seem to be that high after some
time. Therefore, do not further increase a high
volume after getting used to it.
1)
To prevent an excessive initial volume and any
switching noise, set the controls MIC LEVEL
(4) and AUX LEVEL (6) to zero. Switch on the
amplifier using the POWER switch (7). The
power LED ON (8) lights up.
2) To make microphone announcements, keep
the talk button (11) pressed and adjust the
volume using the control MIC LEVEL.
Note: If there is feedback during announcements,
in crease the distance between the speaker and the
Never adjust the amplifier to a
very high volume. Permanent
high volumes may damage your
hearing!.
microphone and / or turn back the volume control
MIC LEVEL.
3)
For reproducing music from a unit connected
to the jack AUX (3), use the the control AUX
LEVEL to adjust the volume.
4) To activate the siren, keep the button SIREN
(5) pressed.
Caution! The siren will always sound at maximum volume (volume not adjustable).
5)
After operation, switch off the amplifier using
the POWER switch.
7 Specifications
Output power at 4 Ω speaker
Rated power: . . . . . . . . . 10 W
Music power: . . . . . . . . . 15 W
Minimum
speaker impedance:
Inputs
Sensitivity/ impedance; connection
1 × MIC: . . . . . . . . . . . . . 3.4 mV/ 2.2 kΩ;
1 × AUX: . . . . . . . . . . . . 240 mV/ 11 kΩ; RCA
Frequency range: . . . . . . . 20 – 20 000 Hz
S / N ratio: . . . . . . . . . . . . . 70 dB
THD: . . . . . . . . . . . . . . . . . < 0.3 %
Power supply: . . . . . . . . . . 12 V (⎓), 2 A
Ambient temperature: . . . 0 – 40 °C
Dimensions (W × H × D): . 151 × 41 × 115 mm
Weight: . . . . . . . . . . . . . . 410 g
Subject to technical modification.
. . . . . 4 Ω
6.3 mm jack, unbal.
English
All rights reserved by MONACOR ® INTERNATIONAL GmbH & Co. KG. No part of this instruction manual may be
reproduced in any form or by any means for any commercial use.
7
Page 8

Amplificateur PA pour
fonctionnement 12 V
Cette notice s’adresse aux installateurs d’instal-
Français
lations de sonorisation (chapitres 1 – 7) et aux
utilisateurs sans connaissances techniques particulières (chapitres 1 – 3 et chapitre 6). Veuillez
lire la présente notice avec attention avant le
fonctionnement et conservez-la pour pouvoir
vous y reporter ultérieurement.
Vous trouverez sur la page 3, dépliable, les
éléments et branchements décrits.
1 Présentation
1 Etriers de montage
2
Prise de branchement MIC (jack 6,35, asym.)
pour le micro livré
3
Prises AUX (RCA) pour brancher un appareil
audio avec sortie ligne (par exemple lecteur
MP3 / CD, radio, magnétophone)
4
Réglage de volume MIC LEVEL pour le micro
relié
5
Touche SIREN pour déclencher la sirène avec
un volume maximal
6
Réglage de volume AUX LEVEL pour un
appareil relié aux prises AUX (3)
7 Interrupteur marche / arrêt POWER
8 Témoin de fonctionnement ON
9 Borne à vis* 12 V ⎓ pour l’alimentation
10 Borne à vis* SPEAKER OUTPUT pour bran-
cher un haut-parleur (impédance minimale4 Ω)
11 Touche parole
12 Support micro
13 Fiche micro pour brancher à la prise MIC (2)
2 Conseils d’utilisation et de sécurité
L’appareil répond à toutes les directives nécessaires de l’Union européenne et porte donc le
symbole .
L’appareil n’est conçu que pour une utilisa-
•
tion en intérieur. Protégez-le de tout type de
projections d’eau, des éclaboussures, d’une
humidité élevée de l’air et de la chaleur (plage
de température de fonctionnement autorisée:
0 – 40 °C).
Pour nettoyer l’appareil, utilisez uniquement
•
un chiffon sec et doux, en aucun cas de produits chimiques ou d’eau.
Nous déclinons toute responsabilité en cas de
•
dommages corporels ou matériels résultants
si l’appareil est utilisé dans un but autre que
celui pour lequel il a été conçu, s’il n’est pas
correctement branché ou utilisé ou s’il n’est
pas réparé par une personne habilitée ; de
même, la garantie deviendrait caduque.
Lorsque l’appareil est définitivement
retiré du service, vous devez le déposer
dans une usine de recyclage de proximité pour contribuer à son élimination
non polluante.
CARTONS ET EMBALLAGE
PAPIER À TRIER
3 Possibilités d’utilisation
L’amplificateur PA-102 est spécialement conçu
pour un fonctionnement 12 V. Il peut être utilisé pour des annonces et pour restituer de la
musique. Sa puissance de sortie est de 15 W
maximum avec un haut-parleur 4 Ω branché.
4 Montage
Pour le montage de l’amplificateur, deux étriers
(1) sont livrés avec l’appareil. Ces étriers peuvent
être vissés sur les côtés de l’amplificateur (voir
page 3). Un support (12) est livrée pour le micro
sur laquelle on peut le poser en cas de non utilisation.
* Pour une meilleure manipulation, les bornes à pinces
peuvent être retirées de leur emplacement de connexion.
8
Page 9

5 Branchements
Tous les branchements ne devraient être effectués que par un technicien qualifié et uniquement lorsque l’amplificateur est éteint !
1) Branchez la fiche (13) du micro livré dans la
prise MIC (2).
2)
Vous pouvez relier un appareil audio avec
niveau de sortie ligne (par exemple lecteur
MP3 / CD, radio, magnétophone) aux prises
AUX (3).
3)
Reliez le haut-parleur (impédance minimale
4 Ω) ou un groupe de haut-parleurs avec une
im pédance totale de 4 Ω au moins à la borne*
SPEAKER OUTPUT (10).
4)
Enfin, reliez la tension de fonctionnement 12 V
(charge minimale 2 A) à la borne* 12 V ⎓(9).
6 Utilisation
ATTENTION
L’oreille s’habitue à des volumes élevés et ne les
perçoit plus comme tels au bout d’un certain
temps. Nous vous conseillons donc de régler le
volume et de ne plus le modifier.
Ne réglez jamais le volume de
l’amplificateur trop fort. Un
volume trop élevé peut, à long
terme, générer des troubles de
l’audition.
4) Si la sirène doit retentir, maintenez la touche
SIREN (5) enfoncée.
Attention ! La sirène retentit toujours avec
un volume maximal (non réglable).
5) Après le fonctionnement, éteignez l’amplificateur avec l’interrupteur POWER.
7 Caractéristiques techniques
Puissance de sortie avec haut-parleur 4 Ω
Puissance nominale : . . . 10 W
Puissance musique : . . . . 15 W
Impédance haut-parleur
minimale :
Entrées
Sensibilité / impédance ; branchement
1 × MIC : . . . . . . . . . . . . 3,4 mV/ 2,2 kΩ; jack
1 × AUX : . . . . . . . . . . . . 240 mV/ 11 kΩ; RCA
Bande passante : . . . . . . . . 20 – 20 000 Hz
Rapport signal / bruit : . . . . 70 dB
Taux de distorsion : . . . . . . < 0,3 %
Alimentation : . . . . . . . . . . 12 V (⎓), 2 A
Température fonc. : . . . . . . 0 – 40 °C
Dimensions (l × h × p) : . . . 151 × 41 × 115 mm
Poids : . . . . . . . . . . . . . . . . 410 g
. . . . . . . . . . . . . 4 Ω
6,35, asym.
Français
1)
Pour éviter tout volume de démarrage trop
élevé et d’éventuels bruits de commutation,
tournez les réglages MIC LEVEL (4) et AUX
LEVEL (6) sur zéro. Allumez l’amplificateur
avec l’interrupteur POWER (7). Le témoin de
fonctionnement ON (8) brille.
2)
Pour une annonce micro, maintenez la touche
parole (11) enfoncée et réglez le volume avec
le réglage MIC LEVEL.
Conseil : Si lors d’une annonce, des effets de larsen
surviennent, augmentez la distance entre le hautparleur et le micro et / ou tournez le réglage de volume
MIC LEVEL vers la gauche.
3) Pour la restitution de musique d’un appareil
relié à la prise AUX (3), réglez le volume avec
le réglage AUX LEVEL.
Notice d’utilisation protégée par le copyright de MONACOR ® INTERNATIONAL GmbH & Co. KG. Toute reproduction
même partielle à des fins commerciales est interdite.
Tout droit de modification réservé.
9
Page 10

Amplificatore PA per funzionamento 12 V
Queste istruzioni sono rivolte agli installatori di
impianti di sonorizzazione (capitoli 1 – 7) nonché
Italiano
agli utenti senza conoscenze tecniche specifiche
(capitoli 1 – 3 e capitolo 6). Vi preghiamo di leggerle attentamente prima dell’installazione e di
conservarle per un uso futuro.
A pagina 3, se aperta completamente, vedrete sempre gli elementi di comando e i collegamenti descritti.
1 Panoramica
1 Angoli di montaggio
2
Presa di connessione MIC (jack 6,3 mm. sbil.)
per il microfono in dotazione
3 Prese AUX (RCA) per il collegamento di un
apparecchio audio con uscita Line (p. es. lettore MP3 / CD, radio, registratore a cassette)
4 Regolatore volume MIC LEVEL per il micro-
fono collegato
5 Tasto SIREN per far scattare la sirena con il
volume massimo
6
Regolatore volume AUX LEVEL per un
apparecchio collegato con le prese AUX (3)
7 Interruttore on / off POWER
8 Spia di funzionamento ON
9 Morsetto a vite* 12 V ⎓ per l’alimentazione
10
Morsetto a vite* SPEAKER OUTPUT per il
collegamento di un altoparlante (impedenza
min. 4 Ω)
11 Tasto voce
12 Supporto per il microfono
13 Connettore del microfono da collegare con
la presa MIC (2)
2 Avvertenze di sicurezza
Quest’apparecchio è conforme a tutte le direttive rilevanti dell’UE e pertanto porta la sigla .
Usare l’apparecchio solo all’interno di locali
•
e proteggerlo dall’acqua gocciolante e dagli
spruzzi d’acqua, da alta umidità dell’aria e
dal calore (temperatura d’impiego ammessa
fra 0 e 40 °C).
Per la pulizia usare solo un panno morbido,
•
asciutto; non impiegare in nessun caso prodotti chimici o acqua.
Nel caso d’uso improprio, di collegamenti
•
sbagliati, d’impiego scorretto o di riparazione
non a regola d’arte dell’apparecchio, non si
assume nessuna responsabilità per eventuali
danni consequenziali a persone o a cose e non
si assume nessuna garanzia per l’apparecchio.
Se si desidera eliminare l’apparecchio definitivamente, consegnarlo per lo smaltimento ad un’istituzione locale per il
riciclaggio.
3 Possibilità d’impiego
L’amplificatore PA-102 è previsto specialmente
per il funzionamento a 12 V. Può essere usato
sia per avvisi che per la sonorizzazione con
musica. La sua potenza d’uscita massima è di
15 W collegando un altoparlante di 4 Ω.
4 Montaggio
Per il montaggio si trovano in dotazione due
angoli (1) che si possono avvitare sui due lati
dell’amplificatore (vedi a pagina 3). Per il microfono è in dotazione un supporto (12) che
accoglie il microfono quando non viene usato.
10
* Per maggiore comodità, i morsetti possono essere stac-
cati dalla loro sede.
Page 11

5 Effettuare i collegamenti
Tutti i collegamenti devono essere eseguiti
solo da una persona specializzata e qualificata,
e l’amplificatore deve assolutamente essere
spento!
1)
Inserire il connettore (13) del microfono in
dotazione nella presa MIC (2).
2) Alle prese AUX (3) si può collegare un apparecchio audio con livello Line (p. es. lettore
MP3 / CD, radio, registratore a cassette).
3)
Collegare l’altoparlante (impedenza min. 4 Ω)
o un gruppo di altoparlanti con impedenza
globale non inferiore a 4 Ω al morsetto*
SPEAKER OUTPUT (10).
4)
Alla fine collegare la tensione d’esercizio
di 12 V (potenza 2 A min.) al morsetto*
12 V ⎓(9).
6 Funzionamento
ATTENZIONE
L’orecchio si abitua agli alti volumi e dopo un
certo tempo non se ne rende più conto. Perciò
non aumentare il volume successivamente.
1) Per escludere un volume inziale troppo alto
e eventuali rumori di commutazione, portare
i regolatori MIC LEVEL (4) e AUX LEVEL (6)
sullo zero. Accendere l’amplificatore con l’interruttore POWER (7). Si accende la spia di
funzionamento ON (8).
2)
Per un avviso fatto con il microfono tener premuto il tasto voce (11) e impostare il volume
con il regolatore MIC LEVEL.
Mai tenere molto alto il volume
dell’amplificatore. A lungo andare, il volume eccessivo può
procurare danni all’udito!
N. B.: Se durante un avviso si manifesta un feedback,
occorre aumentare la distanza fra altoparlante e
microfono e / o abbassare il regolatore volume MIC
LEVEL.
3) Per la riproduzione della musica da un apparecchio collegato con la presa AUX (3), impostare il volume con il regolatore AUX LEVEL.
4) Per azionare la sirena tener premuto il tasto
SIREN (5).
Attenzione! La sirena funziona sempre con
il volume massimo (non regolabile).
5)
Dopo l’uso, spegnere l’amplificatore con l’interruttore POWER.
7 Dati tecnici
Potenza d’uscita con altoparlanti 4 Ω
Potenza nominale: . . . . . 10 W
Potenza musicale: . . . . . . 15 W
Impedenza minima
degli altoparlanti:
Ingressi
Sensibilità / Impedenza; Contatto
1 × MIC: . . . . . . . . . . . . . 3,4 mV/ 2,2 kΩ;
1 × AUX: . . . . . . . . . . . . 240 mV/ 11 kΩ; RCA
Banda de frequenza: . . . . . 20 – 20 000 Hz
Rapporto S / R: . . . . . . . . . . 70 dB
Fattore di distorsione: . . . . < 0,3 %
Alimentazione: . . . . . . . . . 12 V (⎓), 2 A
Temperatura d’esercizio: . . 0 – 40 °C
Dimensioni (l × h × p): . . . 151 × 41 × 115 mm
Peso: . . . . . . . . . . . . . . . . . 410 g
Con riserva di modifiche tecniche.
. . . . . . . 4 Ω
jack6,3 mm, sbil.
Italiano
La MONACOR ® INTERNATIONAL GmbH & Co. KG si riserva ogni diritto di elaborazione in qualsiasi forma delle presenti
istruzioni per l’uso. La riproduzione – anche parziale – per propri scopi commerciali è vietata.
11
Page 12

PA-versterker voor 12 V-bedrijf
Deze handleiding is bedoeld voor installateurs
van geluidsinstallaties (hoofdstuk1 – 7) en voor
gebruikers zonder specifieke vakkennis (hoofdstuk 1 – 3 en hoofdstuk6). Lees de handleiding
Nederlands
grondig door, alvorens het apparaat in gebruik
te nemen, en bewaar ze voor latere raadpleging.
Op de uitklapbare pagina 3 vindt u een
overzicht van de bedieningselementen en de
aansluitingen.
1 Overzicht
1 Montagebeugels
2
Jack MIC (6,3 mm-jack, ongebalanceerd)
voor de bijgeleverde microfoon
3
Jacks AUX (cinch) voor de aansluiting
van een audiotoestel met lijnuitgang (bv.
mp3 / cd-speler, radio, cassetterecorder)
4 Volumeregelaar MIC LEVEL voor de aange-
sloten microfoon
5
Toets SIREN voor het activeren van de sirene
met maximaal geluidsvolume
6 Volumeregelaar AUX LEVEL voor een op de
jacks AUX (3) aangesloten apparaat
7 POWER-schakelaar
8 Bedrijfsled ON
9
Steekschroefklem* 12 V ⎓ voor de voedingsspanning
10 Steekschroefklem* SPEAKER OUTPUT voor
de aansluiting van een luidspreker (min. impedantie 4 Ω)
11 Spraaktoets
12 Microfoonhouder
13
Microfoonstekker voor aansluiting op de
jack MIC (2)
2 Veiligheidsvoorschriften
Dit apparaat is in overeenstemming met alle
relevante EU-Richtlijnen en is daarom met
gekenmerkt.
Het apparaat is enkel geschikt voor gebruik
•
binnenshuis. Vermijd druip- en spatwater, uitzonderlijk warme plaatsen en plaatsen met
een hoge vochtigheid (toegestaan omgevingstemperatuur: 0 – 40 °C).
Gebruik voor de reiniging uitsluitend een
•
droge, zachte doek. Gebruik in geen geval
chemicaliën of water.
In geval van ongeoorloofd of verkeerd gebruik,
•
foutieve aansluiting, incorrecte bediening of
van herstelling door een niet-gekwalificeerd
persoon vervalt de garantie en de verantwoordelijkheid voor hieruit resulterende materiële
of lichamelijke schade.
Wanneer het apparaat definitief uit be
drijf wordt genomen, bezorg het dan
voor milieuvriendelijke verwerking aan
een plaatselijk recyclagebedrijf.
-
3 Toepassingen
De versterker PA-102 is speciaal ontworpen voor
12 V-gebruik. U kunt hem zowel voor aankondigingen als voor muziekweergave gebruiken.
Het uitgangsvermogen ervan bedraagt maximaal 15 W bij de aansluiting van een luidspreker
van4 Ω.
4 Montage
Voor de montage worden twee beugels (1) bijgeleverd. U kunt ze aan beide zijden van de
versterker vastschroeven (zie pagina 3). Voor de
microfoon wordt een houder (12) bijgeleverd,
waarin u de microfoon kunt plaatsen als u hem
niet gebruikt.
12
* Om makkelijker te werken kunt u de aansluitklemmen
uit hun stekkerverbinding trekken.
Page 13

5 Het toestel aansluiten
De in- en uitgangen mogen enkel door een gekwalificeerde vakman uitgevoerd worden en in
elk geval wanneer de versterker uitgeschakeld
is!
1)
Plug de stekker (13) van de bijgeleverde
microfoon in de jack MIC (2).
2) U kunt een audioapparaat met lijnuitgangsniveau (bv. mp3- / cd-speler, radio, cassetterecorder) op de jacks AUX (3) aansluiten.
3) Sluit de luidspreker (min. impedantie 4 Ω) of
een luidsprekergroep met een totale impedantie van ten minste 4 Ω aan op de klem*
SPEAKER OUTPUT (10).
4) Sluit ten slotte de bedrijfsspanning van 12 V
(belastbaar met ten minste 2 A) aan op de
klem* 12 V ⎓ (9).
6 Bediening
OPGELET
Het gehoor raakt aangepast aan hoge volumes
die na een tijdje niet meer zo hoog lijken. Verhoog daarom het volume niet nog meer, nadat
u er gewoon aan bent geraakt.
1) Om een te hoog beginvolume en eventuele
schakelploppen te vermijden, draait u de
regelaar MIC LEVEL (4) en AUX LEVEL (6)
op nul. Schakel de versterker in met behulp
van de schakelaar POWER (7). De bedrijfsled
ON(8) licht op.
2)
Voor een aankondiging via de microfoon
houdt u de spraaktoets (11) ingedrukt en
stelt u het geluidsvolume in met de regelaar
MIC LEVEL.
Stel het volume van de versterker nooit te hoog in. Langdurige
blootstelling aan hoge volumes
kan het gehoor beschadigen!
Aanwijzing: Als bij een aankondiging een terugkop-
pelingstoon optreedt, vergroot u de afstand tussen
de luidspreker en de microfoon en / of draait u de
volumeregelaar MIC LEVEL terug.
3) Voor het afspelen van muziek afkomstig van
een op de jack AUX (3) aangesloten apparaat, stelt u het volume in met de regelaar
AUX LEVEL.
4) Als de sirene moet inschakelen, houdt u de
toets SIREN (5) ingedrukt.
Opgelet! De sirene weerklinkt steeds op
maximaal geluidsvolume (niet regelbaar).
5) Schakel de versterker na gebruik uit met de
schakelaar POWER.
7 Technische gegevens
Uitgangsvermogen op luidsprekers van 4 Ω
Nominaal vermogen: . . . 10 W
Muziekvermogen: . . . . . . 15 W
Min. luidsprekerimpedantie:
Ingangen
Gevoeligheid / impedantie; aansluiting
1 × MIC: . . . . . . . . . . . . . 3,4 mV/ 2,2 kΩ;
1 × AUX: . . . . . . . . . . . . 240 mV/ 11 kΩ; Cinch
Frequentiebereik: . . . . . . . 20 – 20 000 Hz
Signaal / Ruis-verhouding: . 70 dB
THD: . . . . . . . . . . . . . . . . . < 0,3 %
Stroomtoevoer: . . . . . . . . . 12 V (⎓), 2 A
Omgevingstemperaturen: . 0 – 40 °C
Afmetingen (B × H × D): . . 151 × 41 × 115 mm
Gewicht: . . . . . . . . . . . . . . 410 g
Wijzigingen voorbehouden.
4 Ω
6,3mm-jack,
ongebalanceerd
Nederlands
Deze gebruiksaanwijzing is door de auteurswet be schermd eigendom van MONACOR ® INTERNATIONAL GmbH &
Co.KG. Een reproductie – ook gedeeltelijk – voor eigen commerciële doeleinden is verboden.
13
Page 14

Amplificador Megafonía para
Funcionamiento a 12 V
Estas instrucciones van dirigidas a instaladores
Español
de sistemas de megafonía (apartados 1 – 7) y
a usuarios sin ningún conocimiento técnico
específico (apartados 1 – 3 y apartado 6). Lea
atentamente estas instrucciones antes de utilizar
el aparato y guárdelas para usos posteriores.
Puede encontrar todos los elementos de
funcionamiento y las conexiones que se describen en la página 3 desplegable.
1 Vista General
1 Soportes de montaje
2
Toma MIC (jack 6,3 mm, asim.) para conectar
el micrófono entregado
3
Tomas AUX (RCA) para conectar un aparato
de audio con salida de línea (p. ej. lector CD/
MP3, radio, grabador de cintas)
4
Control de volumen MIC LEVEL para el
micrófono conectado
5
Botón SIREN para activar la sirena al máximo
volumen
6
Control de volumen AUX LEVEL para un aparato conectado a las tomas AUX (3)
7 Interruptor POWER
8 LED Power ON
9 Terminal de tornillo* 12 V ⎓ para la alimen-
tación
10
Terminal de tornillo* SPEAKER OUTPUT para
conectar un altavoz (impedancia mínima:
4 Ω)
11 Botón Talk
12 Soporte de micrófono
13 Conector de micrófono para conectar a la
toma MIC (2)
2 Notas de Seguridad
El aparato cumple con todas las directivas relevantes de la UE y por lo tanto está marcado
con el símbolo .
El aparato está adecuado para su utilización
•
sólo en interiores. Protéjalo de goteos y salpicaduras, elevada humedad del aire y calor
(temperatura ambiente admisible: 0 – 40 ºC).
Para limpiar el aparato, utilice un trapo seco y
•
suave, no utilice nunca ni productos químicos
ni agua.
No podrá reclamarse garantía o responsabi-
•
lidad alguna por cualquier daño personal o
material resultante si el aparato se utiliza para
otros fines diferentes a los originalmente concebidos, si no se conecta o utiliza adecuadamente o si no se repara por expertos.
Si va a poner el aparato definitivamente
fuera de servicio, llévelo a la planta
de reciclaje más cercana para que su
eliminación no sea perjudicial para el
medioambiente.
3 Aplicaciones
El amplificador PA-102 está diseñado especialmente para funcionar a 12 V. Está adecuado
para realizar anuncios y para reproducir música.
Con un altavoz de 4 Ω conectado, la potencia de
salida del amplificador es de 15 W max.
4 Montaje
Para el montaje del amplificador, se entregan
dos soportes (1). Estos soportes pueden atornillarse en los dos lados del amplificador (ver
página 3). Se entrega un soporte (12) para el
micrófono en el cual se puede dejar en caso de
no utilizarlo.
14
* Para mejorar la manipulación, durante la fijación de los
ca bles, puede sacar los bornes a pinzas.
Page 15

5 Conexiones
Sólo un técnico cualificado y habilitado debería
efectuar las conexiones y sólo cuando el amplificador esté desconectado!
1) Conecte el conector (13) del micrófono entregado a la toma MIC (2).
2)
Las tomas AUX (3) se pueden utilizar para
conectar un aparato de audio con nivel de
salida de línea (p. ej. lector CD / MP3, radio,
grabador de cintas).
3) Conecte el altavoz (impedancia mínima: 4 Ω)
o un grupo de altavoces con una impedancia total de 4 Ω como mínimo al terminal*
SPEAKER OUTPUT (10).
4)
Finalmente conecte el voltaje de funcionamiento de 12 V (corriente mínima: 2 A) al
terminal* 12 V ⎓ (9).
6 Utilización
PRECAUCIÓN
Su oído se acostumbrará a los volúmenes altos
que no lo parecen tanto después de un rato. Por
lo tanto, no aumente un volumen alto después
de acostumbrarse a él.
1)
Para prevenir un volumen inicial excesivo y
cualquier ruido de conexión, ajuste los controles MIC LEVEL (4) y AUX LEVEL (6) en cero. Conecte el amplificador utilizando el interruptor
POWER (7). Se ilumina el LED Power ON (8).
2)
Para realizar anuncios de micrófono, mantenga pulsado el botón (11) y ajuste el volumen utilizando el control MIC LEVEL.
Nota: Si aparece feedback durante los anuncios,
aumente la distancia entre el altavoz y el micrófono
y/o baje el control de volumen MIC LEVEL.
No ajuste nunca el amplificador
en un volumen muy elevado. Los
volúmenes altos permanentes
pueden dañar su oído.
3) Para reproducir música desde un aparato conectado a la toma AUX (3), utilice el control
AUX LEVEL para ajustar el volumen.
4)
Para activar la sirena, mantenga pulsado el
botón SIREN (5).
¡Precaución! La sirena siempre sonará al
volumen máximo (volumen no ajustable).
5)
Después del funcionamiento, desconecte el
amplificador utilizando el interruptor POWER.
7 Especificaciones
Potencia de salida con un altavoz
de 4 Ω conectado
Potencia nominal: . . . . . . 10 W
Potencia musical: . . . . . . 15 W
Impedancia mínima
del altavoz:
Entradas
Sensibilidad / impedancia; conexión
1 × MIC: . . . . . . . . . . . . . 3,4 mV/ 2,2 kΩ;
1 × AUX: . . . . . . . . . . . . 240 mV/11 kΩ; RCA
Rango de frecuencias: . . . . 20 – 20 000 Hz
Relación señal / ruido: . . . . . 70 dB
THD: . . . . . . . . . . . . . . . . . < 0,3 %
Alimentación: . . . . . . . . . . 12 V (⎓), 2 A
Temperatura ambiente: . . . 0 – 40 °C
Dimensiones (B × H × P): . . 151 × 41 × 115 mm
Peso: . . . . . . . . . . . . . . . . . 410 g
Sujeto a modificaciones técnicas.
. . . . . . . . . . . . 4 Ω
jack 6,3 mm, asim.
Español
Manual de instrucciones protegido por el copyright de MONACOR ® INTERNATIONAL GmbH & Co. KG. Toda reproducción mismo parcial para fines comerciales está prohibida.
15
Page 16

Wzmacniacz PA do pracy 12 V
Niniejsza instrukcja przeznaczona jest zarówno
Polski
dla instalatorów (rozdziały 1 – 7), jak i dla użytkowników, którzy nie posiadają wiedzy i doświadczenia technicznego (rozdziały 1 – 3 i rozdział 6). Przed rozpoczęciem użytkowania proszę
zapoznać się z instrukcją, a następnie zachować
ją do wglądu.
Proszę otworzyć niniejszą instrukcję na stronie3. Pokazano tam rozkład elementów operacyjnych i złączy.
1 Elementy Sterujące i Połączenia
1 Uchwyty montażowe
2
Gniazdo MIC (6,3 mm, niesym.) do podłączania mikrofonu
3 Gniazda AUX (RCA) do podłączania źródła
audio z wyjściem liniowym (np. odtwarzacza
MP3 / CD, radia, magnetofonu)
4
Regulator głośności MIC LEVEL dla mikrofonu
5 Przycisk SIREN do włączania syreny z mak-
symalną głośnością
6
Regulator głośności AUX LEVEL dla urządzenia podłączonego do gniazd AUX (3)
7 Włącznik POWER
8 Dioda zasilania ON
9
Terminale śrubowe* do podłączania zasilania 12 V ⎓
10
Terminale śrubowe* SPEAKER OUTPUT do
podłączania głośników (minimalna impedancja: 4 Ω)
11 Przycisk Talk
12 Uchwyt mikrofonowy
13
Wtyk mikrofonu do podłączania do gniazda
MIC (2)
2 Informacje Dotyczące
Bezpieczeństwa
Urządzenie spełnia wszystkie wymagania norm
UE dzięki czemu jest oznaczone symbolem .
Urządzenie jest przeznaczone tylko do użytku
•
wewnątrz pomieszczeń. Należy chronić je
przed działaniem wody, dużej wilgotności
powietrza oraz wysokiej temperatury (dopuszczalny zakres 0 – 40 °C).
Do czyszczenia urządzenia zawsze używać
•
czystego i suchego kawałka materiału; nigdy
nie należy używać wody, ani środków chemicznych.
Dostawca oraz producent nie ponoszą odpo-
•
wiedzialności za ewentualnie wynikłe szkody
materialne lub uszczerbki na zdrowiu, jeśli
urządzenie było używane niezgodnie z przeznaczeniem, zostało niepoprawnie zainstalowane lub obsługiwane oraz było poddawane
naprawom przez nieautoryzowany personel.
Jeśli urządzenie nie będzie już nigdy
więcej używane, wskazane jest przekazanie go do miejsca utylizacji odpadów, aby zostało zniszczone bez
szkody dla środowiska.
3 Zastosowanie
Wzmacniacz PA-102 przystosowany jest do
pracy na zasilaniu 12 V. Pozwala na emitowanie
komunikatów oraz tła muzycznego. Przy obciążeniu 4 Ω głośnikiem, zapewnia moc 15 W max.
4 Montaż
W celu montażu można użyć dwóch dołączonych uchwytów, które można przymocować
po obu stronach urządzenia (1) (patrz str. 3).
W zestawie znajduje się uchwyt mikrofonu (12).
16
* Dla ułatwienia można odłączyć terminale śrubowe od
gniazd.
Page 17

5 Podłączanie
Wszelkie podłączenia mogą być wykonywane
jedynie przez wyszkolony personel i zawsze przy
wyłączonym wzmacniaczu!
1)
Podłączyć wtyk (13) mikrofonu do gniazda
MIC (2).
2)
Gniazda AUX (3) pozwalają na podłączenie
źródła audio z wyjściem liniowym (np. odtwarzacza MP3 / CD, radia, magnetofonu).
3)
Głośnik (minimalna impedancja: 4 Ω) lub
grupę głośników o wypadkowej impedancji
co najmniej 4 Ω należy podłączać do terminali* SPEAKER OUTPUT (10).
4) Napięcie zasilające 12 V (ze źródła o wydolności prądowej minimum 2 A) podać na terminale* 12 V ⎓ (9).
6 Obsługa
UWAGA Nigdy nie ustawiać bardzo dużej
głośności wzmacniacza! Stały,
bardzo wysoki poziom dźwięku
może uszkodzić narząd słuchu.
Ucho ludzkie adaptuje się do wysokiego poziomu dźwięku, który po pewnym czasie nie
jest już percepowany jako wysoki. Dlatego nie
wolno przekraczać raz już ustawionego maksymalnego poziomu głośności.
1) Przed pierwszym uruchomieniem, aby uniknąć zbyt dużej głośności oraz trzasku w głośnikach, ustawić regulatory MIC LEVEL (4)
oraz AUX LEVEL (6) na zero. Włączyć wzmacniacz przełącznikiem POWER (7). Zapali się
dioda ON (8).
2)
Aby nadać komunikat, przytrzymać wciśnięty
przycisk talk (11) i ustawić głośność regulatorem MIC LEVEL.
Uwaga: W przypadku wystąpienia sprzężenia, zwięk-
szyć dystans między mikrofonem a głośnikiem i / lub
skręcić regulator głośności MIC LEVEL.
3) W celu odtwarzania muzyki ze źródła podłączonego do gniazd AUX (3), ustawić głośność
regulatorem AUX LEVEL.
4)
Aby aktywować syrenę, przytrzymać wciśnięty
przycisk SIREN (5).
Uwaga! Sygnał syreny nadawany jest zawsze
z maksymalną głośnością (brak możliwości
regulacji).
5) Po zakończeniu pracy, wyłączyć wzmacniacz
przełącznikiem POWER.
7 Dane Techniczne
Moc wyjściowa przy 4 Ω głośniku
Moc znamionowa: . . . . . 10 W
Moc muzyczna: . . . . . . . 15 W
Minimalna
impedancja głośnikowa:
Wejścia
Czułość / impedancja; złącza
1 × MIC: . . . . . . . . . . . . . 3,4 mV/ 2,2 kΩ;
1 × AUX: . . . . . . . . . . . . 240 mV/11 kΩ; RCA
Zakres częstotliwość: . . . . . 20 – 20 000 Hz
Współczynnik S / N: . . . . . . 70 dB
THD: . . . . . . . . . . . . . . . . . < 0,3 %
Zasilanie: . . . . . . . . . . . . . . 12 V (⎓), 2 A
Dopuszczalny zakres temperatury otoczenia pracy:
Rozmiary (S × W × G): . . . 151 × 41 × 115 mm
Waga: . . . . . . . . . . . . . . . . 410 g
Z zastrzeżeniem możliwość zmian.
. . 4 Ω
gniazdo 6,3 mm,
niesym.
. . . 0 – 40 °C
Polski
Instrukcje obsługi są chronione prawem copyright for MONACOR ® INTERNATIONAL GmbH & Co. KG. Przetwarzanie
całości lub części instrukcji dla osobistych korzyści finansowych jest zabronione.
17
Page 18

MONACOR INTERNATIONAL GmbH & Co. KG • Zum Falsch 36 • 28307 Bremen • Germany
Copyright © by MONACOR INTERNATIONAL. All rights reserved. A-1534.99.02.11.2018
 Loading...