

Monacor LEDP-300RGB, LEDP-600RGB, LEDP-620RGB, LEDP-1230RGB, LEDP-1260RGB Installation Manual
Page 1
ELECTRONICS FOR SPECIALISTS ELECTRONICS FOR SPECIALISTS ELECTRONICS FOR SPECIALISTS ELECTRONICS FOR SPECIALISTS
MONTAGEANLEITUNG
INSTALLATION MANUAL
NOTICE DE MONTAGE
ISTRUZIONI PER IL MONTAGGIO
LED Panel
LEDP-300RGB Bestell-Nr. • Order No. 05.0215
LEDP-600RGB Bestell-Nr. • Order No. 05.0216
LEDP-620RGB Bestell-Nr. • Order No. 05.0217
LEDP-1230RGB Bestell-Nr. • Order No. 05.0218
LEDP-1260RGB Bestell-Nr. • Order No. 05.0219
Page 2
ELECTRONICS FOR SPECIALISTS ELECTRONICS FOR SPECIALISTS ELECTRONICS FOR SPECIALISTS ELECTRONICS FOR SPECIALISTS
2
b
c
1.
2.
a
➂
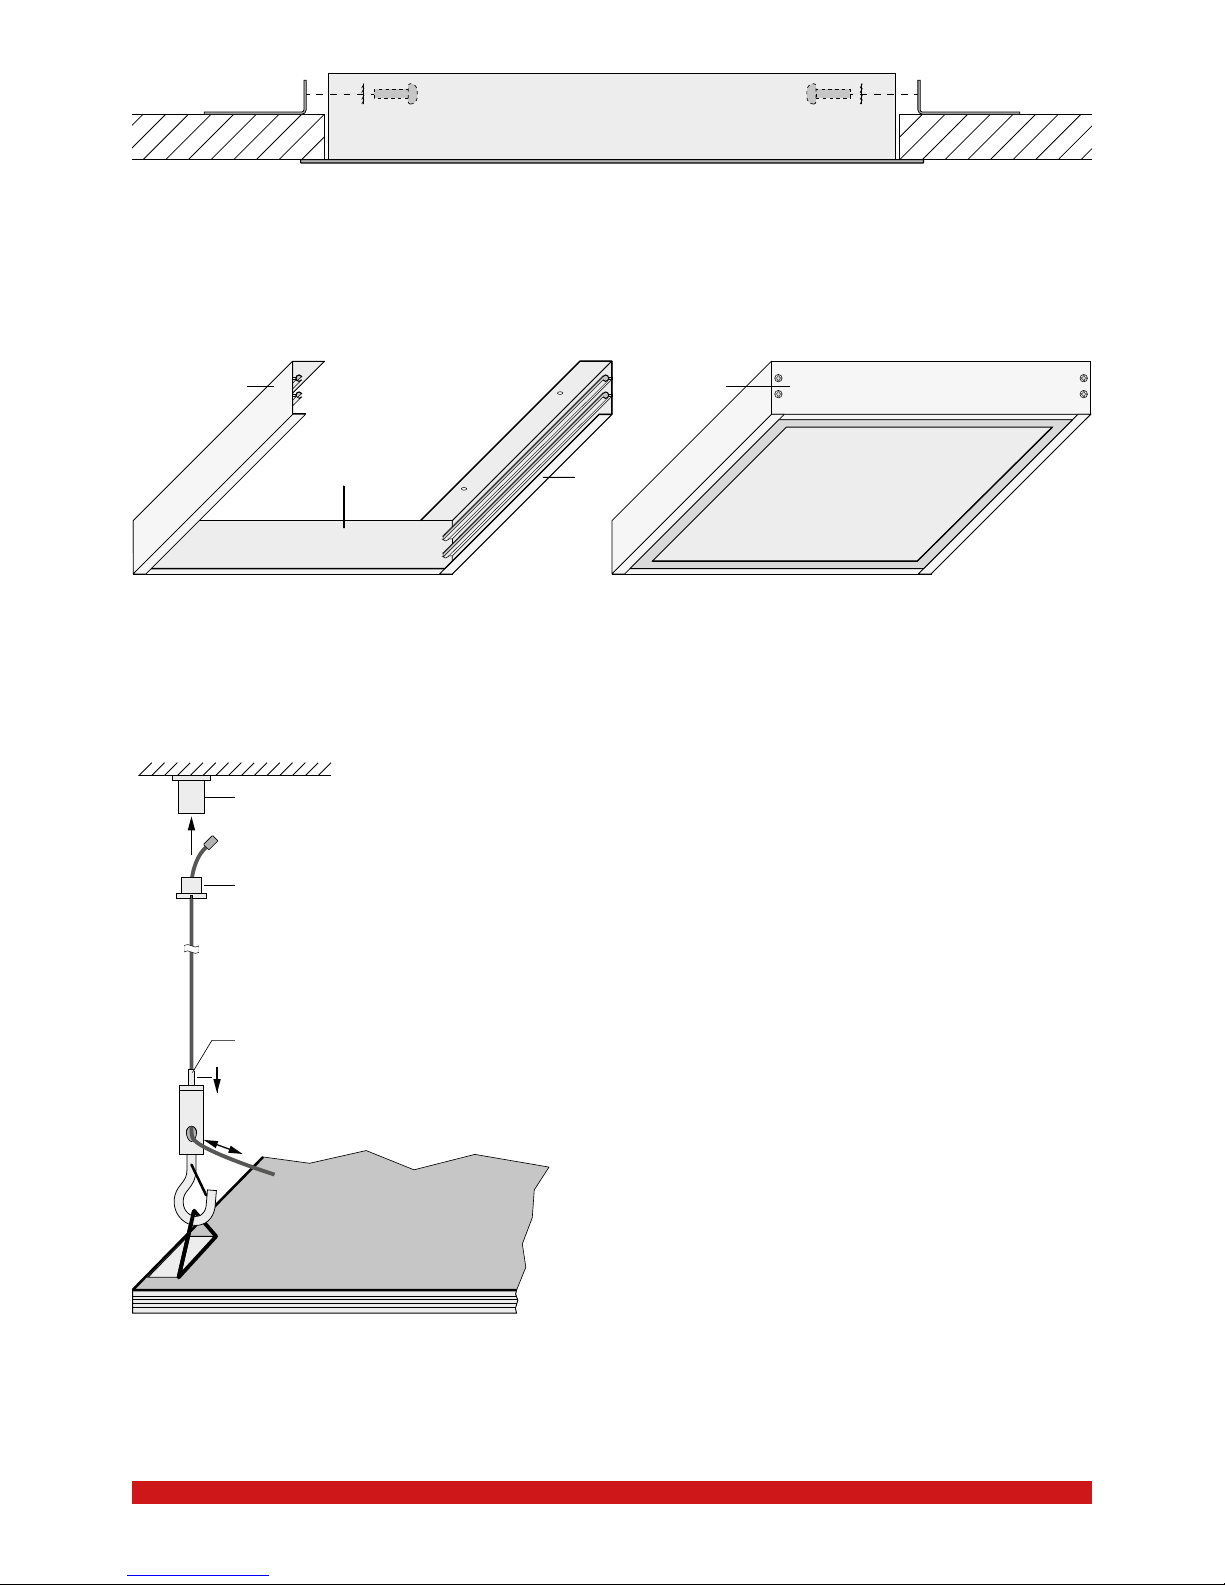
Hängende Montage mit dem Seilset LEDP-4SP (☞ Kap. 3.4)
Suspended installation with rope set LEDP-4SP (☞ chapter 3.4)
Montage suspendu avec le set d‘élingues LEDP-4SP (☞ chapitre 3.4)
Montaggio sospeso con il set di funi LEDP-4SP (☞ Cap. 3.4)
➀
Montage in eine abgehängte Decke ohne Rasterplatten mit dem Einbaurahmen LEDP-xxxRF (☞ Kap. 3.2)
Installation to a suspended ceiling without grid boards by means of mounting frame LEDP-xxxRF (☞ chapter 3.2)
Montage dans un plafond suspendu non modulaire avec le cadre de montage LEDP-xxxRF (☞ chapitre 3.2)
Montaggio in un controsoffitto senza piastre modulari con il telaio di montaggio LEDP-xxxRF (☞ Cap. 3.2)
LEDP-xxxRF
2 × 2 ×
➁
Festschrauben des Panels unter eine Decke mit dem Montagerahmen LEDP-xxxF (☞ Kap. 3.3)
Screwing the panel to a ceiling by means of mounting frame LEDP-xxxF (☞ chapter 3.3)
Vissage du panneau sous un plafond avec le cadre de montage LEDP-xxxF (☞ chapitre 3.3)
Avvitamento del pannello sotto il soffitto con il telaio di montaggio LEDP-xxxF (☞ Cap. 3.3)
A
CB
D
Page 3
ELECTRONICS FOR SPECIALISTS ELECTRONICS FOR SPECIALISTS ELECTRONICS FOR SPECIALISTS ELECTRONICS FOR SPECIALISTS
3
Deutsch ...........Seite 4
English ............Page 5
Français ...........Page 6
Italiano............Pagina 7
Page 4

4
Deutsch
LED-Panel
Diese Anleitung richtet sich an Elektroinstallateure. Bitte lesen Sie sie vor dem Betrieb
gründlich durch und heben Sie sie für ein
späteres Nachlesen auf.
1 Einsatzmöglichkeiten
undZubehör
Das LED-Panel ist speziell als Raumbeleuchtung zur Deckenmontage konzipiert. Die
Montage ist sehr einfach und auf verschiedene Arten möglich:
1. In abgehängte Decken mit Rasterplatten
(Odenwaldraster) werden die Panels einfach eingesetzt.
2. Für abgehängte Decken ohne Rasterplatten
sind entsprechende Einbaurahmen lieferbar (siehe Technische Daten / Zubehör).
3. Zum Festschrauben unter die Raumdecke
sind passende Montagerahmen lieferbar
(siehe Technische Daten / Zubehör).
4. Eine hängende Montage ist mit dem Seilset
LEDP-4SP möglich.
2 Hinweise für den
sicherenGebrauch
Das LED-Panel entspricht allen relevanten
Richtlinien der EU und trägt deshalb das
-Zeichen.
•
Das LED-Panel ist nur für den Betrieb im
Innenbereich geeignet. Schützen Sie es vor
Tropf- und Spritzwasser sowie vor hoher
Luftfeuchtigkeit. Der zulässige Einsatztemperaturbereich beträgt 0 – 40 °C.
•
Reinigen Sie die Panel- Kunststoffscheibe
nur mit einem trockenen oder leicht angefeuchteten, weichen Tuch. Benutzen Sie
keine scheuernden Reinigungsmittel oder
Chemikalien.
•
Wird das LED-Panel zweckentfremdet, nicht
fachgerecht installiert oder falsch bedient,
kann keine Haftung für daraus resultie-
rende Sach- oder Personenschäden und
keine Garantie für das Panel übernommen
werden.
Soll das LED-Panel aus dem Betrieb
genommen werden, übergeben Sie
es zur umweltgerechten Entsorgung
einem örtlichen Recyclingbetrieb.
3 Montage
3.1 Abgehängte Decke
mitRasterplatten
Für verschiedene Rastermaße sind die LEDPanels in den entsprechenden Größen lieferbar. Die Panels einfach in die Deckenkonstruktion einsetzen. Zuvor den elektrischen Anschluss herstellen.
3.2 Abgehängte Decke
ohneRasterplatten
Zum Einsetzen eines Panels in eine abgehängte Decke ohne Rasterplatten wird ein
passender Einbaurahmen benötigt (siehe
Technische Daten / Zubehör).
1) In die Decke einen für den Einbaurahmen
passenden Ausschnitt sägen.
2)
Bei Bedarf eine zweite Person zur Hilfe
nehmen, die den Rahmen im Ausschnitt
festhält.
3)
An den Rahmen die vier Haltewinkel so
anschrauben, dass der Rahmen fest im
Deckenausschnitt sitzt (Abb. 1 auf Seite2).
4) Den elektrischen Anschluss herstellen.
5) Das Panel in den Rahmen einsetzen.
3.3 Montage unter die Raumdecke
Zum Festschrauben eines Panels unter die
Raumdecke wird ein passender Montagerahmen benötigt (siehe Technische Daten /
Zubehör).
1) Die drei Rahmenteile A, B und C zusam-
menschrauben (Abb. 2 auf Seite 2).
2)
Den vorgefertigten Rahmen unter die
Decke schrauben.
3) Den elektrischen Anschluss herstellen.
4) Das Panel in den Rahmen hineinschieben
und den Rahmen durch Festschrauben des
Rahmenteils D schließen.
3.4 Hängende Montage
Für eine hängende Montage wird das Seilset
LEDP-4SP benötigt. Die Montage ist in der
Abbildung 3 auf der Seite 2 dargestellt.
1)
Jeweils das untere Teil (b) der Seilhalter
herausschrauben und die oberen Teile (a)
im entsprechenden Abstand an der Decke
festschrauben.
2) Jeweils ein Seil durch das untere Teil des
Seilhalters führen und weiter durch den
Panel-Haltehaken.
3)
Das untere Seilhalterteil mit dem Seil in das
obere Teil an der Decke hineinschrauben.
4)
Die vier Seile auf die gewünschte Länge
einstellen. Dazu am Panel-Haltehaken die
Hülse (c) hineindrücken.
5)
Das Panel mit seinen Ösen in die Haltehaken einhängen. Durch Feinjustierung
der Seillänge das Panel waagerecht ausrichten.
6) Den elektrischen Anschluss herstellen.
4 Elektrischer Anschluss
Der Anschluss an das 230-V-Netz darf nur
von einer qualifizierten Fachkraft durchgeführt werden!
Das Panel über ein geeignetes Netzgerät, z. B.
PSIP-60 / 24 (24 V, 2,5 A) an das 230-V-Netz
anschließen. Zur Steuerung des Panels kann
z. B. der Controller CU-3BT dazwischen geschaltet werden. Zu dem CU-3BT passen die
Funkfernbedienungen CU-1BTT und CU-2BTT.
Technische Daten LEDP-300RGB LEDP-600RGB LEDP-620RGB LEDP-1230RGB LEDP-1260RGB
Abmessungen 295 × 10 × 295 mm 595 × 10 × 595 mm 620 × 10 × 620 mm 295 × 10 × 1195 mm 595 × 10 × 1195 mm
Gewicht 1,1 kg 3,7 kg 4 kg 4,2 kg 7,4 kg
Nennleistung 12 W 48 W 48 W 48 W 48 W
Stromversorgung / Stromaufnahme
24 V (⎓) / 0,5 A 24 V (⎓) / 2 A 24 V (⎓) / 2 A 24 V (⎓) / 2 A 24 V (⎓) / 2 A
Lichtstrom 230 – 240 lm 950 – 1050 lm 950 – 1050 lm 950 – 1050 lm 950 – 1050 lm
LED-Bestückung 48 × SMD 5050 RGB 216 × SMD 5050 RGB 216 × SMD 5050 RGB 216 × SMD 5050 RGB 216 × SMD 5050 RGB
Energieeffizienzklasse A+
Leuchtfarbe Rot, Grün, Blau
Abstrahlwinkel 120°
Nennlebensdauer 30 000 h
Dimmbar ja
Zubehör (optional) LEDP-300RGB LEDP-600RGB LEDP-620RGB LEDP-1230RGB LEDP-1260RGB
Einbaurahmen
für abgehängte Decken ohne Raster
LEDP-300RF LEDP-600RF LEDP-620RF LEDP-1230RF LEDP-1260RF
Montage rahmen
zum Festschrauben unter die Decke
LEDP-300F LEDP-600F LEDP-620F LEDP-1230F LEDP-1260F
Seilset für hängende Montage LEDP-4SP
Diese Bedienungsanleitung ist urheberrechtlich für MONACOR ® INTERNATIONAL GmbH & Co. KG
geschützt. Eine Reproduktion für eigene kommerzielle Zwecke – auch auszugsweise – ist untersagt.Änderungen vorbehalten.
Page 5

5
English
LED Panel
These instructions are intended for electricians. Please read the instructions carefully
prior to operation and keep them for later
reference.
1 Applications
The LED panel is specially designed for installation to a ceiling to provide room illumination. Installation is easy and can be done in
different ways:
1. Installation to suspended ceilings with grid
boards (OWA ceiling grid): Simply insert
the panels.
2. Installation to suspended ceilings without
grid boards: The required mounting frames
are available as options (please refer to
“Specifications”/”Accessories”).
3. Installation by screwing the panels to the
ceiling: The adequate mounting frames are
available as options (please refer to “Specifications”/ ”Accessories”)
4. Suspended installation: Use the rope set
LEDP-4SP.
2 Safety Notes
The LED panel corresponds to all relevant
directives of the EU and is therefore marked
with .
•
The LED panel is suitable for indoor use
only. Protect it against dripping water,
splash water and high air humidity. The
admissible ambient temperature range is
0 – 40 °C.
•
Clean the plastic pane of the panel with a
soft cloth, dry or slightly damp. Never use
abrasive detergents or chemicals.
•
No guarantee claims for the LED panel and
no liability for any resulting personal damage or material damage will be accepted
if the LED panel is used for other purposes
than originally intended or if it is not correctly installed or operated.
If the LED panel is to be put out of operation definitively, take it to a local
recycling plant for a disposal which
is not harmful to the environment.
3 Mounting
3.1 Suspended ceiling
withgridboards
LED panels for various grid dimensions are
available. Simply insert the panels into the
grids. Make sure to establish the electrical
connection first.
3.2 Suspended ceiling
withoutgridboards
To install a panel to a suspended ceiling
without grid boards, use the appropriate
mounting frame (please refer to “Specifications”/”Accessories”).
1)
Saw a cutout into the ceiling that matches
the size of the mounting frame.
2) If necessary, ask a second person to hold
the frame in the cutout.
3)
Screw the four mounting brackets onto
the frame so that the frame securely fits
into the cutout (fig. 1 on page 2).
4) Establish the electrical connection.
5) Insert the panel into the frame.
3.3 Direct installation at the ceiling
To screw a panel to the ceiling, use the appropriate mounting frame (please refer to
“Specifications”/ ”Accessories”).
1) Screw the frame components A, B and C
together (fig. 2 on page 2).
2) Screw the assembled frame to the ceiling.
3) Establish the electrical connection.
4) Slide the panel into the frame; then screw
component D onto the frame to close the
frame.
3.4 Suspended installation
For suspended installation, use rope set LEDP4SP. The installation is shown in figure 3 on
page 2.
1) Unscrew the lower part (b) of each rope
support and screw the upper parts (a) to
the ceiling with a corresponding distance
between the parts.
2)
Guide a rope through the lower part of
each rope support and through the panel
support hook.
3) Screw the lower part of the rope support
with the rope to the upper part of the rope
support at the ceiling.
4)
To adjust the desired length of the four
ropes, press the sleeve (c) of the panel
support hook.
5)
Hook the eyebolts of the panel into the
support hook. Then fine-adjust the rope
length to align the panel horizontally.
6) Establish the electrical connection.
3.5 Electrical connection
Connection to the 230 V mains must only
be made by skilled personnel!
Use a suitable PSU (e. g. PSIP-60 / 24 (24 V,
2.5 A) to connect the panel to the 230 V mains.
For panel control, the controller CU-3BT, for
example, can be inserted. The wireless remote
controls CU-1BTT and CU-2BTT can be used
with the CU-3BT.
Specifications LEDP-300RGB LEDP-600RGB LEDP-620RGB LEDP-1230RGB LEDP-1260RGB
Dimensions 295 × 10 × 295 mm 595 × 10 × 595 mm 620 × 10 × 620 mm 295 × 10 × 1195 mm 595 × 10 × 1195 mm
Weight 1.1 kg 3.7 kg 4 kg 4.2 kg 7.4 kg
Rated power 12 W 48 W 48 W 48 W 48 W
Power supply / Power consumption
24 V (⎓) / 0.5 A 24 V (⎓) / 2 A 24 V (⎓) / 2 A 24 V (⎓) / 2 A 24 V (⎓) / 2 A
Luminous flux
230 – 240 lm 950 – 1050 lm 950 – 1050 lm 950 – 1050 lm 950 – 1050 lm
Number of LEDs 48 × SMD 5050 RGB 216 × SMD 5050 RGB 216 × SMD 5050 RGB 216 × SMD 5050 RGB 216 × SMD 5050 RGB
Energy efficiency class A+
Lighting colour red, green, blue
Beam angle 120°
Rated life 30 000 h
Dimmable yes
Accessories (optional) LEDP-300RGB LEDP-600RGB LEDP-620RGB LEDP-1230RGB LEDP-1260RGB
Mounting frame for
suspended ceilings without grid board
LEDP-300RF LEDP-600RF LEDP-620RF LEDP-1230RF LEDP-1260RF
Mounting frame
to be screwed to the ceiling
LEDP-300F LEDP-600F LEDP-620F LEDP-1230F LEDP-1260F
Rope set for suspended installation LEDP-4SP
All rights reserved by MONACOR ® INTERNATIONAL GmbH & Co. KG. No part of this instruction manual
may be reproduced in any form or by any means for any commercial use.Subject to technical modification.
Page 6

6
Français
Panneau à LEDs
Cette notice s’adresse aux installateurs électriciens. Veuillez lire la présente notice avec attention avant le fonctionnement et conservez-la
pour pouvoir vous y reporter ultérieurement.
1 Possibilités d‘utilisation
etaccessoires
Le panneau à LEDs est spécialement conçu
comme un éclairage de pièce avec un montage au plafond. Le montage, très simple,
peut être réalisé de différentes manières :
1. Dans des plafonds suspendus modulaires,
les panneaux sont facilement insérés.
2. Pour des plafonds suspendus non modulaires, les cadres de montage correspondants sont disponibles (voir Caractéristiques techniques /Accessoires).
3. Des cadres de montage adaptés sont disponibles pour fixer le panneau sous le
plafond (voir Caractéristiques techniques /
Accessoires)
4. Un montage suspendu est possible avec le
set d‘élingues LEDP-4SP.
2 Conseils d’utilisation
etdesécurité
Le panneau à LED répond à toutes les directives nécessaires de l’Union européenne et
porte donc le symbole .
•
Le panneau à LEDs n‘est conçu que pour
une utilisation en intérieur. Protégez-le des
éclaboussures, de tout type de projections
d‘eau et d’une humidité d‘air élevée. La
plage de température ambiante admissible
est de 0 – 40 °C.
•
Nettoyez la vitre plastique du panneau uniquement avec un tissu sec ou légèrement
humide et doux. En aucun cas, n‘utilisez de
détergents abrasifs ou produits chimiques.
•
Nous déclinons toute responsabilité en cas
de dommages matériels ou corporels résul-
tants si le panneau est utilisé dans un but
autre que celui pour lequel il a été conçu
ou s’il n’est pas correctement installé ou
utilisé; en outre, la garantie deviendrait
caduque.
Lorsque le panneau est définitivement retiré du service, vous devez le
déposer dans une usine de recyclage
adaptée pour contribuer à son élimination non polluante.
CARTONS ET EMBALLAGE
PAPIER À TRIER
3 Montage
3.1 Plafond suspendu modulaire
Pour différentes dimensions, les panneaux à
LEDs sont livrables dans les tailles correspondantes. Placez les panneaux à LEDs dans la
construction du plafond. Effectuez le branchement électrique au préalable.
3.2 Plafond suspendu non modulaire
Pour insérer un panneau dans un plafond non
modulaire, un cadre de montage adapté est
nécessaire (voir Caractéristiques techniques /
Accessoires).
1)
Découpez dans le plafond, l‘emplacement
correspondant pour le cadre de montage.
2)
Si besoin, faites-vous aider pour maintenir
le cadre dans la découpe.
3)
Vissez sur le cadre, les quatre étriers
de maintien de telle sorte que le cadre
soit bien positionné dans la découpe
(schéma1, page 2).
4) Effectuez le branchement électrique.
5) Placez le panneau dans le cadre.
3.3 Montage sous le plafond
Pour visser un panneau sous le plafond, il
faut utiliser un cadre de montage adapté (voir
Caractéristiques techniques /Accessoires).
1)
Vissez ensemble lest trois éléments du
cadre A, B et C (schéma 2, page 2).
2) Vissez le cadre monté sous le plafond.
3) Effectuez le branchement électrique.
4) Poussez le panneau dans le cadre, fermez
le cadre en vissant l‘élément D.
3.4 Montage suspendu
Pour un montage suspendu, le set d‘élingues
LEDP-4SP est nécessaire. Le montage et présenté sur le schéma 3, page 2.
1)
Dévissez respectivement la partie inférieure
(b) du support de l‘élingue et vissez la partie supérieure (a) à une distance correspondante dans le plafond.
2)
Faites passer une élingue dans la partie
inférieure du support puis dans le crochet
de maintien du panneau.
3) Vissez la partie inférieure du support avec
l‘élingue dans la partie supérieure au plafond.
4)
Réglez les quatre élingues à la longueur
voulue. Pour ce faire, appuyez sur la douille
(c) sur le crochet du panneau.
5)
Suspendez le panneau avec ses œillets aux
crochets de maintien. Réglez avec précision la longueur des élingues pour mettre
le panneau à l‘horizontale.
6) Effectuez le branchement électrique.
4 Branchement électrique
Seul un technicien qualifié peut effectuer
le branchement au secteur 230 V !
Reliez le panneau via un bloc secteur adéquat, par exemple PSIP-60 / 24 (24 V, 2,5 A)
à une prise secteur 230 V. Pour contrôler le
panneau, vous pouvez insérer par exemple le
contrôleur CU-3BT. Les télécommandes sans
fil CU-1BTT et CU-2BTT peuvent être utilisées
avec le CU-3BT.
Notice d’utilisation protégée par le copyright de MONACOR ® INTERNATIONAL GmbH & Co. KG. Toute
reproduction même partielle à des fins commerciales est interdite.Tout droit de modification réservé.
Caractéristiques techniques LEDP-300RGB LEDP-600RGB LEDP-620RGB LEDP-1230RGB LEDP-1260RGB
Dimensions 295 × 10 × 295 mm 595 × 10 × 595 mm 620 × 10 × 620 mm 295 × 10 × 1195 mm 595 × 10 × 1195 mm
Poids 1,1 kg 3,7 kg 4 kg 4,2 kg 7,4 kg
Puissance nominale 12 W 48 W 48 W 48 W 48 W
Alimentation / Consommation
24 V (⎓) / 0,5 A 24 V (⎓) / 2 A 24 V (⎓) / 2 A 24 V (⎓) / 2 A 24 V (⎓) / 2 A
Flux lumineux
230 – 240 lm 950 – 1050 lm 950 – 1050 lm 950 – 1050 lm 950 – 1050 lm
Nombre LEDs 48 × SMD 5050 RGB 216 × SMD 5050 RGB 216 × SMD 5050 RGB 216 × SMD 5050 RGB 216 × SMD 5050 RGB
Classe efficacité énergétique A+
Couleur lumière
rouge, vert, bleu
Angle de rayonnement 120°
Durée de vie nominale 30 000 h
Dimmable oui
Accessoires (optionnel) LEDP-300RGB LEDP-600RGB LEDP-620RGB LEDP-1230RGB LEDP-1260RGB
Cadre pour
plafonds suspendus non modulaires
LEDP-300RF LEDP-600RF LEDP-620RF LEDP-1230RF LEDP-1260RF
Cadre de montage pour
visser sous le plafond
LEDP-300F LEDP-600F LEDP-620F LEDP-1230F LEDP-1260F
Set d‘élingues pour montage suspendu LEDP-4SP
Page 7

7
Italiano
Pannello LED
Queste istruzioni sono rivolte a installatori
elettrici. Vi preghiamo di leggerle attentamente prima della messa in funzione e di
conservarle per un uso futuro.
1 Possibilità d‘impiego
eaccessori
Il pannello LED è stato realizzato specialmente
per l‘illuminazione di ambienti e per il montaggio al soffitto. Il montaggio è molto semplice e possibile in vari modi:
1. Nei controsoffitti con piastre modulari
(OWA), i pannelli si inseriscono semplicemente.
2. Per i controsoffitti senza piastre modulari
sono disponibili dei telai di montaggio (vedi
Dati tecnici /Accessori).
3. Per avvitare i pannelli sotto il soffitto sono
disponibili dei telai adatti di montaggio
(vedi Dati tecnici/Accessori).
4. Un montaggio sospeso è possibile con il
set di funi LEDP-4SP.
2 Avvisi per l’uso sicuro
Il pannello LED è conforme a tutte le direttive
rilevanti dell’UE e pertanto porta la sigla .
•
Usare il pannello LED solo all’interno di
locali. Proteggerlo dall’acqua gocciolante
e dagli spruzzi d’acqua nonché da alta umidità dell’aria. La temperatura d’esercizio
ammessa è 0 – 40 °C.
•
Per la pulizia del disco di plastica del
pannello usare solo un panno morbido,
asciutto, o leggermente inumidito; non
impiegare detergenti abrasivi o prodotti
chimici.
•
Nel caso d’uso improprio, d‘installazione
non a regola d’arte o d’impiego scorretto
del pannello LED, non si assume nessuna
responsabilità per eventuali danni conse-
quenziali a persone o a cose e non si assume nessuna garanzia per il pannello.
Se si desidera eliminare lil pannello
LED definitivamente, consegnarlo
per lo smaltimento ad un’istituzione
locale per il riciclaggio.
3 Montaggio
3.1 Controsoffitti con piastre modulari
Per moduli differenti, i pannelli LED sono
disponibili con varie dimensioni. Inserire i
pannelli semplicemente nella struttura del
soffitto. Prima ancora, effettuare i collegamenti elettrici.
3.2 Controsoffitti senza piastre
modulari
Per inserire un pannello in un controsoffitto
senza piastre modulari è richiesto un telaio adatto di montaggio (vedi Dati tecnici /
Accessori).
1) Segare nel soffitto un‘apertura adatta per
il telaio di montaggio.
2)
Se necessario farsi aiutare da una seconda
persona che tenga fermo il telaio nell‘apertura.
3)
Avvitare i quattro angolo di sostegno al telaio, in modo che il telaio stia fermo nell‘apertura del soffitto (Fig. 1 a pagina 2).
4) Effettuare il collegamento elettrico.
5) Inserire il pannello nel telaio.
3.3 Montaggio sotto il soffitto
Per avvitare un pannello sotto il soffitto è richiesto un telaio adatto di montaggio (vedi
Dati tecnici/Accessori).
1)
Avvitare le tre parti del telaio A, B e C
(Fig. 2 a pagina 2).
2)
Avvitare il telaio preparato sotto il soffitto.
3) Effettuare il collegamento elettrico.
4)
Spingere il pannello nel telaio e chiudere il
telaio avvitando la parte D del telaio.
3.3.1 Montaggio sospeso
Per un montaggio sospeso è richiesto il set
con funi LEDP-4SP. Il montaggio è rappresen
-
tato in fig. 3 a pagina 2.
1) Svitare la parte inferiore (b) dei reggifune
e avvitare le parti superiori (a) al soffitto
rispettando la corretta distanza.
2)
Far passare una fune attraverso la parte
inferiore del reggifune e quindi attraverso
il gancio di sostegno del pannello.
3)
Avvitare la parte inferiore del reggifune
insieme alla fune nella parte superiore al
soffitto.
4) Regolare la lunghezza delle quattro funi.
Per fare ciò, sul gancio di sostegno del
pannello spingere indentro la bussola (c).
5)
Appendere il pannello per mezzo delle
sue asole nei ganci di sostegno. Tramite
regolazione fine della lunghezza delle funi,
orientare il pannello in senso orizzontale.
6) Effettuare il collegamento elettrico.
4 Collegamento elettrico
Il collegamento con la rete 230 V deve
essere fatto solo da una persona qualificata!
Collegare il pannello con la rete 230 V per
mezzo di un alimentatore adatto, p. es. PSIP60 / 24 (24 V, 2,5 A). Per comandare il pannello
si può inserire p. es. il controller CU-3BT. Per
il CU-3BT sono previsti i telecomandi wireless
CU-1BTT e CU-2BTT.
Dati tecnici LEDP-300RGB LEDP-600RGB LEDP-620RGB LEDP-1230RGB LEDP-1260RGB
Dimensioni 295 × 10 × 295 mm 595 × 10 × 595 mm 620 × 10 × 620 mm 295 × 10 × 1195 mm 595 × 10 × 1195 mm
Peao 1,1 kg 3,7 kg 4 kg 4,2 kg 7,4 kg
Potenza nominale 12 W 48 W 48 W 48 W 48 W
Alimentazione / Corrente assorbita
24 V (⎓) / 0,5 A 24 V (⎓) / 2 A 24 V (⎓) / 2 A 24 V (⎓) / 2 A 24 V (⎓) / 2 A
Flusso luminoso 230 – 240 lm 950 – 1050 lm 950 – 1050 lm 950 – 1050 lm 950 – 1050 lm
Equipaggiamento con LED 48 × SMD 5050 RGB 216 × SMD 5050 RGB 216 × SMD 5050 RGB 216 × SMD 5050 RGB 216 × SMD 5050 RGB
Classe efficienza energetica A+
Colore dei LED rosso, verde, blu
Angolo d’emission 120°
Durata nominale 30 000 h
Dimmabile sì
Accessori (opzionale) LEDP-300RGB LEDP-600RGB LEDP-620RGB LEDP-1230RGB LEDP-1260RGB
Telaio di montaggio
per controsoffitti senza piastre modulari
LEDP-300RF LEDP-600RF LEDP-620RF LEDP-1230RF LEDP-1260RF
Telaio di montaggio
per avvitamento sotto il soffitto
LEDP-300F LEDP-600F LEDP-620F LEDP-1230F LEDP-1260F
Set di funi per montaggio sospeso LEDP-4SP
La MONACOR ® INTERNATIONAL GmbH & Co. KG si riserva ogni diritto di elaborazione in qualsiasi forma
delle presenti istruzioni per l’uso. La riproduzione – anche parziale – per propri scopi commerciali è vietata.
Con riserva di modifiche tecniche.
Page 8

MONACOR INTERNATIONAL GmbH & Co. KG • Zum Falsch 36 • 28307 Bremen • Germany
Copyright© by MONACOR INTERNATIONAL. All rights reserved.
A-1838.99.01.03.2017
 Loading...