

Page 1

ICM-20
Best.-Nr. 17.3110
BEDIENUNGSANLEITUNG
INSTRUCTION MANUAL
MODE D’EMPLOI
ISTRUZIONI PER L’USO
VEILIGHEIDSVOORSCHRIFTEN
CONSEJOS DE SEGURIDAD
ŚRODKI BEZPIECZEŃSTWA
SIKKERHEDSOPLYSNINGER
SÄKERHETSFÖRESKRIFTER
TURVALLISUUDESTA
GEGENSPRECHANLAGE
INTERCOM SYSTEM
Page 2

2
Bevor Sie einschalten ...
Wir wünschen Ihnen viel Spaß mit Ihren neuen Ge räten von MONACOR. Bitte lesen Sie die Be die nungsanleitung vor dem Betrieb gründlich durch.
Nur so lernen Sie alle Funktionsmöglichkeiten kennen, ver meiden Fehlbedienungen und schüt zen
sich und Ihre Geräte vor eventuellen Schäden
durch unsachge mäßen Ge brauch. Heben Sie die
Anleitung für ein späteres Nach lesen auf.
Der deutsche Text beginnt auf der Seite 4.
Avant toute mise en service ...
Nous vous souhaitons beaucoup de plaisir à uti li ser
ces appareils MONACOR. Lisez ce mode d'em ploi
entièrement avant toute utilisation. Uni que ment
ainsi, vous pourrez apprendre lʼen sem ble des possibilités de fonctionnement des ap pareils, éviter
toute manipulation erronée et vous pro téger, ainsi
que les appareils, de dommages éven tuels en gen drés par une utilisation inadaptée. Conservez la
notice pour pouvoir vous y reporter ultérieurement.
La version française se trouve page 8.
Voor u inschakelt …
Wij wensen u veel plezier met uw nieuwe apparatuur
van MONACOR. Lees de veiligheids voor schrif ten
grondig door, alvorens de toestellen in gebruik te
nemen. Zo behoedt u zichzelf en de toestellen voor
eventuele schade door ondeskundig ge bruik. Be waar de handleiding voor latere raadpleging.
De veiligheidsvoorschriften vindt u op pagina 12.
Przed uruchomieniem …
Życzymy zadowolenia z nowego produktu MONA COR. Prosimy zapoznać się z informa cjami do tyczą cymi bezpieczeństwa przed użyt kowa niem
urzą dz e nia, w ten sposób zdrowie użytkownika nie
bę dzie zagrożone, a urzą dze nie nie ulegnie uszko dzeniu. Instrukcję na leży zachować do wglądu.
Informacje dotyczące bezpieczeństwa znajdują się
na stronie 12.
Before switching on …
We wish you much pleasure with your new MONACOR units. Please read these operating instructions carefully prior to operating the units. Thus, you
will get to know all functions of the units, operating
errors will be prevented, and yourself and the units
will be protected against any damage caused by
improper use. Please keep the operat ing instructions for later use.
The English text starts on page 6.
Antes de la utilización …
Le deseamos una buena utilización para sus nue vos aparatos MONACOR. Por favor, lea los consejos de seguridad detalladamente antes de hacer
funcionar los aparatos para protejerse y protejer los
aparatos de cualquier daño causado por una mala
utilización, guarde las instrucciones para una utilización posterior.
Los consejos de seguridad pueden encontrarse en
la página 12.
Prima di accendere ...
Vi auguriamo buon divertimento con i vostri apparecchi nuovi di MONACOR. Leggete atten ta mente
le istruzioni prima di mettere in funzione gli apparecchi. Solo così potete cono scere tutte le funzionalità, evitare comandi sba gliati e proteggere voi
stessi e gli apparecchi da eventua li danni in seg ui to ad un uso improprio. Conservate le istruzioni per
poterle consultare anche in futuro.
Il testo italiano inizia a pagina 10.
Innan du slår på enheten …
Vi önskar dig mycket glädje med din nya MONACOR produkt. Läs igenom säkerhetsföre skrifterna
innan en heterna tas i bruk för att undvika skador till
följd av felaktig hantering. Behåll instruktionerna för
framtida bruk.
Säkerhetsföreskrifterna återfinns på sidan 13.
Ennen kytkemistä …
Toivomme Sinulle paljon miellyttäviä hetkiä uu den
MONACOR laitteen kanssa. Ennen laitteen käyttöä
Sinua huolellisesti tutustumaan turval li suu soh jeisiin. Näin vältyt vahingoilta, joita vir heel linen laitteen käyttö saattaa aiheuttaa. Ole hyvä ja säilytä
käyttöohjeet myöhempää tarvetta varten.
Turvallisuusohjeet löytyvät sivulta 13.
Inden De tænder for apparatet ...
Tillykke med dit nye MONACOR produkt. Læs
sikkerhedsanvisningerne nøje før ibrug tagn ing, for
at beskytte Dem og enhederne mod skader, der
skyldes forkert brug. Gem manualen til se nere
brug.
Sikkerhedsanvisningerne findes på side 13.
D
A
CH
F
B
CH
S
PL
NL
B
GB
I
FIN
E
DK
Page 3
3
6
8
7
9
10
12345
11
12
13
15
14
Page 4
D
A
CH
Auf der ausklappbaren Seite 3 finden Sie alle
beschriebenen Bedienelemente und Anschlüsse.
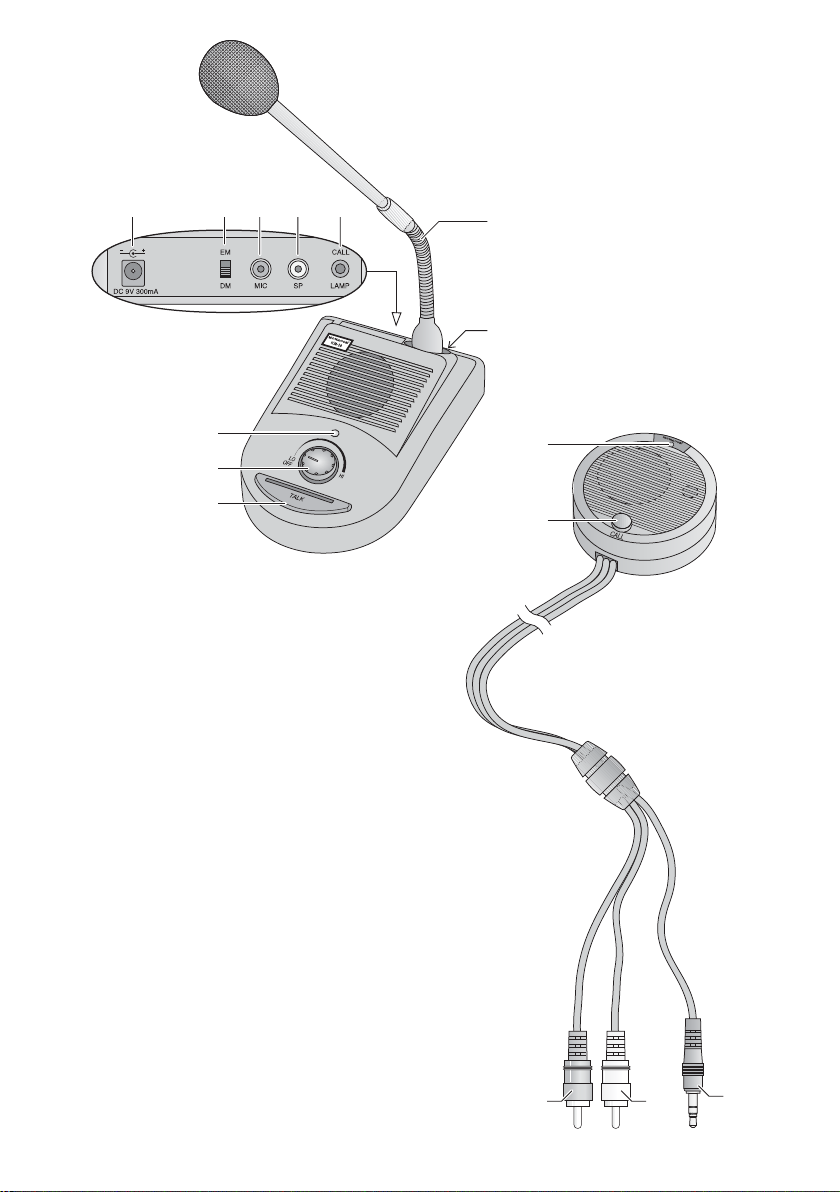
1 Übersicht der Bedienelemente
und Anschlüsse
1.1 Basisstation
1 Stromversorgungsbuchse zum Anschluss des
Steckernetzgeräts
2 Wahlschalter für den Mikrofontyp: den Schalter auf
EM (= Elektret-Mikrofon) stellen
3 Buchse MIC zum Anschluss des roten Cinch-Ste-
ckers (13) der Rufstation
4 Buchse SP zum Anschluss des weißen Cinch-Ste-
ckers (14) der Rufstation
5 Buchse CALL-LAMP zum Anschluss des 3,5-mm-
Klinkensteckers (15) der Rufstation
6 Elektret-Schwanenhalsmikrofon mit aufgesteck-
tem Poppschutz
7 Anschluss für das Schwanenhalsmikrofon
8 Betriebsanzeige
9 Lautstärkeregler, kombiniert mit einem Ein-/Aus-
schalter; bei Einrasten des Reglers am Linksanschlag (OFF) ist die Anlage ausgeschaltet
10 Sprechtaste TALK, während einer Durchsage ge -
drückt halten
1.2 Rufstation
11 Betriebsanzeige
12 Ruftaste CALL, bei Drücken der Taste wird an der
Basisstation ein Signalton abgegeben
13 roter Cinch-Stecker zum Anschluss an die Buchse
MIC (3) der Basisstation
14 weißer Cinch-Stecker zum Anschluss an die
Buchse SP (4) der Basisstation
15 3,5-mm-Klinkenstecker zum Anschluss an die
Buchse CALL-LAMP (5) der Basisstation
2 Hinweise für den sicheren Gebrauch
Die Geräte entsprechen allen erforderlichen Richt linien der EU und sind deshalb mit gekennzeichnet.
Beachten Sie auch unbedingt die folgenden Punkte:
G
Verwenden Sie die Geräte nur im In nen bereich und
schützen Sie sie vor Tropf- und Spritzwasser, hoher
Luftfeuchtigkeit und Hitze (zulässiger Einsatztemperaturbereich 0 – 40 °C).
G
Nehmen Sie die Anlage nicht in Betrieb bzw. zie hen
Sie sofort das Netzgerät aus der Steckdose,
1. wenn sichtbare Schäden an einem der Geräte
vorhanden sind,
2. wenn nach einem Sturz oder Ähnlichem der Verdacht auf einen Defekt besteht,
3. wenn Funktionsstörungen auftreten.
Geben Sie die Geräte in jedem Fall zur Reparatur in
eine Fachwerkstatt.
G
Verwenden Sie für die Reinigung nur ein trockenes,
weiches Tuch, niemals Wasser oder Chemikalien.
G
Werden die Geräte zweckentfremdet, nicht richtig
installiert, falsch be dient oder nicht fach gerecht
repariert, kann keine Haftung für daraus resultierende Sach- oder Personenschäden und keine
Garantie für die Geräte übernommen werden.
3 Einsatzmöglichkeiten
Die kabelgebundene Gegensprechanlage ICM-20
eignet sich z. B. für Rezeptionen, Verkaufsschalter,
Restaurants usw. Sie besteht aus einer Basisstation
mit integriertem Verstärker, einer Rufstation und einem
Steckernetzgerät für die Stromversorgung. Montagematerial zur Befestigung der Rufstation liegt bei.
Die Basisstation verfügt über einen eingebauten
Lautsprecher mit Lautstärkeregelung, ein abnehm bares Schwanenhals mikrofon sowie eine Sprechtaste.
Die Ruf station, mit eingebautem Lautsprecher und
Mikrofon, wird über drei Kabel mit der Basisstation verbunden. Sie besitzt zusätzlich eine Ruftaste zum Auslösen eines Signaltons.
4 Montage der Rufstation
4.1 Klebemontage
Über die zwei beiliegenden Klettringe kann die Ruf station an eine Glasscheibe geklebt werden.
1) Die Ringe, die über Klettverschluss miteinander
verbunden sind, trennen. Bei de Ringe besitzen auf
ihrer Rückseite eine Klebeschicht unter einer
abziehbaren Folie.
2) Von einem der Ringe die Folie abziehen und ihn auf
die Rückseite der Rufstation kleben.
3) Vom zweiten Ring die Folie abziehen und ihn an die
gewünschte Stelle auf der Glasscheibe kleben.
4) Die Rufstation mit ihrem Klettring an den Klettring
auf der Glasscheibe heften.
Sollen die Geräte endgültig aus dem Betrieb
genommen werden, übergeben Sie sie zur
umweltgerechten Entsorgung einem örtlichen Recyclingbetrieb.
WARNUNG Das Netzgerät wird mit lebensgefährlich
hoher Netzspannung versorgt. Nehmen
Sie deshalb niemals selbst Eingriffe am
Gerät vor. Durch unsachgemäßes Vorgehen besteht die Gefahr eines elektrischen Schlages.
4
Page 5
D
A
CH
5
Abb. 3 Klebemontage
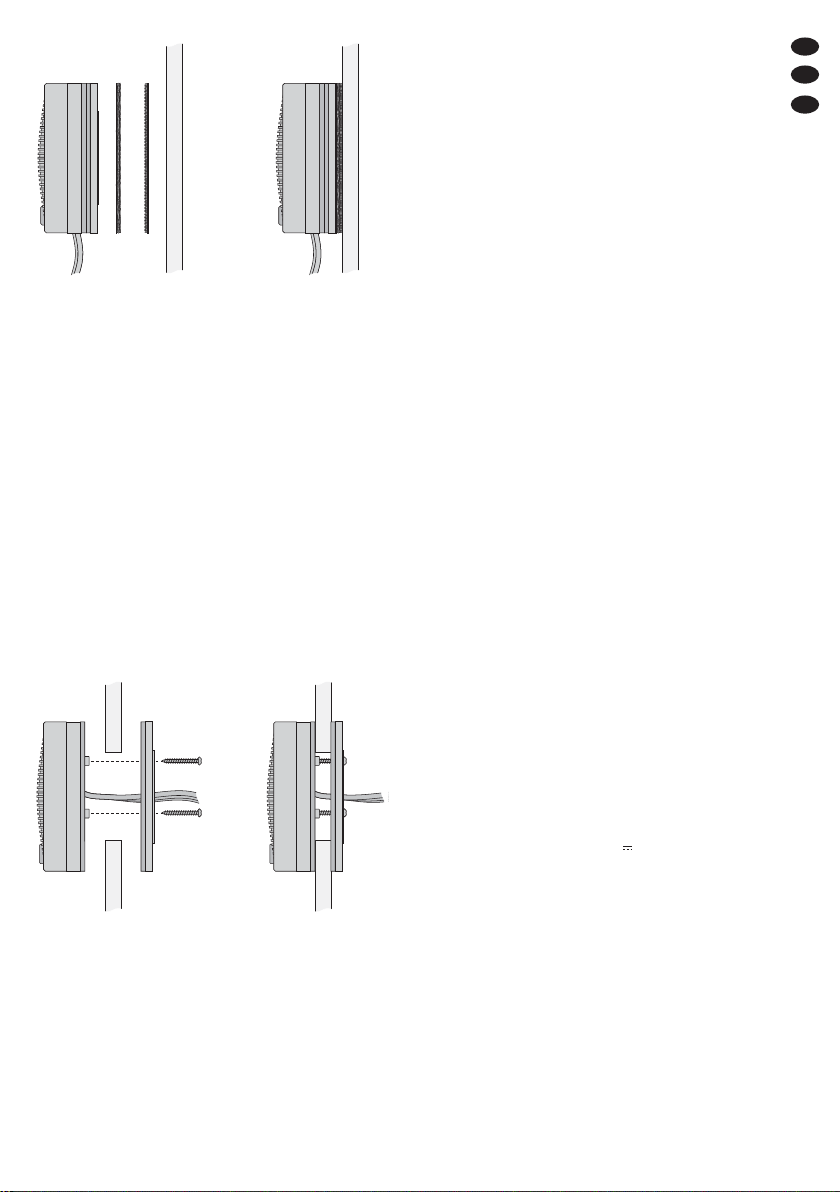
4.2 Schraubmontage
Über die beiliegenden Schrauben kann die Rufstation
an einer dünnen Trennwand (z.B. Glasscheibe) montiert werden.
1) An der Trennwand ein Loch mit einem Durchmesser von 50 mm bohren.
2) Das Rückteil der Ruf station abschrauben.
3) Den Gummiring am Vorderteil so weit lösen, dass
sich die Anschlusskabel aus der seitlichen Kabelführung herausnehmen lassen. Danach den Ring
wieder am Vorderteil anbringen.
4) Das Vorderteil vorn vor das Loch in der Trennwand
setzen und die Kabel nach hinten durch das Loch
führen.
5) Die Kabel durch das Rückteil führen.
6) Mit den drei beiliegenden längeren Schrauben das
Rückteil mit dem Vorderteil verschrauben.
Abb. 4 Schraubmontage
5 Anschluss
1) Das Schwanenhalsmikrofon (6) in die XLR-Buchse
(7) der Basisstation stecken. Der Schiebeschalter
(2) muss in der Position EM (= Elektret-Mikrofon)
stehen.
2) Die drei Anschlusskabel der Rufstation mit den passenden Buchsen an der Basisstation verbinden:
– den roten Cinch-Stecker (13) mit der roten
Buchse MIC (3)
– den weißen Cinch-Stecker (14) mit der weißen
Buchse SP (4)
– den Klinkenstecker (15) mit der 3,5-mm-Klin -
kenbuchse (5) CALL-LAMP
3) Das Steckernetzgerät an die Stromversorgungsbuchse (1) der Basisstation anschließen und in eine
Steckdose (230 V~/50 Hz) stecken.
6 Bedienung
Die Anlage durch Aufdrehen des Reglers (9) einschalten. Die Betriebsanzeigen (8, 11) leuchten.
Tonübertragung Rufstation → Basisstation:
An die Rufstation herantreten (optimaler Abstand
10 – 20 cm) und sprechen. An der Basisstation die
Lautsprecherlautstärke mit dem Regler (9) einstellen. Die Person an der Rufstation kann durch Drücken der Taste CALL (12) einen Signalton auslösen.
Tonübertragung Basisstation → Rufstation:
Für eine Durchsage die Sprechtaste TALK (10) ge drückt halten und in das Schwanenhalsmikrofon (6)
sprechen. Die Durchsage wird über den Lautsprecher der Rufstation wiedergegeben. Nach der
Durchsage die Taste wieder lösen.
Zum Ausschalten der Anlage den Regler (9) ganz nach
links drehen, bis er einrastet (Position OFF). Wird die
Anlage längere Zeit nicht betrieben, sollte das Netz gerät aus der Steckdose gezogen werden, weil es
auch bei ausgeschalteter Anlage einen geringen
Strom verbraucht.
7 Technische Daten
Schwanenhalsmikrofon: . . Elektret-Mikrofonkapsel,
Nierencharakteristik,
300-mm-Schwanenhals
Stromversorgung: . . . . . . . 9 V /300 mA über beilie-
gendes Steckernetzgerät
(230 V~/50 Hz/7 VA)
Einsatztemperatur: . . . . . . 0 – 40 °C
Abmessungen
Basisstation: . . . . . . . . . 115 × 65 × 170mm
Rufstation: . . . . . . . . . . . ∅ 85mm × 35mm
Kabellänge: . . . . . . . . . . 3 m
Änderungen vorbehalten.
Diese Bedienungsanleitung ist urheberrechtlich für MONACOR®INTERNATIONAL GmbH & Co. KG ge schützt.
Eine Reproduktion für eigene kommerzielle Zwecke – auch auszugsweise – ist untersagt.
Page 6

All operating elements and connections can be
found on the fold-out page 3.
1 Operating Elements and Connections
1.1 Base station
1 Power supply jack for connection of the plug-in
power supply unit
2 Selector switch for the microphone type: set the
switch to EM (= electret microphone)
3 Jack MIC for connection of the red phono plug (13)
of the calling station
4 Jack SP for connection of the white phono plug (14)
of the calling station
5 Jack CALL-LAMP for connection of the 3.5 mm
plug (15) of the calling station
6 Electret gooseneck microphone with applied pop
protection
7 Connection for the gooseneck microphone
8 Operating indication
9 Volume control, combined with an on / off switch;
when the control is engaged at the left stop (OFF),
the system is switched off
10 TALK button, keep it pressed during an announce-
ment
1.2 Calling station
11 Operating indication
12 CALL button, when pressing the button, a signal
sound is released at the base station
13 Red phono plug for connection to the jack MIC (3)
of the base station
14 White phono plug for connection to the jack SP (4)
of the base station
15 3.5 mm plug for connection to the jack CALL-LAMP
(5) of the base station
2 Safety Notes
The units correspond to all required directives of the
EU and are therefore marked with .
It is essential to observe the following items:
G
The units are suitable for indoor use only. Protect
them against dripping water and splash water, high
air humidity, and heat (admissible ambient temperature range 0 – 40 °C).
G
Do not set the system into operation, or immediately
disconnect the power supply unit from the mains
socket if
1. there is visible damage to one of the units,
2. a defect might have occurred after a drop or similar accident,
3. malfunctions occur.
The units must in any case be repaired by skilled
personnel.
G
For cleaning only use a dry, soft cloth, never use
chemicals or water.
G
No guarantee claims for the units and no liability for
any resulting personal damage or material damage
will be accepted if the units are used for other purposes than originally intended, if they are not correctly installed or operated, or not repaired in an
expert way.
3 Applications
The cable-connected intercom system ICM-20 is suitable e. g. for reception desks, counters, restaurants,
etc. It consists of a base station with integrated amplifier, a calling station, and a plug-in power supply unit
for the power supply. Mounting material for fixing the
calling station is supplied with the system.
The base station has an integrated speaker with
volume control, a removable gooseneck microphone,
and a talk button. The calling station, with integrated
speaker and microphone, is connected via three
cables to the base station. In addition, it is equipped
with a calling button for releasing a signal sound.
4 Mounting the Calling Station
4.1 Mounting by Glueing
Via the two supplied Velcro rings the calling station can
be glued to a glass pane.
1) Separate the rings which are connected with each
other via Velcro fasteners. Both rings have a glue-
ing layer on their rear side below a removable foil.
2) Remove the foil from one of the rings and glue the
ring onto the rear side of the calling station.
3) Remove the foil from the second ring and glue the
ring onto the desired place on the glass pane.
4) Attach the calling station with its Velcro ring to the
Velcro ring on the glass pane.
If the units are to be put out of operation
definitively, take them to a local recycling
plant for a disposal which is not harmful to the
environment.
WARNING The power supply unit is supplied with
hazardous mains voltage. Leave servicing to skilled personnel only. Inexpert
handling or modification of the unit may
cause an electric shock hazard.
6
GB
Page 7

Fig. 3 Mounting by glueing
4.2 Mounting by screwing
Via the supplied screws the calling station can be
mounted to a thin partition (e. g. glass pane).
1) Drill a hole with a diameter of 50 mm at the partition.
2) Screw off the rear part of the calling station.
3) Loosen the rubber washer at the front part so that
the connection cables can be removed from the lateral cable guidance. Then attach the washer again
to the front part.
4) At the front, place the front part before the hole in
the partition and guide the cables backwards
through the hole.
5) Guide the cables through the rear part.
6) With the three longer screws supplied, screw the
rear part to the front part.
Fig. 4 Mounting by screwing
5 Connection
1) Connect the gooseneck microphone (6) to the XLR
jack (7) of the base station. The sliding switch (2)
must be in position EM (= electret microphone).
2) Connect the three cables of the calling station to the
matching jacks at the base station:
– the red phono plug (13) to the red jack MIC (3)
– the white phono plug (14) to the white jack SP (4)
– the 3.5 mm plug (15) to the 3.5 mm jack (5)
CALL-LAMP
3) Connect the plug-in power supply unit to the power
supply jack (1) of the base station and to a socket
(230 V~ / 50 Hz).
6 Operation
Switch on the system by turning up the control (9). The
operating indications (8, 11) light up.
Audio transmission calling station → base station:
Go close to the calling station (optimum distance
10 to 20 cm) and talk. At the base station, adjust the
speaker volume with the control (9). The person at
the calling station can release a signal sound by
pressing the button CALL (12).
Audio transmission base station → calling station:
For an announcement keep the TALK button (10)
pressed and talk into the gooseneck microphone
(6). The announcement is reproduced via the
speaker of the calling station. After the announcement release the button.
To switch off the system, turn the control (9) counterclockwise until it locks in position OFF. If the system is
not operated for a longer time, the power supply unit
should be disconnected from the socket because it has
a low power consumption even if the system is
switched off.
7 Specifications
Gooseneck microphone: . . electret microphone
cartridge, cardioid,
300 mm gooseneck
Power supply: . . . . . . . . . . 9 V /300 mA via
supplied plug-in
power supply unit
(230 V~/50 Hz/7 VA)
Ambient temperature: . . . . 0 – 40 °C
Dimensions
Base station: . . . . . . . . . 115 × 65 × 170mm
Calling station: . . . . . . . ∅ 85 mm × 35 mm
Cable length: . . . . . . . . . 3 m
Subject to technical modification.
7
GB
All rights reserved by MONACOR®INTERNATIONAL GmbH & Co. KG. No part of this instruction manual may
be reproduced in any form or by any means for any commercial use.
Page 8

Ouvrez le présent livret page 3, dépliable, de
manière à visualiser les éléments et branchements.
1 Eléments et branchements
1.1 Station de base
1 Prise dʼalimentation pour brancher le bloc secteur
2 Sélecteur pour le type de microphone : mettez lʼin-
terrupteur sur EM (= microphone électret)
3 Prise MIC pour brancher la fiche RCA mâle rouge
(13) de la station dʼappel
4 Prise SP pour brancher la prise RCA mâle blanche
(14) de la station dʼappel
5 Prise CALL-LAMP pour brancher la fiche jack 3,5
mâle (15) de la station dʼappel
6 Microphone électret col de cygne avec bonnette de
protection anti-pop
7 Branchement pour le microphone col de cygne
8 Témoin de fonctionnement
9 Potentiomètre de réglage de volume, combiné
avec un interrupteur marche / arrêt : lorsque le
réglage est enfoncé sur la butée de gauche (OFF),
lʼinstallation est éteinte.
10 Touche de parole TALK : maintenez-la enfoncée
pendant une annonce
1.2 Station dʼappel
11 Témoin de fonctionnement
12 Touche dʼappel CALL : lorsque la touche est main-
tenue enfoncée, un signal sonore est émis sur la
station de base
13 Fiche RCA mâle rouge pour brancher à la prise
femelle MIC (3) de la station de base
14 Fiche RCA mâle blanche pour brancher à la prise
femelle SP (4) de la station de base
15 Fiche jack 3,5 mâle pour brancher à la prise
femelle CALL-LAMP (5) de la station de base
2 Conseils dʼutilisation et de sécurité
Ces appareils répondent à toutes les directives nécessaires de lʼUnion européenne et portent donc le symbole .
Respectez scrupuleusement les points suivants :
G
Les appareils ne sont conçus que pour une utilisation en intérieur. Protégez-les de tout type de pro-
jections dʼeau, des éclaboussures, dʼune humidité
de lʼair élevée et de la chaleur (plage de température
de fonctionnement autorisée : 0 – 40 °C).
G
Ne faites pas fonctionner les appareils ou débranchez immédiatement le bloc secteur du secteur
lorsque :
1. des dommages visibles apparaissent sur un des
appareils,
2. après une chute ou un cas similaire, vous avez un
doute sur lʼétat de lʼappareil,
3. des défaillances apparaissent.
Dans tous les cas, les dommages doivent être réparés par un technicien spécialisé.
G
Pour les nettoyer, utilisez uniquement un chiffon sec
et doux, en aucun cas, de produits chimiques ou
dʼeau.
G
Nous déclinons toute responsabilité en cas de dommages matériels ou corporels consécutifs si les
appareils sont utilisés dans un but autre que celui
pour lequel ils ont été conçus, sʼils ne sont pas correctement installés ou utilisés ou sʼils ne sont pas
réparés par une personne habilitée ; de même, la
garantie deviendrait caduque.
3 Possibilités dʼutilisation
Lʼinstallation intercom filaire ICM-20 est adaptée par
exemple pour des réceptions, guichets de vente, restaurants, ... Elle se compose dʼune station de base
avec amplificateur intégré, dʼune station dʼappel et
dʼun bloc secteur pour lʼalimentation. Le matériel de
montage pour fixer la station dʼappel est livré.
La station de base dispose dʼun haut-parleur intégré avec réglage de volume, dʼun microphone col de
cygne amovible et dʼune touche parole. La station
dʼappel, avec haut-parleur intégré et microphone, est
reliée à la station de base via trois câbles. Elle possède en plus dʼune touche dʼappel pour déclencher un
signal sonore.
4 Montage de la station dʼappel
4.1 Montage collé
La station dʼappel peut être collée sur une vitre via les
deux anneaux velcro livrés.
1)
Séparez les anneaux qui sont reliés entre eux via un
velcro. Les deux anneaux possèdent sur leur face
arrière une couche de colle sous une feuille retirable.
2) Sur un des anneaux, retirez la feuille et collez-le sur
la face arrière de la station dʼappel.
3) Retirez la feuille sur le second anneau et collez-le à
lʼendroit voulu sur la vitre.
Lorsque les appareils sont définitivement retirés du service, vous devez les déposer dans
une usine de recyclage adaptée pour contribuer à leur élimination non polluante.
AVERTISSEMENT Le bloc secteur est alimenté par
une tension dangereuse. Ne touchez jamais lʼintérieur de lʼappareil car en cas de mauvaise
manipulation, vous pourriez subir
une décharge électrique.
8
F
B
CH
Page 9

4) Collez la station dʼappel avec son anneau velcro sur lʼanneau velcro sur la vitre.
Schéma 3 montage collé
4.2 Montage par vissage
La station dʼappel peut être montée via les vis livrées
sur une cloison fine (par exemple vitre).
1) Percez un trou de diamètre 50 mm sur la cloison.
2) Dévissez la partie arrière de la station dʼappel.
3) Desserrez lʼanneau caoutchouc sur la partie avant
de telle sorte que les câbles de branchement puissent sortir du guide-câble latéral. Repositionnez
lʼanneau sur la partie avant.
4) Par lʼavant, placez la partie avant devant le trou
dans la cloison et faites passer les câbles à lʼarrière
via le trou.
5) Faites passer les câbles via la partie arrière.
6) Vissez la partie arrière avec la partie avant à lʼaide
des trois vis livrées.
Schéma. 4 montage par vissage
5 Branchement
1)
Placez le microphone col de cygne (6) dans la prise
XLR femelle (7) de la station de base. Lʼinterrupteur
(2) doit être sur la position EM (microphone électret).
2) Reliez les trois câbles de branchement de la station
dʼappel avec les prises femelles correspondantes
sur la station de base :
– la fiche RCA mâle rouge (13) avec la prise
femelle MIC rouge (3)
– la fiche RCA mâle blanche (14) avec la prise
femelle SP blanche (4)
– la fiche jack mâle (15) avec la prise jack 3,5
femelle (5) CALL-LAMP
3) Reliez le bloc secteur à la prise dʼalimentation (1)
de la station dʼappel et à une prise secteur 230 V~ /
50 Hz.
6 Utilisation
Allumez lʼinstallation en tournant le réglage (9). Les
témoins de fonctionnement (8, 11) brillent.
Transmission audio station dʼappel → station de base :
Placez-vous devant la station dʼappel (distance
optimale 10 à 20 cm) et parlez. Sur la station de
base, réglez le volume avec le réglage (9). La personne à la station dʼappel peut déclencher un signal
sonore en appuyant sur la touche CALL (12).
Transmission audio station de base → station dʼappel :
Pour une annonce, maintenez la touche TALK (10)
enfoncée et parlez dans le microphone col de
cygne (6). Lʼannonce est restituée via le haut-parleur de la station dʼappel. Après lʼannonce, relâchez
la touche.
Pour éteindre lʼinstallation, tournez le réglage (9) entièrement à gauche jusquʼà ce quʼil sʼenclenche (position
OFF). En cas de non utilisation prolongée de lʼinstallation, il convient de débrancher le bloc secteur car
même si lʼinstallation est éteinte, le bloc secteur a une
faible consommation.
7 Caractéristiques techniques
Microphone col de cygne : capsule micro électret,
cardioïde,
col de cygne 300 mm
Alimentation : . . . . . . . . . . 9 V /300 mA par
bloc secteur livré
230 V~ / 50 Hz / 7 VA
Température fonc. : . . . . . . 0 – 40 °C
Dimensions
station de base : . . . . . . 115 × 65 × 170mm
station dʼappel : . . . . . . . ∅ 85 mm × 35mm
longueur de câble : . . . . 3 m
Tout droit de modification réservé.
9
F
B
CH
Notice dʼutilisation protégée par le copyright de MONACOR®INTERNATIONAL GmbH & Co. KG. Toute reproduction même partielle à des fins commerciales est interdite.
Page 10

A pagina 3, se aperta completamente, vedrete
sempre gli elementi di comando e i collegamenti
descritti.
1 Elementi di comando e collegamenti
1.1 Stazione base
1 Presa di alimentazione per il collegamento dellʼali-
mentatore a spina
2 Selettore per il tipo di microfono: spostare il selet-
tore su EM (= electret microphone)
3 Presa MIC per il collegamento del connettore RCA
rosso (13) della stazione di chiamata
4 Presa SP per il collegamento del connettore RCA
bianco (14) della stazione di chiamata
5 Presa CALL-LAMP per il collegamento del jack
3,5 mm (15) della stazione di chiamata
6 Microfono elettrete a collo di cigno con protezione
antivento integrata
7 Contatto per il microfono a collo di cigno
8 Spia di funzionamento
9 Regolatore del volume, combinato con un interrut-
tore on / off; allo scatto del regolatore girato tutto a
sinistra (OFF), lʼimpianto è disattivato
10 Tasto voce TALK, tener premuto durante un avviso
1.2 Stazione di chiamata
11 Spia di funzionamento
12 Tasto di chiamata CALL, premendo il tasto, la sta-
zione base emette un suono segnaletico
13 Connettore RCA rosso per il collegamento con la
presa MIC (3) della stazione base
14 Connettore RCA bianco per il collegamento con la
presa SP (4) della stazione base
15 Jack 3,5 mm per il collegamento con la presa
CALL-LAMP (5) della stazione base
2 Avvertenze di sicurezza
Gli apparecchi sono conformi a tutte le direttive richieste dellʼUE e pertanto portano la sigla .
Si devono osservare assolutamente anche i seguenti
punti:
G
Usare gli apparecchi solo allʼinterno di locali e proteggerli dallʼacqua gocciolante e dagli spruzzi dʼac-
qua, da alta umidità dellʼaria e dal calore (temperatura dʼimpiego ammessa fra 0 e 40 °C).
G
Non mettere in funzione lʼapparecchio o staccare
subito lʼalimentatore dalla rete se:
1. uno degli apparecchi presenta dei danni visibili;
2. dopo una caduta o dopo eventi simili sussiste il
sospetto di un difetto;
3. gli apparecchi non funzionano correttamente.
Per la riparazione rivolgersi sempre ad unʼofficina
competente.
G
Per la pulizia usare solo un panno morbido, asciutto;
non impiegare in nessun caso prodotti chimici o
acqua.
G
Nel caso dʼuso improprio, dʼinstallazione sbagliata,
dʼimpiego scorretto o di riparazione non a regola
dʼarte degli apparecchi, non si assume nessuna
responsabilità per eventuali danni consequenziali a
persone o a cose e non si assume nessuna garanzia per gli apparecchi.
3 Possibilità dʼimpiego
Lʼinterfono a cavo ICM-20 è adatto, per esempio, per
reception, sportelli di vendita, ristoranti ecc. È composto da una stazione base con amplificatore integrato,
da una stazione di chiamata e da un alimentatore a
spina. Il materiale di montaggio per fissare la stazione
di chiamata è in dotazione.
La stazione base dispone di un altoparlante integrato con regolazione del volume, di un microfono
staccabile a collo di cigno e di un tasto voce. La stazione di chiamata, con altoparlante integrato e microfono viene collegata con la stazione base per mezzo di
tre cavi. In più possiede un tasto voce per far scattare
un suono segnaletico.
4 Montaggio della stazione di chiamata
4.1 Montaggio incollato
Per mezzo dei due anelli con velcro in dotazione, la
stazione di chiamata può essere incollata a un vetro.
1) Separare gli anelli, collegati fra loro con la chiusura
a velcro. Entrambi gli anelli, sul lato posteriore, pre-
sentano uno strato adesivo coperto da una pellicola
staccabile.
2) Staccare la pellicola da uno degli anelli e incollarlo
sul retro della stazione di chiamata.
3) Staccare la pellicola dal secondo anello e incollarlo
sul posto voluto del vetro.
4) Attaccare la stazione di chiamata con il suo anello
di velcro allʼanello con velcro sul vetro.
Se si desidera eliminare gli apparecchi definitivamente, consegnarli per lo smaltimento ad
unʼistituzione locale per il riciclaggio.
AVVERTIMENTO Lʼalimentatore funziona con peri-
colosa tensione di rete. Non
intervenire mai personalmente al
suo interno. La manipolazione
scorretta può provocare delle
scariche elettriche pericolose.
10
I
Page 11

Fig. 3 Montaggio incollato
4.2 Montaggio a vite
Per mezzo delle viti in dotazione, la stazione di chiamata può essere montata a una sottile parete divisoria
(p. es. un vetro).
1) Applicare nella divisoria un foro del diametro di
50 mm.
2) Svitare la parte posteriore della stazione di chiamata.
3) Allentare lʼanello di gomma sulla parte anteriore al
punto tale che si possano sfilare i cavi di collegamento dalla guida laterale per i cavi. Quindi sistemare nuovamente lʼanello sulla parte anteriore.
4) Posizionare la parte anteriore davanti al foro nella
divisoria e fare passare i cavi attraverso il foro.
5) Far passare i cavi attraverso la parte posteriore.
6) Con le tre viti più lunghe in dotazione, avvitare la
parte posteriore contro la parte anteriore.
Fig. 4 Montaggio a vite
5 Collegamento
1)
Inserire il microfono a collo di cigno (6) nella presa
XLR (7) della stazione base. Il selettore a cursore (2)
deve essere in posizione EM (= electret microphone).
2) Collegare i tre cavi di collegamento della stazione di
chiamata con le relative prese della stazione base:
– il connettore RCA rosso (13) con la presa rossa
MIC (3)
– il connettore RCA bianco (14) con la presa
bianca SP (4)
– il jack (15) con la presa jack 3,5 mm (5) CALL-
LAMP
3) Collegare lʼalimentatore a spina con la presa dʼalimentazione (1) della stazione base e inserirlo in
una presa di rete (230 V~/50 Hz).
6 Funzionamento
Accendere lʼimpianto aprendo il regolatore (9). Si
accendono le spie di funzionamento (8, 11).
Trasmissione audio stazione di chiamata → stazione
base:
Avvicinarsi alla stazione di chiamata (distanza ottimale 10 – 20 cm) e parlare. Sulla stazione base
impostare il volume dellʼaltoparlante con il regolatore (9). Dalla stazione di chiamata si può far scattare un suono segnaletico premendo il tasto CALL
(12).
Trasmissione audio stazione base → stazione di chia-
mata:
Per un avviso, tener premuto il tasto voce TALK
(10) e parlare nel microfono a collo di cigno (6).
Lʼavviso sarà riprodotto tramite lʼaltoparlante della
stazione di chiamata. Dopo lʼavviso sbloccare nuovamente il tasto.
Per spegnere lʼimpianto, girare il regolatore (9) tutto a
sinistra fino allo scatto (posizione OFF). Se lʼimpianto
non viene usato per un certo periodo, conviene staccare lʼalimentatore dalla presa, perché anche con lʼimpianto spento si consuma un poʼ di corrente.
7 Dati tecnici
Microfono a collo di cigno: capsula elettrete,
a cardioide,
collo di cigno di 300 mm
Alimentazione: . . . . . . . . . 9 V /300mA tramite
alimentatore a spina
in dotazione
(230 V~ / 50 Hz / 7 VA)
Temperatura dʼesercizio: . . 0 – 40 °C
Dimensioni
Stazione base: . . . . . . . 115 × 65 × 170 mm
Stazione di chiamata: . . ∅ 85 mm × 35 mm
Lunghezza cavo: . . . . . . 3 m
Con riserva di modifiche tecniche.
11
I
La MONACOR®INTERNATIONAL GmbH & Co. KG si riserva ogni diritto di elaborazione in qualsiasi forma delle
presenti istruzioni per lʼuso. La riproduzione – anche parziale – per propri scopi commerciali è vietata.
Page 12

12
NL
B
E
PL
Lees aandachtig de onderstaande veiligheidsvoorschriften, alvorens de apparaten in gebruik te ne men. Voor meer informatie over de bediening van de apparaten raadpleegt u de anderstalige handlei dingen.
Veiligheidsvoorschriften
De apparaten zijn allemaal in overeenstemming met de EU-Richtlijnen en dragen daarom het -kenmerk.
Let eveneens op het volgende:
G
De apparaten zijn uitsluitend geschikt
voor ge bruik bin nens huis. Vermijd
druip- en spatwater, plaatsen met een
hoge vochtigheid en uitzonderlijk
warme plaatsen (toegestaan omgevingstemperatuurbereik: 0 – 40 °C).
G
Schakel het systeem niet in resp. trek
onmiddellijk de netadapter uit het stopcontact, wanneer:
1. de apparaten zichtbaar be schadigd
zijn,
2. er een defect zou kunnen optreden
nadat een apparaat bijvoorbeeld
gevallen is,
3. een apparaat slecht functioneert.
De apparaten moeten in elk geval hersteld worden door een gekwalificeerd
vakman.
G
Gebruik voor de reiniging uitsluitend
een droge, zach te doek. Gebruik in
geen geval chemicaliën of water.
G
In geval van ongeoorloofd of verkeerd
gebruik, verkeerde installatie, foutieve
bediening of van herstelling door een
niet-gekwalificeerd persoon vervalt de
garantie en de verantwoordelijkheid
voor hieruit resulterende materiële of lichamelijke schade.
Wanneer de apparaten definitief
uit bedrijf worden genomen, be zorg ze dan voor verwerking aan
een plaatselijk recyclagebedrijf.
WAARSCHUWING:
De netspanning van de
netadapter is levensgevaarlijk. Open het apparaat niet,
want door onzorgvuldige
ingrepen loopt u het risico
van elektrische schokken.
Por favor, antes del uso de los aparatos
ob servar en todo caso las instrucciones
de seguridad siguientes. Si informaciones adicionales son necesarias para la
operación de los aparatos, estas se en cuentran en el texto alemán, inglés, fran cés o italiano de estas instrucciones.
Notas de seguridad
Los aparatos co rresponden a todas las
directivas requeridas por la UE y por ello
están marcados con .
Es esencial que observe los puntos
siguientes:
G
Los aparatos són sólo para uso interior. Protegerlos contra todo tipo de
pro yecciones de agua y las salpicaduras de agua, la alta humedad en el ambiente y el calor (rango de temperaturas admisibles para su funcionamiento
0 – 40 °C)
G
No conectar il sistema interfono o inmediatamente desconectar el alimentador de la toma de red si:
1. hay un daño visible en los aparatos,
2. puede haber un error después de
una caída o un accidente similar,
3. hay algún malfuncionamiento.
Siempre deben repararse sólo por personal especializado.
G
Para limpiarlos utilizar sólo un trapo
seco y suave sin ningún tipo de producto químico o agua.
G
Rechazamos cualquier responsabilidad en caso de daños personales o
materiales resultantes si los aparatos
han sido utilizados para otras utilidades, si no han sido instalados o utilizados correctamente o no han sido reparados de manera experta; por estos
mismos motivos carecería todo tipo de
garantía.
Cuando los aparatos estén definitivamente retirados del servicio, hay que depositarlos en
una fábrica de reciclaje adaptada para su contaminación no
contaminante.
ADVERTENCIA:
El alimentador se alimenta
con un voltaje de red peligro so. Deje el mantenimien to
en manos del personal cualificado. El manejo inexperto
puede causar una descarga.
Przed użyciem urządzenia należy przeczytać uważnie poniższą instrukcję
obsługi i zachować tekst do wglądu. Więcej informacji dotyczących obsługi urządzenia znajduje się w innych wersjach
językowych niniejszej instrukcji obsługi.
Środki bezpieczeństwa
Ponieważ urządzenia spełniają wszelkie
normy obowiązujące w Unii Europejskiej, zostały oznaczone symbolem .
Należy przestrzegać następujących
zaleceń:
G
Urządzenia są przeznaczone tylko
do użytku wewnątrz pomieszczeń.
Należy chronić przed wodą, dużą
wilgotnością powietrza oraz wysoką
temperaturą (dopuszczalny zakres
wynosi 0 – 40 °C).
G
Nie wolno używać urządzenia lub natychmiast odłączyć główną wtyczkę zasilającą z gniazda:
1. Jeśli występują widoczne uszkodzenia urządzenia.
2. Uszkodzenie urządzenia może
wystąpić w wyniku upadku lub
innego podobnego zdarzenia.
3. Jeśli urządzenie działa nieprawidłowo.
W takim przypadku naprawą urządzenia powinien zajmować się tylko przeszkolony personel.
G
Do czyszczenia należy używać tylko
suchej, miękkiej ściereczki. Nie wolno
używać wody ani żadnych środków
chemicznych.
G
Nie ponosi się odpowiedzialności za
wynikłe uszkodzenia sprzętu lub obrażenia użytkownika w przypadku gdy
urządzenie jest wykorzystywane w innych celach niż to się przewiduje lub
jeśli jest nieodpowiednio zainstalowane, podłączane, użytkowane lub naprawiane.
Aby nie zaśmiecać środowiska
po całkowitym zakończeniu
eksploatacji urządzeń należy je
oddać do punktu recyklingu.
UWAGA:
Zasilacz urządzenia pracuje na niebezpiecznym
napięciu sieciowym. Wszelkie naprawy należy zlecić
osobie przeszkolonej; nieprawidłowa obsługa może
spowodować porażenie
prądem elektrycznym.
Page 13

13
DK
S
FIN
Læs nedenstående sikkerhedsoplysninger grundigt igennem før ibrugtagning af
enhederne. Bortset fra sikkerhedsoplysningerne henvises til den engelske tekst.
Vigtige sikkerhedsoplysninger
Enhederne overholder alle nødvendige
EU direktiver og er derfor mærket med
.
Vær altid opmærksom på følgende:
G
Enhederne er kun be regnet til indendørs brug. Be skyt dem mod vanddrå-
ber og -stænk, høj luft fug tig hed og
varme (tilladt om givel ses tem pera tur
0 – 40 °C).
G
Tag ikke enhederne i brug og tag
straks strømforsyningen ud af stikkontakten i følgende tilfælde:
1. hvis der er synlig skade på enhederne.
2. hvis der kan være opstået skade,
efter at enhederne er tabt eller lignende.
3. hvis der forekommer fejlfunktion.
I alle tilfælde skal enhederne repareres
af faguddannet personale.
G
Til rengøring må kun benyttes en tør,
blød klud; der må under ingen omstændigheder benyttes kemikalier eller
vand.
G
Der ydes ingen garanti for enhederne,
og vi fraskriver os ethvert ansvar for resulterende personskade eller tingskade,
hvis enhederne anvendes til andre
formål, end de er beregnet til, hvis de
installeres eller anvendes på forkert
måde eller repareres på en ikke tilfredsstillende måde.
Hvis enhederne ikke skal bruges mere, skal de afleveres på
den lokale genbrugsstation for
ikke at skade miljøet.
ADVARSEL:
Strømforsyningen arbejder
med farlig lysnetspænding.
Overlad service til faguddannet personale; forkert
håndtering kan medføre
elektrisk stød.
Läs igenom säkerhetsföreskrifterna in nan
enhetera tas i bruk. Ytterligare information återfinns på övriga språk i manualen.
Säkerhetsföreskrifter
Enheterna uppfyller alla direktiv enligt
EU och har därför försetts med symbolen .
Ge även akt på följande:
G
Enheterna är endast avsedda för in om hus bruk. Enheterna skall skyddas från
rinnande och droppande vätskor, hög
värme och hög luftfuktighet (arbetstemperatur 0 – 40 grader C).
G
Använd inte enheterna och ta omedelbart ut nätdelen ur elurtaget om något
av följande fel uppstår:
1. Om det finns synliga skador på
enheterna.
2. Om någon av enheterna skadats av
fall ed.
3. Om enheterna har andra felfunktioner.
Enheterna skall alltid lagas på verkstad
av utbildad personal.
G
Rengör endast med en mjuk och torr
tra sa, an vänd aldrig kemikalier eller
vatten vid ren göring.
G
Om enheterna används för andra ändamål än vad de är avsedd för, felkopplad, ej handhavd på korrekt sätt
gäller inte garantin, detsamma om
egna eller oauktoriserade ingrepp görs
i enheterna. I dessa fall tas inget ansvar för uppkommen skada på person
eller materiel.
Om enheterna skall kasseras
bör de lämnas in till återvinning.
VARNING:
Nätdelen använder hög
spänning internt (230 V~).
Överlåt därför all service till
elutbildad personal. Felaktiga ingrepp kan ge upphov
till elskador på person och
materiel.
Ole hyvä ja tutustu seuraaviin ohjeisiin
varmis taaksesi tuotteen turvallisen käytön. Tarvitessasi lisätietoja tuotteen käytöstä löydät ne muun kielisistä käyttöohjeista.
Turvallisuudesta
Nämä laiteet täyttävät kaik ki niihin kohdistuvat EU-direktiivit ja niille on myönnetty hyväksyntä.
Huomioi seuraavat seikat:
G
Nämä laitteet soveltuvat käytettäväksi
ainoastaan sisätiloissa. Suojele laitetta
kosteudelta, vedeltä ja kuumuudelta
(sallittu ympäröivä lämpötila 0 –40 Celsius astetta).
G
Irrota virtalähteen johto pistorasiasta,
äläkä käynnistä laitetta, jos:
1. laitteessa on havaittu vaurio,
2. laitteiden putoaminen tai vastaava
vahinko on saattanut aiheuttaa vaurion,
3. laitteissa esiintyy toimintahäiriöitä.
Kaikissa tapauksissa laite tulee toimittaa valtuutettuun huoltoliikkeeseen.
G
Käytä puhdistamiseen pelkästään kuivaa, pehmeää kangasta. Älä käytä kemikaaleja tai vettä.
G
Jos laitetta käytetään muuhun kuin
mihin ne ovat alun perin tarkoitettu, jos
niitä käytetään väärin taikka niitä ei ole
huollettu tai korjattu valtuutetussa huol-
toliikkeessä, takuu ei ole voimassa,
eikä valmistaja, maahantuoja taikka
myyjä ota vastuuta aiheutuneesta vahingosta.
Kun laite poistetaan lopullisesti
käytöstä, huolehdi, että laite
hävitetään asianmukaisesti jätteenkäsittelylaitoksessa.
VAROITUS
Liitettävä virtalähde toimii
hengenvaarallisella jännitteellä (230 V~). Jätä huoltotoimet valtuutetulle huoltoliikkeelle. Epäpäte vä huolto
ja käsittely saattavat aiheuttaa sähköiskun vaaran.
Page 14

MONACOR INTERNATIONAL GmbH & Co. KG •Zum Falsch 36 •28307 Bremen •Germany
Copyright
©
by MONACOR INTERNATIONAL. All rights reserved. A-1027.99.02.05.2011
®
 Loading...