

Page 1
AudiospielerEinbaumodul
Bitte lesen Sie diese Anleitung vor dem Betrieb
gründlich durch und heben Sie sie für ein späteres
Nachlesen auf.
1 Verwendungsmöglichkeiten
Dieses kompakte Audiospieler-Modul ist zum Einbau in ein vorhandenes Gerät oder in ein eigenes
Gehäuse vorgesehen. Es wird mit einer Gleichspannung von 12 V versorgt.
Mit dem Audiospieler lassen sich Audiodateien
im Format MP3 abspielen von:
– USB-Speicher-Sticks
– USB-Festplatten mit eigener Stromversorgung
– SD/SDHC/ MMC-Speicherkarten
Hinweis: Aufgrund der Vielfalt von Speicher-Herstellern
und Gerätetreibern kann nicht garantiert werden, dass alle
Speichermedien mit dem DMP-100 kompatibel sind.
2 Wichtige Hinweise für den Gebrauch
Das Modul entspricht allen relevanten Richtlinien
der EU und ist deshalb mit
gekennzeichnet.
G
Das Modul ist nur zur Verwendung im Innenbereich geeignet. Schützen Sie es vor Tropf- und
Spritzwasser, hoher Luftfeuchtigkeit und Hitze
(zulässiger Einsatztemperaturbereich 0 – 40 °C).
G
Verwenden Sie zum Reinigen nur ein trockenes,
weiches Tuch, nie Wasser oder Chemikalien.
G
Wird das Modul zweckentfremdet, nicht richtig
angeschlossen, falsch bedient oder nicht fachgerecht repariert, kann keine Haftung für daraus
resultierende Sach- oder Personenschäden und
keine Garantie für das Modul übernommen
werden.
3 Einbau und Anschluss
1) Wenn das Gerät, in welches das Modul eingebaut werden soll, mit Netzspannung versorgt
wird, das Gerät unbedingt vom 230-V-Strom netz trennen.
2) Für die Aufnahme des Moduls ist ein Ausschnitt
von 106 mm × 19 mm erforderlich. Die Einbautiefe beträgt 55 mm. Das Modul in die Einbauöffnung schieben und über seine Frontplatte mit
vier Schrauben befestigen.
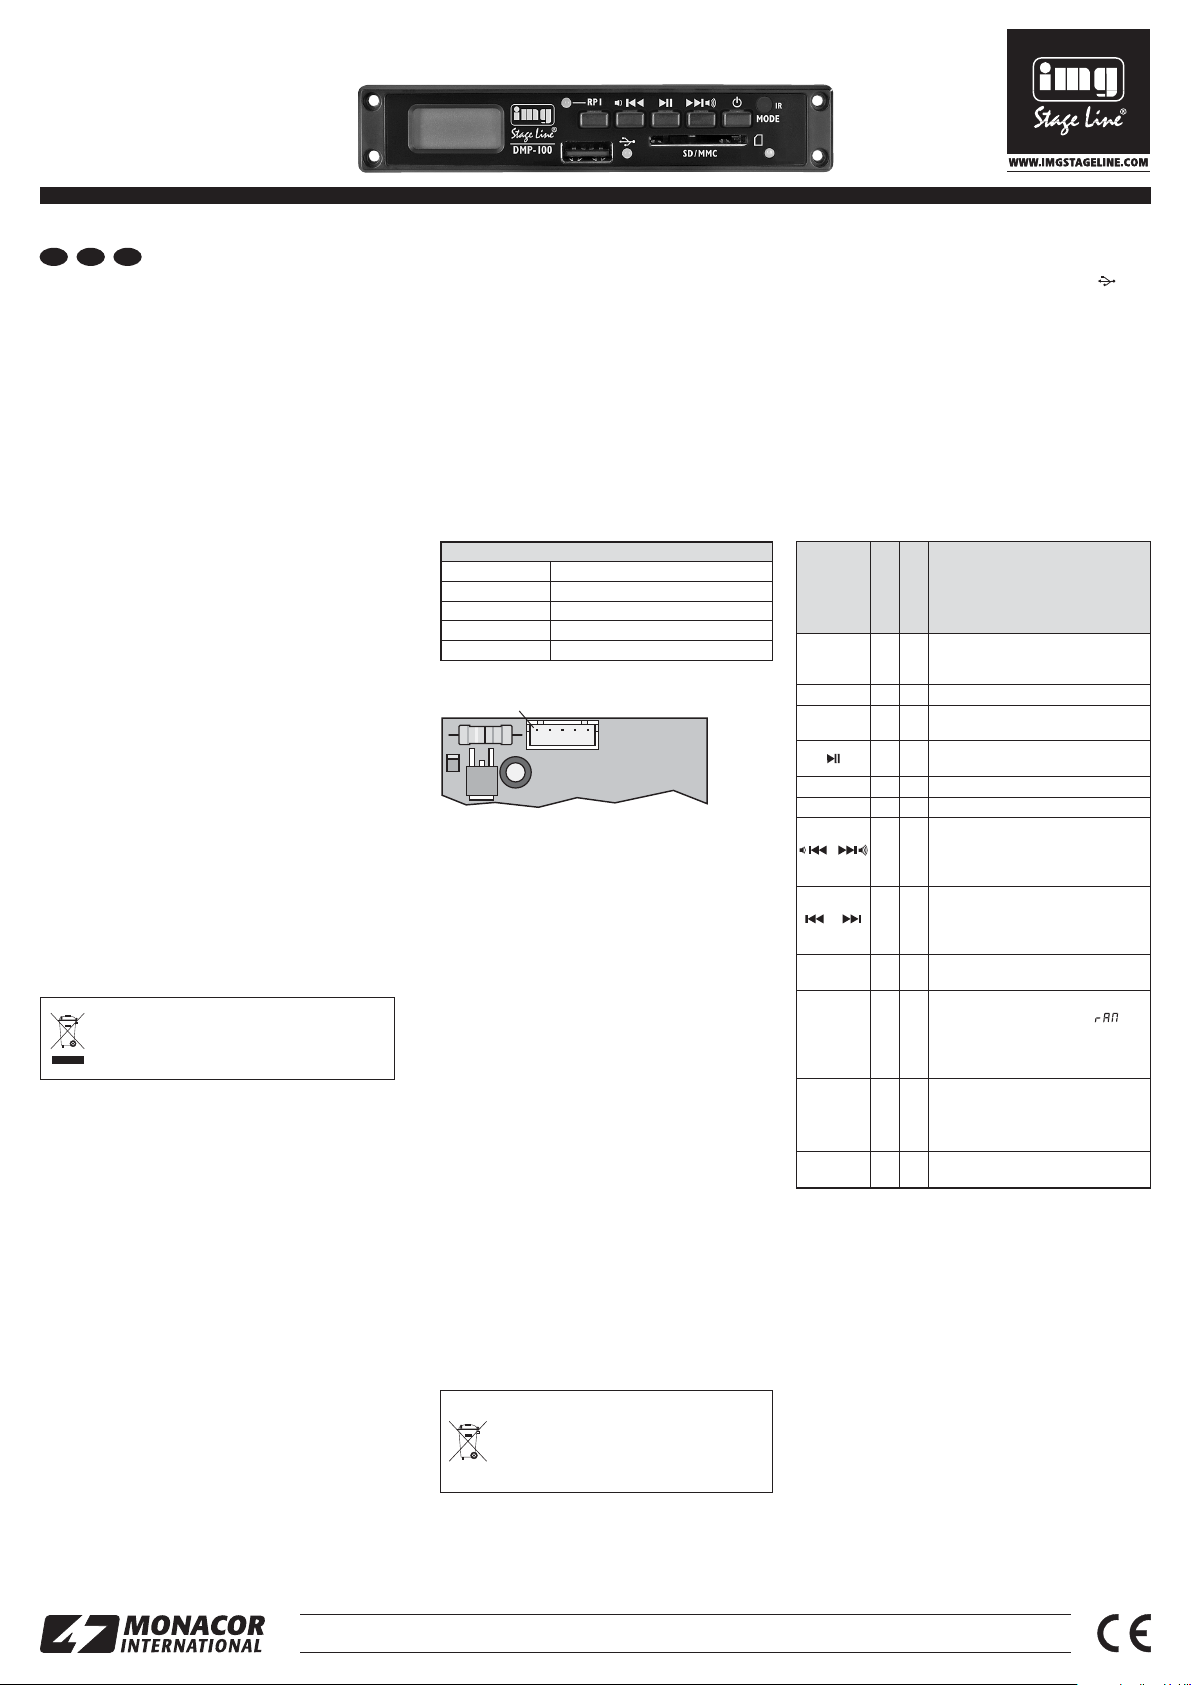
3) Der elektrische Anschluss erfolgt über die
5-polige Stiftleiste CN 2. Die Kontaktbelegung
ist auf der Unterseite der Leiterplatte angegeben:
Leiterplatte mit den Anschlüssen
Dem Modul liegt ein 38-cm-Anschlusskabel mit
5-poligen Steckern bei. Alternativ dazu kann
auch das als Zubehör erhältliche Adapterkabel
DMP-12CC verwendet werden. Es ist mit zwei
Cinch-Kupplungen und einer Kleinspannungskupplung (5,5 mm / 2,1mm, Pluspol = Mittelkontakt) konfektioniert.
4 Fernbedienung
1) Zum Einsetzen der Batterien (2 × 1,5 V, Größe
AAA = Micro) auf der Rückseite der Fernbedienung den Batteriefachdeckel abnehmen. Die
Batterien, wie im Batteriefach angegeben, einsetzen. Das Fach mit dem Deckel wieder
schließen.
Bei längerem Nichtgebrauch die Batterien
herausnehmen, damit die Fernbedienung bei
einem eventuellen Auslaufen der Batterien
nicht beschädigt wird.
2) Die Fernbedienung beim Drücken einer Taste
immer in Richtung des Audiospielers halten. Da bei muss Sichtverbindung zwischen der Fernbedienung und dem Audiospieler bestehen.
3) Lässt die Reichweite der Fernbedienung nach,
sind die Batterien verbraucht und müssen ausgewechselt werden.
5 Bedienung
Einen USB-Stick in den USB-Anschluss stecken oder eine Festplatte mit eigener Stromversorgung mit dem USB-Anschluss verbinden und / oder
eine Speicherkarte in den Steckplatz SD/ MMC stecken. Dabei muss die abgeschrägte Ecke der
Karte nach links und zum Gerät zeigen. Soll die
Karte wieder entnommen werden, sie etwas hin eindrücken, sodass sie ausrastet.
Nach dem Einschalten des Audiospielers startet automatisch der zuletzt gespielte Titel. Alle
Bedienmöglichkeiten sind in der folgenden Tabelle
aufgeführt.
6 Technische Daten
Frequenzgang: . . . . . . 20 – 20 000 Hz
Ausgangspegel: . . . . . 500 mV
Klirrfaktor: . . . . . . . . . . < 0,2 %
Kanaltrennung: . . . . . . > 60 dB
Störabstand: . . . . . . . . > 75 dB (A-bewertet)
Stromversorgung: . . . . 12 V
± 2 V, 100 mA
Einsatztemperatur: . . . 0 – 40 °C
Maße, Gewicht: . . . . . 120 × 22 × 58 mm, 48g
Änderungen vorbehalten.
Verbrauchte Batterien dürfen nicht in
den Hausmüll geworfen werden. Ge ben Sie sie zur umweltgerechten Entsorgung nur in den Sondermüll (z. B.
Sammelbehälter im Einzelhandel).
+12V
CN2
R-CH
GND
L-CH
S-GND
100
6V
78M05
0X1301
CN 2
+12 V Betriebsspannung 12 V, 100 mA
GND Masse
L-CH Ausgang linker Kanal
S-GND Masse
R-CH Ausgang rechter Kanal
Soll das Modul endgültig aus dem Betrieb
genommen werden, übergeben Sie es zur
umweltgerechten Entsorgung einem örtlichen Recyclingbetrieb.
MONACOR INTERNATIONAL GmbH & Co. KG • Zum Falsch 36 • 28307 Bremen • Germany
Copyright
©
by MONACOR INTERNATIONAL. All rights reserved. A-1580.99.01.06.2014
®
DMP-100
Bestellnummer 17.3510
ELECTRONICS FOR SPECIALISTS ELECTRONICS FOR SPECIALISTS ELECTRONICS FOR SPECIALISTS ELECTRONICS FOR SPECIALISTS ELECTRONICS FOR SPECIALISTS ELECTRONICS FOR SPECIALISTS ELECTRONICS FOR SPECIALISTS
D A CH
Taste
am Gerät
auf der Fern-
bedienung
Funktion
MODE
Einschalten, Umschalten zwischen
USB-Anschluss und Speicherkarte;
Ausschalten: 3 s gedrückt halten
Ein- und Ausschalten
MODE
Umschalten zwischen USBAnschluss und Speicherkarte
Wiedergabe starten und Umschalten
zwischen Wiedergabe und Pause
0…9
Direktwahl eines Titels
+10
10 Titel weiterspringen
vorheriger / nächster Titel:
Taste kurz drücken
Lautstärke verringern / erhöhen:
Taste gedrückt halten
vorheriger / nächster Titel:
Taste kurz drücken
schneller Vor-/ Rücklauf: Taste ge drückt halten (Ton dabei stumm)
VOL+
VOL−
Lautstärke erhöhen / verringern:
Taste (mehrfach) kurz drücken
RAND
Abspielen in zufälliger Reihenfolge
– einschalten, Anzeige kurz ,
REPEAT 1 / ALL wird ausgeblendet
– ausschalten, REPEAT 1 / ALL ist wie-
der eingeblendet
RP1
REPEAT
den laufenden Titel
endlos wiederholen
– einschalten, Anzeige: REPEAT 1
– ausschalten, Anzeige: REPEAT ALL
Wiedergabe beenden; das Display
zeigt die Anzahl der Titel an
Page 2
Audio Player Insertion Module
Please read these operating instructions carefully
prior to operation and keep them for later reference.
1 Applications
This compact audio player module is designed for
installation into an existing unit or into a separate
housing. It is supplied with 12 V DC voltage.
The audio player is able to replay audio files in
MP3 format from:
– USB flash drives
– USB hard disks with separate power supply
– SD/SDHC/ MMC memory cards
Note: Due to the large number of storage device manufacturers and device drivers, it cannot be guaranteed that
all storage media are compatible with the DMP-100.
2 Important Notes
This module corresponds to all relevant directives
of the EU and is therefore marked with .
G
The module is suitable for indoor use only. Protect it against dripping water and splash water,
high air humidity and heat (admissible ambient
temperature range: 0 – 40 °C).
G
For cleaning only use a dry, soft cloth; never use
water or chemicals.
G
No guarantee claims for the module and no liability for any resulting personal damage or material damage will be accepted if the module is
used for other purposes than originally intended,
if it is not correctly connected or operated, or if it
is not repaired in an expert way.
3 Installation and Connection
1) If the unit into which the module is to be
installed is supplied with mains voltage, disconnect the unit from the 230 V mains.
2) To install the module, a cutout of 106mm × 19 mm
is required. The installation depth is 55 mm.
Push the module into the cutout and fasten it via
its front panel using four screws.
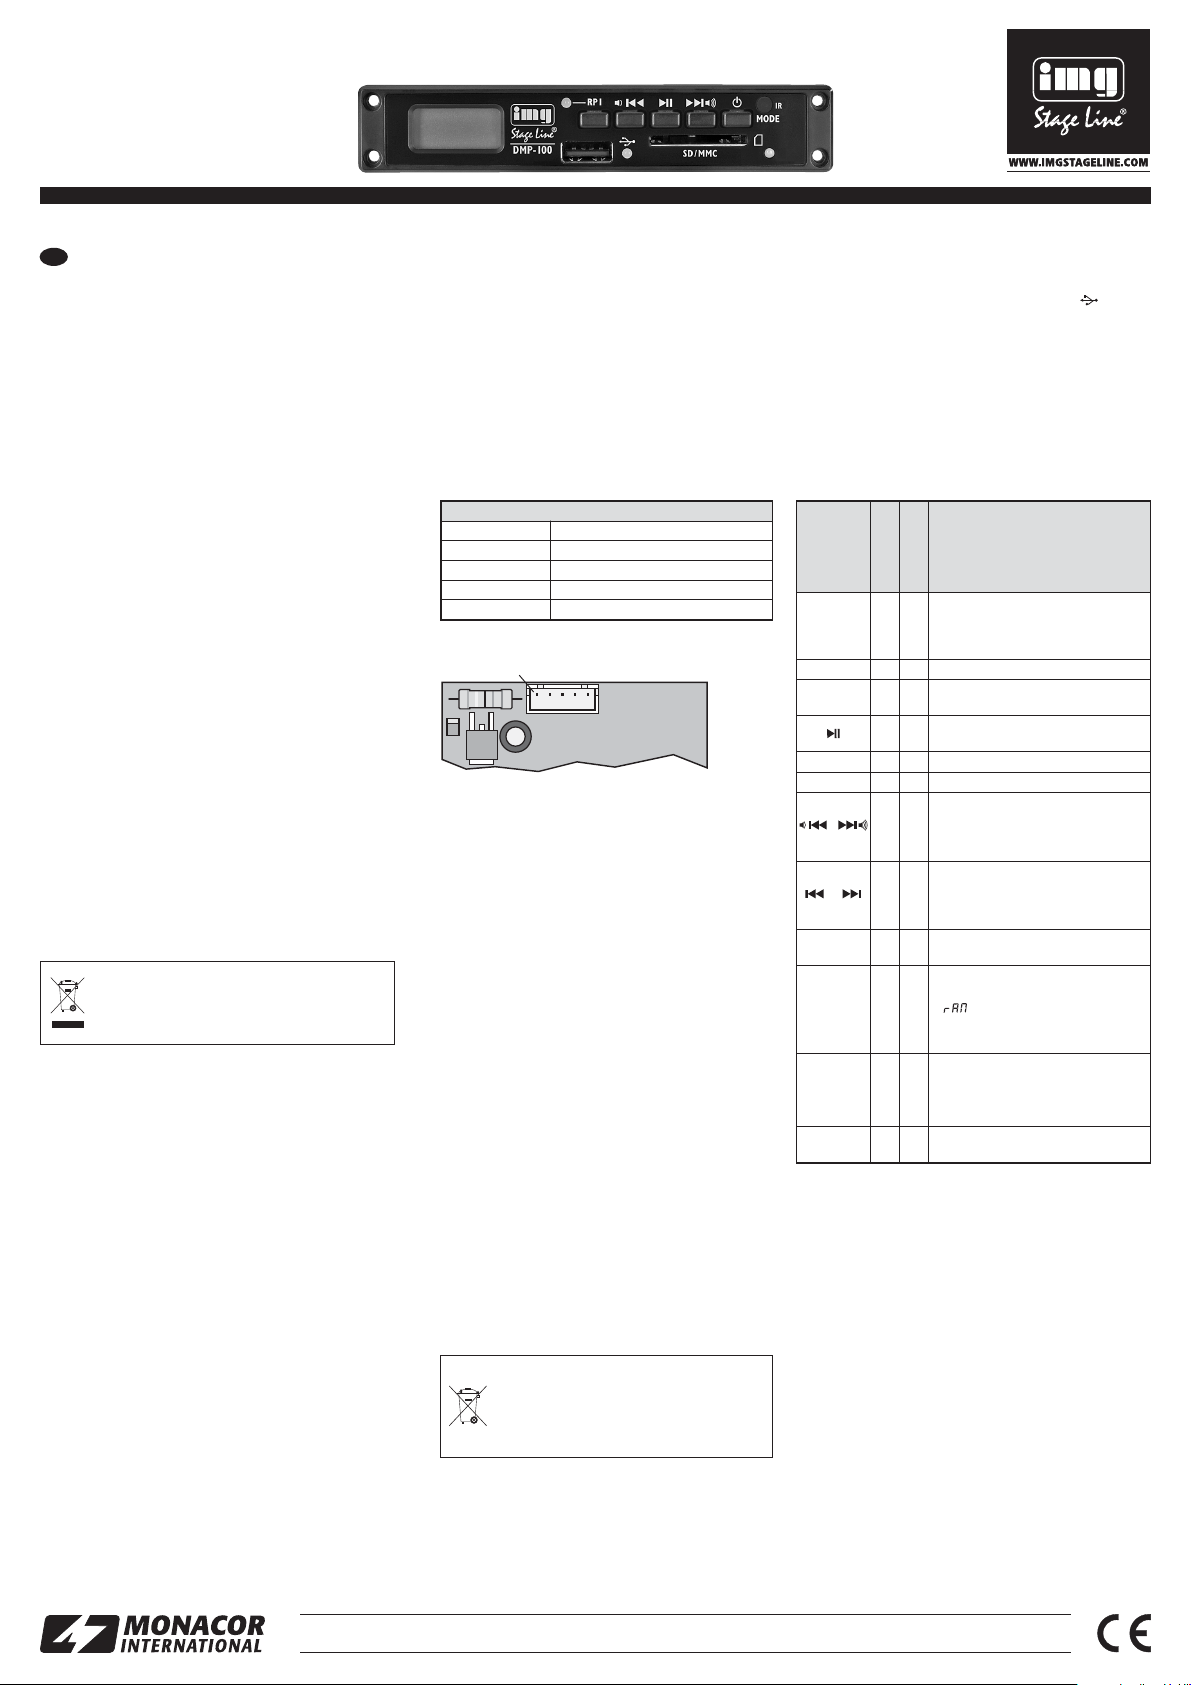
3) Electrical connection is made via the 5-pole pin
connector CN 2. The pin configuration can be
found on the lower side of the PCB:
PCB with connector
The module is supplied with a 38 cm connection
cable with 5-pole plugs. As an alternative, use
the adapter cable DMP-12CC available as an
accessory. The adapter cable is fitted with two
RCA inline jacks and a low-voltage inline jack
(5.5 mm / 2.1 mm, positive pole = centre contact).
4 Remote Control
1) To insert the batteries (2 × 1.5 V, size AAA), re move the battery compartment cover on the
rear of the remote control. Insert the batteries
as indicated in the compartment, and then close
the cover.
If the remote control is not in use for a longer
period of time, always remove the batteries to
prevent damage due to battery leakage.
2) When you press a button on the remote control,
always point the remote control at the audio
player. Make sure that there are no obstacles
between the remote control and the player.
3) If the operating range of the remote control
decreases, the batteries are discharged and
must be replaced.
5 Operation
Connect a USB flash drive or a hard disk with
separate power supply to the USB port and / or
insert a memory card into the slot SD/ MMC
(notched corner to the left and facing the player).
To remove the card, push the card into the slot until
it disengages.
When the audio player is switched on, the title
replayed most recently will start automatically. All
control options can be found in the table below.
6 Specifications
Frequency response: . 20 – 20 000 Hz
Output level: . . . . . . . . 500 mV
THD: . . . . . . . . . . . . . . < 0.2 %
Channel separation: . . > 60 dB
S / N ratio: . . . . . . . . . . > 75 dB (A weighted)
Power supply: . . . . . . . 12 V
± 2 V, 100 mA
Ambient temperature: .0 – 40 °C
Dimensions, weight: . . 120 × 22 × 58 mm, 48 g
Subject to technical modification.
Never put discharged batteries in the
household waste; always take them to
a special waste disposal, e. g. collection container at your retailer.
+12V
CN2
R-CH
GND
L-CH
S-GND
100
6V
78M05
0X1301
CN 2
+12 V 12 V operating voltage, 100 mA
GND ground
L-CH output left channel
S-GND ground
R-CH output right channel
If the module is to be put out of operation
definitively, take it to a local recycling plant
for a disposal which is not harmful to the
environment.
MONACOR INTERNATIONAL GmbH & Co. KG • Zum Falsch 36 • 28307 Bremen • Germany
Copyright
©
by MONACOR INTERNATIONAL. All rights reserved. A-1580.99.01.06.2014
®
DMP-100
Order number 17.3510
ELECTRONICS FOR SPECIALISTS ELECTRONICS FOR SPECIALISTS ELECTRONICS FOR SPECIALISTS ELECTRONICS FOR SPECIALISTS ELECTRONICS FOR SPECIALISTS ELECTRONICS FOR SPECIALISTS ELECTRONICS FOR SPECIALISTS
GB
Button
on the
audio player
on the
remote control
Function
MODE
to switch on, to switch between
USB port and memory card;
to switch off: keep button pressed for
3 seconds
to switch on and off
MODE
to switch between USB port and
memory card
to start the replay and to switch
between replay and pause
0…9
direct title selection
+10
to skip 10 titles
previous / next title:
press button briefly
to increase / decrease the volume:
keep button pressed
previous / next title:
press button briefly
fast forward / reverse: keep button
pressed (sound muted in the process)
VOL+
VOL−
to increase / decrease the volume:
press button briefly (repeatedly)
RAND
replay in random order
– when activated, brief indication
, REPEAT 1 / ALL will disappear
– when deactivated, REPEAT 1 / ALL
will reappear
RP1
REPEAT
continuous repeat of the current title
– when activated, indication REPEAT 1
– when deactivated, indication
REPEAT ALL
to stop the replay; the display will
indicate the number of titles
Page 3

Module lecteur audio
encastrable
Veuillez lire la présente notice avec attention avant
le fonctionnement et conservez-la pour pouvoir
vous y reporter ultérieurement.
1 Possibilités dʼutilisation
Ce module lecteur audio compact est conçu pour
une intégration dans un appareil existant ou dans
un boîtier propre. Il est alimenté par une tension
continue 12 V.
Avec le lecteur audio, il est possible de lire des
fichiers audio au format MP3 venant de :
– clés USB
– disques durs USB avec alimentation propre
– cartes de mémoire SD/ SDHC / MMC
Remarque: En raison de la multitude de fabricants de
supports de mémoire et de drivers dʼappareils, il nʼest pas
possible de garantir que tous les supports de mémoire
soient compatibles avec le DMP-100.
2 Conseils importants d'utilisation
Le module répond à toutes les directives nécessaires de lʼUnion européenne et porte donc le symbole .
G
Le module n'est conçu que pour une utilisation
en intérieur. Protégez-le de tout type de projections d'eau, des éclaboussures, d'une humidité
élevée de l'air et de la chaleur (plage de température de fonctionnement autorisée : 0 – 40 °C).
G
Pour le nettoyage, utilisez uniquement un chiffon
sec et doux, en aucun cas de produits chimiques
ou d'eau.
G
Nous déclinons toute responsabilité en cas de
dommages matériels ou corporels résultants si le
module est utilisé dans un but autre que celui
pour lequel il a été conçu, s'il n'est pas correctement branché ou utilisé ou s'il n'est pas réparé
par une personne habilitée, en outre, la garantie
deviendrait caduque.
3 Installation et branchement
1) Si lʼappareil dans lequel le module doit être
installé, est alimenté par une tension secteur,
débranchez impérativement lʼappareil du secteur 230 V.
2) Pour lʼinstallation du module, une découpe de
106 mm × 19mm est nécessaire. La profondeur
de montage est de 55 mm. Poussez le module
dans lʼouverture et fixez-le via sa façade avec
quatre vis.
3) Le branchement électrique se fait via la barrette
CN 2 (5 pôles). La configuration des contacts
est présentée sur la partie inférieure du circuit
imprimé :
Circuit imprimé avec les branchements
Un cordon de branchement de 38 cm avec
fiches 5 pôles est livré avec le module. On peut
utiliser à la place du cordon 5 pôles, le cordon
adaptateur DMP-12CC, disponible en option.
Il est équipé de deux fiches RCA femelles
et dʼune fiche femelle basse tension (5,5 mm /
2,1 mm, pôle plus = contact médian).
4 Télécommande
1) Pour insérer les batteries (2 × 1,5 V, type R03),
retirez le couvercle du compartiment batterie
sur la face arrière de la télécommande. Insérez
les batteries comme indiqué dans le compartiment. Refermez le compartiment avec le couvercle.
En cas de non utilisation prolongée, retirez
les batteries, elles pourraient couler et endommager la télécommande.
2) Tenez la télécommande toujours en direction
du lecteur audio lorsque vous activez une
touche. Il ne doit pas y avoir dʼobstacle entre la
télécommande et le lecteur audio.
3) Si la portée de la télécommande faiblit, les batteries sont mortes et doivent être remplacées.
5 Utilisation
Mettez une clé USB dans le port USB ou reliez
un disque dur avec alimentation propre au port
USB et / ou insérez une carte mémoire dans la
fente SD/ MMC. Veillez à ce que le coin oblique de
la carte soit positionné sur la gauche et vers lʼappareil. Pour retirer la carte, enfoncez-la un peu
pour quʼelle se désenclenche.
Une fois le lecteur audio allumé, le dernier titre
lu démarre automatiquement. Vous trouverez
toutes les possibilités dʼutilisation sur le tableau cidessous.
6 Caractéristiques techniques
Bande passante : . . . . 20 – 20 000Hz
Niveau de sortie : . . . . 500 mV
Taux de distorsion : . . < 0,2 %
Séparation
des canaux : . . . . . . . . > 60 dB
Rapport signal / bruit : . > 75dB (A pondéré)
Alimentation : . . . . . . . 12 V
± 2 V, 100 mA
Température fonc. : . . 0 – 40°C
Dimensions, poids : . . 120 × 22 × 58 mm, 48 g
Tout droit de modification réservé.
Ne jetez pas les batteries usagées
dans la poubelle domestique. Vous
devez les déposer dans un container
spécifique ou les ramenez à votre
revendeur.
+12V
CN2
R-CH
GND
L-CH
S-GND
100
6V
78M05
0X1301
CN 2
+12 V tension fonctionnement 12 V, 100 mA
GND masse
L-CH sortie canal gauche
S-GND masse
R-CH sortie canal droit
Lorsque le module est définitivement retiré
du service, vous devez le déposer dans
une usine de recyclage adaptée pour
contribuer à son élimination non polluante.
MONACOR INTERNATIONAL GmbH & Co. KG • Zum Falsch 36 • 28307 Bremen • Germany
Copyright
©
by MONACOR INTERNATIONAL. All rights reserved. A-1580.99.01.06.2014
®
DMP-100
Référence numérique 17.3510
ELECTRONICS FOR SPECIALISTS ELECTRONICS FOR SPECIALISTS ELECTRONICS FOR SPECIALISTS ELECTRONICS FOR SPECIALISTS ELECTRONICS FOR SPECIALISTS ELECTRONICS FOR SPECIALISTS ELECTRONICS FOR SPECIALISTS
F B CH
Touche
sur lʼappareil
sur la télé-
commande
Function
MODE
Allumer ; commutation entre port USB
et carte mémoire ; arrêt : maintenez la
touche enfoncée pendant 3 secondes
Marche / Arrêt
MODE
Commutation entre port USB
et carte mémoire
Démarrer la lecture et commutation
entre lecture et pause
0…9
Sélection directe dʼun titre
+10
Sauter 10 titres
Titre précédent / suivant :
Enfoncez la touche brièvement
Diminuer / augmenter le volume :
Maintenez la touche enfoncée
Titre précédent / suivant :
Enfoncez la touche brièvement
Avance et retour rapide : Maintenez
la touche enfoncée (son coupé)
VOL+
VOL−
Augmenter / diminuer le volume :
Appuyez brièvement sur la touche
(plusieurs fois)
RAND
Lecture aléatoire
– activer, affichage bref ,
REPEAT 1 / ALL ne sʼaffiche plus
– désactiver, REPEAT 1 / ALL affiché
RP1
REPEAT
Répétition en continu
du titre en cours
– activer, affichage : REPEAT 1
– désactiver, affichage : REPEAT ALL
Arrêter la lecture ; lʼaffichage indique
le nombre de titres
Page 4

Modulo inserto per lettore audio
Vi preghiamo di leggere attentamente le presenti
istruzioni prima della messa in funzione e di conservarle per un uso futuro.
1 Possibilità d'impiego
Questo modulo compatto per un lettore audio è
previsto per il montaggio in un apparecchio esistente o in un contenitore proprio. È alimentato con
una tensione continua di 12 V.
Con il lettore audio si possono riprodurre file
audio nel format MP3 provenienti da
– chiavette USB
– dischi rigidi USB con alimentazione propria
– schede di memoria SD/ SDHC / MMC
N. B.: Data la molteplicità di produttori di memorie e di
driver non si può garantire che tutti i mezzi di memoria
siano compatibili con il DMP-100.
2 Avvertenze importanti per l'uso
Il modulo è conforme a tutte le direttive rilevanti
dellʼUE e pertanto porta la sigla .
G
Il modulo è previsto solo per lʼuso allʼinterno
di locali. Proteggerlo dall'acqua gocciolante e
dagli spruzzi d'acqua, da alta umidità dell'aria e
dal calore (temperatura dʼimpiego ammessa fra
0 e 40 °C).
G
Per la pulizia usare solo un panno morbido,
asciutto; non impiegare in nessun caso acqua o
prodotti chimici.
G
Nel caso dʼuso improprio, di collegamenti sbagliati, dʼimpiego scorretto o di riparazione non a
regola dʼarte del modulo, non si assume nessuna
responsabilità per eventuali danni consequenziali a persone o a cose e non si assume nessuna garanzia per il modulo.
3 Montaggio e collegamento
1) Se l'apparecchio in cui si deve inserire il modulo
è alimentato occorre separarlo assolutamente
dalla rete di 230 V.
2) Per l'inserimento del modulo è richiesta un'aper tura di 106 mm × 19 mm. La profondità di montaggio è di 55 mm. Inserire il modulo nellʼapertura e fissarlo con il suo panello frontale per
mezzo di quattro viti.
3) Il collegamento elettrico avviene tramite il CN 2
di 5 poli. La piedinatura è indicata sul lato inferiore della piastra:
Piastra con i contatti
Fa parte del modulo un cavo di collegamento di
38 cm con connettori di 5 poli. In alternativa a
questo cavo si può usare il cavo adattatore
DMP-12CC disponibile come accessorio. È
confezionato con due RCA femmina e una
presa DC (5,5 mm / 2,1 mm, polo positivo = contatto centrale).
4 Telecomando
1) Per inserire le batterie (2 × 1,5 V, tipo AAA =
ministilo), togliere sul retro del telecomando il
coperchio del vano batterie. Inserire le batterie
come indicato nel vano stesso. Richiudere il
vano con il suo coperchio.
In caso di mancato uso prolungato conviene
togliere le batterie per evitare che il telecomando venga danneggiato se le batterie dovessero perdere.
2) Premendo un tasto, tenere il telecomando in
direzione del lettore audio. Fra il telecomando e
l'apparecchio non ci devono essere degli ostacoli.
3) Se la portata del telecomando si riduce, significa che le batterie sono scariche e che devono
essere sostituite.
5 Funzionamento
Inserire una chiavetta USB nel contatto USB o
collegare con il contatto USB un disco rigido con
alimentazione propria e / o inserire una scheda di
memoria nello slot SD/ MMC. L'angolo smussato
della scheda deve essere rivolto a sinistra, verso
l'apparecchio. Per togliere la scheda, spingerla
leggermente indentro in modo che si sblocchi.
Dopo l'accensione del lettore audio si avvia
automaticamente il titolo riprodotto per ultimo.
Tutte le possibilità di comando sono elencate nella
tabella seguente:
6 Dati tecnici
Risposta in frequenza: 20 – 20 000Hz
Livello d'uscita: . . . . . . 500 mV
Fattore di distorsione: .< 0,2 %
Separazione canali: . . 60 dB
Rapporto S / R: . . . . . . > 75 dB (valutato A)
Alimentazione: . . . . . . 12 V
± 2 V, 100 mA
Temperatura
d'esercizio: . . . . . . . . . 0 – 40°C
Dimensioni, peso: . . . . 120 × 22 × 58 mm, 48 g
Con riserva di modifiche tecniche.
Non gettare le batterie scariche o difettose nelle immondizie di casa bensì
negli appositi contenitori (p. es. presso
il vostro rivenditore).
+12V
CN2
R-CH
GND
L-CH
S-GND
100
6V
78M05
0X1301
CN 2
+12 V Tensione d'esercizio 12 V, 100 mA
GND Massa
L-CH Uscita canale sinistro
S-GND Massa
R-CH Uscita canale destro
Se si desidera eliminare il modulo definitivamente, consegnarlo per lo smaltimento
ad un'istituzione locale per il riciclaggio.
MONACOR INTERNATIONAL GmbH & Co. KG • Zum Falsch 36 • 28307 Bremen • Germany
Copyright
©
by MONACOR INTERNATIONAL. All rights reserved. A-1580.99.01.06.2014
®
DMP-100
Numero d’ordine 17.3510
ELECTRONICS FOR SPECIALISTS ELECTRONICS FOR SPECIALISTS ELECTRONICS FOR SPECIALISTS ELECTRONICS FOR SPECIALISTS ELECTRONICS FOR SPECIALISTS ELECTRONICS FOR SPECIALISTS ELECTRONICS FOR SPECIALISTS
I
Tasto
sul -
l'apparecchio
sul
telecomando
Funzione
MODE
Accendere, cambiare fra collegamento USB e scheda di memoria;
Spegnere: tener premuto per 3 s
Accendere e spegnere
MODE
Cambiare fra collegamento USB
e scheda di memoria
Avviare la riproduzione e
cambiare fra riproduzione e pausa
0…9
Selezione diretta di un titolo
+10
Saltare avanti di 10 titoli
Titolo precedente / successivo:
premere brevemente il tasto
Ridurre / aumentare il volume:
tener premuto il tasto
Titolo precedente / successivo:
premere brevemente il tasto
Avanzamento / ritorno veloce: tener
premuto il tasto (audio rimane muto)
VOL+
VOL−
Aumentare/ridurre il volume: premere (più volte) brevemente il tasto
RAND
Riproduzione in ordine casuale
– attivare, indicazione breve ,
REPEAT 1 / ALL non è visibile
– disattivare, REPEAT 1 / ALL è nuova-
mente visualizzato
RP1
REPEAT
Ripetere senza fine il titolo attuale
– attivare, indicazione: REPEAT 1
– disattivare, indicazione: REPEAT ALL
Terminare la riproduzione; il display
indica il numero dei titoli
 Loading...