

Page 1

BEDIENUNGSANLEITUNG
INSTRUCTION MANUAL
MODE D’EMPLOI
ISTRUZIONI PER L’USO
GEBRUIKSAANWIJZING
HANDLEIDING
MANUAL DE INSTRUCCIONES
BRUGSANVISNING
BRUKSANVISNING
KÄYTTÖOHJE
FARB-ÜBERWACHUNGSMONITOR
COLOUR MONITOR
CDM-1403COL
Best.-Nr. 19.5680
CDM-1003COL
Best.-Nr. 19.5670
®
Page 2

2
Bevor Sie einschalten ...
Wir wünschen Ihnen viel Spaß mit Ihrem neuen Gerät
von MONACOR. Dabei soll Ihnen diese Bedienungsanleitung helfen, alle Funktionsmöglichkeiten kennenzulernen. Die Beachtung der Anleitung vermeidet außerdem Fehlbedienungen und schützt Sie und Ihr Gerät vor
eventuellen Schäden durch unsachgemäßen Gebrauch.
Den deutschen Text finden Sie auf den Seiten 4–5.
Before you switch on ... ...
We wish you much pleasure with your new unit by
MONACOR. With these operating instructions you will
be able to get to know all functions of the unit. By following these instructions false operations will be avoided,
and possible damage to you and your unit due to improper use will be prevented.
You will find the English text on the pages 4–5.
D
A
CH
GB
Avant toute mise en service ...
Nous vous remercions d’avoir choisi un appareil
MONACOR et vous souhaitons beaucoup de plaisir à
l’utiliser. Cette notice a pour objectif de vous aider à
mieux connaître les multiples facettes de l’appareil et à
vous éviter toute mauvaise manipulation.
La version française se trouve pages 6–7.
Prima di accendere ...
Vi auguriamo buon divertimento con il Vostro nuovo apparecchio MONACOR. Le istruzioni per l’uso Vi possono
aiutare a conoscere tutte le possibili funzioni. E
rispettando quanto spiegato nelle istruzioni, evitate di
commettere degli errori, e così proteggete Voi stessi, ma
anche l’apparecchio, da eventuali rischi per uso improprio.
Il testo italiano lo potete trovare alle pagine 6–7.
F
B
CH
I
Voordat u inschakelt ...
Wij wensen u veel plezier met uw nieuw toestel van
MONACOR. Lees de veiligheidsvoorschriften, alvorens
het toestel in gebruik te nemen. Door de veiligheidsvoorschriften op te volgen zal een slechte werking vermeden
worden, en zal een eventueel letsel aan uzelf en schade
aan uw toestel tengevolge van onzorgvuldig gebruik
worden voorkomen.
U vindt de veiligheidsvoorschriften op pagina 8.
Antes de cualquier instalación ...
Tenemos de agradecerle el haber adquirido un aparato
MONACOR y le deseamos un agrable uso. Por favor lee
las instrucciones de seguridad antes del uso. La observación de las instrucciones de seguridad evita operaciones erróneas y protege Vd. y vuestro aparato contra
todo daño posible por cualquier uso inadecuado.
Las instrucciones de seguridad se encuentran en la
página 8.
NL
B
E
Inden De tænder for apparatet ...
Vi ønsker Dem god fornøjelse med Deres nye MONACOR
apparat. Læs oplysningerne for en sikker brug af apparatet før ibrugtagning. Følg sikkerhedsoplysningerne for at
undgå forkert betjening og for at beskytte Dem og Deres
apparat mod skade på grund af forkert brug.
Sikkerhedsoplysningerne finder De på side 8.
Förskrift
Vi önskar dig mycket nöje med din nya enhet från
MONACOR. Läs gärna säkerhetsinstruktionerna innan
du använder enheten. Genom att följa säkerhetsinstruktionerna kan många problem undvikas, vilket annars kan
skada enheten.
Du finner säkerhetsinstruktionerna på sidan 9.
DK
S
Ennen virran kytkemistä…
Toivomme, että uusi MONACOR-laitteesi tuo sinulle paljon iloa ja hyötyä. Ole hyvä ja lue käyttöohjeet ennen laitteen käyttöönottoa. Luettuasi käyttöohjeet voit käyttää
laitetta turvallisesti ja vältyt laitteen väärinkäytöltä.
Käyttöohjeet löydät sivulta 9.
FIN
wwwwww..mmoonnaaccoorr..ccoomm
Page 3
3
123 456 7 8 124356 7 8
®
CDM-1003COL
POWER
SHARPNESS BRIGHT COLOR CONTRAST TINT
➀➁
➂➃
®
CDM-1403COL
SHARPNESS COLOR BRIGHT CONTRAST TINT
POWER
VIDEO
IN OUT
Y/C IN
V-SIZE SUB BRI
SCEEN
FOCUS
C Y
75/HI
CDM-1003COL
AC INPUT
I/P
O/P
VIDEO
SCREEN
FOCUS
Y/C
V-SIZE
SUB-BRI
IMPEDANCE
HI 75 Ω
9 10 11 12 13 14 9 10 11 12 13 14
CDM-1403COL
Page 4

Bitte klappen Sie die Seite 3 heraus. Sie sehen
dann immer die beschriebenen Bedienelemente
und Anschlüsse.
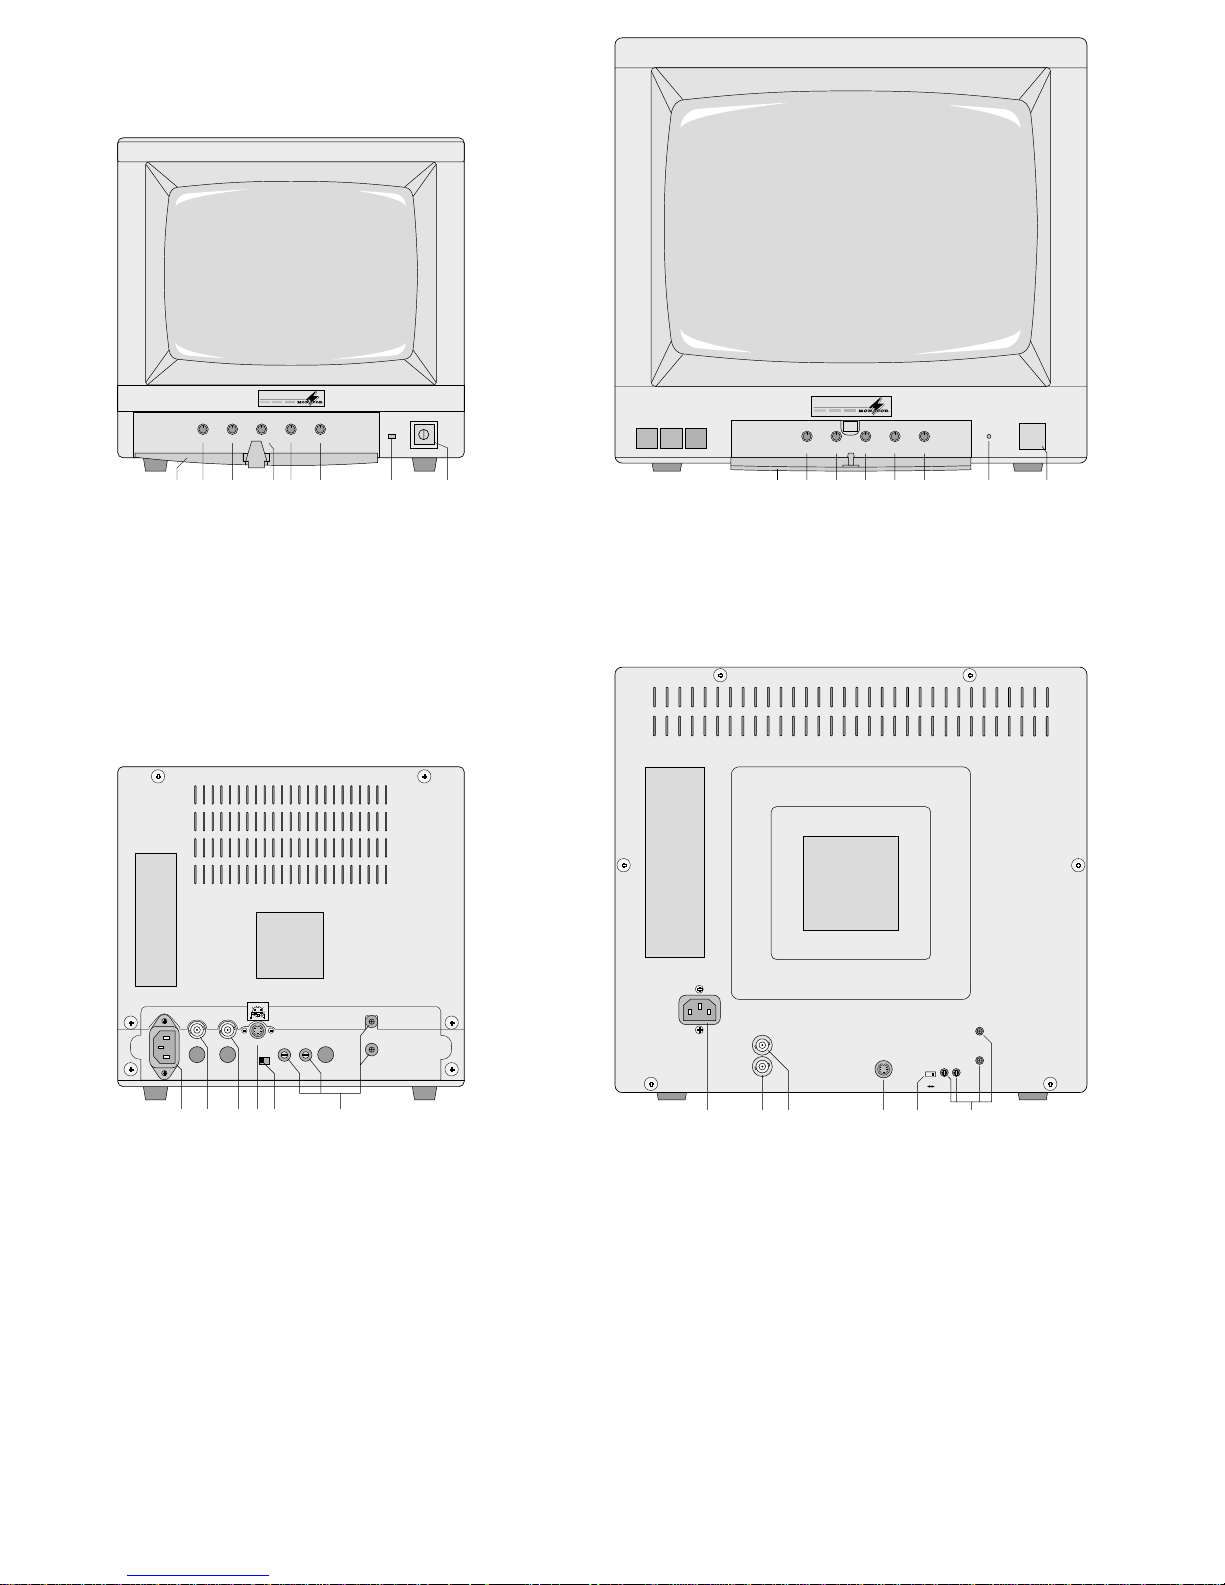
1 Übersicht der Bedienelemente und
Anschlüsse
1.1 Frontseite
1 Bedienfachklappe (geöffnet)
2 Bildschärferegler
3 Helligkeitsregler
4 Farbsättigungsregler
5 Kontrastregler
6 Farbtonregler (nur bei Wiedergabe in der NTSC-
Farbnorm wirksam)
7 Betriebsanzeige
8 Ein-/Ausschalter
1.2 Rückseite
9 Netzbuchse für die beiliegende Netzleitung zum
Anschluß an die Stromversorgung (100V–240V)
10 BNC-Buchse für den Videoeingang zum An-
schluß einer Überwachungskamera bzw. eines
Kamera-Umschalters oder Video-Splitters
11 BNC-Buchse für den Videoausgang zum An-
schluß eines weiteren Monitors oder eines
Videorecorders
12 Mini-DIN-Buchse für den Anschluß einer Kamera
oder eines Videorecorders mit Y/C-Ausgang
[alternativ zum Videoeingang (10)]
13 Impedanzumschalter für den Videoeingang (10)
HI = Der Eingang ist hochohmig; erforderlich
wenn ein weiteres Gerät am Videoausgang (11) angeschlossen ist
75Ω = Der Eingang ist mit 75 Ω abgeschlossen;
erforderlich wenn kein Gerät am Videoausgang angeschlossen ist
14 Einstellregler, nur für den Service durch eine
Fachwerkstatt bestimmt
2 Hinweise für den sicheren Gebrauch
Dieses Gerät entspricht der Richtlinie für elektromagnetische Verträglichkeit 89/336/EWG und der Niederspannungsrichtlinie 73/23/EWG.
Das Gerät wird mit lebensgefährlicher Netzspannung (230 V~) versorgt. Nehmen Sie deshalb niemals selbst Eingriffe im Gerät vor. Durch unsachgemäßes Vorgehen besteht die Gefahr eines
elektrischen Schlages. Außerdem erlischt beim
Öffnen des Gerätes jeglicher Garantieanspruch.
Beachten Sie auch unbedingt die folgenden Punkte:
●
Vorsicht! Die Bildröhre ist luftleer. Bei mechanischer Beschädigung besteht Implosionsgefahr
und Verletzungsgefahr durch herumfliegende
Glassplitter.
●
Das Gerät ist nur zur Verwendung im Innenbereich geeignet. Schützen Sie es vor Feuchtigkeit
und Hitze (zulässiger Einsatztemperaturbereich
0–40°C).
●
Die in dem Gerät entstehende Wärme muß durch
Luftzirkulation abgegeben werden. Decken Sie
darum die Lüftungslöcher des Gehäuses nicht mit
irgendwelchen Gegenständen ab.
●
Stecken Sie nichts durch die Lüftungslöcher! Dabei
kann es zu einem elektrischen Schlag kommen.
●
Nehmen Sie das Gerät nicht in Betrieb bzw. ziehen Sie sofort den Netzstecker aus der Steckdose, wenn:
1. sichtbare Schäden am Gerät oder an der Netzanschlußleitung vorhanden sind,
2. nach einem Sturz oder ähnlichem der Verdacht
auf einen Defekt besteht,
3. Funktionsstörungen auftreten.
Geben Sie das Gerät in jedem Fall zur Reparatur
in eine Fachwerkstatt.
●
Ziehen Sie den Netzstecker nie an der Zuleitung
aus der Steckdose.
●
Verwenden Sie für die Reinigung nur ein trockenes, weiches Tuch, auf keinen Fall Chemikalien
oder Wasser.
●
Wird das Gerät zweckentfremdet, falsch angeschlossen, nicht richtig bedient oder nicht fachge-
recht repariert, kann für eventuelle Schäden keine
Haftung übernommen werden.
●
Soll das Gerät endgültig aus dem Betrieb genommen werden, übergeben Sie es zur Entsorgung
einem örtlichen Recyclingbetrieb.
3 Einsatzmöglichkeiten
Der Monitor ist speziell für den Einsatz in VideoÜberwachungsanlagen konzipiert. Durch die automatische Netzspannungsanpassung (100V–240V,
50– 60 Hz), die automatische Videonorm-Umschaltung (CCIR/ EIA) und die automatische FarbnormUmschaltung (PAL/NTSC) läßt sich das Gerät in
verschiedenen Ländern einsetzen.
Mehrere Monitore lassen sich zu einer Monitorkette verbinden, um so an verschiedenen Stellen
oder durch mehrere Personen eine Überwachung
zu ermöglichen.
4 Anschluß des Monitors
Alle Anschlüsse nur bei ausgeschaltetem Gerät vornehmen bzw. verändern.
1) Den Videoeingang VIDEO IN bzw. VIDEO I/P
(10) über ein 75-Ω-Koaxialkabel an den Ausgang
der Videoquelle (z.B. Überwachungskamera, Ka-
mera-Umschalter, Video-Splitters) anschließen.
Ist an der Videoquelle ein Y/C-Ausgang vorhanden, sollte wegen der besseren Wiedergabequalität die Mini-DIN-Buchse Y/C (12) anstatt
des BNC-Videoeingangs verwendet werden.
2) Sollen zur parallelen Überwachung mehrere
Monitore aufgestellt werden, immer den Videoausgang VIDEO OUT bzw. VIDEO O/P (11) über
ein 75-Ω-Koaxialkabel mit dem Videoeingang
(10) des nächsten Monitors verbinden.
An die Buchse VIDEO OUT bzw. VIDEO O/ P
läßt sich aber auch alternativ ein Videorecorder
anschließen, um gleichzeitig das Kamerabild aufzuzeichnen.
Please unfold page3. Then you can always see
the operating elements and connections described.
1 Operating Elements and Connections
1.1 Front panel
1 Hinged cover of control panel (opened)
2 Sharpness control
3 Brightness control
4 Colour intensity control
5 Contrast control
6 Tint control (effective only in case of reproduction
in the NTSC colour standard)
7 Power LED
8 Power switch
1.2 Rear panel
9 Mains jack to connect the supplied mains cable
to the power supply (100V–240V)
10 BNC jack for the video input to connect a moni-
toring camera, a camera switcher or a video
splitter
11 BNC jack for the video output to connect a fur-
ther monitor or a video recorder
12 Mini DIN jack to connect a camera or a video
recorder with Y/C output [alternatively to the
video input (10)]
13 Impedance selector for the video input (10)
HI = The input is of high impedance; this is
required if a further unit is connected to
the video output (11)
75Ω = The input is terminated with 75 Ω; this is
required if no unit is connected to the
video output
14 Adjusting controls; provided for service by skilled
personnel only
2 Safety Notes
This unit corresponds to the directive for electromagnetic compatibility 89/336/ EEC and to the low voltage directive 73/23/EEC.
The unit is supplied with hazardous mains voltage
(230V~). Leave servicing to authorized personnel
only. Inexpert handling may cause an electric
shock hazard. Furthermore, any guarantee claim
will expire if the unit has been opened.
Please observe the following items in any case:
●
Caution! The picture tube is vacuous. In case of
mechanical damage, there is an implosion hazard
and scattered glass may cause injuries.
●
The unit is suitable for indoor use only. Protect it
against humidity and heat (admissible ambient
temperature range 0–40°C).
●
The heat generated in the unit must be carried off
by air circulation. Therefore, do not cover the air
vents of the housing with any objects.
●
Do not insert anything through the air vents! An
electric shock may result.
●
Do not operate the unit and immediately disconnect it from the mains socket
1. if there is visible damage to the unit or to the
mains cable,
2. if a defect might have occurred after the unit
was dropped or suffered a similar accident,
3. if malfunctions occur.
In any case the unit must be repaired by authorized personnel.
●
Never pull the mains cable to disconnect the unit
from the mains socket.
●
For cleaning only use a dry, soft cloth, by no
means chemicals or water.
●
If the unit is used for other purposes than originally
intended, if it is not connected or operated in the
correct way or not repaired by authorized personnel, no liability for any damage will be accepted.
●
If the unit is to be put out of operation permanently, take it to a local recycling plant for disposal.
●
Important for U.K. Customers!
The wires in this mains lead are coloured in accordance with the following code:
green/yellow = earth
blue = neutral
brown = live
As the colours of the wires in the mains lead of this
appliance may not correspond with the coloured
markings identifying the terminals in your plug,
proceed as follows:
1. The wire which is coloured green and yellow
must be connected to the terminal in the plug
which is marked with the letter E or by the earth
symbol , or coloured green or green and
yellow.
2. The wire which is coloured blue must be connected to the terminal which is marked with the
letter N or coloured black.
3. The wire which is coloured brown must be connected to the terminal which is marked with the
letter L or coloured red.
Warning
-
This appliance must be earthed.
3 Applications
The monitor has especially been designed for application in video monitoring systems. Due to automatic
mains voltage adjustment (100V–240V , 50–60 Hz),
automatic video standard selection (CCIR/ EIA) and
automatic colour standard selection (PAL/NTSC),
the unit is suitable for operation in different countries.
Several monitors can be connected to a chain of
monitors to allow monitoring in different places or by
several persons.
4 Connecting the Monitor
All connections must be made or changed only with
the unit switched off.
1) Connect the video input VIDEO IN or VIDEO I/P
(10) to the output of the video source (e.g. moni-
toring camera, camera switcher, video splitter)
via a 75Ω coaxial cable.
4
GB
D
A
CH
Page 5

Wichtig! Die Eingangsimpedanz mit dem Umschalter IMPEDANCE bzw. 75/HI (13) wählen:
75Ω wenn kein Gerät am Videoausgang (11)
angeschlossen ist
HI wenn ein weiteres Gerät am Videoausgang
(11) angeschlossen ist
3) Zum Schluß das beiliegende Netzkabel zuerst in
die Netzbuchse (9) des Monitors und dann in
eine Steckdose stecken.
5 Bedienung
1) Den Monitor mit dem Schalter POWER (8) einschalten. Die grüne LED (7) leuchtet als Betriebsanzeige.
2) Nachdem alle Geräte der Überwachungsanlage
eingeschaltet wurden, mit dem Helligkeitsregler
BRIGHT (3) und dem Kontrastregler CONTRAST
(5) ein optimales Bild einstellen. Dazu die
Bedienfachklappe (1) öffnen:
Bei dem Modell CDM-1003COL die Verschlußlasche nach unten drücken.
Bei dem Modell CDM-1403COLdie Klappe durch
Drücken auf das Symbol ▲ öffnen.
3) Mit dem Regler SHARPNESS (2) die Bildschärfe
einstellen.
4) Bei der Verwendung von Farbkameras mit dem
Regler COLOR (4) die Farbintensität einstellen.
Sind Farbkameras mit NTSC-Standard eingesetzt, zusätzlich mit dem Regler TINT (6) den
Farbton einstellen.
6 Technische Daten
sichtbare Bildröhrendiagonale
CDM-1003COL: . . . . . . . . 23 cm (10")
CDM-1403COL: . . . . . . . . 34 cm (14")
Auflösung: . . . . . . . . . . . . . . 400 Linien
Linearität: . . . . . . . . . . . . . . . hor. 10%, vert. 10%
Synchronisation, automatisch umschaltend
CCIR: . . . . . . . . . . . . . . . . h. 15 625 Hz, v. 50Hz
EIA: . . . . . . . . . . . . . . . . . . h. 15750Hz, v. 60Hz
Farbsystem: . . . . . . . . . . . . . PALund NTSC, auto-
matisch umschaltend
Videoeingang: . . . . . . . . . . . 1 Vss
Impedanzumschaltung: . . . . 75Ω/hochohmig
(manuell)
Video-Durchschleifausg.: . . . 1 Vss (BNC)
Einsatztemperatur: . . . . . . . . 0–40°C
Stromversorgung: . . . . . . . . 100 – 240 V~ /
50–60Hz
Leistungsaufnahme
CDM-1003COL: . . . . . . . . 45 VA
CDM-1403COL: . . . . . . . . 80 VA
Abmessungen (B x H x T)
CDM-1003COL: . . . . . . . . 260 x 290 x 242 mm
CDM-1403COL: . . . . . . . . 350 x 370 x 340 mm
Gewicht
CDM-1003COL: . . . . . . . . 9 kg
CDM-1403COL: . . . . . . . . 16 kg
Laut Angaben des Herstellers.
Änderungen vorbehalten.
If a Y/C output is available at the video source,
the mini DIN jack Y/C (12) should be used
instead of the BNC video input to assure a higher
reproduction quality.
2) If several monitors are to be set up for parallel
monitoring, always connect the video output
VIDEO OUT or VIDEO O/P (11) to the video
input (10) of the following monitor via a 75 Ω
coaxial cable.
However, alternatively a video recorder can
be connected to the jack VIDEO OUT or VIDEO
O/P to record the camera picture simultaneously.
Important! Select the input impedance with the
IMPEDANCE selector or 75/HI (13):
75Ω if no unit is connected to the video output
(11)
HI if a further unit is connected to the video
output (11)
3) Finally connect the supplied mains cable first to
the mains jack (9) of the monitor and then to a
mains socket.
5 Operation
1) Switch on the monitor with the POWER switch
(8). The green power LED (7) will light up as
operating indication.
2) After all units of the monitoring system have been
switched on, adjust an optimum picture with the
brightness control BRIGHT (3) and the CONTRAST control (5). For this purpose, open the
hinged cover (1):
For model CDM-1003COL, press the locking clip
downwards
For model CDM-1403COL, open the cover by
pressing the symbol ▲
3) Adjust the picture sharpness with the SHARPNESS control (2).
4) If colour cameras are used, adjust the colour
intensity with the COLOR control (4). If colour
cameras with NTSC standard are used, additionally adjust the tint with the TINT control (6).
6 Specifications
Visible diagonal of picture tube
CDM-1003COL: . . . . . . . . 23 cm (10")
CDM-1403COL: . . . . . . . . 34 cm (14")
Resolution: . . . . . . . . . . . . . . 400 lines
Linearity: . . . . . . . . . . . . . . . hor. 10%, vert. 10%
Synchronization, automatic selection
CCIR: . . . . . . . . . . . . . . . . h. 15 625 Hz, v. 50Hz
EIA: . . . . . . . . . . . . . . . . . . h. 15750Hz, v. 60Hz
Colour system: . . . . . . . . . . . PAL and NTSC, auto-
matic selection
Video input: . . . . . . . . . . . . . 1 Vpp
Impedance selection: . . . . . . 75 Ω/high impedance
(manual)
Video feed-through output: . 1 Vpp (BNC)
Ambient temperature: . . . . . 0 – 40 °C
Power supply: . . . . . . . . . . . 100 – 240 V~/
50–60Hz
Power consumption
CDM-1003COL: . . . . . . . . 45 VA
CDM-1403COL: . . . . . . . . 80 VA
Dimensions (W x H x D)
CDM-1003COL: . . . . . . . . 260 x 290 x 242 mm
CDM-1403COL: . . . . . . . . 350 x 370 x 340 mm
Weight
CDM-1003COL: . . . . . . . . 9 kg
CDM-1403COL: . . . . . . . . 16 kg
According to the manufacturer.
Subject to technical change.
5
GB
D
A
CH
Page 6

Ouvrez le présent livret page 3 de manière à
visualiser les éléments et branchements.
1 Eléments et branchements
1.1 Face avant
1 Couvercle du compartiment (ouvert)
2 Potentiomètre de réglage de la netteté
3 Potentiomètre de réglage de la luminosité
4 Potentiomètre de réglage de la saturation des
couleurs
5 Potentiomètre de réglage du contraste
6 Potentiomètre de réglage des couleurs (unique-
ment lors de la lecture d’images au standard
NTSC)
7 Témoin de fonctionnement
8 Interrupteur Marche/Arrêt
1.2 Face arrière
9 Prise secteur pour brancher le cordon secteur
livré à l’alimentation 100V–240V
10 Prise BNC pour l’entrée vidéo pour brancher une
caméra de surveillance / un sélecteur de caméra
ou un répartiteur vidéo
11 Prise BNC pour la sortie vidéo pour brancher un
autre moniteur ou un magnétoscope
12 Mini prise DIN pour brancher une caméra ou un
magnétoscope à sortie Y/C [alternativement
avec l’entrée vidéo (10)]
13 Sélecteur d’impédance pour l’entrée vidéo (10)
HI = entrée haute impédance; nécessaire
lorsqu’un autre appareil est branché à la
sortie vidéo (11)
75Ω = l’entrée est terminée avec 75 Ω; néces-
saire lorsque aucun appareil n’est branché à la sortie vidéo
14 Réglage: ne doit être utilisé que par un techni-
cien spécialisé
2 Conseils d’utilisation
Le moniteur répond à la norme européenne
89/336/CEE relative à la compatibilité électromagnétique et à la norme 73/ 23 /CEE portant sur
les appareils à basse tension.
Cet appareil est alimenté par une tension en
230V~/50Hz. Ne touchez jamais l’intérieur de
l’appareil car, en cas de mauvaise manipulation,
vous pourriez subir un choc électrique. En outre,
l’ouverture de l’appareil rend tout droit à la garantie caduque.
Respectez scrupuleusement les points suivants:
●
Attention! Le tube du moniteur est vide d’air. En
cas de dommage mécanique, un risque d’implosion et de blessure existe à cause de débris de
verre.
●
Cet appareil n’est conçu que pour une utilisation
en intérieur. Protégez-le de l’humidité et de la chaleur (0–40°C).
●
La chaleur dégagée par l’appareil doit être évacuée facilement; les ouïes de ventilation ne
doivent jamais être obturées.
●
Ne faites rien tomber dans les ouïes de ventilation, vous pourriez subir un choc électrique.
●
Ne le faites pas fonctionner et débranchez-le
immédiatement dans les cas suivants:
1. L’appareil ou le cordon secteur présente des
dommages visibles.
2. Après une chute ou un cas similaire vous avez
un doute sur l’état de l’appareil.
3. Des défaillances apparaissent.
Dans tous les cas, les dommages doivent être
réparés par un technicien spécialisé.
●
Ne retirez jamais le cordon secteur de la prise en
tirant dessus.
●
Pour nettoyer l’appareil, utilisez un chiffon sec et
doux, en aucun cas de produits chimiques ou
d’eau.
●
Nous déclinons toute responsabilité en cas de
dommage si l’appareil est utilisé dans un but autre
que celui pour lequel il a été conçu, s’il n’est pas
correctement branché ou utilisé ou réparé par une
personne habilitée.
●
Lorsque l’appareil est définitivement retiré du service, vous devez le déposer dans une usine de
recyclage adaptée.
3 Utilisations
Le moniteur est spécialement conçu pour une utilisation dans des centrales de surveillance vidéo.
L’adaptation automatique de tension (100V–240 V,
50–60 Hz), la commutation automatique de norme
vidéo (CCIR/ EIA), la commutation automatique de
standard de couleur (PAL/NTSC) permettent une
utilisation dans de nombreux pays.
Il est possible de brancher plusieurs moniteurs
en série pour permettre une surveillance à plusieurs
endroits ou par plusieurs personnes.
4 Branchements du moniteur
Les branchements ne peuvent être effectués ou
modifiés que lorsque le moniteur est débranché.
1) Reliez l’entrée vidéo VIDEO IN ou VIDEO I /P
(10) via un câble coaxial 75 Ω à la sortie de la
source vidéo (par exemple caméra de surveil-
lance, sélecteur de caméra, répartiteur vidéo).
Si une sortie Y/C est prévue sur la source
vidéo, la mini prise DIN Y/C (12) doit toujours
être utilisée à la place de l’entrée vidéo BNC et
ce pour une meilleure qualité d’image.
2) Pour une surveillance en parallèle, si plusieurs
moniteurs doivent être branchés, reliez toujours
la sortie vidéo VIDEO OUT ou VIDEO O / P (11)
via un câble coaxial 75Ω à l’entrée vidéo (10) du
moniteur suivant.
Il est possible de brancher un magnétoscope
à la prise VIDEO OUT ou VIDEO O/P pour enregistrer simultanément l’image de la caméra.
Important! Sélectionnez l’impédance d’entrée
avec le sélecteur IMPEDANCE ou 75/HI (13):
Vi preghiamo di aprire completamente la pagina 3. Così vedrete sempre gli elementi di
comando e i collegamenti descritti.
1 Elementi di comando e collegamenti
1.1 Lato frontale
1 Sportello degli elementi di comando (aperto)
2 Regolatore messa a fuoco
3 Regolatore luminosità
4 Regolatore saturazione immagine
5 Regolatore contrasto
6 Regolatore colore (solo con la norma NTSC)
7 Spia di funzionamento
8 Interruttore on/off
1.2 Lato posteriore
9 Presa per il cavo rete in dotazione per l’alimenta-
zione (100V–240V)
10 Presa BNC per l’ingresso video, per il collega-
mento di una telecamera di sorveglianza, di un
selettore o di uno splitter video
11 Presa BNC per l’uscita video, per il collegamento
di un altro monitor o di un videoregistratore
12 Presa mini DIN per il collegamento di una teleca-
mera o di un videoregistratore con uscita Y/C [in
alternativa all’ingresso video (10)]
13 Commutatore impedenza per l’ingresso video
(10)
HI = ingresso ad alta impedenza; richiesto se
è collegato un ulteriore apparecchio
all’uscita video (11)
75Ω = ingresso terminato con 75 Ω; richiesto se
non è collegato nessun apparecchio
all’ingresso video
14 Potenziometro di regolazione; solo per il servizio
di assistenza di un laboratorio specializzato
2 Avvertenze di sicurezza
Quest’apparecchio corrisponde alle direttive CE
89/ 336 / CEE sulla compatibilità elettromagnetica e
73/23/CEE per apparecchi a bassa tensione.
L’apparecchio funziona con tensione di rete di
230V~. Non intervenire mai al suo interno; la
manipolazione scorretta può provocare delle scariche pericolose. Se l’apparecchio viene aperto,
cessa ogni diritto di garanzia.
Durante l’uso si devono osservare assolutamente i
seguenti punti:
●
Attenzione! Il tubo catodico è sotto vuoto. Nel
caso di danneggiamento meccanico sussiste per
il pericolo di implosione con possibili danni alle
persone provocati dalle schegge
●
Lo strumento è previsto solo per l’uso all’interno di
locali. Proteggerlo dall’umidità e dal calore (temperatura d’impiego ammessa fra 0 e 40°C).
●
Dev’essere garantita la libera circolazione dell’
aria per dissipare il calore che viene prodotto
all’interno dell’apparecchio. Non coprire in nessun
modo le fessure di aerazione.
●
Non inserire oggetti nelle fessure di aerazione!
Altrimenti si potrebbe provocare una scarica
elettrica.
●
Non mettere in funzione l’apparecchio e staccare
subito la spina rete se:
1. l’apparecchio o il cavo rete presentano dei
danni visibili;
2. dopo una caduta o dopo eventi simili sussiste il
sospetto di un difetto;
3. l’apparecchio non funziona correttamente.
Per la riparazione rivolgersi sempre ad una officina competente.
●
Staccare il cavo rete afferrando la spina, senza tirare il cavo.
●
Per la pulizia usare solo un panno asciutto e
morbido; non impiegare in nessun caso prodotti
chimici o acqua.
●
Nel caso di uso improprio, di impiego scorretto, di
collegamenti sbagliati o di riparazione non a
regola d’arte non si assume nessuna responsabilità per eventuali danni.
●
Se si desidera eliminare l’apparecchio definitivamente, consegnarlo per lo smaltimento ad un’istituzione locale per il riciclaggio.
3 Possibilità d’impiego
Il monitor è previsto specialmente per l’impiego in
impianti di sorveglianza con telecamere. Grazie alla
regolazione automatica della tensione di rete
(100V–240V , 50–60Hz), alla commutazione automatica della norma video (CCIR/ EIA) e dello standard colore (PAL/NTSC), il monitor può essere
utilizzato in diversi paesi.
Si possono collegare più monitor per formare una
catena di monitor. In tal modo è possibile una sorveglianza in luoghi diversi oppure con più persone.
4 Collegare il monitor
Eseguire o modificare tutti i collegamenti solo con
l’apparecchio spento.
1) Collegare l’ingresso VIDEO IN o VIDEO I/P (10)
con l’uscita della sorgente video (p. es. teleca-
mera, selettore o video splitter), servendosi di un
cavo coassiale 75Ω.
Se la sorgente video possiede un’uscita Y/C,
è consigliabile utilizzare la presa mini DIN Y/C
(12) al posto dell’ingresso video BNC per migliorare la riproduzione.
2) Se si desidera collocare più monitor per una sorveglianza parallela, collegare sempre l’uscita
VIDEO OUT oppure VIDEO O /P (11) con l’ingresso video (10) del monitor successivo, servendosi di un cavo coassiale 75Ω.
Alla presa VIDEO OUT o VIDEO O/P può
essere collegato anche un videoregistratore per
registrare nello stesso tempo l’immagine.
Importante! Selezionare l’impedenza all’ingresso con il commutatore IMPEDANCE oppure
75/HI (13):
6
I
F
B
CH
Page 7

75 Ω Aucun appareil n’est relié à la sortie vidéo
(11)
HI Un autre appareil est relié à la sortie vidéo
(11)
3) Reliez maintenant le cordon secteur livré à la
prise (9) du moniteur puis à une prise secteur.
5 Fonctionnement
1) Allumez le moniteur avec l’interrupteur POWER
(8); la LED verte (7), témoin de fonctionnement,
brille.
2) Une fois que l’ensemble des appareils de l’installation de surveillance est allumé, effectuez les
réglages de manière à obtenir une image optimale:
luminosité avec le réglage BRIGHT (3)
contraste avec le réglage CONTRAST (5)
Les réglages se trouvent derrière le cache (1):
sur le modèle CDM-1003COL: poussez vers le
bas
sur le modèle CDM-1403COL: ouvrez le couvercle en appuyant sur le symbole ▲.
3) Réglez la netteté de l’image avec le réglage
SHARPNESS (2).
4) Réglez l’intensité des couleurs avec le réglage
COLOR (4) si vous utilisez des caméras couleur.
Si ces dernières sont au standard NTSC, utilisez
également le réglage TINT (6).
6 Caractéristiques techniques
Diagonale visible du tube image
CDM-1003COL: . . . . . . . . 23 cm (10")
CDM-1403COL: . . . . . . . . 34 cm (14")
Résolution: . . . . . . . . . . . . . . 400 lignes
Linéarité: . . . . . . . . . . . . . . . hor. 10%, vert. 10%
Synchronisation automatique, par commutation
CCIR: . . . . . . . . . . . . . . . . h. 15 625 Hz, v. 50Hz
EIA: . . . . . . . . . . . . . . . . . . h. 15750Hz, v. 60Hz
Système de couleur: . . . . . . PALet NTSC, com-
mutation automatique
Entrée vidéo: . . . . . . . . . . . . 1 Vcc
Commutation impédance: . . 75 Ω/haute impé-
dance (manuelle)
Sortie insert vidéo: . . . . . . . . 1 Vcc (BNC)
Température
de fonctionnement: . . . . . . . 0 – 40 °C
Alimentation: . . . . . . . . . . . . 100–240V~/
50–60Hz
Consommation
CDM-1003COL: . . . . . . . . 45 VA
CDM-1403COL: . . . . . . . . 80 VA
Dimensions (L x H P)
CDM-1003COL: . . . . . . . . 260 x 290 x 242 mm
CDM-1403COL: . . . . . . . . 350 x 370 x 340 mm
Poids
CDM-1003COL: . . . . . . . . 9 kg
CDM-1403COL: . . . . . . . . 16 kg
D’après les données du constructeur.
Tout droit de modification réservé.
75Ω se all’uscita video (11) non è collegato nes-
sun altro apparecchio
HI se all’uscita video (11) è collegato un ulteri-
ore apparecchio
3) Alla fine inserire il cavo rete prima nella presa (9)
del monitor e quindi in una presa di rete.
5 Funzionamento
1) Accendere il monitor con l’interruttore on/off
POWER (8). Si accende la spia verde (7).
2) Dopo aver acceso tutti gli apparecchi dell’impianto di sorveglianza, impostare l’immagine ottimale mediante i regolatori di luminosità BRIGHT
(3) e di contrasto CONTRAST (5). Per fare ciò
aprire lo sportello (1):
nel modello CDM-1003COL premere la linguetta
di chiusura verso il basso;
nel modello CDM-1403COL aprire lo sportello
con una pressione sul simbolo ▲.
3) Con il regolatore SHARPNESS (2) impostare la
messa a fuoco.
4) Se si usano telecamere a colore, impostare l’intensità del colore con il regolatore COLOR (4).
Nel caso di telecamere con lo standard NTSC,
impostare il colore anche con il regolatore TINT
(6).
6 Dati tecnici
Diagonale tubo visibile
CDM-1003COL: . . . . . . . . 23 cm (10")
CDM-1403COL: . . . . . . . . 34 cm (14")
Risoluzione: . . . . . . . . . . . . . 400 righe
Linearità: . . . . . . . . . . . . . . . orizz. 10%, vert. 10%
Sincronizzazione, a commutazione automatica
CCIR: . . . . . . . . . . . . . . . . o. 15 625 Hz, v. 50Hz
EIA: . . . . . . . . . . . . . . . . . . o. 15750Hz, v. 60Hz
Standard colore: . . . . . . . . . PAL e NTSC,
a commutazione
automatica
Ingresso video: . . . . . . . . . . 1 V pp
Commutazione impedenza: . 75 Ω/alta impedenza
(manuale)
Uscita per segnale
d’ingresso passante: . . . . . . 1 Vpp (BNC)
Temperatura
d’impiego ammessa: . . . . . . 0 – 40 °C
Alimentazione: . . . . . . . . . . . 100 – 240 V~ /
50–60Hz
Corrente assorbita
CDM-1003COL: . . . . . . . . 45 VA
CDM-1403COL: . . . . . . . . 80 VA
Dimensioni (L x H x P)
CDM-1003COL: . . . . . . . . 260 x 290 x 242 mm
CDM-1403COL: . . . . . . . . 350 x 370 x 340 mm
Peso
CDM-1003COL: . . . . . . . . 9 kg
CDM-1403COL: . . . . . . . . 16 kg
Dati forniti dal costruttore.
Con riserva di modifiche tecniche.
7
I
F
B
CH
Page 8

8
Bewakings monitor, kleur
Lees aandachtig de onderstaande veiligheidsvoorschriften, alvorens het toestel in gebruik te
nemen. Mocht u bijkomende informatie over de
bediening van het toestel nodig hebben, lees dan de
Duitse, Engelse, Franse, of Italiaanse tekst in deze
handleiding.
Veiligheidsvoorschriften
Dit toestel is in overeenstemming met de EU-richtlijn
89/ 336/ EEG voor elektromagnetische compatibiliteit en 73/23/EEG voor toestellen op laagspanning.
De netspanning (230 V~) van het toestel is levensgevaarlijk. Open het toestel niet, want door
onzorgvuldige ingrepen loopt u het risico van een
elektrische schok. Bovendien vervalt elke garantie
bij het eigenhandig openen van het toestel.
Let eveneens op het volgende:
●
Opgelet! De beeldbuis is vacuüm. Bij mechanische beschadiging bestaat er gevaar voor implosie en risico op verwondingen door rondvliegende
glassplinters.
●
Het toestel is enkel geschikt voor gebruik binnenshuis. Vermijd uitzonderlijk warme plaatsen en
plaatsen met een hoge vochtigheid (toegestaan
omgevingstemperatuurbereik: 0–40°C).
●
De warmte die in het toestel ontstaat, moet door
ventilatie afgevoerd worden. Zorg er daarom voor
dat u de ventilatieopeningen van de behuizing met
geen enkel voorwerp afdekt.
●
Zorg ervoor dat u niets in de ventilatieopeningen
steekt! Er bestaat immers gevaar voor elektrische
schokken.
●
Schakel het toestel niet in resp. trek onmiddellijk
de stekker uit het stopcontact, wanneer:
1. het toestel of het netsnoer zichtbaar beschadigd zijn,
2. er een defect zou kunnen optreden nadat het
toestel bijvoorbeeld gevallen is,
3. het toestel slecht functioneert.
Het toestel moet in elk geval hersteld worden door
een gekwalificeerd vakman.
●
Trek de stekker nooit met het snoer uit het stopcontact.
●
Gebruik voor de reiniging uitsluitend een droge,
zachte doek. Gebruik in geen geval chemicaliën
of water.
●
In geval van ongeoorloofd of verkeerd gebruik,
verkeerde aansluiting, foutieve bediening of herstelling door een niet-gekwalificeerd persoon vervalt de garantie bij eventuele schade.
●
Wanneer het toestel definitief uit bedrijf genomen
wordt, bezorg het dan voor verwerking aan een
plaatselijk recyclagebedrijf.
NL B
Monitor color
Por favor, antes del uso del aparato observar en
todo caso las instrucciones de seguridad siguientes.
Si informaciones adicionales son necesarias para la
operación del aparato, estas se encuentran en el
texto alemán, inglés, francés o italiano de estas
instrucciones.
Consejos de utilización
El monitor cumple la norma europea 89/ 336/ CEE
relativa a la compatibilidad electromagnética y a la
norma 73/23/CEE sobre los aparatos a baja tensión.
Este aparato está alimentado por una tensión de
230V~. No tocar nunca dentro el aparato, se podría recibir una descarga eléctrica mortal. Además la abertura del aparato anula todo tipo de
garantía.
Respetar en todo caso los puntos siguientes:
●
Atención: el tubo de imagen está vacío de aire,
en caso de daños mecánicos, puede implotar y
dañaros proyectando cascos de vidrio de la pantalla.
●
Este aparato sólo se puede usar en interior. Protegerlo de la humedad y del calor (temperatura de
utilización admisible 0–40°C).
●
El calor generado por el aparato tiene que estar
disipado por una corriente de aire correcta. En
ningún caso, las ranuras de ventilación no pueden
estar obstruidas.
●
¡No hacer caer nada dentro las ranuras de ventilación! Se podría recibir una descarga eléctrica.
●
No hacerlo funcionar y desconectarlo inmediatamente de la red cuando:
1. daños aparecen sobre el aparato o sobre el
cable de red,
2. después una caída o accidente parecido, el
aparato pueda tener un defecto,
3. disfunciones aparecen.
Sólo un técnico habilitado puede efectuar las
reparaciones.
●
No desconectarlo nunca estirando el cable de red.
●
Para limpiarlo, utilizar un trapo seco y suave, en
ningún caso, productos químicos o agua.
●
Declinamos toda responsabilidad en caso de
daños si el aparato está utilizado por un uso diferente de su concepción, si no está correctamente
conectado, utilizado o no está reparado por un
técnico habilitado.
●
Cuando el aparato está definitivamente retirado
del servicio, se tiene que depositar dentro una
fábrica de reciclaje adaptada.
Farve monitor
Læs nedenstående sikkerhedsoplysninger opmærksomt igennem før ibrugtagning af enheden. Bortset
fra sikkerhedsoplysningerne henvises til den
engelske, tyske, franske eller italienske tekst.
Vigtige sikkerhedsoplysninger
Denne enhed overholder EU-direktivet vedrørende
elektromagnetisk kompatibilitet 89/336/EØF og lavspændingsdirektivet 73/23/EØF.
Enheden benytter livsfarlig netspænding (230V~).
Overlad servicering til autoriseret personel. Forkert
håndtering kan forårsage fare for elektrisk stød.
Desuden bortfalder enhver reklamationsret, hvis
enheden har været åbnet.
Vær altid opmærksom på følgende:
●
Advarsel! Der er vakuum i billedrøret. Hvis der
opstår mekanisk skade, vil der være risiko for, at
billedrøret eksploderer, hvorved glassplinter kan
forårsage skader.
●
Enheden er kun beregnet til indendørs brug. Beskyt enheden mod fugt og varme (tilladt temperaturområde i drift 0–40°C).
●
Varmen, der udvikles i enheden, skal kunne slippe
ud ved hjælp af luftcirkulation. Enhedens ventilationshuller må derfor aldrig tildækkes.
●
Undlad at indføre eller tabe noget i ventilationshullerne! Dette kan forårsage fare for elektrisk
stød.
●
T ag ikke enheden i brug og tag straks stikket ud af
stikkontakten i følgende tilfælde:
1. hvis der er synlig skade på enheden eller netkablet
2. hvis der kan være opstået skade, efter at enheden er tabt eller lignende
3. hvis der forekommer fejlfunktion.
Enheden skal altid repareres af autoriseret personel.
●
Tag aldrig stikket ud af stikkontakten ved at
trække i kablet; tag fat i selve stikket.
●
Til rengøring må der kun benyttes en tør, blød
klud; der må under ingen omstændigheder benyttes kemikalier eller vand.
●
Hvis enheden benyttes til andre formål, end den
oprindeligt er beregnet til, hvis den ikke er korrekt
tilsluttet, hvis den betjenes forkert, eller hvis den
ikke repareres af autoriseret personel, omfattes
eventuelle skader ikke af garantien.
●
Hvis enheden skal tages ud af drift for bestandigt,
skal den bringes til en lokal genbrugsstation for
bortskaffelse.
E DK
Page 9

9
Färg monitor
Innan enheten tas i bruk observera följande säkerhetsinstruktioner. Behövs ytterligare information för
handhavande utav enheten finner Ni det i den
Tyska, Engelska, Franska eller Italienska delen i
manualen.
Säkerhetsföreskrifter
Enheten uppfyller EG-direktiv 89/336/EWG avseende elektromagnetiska störfält samt EG-direktiv
73/23/EWG avseende lågspänningsapplikationer.
Enheten använder hög spänning internt (230V~).
Öppna därför aldrig chassit på egen hand utan
överlåt all service till auktoriserad verkstad.
Ge även akt på följande:
●
Varning! Bildröret är vakuumfyllt. Vid mekaniskt
fel så finns det risk för implosion och glas splitter
kan förorsaka skada.
●
Enheten är endast avsedd för inomhusbruk.
Enheten skall skyddas mot hög värme och hög
luftfuktighet (arbetstemperatur 0–40°C).
●
Värmen som alstras vid användning leds bort
genom självcirkulering. Täck därför aldrig över
enheten eller ställ den så att luftcirkuleringen försämras.
●
Stoppa eller tappa aldrig föremål i kylhålen då
detta kan leda till elektriska överslag.
●
Tag omedelbart ut kontakten ur elurtaget om
något av följande uppstår.
1. Enheten eller elsladden har synliga skador.
2. Enheten är skadad av fall ed.
3. Enheten har andra felfunktioner.
Enheten skall lämnas till auktoriserad verkstad för
service.
●
Dra aldrig ur kontakten genom att dra i sladden
utan ta tag i kontaktkroppen.
●
Rengör endast med en ren och torr trasa, använd
aldrig vätskor i någon form då dessa kan rinna in
och orsaka kortslutning.
●
Om enheten används på annat sätt än som avses
upphör alla garantier att gälla. Detsamma gäller
om egna eller oauktoriserade ingrepp görs i enheten.
●
Om enheten skall kasseras bör den lämnas till
återvinning.
S
Värimonitori
Ole hyvä ja huomioi aina seuraavat turvallisuutta
koskevat ohjeet ennen laitteen käyttöön ottoa. Katso
käyttöön liittyviä ohjeita Saksan, Englannin, Ranskan tai Italian kielisistä ohjeista, jos tarvitset lisää tietoa laitteen käytöstä.
Turvallisuudesta
Tämä laite vastaa direktiiviä 89/336/EEC sähkömagneettisesta yhteensopivuudesta sekä matalajännitedirektiiviä 73/23/EEC.
Tämä laite toimii hengenvaarallisella jännitteellä
(230 V~). Jätä huoltotoimet valtuutetun huoltoliikkeen tehtäväksi. Asiantuntematon käsittely saattaa aiheuttaa sähköiskun vaaran. Huomioi myös,
että takuu raukeaa, jos laite on avattu.
Huomioi seuraavat seikat:
●
Varoitus! Kuvaputki on alipaineistettu. Mekaanisen vaurion sattuessa kuvaputki saattaa luhistua
räjähdysmäisesti. Tämä aiheuttaa vaaran lasin
hajotessa pirstaleiksi.
●
Tämä laite soveltuu vain sisätilakäyttöön. Suojele
laitetta kosteudelta ja kuumuudelta (sallittu ympäröivä lämpötila 0–40°C).
●
Laitteessa kehittyvä lämpö poistetaan ilmanvaihdolla. Tämän vuoksi laitteen tuuletusaukkoja ei
saa peittää.
●
Älä työnnä mitään esinettä tuuletusaukosta sisään! Sähköiskun vaara.
●
Irrota virtajohto pistorasiasta, äläkä käynnistä laitetta jos:
1. virtajohdossa on havaittava vaurio
2. putoaminen tai muu vastaava vahinko on saattanut aiheuttaa vaurion
3. laitteessa esiintyy toimintahäiriöitä
Kaikissa näissä tapauksissa laite tulee toimittaa
valtuutettuun huoltoliikkeeseen.
●
Älä koskaan irrota virtajohtoa pistorasiasta johdosta vetämällä.
●
Käytä puhdistamiseen pelkästään kuivaa, pehmeää kangasta. Älä käytä kemikaaleja tai vettä.
●
Maahantuoja ja valmistaja eivät vastaa mahdollisesta vahingosta, jos laitetta käytetään muuhun
tarkoitukseen kuin se alun perin on suunniteltu, se
on väärin asennettu, sitä on väärin käytetty tai
huollatettu valtuuttamattomassa huoltoliikkeessä.
●
Kun laite joskus poistetaan lopullisesti käytöstä,
huolehdi että laite hävitetään asianmukaisesti.
FIN
Page 10

Copyright©by INTER-MERCADOR GmbH & Co. KG, Bremen, Germany.
All rights reserved.
MONACOR
®
International www.monacor.com 03.00.01
 Loading...