

Page 1
ELECTRONICS FOR SPECIALISTS ELECTRONICS FOR SPECIALISTS ELECTRONICS FOR SPECIALISTS ELECTRONICS FOR SPECIALISTS
BEDIENUNGSANLEITUNG
INSTRUCTION MANUAL
MODE D’EMPLOI
ISTRUZIONI PER L’USO
GEBRUIKSAANWIJZING
MANUAL DE INSTRUCCIONES
INSTRUKCJA OBSŁUGI
SIKKERHEDSOPLYSNINGER
SÄKERHETSFÖRESKRIFTER
TURVALLISUUDESTA
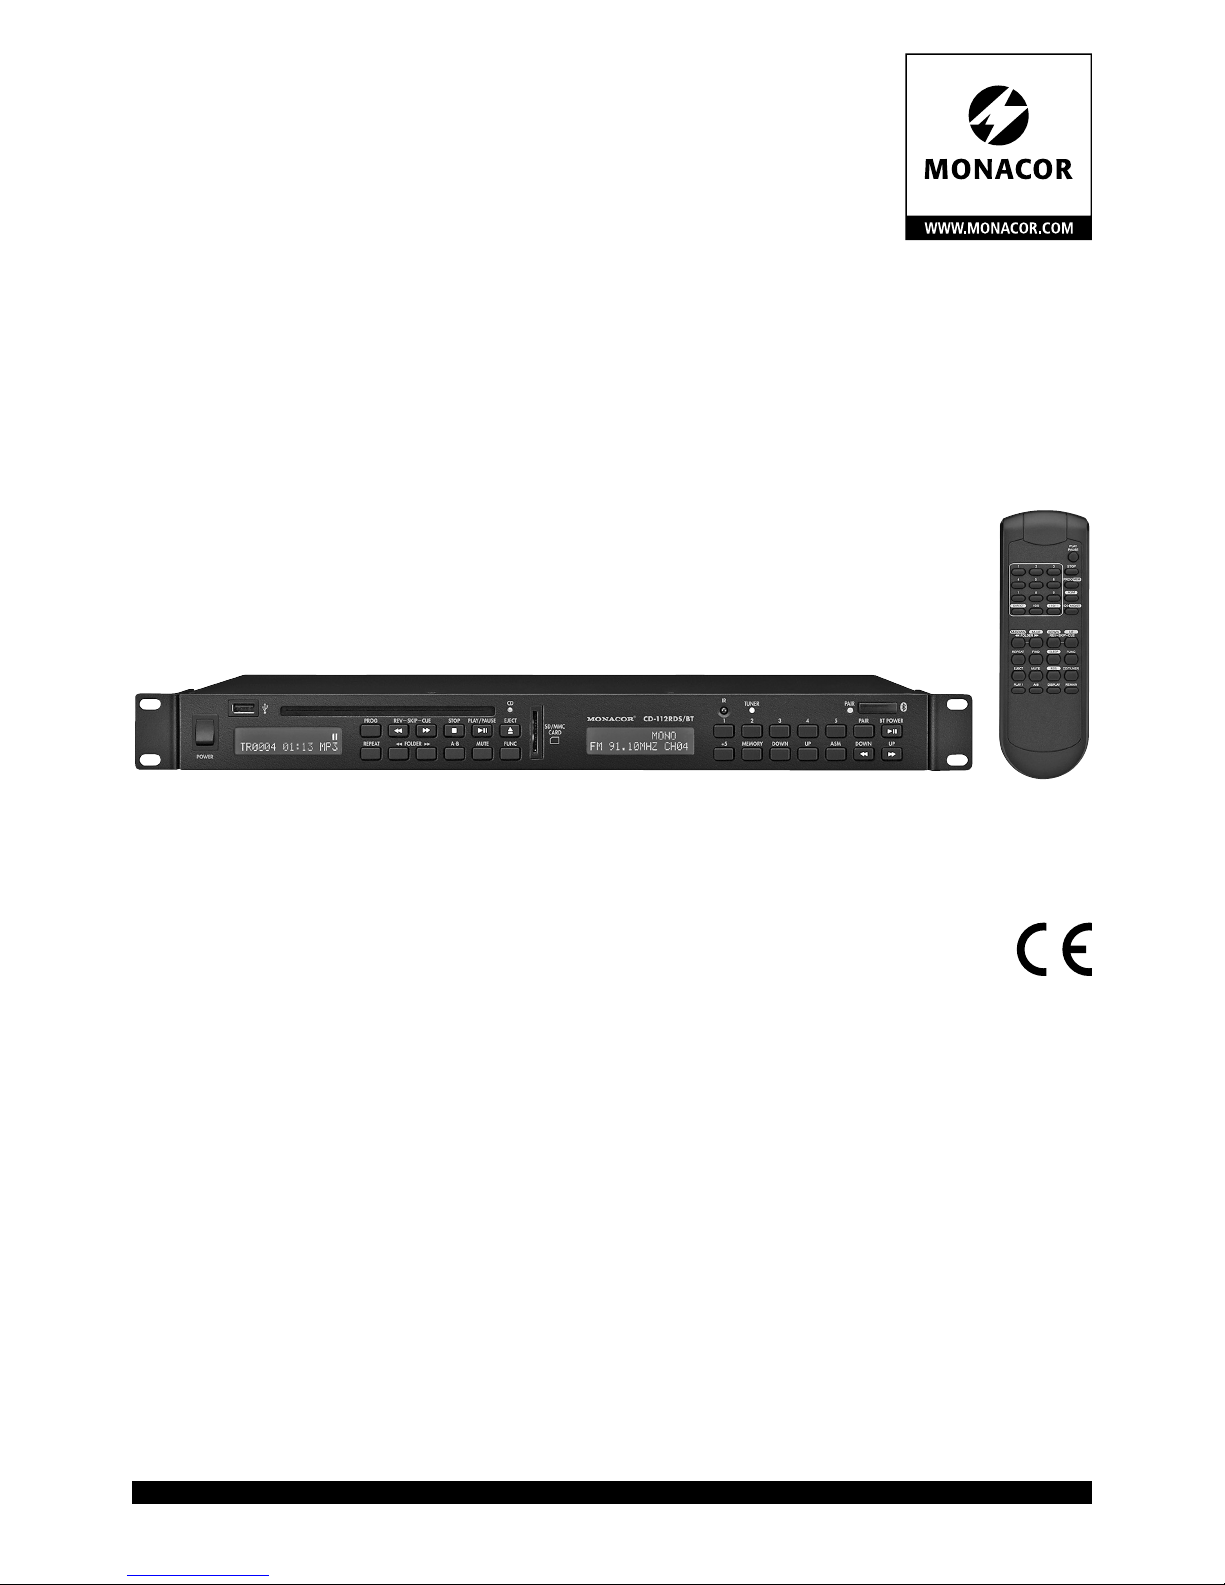
CD / MP3-Spieler
mit FM-RDS-Tuner
CD / MP3 Player
with FM RDS Tuner
CD-112RDS/BT
Bestell-Nr. • Order No. 21.2950
Page 2

Page 3

ELECTRONICS FOR SPECIALISTS ELECTRONICS FOR SPECIALISTS ELECTRONICS FOR SPECIALISTS ELECTRONICS FOR SPECIALISTS
3
Deutsch ...........Seite 4
English ............Page 8
Français ...........Page 12
Italiano............Pagina 16
Nederlands ........Pagina 20
Español ...........Página 24
Polski .............Strona 28
Dansk .............Sida 32
Svenska ...........Sidan 32
Suomi.............Sivulta 33
Page 4
4
Deutsch
USE ONLY WITH A 250V FUSE
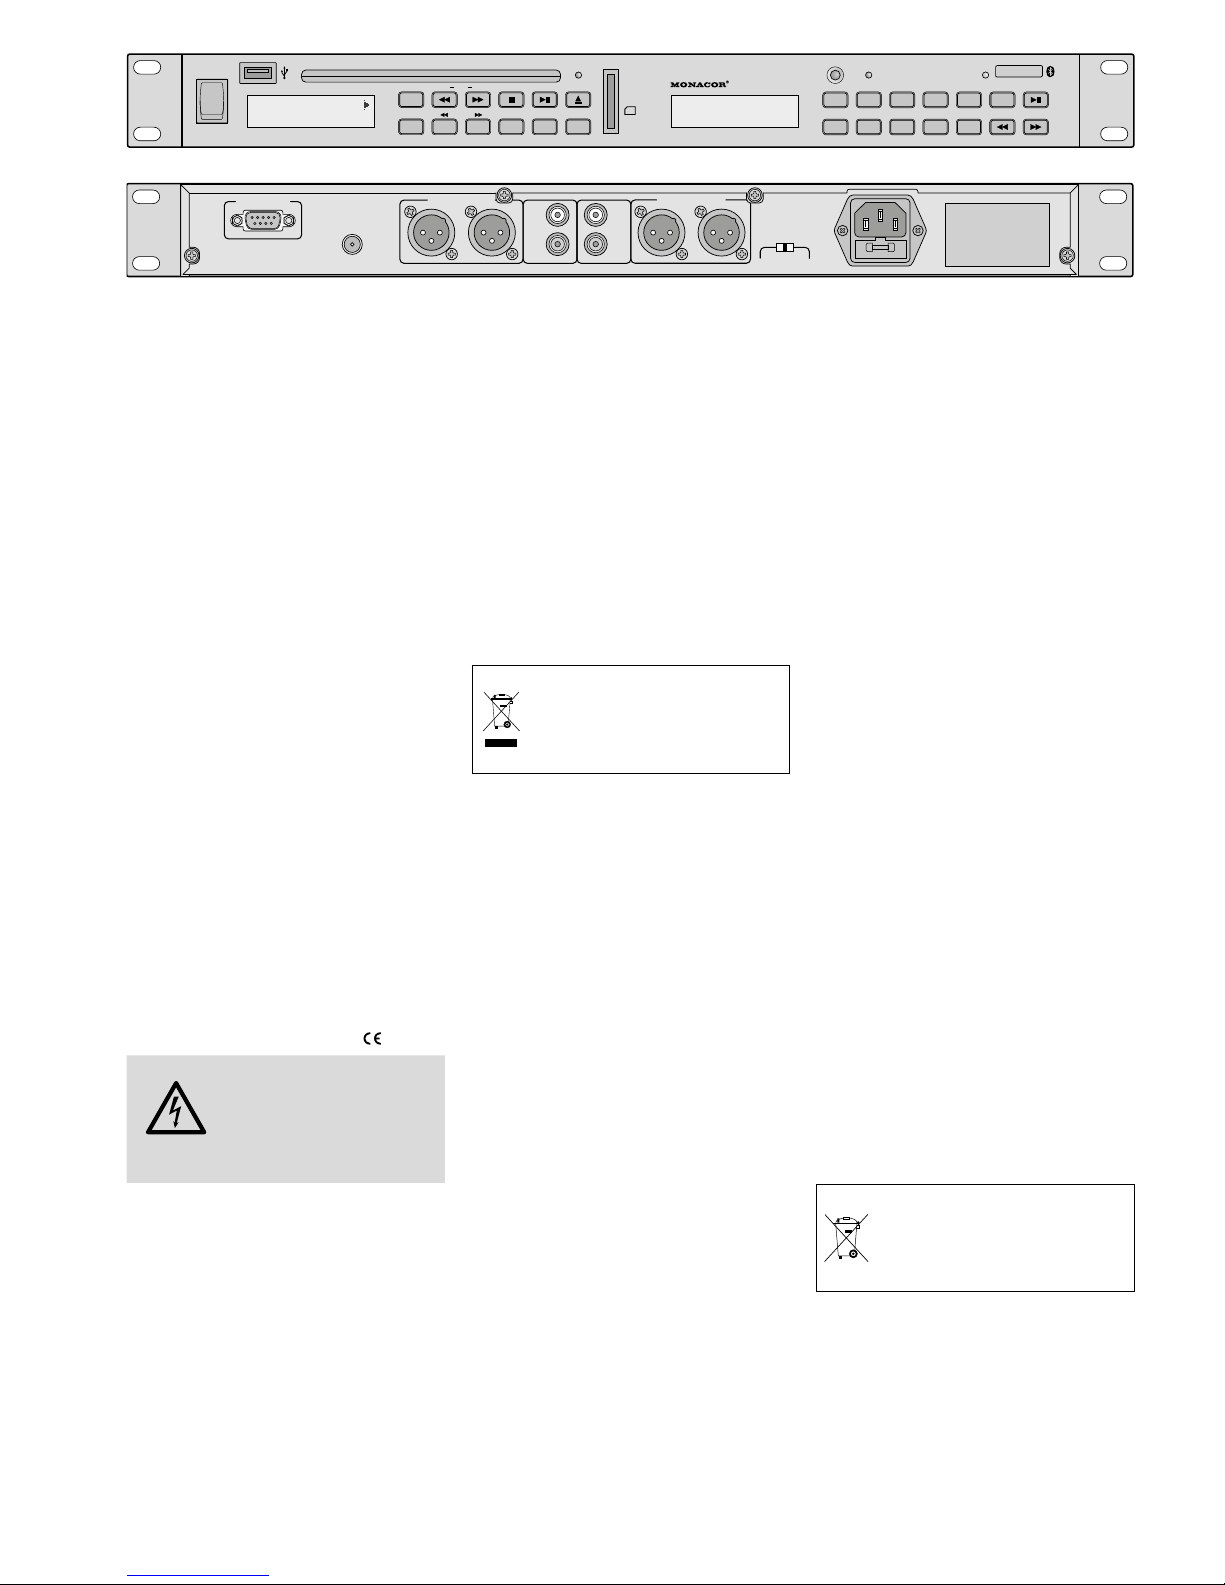
6 7 8 9
1 2 3 4 5
REMOTE CONTROL
ANTENNA
R
PRIORITY OUT
L
L
BT OUT
TUNER
OUT
L
R CD PLAYER OUT L
AUTO PLAY
RANDOM
AUTO PLAY
230
V
~/
50
Hz
SELECT PLAY TYPE
NORMAL
POWER
POWER
CD
PROG
REPEAT
SKIP
REV
CUE
A- B
MUTE FUNC
STOP
PLAY/PAUSE
EJECT
CD -112R D S/B T
FOLDER
SD/MMC
CARD
IR
TUNER
PAIR
1 2 3 4 5 PAIR BT POWER
+5 MEMORY DOWN UP ASM DOWN UP
DISC
TR 02 01:53 CDA
STEREO
FM 92.50MHZ CH04
CD / MP3-Spieler
Diese Bedienungsanleitung richtet sich an
Benutzer ohne besondere Fachkenntnisse.
Bitte lesen Sie die Anleitung vor dem Betrieb
gründlich durch und heben Sie sie für ein späteres Nachlesen auf.
1 Einsatzmöglichkeiten
Das Gerät CD-112RDS / BT ist eine Kombination aus CD / MP3-Spieler, FM-RDS-Tuner
und Bluetooth-Empfänger und eignet sich
für vielfältige Beschallungsaufgaben, z. B.
im Theater, in Gaststätten, in Warteräumen.
Der CD / MP3-Spieler bietet dazu spezielle
Funktionen wie z. B. Endloswiedergabe, Zufallswiedergabe, MP3-Wiedergabe von USBSpeichermedien und Speicherkarten (max.
32 GB)*.
Mit dem Gerät können Audio-CDs, selbst
gebrannte Audio-CDs (Audio CD-R) sowie
CDs mit Titeln im MP3-Format abgespielt werden. Bei wiederbeschreibbaren CDs (CD-RW)
kann es jedoch je nach CD-Typ, verwendetem
CD-Brenner und Brennprogramm beim Abspielen zu Problemen kommen.
* Hinweis: Aufgrund der Vielfalt von Speicher-
Herstellern und Gerätetreibern kann nicht garantiert werden, dass alle Speichermedien mit dem
CD-112RDS / BT kompatibel sind.
2 Hinweise für den
sicherenGebrauch
Das Gerät entspricht allen relevanten Richtlinien der EU und trägt deshalb das -Zeichen.
WARNUNG
Das Gerät wird mit lebensgefährlicher Netzspannung
versorgt. Nehmen Sie deshalb
niemals selbst Eingriffe daran
vor. Es besteht die Gefahr
eines elektrischen Schlages.
•
Das Gerät ist nur zur Verwendung im Innenbereich geeignet. Schützen Sie es vor
Tropf- und Spritzwasser sowie vor hoher
Luftfeuchtigkeit. Der zulässige Einsatztemperaturbereich beträgt 0 – 40 °C.
•
Stellen Sie keine mit Flüssigkeit gefüllten
Gefäße, z. B. Trinkgläser, auf das Gerät.
•
Nehmen Sie das Gerät nicht in Betrieb und
ziehen Sie sofort den Netzstecker aus der
Steckdose,
1. wenn sichtbare Schäden am Gerät oder
am Netzkabel vorhanden sind,
2. wenn nach einem Sturz oder Ähnlichem
der Verdacht auf einen Defekt besteht,
3. wenn Funktionsstörungen auftreten.
Geben Sie das Gerät in jedem Fall zur Reparatur in eine Fachwerkstatt.
•
Ziehen Sie den Netzstecker nie am Kabel
aus der Steckdose, fassen Sie immer am
Stecker an.
•
Verwenden Sie für die Reinigung nur ein
trockenes, weiches Tuch, niemals Wasser
oder Chemikalien.
•
Wird das Gerät zweckentfremdet, nicht
richtig angeschlossen, falsch bedient oder
nicht fach gerecht repariert, kann keine Haftung für daraus resultierende Sach- oder
Personenschäden und keine Garantie für
das Gerät übernommen werden.
Soll das Gerät endgültig aus dem
Betrieb genommen werden, übergeben Sie es zur umweltgerechten Entsorgung einem örtlichen Recyclingbetrieb.
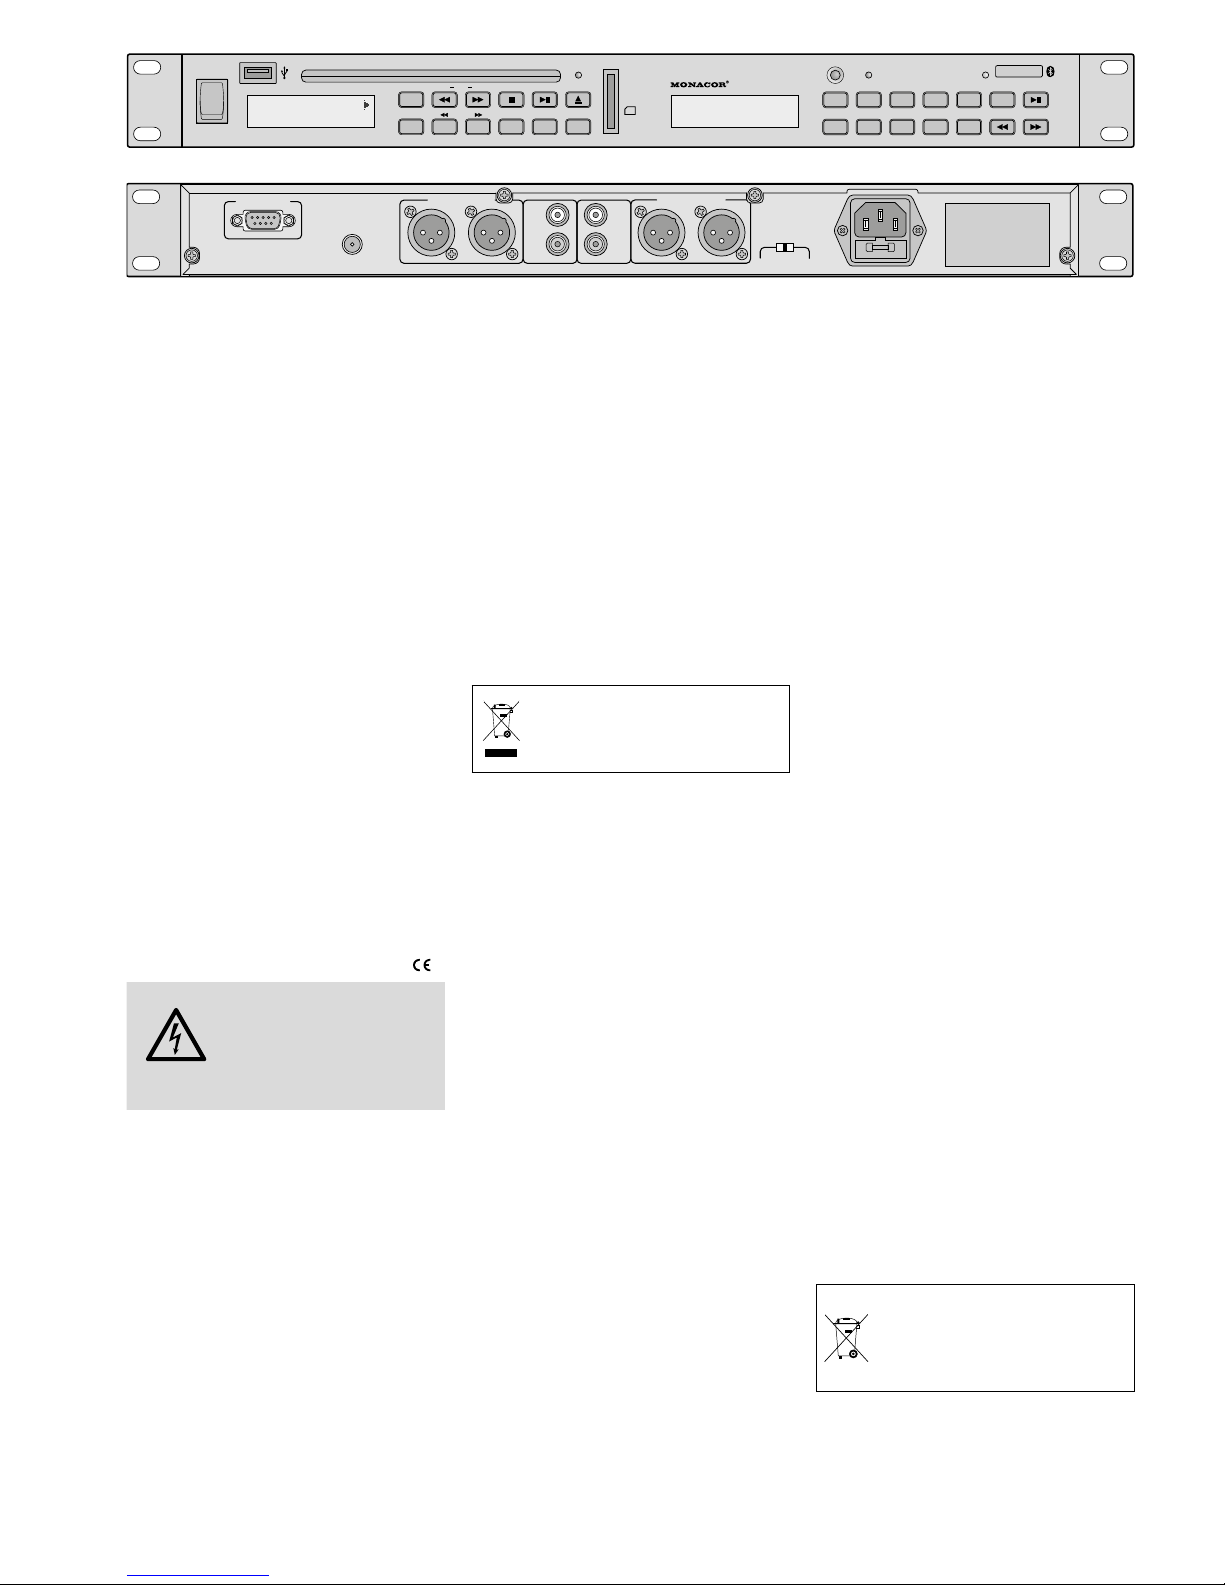
3 Gerät aufstellen
undanschließen
Das Gerät ist für die Montage in ein Rack
(482 mm / 19”) vorgesehen, kann aber auch
als frei stehendes Tischgerät verwendet werden. Für den Einbau in ein Rack wird 1 HE
benötigt (HE = Höheneinheit = 44,45 mm).
Vor dem Anschluss bzw. vor dem Verändern
von Anschlüssen den CD-112RDS / BT und die
anzuschließenden Geräte ausschalten.
1)
Um die Audiosignale an das nachfolgende
Gerät (z. B. Mischpult oder Verstärker) weiterzuleiten, sind vier Line-Pegel-Ausgänge
vorhanden:
PRIORITY OUT
1. Für das Signal des Bluetooth-Empfängers; das Signal hat Vorrang vor den
Signalen des CD / MP3-Spielers und des
Tuners.
2. Wird kein Bluetooth-Signal empfangen oder ist die Wiedergabe auf Pause
geschaltet, liegt hier das Signal des
CD / MP3-Spielers an.
3. Ist der CD / MP3-Spieler auf Pause oder
Stopp geschaltet, liegt hier das Signal
des Tuners an.
BT OUT
für das Signal des Bluetooth-Empfängers
TUNER OUT
für das Signal des Tuners
CD PLAYER OUT
für das Signal des CD / MP3-Spielers
2)
Eine UKW-Antenne an die Buchse ANTENNA anschließen. Eine einfache UKWAntenne liegt dem Gerät bei.
3)
Zum Schluss das beiliegende Netzkabel zuerst in die Netzbuchse und dann in eine
Steckdose (230 V/ 50 Hz) stecken.
4 Bedienung
Das Gerät mit dem Netzschalter POWER einschalten. Auf dem Display des CD / MP3-Spielers erscheint die Anzeige
Welcome
. Das
Display des Tuners zeigt den zuletzt gewählten Sender an.
4.1 Fernbedienung
1)
Zum Einsetzen der Batterien (2 × 1,5 V,
Größe AAA = Micro) auf der Rückseite der
Fernbedienung den Batteriefachdeckel abnehmen. Die Batterien, wie im Batteriefach
angegeben, einsetzen. Das Fach mit dem
Deckel wieder schließen.
Bei längerem Nichtgebrauch die Batterien herausnehmen, damit die Fernbedienung bei einem eventuellen Auslaufen der
Batterien nicht beschädigt wird.
2)
Die Fernbedienung beim Drücken einer
Taste immer in Richtung des Sensors „IR“
halten. Dabei muss Sichtverbindung zwischen der Fernbedienung und dem Sensor
bestehen.
3)
Am Gerät zeigen die LEDs „CD“ und
„TUNER“ an, ob der CD / MP3-Spieler oder
der Tuner mit der Fernbedienung gesteuert
werden kann. Zum Umschalten der Steuerung die Taste CD / TUNER drücken.
4)
Lässt die Reichweite der Fernbedienung
nach, sind die Batterien verbraucht und
müssen ausgewechselt werden.
Batterien dürfen nicht in den Hausmüll geworfen werden. Geben Sie
sie zur umweltgerechten Entsorgung nur in den Sondermüll (z. B.
Sammelbehälter im Einzelhandel).
Page 5
5
Deutsch
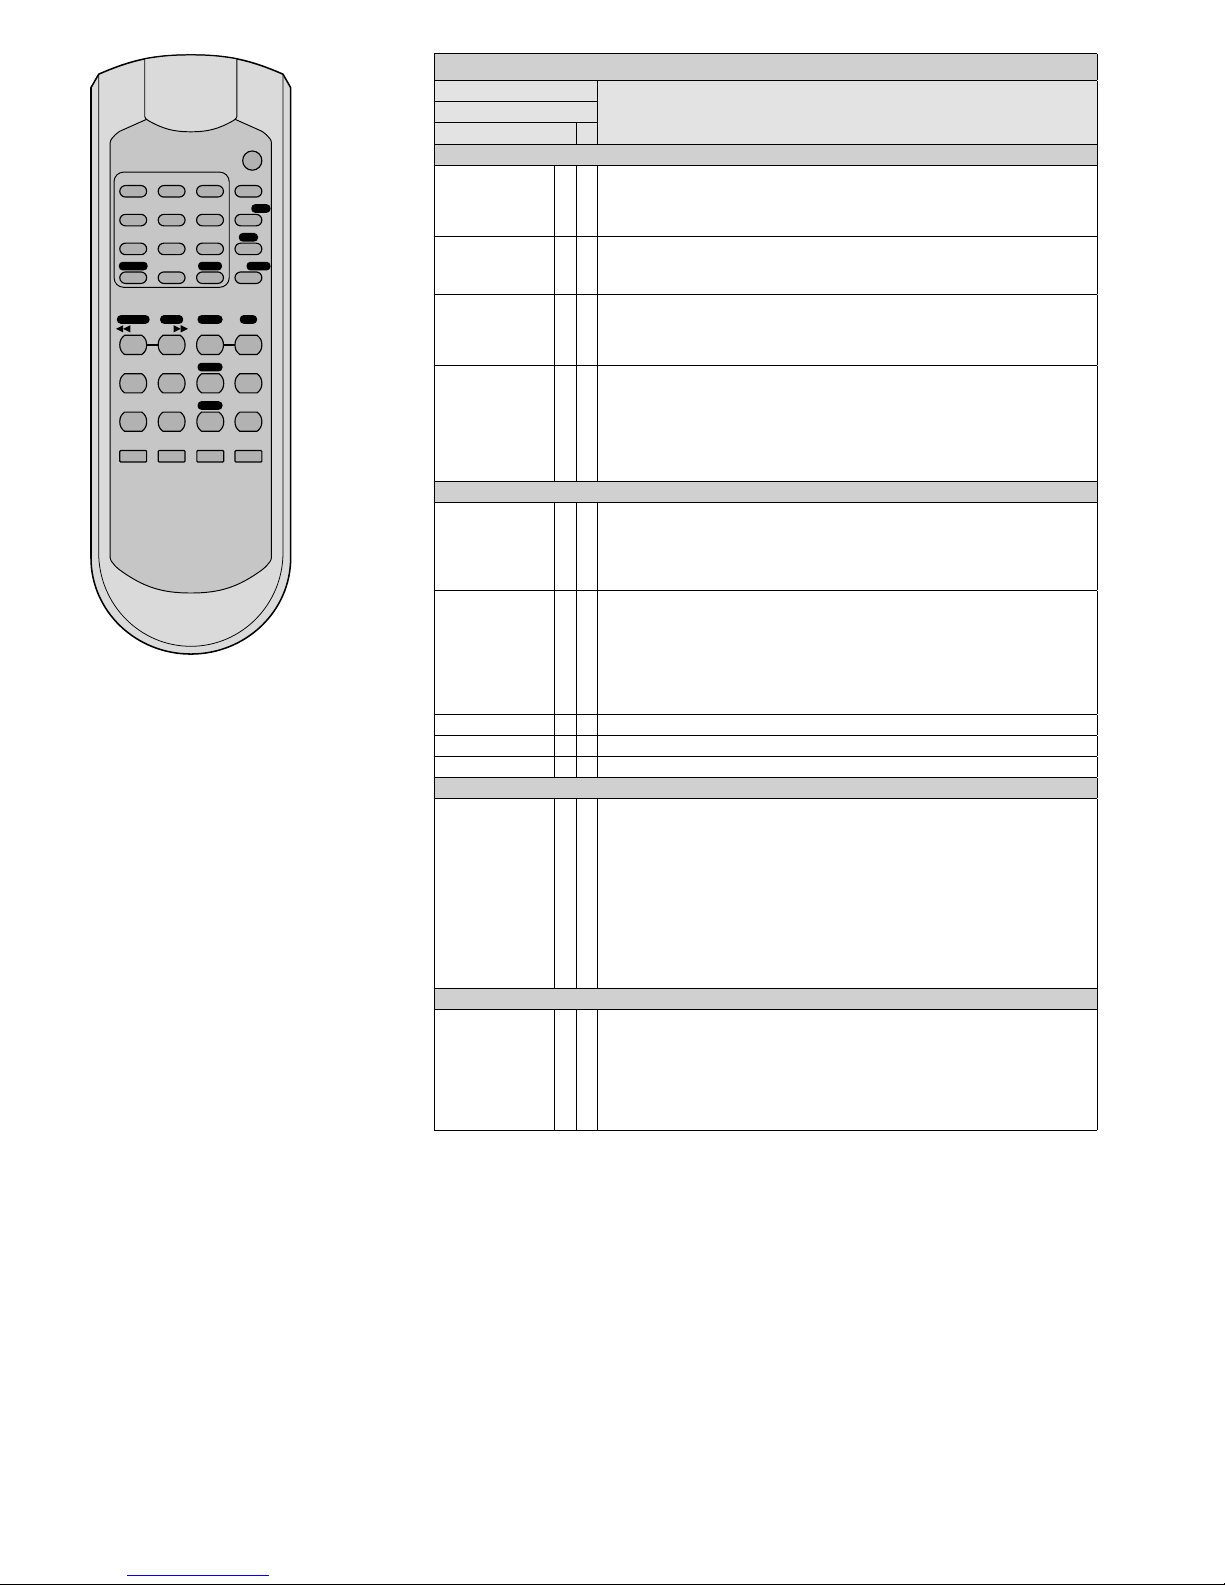
4.2 Tuner
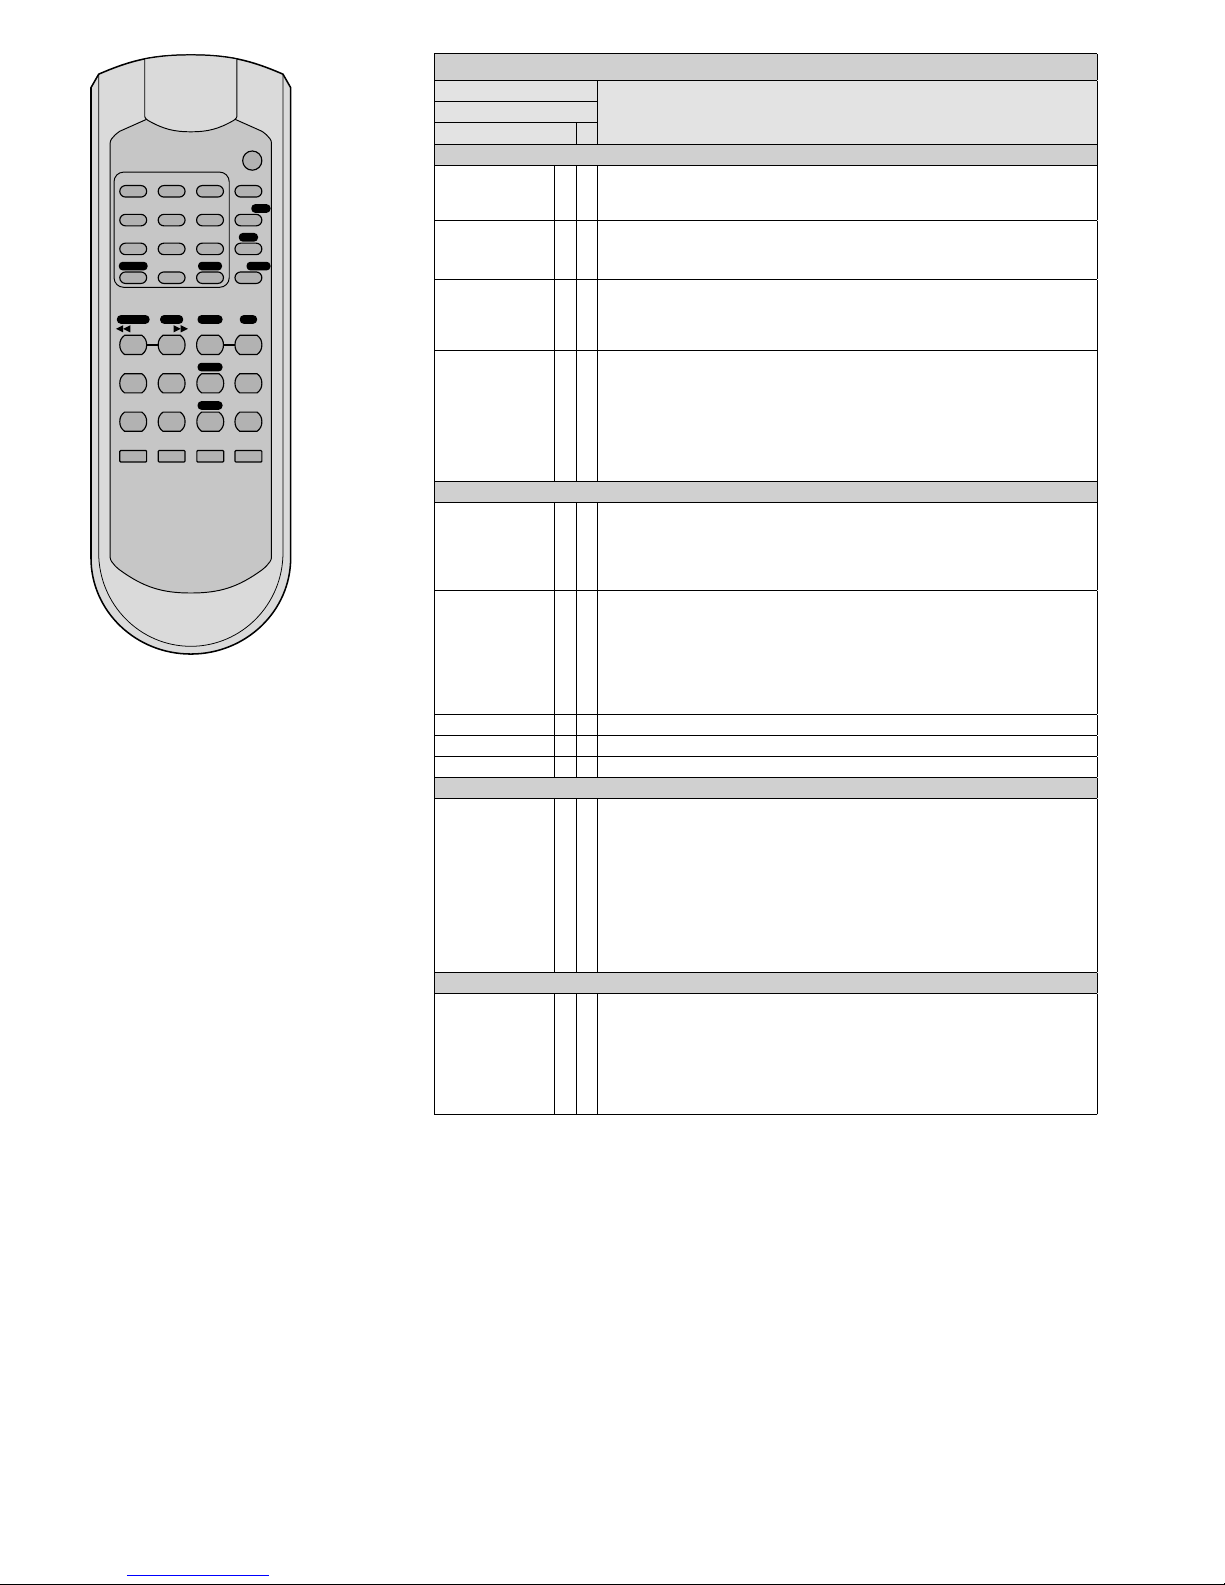
1) Die Tasten für die Tuner-Funktionen sind
auf der Fernbedienung durch ein weißes
Feld mit schwarzer Schrift gekennzeichnet
(außer die Zifferntasten 1…9, 10 / 0). Um
den Tuner mit der Fernbedienung steuern zu können, muss am Gerät die LED
„TUNER“ leuchten. Leuchtet jedoch die
LED „CD“, auf der Fernbedienung die
Taste CD / TUNER drücken.
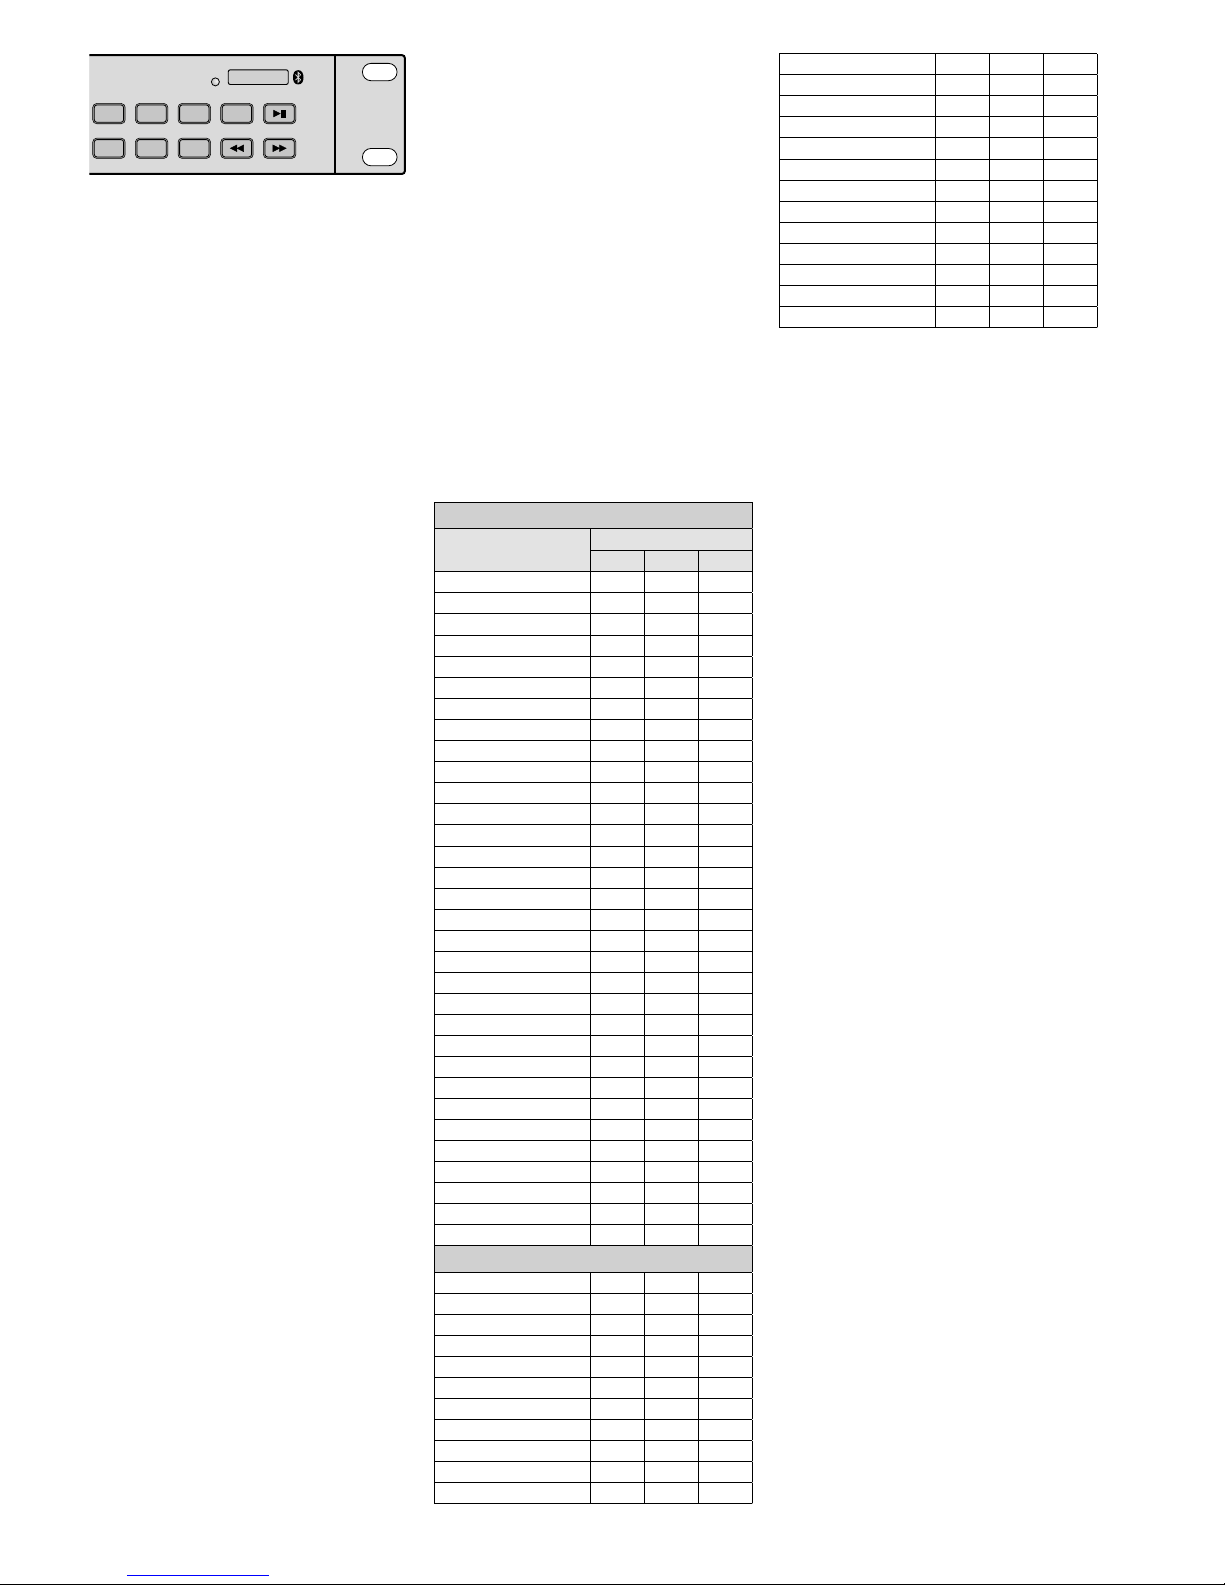
2) Alle Bedienmöglichkeiten sind in der folgenden Tabelle aufgeführt.
3)
Beim ersten Betrieb zuerst die Sender speichern, die am Standort empfangen werden können. 30 Stationsspeicher stehen
zur Verfügung.
FM-Tuner
Taste
Funktion
auf der Fernbedienung
am Gerät
Sender speichern
ASM × ×
Alle Sender suchen und nacheinander automatisch speichern:
Taste 2 s gedrückt halten, bis die Zahlen der Frequenzanzeige durchlaufen. Alle
Sender sind gespeichert, wenn das Display die Stations-Nr. CH01 anzeigt.
DIRECT ×
Eingabe der Empfangsfrequenz:
1. Taste DIRECT drücken.
2. Frequenz in MHz mit den Tasten 1…9 und 10 / 0 eingeben.
DOWN
UP
× ×
Sendersuchlauf:
Taste gedrückt halten, bis die Zahlen der Frequenzanzeige durchlaufen.
Feinabstimmung:
Taste (mehrfach) kurz drücken.
MEMORY
MEM
×
×
Sender speichern:
1. Sender einstellen (siehe Tasten DIRECT oder DOWN / UP).
Alle weiteren Tasten jeweils innerhalb von 5 Sek. drücken, sonst müssen die
Schritte 2 – 4 wiederholt werden.
2. Taste MEM(ORY) drücken.
3. Stationsnummer wählen (siehe „Gespeicherte Sender aufrufen“).
4. Taste MEM(ORY) drücken.
Gespeicherte Sender aufrufen
1… 5,
+5
×
Nr. Tasten
4 4
10 5, +5, +5
18 3, +5, +5, +5, +5
22 2, +5, +5, +5, +5, +5
1… 9, 10 / 0,
+10 / - -
×
Nr. Tasten
4 4
10 10 / 0
18 8, +10 / - 22 2, +10 / - -, +10 / - -
oder 2 Sek. die Taste +10 / - - gedrückt halten, bis CH-- angezeigt wird; dann die
Nummer zweistellig eingeben.
M-DOWN / M-UP × vorherige / nächste Stationsnummer
MO / ST × Umschalten zwischen Stereo- und Mono-Empfang
MUTE × Ton aus- und einschalten
Zusätzliche Informationen beim RDS-Empfang
RDS ×
1. Tastendruck:
Anzeige des Programmtyps oder
PTY NONE*
2. Tastendruck:
Informationen zum Titel / zur Sendung oder RT NONE*
3. Tastendruck:
Anzeige der Uhrzeit (nach dem Aufrufen des Senders kann es einige Minuten
dauern, bis die Uhrzeit erscheint) oder
CT NONE*
4. Tastendruck:
Kurz Frequenz und Stations-Nr., dann Sendername (Grundeinstellung)
*wenn die Information nicht gesendet wird
Automatisches Ausschalten des Tuners
SLEEP ×
1. Taste so oft drücken, bis die gewünschte Zeit bis zum Ausschalten angezeigt
wird. Nach dem Ablauf der Zeit schaltet sich der Tuner aus.
2. Wiedereinschalten:
Taste drücken:
SLEEP-90 MIN wird angezeigt. Taste noch 1 × drücken, sonst
ist die Ausschaltfunktion wieder aktiviert.
3. Ausschalten der Funktion vor Ablauf der eingestellten Zeit:
Taste drücken, sodass
SLEEP… MIN ausgeblendet wird.
2 31
5 64
8 97
REV – SKIP – CUE
FUNC
FINDREPEAT
MUTEEJECT
PLAY 1 A-B
FOLDER
MEM
ASM
MO/ST
+10/- -DIRECT
M-DOWN M-UP DOWN
SLEEP
RDS
UP
STOP
PLAY
PAUSE
PROG
ID3
DISPLAY
REMAIN
CD/TUNER
10/0
Page 6
6
Deutsch
2 31
5 64
8 97
REV – SKIP – CUE
FUNC
FINDREPEAT
MUTEEJECT
PLAY 1 A-B
FOLDER
MEM
ASM
MO/ST
+10/- -DIRECT
M-DOWN M-UP DOWN
SLEEP
RDS
UP
STOP
PLAY
PAUSE
PROG
ID3
DISPLAY
REMAIN
CD/TUNER
10/0
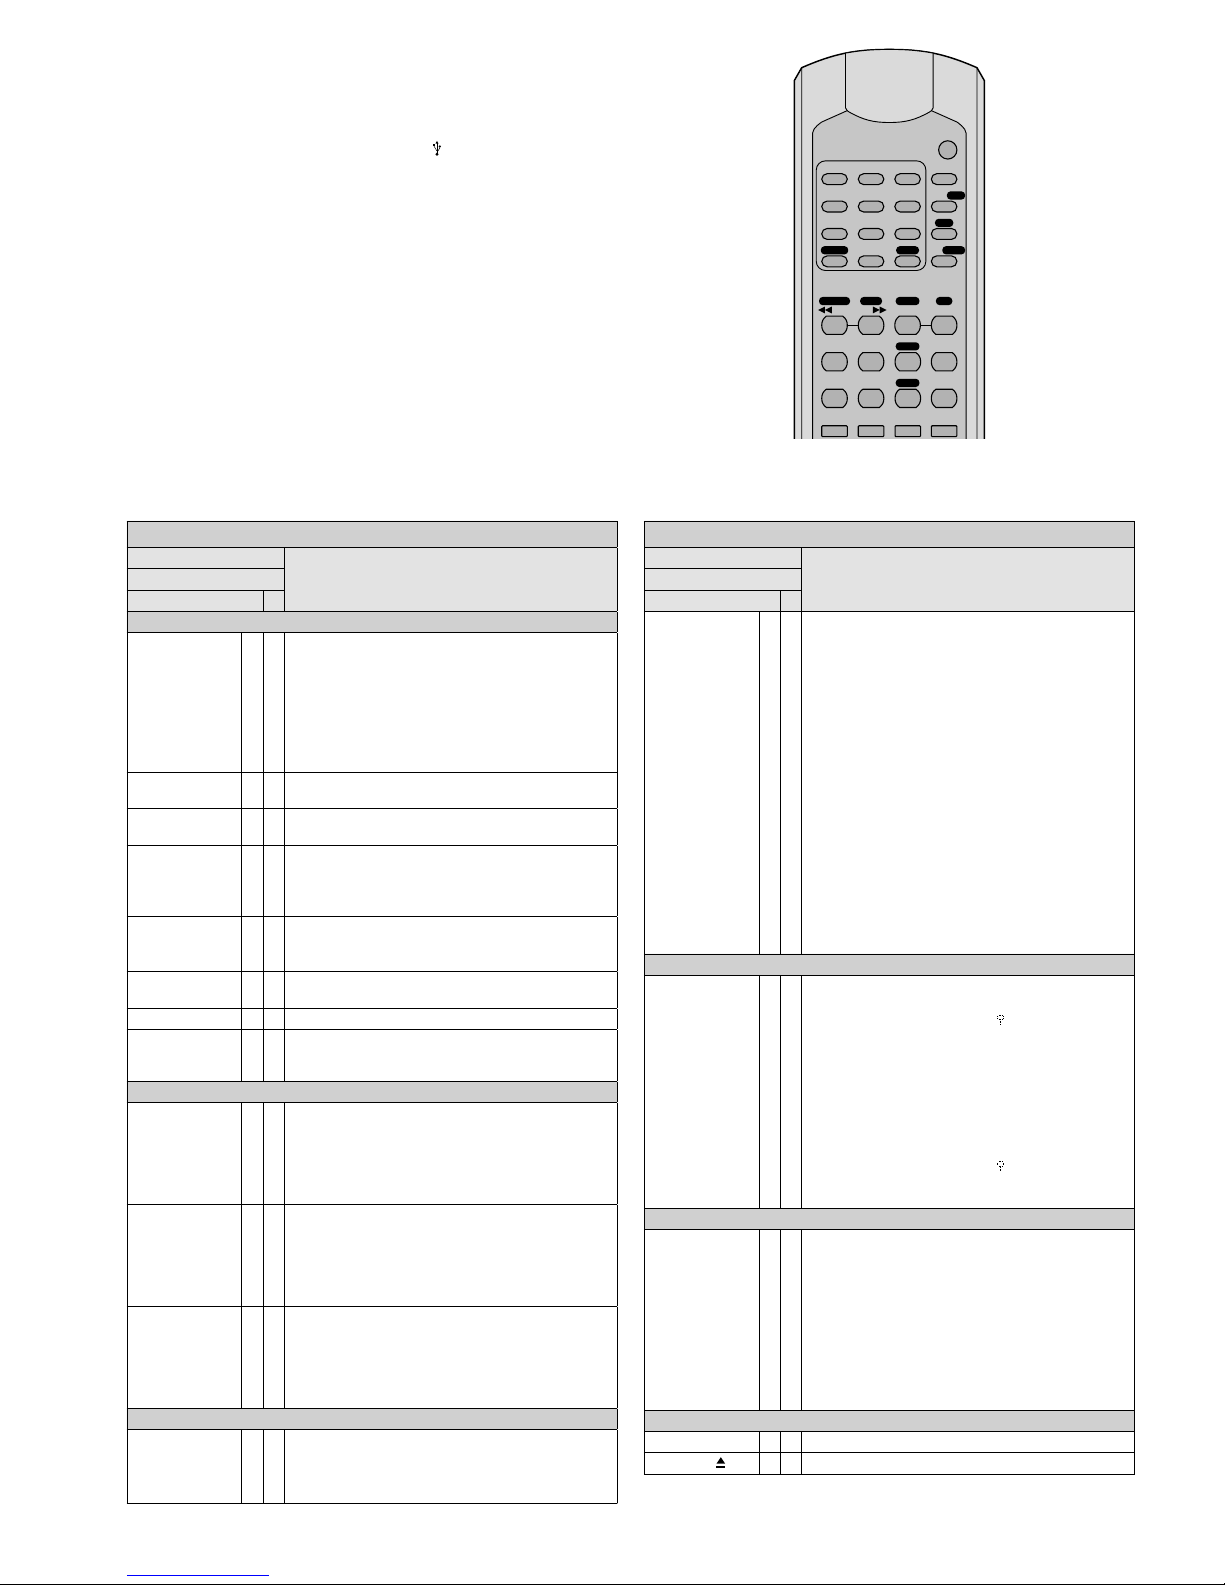
4.3 CD / MP3-Spieler
1) Eine CD, mit der Beschriftung nach oben zeigend, in den Einzugsschlitz schieben, bis sie automatisch eingezogen wird
und / oder
einen USB-Stick in den USB-Anschluss stecken oder eine Fest-
platte (ggf. mit eigener Stromversorgung) mit dem USB-Anschluss
verbinden
und / oder
eine Speicherkarte in den Schlitz SD/ SDHC CARD stecken. Dabei
muss die abgeschrägte Ecke der Karte nach oben zeigen. Soll die
Karte wieder entnommen werden, sie etwas hineindrücken, sodass
sie ausrastet.
2) Um den Audiospieler mit der Fernbedienung steuern zu können,
muss am Gerät die LED „CD“ leuchten. Leuchtet jedoch die LED
„TUNER“, auf der Fernbedienung die Taste CD / TUNER drücken.
3) Alle weiteren Bedienmöglichkeiten sind in der Tabelle aufgeführt.
Nach dem Betrieb das Gerät mit dem Netzschalter POWER ausschalten.
CD / MP3-Spieler
Taste
Funktion
auf der Fernbedienung
am Gerät
Grundfunktionen
SELECT PLAY TYPE
×
Schiebeschalter auf der Rückseite:
AUTO PLAY = Nach dem Einschalten des Gerätes
startet automatisch die Wiedergabe
NORMAL = Nach dem Einschalten steht der Audio-
spieler auf Pause
RANDOM AUTO PLAY = Nach dem Einschalten startet
automatisch die Wiedergabe in zufälliger Reihenfolge
der Titel
FUNC × ×
Umschalten zwischen CD, USB-Anschluss und
Speicherkarte
II
PLAY/ PAUSE
××Wiedergabe starten und
Umschalten zwischen Wiedergabe und Pause
1… 9, 10 / 0 × ×
Direktwahl eines Titels, Beispiele:
Titel 8 = Tasten 8 und II
Titel 30 = Tasten 3, 10 / 0 und II
Titel 125 = Tasten 1, 2, 5 und II
REV − SKIP − CUE
×
×
Titelanfang, vorheriger / nächster Titel:
Taste kurz drücken
schneller Vor- / Rücklauf: Taste gedrückt halten
FOLDER
× ×
auf den ersten Titel des vorherigen / nächsten Ordners
springen
MUTE × × Ton aus- und einschalten
PLAY 1 ×
Einzeltitelwiedergabe (Anzeige
1Ɗ):
Am Ende eines Titels schaltet das Gerät auf Pause.
Zum Starten des nächsten Titels die Taste II drücken.
Umschalten der Informationen im Display
REMAIN ×
nur beim Abspielen einer CD-DA
(Compact Disc Audio Digital):
Umschalten zwischen der Anzeige
– der bereits gespielten Zeit des Titels
– der Restzeit des Titels
– der Restzeit der CD
ID3 ×
nur beim Abspielen von MP3-Dateien:
Umschalten der oberen Displayzeile
– Namen der Datei, des Titels, des Künstlers und des
Albums laufen durch
– Anzeige des angewählten Tonträgers:
DISC, USB oder CARD
DISPLAY ×
nur beim Abspielen von MP3-Dateien:
Umschalten der unteren Displayzeile
– Titel-Nr. und Titel-Spielzeit
– Ordnername
– Titelname
– Anzahl der Ordner und der Titel
Wiederholfunktionen
A-B × ×
Titelabschnitt wiederholen (Endlosschleife):
Jeweils am Anfang und am Ende des Abschnitts die
Taste drücken (minimale Länge des Abschnitts 2 Sek.).
Zum Verlassen der Schleife die Taste erneut drücken.
CD / MP3-Spieler
Taste
Funktion
auf der Fernbedienung
am Gerät
REPEAT × ×
Wiederholfunktionen, Zufallswiedergabe und
Anspielfunktion
Grundeinstellung PLAY ALL: alle Titel werden
einmal abgespielt
erster Tastendruck REPEAT TRACK
ständige Wiederholung des angewählten Titels
nächster Tastendruck REPEAT FOLDER
ständige Wiederholung aller Titel im angewählten
Ordner
nächster Tastendruck REPEAT ALL
ständige Wiederholung aller Titel
nächster Tastendruck RANDOM REPEAT
ständiges Abspielen aller Titel in zufälliger Reihen-
folge
nächster Tastendruck RANDOM PLAY
einmalige Wiedergabe aller Titel in zufälliger
Reihenfolge
nächster Tastendruck INT PLAY
Anspielfunktion: Jeder Titel wird für 10 s angespielt
nächster Tastendruck PLAY ALL: Grundeinstellung
Alphabetische Suche von MP3-Titeln
FIND ×
Alphabetische Suche von Titeln und Ordnern
Titelsuche
1. FIND 1 × drücken Anzeige "A".
2. Den Anfangsbuchstaben des Titels mit
REV − SKIP − CUE wählen.
3. Mit PLAY den Titel starten.
Bei mehreren Titeln mit demselben Anfangsbuchstaben Taste REV oder CUE gedrückt halten, bis der
Buchstabe blinkt; mit REV − SKIP − CUE den Titel
aussuchen und mit PLAY den Titel starten.
Ordnersuche
1. FIND 2 × drücken Anzeige Dir.
2. Mit REV − SKIP − CUE den Ordner aussuchen.
3. Mit PLAY den 1. Titel im Ordner starten.
Eigene Titelfolge programmieren
PROG × ×
1. Taste STOP drücken.
2. Taste PROG drücken.
3. Nur bei MP3-Dateien: Ordner-Nr. eingeben und
Taste PROG drücken.
4. Titel-Nr. eingeben und Taste PROG drücken.
5. Alle weiteren Titel genauso programmieren
(max. 64).
6. Abspielen mit Taste PROG starten.
Programmierung löschen oder abbrechen:
Taste STOP
drücken.
Wiedergabe beenden
STOP
× × Wiedergabe beenden
EJECT
× × CD auswerfen
Page 7
7
Deutsch
4.4 Bedienung des BluetoothEmpfängers
Mit dem Bluetooth-Empfänger kann eine
Funkverbindung zu einer Bluetooth-Signalquelle (z. B. Notebook, Smartphone,
Tablet-PC) hergestellt werden, um die dort
gespeicherten Audio-Dateien über den CD112RDS / BT abzuspielen.
Hinweis: Die Bluetooth-Signalquelle muss nach dem
A2DP-Protokoll arbeiten (Advanced Audio Distribution Profile). Anderenfalls ist keine Funkverbindung
möglich.
1)
Die Bluetooth-Funktion am Notebook,
Smartphone oder Tablet-PC einschalten
(siehe ggf. Anleitung des Gerätes).
2)
Um den Bluetooth-Empfänger des CD112RDS / BT einzuschalten, die Taste BT
POWER [II] kurz gedrückt halten, bis die
Anzeige PAIR blinkt.
3)
Um den CD-112RDS / BT mit der BluetoothSignalquelle zu koppeln, die Taste PAIR
kurz gedrückt halten, bis die Anzeige PAIR
langsamer blinkt. Sobald die Funkverbindung hergestellt ist, leuchtet die Anzeige
PAIR konstant.
Hinweis: Der CD-112RDS / BT wird auf dem Display
der Bluetooth-Signalquelle mit „Audio Bluetooth“
angezeigt.
4) Die Wiedergabe eines Titels an der Blue-
tooth-Signalquelle starten.
5) Mit der Taste BT POWER [II] lässt sich die
Wiedergabe unterbrechen und wieder
fortfahren.
Hinweis: Solange die Wiedergabe unterbrochen
ist, liegt am Ausgang PRIORITY das Signal des CD /
MP3-Spielers oder des Tuners an.
6)
Mit den Tasten DOWN [ ] und UP [ ]
kann auf den vorherigen oder den nächsten Titel gesprungen werden (Taste kurz
drücken) sowie ein schneller Rück- oder
Vorlauf erfolgen (Taste gedrückt halten).
7)
Soll der Bluetooth-Empfänger ausgeschaltet werden, die Taste BT POWER [II] so
lange gedrückt halten, bis die Anzeige
PAIR erlischt.
5 PC-Steuerung des Gerätes
über die RS-232-Schnittstelle
Der CD-112RDS / BT kann mit einem entsprechenden Terminalprogramm von einem PC
aus gesteuert werden. Die Buchse REMOTE
CONTROL mit der RS-232-Schnittstelle des
Computers verbinden. Folgende Parameter
im Terminalprogramm einstellen:
Symbolrate:
. . . . . . . .9600 baud
Anzahl der Datenbits:
.8
Anzahl der Stoppbits:
.1
Parität:
. . . . . . . . . . . .keine
Flusskontrolle:
. . . . . . .keine
Die Steuerbefehle für sämtliche Funktionen
des CD-112RDS / BT sind in der folgenden
Tabelle aufgeführt und werden vom Terminalprogramm im ASCII-Code gesendet. Als
4. und 5. Byte müssen abschließend die Befehle „Carriage Return“ (0D hexadezimal)
und „Line Feed“ (0A hexadezimal) an den
CD-112RDS/BT gesendet werden. Einige Terminalprogramme führen diese automatisch
aus oder können entsprechend eingestellt
werden.
Nach dem Ausführen eines Befehles
meldet der CD-112RDS / BT an den PC im
ASCII-Code zurück:
+ O K „Carriage Return“ „Line Feed“
Bei einer Fehleingabe meldet das Gerät:
+ E R „Carriage Return“ „Line Feed“
Hinweis: Zwischen zwei Befehlen muss eine Pause
von mindestens 300 ms liegen. Nach einem Sendersuchlauf-Befehl ist eine Pause von min. 800 ms erforderlich.
Funktionen des CD/MP3-Spielers
Funktion
Steuerbefehl
Byte 1 Byte 2 Byte 3
FOLDER
E A A
FOLDER
E A B
SKIP REV
E A C
SKIP CUE
E A D
STOP E A E
PLAY PAUSE II
E A F
EJECT E A G
PROG E A H
ID3 E A I
FIND E A J
MUTE E A K
REPEAT E A L
FUNC E A M
DISPLAY E A N
A-B E A O
EJECT sperren E A P
EJECT freigegen E A Q
CARD E A R
CD E A S
USB E A T
PLAY 1 E A U
REMAIN E A V
0 E A 0
1 E A 1
2 E A 2
3 E A 3
4 E A 4
5 E A 5
6 E A 6
7 E A 7
8 E
A 8
9 E A 9
Funktionen des Tuners
1 E C A
2 E C B
3 E C C
4 E C D
5 E C E
6 E C F
7 E C G
8 E C H
9 E C I
10 / 0 E C J
+10 E C K
DIRECT E C L
(Tuning) DOWN E C M
(Tuning) UP E C N
MUTE E C O
RDS E C P
(Station) M-UP E C 0
(Station) M-DOWN E C 1
MEM (ORY) E C 2
ASM E C 3
Mono / Stereo E C 4
SLEEP E C 5
Sendersuchlauf
E C 7
Sendersuchlauf
E C 8
6 Pflege
Das Gerät vor Staub, Vibrationen, Feuchtigkeit
und Hitze schützen (zulässiger Einsatztemperaturbereich 0 – 40 °C). Für die Reinigung nur
ein weiches, trockenes Tuch verwenden, auf
keinen Fall Wasser oder Chemikalien.
Hinweis zu Tonaussetzern
und Lesefehlern
Zigarettenrauch und Staub dringen leicht
durch alle Öffnungen des Gerätes und setzen
sich auch auf der Optik der Laser-Abtastsysteme ab. Sollte dieser Belag zu Lesefehlern
und Tonaussetzern führen, muss das Gerät in
einer Fachwerkstatt gereinigt werden. Diese
Reinigung ist kostenpflichtig, auch während
der Garantiezeit!
7 Technische Daten
Frequenzgang: . . . . . .20 – 20 000 Hz
Klirrfaktor: . . . . . . . . .< 0,1 %
Kanaltrennung: . . . . . .> 60 dB
Dynamikumfang: . . . .> 96 dB
Störabstand: . . . . . . . .> 70 dB
Audioausgang: . . . . . .1,2 V
Stromversorgung: . . . .230 V/ 50 Hz
Leistungsaufnahme: . .max. 50 VA
Einsatztemperatur: . . .0 – 40 °C
Abmessungen
(B × H × T):
. . . . . . . . .482 × 44 × 265 mm,
1 HE (Höheneinheit)
Gewicht: . . . . . . . . . . .4 kg
Anschlüsse
Priority:. . . . . . . . . . .XLR, sym.
CD: . . . . . . . . . . . . .XLR, sym.
Bluetooth: . . . . . . . .Cinch
Tuner: . . . . . . . . . . . .Cinch
Remote Control: . . . .D-Sub-Buchse,
9-polig
Änderungen vorbehalten.
Diese Bedienungsanleitung ist urheberrechtlich für
MONACOR ® INTERNATIONAL GmbH & Co. KG
geschützt. Eine Reproduktion für eigene kommerzielle Zwecke – auch auszugsweise – ist untersagt.
PAIR
3 4 5 PAIR BT POWER
DOWN UP ASM DOWN UP
Page 8
8
English
USE ONLY WITH A 250V FUSE
6 7 8 9
1 2 3 4 5
REMOTE CONTROL
ANTENNA
R
PRIORITY OUT
L
L
BT OUT
TUNER
OUT
L
R CD PLAYER OUT L
AUTO PLAY
RANDOM
AUTO PLAY
230
V
~/
50
Hz
SELECT PLAY TYPE
NORMAL
POWER
POWER
CD
PROG
REPEAT
SKIP
REV
CUE
A- B
MUTE FUNC
STOP
PLAY/PAUSE
EJECT
CD -112R D S/B T
FOLDER
SD/MMC
CARD
IR
TUNER
PAIR
1 2 3 4 5 PAIR BT POWER
+5 MEMORY DOWN UP ASM DOWN UP
DISC
TR 02 01:53 CDA
STEREO
FM 92.50MHZ CH04
CD/MP3 Player
These instructions are intended for users
without any specific technical knowledge.
Please read these instructions carefully prior to
operation and keep them for later reference.
1 Applications
The CD-112RDS / BT is a combination of CD /
MP3 player, FM RDS tuner and Bluetooth
receiver: It is suited for versatile PA applications (e. g. in theatres, pubs or waiting rooms)
and offers special features for this purpose,
e. g. continuous repeat, random replay, MP3
replay of USB storage media and memory
cards (32 GB max.)*.
It is able to play audio CDs, audio CDs
you have burnt yourself (audio CD-R) and CDs
with titles in MP3 format. However, problems
may occur when replaying rewriteable CDs
(CD-RW) depending on the type of CD, the
CD burner and the burning program used.
* Note: Due to the large number of storage device
manufacturers and device drivers, it cannot be guaranteed that all storage media are compatible with
the CD-112RDS / BT.
2 Safety Notes
This unit corresponds to all relevant directives
of the EU and is therefore marked with .
WARNING
The unit uses dangerous mains
voltage. Leave servicing to
skilled personnel only. Inexpert handling or modification
of the unit may result in electric shock.
•
The unit is suitable for indoor use only. Pro
tect it against dripping water, splash water
and high air humidity. The admissible ambient temperature range is 0 – 40 °C.
•
Do not place any vessel filled with liquid on
the unit, e. g. a drinking glass.
•
Do not operate the unit and immediately
disconnect the mains plug from the socket
1.
if the unit or the mains cable is visibly
damaged,
2. if a defect might have occurred after the
unit was dropped or suffered a similar
accident,
3. if malfunctions occur.
In any case the unit must be repaired by
skilled personnel.
•
Never pull the mains cable to disconnect
the mains plug from the socket, always
seize the plug.
•
For cleaning only use a dry, soft cloth; never
use water or chemicals.
•
No guarantee claims for the unit and no
liability for any resulting personal damage
or material damage will be accepted if the
unit is used for other purposes than originally intended, if it is not correctly connected or operated, or if it is not repaired
in an expert way.
If the unit is to be put out of operation definitively, take it to a local
recycling plant for a disposal which
is not harmful to the environment.
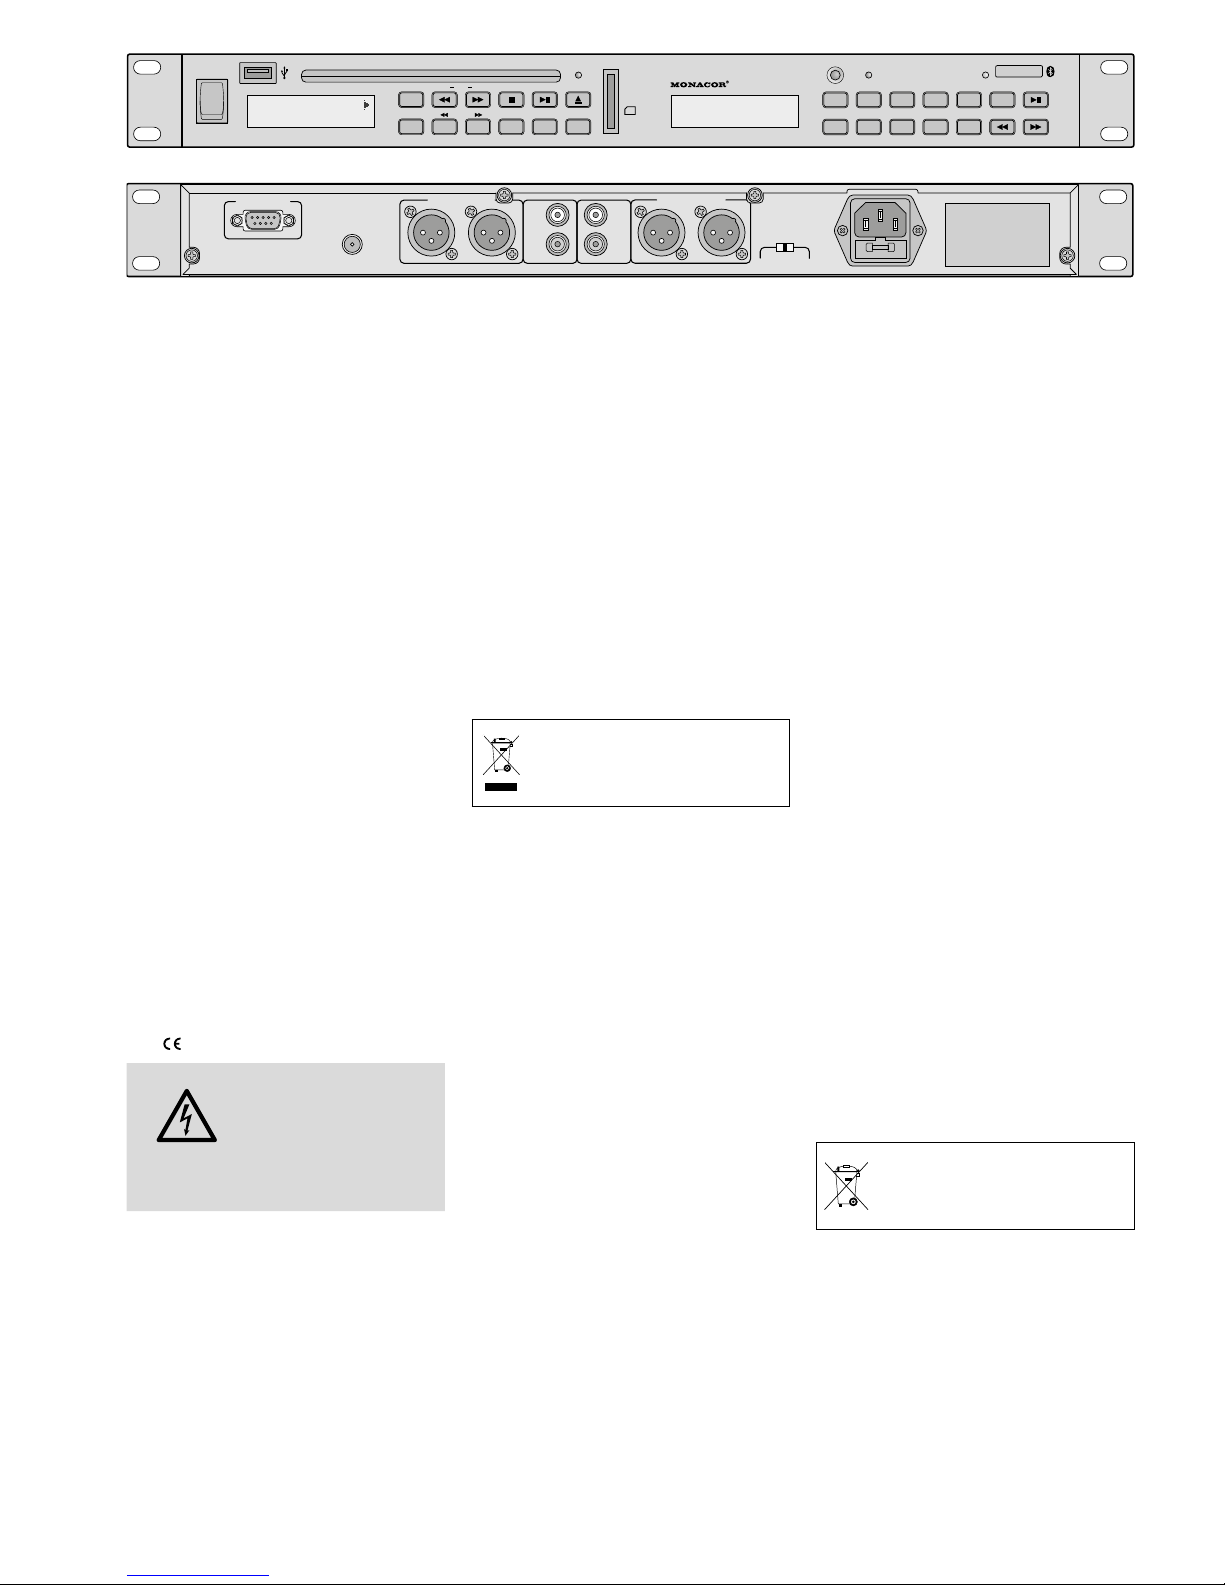
3 Setting Up and Connecting
the Player
The player is designed for installation into a
rack (482 mm / 19”); however, it can also be
placed as desired as a desktop unit. For rack
installation, 1rack space (RS = 44.45 mm) is
required.
Prior to making or changing any connections,
switch off the CD-112RDS / BT and the units
to be connected.
1)
Four line level outputs are available to
route the audio signals to the subsequent
unit (e. g. mixer or amplifier):
PRIORITY OUT
1. For the signal of the Bluetooth receiver;
the signal will take priority over the signals of the CD / MP3 player and of the
tuner.
2. When no Bluetooth signal is received or
when the replay has been set to pause,
the signal of the CD / MP3 player is available at this output.
3. When the CD / MP3 player has been set
to pause or stop, the signal of the tuner
is available at this output.
BT OUT
for the signal of the Bluetooth receiver
TUNER OUT
for the signal of the tuner
CD PLAYER OUT
for the signal of the CD / MP3 player
2)
Connect an FM antenna to the jack
ANTENNA. A basic FM antenna is supplied
with the unit.
3) Finally connect the mains cable provided
to the mains jack first and then to a mains
socket (230 V/ 50 Hz).
4 Operation
Switch on the player with the POWER switch.
The display of the CD / MP3 player shows
Welcome. The display of the tuner shows
the station most recently selected.
4.1 Remote control
1)
To insert the batteries (2 × 1.5 V, size AAA),
remove the battery compartment cover on
the rear side of the remote control. Insert
the batteries as indicated in the battery
compartment. Close the compartment
with the cover.
If the remote control is not in use for a
longer period of time, remove the batteries to prevent any damage due to battery
leakage.
2) When you press a button on the remote
control, always direct the remote control
towards the sensor “IR”. There must be
no obstacles between the remote control
and the sensor.
3)
On the unit, the LEDs “CD” and “TUNER”
will indicate if it is possible to control the
CD / MP3 player or the tuner with the remote control. To change the control, press
the button CD / TUNER.
4)
If the range of the remote control decreases, the batteries are discharged and
must be replaced.
Discharged batteries must not be
placed in the household waste; always take them to a special waste
disposal, e. g. collection container at
your retailer.
Page 9

9
English
4.2 Tuner
1)
On the remote control, the buttons for
the tuner functions are marked by a white
field with black letters (with the exception of the number buttons 1 … 9, 10 / 0).
The tuner can only be operated with the
remote control when the LED “TUNER”
lights up. If the LED “CD” lights up, press
the button CD / TUNER on the remote
control.
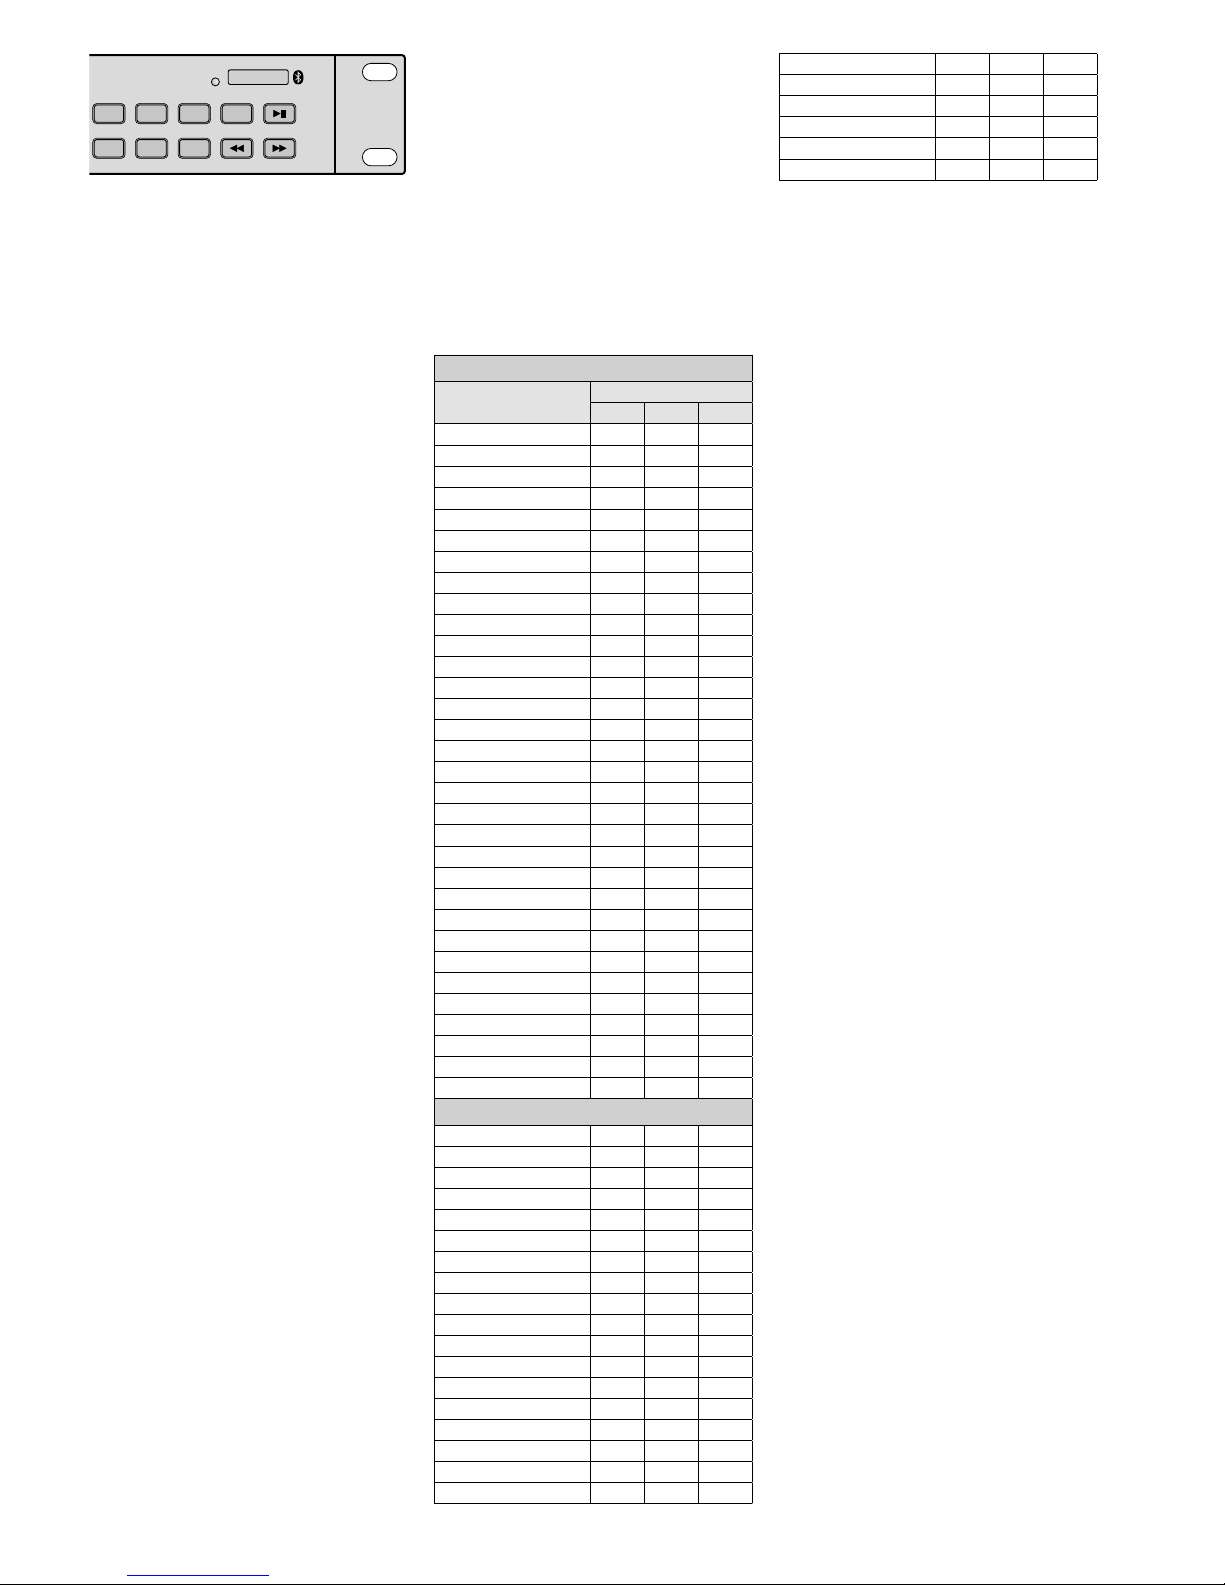
2) All operating options are listed in the following table.
3)
During initial operation, first store the stations that can be received at where you
are located. A maximum of 30 stations
can be stored.
FM Tuner
Button
Function
on the remote control
on the unit
Storing stations
ASM × ×
to scan all stations and to store them one after the other:
Keep button pressed for 2 s until the figures start to appear on the frequency
indication. When the station number CH01 appears on the display, all stations
have been stored.
DIRECT ×
to enter the received frequency:
1. Press the button DIRECT.
2. Enter the frequency in MHz, using the buttons 1…9 and 10 / 0.
DOWN
UP
× ×
station scanning:
Keep button pressed until the figures start to appear on the frequency indication.
fine tuning:
Briefly press button (repeatedly).
MEMORY
MEM
×
×
to store stations:
1. Set the station (see buttons DIRECT or DOWN / UP).
Press each of the following buttons within 5 seconds; otherwise, steps 2 – 4 must
be repeated.
2. Press the button MEM(ORY).
3. Select the station number (see “Calling up stored stations”).
4. Press the button MEM(ORY).
Calling up stored stations
1… 5,
+5
×
no. buttons
4 4
10 5, +5, +5
18 3, +5, +5, +5, +5
22 2, +5, +5, +5, +5, +5
1… 9, 10 / 0,
+10 / - -
×
no. buttons
4 4
10 10 / 0
18 8, +10 / - 22 2, +10 / - -, +10 / - -
or keep the button +10 / - - pressed for 2 seconds until CH-- appears on the
display, and then enter the number (two digits).
M-DOWN / M-UP × previous / next station number
MO / ST × to switch between stereo reception and mono reception
MUTE × to mute and unmute the sound
Additional information for RDS reception
RDS ×
1st press of the button:
indication of the programme type or
PTY NONE*
2
nd
press of the button:
information with regard to title / broadcast programme or RT NONE*
3
rd
press of the button:
indication of the time (after calling up the station, it may take a few minutes until
the time is available) or
CT NONE*
4
th
press of the button:
brief indication of the frequency and the station number, then indication of the
station name (basic setting)
*if the information is not provided
Automatic switch-off of the tuner
SLEEP ×
1. Press button repeatedly until the display indicates the desired length of time
after which the tuner switches off. The tuner will switch off when the set length
of time has elapsed.
2. To switch the tuner on again:
Press button:
SLEEP-90 MIN will appear on the display. Press button once
again; otherwise, the switchoff function will be activated again.
3. To deactivate the function before the set length of time has elapsed:
Press button so that the indication
SLEEP… MIN disappears.
2 31
5 64
8 97
REV – SKIP – CUE
FUNC
FINDREPEAT
MUTEEJECT
PLAY 1 A-B
FOLDER
MEM
ASM
MO/ST
+10/- -DIRECT
M-DOWN M-UP DOWN
SLEEP
RDS
UP
STOP
PLAY
PAUSE
PROG
ID3
DISPLAY
REMAIN
CD/TUNER
10/0
Page 10

10
English
2 31
5 64
8 97
REV – SKIP – CUE
FUNC
FINDREPEAT
MUTEEJECT
PLAY 1 A-B
FOLDER
MEM
ASM
MO/ST
+10/- -DIRECT
M-DOWN M-UP DOWN
SLEEP
RDS
UP
STOP
PLAY
PAUSE
PROG
ID3
DISPLAY
REMAIN
CD/TUNER
10/0
CD / MP3 player
Button
Function
on the remote control
on the unit
Basic functions
SELECT PLAY TYPE
×
sliding switch on the rear:
AUTO PLAY = The replay will start automatically after
the unit has been switched on
NORMAL = The unit will be set to pause after the unit
has been switched on
RANDOM /AUTO PLAY = Replay in random order will
start automatically after the unit has been switched on
FUNC × × to switch between CD, USB port and memory card
II
PLAY/ PAUSE
××to start the replay and
to switch between replay and pause
1… 9, 10 / 0 × ×
direct title selection, examples:
title 8 = buttons 8 and II
title 30 = buttons 3, 10 / 0 and II
title 125 = buttons 1, 2, 5 and II
REV − SKIP − CUE
×
×
beginning of title, previous / next title:
Press button briefly.
fast forward / reverse: Keep button pressed
FOLDER
× ×
to go to the first title of the previous / next folder
MUTE × × to mute and unmute the sound
PLAY 1 ×
single title replay (indication
1Ɗ):
At the end of a title, the player is set to pause.
To start the next title, press the button II
.
Changing the information shown on the display
REMAIN ×
only when a CD-DA (Compact Disc Audio Digital)
is being replayed:
to change the information shown on the display
– time already played of the title
– remaining time of the title
– remaining time of the CD
ID3 ×
only when MP3 files are being replayed:
to change the information shown in the upper line of
the display
– name of the file, the title, the artist and the album
will scroll through the upper line
– the type of the selected storage medium will be
indicated: DISC, USB or CARD
DISPLAY ×
only when MP3 files are being replayed:
to change the information shown in the lower line of
the display
– number and playing time of the title
– name of the folder
– name of the title
– number of folders and titles
CD / MP3 player
Button
Function
on the remote control
on the unit
Repeat functions
A-B × ×
repeat of title section (continuous loop):
Press button at the beginning and at the end of the
section (minimum length of the section: 2 seconds).
Press button once again to exit the loop.
REPEAT × ×
repeat functions, random replay and intro function
basic setting PLAY ALL: all titles will be replayed
once
first actuation of button REPEAT TRACK
the title selected will be repeated continuously
next actuation of button REPEAT FOLDER
all titles in the folder selected will be repeated
continuously
next actuation of button REPEAT ALL
all titles will be repeated continuously
next actuation of button RANDOM REPEAT
all titles will be replayed continuously in random
order
next actuation of button RANDOM PLAY
all titles will be replayed once in random order
next actuation of button INT PLAY
intro function: the first 10 seconds of each title will
be replayed
next actuation of button PLAY ALL: basic setting
Alphabetic search for MP3 titles
FIND ×
alphabetic search for titles and folders
Title search
1. Press FIND once Indication "A".
2. Select the 1st letter of the title with REV − SKIP − CUE.
3. Press the button PLAY to start the replay.
If there are multiple titles beginning with the
same letter, keep the button REV or CUE pressed
until the letter starts flashing; select the title with
REV − SKIP − CUE and then press the button PLAY to
start the replay of the title.
Folder search
1.
Press FIND twice Indication Dir.
2. Select the folder with REV − SKIP − CUE.
3. Press the button PLAY to start the replay of the first
title in the folder.
To program an individual title sequence
PROG × ×
1. Press the button STOP .
2. Press the button PROG.
3. for MP3 files only: Enter the folder number and
press the button PROG.
4. Enter the title number and press the button PROG.
5. Repeat these steps to program all further titles
(64max.).
6. Press the button PROG to start the replay.
To delete or cancel the sequence,
press the button STOP
.
To stop the replay
STOP
× × to stop the replay
EJECT
× × to eject the CD
4.3 CD / MP3 player
1)
Insert a CD with the lettering facing up into the slot until it is pulled
in automatically
and / or
connect a USB flash drive to the USB port or connect a hard disk
(with individual power supply, if required) to the USB port
and / or
insert a memory card into the slot SD/ SDHC CARD, the notched
corner of the card facing up. To remove the card, slightly push it
in to eject the card from the slot.
2)
The audio player can only be operated with the remote control
when the LED “CD” lights up. If the LED “TUNER” lights up, press
the button CD / TUNER on the remote control.
3) All other operating options are listed in the table. After operation,
switch off the unit with the POWER switch.
Page 11
11
English
4.4 Operation of the Bluetooth receiver
The Bluetooth receiver is used for radio communication with a Bluetooth signal source
(e. g. notebook, smartphone, tablet PC).
Thus, the CD-112RDS / BT will be able to replay the audio files that have been stored on
this source.
Note: The Bluetooth signal source must be compatible with the A2DP protocol (Advanced Audio
Distribution Profile); otherwise radio communication
will not be possible.
1)
Enable the Bluetooth function on the
notebook, smartphone or tablet PC (see
manual of the unit, if necessary).
2)
To switch on the Bluetooth receiver of
the CD-112RDS / BT, keep the button BT
POWER [II] pressed briefly until the LED
PAIR starts flashing.
3)
To link the CD-112RDS / BT to the Bluetooth signal source, keep the button PAIR
pressed briefly until the LED PAIR keeps
flashing more slowly. As soon as the radio
communication has been established, the
LED PAIR will light permanently.
Note: On the display of the Bluetooth signal source,
the CD-112RDS / BT is indicated as “Audio Bluetooth”.
4)
Start a title at the Bluetooth signal source.
5)
To pause or continue the title, press the
button BT POWER [II].
Note: As long as the replay is interrupted, the signal
of the CD / MP3 player or of the tuner will be available
at the output PRIORITY.
6) Use the buttons DOWN [ ] and UP [ ]
to go to the previous or next title (press the
button briefly) or for fast forward / reverse
(keep the button pressed).
7) To switch off the Bluetooth receiver, keep
the button BT POWER [II] pressed until
the LED PAIR is extinguished.
5 PC Control of the Unit via
RS-232 Interface
It is possible to control the CD-112RDS / BT
from a PC via a suitable terminal program.
Connect the jack REMOTE CONTROL to the
RS-232 interface of the computer. Set the following parameters in the terminal program:
Symbol rate
. . . . . . . .9600 bauds
Number of data bits:
. .8
Number of stop bits:
. . 1
Parity:
. . . . . . . . . . . . .none
Flow control:
. . . . . . . .none
The control commands for all functions of the
CD-112RDS / BT are listed in the table below.
The terminal program will send them in ASCII
code. Finally, the commands “Carriage Re-
turn” (0D hexadecimal) and “Line Feed”
(0A hexadecimal) must be sent to the CD112RDS / BT as bytes 4 and 5. Some terminal
programs will execute them automatically or
can be adjusted accordingly.
After a command has been executed,
the CD-112RDS / BT will send the following
message in ASCII code to the PC:
+ O K “Carriage Return” “Line Feed”
In case of an input error, it will send the mes-
sage:
+ E R “Carriage Return” “Line Feed”
Note: Between two commands, there must be an
interval of at least 300 ms. After a command for
station scanning, an interval of at least 800 ms is
required.
Functions of the CD/MP3 player
Function
Control command
Byte 1 Byte 2 Byte 3
FOLDER
E A A
FOLDER
E A B
SKIP REV
E A C
SKIP CUE
E A D
STOP E A E
PLAY PAUSE II
E A F
EJECT E A G
PROG E A H
ID3 E A I
FIND E A J
MUTE E A K
REPEAT E A L
FUNC E A M
DISPLAY E A N
A-B E A O
disable EJECT E A P
enable EJECT E A Q
CARD E A R
CD E A S
USB E A T
PLAY 1 E A U
REMAIN E A V
0 E A 0
1 E A 1
2 E A 2
3 E A 3
4 E A 4
5 E A 5
6 E A 6
7 E A 7
8 E
A 8
9 E A 9
Functions of the tuner
1 E C A
2 E C B
3 E C C
4 E C D
5 E C E
6 E C F
7 E C G
8 E C H
9 E C I
10 / 0 E C J
+10 E C K
DIRECT E C L
(Tuning) DOWN E C M
(Tuning) UP E C N
MUTE E C O
RDS E C P
(Station) M-UP E C 0
(Station) M-DOWN E C 1
MEM (ORY) E C 2
ASM E C 3
Mono / Stereo E C 4
SLEEP E C 5
Station scanning
E C 7
Station scanning
E C 8
6 Maintenance
Protect the player from dust, vibrations,
humidity and heat (admissible ambient temperature range 0 – 40 °C). For cleaning only
use a dry, soft cloth; never use water or
chemicals.
Note concerning sound interruptions and
reading errors
Cigarette smoke and dust will easily penetrate through all openings of the unit and will
also settle on the optics of the laser sampling
systems. If this deposit should cause reading
errors and sound interruptions, the unit must
be cleaned by skilled personnel. Please note
that there will be a charge on cleaning, even
during the warranty period!
7 Specifications
Frequency range: . . . .20 – 20 000 Hz
THD: . . . . . . . . . . . . . .< 0.1 %
Channel separation: . .> 60 dB
Dynamic range: . . . . . .> 96 dB
S/N ratio: . . . . . . . . . .> 70 dB
Audio output: . . . . . . .1.2 V
Power supply: . . . . . . .230 V/ 50 Hz
Power consumption: . . 50 VA max.
Ambient temperature: 0 – 40 °C
Dimensions
(W × H × D): . . . . . . . . .482 × 44 × 265 mm,
1 rack space
Weight:
. . . . . . . . . . .4 kg
Connections
Priority:. . . . . . . . . . .XLR, balanced
CD: . . . . . . . . . . . . .XLR, balanced
Bluetooth: . . . . . . . .RCA
Tuner: . . . . . . . . . . . .RCA
Remote Control: . . . .D-sub jack, 9 poles
Subject to technical modification.
All rights reserved by MONACOR ® INTERNATIONAL
GmbH & Co. KG. No part of this instruction manual
may be reproduced in any form or by any means for
any commercial use.
PAIR
3 4 5 PAIR BT POWER
DOWN UP ASM DOWN UP
Page 12

12
Français
USE ONLY WITH A 250V FUSE
6 7 8 9
1 2 3 4 5
REMOTE CONTROL
ANTENNA
R
PRIORITY OUT
L
L
BT OUT
TUNER
OUT
L
R CD PLAYER OUT L
AUTO PLAY
RANDOM
AUTO PLAY
230
V
~/
50
Hz
SELECT PLAY TYPE
NORMAL
POWER
POWER
CD
PROG
REPEAT
SKIP
REV
CUE
A- B
MUTE FUNC
STOP
PLAY/PAUSE
EJECT
CD -112R D S/B T
FOLDER
SD/MMC
CARD
IR
TUNER
PAIR
1 2 3 4 5 PAIR BT POWER
+5 MEMORY DOWN UP ASM DOWN UP
DISC
TR 02 01:53 CDA
STEREO
FM 92.50MHZ CH04
Lecteur CD / MP3
Cette notice s‘adresse aux utilisateurs sans
connaissances techniques particulières. Veuillez lire la présente notice avant le fonctionnement et conservez-la pour pouvoir vous y
reporter ultérieurement.
1 Possibilités d’utilisation
L’appareil CD-112RDS / BT est une combinaison d’un lecteur CD / MP3, d’un tuner FM RDS
et d’un récepteur Bluetooth ; il est adapté
pour des applications de sonorisation multiples, par exemple théâtres, restaurants,
salles d’attente. Le lecteur CD / MP3 propose
de nombreuses fonctions telles que répétition
continue, lecture aléatoire, lecture MP3 de
supports de stockage USB et cartes mémoire
(32 GO max.)*.
On peut lire des CDs audio, des CD-R
(CDs audio gravés) et des CDs avec titres au
format MP3. Pour des CD-RW (CDs réinscriptibles), on peut rencontrer des problèmes lors
de la lecture selon le type de CD, le graveur
et le programme de gravure utilisés.
* Conseil : En raison de la multitude de fabricants
de supports de mémoire et de drivers d’appareils, il n’est pas possible de garantir que tous les
supports de mémoire soient compatibles avec le
CD-112RDS / BT.
2 Conseils d’utilisation
etdesécurité
Cet appareil répond à toutes les directives
nécessaires de l’Union européenne et porte
donc le symbole
.
AVERTISSEMENT
Cet appareil est alimenté
par une tension dangereuse. Ne touchez jamais
l’intérieur de l’appareil
car, en cas de mauvaise
manipulation, vous pourriez subir une décharge
électrique.
•
L‘appareil n‘est conçu que pour une utilisation en intérieur. Protégez-le des éclaboussures, de tout type de projections d‘eau et
d’une humidité d‘air élevée. La plage de
température ambiante admissible est de
0 – 40 °C.
•
En aucun cas, vous ne devez poser d’objet contenant du liquide ou un verre sur
l’appareil.
•
Ne le faites jamais fonctionner et débranchez-le immédiatement lorsque :
1. des dommages visibles apparaissent sur
l’appareil et sur le cordon secteur
2. après une chute ou accident similaire...,
vous avez un doute au sujet de l’état de
l’appareil.
3. des dysfonctionnements apparaissent.
Dans tous les cas, les dommages doivent
être réparés par un technicien spécialisé.
•
Ne débranchez jamais l’appareil en tirant
sur le cordon secteur, tenez-le toujours par
la fiche.
•
Pour le nettoyage utilisez uniquement un
chiffon doux et sec, en aucun cas de produits chimiques ou d’eau.
•
Nous déclinons toute responsabilité en
cas de dommages matériels ou corporels
résultants si l’appareil est utilisé dans un
but autre que celui pour lequel il a été
conçu, s’il n’est pas correctement branché
ou utilisé ou s’il n’est pas réparé par une
personne habilitée; en outre, la garantie
deviendrait caduque.
Lorsque l’appareil est définitivement
retiré du service, vous devez le déposer dans une usine de recyclage
adaptée pour contribuer à son élimination non polluante.
CARTONS ET EMBALLAGE
PAPIER À TRIER
3 Positionnement de l’appareil
et branchements
L’appareil est prévu pour une installation en
rack 19” (= 482 mm). Il peut également être
directement posé sur une table. Pour une installation en rack, une unité (1 U = 44,45 mm)
est nécessaire.
Avant d’effectuer ou de modifier les branchements, assurez-vous que le lecteur CD112RDS / BT et les appareils à relier sont
éteints.
1)
Pour diriger les signaux audio vers l’appareil
suivant (par exemple table de mixage ou
amplificateur), quatre sorties niveau ligne
sont prévues :
PRIORITY OUT
1. Pour le signal du récepteur Bluetooth ;
le signal a la priorité sur les signaux du
lecteur CD / MP3 et du tuner.
2. Si aucun signal Bluetooth n’est reçu ou
si la lecture est sur Pause, le signal du
lecteur CD / MP3 est présent ici.
3. Si le lecteur CD / MP3 est sur Pause ou
Arrêt, le signal du tuner est présent ici.
BT OUT
pour le signal du récepteur Bluetooth
TUNER OUT
pour le signal du tuner
CD PLAYER OUT
pour le signal du lecteur CD / MP3
2)
Reliez une antenne FM à la prise ANTENNA. Une antenne FM simple est livrée
avec l’appareil.
3) Pour finir, reliez le cordon secteur livré à la
prise secteur et à une prise 230 V/
50 Hz.
4 Utilisation
Allumez l’appareil avec l’interrupteur secteur
POWER. Le message
Welcome
est visible sur
l’affichage du lecteur CD / MP3. L’affichage du
tuner indique la dernière station sélectionnée.
4.1 Télécommande
1) Pour insérer les batteries (2 × 1,5 V, type
R03), retirez le couvercle du compartiment
batterie sur la face arrière de la télécommande. Insérez les batteries comme indiqué dans le compartiment, refermez le
compartiment avec le couvercle.
En cas de non utilisation prolongée
de la télécommande, retirez les batteries,
elles pourraient couler et endommager la
télécommande.
2)
Maintenez toujours la télécommande dans
la direction du capteur «IR» lorsque vous
activez une touche. Il ne faut aucun obstacle entre la télécommande et le capteur.
3) Sur l’appareil, les LEDs «CD» et «TUNER»
indiquent si le lecteur CD / MP3 ou le tuner
peut être géré avec la télécommande.
Pour commuter la gestion, appuyez sur la
touche CD / TUNER.
4) Si la portée de la télécommande diminue,
les batteries sont épuisées et doivent être
remplacées.
Ne jetez pas les batteries usagées
dans la poubelle domestique, déposez-les dans un container spécifique ou ramenez-les chez votre
revendeur.
Page 13

13
Français
4.2 Tuner
1)
Les touches pour les fonctions tuner sur
la télécommande sont repérées par un
champ blanc en caractères noires (sauf
les touches numériques 1 … 9, 10 / 0).
Pour pouvoir utiliser le tuner avec la télécommande, la LED «TUNER» doit briller
sur l’appareil. Mais si la LED «CD» brille,
appuyez sur la touche CD / TUNER sur la
télécommande.
2)
Le tableau suivant présente toutes les possibilités d’utilisation.
3)
Lors de la première utili sation, mémorisez tout d’abord les stations pouvant être
reçues sur le lieu d’utilisation. 30 mémoires
sont disponibles.
FM Tuner
Touche
Fonction
sur le télécommande
sur l’appareil
Mémoriser la station
ASM × ×
Recherche de toutes les stations et mémorisation les unes après les autres automatiquement :
Maintenez la touche enfoncée pendant 2 secondes jusqu’à ce que les chiffres de
la fréquence défilent sur l’affichage. Toutes les stations sont mémorisées lorsque
l’affichage indique le numéro de la station CH01.
DIRECT ×
Saisie de la fréquence de réception :
1. Appuyez sur la touche DIRECT.
2. Saisissez la fréquence en MHz avec les touches 1…9 et 10 / 0.
DOWN
UP
× ×
Recherche de station :
Maintenez la touche enfoncée jusqu’à ce que les chiffres de fréquence défilent sur
l’affichage.
Réglage précis :
Appuyez brièvement sur la touche (plusieurs fois).
MEMORY
MEM
×
×
Mémorisation de station :
1. Réglez la station (voir touches DIRECT ou DOWN / UP).
Appuyez sur chacune des touches suivantes en l‘espace de 5 secondes sinon il faut
répéter les points 2 à 4.
2. Appuyez sur la touche MEM(ORY).
3. Sélectionnez le numéro de la station (voir «Appeler les stations mémorisées»).
4. Appuyez sur la touche MEM(ORY).
Appeler les stations mémorisées
1… 5,
+5
×
Numéros
Touches
4 4
10 5, +5, +5
18 3, +5, +5, +5, +5
22 2, +5, +5, +5, +5, +5
1… 9, 10 / 0,
+10 / - -
×
Numéros
Touches
4 4
10 10 / 0
18 8, +10 / - 22 2, +10 / - -, +10 / - -
ou maintenez la touche +10 / - - enfoncée pendant 2 secondes jusqu’à ce que
CH-- soit affiché ; ensuite, saisissez le numéro à deux chiffres.
M-DOWN / M-UP × Numéro précédent / suivant de station
MO / ST × Commutation entre réception stéréo et réception mono
MUTE × Son activé et désactivé
Informations supplémentaires en mode réception RDS
RDS ×
1. pression :
Affichage du type du programme ou
PTY NONE*
2. pression :
Informations sur le titre / émission ou RT NONE*
3. pression :
Affichage de l’heure (une fois la station appelée, quelques minutes peuvent
s’écouler jusqu’à ce que l‘heure s’affiche) ou
CT NONE*
4. pression :
Brièvement, fréquence et numéro de station, puis nom de la station
(réglage de base)
*si l’information n’existe pas
Déconnexion automatique du tuner
SLEEP ×
1. Appuyez sur la touche jusqu’à ce que l’affichage indique la durée souhaitée
après laquelle le tuner s’éteint. Une fois la durée écoulée, le tuner s’éteint.
2. Rallumer : Appuyez sur la touche :
SLEEP-90 MIN s’affiche. Appuyez encore une fois sur la touche sinon la
fonction de déconnexion est activée.
3. Déconnexion de la fonction avant la fin de la durée réglée :
Appuyez sur la touche pour que
SLEEP… MIN ne s’affiche plus.
2 31
5 64
8 97
REV – SKIP – CUE
FUNC
FINDREPEAT
MUTEEJECT
PLAY 1 A-B
FOLDER
MEM
ASM
MO/ST
+10/- -DIRECT
M-DOWN M-UP DOWN
SLEEP
RDS
UP
STOP
PLAY
PAUSE
PROG
ID3
DISPLAY
REMAIN
CD/TUNER
10/0
Page 14

14
Français
2 31
5 64
8 97
REV – SKIP – CUE
FUNC
FINDREPEAT
MUTEEJECT
PLAY 1 A-B
FOLDER
MEM
ASM
MO/ST
+10/- -DIRECT
M-DOWN M-UP DOWN
SLEEP
RDS
UP
STOP
PLAY
PAUSE
PROG
ID3
DISPLAY
REMAIN
CD/TUNER
10/0
Lecture CD / MP3
Touche
Fonction
sur le télécommande
sur l’appareil
Fonctions de base
SELECT PLAY TYPE
×
Sélecteur sur la face arrière :
AUTO PLAY = la lecture démarre automatiquement
après l’allumage de l’appareil
NORMAL = après l’allumage, l’appareil est sur Pause
RANDOM /AUTO PLAY = après l’allumage, la lecture
en ordre aléatoire des titres démarre automatiquement
FUNC × ×
Commutation entre CD, port USB et
carte mémoire
II
PLAY/ PAUSE
××Démarrer la lecture et
commuter entre lecture et pause
1… 9, 10 / 0 × ×
Sélection directe d’un titre, exemples :
titre 8 = touches 8 et II
titre 30 = touches 3, 10 / 0 et II
titre 125 = touches 1, 2, 5 et II
REV − SKIP − CUE
×
×
Début de titre, titre précédent / suivant :
Appuyez brièvement sur la touche
Avance / retour rapide : Maintenez la touche enfoncée
FOLDER
× ×
Aller au premier titre du dossier précédent / suivant
MUTE × × Son activé ou désactivé
PLAY 1 ×
Lecture titre par titre (affichage
1Ɗ) :
A la fin d’un titre, l’appareil commute sur Pause. Pour
démarrer le titre suivant, appuyez sur la touche II.
Commutation des informations sur l‘affichage
REMAIN ×
uniquement pour la lecture d‘un CD-DA
(Compact Disc Audio Digital) :
Commutation entre l‘affichage de
– durée déjà lue du titre
– durée restante du titre
– durée restante du CD
ID3 ×
uniquement pour la lecture de fichiers MP3 :
Commutation de la ligne supérieure de l‘affichage
– le nom du fichier, titre, artiste et album défilent
dans la ligne supérieure
– le titre du support de mémoire sélectionné est
indiqué : DISC, USB ou CARD
DISPLAY ×
uniquement pour la lecture de fichiers MP3 :
Commutation de la ligne inférieure de l‘affichage
– numéro et durée du titre
– nom du dossier
– nom du titre
– nombre de dossiers et titres
Lecture CD / MP3
Touche
Fonction
sur le télécommande
sur l’appareil
Fonctions répétition
A-B × ×
Répétition segment d’un titre (boucle continue) :
Appuyez sur la touche au début et à la fin du seg-
ment (longueur minimale du segment 2 secondes).
Pour quitter la boucle, appuyez une nouvelle fois sur
la touche.
REPEAT × ×
Fonctions répétition, lecture aléatoire et fonction
lecture introduction
Réglage de base PLAY ALL : tous les titres sont lus
une fois
Première pression REPEAT TRACK :
répétition continue du titre sélectionné
Pression suivante REPEAT FOLDER
répétition continue de tous les titres dans le dossier
sélectionné
Pression suivante REPEAT ALL
répétition continue de tous les titres
Pression suivante RANDOM REPEAT
lecture continue de tous les titres en ordre aléatoire
Pression suivante RANDOM PLAY
lecture unique de tous les titres en ordre aléatoire
Pression suivante INT PLAY
fonction lecture introduction : chaque titre est lu
pendant 10 s
Pression suivante PLAY ALL : réglage de base
Recherche alphabétique de titres MP3
FIND ×
Recherche alphabétique de titres et dossiers
Recherche de titres
1. Appuyez sur FIND 1 × affichage «A».
2. Sélectionnez la première lettre du titre avec
REV − SKIP − CUE.
3. Démarrez le titre avec PLAY.
Pour plusieurs titres avec la même première lettre,
maintenez la touche REV ou CUE enfoncée jusqu‘à ce
que la lettre clignote ; avec REV − SKIP − CUE, recherchez le titre et démarrez la lecture avec PLAY.
Recherche de dossiers
1.
Appuyez sur FIND 2 × affichage
Dir.
2. Sélectionnez le dossier avec REV − SKIP − CUE.
3. Démarrez le premier titre dans le dossier avec PLAY.
Programmation d’une suite de titres
PROG × ×
1. Appuyez sur la touche STOP .
2. Appuyez sur la touche PROG.
3. Uniquement pour des fichiers MP3 : Saisissez le
numéro du dossier et appuyez sur la touche PROG.
4. Saisissez le numéro du titre et appuyez sur la
touche PROG.
5. Programmez tous les titres de la même manière
(64 max.).
6. Démarrez la lecture avec la touche PROG.
Effacer ou interrompre la programmation :
Appuyez sur la touche STOP
.
Arrêter la lecture
STOP
× × Arrêter la lecture
EJECT
× × Éjecter le CD
4.3 Lecture CD / MP3
1)
Insérez un CD, inscription vers le haut, dans la fente jusqu’à ce qu’il
soit automatiquement inséré
et / ou
mettez une clé USB dans le port USB ou branchez un disque dur
(le cas échéant avec alimentation propre) au port USB
et / ou
mettez une carte mémoire dans la fente SD/ SDHC CARD. Le coin
oblique de la carte doit être dirigé vers le haut. Pour retirer la carte,
enfoncez-la légèrement pour qu’elle se désenclenche.
2) Pour pouvoir utiliser le lecteur audio avec la télécommande, il faut
que la LED «CD» brille sur l’appareil. Mais si la LED «TUNER» brille,
appuyez sur la touche CD / TUNER sur la télécommande.
3)
Toutes les autres possibilités d’utilisation sont décrites dans le
tableau. Après le fonctionnement, éteignez l’appareil avec l’interrupteur POWER.
Page 15

15
Français
4.4 Utilisation du récepteur Bluetooth
Avec le récepteur Bluetooth, on peut établir
une liaison radio vers une source de signal
Bluetooth (par exemple ordinateur portable,
Smartphone, tablette PC) pour lire, via le
CD-112RDS / BT, les données audio qui y sont
mémorisées.
Conseil : La source de signal Bluetooth doit fonctionner selon le protocole A2DP (Advanced Audio
Distribution Profile). Sinon aucune liaison radio n’est
possible.
1)
Allumez la fonction Bluetooth sur l’ordinateur portable, Smartphone ou tablette
PC (voir si besoin la notice de cet appareil).
2)
Pour allumez le récepteur Bluetooth du
CD-112RDS / BT maintenez la touche BT
POWER [II] brièvement enfoncée jusqu’à
ce que la LED PAIR clignote.
3)
Pour coupler le CD-112RDS / BT à la source
de signal Bluetooth, maintenez la touche
PAIR brièvement enfoncée jusqu’à ce que
la LED PAIR clignote lentement. Dès que la
liaison radio est établie, la LED PAIR brille
en continu.
Conseil : Le CD-112RDS / BT est indiqué sur l’affichage de la source de signal Bluetooth par «Audio
Bluetooth».
4)
Démarrez la lecture d’un titre sur la source
de signal Bluetooth.
5) Avec la touche BT POWER [II], vous pou-
vez interrompre puis reprendre la lecture.
Conseil : Tant que la lecture est interrompue, le
signal du lecteur CD / MP3 ou du tuner est présent à
la sortie PRIORITY.
6) Avec les touches DOWN [ ] et UP [ ] ,
vous pouvez aller au titre précédent ou
au titre suivant (enfoncez la touche brièvement) ou faire un retour / avance rapide
(maintenez la touche enfoncée).
7)
Pour éteindre le récepteur Bluetooth, maintenez la touche BT POWER [II] enfoncée
jusqu’à ce que la LED PAIR s’éteigne.
5 Gestion PC de l’appareil via
l’interface RS-232
Le CD-112RDS / BT peut être géré via un programme terminal correspondant depuis un
PC. Reliez la prise REMOTE CONTROL à l’interface RS-232 de l’ordinateur. Réglez les paramètres suivants dans le programme terminal :
Taux de symbole : . . . . . . . . . 9600 bauds
Nombre de bits de données :
8
Nombre de bits d’arrêt :
. . . . 1
Parité :
. . . . . . . . . . . . . . . . . aucune
Contrôle de flux :
. . . . . . . . . aucun
Les ordres de commande pour toutes les fonctions du CD-112RDS / BT sont décrits dans le
tableau suivant ; le programme terminal les
envoie en code ASCII. Il faut envoyer comme
bytes 4 et 5, les ordres «Carriage Return» (0D
hexadécimal) et «Line Feed» (0A hexadécimal)
au CD-112RDS / BT. Quelques programmes
terminal les effectuent automatiquement ou
peuvent être réglés en conséquence.
Une fois l’ordre exécuté, le CD-112RDS / BT
envoie le message suivant, en code ASCII
au PC :
+ O K «Carriage Return» «Line Feed»
En cas d’erreur de saisie, l’appareil indique :
+ E R «Carriage Return» «Line Feed»
Remarque : Il faut une pause de 300 ms au moins
entre deux ordres. Après un ordre de recherche de
stations, il faut une pause de 800 ms minimum.
Fonctions du lecteur CD/MP3
Fonction
Ordre de commande
Byte 1 Byte 2 Byte 3
FOLDER
E A A
FOLDER
E A B
SKIP REV
E A C
SKIP CUE
E A D
STOP E A E
PLAY PAUSE II
E A F
EJECT E A G
PROG E A H
ID3 E A I
FIND E A J
MUTE E A K
REPEAT E A L
FUNC E A M
DISPLAY E A N
A-B E A O
bloquer EJECT E A P
débloquer EJECT E A Q
CARD E A R
CD E A S
USB E A T
PLAY 1 E A U
REMAIN E A V
0 E A 0
1 E A 1
2 E A 2
3 E A 3
4 E A 4
5 E A 5
6 E A 6
7 E A 7
8 E
A 8
9 E A 9
Fonctions du tuner
1 E C A
2 E C B
3 E C C
4 E C D
5 E C E
6 E C F
7 E C G
8 E C H
9 E C I
10 / 0 E C J
+10 E C K
DIRECT E C L
(Tuning) DOWN E C M
(Tuning) UP E C N
MUTE E C O
RDS E C P
(Station) M-UP E C 0
(Station) M-DOWN E C 1
MEM (ORY) E C 2
ASM E C 3
Mono / Stereo E C 4
SLEEP E C 5
recherche stations
E C 7
recherche stations
E C 8
6 Entretien
Protégez l’appareil de la poussière, des vibra
tions, de l’humidité et de la chaleur (température de fonctionnement admissible 0 – 40 °C).
Pour le nettoyer, utilisez uniquement un chiffon sec et doux, en aucun cas, de produits
chimiques ou d’eau.
Remarque sur les coupures du son et les
erreurs de lecture
La fumée de cigarettes s’introduit facilement
dans les ouvertures du lecteur et se dépose
sur l’optique du système laser. Cela peut générer des erreurs de lecture et des coupures
de son. Dans ce cas, confiez impérativement
le nettoyage du lecteur à un technicien spécialisé. Cette opération est à la charge de
l’utilisateur, même lorsque l’appareil est sous
garantie !
7 Caractéristiques techniques
Bande passante : . . . . .20 – 20 000 Hz
Taux de distorsion : . . .< 0,1 %
Séparation de canaux : > 60 dB
Plage dynamique : . . .> 96 dB
Rapport signal
sur bruit :
. . . . . . . . . .> 70 dB
Sortie audio : . . . . . . .1,2 V
Alimentation : . . . . . . .230 V/ 50 Hz
Consommation : . . . . .50 VA max.
Température fonc. : . . .0 – 40 °C
Dimensions
(l × h × p) :
. . . . . . . . .482 × 44 × 265 mm,
1unité
Poids :
. . . . . . . . . . . . .4 kg
Branchement
Priority:. . . . . . . . . . .XLR, symétrique
CD: . . . . . . . . . . . . .XLR, symétrique
Bluetooth: . . . . . . . .RCA
Tuner: . . . . . . . . . . . .RCA
Remote Control: . . . .prise D-sub, 9 pôles
Tout droit de modification réservé.
Notice d’utilisation protégée par le copyright de
MONACOR ® INTERNATIONAL GmbH & Co. KG.
Toute reproduction même partielle à des fins commerciales est interdite.
PAIR
3 4 5 PAIR BT POWER
DOWN UP ASM DOWN UP
Page 16
16
Italiano
USE ONLY WITH A 250V FUSE
6 7 8 9
1 2 3 4 5
REMOTE CONTROL
ANTENNA
R
PRIORITY OUT
L
L
BT OUT
TUNER
OUT
L
R CD PLAYER OUT L
AUTO PLAY
RANDOM
AUTO PLAY
230
V
~/
50
Hz
SELECT PLAY TYPE
NORMAL
POWER
POWER
CD
PROG
REPEAT
SKIP
REV
CUE
A- B
MUTE FUNC
STOP
PLAY/PAUSE
EJECT
CD -112R D S/B T
FOLDER
SD/MMC
CARD
IR
TUNER
PAIR
1 2 3 4 5 PAIR BT POWER
+5 MEMORY DOWN UP ASM DOWN UP
DISC
TR 02 01:53 CDA
STEREO
FM 92.50MHZ CH04
Lettore CD / MP3
Queste istruzioni sono rivolte all‘utente senza
conoscenze tecniche specifiche. Vi preghiamo
di leggerle attentamente prima della messa in
funzione e di conservarle per un uso futuro.
1 Possibilità d’impiego
L’apparecchio CD-112RDS / BT è una combinazione fra lettore CD / MP3, tuner FM-RDS
e ricevitore bluetooth ed è adatto per molteplici tipi di sonorizzazione, p. es. in teatri,
ristoranti, sale d’attesa. A tale scopo, il lettore
CD / MP3 offre funzioni particolari, come p. es.
la riproduzione senza fine o casuale, la riproduzione MP3 da memorie USB e da scheda
memoria (max. 32 GB)*.
Con questo apparecchio si possono riprodurre CD audio, CD audio masterizzati in
proprio (CD-R) nonché CD con titoli nel formato MP3. Nel caso di CD riscrivibili (CD-RW)
è possibile che vi siano dei problemi durante
la riproduzione a seconda del tipo di CD, del
masterizzatore e del programma usato.
* Nota: Dato il grande numero di produttori di
memorie e di driver per apparecchi, non si può
garantire che tutti i mezzi di memoria siano compatibili con il CD-112RDS / BT.
2 Avvertenze di sicurezza
Quest’apparecchio è conforme a tutte le direttive rilevanti dell’UE e pertanto porta la
sigla .
AVVERTIMENTO
L’apparecchio funziona con
pericolosa tensione di rete.
Non intervenire mai personalmente al suo interno.
La manipolazione scorretta
può provocare delle scariche elettriche pericolose.
•
Usare l’apparecchio solo all’interno di locali.
Proteggetelo dall’acqua gocciolante e dagli
spruzzi d’acqua nonché da alta umidità dell’aria. La temperatura d’esercizio ammessa
è 0 – 40 °C.
•
Non depositare sull’apparecchio dei contenitori riempiti di liquidi, p. es. bicchieri.
•
Non mettere in funzione l’apparecchio e
staccare subito la spina rete se:
1.
l’apparecchio o il cavo rete presentano
dei danni visibili;
2.
dopo una caduta o dopo eventi simili
sussiste il sospetto di un difetto;
3.
l’apparecchio non funziona correttamente.
Per la riparazione rivolgersi sempre ad
un’officina competente.
•
Staccare il cavo rete afferrando la spina,
senza tirare il cavo.
•
Per la pulizia usare solo un panno morbido,
asciutto; non impiegare in nessun caso prodotti chimici o acqua.
•
Nel caso d’uso improprio, di collegamenti
sbagliati, d’impiego scorretto o di riparazione non a regola d’arte dell’apparecchio,
non si as sume nessuna responsabilità per
eventuali danni consequenziali a persone
o a cose e non si assume nessuna garanzia
per l’apparecchio.
Se si desidera eliminare l’apparecchio definitivamente, consegnarlo
per lo smaltimento ad un’istituzione
locale per il riciclaggio.
3 Collocare e
collegarel’apparecchio
L’apparecchio è previsto per il montaggio in
un rack (482 mm / 19”), ma può essere collocato anche liberamente su un tavolo. Per
il montaggio in un rack e richiesta un’unità
d’altezza (=44,45 mm).
Prima di effettuare o modificare i collegamenti, spegnere il CD-112RDS / BT e gli apparecchi da collegare.
1)
Per inoltrare i segnali audio all’apparecchio
a valle (p. es. mixer o amplificatore), sono
presenti quattro uscite con livello Line:
PRIORITY OUT
1. Per il segnale del ricevitore bluetooth; il
segnale ha la priorità rispetto ai segnali
del lettore CD / MP3 e del tuner.
2. Se non si riceve nessun segnale bluetooth o se la riproduzione è messa su
pausa, qui è presente il segnale del
lettore CD / MP3.
3. Se il lettore CD / MP3 è messo su pausa o
stop, qui è presente il segnale del tuner.
BT OUT
Per il segnale del ricevitore bluetooth
TUNER OUT
Per il segnale del tuner
CD PLAYER OUT
Per il segnale del lettore CD / MP3
2)
Collegare un’antenna FM con la presa
ANTENNA. Un’antenna FM semplice è in
dotazione.
3)
Alla fine inserire il cavo in dotazione
nella presa e quindi in una presa di rete
(230 V/ 50 Hz).
4 Funzionamento
Accendere l’apparecchio con l’interruttore
POWER. Sul display del lettore CD / MP3 si
vede l’indicazione
Welcome
. Il display del
tuner visualizza la stazione selezionata per
ultima.
4.1 Telecomando
1) Per inserire le batterie (2 × 1,5 V, tipo AAA
= ministilo), togliere il coperchio del vano
batterie sul retro del telecomando. Inserire
le batterie come indicato nel vano stesso e
richiudere il vano con il coperchio.
In caso di mancato uso prolungato,
conviene togliere le batterie per non danneggiare il telecomando se le batterie dovessero perdere.
2)
Premendo un tasto del telecomando,
tenerlo sempre in direzione del sensore
“IR”. Non ci devono essere ostacoli fra il
telecomando e il sensore.
3) Sull’apparecchio, i LED “CD” e “TUNER”
indicano se con il telecomando può essere
comandato il lettore CD / MP3 o il tuner.
Per cambiare il tipo di comando premere
il tasto CD / TUNER.
4)
Se la portata del telecomando diminuisce,
significa che le batterie sono scariche e che
devono essere sostituite.
Non gettare le batterie scariche nelle
immondizie di casa bensì negli appositi contenitori (p. es. presso il vostro
rivenditore).
Page 17
17
Italiano
4.2 Tuner
1)
I tasti per le funzioni del tuner sono caratterizzati sul telecomando da un campo
bianco con scritta nera (eccetto i tasti
numerici 1…9, 10 / 0). Per poter comandare il tuner per mezzo del telecomando,
sull’apparecchio deve essere acceso il
LED “TUNER”. Se invece è acceso il LED
“CD”, premere il tasto CD / TUNER sul
telecomando.
2) Tutte le possibilità di comando sono elencate nella seguente tabelle.
3)
Al primo uso, memorizzare dapprima le
stazioni che si possono ricevere sul luogo.
Sono disponibili 30 memorie per le stazioni.
Tuner FM
Tasto
Funzione
sul telecomando
sull’apparecchio
Memorizzare le stazioni
ASM × ×
Cercare tutte le stazioni e memorizzarle automaticamente, una dopo l’altra:
Tener premuto il tasto per 2 s, finché scorrono i numeri dell’indicazione della
frequenza. Sono memorizzate tutte le stazioni quando il display indica il numero di
stazione CH01.
DIRECT ×
Digitazione della frequenza di ricezione:
1. Premere il tasto DIRECT.
2. Digitare la frequenza in MHz con i tasti 1…9 e 10 / 0.
DOWN
UP
× ×
Ricerca automatica delle stazioni:
Tener premuto il tasto finché scorrono i numeri dell’indicazione della frequenza.
Sintonizzazione fine:
Premere il tasto (più volte) brevemente.
MEMORY
MEM
×
×
Memorizzare le stazioni:
1. Impostare il trasmettitore (vedi i tasti DIRECT o DOWN / UP).
Premere tutti gli altri tasti entro 5 s, altrimenti si devono ripetere i passi 2 – 4.
2. Premere il tasto MEM(ORY).
3. Scegliere il numero della stazione (vedi “Chiamare le stazioni memorizzate”).
4. Premere il tasto MEM(ORY).
Chiamare le stazioni memorizzate
1… 5,
+5
×
N. Tasti
4 4
10 5, +5, +5
18 3, +5, +5, +5, +5
22 2, +5, +5, +5, +5, +5
1… 9, 10 / 0,
+10 / - -
×
N. Tasti
4 4
10 10 / 0
18 8, +10 / - 22 2, +10 / - -, +10 / - -
opp. tener premuto per 2 s il tasto +10 / - -, finché viene indicato CH--; quindi
digitare il numero con due cifre.
M-DOWN / M-UP × Numero stazione precedente / successivo
MO / ST × Cambio fra ricezione stereo e mono
MUTE × Disattivare e attivare l’audio
Informazioni supplementari per la ricezione RDS
RDS ×
1. pressione del tasto:
Indicazione del tipo di programma oppure
PTY NONE*
2. pressione del tasto:
Informazioni sul titolo / sulla trasmissione oppure RT NONE*
3. pressione del tasto:
Indicazione dell’ora (dopo la chiamata della stazione possono trascorrere alcuni
minuti prima che appaia l’ora) oppure
CT NONE*
4. pressione del tasto:
Brevemente frequenza e numero della stazione, quindi nome della stazione (impostazione base)
*se l’informazione non viene trasmessa
Spegnimento automatico del tuner
SLEEP ×
1. Premere il tasto tante volte finché viene visualizzato il tempo desiderato per lo
spegnimento. Trascorso tale tempo, il tuner si spegne automaticamente.
2. Nuova accensione:
Premere il tasto: si vede
SLEEP-90 MIN. Premere ancora una volta il tasto,
altrimenti la funzione di spegnimento è nuovamente attivata.
3. Disattivazione della funzione prima del tempo impostato:
Premere il tasto in modo che non si vede più
SLEEP… MIN.
2 31
5 64
8 97
REV – SKIP – CUE
FUNC
FINDREPEAT
MUTEEJECT
PLAY 1 A-B
FOLDER
MEM
ASM
MO/ST
+10/- -DIRECT
M-DOWN M-UP DOWN
SLEEP
RDS
UP
STOP
PLAY
PAUSE
PROG
ID3
DISPLAY
REMAIN
CD/TUNER
10/0
Page 18
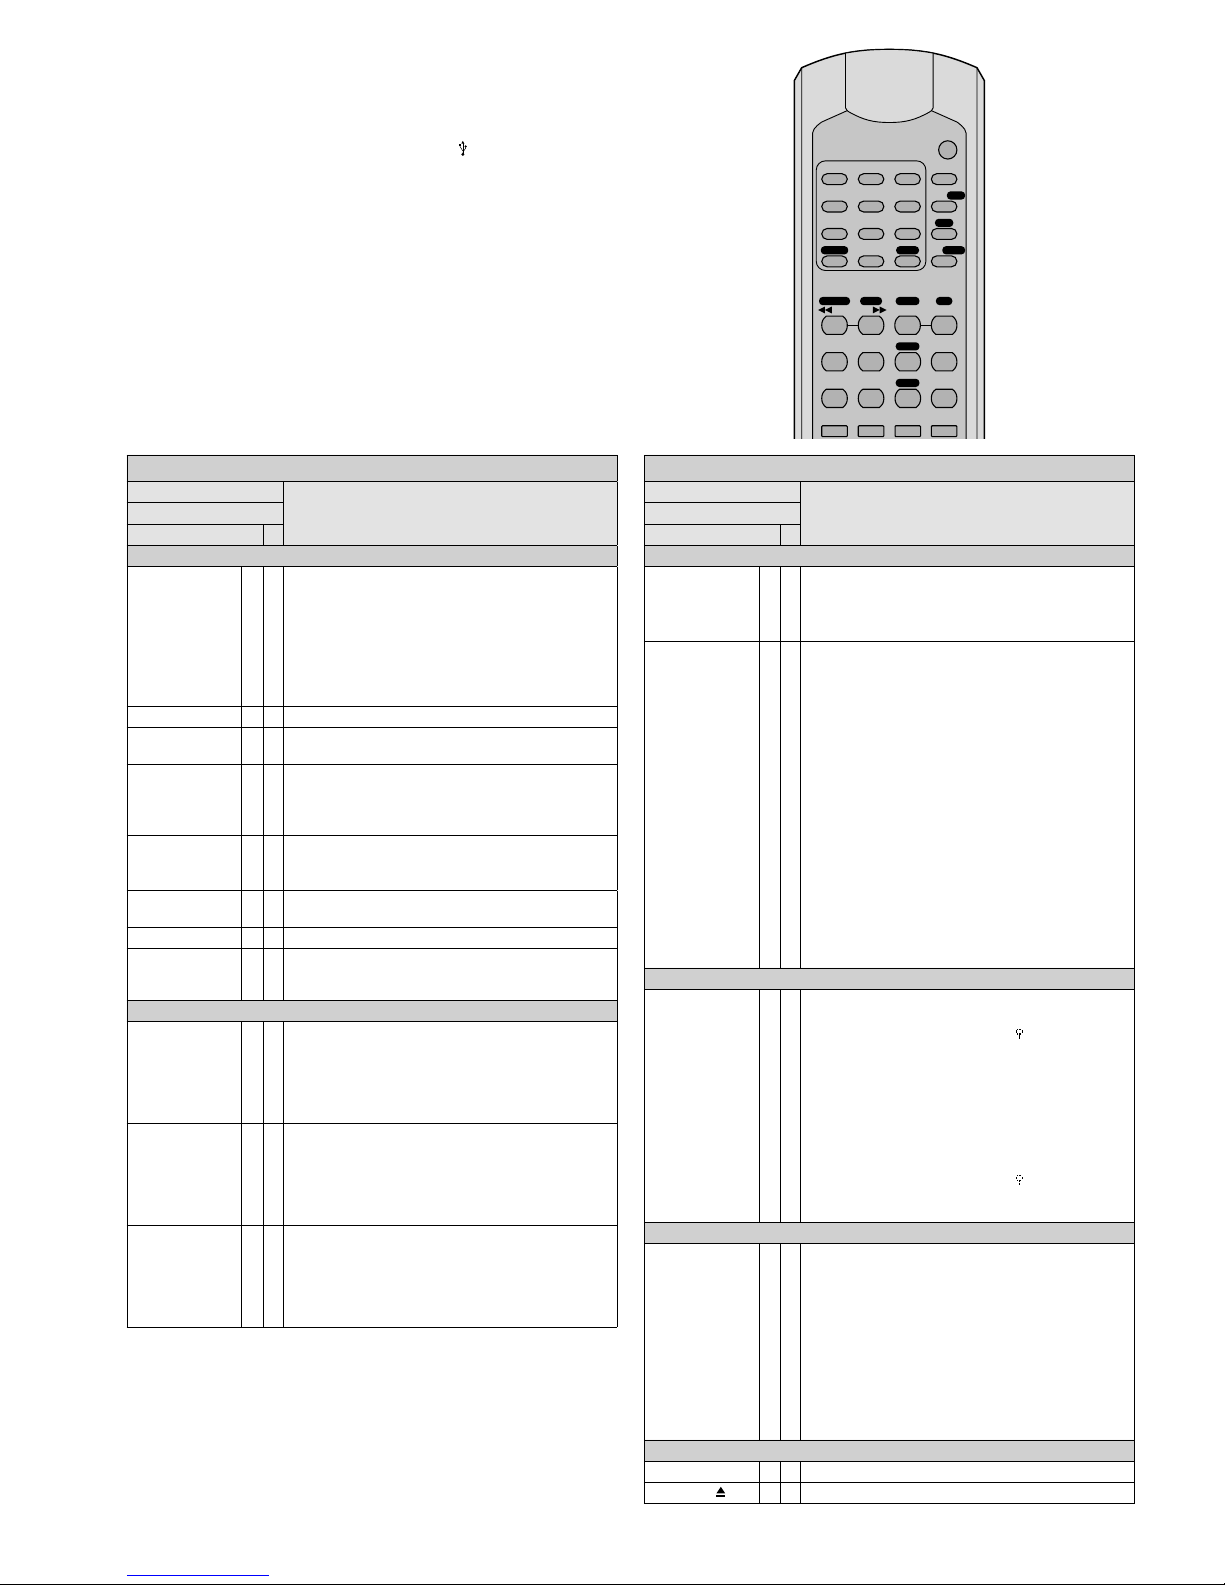
18
Italiano
2 31
5 64
8 97
REV – SKIP – CUE
FUNC
FINDREPEAT
MUTEEJECT
PLAY 1 A-B
FOLDER
MEM
ASM
MO/ST
+10/- -DIRECT
M-DOWN M-UP DOWN
SLEEP
RDS
UP
STOP
PLAY
PAUSE
PROG
ID3
DISPLAY
REMAIN
CD/TUNER
10/0
Lettore CD / MP3
Tasto
Funzione
sul telecomando
sull‘apparecchio
Funzione fundamentali
SELECT PLAY TYPE ×
Interruttore a cursore sul retro:
AUTO PLAY = Dopo l‘accensione dell‘apparecchio si
avvia automaticamente la riproduzione
NORMAL = Dopo l‘accensione, il lettore audio è in
pausa
RANDOM /AUTO PLAY = Dopo l‘accensione si avvia
automaticamente la riproduzione con ordine casuale
dei titoli
FUNC × × Cambio fra CD, porta USB e scheda di memoria
II
PLAY/ PAUSE
××Avviare la riproduzione e
cambio fra riproduzione e pausa
1… 9, 10 / 0 × ×
Selezione diretta di un titolo, esempi:
Titolo 8 = tasti 8 e II
Titolo 30 = tasti 3, 10 / 0 e II
Titolo 125 = tasti 1, 2, 5 e II
REV − SKIP − CUE
×
×
Inizio del titolo, titolo precedente / successivo:
Premere il tasto brevemente
Avanzamento / ritorno veloce: tenere premuto il tasto
FOLDER
× ×
Saltare sul primo titolo della cartella precedente /
successiva
MUTE × × Disattivare e attivare l‘audio
PLAY 1 ×
Riproduzione di titoli singoli (indicazione
1Ɗ):
Alla fine di un titolo, l‘apparecchio va in pausa. Per
avviare il titolo successivo premere il tasto II .
Cambiare le informazioni sul display
REMAIN ×
solo riproducendo un CD-DA
(Compact Disc Audio Digital):
Cambio fra l‘indicazione
– del tempo già trascorso del titolo
– del tempo rimanente del titolo
– del tempo rimanente del CD
ID3 ×
solo riproducendo dei file MP3:
Cambio della riga superiore del display
– scorrono i nomi del file, del titolo, dell‘artista e
dell‘albo
– indicazione del supporto audio scelto:
DISC, USB o CARD
DISPLAY ×
solo riproducendo dei file MP3:
Cambio della riga inferiore del display
– numero del titolo e durata del titolo
– nome della cartella
– nome del titolo
– numero delle cartelle e dei titoli
Lettore CD / MP3
Tasto
Funzione
sul telecomando
sull‘apparecchio
Funzioni di ripetizione
A-B × ×
Ripetere una parte del titolo (loop senza fine):
All‘inizio e alla fine della parte premere il tasto
(lunghezza minima della parte 2 sec.).
Per uscire dal loop, premere nuovamente il tasto.
REPEAT × ×
Funzioni di ripetizione, riproduzione casuale e riproduzione dell’inizio di un titolo
Impostazione base PLAY ALL: tutti i titoli saranno
riprodotti una volta
Prima pressione del tasto REPEAT TRACK
Ripetizione continua del titolo scelto
Pressione successiva del tasto REPEAT FOLDER
Ripetizione continua di tutti i titoli della cartella scelta
Pressione successiva del tasto REPEAT ALL
Ripetizione continua di tutti i titolo
Pressione successiva del tasto RANDOM REPEAT
Ripetizione continua di tutti i titoli in ordine casuale
Pressione successiva del tasto RANDOM PLAY
Ripetizione unica di tutti i titoli in ordine casuale
Pressione successiva del tasto INT PLAY
Riproduzione dell’inizio dei titoli: inizio per 10 s di
ogni titolo
Pressione successiva del tasto PLAY ALL: Impostazione base
Ricerca alfabetica di titoli MP3
FIND ×
Ricerca alfabetica di titoli e cartelle
Ricerca titoli
1. FIND 1 × premere Indicazione "A".
2. Con REV − SKIP − CUE scegliere la lettera iniziale del
titolo.
3. Con PLAY avviare il titolo.
Con più titoli con la stessa lettera iniziale tener premuto il tasto REV o CUE finché la lettera lampeggia;
con REV − SKIP − CUE selezionare il titolo e con PLAY
avviare il titolo.
Ricerca cartelle
1. FIND 2 × premere Indicazione Dir.
2. Con REV − SKIP − CUE scegliere la cartella.
3. Con PLAY avviare il primo titolo della cartella.
Programmare una sequenza individuale dei titolo
PROG × ×
1. Premere il tasto STOP .
2. Premere il tasto PROG.
3. Solo per i file MP3: Digitare il numero della cartella
e premere il tasto PROG.
4. Digitare il numero del titolo e premere il tasto
PROG.
5. Programmare in questo modo tutti gli altri titoli
(max. 64).
6. Avviare la riproduzione con il tasto PROG.
Cancellare o interrompere la programmazione:
premere il tasto STOP
.
Terminare la riproduzione
STOP
× × Terminare la riproduzione
EJECT
× × Espellere il CD
4.3 Lettore CD / MP
1)
Inserire un CD, con la scritta rivolta in alto, nella fessura finché non
viene ritirata automaticamente
e / o
inserire una chiavetta USB nella porta USB o collegare un disco
rigido (eventualmente con alimentazione individuale) con la porta
USB
e / o
inserire una scheda di memoria nella fessura SD/ SDHC CARD, con
l’angolo smussato rivolto in alto. Per togliere nuovamente la scheda,
spingerla un po’ indentro per sbloccarla.
2)
Per poter comandare il lettore audio tramite il telecomando, sull’ap
parecchio deve essere acceso il LED “CD”. Se invece è acceso il LED
“TUNER”, premere il tasto CD / TUNER sul telecomando.
3) Tutte le ulteriori possibilità di funzionamento sono segnalate nella
tabella. Dopo l’uso, spegnere l’apparecchio con l’interruttore di
rete POWER.
Page 19

19
Italiano
4.4 Funzionamento del
ricevitorebluetooth
Con il ricevitore bluetooth è possibile creare
un collegamento radio con una fonte di segnali bluetooth (p. es. notebook, smartphone,
tablet-PC) per riprodurre tramite il CD112RDS / BT i file audio memorizzati su detta
fonte.
N. B.: La fonte di segnali bluetooth deve usare il protocollo A2DP (Advanced Audio Distribution Profile).
Altrimenti non è possibile il collegamento via radio.
1)
Attivare la funzione bluetooth sul notebook, smartphone o tablet-PC (vedere
eventualmente le relative istruzioni).
2)
Per accendere il ricevitore bluetooth del
CD-112RDS / BT, tener premuto brevemente il tasto BT POWER [II] finché lam-
peggia la spia PAIR.
3)
Per collegare il CD-112RDS / BT con la fonte
di segnali bluetooth, tener premuto brevemente il tasto PAIR finché la spia PAIR
lampeggia più lentamente. Quando il
collegamento via radio esiste, la spia PAIR
rimane accesa costantemente.
N. B.: Sul display della fonte di segnali bluetooth, il
CD-112RDS / BT è indicato con “Audio Bluetooth”.
4) Avviare sulla fonte di segnali bluetooth la
riproduzione di un titolo.
5) Con il tasto BT POWER [II] si può inter-
rompere e riprendere la riproduzione.
N. B.: Mentre la riproduzione è interrotta, all’uscita
PRIORITY è presente il segnale del lettore CD / MP3
o del tuner.
6)
Con i tasti DOWN [ ] e UP [ ] si può
saltare sul titolo precedente o successivo
(premere brevemente il tasto) oppure si
può attivare il ritorno o l’avanzamento
veloce (tener premuto il tasto).
7) Per spegnere il ricevitore bluetooth, tener
premuto il tasto BT POWER [II] finché si
spegne la spia PAIR.
5 Comando dell’apparecchio
tramite PC per mezzo
dell’interfaccia RS-232
Con un adeguato programma di emulazione terminale è possibile comandare il
CD-112RDS / BT da un PC. Collegare la presa
REMOTE CONTROL con l’interfaccia RS-232
del computer. Nel programma terminale impostare i seguenti parametri:
Symbol rate:
. . . . . . . .9600 baud
Numero data bit:
. . . .8
Numero stop bit:
. . . . .1
Parità:
. . . . . . . . . . . . .nessuna
Controllo di flusso:
. . .nessuno
I comandi per tutte le funzioni del CD112RDS / BT sono elencati nella tabella
seguente e sono inviati dal programma ter-
minale con i codici ASCII. Come 4. e 5. byte
occorre alla fine inviare al CD-112RDS / BT i
comandi “Carriage Return” (0D esadecimale)
e “Line Feed” (0A esadecimale). Alcuni programmi terminali lo fanno automaticamente
oppure possono essere impostati in merito.
Dopo aver eseguito un comando, il CD112RDS / BT invia al PC il seguente messaggio
con codici ASCII:
+ O K “Carriage Return” “Line Feed”
Con ogni immissione sbagliata, l’apparecchio
segnala:
+ E R “Carriage Return” “Line Feed”
Nota: Fra due comandi ci deve essere un intervallo
non inferiore a 300 ms. Dopo il comando di ricerca
automatica delle stazioni è richiesta una pausa non
inferiore a 800 ms.
Funzioni del lettore CD / MP3
Funzione
Comando
Byte 1 Byte 2 Byte 3
FOLDER
E A A
FOLDER
E A B
SKIP REV
E A C
SKIP CUE
E A D
STOP E A E
PLAY PAUSE II
E A F
EJECT E A G
PROG E A H
ID3 E A I
FIND E A J
MUTE E A K
REPEAT E A L
FUNC E A M
DISPLAY E A N
A-B E A O
Bloccare EJECT E A P
Abilitare EJECT E A Q
CARD E A R
CD E A S
USB E A T
PLAY 1 E A U
REMAIN E A V
0 E A 0
1 E A 1
2 E A 2
3 E A 3
4 E A 4
5 E A 5
6 E A 6
7 E A 7
8 E A
8
9 E A 9
Funzioni del tuner
1 E C A
2 E C B
3 E C C
4 E C D
5 E C E
6 E C F
7 E C G
8 E C H
9 E C I
10 / 0 E C J
+10 E C K
DIRECT E C L
(Tuning) DOWN E C M
(Tuning) UP E C N
MUTE E C O
RDS E C P
(Station) M-UP E C 0
(Station) M-DOWN E C 1
MEM (ORY) E C 2
ASM E C 3
Mono / Stereo E C 4
SLEEP E C 5
Ricerca automatico delle
stazioni
E C 7
Ricerca automatico delle
stazioni
E C 8
6 Cura dell’apparecchio
Proteggere l’apparecchio da polvere, vibrazioni, umidità e calore (temperatura d’esercizio ammessa 0 – 40 °C). Per la pulizia usare
solo un panne morbido, asciutto, in nessun
caso acqua o prodotti chimici.
Note su possibili buchi nella riproduzione
e su errori di lettura
Il fumo di sigarette e polvere penetrano facilmente fra tutte le aperture dell’apparecchio
e si depositano sul sistema ottico della scansione ai raggi laser. Se ciò dovesse provocare
errori di lettura e buchi nella riproduzione,
l’apparecchio deve essere pulito in un laboratorio specializzato. Una tale pulizia è a pagamento, anche durante il periodo di garanzia!
7 Dati tecnici
Risposta in frequenza: .20 – 20 000 Hz
Fattore di distorsione: .< 0,1 %
Separazione canali: . . .> 60 dB
Range dinamico: . . . . .> 96 dB
Rapporto S / R: . . . . . . .> 70 dB
Uscita audio: . . . . . . . .1,2 V
Alimentazione: . . . . . .230 V/ 50 Hz
Potenza assorbita: . . . .max. 50 VA
Temperatura
d’esercizio:
. . . . . . . . .0 – 40 °C
Dimensioni
(l × h × p):
. . . . . . . . .482 × 44 × 265 mm,
1 U (unità d’altezza)
Peso: . . . . . . . . . . . . . .4 kg
Connessioni
Priority:. . . . . . . . . . .XLR, symmetrico
CD: . . . . . . . . . . . . .XLR, symmetrico
Bluetooth: . . . . . . . .RCA
Tuner: . . . . . . . . . . . .RCA
Remote Control: . . . .presa D-sub,
9 poli
Con riserva di modifiche tecniche.
La MONACOR ® INTERNATIONAL GmbH & Co. KG si
riserva ogni diritto di elaborazione in qualsiasi forma
delle presenti istruzioni per l’uso. La riproduzione
– anche parziale – per propri scopi commerciali è
vietata.
PAIR
3 4 5 PAIR BT POWER
DOWN UP ASM DOWN UP
Page 20

20
Nederlands
USE ONLY WITH A 250V FUSE
6 7 8 9
1 2 3 4 5
REMOTE CONTROL
ANTENNA
R
PRIORITY OUT
L
L
BT OUT
TUNER
OUT
L
R CD PLAYER OUT L
AUTO PLAY
RANDOM
AUTO PLAY
230
V
~/
50
Hz
SELECT PLAY TYPE
NORMAL
POWER
POWER
CD
PROG
REPEAT
SKIP
REV
CUE
A- B
MUTE FUNC
STOP
PLAY/PAUSE
EJECT
CD -112R D S/B T
FOLDER
SD/MMC
CARD
IR
TUNER
PAIR
1 2 3 4 5 PAIR BT POWER
+5 MEMORY DOWN UP ASM DOWN UP
DISC
TR 02 01:53 CDA
STEREO
FM 92.50MHZ CH04
CD / MP3-speler
Deze handleiding is bedoeld voor gebruikers
zonder bijzondere vakkennis. Lees de handleiding grondig door, alvorens het apparaat in
gebruik te nemen, en bewaar ze voor latere
raadpleging.
1 Toepassingen
De CD-112RDS / BT is een combinatie van
een cd / mp3-speler, FM-RDS-tuner en Bluetooth-ontvanger, en is geschikt om het geluid te verzorgen op de meest uiteenlopende
plaatsen (b.v. in het theater, in restaurants, in
wachtzalen). De cd / mp3-speler biedt daarbij
speciale functies zoals continuweergave, willekeurig afspelen, mp3- weergave van USB-opslagmedia en geheugenkaarten (max. 32 GB)*.
Met het apparaat kunt u zowel audiocd’s, zelfgebrande audio-cd’s (audio-cd-r) als
cd’s met tracks in mp3-formaat afspelen. Bij
herbeschrijfbare cd’s (cd-rw) kan het afspelen
naargelang het cd-type en gebruikte cd-brander echter problematisch verlopen.
* Opmerking: Door de verscheidenheid aan opslag-
geheugenfabrikanten en besturingsprogramma‘s
kan niet gegarandeerd worden, dat alle opslagmedia compatibel zijn met de CD-112RDS / BT-speler.
2 Veiligheidsvoorschriften
Het apparaat is in overeenstemming met alle
relevante EU-Richtlijnen en is daarom gekenmerkt met .
WAARSCHUWING
De netspanning van het
apparaat is levensgevaarlijk. Open het apparaat
niet, want door onzorgvuldige in grepen loopt u
het risico van elektrische
schokken.
•
Het apparaat is enkel geschikt voor gebruik
binnenshuis; vermijd druip- en spatwater
en plaatsen met uitzonderlijk hoge vochtigheid. Het toegestane omgevingstemperatuurbereik is 0 – 40 °C.
•
Plaats geen bekers met vloeistof zoals
drinkglazen etc. op het apparaat.
•
Schakel het apparaat niet in resp. trek onmiddellijk de stekker uit het stopcontact,
1.
wanneer het apparaat of het netsnoer
zichtbaar beschadigd is,
2. wanneer er een defect zou kunnen optreden nadat het apparaat bijvoorbeeld
is ge vallen,
3.
wanneer het apparaat slecht functioneert.
Het apparaat moet in elk geval worden
hersteld door een gekwalificeerd vakman.
•
Trek de stekker nooit met het snoer uit het
stopcontact, maar met de stekker zelf.
•
Verwijder het stof met een droge, zachte
doek. Gebruik zeker geen water of chemicaliën.
•
In geval van ongeoorloofd of verkeerd
ge bruik, verkeerde aansluiting, foutieve
bediening of van herstelling door een
niet-gekwalificeerd persoon vervalt de
garantie en de verantwoordelijkheid voor
hieruit resulterende materiële of lichamelijke schade.
Wanneer het apparaat definitief uit
bedrijf wordt genomen, bezorg het
dan voor milieuvriendelijke verwerking aan een plaatselijk recyclagebedrijf.
3 Het apparaat opstellen
enaansluiten
Het apparaat is voorzien voor montage in een
19”-rack (482 mm), maar kan ook als vrijstaand tafelmodel worden gebruikt. Voor de
montage in een rack is 1 RE (1 rack-eenheid
= 44,45 mm) nodig.
De in- en uitgangen mogen enkel worden
aangesloten en gewijzigd, wanneer de CD112RDS / BT en de aan te sluiten apparatuur
is uitgeschakeld.
1) Om de audiosignalen naar het nageschakelde apparaat (bv. mengpaneel of versterker) door te sturen, zijn er vier lijnniveauuitgangen beschikbaar:
PRIORITY OUT
1. Voor het signaal van de Bluetooth-ont-
vanger; het signaal heeft voorrang op
de signalen van de cd / mp3-speler en
van de tuner.
2. Als er geen Bluetooth-signaal wordt
ontvangen of als het afspelen in pauze
geschakeld is, dan is het signaal van de
cd / mp3-speler beschikbaar.
3. Als de cd / mp3-speler op pauze of stop
geschakeld is, dan is het signaal van de
tuner beschikbaar.
BT OUT
voor het signaal van de Bluetooth-
ontvanger
TUNER OUT
voor het signaal van de tuner
CD PLAYER OUT
voor het signaal van de cd / mp3-speler
2)
Sluit een UKG-antenne aan op de jack
ANTENNA. Een eenvoudige UKG-antenne
wordt bij het apparaat geleverd.
3)
Ten slotte verbindt u het meegeleverde
netsnoer eerst met de jack en plugt u
de stekker ervan in een stopcontact
(230 V/ 50 Hz).
4 Bediening
Schakel het toestel in met de POWER-schakelaar . Op het display van de cd / mp3-speler
verschijnt de melding
Welcome
. Het display
van de tuner toont de laatst geselecteerde
zender weer.
4.1 Afstandsbediening
1)
Om de batterijen (2 × 1,5 V, maat AAA
= micro) aan te brengen, moet u aan de
achterzijde van de afstandsbediening het
deksel van het batterijvakje afnemen. Breng
de batterijen aan zoals in het batterijvak is
aangegeven. Sluit het vak opnieuw met
het deksel.
Als de afstandsbediening langere tijd
niet wordt gebruikt, neemt u de batterijen
eruit, zodat ze niet wordt beschadigd bij
eventueel uitlopen van de batterijen.
2)
Houd de afstandsbediening steeds naar
de sensor “IR” gericht, als u op een toets
drukt. De visuele verbindingslijn tussen de
afstandsbediening en de sensor mag niet
worden belemmerd.
3) Op het apparaat geven de LED’s “CD” en
“TUNER” aan, of de cd / mp3-speler of de
tuner met de afstandsbediening gestuurd
kan worden. Om de besturing om de schakelen, drukt u op de toets CD / TUNER.
4)
Als het bereik van de afstandsbediening
het laat afweten, zijn de batterijen bijna
leeg en moeten ze worden vervangen.
Lege batterijen horen niet in het
huisvuil. Verwijder ze voor een milieuvriendelijke verwerking uitsluitend
als KGA (bv. de inzamelbox in de
detailhandel).
Page 21

21
Nederlands
4.2 Tuner
1) De toetsen voor de tunerfuncties hebben
op de afstandsbediening een wit veld met
zwart opschrift (behalve de cijfertoetsen
1…9, 10 / 0). Om de tuner met de afstandsbediening te kunnen sturen, moet op het
apparaat de led “TUNER” oplichten. Als
de led “CD” echter oplicht, drukt u op de
toets CD / TUNER op de afstandsbediening.
2)
Alle bedieningsmogelijkheden worden
vermeld in de volgende tabel.
3)
Bij de eerste ingebruikname van het apparaat slaat u eerst de zenders op die u ter
plaatse kunt ontvangen. Er zijn 30 geheugenplaatsen voor zenders.
FM-Tuner
Toets
Functie
op de afstandsbediening
op het apparaat
Zenders opslaan
ASM × ×
Alle zenders zoeken en na elkaar automatisch opslaan:
Houd de toets twee seconden lang ingedrukt tot de cijfers van de frequentieweer-
gave doorlopen. Alle zenders zijn opgeslagen, als het display het zendernummer
CH01 weergeeft.
DIRECT ×
Invoer van de ontvangstfrequentie:
1. Druk op de toets DIRECT.
2. Voer de frequentie in MHz in met de toetsen 1… 9 en 10 / 0.
DOWN
UP
× ×
Zenderzoekfunctie:
Houd de toets ingedrukt tot de cijfers van de frequentieweergave doorlopen
Fijnregeling:
Druk (meerdere keren) kort op de toets.
MEMORY
MEM
×
×
Zenders opslaan:
1. Stel de zender in (zie toetsen DIRECT of DOWN / UP).
Druk binnen de vijf seconden op elk van de andere toetsen, anders moet u de
stappen 2 – 4 herhalen.
2. Druk op de toets MEM(ORY).
3. Selecteer een zendernummer (zie “Opgeslagen zenders oproepen”).
4. Druk op de toets MEM(ORY).
Opgeslagen zenders oproepen
1… 5,
+5
×
Nr. Toetsen
4 4
10 5, +5, +5
18 3, +5, +5, +5, +5
22 2, +5, +5, +5, +5, +5
1… 9, 10 / 0,
+10 / - -
×
Nr. Toetsen
4 4
10 10 / 0
18 8, +10 / - 22 2, +10 / - -, +10 / - -
of houd de toets +10 / - - 2 s ingedrukt tot CH-- op het display verschijnt; voer dan
het tweecijferige nummer in.
M-DOWN / M-UP × vorige / volgende zendernummer
MO / ST × Omschakelen tussen stereo- en mono-ontvangst
MUTE × Geluid uit- en inschakelen
Bijkomende informatie bij de RDS-ontvangst
RDS ×
1ste keer drukken op de toets:
Weergave van het programmatype of
PTY NONE*
2de keer drukken op de toets:
Informatie over de track / over het programma of RT NONE*
3de keer drukken op de toets:
Weergave van de tijd (na oproepen van de zender kan het enkele minuten duren
tot de tijd verschijnt) of
CT NONE*
4de keer drukken op de toets:
Kort frequentie en zendernr., dan zendernaam (basisinstelling)
*als de informatie niet verzonden
De tuner automatisch uitschakelen
SLEEP ×
1. Druk enkele keren op de toets tot de gewenste tijd tot aan het uitschakelen
weergegeven wordt. Na het verstrijken van de tijd, schakelt de tuner automatisch uit.
2. Opnieuw inschakelen:
Druk op de toets:
SLEEP-90 MIN wordt weergegeven. Druk nogmaals op de
toets, anders is de uitschakelfunctie opnieuw geactiveerd.
3. De functie uitschakelen voor verstrijken van de ingestelde tijd:
Druk op de toets, zodat
SLEEP… MIN van het display verdwijnt.
2 31
5 64
8 97
REV – SKIP – CUE
FUNC
FINDREPEAT
MUTEEJECT
PLAY 1 A-B
FOLDER
MEM
ASM
MO/ST
+10/- -DIRECT
M-DOWN M-UP DOWN
SLEEP
RDS
UP
STOP
PLAY
PAUSE
PROG
ID3
DISPLAY
REMAIN
CD/TUNER
10/0
Page 22

22
Nederlands
2 31
5 64
8 97
REV – SKIP – CUE
FUNC
FINDREPEAT
MUTEEJECT
PLAY 1 A-B
FOLDER
MEM
ASM
MO/ST
+10/- -DIRECT
M-DOWN M-UP DOWN
SLEEP
RDS
UP
STOP
PLAY
PAUSE
PROG
ID3
DISPLAY
REMAIN
CD/TUNER
10/0
CD / MP3-speler
Toets
Functie
op de afstandsbediening
op het apparaat
Basisfuncties
SELECT PLAY TYPE
×
Schuifregelaar aan de achterzijde:
AUTO PLAY = Na het inschakelen start het apparaat
automatisch met afspelen
NORMAL = Na het inschakelen staat de audio speler in
de pauzestand
RANDOM /AUTO PLAY = Na het inschakelen wordt
de weergave van de tracks in willekeurige volgorde
automatisch gestart
FUNC × ×
Omschakelen tussen cd, USB-aansluiting
en geheugenkaart
II
PLAY/ PAUSE
××Afspelen starten en
omschakelen tussen afspelen en pauze
1… 9, 10 / 0 × ×
Een track rechtstreeks selecteren, voorbeelden:
Track 8 = toetsen 8 en II
Track 30 = toetsen 3, 10 / 0 en II
Track 125 = toetsen 1, 2, 5 en II
REV − SKIP − CUE
×
×
Begin van de track, vorige / volgende track:
Kort op de toets drukken
Snel vooruit / achteruit zoeken: Toets ingedrukt houden
FOLDER
× ×
Naar de eerste track van de vorige / volgende map
springen
MUTE × × Geluid uit- en inschakelen
PLAY 1 ×
Afspelen van een individuele track
(
1Ɗ op het display):
Op het einde van een track schakelt de cd-speler in
pauze. Druk op de toets II om de volgende track te
starten.
Gegevens op het display wisselen
REMAIN ×
Alleen bij het afspelen van een cd-da
(Compact Disc Audio Digital):
Wisselen tussen de weergave
– van de reeds gespeelde tijd van de track
– van de resterende tijd van de track
– van de resterende tijd van de cd
ID3 ×
Alleen bij het afspelen van mp3-bestanden:
De bovenste displayregel wisselen
– naam van het bestand, de track, de kunstenaar en
het album lopen door
– weergave van de geselecteerde geluidsdrager:
DISC, USB of CARD
DISPLAY ×
Alleen bij het afspelen van mp3-bestanden:
De onderste displayregel wisselen
– nummer en afspeeltijd van de tracks
– naam van de map
– naam van de track
– aantal mappen en tracks
Herhalingsfuncties
A-B × ×
Fragment track herhalen (naadloze loop):
Druk zowel aan het begin als op het einde van het
fragment op de toets (minimale lengte van het fragment 2 seconden).
Druk nogmaals op de toets om deze loop te verlaten.
CD / MP3-speler
Toets
Functie
op de afstandsbediening
op het apparaat
REPEAT × ×
Herhalingsfuncties, willekeurig afspelen en voorbeluisteringsfunctie
Basisinstelling PLAY ALL: alle tracks worden eenmaal afgespeeld
eerste keer drukken op de toets REPEAT TRACK
continue herhaling van de geselecteerde track
volgende keer drukken op de toets REPEAT FOLDER
continue herhaling van alle tracks in de geselec-
teerde map
volgende keer drukken op de toets REPEAT ALL
continue herhaling van alle tracks
volgende keer drukken op de toets RANDOM REPEAT
continu afspelen van alle tracks in willekeurige
volgorde
volgende keer drukken op de toets RANDOM PLAY
eenmalig afspelen van alle tracks in willekeurige
volgorde
volgende keer drukken op de toets INT PLAY
voorbeluisteringsfunctie: Elke track wordt gedu-
rende 10 seconden afgespeeld
volgende keer drukken op de toets PLAY ALL:
vasisinstelling
Mp3-tracks alfabetisch zoeken
FIND ×
Alfabetisch zoeken van tracks en mappen
Een track zoeken
1. 1 × op FIND drukken weergave "A".
2. De eerste letter van de track met REV − SKIP − CUE
selecteren.
3. Met PLAY de track starten.
Bij meerdere tracks met dezelfde beginletter de toets
REV of CUE ingedrukt houden, tot de letter knippert;
met
REV − SKIP − CUE de track selecteren en met PLAY
het afspelen van de track starten.
Een map zoeken
1. 2 × op FIND drukken weergave Dir.
2. Met REV − SKIP − CUE de map selecteren.
3. Met PLAY de 1ste track in de map starten.
Een eigen reeks tracks programmeren
PROG × ×
1. Druk op de toets STOP .
2. Druk op de toets PROG.
3. Alleen bij mp3-tracks: Voer mapnr. in en druk op de
toets PROG.
4. Voer tracknr. in en druk op de toets PROG.
5. Programmeer alle andere tracks op dezelfde wijze
(max. 64).
6. Start afspelen met toets PROG.
Programmering wissen of afbreken:
Druk op toets STOP
.
Weergave afsluiten
STOP
× × Weergave afsluiten
EJECT
× × De cd uitwerpen
4.3 Cd / mp3-speler
1) Schuif een cd met het label naar boven gericht in de sleuf tot de
cd automatisch wordt ingetrokken
en / of
steek een USB-stick in de USB-aansluiting of verbind een harde
schijf (evt. met eigen voeding) met de USB-aansluiting
en / of
steek een geheugenkaart in de slot SD/ SDHC CARD. Daarbij moet
de afgeschuinde hoek van de kaart omhoog gericht zijn. Als u de
kaart er weer wilt uitnemen, drukt u ze iets in, zodat ze ontgrendelt.
2) Om de audiospeler met de afstandsbediening te kunnen sturen,
moet de led “CD” van het apparaat oplichten. Als de led “TUNER”
echter oplicht, drukt u op de toets CD / TUNER van de afstandsbediening.
3) Alle andere bedieningsmogelijkheden zijn vermeld in de tabel. Na
het gebruik schakelt u de apparaat uit met de schakelaar POWER.
Page 23

23
Nederlands
4.4 Bediening van
de Bluetooth-ontvanger
Met de Bluetooth-ontvanger kan een radioverbinding met een Bluetooth-signaalbron
(bv. notebook, smartphone, tablet-pc) tot
stand gebracht worden, om de daarop opgeslagen audiobestanden via de CD-112RDS / BT
af te spelen.
Opmerking: De Bluetooth-signaalbron moet volgens
het A2DP-protocol werken (Advanced Audio Distribution Profile). Anders is er geen radioverbinding
mogelijk.
1) Schakel de Bluetooth-functie op de note-
book, smartphone of tablet-pc in (zie
handleiding van het toestel).
2)
Om de Bluetooth-ontvanger van de CD112RDS / BT in te schakelen, houdt u de
toets BT POWER [II] kort ingedrukt tot
de led PAIR knippert.
3)
Om de CD-112RDS / BT te koppelen met
de Bluetooth-signaalbron houdt u de toets
PAIR kort ingedrukt tot de led PAIR langzamer knippert. Zodra de radioverbinding
tot stand is gebracht, licht de melding PAIR
constant op.
Opmerking: De CD-112RDS / BT wordt op het display Bluetooth-signaalbron weergegeven met “Audio
Bluetooth”.
4)
Start het afspelen van een track op de
Bluetooth-signaalbron.
5) Met de toets BT POWER [II] kunt u het
afspelen onderbreken en weer voortzetten.
Opmerking: Zodra het afspelen onderbroken
is, is op de uitgang PRIORITY het signaal van de
cd / mp3-speler of van de tuner beschikbaar.
6)
Met de toetsen DOWN [ ] en UP [ ]
kunt u naar de volgende of vorige track
springen (kort op de toets drukken) evenals snel achteruit of vooruit zoeken (toets
ingedrukt houden).
7)
Als de Bluetooth-ontvanger uitgeschakeld
moet worden, houdt u de toets BT POWER
[II] ingedrukt tot de led PAIR dooft.
5 Pc-besturing van het
apparaat RS-232-interface
De CD-112RDS / BT kan met een overeenkomstig terminalprogramma vanaf een pc
gestuurd worden. Verbind de bus REMOTE
CONTROL met de RS-232-interface van de
computer. Stel de volgende parameters in het
terminalprogramma in:
Symboolsnelheid:
. . . .9600 baud
Aantal gegevensbits:
. .8
Aantal stopbits:
. . . . . .1
Pariteit:
. . . . . . . . . . . .geen
Voortgangsbesturing:
.geen
De besturingscommando’s voor alle functies
van de CD-112RDS / BT worden in de volgende tabel vermeld en worden door het
terminalprogramma in ASCII-code verstuurd.
Als 4de en 5de byte moeten afsluitend de
commando’s “Carriage Return” (0D hexadecimaal) en “Line Feed” (0A hexadecimaal) naar
de CD-112RDS / BT gestuurd worden. Enkele
terminalprogramma’s voeren deze automatisch uit of kunnen overeenkomstig worden
ingesteld.
Na het uitvoeren van een commando
meldt de CD-112RDS / BT zich in ASCII-code
weer aan op de pc:
+ O K “Carriage Return” “Line Feed”
Bij een foutieve invoer meldt het apparaat:
+ E R “Carriage Return” “Line Feed”
Opmerking: Tussen twee commando’s moet een
pauze van ten minste 300 ms liggen. Na het commando om een zender te zoeken, is er een pauze
van ten minste 800 ms vereist.
Functies van de cd / mp3-speler
Functie
Besturingscommando
Byte 1 Byte 2 Byte 3
FOLDER
E A A
FOLDER
E A B
SKIP REV
E A C
SKIP CUE
E A D
STOP E A E
PLAY PAUSE II
E A F
EJECT E A G
PROG E A H
ID3 E A I
FIND E A J
MUTE E A K
REPEAT E A L
FUNC E A M
DISPLAY E A N
A-B E A O
EJECT vergrendelen E A P
EJECT vrijgeven E A Q
CARD E A R
CD E A S
USB E A T
PLAY 1 E A U
REMAIN E A V
0 E A 0
1 E A 1
2 E A 2
3 E A 3
4 E A 4
5 E A 5
6 E A 6
7 E A 7
8 E A
8
9 E A 9
Functies van de tuner
1 E C A
2 E C B
3 E C C
4 E C D
5 E C E
6 E C F
7 E C G
8 E C H
9 E C I
10 / 0 E C J
+10 E C K
DIRECT E C L
(Tuning) DOWN E C M
(Tuning) UP E C N
MUTE E C O
RDS E C P
(Station) M-UP E C 0
(Station) M-DOWN E C 1
MEM (ORY) E C 2
ASM E C 3
Mono / Stereo E C 4
SLEEP E C 5
Zenderzoekfunctie
E C 7
Zenderzoekfunctie
E C 8
6 Reiniging
Bescherm het apparaat tegen stof, trillingen,
vocht en warmte (toegelaten omgevingstemperatuur 0 – 40 °C). Verwijder het stof met
een zachte, droge doek. Gebruik zeker geen
water of chemicaliën.
Opmerking in verband met klankstoringen en leesfouten
Sigarettenrook en stof dringen makkelijk in
alle openingen van de cd-speler en zet zich
ook af op de optische onderdelen van de
laseraftastsystemen. Mocht deze afzetting
tot leesfouten en klankstoringen leiden, dan
moet het apparaat door een gekwalificeerd
vakman worden gereinigd. De kosten voor
deze reiniging draagt de koper, ook tijdens
de garantietermijn!
7 Technische gegevens
Frequentiecurve: . . . . .20 – 20 000 Hz
THD: . . . . . . . . . . . . . .< 0,1 %
Kanaalscheiding: . . . . .> 60 dB
Dynamisch bereik: . . . .> 96 dB
Signaal / Ruisverhouding:
. . . . . . . .> 70 dB
Audio-uitgang: . . . . . .1,2 V
Voedingsspanning: . . .230 V/ 50 Hz
Vermogensverbruik: . .max. 50 VA
Omgevings-
temperatuurbereik:
. . .0 – 40 °C
Afmetingen
(B × H × D): . . . . . . . . . .482 × 44 × 265 mm,
1 RE (rackeenheid)
Gewicht: . . . . . . . . . . .4 kg
Aansluitingen
Priority:. . . . . . . . . . .XLR, gebal.
CD: . . . . . . . . . . . . .XLR, gebal.
Bluetooth: . . . . . . . .cinch
Tuner: . . . . . . . . . . . .cinch
Remote Control: . . . .D-Sub-bus, 9-polig
Wijzigingen voorbehouden.
Deze gebruiksaanwijzing is door de auteurswet beschermd eigendom van MONACOR ® INTER NATIONAL
GmbH& Co. KG. Een reproductie – ook gedeeltelijk
–voor eigen commerciële doeleinden is verboden.
PAIR
3 4 5 PAIR BT POWER
DOWN UP ASM DOWN UP
Page 24

24
Español
USE ONLY WITH A 250V FUSE
6 7 8 9
1 2 3 4 5
REMOTE CONTROL
ANTENNA
R
PRIORITY OUT
L
L
BT OUT
TUNER
OUT
L
R CD PLAYER OUT L
AUTO PLAY
RANDOM
AUTO PLAY
230
V
~/
50
Hz
SELECT PLAY TYPE
NORMAL
POWER
POWER
CD
PROG
REPEAT
SKIP
REV
CUE
A- B
MUTE FUNC
STOP
PLAY/PAUSE
EJECT
CD -112R D S/B T
FOLDER
SD/MMC
CARD
IR
TUNER
PAIR
1 2 3 4 5 PAIR BT POWER
+5 MEMORY DOWN UP ASM DOWN UP
DISC
TR 02 01:53 CDA
STEREO
FM 92.50MHZ CH04
Lector CD / MP3
Estas instrucciones van dirigidas a usuarios
sin ningún conocimiento técnico específico.
Lea atentamente estas instrucciones antes
de utilizar el aparato y guárdelas para usos
posteriores.
1 Aplicaciones
El CD-112RDS / BT es una combinación de lector CD / MP3, sintonizador FM RDS y receptor
Bluetooth. Está adecuado para todo tipo de
aplicaciones de megafonía (p. ej. en teatros,
pubs o salas de espera) y contiene funciones
especiales, p. ej. repetición continua, lectura
aleatoria, reproducción MP3 de medios de
almacenamiento USB y de tarjetas de memoria (máx. 32 GB)*.
Puede reproducir CDs de audio, CDs de
audio creados por usted (CD-R) y CDs con
pistas en formato MP3. Sin embargo, puede
aparecer algún problema cuando se reproduce un CD-RW, dependiendo del tipo de
CD, del grabador de CDs y del programa de
grabación utilizado.
* Nota: Debido a la gran cantidad de fabricantes de
medios de almacenamiento y de drivers, no podemos
garantizar que todos los medios de almacenamiento
sean compatibles con el CD-112RDS / BT.
2 Notas de Seguridad
Este aparato cumple con todas las directivas
relevantes de la UE y por lo tanto está marcado con el símbolo .
ADVERTENCIA
El aparato utiliza un voltaje
peligroso. Deje el mantenimiento en manos del personal cualificado. El manejo
inexperto o la modificación
del aparato pueden provocar
una descarga.
•
El aparato está adecuado sólo para utilizarlo en interiores. Protéjalo contra goteos,
salpicaduras y humedad elevada. Rango de
temperatura ambiente admisible: 0 – 40 ºC.
•
No coloque ningún recipiente con líquido
en cima del aparato, p. ej. un vaso.
•
No utilice el aparato y desconecte inmediatamente la toma de corriente del enchufe si:
1. El aparato o el cable de corriente están
visiblemente dañados.
2. El aparato ha sufrido daños después de
una caída o accidente similar.
3. No funciona correctamente.
Sólo el personal cualificado puede reparar el
aparato bajo cualquier circunstancia.
•
No tire nunca del cable de corriente para
desconectarlo de la toma, tire siempre del
en chufe.
•
Utilice sólo un paño suave y seco para la
limpieza; no utilice nunca ni productos químicos ni agua.
•
No podrá reclamarse garantía o responsabilidad alguna por cualquier daño personal
o material resultante si el aparato se utiliza
para otros fines diferentes a los originalmente concebidos, si no se conecta o se
utiliza adecuadamente o no se repara por
expertos.
Si va a poner el aparato fuera de
servicio definitivamente, llévelo a la
planta de reciclaje de la zona para
que su eliminación no sea perjudicial
para el medio ambiente.
3 Colocación y
ConexióndelLector
El lector está diseñado para su instalación en
un rack (482 mm / 19”); sin embargo, también
puede colocarse como quiera como aparato
de sobremesa. Para su instalación en rack, se
necesita 1 unidad de rack (1 U = 44,45 mm).
Antes de hacer o modificar cualquier conexión, desconecte el CD-112RDS / BT y todos
los aparatos que hay que conectar.
1)
Hay cuatro salidas de nivel de línea disponibles para direccionar las señales de
audio al siguiente aparato (p. ej. mezclador
o amplificador):
PRIORITY OUT
1. Para la señal del receptor Bluetooth;
la señal tomará prioridad por encima
de las señales del lector CD / MP3 y del
sintonizador.
2. Cuando no se reciba ninguna señal
Bluetooth o cuando se haya puesto la
reproducción en pausa, la señal del lector CD / MP3 estará disponible en esta
salida.
3. Cuando el lector CD / MP3 se haya
puesto en pausa o se haya parado, la
señal del sintonizador estará disponible
en esta salida.
BT OUT
Para la señal del receptor Bluetooth
TUNER OUT
Para la señal del sintonizador
CD PLAYER OUT
Para la señal del lector CD / MP3
2)
Conecte una antena FM a la toma
ANTENNA. Con el aparato se entrega una
antena FM básica.
3) Finalmente, conecte el cable de corriente
entregado a la toma de corriente y luego
a un enchufe de corriente (230 V/ 50 Hz).
4 Funcionamiento
Conecte el lector con el interruptor POWER.
En el visualizador de lector CD / MP3 aparecerá
Welcome
. El visualizador del sintonizador
muestra la última emisora seleccionada.
4.1 Control remoto
1)
Para insertar las baterías (2 × 1,5 V, tipo
AAA), extraiga la tapa del compartimento
de la batería de la parte posterior del control remoto. Inserte las baterías como se
indica en el compartimento de la batería.
Cierre el compartimento con la tapa.
Si el control remoto no se va a utilizar
durante un largo periodo de tiempo, quite
las baterías para prevenir cualquier daño
provocado por el derrame de una batería.
2)
Cuando pulse un botón del control remoto, dirija siempre el control remoto
hacia el sensor “IR”. No puede haber obstáculos entre el control remoto y el sensor.
3) En el aparato, los LEDs “CD” y “TUNER”
indicarán si es posible controlar el lector
CD / MP3 o el sintonizador con el control
remoto. Para cambiar el control, pulse el
botón CD / TUNER.
4) Si el rango del control remoto disminuye
significa que las baterías se están agotando
y hay que cambiarlas.
Las baterías gastadas no deben depositarse en el contenedor normal;
llévelas a un contenedor especial,
p. ej. al contenedor de su vendedor.
Page 25

25
Español
4.2 Sintonizador
1) En el control remoto, los botones para las
funciones tuner están marcados por un
campo blanco con letras negras (excepto
los botones numéricos 1…9, 10 / 0). El
sintonizador sólo se puede utilizar con el
control remoto cuando se ilumina el LED
“TUNER”. Si el LED “CD” se ilumina, pulse
el botón CD / TUNER del control remoto.
2)
Todos los modos de funcionamiento están
listados en la siguiente tabla.
3)
Durante el funcionamiento inicial, primero
guarde las emisoras que se puedan recibir
donde esté situado. Se pueden guardar un
máximo de 30 emisoras.
Sintonizador FM
Botón
Función
En el control remoto
En el aparato
Almacenamiento de emisoras
ASM × ×
Para escanear todas las emisoras y para guardarlas una tras otra:
Mantenga el botón pulsado 2 segundos hasta que empiecen a aparecer figuras en
la indicación de frecuencia. Cuando el número de emisora CH01 aparezca en el
visualizador, se habrán guardado todas las emisoras.
DIRECT ×
Para entrar la frecuencia recibida:
1. Pulse el botón DIRECT.
2. Entre la frecuencia en MHz, utilizando los botones 1… 9 y 10 / 0.
DOWN
UP
× ×
Escaneo de emisoras:
Mantenga el botón pulsado hasta que empiecen a aparecer figuras en
la indicación de frecuencia.
Sintonización fina:
Pulse brevemente el botón (repetidamente).
MEMORY
MEM
×
×
Para guardar emisoras:
1. Configure la emisora (ver botones DIRECT o DOWN / UP).
Pulse cada uno de los botones siguientes en 5 segundos; de lo contrario, hay que
repetir los pasos 2 – 4.
2. Pulse el botón MEM(ORY).
3. Seleccione el número de emisora (ver “Activar emisoras guardadas”).
4. Pulse el botón MEM(ORY).
Activar emisoras guardadas
1… 5,
+5
×
N
o
Botones
4 4
10 5, +5, +5
18 3, +5, +5, +5, +5
22 2, +5, +5, +5, +5, +5
1… 9, 10 / 0,
+10 / - -
×
N
o
Botones
4 4
10 10 / 0
18 8, +10 / - 22 2, +10 / - -, +10 / - -
o mantenga pulsado el botón +10 / - - durante 2 segundos hasta que aparezca
CH-- en el visualizador, y luego entre el número (dos dígitos).
M-DOWN / M-UP × Número de emisora anterior / siguiente
MO / ST × Para conmutar entre recepción estéreo y mono
MUTE × Para silenciar y devolver el sonido
Información adicional de la recepción RDS
RDS ×
1ª pulsación del botón:
Indicación del tipo de programa o
PTY NONE*
2ª pulsación del botón:
Información referente a la pista / programa de difusión o RT NONE*
3ª pulsación del botón:
Indicación del tiempo (después de activar la emisora, puede tardar unos minutos
hasta que el tiempo esté disponible) o
CT NONE*
4ª pulsación del botón:
Indicación breve de la frecuencia y del número de la emisora, luego la indicación
del nombre de la emisora (ajuste básico)
*si la información no está disponible
Desconexión automática del sintonizador
SLEEP ×
1. Pulse el botón repetidamente hasta que el visualizador indique la duración
temporal deseada después de que se apague el sintonizador. El sintonizador se
desconectará cuando haya transcurrido el tiempo ajustado.
2. Para conectar el sintonizador de nuevo: Pulse el botón: SLEEP-90 MIN aparecerá en el visualizador. Pulse el botón de nuevo; de lo contrario, se activará de
nuevo la función de desconexión.
3. Para desactivar la función antes de que el tiempo ajustado haya transcurrido:
Pulse el botón para que desaparezca la indiación
SLEEP… MIN.
2 31
5 64
8 97
REV – SKIP – CUE
FUNC
FINDREPEAT
MUTEEJECT
PLAY 1 A-B
FOLDER
MEM
ASM
MO/ST
+10/- -DIRECT
M-DOWN M-UP DOWN
SLEEP
RDS
UP
STOP
PLAY
PAUSE
PROG
ID3
DISPLAY
REMAIN
CD/TUNER
10/0
Page 26

26
Español
2 31
5 64
8 97
REV – SKIP – CUE
FUNC
FINDREPEAT
MUTEEJECT
PLAY 1 A-B
FOLDER
MEM
ASM
MO/ST
+10/- -DIRECT
M-DOWN M-UP DOWN
SLEEP
RDS
UP
STOP
PLAY
PAUSE
PROG
ID3
DISPLAY
REMAIN
CD/TUNER
10/0
Lector CD / MP3
Botón
Función
En el control remoto
En el aparato
Funciones básicas
SELECT PLAY TYPE
×
Interruptor deslizante de la parte posterior:
AUTO PLAY = La reproducción empezará automática-
mente después de que el aparato se haya conectado
NORMAL = El aparato se pondrá en pausa después de
que el aparato se haya conectado
RANDOM /AUTO PLAY = La reproducción en orden
aleatorio empezará automáticamente después de que
el aparato se haya conectado
FUNC × ×
Para conmutar entre CD, puerto USB y
tarjeta de memoria
II
PLAY/ PAUSE
××Para iniciar la reproducción y
para conmutar entre reproducción y pausa
1… 9, 10 / 0 × ×
Selección directa de pista, ejemplos:
Pista 8 = botones 8 y II
Pista 30 = botones 3, 10 / 0 y II
Pista 125 = botones 1, 2, 5 y II
REV − SKIP − CUE
×
×
Inicio de la pista, pista anterior / siguiente:
Pulse el botón brevemente
Avance / retroceso rápido: Mantenga el botón pulsado
FOLDER
× ×
Para ir a la primera pista de la anterior /
siguiente carpeta
MUTE × × Para silenciar y devolver el sonido
PLAY 1 ×
Reproducción de una pista individual (indicación
1Ɗ):
Al final de una pista, el lector se pone en pausa. Para
iniciar la siguiente pista, pulse el botón II.
Cambiar la información que se muestra en el visualizador
REMAIN ×
Sólo cuando se reproduce un CD-DA
(Compact Disc Audio Digital):
para cambiar la información mostrada
en el visualizador
– tiempo transcurrido de la pista
– tiempo restante de la pista
– tiempo restante del CD
ID3 ×
Sólo cuando se reproducen archivos MP3:
para cambiar la información mostrada en la línea
superior del visualizador
– nombre del archivo, pista, artista y álbum se despla-
zarán por la línea superior
– se indicará el tipo de medio de almacenamiento
seleccionado: DISC, USB o CARD
DISPLAY ×
Sólo cuando se reproducen archivos MP3:
para cambiar la información mostrada en la línea
inferior del visualizador
– número y tiempo transcurrido de la pista
– nombre de la carpeta
– nombre de la pista
– número de carpetas y pistas
Funciones de repetición
A-B × ×
Repetición de la sección de pista (bucle continuo):
Pulse el botón al iniciar y acabar la sección (duración
mínima de la sección: 2 segundos).
Pulse el botón de nuevo para salir del bucle.
Lector CD / MP3
Botón
Función
En el control remoto
En el aparato
REPEAT × ×
Funciones de repetición, reproducción aleatoria y
función intro
ajuste básico PLAY ALL: todas las pistas se reproducirán una vez
primera pulsación del botón REPEAT TRACK
la pista seleccionada se repetirá continuamente
siguiente pulsación del botón REPEAT FOLDER
todas las pistas de la carpeta seleccionada se repeti-
rán continuamente
siguiente actuación del botón REPEAT ALL
todas las pistas se repetirán continuamente
siguiente pulsación del botón RANDOM REPEAT
todas las pistas se reproducirán continuamente en
orden aleatorio
siguiente pulsación del botón RANDOM PLAY
todas las pistas se reproducirán una vez en orden
aleatorio
siguiente pulsación del botón INT PLAY
función intro: se reproducirán los 10 primeros
segundos de cada pista
siguiente pulsación del botón PLAY ALL:
configuración básica
Búsqueda alfabética de pistas MP3
FIND ×
Búsqueda alfabética de pistas y carpetas
Buscar pistas
1. Press FIND once Indicación "A”.
2. Seleccione la primera letra de la pista con
REV − SKIP − CUE.
3. Pulse el botón PLAY para iniciar la reproducción.
Si hay varias pistas que empiecen por la misa letra,
mantenga pulsado el botón REV o CUE hasta que
la letra empiece a parpadear; seleccione la pista con
REV − SKIP − CUE y luego pulse el botón PLAY para
empezar la reproducción de la pista.
Buscar carpetas
1.
Pulse FIND dos veces Indicación Dir.
2. Seleccione la carpeta con REV − SKIP − CUE.
3. Pulse el botón PLAY para iniciar la reproducción de
la primera pista de la carpeta.
Programar una secuencia de pistas individual
PROG × ×
1. Pulse el botón STOP .
2. Pulse el botón PROG.
3.
Sólo para archivos MP3: Entre el número de carpeta
y pulse el botón PROG.
4. Entre el número de pista y pulse el botón PROG.
5. Repita estos pasos para programar el resto de pistas
(64 máx.).
6. Pulse el botón PROG para iniciar la reproducción.
Para borrar o cancelar la secuencia,
pulse el botón STOP
.
Parar la reproducción
STOP
× × Para parar la reproducción
EJECT
× × Para expulsar el CD
4.3 Lector CD / MP3
1)
Inserte un CD con la inscripción hacia arriba en la ranura hasta que
se introduzca automáticamente
y/ o
conecte una unidad USB flash al puerto USB o conecte un disco
duro (con alimentación individual si es necesario) al puerto USB
y/ o
inserte una tarjeta de memoria en la ranura SD/ SDHC CARD, con
la esquina biselada de la tarjeta mirando hacia arriba. Para extraer
la tarjeta, empújela levemente para expulsarla de la ranura.
2)
El lector de audio sólo se puede utilizar con el control remoto
cuando se ilumina el LED “CD”. Si el LED “TUNER” se ilumina,
pulse el botón CD / TUNER del control remoto.
3)
Los otros modos de funcionamiento están listados en la tabla.
Después del funcionamiento, desconecte el aparato con el interruptor POWER.
Page 27

27
Español
4.4 Funcionamiento
delreceptorBluetooth
El receptor Bluetooth se utiliza para la comunicación por radio con una fuente de
señal Bluetooth (p. ej. portátil, smartphone,
tableta). De este modo, el CD-112RDS / BT
podrá reproducir los archivos de audio que
se han guardado en esta fuente.
Nota: La fuente de señal Bluetooth tiene que ser
compatible con el protocolo A2DP (Advanced Audio
Distribution Profile); de lo contrario no se podrá
realizar la comunicación por radio.
1) Active la función Bluetooth en el portátil,
smartphone o tableta (ver manual del aparato, si es necesario).
2)
Para conectar el receptor Bluetooth del
CD-112RDS / BT, mantenga pulsado el
botón BT POWER [II] hasta que el LED
PAIR empiece a parpadear.
3)
Para enlazar el CD-112RDS / BT con la
fuente de señal Bluetooth, mantenga
pulsado brevemente el botón PAIR hasta
que el LED PAIR se mantenga parpadeando
más lentamente. En cuanto se haya establecido la comunicación por radio, el LED
PAIR se iluminará permanentemente.
Nota: En el visualizador de la fuente de señal Bluetooth, el CD-112RDS / BT se indicará como “Audio
Bluetooth”.
4)
Inicie una pista en la fuente de señal
Bluetooth.
5) Para pausar o continuar la pista, pulse el
botón BT POWER [II
].
Nota: En cuanto se interrumpe la reproducción, la
señal del lector CD / MP3 o del sintonizador estará
presente en la salida PRIORITY.
6) Utilice los botones DOWN [ ] y UP [ ]
para ir a la pista previa o a la siguiente
(pulse el botón brevemente) o para avanzar / retroceder rápidamente (mantenga el
botón pulsado).
7)
Para desconectar el receptor Bluetooth,
mantenga pulsado el botón BT POWER
[II] hasta que se apague el LED PAIR.
5 Control del Aparato por
PCmediante Interfaz RS-232
Existe la posibilidad de controlar el CD112RDS/ BT desde un PC mediante un emulador adecuado. Conecte la toma REMOTE
CONTROL a la interfaz RS-232 del ordenador. Ajuste los siguientes parámetros en el
emulador:
Número de bits de datos:
. . . 8
Número de bits de paro:
. . . . 1
Paridad:
. . . . . . . . . . . . . . . . Ninguna
Control de flujo:
. . . . . . . . . . Ninguno
Los comandos de control para todas las funciones del CD-112RDS / BT están listados en la
tabla a continuación. El emulador los enviará
en código ASCII. Finalmente, los comandos
“Carriage Return” (0D hexadecimal) y “Line
Feed” (0A hexadecimal) tienen que enviarse
al CD-112RDS / BT como bytes 4 y5. Algunos
emuladores los ejecutarán automáticamente
o pueden ajustarse convenientemente.
Después de que se haya ejecutado un
comando, el CD-112RDS/ BT enviará el mensaje siguiente en código ASCII al PC:
+ O K “Carriage Return” “Line Feed”
En caso de error de entrada, enviará el
siguiente mensaje:
+ E R “Carriage Return” “Line Feed”
Nota: Entre dos comandos, tiene que haber un
intervalo de por lo menos 300 ms. Después de un
comando para escanear estaciones, se necesita un
intervalo de 800 ms.
Funciones del lector CD / MP3
Función
Comando de control
Byte 1 Byte 2 Byte 3
FOLDER
E A A
FOLDER
E A B
SKIP REV
E A C
SKIP CUE
E A D
STOP E A E
PLAY PAUSE II
E A F
EJECT E A G
PROG E A H
ID3 E A I
FIND E A J
MUTE E A K
REPEAT E A L
FUNC E A M
DISPLAY E A N
A-B E A O
Desactivar EJECT E A P
Activar EJECT E A Q
CARD E A R
CD E A S
USB E A T
PLAY 1 E A U
REMAIN E A V
0 E A 0
1 E A 1
2 E A 2
3 E A 3
4 E A 4
5 E A 5
6 E A 6
7 E A 7
8 E
A 8
9 E A 9
Funciones del sintonizador
1 E C A
2 E C B
3 E C C
4 E C D
5 E C E
6 E C F
7 E C G
8 E C H
9 E C I
10 / 0 E C J
+10 E C K
DIRECT E C L
(Tuning) DOWN E C M
(Tuning) UP E C N
MUTE E C O
RDS E C P
(Station) M-UP E C 0
(Station) M-DOWN E C 1
MEM (ORY) E C 2
ASM E C 3
Mono / Stereo E C 4
SLEEP E C 5
Escaneo de emisoras
E C 7
Escaneo de emisoras
E C 8
6 Mantenimiento
Proteja el lector del polvo, de las vibraciones,
de la humedad y del calor (temperatura ambiente admisible: 0 – 40 ºC). Utilice sólo un
paño suave y seco para la limpieza; no utilice
nunca ni productos químicos ni agua.
Nota referente a las interrupciones de
sonido y los errores delectura
El humo del tabaco y el polvo pueden penetrar fácilmente a través de todas las aperturas
del aparato y depositarse en las ópticas de
los sistemas de muestreo láser. Si estos restos
causan errores de lectura o interrupciones del
sonido, el personal cualificado deberá limpiar el aparato. Tenga en cuenta que habrá
un cargo por la limpieza, ¡incluso durante el
periodo de garantía!
7 Especificaciones
Rango de frecuencias: .20 – 20 000 Hz
THD: . . . . . . . . . . . . . .< 0,1 %
Separación de canal: . .> 60 dB
Dinámica: . . . . . . . . . .> 96 dB
Relación sonido / ruido: > 70 dB
Salida de audio: . . . . .1,2 V
Alimentación: . . . . . . .230 V/ 50 Hz
Consumo: . . . . . . . . . .50 VA máx.
Temperatura
ambiente:
. . . . . . . . . .0 – 40 °C
Dimensiones
(B × H × P): . . . . . . . . .482 × 44 × 265 mm,
1 U
Peso: . . . . . . . . . . . . . .4 kg
Conexiones
Priority:. . . . . . . . . . .XLR, simétrica
CD: . . . . . . . . . . . . .XLR, simétrica
Bluetooth: . . . . . . . .RCA
Tuner: . . . . . . . . . . . .RCA
Remote Control: . . . .Toma D-Sub
de 9polos
Sujeto a modificaciones técnicas.
Manual de instrucciones protegido por el copyright
de MONACOR ® INTER NATIONAL GmbH & Co.KG.
Toda reproducción mismo parcial para fines comerciales está prohibida.
PAIR
3 4 5 PAIR BT POWER
DOWN UP ASM DOWN UP
Page 28

28
Polski
USE ONLY WITH A 250V FUSE
6 7 8 9
1 2 3 4 5
REMOTE CONTROL
ANTENNA
R
PRIORITY OUT
L
L
BT OUT
TUNER
OUT
L
R CD PLAYER OUT L
AUTO PLAY
RANDOM
AUTO PLAY
230
V
~/
50
Hz
SELECT PLAY TYPE
NORMAL
POWER
POWER
CD
PROG
REPEAT
SKIP
REV
CUE
A- B
MUTE FUNC
STOP
PLAY/PAUSE
EJECT
CD -112R D S/B T
FOLDER
SD/MMC
CARD
IR
TUNER
PAIR
1 2 3 4 5 PAIR BT POWER
+5 MEMORY DOWN UP ASM DOWN UP
DISC
TR 02 01:53 CDA
STEREO
FM 92.50MHZ CH04
Odtwarzacz CD / MP3
Niniejsza instrukcja przeznaczona jest dla
użytkowników, którzy nie posiadają wiedzy i
doświadczenia technicznego. Przed rozpoczęciem użytkowania proszę zapoznać się z instrukcją, a następnie zachować ją do wglądu.
1 Zastosowanie
Urządzenie CD-112RDS / BT jest kombinacją
odtwarzacza CD / MP3, tunera FM RDS oraz
odbiornika Bluetooth. Służy do zastosowań
niemal w każdym systemie PA (np. sklepach,
pubach lub poczekalniach). Posiada wiele
przydatnych funkcji np. ciągłe odtwarzanie,
odtwarzanie losowe, odtwarzanie plików
MP3 z nośników USB oraz karty pamięci
(max32 GB)*.
Kompatybilny jest z niemal wszystkimi
rodzajami płyt: audio CD, audio CD wypalanymi we własnym zakresie (CD-R), płyt z plikami MP3. Mogą się jednak pojawić problemy
z odtwarzaniem niektórych płyt wielokrotnego zapisu (CD-RW), w zależności od nagrywarki lub użytego programu nagrywającego.
* Uwaga: Ze względu na dużą ilość producentów
nośników, producent nie gwarantuje kompatybilności odtwarzacza CD-112RDS / BT ze wszystkimi
dostępnymi na rynku nośnikami.
2 Środki bezpieczeństwa
Urządzenie spełnia wszystkie wymagania
norm UE, dzięki czemu zostało oznaczone
symbole .
UWAGA Urządzenie jest zasilane niebez-
piecznym dla życia napięciem
zmiennym. Naprawą urządzenia
może zajmować się tylko przeszkolony personel. Samodzielne
otwarcie obudowy urządzenia
może spowodować porażenie
prądem elektrycznym.
•
Urządzenie przeznaczone jest wyłącznie
do użytku wewnątrz pomieszczeń. Należy
chronić je przez wodą, dużą wilgotnością
oraz wysoką temperaturą (dopuszczalny
zakres wynosi 0 – 40 °C).
•
Nie wolno stawiać na urządzeniu żadnych
pojemników z cieczą np. szklanek.
•
Nie wolno używać urządzenia lub natychmiast odłączyć wtyczkę zasilającą z
gniazdka
1. jeżeli stwierdzono istnienie widocznego
uszkodzenia urządzenia lub kabla zasilającego,
2.
jeżeli uszkodzenie urządzenia mogło
nastąpić w wyniku upadku lub innego
podobnego zdarzenia,
3. jeżeli urządzenie działa nieprawidłowo.
Naprawą urządzenia może zajmować się
wyłącznie przeszkolony personel.
•
Nie wolno odłączać urządzenia z gniazdka
sieciowego ciągnąc za kabel zasilania, należy zawsze chwytać za wtyczkę.
•
Do czyszczenia urządzenia należy używać
suchej, miękkiej tkaniny. Nie stosować
wody ani środków chemicznych.
•
Producent ani dostawca nie ponoszą odpowiedzialności za wynikłe szkody (uszkodzenie sprzętu lub obrażenia użytkownika),
jeśli urządzenie było używane niezgodnie
z ich przeznaczeniem, nieprawidłowo zamontowane, podłączone lub obsługiwane
bądź poddane nieautoryzowanej naprawie.
Po całkowitym zakończeniu eksploatacji urządzenia, należy oddać je do
punktu recyklingu, aby nie zaśmiecać środowiska.
3 Przygotowanie do pracy
ipodłączanie
Urządzenie przystosowane jest do montażu
w racku (482 mm / 19”), ale może również
pracować jako wolnostojące. Przy montażu
w racku zajmuje przestrzeń 1 U (44,45 mm).
Przed przystąpieniem do podłączania lub
zmiany połączeń należy bezwzględnie wyłączyć odtwarzacz CD-112RDS / BT oraz podłączane urządzenia.
1) Urządzenie posiada cztery wyjścia liniowe
do podłączania kolejnych urządzeń w torze
sygnałowym (np. mikserów lub wzmacniaczy):
PRIORITY OUT
1. Dla sygnału z odbiornika Bluetooth;
sygnał ma wyższy priorytet niż sygnały z
odtwarzacza CD / MP3 oraz tunera.
2. Jeżeli odbiornik Bluetooth nie od-
biera żadnego sygnału lub zatrzymano
odtwarzanie, na wyjściu dostępny jest
sygnał z odtwarzacza CD / MP3.
3. Jeżeli odtwarzacz CD / MP3 ustawiono w
tryb pauzy lub zatrzymano odtwarzanie,
na wyjściu dostępny jest sygnał z tunera.
BT OUT
dla sygnału z odbiornika Bluetooth
TUNER OUT
dla sygnału z tunera
CD PLAYER OUT
dla sygnału z odtwarzacza CD / MP3
2)
Podłączyć antenę FM do gniazda ANTENNA. Podstawowa antena FM dostarczana jest wraz z urządzeniem.
3)
Podłączyć kabel zasilający do gniazda zasilającego, a następnie do gniazdka sieciowego (230 V/ 50 Hz).
4 Obsługa
Włączyć urządzenie przyciskiem POWER. Na
wyświetlaczu odtwarzacza CD / MP3 pojawi
się komunikat
Welcome
. Wyświetlacz tu-
nera pokaże najczęściej wybieraną stację.
4.1 Zdalne sterowanie
1)
Aby włożyć baterie (2 × 1,5 V bateria AAA)
do pilota, należy zdjąć pokrywę komory
bateryjnej na tylnej stronie. Po włożeniu
baterii, zgodnie z oznaczeniem wewnątrz,
zamknąć pokrywę.
Jeżeli pilot nie będzie przez dłuższy czas
wykorzystywany, należy wyjąć z niego
baterie.
2)
Podczas korzystania z pilota, należy kierować go w stronę urządzenia, na czujnik
“IR”. Między czujnikiem a pilotem nie powinny się znajdować żadne przeszkody.
3)
Urządzenie gotowe do sterowania pilotem
sygnalizowane jest za pomocą diody “CD”
lub “TUNER”. Do przełączania między sterowaniem odtwarzaczem CD / MP3 a tunerem służy przycisk CD / TUNER.
4)
Jeżeli zmniejszy się dystans działania pilota,
należy wymienić baterie na nowe.
Zużyte baterie należy wyrzucać do
specjalnych pojemników, nie do
zwykłych koszy na śmieci.
Page 29
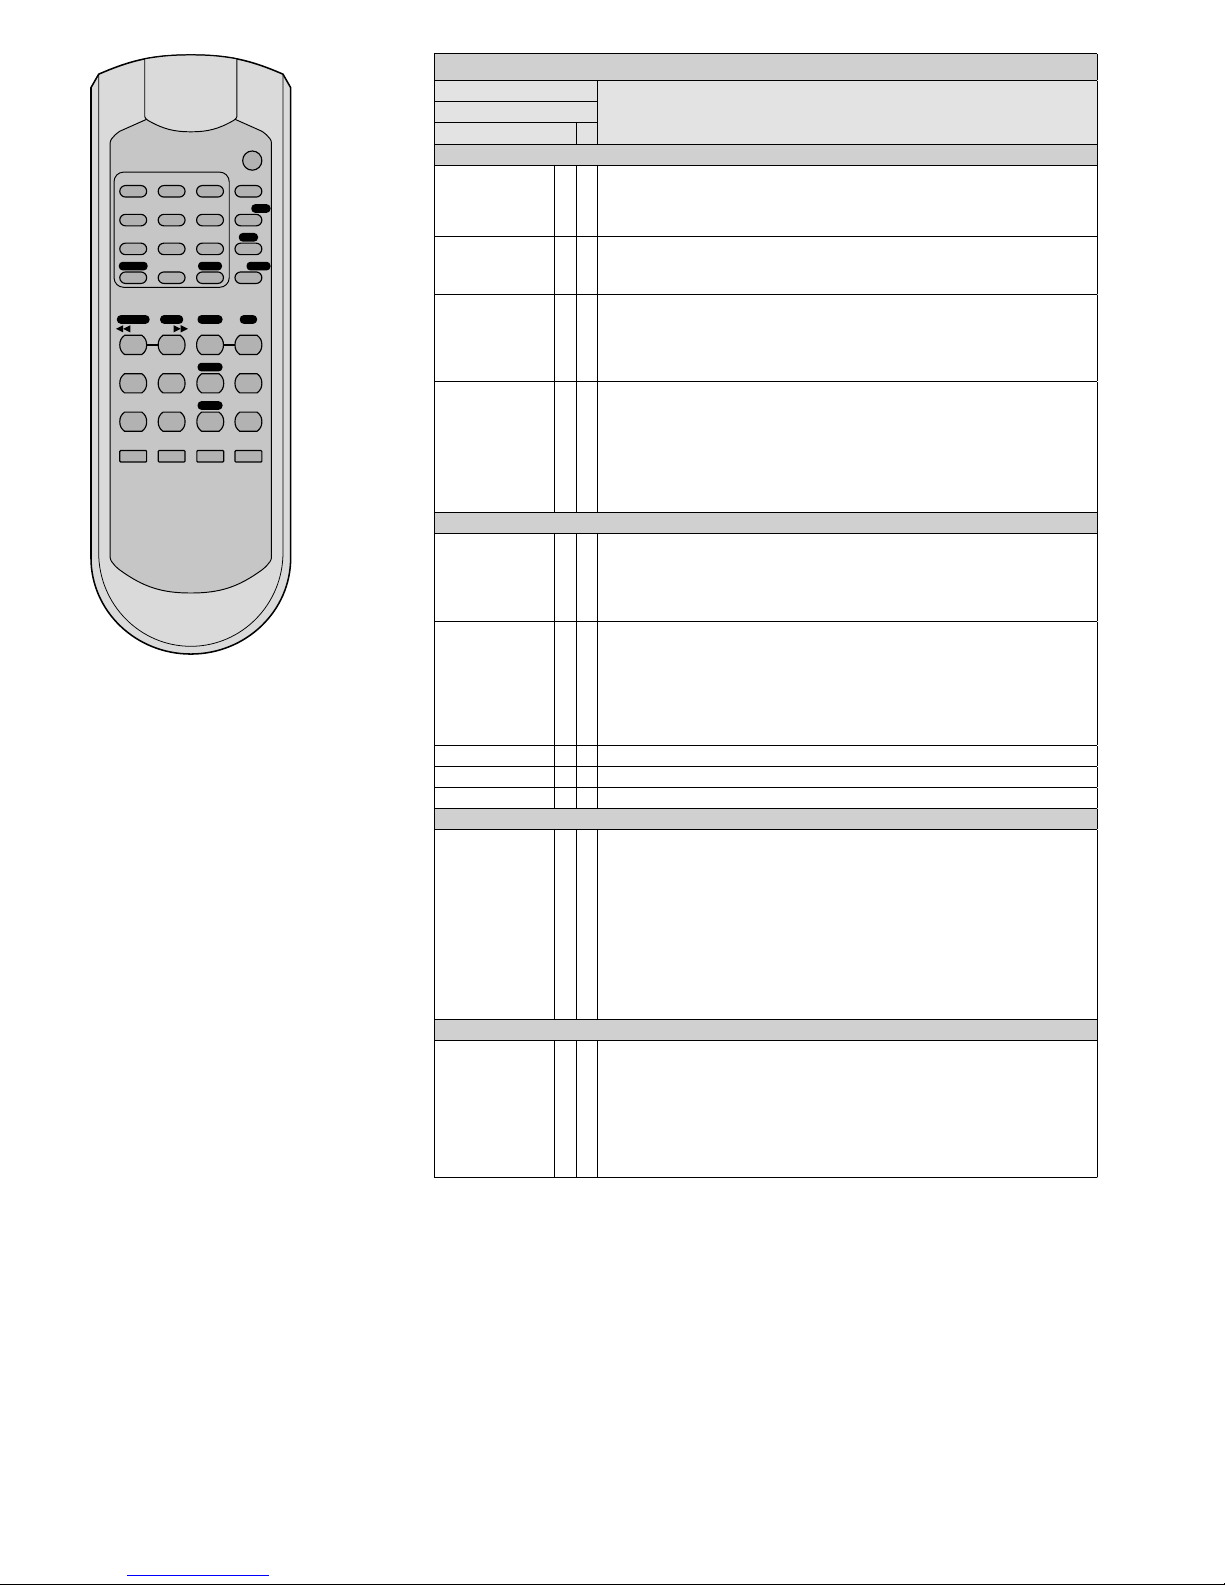
29
Polski
4.2 Tuner
1)
Przyciski na pilocie, które służą do sterowania funkcjami tunera oznaczone są na biało
z czarnym napisem (za wyjątkiem przycisków numerycznych 1…9, 10 / 0). Sterowanie tunerem możliwe jest wyłącznie gdy na
urządzeniu świeci dioda “TUNER”. Jeżeli
świeci się dioda “CD”, wcisnąć przycisk
CD / TUNER na pilocie.
2)
Wszystkie funkcje przedstawiono w poniższej tabeli.
3)
Podczas pierwszego uruchamiania, należy
najpierw wyszukać i zapisać dostępne stacje radiowe. Możliwe jest zapisanie maksymalnie 30 stacji.
Tuner FM
Przycisk
Funkcje
na pilot sterujący
na urządzeniu
Zapisywanie stacji
ASM × ×
wyszukiwanie wszystkich stacji i zapisywanie ich kolejno:
Przytrzymać wciśnięty przycisk przez 2 sekundy, aż na wskaźniku częstotliwości
znaczą pojawiać się cyfry. Pojawienie się numeru stacji CH01 oznacza, że wszystkie stacje zostały zapisane.
DIRECT ×
aby bezpośrednio wpisać częstotliwość:
1. Wcisnąć przycisk DIRECT.
2. Wprowadzić częstotliwość w MHz, za pomocą przycisków 1…9,10 / 0.
DOWN
UP
× ×
skanowanie stacji:
Przytrzymać wciśnięty przycisk, aż na wskaźniku częstotliwości znaczą pojawiać
sięcyfry.
dokładne skanowanie:
Wcisnąć na krótko przycisk (kilak razy).
MEMORY
MEM
×
×
aby zapisać stacje:
1. Ustawić stację (patrz opis przycisków DIRECT lub DOWN / UP).
Kolejne przyciski należy wcisnąć w ciągu 5 sekund; w przeciwnym razie konieczne
będzie powtórzenie kroków 2 – 4.
2. Wcisnąć przycisk MEM(ORY).
3. Wybrać numer stacji (patrz “Wywoływanie zapisanych stacji”).
4. Wcisnąć przycisk MEM(ORY).
Wywoływanie zapisanych stacji
1… 5,
+5
×
nr
przyciski
4 4
10 5, +5, +5
18 3, +5, +5, +5, +5
22 2, +5, +5, +5, +5, +5
1… 9, 10 / 0,
+10 / - -
×
nr
przyciski
4 4
10 10 / 0
18 8, +10 / - 22 2, +10 / - -, +10 / - -
lub przytrzymać wciśnięty przycisk +10 / - - przez 2 sekundy, aż na wyświetlaczu
pojawi sie
CH--, i następnie wpisać numer (dwie cyfry).
M-DOWN / M-UP × poprzedni / kolejny numer stacji
MO / ST × przełączanie między trybem stereo a mono
MUTE × włączanie i wyłączanie wyciszenia
Dodatkowe informacje RDS
RDS ×
pierwsze wciśnięcie przycisku:
wskazanie typu programu lub
PTY NONE*
drugie wciśnięcie przycisku:
informacja o bieżącym programie lub
RT NONE*
trzecie wciśnięcie przycisku:
informacja o czasie (wskazanie czasu nie jest nadawane ciągle; na informację
tętrzeba odczekać nawet kilka minut) lub
CT NONE*
czwarte wciśnięcie przycisku:
krótkie wskazanie częstotliwości oraz numeru stacji, następnie nazwy stacji
(podstawowe ustawienie)
*jeżeli dana informacja nie jest nadawana
Automatyczne wyłączanie tunera
SLEEP ×
1. Wcisnąć przycisk kilka razy, aż na wyświetlaczu pokazany zostanie żądany czas,
po którym nastąpi wyłączenia tunera. Tuner wyłączy się po upływie ustawionego czasu.
2. Aby ponownie włączyć tuner:
Wcisnąć przycisk: na wyświetlaczu pojawi się
SLEEP-90 MIN. Wcisnąć po-
nownie przycisk; w przeciwnym razie funkcja wyłączania będzie nadal aktywna.
3. Aby wyłączyć funkcję przed upływem czasu:
Wcisnąć przycisk aż zniknie wskazanie
SLEEP… MIN.
2 31
5 64
8 97
REV – SKIP – CUE
FUNC
FINDREPEAT
MUTEEJECT
PLAY 1 A-B
FOLDER
MEM
ASM
MO/ST
+10/- -DIRECT
M-DOWN M-UP DOWN
SLEEP
RDS
UP
STOP
PLAY
PAUSE
PROG
ID3
DISPLAY
REMAIN
CD/TUNER
10/0
Page 30

30
Polski
2 31
5 64
8 97
REV – SKIP – CUE
FUNC
FINDREPEAT
MUTEEJECT
PLAY 1 A-B
FOLDER
MEM
ASM
MO/ST
+10/- -DIRECT
M-DOWN M-UP DOWN
SLEEP
RDS
UP
STOP
PLAY
PAUSE
PROG
ID3
DISPLAY
REMAIN
CD/TUNER
10/0
Odtwarzacz CD / MP3
Przycisk
Funkcje
na pilot sterujący
na urządzeniu
Podstawowe funkcje
SELECT PLAY TYPE
×
przełącznik na tylnej stronie:
AUTO PLAY = odtwarzanie rozpoczyna się automa-
tycznie po włączeniu urządzenia
NORMAL = po włączeniu urządzenia, o dtwarzacz
ustawia się w tryb pauzy
RANDOM /AUTO PLAY = po włączeniu urządzenia au-
tomatycznie rozpoczyna się odtwarzanie w kolejności
losowej
FUNC × ×
do przełączania pomiędzy CD, portem USB
a czytnikiem kart
II
PLAY/ PAUSE
××do rozpoczynania odtwarzania oraz
przełączania między odtwarzaniem a pauzą
1… 9, 10 / 0 × ×
do bezpośredniego wyboru utworów, przykładowo:
utwór 8 = przyciski 8 oraz II
utwór 30 = przyciski 3, 10 / 0 oraz II
utwór 125 = przyciski 1, 2, 5 oraz II
REV − SKIP − CUE
×
×
początek utworu, poprzedni / kolejny utwór:
Wcisnąć przycisk na krótko
szybkie przewijanie: przytrzymać wciśnięty przycisk
FOLDER
× ×
przechodzenie do pierwszego utworu w poprzednim /
kolejnym folderze
MUTE × × włączanie i wyłączanie wyciszenia
PLAY 1 ×
odtwarzanie pojedynczych utworów (wskazanie
1Ɗ):
Po zakończeniu bieżącego utworu, odtwarzacz
ustawia się w tryb pauzy. Aby rozpocząć odtwarzanie
kolejnego utworu, wcisnąć przycisk II.
Zmiana informacji pokazywanych na wyświetlaczu
REMAIN ×
tylko dla płyt audio CD-DA
(Compact Disc Audio Digital):
do zmiany wyświetlanych informacji
– miniony czas odtwarzania utworu
– czas do końca utworu
– czas do końca płyty CD
ID3 ×
tylko dla plików MP3:
do zmiany informacji pokazywanych w górnej linii
wyświetlacza
– nazwa pliku, tytuł, wykonawca oraz nazwa albumu
przewijane w górnej linii wyświetlacza
– wskazanie wybranego nośnika:
DISC, USB lub CARD
DISPLAY ×
tylko dla plików MP3:
do zmiany informacji pokazywanych w dolnej linii
wyświetlacza
– numer i czas odtwarzania pliku
– nazwa folderu
– tytuł utworu
– liczba folderów i utworów
Funkcji powtarzania
A-B × ×
powtarzanie fragmentu utworu (pętla ciągła):
Wcisnąć przycisk na początku i na końcu żądanego
fragmentu (minimalna długość sekcji: 2 sekundy).
Wcisnąć przycisk ponownie aby wyjść z pętli.
Odtwarzacz CD / MP3
Przycisk
Funkcje
na pilot sterujący
na urządzeniu
REPEAT × ×
funkcje powtarzania, odtwarzanie losowe oraz odtwarzanie intro
Podstawowe ustawienie PLAY ALL: jednokrotne
odtworzenie wszystkich utworów
pierwsze wciśnięcie przycisku REPEAT TRACK
ciągle powtarzanie wybranego utworu
kolejne wciśnięcie przycisku REPEAT FOLDER
ciągłe odtwarzanie wszystkich plików z wybranego
folderu
kolejne wciśnięcie przycisku REPEAT ALL
ciągle odtwarzanie wszystkich utworów
kolejne wciśnięcie przycisku RANDOM REPEAT
ciągle odtwarzanie wszystkich utworów w kolejno-
ści losowej
kolejne wciśnięcie przycisku RANDOM PLAY
jednokrotne odtworzenie wszystkich utworów w
kolejności losowej
kolejne wciśnięcie przycisku INT PLAY
funkcja intro: odtwarzanie początkowych 10se-
kund każdego utworu
kolejne wciśnięcie przycisku PLAY ALL: podstawowe ustawienie
Alfabetyczne wyszukiwanie utworów
FIND ×
alfabetyczne wyszukiwanie utworów i folderów
Wyszukiwanie utworów
1. Wcisnąć FIND jeden raz Indication "A".
2. Wybrać pierwszą literę tytułu za pomocą
REV − SKIP − CUE.
3. Wcisnąć PLAY żeby rozpocząć odtwarzanie.
Jeżeli kilka utworów zaczyna się na daną literę,
przytrzymać wciśnięty przycisk REV lub CUE aż litera
zacznie migać; wybrać utwór za pomocą przycisków
REV − SKIP − CUE a następnie wcisnąć przycisk PLAY
żeby rozpocząć odtwarzanie.
Wyszukiwanie folderów
1.
Wcisnąć FIND dwa razy wskazanie Dir.
2. Wybrać folder za pomocą przycisków
REV − SKIP − CUE.
3. Wcisnąć PLAY żeby rozpocząć odtwarzanie pierwszego utworu z folderu.
Do programowania indywidualnej sekwencji utworów
PROG × ×
1. Wcisnąć przycisk STOP .
2. Wcisnąć przycisk PROG.
3. Tylko dla plików MP3: Wprowadzić numer folderu i
wcisnąć przycisk PROG.
4. Wprowadzić numer utworu i wcisnąć przycisk
PROG.
5. Powtórzyć powyższe kroki dla kolejnych utworów
(max 64).
6. Wcisnąć przycisk PROG aby rozpocząć odtwarzanie.
Aby skasować lub zrezygnować z odtwarzania
sekwencji, wcisnąć przycisk STOP .
Do zatrzymywania odtwarzania
STOP
× × do zatrzymywania odtwarzania
EJECT
× × do wysuwania płyty CD
4.3 Odtwarzacz CD / MP3
1)
Wsunąć płytę CD, stroną zadrukowaną do góry, w szczelinę aż
zostanie automatycznie wciągnięta
i / lub
podłączyć nośnik USB lub twardy dysk USB (z osobnym zasilaniem)
do złącza USB na urządzeniu
i / lub
włożyć kartę pamięci do czytnika SD/ SDHC CARD, ściętym rogiem
do przodu. Aby wyjąć kartę, należy najpierw lekko ją wcisnąć.
2)
Sterowanie odtwarzaczem audio możliwe jest wyłącznie gdy na
urządzeniu świeci dioda “CD”. Jeżeli świeci się dioda “TUNER”,
wcisnąć przycisk CD / TUNER na pilocie.
3)
Funkcje poszczególnych przycisków oraz opcje sterowania zawarto
w tabeli. Po zakończeniu pracy, wyłączyć urzadąnie przełącznikiem
POWER.
Page 31
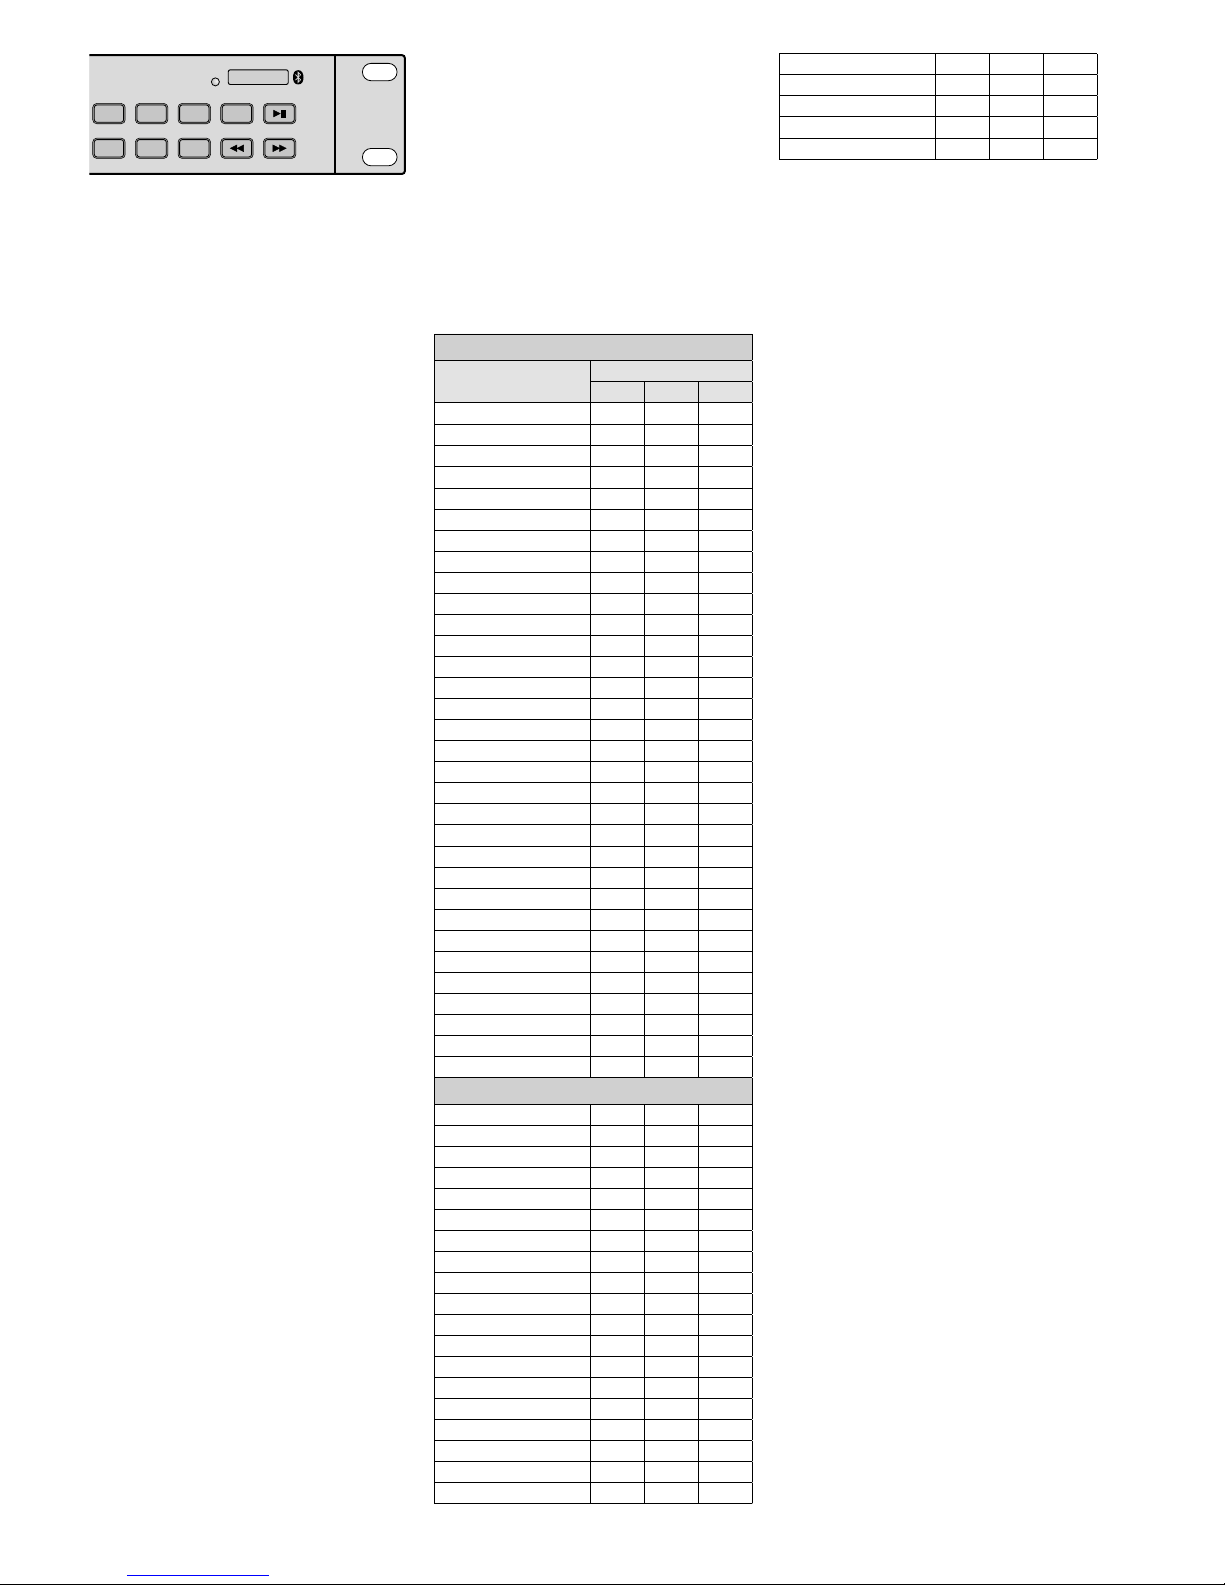
31
Polski
4.4 Obsługa odbiornika Bluetooth
Odbiornik Bluetooth służy do bezprzewodowego łączenia się ze źródłami sygnału wyposażonymi w nadajnik Bluetooth (np. notebookami, smartfonami, tabletami PC). Dzięki
temu, poprzez urządzenie CD-112RDS / BT
można odtwarzać utwory zapisane w pamięci
tych urządzeń.
Uwaga: Źródła sygnału Bluetooth muszą być kompatybilne z protokołem A2DP (Advanced Audio Distribution Profile); w przeciwnym razie, połączenie z nimi
nie będzie możliwe.
1) Włączyć funkcję Bluetooth w notebooku,
smartfonie lub tablecie PC (jeśli trzeba,
patrz instrukcja tych urządzeń).
2)
Włączyć odbiornik Bluetooth w CD 112RDS / BT, przytrzymując wciśnięty przycisk BT POWER [II] aż dioda PAIR zacznie
migać.
3) Aby połączyć odtwarzacz CD-112RDS / BT
ze źródłem sygnału Bluetooth, przytrzymać
wciśnięty przycisk PAIR aż dioda PAIR zacznie migać wolniej. Po ustanowieniu połączenia, dioda PAIR będzie świecić ciągle.
Uwaga: Na wyświetlaczu źródła Bluetooth, odtwarzacz CD-112RDS / BT zostanie rozpoznany jako
“Audio Bluetooth”.
4)
Rozpocząć odtwarzanie na źródle sygnału
Bluetooth.
5) Do wstrzymywania i kontynuowania odtwarzania służy przycisk BT POWER [II
].
Uwaga: Po przerwaniu odtwarzania, na wyjściu
PRIORITY pojawi się sygnał z odtwarzacza CD / MP3
lub tunera.
6)
Za pomocą przycisków DOWN [ ] oraz
UP [ ] można przechodzić do kolejnego
lub poprzedniego utworu (wcisnąć przycisk na krótko) lub przewijać wewnątrz
utworu (przytrzymać wciśnięty przycisk).
7)
Aby wyłączyć odbiornik Bluetooth, przytrzymać wciśnięty przycisk BT POWER [II]
aż dioda PAIR zgaśnie.
5 Zdalne sterowanie komputerem
poprzez interfejs RS-232
Urządzenie CD-112RDS / BT może być sterowane komputerem PC, za pomocą odpowiedniego programu. Połączyć gniazdo REMOTE
CONTROL do portu RS-232 na komputerze.
Ustawić następujące parametry w programie:
Symbol rate: . . . . . . . .9600 baud
Liczba bitów danych:
.8
Liczba bitów stop:
. . . .1
Parity:
. . . . . . . . . . . . .none
Flow control:
. . . . . . . .none
Komendy sterujące dla wszystkich funkcji
urządzenia CD-112RDS / BT pokazano w tabeli
poniżej. Program wysyła je w kodzie ASCII.
Komendy “Carriage Return” (0D szesnastkowo) oraz “Line Feed” (0A szesnastkowo)
muszą być wysyłane do CD-112RDS / BT jako
bity 4 i 5. Niektóre programy wywołują je automatycznie lub można je ustawić.
Po wykonaniu komendy, CD-112RDS / BT
wysyła do komputera PC następującą wiadomość w kodzie ASCII:
+ O K “Carriage Return” “Line Feed”
W przypadku błędu wejściowego, wysłana
zostanie wiadomość:
+ E R “Carriage Return” “Line Feed”
Uwaga: Pomiędzy dwiema komendami musi być
przerwa minimum 300 ms. Po komendzie wyszukiwania stacji, przerwa musi wynosić minimum 800 ms.
Funkcje odtwarzacza CD/MP3
Funkcja
Komenda sterująca
Bajt 1 Bajt 2 Bajt 3
FOLDER
E A A
FOLDER
E A B
SKIP REV
E A C
SKIP CUE
E A D
STOP E A E
PLAY PAUSE II
E A F
EJECT E A G
PROG E A H
ID3 E A I
FIND E A J
MUTE E A K
REPEAT E A L
FUNC E A M
DISPLAY E A N
A-B E A O
wyłącz EJECT E A P
włącz EJECT E A Q
CARD E A R
CD E A S
USB E A T
PLAY 1 E A U
REMAIN E A V
0 E A 0
1 E A 1
2 E A 2
3 E A 3
4 E A 4
5 E A 5
6 E A 6
7 E A 7
8 E
A 8
9 E A 9
Funkcje tunera
1 E C A
2 E C B
3 E C C
4 E C D
5 E C E
6 E C F
7 E C G
8 E C H
9 E C I
10 / 0 E C J
+10 E C K
DIRECT E C L
(Tuning) DOWN E C M
(Tuning) UP E C N
MUTE E C O
RDS E C P
(Station) M-UP E C 0
(Station) M-DOWN E C 1
MEM (ORY) E C 2
ASM E C 3
Mono / Stereo E C 4
SLEEP E C 5
Skanowanie stacji
E C 7
Skanowanie stacji
E C 8
6 Konserwacja urządzenia
Urządzenie należy chronić przed kurzem,
wstrząsami, silnym światłem słonecznym
dużą wilgotnością oraz wysoką temperaturą
(dopuszczalny zakres wynosi 0 – 40 ºC). Do
czyszczenia urządzenia należy używać suchej,
miękkiej tkaniny. Nie należy stosować wody
ani chemicznych środków czyszczących.
Uwagi dotyczące zakłóceń dźwięku i
błędówodczytu
Wpływ dymu papierosowego oraz kurzu może
spowodować błędy przy odczycie płyt CD.
Niestety uniknięcie szkodliwych warunków nie
zawsze jest możliwe (np. w dyskotekach).
W takim przypadku należy zlecić okresowe
czyszczenie urządzenia przez autoryzowany
serwis.
7 Specyfikacja
Pasmo przenoszenia: . .20 – 20 000 Hz
THD: . . . . . . . . . . . . . .< 0,1 %
Separacja kanałów: . . .> 60 dB
Zakres dynamiki: . . . . .> 96 dB
Stosunek S / N: . . . . . . .> 70 dB
Wyjście audio: . . . . . . .1,2 V
Zasilanie: . . . . . . . . . . .230 V/ 50 Hz
Pobór mocy: . . . . . . . .50 VA max
Zakres temperatur: . . .0 – 40 °C
Wymiary (S × W × G): 482 × 44 × 265 mm,
1 U
Waga: . . . . . . . . . . . . .4 kg
Złącza
Priority:. . . . . . . . . . .XLR, symetryczne
CD: . . . . . . . . . . . . .XLR, symetryczne
Bluetooth: . . . . . . . .RCA
Tuner: . . . . . . . . . . . .RCA
Remote Control: . . . .D-Sub, 9-pinowy
Z zastrzeżeniem możliwości zmian.
Instrukcje obsługi są chronione prawem copyright
for MONACOR ® INTER NATIONAL GmbH & Co.
KG. Przetwarzanie całości lub części instrukcji dla
osobistych korzyści finansowych jest zabronione.
PAIR
3 4 5 PAIR BT POWER
DOWN UP ASM DOWN UP
Page 32

32
Dansk
Svenska
Ge akt på säkerhetsinformationen innan enheten tas i bruk. Skulle ytterliggare information behövas kan den återfinnas i Manualen
för andra språk.
Säkerhetsföreskrifter
Enheten uppfyller relevanta Eu-direktiv och
har därför försett med symbolen .
VARNING
Enheten använder högspänning
in ternt. Gör inga modifieringar
i enheten eller stoppa föremål
i ventilhålen. Risk för elskador
föreligger.
•
Enheten är endast avsedd för inomhusbruk.
Skyd da enheten mot vätskor, hög luftfuktighet och hög värme (tillåten omgivningstemperatur 0 – 40 °C).
•
Placera inte föremål innehållande vätskor,
t. ex. dricksglass, på enheten.
•
Använd inte enheten och tag omedelbart
ut kontakten ur elurtaget om något av följande uppstår:
1.
Enheten eller elsladden har synliga
skador.
2. Enheten är skadad av fall e. d.
3. Enheten har andra felfunktioner.
Enheten skall alltid lagas av kunnig personal.
•
Drag aldrig ur kontakten genom att dra
i sladden, utan ta tag i kontaktkroppen.
•
Om enheten används på annat sätt än som
avses, om den inte kopplas in ordentligt,
om den används på fel sätt eller inte repareras av auktoriserad personal upphör
alla garantier att gäll. I dessa fall tas inget
ansvar för uppkommen skada på person
eller materiel.
Om enheten ska tas ur drift slutgiltigt, ta den till en lokal återvinningsanläggning för en avyttring som inte
är skadligt för miljön.
Förbrukade batterier från fjärrkontrollen och
defekta uppladdningsbara batterier får inte
slängas bland hushållssopor. Lämna alltid
in dem hos uppsamlingsställen (som t. ex.
batteriholkar eller hos er återförsäljare).
Skötsel av enheten
Skydda enheten mot damm, vibrationer och
fukt. Rengör endast med en ren och torr
trasa. Använd aldrig vätskor i någon form då
dessa kan rinna in och orsaka kortslutning.
Notering ang ljud avbrott och läs
problem
Cigarett rök och damm kommer lätt in genom
enhetens intag och kan då givetvis sätta sig
på det optiska läshuvudet. Om detta sker och
förorsakar ljudstörningar och avbrott så måste
enheten rengöras av kvalificerad personal.
Var vänlig att notera att detta kommer att
fakturears även om artikeln befinner sig inom
garanti perioden.
Alla rättigheter är reserverade av MONACOR ® INTERNATIONAL GmbH & Co. KG. Ingen del av denna
instruktionsmanual får eftertryckas i någon form eller
på något sätt användas i kommersiellt syfte.
Læs nedenstående sikkerhedsoplysninger
op-mærksomt igennem før ibrugtagning
af enheden. Bortset fra sikkerhedsoplysningerne henvises til den engelske tekst.
Vigtige sikkerhedsoplysninger
Denne enhed overholder alle relevante EUdirektiver og er som følge deraf mærket .
ADVARSELEnheden benytter livsfarlig net-
spænding. Udfør aldrig nogen
form for modifikationer på
produktet og indfør aldrig genstande i ventilationshullerne, da
du dermed risikere at få elektrisk
stød.
•
Enheden er kun beregnet til indendørs
brug. Beskyt den mod vanddråber og
-stænk, høj luftfugtighed og varme (tilladt
omgivelsestemperatur 0 – 40 °C).
•
Undgå at placere væskefyldte genstande,
som f. eks. glas, ovenpå enheden.
•
Tag ikke enheden i brug og tag straks stikket ud af stikkontakten i følgende tilfælde:
1. hvis der er synlig skade på enheden eller
netkablet.
2.
hvis der kan være opstået skade, efter at
enheden er tabt eller lignende.
3. hvis der forekommer fejlfunktion.
Enheden skal altid repareres af autoriseret
personel.
•
Tag aldrig stikket ud af stikkontakten ved
at trække i kablet, tag fat i selve stikket.
•
Hvis enheden benyttes til andre formål, end
den oprindeligt er beregnet til, hvis den
ikke er korrekt tilsluttet, hvis den betjenes
forkert, eller hvis den ikke repareres af autoriseret personel, omfattes eventuelle skader
ikke af garantien.
Hvis enheden skal tages ud af drift
for bestandigt, skal den bringes til
en lokal genbrugsstation for bortskaffelse.
Brugte eller defekte batterier må aldrig smides ud sammen med den øvrige husholdningsaffald. Aflever dem altid i genbrugsstationens battericontainere.
Vedligeholdelse af enheden
Beskyt enheden mod støv, vibrationer og fugt.
Til rengøring må kun benyttes en blød, tør
klud; der må under ingen omstændigheder
benyttes vand eller kemikalier.
Note vedrørende læse fejl og afbrydelse af afspilning
Cigaretrøg og støv kan nemt trænge ind
gennem alle åbninger på CD -afspilleren, og
kan sætte sig på laseren. Hvis dette skulle
medfører læse fejl, skal denne renses af en
uddannet reparatør. Rensning af laseren er
ikke omfattet af garantien på CD -afspilleren.
Alle rettigheder til denne brugsvejledning tilhører
MONACOR ® INTERNATIONAL GmbH & Co. KG. Ingen
dele af denne vejledning må reproduceres under
ingen omstændigheder til kommerciel anvendelse.
Page 33

33
Suomi
Ole hyvä ja huomioi joka tapauksessa seuraavat turvallisuuteen liittyvät seikat ennen
laitteen käyttöä. Laitteen toiminnasta saa
lisätietoa tarvittaessa tämän laitteen muunkielisistä käyttöohjeista.
Turvallisuudesta
Tämä laite täyttää kaikki siihen kohdistuvat
EU-direktiivit ja sille on myönnetty hyväksyntä.
VAROITUS Tämä laite toimii hengenvaaral-
lisella jännitteellä. Välttääksesi
sähköiskun, älä avaa laitteen
koteloa. Jätä huoltotoimet valtuutetulle, ammattitaitoiselle
huoltoliikkeelle.
•
Tämä laite soveltuu vain sisätilakäyttöön.
Suojele laitetta kosteudelta, vedeltä ja
kuumuudelta (sallittu ympäröivä lämpötila
0 – 40 °C).
•
Älä sijoita laitteen päälle mitään nestettä
sisältävää, kuten vesilasia tms.
•
Irrota virtajohto pistorasiasta, äläkä käynnistä laitetta jos:
1. virtajohdossa on havaittava vaurio
2.
putoaminen tai muu vastaava vahinko
on saattanut aiheuttaa vaurion
3. laitteessa esiintyy toimintahäiriöitä
Kaikissa näissä tapauksissa laite tulee toimittaa valtuutettuun huoltoliikkeeseen.
•
Älä koskaan irrota virtajohtoa pistorasiasta
johdosta vetämällä.
•
Laitteen takuu raukeaa, eikä valmistaja,
maahantuoja tai myyjä ota vastuuta mahdollisista välittömistä tai välillisistä vahingoista, jos laitetta on käytetty muuhun kuin
alkuperäiseen käyttötarkoitukseen, laitetta
on taitamattomasti käytetty tai kytketty tai
jos laitetta on huollettu muussa kuin valtuutetussa huollossa.
Kun laite poistetaan lopullisesti käytöstä, vie se paikalliseen kierrätyskeskukseen jälkikäsittelyä varten.
Käytöstä poistettavat kauko-ohjaimen patterit ja vaurioituneet ladattavat akut on
vietävä niille tarkoitettuihin keräyspisteisiin,
eikä niitä saa hävittää muun sekajätteen
mukana.
Laitteen huolto ja ylläpito
Suojele laitetta pölyltä, värähtelyiltä ja kosteudelta. Käytä puhdistamiseen vain kuivaa,
pehmeää kangasta. Älä käytä vettä tai kemikaaleja.
Tiedote koskien levyn lukuhäiriöitä
sekä katkoksia äänessä
Laitteeseen kertyvä pöly, tupakansavu yms
aiheuttaa laitteeseen lukuvirheitä. Laitteen
saa avata ja huoltaa vain av-huoltoliike tai
sähköalan ammattilainen. Huomioi että kyseessä on normaalisti veloitettava huoltotyö
myös takuuaikana.
Kaikki oikeudet pidätetään MONACOR ® INTERNATIONAL GmbH & Co. KG. Mitään tämän käyttöohjeen osaa ei saa jäljentää miltään osin käytettäväksi
mihinkään kaupallisiin tarkoituksiin.
Page 34

MONACOR INTERNATIONAL GmbH & Co. KG • Zum Falsch 36 • 28307 Bremen • Germany
Copyright© by MONACOR INTERNATIONAL. All rights reserved.
A-1447.99.02.01.2018
 Loading...