


Chapter 1 - Warranty & Information
Chapter 2 - Driving & Safety Tips
Chapter 3 - Appliances & Equipment
Chapter 4 - Water Systems
Chapter 5 - LP Gas Systems
Chapter 6 - Electrical Systems
Chapter 7 - Unit Care & Maintenance
Chapter 8 - Diagrams & Specifications
Chapter 9 - Chassis Information
12V DC System ..........6-6
120V AC Generator .........6-4
120V AC System - 30 AMP Service. ......6-3
Attic Air Vent ..........3-15
Awning - Side (Optional) ........3-16
Awning - Slide-Out .........3-19
Awning - Window (Optional) ........3-20
Automatic Transmission Operation - Workhorse Chassis ...9-6
Bathroom Exhaust Fan ........3-14
Batteries ...........6-7
Bulb Usage ..........8-13
Cable & Telephone Hookups .......3-13
Carbon Monoxide Detector ........2-10
Chassis Fuses & Circuits ........6-8
Chassis Maintenance Guide - Ford ......9-10
Chassis Maintenance Guide - Workhorse .....9-11
Chassis Specs ..........8-10
Citizens Band (CB) Radio Prep .......3-13
City Water Hook-Up .........4-2
Cleaning Refrigerator .........3-6
Cooktop (Optional) .........3-7
Computer Station Hookups ........3-13
Curbside View ..........8-5
Customer Relations .........1-1
Monarch
Page - 1
MONACO
2000
Alphabetical Index
Alphabetical Index

Dash Panel - Ford .........8-8
Dash Panel - Workhorse ........8-6
Defrosting Refrigerator .........3-6
Disinfecting Fresh Water Systems ......4-3
Driving Safety ..........2-1
Egress Exit Window .........2-12
Electric Entry Step .........3-20
Electrical Switch Chart ........6-2
Engine Specs - Ford Chassis. .......8-11
Engine Specs - Workhorse Chassis ......8-12
Exterior Care ..........7-1
Filling LP Gas Tank .........5-3
Fire Extinguisher .........2-11
Ford Chassis Maintenance Guide .......9-10
Fresh Water Tank Fill .........4-2
Fresh Water System Trouble Shooting ......4-6
Front View ...........8-3
Furnace ...........3-15
Gas Distribution Lines .........5-3
Glossary of Terms .........1-7
Ice Maker Operation .........3-5
Insurance Information .........8-2
Interior Care ..........7-2
Leveling Jacks ..........2-3
LP Gas Consumption .........5-2
LP Gas Detector .........5-4
LP Gas Regulator .........5-4
Microwave Oven ..........3-6
Monarch
Page - 2
Alphabetical Index
Alphabetical Index
MONACO
2000

Operator Controls - Ford. ........9-3
Operator Controls - Workhorse .......9-8
Personal Property Information .......8-2
Power Heated Mirrors ........9-1
Power Disconnects .........6-7
Range w/Oven ..........3-7
Ready to Leave Checklist ........2-13
Rear Hitch - Using .........2-13
Rear View ...........8-3
Rear Vision System .........3-13
Refrigerator - 900 Series ........3-1
Refrigerator - 1200 Series ........3-3
Reporting Safety Defects ........1-2
Roadside View ..........8-4
Roof Air Conditioner .........3-14
Satellite System Prep (Optional) .......3-12
Securing Dinette Chairs for Travel .......3-22
Serial Number Information ........8-1
Side Awning (Optional).........3-16
Slide-Out Awning .........3-19
Slide-Out Room(s) . .........3-22
Smoke Detector ..........2-8
Step - Electric Entry .........3-20
Stereo & CD Player .........3-13
Suggestions for Obtaining Service for Your Motor Home ...1-3
Taking Delivery ..........1-2
Tank Capacities ..........8-11
Television Antenna .........3-11
Television & VCR .........3-12
Temporarily Store Motor Home .......2-14
Tilt Steering Wheel - Ford ........9-3
Tires ............9-1
Monarch
Page - 3
MONACO
2000
Alphabetical Index
Alphabetical Index

Tire Rotation - Ford .........9-2
Tire Rotation - Workhorse ........9-5
To Convert Dinette into a Bed .......3-21
To Convert Sofa into a Bed ........3-22
Towing Procedure .........2-12
Trouble Shooting Fresh Water System ......4-6
Using Rear Hitch..........2-13
Vehicle Loading ..........2-6
Vendor List ..........1-5
VCR & TV Cable Switch Box........3-12
Warranty Information File ........1-3
Warranty Statement .........1-9
Washer/Dryer Prep (Optional) .......3-8
Washer/Dryer (Optional) ........3-9
Waste Water Systems .........4-6
Water Filter ..........4-5
Water Heater ..........4-3
Water Heater By-Pass System .......4-5
Water Hook-Up - City .........4-2
Water Pump ..........4-1
Weighing Your Motor Home ........2-8
Wheel Covers ..........9-1
While Driving ..........2-2
Window Awning (Optional) ........3-20
Winterizing ...........7-5
Monarch
Page - 4
Alphabetical Index
Alphabetical Index
MONACO
2000
MONACO
General Information
In time you will develop a knack
for spotting wonderful little roadside
locations by turning off the main highway and exploring. There are many modern recreational vehicle parks (including
state, county, and federal parks) with
good facilities where you can obtain
hook-ups for electrical, water, and
sewage connections. Directories are published which describe these parks and
the availability of services and hook-ups.
On overnight or weekend trips chances
are you will not fill up the sewage holding tank, deplete the water or LP gas supply, or
run down the batteries which supply the living area 12 volt DC current. On longer trips,
when you have stayed where sewer connections and utility hook-ups were not available,
it will be necessary for you to stop occasionally to empty the holding tanks, and to replenish your water and LP gas supply. Many gas stations have installed sanitary dumping
stations. Publications are available which list these dumping stations. When you stop for
the night, your Monaco motor home is built to be safely parked in any spot that is relatively level and where the ground is firm. Try to pick as level a parking spot as possible.
Your facilities are with you, you are self-contained.
This safety alert symbol means CAUTION or WARNING - “Personal Safety Instructions”.
Read and understand instructions where this symbol is displayed in this manual. Failure to comply with specific instructions may result in personal injury
or death. Many instructions are required by the National Safety Associations.
Customer Relations
Only by insuring your confidence and satisfaction with our products and services
can we have continued success as a manufacturer of motor homes. We believe a good
relationship with our customers is just as important as improving the technical excellence of our products. Your authorized dealer is pleased to help you with instructions
about your motor home and to offer service when you need it. Most problems arise from
misunderstandings about warranty or service needs. If problems remain after you have
consulted your dealer, you are invited to contact our Consumer Affairs Department.
Please have all pertinent information (serial numbers, model number, etc.) when calling
We will work with the dealer and see that every attempt to resolve the matter is made.
Monarch
1-1
WWarranty & Information
arranty & Information
!
2000

Monaco Consumer Affairs Department
606 Nelson’s Parkway
Wakarusa, Indiana 46573
1-877-466-6226
Reporting Safety Defects
If you believe that your motor home has a defect which could cause a crash or
could cause injury or death, you should immediately inform the National Highway Traffic
Safety Administration (NHTSA) in addition to notifying Monaco. If NHTSA receives similar complaints, it may open an investigation, and if it finds that a safety defect exists in
a group of motor homes, it may order a recall or remedy campaign. However, NHTSA cannot become involved in individual problems between you, your dealer or Monaco. To contact NHTSA you may either call the Auto Safety Hot line toll-free at 1-800-424-9393 (or
366-0123 in Washington DC area) or write to:
NHTSA
400 Seventh Street
US Department of Transportation
Washington, DC 20590
Taking Delivery
Your motor home has been inspected by factory personnel throughout the manufacturing process. Your dealer performs additional pre-delivery inspections and system
checks. Your dealer will also help you understand the limited warranty and complete any
necessary forms.
Dealer Responsibilities Include:
1. A customer orientation to the motor home, its systems and components,
including their operation.
2. Ensuring the customer receives a complete Owner’s Packet with warranty cards
and registrations for the motor home and separately warranted products including
detailed operating and maintenance instructions.
3. Reviewing limited warranty provisions with the customer stressing the importance of mailing warranty cards and registrations to the manufacturers within the prescribed time limit to avoid loss of warranty coverage. Assisting the customer in complet-
Monarch
1-2
WWarranty & Information
arranty & Information
2000
M
ONACO

ing these forms and assist in locating serial numbers. Requesting that the customer
reads all warranty information when possible and explaining any provision not clearly
understood.
4. Instructing the customer on how to get local and out-of-town service on the
motor home and its separately warranted components whether in or out of warranty.
Customer Responsibility
As a new motor home vehicle owner you are responsible for regular and proper
maintenance. This will help you prevent conditions arising from neglect that are not covered by your Monaco Limited Warranty. Maintenance services should be performed in
accordance with this Owner’s manual, and any other applicable manuals. As the owner,
it is your responsibility and obligation to return the motor home to an authorized dealer
for repairs and service (See Limited Warranty). Since the authorized dealer where you
purchased your new motor home is responsible for its proper servicing before delivery,
and has an interest in your continued satisfaction, we recommend that Inspection,
Warranty and Maintenance Services be performed by the dealership. We suggest that you
take your new motor home on a weekend shake down before leaving on an extended trip.
Warranty Information File
In addition to this Owner’s Manual you will find a Warranty Information File in
your unit. This file contains valuable documents about your motor home systems and
equipment. Be sure you read and understand all the information in this file to help you
safely operate, maintain and troubleshoot those items.
Suggestions for Obtaining Service for Your Motor Home
Give Thought to the
Appointment Time
Know when to take your motor home in for service. Monday and Friday are busy
days for most dealers. Therefore, it makes sense to make a mid-week appointment whenever possible. Ask your dealer if additional time is needed for check in and completion
of paperwork.
Prepare for the Appointment
If you’re having warranty work done, be sure to have your warranty registration
papers with you. All work to be performed may not be covered by the warranty; be sure
to discuss additional charges with the service manager. Keep a maintenance log of your
motor home service history. This can often provide a clue to the current problem.
Monarch
1-3
WWarranty & Information
arranty & Information
2000
MONACO

Prep
are a List
Make a written list of specific repairs needed. It is important the service manager
be aware of all previous work which has been done on your motor home. For example: if
the motor home has been repaired due to an accident. While this may not seem important it could have a significant effect on the diagnosis of a problem.
Be Reasonable With Your Requests
Don’t leave a list of 20 items to be serviced and expect to have your motor home
back by five o’clock. If you list a number of items, and you must have your motor home
back by the end of the day, discuss the situation with the service manager and list your
items in order of priority. Expect to make a second appointment for work not completed,
or for the parts that may need to be ordered.
You Can’t Look Over the Technicians Shoulder
Please don’t be offended when you are told you cannot watch the work being done.
Insurance requirements forbid the admission of customers to a service area.
Inspect the W
ork Properly
Check out the service or repair job when you pick up your motor home and notify
the service manager of any dissatisfaction. If circumstances prevent returning for immediate corrective work, make an appointment as soon as possible.
Monarch
1-4
WWarranty & Information
arranty & Information
2000
M
ONACO

Vendor List
AIR CONDITIONER FURNACE MONITOR PANEL/
Dometic Corp Atwood Mobile Products STORAGE TANKS
219-463-7712 801-972-4621 KIB Enterprises
219-294-1504
ATTIC FAN GENERATOR POWER CONVERTER
Carefree of Colorado Onan Progressive Dynamics
303-469-3324 219-271-0303 616-781-7802
AWNINGS GFI OUTLET POWER HEATED
Carefree of Colorado Kevco MIRROR
303-469-3324 219-522-8820 Velvac
219-294-7691
BATTERIES HITCH RECEIVER RANGE
Battery Pro’s Reese Products Atwood Mobile Products
541-683-1810 219-264-7564 219-262-2655
CARBON MONOXIDE LEVELING JACKS REAR VISION SYSTEM
DETECTOR Power Gear Jensen
MTI Industries, Inc. 800-334-4712 800-323-4815
800-383-0269
DIESEL ENGINES LIGHTS REFRIGERATOR
CaterPillar, Inc. RB Gustafson Norcold
800-447-4986 219-522-0871 800-543-1219
ELECTRIC STEP LP GAS DETECTOR ROOF VENT
Kwikee MTI Industries, Inc. Ventline
503-836-2126 800-383-0269 219-848-4491
FIRE EXTINGUISHER MICROWAVE
The Fire Extinguisher Co. Sharp Electronics Corp.
919-563-5911 800-447-4700
Continued
Monarch 1-5
WWarranty & Information
arranty & Information
2000
MONACO

SEATING TIRES WINDOW
Flexsteel Industries Goodyear Tire & Rubber Co. Excel Window
219-831-4050 800-847-3638 219-264-2131
SMOKE DETECTOR WATER FILTER
Bob Gun Associates Everpure, Inc.
616-467-8705 800-323-7873
TELEVISION ANTENNA WATER HEATER
Winegard Company Atwood Mobile Products
319-753-0121 219-262-2655
NOTES
Monarch
1-6
WWarranty & Information
arranty & Information
2000
M
ONACO

Glossary of Terms
AC ELECTRICITY - Alternating current also known as household power.
BLACK WATER - Term associated with the sewage holding tank. The toilet drains directly into this tank.
CAMPSTORE - A store that usually has bread, milk and other essentials but not fresh
meats, fruits or vegetables.
CITY WATER - A term associated with the water supply that you hook-up to when you
are at camp grounds. It is called city water because you pull water from a central source
(like in a city) and not the fresh water tank.
CURBSIDE - This refers to the side of the motor home which faces the curb when it is
parked. Often called the door side.
DC ELECTRICITY - Direct current also known as battery power.
DRY CAMPING - Camping in the motor home when there is no city water hook-up or
shore power. In other words using only the water and power that is in the motor home
and not anything from another source.
DUMP STATION - Sites where you can drain your waste (gray) and sewage (black) tanks.
In most states it is illegal to drain your tanks anywhere except at dump stations.
DUMP VALVE - Another name for the T-handle valve used to drain the sewage (black)
and waste (gray tanks).
EGRESS WINDOW - The formal name for the emergency window located in the rear of
the motor home. Egress windows can be easily identified by their red handles.
FULL HOOK-UP SITE - A campground that has city water, shore power and sewer hookups or connections available.
GRAY WATER - Term associated with the waste water holding tank. Water from the sink
drains, the shower and the washer/dryer (if equipped) go into this tank.
ICC BLINK LIGHTS - This switch enables you to blink clearance lights the on motor
home. It is commonly used as a way of indicating your thanks for a courtesy shown to
you by another driver.
Continued
Monarch
1-7
WWarranty & Information
arranty & Information
2000
MONACO

LOW POINT - The lowest point in the plumbing. Drains are placed here so that water will
drain out of the lower end of the motor home. These drains must be closed when you fill
the water tank.
PRIMITIVE SITE - A campground that may have either city water, shore power or sewer
hook-up, but not all of them. Primitive sites may have no hook-ups or connections at all.
DRAIN TRAP - This is a curve that is in all drains. Water is trapped in the curve and this
creates a barrier so tank odors cannot escape through the drain.
PULL-THROUGH SITES - Camp sites that you pull the unit through without having to
back up into the site.
ROAD SIDE - This refers to the side of the motor home which faces the road when it is
parked. Often called the off-door side.
SHORE LINE - This is the electrical cord which runs from the motor home to the camp
ground 120 volt electrical supply.
SHORE POWER - This is the 120 volt outlet that you can plug your motor home into a
campground.
STABILIZING JACKS - These jacks are extended after you have parked the motor home.
They are used to level the motor home.
STINGER - An arm attachment on a tow truck that is used to lift the motor home slightly so that it can be towed.
TAG AXLE - A non-drive axle located behind front axle. A tag axle increases weight carrying capacity of the chassis.
WINTERIZED - If you see this on a unit it means that the unit has been prepared for storage. All water systems are drained and RV antifreeze has been added to protect the water
lines and drains. Low point drains will be open.
Monarch
1-8
WWarranty & Information
arranty & Information
2000
M
ONACO

WARRANTY STATEMENT
MONACO COACH CORPORATION
NONCOMMERCIAL USE LIMITED WARRANTY
LIMITED WARRANTY:
Monaco Coach Corporation (Monaco) warrants to you, the original purchaser, for a period of (1) year from the date of purchase or 24,000 miles, whichever comes first, that this
Monaco Coach Corporation motor home shall be free of SUBSTANTIAL DEFECTS (as
defined below) in material and workmanship attributable to Monaco. Items incorporated in the motorhome that were purchased, manufactured and/or installed outside
Monaco’s factory are not covered by this warranty, but may be covered by the Seller,
Manufacturer and/or installer of the particular item.
Monaco will repair the defect, pay the reasonable parts and labor charges to perform the
repair, and in the event that original consumer purchaser’s motorhome is inoperative due
to malfunction of a warranted part, Monaco will pay the cost of having the motorhome
towed to the nearest Monaco authorized repair facility. If your motorhome must be
towed, you must contact Monaco prior to incurring the towing charges for its direction to
the nearest authorized repair facility. Monaco reserves the right to make use of new
and/or remanufactured parts at its own option in making such repairs.
Monaco reserves the right to change the parts and designs of its motorhomes from time
to time without notice and with no obligation to make corresponding changes in its
motorhomes previously manufactured.
If you are a commercial purchaser, please refer to Monaco’s 90-day limited warranty
which will be provided upon request.
“SUBSTANTIAL DEFECT” DEFINITION:
A part or system qualifies as a substantial defect under this warranty only when it fails
to perform substantially within the design specifications for the part or system and the
failure is attributed to work performed by Monaco
WARRANTY RECOVERY LIMITATIONS AND DISCLAIMERS:
No person shall be entitled to recover from Monaco any consequential or incidental damages resulting from any defect in the motorhome. There is no warranty of any nature
made by Monaco beyond that contained in the warranty. All implied warranties of mer-
Continued
Monarch
1-9
WWarranty & Information
arranty & Information
2000
MONACO

chantability or of fitness for a specific purpose are limited in duration to warranty period of one (1) year from purchase by original consumer purchaser or 24,000 miles,
whichever comes first. All implied and express warranties on items not covered are disclaimed, including any warranties of merchantability or fitness for a particular purpose
and such uncovered parts or systems are sold “as is”. You and any supplier who may
warrant such component part assume the entire risk as to the quality and performance
of such uncovered parts and systems. If the uncovered parts and systems prove defective, you and any supplier that may warrant that part or system and not Monaco,
assumes the entire cost of repair with respect to such systems or parts.
Some states do not allow limitations how long an implied warranty lasts or the exclusion
of limitation or incidental or consequential damages, so the above limitations may not
apply to you. This warranty gives specific legal rights and other rights which may vary
from state to state.
WHAT IS NOT COVERED:
Items purchased, manufactured and/or installed outside Monaco’s factory are not covered by this particular item.
The engine, the transmission and its components, batteries, tires, axles and domestic
appliances are not covered under this warranty. Any warranties covering these items are
provided by the manufacturer of such items and are not the responsibility of Monaco. The
domestic appliances that are not covered include, without limitation, the refrigerator,
stove, oven, microwave, ice maker, water heater, furnace, television, stereo, radio, compact disc player, video cassette player/recorder, washer, dryer and all other domestic
appliances.
Any service contracts offered by a dealer are not warranties of Monaco. All rights and
remedies on such contracts are between the purchaser, the dealer, and the administrator of the service contract.
This warranty does not cover any motorhome that is rented, leased, or loaned for use by
anyone other than the original owner.
Damage or corrosion due to accidents, misuse or alterations is not covered under this
Warranty. By definition, this shall exclude from coverage any accident or damage caused
by off road use, collision, fire, theft, freezing temperatures, vandalism, riot, explosions,
objects striking motorhome, driving over curbs, overloading, racing or unauthorized
motorhome alterations. Additionally, warranty coverage shall not apply if the odometer
Monarch
1-10
WWarranty & Information
arranty & Information
2000
M
ONACO

has been stopped, disconnected or altered. Basic instructions for proper use of this
motorhome are discussed in the Owner’s Manuals.
Damage or surface corrosion due from airborne fallout (including chemicals, tree sap,
etc.) stones, hail, earthquake, water, acid rain, flooding, windstorm, lightning, road salt,
road salt spray, blowing sand, road surface debris or other environmental factors are not
covered under this Warranty.
Damage caused by off road use or a lack of proper maintenance as described in the
Maintenance schedule, in any applicable instructions from Monaco or in any instructions
from a systems or component part manufacturer or in instructions from a repair facility
or as common sense would dictate are not covered. Damage caused by failure to use the
fuel, oil and lubricants recommended in the Owner’s Manual is not covered under this
Warranty. Proof of proper maintenance is your responsibility, therefore you should keep
all receipts evidencing maintenance performed. Maintenance expenses shall be borne by
you. Normal wear-and-tear is not covered under this Warranty.
USAGE LIMITATIONS:
Any usage beyond design intentions will relieve Monaco of responsibility under this
Warranty. Usage of this motorhome in a manner inconsistent with Owner’s Manual
directions will also invalidate the Warranty in regard to defects caused by that inconsistent usage.
Misuse or neglect of the motorhome, failure to provide reasonable and necessary maintenance, unauthorized alteration or modification, accident or improper loading shall discharge Monaco from any and all obligation under this warranty.
This limited warranty does not cover any motorhomes subjected to any commercial or
rental use whatsoever. Any such commercial or rental use voids this limited non commercial consumer warranty. The sole coverage available to any purchaser making any
commercial or rental use of a motorhome is defined by Monaco’s limited commercial warranty, which contains different terms.
Monaco considers any commercial or rental use whatsoever as voiding this limited warranty and limiting owner to coverage, if any, available under Monaco’s written commercial limited warranty. For the purposes of this paragraph, any use, even part-time or only
occasionally, in any business or business-oriented activity, constitutes commercial use.
Continued
Monarch
1-11
WWarranty & Information
arranty & Information
2000
MONACO

YOUR EXPENSE RESPONSIBILITY:
You shall be responsible for and bear all expenses incurred in delivering the motorhome
to Monaco’s factory or authorized repair facility for warranty service including, but not
limited to, the costs of transporting the motorhome for warranty service, lodging and
meals. Unless prohibited by law, if Monaco deems it necessary to have the motorhome
returned to the factory you shall be responsible for and bear all expenses incurred in
delivering the motorhome to Monaco’s factory.
Regular maintenance, including cleaning, polishing, lubricating, replacing filters and
worn brake linings and performing other normal maintenance services required shall be
at your expense. See Maintenance Schedule and Owner’s Manual for recommended
maintenance procedures.
MANDATORY NOTICE:
TO THE EXTENT PERMITTED BY LAW, YOU MUST NOTIFY MONACO (NOT JUST YOUR
DEALER) IN WRITING THAT THERE HAVE BEEN TWO UNSUCCESSFUL REPAIR
ATTEMPTS OR MORE THAN 15 DAYS AGGREGATE REPAIR TIME ON SUBSTANTIAL
DEFECTS. THIS NOTICE MUST BE GIVEN TO MONACO IMMEDIATELY AFTER THE
SECOND REPAIR ATTEMPT OF ANY SUBSTANTIAL DEFECT OR IMMEDIATELY AFTER
15 DAYS OF AGGREGATE REPAIR TIME ON SUBSTANTIAL DEFECTS DURING THE
TERM OF THE WARRANTY. TO THE EXTENT PERMITTED BY LAW, FAILURE TO PROVIDE MONACO WITH THE REQUIRED NOTICE VOIDS THIS WARRANTY. IF A CLAIMED
DEFECT IS RELATED TO AN APPLIANCE THAT FOUND TO BE COVERED BY THIS
WARRANTY OR ANY OTHER WARRANTY OR LAW, ANY REPLACEMENT RIGHTS, TO
THE EXTENT PERMITTED BY LAW, SHALL BE LIMITED TO REPLACEMENT OF THAT
APPLIANCE, NOTHING MORE. TO THE EXTENT PERMITTED BY LAW, YOU AGREE ALL
DISPUTES WITH MONACO WILL BE RESOLVED EXCLUSIVELY BY BINDING ARBITRATION UNDER THE RULES OF THE AMERICAN ARBITRATION ASSOCIATION IN (A)
ELKHART, INDIANA OR EUGENE, OREGON AT BUYER’S CHOICE, (B) AS OTHERWISE
MUTUALLY AGREED OR (C) AS DETERMINED UNDER THE RULES OF THE AMERICAN
ARBITRATION ASSOCIATION.
PROCEDURE FOR OBTAINING WARRANTY SERVICE:
If towing is necessary phone Monaco prior to towing for assistance. A toll free number
(1-800-283-0869) is provided for your convenience.
To obtain Warranty Service, call the authorized repair facility nearest you for an appointment. Contact Monaco’s Warranty Department for assistance in locating an authorized
warranty repair facility in your location. A list of Authorized service facilities can be
Monarch
1-12
WWarranty & Information
arranty & Information
2000
M
ONACO

obtained from Monaco by contacting it at the address listed below. You must deliver the
motorhome to an authorized service center within a reasonable time after discovery of the
defect and in no event after the expiration of the appropriated warranty period. Warranty
Service can only be obtained at Monaco’s authorized dealers and service centers. No
other claims will be honored.
You must request that Monaco be consulted BEFORE work commences to avoid possible delay and reduction of reimbursement request and you must present your owner
identification card to the Service Manager.
All request for reimbursement for warranty service must be received by Monaco on a
Warranty Reimbursement Form with evidence of the charges and the work performed at
the address noted below within 60 days of the date the services were performed. If you
cannot obtain satisfactory Warranty Service from authorized dealers or service centers,
or if a substantial defect has not been resolved after the second repair attempt, you must
contact Monaco in writing immediately to seek a satisfactory resolution of the situation.
Written notice to a dealer or authorized or unauthorized repair facility shall not constitute written notice to Monaco of a continuing problem or unsatisfactory warranty service.
As a goodwill gesture, and without any legal obligation to do so, Monaco often provides
reasonable assistance to the original consumer purchaser in contacting the manufacturers of components not warranted by Monaco if the original consumer purchaser believes
such components to be defective. The original consumer purchaser may request such
assistance by contacting Monaco’s Warranty Department listed below.
As a goodwill gesture and solely to assist the purchaser who does not desire to take the
motorhome to an authorized repair facility, Monaco may also refer you to an unauthorized repair facility, and may pay for a repair. Whether or not Monaco pays for such
repair efforts shall not constitute a repair attempt by an authorized repair facility or
Monaco.
PAYMENT FOR SERVICE:
Request for warranty payments must be received by Monaco within 60 days of service
rendered. Request for reimbursement submitted beyond 60 days will not be paid.
AUTHORITY TO ENLARGE WARRANTY:
No person, dealer or repair agent has authority to enlarge, amend or modify this warranty. This Warranty gives only those legal rights specifically enumerated herein. You
may have other legal rights which vary from state to state.
Continued
Monarch
1-13
WWarranty & Information
arranty & Information
2000
MONACO

WARRANTY APPLICABILITY:
This Warranty applies to covered parts of Monaco Coach Corporation motorhomes and
Roadmaster Chassis registered in the United States and/or Canada.
MONACO COACH CORPORATION
ATTENTION: WARRANTY DEPARTMENT
91320 COBURG INDUSTRIAL WAY
COBURG, OREGON 97408
1-877-466-6226
NOTES
Monarch
1-14
WWarranty & Information
arranty & Information
2000
M
ONACO
Driving Safety
There are differences between
your motorhome and passenger automobiles. You should always be aware
of those differences.
Before You Start Out
As you first sit down in the driver’s seat you will notice that you are
sitting up higher and further to the left than in a passenger automobile. Your perspective of the road will therefore be different. Because of the driver’s seat location and configuration of the motorhome, you will rely on the outside mirrors to line up with your lane
and to check conditions behind you. Your dashboard may contain more gauges and controls than are normally found in passenger automobiles. You should become familiar
with these devices and how they operate before starting out.
Safety Seat Belts
All occupants must be furnished with and use seat belts while the
motorhome is moving. Driver’s seat and all other seats designed to
carry passengers while the motorhome is in motion are equipped
with safety seat belts. While traveling, do not occupy beds or any
seats that do not have a safety belt. Seat belts must only be used
on permanently mounted seats. Driver’s seat must be locked in the
forward facing position while the motorhome is in motion. Do not
use a seat belt on more than one person.
To fasten seat belt, pull belt out of retractors and insert tab into buckle; you will
hear a click when tab locks into buckle. Seat belt length automatically adjusts to your
size and sitting position. Do not route seat belts over armrests.
Monarch 2-1
MONACO
2000
Operating & Safety T
Operating & Safety Tipipss
! WARNING !
Seats must be pointed in a forward position and seat belts fastened while
motorhome is in motion. Avoid seat rotation while in transit.
Children must not be transported unrestrained. Infants must be placed in
approved safety seats. Small children must be restrained in child safety seats.
Failure to comply with these rules can cause injury or death.

While Driving
Because your motorhome is longer than the average automobile the turning radius
will be wider. Therefore, it is always a good idea to pay close attention when turning your
motorhome. Keep a close eye on the rear of the motorhome making sure it will clear
potential obstacles. Your motorhome is also heavier than an average automobile with a
higher center of gravity. Those factors may make it difficult to change momentum of your
motorhome. Swerves and sharp turns, especially at high speeds, could result in loss of
control of the motorhome. You should always keep that in mind and drive with extra
caution necessary to avoid situations which might require quick momentum changes.
You will find that your motorhome will travel safely and comfortably at highway speed
limits. However, it will take longer to reach that speed and you must always bear this in
mind when overtaking and passing another vehicle. Allow more time to go around other
vehicles because you cannot cut back as quickly, due to the longer length of your
motorhome. When descending a long hill, drop down into a lower gear. The transmission and engine will help in controlling downhill speed and can lengthen brake life. The
distance required to stop your motorhome will be greater than an automobile’s. Even
though your motorhome is equipped with brakes designed for its Gross Vehicle Weight
Rating (GVWR), we suggest that you practice stopping, away from traffic, until you
become accustomed to the motorhome’s stopping distance. When backing up, have your
co-pilot get out of the motorhome and walk to the driver’s side rear corner. Your co-pilot
can watch for any obstacles and give hand signals to you as you back up. When traveling make sure that any bridges you cross can support the weight of your motorhome.
Check tonnage limit of bridges before crossing them. Signs are normally posted at bridge
entrances. Know and observe the laws where you will be traveling as they may vary from
state to state.
Emergency Stopping
Always carry road flares or reflective warning signs to display if necessary. Pull off
the roadway as far as possible for emergency stopping or tire changing. Turn ON your
motorhome hazard warning flashers when parked alongside traffic lanes. Set the parking brake.
Backing In
If your destination does not have drive through sites, pick a good level site and
back in carefully. We suggest that you stop near the site, get out of the motorhome and
observe the surrounding area. Check for low-hanging tree limbs, posts, large rocks or
other obstacles. Try to choose a site that is on the driver’s side, so that you can see what
the rear of the motorhome is doing. With the site on the passenger side you would be
backing into the site on your blind side, which is more difficult. When site conditions are
Monarch
2-2
Operating & Safety T
Operating & Safety Tipipss
MONACO
2000
satisfactory, maneuver motorhome into a position for backing into the site space. Back
up your motorhome slowly, using side mirrors as a guide or have another person outside
to help guide you until the motorhome is in the desired position.
Parking
Put the motorhome gear shift in park and set hand brake. Turn off the ignition
switch. Block all four wheels securely. Level motorhome as directed under “Leveling
Jacks”.
Full Hook-Up Camping - Connect the 120 volt AC power cord. Open the LP gas
tank valve. Connect the fresh water supply, or turn the water pump on. Connect the
waste drain hose to the sewer hook-up. If applicable, start the refrigerator, water heater
and furnace. If applicable light the oven pilot light.
Dry Camping - Open the LP gas tank valve. Turn on the water pump. If applicable, start the refrigerator, water heater and furnace. If applicable, light the oven pilot
light.
Leveling Jacks
Before You Operate Leveling Jacks
Leveling system shall only be operated under the following conditions:
• Motorhome is parked on a reasonable level surface.
• “PARKING BRAKE” is engaged.
• Transmission is engaged in “Neutral or Park”.
• Ignition switch is in run position with engine not running.
Monarch 2-3
MONACO
2000
Operating & Safety T
Operating & Safety Tipipss
!
WARNING !
Do not use leveling jacks (or air suspension) to support vehicle while
under coach or changing tires. Hydraulic leveling system is designed as a leveling system only.
Do not use as a jack or in conjunction with a jack. It is highly recommended that should a tire change be required that it be performed by a knowledgeable trained professional. Attempts to change tires while supporting
motorhome with hydraulic system could result in damage to motorhome and
risk causing serious injury.
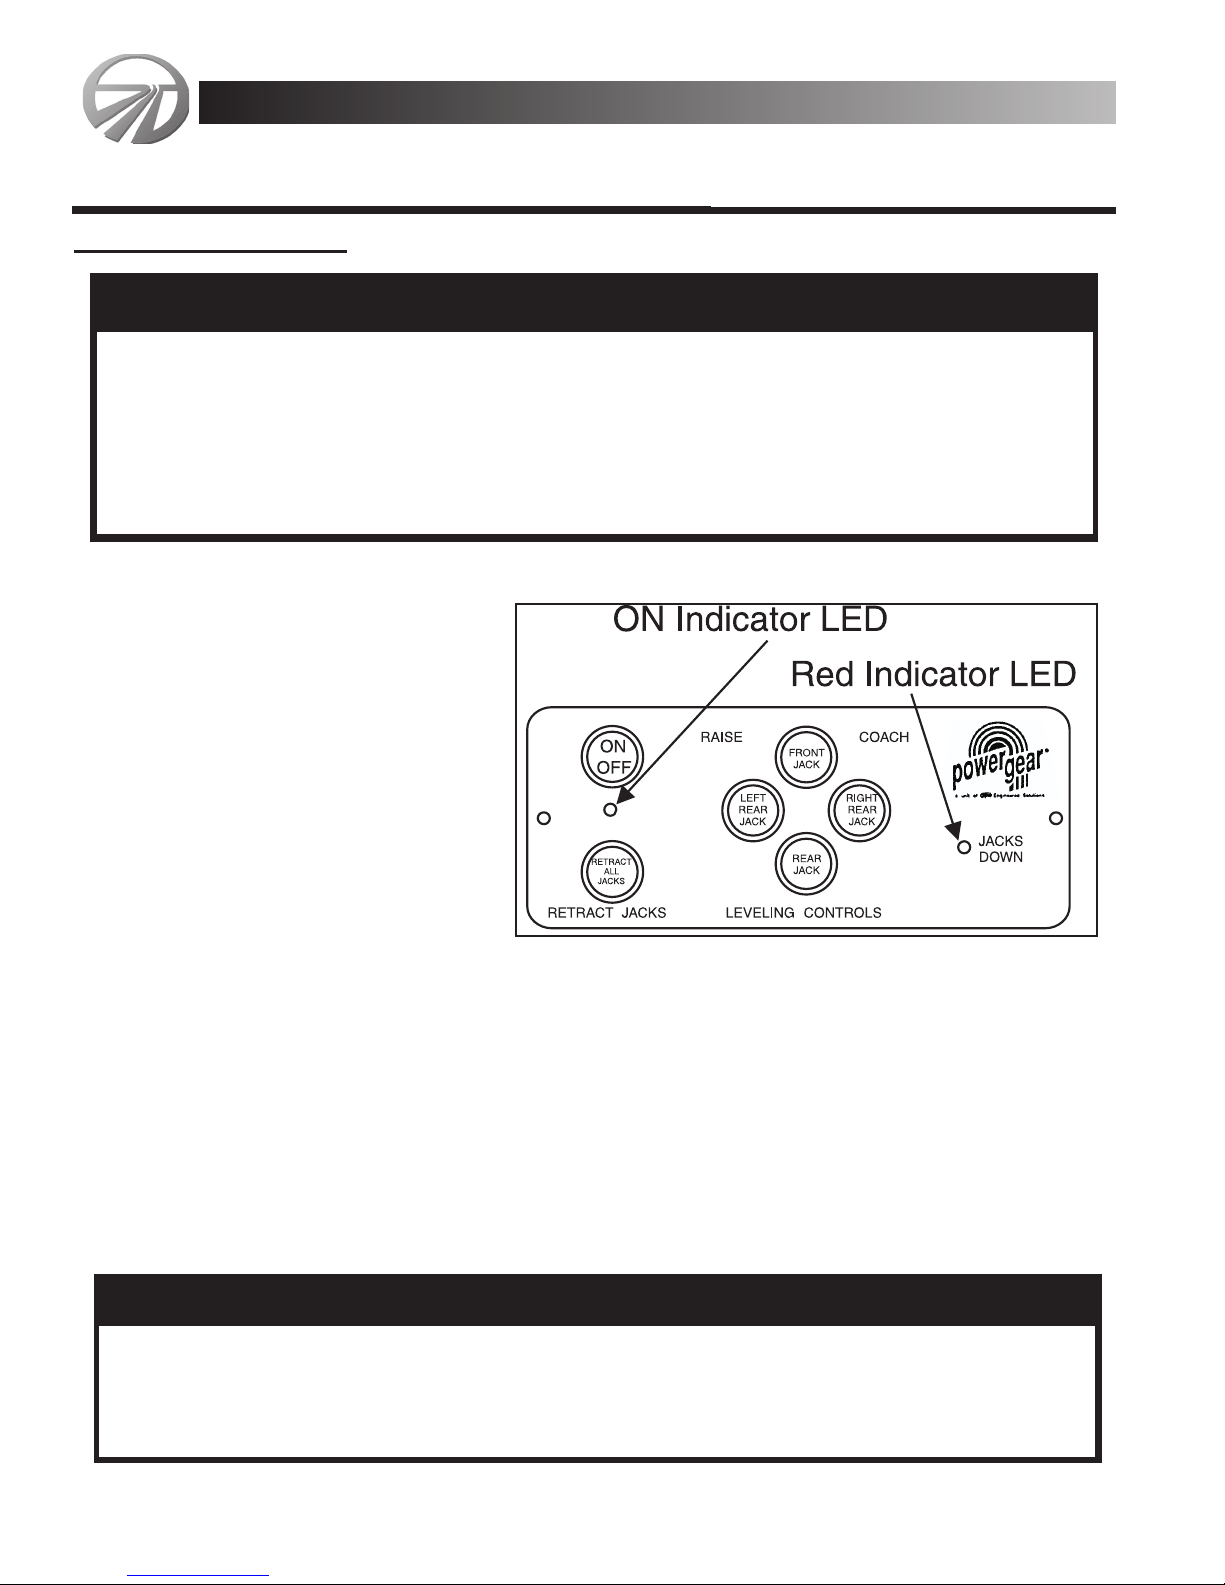
To Level Motorhome
• Push “ON/OFF” pad on control panel. System is now operational and “ON/OFF”
light will be lit. If “ON/OFF”
light is not lit, see “BEFORE
YOU OPERATE LEVELING
JACKS” conditions on previous page.
• Push “FRONT” pad until
jack contact with the
ground is felt.
• Push and hold air bag
dump switch to allow air to
escape chassis air suspension. Release switch after
air escaping sound stops.
• Push pad “FRONT” or “REAR” that is opposite air bubble in level vial that is point-
ed front to rear (i.e. If bubble is towards front of coach push “REAR” pad). Keep
pad depressed until bubble is centered in vial.
• Push pad “LEFT or “RIGHT” that is opposite air bubble in vial level that is
pointed left to right (i.e. If bubble is towards left of coach push “RIGHT PAD”.
Keep pad depressed until bubble is centered in vial.
NOTE: Right and left rear jacks are used to level motorhome side to side. Pushing
“LEFT” pad on control panel will extend left rear jack. Pushing “RIGHT” pad on control
panel will extend right rear jack. There is no individual control for right or left front
jacks.
Monarch
2-4
Operating & Safety T
Operating & Safety Tipipss
MONACO
2000
! CAUTION
!
Check that potential jack contact locations are clear of obstructions or
depressions before operation.
Keep people clear of motorhome while leveling system is in use.
Never expose hands or other parts of the body near hydraulic leaks. High
pressure oil leaks may cut and penetrate your skin causing serious injury.
! CAUTION !
Park motorhome on reasonable solid surface, or jacks may sink into ground.
On extremely soft surfaces use load distribution pads under each jack.
Never lift all wheels off the ground to level motorhome. Doing so may create
an unstable condition.

To Retract Leveling Jacks
• Push “ON/OFF” pad on. See first step of leveling.
• Push “Retract All Jacks” pad. All jacks will start to retract and return to full
retract position. When all jacks return to full retract position, the “JACKS
DOWN” light will go out.
NOTE: If you wish to stop jacks from retracting, turn system off and back on again by
pushing the ON/OFF pad twice. You can then re-level the motorhome by following the
steps under “To Level Motorhome”.
• When the “JACKS DOWN” light goes out push, “ON/OFF” pad on control panel
to disengage the system. Perform a brief visual inspection around your
motorhome to verify that all jacks are fully retracted. You may then proceed to
travel.
Drive Away Protection System
If the ignition switch is in “RUN” position, jacks are down, and an operator takes
the transmission out of neutral or park, or releases the parking brake, the “JACKS
DOWN” indicator will light and the alarm beeper will activate. The system will then automatically retract all jacks until jacks are fully retracted, or the operator resets the parking brake and places the transmission back into park or neutral.
Leveling Jacks Maintenance
• Change fluid every 36 months.
• Check fluid level every month. Fluid should be within 1/4 inch of fill port lip
and checked only with all jacks retracted.
• Inspect and clean all hydraulic pump electrical connections every 12 months.
• Remove dirt and road debris from jacks as needed.
• If jacks are down for extended periods, it is recommended to spray exposed
chrome rods with a silicone lubricant every seven days for protection.
In most applications, Type A automatic transmission fluid will work satisfactorily. If
operating in cold temperature (less than 10-Fo), jacks may extend and retract slowly.
Monarch 2-5
MONACO
2000
Operating & Safety T
Operating & Safety Tipipss
! CAUTION !
Do not rely solely upon warning lights or warning buzzer to determine position of leveling jacks. It is operator’s responsibility to check that all jacks are
raised all the way up before moving motorhome.
FRONT and REAR JACKS LEVERS should be kept in stored position while
traveling to keep jacks raised all the way up.

For cold weather operation, fluids specially-formulated for low temperatures may be
desirable. Consult factory for recommended cold weather fluid.
• Useable Reservoir Capacity = 1.2 gal.
• 4-Jack System Capacity = 2.4 gal. (approx.)
Vehicle Loading
There are two important factors to consider when loading your motorhome; total
weight and balance. When loading heavy objects, keep them as low as possible, preferably on the floor. Load weight must be distributed as evenly as possible.
Unloaded Vehicle Weight (UVW)
UVW means weight of this motorhome as built at the factory with full fuel, engine
oil, and coolants. UVW does not include cargo, fresh water, LP Gas, occupants, or dealer installed accessories.
Net Carrying Capacity (NCC)
NCC means maximum weight of all occupants including driver, personal belongings, food, fresh water, LP gas, tools, tongued weight of towed vehicle, dealer installed
accessories, etc., that can be carried by this motorhome. (NCC is equal to or less than
GVWR minus UVW).
Gross Combination Weight Rating (GCWR)
GCWR means value specified by motorhome manufacturer as maximum allowable loaded weight of this motorhome with its towed trailer or towed vehicle.
Gross Axle Weight Rating (GAWR)
GAWR means load-carrying capacity specified by manufacturer of a single axle
system, as measured at the tire ground interfaces.
Monarch
2-6
Operating & Safety T
Operating & Safety Tipipss
MONACO
2000

Monarch 2-7
MONACO
2000
Operating & Safety T
Operating & Safety Tipipss
motorhome CONSULT OWNER’S MANUAL FOR SPECIFIC WEIGHING
WEIGHT INFORMATION INSTRUCTIONS AND TOWING GUIDELINES.
MODEL GVWR
UVW NCC GCWR
THIS motorhome IS CAPABLE OF CARRYING UP TO GAL.
OF FRESH WATER (INCLUDING WATER HEATER) FOR A TOTAL OF LBS.
REFERENCE: WEIGHT OF FRESH WATER IS 8.33 EQUAL LBS/GAL; WEIGHT OF LP GAS IS
4.5 LBS/GAL (AVERAGE).
GVWR GROSS VEHICLE WEIGHT RATING MEANS THE MAXIMUM PERMISSIBLE WEIGHT OF THIS
MOTORHOME. THE GVWR IS EQUAL TO OR GREATER THAN THE SUM OF THE UNLOADED
VEHICLE WEIGHT PLUS THE NET CARRYING CAPACITY.
UVW UNLOADED VEHICLE WEIGHT MEANS THE WEIGHT OF THIS motorhome AS BUILT AT
THE FACTORY WITH FULL FUEL, ENGINE OIL, AND COOLANTS. THE UVW DOES NOT
INCLUDE CARGO, FRESH WATER, LP GAS, OCCUPANTS, OR DEALER INSTALLED
ACCESSORIES.
NCC NET CARRYING CAPACITY MEANS THE MAXIMUM WEIGHT OF ALL OCCUPANTS
INCLUDING THE DRIVER, PERSONAL BELONGINGS, FOOD, FRESH WATER, LP GAS
TOOLS, TONGUE WEIGHT OF TOWED VEHICLE, DEALER INSTALLED ACCESSORIES, ETC.,
THAT CAN BE CARRIED BY THIS motorhome (NCC IS EQUAL TO OR LESS THAN
GVWR MINUS UVW)
GCWR GROSS COMBINATION WEIGHT RATING MEANS THE VALUE SPECIFIED BY THE
MOTORHOME MANUFACTURER AS THE MAXIMUM ALLOWABLE LOADED WEIGHT OF THIS
MOTORHOME WITH ITS TOWED TRAILER OR TOWED VEHICLE.
CD-126
This label is located on the inside of a wardrobe door.
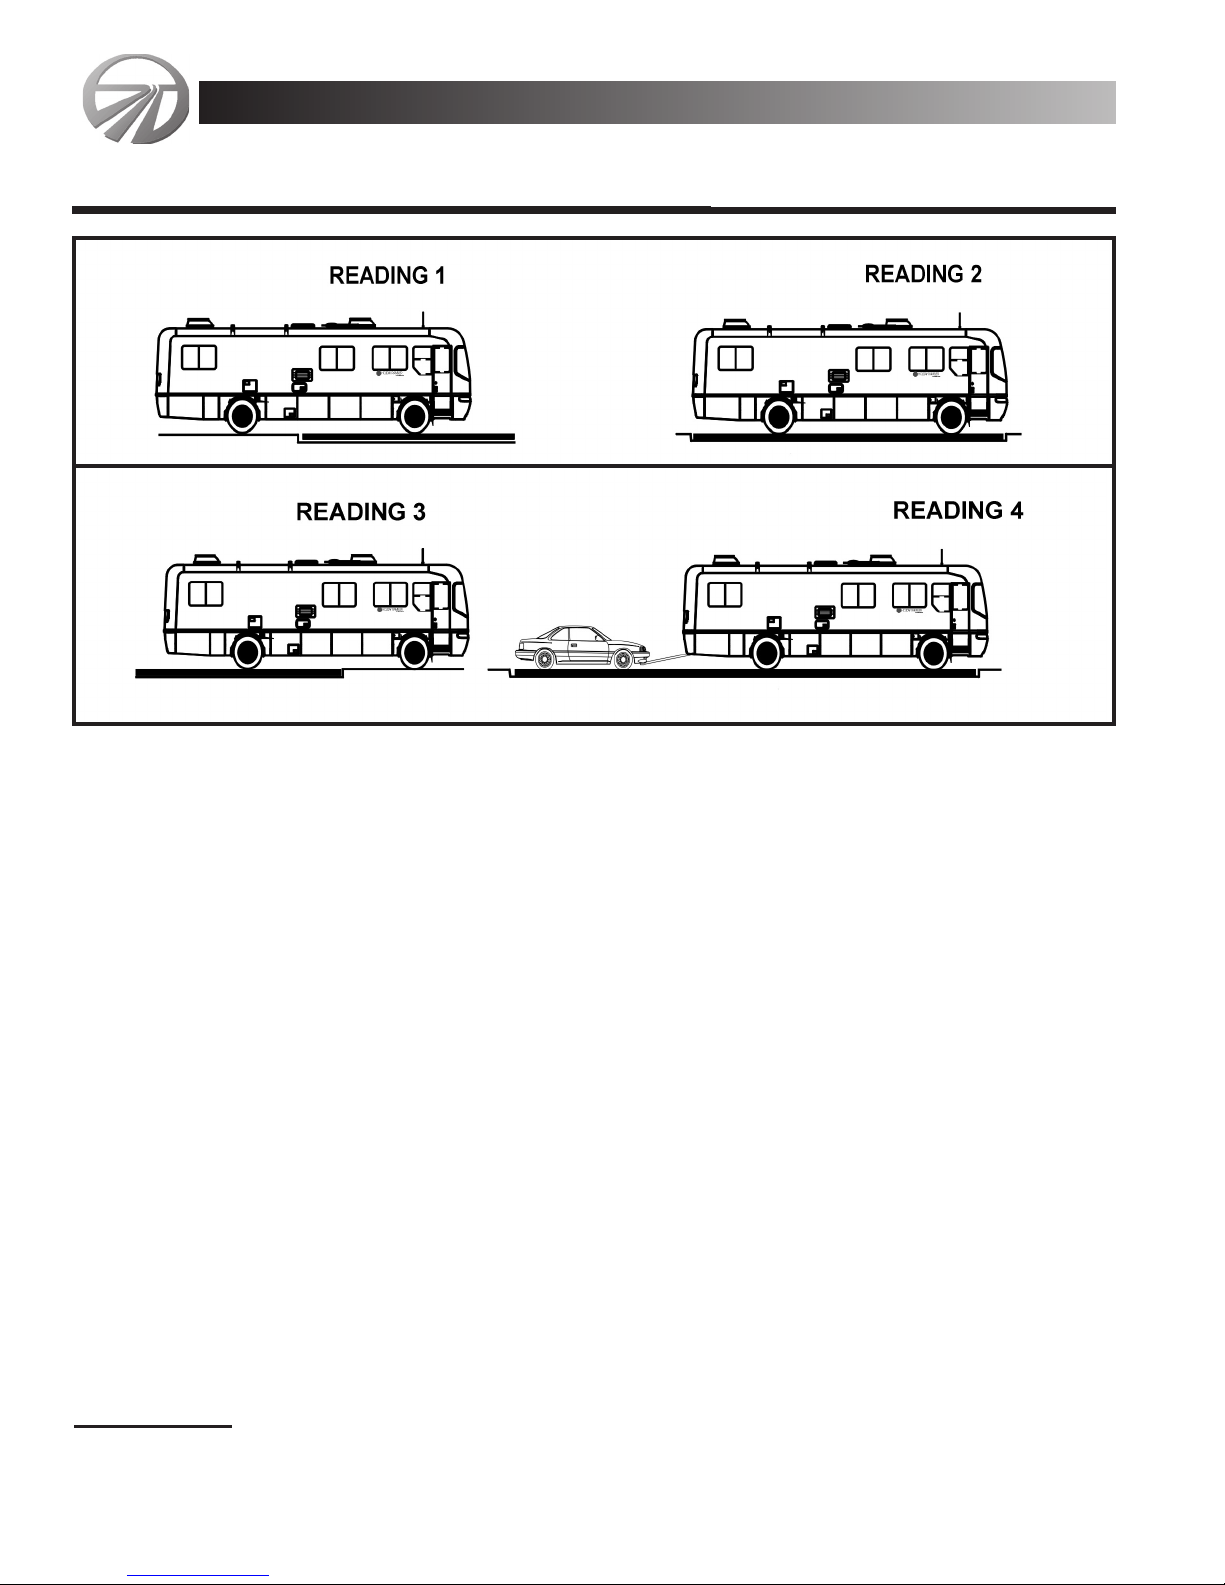
Weighing Your motorhome
READING 1 - GAW (Gross Axle Weight) front axle on scale only (loaded for travel).
READING 2 - GVW (Gross Vehicle Weight) entire unit on scale (loaded for travel).
READING 3 - GAW (Gross Axle Weight) rear axle on scale only (loaded for travel).
READING 4 - GCW (Gross Combined Weight) entire unit on scale with towed vehicle
(loaded for travel).
NOTE: Compare actual weights to ratings to ensure you are below maximum ratings.
Smoke Detector
Statistics show that most fire casualties are not caused by direct flame, but by the
less visible smoke (products of combustion). Smoke detector responds to both visible and
invisible products of combustion. A smoke detector will automatically return from alarm
to normal state when the reason for activation, the presence of smoke, is completely
removed. Three of the most common fire killers are: smoking in bed, leaving children
unattended and cleaning with flammable fluids. Please be safety conscious and avoid
unnecessary risk.
How to Test
Monarch
2-8
Operating & Safety T
Operating & Safety Tipipss
MONACO
2000
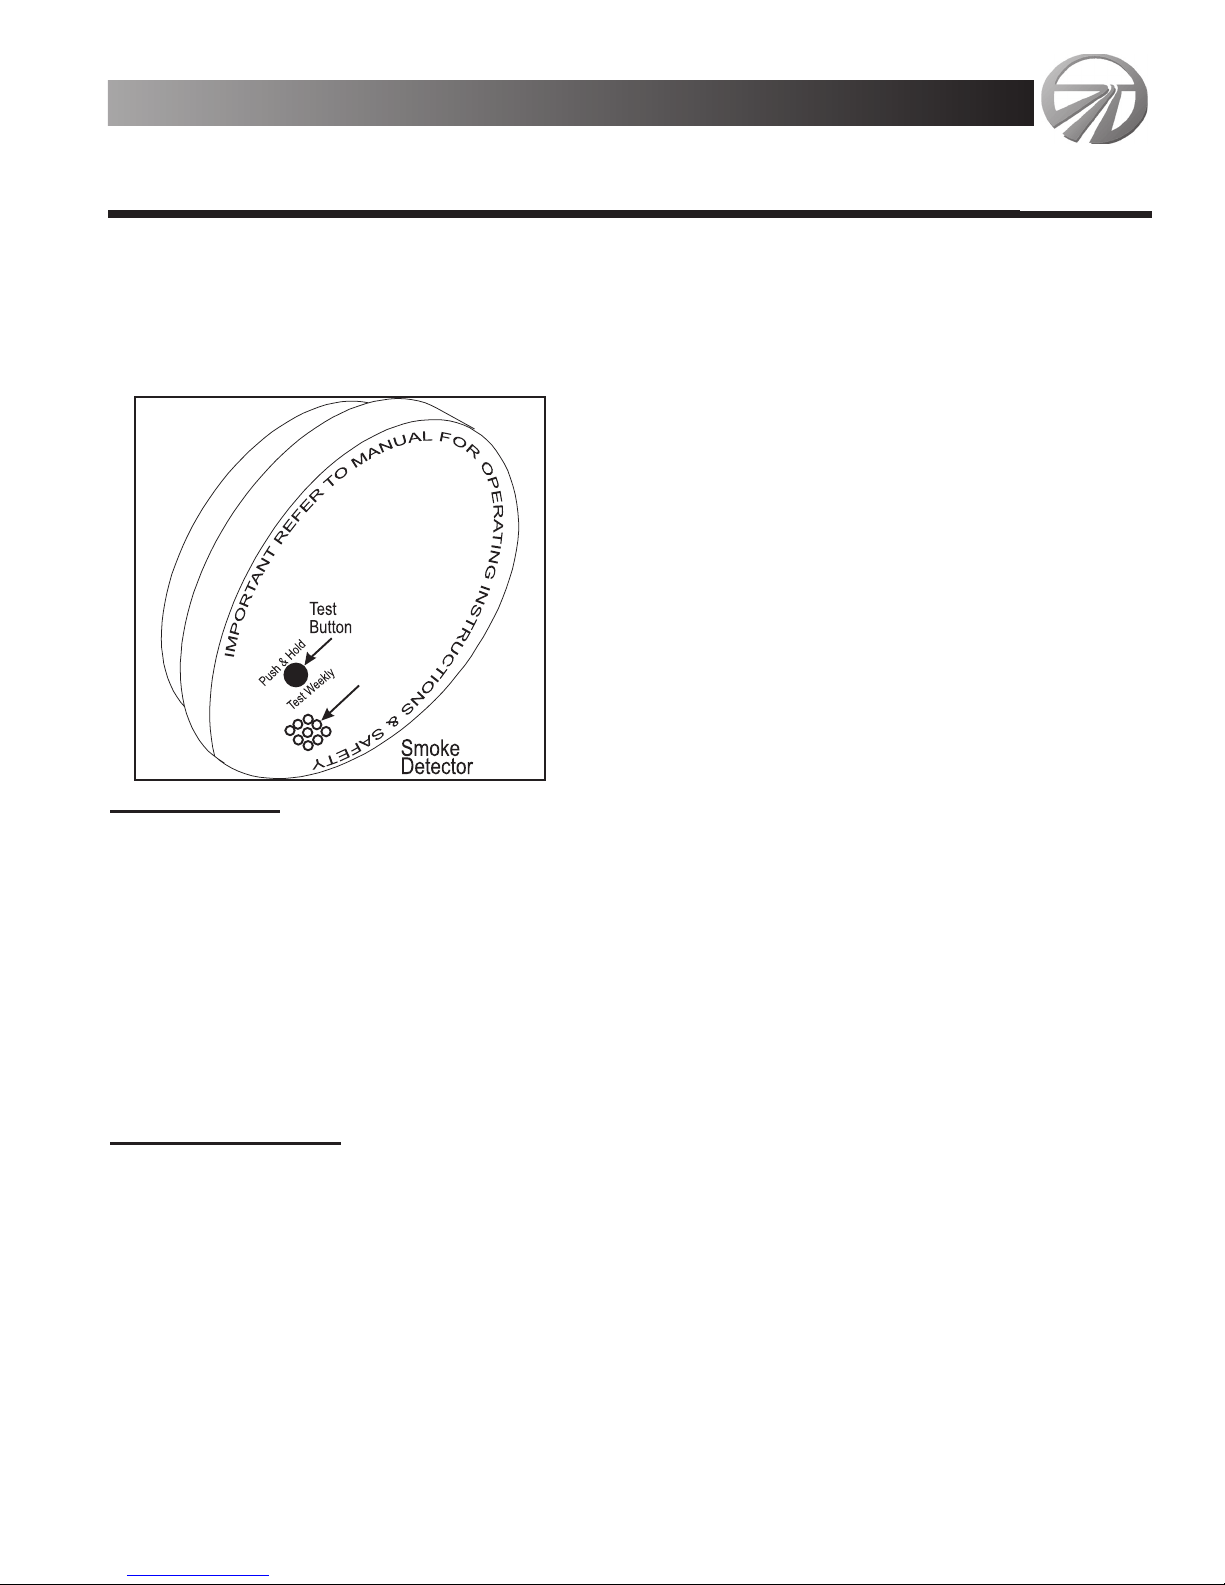
To test the electronics of the alarm, press the test button on the cover of the smoke
alarm for a few seconds. The smoke alarm will sound by making a continuous loud beep.
To complete the test sequence, release the button and the alarm should stop.
To test if smoke can reach the
ionization/sensing chamber, you must blow
smoke into the sensing chamber (in a careful fire
safe manner) until the alarm sounds. Do not use
an open direct flame of any kind, or you may
damage your detector. The smoke alarm will
stop sounding once smoke has cleared the ionization chamber.
NOTE: Test the smoke alarm after the
motorhome has been in storage, before each trip,
and at least once a week during use.
Maintenance
Vacuum slots in cover and sides with a soft brush attachment every month. Your
smoke alarm should be cleaned every six months to help keep the unit working sufficiently. Do not paint the detector.
The only acceptable batteries for use in the the smoke alarm, are the Eveready 216
or equivalent. A battery should power the smoke alarm for at least one year under normal use. When the battery reaches the end of its normal life, a low battery warning
(intermittent beeping) will indicate the need for battery replacement.
Trouble Shooting
If the alarm does not sound when the test button is pushed, or with the smoke test,
try the following:
• Inspect for obvious damage.
• Check for recommended battery type.
• Check battery for proper connection, or replace battery if needed.
• Gently vacuum as recommended.
If these procedures do not correct the problem, do not attempt repairs. If the
Monarch 2-9
MONACO
2000
Operating & Safety T
Operating & Safety Tipipss
Smoke
Sensing
Chamber

smoke alarm is within the warranty period and terms indicate the nature of the problem,
return the unit to your dealer. Smoke detectors beyond warranty cannot be economically
repaired.
Abnormal air conditions may cause the smoke alarm to be highly sensitive and give
a false alarm. If no fire is apparent, ventilate the room and/or blow fresh air into the
motorhome until the alarm stops. Once cleared, the smoke alarm will automatically
reset. Dust can lead to excessive sensitivity; vacuum as recommended.
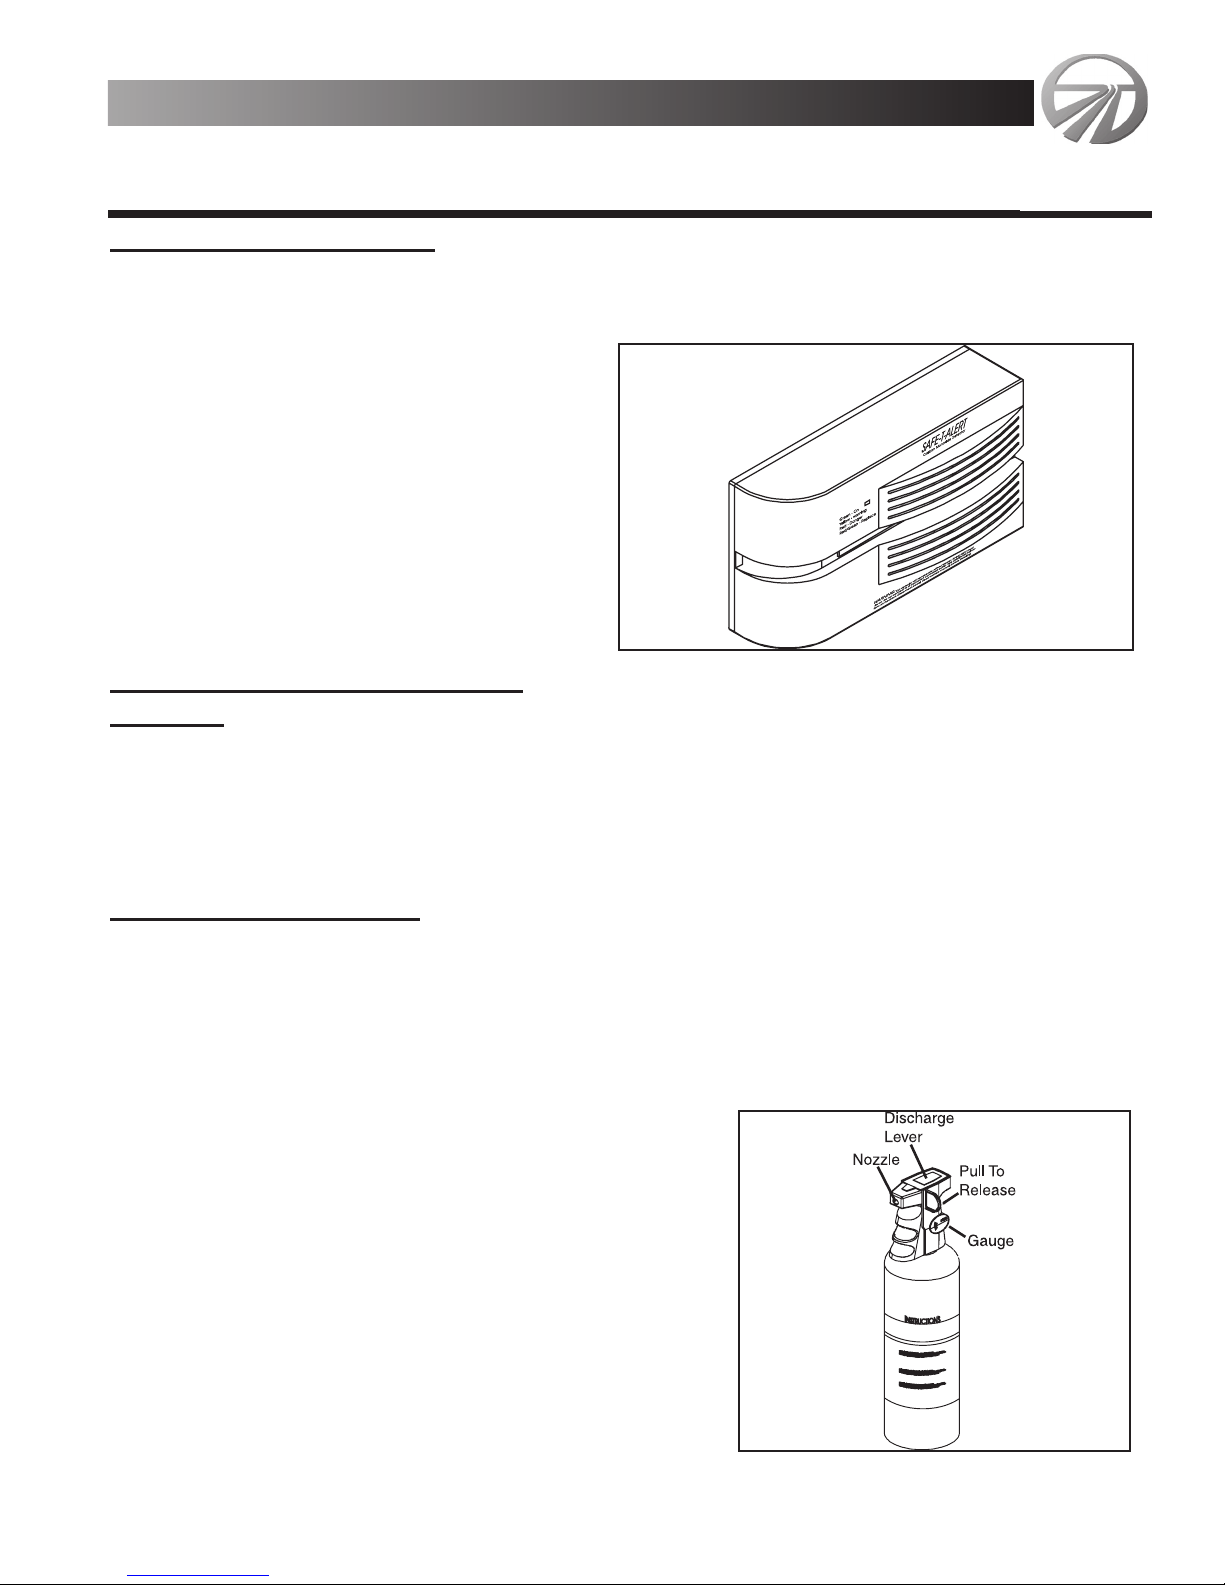
Carbon Monoxide Detector
Your motorhome is equipped with a carbon monoxide detector. Carbon monoxide
(CO) is a colorless, odorless and tasteless gas. Even low levels of CO have been known
to cause brain and other vital organ damage in unborn infants, with no effect on the
mother. In cases of mild exposure, symptoms include a slight headache, nausea, vomiting, and fatigue. Symptoms of medium exposure are severe throbbing headaches,
drowsiness, confusion and fast heart rate. Extreme exposure can result in unconsciousness, convulsions, cardio-respirator failure and death. Young children and household pets may be the first affected. Your CO detector is designed to detect the toxic CO
fumes that result from vehicle exhaust and incomplete combustion sources like a furnace, gas stove, or water heater. Consequently, it is uncommon for household smoke
from cigarettes or normal cooking to cause the alarm to sound.
Operating Instructions
The detector is equipped with a self-cleaning CO sensor and requires a ten minute
initial warm-up period to clean the sensor element and achieve stabilization. The green
power light should be lit when the power is on. If the light is not lit, turn off power and
check all wire connections. If power is on and connections are correct but the indicator
still does not light, the detector should be returned for service. Do not attempt to fix the
detector yourself.
The indicator light displays a specific color to monitor conditions as follows:
• Green color indicates an “ON” or normal condition. The CO detector has power
and is sensing air for presence of CO gas. The alarm horn will not sound.
• Yellow color indicates a “TROUBLE” or malfunction condition; the alarm horn
will sound and cannot be reset by TEST/RESET button. CO detector is not
working properly and must be immediately replaced or repaired.
• Red color indicates an “ALARM CONDITION”, the detector has sensed a presence of hazardous level of carbon monoxide. The alarm horn will sound continuously until reset by the RESET switch.
Monarch
2-10
Operating & Safety T
Operating & Safety Tipipss
MONACO
2000
When the Alarm Sounds
When the alarm sounds you should have the detector and motorhome checked by
an authorized service technician as soon
as possible. Never disconnect a CO
detector to silence a nuisance alarm.
Evacuate motorhome immediately when
RED light is lit and alarm sounds. Do a
head count to check that all persons are
accounted for. Call the nearest fire
department and ask them to determine
the source of carbon monoxide. Do not
re-enter motorhome until it has been
aired out and the problem is corrected.
T
esting Your Carbon Monoxide
Detector
Test the carbon monoxide detector operation after the motorhome has been in storage, before each trip, and at least once a week during use. You can test the alarm by
holding the test button in until the alarm sounds. The alarm will stop beeping in about
30 seconds.
Cleaning
Your Detector
Use a vacuum cleaner to remove dust and any other build-up on the detector. Do
not wash. Wipe the detector with a damp cloth and dry it with a towel. Do not open the
detector for cleaning. Do not paint the detector. We recommend replacing your carbon
monoxide detector every 10 years.
Fire Extinguisher
The fire extinguisher in your motorhome is
located near the main entrance door. Please read
the operating instructions that are printed on the
fire extinguisher. If there is any doubt on the operation of the fire extinguisher, you and your family
should practice using it then replace or recharge it.
Inspect the fire extinguisher at least once a month;
more frequently if it is exposed to weather or possible tampering. Check gauge for extinguisher level.
Partially discharging will cause a loss of pressure.
Monarch 2-11
MONACO
2000
Operating & Safety T
Operating & Safety Tipipss
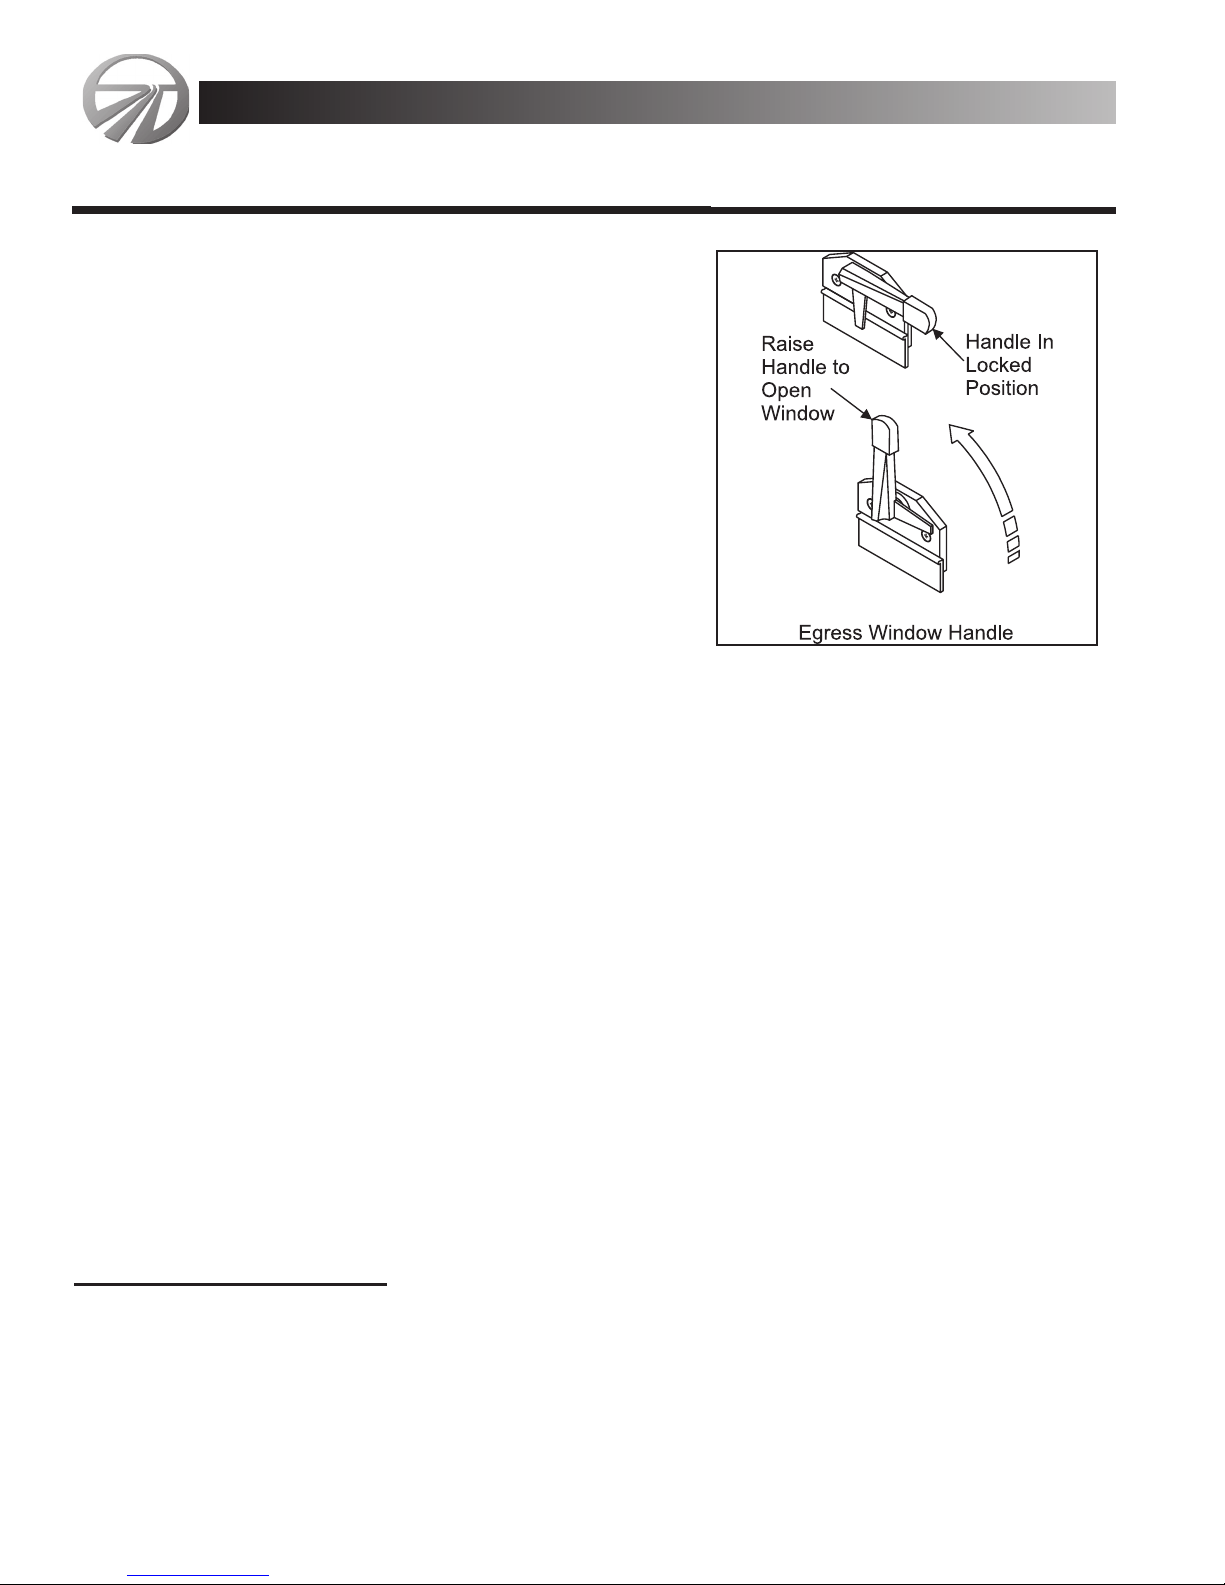
Egress Exit Window
Motorhomes are equipped with an egress exit
window. This window is designed to be used as an
additional exit for the motorhome in the case of an
emergency. It can easily be identified by the red
color of the handle. Open the egress window by lifting the handle and pushing outward on the window.
The window can be closed by pulling the window
closed and lowering the handle to the down or locked
position.
Towing Procedure
It is recommended that if a towing company is
called, make sure they use a stinger (an arm that goes under motorhome and hooks to
front cross member). This is the safest and most efficient way to tow a motorhome. It
also protects the front bumper and cap from damage. Generally, if your motorhome ever
needs to be towed, follow these instructions.
• Secure any loose or protruding parts if motorhome is damaged.
• Inspect points of attachment on disabled motorhome. If attachment points are
• damaged, select other attachment points at a substantial frame structural
member.
• Never allow anyone to go under a motorhome while it is being lifted by towing
equipment, unless the disabled motorhome is adequately supported by safety
stands.
• Do not tow motorhome from the rear. Towing from the rear will cause front
tires and suspension to be seriously overloaded, possibly resulting in tire or
front suspension failure. Rear frame extensions are not designed to withstand
loads imposed by lifting the rear of motorhome.
• If rear wheels are disabled, place motorhome on a flat bed trailer, or use a
heavy duty dolly under rear wheels and tow from the front of the motorhome.
• Drive shaft should be removed to protect transmission.
T
owing Without Stinger
Make sure the tow truck can safely pull the weight of your motorhome. It is recommended that you give the tow company the weight of your motorhome when you call
them. If your motorhome is going to be towed without a stinger, do the following:
Monarch
2-12
Operating & Safety T
Operating & Safety Tipipss
MONACO
2000

• Wrap chains around both A=arms or front axle on each side.
• Pass chains beneath tow bar below bumper.
• Position a 6’ x 6’ timber between ends of main frame rails and tow vehicle
transfer plate to maintain clearance to body parts.
• Attach safety chains, which are completely independent of primary lifting
device, to main frame walls.
• When the motorhome is under tow, allow enough room between the front of
the motorhome and rear of the tow vehicle while turning corners.
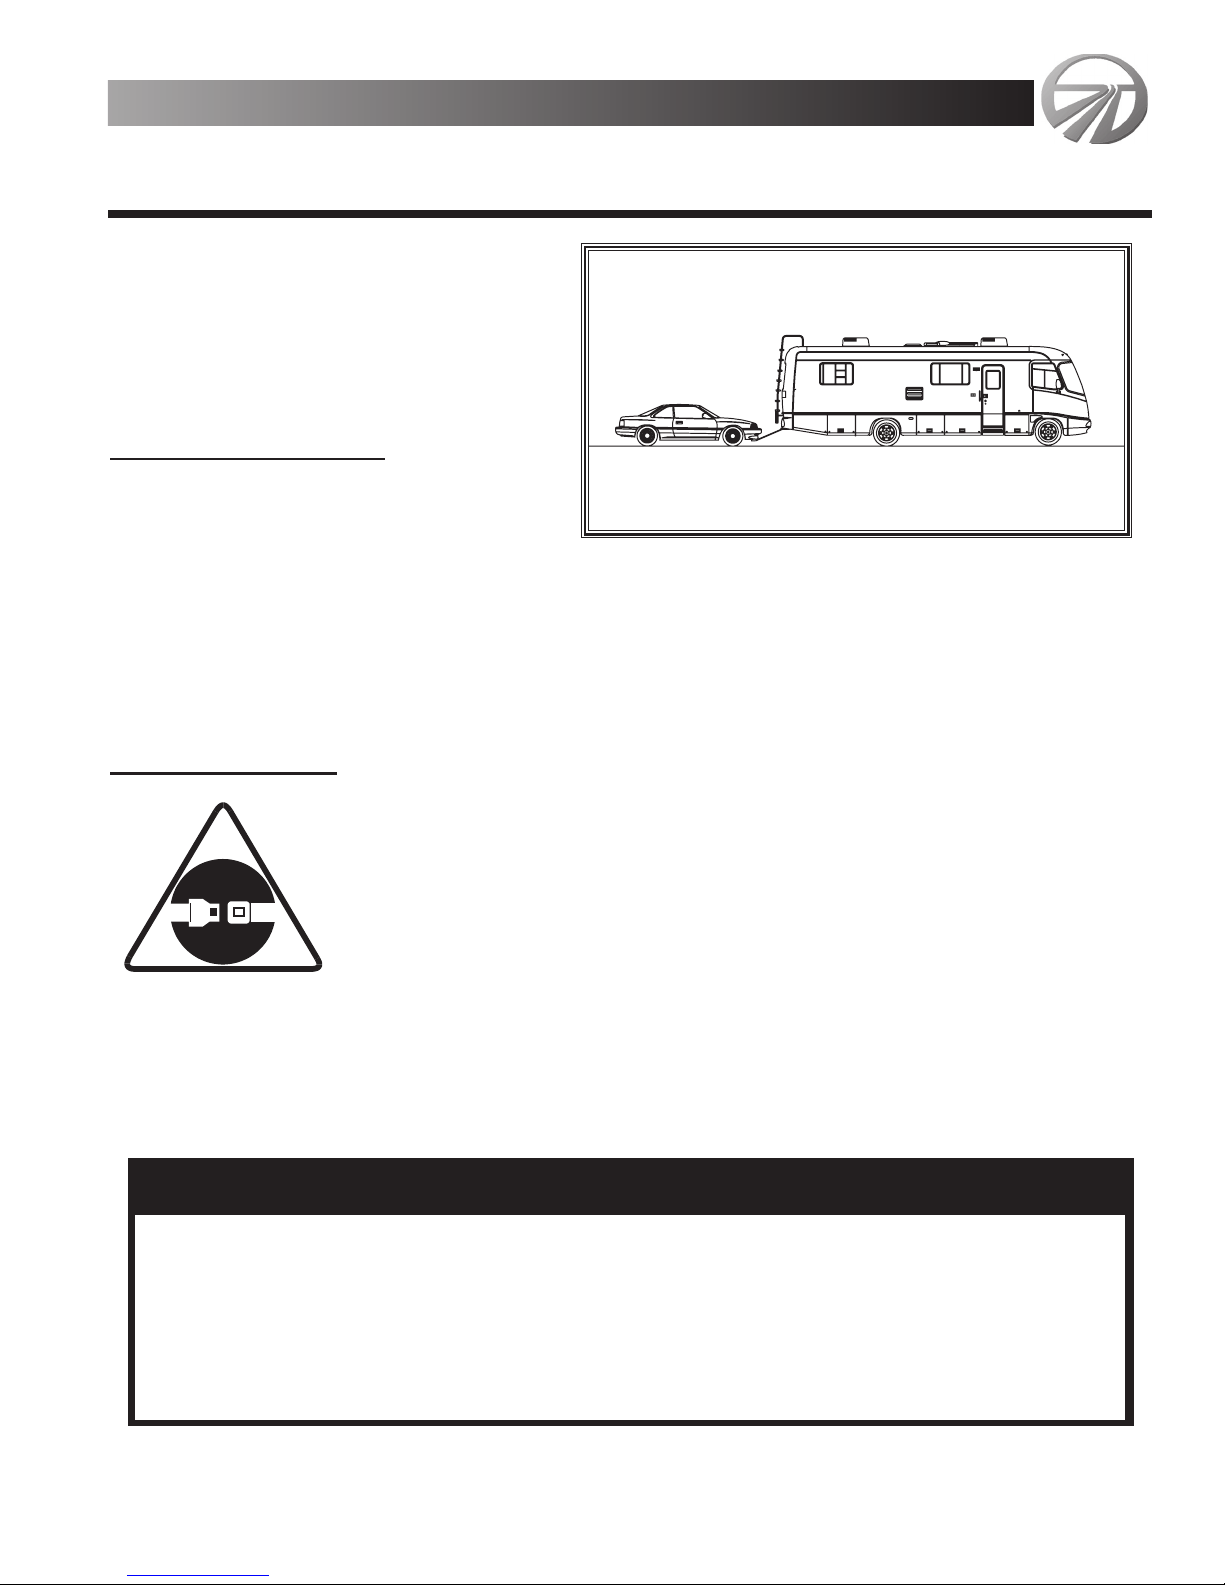
Using Rear Hitch
When using a rear hitch, remember that your motorhome is intended for towing
light loads. Your motorhome is designed to be used primarily as a recreational vehicle,
towing will affect durability and economy. Your safety and satisfaction require proper
use. Avoid excessive loads or any other abuse. Instructions for towing are listed in the
chassis Owner’s manual provided in your Owner’s Information File. You should not use
your motorhome to tow anything until your motorhome has been driven 500 miles (800
kilometers). Weight pushing down on the rear hitch must not exceed 300 pounds. We
recommend weighing your motorhome as it will be operated to be certain that there is
proper weight distribution. When weighing your motorhome be sure to take the passenger locations into consideration. Total weight of your motorhome and any vehicle towed
by it must not exceed the GCWR.
Ready to Leave Checklist
• Drain and flush out holding tanks. Close valves all the way and install caps
securely.
• Disconnect sewer hose and store it in an outside compartment.
• Fill fresh water tank. Disconnect and store fresh water hose.
• Disconnect shore line and store it in an outside compartment.
• Disconnect cable TV and phone hookups and lower TV antenna.
• Retract any awnings and secure them for transport.
• Close all roof vents.
• If applicable, retract leveling jacks to their travel position.
• Check engine oil, transmission fluid, brake fluid, engine coolant, power steering
fluid, windshield washer fluid and tire inflation.
• Secure any loose, heavy or sharp objects in the motorhome or service compartments.
• Turn off interior lights, water heater, furnace and water pump.
• Check LP gas tank gauge to make sure there is LP gas available.
• Check fuel gauge and lights on motorhome.
Monarch 2-13
MONACO
2000
Operating & Safety T
Operating & Safety Tipipss

• Fasten bifold and pocket doors securely.
• Secure dinette chairs, if applicable.
• Walk around your motorhome one last time to make sure everything is stored
away and outside compartments are closed and locked. Pull forward, clean site
if necessary and check for forgotten items.
• Secure and lock entrance door.
To Temporarily Store Motorhome (Between Weekend or Monthly
Trips)
To Store:
• Drain holding tanks.
• Shut off all appliances and water heater. Close LP gas valve.
• Turn water pump OFF.
• Close all roof vents.
• Remove articles from refrigerator/freezer and clean thoroughly. Leave
door ajar to prevent mildew.
• Retract any awnings and secure them for transport.
• Turn battery disconnects to OFF.
• Secure and lock entrance door.
To Take Out of Storage:
• Turn battery disconnects to ON.
• Turn on LP gas valve and check operation of appliances and water heater.
• Perform “Ready to Leave Checklist”.
NOTES
Monarch
2-14
Operating & Safety T
Operating & Safety Tipipss
MONACO
2000

General Information
This chapter covers the operation and care of various appliances
and types of equipment found in your
motorhome. Your motorhome can be
equipped with many different kinds of
equipment such as: refrigerator, range,
microwave, television, VCR, stereo,
furnace, water heater, air conditioning,
awning and slide out room. The appliances found in your motorhome are
similar to those you have in your home. Many operate on LP gas, AC/DC current, or a
combination. Detailed information, CAUTION and WARNING instructions for your various appliances and electronic components, other than what is in this chapter, can be
found in the manufacturer’s manuals located in your motorhome Warranty Information
File.
Refrigerator
Operating Instructions - 900 Series
A 12 volt DC supply is required to operate the refrigerator. If indicator lights are
not lit on the control panel when the refrigerator is turned on, check for loss of DC supply voltage. The shore line must be plugged in for 120 volt AC operation. The refrigerator AC power cord must be plugged in and LP gas valve must be open for operation (refrigerator AC power cord is located in refrigerator outside compartment). Refer to Chapter 8
Monarch 3-1
Appliances & Equipment
Appliances & Equipment
!
WARNING !
Most LP gas appliances and equipment used in recreation motorhomes are
vented to the outside. When parked close to a gasoline pump it is possible that
gasoline fumes could enter this type of appliance or equipment and ignite the
burner flame causing a fire or explosion. Shut off these appliances when refueling motorhome.
Carbon Monoxide can cause nausea, fainting, or death. Inadequate ventilation or partial blockage of LP gas appliances and equipment flues may result
in increased carbon monoxide fumes when operating in LP gas mode.
Do not store cigarette lighter fluid, petrol, ether, etc. in refrigerator, they
can cause a fire or explosion.
M
ONACO
2000

“Diagrams” for compartment locations. A 2-way refrigerator operates on AC current or
LP Gas. A 3-way refrigerator (optional) operates on AC current, DC current, or LP Gas.
Door - 900 Series
The handle is equipped with a storage latch which enables doors to be left partially open to prevent buildup of odor during extended refrigerator shut down periods. To
use the storage latch, open door approximately 1/2 inch and slide storage latch in cut
out on strike plate.
Control Panel - 900 Series
LCD Display - The window has a light which illuminates when any button is
pressed and remains lit for 10 seconds after button is released.
ON/OFF Button Press button to turn refrigerator ON. Press button and
hold until no lights are lit to
turn refrigerator OFF.
MODE Button Pressing and holding button
allows user to cycle through three choices; on “AUTO” and two manual modes (AC and
LP Gas). The refrigerator will not switch to a new operating mode until the button is
released.
TEMP SET Button - Press and hold button to select desired temperature setting.
Temperature settings appear in the display window, with the highest number reading
indicating the coldest setting.
Manual Mode - 900 Series
To operate in “MANUAL” mode, press and hold “MODE” button until desired operating mode (AC & LP Gas) is displayed. If energy source is interrupted, a diagnostic code
will flash in LED display and an alarm will sound. Turn refrigerator OFF to silence alarm
and refer to refrigerator Operator’s manual for diagnostic meaning.
Monarch
3-2
Appliances & Equipment
Appliances & Equipment
MONACO
2000

AUTO Mode - 900 Series
• Press main power ON/OFF button so that display light is lit.
• Press TEMP SET button and hold until coldest reading is indicated.
• Press and hold MODE button to select AUTO setting then release button.
Operating control automatically selects one of the following:
1. When 120 volt AC is available, “AUTO AC” will be visible in display panel indicating refrigerator is operating on AC Current.
2. If 120 volt AC is not available, refrigerator will switch to LP gas operation and
“AUTO LP GAS” will be visible in display panel. If gas burner does not ignite
within 30 seconds refrigerator gas valve will automatically close, controls will
revert to a standby mode in which an alarm will sound and flashing LED dis-
play will indicate “A1”. Turn refrigerator OFF to silence alarm. If gas burner
does not light after several tries, consult your authorized dealer for assistance.
If AC electric becomes available while refrigerator is operating in “AUTO LP
GAS” mode, refrigerator will switch to “AUTO AC” operation.
6 After the refrigerator is operating press “TEMP SET” button and adjust to desired
temperature.
Shut Down - 900 Series
Press ON/OFF button and hold until no indicator lights are lit. If the refrigerator
will not be in operation for a period of weeks it should be emptied, defrosted, cleaned and
the doors left ajar. Ice trays should be dried and kept outside the refrigerator.
Diagnostic Codes - 900 Series
Operating controls are equipped with a diagnostic systems which alerts to a problem in any mode of operation. When a problem occurs within a given mode, operating
controls will revert to a standby mode in which an alarm will sound and a diagnostic code
will flash in LED window. Turn the refrigerator OFF to silence the alarm and refer to
refrigerator Operator’s manual for diagnostic meaning.
Operating Instructions - 1200 Series
A 12 volt DC supply is required to operate the refrigerator; if indicator lights are
not lit on the control panel when the refrigerator is turned on, check for loss of DC supply voltage. The shore line must be plugged in for 120 volt AC operation. The refrigera-
Monarch 3-3
Appliances & Equipment
Appliances & Equipment
MONACO
2000

tor AC power cord must be plugged in and LP gas valve must be open for operation (refrigerator AC power cord is located in refrigerator outside compartment). Refer to Chapter 8
“Diagrams” for compartment locations. The refrigerator operates on AC current or LP
Gas.
Control Panel - 1200 Series
LED Display - Flashes a
LED fault code to diagnose an
abnormal operating condition.
ON/OFF Button - Press
button to turn refrigerator ON.
Press button and hold until no
lights are lit to turn refrigerator
OFF.
MODE Button - Pressing and holding button allows the user to cycle through three
choices; AUTO, AC and LP modes. The refrigerator will not switch to new operating mode
until the button is released.
TEMP SET Button - Press and hold button to select desired temperature setting.
Temperature settings appear in display between COLD and COLDEST range.
Manual Mode - 1200 Series
To operate in “MANUAL” mode, press and hold “MODE” button until desired operating mode (AC or LP) light is lit. If energy source is interrupted, a diagnostic code will
flash in LED display and an alarm will sound. Turn refrigerator OFF to silence alarm and
refer to refrigerator Operator’s manual for diagnostic meaning.
AUTO Mode - 1200 Series
• Press main power ON/OFF button so that any light is lit.
• Press TEMP SET button and hold until COLDEST reading is indicated.
• Press and hold MODE button to select AUTO setting then release button.
Operating control automatically selects one of the following:
1. When 120 volt AC is available, AUTO and AC lights will be lit indicating
refrigerator is operating on AC current. After 10 seconds AC light will go off
and AUTO light will stay lit. Press and quickly release MODE button to display operating mode.
Monarch
3-4
Appliances & Equipment
Appliances & Equipment
MONACO
2000

2. When 120 volt AC is not available, AUTO and LP lights will be lit indicating refrigerator is operating on LP gas. After 10 seconds LP light will go off
and AUTO light will stay lit. Press and quickly release MODE button to display operating mode. If gas burner does not ignite within 30 seconds refrigerator gas valve will automatically close, controls will revert to a standby
mode in which an alarm will sound and flashing LED display will indicate a
fault code. Turn refrigerator OFF to silence alarm. If gas burner does not
light after several tries, consult yourauthorized dealer for assistance. If AC
electric becomes available while refrigerator is operating in “AUTO LP GAS”
mode, refrigerator will switch to “AUTO AC” operation.
• After refrigerator is operating, press TEMP SET button and adjust to desired
temperature.
Shut Down - 1200 Series
Press ON/OFF button and hold until no indicator lights are lit. If the refrigerator
will not be in operation for a period of weeks it should be emptied, defrosted, cleaned and
doors left ajar. Ice trays should be dried and kept outside refrigerator.
Diagnostic Codes - 1200 Series
Operating controls are equipped with a diagnostic system which alerts to a problem in any mode of operation. When a problem occurs within a given mode, operating
controls will revert to a standby mode in which an alarm will sound and a diagnostic code
will flash in LED window. Turn refrigerator OFF to silence alarm and refer to refrigerator Operator’s manual for diagnostic meaning.
Ice Maker Operation
The refrigerator must be allowed to pre-cool properly before starting the ice maker.
The refrigerator has to be connected to a 120 volt AC before the ice maker can operate.
• The water pump must be in the ON position, or the system hooked to a water
supply to furnish the ice maker with water.
• Manual water shut off valve must be open. The valve is located inside motorhome
under the kitchen sink next to the water filter.
• To start the ice maker, move the ice level bail arm to the down position.
• To shut off the ice maker, move the ice bail arm all the way to the up position.
Monarch 3-5
Appliances & Equipment
Appliances & Equipment
MONACO
2000

When the ice maker thermostat senses preset temperature for ejection of ice cubes,
the mold fins will start to rotate dumping ice cubes and the mold will refill with water.
The first few cycles of the ice maker may make small ice cubes due to air trapped
in water lines. The first container of ice cubes should be dumped if the water system has
been winterized, or not in use for several weeks.
Defrosting Refrigerator
• Shut down refrigerator.
• While emptying refrigerator, leave a drip tray under the cooling fins.
• Keep cabinet and freezer doors open.
• Defrosting time can be reduced by placing a pan of hot water in freezer.
• After frost has melted, empty drip tray and clean refrigerator.
Cleaning Refrigerator
Cleaning the refrigerator is usually done after it is defrosted or when it is put into
storage.
• To clean interior lining of refrigerator, use a luke warm weak soda solution.
• Use only warm water to clean cooling fins and ice trays.
• Never use strong chemicals or abrasives to clean these parts, as protective sur-
faces will be damaged.
Microwave Oven
Microwave oven operates on AC current only. For instructions on how to operate
special features on the microwave oven, refer to manufacturer’s manual in your
motorhome Warranty Information File.
Monarch
3-6
Appliances & Equipment
Appliances & Equipment
MONACO
2000
!
CAUTION !
Do not use a hot air blower. Permanent damage could result from warping metal or plastic parts. Do not use a knife, ice pick or other sharp tools to
remove frost from freezer, they can create a leak in the ammonia system.

Cleaning Microwave Oven
• To clean inside walls, ceiling and floor, wipe up any splatters or spills with a soft
damp cloth or sponge after each use, or clean with mild detergent and water.
• Clean outside surface with mild soap and water, rinse and dry with a soft cloth.
• Never use strong chemicals or abrasives to clean microwave oven or surfaces will
be damaged.
Cooktop - (Optional)
Cooktop burners use electronic ignitors to light burners. Inverter must be ON,
shore power plugged in or generator running to supply current to ignitors.
• To light burners, make sure LP gas is turned on.
• Push in and turn burner knob to HI position.
• Ignitors will spark until burner lights.
• Turn burner knob to desired setting.
• Turn burner knob to OFF when finished.
If burner does not light within 4 to 10 seconds, turn burner knob to OFF. Check
that LP gas is present, cooktop cord is plugged in, circuit breaker is not tripped and electronic ignitors spark. If burner does not light after three attempts, contact your servicing dealer.
Range with Oven
Range - Top burners use electronic ignitors to light burners. Inverter must be ON,
shore power plugged in, or generator running to supply current to ignitors.
• To light burners, raise burner cover and fold it to the back of range.
• Push in and turn burner control knob counterclockwise to turn gas on, wait two
seconds, and turn left spark ignitor control knob clockwise until a flame appears.
• After burners have been shut off and range has cooled, fold cover over range.
Oven:
• To light oven pilot push in oven control knob and rotate counterclockwise to
PILOT ON position.
Monarch 3-7
Appliances & Equipment
Appliances & Equipment
MONACO
2000
! WARNING !
Do not heat motorhome interior with cooktop, range or oven. Gas com-
bustion consumes oxygen inside motorhome.

• Light oven pilot light located at bottom and back of oven to the left of oven
burner. Oven pilot may be slow in lighting due to initial air in gas line.
• Oven pilot has been factory adjusted and no further adjustment is necessary.
• To light oven push in on oven knob and turn to desired temperature.
• To extinguish oven pilot push in oven control knob and turn clockwise to OFF.
Cleaning Cooktop or Range
• Clean all surfaces as soon as possible after spills or spotting.
• Use warm soapy water only. Grit or acid-type cleaners should never be used.
• Use oven cleaner in oven; follow directions for any oven cleaner used.
• To remove range top, lift top upwards by front edge and pull top up and away
from rear trim.
• To install range top, lower top into place. Apply slight downward pressure on
both sides of top to engage retaining clips.
Washer/Dryer Prep (Optional)
On some floorplans, water supply plumbing, waste water drainage plumbing, and
120 VAC electrical wiring have been installed at the factory for a combination
washer/dryer. If installing such equipment, be sure to follow appliance manufacturer’s
installation instructions. Also, adhering to following directions will ensure safe and reliable operation of your after market washer/dryer.
• Do not connect clothes dryer moisture-line exhaust duct to any other duct, vent,
or chimney.
• Do not terminate moisture-lint exhaust duct beneath motorhome.
• Do not attach moisture-lint exhaust duct to dryer vent connection or exterior
termination vent with sheet metal screws or other fastening devices that extend
into interior of duct that may catch lint.
• Locate and install backer for moisture-lint exhaust duct and exterior termination
vent in accordance with appliance manufacturer’s printed instructions.
Washer/Dryer (Optional)
Operating Instructions
Before using washer/dryer for the first time, wipe inside with a damp cloth to remove any
dust that has accumulated and run rinse cycle to rinse out water.
• Turn hot and cold faucets on.
• Place clothes and measured amount of detergent in washer/dryer and turn cycle
Monarch
3-8
Appliances & Equipment
Appliances & Equipment
MONACO
2000

selector to desired temperature setting.
• Turn wash timer clockwise to desired wash setting.
• Select dryer time and half heat if required (half heat is selected by pushing in heat
button).
• Press ON/OFF button to ON position. Door lock light will light up as soon as
washer starts.
• After wash cycle is complete wait 2 minutes for door lock to release before
attempting to open door. Attempting to open door before lock releases could dam-
age handle.
• Light will go out when it is safe to open door.
• After washing is complete hot and cold water faucets should be turned OFF and
ON/OFF switch pushed to OFF position.
NOTE: If door must be opened during wash cycle:
• Open door by pushing door lock button to OFF position and wait until water is
discharged.
• Turn washer/dryer OFF and wait at least 3 minutes for door lock to open.
• To restart washer/dryer, push ON/OFF button to ON position.
Cleaning Drain Screen
Removable drain screen
which protects pump from lint and
foreign matter needs to be cleaned
periodically. How often will depend
on type of clothes that you wash.
Cotton articles cause more lint to
collect than nylon articles. Under
no circumstances should drain
screen be removed while washer is
full of water.
• Run spin cycle to reduce
amount of water in washer.
• To clean drain screen, open service door by pressing on left hand side.
• Place a cloth or shallow tray under drain screen housing, as a small amount of
water may run out.
• Turn drain screen counterclockwise and pull drain screen out.
• Clean screen to remove any dirt and lint.
• To replace screen slide it back into housing and turn it clockwise to secure.
• Close service door.
Monarch 3-9
Appliances & Equipment
Appliances & Equipment
MONACO
2000

Cleaning Washer/Dryer
As you use washer/dryer, occasionally wipe exterior of cabinet with a damp cloth
or sponge; wipe it dry with a soft cloth. Do not use polish on plastic trim.
• Clean interior with 1 cup of chlorine bleach mixed with 2 cups of detergent.
• Run washer through a complete cycle using hot water.
• Repeat process if necessary.
• Remove hard water deposits using only cleaners labeled as washer safe.
• Wipe inside of washer/dryer door with a soft cloth to remove any moisture.
• Periodically, a thin coat of paste wax should be applied to inner door; especially
to area which is immediately next to door window. This will protect door finish
from laundry spills and discoloration.
Television Antenna
Antenna Booster
The television antenna is designed for color and black-and-white televisions. If
reception is poor, make sure power supply switch is ON and connectors are tight. The
power switch is located in an overhead compartment next to entrance door. If reception
remains poor, check with your authorized dealer.
Monarch
3-10
Appliances & Equipment
Appliances & Equipment
MONACO
2000
! WARNING !
Do not wash or dry articles that have previously been cleaned in, washed in,
soaked in, or spotted with gasoline, dry cleaning solvents or other flammable or
explosive substances. They give off vapors that could ignite or explode.
Do not add gasoline, dry cleaning solvents, or other flammable or explosive
substances to wash water.
Under certain conditions, hydrogen gas may be produced in a hot water system that has not been used for 2 weeks or more.
Hydrogen gas is explosive. If hot water system has not been used for a long
time turn on all hot water faucets and let water run for a minute before using
washer/dryer. This will release any accumulated hydrogen.
Do not use heat to dry articles containing foam rubber or similar textured
rubber like materials.
Clean lint screen (located on back of wash in top left corner) after each use,
and keep area around exhaust opening and adjacent areas free from accumulation
of lint, dust and dirt.

To Raise Antenna
Before raising antenna, check for clearance above motorhome.
• To raise antenna to operating position, turn crank
toward UP arrow until you feel resistance.
• Turn power booster switch to ON position.
• Rotate antenna only when antenna is fully raised; to
rotate antenna, pull down on rotating knob until
it disengages ceiling plate. Turn antenna clockwise
or counterclockwise for best picture and sound. Do
not rotate antenna except when it is in the fully
raised position.
T
o Lower Antenna
Important: Never lower antenna without first aligning pointer.
• To lower antenna, align arrow on rotating knob with pointer on ceiling plate. Do
not force handle or you will damage antenna.
• Turn crank towards DOWN arrow position until you feel resistance.
Monarch 3-11
Appliances & Equipment
Appliances & Equipment
MONACO
2000

Satellite System Prep (Optional)
If your motorhome does not have a satellite dish, check to see if optional satellite
system prep wiring has been installed. If your motorhome is equipped with a satellite
dish system, refer to manufacturer’s Owner’s manual in your Warranty Information File
for operating instructions.
Television and VCR
Your motorhome is equipped with a color TV located above operator’s seat. There
is also a color TV in bedroom. VCR is located in an overhead compartment in front of
motorhome. VCR and TV’s are powered by 120 volt electricity only. For detailed information and operating instructions on VCR and TV’s, refer to manufacturer’s manual in
your Warranty Information File.
VCR & TV Cable Switch Box
The VCR can be used by either one or both TV’s. The cable switch box is located
in an overhead compartment in the front of the motorhome. This box allows you to
choose whether you want TV’s to use VCR, cable hookup, roof antenna or any combination of the three. For detailed information and operating instructions on the cable switch box, refer to
manufacturer’s manual in your Warranty
Information File.
Monarch
3-12
Appliances & Equipment
Appliances & Equipment
MONACO
2000
! WARNING !
Do not raise TV antenna near overhead electrical wires as contact may
cause serious injury or death.
Do not move motorhome when TV antenna is up. There is a red warning
light on operator’s dash panel. When the ignition switch is turned to the ON
position the warning light will be lit if antenna is up. When this light is lit lower
antenna before moving the motorhome.
TV & VCR
Cable Control
Buttons

Cable and Telephone Hookups
Your motorhome is equipped with cable TV and telephone hookups. These
hookups can be used to connect to cable TV and telephone services at campgrounds
(hookups are located in outside storage compartments).
Computer Station Hookups
Your motorhome is equipped with necessary
plugs, 12V or 110V and telephone jacks, to operate
your computer. The plug panel is located in the front
of the motorhome on passenger side wall.
Stereo & CD Player
Your motorhome is equipped with an AM/FM CD Player Stereo located in the dash.
Stereo receives 12 volt power directly from the house battery. You may also have an
(Optional) stereo available with a built in cassette player. For detailed information and
operating instructions on the stereo and CD player systems refer to manufacturer’s manual in your Warranty Information File.
Citizens Band (CB) Radio Prep
Located under the dash next to the two pin dash accessory connector is a two pin
connector labeled Citizens Band Radio. The red wire is at 12VDC DC and is fused at 2
amps through the front distribution panel. The ground (white) wire is connected to chassis frame.
Rear Vision System
If your motorhome does not have a rear vision system, the wiring is provided
behind the dash and rear cap for future installation.
The rear vision system consists of a camera located on the rear of the motorhome
and a monitor located in the dash. The operator can see what is behind the motorhome
when backing up. The rear vision monitor system is equipped with the ability to be ON
all the time when the ignition switch is ON, or only activated when the motorhome gear
shift is in reverse when backing up. For detailed information and operating instructions
on the rear vision system, refer to manufacturer’s manual in your Warranty Information
File.
Monarch 3-13
Appliances & Equipment
Appliances & Equipment
MONACO
2000

Roof Air Conditioner
To Operate Air Conditioner
The roof mounted air conditioner
filters, circulates, cools and dehumidifies air inside your motorhome. The air
conditioner operates only on a 120 volt
AC current. To operate the air conditioner, set thermostat FAN control to
AUTO and either HI or LOW setting. Set
temperature control to desired setting.
Set SYSTEM control to COOL setting.
Ceiling ducts control air flow, adjust as
desired. To shut off air conditioner, slide ON/OFF switch to OFF position. A small
amount of water from dehumidification will collect and is dispelled outside the
motorhome.
Return air filters should be cleaned frequently, and are located on the motorhome
ceiling inside air intake vent covers. Never run the air conditioner without the return air
filters in place. This may plug evaporator core with dirt and may substantially affect performance.
To Clean Filters:
• Remove vent covers and filters.
• Wash filters in warm soapy water. DO NOT use solvents.
• Rinse filters thoroughly with fresh water and allow them to dry.
• Reinstall filters and covers.
Bathroom Exhaust Fan
The exhaust fan is powered by 12V DC. Always close dome lid when motorhome
is stored or unattended for an extended period of time. High winds and moisture leakage could cause serious damage to motorhome. The fan is for ventilation only, it will not
cool the motorhome.
Monarch
3-14
Appliances & Equipment
Appliances & Equipment
MONACO
2000
!CAUTION !
Wait at least two minutes before restarting air conditioner after shutting off
air conditioner, with OFF or temperature control. This will equalize the compressor pressure. Failure to follow these instructions may cause circuit breaker or
fuse to open.

Attic Air Vent
The attic air vent will only draw air out of the motorhome. To operate fan, turn
switch to the high position. This will provide enough force to open the door of the fan
shroud. Once the fan has been turned on high to open the door of the shroud, choose
either the Low, Medium, or High settings for whatever your conditions dictate.
Periodically check all fasteners to make sure they remain tight. If fasteners become
loose, see that they are adequately retightened right away. Periodically check to make
sure the seal is still adequate where the fan is attached to the roof.
Furnace
Operating Instructions
• Set thermostat FAN control
to AUTO and either HI or
LOW settings.
• Set thermostat control 10
o
higher than motorhome air
temperature, control is located at right side of thermostat.
• Set SYSTEM control to
HEAT.
• Allow 40 to 60 seconds for
furnace to begin operating.
• Set temperature to desired
setting.
• If furnace does not light, and you do not smell gas, repeat the above procedure.
• If furnace does not ignite after three attempts, slide thermostat control to OFF
and call a qualified service technician or your gas supplier.
• To shut down furnace, slide thermostat control to OFF. After you have turned
the furnace off, or burner has shut down, the fan will run for approximately 30
to 60 seconds to cool down the furnace.
Cleaning Furnace
Clean entire furnace and air tube passageways periodically to remove dust, lint,
etc. Check gas systems for leaks at least once a year. Check and clean blower wheel
annually. Control compartment of furnace must be kept clean; failure to do so could
result in operational or fire hazards.
Monarch 3-15
Appliances & Equipment
Appliances & Equipment
MONACO
2000

Before each heating season starts, furnace should be thoroughly cleaned of wasp
and spider nests, lint accumulations and other debris. Debris will restrict air flow for
combustion and keep blower fan from running. Check burner pilot orifices for debris.
Lint accumulations will cause blower to become unbalanced and vibrate, restrict ability
of blower to move air, and if blown onto heat exchanger will cause odor and fire hazard.
Contact your authorized dealer service technician for annual cleaning.
Side Awning (Optional)
To Extend Awning
• Have someone help you extend awning.
• To extend awning, loosen black brace locking
knobs located on the inside lower front and
rear braces. Failure to loosen black knobs will
prevent awning from fully extending.
• Lift and move arm storage locks, top handle on
Monarch
3-16
Appliances & Equipment
Appliances & Equipment
MONACO
2000
! WARNING !
Never attempt to modify this furnace. Fire, explosion, asphyxiation or car-
bon monoxide poisoning may result in serious bodily harm or death.
If you smell gas (a rotten egg or sulfur smell) at any time, perform the fol-
lowing steps immediately:
• Turn off main gas supply.
• Do not touch any electric switches.
• Extinguish any open flames.
• Open windows and doors.
• Do not try to light any appliance.
• Exit the motorhome and contact a service center or gas supplier.
Do not store combustible or any other material next to the furnace. Storage
of any materials may restrict the air flow and affect the efficiency of your furnace,
or result in a fire.
Be careful when washing your motorhome so that water is not aimed directly into furnace outside vent. If water is forced into vent and past fan baffles in
furnace, rusting and improper combustion could occur. For your safety, do not
use gasoline or other flammable vapors and liquids in vicinity of furnace.
Electrical power to furnace should be turned off while cleaning control compartment to avoid shock or damage to furnace.

front and rear arms, all the way up to unlocked position.
• Slide brake control, center handle located on front arm only, all the way up to
unlocked position; red warning will be visible at top of arm.
• Hook loop of pull strap, located in center of reel, with catch rod and draw awning,
reel assembly and arms all the way out away from motorhome.
• Hold awning out and have someone push both front and rear braces attached to
black knobs, all the way out to reel end of arms and lock braces in place.
• Tighten black locking knobs. Braces that are left in down position, or not locked
to reel end of arms, will allow awning to retract inadvertently.
• Slide center pull strap to one end of awning and store.
• Raise arm extension lock handles, located on bottom of front and rear arms, all
the way up to unlock position. Extend arms up to position awning at desired
height, and lower lock handles to secure arms.
To Retract Awning
Monarch 3-17
Appliances & Equipment
Appliances & Equipment
MONACO
2000
!
CAUTION !
The awning is under extreme spring tension when extended. If the pull
strap is released quickly, or let go completely, the awning will abruptly roll up to
the stored position and can cause bodily injury or damage to awning.

• Have someone help you retract awning.
• If applicable, move awning out of carport position (see “Using Carport Feature”).
• Retract arms to lower awning until arms rest on lower stop bolts and lock in posi-
tion.
• Position pull strap in center of reel.
• Hold pull strap and have someone loosen black knobs and lower braces all the
way toward motorhome; do not tighten black knobs.
• Pull down slightly on pull strap, have someone release slide brake and allow
awning to roll up to stored position.
• Lower arm storage locks, top handle on front and rear arms, to lock awning in
place.
• Tighten both front and rear black knobs.
Rain Release Setting
After you have extended the awning you
can choose to position it in rain release position.
This position will prevent water build up on the
awning. To position awning lower one arm of
awning and leave the other arm in normal position. This will create enough of a slope for adequate water run off.
Using Carport Feature
In order to use carport feature safely, braces must be extended and locked to the
end of side arms, and black knobs tightened.
• Extend awning as described under “To Extend Awning”.
• Unlatch bottom of rear arm by push-
ing in on lock handle on arm bracket
and swing arm away from motor
home to an upright position.
• Raise rear arm extension lock han-
dle all the way up to unlocked position, extend arm to position awning
at desired height and lower lock han-
dle to lock arms in place. Drive stakes
through bottom holes in arm.
• Unlatch bottom of front arm by push-
ing in on lock handle on arm bracket and swing arm away from motorhome to
an upright position.
Monarch
3-18
Appliances & Equipment
Appliances & Equipment
MONACO
2000
Rain Release Setting
One Arm Lower Than the Other Arm

• Raise front arm extension lock handle all the way up to unlocked position, extend
arm to position awning at desired height and lower lock handle to lock arms in
place. Drive stakes through bottom holes in arm.
• To move awning out of carport position reverse above steps.
Securing Awning for T
ravel
Before travel, check the following:
• Awning is fully retracted to side of motorhome.
• Black locking knobs are tightened.
• Storage locks are down in locked position.
• Brake control is in full down (locked) position and no red warning is showing.
• Bottom of front and rear arms are latched properly into bottom brackets.
• Catch rod is stored away.
Slide-Out Awning
To Extend
Awning
Slide-out room must extend equally at both ends so that awning fabric will be taut
when room is fully extended.
• Move slide-out room all the way out.
• Find pull rod.
• Using pull rod push arm locks (one on each end arm) up all the way
to the unlocked position.
• Hook pull rod end into pull strap of
awning and pull awning and arms
out all the way.
• Hook end of side strap loops (one on
each end of awning) on to side strap
hooks on slide-out room.
• Slowly release awning.
• Pull strap to one side, remove pull rod
and store strap.
• Store pull rod.
T
o Retract Awning
Monarch 3-19
Appliances & Equipment
Appliances & Equipment
MONACO
2000

• Find pull rod.
• Using pull rod, position pull strap in center of awning.
• Pull awning out all the way.
• Unhook side strap loops (one on each end of awning) from side strap hooks on
slide-out room.
• Slowly release awning and allow it to roll up all the way.
• Pull arms locks (one on each end arm) down into locked position. Make sure
arms are locked securely. NOTE: Wind can pull awning away from the motorhome
and damage awnings if not locked properly.
Window Awning (Optional)
To Extend Awning
• Hook loop of pull strap with catch rod and
pull awning, reel assembly and side arms to
extend fully away from motorhome.
• Hook pull strap on side strap hook, remove
catch rod from pull strap and store.
To Retract Awning
• Hook catch rod on pull strap, remove pull
strap from side strap hook and slowly allow
awning to retract.
• Remove catch rod from pull strap and store.
Electric Entry Step
Your electric entry step features amber lighting under step, automatic retraction
with ignition key in RUN position and a last out benefit.
Located just inside the door is a switch with an indicator light. The indicator light will be illuminated when
step switch is in the ON position.
Operation (Normal)
• With ignition key in off position, move step
switch to ON position. Indicator light will illuminate and step will extend and retract with
opening and closing door.
• If switch is turned off with step in retracted position, step will not extend when
opening door.
Monarch
3-20
Appliances & Equipment
Appliances & Equipment
MONACO
2000

• If step switch is turned off after step has been fully extended for approximately
5-10 seconds, step will not retract when closing door.
• When motorhome ignition key is in RUN position, step will always extend and
retract with door regardless of step switch position.
• Any time step switch is on and door is open, an amber light under the step will
be illuminated placing a drain of approximately 1/2 amp on chassis battery.
Operation (Last Out)
• If step is in extended position with step switch off and door closed, starting
engine or placing ignition key in RUN position will cause step to automatically
retract.
• When engine is stopped and ignition key is returned to OFF position, opening door will cause step to extend.
• Allow step to fully extend and wait approximately 5-10 seconds before closing
door.
• Step will remain extended until step switch is returned to ON position or ignition key is rotated to RUN position.
NOTE: Not allowing step to fully extend and remain extended for 5-10 seconds before
closing door may cause step to retract. Opening door after this will cause no step extension until step switch is returned to ON position.
To Convert Dinette Into a Bed
• Remove dinette seat cushions from seats.
• Lift up on end of table and release lock on leg.
• Swing table leg back until it locks.
• Pull table away from ledge and lower it down until table lays on ledge of dinette
seat.
• Table is hinged for easy movement. Lay table on dinette seat ledges and spread
cushions out to form a mattress.
• To return dinette to its original position, lift table back on to ledge on wall.
• Release lock on leg and allow it to lock in outstretched position.
• Lower table until leg rests on floor.
Monarch 3-21
Appliances & Equipment
Appliances & Equipment
MONACO
2000

Securing Dinette Chairs for Travel
• Tie down chairs securely so that it is not possible to sit in any chairs.
To Convert Sofa into a Bed
• Grab front edge of sofa under cushions and pull up and out. Sofa will extend into
a fold-out bed.
• To return bed to sofa position lift up on front edge and push in.
Slide-Out Rooms
To Extend Slide-Out
• Check that you have at least five (5) feet of clearance outside of motorhome for
slide-out room.
• Check that the battery is fully charged and hooked-up to the unit’s electrical system.
Monarch
3-22
Appliances & Equipment
Appliances & Equipment
MONACO
2000
! WARNING !
Make sure you have five (5) or more feet of clear space on the outside of
your motorhome before moving the slide-out in the OUT position. Be sure you
have sufficient clearance of the inside of your motorhome before you retract the
slide-out. Do not operate the slide-out when the battery has been removed from
the motorhome. Use with only the converter, may damage the slide-out’s electrical components. Continuous operation of the slide-out could cause battery
drain and damage to the slide-out motor from overheating.
Never move motorhome without having the slide-out retracted.
!
WARNING !
Do not occupy any of these chairs while motorhome is in motion. Chairs
are not equipped with occupant restraint systems. In addition, chairs must be
stored in an enclosed area or secured with tie-down straps prior to setting
motorhome into motion to avoid risk of personal injury to motorhome occupants
resulting from a crash or sudden stop.

• Check that the unit is level.
• Remove the transit bars (if unit is so equipped).
• Press and hold slide-out room switch in the OUT posi-
tion. Switch is located in a side overhead compartment
near entrance door. Slide-out room will move slowly to
the OUT position
• To stop slide-out room before room reaches OUT the
position, release switch.
• To continue room movement, push and hold switch in.
T
o Retract Slide-Out Room
• Check that there is sufficient clearance inside motor
home for slide-out room.
• If applicable, clean floor.
• Press and hold the IN/OUT switch in the IN position, until the room is fully
retracted and stops moving.
• To stop slide-out room before room reaches the IN position, release switch. To
continue room movement, push and hold switch in.
• Install transit bars in designated locations (if unit is so equipped).
Manual Operation
Your slide-out system is equipped with a manual override that allows you to extend
or retract a room in the event of power loss.
If your system will not move when the switch is pressed make sure that:
1. The battery is fully charged.
2. The transit bars are removed (if so equipped).
Monarch 3-23
Appliances & Equipment
Appliances & Equipment
MONACO
2000

• Locate the slide-out motor. It is located in a storage compartment under
the slide-out room (center of room).
• Rotate the lever protruding out of the black housing of the motor assembly (brake
release lever) to disengage brake. NOTE: There is a label showing ENGAGED and
DISENGAGED.
• The room is now free to move. Locate the slide-out rail assemblies (one on each
side of the motor assembly) and 3/4” hex coupling on the end of the drive shaft.
• Using a 3/4” wrench or rachet, crank the room either in or out completely
(depending on your need).
• When the room is fully in (or out) have one person put pressure on the
wrench/rachet to ensure a tight seal while the other person returns the motor
brake lever to the engaged positioin. This will ensure the room is locked into a
sealed position.
• Install transit bars (if so equipped) and take the motorhome to an authorized
dealer for service.
Maintenance
• When the room is out, visually inspect the inner rail assemblies. Check for foreign matter of other objects. Remove any debris that may be present.
• If the system squeaks or makes any noise it is permissible to apply a coat of
lithium grease to the rollers and/or bearing sleeves. Wipe off any excess lubricant.
• There is no need to lubricate the gear or gear rack. This system is designed to
operate without lubricant to these components.
Monarch
3-24
Appliances & Equipment
Appliances & Equipment
MONACO
2000
! WARNING !
When the slide-out room motor brake lever is disengaged the room will not
lock into place, and therefore will not be sealed from the outdoors.
! CAUTION !
Do not work on your systems unless the battery is disconnected.

WWater Systems
ater Systems
General Information
It is hard to imagine how much
water you use everyday when you are at
home. Newcomers to self contained
motorhomes soon discover that water
does not last very long unless consumption is drastically reduced. For
instance, you can use less water for
showering if you wet down, turn off
water while soaping, then turn on water
to rinse. This way a good shower uses a
gallon or less of water. There is plenty
of water to meet your needs once you
adjust your habits.
There are two different water systems in your motorhome. The fresh water
system consists of the fresh water tank,
water pump, water heater and a city water
connection. The waste water system consists of a waste holding tank (gray water),
a sewage holding tank (black water), toilet
and drains.
The control panel for these two systems has a water pump switch, water
heater switch and level indicator lights for
tanks. To check water level of all tanks
push test button on left side of panel.
Water Pump
A water pump is used to pressurize the fresh water system when it is not connected
to city water. The water pump is totally automatic and self-priming, operating on
demand as water is used. The pump is located in an outside water connection panel
compartment on the road side of motorhome. To operate pump, check water level in tank
from the control panel; refill if necessary (see “Fresh Water Tank Fill”). Open all valves
and faucets except drain valves. This includes hot and cold water valves, all faucets, and
shower. Make sure water heater bypass valve is set to NORMAL FLOW position (see
“Water Heater Bypass System”) so that water can run into your water heater. Turn pump
on by pushing switch on control panel and wait for water lines and hot water tank to fill.
Monarch 4-1
MONACO
2000

Close each faucet when it delivers a steady stream of water (cold water faucets first). The
pump is now ready for automatic operation. It will start when a faucet is opened and
stop once faucet is closed. Do not allow pump to run when the fresh water supply tank
is empty. Continued operation with a dry tank may open an electrical circuit and/or
damage pump. For more detailed information see manufacturer’s brochure in your
Warranty Information File.
City Water Hook-Up
When connecting your motorhome to city water be sure to use a hose manufac-
tured and labeled for potable water to insure that hose will not flavor water.
To Hook-up City Water
• Attach hose to CITY/FRESH WATER FILL connection on the water connection panel located in an
outside service compartment on the roadside of the
motorhome and to a water source.
• Turn valve to LOCAL SUPPLY position.
• Shut off water pump on control panel.
• Turn on water supply and open faucets to purge
any trapped air in water system.
Fresh Water Tank Fill
• To fill tank, close tank drain valve and connect hose to CITY/FRESH WATER FILL
valve and to water source. Fill and drain valves are located in an outside water
connection panel compartment on the roadside of the motorhome.
• Turn valve to FRESH WATER TANK position.
• Turn on water and check level of tank on control panel while filling so tank does
not overfill. There is no automatic shut off on valve. There is an overflow drain
in the tank.
• Shut off water and unhook hose when tank is full.
Monarch
4-2
WWater Systems
ater Systems
MONACO
2000
!
CAUTION !
Some water sources develop high pressure, particularly in mountainous
regions. High pressure is anything over 55 psi (pounds per square inch).
Excessive pressure can cause leaks in water lines and/or damage water heater.
Water pressure regulators are available to protect water system against high
pressures. See your dealer for information.

Disinfecting Fresh Water System
Disinfecting the water system with chlorine bleach (superchlorination) protects you
and your family from bacteriological or viral contamination from any common water
source. You should disinfect the water system if your motorhome is new or hasn’t been
used in a long time. Use the following procedure to disinfect the water system.
• Prepare a chlorine solution using 1 gallon water and 1/4 cup of chlorine bleach
(sodium hypochlorite solution). Pour chlorine solution into empty fresh water
tank using 1 gallon of solution for every 15 gallons of tank capacity.
Example: Add 2-2/3 gallons solution to a 40 gallon tank. Add 4-2/3 gallons solu-
tion to a 70 gallon tank. This mixture puts a 50 ppm (parts per million) residual
chlorine concentration in the motorhome’s water system. This concentration will
act as a quick-kill dosage for harmful bacteria, viruses and slime-forming organ-
isms. Concentrations higher than 50 ppm may damage water lines and/or tanks.
• Fill tank with fresh water. Open each faucet in turn and run water until you
smell a distinct chlorine odor. Do not forget hot water, tub and shower faucets.
• Allow system to stand for 4 hours.
• Drain system and flush with fresh water. Drain is located in an outside water
control compartment. Flush with fresh water repeatedly, if necessary, until no
chlorine taste or smell is left in the water system.
Water Heater
Your motorhome is equipped with a
six gallon water heater. The water heater
operates on LP gas only and is controlled by
a switch on the control panel. Before operating the water heater be sure fresh water
tank and water heater are filled with water.
Purge any air from the water heater by opening all faucets until water flows steadily from
each.
Monarch 4-3
MONACO
2000
WWater Systems
ater Systems
! CAUTION !
Do not operate water heater unless water covers the heating element.
Failure to do so may damage water heater and void warranty.

LP Gas Operation
To light the water heater turn on the LP gas supply and push control switch to ON.
If no flame is established within a 10 to 15 second period, the system will go into lockout. This means that the water heater is not igniting. To reset the system, push switch
to OFF and back to ON position. If the water heater fails to ignite after three tries, contract your authorized dealer for service. Lock-out can occur when LP gas tank has been
refilled. If the water heater goes into lock-out frequently, during regular use, contact
your authorized dealer for service. To turn off water heater push control switch to OFF.
Draining and Storage
If your motorhome is to be stored for a long period of time, or during winter
months, the water heater must be drained to prevent damage from freezing. Refer to
Chapter 7 “Winterizing” for instructions. Be sure to refill water heater with water before
resuming operation.
Temperature/Pressure Relief Valve
The water heater is equipped with a temperature and
pressure relief valve which is designed to open if the water
temperature within the heater reaches 210oF (98.8oC), or if
the water heater reaches 150 pounds. motorhome water systems are closed systems and during the heating cycle pressure build-up in the system may reach 150 pounds. If this
pressure is reached, the pressure relief valve will open and
water will drip from the valve. This dripping will continue
until the pressure is reduced below 150 pounds and valve
closes.
Burner Compartment
Periodically check the service compartment and screen in door on outside of
motorhome (refer to Chapter 8 “Diagrams” for location) to see that no foreign material has
accumulated to prevent flow of combustion and ventilating air.
Monarch
4-4
WWater Systems
ater Systems
MONACO
2000
! WARNING !
Do not store any combustible materials or liquids near or adjacent to this
water heater. Do not plug pressure temperature relief valve under any circumstances. A severe explosion or fire could result causing bodily injury or death.

Water Heater Bypass System
The water heater bypass is a valve
located on the back of the water heater. By
turning the handle on valve to BYPASS
position you can divert water away from the
water heater. Do this when you winterize
the unit. Bypassing the water heater keeps
antifreeze out of the water heater.
For water heater operation turn valve
so that handle points to NORMAL FLOW.
Water Filter
A water filter will remove dirt and matter, and eliminate most chlorine and phenol
from water for drinking and cooking. The water filter in your motorhome is not guaranteed to remove tastes and odors of iron and sulfer. To remove these tastes you will need
to chlorinate water. Replacement filters are available that will filter iron and sulfer. Ask
your dealer or motorhome store about acquiring and iron/sulfer filter. If you are traveling in an area where water has a high iron content add 1 tablespoon of chlorine bleach
for every 10 gallons of water in your tank. This will precipitate iron so the filter can
remove it along with chlorine. If you are at a site where your motorhome is hooked up
to city water, you will not be able to chlorinate the system because water goes straight to
faucets rather than through the fresh water tank. The filter should be changed every 612 months depending on the amount of water that is used in your motorhome. If you
notice that water is flowing much slower from faucets, the filter will need to be changed.
The filter used in your motorhome is Everpure AC Quick Change Cartridge #9292-01.
These cartridges can be bought from any motorhome supply store.
Changing W
ater Filter or Diverter Cap
You need to replace the filter with the
diverter cap before you disinfect the water
system with a chlorine solution. To change
filter or replace filter with diverter cap use the
following procedure.
To Remove
• Turn off water supply and water
pump, then open faucet to bleed off
pressure.
• Lift locking lever up to a vertical position.
• Turn locking ring all the way left.
Monarch 4-5
MONACO
2000
WWater Systems
ater Systems
Continued

• Turn cartridge or diverter cap all the way left and pull down to remove.
To Install
• Check that locking ring is all the way left and down. Align bump on cartridge or
diverter cap with opening in locking ring. Push new cartridge or diverter cap up
into base and turn right until it stops.
• Turn locking ring right until it stops and lower locking lever so that it locks ring.
• Turn on water pump or city water.
Trouble Shooting Fresh Water System
Water system problems and leaks usually fall into two categories: System problems and problems caused by improper use or lack of attention. These problems usually stem from improper winterizing, poor maintenance, road vibration and campsite water
pressure variations. Check all plumbing connections for leaks at least once a year. If
the water pump runs when a faucet is not open check for a water leak. Be sure tank
drain valves are closed. If the system continues to leak take your motorhome to an
authorized dealer for service.
Waste Water Systems
Waste drainage system was designed to provide adequate and safe storage and/or
discharge of waste materials. All materials used in fabrication and installation of the system is tested by a nationally recognized testing laboratory. The entire fabricated waste
system is factory tested in accordance with the American National Standards Code
A119.2. The drainage system uses ABS plastic piping and fittings connected to sinks,
shower, toilet and holding tanks and provides for their drainage to an outside termination. The motorhome should be reasonably level for best operation of the system. There
are two separate systems, one for waste water (gray water) and one for sewage waste
(black water). Each one has its own control valve and both empty through the sewer
drain hose. When traveling, we recommend holding tanks be empty or less than half full.
Drain Traps
Sinks and shower drains have a water trap to prevent holding tank odor from
entering the motorhome. These traps must have water in them to trap odors. During
travel water can spill out of sinks and shower drain traps. During storage, water can
evaporate and allow odor into the motorhome. If odor is detected, run water into sinks
and shower to fill drain traps.
T
oilet Operating Instructions
The toilet operates from either the fresh water tank or from a city water supply.
The water pump must be turned on or city water connected. The toilet flushes directly
in the black water holding tank and uses high velocity water injection to produce a swirl
effect in bowl.
Monarch
4-6
WWater Systems
ater Systems
MONACO
2000

To flush the toilet push lever down all the way, hold for 4-8 seconds and release
lever. Push thumb lever on hand spray water saver to direct spray toward desired area
of bowl while flushing. If additional water is needed in bowl, raise flush lever to add
water.
Water is retained in bowl using a sealing blade attached to the foot pedal. If the
sealing blade does not move freely after extended use apply a light film of silicone spray
on blade. If toilet water is running, blade could be partially open or sealing groove of
blade could be clogged. Clean seal groove, taking care not to damage rubber seals.
To clean toilet use any good quality non-abrasive cleaner. Avoid highly concentrated or acidic household cleaners which might damage rubber seals.
Proper Waste Disposal
Most state parks have strict regulations about discharging wastes except into
authorized disposal systems. Dumping raw sewage from toilet holding tanks except at
authorized dumping stations is universally prohibited. Illegal dumping along roadside by
a minority of recreational vehicle users has resulted in tough laws, and has unfairly
labeled all camping vehicle trailers as unwelcome in some areas. Most states, national
and private parks have either a central dump facility or campsite hook-up for sewage.
You will find a list of dumping stations from coast to coast in Woodall’s Campground
Directory, Trailer Life’s RV Campgrounds and Services Directory, Rand McNally’s
Campground and Trailer Park Guide, Good Sam Park Director (Good Sam Club), and
other publications. Some major oil companies offer dump facilities at selected stations.
Plan ahead, and you will find few inconveniences in proper and legal disposal of holding
tank wastes.
Waste Holding Tank - Gray Water
Waste water tank is located under the floor. Waste tank stores sinks and shower
drain water. Chemical is not required in this holding tank.
Sewage Holding T
ank - Black Water
The sewage holding tank is located directly beneath the toilet. Before using the toilet you need to treat the holding tank with water that is mixed with an odor controlling
chemical. Chemical is readily available at any RV supply store. Be careful not to spill
chemical on your hands, clothing, or carpet; chemical can cause a permanent stain. To
Monarch 4-7
MONACO
2000
WWater Systems
ater Systems
! CAUTION !
Do not use any products that contain petroleum or ammonia in place of
an RV odor controlling chemical. Petroleum and ammonia will damage ABS
plastic holding tanks and seals.

treat tank, pour chemical into toilet and flush toilet to allow chemical to mix with water.
Continue to flush toilet until there is at least 1 inch of water/chemical solution in tank
directly under toilet.
To Drain W
aste and Sewage Tanks
To empty tanks, connect adapter to drain
hose. You will find an adapter stored in a drawer
inside of the motorhome. Once you have placed the
adapter on the drain hose it can remain there for life
of hose. T-handle drain valves are located on the
water control panel in the outside service compartment on the roadside of the motorhome.
To drain tanks, turn drain end cap counterclockwise and remove it from the drain
pipe. Unscrew bottom access hold plugs from the service compartment, feed adapter end
of hose up though hole and install hose adapter on drain pipe. Attach other end of drain
hose to sewer connection at dump station. Drain sewage tank first by pulling T-handle
out (SOLID WASTE DRAIN) on water control panel.
Flush holding tank with flush system. Connect water supply hose to SEWAGE TANK
FLUSH connection on water connection panel. Turn water on and flush system for
approximately two minutes or until water runs clear from drain hose. Turn water off and
disconnect hose when finished flushing system. After you have drained sewage tank,
Monarch
4-8
WWater Systems
ater Systems
MONACO
2000
Exterior Hose
Faucet
Low Point Drains
Fresh Water
Drain
Drain
Pipe
End Cap
City Water
Hook-Up
Tank Drain
Sewage Tank Flush
Tank
Drain

drain waste water tank by pulling T-handle out (LIQUID WASTE DRAIN) on water control panel. When tanks are empty you need to flush them with a fresh water rinse before
you close valves. Waste water tank is flushed by pouring two gallons of water down a
sink drain. Run toilet water to flush sewage tank. Always push both T-handles in and
install end cap (required in some states) when in transit to prevent leakage.
When Connected to Sewer Hook-Up
Keep holding tank (black water) valve closed at all times, except when dumping.
Waste holding tank (gray water) can remain open to drain when parked; connect drain
hose to sewer hook-up. Before emptying, be sure there is enough liquid in tanks to provide a smooth flow through valve and drain hose. Sufficient liquid in tanks cause a
swirling action that should take with it accumulated solid wastes. Empty tanks when
they are 1/2 to totally full.
What Not to Put in Holding Tanks
• Do not flush facial tissues. They are treated chemically to give them wet strength
and they will not dissolve like toilet paper. Special holding tank tissues are avail-
able at most RV supply stores. Also, white toilet paper dissolves faster than colored papers.
• Do not use strong detergents or full strength bleach to deodorize and disinfect.
Use odor control chemicals made especially for holding tanks.
• Do not put automotive antifreeze, ammonia, alcohol or acetone in holding tanks.
Some chemicals will dissolve plastic.
• Do not put large table scraps in tanks. They could get stuck in or damage valve
seals.
Cold Weather Use
Your motorhome was not designed for extended use in below freezing (32oF-0oC)
weather. However, you may not experience any problems as long as temperatures do not
fall too low. Interior water lines, fixtures, water storage tank and pump are normally protected from moderate freezing temperatures as long as furnace operates. Exposed drains
may freeze quickly. If you are in doubt about what temperatures your motorhome will
tolerate, winterize with a potable antifreeze.
NOTES
Monarch 4-9
MONACO
2000
WWater Systems
ater Systems

NOTES
Monarch
4-10
WWater Systems
ater Systems
MONACO
2000

General Information
Components for your
motorhome LP gas systems are
approved for use in camping vehicles
by a nationally recognized testing
laboratory. When properly handled,
LP gas is a clean-burning dependable
fuel for heat producing components.
The LP gas tank in your motorhome
contains liquid petroleum gas under
high pressure. As fuel is used, liquid
gas vaporizes and passes through the
tank valve to a regulator that automatically reduces pressure. Lowpressure gas is then distributed to
components through a pipe manifold
system. Component lighting problems are commonly caused by an improperly adjusted
gas regulator. Never attempt to reset the regulator yourself. Have your dealer or an
authorized service person make adjustments. In high altitudes or extreme cold weather
(10oF/-12.2oC or lower) you may experience a shortage of LP gas. You can adjust to this
by not running more than one component at a time, such as turning off the furnace while
using the range. If you are going to be in higher attitudes or cold climates for a long period of time, an authorized service person can adjust your LP regulator for these conditions.
We recommend that you have the LP gas system checked by an authorized dealer
at least once a year, and thereafter every extended trip. Although the manufacturer and
dealer both test carefully for leakage, travel vibrations could loosen fittings. Leaks can
be easily found by applying a leak detector solution at the connections. If leak detection
solution is not available, a soapy water solution made with dish soap can be used.
Tightening fittings usually stops any leaks. If not, shut off main gas valve at the tank
and see your authorized dealer for repairs immediately. Hand tighten tank valves only.
Do not use a wrench or pliers as over tightening may damage valve seats and cause them
to leak. If you have a leak identifying odor, smells like rotten eggs (sulfur), never light a
match or have an open flame where you suspect leaking gas.
Monarch 5-1
LP
LP
Gas Systems
Gas Systems
MONACO
2000

Monarch
5-2
MONACO
2000
LP
LP
Gas Systems
Gas Systems
LP Gas Consumption
Each gallon of LP gas produces
approximately 92,000 BTU’s of heat. Total
consumption depends on the rate of usage
by each appliance and operating time.
Oven and heating systems use the most
gas. With sub-freezing temperatures and
high winds, consumption by the furnace
can be very high. To check tank level,
press test switch on the monitor panel.
! DANGER !
Fire or an explosion from ignited gas or gas fumes can seriously injure you
or cause death.
Shut off all LP gas tank valves when motorhome is not in use. Since the
introduction of DSI boards in appliances, it is very important to shut off all LP gas
valves, pilot lights and appliances, and disable igniters (see operating instructions
in Chapter 3) during refueling motorhome and filling LP gas tanks to prevent a fire
or explosion.
If you smell gas (a rotten egg or sulfur smell) at any time, perform the following steps immediately.
• Turn off main gas supply.
• Do not touch any electric switch.
• Extinguish any open flames.
• Open windows and doors.
• Do not try to light any appliance.
• Exit motorhome and contract service center or gas supplier.
If you are storing LP gas tanks (do not transport or store LP gas tanks, gasoline, or other flammable liquids inside motorhomes) that are not connected to a LP
gas system install an approved plug in tank outlet holes to prevent leaks. Do not
store empty LP gas tanks. Keep open flame and spark producing materials away
from LP gas area. If this warning is ignored, a fire or explosion could result.

Gas Distribution Lines
A primary manifold black steel pipe running throughout the motorhome distributes LP gas to secondary lines. All secondary lines leading to gas appliances are made
of copper tubing with flared fittings. If any of these lines rupture do not attempt to splice
them. Always run a new line. We recommend gas distribution work to be performed by
an authorized dealer or an authorized service technician. When removing or servicing
any gas appliance, close main valve at LP gas tank. This will prevent dangerous gas leakage that could result in an explosion, and possible serious injury. If you suspect a leak,
get the system inspected and repaired by a qualified service technician as soon as possible.
Filling LP Gas Tank
Woodall’s Campground and Trailer Guide, and other publications, list refueling
stations. Many travel parks sell LP gas. Shut off pilot lights, appliances and igniters (see
operating instructions in Chapter 3) before filling LP gas tank to prevent a fire or explosion. Have a trained service person fill LP gas tank. Caution service technician that if
your tank is new and being filled for the first time to purge any air from tank before filling. When the tank is filled to the proper level, there is space available for conversion of
liquid into gas. If a tank is over filled it may vent pressure. When this happens you may
detect a strong rotten egg odor near the tank and/or hear a hissing noise. LP tank has
a gas level gauge to aid in filling tank.
Monarch 5-3
LP
LP
Gas Systems
Gas Systems
MONACO
2000

Monarch
5-4
MONACO
2000
LP
LP
Gas Systems
Gas Systems
LP Gas Regulator
The regulator is the heart of an LP gas system. LP gas in the tank is under high
pressure. The regulator reduces pressure of gas so that it is safe to use with various
appliances. The regulator is equipped with a vent so that it can breathe. This means
that if pressure in the LP tank is too high, the regulator will allow gas to escape through
the vent until pressure returns to a normal range. It is important to keep vent clean and
clear of obstructions or corrosion. If the vent becomes clogged, pressure from the LP tank
could cause a failure of components. If you notice any corrosion, contact a qualified LP
gas service technician. The regulator is mounted so that the vent faces downward. If the
vent becomes clogged, you can clean it with a toothbrush.
Operating Instructions
Open shut-off valve for use. Tank has a LP gas level gauge to monitor gas usage.
Turn off valve when motorhome is between trips and when in storage. Hand tighten
valve, do not use a wrench or pliers to close valve. Valve is designed to be closed by hand.
Over tightening may permanently damage valve seat.
LP Gas Detector
Liquid Propane (LP) Gas is heavier than air and will settle to the lowest point, which
is generally the floor of your motorhome. The detector is also sensitive to other fumes
such as hair spray, of which most contain butane as the propellant. Butane, like
propane, is heavier than air and will settle to the floor level where it will be detected.
When this occurs, press reset button, for 60 seconds, to stop alert sound.
Other combustibles which will be detected include alcohol, liquor, deodorants,
colognes, perfumes, wine, adhesives, lacquer, kerosene, gasoline, glues, most cleaning
agents and propellant of aerosol cans. Most are lighter than air in their vapor state and
will only be detected when the motorhome is closed up.
! WARNING !
Do not attempt to adjust the regulator, it is preset at the factory. If adjustments need to be made, contact a qualified LP gas service technician.
Adjustments can only be made by using special equipment. Failure to follow
these instructions may result in a fire or explosion and cause severe personal
injury or death.

Operation
Detector only indicates presence
of Propane Gas at sensor. Propane
Gas may be present in other areas.
This device is intended for detection of
Propane Gas leaks only. LP gas detector is operating at all times when it is
connected to its power source. This
detector is a safety device, and must
not be connected in such a way as to
allow it to be switched off or become
disconnected from its power supply.
When the motorhome is equipped with
a master cutoff switch, the detector will be turned off when the switch is turned OFF.
When the detector is powered or turned ON a green indicator light will be lit. After 3 minutes the detector will begin monitoring immediate environment for combustible vapors.
Propane you use to cook and refrigerate with is combustible. Should a leak occur, when
gas reaches the detector in sufficient concentrations, your detector will produce a pulsating alarm sound and A RED indicator alarm light will flash. This alarm (4 rapid beeps
per second) will continue to sound until gas has dissipated or until reset button is
pressed. The reset button only stops alarm from sounding for 60 seconds.
Gas detector is powered by your motorhome battery and/or your converter. It
draws less current than drawn by one instrument panel lamp. Your detector will operate to detect gas until your battery is drained down to 9 volts. (Your low battery condition 10.4 volts). If the power source (battery and/or converter) is disconnected, or if
power is otherwise interrupted, detector will not operate.
The gas detector has a self check circuit which runs at all times while the detector
is powered. In the event that circuitry fails, a fault alarm will sound and the fault indic-
Monarch 5-5
LP
LP
Gas Systems
Gas Systems
MONACO
2000
!
WARNING !
When alarm sounds open all doors and windows to air out motorhome and
turn gas off at LP tank. Do not re-enter motorhome until alarm stops sounding. If
alarm sounds a second time after gas is turned back on, leave gas off and contact
a qualified service technician to find source and repair gas leak.

Monarch
5-6
MONACO
2000
LP
LP
Gas Systems
Gas Systems
ator light will flash. Fault alarm is a short beep tone, once every 45 seconds, and is distinctively different from the alarm sound.
T
esting LP Gas Detector
The detector must be operating for at least 3 minutes before it can be tested.
Expose detector to gas and observe that alert alarm will begin to sound. One method of
simulating gas is to use a butane lighter. DO NOT ROTATE flint wheel. Just press on
gas release button and point exit nozzle into gas sensing area near top left of detector.
Alert will continue to sound until:
6 Gas mixture at detector returns to a safe level.
6 Reset button is pressed. When reset button is pressed, detector cannot be
tested again for at least 3 minutes.
NOTES

General Information
Your motorhome electrical system consists of 120 Volt AC and 12
Volt DC systems. For additional component information, other than what is
in this manual, refer to each manufacturer’s brochure in your Warranty
Information File.
The 120 Volt AC system includes
a UL listed power cord, UL listed distribution panel with transfer switch and
a generator package.
The 12 Volt DC system includes two 6 volt batteries connected in series, 55 AMP
power converter, two 12 Volt DC fuse panels, two battery disconnects and a battery isolator system.
Fuses are installed to protect circuits from overloading. Do not change circuitry or
add appliances yourself. See an authorized dealer. Always use the motorhome’s builtin power supply cord (shore line) to connect with 120V AC source.
Monarch 6-1
MONACO
2000
Electrical Systems
Electrical Systems
! WARNING !
Disconnect 120V AC electric shore cord and negative terminal from 12V DC
battery before working on electrical system.
Remove rings, metal watch bands, and other metal jewelry before working
around batteries and connectors.
Use caution when using metal tools. If tool contacts a battery terminal or
metal connected to it, shore circuit could occur which could cause personal injury,
explosion or fire.
Before hooking up to park shore power, verify that proper voltage and ground
protection is present. After hooking up to park shore power, verify that proper voltage and ground protection is present in motor home. Inexpensive testers are available for this purpose.

Electrical Switch Chart - Some Switches Not On All Units
Monarch
6-2
Electrical Systems
Electrical Systems
MONACO
2000
SWITCH
Air Conditioner Thermostat(s)
Battery Disconnect
Battery Level - House
Electric Generator
Fan - Ceiling Exhaust Bathroom
Fan - Ceiling Exhaust Kitchen/Living Room
Furnace Thermostat
Light - Bath
Light - Bath Ceiling
Light - Bathroom Vanity
Light - Bedroom Ceiling
Lights - Bedroom Wall
Light - Dinette
Light - Engine Compartment
Lights - Kitchen and Living
Room - Ceiling
Lights - Kitchen
Lights - Living Room - Side
Lights - Outside Compartments
Light - Porch
Light - Toilet Room
LOCATION -
Varies Slightly
On Some Units
Living Room Wall, Bedroom Wall
(Units With Two Air Conditioners
Only)
Entrance Door Stepwell
Control Panel In Bathroom
Dash, Generator Outside
Roadside Compartment
Fan Base
Fan Base
Living Room Wall - LP Valve
Must Be Open
Bathroom Vanity
Light Base Vanity
Light Base Vanity
Bedroom Wall, Light Base
Light Base
Next to Entrance Door & Light
Base
Light Base
Next to Entrance Door, Light
Bases
Light Base
Light Bases
Next to Entrance Door, Outside
Water Compartment
Next to Entrance Door
Light Base and Toilet Wall
FUNCTION/USAGE
Regulates Cool Air Temperature
Turns ON/OFF All House
Electrical Systems
Measures Battery Voltage
Starts/Stops Electrical
Generator
Turns Fan ON/OFF
Turns Fan ON/OFF
Regulates Heat Air Temperature
Turns Lights ON/OFF
Turns Lights ON/OFF
Turns Lights ON/OFF
Turns Lights ON/OFF
Turns Lights ON/OFF
Turns Lights ON/OFF
Turns Lights ON/OFF
Turns Lights ON/OFF
Turns Lights ON/OFF
Turns Lights ON/OFF
Turns Lights ON/OFF
Turns Lights ON/OFF
Turns Lights ON/OFF

120V AC System
Power supply cord is located in the roadside rear compartment and is permanently connected to the motorhome. When the cord is plugged into the AC power supply it
supplies power to distribution panel (located in bedroom night stand) through the transfer switch. Generator also supplies AC power to distribution panel through the transfer
switch.
30 AMP Distribution Panel
When 120V AC power supply cord (shore line) is used, only one (front or rear) air
condition can be used at a time and is controlled with an air conditioner selector switch
located next to the 30 AMP distribution panel. Distribution panel supplies one air conditioner unit, microwave oven and three branch circuits. Refer to label on distribution
panel for circuit assignments.
When the generator 120V AC power is used, a 30 AMP circuit breaker (located on
the generator) is used to supply power to the 30 AMP distribution panel, and a 20 AMP
circuit breaker (located on the generator) supplies power to the second air conditioner,
allowing use of both front and rear air conditioners at the same time.
Monarch 6-3
MONACO
2000
Electrical Systems
Electrical Systems
Light - Water Control Panel
Bedroom Slide-Out
Living Room Slide-Out
Radio
Step - Entry
TV Power Booster
TV/VCR Control Box
Water Heater - Electric
Operation
Water Heater - LP Operation
Water Pump
Water Tanks Level
Automatic When Door Opens
Bedroom Wall
Next to Entrance Door
Dash Panel, Bedroom
Next to Entrance Door
Front Overhead Cabinet
Front Overhead Cabinet
Bathroom Wall - Needs Shore
Power
Control Panel in Bathroom - LP
Valve Must Be Open
Control Panel in Bathroom
Control Panel in Bathroom
Turns Lights ON/OFF
Moves Room OUT/IN
Moves Room OUT/IN
Turns Radio ON/OFF
Turns Step ON/OFF
Turns Amplifier ON/OFF
Switches TV Options
Turns Water Heater ON/OFF
Turns Water Heater ON/OFF
Turns Pump ON/OFF
Measures Tanks Level

Transfer Switch
The auto transfer switch automatically switches from shore power to generator
power when the generator is started. There is a 45 second delay after the generator is
started before the motorhome electrical load is connected. This delay allows the generator to reach normal operating speed with no load connected.
Ground Fault Circuit Interrupter (GFCI) Outlet
For your protection certain circuits, in a motorhome, are protected by a Ground
Fault Circuit Interrupter (GFCI). The GFCI receptacle is located in the bathroom. GFCI
protected receptacles wired down into the stream of the bathroom. GFCI include kitchen
receptacles, outside receptacle, and all non-dedicated receptacles located within 6 ft. of
any lavatory or sink.
Testing Instructions
Test GFCI at least once a month. To test GFCI be sure that 120 volt electrical system is on. Before you start test be sure the reset button is pushed all the way in. Push
test button in, this should cause the reset button to pop out, which means the protected circuit has been disconnected. Push the reset button in until you hear a click, this
will reactivate protected circuit. If GFCI is working properly the reset button will stay
pushed in.
120V AC Generator
The generator is located in a service compartment on the roadside of the
motorhome. The generator may stop running before the chassis fuel tank is completely
empty. This is a safety feature to prevent the motorhome from running completely out
of fuel.
A preheater control lever on the generator needs to be set for changing temperature to prevent the engine from erratic operation and over speeding. At temperatures
below 40oF (4oC) move lever to WINTER position; between 40oF (4oC) and 70oF (21oC)
the lever can be in SUMMER or WINTER position; above 70oF (21oC) move lever to SUMMER position.
Monarch
6-4
Electrical Systems
Electrical Systems
MONACO
2000
! CAUTION !
If the GFCI breaker continues to trip, there is a loss in protection and a
potentially dangerous condition. Have the system repaired by a qualified electrician.

Starting Generator
The generator is controlled by either a remote switch on dash, or switch located on
generator. To start generator, shut off all 120V AC appliances/equipment. Push start
switch and hold until generator is running and release switch. Dash switch will be lit
when generator is running. Normally the generator will start running within 5 seconds;
if it fails to start after cranking for 10 seconds, release switch and wait 30 seconds before
cranking again. If the generator fails to start after 5 attempts, allow starter motor to cool
down for 5 minutes before cranking again.
S
topping Generator
Turn off all 120V AC appliances/equipment and run generator for at least 3 minutes before turning generator off. This lets lubricating oil carry heat away from combustion chamber and bearings. To stop generator, push switch to stop position for
approximately one second then release. For in-depth information regarding low oil shutdown protection, circuit breaker locations and maintenance procedures, refer to manu-
Monarch 6-5
MONACO
2000
Electrical Systems
Electrical Systems
! WARNING !
Do not block service compartment ventilating air inlets and outlets. Engine
requires a constant supply of cooling air. Do not operate generator when
motorhome is parked in high grass or brush. Engine exhaust could ignite grass or
brush and resulting fire could cause property damage, and/or personal injury or
death.
When motorhome is in parked position, move the dash air conditioner control in OFF position to prevent outside air from entering motorhome.
Engine exhaust gases contain carbon monoxide which is an odorless and colorless gas. Carbon monoxide gas is poisonous and can cause unconsciousness
and/or death. Inspect exhaust system thoroughly before starting engine. Do not
block exhaust pipe or situate motorhome in a place where exhaust gases have any
possibility of accumulating either outside, underneath, or inside motorhome or any
nearby vehicles. Operate generator only when safe dispersion of exhaust gases can
be assured and monitor outside conditions to be sure that exhaust gases continue
to be dispersed safely.
When working in generator compartment, remove house battery ground
cable and turn HOUSE BATTERY disconnect to OFF position to avoid personal
injury.
Failure to turn off 120V AC appliances/equipment when starting and/or
stopping generator may damage transfer switch and/or electrical problems.

facturer’s brochure in your Warranty Information File.
12V DC System
Two 6-volt batteries are located in the first compartment behind the curbside rear
wheels. Positive battery lead is routed to an insulator post in the generator compartment
(generator start motor/HWH pump), then to a 12V DC distribution panel on firewall.
Inside motorhome Distribution Panel Circuit and Fuses
Fuse assignments are listed on a fuse label attached to the inside cover of the dis-
tribution panel. When replacing fuses, always replace with same size as listed for a particular location. Fuse sizes shown are maximum fuse sizes allowable. Installing fuse
sizes other than those listed can cause electrical wiring to become overloaded and create
hazardous situations.
Fuse assignments are as follows:
1. Bath Lights/Vent - 15 amp Fuse
2. Dinette/Porch/Rt. Overhead - 15 amp Fuse
3. Bedroom/ODS Lights - 15 amp Fuse
4. Kitchen/Left Overhead, Stove Vent,
Opt. Vent - 15 amp Fuse
5. Ceiling Lights - 15 amp Fuse
6. Furnace - 15 amp Fuse
7. Monitor Panel - 15 amp Fuse
8. Slide-out - 15 amp Fuse
9. Radio - 5 amp Fuse
Circuit Breaker assignments are as follows:
Left Side: Right Side:
• 50 AMP MAIN • Converter, Bedroom, TV, Dining Room
• Front Air Conditioner • Bathroom, Kitchen, Refrigerator, TV, VCR
• Rear Air Conditioner • Water Heater
• Microwave
Outside motorhome Distribution Panel
The distribution panel (12V DC) is
located inside a roadside compartment. Fuse
assignments are listed on a fuse label
attached to the inside cover of the front distribution panel. When replacing fuses, always
Monarch
6-6
Electrical Systems
Electrical Systems
MONACO
2000
Fuses
Cover

replace with the same size as listed for a particular location. Fuse sizes shown are maximum fuse sizes allowable. Installing fuse sizes other than those listed can cause electrical wiring to become overloaded and create hazardous situations.
Fuse assignments are as follows:
1. Slide-Out Room - 15 amp C.B. 20. Rear Vision (Opt) - 5 amp Fuse
2. LP Detector - 3 amp Fuse 21. Leveling Jacks (Opt) - 5 amp Fuse
3. Power Seat (Opt) - 15 amp C.B. 22. Accessory Switch - 15 amp Fuse
4. Power Seat (Opt) - 15 amp C.B. 25. Air Conditioner - 20 amp Fuse
5. Storage Lights - 15 amp Fuse 26. Jack/Antenna Warning Lamp -
6. Bedroom Slide-Out - 15 amp C.B. 5 amp Fuse
7. Auxiliary Start/TV Amp - 7.5 amp Fuse 27. TV Cutout Relay - 7.5 amp Fuse
8. Cigarette Lighter - 15 amp Fuse 28. Galley Slide-Out Room Ign. Relay -
9. Map Lights - 7.5 amp Fuse 7.5 amp Fuse
10. C.B. Radio - 2 amp Fuse 29. Mirror Heaters - 15 amp Fuse
11. Service Light - 7.5 amp Fuse 30. Mirror Motors - 1 amp Fuse
12. 12V Receptacle - 15 amp Fuse 33. Step/Isolator Relay - 7.5 amp Fuse
13. Step Switch - 7.5 amp Fuse 34. Marker Lights - 7.5 amp Fuse
14. Step Motor - 25 amp Fuse
NOTE: Number’s 15, 16, 17, 18, 19, 23, 24, 31, 32 are not used.
Power Disconnects
The disconnects are mounted
in outside roadside compartments:
HOUSE BATTERY disconnect turns
power ON or OFF from the house
batteries. CHASSIS BATTERY disconnect turns power ON or OFF
from chassis battery. Both disconnects supply 12V DC power to fuses
and circuit breakers inside distribution panel.
Batteries
House batteries power level can be
checked by pushing the test button on
the left side of the control panel.
Batteries are located on the curb
side of the motorhome and are charged
Monarch 6-7
MONACO
2000
Electrical Systems
Electrical Systems

two ways:
1. When 120V AC shore line is plugged in, 55 amp converter supplies power to the
12V DC circuits and charges house batteries.
2. Chassis charging systems supplies power to house 12V DC circuits when engine
is running. Chassis charging system will continue to supply power to house system
unless excessive loading prevents chassis system from keeping up with demand. In this
case chassis systems take priority and separates house system from it circuits.
Battery Inspection & Care
Check external condition of batteries periodically. Look for cracks in cover and
case. Check vent plugs and replace them if they are cracked or broken. Keep batteries
clean. Accumulations of acid film and dirt may permit current flow between terminals
which could drain battery.
When not using your motorhome for an extended period of time, remove batteries
and store them in a warm dry place. Mark positive and negative cables for easy identification. Charge batteries periodically during storage. If you are putting your motorhome
into storage for a long time, it is recommended that you remove all batteries from clocks,
radios, smoke alarms, etc. that may be inside your motorhome. This prevents unnecessary drain and corrosion of batteries. motorhome batteries are deep cycle marine batteries that consume water, and they must be periodically filled. Use distilled water only.
Chassis Fuses and Circuits
There are two fuse boxes in addition to the front distribution box that supply your
motorhome chassis with 12V DC power. One fuse box is located under the dash on the
curbside of the motorhome. The second fuse box is located outside the motorhome
behind grille on chassis firewall. Fuse assignments are as follows:
Monarch
6-8
Electrical Systems
Electrical Systems
MONACO
2000
!
WARNING !
Do not allow battery electrolyte to come into contact with skin, eyes, fabric
or painted surfaces. Electrolyte is sulfuric acid solution which could cause serious personal injury or property damage. Wear eye protection when working with
batteries.
Do not store anything in battery compartment near batteries that might
touch terminals. This could cause an electrical short circuit, drain the battery
power, or start a fire.

Fuse Box Under Dash
NOTE: Fuse Number’s 1, 3, 10, 11, 12, 15,1 6, 17 are not used.
Monarch 6-9
MONACO
2000
Electrical Systems
Electrical Systems
Fuse Location Size Circuit
2 8.25A Interval Wiper/Washer Windshield Wiper
Washer System
Instrument Panel Warning Lights
4 15A Programmable Speedometer/Odometer
Module, Warning Chime
5 20A Instrument Panel Lamps, Prk/Marker,
Light Module, (POSM)
6 10A Body Builders Accessory Feed (Accessory
and Run)
7 20A Overdrive Cancel Switch, Turn Signals
8 15A Body Builders Accessory Feed (Run Only)
9 20A Brake Pressure Switch, Hazard Lamp,
Stop Lamps
13 5A Instrument Panel Illumination
14 5A Not Used (For Radio Feed - see Inside
Fuse Panel)
18 15A Not Used by Body Builder

Fuse Box Behind Grille on Firewall
NOTE: Fuses G, H, I, J, T, U are not used. Relay #5 is not used.
Monarch
6-10
Electrical Systems
Electrical Systems
MONACO
2000
Fuse Location Size Circuit
A 15A Not Used (For Cigar Lighter - See Front
Distribution Panel)
B 20A Flash to Pass, Daytime Running Lamps
C 20A Horn Relay, Slip Ring Assembly
D 20A Body Builder Battery Accessory Feed
E 15A Heated Exhaust Gas Oxygen Sensor,
Back-up Lamps, Blower Relay Coil
F 10A Speed Control
K 20 MAXI P R N D L Sensor, Starter Motor Relay,
T.F.I. Module
L Diode EEC Relay
M 30 MAXI EEC Relay
N 60 MAXI Ignition Switch
O 30 MAXI Electric Brake
P 50 MAXI Not Used (For Blower Motor Feed - See
Front Distribution Panel)
Q 60 MAXI Head Lamps, Main Light Switch, PSOM
R 20 MAXI Fuel Pump Relay
S 20 MAXI Body Builder Battery Feed
V 20 MAXI TFI Ignition Module, Ignition Coil,
Distributor, Radio Capacitor, EEC Relay Coil
Relay #1 Electronic Engine Control (EEC)
Relay #2 Fuel Pump Relay
Relay #3 Horn Relay
Relay #4 Not Used

Exterior Care
The exterior of your
camping motor home is
made of a pre-finished aluminum and fiberglass.
Wash it frequently with a
mild soap in lukewarm
water. If you travel roads
that have been salted for ice
removal, wash your motor
home as soon as possible.
Most common causes of
corrosion are: accumulation
of road salt, dirt and moisture in hard to reach areas
under your motor home.
Undercarriage should be rinsed off periodically to prevent build-up of dirt or chemicals.
To minimize the chance of corrosion, be thorough when you wash your motor home.
Make sure you wash the undercarriage and wheel wells as well as the exterior of the
motor home. A good automotive cleaner/wash should be used to remove tree sap, road
tars, and insects that may damage the surface. Do not use naphtha or turpentine. We
recommend that you wash your motor home about every three weeks and wax it in the
spring and fall.
NOTE: Aerosol cans of spray enamels are available from your dealer for use on steel
chassis parts. Do not use them on exterior aluminum or fiberglass.
Check seals around doors, windows and external seams at least twice a year. If a
seal is cracked or dried out it should be replaced with new material to prevent leakage.
Sealants can be purchased from your Monaco dealer. Check roof seals once a year to see
if they are cracked or peeling, if so reseal seams. If you need to reseal roof, use Dolphine
7547 Lo Thix UVR ElastiSeal in Off White. Be sure that you do not kneel on roof without a knee pad. Pressure from your knees will dent the aluminum roof. Walking on the
roof will not dent it.
Monarch
2000
Unit Care & Maintenance
Unit Care & Maintenance
7-1
MONACO

Interior Care
Fabrics have been manufactured with the same quality you would expect to find in
a furniture store. However, if abused they are not completely resistant to damage.
Special care is needed when your motor home is exposed to a very humid climate for an
extended period of time. Cover upholstery and make sure window coverings are down to
protect from sun damage. This will protect fabric from any unnecessary exposure to
moisture. Sofa, pillows, dinette cushions, living area chairs, driver/passenger seating,
and window treatments have been treated with Scotch Guard to prevent overall water
spots or soiling. Soiling may occur more frequently and items will probably need more
attention than your furniture at home. Use the following guidelines for cleaning your
upholstery fabrics.
• Water base cleaners are not recommended.
• If a spill does occur, blot up spot, but do not rub it in.
• Some solvents are not recommended since they may have an adverse reaction on
specific backings of your upholstery fabric.
• To prevent overall soiling, frequent vacuuming or light brushing to remove dust
and grime is recommended.
• Spot clean, using a mild water-free solvent or dry cleaning product.
• Clean only in a well ventilated area and avoid any product containing carbon
tetra-chloride or other toxic materials.
• Use a professional furniture cleaning service for an overall cleaning.
Bedspread/Draperies/Valance/Headboards
We recommend dry cleaning for your bedspread and draperies just as you would
for your draperies and comforters at home. Although this is more expensive, proper care
of material will help insure a longer life. Care of headboard and bedroom valance fabric
should be done with same instructions given for upholstery fabrics. Laundering and
improper cleaning may result in fabric shrinking or deteriorating prematurely.
Monarch
7-2
Unit Care & Maintenance
Unit Care & Maintenance
2000
MONACO
!
WARNING !
Urea-formaldehyde is used in production of particle board, hardwood plywood or paneling. Urea-formaldehyde resin may release formaldehyde vapors
which may cause headaches, eye, nose and throat irritation in some people.
Formaldehyde may aggravate some allergies or upper respiratory problems like
asthma. Proper ventilation should reduce the risk of such problems.

Wall and Ceiling Coverings
Your decorative wall and ceiling coverings are not much different from vinyl wall
paper that you may have in your home. They should be cleaned with a non-abrasive
cleaner and a soft cloth.
Solid W
ood Cabinetry
These products should be cared for as you would any fine piece of wood furniture.
Apply a furniture polish when you clean your motor home to maintain natural beauty
and luster of the wood. This will keep your cabinetry looking new and keep wood from
drying out.
Counter Tops
High pressure laminate counter tops are quite easy to keep clean. Waxing is not
necessary. Glass rings, food spills, water spots and smudges usually wipe off with a
damp cloth or sponge. Stubborn stains can be removed with a spray cleaner. Laminated
surface resists alcohol, fruit acids, cosmetics and most household chemicals. Avoid contact with dyes, strong laundry bleaches and bluing solutions. Indelible inks used on food
packages may leave a stain, so take care when unpacking groceries on a damp countertop. Sharp knives can damage the finish, so confine slicing to a good cutting board.
Counter tops resist minor heat. Very hot pots and pans straight from the oven or broiler should be placed on hot pads. Keep irons on an ironing board and lighted cigarettes
in an ashtray. For lasting beauty avoid using harsh abrasives, scouring powders, peroxides or bleaches. These can dull the surface and make it more likely to stain next time.
Appliances
Care for these as you would at home by using a kitchen cleaner.
Carpet
Your carpet is made of Nylon. Professional cleaning is recommended for major
cleaning. Frequent vacuuming is recommended for daily accumulations.
Bath Fixtures
Clean your tub/shower, sinks, and toilets as you would at home. A non-abrasive
cleaner is recommended. When cleaning mirrors or shower doors a vinegar and water
solution works very well to remove hard water spots and stains.
Monarch
2000
Unit Care & Maintenance
Unit Care & Maintenance
7-3
MONACO

Hardware/Accessories/Light Fixtures
Wipe clean as you would for daily cleaning. Use a non-abrasive cleaner to avoid
damaging finish.
Cleaning Of Brass Fixtures
To clean fixtures, wipe with a soft damp cloth. Warm water will remove dry water
spots. Do not use cleaners which contain abrasive or harsh chemicals. Never use alcohol or other organic solvents.
W
indows
Any glass will develop water spots if glass is not cleaned properly. Spotting effect
is magnified when the glass has a reflective finish. Use a squeegee immediately after
washing to reduce water spotting. To remove stubborn water stains from reflective glass,
we recommend Cerium Oxide Polishing Compound. This compound is made by C.R.
Lawrence and is available at most glass shops.
Condensation
Condensation is a natural phenomenon. The amount of condensation will vary
with climate conditions, particularly relative humidity. Condensation occurs because
there is water vapor present in the air, and each of us adds more by breathing, bathing,
cooking, etc. Water vapor collects wherever there is available air space, and when temperature reaches dew point, water vapor in air condenses and changes to liquid form.
Controlling Moisture Condensation
You can reduce or eliminate interior moisture condensation during cold weather by
taking following steps:
• Partially open roof vents and windows so that outside air can circulate into interior air. Increase ventilation when larger numbers of people are in the motor
home; even when it is raining or snowing, air from outside will be far drier than
interior air.
• Cover ground under motor home with a vapor barrier such as a 6 mil polyethylene cover.
• Install a dehumidifier. Continuous use of a dehumidifier will be more effective in
removing excess moisture from interior air. While use of a dehumidifier is not a
Monarch
7-4
Unit Care & Maintenance
Unit Care & Maintenance
2000
MONACO

cure-all, and ventilation and moisture reduction continue to be important,
operation of a dehumidifier will reduce the amount of outside air needed for ven-
tilation.
• Reduce moisture released inside motor home. Run range vent fan when cooking and bath vent fan (or open bath vent) when bathing to reduce water vapor.
Avoid making steam from excessive boiling or use of hot water.
• Do not heat motor home interior with range or oven. Heating with the range or
oven increases the risk of toxic fumes and oxygen depletion. Also, open flames
add moisture to interior air, increasing condensation.
• In very cold weather, leave cabinet and closet doors partially open to warm and
ventilate interior of storage compartments. Air flow will warm exterior wall sur-
face reducing or eliminating condensation and preventing possible ice formation.
Winterizing
To use air pressure to winterize your motor home you will have to have access to
an air compressor and adapter to connect air line to your water system. Adapters can
be found at any RV supply store. You should not exceed 40 pounds p.s.i. when hooked
to water lines. Higher
pressures will damage
lines.
1. Drain fresh
water tank by opening
drain valve located in
exterior service compartment.
2. Open lowpoint drains. Turn
knobs to open drains.
Opening low point
drains clear water out
of hot and cold water
lines.
Monarch
2000
Unit Care & Maintenance
Unit Care & Maintenance
7-5
MONACO
! WARNING !
When draining low-point drain lines and water heater be sure water is not
hot. Hot water from lines can burn you.
Exterior Hose
Faucet
Low Point Drains
Fresh Water
Drain
Drain
Pipe
End Cap
City Water
Hook-Up
Tank Drain
Sewage Tank Flush
Tank
Drain

3. Let all water drain. Turn on pump and allow it to run for 30 seconds to 1
minute so that all water is cleared out of pump and fresh water tank. Pump switch is
located on control panel.
4. Remove water heater drain plug and open pressure release valve (both are located behind water heater cover on exterior of motor home).
5. After you have drained water lines, hook an air hose to the city water connection located outside motor home. Blow out water lines until no more water can be seen
coming out of drain lines. Do not exceed 40 p.s.i. in water lines and faucets.
6. Open water heater bypass valve located on rear of water heater (Chapter 4
“Water Heater Bypass System”).
7. Replace water heater drain plug and close pressure release valve. Open all
faucets (including outside spigot) one at a time while air is on to clear water from faucet
supply lines. Also do not forget to drain the shower.
8. While air is on, hold spray nozzle (located right next to toilet) open until water
has quit running. Hold toilet flush pedal or handle down until water has stopped running.
9. Unhook air hose and close city water connection.
10. You will need 1 gallon of RV antifreeze to protect various water lines in your
motor home. Pour 1 pint in both kitchen and bath shower drains, 2 pints go in bath sink
drain with some antifreeze going into gray tank to protect drain valve. While holding
down flush pedal pour another 3-1/2 pints into toilet letting antifreeze run into black
tank to protect valve located there. Pour last 1/2 pint of antifreeze into toilet after you
have released flush pedal. Use a soft cloth to wipe out sinks and shower after you pour
in antifreeze to protect surfaces from stains.
11. If you do not choose to fill water lines with NONTOXIC (potable) winterizing
antifreeze, leave low-point drains open until you are ready to use your motor home again.
If you choose to fill water lines with antifreeze, you will need 10 gallons of NONTOXIC (potable) winterizing antifreeze to protect water lines. Close all faucets and low
point drains. Acquire a hose and adapter and install them on the inlet side of the water
pump. Insert the end of hose into the antifreeze container and turn ON water pump.
Open each inside faucet and shower valves until a small amount of antifreeze runs into
the holding tanks and close faucets. Use a soft cloth to wipe out sinks and shower to
protect surfaces from antifreeze stains. Flush stool and hold spray nozzle to allow a
Monarch
7-6
Unit Care & Maintenance
Unit Care & Maintenance
2000
MONACO

small amount of antifreeze to run into the holding tank. Open and close the exterior hose
faucet to fill lines with antifreeze. When finished, remove hose and adapter from water
pump and reconnect original inlet line to pump.
Winter Storage Check List
• Plumbing Lines - Drain and protect by filling with approved RV antifreeze.
• Water Heater - Drain.
• Toilet - Drain and hold pedal down until antifreeze appears in bowl.
• Fresh Water Tank - Drain.
• Body - Clean and wax. Oil locks and hinges. Repair roof seams as needed.
After each snowfall remove heavy wet snow accumulation with a push broom.
• Tires - Block up motor home with wooden blocks or manufactured jack-stands
on a hard level surface. Partially deflate tires. Cover tires to protect against
sunlight.
• Countertop and Cabinets - Wash with mild soap and water.
• Curtains - Remove and clean according to care specifications.
• Windows - To protect interior fabric from fading, cover windows by pulling
blinds, closing shades or use a separate cover such as a sheet.
• Holding Tank - Drain and rinse. Close valves. Add a small amount of
antifreeze to keep valves and gaskets lubricated.
• Drain Traps - Pour a cup of RV antifreeze down all drains.
• Batteries - Add distilled water and recharge if needed. Disconnect cables.
Remove batteries and store them in a cool dry place. Check and recharge as
needed.
• Refrigerator - Clean and leave both doors propped open. Cover exterior panels
and roof vents.
• Air Conditioner - Remove air filters and clean or replace. Cover shroud.
• Roof must be kept clear of snow accumulation or damage may occur.
Opening Motor Home Check List
If the motor home was properly and carefully prepared for storage, taking it out
of storage will not be difficult. The following procedure check list assumes that you
stored your motor home properly. If you didn’t, and extensive freeze damage or other
serious deterioration has occurred, consult your dealer or an authorized service center
for advice.
• Thoroughly inspect outside of motor home. Look for animal nests in wheel
wells, furnace vent, water heater vent, or in other out of the way places.
• Remove all appliance vents, ceiling vents and air conditioning covers. Be sure
all furnace, water heater and refrigerator openings are free of debris, insect
Monarch
2000
Unit Care & Maintenance
Unit Care & Maintenance
7-7
MONACO

nests, webs, etc..
• Open all doors and compartments. Check for animal or insect intrusion,
water damage or other deterioration.
• Check all chassis fluid levels - engine oil, engine coolant, power steering fluid,
brake fluid transmission oil, rear axle oil.
• Check charge levels in batteries. Refill and recharge as necessary. Reinstall
batteries if necessary. Be sure cable ends and terminals are clean and free of
corrosion.
• Check tire pressures. Reinflate to specified cold pressure.
• Remove coverings from windows if necessary.
• Open vents and windows for ventilation.
• Be sure engine instruments indicate proper readings. Run engine up to operat-
ing temperature. Shut engine down. Check all fluids and fill as necessary.
• During engine run, check operation of headlights, tail lights, turn signals, backup lights, license plate light and emergency flashers. Operate motor home air
conditioner. If air conditioner doesn’t work, or unusual sounds occur, have
system checked by a qualified air conditioner technician.
• Drain, flush, and sanitize fresh water system as outlined in water chapter.
Inspect drain hose for leaks. Replace if necessary (repairs are not usually effective).
• Operate all faucets and fixtures in fresh water system.
• Check for leaks at all joints and fittings. Repair if necessary.
• Check 12 volt circuit breakers and inspect fuses.
• Operate all 12 volt lights and accessories.
• Install new batteries in battery operated devices.
• Test carbon monoxide, LP gas and smoke detectors.
• Check monitor panel operation.
• Open and operate vents and vent fans including range hood fan.
• Inspect 120 volt electrical system which includes power cord, converter, all out-
lets, and exposed wiring. If defects are found, refer to your dealer or an authorized service center.
• Prepare generator for operation following instructions in generator operating
manual in your Warranty Information File. Start and run generator.
• Operate 120 volt appliances and air conditioners. Be sure to uncover air conditioner shrouds.
• Inspect LP gas system and check for leaks. If LP tank shows signs of rust or
corrosion, have it inspected by a qualified LP technician.
• Operate each LP gas appliance. Observe all burner/pilot flames for proper
color and size. In any case, have LP gas regulator adjusted for proper pressure
by a qualified technician.
• Inspect and clean interior.
• Check sealant around all roof and body seams and windows. Reseal if neces-
sary.
Monarch
7-8
Unit Care & Maintenance
Unit Care & Maintenance
2000
MONACO

• Lubricate all exterior locks, hinges, and latches.
• Check windshield wiper blade condition. Check wiper/washer operation.
• Wash and wax exterior. Inspect body for scratches or other damage. Touch up
or repair as necessary. Flush underside thoroughly.
• Run through operational checks for steering, brakes, engine and transmission.
Operate motor home slowly during these checks to allow sufficient circulation of
fluids and resetting of components.
• Your camping motor home should now be ready for a new traveling season. If
you choose, your dealer can double check your preparation and correct any
defects or make any necessary adjustments.
NOTES
Monarch
2000
Unit Care & Maintenance
Unit Care & Maintenance
7-9
MONACO

NOTES
Monarch
7-10
Unit Care & Maintenance
Unit Care & Maintenance
2000
MONACO

This chapter is made up of
drawings to identify locations of
access doors, plug-ins, water connections, exterior views, dash
views, etc. There are also charts of
various capacities and bulb types
used in your motorhome. For your
convenience we have included
pages for you to use to list personal property ID numbers and serial
numbers. The Federal Certification
Label of your motorhome is located
near the operator’s seat on the sidewall.
Serial Number Information
Refer to the motorhome Warranty Information File for locations of component
manufacturer serial number locations that are not listed below.
Motorhome Serial Number
Motorhome Federal Vehicle Identification Number (VIN)
Door Key Number
Range Model & Serial Number
Located under top burner plate.
Microwave Model & Serial Number
Located behind door on case.
Refrigerator Model & Serial Number
Located inside refrigerator compartment.
Furnace Model & Serial Number
Located in outside compartment on furnace.
Water Heater Model & Serial Number
Located in outside compartment on water heater.
Electric Generator
Located in outside compartment on generator.
Roof Air Conditioner
Located under top cover on air conditioner.
Monarch 8-1
2000
Diagrams & S
Diagrams & S
pecifications
pecifications
MONACO

Personal Property Information
Item Serial Number Value
Insurance Information
Company
Policy Number
Agent’s Name & Address
Business Phone
Emergency Phone
Renewal Dates
Monarch
Diagrams & S
Diagrams & S
pecifications
pecifications
2000
8-2
MONACO

Locations vary from model to model. Identify each by their specific view.
Front View Rear View
1. Mirrors 1. Identification Lights
2. Headlights 2. Clearance Lights
3. License Plate 3. Rear Vision Camera
4. Engine Access Door 4. Center High Mount
Brake Light
5. Windshield Wipers 5. Turn Signals/Tail Lights
6. Clearance Lights 6. License Plate
7. Identification Lights 7. Rear Tow Hitch
Monarch 8-3
2000
Diagrams & S
Diagrams & S
pecifications
pecifications
MONACO

Roadside View
Locations vary from model to model. Identify each by their specific view.
1. Storage & Electrical Panel 9. TV Antenna
2. Storage Compartment 10. Shower Vent
3. Electric Generator/Leveling Jacks 11. Toilet Vent
Hydraulic Pump
12. Roof Air Vent
4. Side Marker Light
13. Holding Tank Vent
5. Water Control Panel
14. Attic Air Vent
6. Electric Cord (Shore Line)/Storage/
Telephone & Cable Hookup 15. Radio Antenna
7. Gravity Fresh Water Fill 16. Fuel Fill
8. Roof Air Conditioner
Monarch
Diagrams & S
Diagrams & S
pecifications
pecifications
2000
8-4
MONACO
1
2
2
3
4
5
6
7
8
8
9
10
11
12
13
1415
16

Curbside View
Locations vary from model to model. Identify each by their specific view.
1. Storage Compartment 8. Porch Light
2. Storage Compartment/House 9. Grab Handle
Batteries and Disconnect
10. Furnace Compartment
3. Side Marker Light
11. Refrigerator Compartment
4. LP Tank/Spare Tire
12. Water Heater Compartment
5. Storage Compartment/Telephone &
Cable Hookup 13. Refrigerator Vent
6. Step
7. Chassis Disconnect & Storage
Compartment
Monarch 8-5
2000
Diagrams & S
Diagrams & S
pecifications
pecifications
MONACO
12
3
4
5
6
7
8
9
10
11
12
13

Dash Panel - Workhorse Chassis
1. Headlight Switch - Turns headlights on and off.
2. Panel Light Switch - Dims dash lights.
3. Power Mirrors Controls - Left lever controls movement of driver’s side mirror and
right lever controls movement of passenger’s side mirror.
4. Mirror Defrost Switch - Will turn on heater in the exterior power mirrors to defrost
them for better visibility.
5. Accessory Switch
6. Auxiliary Start Switch - Will borrow power from the coach battery to jump start
motorhome if chassis battery does not start motorhome.
7. Air Conditioner Vent - Louvers in vent will direct air either right, left, up or down.
Monarch
Diagrams & S
Diagrams & S
pecifications
pecifications
2000
8-6
MONACO
1
2
3
4
5
6
7
8
9
10
11
12
13
14
15
16
17
18
19
20
7
7

8. Voltmeter - Shows voltage of chassis electrical system.
9. Oil Pressure Gauge - Registers oil pressure of engine. A reading in midrange area
at average engine temperature is considered average.
10. Engine Temperature Gauge - Normal operating temperatures is 190oF to 240oF.
11. Fuel Gauge - This gauge indicates approximate amount of fuel in fuel tank.
12. Antenna Up Warning Light - Illuminates when TV antenna is in raised position
with ignition switch ON. You should not move motorhome until you lower antenna.
13. Speedometer - Indicates speed of motorhome in both mile per hour (MPH) and
kilometers per hour (KPH).
14. Tachometer - Registers RPM’s of engine.
15. Radio power switch - Turns radio on and off independent of main switch on radio.
16. Generator Start Switch - Allows you to start generator from inside your
motorhome.
17. Cigarette Lighter/Auxiliary Power - Can be used as a power source for a cellular
phone.
18. Rear View Camera Monitor.
19. Dash Air Conditioning and Heater Controls - Operate dash air and heat only.
20. Radio - Complete instructions for operation of radio are in your Owner’s
Information Packet.
Monarch
2000
Diagrams & S
Diagrams & S
pecifications
pecifications
MONACO
8-7

Dash Panel - Ford Chassis
1. Headlight Switch - Turns headlights on and off.
2. Panel Light Switch - Dims dash lights.
3. Power Mirrors Control - Left lever controls movement of driver’s side mirror and right
lever controls movement of passenger’s side mirror.
4. Mirror Defrost Switch - Will turn on heater in the exterior power mirrors to defrost
them for better visibility.
5. Accessory Switch
6. Auxiliary Start Switch - Will borrow power from the coach battery to jump start
motorhome if chassis battery does not start motorhome.
7. Air Conditioner Vent - Louvers in vent will direct air either right, left, up or down.
8. Voltmeter - Shows voltage of chassis electrical system.
Monarch
Diagrams & S
Diagrams & S
pecifications
pecifications
2000
8-8
MONACO
 Loading...