

Page 1
1080P IOT CAMERA
USER MANUAL
Page 2

2
Contents
Introduction 4
LED Indicators 5
What’s Included 6
Wi-Fi Requirements 7
Mobile Device Requirements 7
Download the Momentum App 8
Setup 9
Pairing 9
Pairing additional Momentum Devices 11
Pairing additional non-Momentum Devices 11
Setting up Rules 12
Triggers 12
Adding a New Rule 12
Mobile Alerts 13
Storage Options 14
Momentum Capture Cloud Storage 14
Micro-SD Card Storage 15
Your Dashboard 16
Camera Functions 17
Page 3

3
Watching Live Video 17
Taking Photos 18
Recording Videos 18
Audio Functions 19
Viewing Recorded Photos and Videos 20
Saving and Deleting recordings 21
Device Settings 22
Deleting Devices 22
Siren Activation 23
Restoring Forgotten Passwords 23
Resetting the Camera 24
Troubleshooting 25
About Momentum 26
© 2016 Momentum
Momentum is a registered trademark in the United States. Apple and iPhone
are registered trademarks of Apple Inc. Google, Google Play, and Android are
trademarks of Google LLC. All other brands and product names are or may
be trademarks of their respective owners.
Note: Screen shots and procedures described in this manual are subject to
change without notice. The latest Momentum User Guide is always available
on our website at http://www.momentumcam.com.
Page 4
4
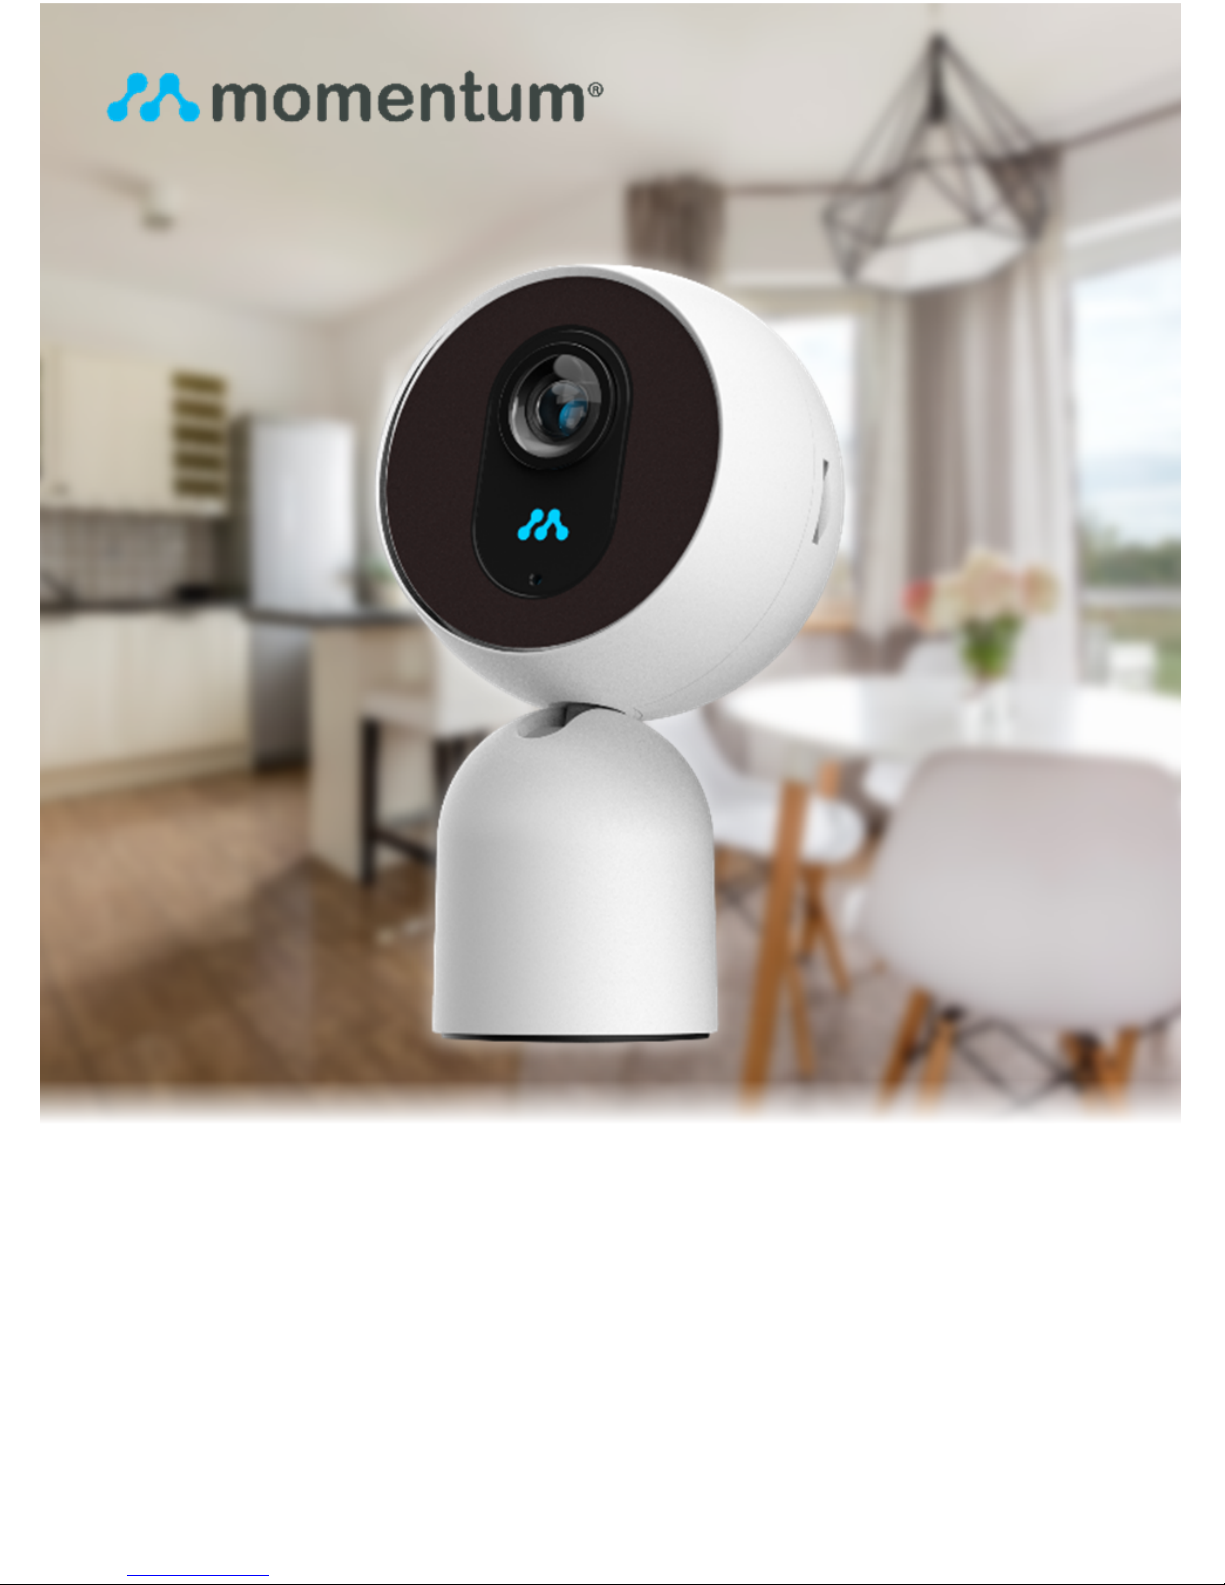
Introduction
The Momentum ™ is an indoor 1080P HD Smart Home
Security Camera with wireless monitoring capabilities
that can be accessed from anywhere where you have
an internet connection. It’s great for indoor surveillance
for your home, office, shop, warehouse, or other
locations. All you need is a:
1. Wireless internet connection, and
2. Mobile device (Android or iOS)
See page #7 for device requirements.
Use your smartphone and/or tablet to use and manage
the camera and app’s functions remotely.
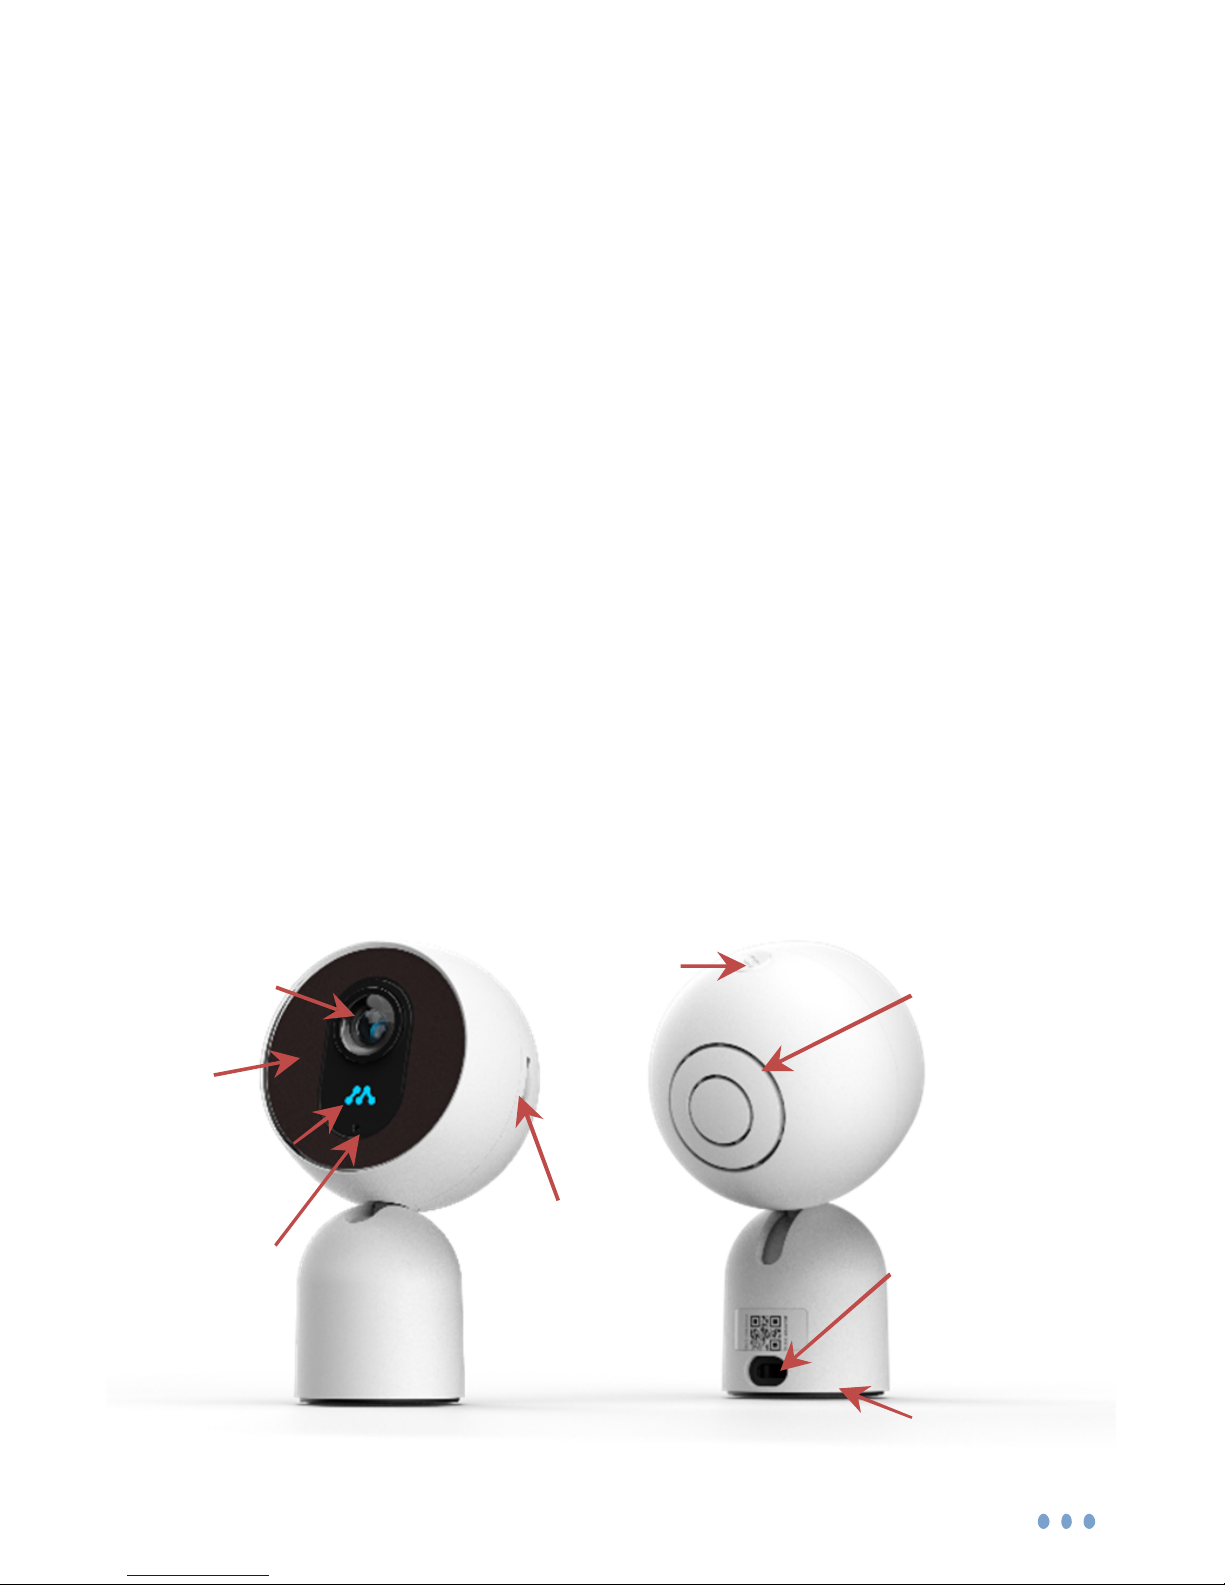
Front Rear
Built
-
in speaker
Camera lens
IR
LED
s
Micro- USB port
for power supply
Reset button
Indicator light
Microphone
Micro SD
card slot
(128GB max)
Mounting plate
Page 5

5
LED Indicators
1080P IOT CAMERA displays an LED indicator light that
lets you know what it is doing.
Solid Red Light: Camera is booting up.
Slow Blinking Red Light: Disconnected from Wi-Fi.
Double Blinking Blue Light: Ready to connect to Wi-Fi.
Blinking Blue Light: 1080P IOT CAMERA is connected
to Wi-Fi. Solid Blue Light: User is currently live
streaming.
Indicator light
Page 6
6
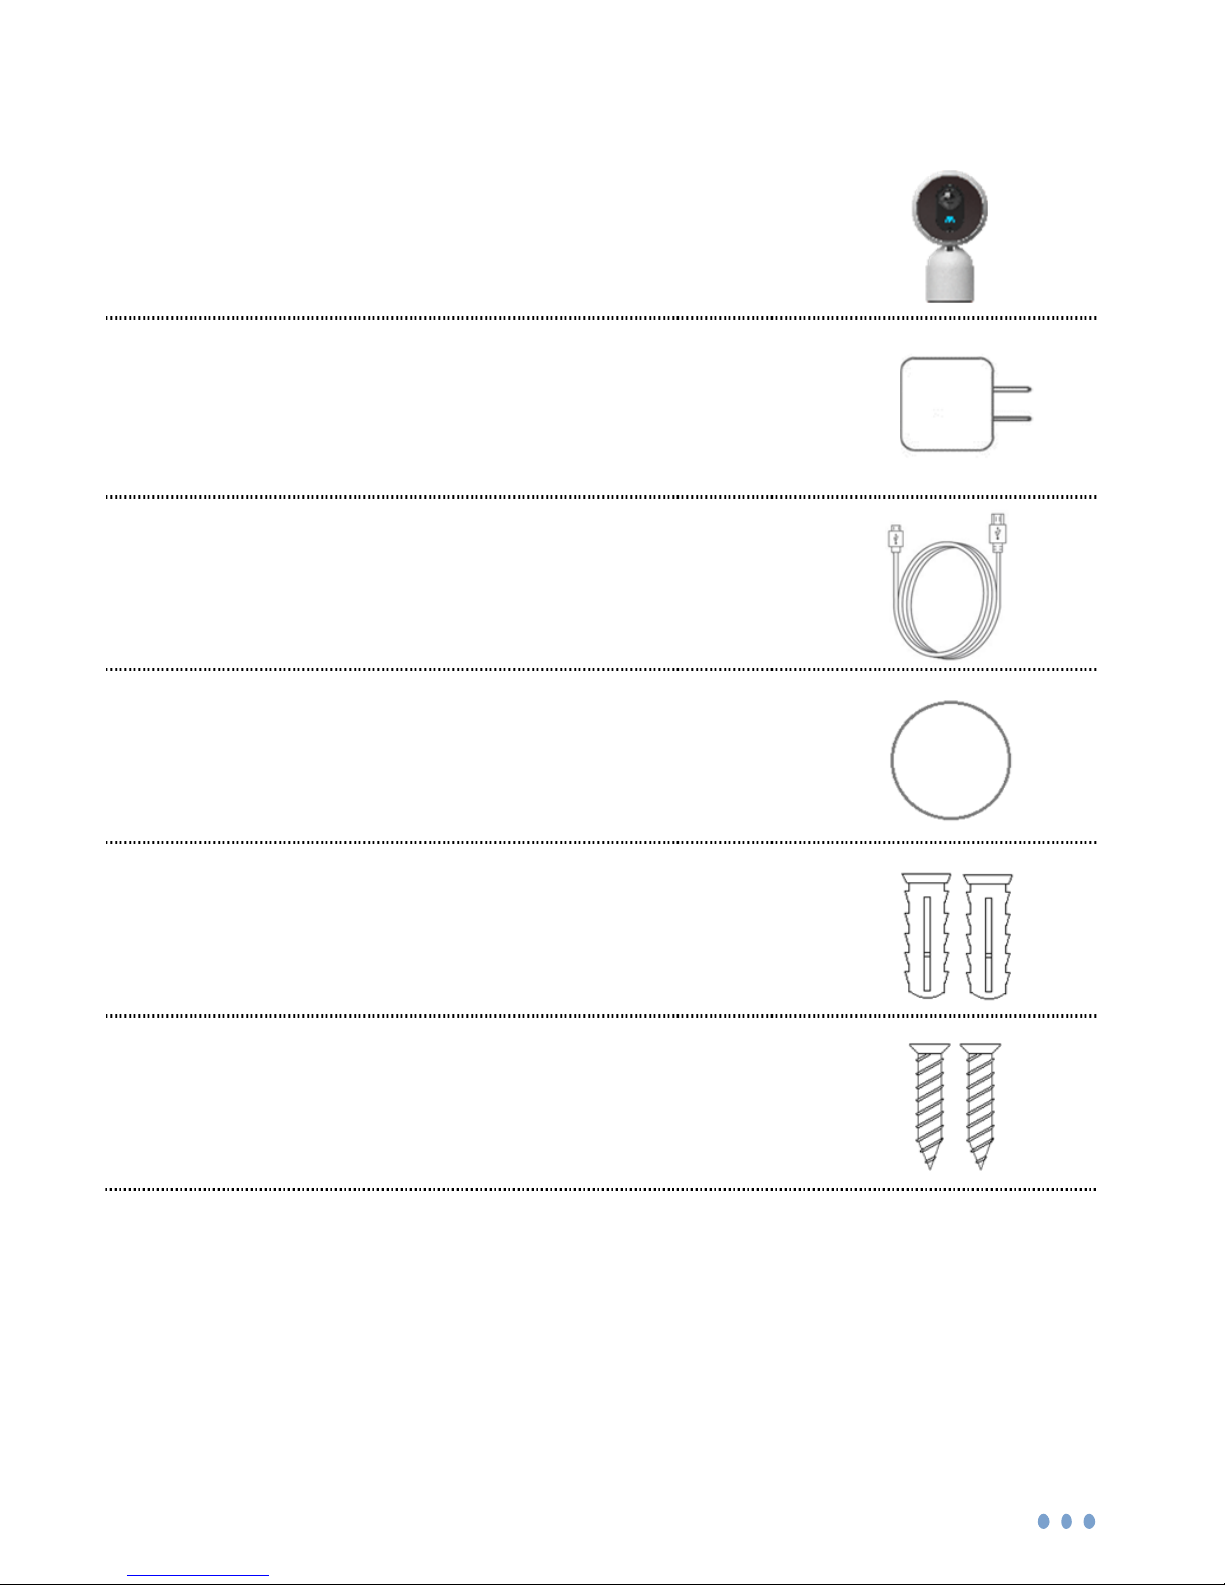
What’s Included
1*05
$".&3" Camera
AC Power Adaptor
USB Cable
Mounting Sticker
Wall Anchors x 2
Screws x 2
Page 7

7
Wi-Fi Requirements
1080P IOT CAMERA requires a 2.4GHz or 5GHz router
(802.11bg/n) for Wi-Fi connectivity. This is a standard
home Wi-Fi router. You will need your Wi-Fi name and
password when pairing your mobile device and camera.
Note: If you are using a 2.4GHz + 5 GHz dual band
router, create separate SSID names for each band on
your Wi-Fi router settings page. This will make it easier for
you to select the 2.4GHz or 5GHz band for camera setup.
Mobile Device Requirements
The Momentum app requires a smart phone or tablet
device that runs on Android or iOS. Please see the in-app
description for device compatibility for the most up-to-date
info.
Page 8
8
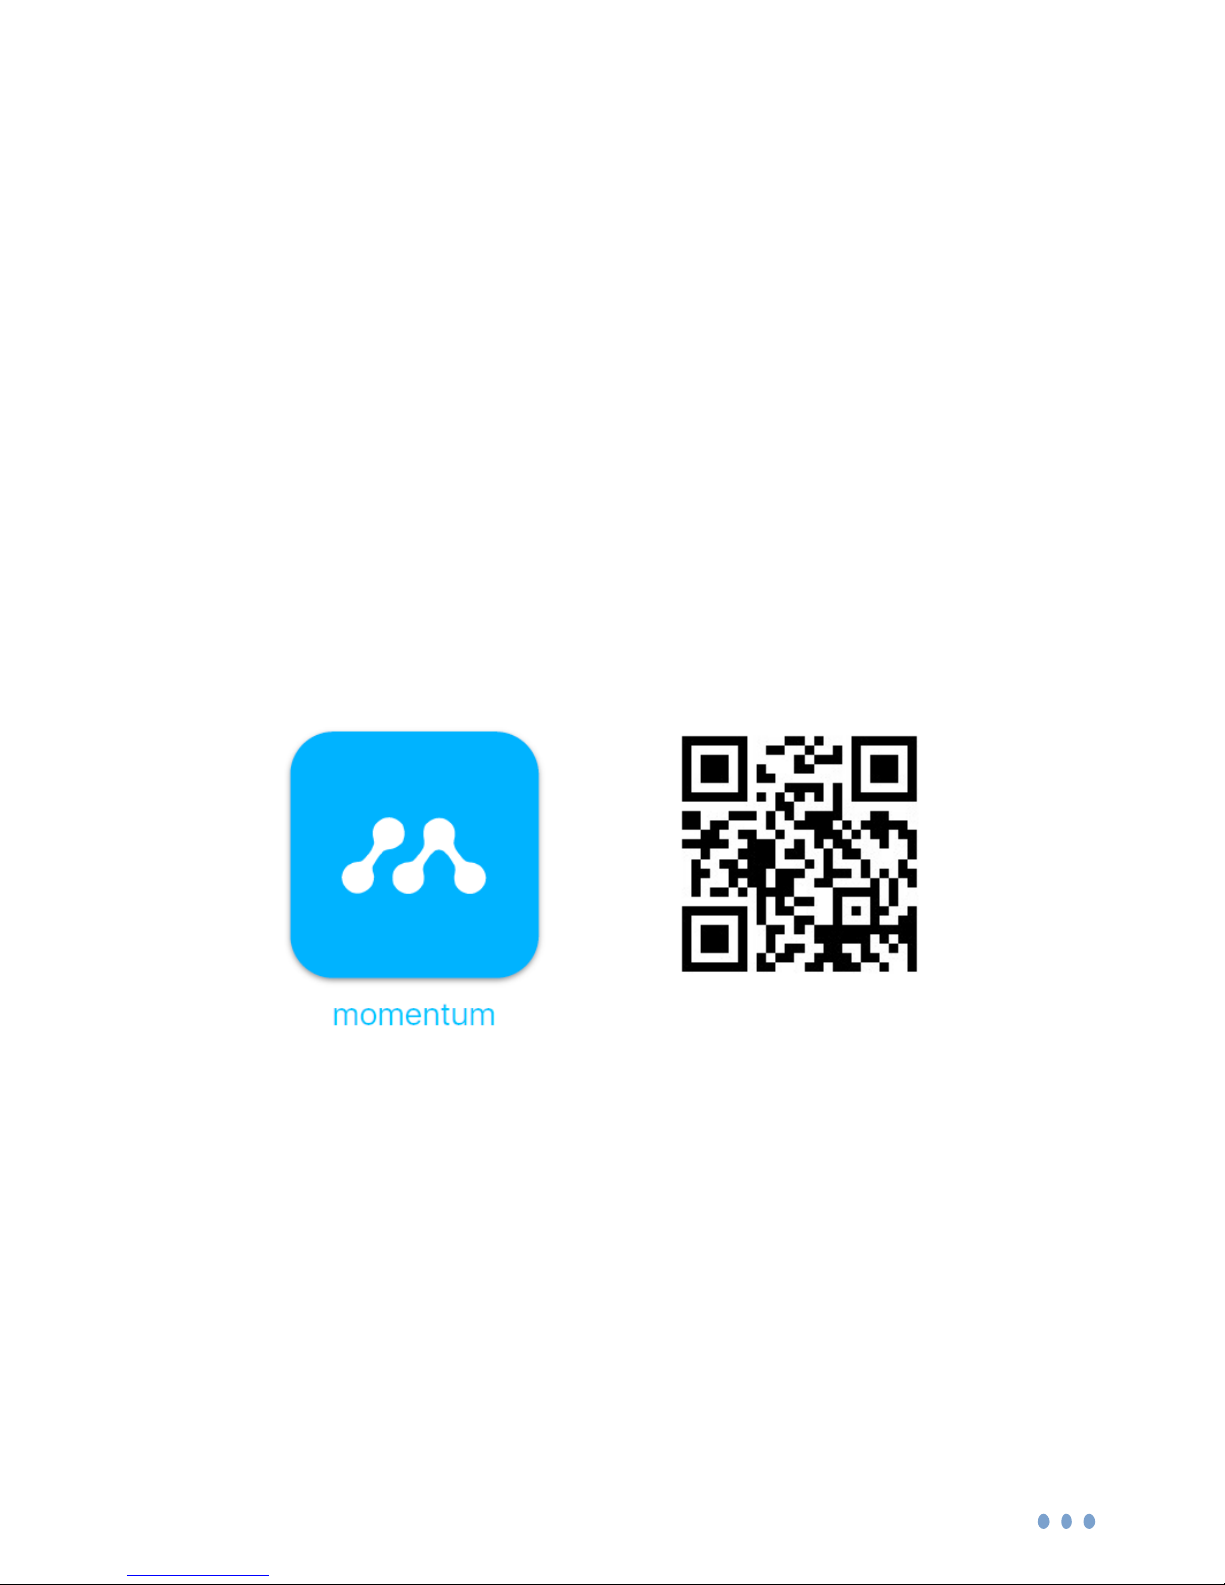
Download the Momentum App
Download and install the Momentum app on your mobile
device.
Search for Momentum on the Google Play Store for
Android devices, or on the Apple App Store for iOS
devices. You may also scan the QR code below from your
mobile device to route you directly to the app.
Make sure the app logo you download matches the one
shown below.
Create an Account
If you don’t already have a Momentum account, you will
need to create one. To create a new account, follow the
in-app instructions.
Page 9

9
Setup
To begin using your Momentum device you will first need
to pair it to your Momentum account and then connect it to
your Wi-Fi network.
Pairing
IMPORTANT: Make sure your mobile device is
connected to the same Wi-Fi network as the one you
will be connecting the camera to. (This is required just
for the pairing process; feel free to disconnect your
mobile device from the Wi-Fi network after pairing is
complete if you wish to do so.)
1) Power on the 1080P IOT CAMERA camera.
Once your 1080P IOT CAMERA has been powered on,
it should already be put into pairing mode. There will
also be a sound played to notify you that it’s ready to
connect.
- If it’s not in pairing mode, you will need to hold the
reset button for 10 seconds. You should hear a
recording play that the is ready to connect.
Page 10

10
2) Open the app and select 1080P IOT CAMERA.
From the Momentum app, select Pair device, then select
1080P IOT CAMERA.
3)
Connect to
1080P IOT CAMERA
’s Wi-Fi access point.
When prompted in the app, go to your mobile device’s
Wi-Fi settings. You should see a Wi-Fi network option for
“1080P IOT CAMERA”. Tap the “1080P IOT CAMERA”
network to connect, then return to the Momentum app
again.
(Note some Android devices may notify you to confirm
the Wi-Fi connection again.)
4) Enter Wi-Fi credentials.
Your Wi-Fi network will automatically be detected. Enter
in the password (if any) for the Wi-Fi network.
5) Name your device.
Select from the provided list of names or create a custom
name for your new camera. Once you’ve finished naming
your device, your setup is complete!
Page 11

11
Pairing additional Momentum Devices
To pair additional Momentum devices, select Pair Device
in the app’s menu and repeat steps 1 – 5 that were used
in pairing your initial Momentum device.
Pairing additional Non-Momentum Devices
You can use your Momentum app to control nonMomentum devices like the Nest™ Learning Thermostat.
To pair non-Momentum devices, select Pair in the Devices
section of the app menu and select the non-Momentum
device you wish to pair. Simply follow the in-app
instructions for pairing that device with your Momentum
app.
Page 12

12
Setting up Rules
Your 1080P IOT CAMERA camera will record video when
rules have been set through the Momentum App. Rules
allow your device to activate and monitor the area while
you are not watching the live stream. Set triggers to have
your 1080P IOT CAMERA activate under certain
conditions.
Note: You must have a Momentum Capture Cloud
Storage subscription or a micro-SD card to record videos
and photos.
Triggers
You can set a trigger for 1080P IOT CAMERA to have it
start automatically recording after detecting motion.
Adding a New Rule
Add the days of the week and times of the days you want
the rule to be set in place. The trigger you have chosen
will then set off an action of your choosing, such as
Record a Video with the device you have selected. Note:
Scheduled times cannot carry over past midnight. (i.e. cannot
schedule 9PM-1AM. Must schedule two different times:
9PM-11:59PM; 12AM-1AM)
Page 13

13
Mobile Alerts
Once you have created a Rule set to your chosen
parameters, you will receive a notification alert to your
mobile device if an event is triggered.
If you’d like to stop receiving alerts, you must delete the
Rule, or you can turn it off from your mobile device’s
notification settings for the Momentum App.
If you have a cloud plan, you may also view all your
previous alerts by tapping the Activity tile on your
Dashboard.
Page 14

14
Storage Options
1080P IOT CAMERA can save your recorded videos or
pictures through the Momentum Capture Cloud Storage
subscription plan or with your own micro-SD card inserted
into the device. The micro-SD card slot can be found on
the side of the camera device. (see pg. 4)
Momentum Capture Cloud Storage
After you initially pair a Momentum device to your
Momentum account, you will be provided FREE cloud
recordings that last for 24hrs. The Momentum Capture
cloud storage subscription will allow you to store recorded
pictures and videos taken by your 1080P IOT CAMERA
camera.
If you wish to continue the cloud service after the trial
service has expired, you may purchase and manage your
subscription plans by logging into your Momentum
account at momentumcam.com.
Page 15

15
Micro-SD Card Storage
You also have the option to use your own micro-SD card
(up to 128GB) instead for back-up storage.
Insert the micro-SD card into 1080P IOT CAMERA
’s
micro-SD slot on the side of the camera. The camera will
automatically record events and camera photos you take
directly into the
micro-SD card as back-up storage.
Once the memory capacity has been reached on the card,
the new recording will loop over and begin to overwrite the
earliest saved recordings.
To access the back-up micro-SD card recordings, go to
the camera’s settings and select “View Camera Backup”.
Page 16

16
Your Dashboard
Your dashboard is your app’s home screen where you can
view and access your paired devices. You can rearrange
the Tiles on your dashboard by tapping the Pencil icon in
the top right corner of the app. You can also make some
device tiles larger or smaller when editing your dashboard.
Be sure to tap the Save Dashboard button at the bottom
when you are finished editing.
Page 17

17
Camera Functions
1080P IOT CAMERA has several functions you can control
through the Momentum app.
Watching Live Video
To view live video stream, first select the camera you
would like to view. Rotate your mobile device to view in
either portrait mode or landscape mode.
In portrait mode you can use your fingers to pan around
the video feed. Landscape mode will display the video in
full screen mode. You may use your fingers to pinch to
zoom in on the video as well.
(Note: You do not need a micro-SD memory card or cloud
storage subscription for live video streaming.)
Page 18

18
Taking Photos
Tap the Camera icon to save a screenshot while watching
live video.
To save images taken from your 1080P IOT CAMERA you
must either have a:
1. Micro-SD card inserted into the camera, or
2. Cloud storage subscription for the specific device
through the Momentum app.
Recording Videos
Tap the Record Video icon to start recording. The video
will record based on a 20 second clip.
To save you must either have a:
1. Micro-SD card inserted into the camera.
2. Momentum Capture cloud storage subscription.
Record Video Take Photo
Page 19

19
Audio Functions
You can engage in two-way conversations while you’re in
1080P IOT CAMERA
’s live video stream option. Note that
the audio willonly go through one source (camera or app)
at a time.
To speak through the app to 1080P IOT CAMERA
’s
speakers, tap on the
Microphone icon. You must tap on the icon again to de-
select it to begin hearing 1080P IOT CAMERA
’s side
again.
To only listen through Robbi’s audio, make sure the
Microphone icon is de-selected.
Microphone Button
Page 20

20
Viewing Recorded Photos and Videos
To view Cloud videos, tap the Activity tile to view recorded
videos, captured photos, or alerts for a specific day. You
can also access the activity list from the live camera view.
When you select a video in your activity list, it will begin
playing back automatically. To rewind or fast forward, tap
the video to reveal the video playback controls.
For back-up micro-SD card recordings, you may access
them from the camera settings and selecting the “View
Camera Backup” button (see pg.15).
Page 21

21
Saving and Deleting Recordings
If you have purchased a cloud subscription and set up a
rule for recordings, footage of those recordings will be
automatically saved onto the cloud for the predetermined
time, depending on which plan the camera has.
If you have inserted your own micro-SD card and set up a
rule for recordings, footage of those recordings will be
saved on the micro-SD card until the storage becomes full
and loops back over to record over your previous
recordings.
However, if you’d like to save your cloud or micro-SD card
recordings to your mobile device’s local storage, you can
do so while you’re viewing the specific recording. Press
the ‘save’ button at the bottom right corner to save a copy
of the footage onto your mobile device’s local storage.
You may also delete the recording permanently off your
cloud storage or micro-SD card swiping left on the
recording on the activity list page.
Page 22

22
Device Settings
Under the Menu tab, you will find My Devices. Here you
can change your device’s name, check on the device’s
Cloud subscription status, update the firmware, and adjust
the camera’s image-quality, motion detection and sound
detection levels.
Use the slide bar to adjust the image-quality, motion
detector and sound detector to your liking.
Deleting Devices
If you’d like to remove a device from your account, tap
the Menu and go to My Devices. Select the specific
device, then tap Remove Device.
Page 23

23
Siren Activation
Your 1080P IOT CAMERA has a built-in siren that is loud
enough to scare away any perpetrators.
You can activate the siren from the Siren Tile or the live
view screen.
Restoring Forgotten Passwords
If you've forgotten your login password, tap on the Forgot
Password button at the sign in page. You will receive an
email with instructions to guide you through the rest of the
way.
Siren Tile
Live View Screen
Page 24

24
Resetting the Camera
If your camera is having connection issues, try these
steps to correct the issue.
Power cycle the Camera
1. Unplug the camera, wait 10 seconds, then plug it back
in. If it still does not fix the issue, trying resetting the
camera.
Reset the Camera
1. To reset your Momentum device, hold the Reset button
on the back of the camera for about 10 seconds. During
the reset sequence, the LED indicator light on the front
of the camera will first display a solid red, then double
blinking blue.
2. You will then need to re-pair the camera again. Follow
the same initial pairing process (see pg. 9).
Page 25

25
Troubleshooting
Assistance is available both in the app and on the
Momentum website.
To access the most current version of the user’s
manual, tap the Menu icon to launch the screen
with a menu bar and tap Support.
For further assistance, go to
https://www.support.momentumcam.com.
Page 26

26
About Momentum
Momentum provides an easy-to-setup home security
camera that connects to your smart phone or tablet giving
you real-time video streaming and two-way voice
communication – anywhere, anytime. Momentum
subscribers also have access to IOT cloud-based storage
for camera-captured videos from a user-friendly mobile
app. Whether you want to check on your babysitter, are
wondering what your pets are doing, or are leaving for
vacation, you’ll always have an eye in your home with
Momentum.
For more information, please visit
www.momentumcam.com or contact us at
help@momentumcam.com.
Page 27

QUICK START GUIDE
1080P IOT CAMERA
Page 28

Download the Momentum App from the
Apple App Store or Google Play.
Connect your mobile device Wi-Fi to the
network you want your camera to be
paired to.
Important: Make sure the app you
download matches the same logo as
shown above.
Step 1: Download the app
Page 29

Sign up for a new account.
Once you’ve finished entering your
information, you will receive an email
verification link.
Click on the email link to activate your
account.
Return to the app and sign in.
Step 2: Create an Account
Page 30

Connect the Micro-USB cable to the
back of the camera and the power
adapter.
Plug in the power adapter to an outlet.
Micro-USB
Power Port
St ep 3: Plug in 1080P IOT CAMERA
Page 31

• From the Momentum app, select Pair
Device.
• Select the 1080P IOT CAMERA camera
from the list of devices.
• Go to your mobile device’s Wi-Fi
settings.
• Connect to the ‘1080P IOT CAMERA’
Wi-Fi network.
St ep 4: Pair
Page 32

Go back to the Momentum App.
Your Wi-Fi network will auto load, so you
will just need to enter your network
password.
(If your Wi-Fi network did not show up,
that means your mobile device was not
connected to it prior to pairing. See ‘Step 1’
for details.)
Step 5: Connect to Wi-Fi Network
Page 33

Enter a name for your camera or select
one of the preset options.
Select Get Started to complete the setup
process.
(If you’d like to pair more cameras, repeat
steps 4-6.)
Step 6: Name your Camera
Page 34

Light Indicators & Status
1. Solid Red – Booting
2. Slow Blinking Red – Disconnected
from Wi-Fi
3. Double Blinking Blue – Ready to
connect to Wi-Fi.
4. Blinking Blue – Connected to Wi-Fi
5. Solid Blue – Live streaming
Note: If the camera has failed to connect to
your Wi-Fi, try resetting the camera by
following these steps.
Reset
1. With the camera plugged in, hold
down the reset button in the back of
the camera for 10 seconds.
Quick Tips:
Page 35

2. The camera will then start the reset
sequence. Note that the camera will
still be bound to the same
Momentum account it was initially
paired with.
3. During the reset sequence, the
camera’s indicator light will go from
solid red to double blinking blue,
which indicates that the camera is now
be ready to connect to the Wi-Fi again.
Hold for 10 seconds
Quick Tips:
Page 36

- If you are having trouble connecting or
using your device, please see our FAQ
page on our website or contact our
customer service team.
Toll Free: 1 888 818 0436
E-mail: help@momentumcam.com
Troubleshooting
Page 37

FCC Warnning:
This equipment has been tested and found
to comply with the limits for a Class B digital device,pursuant
to part 15 of the FCC Rules. These limits are designed to provide
reasonable protection against harmful interference in a residential
installation. This equipment generates, uses and can radiate radio
frequency energy and, if not installed and used in accordance with the
instructions, may cause harmful interference to radio
communications. However, there is no guarantee that interference
will not occur in a particular installation. If this equipment does cause
harmful interference to radio or television reception, which can be
determined by turning the equipment off and on, the user is
encouraged to try to correct the interference by one or more of the
following measures:
• Reorient or relocate the receiving antenna.
• Increase the separation between the equipment and receiver.
• Connect the equipment into an outlet on a circuit different from
that to which the receiver is connected.
• Consult the dealer or an experienced radio/TV technician for
help.
Caution: Any changes or modifications to this device not explicitly
approved by manufacturer could void your authority to operate
this equipment.
This device complies with part 15 of the FCC Rules. Operation is
subject to the following two conditions:
(1)This device may not cause harmful interference, and (2) this
device must accept any interference
received, including interference that may cause undesired
operation.
This equipment complies with FCC radiation exposure limits set
forth for an uncontrolled environment. This equipment should be
installed and operated with minimum distance 20cm between the
radiator and your body.
www.momentumcam.com
Page 38

28
Apollo Tech USA, Inc.
8608 Utica Ave. #220,
Rancho Cucamonga, CA 91730
Customer Service: +1 888 818 0436
E-mail: help@momentumcam.com
Version 1.0
conjunction with any other antenna or transmitter.
This transmitter must not be co-located or operating in
 Loading...