

Page 1

HDP100
DMR Portable Radio
Quick Guide
14222-1100-1000, Nov/11
Page 2
NOTE
tion, which may improve system performance or
NOTE
NOTE
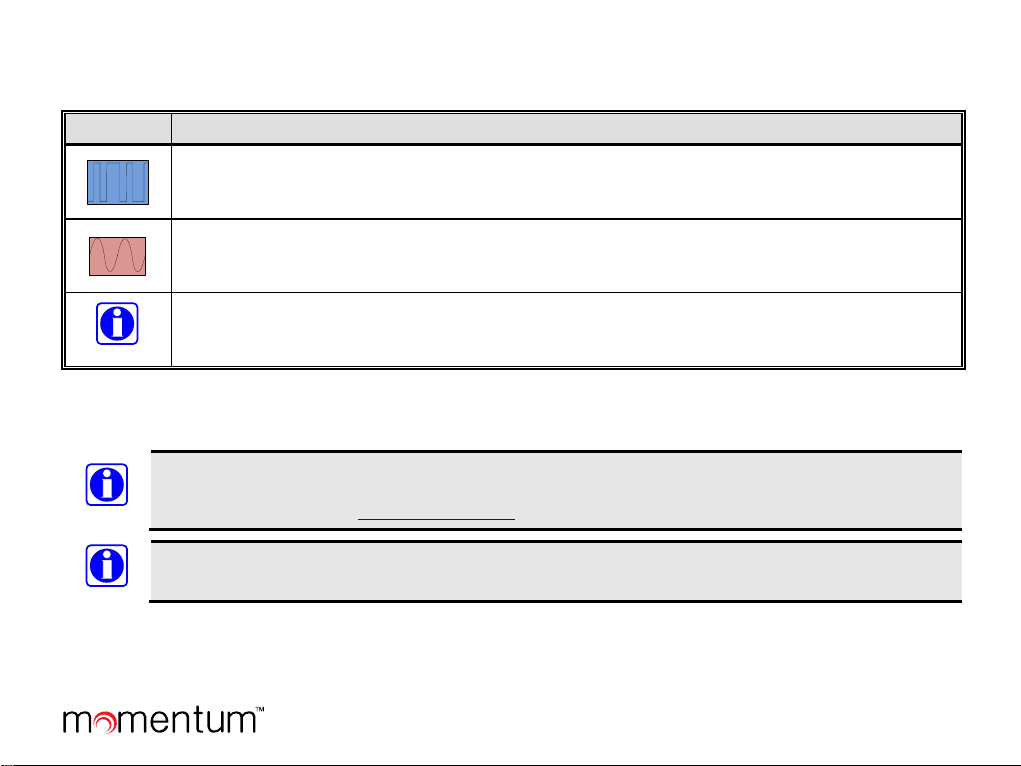
SYMBOLS USED IN THIS GUIDE
The following table lists symbols used in this guide:
SYMBOL DESCRIPTION
The DIGITAL CHANNEL symbol indicates the particular feature or function is available on digital
channels only.
The ANALOG CHANNEL symbol indicates the particular feature or function is available on analog
channels only.
The NOTE symbol calls attention to supplemental informa
clarify a process or procedure. It may also be used to add tips that can help you make better use of the radio.
If no digital channel or analog channel symbol appears, the function/feature is applies to both analog channels and digital
channels.
NOTICE!
For detailed operating information and a list of options and accessories available for the HDP100 portable
radio, refer to Operator’s Manual publication number 14222-1100-2000. This and other rela ted publications
are also available online at www.pspc.harris.com.
Also refer to the Operator’s Manual for important safety-related information!
The material contained herein is subject to U.S. export approval. No export or re-export is permitted without written
approval from the U.S. Government. Rated: EAR99 in accordance with U.S. Dept. of Commerce regulations 15CFR774,
Export Administration Regulations.
Copyright© 2011, Harris Corp oration
Page 2 Quick Guide
Page 3
1
8
2
9
3
10
4
11
5
12
6
13
7
14
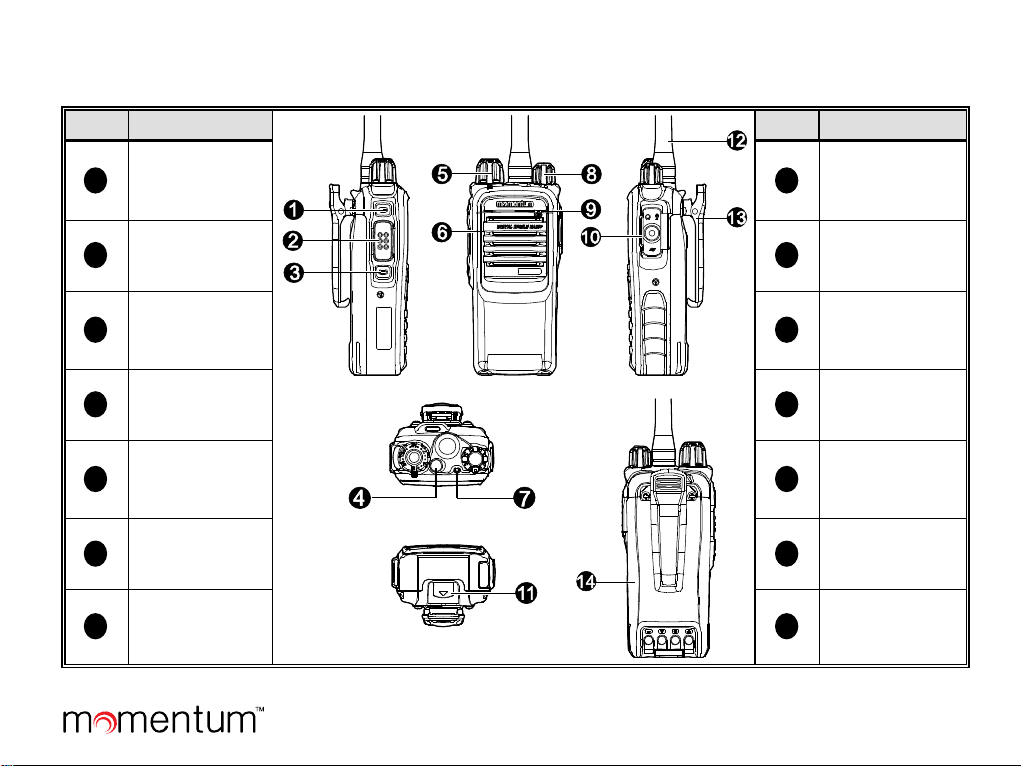
RADIO CONTROLS AND OTHER ITEMS
RADIO OVERVIEW
ITEM NAME
Side Key 1
(SK1)
PTT Key
Side Key 2
(SK2)
Top Key (TK)
Channel
Selector Knob
Speaker
LED Indicator
ITEM NAME
On/Off/Volume
Control Knob
Microphone
Accessory Jack
Battery Latch
Antenna
Belt Clip
Battery
Page 3 Quick Guide
Page 4
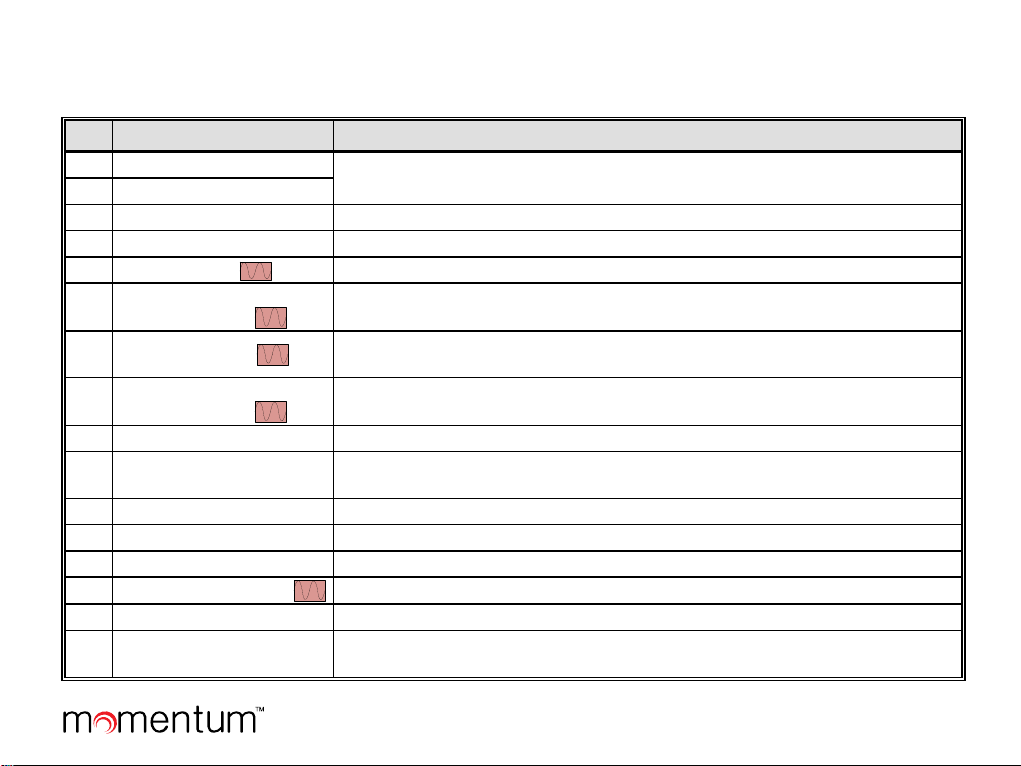
PROGRAMMABLE SHORTCUT KEYS
For enhanced convenience, you may request your dealer pre-program keys SK1, SK2, and TK as shortcuts to any of the
functions listed in this table:
NO. SHORTCUT NAME SHORTCUT KEY FUNCTION
1 Zone Up
2 Zone Down
Change to another zone. See page 5.
3 Adjust Power Level Quickly change the radio’s transmitting power level. S ee page 10.
4 Talk-Around Directly communicate with other radios. See page 8.
5
6
7
8
Monitor
Monitor
Momentary
Squelch Off
Squelch Off
Momentary
Toggle receiver muting on and off. See page 9.
Momentarily turn receiver muting of f. See page 9.
Toggle squelch on and off. When off, t he radio always unmutes so if no radio
carrier is present on the channel, rec eiver noise is heard. See page 9.
Momentarily turn squelch off. O therwise, same as above. See page 9.
9 Scan Enable and disable scanni ng. See page 10.
10
Nuisance Temporary
Delete
Temporarily skip unwanted channel activity during scanning. See page 11.
11 Emergency On Turn on the emergency mode and transmit emergency call/signaling.
12 Emergency Off Turn off the emergency call/signaling, exiting emergency mode.
13 Lone Worker Toggle the Lone Worker feature on and off.
14
Adjust Squelch Level
Temporarily adjust the receiver s quel ch threshold. See page 9.
15 Battery Strength Indicator Indicate remaining battery strength by the LED indicator. See page 10.
16
Man Down
(Optional Feature)
Activate this emergency feature so if the radio is positioned at an angle for a
preset period of time, it will begin emergency transmissions.
Page 4 Quick Guide
Page 5

NOTE
NO. SHORTCUT NAME SHORTCUT KEY FUNCTION
Scrambler: Encrypt voice transmissions for secure communications.
17
18
19
Scrambler
Encrypt
One Touch Call
(1 though 5)
Telemetry
/
Encrypt: Encrypt voice and message transmissions for secure
communications. See page 12.
Quickly make calls or send messages.
To supervise remote devices.
20 Roam To enable and disable the Roam featur e.
Long and short presses of a key can be programmed with different functions by your dealer.
The Top Key (TK) is programmed as the emergency key by default. It may be reprogrammed by your dealer.
BASIC OPERATIONS
TURNING THE RADIO ON AND OFF
To turn on the radio, rotate its On/Off Volume Control knob clockwise out of the detent position. A click will be sensed.
The radio flashes its LED status indicator green. This knob is item 8 on page 3.
To turn the radio off, rotate this knob fully counter-clockwise until the detent click is sensed.
ADJUSTING THE VOLUME
After turning the radio on, rotate the On/Off Volume Control knob clockwise to increase the volume or counterclockwise to decrease it. Volume adjustment can be made at anytime later in the same manner.
SELECTING A ZONE
A zone is a group of pre-programmed radio channels exhibiting similar properties. The radio supports up to three (3) zones
and each zone can have up to sixteen (16) channels. Zones and channels are pre-programmed into the radio by your dealer.
Select a zone by pressing the programmed Zone Up or Zone Down shortcut key. When zone 1 is selected, the radio beeps
once. When zone 2 is selected, the radio beeps twice. When zone 3 is selected, the radio beeps three times. Keys SK1,
Page 5 Quick Guide
Page 6

SK2, or TK may be pre-programmed by your dealer as Zone Up and Zone Down shortcut keys. Key locations are shown on
page 3.
SELECTING A CHANNEL
The radio’s Channel Selector knob is locat ed on the top of the radio. It is item 5 on page 3. Rota te this knob to select the
desired channel within the currently selected z one.
This knob has sixteen (16) positions, for a total of sixteen channels per zone. Some knob positions may not be programmed
with a channel.
SWITCHING THE CHANNEL MODE BETWEEN ANALOG AND DIGITAL
Each channel can be pre-programmed as either an analog channel or a digital channel. If the currently selected zone includes
both analog and digital channels, the Channel Selector knob c an be used to quickly switch between analog and digital
channels. Select the desired channel by rotating the knob to the respective position.
LED INDICATOR
A light-emitting diode (LED) type
status indicator is located on the top
of the radio, near the On/Off/Volume
LED INDICATOR RADIO STATUS
Flashing Green
Powering on
Control Knob. This indicator can be
quickly viewed to determine the
basic operational status of the radio.
Each status indication is described in
the table at the right.
PRIVATE CALLS
A private call is a call initiated by a
radio user to another radio user.
Transmitting a Private Call
When the channel is clear (i.e., when
Glowing Red
Glowing Green
Flashing Orange Slowly
(approximately once every 2 sec.)
Flashing Orange Rapidly
(approximately twice every 1 sec.)
Glowing Orange
OK to transmit voice audio by
speaking into the microphone.
Transmitting
Receiving
Scanning
Emergency
pressing the PTT key and
not receiving a signal), hold down the radio’s PTT key to transmit a private call to the Private Call contact preset for the
currently selected ch annel. Release the PTT key to stop transmitting, and listen for a reply.
Page 6 Quick Guide
Page 7

NOTE
NOTE
Whenever transmitting (i.e., PTT key depressed), hold the front of the radio between 1 to 2 inches from your
mouth and speak into the microphone at a normal voice level. This will ensure optimal reception at the
receiving radio unit(s). Never shout or whisper when transmitting. As illustrated on page 3, the radio’s
microphone is located near the top of the radio.
Each digital channel may be pre-programmed with a preset contact by your dealer. The preset contact can be
a Private Call contact, a Group Call contact, or an All Call contact.
Receiving and Responding to a Private Call
When a private call is received, listen to the call and adjust the volume as necessary. To respond to the call, hold down the
PTT key within the preset time period, and speak into the microphone at a normal voice level. GROUP CALLS
A group call is a call initiated by a radio user to a group of radio users.
Transmitting a Group Call
When the channel is clear (i.e., when not receiving a signal), hold down the radio’s PTT key to transmit a group call to the
Group Call contact preset for the currently selected channel. Release the PTT key to stop transmitting, and listen for a reply.
See Receiving and Responding to a Group Call for additional information.
Receiving and Responding to a Group Call
When a group call is received, listen to the call and adjust the volume as necessary. To respond to the call, hold down the
PTT key within the preset time period, and speak into the microphone at a normal voice level. ALL CALLS
An all call is a call initiated by a radio user to all radio users on the channel.
Transmitting an All Call
When the channel is clear (i.e., when not receiving a signal), hold down the radio’s PTT key to transmit an all call to the All
Call contact preset for the currently selected channel. Release the PTT key to stop transmitting, and listen for a reply.
Page 7 Quick Guide
Page 8

NOTE
When an all call is received, the call’s audio is heard in the radio’s
NOTE
All calls can only be transmitted if enabled by your dealer via radio pre-programming.
Receiving an All Call
speaker.
It is not possible to respond to an
all call.
TALK-AROUND (DIRECT MODE)
The talk-around feature provides direct radio-to-radio communications. With talk-around, a radio repeater system is not
required for radio communications. This type of operation is sometimes called “direct mode.” Talk-around is beneficial
when, for example, a radio repeater system malfunction has occurred, or when the radio is out-of-range of a radio repeater
system, but other radios are nearby that can communicate on the same pre-programmed radio channels.
To toggle radio operation between normal communications mode (repeater mode) and talk-around, press the pre-configured
Talk-Around shortcut key.
CALLS ON ANALOG CHANNELS
Transmitting a Call on an Analog Channel
1. If not already, select the desired analog channel.
2. Listen for a clear channel. In other words, if another person is using the channel, wait for them to finish
transmitting/speaking. If pre-programmed, a monitor or squelch off shortcut key should be used to verify the channel is
clear. See the following sections for additional information on these functions.
3. Hold down the radio’s PTT key and speak into the microphone at a normal voice level.
4. Release the PTT key to stop transmitting and listen for a reply.
Receiving a Call on an Analog Channel
1. If not already, select the desired analog channel. Do not
press the PTT key.
2. When an incoming call is received on the channel, rotate the On/Off Volume Control knob as necessary to adjust the
volume.
Page 8 Quick Guide
Page 9

If programmed, a Monitor, Monitor Momentary, Squelch Off and/or Squelch Off Momentary shortcut key can
be used to verify there is no signal on the channel. Also, the Squelch Off shortcut key can be used in weak signal
conditions.
Monitor
Monitor is a function for analog channels that allows any pre-programmed receiver decoding to be disabled so calls (or
other activity) on the selected channel without the correct code can be monitored.
This does not disable receiver squelch. When the Monitor function is enabled, any calls on the channel will be heard in the
radio’s speaker.
To enable and disable the Monitor function, press the pre-programmed Monitor shortcut key, or the Monitor Momentary
shortcut key. The Monitor shortcut key provides a toggle on/off type function, whereas the Monitor Momentary shortcut
key temporarily enables the function only while the shortcut key is depressed.
Squelch Off
Squelch Off is an analog channel function that, when enabled, keeps the receiver unsquelched (i.e., not muted) even when
there is no signal on the selected channel. When enabled, call audio on the channel (or receiver noise) is routed to the
radio’s speaker.
To toggle squelch between enabled and disabled, press the pre-configured Squelch Off shortcut key.
To momentarily turn squelch off, depress the pre-configured Squelch Off Momentary key. When this key is released,
squelch turns back on.
Adjust Squelch Level
If programmed, the Adjust Squelch Level shortcut key can be used to select one of three receiver squelch levels: Tight,
Normal, and Open. The default squelch level is Normal, which is often used in a low radio frequency noise environment.
Generally, the Tight level should be used in a high radio frequency noise environment; it requires a stronger received radio
signal to unmute the receiver. Using Open will keep the speaker unmuted, regardless of the noise level or the decode
settings.
When switching from Tight to Open, a low-pitched tone sounds and received noise or call audio is heard from the speaker.
When switching from Open to Normal, a high-pitched tone sounds and the background sounds disappear. When switching
from Normal to Tight, a high-pitched tone announces.
Page 9 Quick Guide
Page 10

BATTERY STRENGTH INDICATOR
If the Battery Strength Indicator shortcut key is preprogrammed, this function can be used to quickly check the
remaining battery strength via the LED indicator on the top
of the radio. Press and hold this pre-programmed shortcut
key and view the LED indicator on the top of the radio.
TRANSMIT POWER LEVEL
With this feature, the radio’s transmit power level can be
quickly changed between a low and a high power level. Use
LED INDICATOR
Glowing Green
Glowing Orange
Glowing Red
Glowing Red
(and Low Battery Alert Tone sounds)
BATTERY
STRENGTH
High
Medium
Low
Insufficient
the low power level whenever possible to increase battery
operating time and to reduce the possibility of radio communications interference. However, if communications with other
radios is not possible on the currently selected channel at the low power level, select and use the high power level.
Press the programmed Adjust Power Level shortcut key to toggle between the low and high power levels. When
switching to the high power level, a high-pitched tone sounds. When switching the low power level, a low-pitched tone
sounds.
SCANNING CHANNELS
GENERAL INFORMATION
The radio’s scan feature allows scanning of radio channels pre-programmed into the radio for call activity. Scan lists can be
pre-programmed for each channel. Each scan list may contain 32 digital or analog channels. When the radio is scanning
channels:
• The LED indicator on the top of the radio flashes orange slowly.
• The radio scans the channels currently on the scan list for calls (or other activity).
• When a call (or other activity) is received/detected on a channel in the scan list:
o The call’s audio is routed to the radio’s speaker.
o The LED indicator glows green.
o The radio remains on the channel (i.e., scan operation automatically pauses) until the call (or other activity) ends.
Page 10 Quick Guide
Page 11

OPERATION
Turning Scan On and Off
Scan can be turned on and off by pressing the Scan shortcut key. When scan turns on, a high-pitched tone sounds.
The radio can be pre-programmed with the Auto Scan feature on a per-channel basis. If so, the radio will automatically
begin scanning the channel’s scan list when the channel is selected. In this case, to turn scan off, press the Scan shortcut
key once.
Pausing Scan
If a call is received on an analog channel and staying on the channel (i.e., pausing scan) is desired so additional
transmissions can be heard on it, press the pre-programmed Monitor or Squelch Off shortcut key when a call is on the
channel. When the Monitor function is on, if present, call audio on the channel is heard in the radio’s speaker. When the
Squelch Off function is on or when a call is on the channel, call audio on the channel (or receiver noise) is heard in the
radio’s speaker. Press the shortcut key again or the Scan shortcut key to unpause scan.
Nuisance Temporary Delete
To temporarily remove a channel from a channel’s scan list so calls on it will not pause scanning, press the pre-programmed
Nuisance Temporary Delete shortcut key when a call is on the channel. In this case, the channel will not be scanned
again until after the channel or zone is changed, the radio is power-cycled, or scan is turned off and back on.
EMERGENCY COMMUNICATIONS
The radio’s emergency feature can be used to summon help from another radio operator(s) and/or via a radio
dispatch/control center. The emergency process has the highest call priority throughout the radio communications system.
Emergency operations can be performed when the radio is transmitting or receiving. The radio can be programmed with
different emergency modes, emergency types, and emergency ID types. Each channel can be programmed with different
emergency system operation. Refer to the Operator’s Manual for detailed information. Also consult your radio dealer for
specific information on how your radio is programmed.
Page 11 Quick Guide
Page 12

Public Safety and Professional Communications
7711
SECURE COMMUNICATIONS
GENERAL INFORMATION
The radio’s Scrambler feature for analog channels can be used to reduce the likelihood of someone “eavesdropping” via
analog radio channels. This feature employs analog voice inversion technology. It can be enabled and disabled on a perchannel basis.
The radio’s Encrypt feature for digital channels can be used to prevent “eavesdropping” via the digital radio channel. This
feature employs 256-bit digital AES encryption technology. This feature ensures the best guarantee of communication
privacy. It can be enabled and disabled on a per-channel basis.
OPERATION
The Scrambler/Encrypt feature may be programmed to automatically enable when a channel is selected, or it may be
manually enabled.
Manually Enabling and Disabling Scrambler/Encrypt
• If the Scrambler or Encrypt shortcut key is programmed to a key, press this key to enable or disable the feature. A
high-pitched tone sounds to indicate the feature is enabled. A low-pitched tone sounds to indicate the feature is
disabled.
TECHNICAL ASSISTANCE
If a technical problem arises, first refer to the troubleshooting table in the radio’s Operator’s Manual for a possible solution
to the problem. If the problem cannot be resolved using that table, contact your radio equipment dealer for assistance. Also
contact your radio equipment dealer for specific information about how the radio is programmed.
Page 12 Quick Guide
221 Jefferson Ridge Parkway | Lynchburg, VA USA 24501
www.pspc.harris.com | 1-800-528-
 Loading...