

Momentum DIGIWALKER SW-650, DIGIWALKER SW-651, DIGIWALKER SW-800, DIGIWALKER SW-801 Operating Instructions Manual
Page 1
DIGIWALKER PEDOMETER
momentum® by / par / von st. moritz watch corp.
OPERATING INSTRUCTIONS / MODE D’EMPLOI
Please read instructions carefully to understand how to operate your
Momentum® instrument. Your model may not have all of the
features described in this booklet.
Veuillez lire attentivement les modes d’emploi pour bien comprendre le
fonctionnement de votre montre Momentum®. Toutes les fonctions
décrites ne sont pas disponibles sur tous les modèles.
Lesen Sie bitte diese Anleitung für Ihre Momentum®-Uhr genau
durch. Es ist möglich, daß Ihr Modell nicht alle in dieser
Gebrauchsanweisung beschriebenen Funktionen
aufweist.
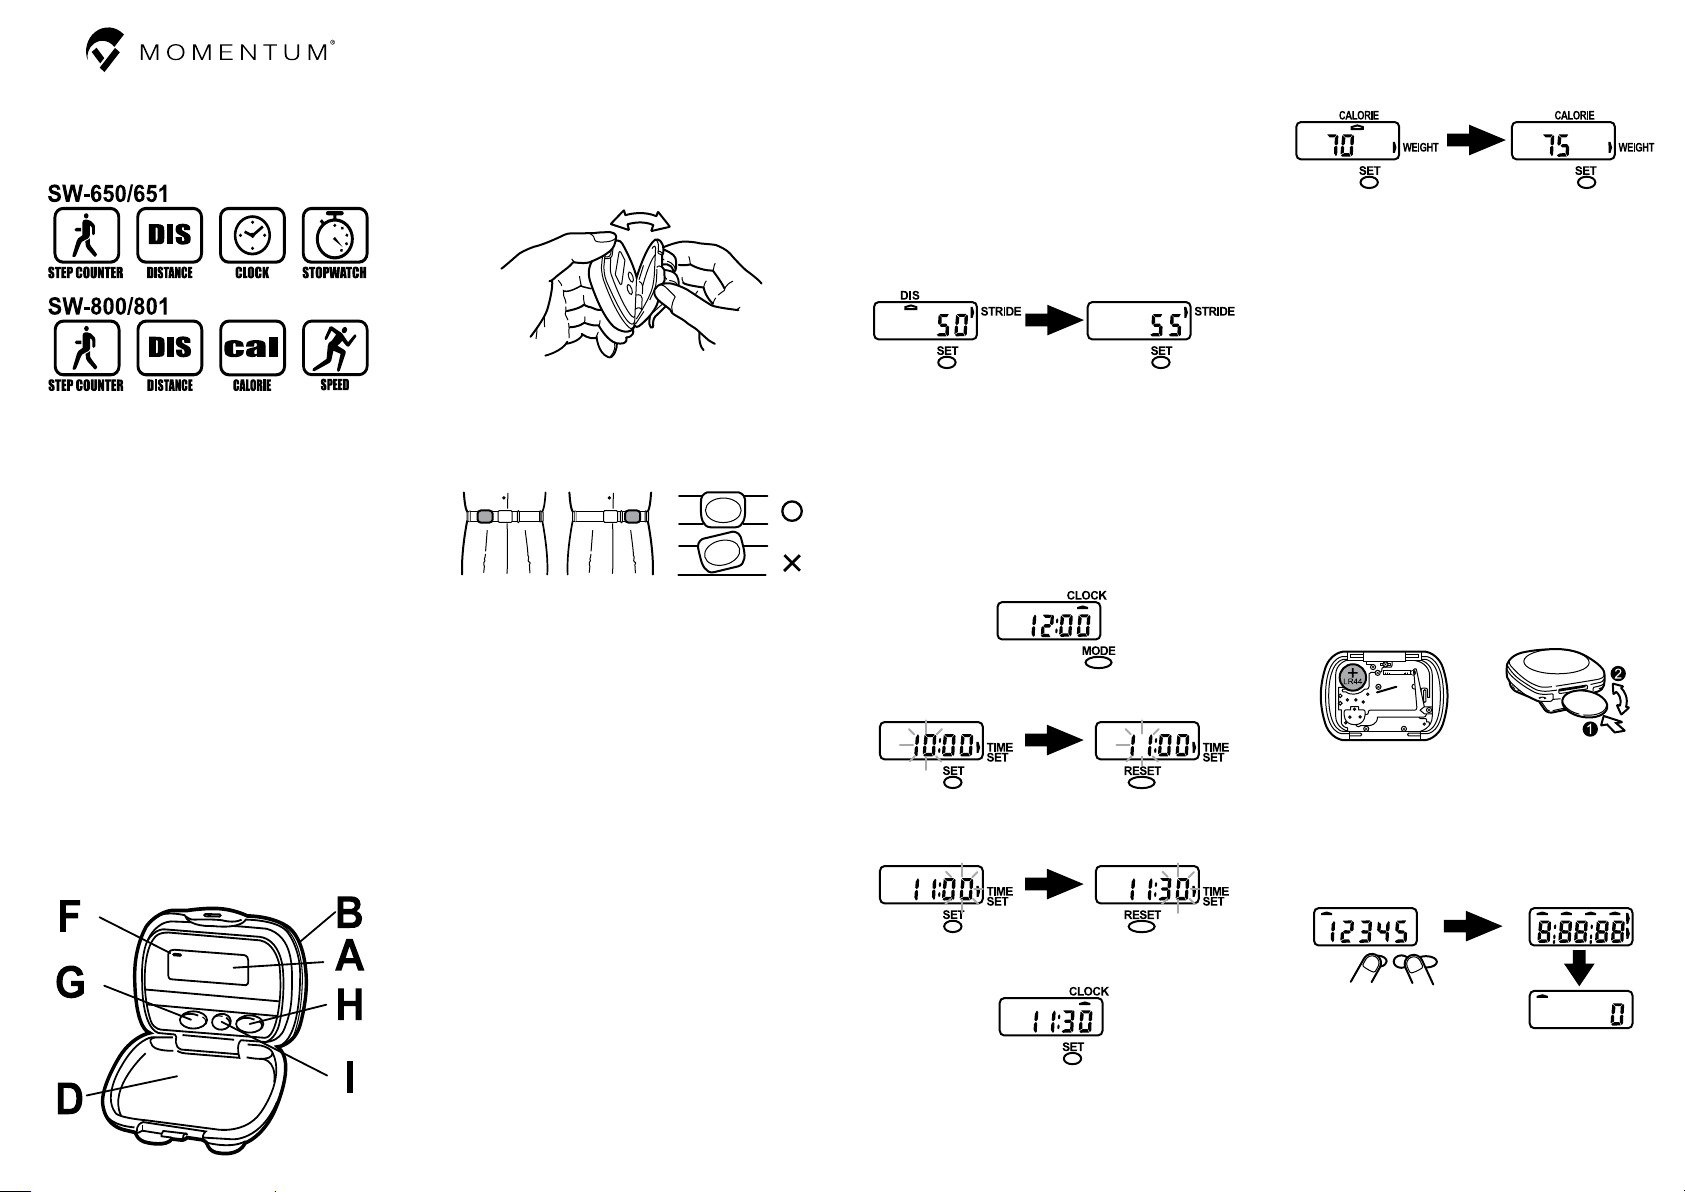
PARTS OF THE PEDOMETER
PIÈCES DU PODOMÈTRE
A. Liquid Crystal Display / Affichage à cristaux liquides
B. Case / Étui
D. Case Back with Clip / Pince pour ceinture sur l’arrière de l’étui
F. Cursor / Curseur
G. Reset Button / Bouton de réinitialisation
H. Mode Button / Bouton de mode
I. Set Button / Bouton d’Initialisation
THANK YOU for purchasing this Momentum® pedometer. This
pedometer has been carefully designed to give you years of
reliable service. We value your opinion: please let us know
if you have any comments or suggestions as to how we might
improve our products.
OPENING THE COVER
Holding the pedometer upright, grasp the top of the clip with one
hand. Use the other hand to push the lip (projecting portion) and
swing the pedometer open.
HOW TO WEAR YOUR PEDOMETER
Using the clip, attach the pedometer securely to your belt or
waistband. For the best results keep it close to your hip and keep
in mind that the pedometer works best when it is in a vertical
position and level.
HOW TO DETERMINE YOUR "STRIDE LENGTH"
When you walk each step that you take is a certain length. That
step / stride length needs to be entered into your DIGIWALKER
pedometer so that it can calculate distance Since your steps will
vary in their length, you want to determine your average step
length. The best way of doing this is to walk a given (measured)
distance while counting the number of steps that it takes to cover
that given distance. Divide the known distance by the number of
steps that it took to cover the distance. A high school or college
track works well. The more accurately you can determine your
average stride length, the more accurate the distance shown on
the pedometer will be.
Example (Kilometers): Say you find a high school track with a
100M distance marked on it. Now walk, jog or run the 100M,
counting your steps. (NB: it is very important to emulate the type
of activity and terrain where you intend to use the pedometer.
E.g. stride length will vary significantly depending on whether
you are running / walking, or if you are going uphill /downhill.)
If it takes you 185 steps to walk, jog or run this 100M distance,
then divide 100M by 185 steps, to get your average stride
length: 100 ÷ 185 = 0.54M or 54 cm. Your stride length is 54
cm and that is the number that you enter into your pedometer.
1320 feet distance, then divide 1320 feet by 258 steps, to
get your average stride length: 1320 ÷258 = 2.5. Your stride
length is 2.5 feet and that is the number that you enter into your
pedometer.
HOW TO SET YOUR STRIDE LENGTH
1. Press the MODE button until the little black cursor points to DIS
which stands for DISTANCE.
2. Press the SET button. The cursor will "jump over" to STRIDE.
Continue to press the SET button until your stride length
appears. Stride length can be set from 30cm to 180cm in 1
cm increments (1 feet to 6 feet in 0.5 increments on the SW-
651). If you overshoot or wish to reduce the set stride length,
continue to press the SET button until the number cycles back
through to your number.
HOW TO USE THE STOPWATCH (SW-650/651)
Press the MODE button until the little black cursor points to
STOPWATCH. To start the timing, press the SET button. To stop
the timing, press the SET button again. To reset the stopwatch to
zero press the RESET button.
HOW TO SET THE CLOCK
To set the clock press the MODE button until the black cursor
points to CLOCK.
Press and hold the SET button. The hour digit will start to flash.
Press the RESET button to change the hour digit.
Once you have the correct hour digit, press the SET button
again. The minute digits will start to flash. Press the RESET button
to change the minute digits.
Once you have the correct minute digits, press the SET button.
That’s it!
will point to “WEIGHT” (kg or lbs). The pedometer will accept
weight in either 1 kg (SW800) or 1 lbs (SW801) increments
starting at 30 kg or 70 lbs. The maximum weight is 120 kg or
300 lbs. After setting your weight, the cursor will automatically
return to “CALORIE”.
CALCULATING YOUR SPEED (SW800/801)
The pedometer display will show your speed every 10 seconds.
The displayed speed is based on a calculation of your average
speed for the previous 10 seconds. The minimum displayed
speed is 0.01 km/h or 0.01 mph.
REPLACING THE BATTERY
The usual battery life is 2-3 years. When the display begins to
dim a new battery should be installed. Replace the battery with
an LR-44 type photo / electronic battery. To replace the battery:
1. Insert the edge of a coin in the slot on the bottom of the
pedometer (opposite the end where you open it). Slowly twist
the coin. The cover will pop off.
2. Replace the "dead" battery with a new one, making sure that
the + side faces up.
3. Replace the cover, making sure that it is properly aligned and
then snap it shut.
4. You must then reset, by holding down all of the buttons
simultaneously for about 5 seconds. When the display goes
blank, release the buttons. Your display will show "88888"
then "0". The time and your stride length can then be
reprogrammed.
Erratic Display
If there is an unusual or erratic display, please press all the buttons
at the same time for about 5 seconds. The display will then show
“88888”; after a few seconds, the display will automatically
revert to “0”. After this manual reset, you will need to enter the
date, time, stride length, and your weight (SW800/801).
Example (Miles): Say you find a high school track with a ¼ mile
(1320 feet) distance marked on it. Now walk, jog or run the ¼
mile, counting your steps. (NB: it is very important to emulate
the type of activity and terrain where you intend to use the
pedometer. E.g. stride length will vary significantly depending
on whether you are running / walking, or if you are going uphill
/downhill.) If it takes you 258 steps to walk, jog or run this
HOW TO SET YOUR WEIGHT (SW800/801)
Press the MODE button to move the cursor to “CALORIE”. Then,
press the SET button to input your body weight. The cursor
IF YOUR PEDOMETER REQUIRES SERVICE, please return
it to a St. Moritz Service Center. Our Service Centers can
provide repairs, service and replacement bands promptly and
at reasonable prices. When sending your pedometer, please
provide your return shipping information, including email
address and daytime phone number.
Page 2

NOUS VOUS REMERCIONS d’avoir acheté ce podomètre
Momentum®. Cet appareil a été conçu pour une utilisation longue
et durable. Votre opinion est très importante pour nous; nous vous
serions donc reconnaissants de nous transmettre vos commentaires ou
suggestions afin de nous aider à améliorer nos produits.
OUVRIR LE COUVERCLE
Tout en tenant le podomètre en position verticale, agrippez le
dessus de la pince d’une main. Utilisez l’autre main pour pousser
le rebord et ouvrir le podomètre.
COMMENT PORTER VOTRE PODOMÈTRE
Attachez le podomètre à votre ceinture en utilisant la pince. Pour
obtenir de meilleurs résultats, tenez le podomètre près de votre
hanche et rappelez-vous que le podomètre fonctionne à son
meilleur lorsqu’il est en position verticale et à niveau.
COMMENT MESURER VOTRE ENJAMBÉE
Lorsque vous marchez, chaque pas que vous faites mesure
une certaine longueur. La mesure de votre pas ou enjambée,
doit être enregistrée dans votre podomètre DIGIWALKER pour
calculer la distance. Puisque la mesure de vos enjambées
variera en longueur, il vous faut en déterminer la moyenne. La
meilleure façon de déterminer votre moyenne est de marcher sur
une distance donnée (mesurée) en comptant le nombre de pas
que vous faites pour couvrir cette distance. Divisez la distance
par le nombre de pas pour obtenir votre moyenne. Le terrain
idéal pour ce calcul est une piste d’école ou de collège. Plus
votre moyenne est exacte et plus la distance qui sera affichée sur
votre odomètre sera exacte.
Exemple (kilomètres) : Prenons une piste d’école de 100 m.
Marchez, joggez ou courez toute la distance du 100 m en
comptant vos pas. (n.b.: il est très important d’imiter le même
type d’activités que vous planifiez faire avec votre podomètre. La
longueur d’enjambée variera considérablement selon que vous
marchez, joggez ou courez ou si vous descendez ou montez une
colline). Si, par exemple, il vous faut faire 185 pas pour couvrir
le 100 m en marchant, joggant ou courant, vous divisez alors
100 m par 185 et vous obtiendrez votre moyenne : 100 ÷ 185
= 0.54 m ou 54 cm. La longueur de votre enjambée mesure
donc 54 cm et c’est ce chiffre que vous devrez enregistrer dans
votre podomètre.
Exemple (milles) : Prenons une piste d’école de ¼ mille (1 320
pieds). Marchez, joggez ou courez toute la distance du 100 m
en comptant vos pas. (n.b.: il est très important d’imiter le même
type d’activités que vous planifiez faire avec votre podomètre.
La longueur d’enjambée variera considérablement selon que
vous marchez, joggez ou courrez ou si vous descendez ou
monter une colline). Si, par exemple, il vous faut faire 258 pas
pour couvrir la distance de 1 320 pieds en marchant, joggant
ou courant, vous divisez alors 1 320 par 258 et vous obtiendrez
votre moyenne : 1 320 ÷ 258 = 2,5 pi. La longueur de votre
enjambée mesure donc 2,5 pi. et c’est ce chiffre que vous devrez
enregistrer dans votre podomètre.
ENREGISTRER LA LONGUEUR DE VOTRE ENJAMBÉE
1. Appuyez sur le bouton MODE jusqu’à ce que le petit curseur
noir indique DIS pour DISTANCE.
2. Appuyez sur le bouton INITIALISATION (SET). Le curseur
avancera sur ENJAMBÉE (STRIDE). Continuez à appuyer
sur le bouton INITIALISATION (SET) jusqu’à ce que la bonne
mesure soit affichée. La longueur des enjambées peut être
ajustée de 30 cm à 180 cm en incrément de 1 cm (1 à
6 pieds en incréments de 0,5 sur le modèle SW-651). Si
vous passez la mesure désirée ou si vous désirez réduire la
longueur d’enjambée, continuez à appuyer sur le bouton
INITIALISATION jusqu’à ce que les chiffres retournent au
chiffre désiré.
MODE D’EMPLOI DU CHRONOMÈTRE (SW-650/651)
Appuyez sur le bouton MODE jusqu’à ce que le petit curseur
noir indique CHRONOMÈTRE (STOPWATCH). Pour débuter la
séquence, appuyez sur le bouton INITIALISATION. Pour arrêter la
séquence, appuyez de nouveau sur le bouton INITIALISAITON.
Pour réinitialiser le chronomètre à zéro, appuyez sur le bouton
RÉINITIALISATION.
AJUSTER LA MONTRE
Pour ajuster la montre, appuyez sur le bouton MODE jusqu’à ce
que le petit curseur noir indique MONTRE (CLOCK).
Appuyez et tenez le bouton INITIALISATION. Les chiffres des
heures clignoteront.
Appuyez sur le bouton RÉINITIALISATION pour changer
l’heure.
Appuyez sur le bouton INITIALISATION de nouveau pour
changer le chiffre des minutes. Les chiffres clignoteront.
Appuyez sur le bouton RÉINITIALISATION pour changer les
minutes.
Une fois l’heure et les minutes ajustées, appuyez sur le bouton
INITIALISATION. Et voilà!
ENREGISTRER VOTRE POIDS (SW800/801)
Appuyez sur le bouton MODE jusqu’à ce que le curseur indique
“CALORIE”. Appuyez sur le bouton INITIALISATION pour
enregistrer votre poids. Le curseur indiquera POIDS (en kg ou en
lb). Le podomètre accepte les incréments de 1 kg pour le modèle
SW800 ou 1 lb pour le modèle SW801 à partir de 30 kg ou 70
lbs. Le poids maximum est de 120 kg ou 300 lbs. Après avoir
enregistré votre poids, le curseur retournera automatiquement à
“CALORIE”.
CALCUL DE VOTRE VITESSE (SW800/801)
L’écran de votre podomètre affichera votre vitesse chaque 10
secondes. La vitesse affichée est basée sur le calcul de la vitesse
moyenne des 10 secondes précédentes. La vitesse minimale
affichée est de 0,01 km/h ou 0,01 mph.
REMPLACER LA PILE
La longévité normale de la pile est de 2 à 3 ans. Lorsque
l’affichage commence à affaiblir, vous devez installer une
nouvelle pile. Remplacez la pile par une pile de type LR-44 pour
photo ou appareil électronique. Pour remplacer la pile:
1. Insérez le bout d’une pièce de monnaie dans la fente au
dessous du podomètre. Tournez la pièce de monnaie tout
doucement. Le couvercle s’ouvrira.
2. Enlevez la pile morte et mettez la nouvelle en vous assurant
que le côté positif (+) soit vers le haut.
3. Remettez le couvercle. Alignez-le bien et fermez-le avec
fermeté.
4. Vous devez réinitialiser votre podomètre en appuyant sur tous
les boutons en même temps pendant 5 secondes. Lorsque
l’écran d’affichage se vide, relâchez les boutons. Vous verrez
“88888” puis “0” sur l’écran. L’heure et la longueur de votre
enjambée sont prêtes à être reprogrammées.
RÉINITIALISATION MANUELLE
Si jamais vous voyez une entrée anormale ou irrégulière sur votre
écran, appuyez sur tous les boutons en même temps pendant 5
secondes. Vous verrez sur l’écran “88888” puis après quelques
secondes, “0”. Après cette réinitialisation manuelle, vous devrez
reprogrammer la date, l’heure, votre longueur d’enjambée et
votre poids (SW800/801).
SI VOTRE PODOMÈTRE A BESOIN DE RÉPARATION,
s.v.p. retournez-le au Centre de service St-Moritz. Nos centres
de service réparent, font l’entretien et le remplacement des
bracelets, vite, efficacement et à prix raisonnable. N’envoyez
pas la boîte-cadeau, s.v.p.
ONE YEAR WARRANTY
Great care has been taken to ensure that your pedometer will
give you many years of reliable service. It is guaranteed for one
year against any defect caused by a fault in its manufacture*.
The best possible materials and components have gone into your
pedometer. To keep it in top condition, please treat it with care
and have it professionally serviced at regular intervals.
* Loss or damage caused by accident, negligence, or opening, or repair
by unauthorized persons is excluded from this warranty, as is cosmetic
deterioration of the case or bracelet caused by wear & tear or abuse
and damage caused by cracked or broken crystals.
GARANTIE DE 1 ANS
Votre podomètre a été construite pour vous assurer plusieurs
années de service fiable. Elle est garantie contre tout défaut de
fabrication* pour une période initiale de 1 ans.
* Perte ou dommages dus à un accident, ou causés par l’ouverture de la
boîte par des personnes non autorisées sont exclus de cette garantie,
tout comme la détérioration cosmétique de la boîte ou du bracelet
causée par la portée ou l’abus. La durée de vie de la pile n’est pas
couvert sous la garantie. Les dommages causées par l’entrée de
l’humidité n’est pas compris.
Questions?
1-800-663-1881
(weekdays, 9am-5pm Pacific Time)
(lun~ven, 9 h-17 h, heure du pacifique)
SERVICE IN CANADA:
St. Moritz Service Centre
1140 West 7th Avenue
Vancouver BC V6H 1B4 Canada
Service In The US:
St. Moritz Service Center
264 H Street, Suite D
Blaine WA 98230 USA
For current service centre addresses, please check at:
Pour l’adresse du centre de service le plus proche, voir:
www.st-moritz.com
 Loading...