

Page 1
T
T
y
y
r
r
o
o
1
1
5
5
0
0
Page 2

Molt Models Tyro150 Building Instructions
Molt Models Background Design Philosophy
When I was first introduced to this hobby in 1985, the first plane my Dad and I flew was one of
the typical .40 sized glow powered trainers still available today. Since then however,
technological advances in both electric motors and batteries have completely changed
the look of radio controlled model airplanes. These changes also brought forth a completely
different style of trainer airplane. Many of these new electric powered trainers are
wonderfully stable and easy to fly. However, in my opinion, they lack flight c h ar acteristics
that I associate with the typical .40 sized glow powered trainer that truly prepare the novice
pilot for the next level of flying. The Molt Models Tyro150 contains all the capabilities
associated with the typical .40 sized glow powered trainer, but includes the simplicity of
electric flight and a much lower wing loading.
The Molt Models design philosophy is comprised of methods that enhance appearance and
all around flight performance. The first thing you’ll notice about a Molt Models kit is that the
majority of wood parts, illustrations and plans are CAD based. These items are derived from
the same 3D modeling environment that the plane was designed in. My goal is to cut down
on wordy instructions and use a more visual approach that will get you from kit to airborne in
as little time as possible.
Molt Models Tyro150
Thank you for purchasing the Molt Models Tyro150. This kit represents a true first in 4-channel
electric trainers in that it possesses characteristics that make it both enjoyable to build and
more importantly, fly. I sincerely hope that you enjoy your new Molt Models kit. Please visit
us at
www.moltmodels.com for updates and information on future kits.
Manual Revisions
Rev 0 - Initial release
Molt ModelsTyro150 Specifications
Length: 45.5 in
Wing Span: 54 in
Wing Area: 558 in
Flying Weight: 37.0 ~ 45.0 oz
Wing Loading: 9.52 ~ 11.61 oz/ft
Power System: 150~250 W see next section of manual)
Functions: Aileron, Elevator, Rudder, & Throttle
Battery Pack: 3S1P, 1200mAh or larger Lithium Polymer
© Copyright 2007 Molt Models. All rights reserved. 2 of 47
2
2
Page 3

Molt Models Tyro150 Building Instructions
Components you will need to complete the Tyro150 kit:
• (1) Power system
Motor Type = Radial moun t brushle ss outrunner
Power = 150~250 W
Kv = 1000~1250 RPM/Volt
Weight = 2.5~3.5 oz
Propeller size = 10x5~12x6
ESC Type = appropriate for selected motor
Battery connector = appropriate for selected motor
• (1) Receiver
4-channel receiver with Y-harness
Or
6-channel receiver (flaperon setu p)
• (2) 12” servo extensions (for aileron lead ex tensions through wing)
• (4) Servos (HS-81, HS-81MG, HS-85BB, HS85MG or equivalent)
• (2) Rolls of Solarfilm covering
Supplies and tools you will need to complete the Tyro150 kit:
• Hobby knife and blades
• Ruler
• Covering iron
• Fine tip ink pen
• Fine/medium sand paper
• 5-minute epoxy
• Thin CA glue and fine extension tip
• 40W soldiering iron
• Soldier paste/flux
• Soldier
General model building tips, orientation, and how to use this manual
First and foremost, this kit is for the first time wood kit builder. However, it is still important that
you study this manual and get help from an experienced builder if you run into trouble.
Please be sure to read through the following instructions before attempting to build your
Tyro150. Having a good idea of what to expect as you progress will cut down on mistakes
and allow you to better organize your project. Checkboxes have been provided in front of
each step, allowing you to easily keep track of your work.
Thin CA glue is suitable for almost all the build sections of this model. If another type of glue
is necessary for a certain build section it will be recommended in that segment.
Standing behind the plane orients the left and right side of the model. These building
instructions refer to areas of the model in this manner. All dimensions are presented in English
units.
Each section of this manual is organized by showing portions of the plane being built from
general construction all the way to covering. However, most experienced builders prefer to
completely build each component to the point where it is ready to be covered, build the
next components, and then cover all the components at the end of the building process.
Feel free to use the checkboxes to help keep track of where you are in the building process
regardless of which method you choose to follow.
© Copyright 2007 Molt Models. All rights reserved. 3 of 47
Page 4
Molt Models Tyro150 Building Instructions
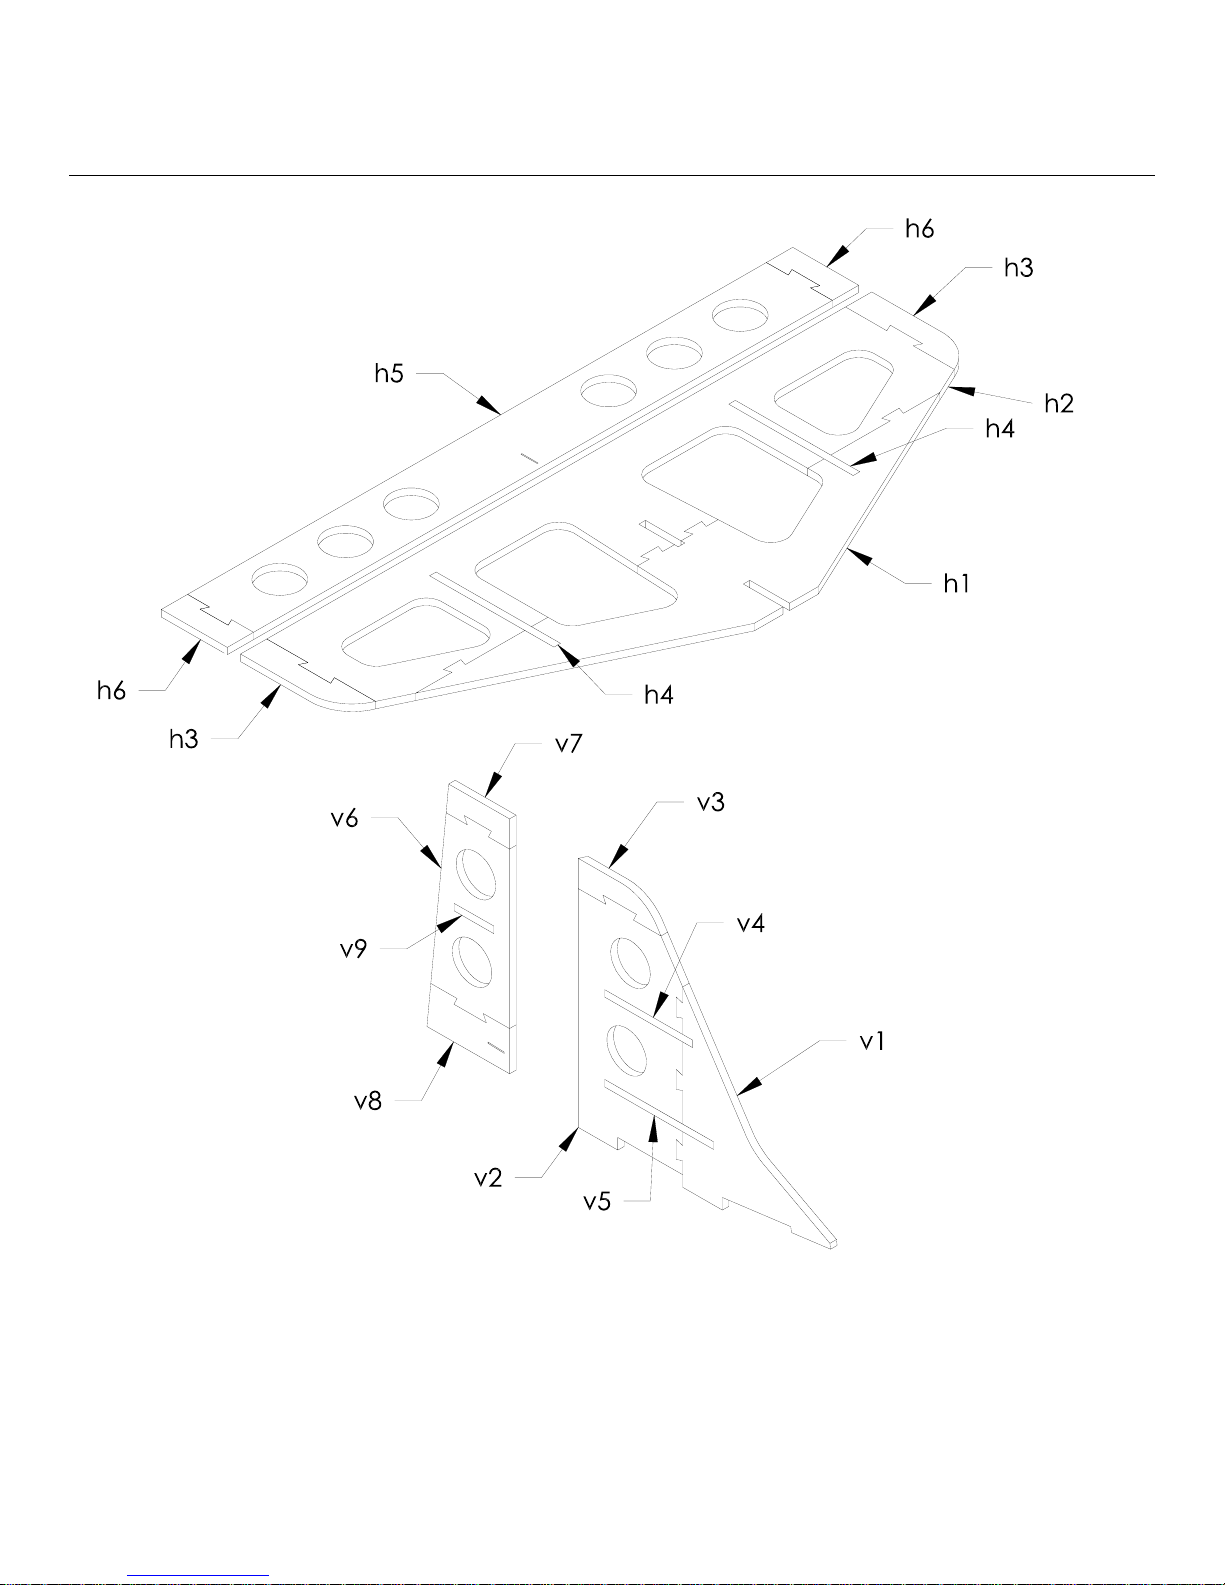
Horizontal stabilizer, vertical stabilizer, elevator, and rudder construction
© Copyright 2007 Molt Models. All rights reserved. 4 of 47
Page 5
Molt Models Tyro150 Building Instructions
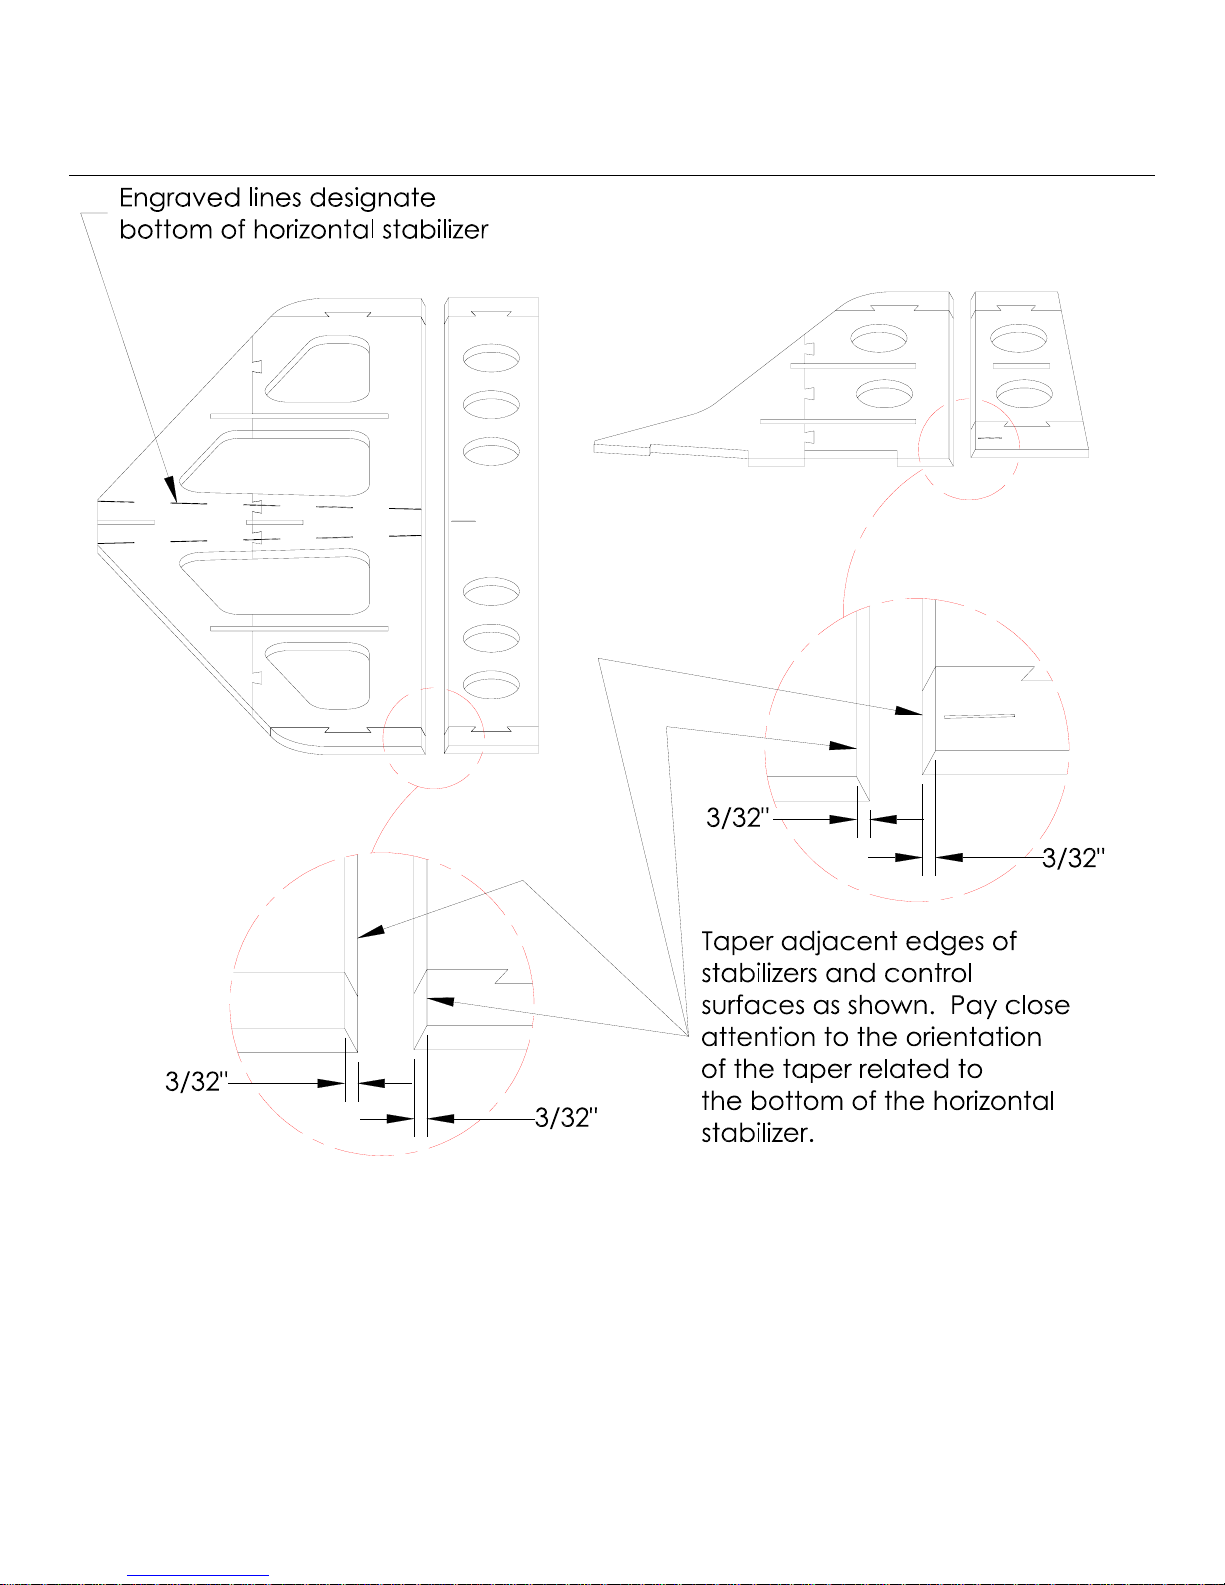
Horizontal stabilizer, vertical stabilizer, elevator, and rudder sanding
(for covering hinges)
© Copyright 2007 Molt Models. All rights reserved. 5 of 47
Page 6
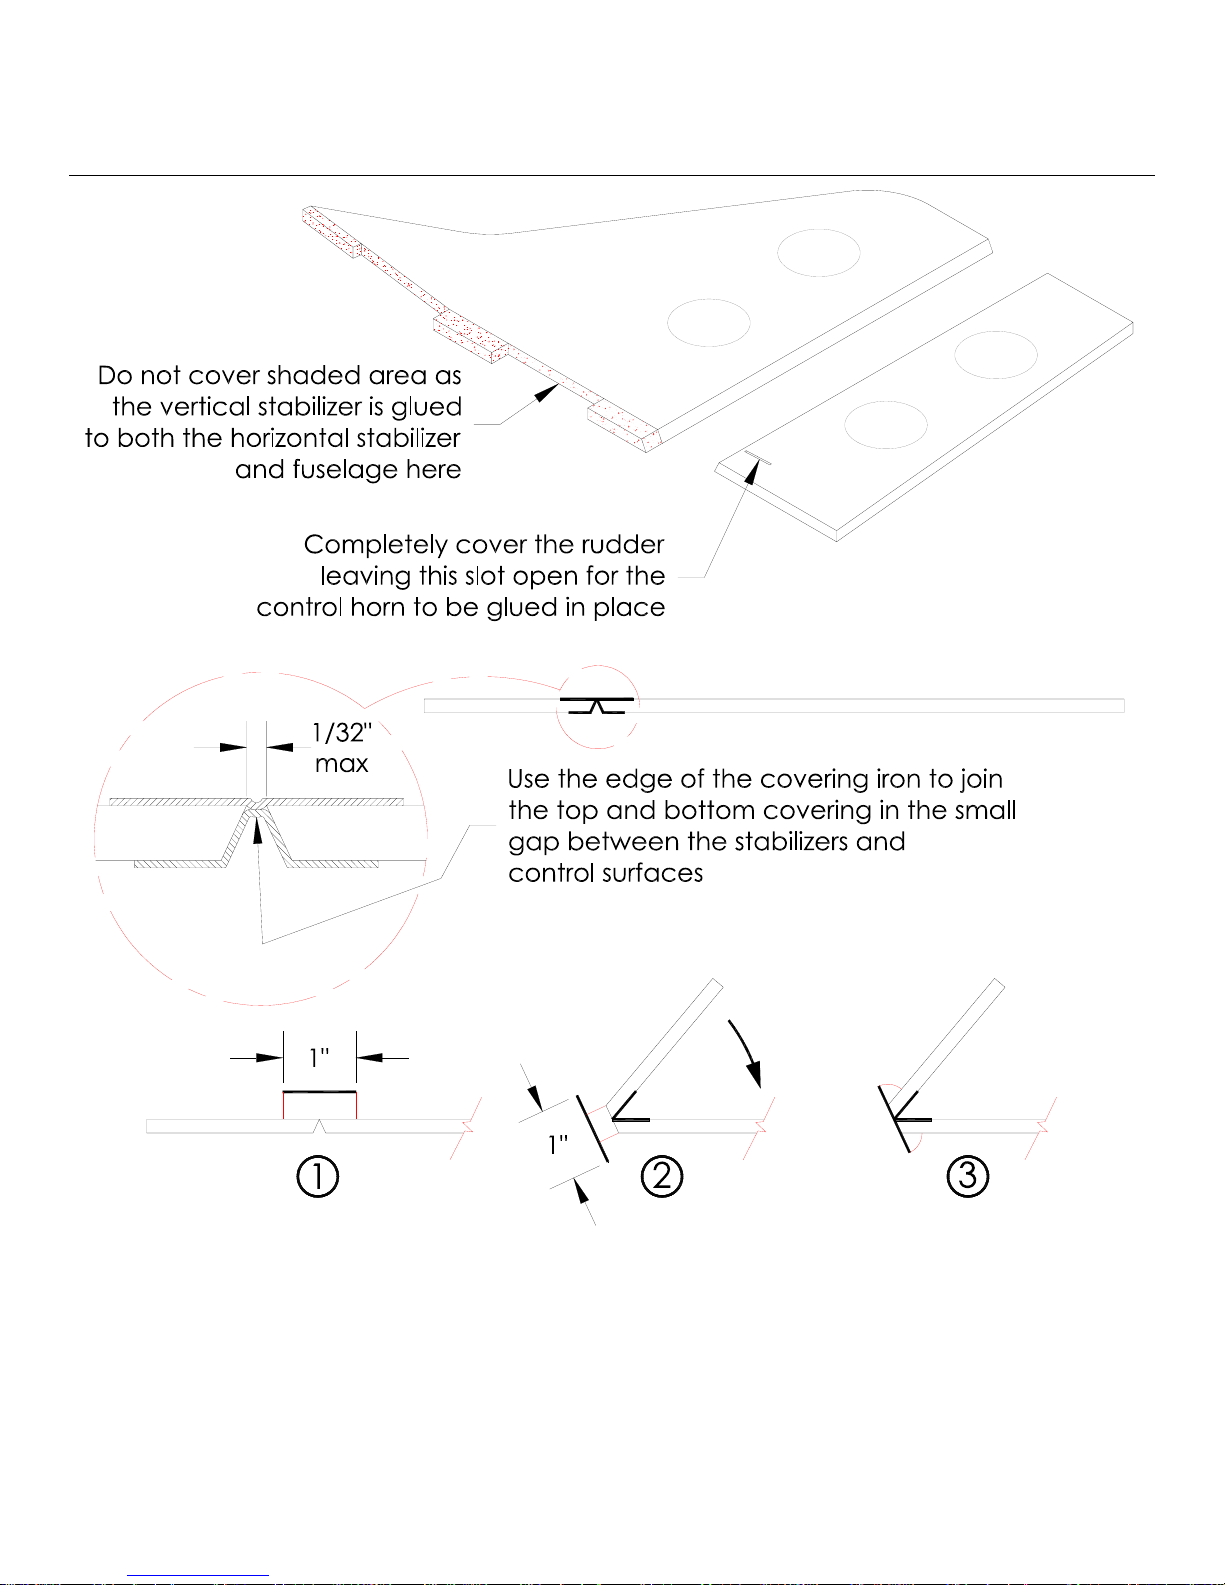
Molt Models Tyro150 Building Instructions
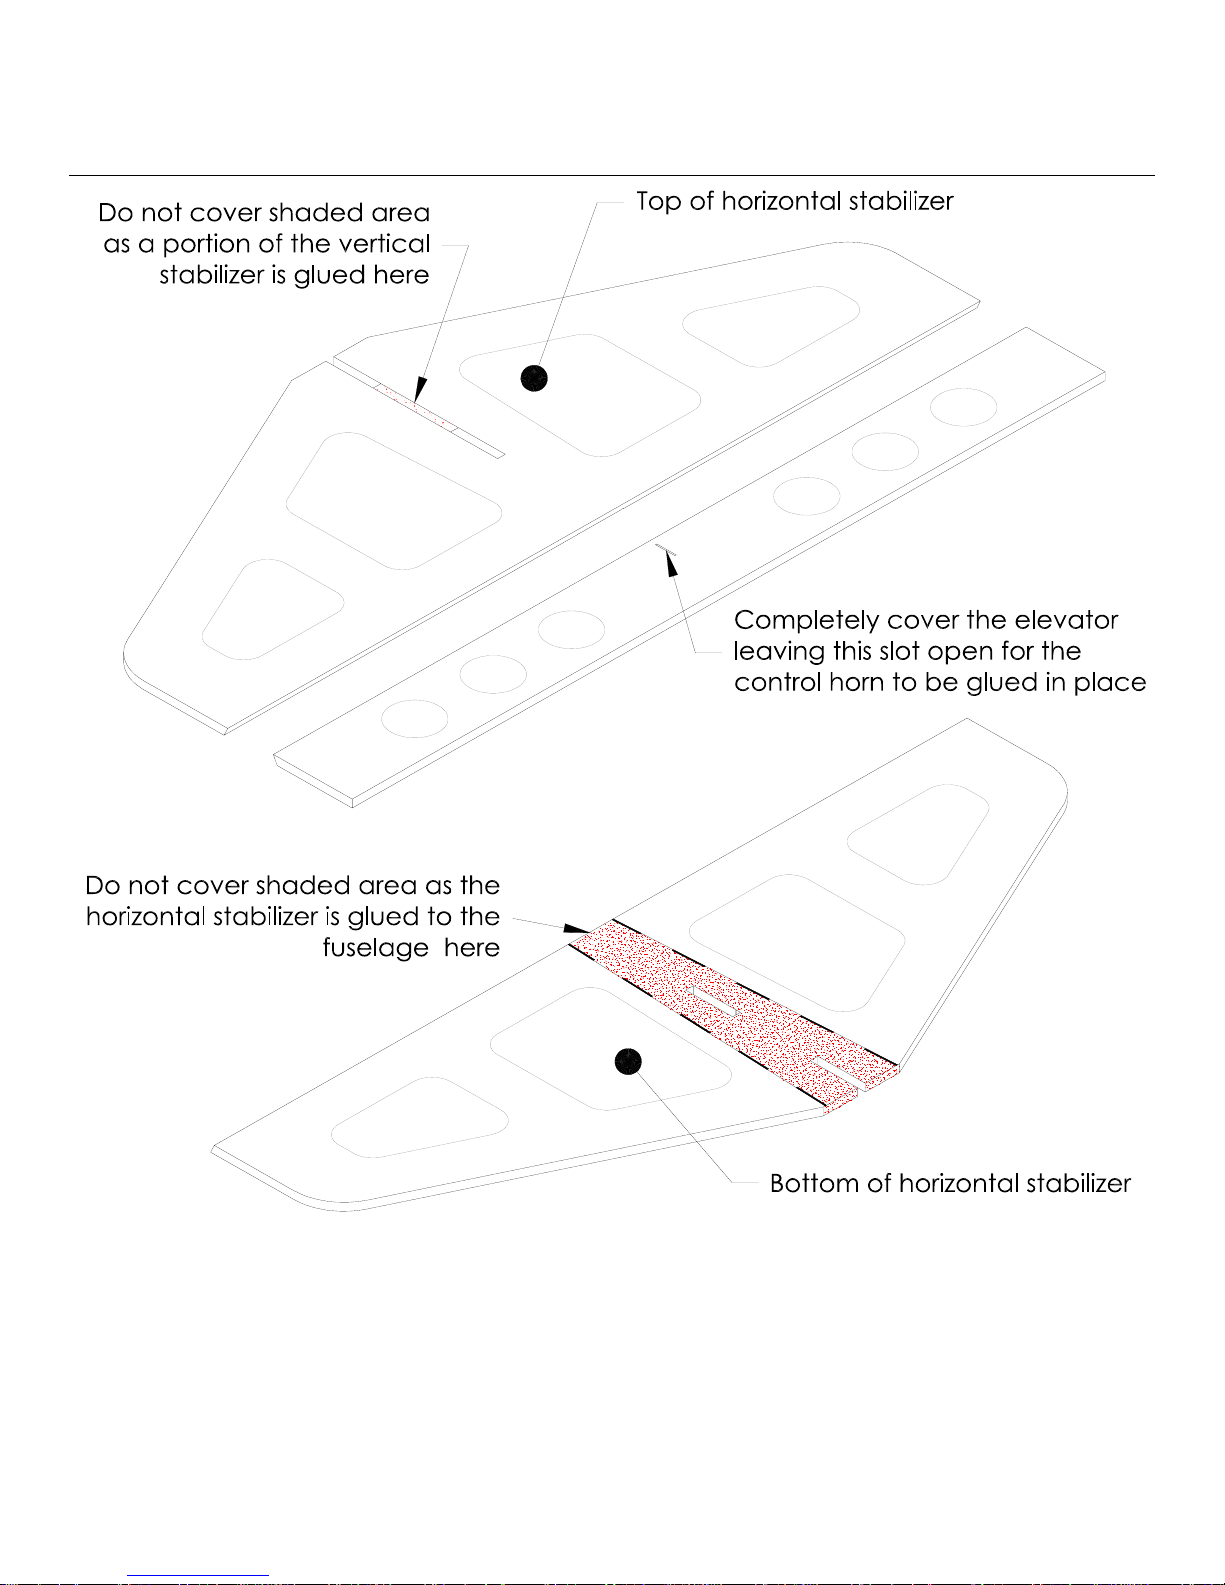
Horizontal stabilizer, vertical stabilizer, elevator, and rudder covering
© Copyright 2007 Molt Models. All rights reserved. 6 of 47
Page 7
Molt Models Tyro150 Building Instructions
Horizontal stabilizer, vertical stabilizer, elevator, and rudder hinging
© Copyright 2007 Molt Models. All rights reserved. 7 of 47
Page 8
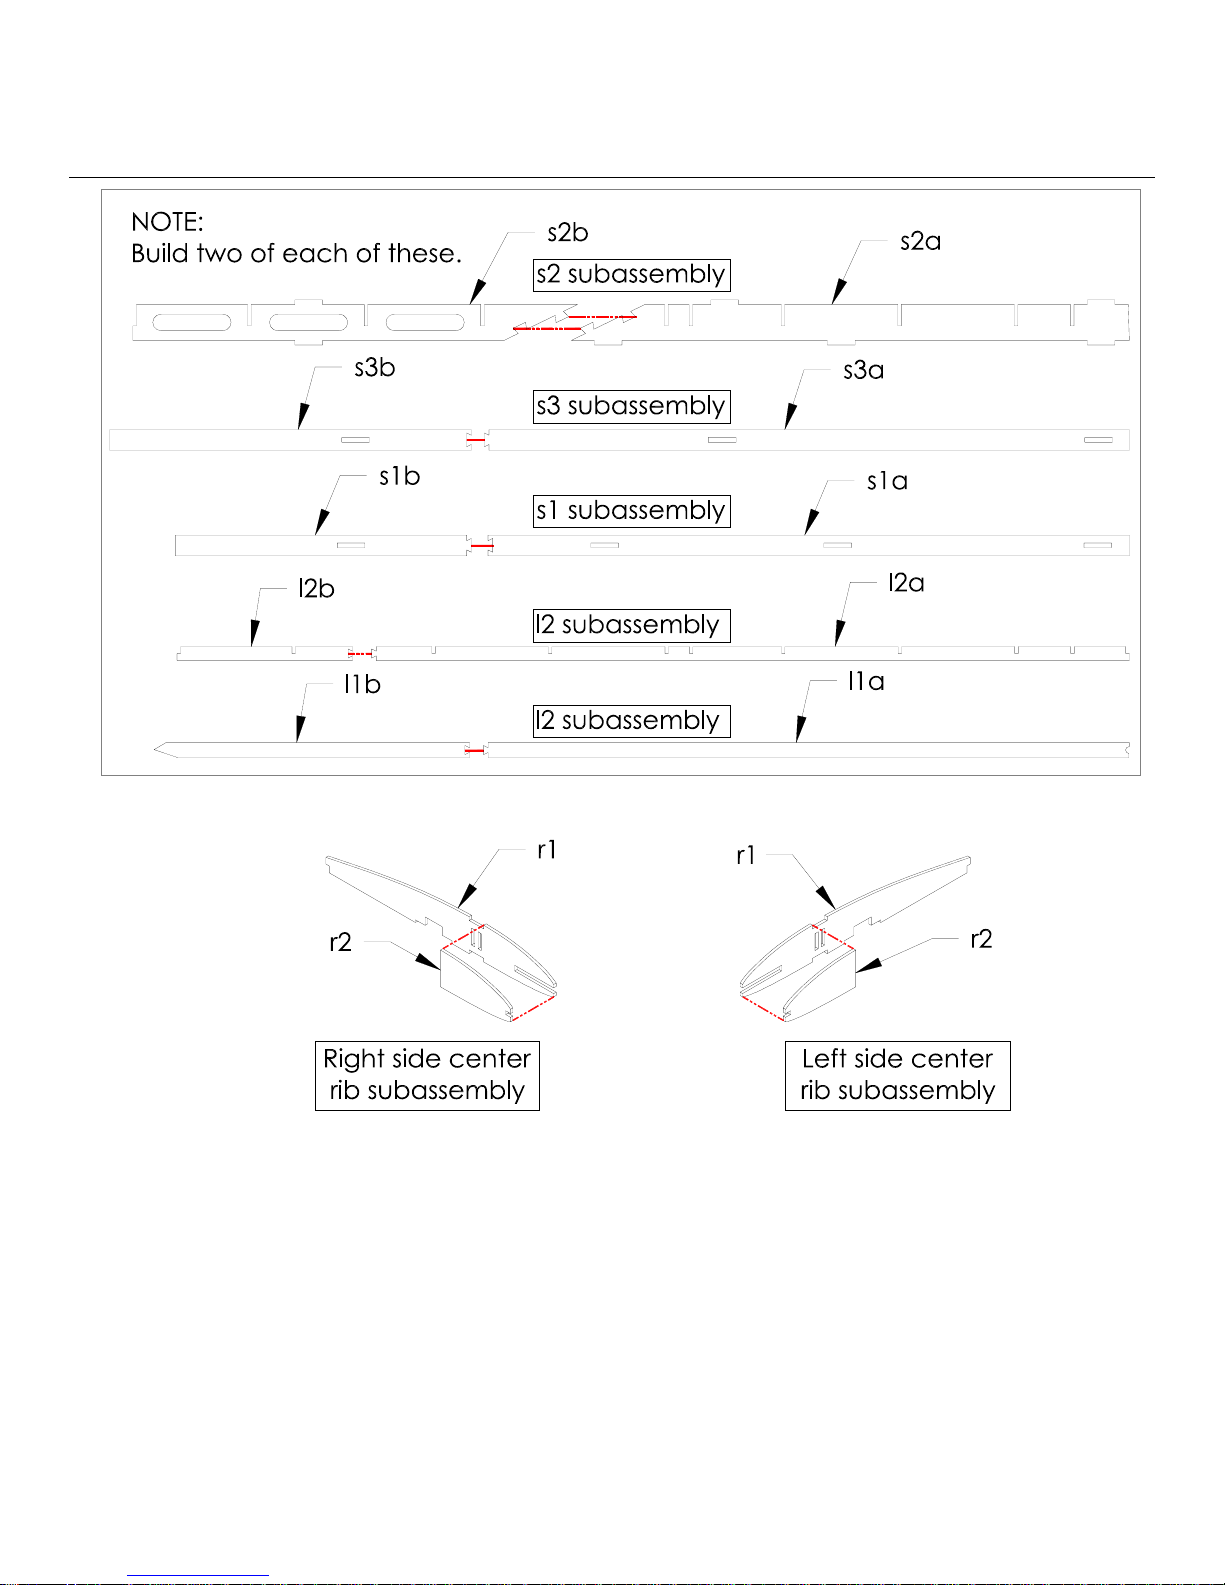
Molt Models Tyro150 Building Instructions
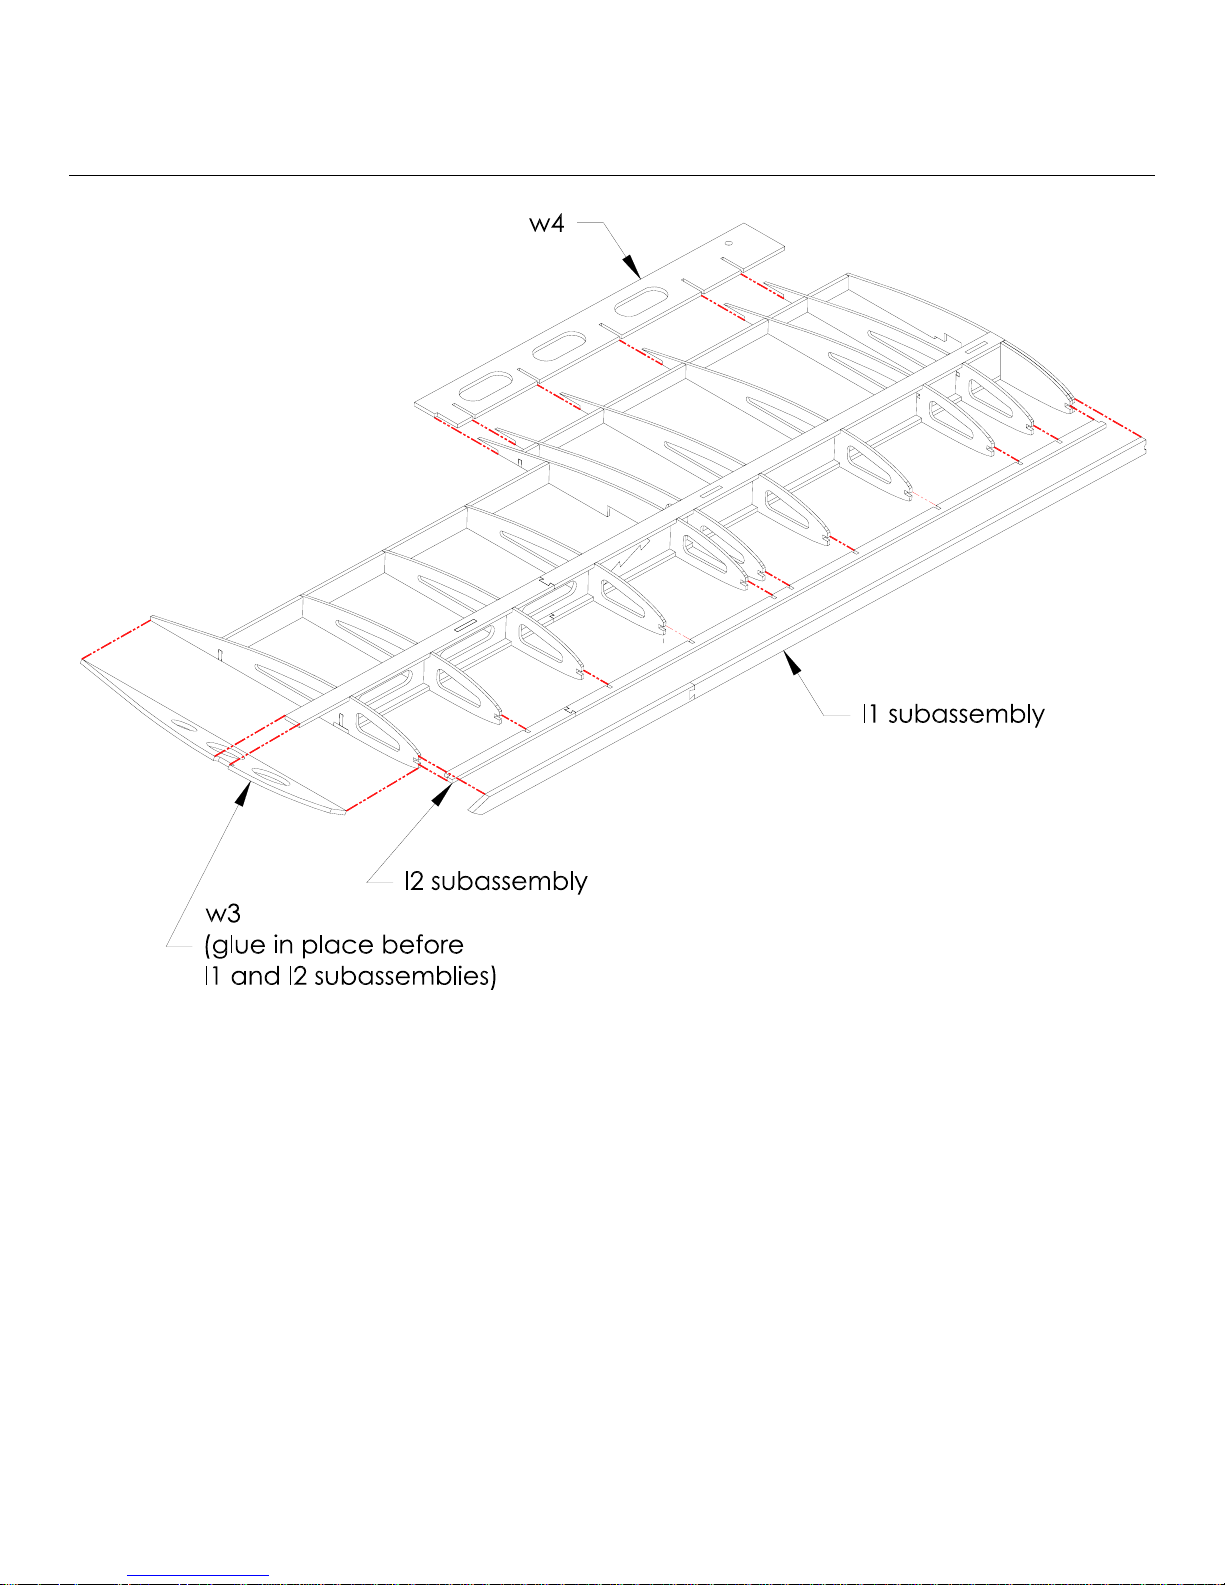
Wing construction
© Copyright 2007 Molt Models. All rights reserved. 8 of 47
Page 9
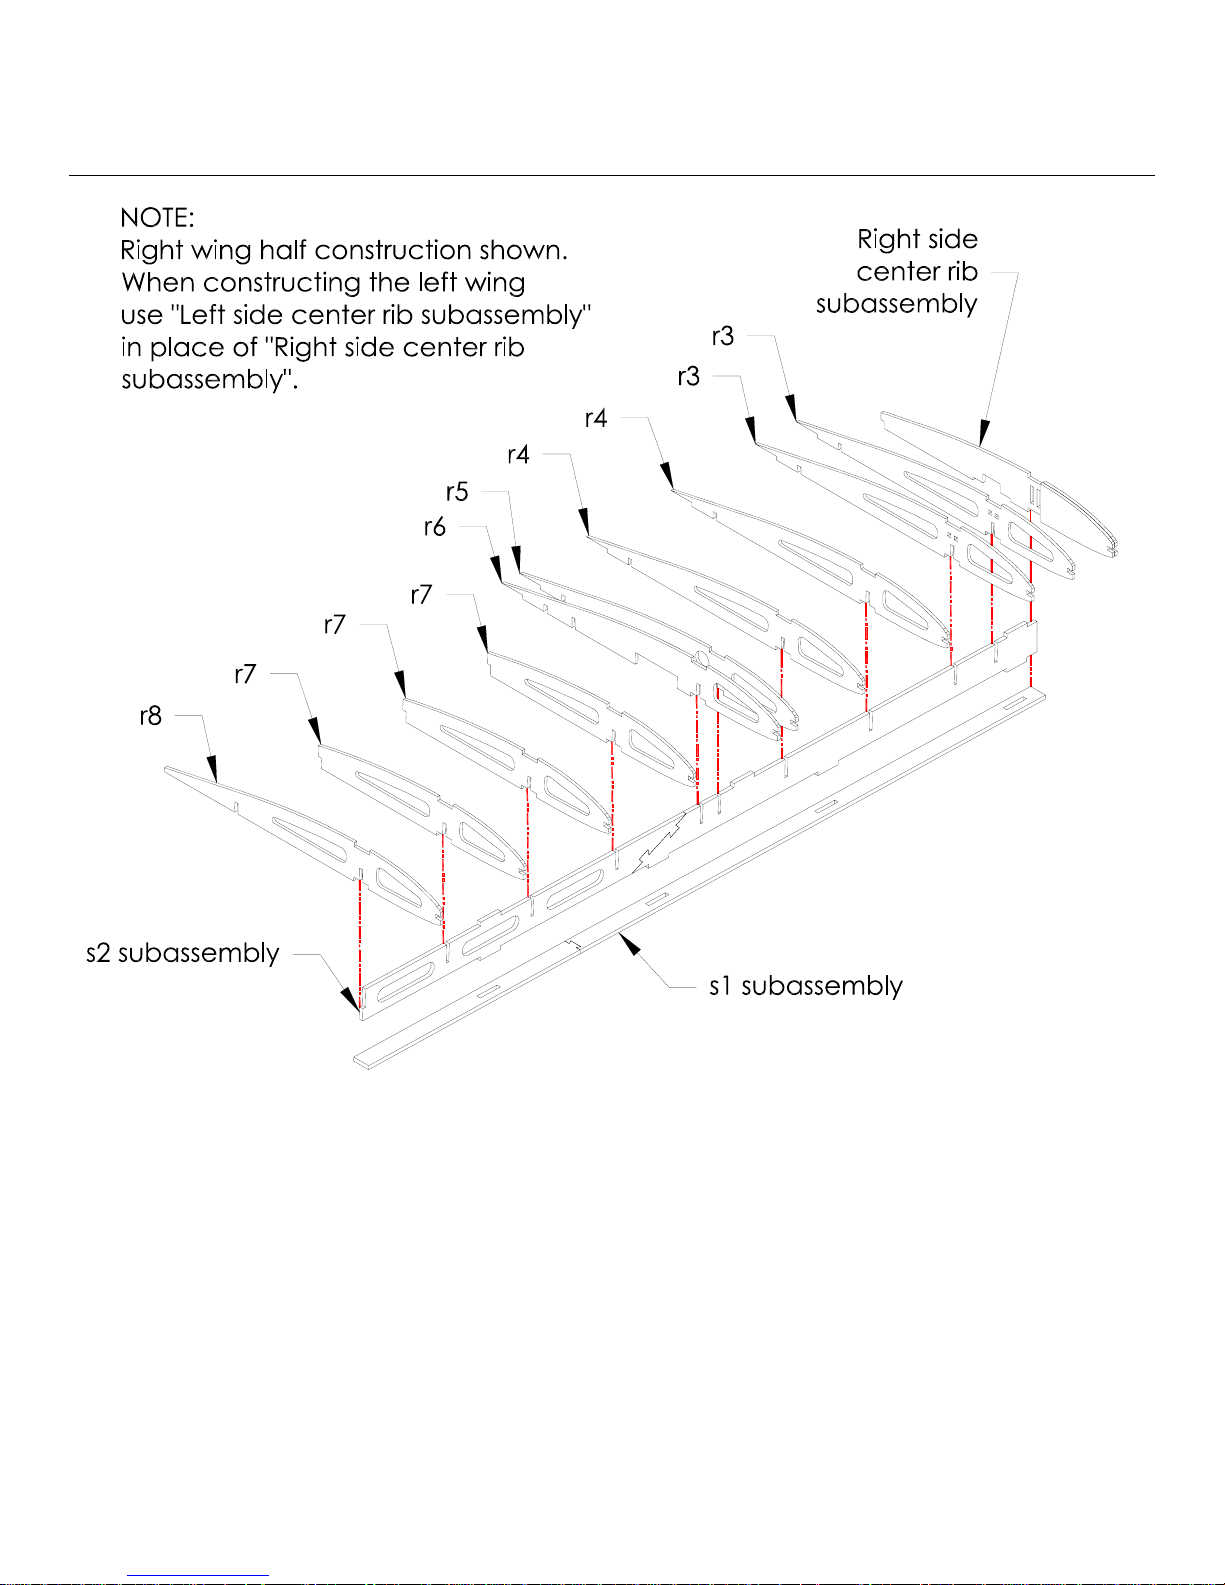
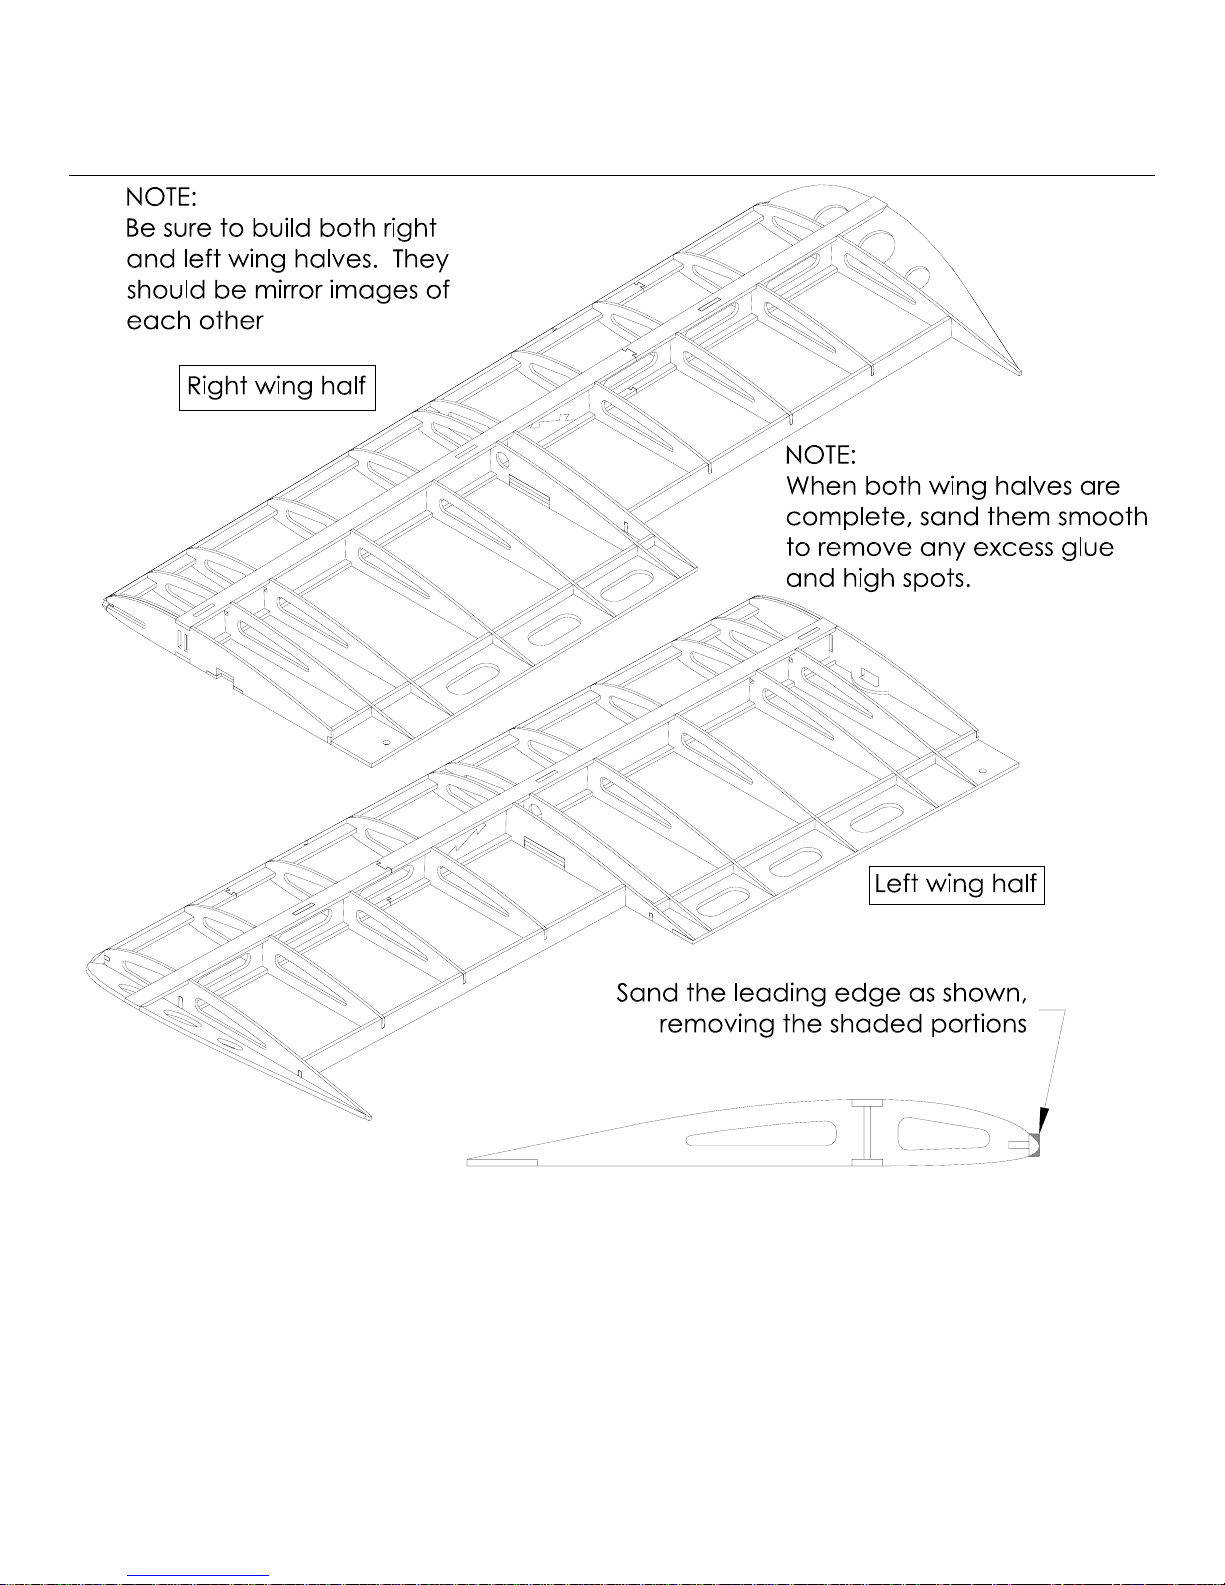
Molt Models Tyro150 Building Instructions
Wing construction (continued)
© Copyright 2007 Molt Models. All rights reserved. 9 of 47
Page 10
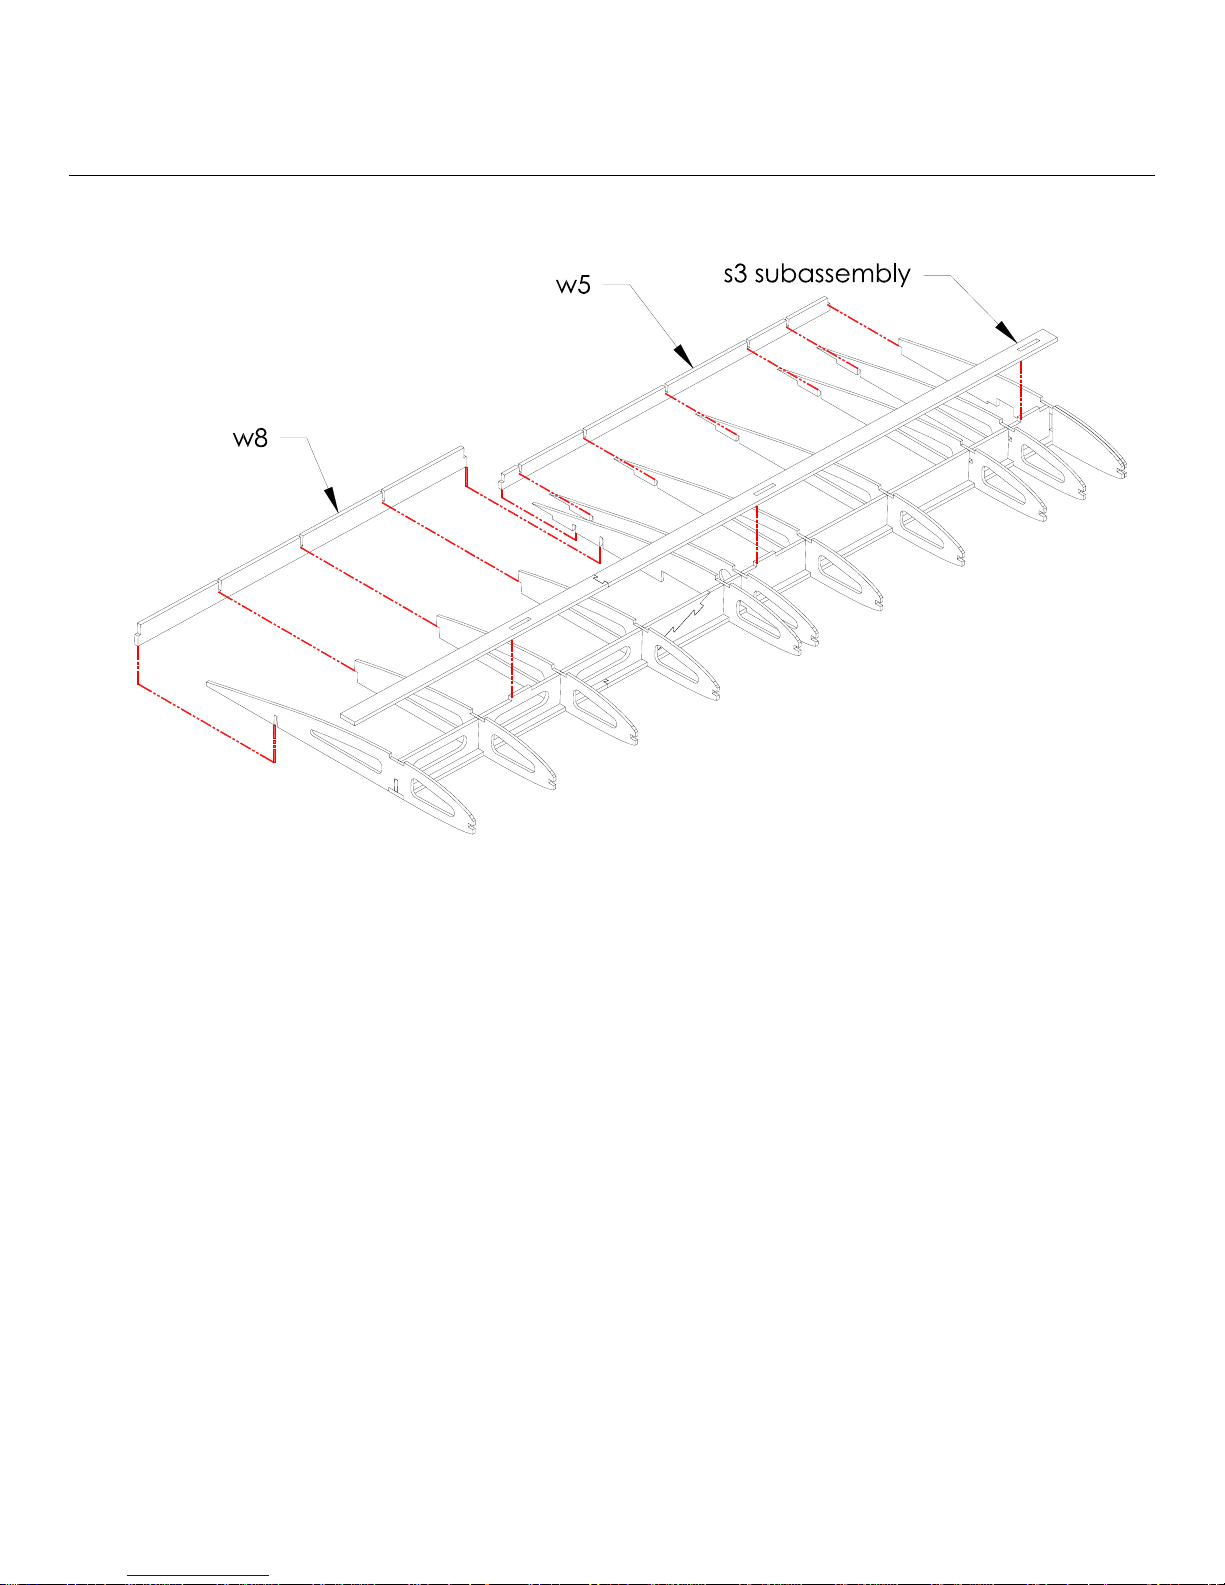
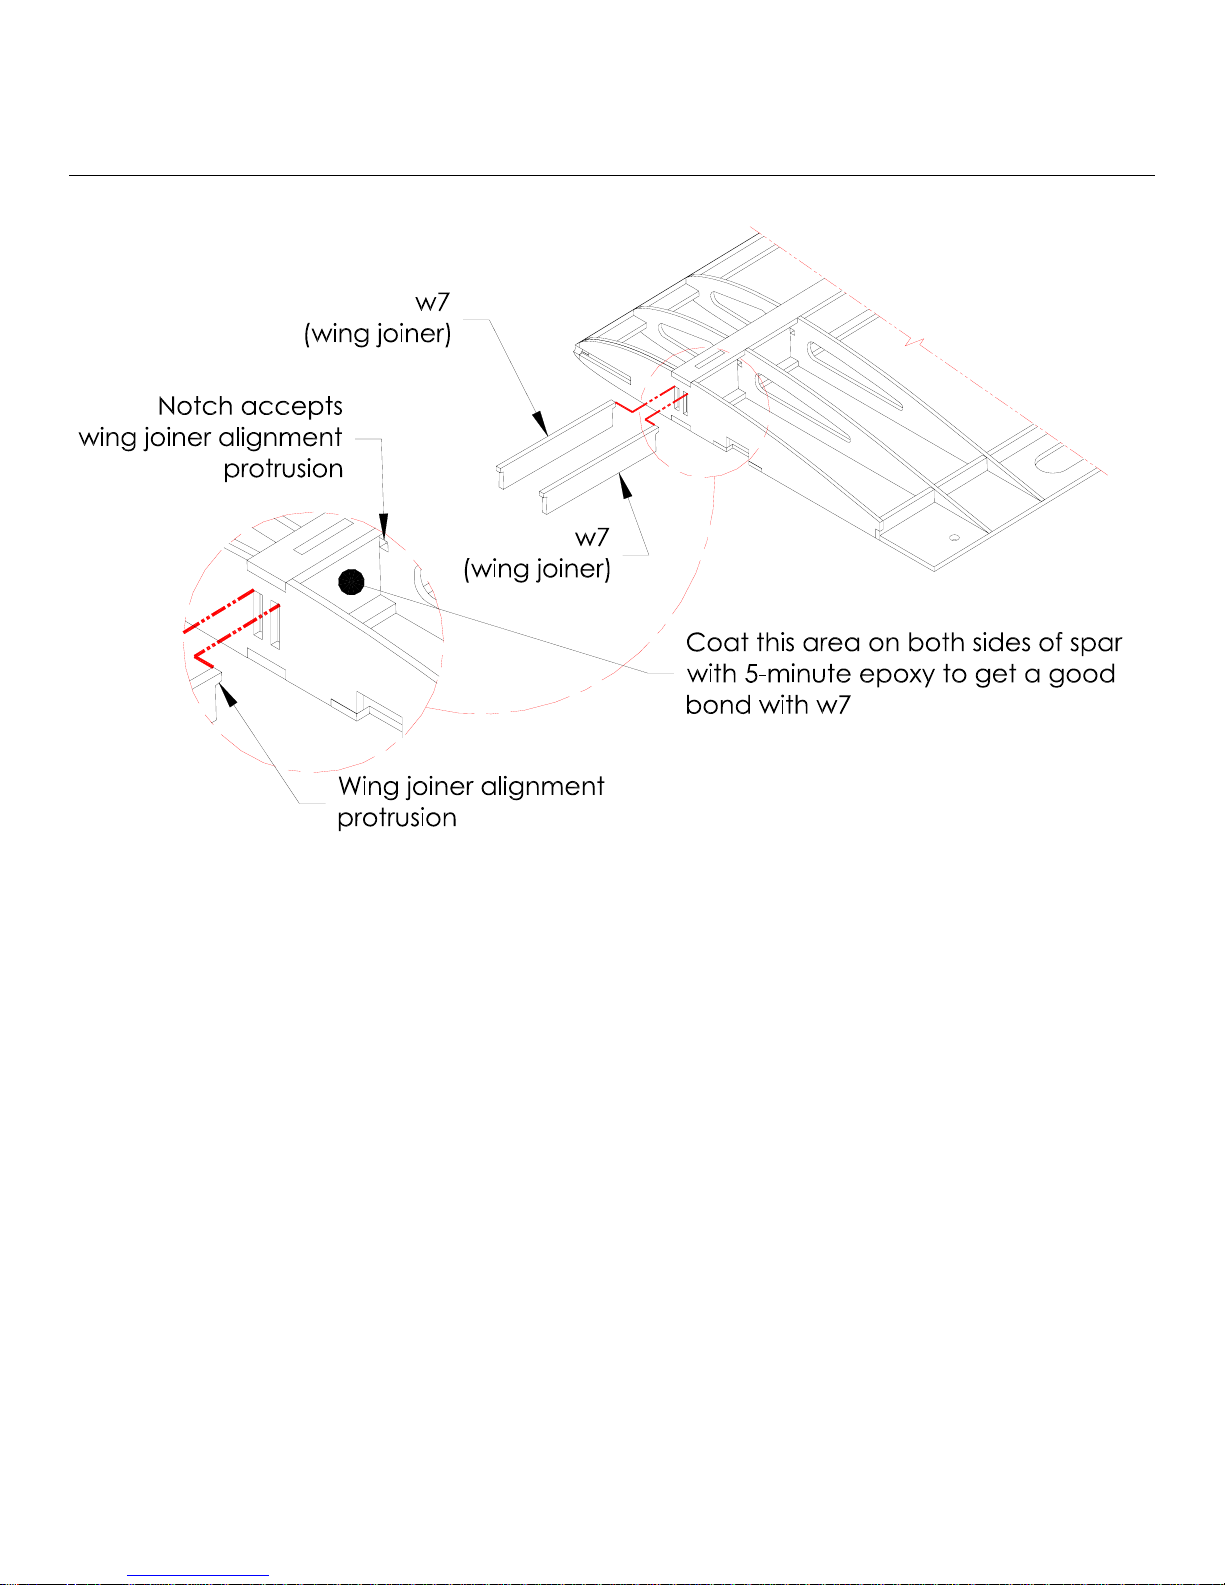
Molt Models Tyro150 Building Instructions
Wing construction (continued)
© Copyright 2007 Molt Models. All rights reserved. 10 of 47
Page 11
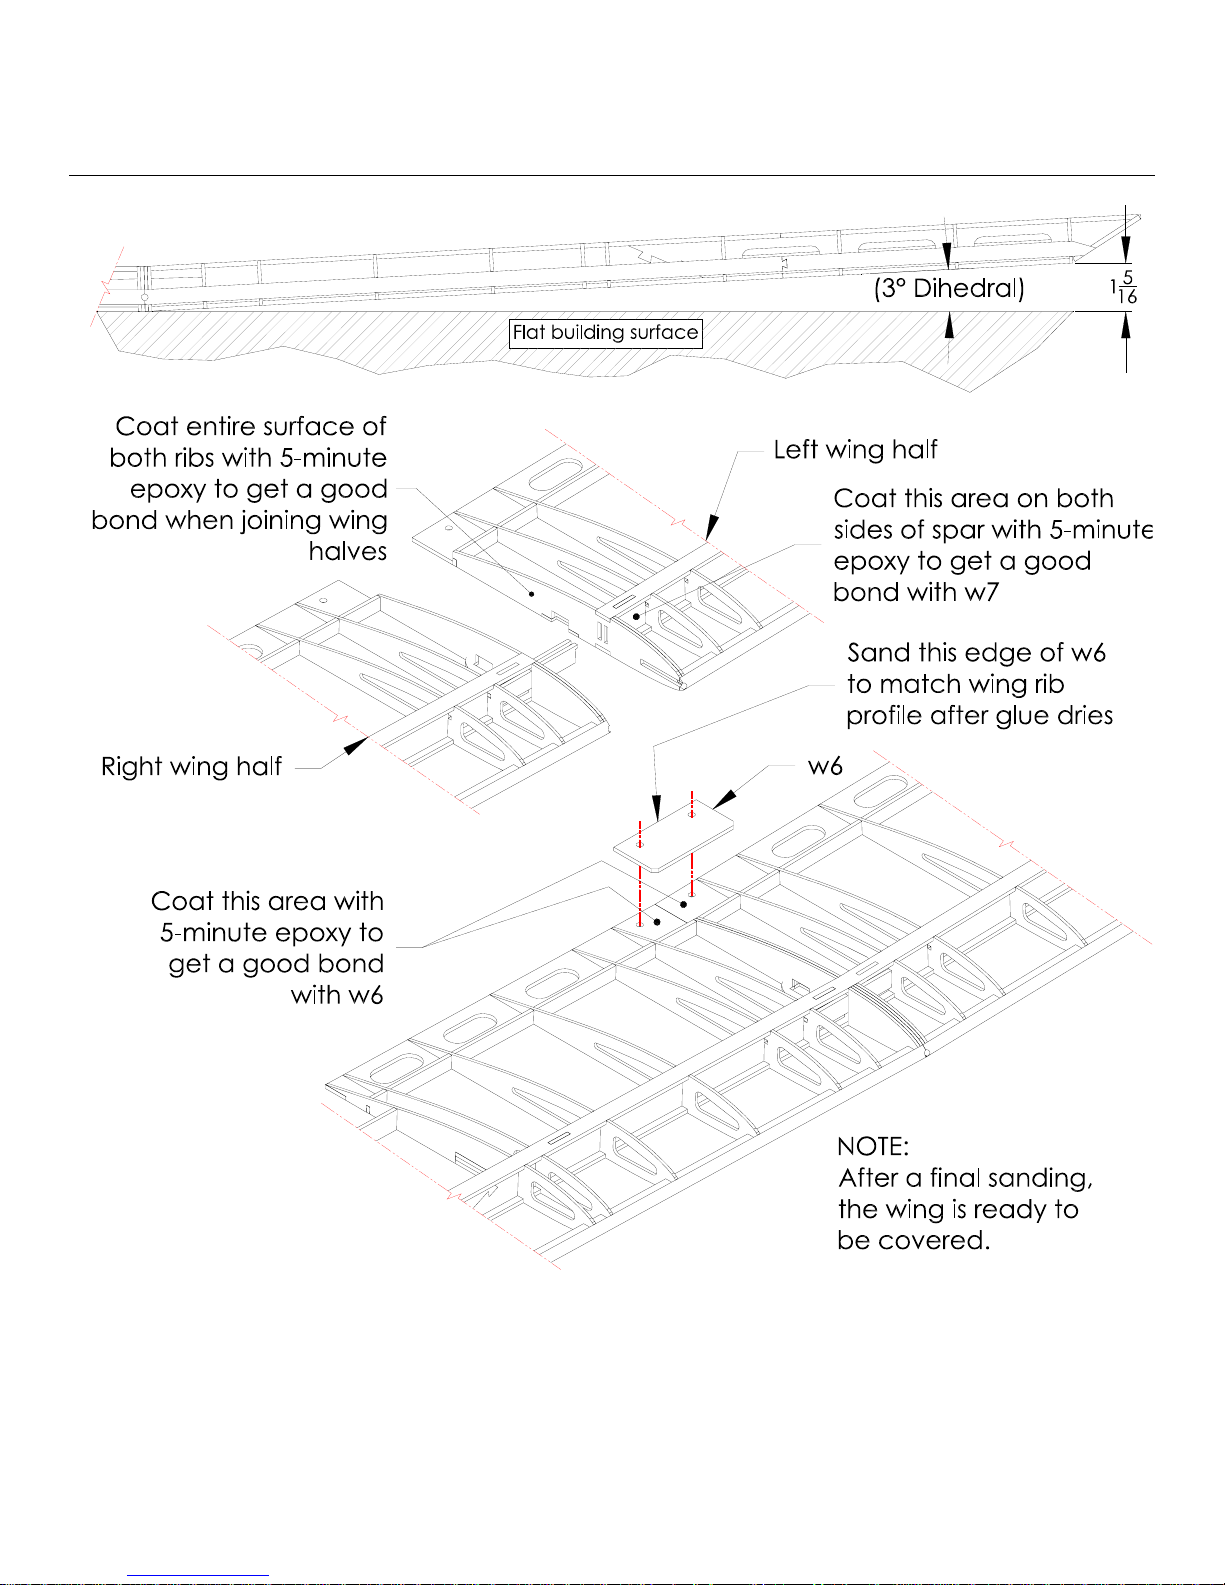
Molt Models Tyro150 Building Instructions
Wing construction (continued)
© Copyright 2007 Molt Models. All rights reserved. 11 of 47
Page 12

Molt Models Tyro150 Building Instructions
Wing construction (continued)
© Copyright 2007 Molt Models. All rights reserved. 12 of 47
Page 13
Molt Models Tyro150 Building Instructions
Wing construction (continued)
© Copyright 2007 Molt Models. All rights reserved. 13 of 47
Page 14
Molt Models Tyro150 Building Instructions
Wing construction (continued)
© Copyright 2007 Molt Models. All rights reserved. 14 of 47
Page 15
Molt Models Tyro150 Building Instructions
Wing construction (continued)
© Copyright 2007 Molt Models. All rights reserved. 15 of 47
Page 16

Molt Models Tyro150 Building Instructions
Wing covering and hardware installation
© Copyright 2007 Molt Models. All rights reserved. 16 of 47
Page 17

Molt Models Tyro150 Building Instructions
Aileron construction and covering
© Copyright 2007 Molt Models. All rights reserved. 17 of 47
Page 18

Molt Models Tyro150 Building Instructions
Wing and aileron hinging
© Copyright 2007 Molt Models. All rights reserved. 18 of 47
Page 19

Molt Models Tyro150 Building Instructions
Aileron control rod installation
© Copyright 2007 Molt Models. All rights reserved. 19 of 47
Page 20

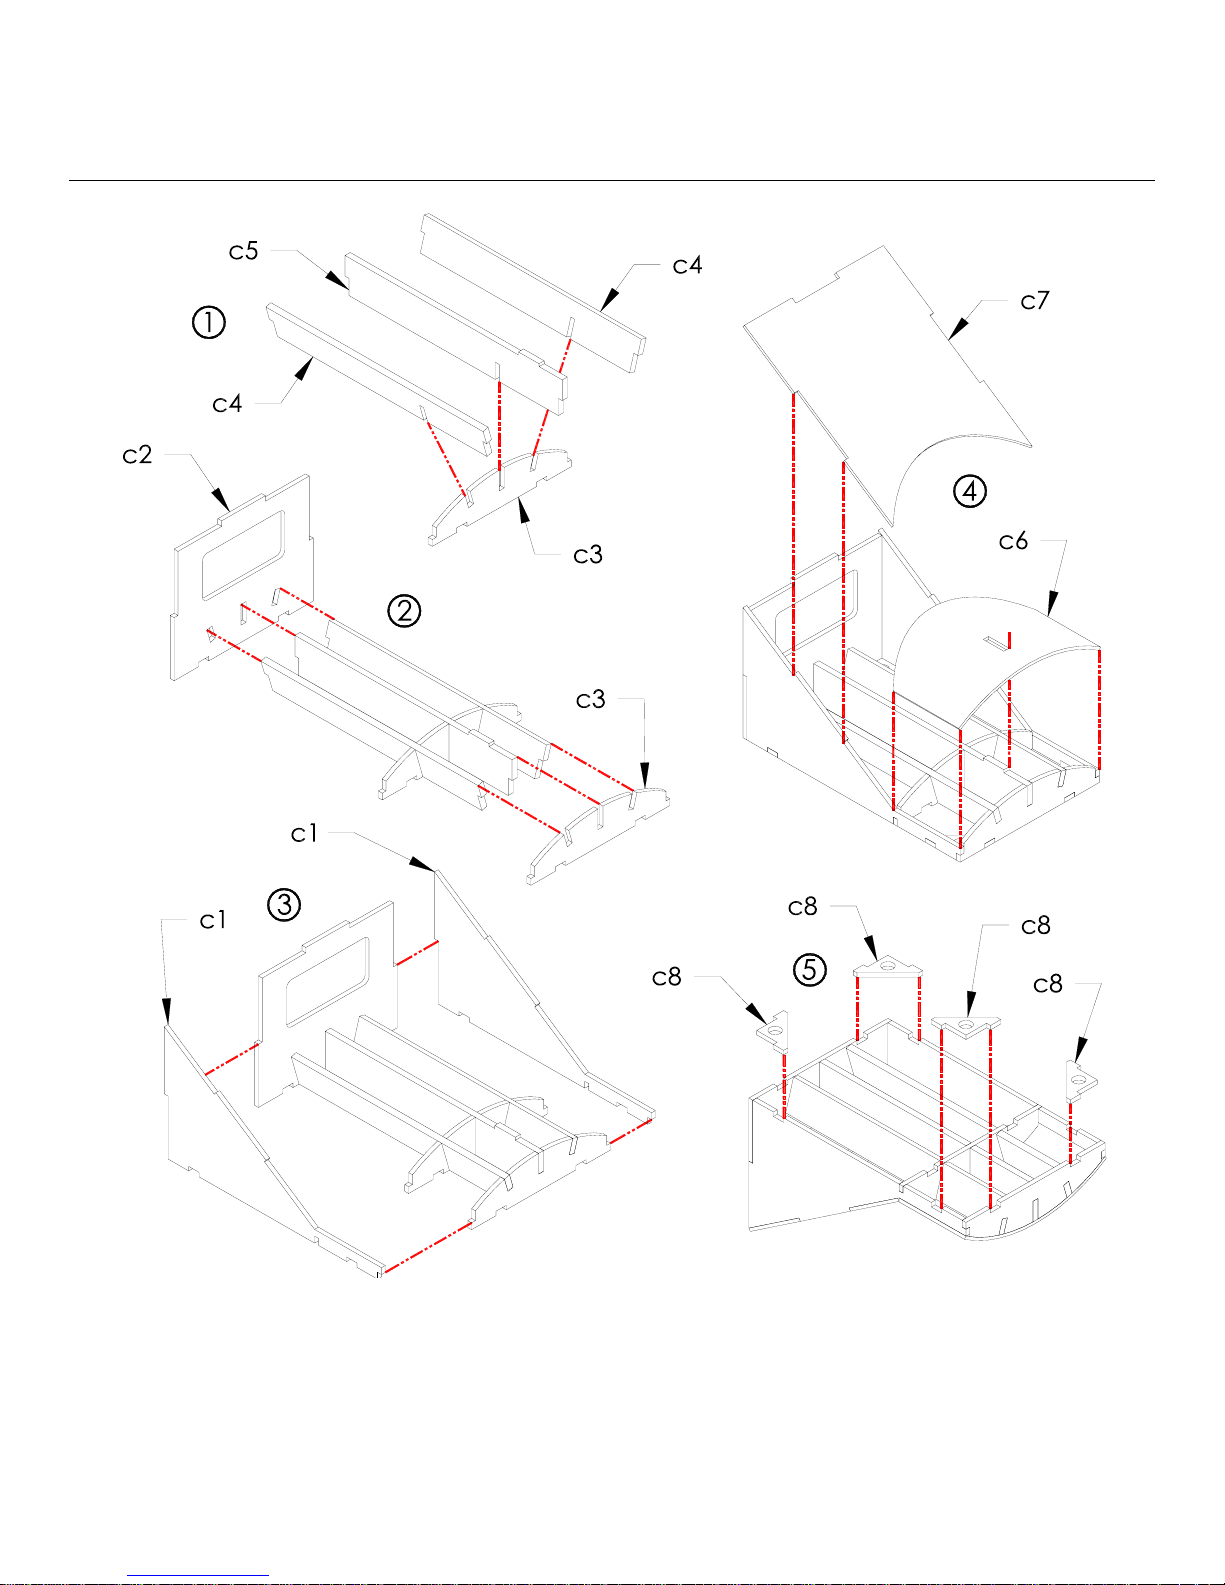
Molt Models Tyro150 Building Instructions
Fuselage construction
© Copyright 2007 Molt Models. All rights reserved. 20 of 47
Page 21

Molt Models Tyro150 Building Instructions
Fuselage construction (continued)
© Copyright 2007 Molt Models. All rights reserved. 21 of 47
Page 22

Molt Models Tyro150 Building Instructions
Fuselage construction (continued)
© Copyright 2007 Molt Models. All rights reserved. 22 of 47
Page 23
Molt Models Tyro150 Building Instructions
Fuselage construction (continued)
© Copyright 2007 Molt Models. All rights reserved. 23 of 47
Page 24

Molt Models Tyro150 Building Instructions
Fuselage construction (continued)
© Copyright 2007 Molt Models. All rights reserved. 24 of 47
Page 25

Molt Models Tyro150 Building Instructions
Fuselage construction (continued)
© Copyright 2007 Molt Models. All rights reserved. 25 of 47
Page 26

Molt Models Tyro150 Building Instructions
Fuselage construction (continued)
© Copyright 2007 Molt Models. All rights reserved. 26 of 47
Page 27

Molt Models Tyro150 Building Instructions
Fuselage construction (continued)
© Copyright 2007 Molt Models. All rights reserved. 27 of 47
Page 28

Molt Models Tyro150 Building Instructions
Fuselage construction (continued)
© Copyright 2007 Molt Models. All rights reserved. 28 of 47
Page 29

Molt Models Tyro150 Building Instructions
Fuselage construction (continued)
© Copyright 2007 Molt Models. All rights reserved. 29 of 47
Page 30

Molt Models Tyro150 Building Instructions
Fuselage construction (continued)
© Copyright 2007 Molt Models. All rights reserved. 30 of 47
Page 31

Molt Models Tyro150 Building Instructions
Fuselage construction (continued)
© Copyright 2007 Molt Models. All rights reserved. 31 of 47
Page 32
Molt Models Tyro150 Building Instructions
Fuselage construction (continued)
© Copyright 2007 Molt Models. All rights reserved. 32 of 47
Page 33

Molt Models Tyro150 Building Instructions
Fuselage construction (continued)
© Copyright 2007 Molt Models. All rights reserved. 33 of 47
Page 34

Molt Models Tyro150 Building Instructions
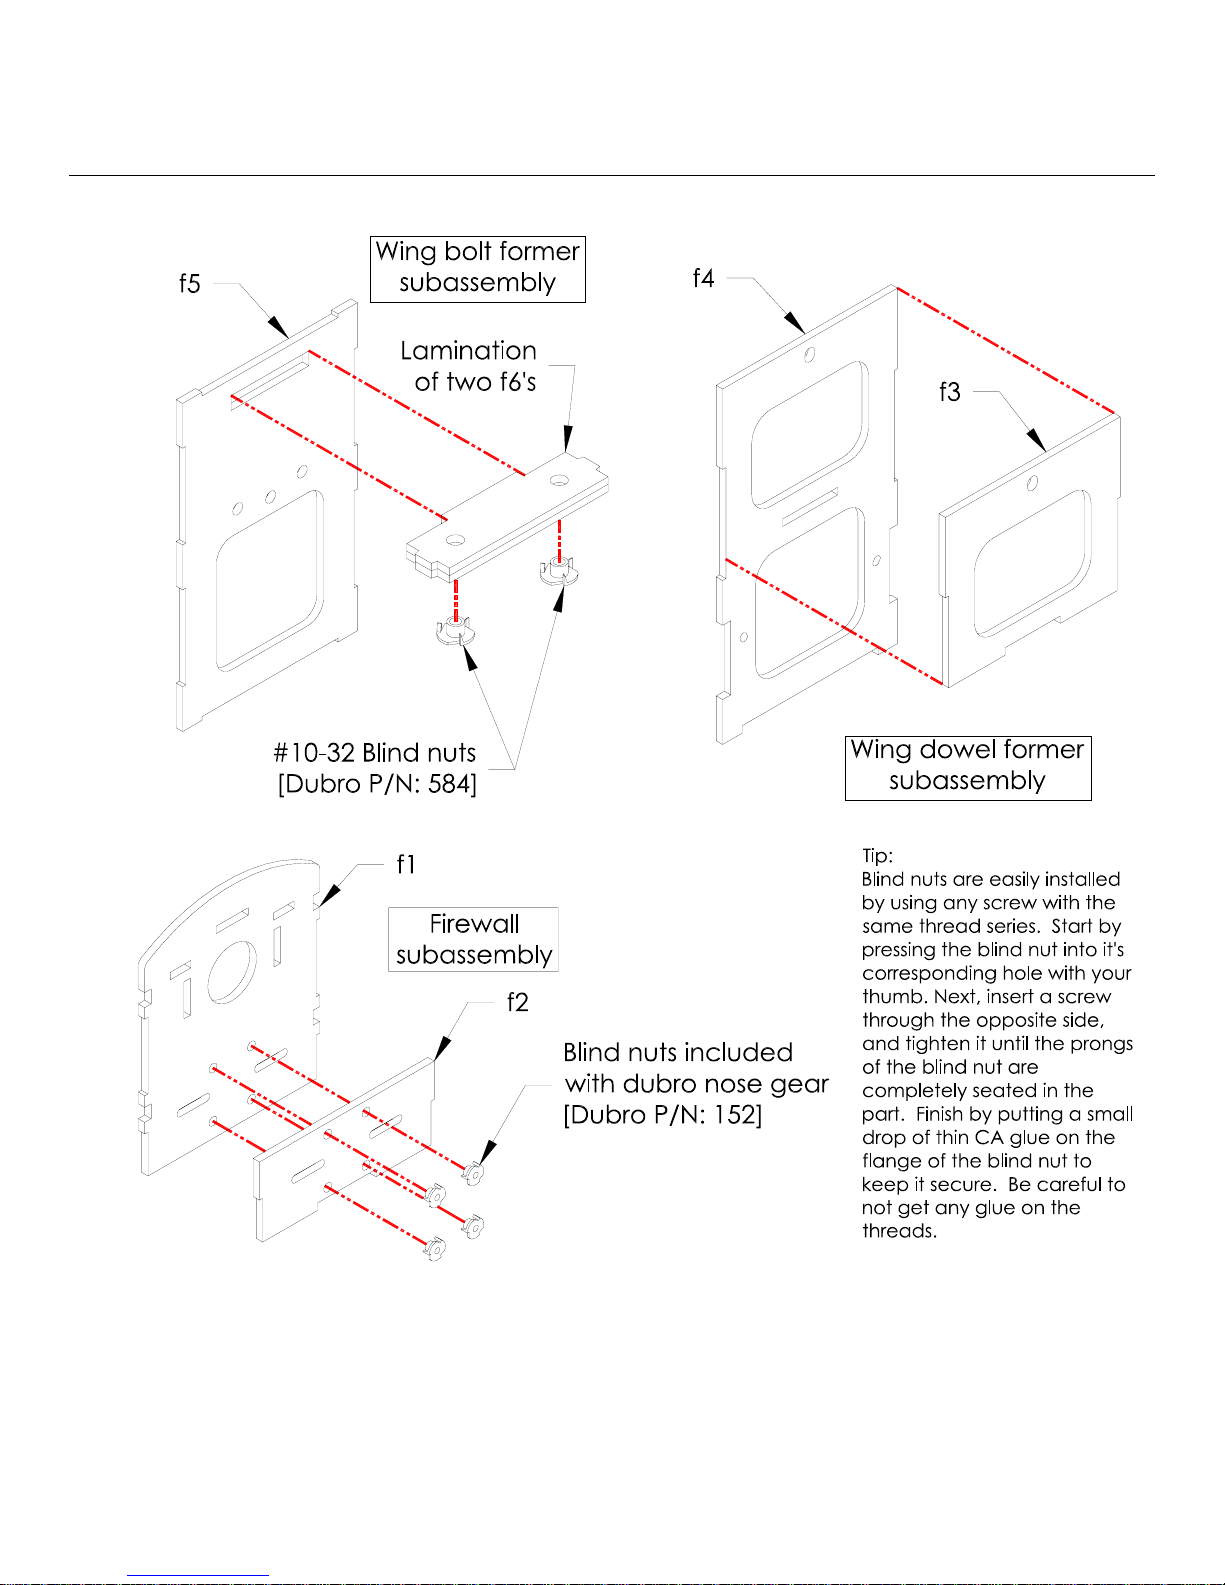
Fuselage nose gear installation
© Copyright 2007 Molt Models. All rights reserved. 34 of 47
Page 35

Molt Models Tyro150 Building Instructions
Fuselage nose gear installation (continued)
© Copyright 2007 Molt Models. All rights reserved. 35 of 47
Page 36

Molt Models Tyro150 Building Instructions
Fuselage main gear installation
© Copyright 2007 Molt Models. All rights reserved. 36 of 47
Page 37

Molt Models Tyro150 Building Instructions
Fuselage motor installation
© Copyright 2007 Molt Models. All rights reserved. 37 of 47
Page 38

Molt Models Tyro150 Building Instructions
Fuselage controls and hardware installation
© Copyright 2007 Molt Models. All rights reserved. 38 of 47
Page 39

Molt Models Tyro150 Building Instructions
Fuselage steering control cable installation
© Copyright 2007 Molt Models. All rights reserved. 39 of 47
Page 40

Molt Models Tyro150 Building Instructions
Fuselage cowl trimming
© Copyright 2007 Molt Models. All rights reserved. 40 of 47
Page 41

Molt Models Tyro150 Building Instructions
Fuselage cowl fitting and installation
© Copyright 2007 Molt Models. All rights reserved. 41 of 47
Page 42

Molt Models Tyro150 Building Instructions
Fuselage and hatch covering, and stabilizer/control surface installation
© Copyright 2007 Molt Models. All rights reserved. 42 of 47
Page 43

Molt Models Tyro150 Building Instructions
Elevator and rudder control rod installation
© Copyright 2007 Molt Models. All rights reserved. 43 of 47
Page 44

Molt Models Tyro150 Building Instructions
Wheel and wheel collar installation
© Copyright 2007 Molt Models. All rights reserved. 44 of 47
Page 45

Molt Models Tyro150 Building Instructions
Battery belt installation
© Copyright 2007 Molt Models. All rights reserved. 45 of 47
Page 46

Molt Models Tyro150 Building Instructions
Control surface and steering setup
I recommend you start with the following amount of control surface settings:
Ailerons: 1/2" both directions
Rudder: maximize in either direction
Elevator: 1/2" either direction
(Please note these are measured from the trailing edge of the control surfaces)
Please make sure all control surfaces return to the center position when no inputs are made
on the transmitter. Additionally, take time to make sure the nose gear wheel is properly
aligned so your Tyro150 will track straight on takeoff and landing. Rolling the fuselage and
watching to see if the fuselage tracks straight will accomplish this. If needed, make the
necessary adjustments at the E/Z connector located on the rudder/steering servo until your
fuselage rolls straight and true.
Balance
I recommend you start by balancing your Tyro150 within the following center-of-gravity
range (C.G. range). Always remember, a slightly nose heavy plane will at least fly, a slightly
tail heavy plane may not.
(After your test flight, feel free to move the balance point to get the desired performance.)
© Copyright 2007 Molt Models. All rights reserved. 46 of 47
Page 47

Molt Models Tyro150 Building Instructions
Pre-Flight
With proper setup and balance you’re ready for your first flight with the Tyro150. If this is the
very first time you’ve attempted to fly a radio-controlled model airplane, please get help
from someone with flying experience. I cannot stress this enough, as help from someone that
knows how to fly will greatly improve your chance of success. In addition, I highly
recommend you purchase the book, “The Pilot’s Guide to Mastering Radio Controlled
Flight”, by Scott Stoops. Scott’s book is without a doubt, the best text available for learning
how to properly fly a radio-controlled model airplane. Scott’s book is available for purchase
through one of his many distributors or direct at the following address.
http://www.rcpilotguide.com
Flight
On the first flight, get the Tyro150 high enough that you can let off the control sticks to see
what it does without risking a crash. The Tyro150 is a very forgiving model and depending on
the equipment you chose to finish it, you may have to trim it out as necessary. If you
experience some adverse yaw with your Tyro150, I’ve found that it is quite useful to
coordinate the turns by adding some rudder. This can be done manually, or by mi xing some
rudder output with the aileron channel on a computer transmitter.
"Preparation, I have often said, is rightly two-thirds of any venture." – Amelia Earhart
Enjoy your Molt Models Tyro150!
© Copyright 2007 Molt Models. All rights reserved. 47 of 47
 Loading...