

Page 1
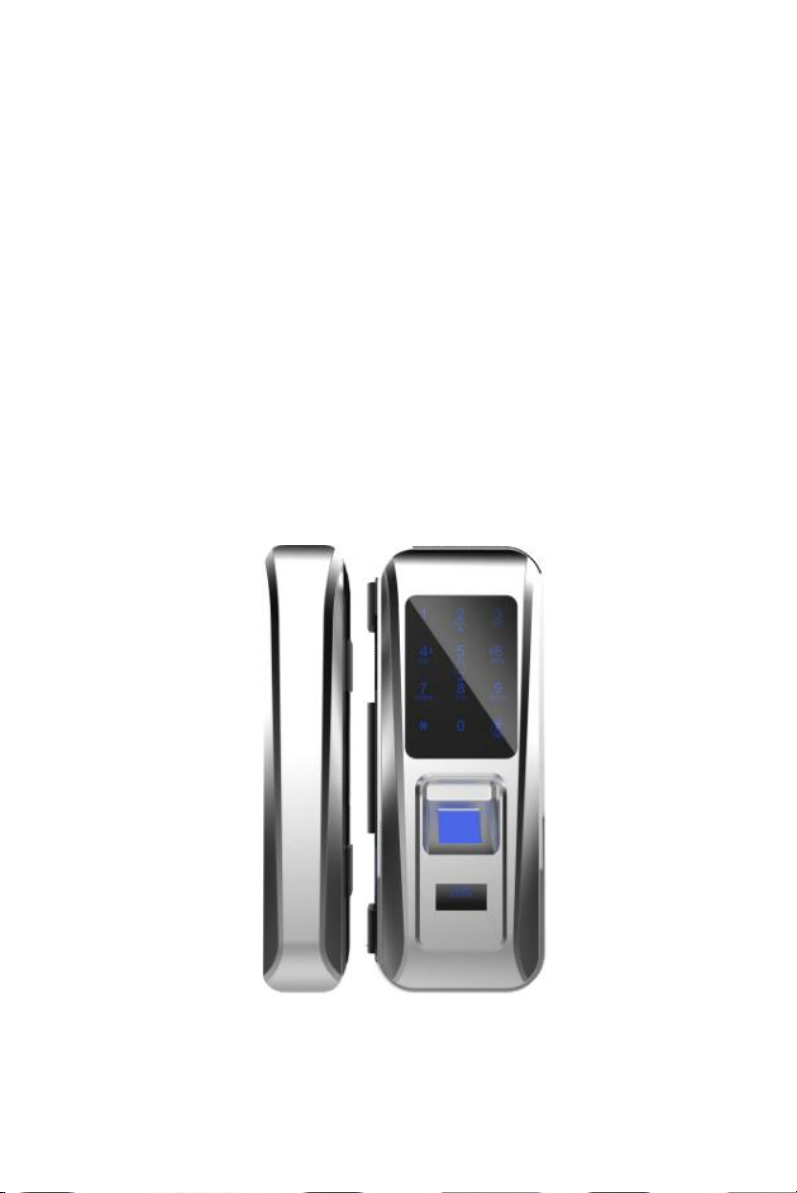
Smart Glass Door Lock: F05
Operation
manual
Page 2

Safety and Precautions
Electronic door lock as the high-tech products, the installation directly impact on the normal operation of
the door lock and life, it is recommended that you have completed the renovation of the room before the
installation of the door, please select the quality of personnel to install, and in strict accordance with the the
company's installation standards to operating.
Do not use in environments with corrosive substances such as intense radiation, high magnetic field, high
temperature high salinity, etc., to prevent the performance and life of electronic locks.
Please initialize the door lock when the door lock is completed, and restore the lock to the initialization
state. Please set your electronic key immediately after initialization to prevent others from illegally opening
your door lock.
To protect your safety, please check the key whether the key box opened or not.
Please keep your own set of electronic keys and mechanical keys.
Please also replace the same brand of 4 *1.5V over based batteries, old and new batteries or use nonalkaline batteries will damage your door lock.
In order to better feel convenient and advanced products of our company, please read the instructions
carefully before use, if you have any doubt, you can directly call the headquarters of the company or
customer center around the service center, the company has professional and technical personnel for your
service, make sure you use the rest assured.
If you need to know more about our company or if your instructions are lost, you can log in to our
website for inquiries and download.
Please collect our company's website in your computer so that you can always check my company's
service information and product description.
Product feature
1.Open the door way: fingerprint, password, combination of other ways to make you feel safe and convenient.
2.Double authentication: with fingerprint encryption and dual-fingerprint combination of open the door
for your furniture to provide a double security security.
3.Leading algorithm: adopting international leading fingerprint algorithm, mature and stable.
4.Touch keyboard: with capacitive touch key and LED back light, beautiful and durable, comfortable operation.
5.Induction Power: fingerprint sensor should be powered, use will more convenient.
6.Display: humanized menu design, easy to operate.
7.Low voltage warning: the display screen shows the battery voltage in real time, prompting the user to
change the battery in time.
Page 3
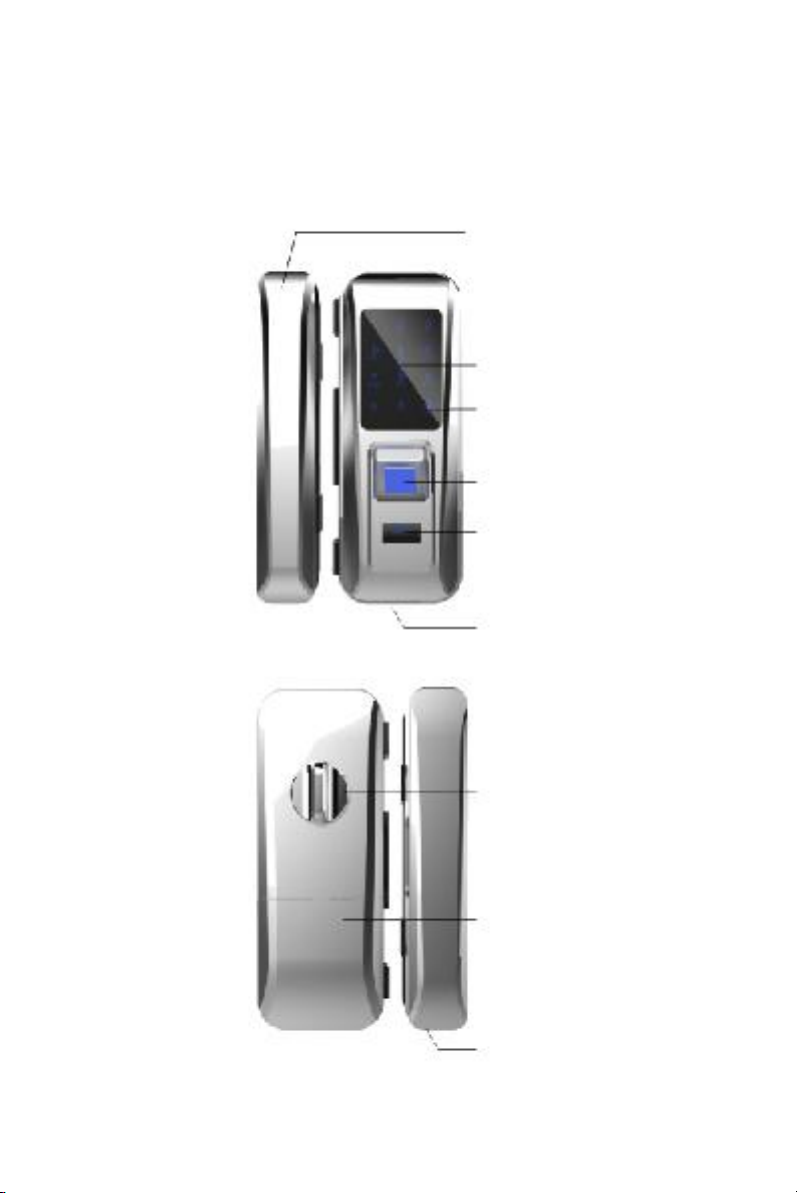
Lock body(Schematic of lock)
Outdoor lock
Digital keyboard, swipe area
The doorbell
The fingerprint
Display screen
Emergency power
interface
Switch knob indoor
Battery cover
Page 4
Indoor
1.Enter the correct user (fingerprint. Password. Card) or the correct remote control key on the
1.When the lock is in the auto-locked state, the door lock is aligned with the keyhole, the latch is
1. When the lock is in the auto-locked state, the door lock is aligned with the keyhole, the latch is automatically
2.When the lock is in the state of manual lock, the door latch is aligned with the keyhole, rotary
lock
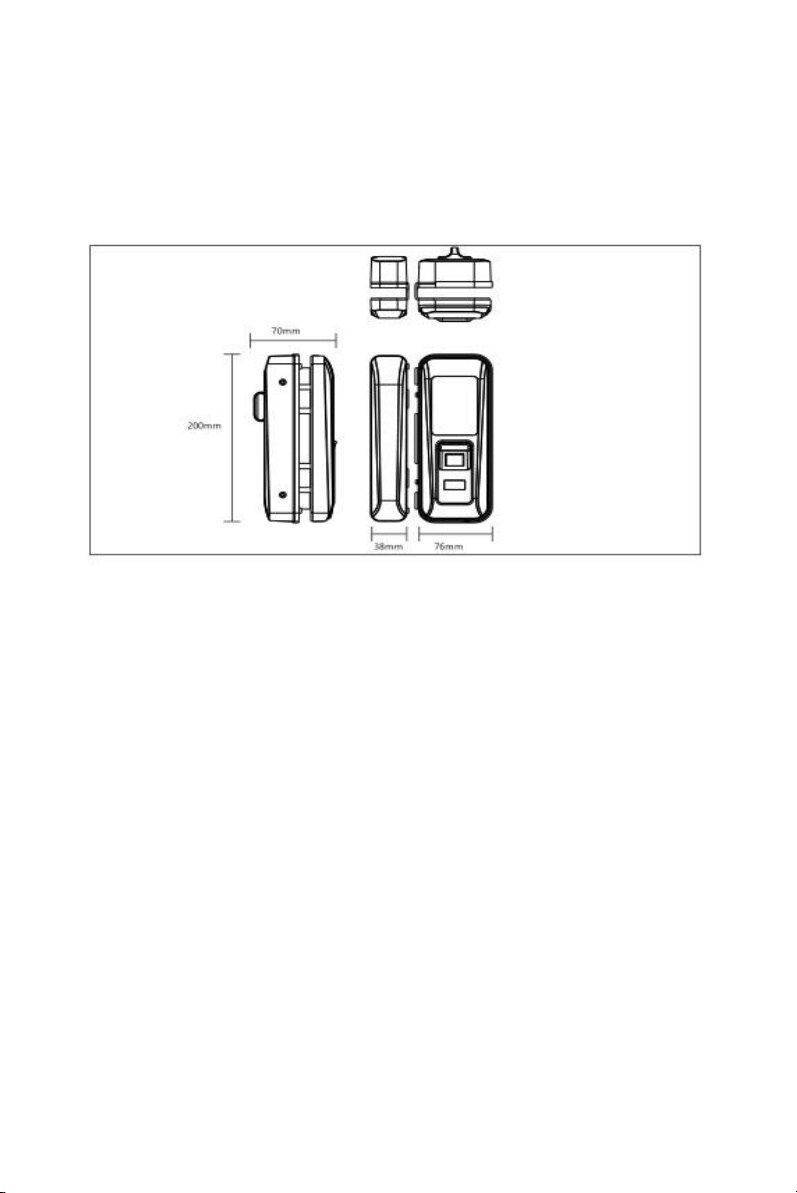
Smart Glass Door Lock Dimension Figure
Product features
(1)outdoor unlock
outdoor lock body, and the lock will automatically return to unlock.
(2) Outdoor lock
automatically closed. 2.When the lock is in the state of manual lock, after the door lock and keyhole
alignment, touch any key to start the keyboard, press the "*" key holds out the lock .
(3) Indoor unlock
Rotate the knob, lock back, unlock.
(4) Indoor lock
closed.
knob ,the latch holds out the lock.
Page 5

Matters need attention
1.Please do not let water, drink and other liquid ingredients infiltrate into the product.
2.Do not use acid material to clean the door. Please update your password regularly.
3.Please pay attention to the battery usage and replace the battery in time.
4.Do not use sharp objects to scrape and beat the door lock.
5.Try not to expose the door lock to outdoor, avoid sun exposure and rain erosion.
Page 6
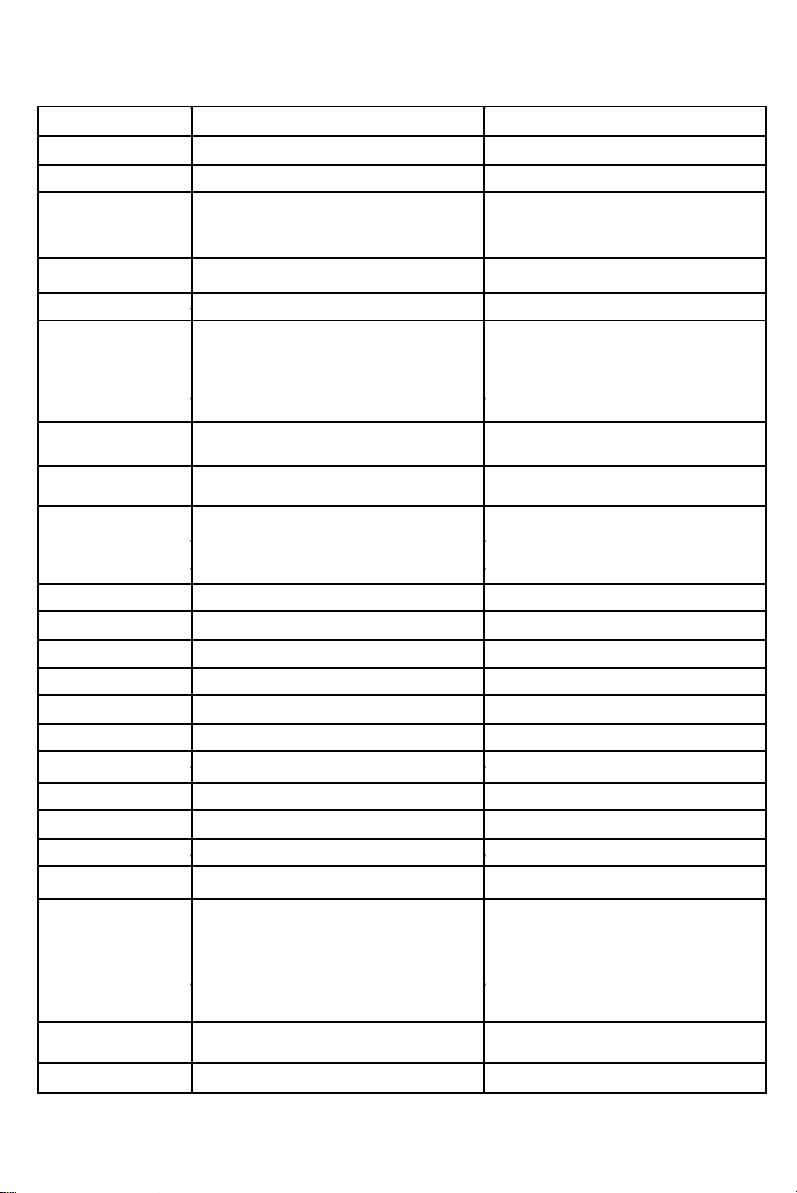
Technology and parameter details
Working voltage
4pcs*1.5V“AA”alkaline batteries
High quality
Fingerprint sesor type
Optical sensor
Password keyboard
Capacitive touch keyboard
Number of keys
12 button(0~9,ensure,cancel)
Including managing passwords,fingerprints
and
cards
Password capacity
300 groups
Switch between Chinese and English
Language models
Chinese-English
Without any working condition
Screen display and fingerprint window light
and
Quiescen
t
current
≤50uA
button backlight LED light at the same time
Dynami
c
current
≤200mA
Working voltage 3V~6V
Drive output
DC motor
The max current of drive output
Drive Capability
≤500mA
Conform to the national standard
(80%±5%)
Alarm voltage
≤4.7V
Working temperature
-25℃ ~ +65℃
Storage temperature
-25℃ ~ +55℃
Storage time
Over 10 years
Fingerprint changes
100000 times
Fingerprint capacity
300 pieces
Recognition rate
<0.0001%
Rejection rate
<1%
Working humidity
5~95%RH(no condensation )
Card model
Mf card、ID card
Display screen
OLED screen 0.96 "
Lock core, emergency power, display screen,
Interface
s
fingerprint sensor, anti-lock switch, antidemolition
alarm, remote control, reading card interface,
etc.
Antistati
c
Air discharge 15KV,Contact discharge 8KV
Contract mode
1 :N
Page 7
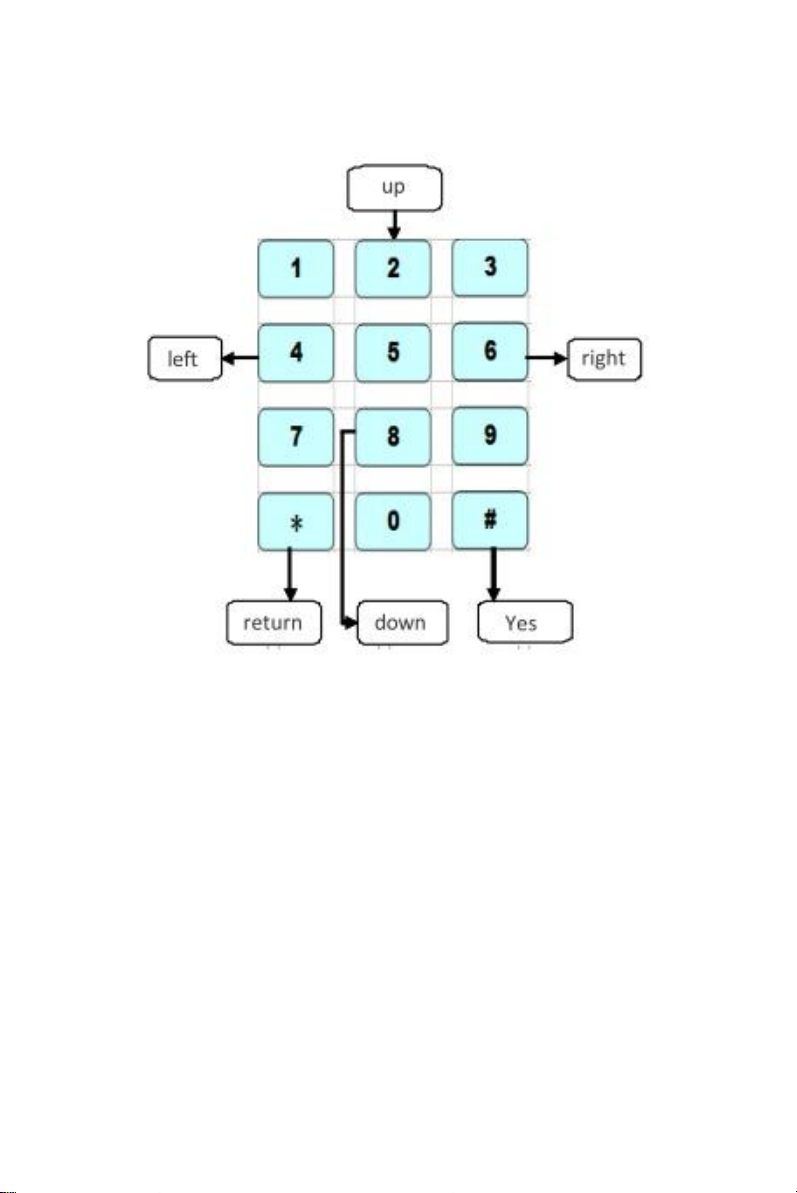
Acrylic panel
1. When enter the main menu bar, number 2, 4, 6, 8, * and # keys backlight light up, 2 for the turn key, 4
2.When entering the input state of the add key, all digital backlight lights will be lit, for the digital
3.Enter the "main menu bar" mode
3.1When the lock is in the factory state, the digital key of the touch panel is on the system and
3.2Lock has added a user mode, you must enter "0 #", the button panel screen displays"Please
for the left, 6for the right, 8 as the down key, * for the return key, # for confirmation key.
password key.
input "0 #" into the main menu bar interface.
entered password management (fingerprint) authorization" voice synchronization prompts "Please
Page 8

input management fingerprints or password", enter "key management member", press "#" key to
confirm, then enter the main menu bar interface.
Page 9
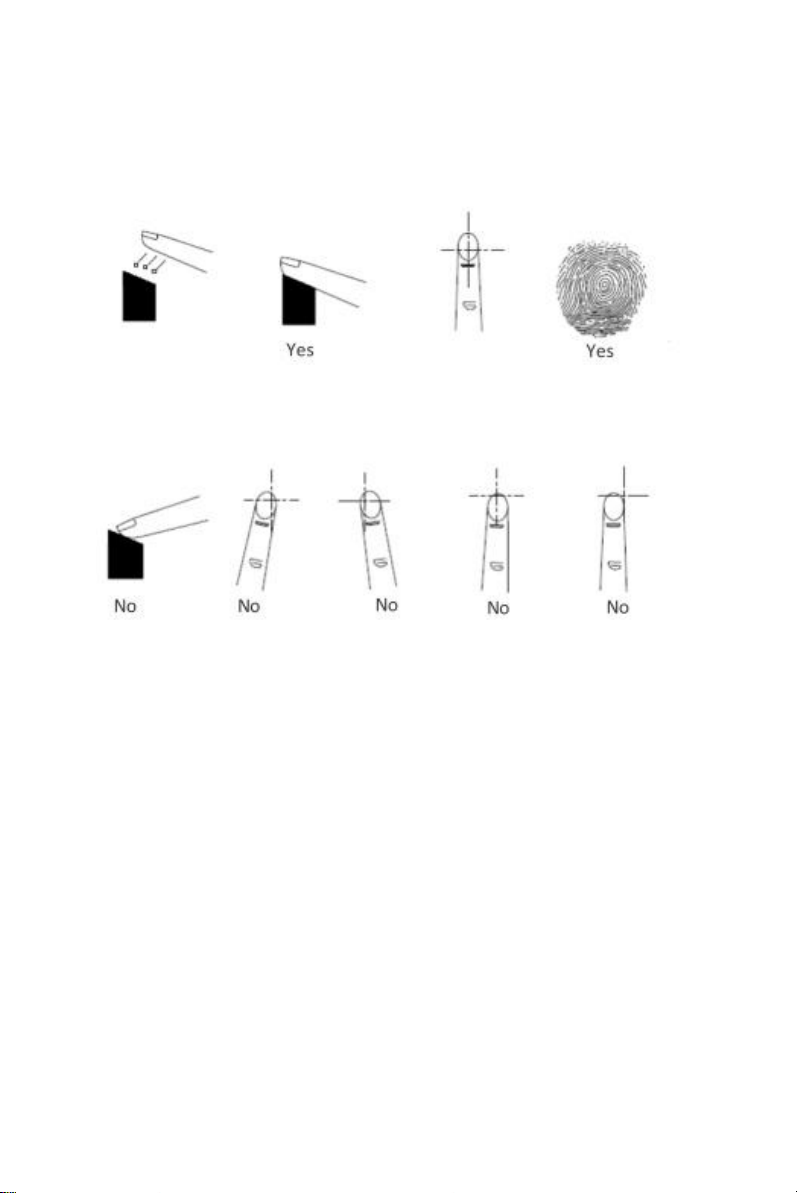
The use of fingerprints
Precautions:
When fingerprint collection window light is on , please press the correct method above the finger on the
fingerprint
collection window, about 1 second ,and the door is automatically completed fingerprint collection.
Page 10
Smart Anti-theft lock instructions
item
Function
Description
1
Menu display
Using OLED0.96 display, hierarchical management menu display mode
2
System
Press "0 + #" to enter the main menu bar system management interface, the initial state directly into
the main
Management
menu bar
3
Password
Password by the user management, it can save 300 groups 6-10 password,initialization will delete
all the
mana gement
password.
4
Fingerprint
mana gement
Fingerprint by the user self-management, it can save 300 fingerprints, initialization will delete all the
fingerprints.
5
APP dynamic
Single temporary password, periodic temporary password, network temporary password, time limit
password,
Password
mana gement
time password management,total five functions.
6
User
User management by the administrator self-management, the administrator can change the user
permissions
management
(owner, guests, children, nanny, part-time workers, temporary workers). The number of users can be
set to 99
users.
7
Permission
By the administrator to limit other users and cha nge the nature of the user (guests or children), set the
effective
settings
time period, cycle can enter the lock.
8
Safe mode
Support single key, double key, dual user mode unlock.
9
Normally open
set
You can set the lock to normally open mode. Use a valid password or a fingerprint lock to unlock the
settings.
10
System
Press the Initialize key to restore the system factory settings.
initialization
11
The system has time memory, which provides the time basis for the unlock operation and can be
adjusted
Time setting
according to the current time information.
12
Voice prompts
Different operations have voice navigation tips, adjustable volume and select mute.
13
Attack
protection
Continuous input 5 times the wrong key, the system automatically locked for 3 minutes, the system
into the
locked state at this time can not be unlocked.
14
Low voltage
alarm
When the battery is not enough, there will be a voice prompt and the battery will run out.
Page 11

15
Records query
Can provide the most recent 10,000 open lock operation record.
16
Power display
With the power display function to show the current state electrical value.
Page 12

17
Garbled function
Open lock password can be entered in 2 0 bits of password, as long as continuous input the correct password to
open the door; Prevent o thers from watching and stealing passwords.
18
Emergency open
When the battery voltage is insufficient to drive the motor, the external power supply can be used for emergency
the door
door opening or mechanical key to open the door.
19
Dual power
Support two circuit power s upply at the same time.
supply
Function menu navigation
Project
item
step 1
Step 2
Step 3
Step 4
Step 5
Step6
Step 7
Step 8
Edit
th e
Add the n ew pa sswor
d
Ente r t he
New u ser
Enter th e u se r
password
ne w pa ssword
nam
e
Edit t h e
Add th e n ew fingerp
rint
En ter the
finge rpr int
ne w
fin gerp rint
User
ente r“ 0 #”
En ter
User
Edit
th e car d
Add a car
d
Co nfigure the
manage ment
man agem e nt
ma nage me nt
ne w ca rd
passwor d
Edit
the
Edit
t he
Add a new p assw o rd
Ad min istr ato r
password
password
Edit f inger print
Edit f inger print
Add th e n ew fingerp
rint
Edit t h e car d
Edit t h e card
C o nfigure th e n ew
card
Edit
th e
Ad d a ne w
En ter the ne w
password
password
password
User 01
001:33 **2 2
Whet her
to
de lete
th e cur ren t pa sswo
rd
Ad d t he new
En ter the ne
w
Edit f inger print
finge rpr int
fin gerp
rint
Whet her
to
de lete
002:00 01
th e cur ren t
fin gerp
rint
Edit t h e car d
Ad d a card
C o nfigure th e n ew
card
003:00 01
Whet her to de lete th e
cur r ent card
Single
En ter admin
Use r
Safe mo de
ve rif icatio n
Lo ck mod e
Ente r“0 #”
passwor d
ma nage me nt
mod
e
Doub le key
ve rif icatio n
Doub le user
auth ent icat io n
La ngua ge
Chine se
1.Function menu
Page 13

mod es
English
Page 14

Sing le
Dynamic
temp
orary
password
password
Period ic
password
Network
temp
orary
password
password
Time
slo t
password
Time slot
password
manage ment
Start date
2017 -05-23
Ch il d
End d at e
2017 -05-23
Perm is sion
Ente r“0 #”
En ter admin
User
Clent
Open t ime 1
00:00~ 23 :5 9
mod e
passwor d
ma nageme nt
Bo dyguar ds
Open t ime 2
00:00~ 23 :5 9
Hour ly
Open t ime 3
00:00~ 23 :5 9
employee
Cycle tim
e
Sund ay,
Tem por ar y
Mon d ay,Tuesday
wo rkers
, Wed nesday,
Thur sd ay,Friday ,
Saturd ay
Serial num
ber :
0 01
( password )
Lo ck recor d
Ente r“0 #”
En ter admin
User
Lo ck reco rd
Name: admin
passwor d
ma nageme nt
Date:
2017 -05-2
4
time :12:10:12
ID:536 14 89 22 1
2
En ter admin
Lock
Ente r“0 #”
User
Lo ck
V2 .2 x1 7052 3
infor ma tio n
passwor d
ma nageme nt
info rma tion
RES V1 .0 X170
312
Ne t wo rk
Network close
configurat io n
Network op en
System
Ente r“# ”
Ente r ad min
Remo te
manage ment
p asswo rd
con trol
ma nageme nt
Tone control
Time set
2017-05-23
18:12:10
Restore
Whetherto
factory
restore factory
Page 15

settings
setting
Page 16

2. Factory Settings
2.1.After panel operating: enter "0 # " on the button panel, screen displays "Please enter the administrative password
(fingerprint)
authorization"and voice synchronization prompts "Please enter management password (fingerprint)", enter the management
key
"0123456789",and press "#" key and ensure, then enter the main menu interface; turn the left or right in the column of the main menu
to
find restore factory Settings. Press" # "menu to confirm, press the figure" 3 "key and ensure, the screen shows "initializing... ", then
shows
"initial success" , voice synchronization prompts "initial success". All data in the lock is completely cleared to restore the
factory setting
state , ,delete all the information such as fingerprints, password , management password recovery to factory Settings, the lock of the
time will
not return to initialize.
3.Functional instructions
3.1 Administrator key Settings, changes and deletes
3.1.1 Administrator key setting
Enter "0 #" on the keypad, the screen displays "Please enter the management password (fingerprint) authorization", voice
synchronization
prompts " Please enter the management password (fingerprint)", enter the management key, Enter the initial management
key. "
0123456789", press "#" key to confirm, enter the main menu.press "#" key to enter"User management", select
"Administrator", press "#" to
confirm, select "Edit password (Fingerprint)", press "#" key to confirm,then according to the screen prompts "Please configure
passwords
(fingerprint)", enter a group made up of 6-10 digital password, press "#" key to confirm or enter a fingerprint, confirm the success of
the press
"*" key to exit the menu, Digital management password can only exist one, fingerprint key and card password can exist more
than one.
Warm prompt: please change the initial administrator password and set the administrator fingerprint immediately
after
The installation and debugging, in case of leaving hidden troubles for safety.
3.1.2 Delete the management key
Enter "0 #" on the keypad, the screen displays "Please enter the management password (fingerprint) authorization" voice
synchronization
prompt "Please enter the management password or fingerprint", the keyboard input management key "such as 0123456789", then
press
Page 17

"#"to confirm, enter the main menu ,press "#" key to enter"User management" select "administrator" in the user list, press "#" key to
enter,
select "Edit password", select"Edit password", press "#" key to enter " Add a new password", enter the new password and press "#" to
confirm
the system automatically clear the original password. Administrators have the highest privilege to change and delete user
rights.
3.2 User management operation
3.2.1 Add the user
Enter "0 #" on the key panel, the screen displays "Please enter the management password (fingerprint) authorization", voice prompts
select"
Add user ", press" # "to confirm, the system prompts" Please enter the user name " ,edit the user name, press the "#" key to
confirm,
according to the screen prompt "Edit password, Edit fingerprint, Edit card, Change permission, Delete user", select the appropriate
option to
add the digital password, fingerprint and card. Digital password consists of 6-10 numbers ,fingerprints need to enter 3 times to
confirm ,the
card once configured successfully. After confirming success, press "*" to exit the menu. If you want to input more than one key, repeat
the above operation.
Page 18

3.2.2 Delete the key
3.4.1.2 Language setting function: Chinese and English options
Delete the key:
authorization" voice synchronization
prompts "Please enter the management password or fingerprint", enter the management key "such as 0123456789",
phen press "#"to
confirm, enter the main menu ,press "#" key to enter"User management" select "administrator" in the user list, select
non-management user
"such as user 02", press "#" key to confirm, in "user 02" choose the confirmed key , press "#" key to confirm, system
prompts "whether to
delete the current password (fingerprint), press" # "key to confirm, press" * "key to return menu after a successful delete ,
if you want to
continue to delete several keys, repeat the above operation.
Enter "0 #" on the keypad, the screen displays "Please enter the management password (fingerprint)
3.3 Permission settings
Permission settings include changing the user rights to guest, child, nanny, part-time, temporary worker, and setting a
certain period of time
within a certain period of time to unlock.
Change the permissions: enter "0 #" on the key panel, the screen displays "Please enter the management
password (fingerprint)
authorization" voice synchronization prompts "Please enter the management password or fingerprint", enter the
management key "such as
0123456789"then press the "#" key to enter the main menu, select
key to enter the "permission
settings", the screen will display "children, guests, nanny, part-time workers, temporary workers", choose the
authority you want "such as
children", select "child", press "#" key to confirm, and then press "*" to return to the "Start", "End Date", "Effective Period"
and "Cycle", and
then press "#" to confirm. And then according to the actual situation set the "start date", "end date", "effective time" and
"cycle", and finally
press "#" key to confirm, complete the settings, press "* " key to return .
the "permission settings", press the "#"
3.4 Lock mode
Intelligent security lock mode includes security mode, language selection and dynamic password.
3.4.1.1 Safe mode:
mainly for the lock mode and the security level of unlocked .Set the unlock certification operation method:
enter"0 #" on the key panel , screen displays of "Please enter the management password (fingerprint)
authorization" voice synchronization prompts "Please enter the administrative password or fingerprint", enter
the management key "0123456789", press "#" key to confirm, after entering the main menu interface, select
"Lock mode", press "#" confirmation key, the screen will show" single mode, dual key inspection certificate,
double user authentication ", finally , according to the actual situation to select the lock security mode, press
the "#" key to confirm, press "*" key to exit.
Page 19

Language setting: enter "0 #" on the keypad, the screen displays "Please enter the management password
3.7 Normally open set
(fingerprint) authorization" voice
synchronization prompts "Please enter the management password or fingerprint", enter the management key
"such as 0123456789" press
the "#" key to confirm.Enter the main menu interface, select "lock mode", press "#" key to confirm, choose
"language choice" in the system
settings interface, press "#" key to confirm, and then choose to use the language (Chinese and English) mode,
press the "#" key to confirm,
press "*" to exit.
Note: replace the voice option with an initial operation
3.5 Volume adjustment function: Convenient for user to set the volume
according to the user environmental needs
Volume adjustment: Enter "0 #" on the keypad, the screen displays "Please enter the management password
(fingerprint)
authorization"voice synchronization prompts "Please enter the management password or fingerprint", enter the
management key "such as 0123456789" press the"#" key to confirm, enter the main menu interface, select the
"volume
adjustment" in the main menu interface,and then set the volume according to the environmental requirements,
press
the "left 4" key to decrease the volume. Press "right 8"key to increase the volume. Press "#" to confirm. The
display
shows: "Set success", and the voice prompts "Set up successfully" and return to the main menu.
3.6 Factory Reset:
Enter "0 #" on the keypad, the screen displays "Please enter the management password (fingerprint) authorization" voice
synchronization prompts "Please enter the management password or fingerprint", enter the management key "s uch as 0123456789",
then press "#"key to confirm , Enter the main menu interface, select "restore factory settings" press the "#" key to confirm,
the screen
displays: "whether restore the factory settings", press the "1 key" No, press the "3 key" YES, press the "3" key to confirm,
displays "is initializing ...", initialization is complete, the screen displays: "initial success", while the voice prompts "initialization
success."
Or press the Initialize button on the front panel to initialize.
Enter management key "0123456789" on the keypad, press "#" key to confirm, enter the administrator operation,
digital keys "8" "2" light on, press "2" "8" button to enter normally open model, the screen displays: "has entered the
normally open mode", at the same time voice prompts "has entered the normally open mode", the system
automatically exits.
Note: user secret-key lock cannot use the "2" "8" key to enter the normal open mode.
the screen
Page 20

3.8.1 Check Unlock record: the administrator check a specific user that when and
which way to unlock .
Key Record query: enter "0 #" on the key panel, the screen displays "Please enter the management password (fingerprint)
authorization" voice
synchronization prompts "Please enter the management password or fingerprint", enter the management key "such as
0123456789 ,then
press" # "Key to confirm, enter the main menu interface, select" unlock record ", press" # "key to confirm the completion of
the lock record
query, press" * "key to exit. (Unlock record can store 1000pcs)
3.9 Time setting
3.9.1 Time setting: It is the correction of the current time of the lock, making the
lock record more accurate and more effective.
Select "time setting" and press "#" key to set the date and time, then press "#" key to confirm
The screen displays: "setting success" and the voice prompts "setting success", the system returns automatically main
menu .
Time Settings:enter "0 #" on the key panel , screen displays "Please enter the administrative password (fingerprint) voice
authorization" voice
synchronization prompts "Please enter the administrative password or fingerprint", enter key management "such as 0123456789",
then
confirm by "#"key, enter the main menu interface and select "time setting" , press "#" key to set date, time, then press "#" key to
confirm,
screen displays: "setting success", while voice prompts "setting success", the system returns to the main menu automatically.
3.11 Remote control: Configure remote control.
3.11.1 Remote management:
Enter "0 #" on the key panel , screen displays "Please enter the password management (fingerprint) authorization"
voice synchronization prompts "Please enter the administrative password or fingerprint," enter the management key such as"
0123456789",
press "#" key to confirm, enter the main menu surface ,select "system settings", press "#" key to select "remote control", press the "#"
key to
enter the remote control configuration, press the "#" key to confirm, then pair by pressing ON and OFF key in the remote control at
the same time.
Page 21

Appendix I
Fault phenomenon
Possible Causes
Method of exclusion
Door card/fingerprint/password unlocked
①
The battery is exhausted
①Replace the battery or emergency power
without reaction
②
Others
supply
②Please contact after-sales service
Unlock the tongue fixed
①The door is not aligned
①Try again when the door is aligned
②Not enough power
② Unlock with emergency power
①The skin of the fingers is dry and wrinkled
① Give your finger a bit of moisture to
make
Fail to read fingerprints
②After long use, the collection surface
becomes
your fingerprint clear
unclean, or scratches
②Use stickers to stick the dirt on the
surface
③Others
of the collection head ③ If you have any
questions, you could contact the supplier
for a
warranty
Can not close automatically
①The battery is exhausted
①Replacement battery
②It's not automatic lock mode
②Set to auto lock door mode
Can not set the unlock door card /
① not authorized
①Get authorization (input management
fingerprint / password
②There is no step-by-step authorization
fingerprint)
③Thetotal number of cards plus the password
more
②According to the front door lock setting,
than 300
follow the steps
③Delete the unneeded door
card/fingerprint/password
Common problems and exclusion of door locks
Page 22
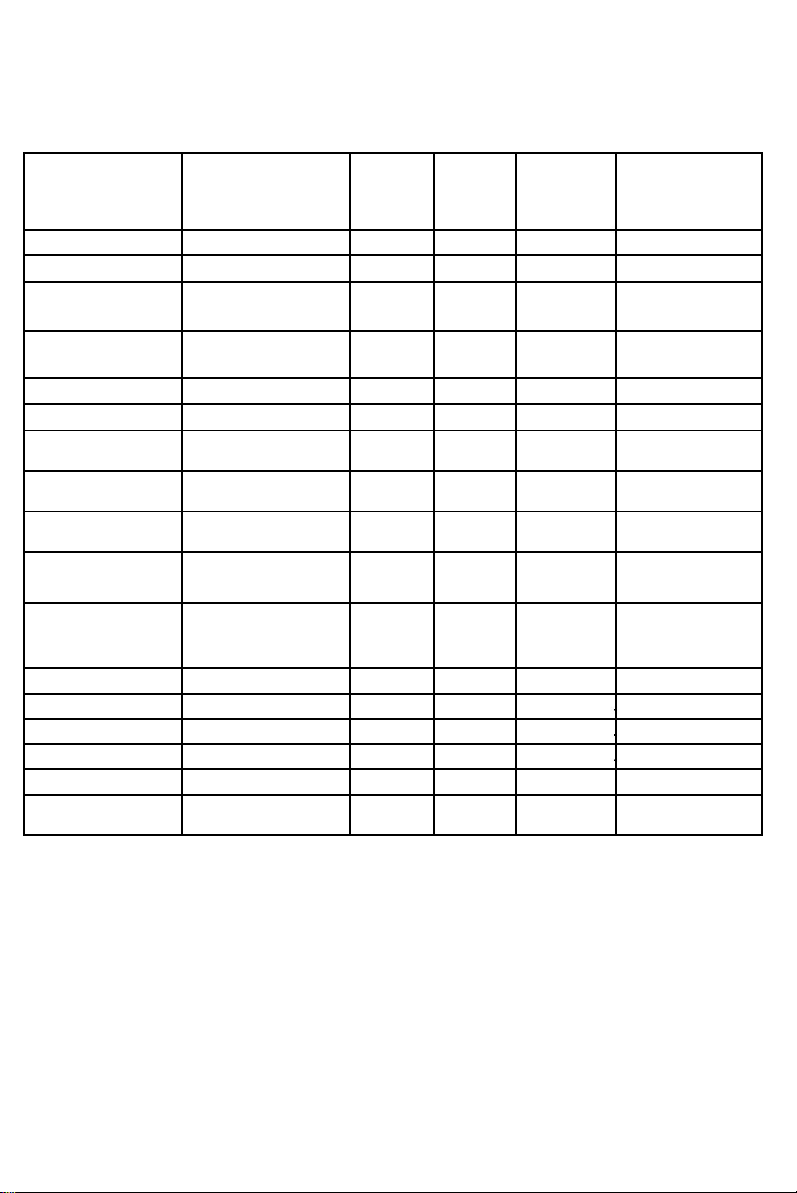
Appendix II
P a rt na m e
p a rt
U n it
D o u b l e
S i n gl e
B o r d er s id e
d e s cri p t io n
d o o r
d o o r
d o o r / w o o d e n
d o o r
O u t d o o r p a n e l
w i t h s u p p o r t
P C11
1
In d o o r p a n e l
w i t h s u p p o r t
P C11
1
In d o o r lo ck b o x
w i th s u p p o r t a n d
P C11
m a g n e t
O u t d o o r l o ck b o x
w i t h s u p p o r t
p i e ce
1
B a tt e r y co v e r
p i e ce11
1
C a b l e
ro o t11
1
C i r cu i t b o
a r d
s e t11
1
Sc r e w p a c
k
s p e c i al d o o r l o ck
s e t11
1
In t e l li g e n
t
c ar d
p i e c e s22
2
Lo c k b o d y
p i e ce11
m o u n t i n g p l a te
Lo c k b u ck l
e
p i e ce
1
m o u n t i n g p l a te
Si n g l e d o o r p a n e l
w i t h m a g n e t
p i e ce
1
R e m o te c o n t r o l
o p t i o n a l
p i e ce
V o lt a g e m o d e
o p t i o n a l
p i e ce
M a n u a l
t h i s11
1
P a ck a ge b o x
s e t11
1
O t h e
r
Configuration list
Page 23

Dear customer
1. Within one year from the date of purchase, if the performance of non-personnel damage failure,
2. If one of the following conditions have to be paid:
:
Thank you for using the smart glass door lock products, we will in accordance with the "People's
Republic of China Consumer Protection Law", to provide you with one year free maintenance and
life-long
maintenance services!
consumers can provide the invoice and warranty book in the designated authorized maintenance shops to
enjoy
free maintenance services.
①
More than warranty period.
②
The contents of the warranty and material standard is unmatched or altered with the material
object.
③
Failure to follow the instructions, maintenance, caused by maintenance damage .
④
Maintenance and Disassemble
in the non-authorized shops ,
⑤All man-made or force majeure caused by damage, infusion, smashed and so on.
3. Please purchase the product in our authorized shops, and fill in the warranty book in time, and stamped,
and the
warranty book can not be altered, otherwise invalid, please keep the warranty book.Unsettled matters conflict
with
national laws and regulations, based on national laws and regulations.If you need special custom door locks,
special
colors, material, functional requirements, please contact us.
Page 24
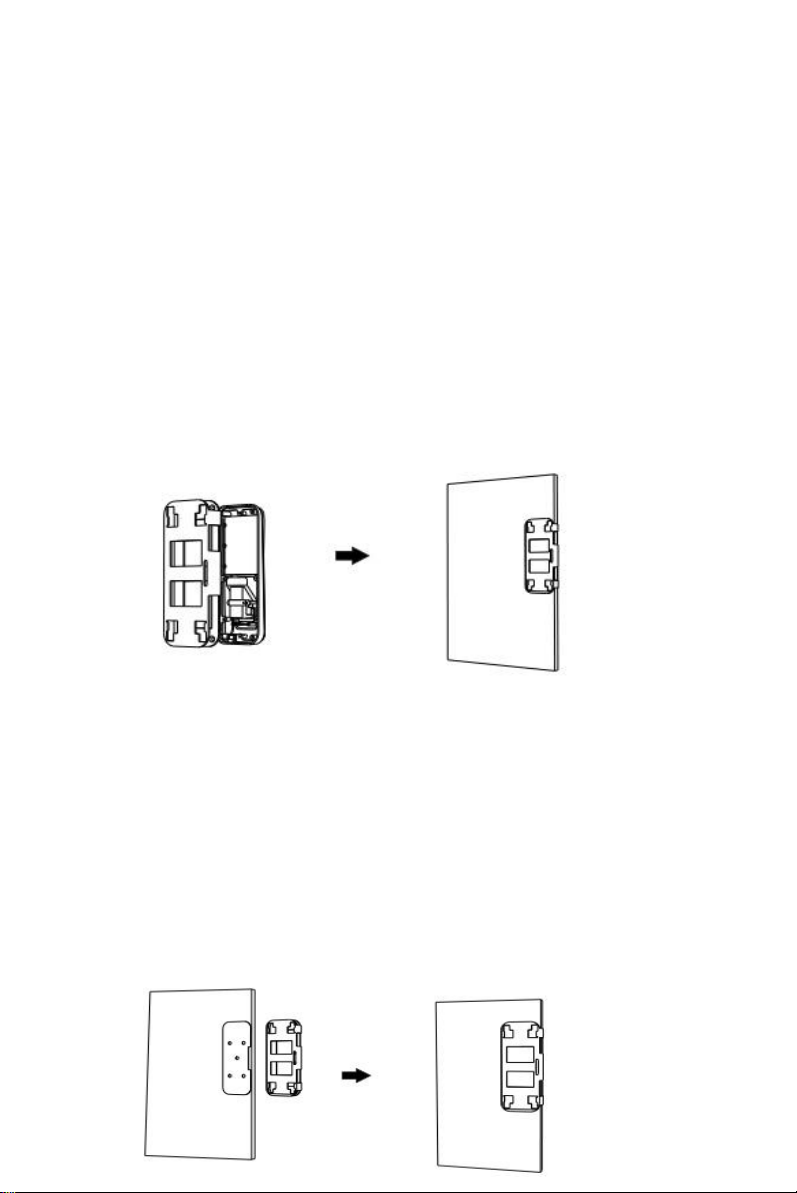
Smart Glass door lock installation instructions:
When the direction of the door and the lock is not consistent, change the direction of the former lock bod y, re move the back of the four
screws,the front lock body rotated 180°, and then tighten the four screws.
1. Change the former lock direction:
2. Lock body plate:
Clean the front (outdoor) and behind (indoor) of door lock location and remove the rubber protective paper of fixed plate in the lock, two
small feet of the lock plate will be attached to the side of the door, slowly paste the glue to the door of the glass door, press hard, you can
use
some glass glue in the surrounding area.
3.Install former lock body:
The combination of the front lock and the lock mounting plate is pushed in the direction of the locking plate where attached to the glass.
Notice that the edge of the pad cannot be crimped.
4.Fixing screw:
Screw 5pcs* M5X8 round head screws onto the stationary plate to hold the front lock assembly
Page 25
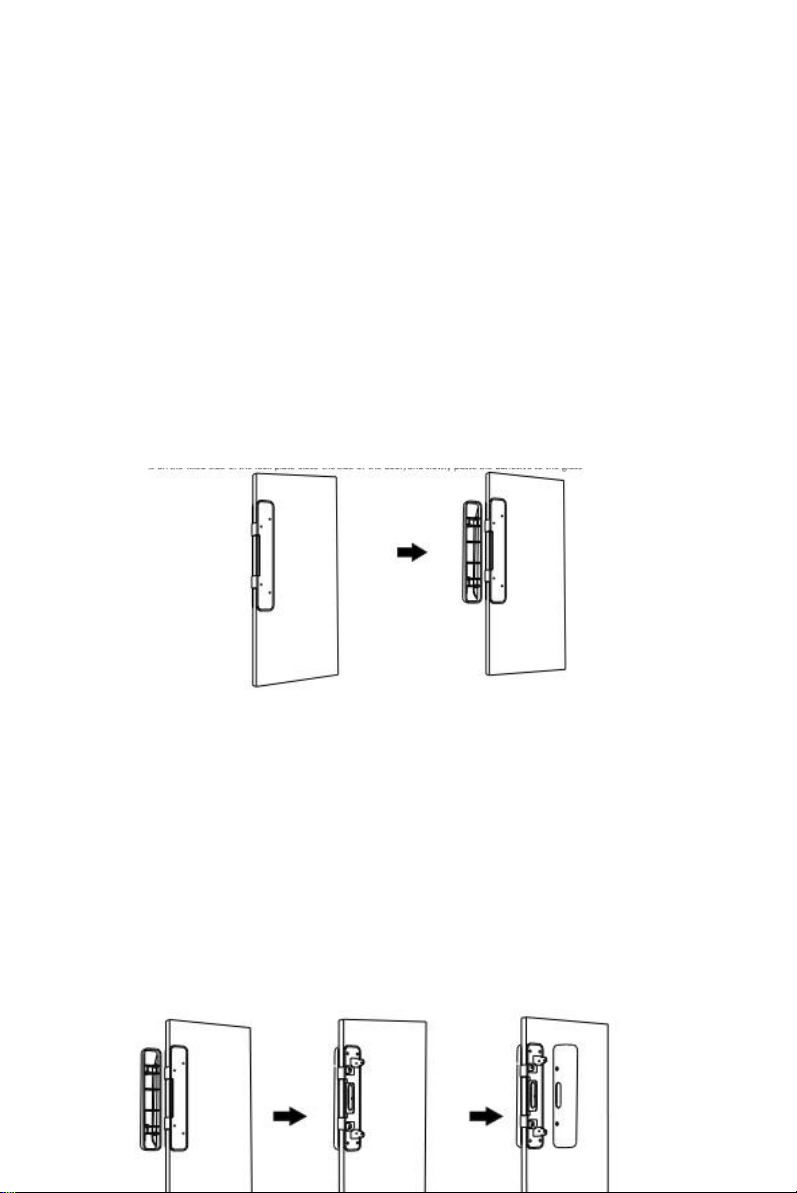
5.Install the rear lock body:
Insert the line, arrange line straightening, install the rear lock body in the lock mounting plate, with 4pcs *M4X5 sunk head screw
tightening.
6. Paste lock plate:
(The outdoor) and the rear (indoor) are wiped clean, the rear lock body of the tongue out, so that the lock hole aligned on the
tongue, both
sides of the same distance, with a pencil make the mark, remove the protective paper of the fixed plate in the lock, the two
buttons on the
fixed side of the lock plate close the side of the door, and slowly paste the adhesive to the glass door .
7. Install former lock :
The combination of the front lock and the lock mounting plate is pushed in the direction of the locking plate where attached to
the glas
Notice that the edge of the pad cannot be crimped.
8. Screw the 5pcs * M5X8 round screws onto the mounting plate and fix the
front lock assembly.
9.Install the rear lock body:
Install the rear lock in the lock body. Screw down with 4pcs* M4X5 countersunk screws.
 Loading...