

Page 1
ImageXpress® Micro
High Content Imaging System
Options
User Guide
5014166 D
September 2015
Page 2

This document is provided to customers who have purchased Molecular Devices
equipment, software, reagents, and consumables to use in the operation of such
Molecular Devices equipment, software, reagents, and consumables. This document
is copyright protected and any reproduction of this document, in whole or any part,
is strictly prohibited, except as Molecular Devices may authorize in writing.
Software that may be described in this document is furnished under a nontransferrable license. It is against the law to copy, modify, or distribute the software
on any medium, except as specifically allowed in the license agreement.
Furthermore, the license agreement may prohibit the software from being
disassembled, reverse engineered, or decompiled for any purpose.
Portions of this document may make reference to other manufacturers and/or their
products, which may contain parts whose names are registered as trademarks and/or
function as trademarks of their respective owners. Any such usage is intended only to
designate those manufacturers’ products as supplied by Molecular Devices for
incorporation into its equipment and does not imply any right and/or license to use
or permit others to use such manufacturers’ and/or their product names as
trademarks.
Each product is shipped with documentation stating specifications and other
technical information. Molecular Devices products are warranted to meet the stated
specifications. Molecular Devices makes no other warranties or representations
express or implied, including but not limited to, the fitness of this product for any
particular purpose and assumes no responsibility or contingent liability, including
indirect or consequential damages, for any use to which the purchaser may put the
equipment described herein, or for any adverse circumstances arising therefrom. The
sole obligation of Molecular Devices and the customer's sole remedy are limited to
repair or replacement of the product in the event that the product fails to perform as
warranted.
For research use only. Not for use in diagnostic procedures.
The trademarks mentioned herein are the property of Molecular Devices, LLC or their respective owners. These
trademarks may not be used in any type of promotion or advertising without the prior written permission of
Molecular Devices, LLC.
Patents:
Product manufactured by Molecular Devices, LLC.
1311 Orleans Drive, Sunnyvale, California, United States of America 94089.
Molecular Devices, LLC is ISO 9001 registered.
© 2015 Molecular Devices, LLC.
All rights reserved.
http://www.moleculardevices.com/productpatents
Page 3

Contents
Foreword . . . . . . . . . . . . . . . . . . . . . . . . . . . . . . . . . . . . . . . . . . . . . 3
Who this User Guide is For. . . . . . . . . . . . . . . . . . . . . . . . . . . . . . . . . . 3
Conventions. . . . . . . . . . . . . . . . . . . . . . . . . . . . . . . . . . . . . . . . . . . . . . 3
Obtaining Support. . . . . . . . . . . . . . . . . . . . . . . . . . . . . . . . . . . . . . . . . 4
Chapter 1: Environment Control Option
Operations. . . . . . . . . . . . . . . . . . . . . . . . . . . . . . . . . . . . . . . . . . . . 7
Environment Control Hardware. . . . . . . . . . . . . . . . . . . . . . . . . . . . . . 8
Items Included in the Installation . . . . . . . . . . . . . . . . . . . . . . . . . . . 8
Items to Be Provided by the Customer. . . . . . . . . . . . . . . . . . . . . . 11
Setting Up Environmental Control. . . . . . . . . . . . . . . . . . . . . . . . . . . 12
Setting the Temperature . . . . . . . . . . . . . . . . . . . . . . . . . . . . . . . . . 12
Setting Up the Water Reservoir . . . . . . . . . . . . . . . . . . . . . . . . . . . 12
Setting Up the Carbon Dioxide . . . . . . . . . . . . . . . . . . . . . . . . . . . . 14
Loading the Sample Plate . . . . . . . . . . . . . . . . . . . . . . . . . . . . . . . . 15
Environment Control Software . . . . . . . . . . . . . . . . . . . . . . . . . . . . . 18
Environmental Parameters in Image Information . . . . . . . . . . . . . 19
Performing Timelapse Experiments. . . . . . . . . . . . . . . . . . . . . . . . . . 20
Reviewing Timelapse Data. . . . . . . . . . . . . . . . . . . . . . . . . . . . . . . . 23
Chapter 2: Fluidics Option Operations . . . . . . . . . . . . . . . . . . . . 27
Fluidics Hardware . . . . . . . . . . . . . . . . . . . . . . . . . . . . . . . . . . . . . . . . 27
Items to Be Provided by the Customer. . . . . . . . . . . . . . . . . . . . . . 29
Tips . . . . . . . . . . . . . . . . . . . . . . . . . . . . . . . . . . . . . . . . . . . . . . . . . . 29
Plates . . . . . . . . . . . . . . . . . . . . . . . . . . . . . . . . . . . . . . . . . . . . . . . . . 29
Setting Up Fluidics Hardware. . . . . . . . . . . . . . . . . . . . . . . . . . . . . . . 29
Configuring Fluidics Software. . . . . . . . . . . . . . . . . . . . . . . . . . . . . . . 31
Manual Fluidics Control . . . . . . . . . . . . . . . . . . . . . . . . . . . . . . . . . . 34
Performing Fluidics Experiments . . . . . . . . . . . . . . . . . . . . . . . . . . . . 37
Preventing Evaporation from Compound Plates . . . . . . . . . . . . . . . 43
Evaluated Seals. . . . . . . . . . . . . . . . . . . . . . . . . . . . . . . . . . . . . . . . . 43
5014166 D 3
Page 4

ImageXpress Micro High Content Imaging System Options User Guide
Chapter 3: Environment Control and Fluidics
Options Maintenance . . . . . . . . . . . . . . . . . . . . . . . . . . . . . . . . . . 45
Carbon Dioxide Tubing . . . . . . . . . . . . . . . . . . . . . . . . . . . . . . . . . . . . 45
Cleaning the Water Reservoir . . . . . . . . . . . . . . . . . . . . . . . . . . . . . . . 46
Waste Disposal Box and Plate Sealing Ring . . . . . . . . . . . . . . . . . . . . 47
Chapter 4: Transmitted Light Option Operations . . . . . . . . . . . 49
Transmitted Light Hardware . . . . . . . . . . . . . . . . . . . . . . . . . . . . . . . . 50
Transmitted Light Software Configuration . . . . . . . . . . . . . . . . . . . . 54
Transmitted Light Phase Ring Alignment . . . . . . . . . . . . . . . . . . . . . . 56
Transmitted Light Experiments . . . . . . . . . . . . . . . . . . . . . . . . . . . . 63
Index . . . . . . . . . . . . . . . . . . . . . . . . . . . . . . . . . . . . . . . . . . . . . . . 65
4 5014166 D
Page 5
Preface
Who this User Guide is For
This user guide is written for those who want to use an ImageXpress®
Micro High Content Imaging System with any of the following optional
components:
• ImageXpress Environment Control option
• ImageXpress Fluidics option
• ImageXpress Transmitted Light option
The ImageXpress Environment Control option, ImageXpress Fluidics
option, and ImageXpress Transmitted Light option described in this guide
are available for only the ImageXpress Micro High Content Imaging
System.
Conventions
In this user guide, the following typographical conventions are used.
WARNING! A warning indicates an operation that can cause personal
injury if precautions are not followed.
CAUTION! Indicates an operation that can cause damage to the
instrument, device, or data, if the precautions are not followed.
Note: Provides essential information for the completion of a
procedure.
Tip: Provides useful information that helps apply the techniques and
procedures in the text to your specific needs, and can also provide
shortcuts. The information in a tip is not essential to the completion of a
procedure.
.
5014166 D 5
Page 6

ImageXpress Micro High Content Imaging System Options User Guide
MetaXpress Software
Use the MetaXpress® Software with the ImageXpress Micro System to
select a standard image analysis routine or to develop a custom protocol
to fit your specific acquisition and analysis needs. The MetaXpress
Software workflow is divided into two major parts: acquisition and
analysis.
• The acquisition workflow involves configuring settings, acquiring
images, and storing plate data in a database.
• The analysis workflow consists of processing, enhancing, and
analyzing acquired plate data. See the MetaXpress High Content
Image Acquisition & Analysis Software Analysis Guide included
on the MetaXpress Software installation USB flash drive.
Simplified Menu Structure
An optional simplified menu structure can be installed to reduce the
number of top-level menus in the MetaXpress Software. All the features
of the software are available in this reorganized menu structure.
The procedures in this guide describe both the default menu structure
and the simplified menu structure.
You can use the Menu Map in the Help menu to help you find the
locations of features in the simplified menu structure. The Menu Map is
available only after the simplified menu installation.
1. Click Help > Menu Map.
2. In the Menu Map dialog, select to view the Default to
customized menu map.
3. Click the menu path where the software feature you want is
found in the default menu structure.
The simplified menu path appears to the right of the desired
feature in the menu.
4. Click the menu path in the software window to access the
desired feature.
For example, if you want to make a duplicate of an image, then use the
following procedure:
1. Click Help > Menu Map.
2. In the Menu Map dialog, select to view the Default to
customized menu map.
3. Click Edit > Duplicate.
The simplified menu path -> Edit: Image: Duplicate Image/Plane
appears to the right of the Image option in the submenu.
6 5014166 D
Page 7

Obtaining Support
Molecular Devices is a leading worldwide manufacturer and distributor
of analytical instrumentation, software, and reagents. We are committed
to the quality of our products and to fully supporting our customers with
the highest possible level of technical service.
Our support web site,
link to the Knowledge Base with technical notes, software upgrades,
safety data sheets, and other resources. If you do not find the answers
you are seeking, follow the links to the Technical Support Service Request
Form to send an email message to a pool of technical support
representatives.
You can contact your local representative or contact Molecular Devices
Technical Support by telephone at 800-635-5577 (U.S. only) or
+1 408-747-1700. In Europe call +44 (0) 118 944 8000.
Part of effective communication with Molecular Devices is determining
the channels of support for the ImageXpress Micro System, including the
MetaXpress Software. Molecular Devices provides a wide range of
support:
Preface
4. In the software window, click Edit > Image > Duplicate
Image/Plane.
http://www.moleculardevices.com/support, has a
• Documentation: Check the guides that are included on the
installation media and the help that is available within the
MetaXpress Software. Help for an active dialog can be accessed
by pressing F1 on your keyboard.
• Online knowledge base: The knowledge base has links to
technical notes, software upgrades, newsletters, user guides,
and other resources. Visit the Molecular Devices Support web
page at http://www.moleculardevices.com/support and follow
the links to the knowledge base.
• MetaMorph Software forum: This forum has information on
journal scripts and custom modules, and has links to videos and
webinars that can help you troubleshoot problems and be more
productive using the software. Visit the forum at
metamorph.moleculardevices.com/forum.
5014166 D 7
Page 8

ImageXpress Micro High Content Imaging System Options User Guide
• Technical Support:
Phone: Contact Technical Support at (800)-635-5577 (U.S. only)
or +1 408-747-1700. In Europe call +44 (0) 118 944 8000.
Online: Visit
http://www.moleculardevices.com/support and
follow the links in the knowledge base to the Technical Support
Request Form to send an email to a group of experienced
Technical Support representatives.
Please have the system ID number, system serial number,
software version number, and the name of the system owner
available when you call.
To find your system ID number, in the MetaXpress Software,
click Help > About MetaXpress. The About dialog displays
your system ID number.
The system serial number is located on your instrument.
• Additional support resources include:
Nikon web-based microscopy course:
http://www.microscopyu.com
The Molecular Probes Handbook:
http://www.lifetechnologies.com/us/en/home/references/
molecular-probes-the-handbook.html
This resource offers advice on fluorescent probes and can
help you determine if there are better stains available for
your analysis.
The following sites offer filter information:
- http://www.chroma.com
- http://www.semrock.com
- http://www.omegafilters.com
8 5014166 D
Page 9

Environment Control Option Operations
The ImageXpress® Environment Control option is designed to maintain an
environment for living cells to enable multi-day live-cell timelapse
imaging. Temperature, carbon dioxide, and humidity can all be
maintained within the sample plate so that cells can be kept alive for
many days, growing at a rate comparable to that expected in a standard
cell culture incubator. In addition to offering kinetic and timelapse
imaging capabilities, the environmental enclosure can accommodate a
single-channel fluidics robot for delivering compounds during
experimentation.
The ImageXpress Environment Control option can be installed together
with either the Fluidics option or the Transmitted Light option.
See also:
• Fluidics Option Operations on page 31
• Transmitted Light Option Operations on page 55
This chapter contains the following sections:
• Environment Control Hardware on page 10
• Setting Up Environmental Control on page 14
• Environment Control Software on page 21
• Doing Timelapse Experiments on page 23
1
5014166 D 9
Page 10

ImageXpress Micro High Content Imaging System Options User Guide
Environment Control Hardware
The ImageXpress Environment Control option consists of a sealing ring
on top of the sample plate and a top door above the plate that together
forms a small, sealed volume. Humidified carbon dioxide is sourced into
this small volume to form the required environment above the plate.
Temperature is controlled within the upper half of the instrument.
The ImageXpress Environment Control option consists of the following
hardware subsystems:
• Temperature control within the upper half of the base
instrument. Warm air is provided from the Environmental
Control Option Controller or the Systems Power & Options
Controller through an air hose. Feedback from temperature
sensors installed near the plate maintains the temperature. The
temperature can be controlled within a range of 30°C to 40°C,
when the ambient room temperature is 22°C or lower.
• Carbon dioxide is provided from a customer-supplied tank of
pre-mixed 5% CO2 and 95% air. The tank regulator must be set
between 15 PSI and 20 PSI. The Environmental Control Option
Controller or the Systems Power & Options Controller controls
the flow to the space above the plate, maintained by the live-cell
sealing ring. If a plate is ejected and loaded, the system conducts
a purge cycle automatically.
• Humidity is passively provided by bubbling the carbon dioxide
through a water reservoir, minimizing evaporation from the
sample plate over the duration of a timelapse experiment.
Items Included in the Installation
The following hardware components are included in an ImageXpress
Environment Control option installation:
• ImageXpress Micro Environmental Control Option Controller or
the ImageXpress Micro Systems Power & Options Controller.
See Figure 1-1 on page 11 and Figure 1-2 on page 11.
• Warm air hose and carbon dioxide tubing. See Figure 1-3 on
page 12 and Figure 1-4 on page 12.
• Temperature sensors. To ensure accurate readings, the sensors
are located near the sample plate.
• Water reservoir. See Figure 1-5 on page 13.
• Live-cell sealing ring. Compatible with 96-well and 384-well
standard height plates. The standard height for these plates is
14.35 mm ± 0.25 mm (0.5650 inches ± 0.0098 inches). See
Figure 1-6 on page 13.
10 5014166 D
Page 11
Environment Control Option Operations
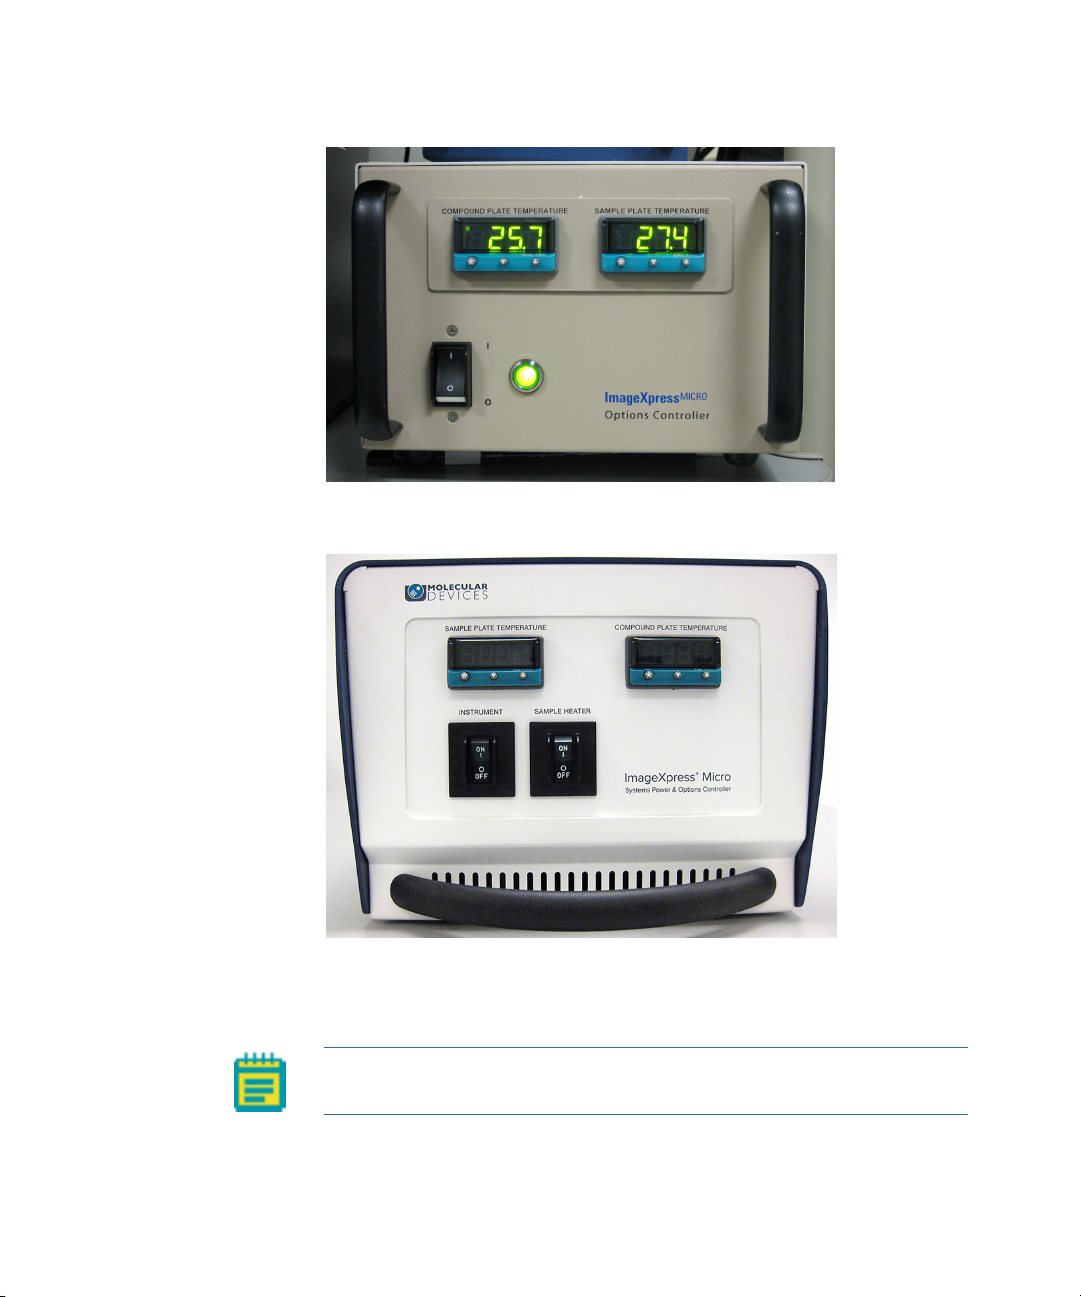
Figure 1-1: Environmental Control Option Controller used for the
ImageXpress Micro Standard and XLS Systems
Figure 1-2: Systems Power & Options Controller used for the
ImageXpress Micro Confocal System
Note: The Compound Plate Temperature setting is available only when
the Fluidics option is also installed.
5014166 D 11
Page 12
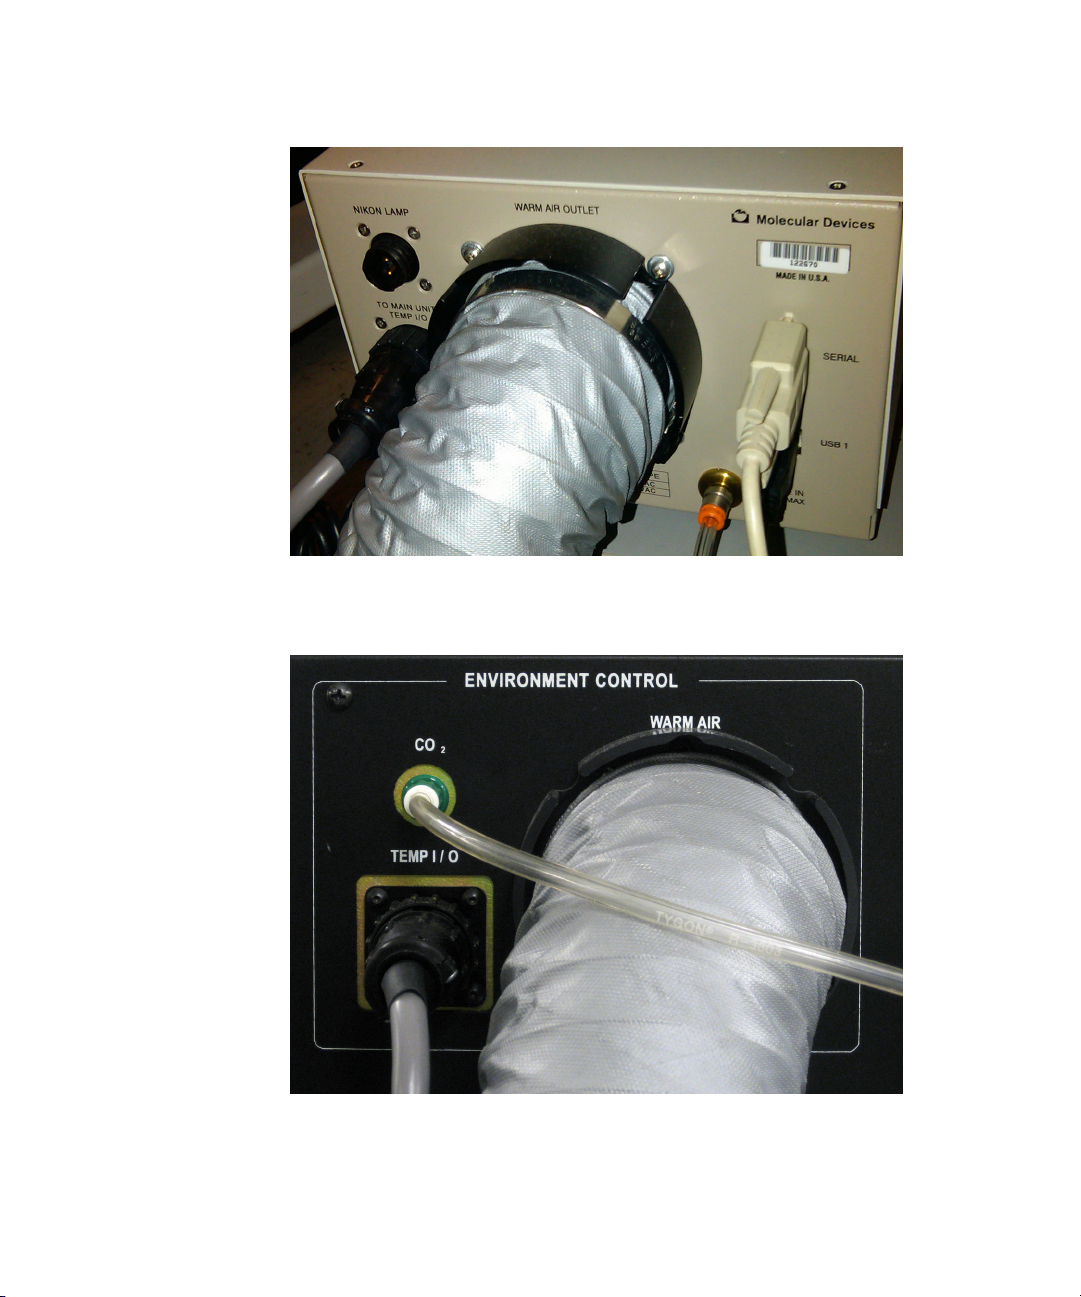
ImageXpress Micro High Content Imaging System Options User Guide
Figure 1-3: Environment Control option warm air hose and carbon
dioxide tubing on the back of the Environmental Control Option
Controller
Figure 1-4: Environment Control option warm air hose and carbon
dioxide tubing on the back of the ImageXpress Micro Standard System
12 5014166 D
Page 13

Environment Control Option Operations
Figure 1-5: Environment Control option water reservoir
Figure 1-6: Environment Control option live-cell sealing ring
5014166 D 13
Page 14

ImageXpress Micro High Content Imaging System Options User Guide
Items to Be Provided by the Customer
The customer must provide the following items for the Environment
Control option installation:
• A tank of pre-mixed 5% CO2 and 95% air.
• The regulator, fittings, and tubing required to deliver 15 to 20 PSI
carbon dioxide from the tank to the Environmental Control
Option Controller or the Systems Power & Options Controller.
• Microwell plates with standard ANSI height. Most 96-well and
384-well plates are standard height. The standard height for
these plates is: 14.35 mm ± 0.25 mm (0.5650 inches ± 0.0098
inches).
• Deionized water to maintain humidity.
Setting Up Environmental Control
An FSE (Field Service Engineer) installs the ImageXpress Environment
Control option. After installation, environmental control can be set up for
experiments.
Setting the Temperature
The temperature controller is calibrated before the instrument ships
from the factory. Use the external temperature controller to set the
temperature that you want the environmental enclosure to maintain.
14 5014166 D
Page 15
Environment Control Option Operations
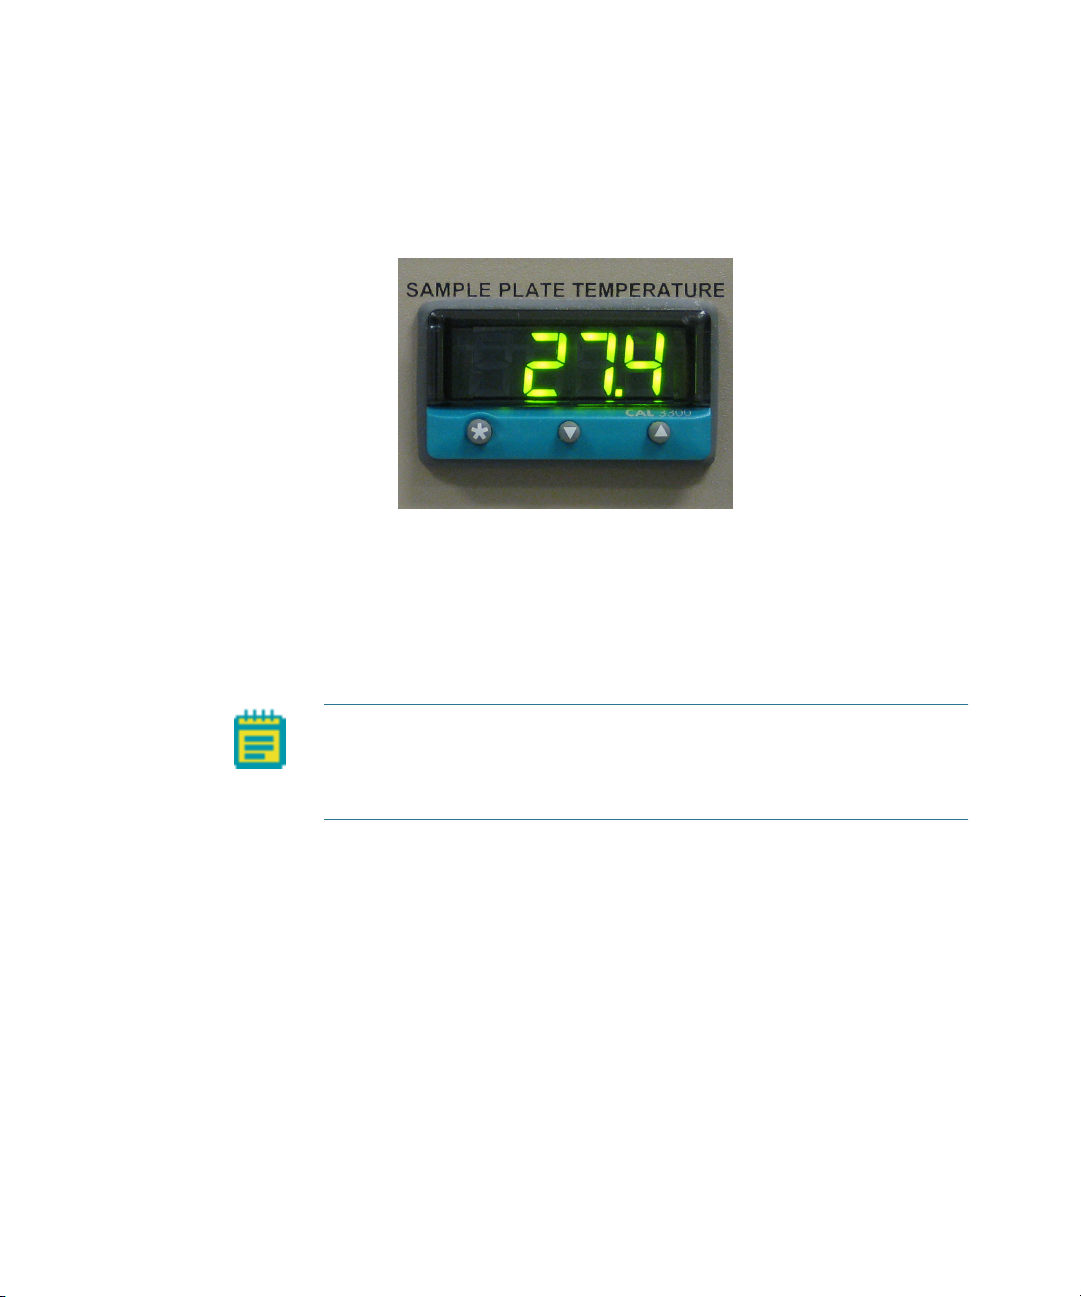
To set the temperature
1. On the front of the Environmental Control Option Controller or
the Systems Power & Options Controller, view the current
sample plate temperature.
Figure 1-7: Sample Plate Temperature control interface
2. To view the temperature set point, press .
3. To increase the temperature set point, press and .
4. To decrease the temperature set point, press and .
After you release , the current temperature in the chamber is
displayed.
Note: For the ImageXpress Micro Confocal System, you can set the
temperature with the Instrument power switch in the On position. To
regulate the temperature in the chamber, the Sample Heater power
switch must be also in the On position.
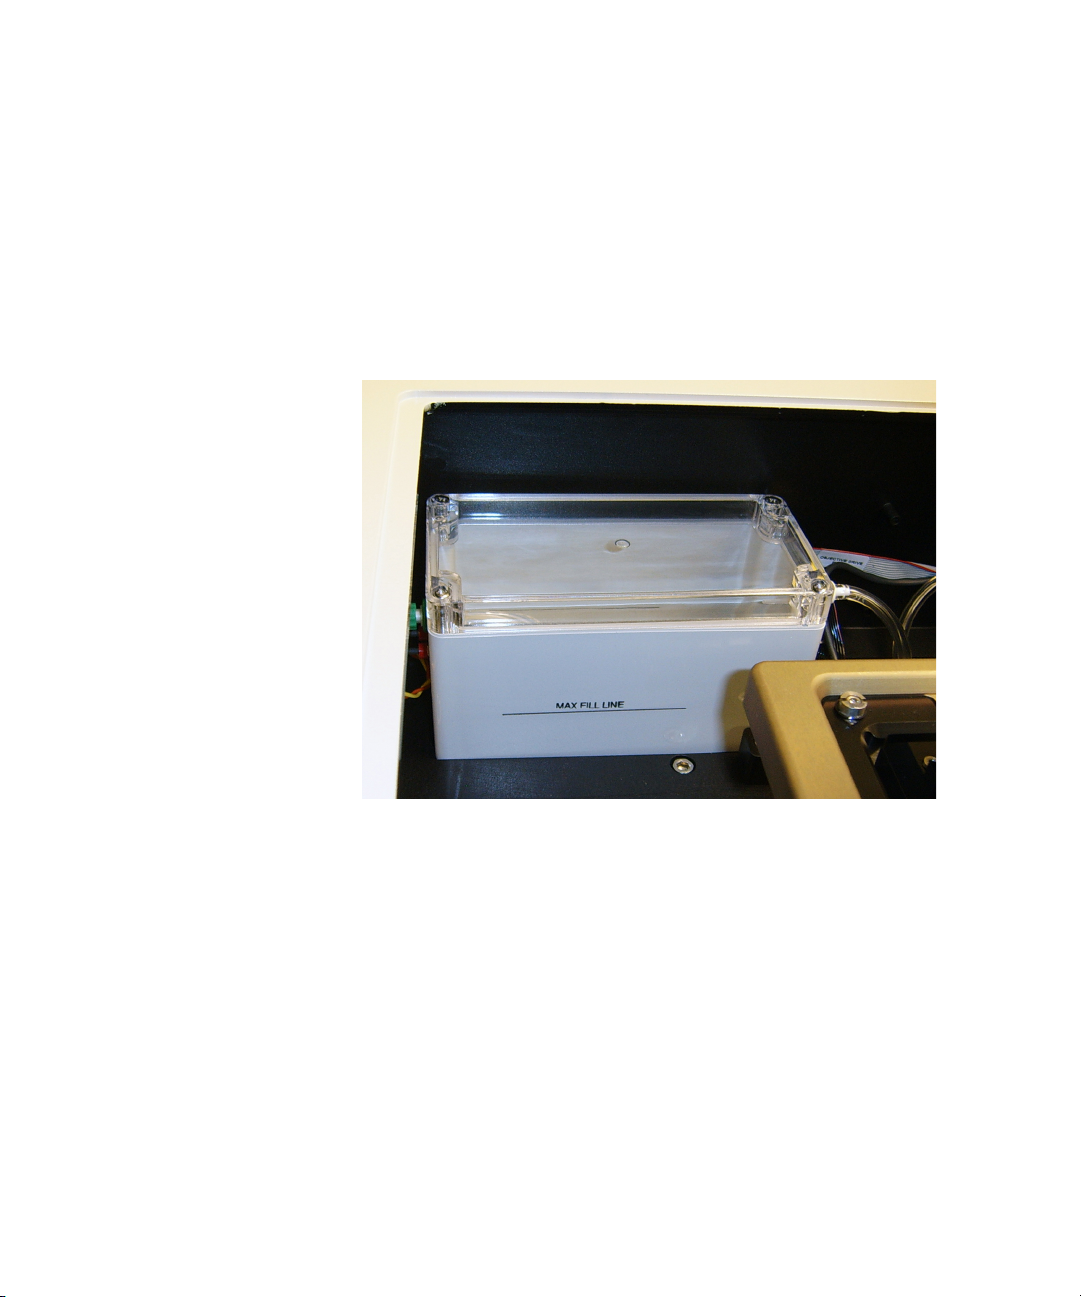
Setting Up the Water Reservoir
Air supplied to the environmental enclosure flows through the water
reservoir to make sure the air has a high degree of humidity.
Tools required for setup:
Syringe
Deionized Water (preferably sterilized)
5014166 D 15
Page 16
ImageXpress Micro High Content Imaging System Options User Guide
To set up the water reservoir
1. In the MetaXpress software, click Screening > Plate acquisition
and Control > Eject Plate to open the top door of the instrument.
2. Remove the insert that surrounds the top door.
3. Disconnect the CO
the instrument.
4. Insert a syringe filled with deionized water into the luer lock.
5. View the water reservoir through the open top panel.
/air tubing from the luer lock on the rear of
2
Figure 1-8: Environment Control option water reservoir
6. Dispense the deionized water from the syringe into the water
reservoir until the water reaches the fill line.
7. Remove the syringe from the luer lock.
8. Reconnect the CO
/air tubing to the luer lock.
2
9. Replace the insert that surrounds the top door.
10. In the MetaXpress software, click Screening > Plate acquisition
and Control > Load Plate to close the top door of the instrument.
16 5014166 D
Page 17

Environment Control Option Operations
Setting Up the Carbon Dioxide
A pre-mixed CO2 tank with a regulator must be set up and connected to
the carbon dioxide controller. The carbon dioxide controller then controls
the flow rate of carbon dioxide delivered to the water reservoir within
the environmental enclosure.
Before you begin, make sure the water reservoir is set up. See
the Water Reservoir on page 15.
To set up the carbon dioxide
1. Connect the tubing from the pre-mixed CO2 tank to the
Environmental Control Option Controller or the Systems Power &
Options Controller.
2. Verify that the tubing from the Environmental Control Option
Controller or the Systems Power & Options Controller to the
instrument is connected.
3. Connect the regulator to the CO
4. Turn on the CO
regulator to approximately 15 PSI to 20 PSI.
2
5. From the top of the ImageXpress Micro System, lift the insert
surrounding the top door and remove it. Keep the top door of
the instrument closed.
6. Verify that there is a steady flow of bubbles in the water
reservoir.
7. Replace the insert surrounding the top door.
8. Check the environmental control settings to verify that the CO
pressure is OK. See Environment Control Software on page 21.
tank.
2
Setting Up
2
After setting up the carbon dioxide
Load an unlidded plate with the live-cell sealing ring on top. If there are
concerns about contamination, a breathable seal can be used over the
top of the plate. See Loading the Sample Plate on page 18.
Note: Before you do imaging experiments, wait for the system and
plate to reach equilibrium. Allow at least two hours for the system and
30 minutes for the plate. Because focus settings and offsets change with
temperature, you might need to optimize them after the system and
plate have reached equilibrium.
5014166 D 17
Page 18
ImageXpress Micro High Content Imaging System Options User Guide
Loading the Sample Plate
You must use the live-cell sealing ring to maintain the CO2 flow to the
sample plate. The sealing ring helps to contain the inputted air directly
over the cells and maintains the proper CO2 and temperature levels.
WARNING! BIOHAZARD! Wear gloves when handling sample plates.
Note: To ensure that it is at the proper temperature, before you load
the sample plate, make sure that the live cell sealing ring is in the system
or in the incubator.
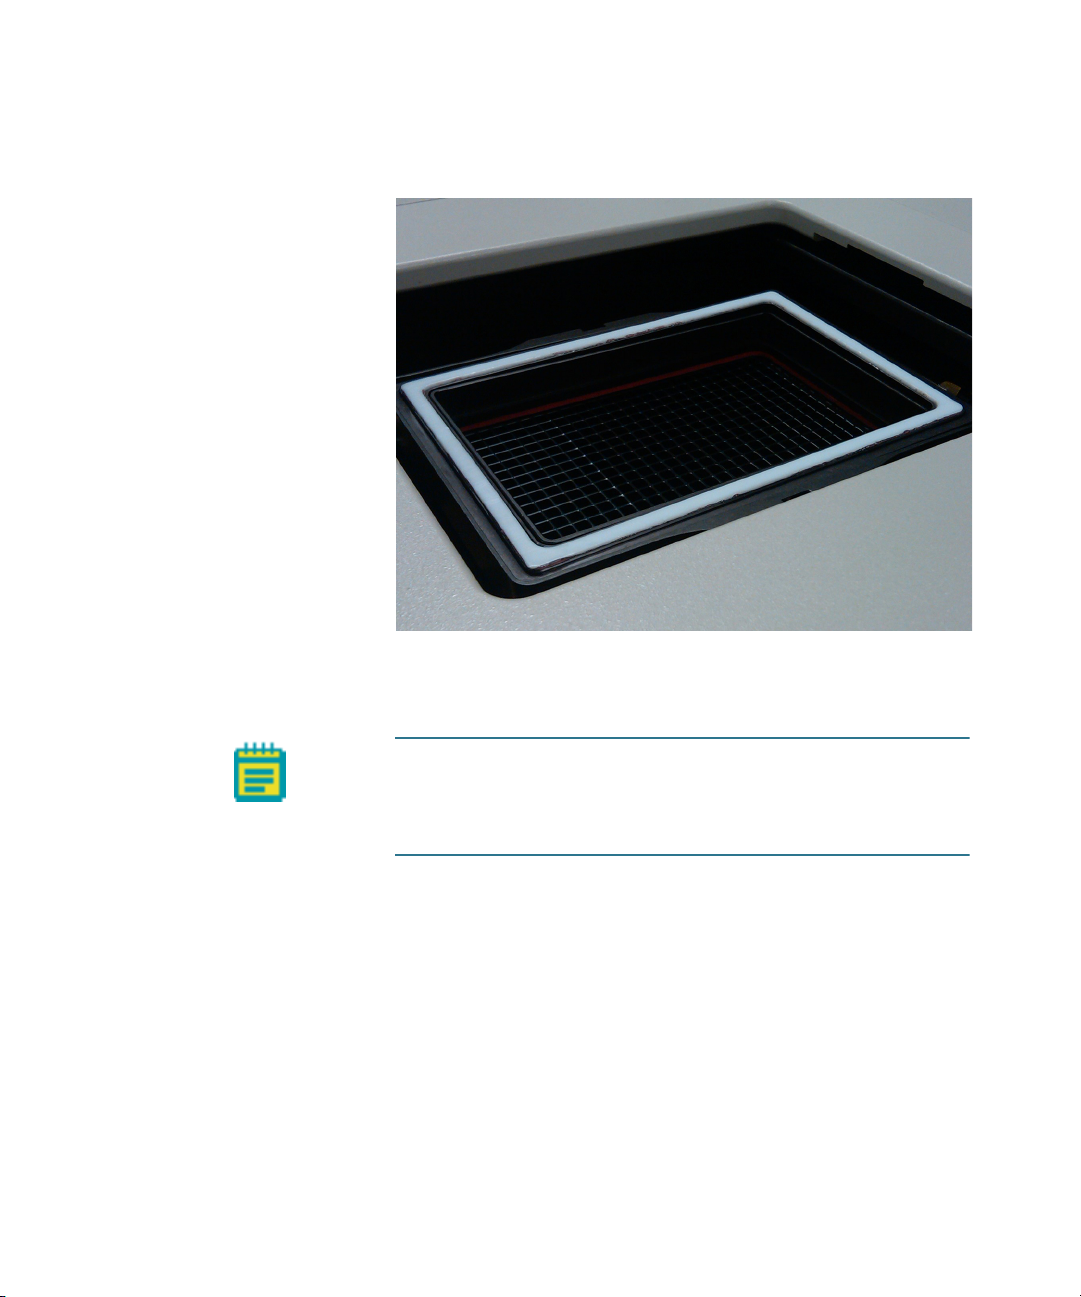
To load the sample plate
1. In the MetaXpress software, click Screening > Plate acquisition
and Control > Eject Plate to open the top door of the instrument.
2. Insert the sample plate into the stage and then remove the lid
from the plate. If there are concerns about contamination, a
breathable seal can be used over the top of the plate.
18 5014166 D
Page 19
Environment Control Option Operations
3. Place the live-cell sealing ring directly on top of the plate, making
sure that it fits securely onto the plate.
Figure 1-9: Environment Control option live-cell sealing ring
4. In the MetaXpress software, click Screening > Plate acquisition
and Control > Load Plate to close the top door of the instrument.
Note: Temperature fluctuations in the plate and its
surroundings cause the plate and its cells to shift in X,Y, and Z
direction. To minimize these temperature fluctuations, take the
following precautions.
5014166 D 19
Page 20

ImageXpress Micro High Content Imaging System Options User Guide
Before you run an experiment:
• Allow the instrument to warm up for at least two hours.
• Make sure the plate sealing ring is at 37°C before use, either by
keeping it inside the instrument or inside an incubator. Incorrect
sealing-ring temperature can cause temperature fluctuation.
• Wait 30 minutes to 1 hour for the plate to reach equilibrium. You
can use a journal to set this waiting period.
The current temperature in the chamber is displayed on the
front of the controller.
• If there is interstitial space between wells, pipette deionized
water or media into these areas. This helps to increase the
thermal mass of the plate and reduces overall evaporation.
1.
Note: Due to the changes in Z height over time, you might need
to adjust the plate focus parameters in the MetaXpress software
occasionally. To do so, open the MetaXpress software, and then
click Screening > Plate Acquisition Setup > Plate tab > Edit Plate
Bottom Settings. Increase the adjacent well max variation to
accommodate the added Z-height variation introduced by the
fluctuation of temperature.
When setting laser autofocus options, make sure that the
instrument and plate temperatures are at equilibrium. Roomtemperature laser autofocus settings are not ideal when the
system is used at higher temperatures.
20 5014166 D
Page 21
Environment Control Software
The MetaXpress software controls the ImageXpress Micro System
screening and monitors the system’s environmental parameters. You can
check Environment Control settings and connections in the MetaXpress
software.
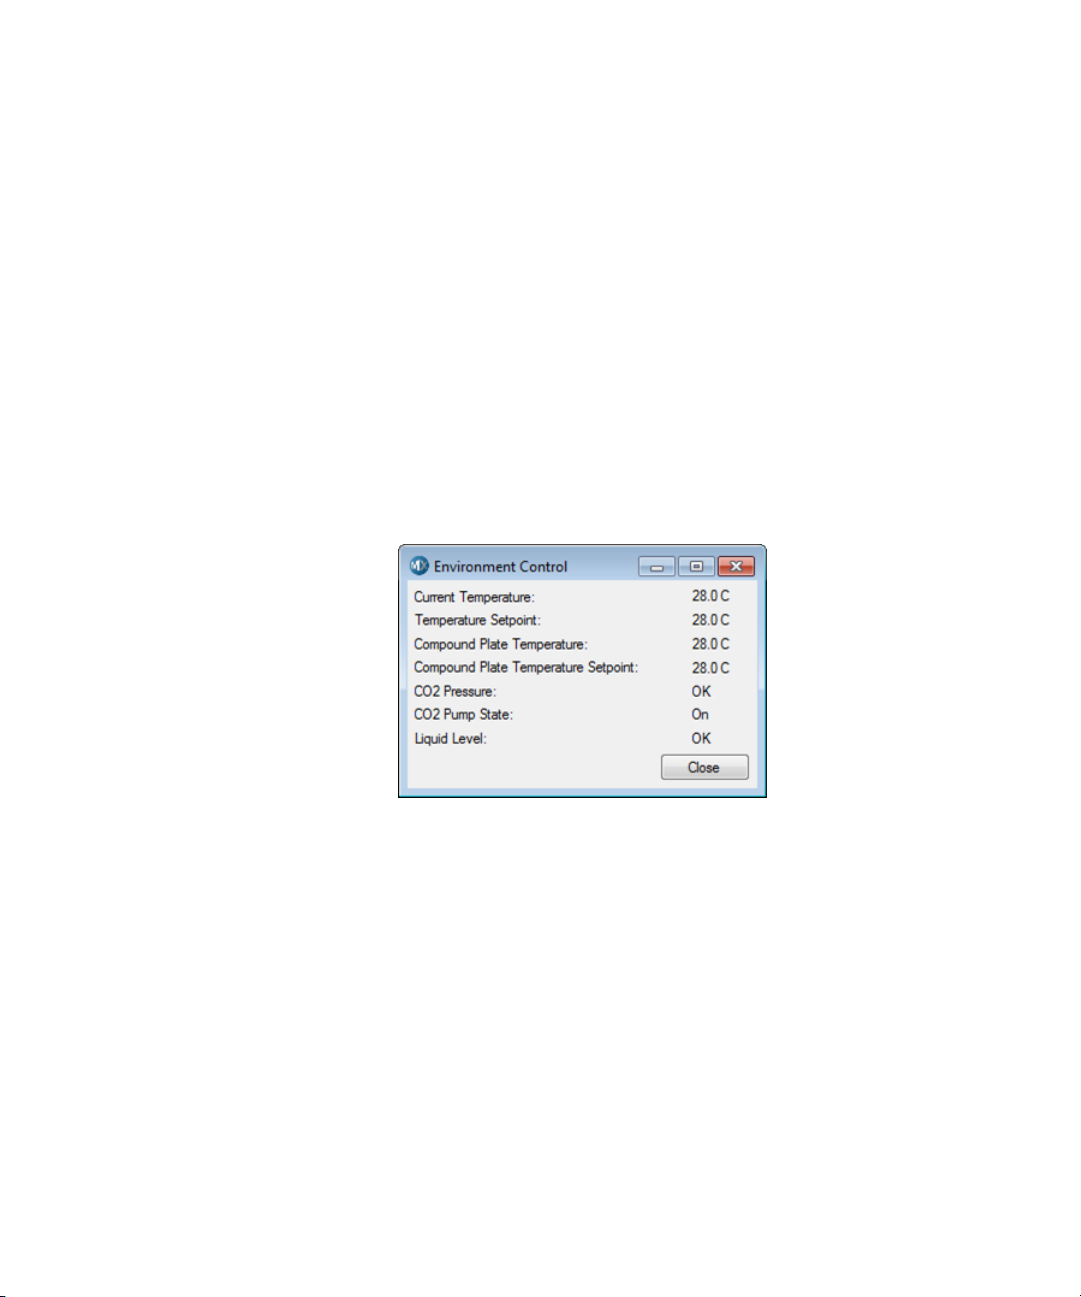
To check the Environment Control settings
1. In the MetaXpress software, click Devices > Environment
Control.
In the simplified menu, click Control > ImageXpress >
Environment Control.
In the Environment Control dialog, the Current Temperature
and the Temperature Setpoint values are displayed.
Temperature is recorded in degrees Centigrade.
Carbon dioxide pressure is recorded as Low or OK.
Environment Control Option Operations
Figure 1-10: Environment Control dialog
When the top door of the ImageXpress instrument is opened, the
MetaXpress Software triggers the environment control to increase the
flow rate of the carbon dioxide in order to flood the chamber with
humidified and carbon dioxide-controlled air. When a plate is loaded, the
system transiently purges the carbon dioxide at a higher flow rate.
However, the MetaXpress Software does not control the parameters,
such as the level of CO
or temperature. These parameters are controlled
2
directly through their hardware devices, such as the temperature
controller on the Environmental Control Option Controller or the
Systems Power & Options Controller (Figure 1-1 on page 11 and
Figure 1-2 on page 11) and the regulator on the carbon dioxide tank.
5014166 D 21
Page 22
ImageXpress Micro High Content Imaging System Options User Guide
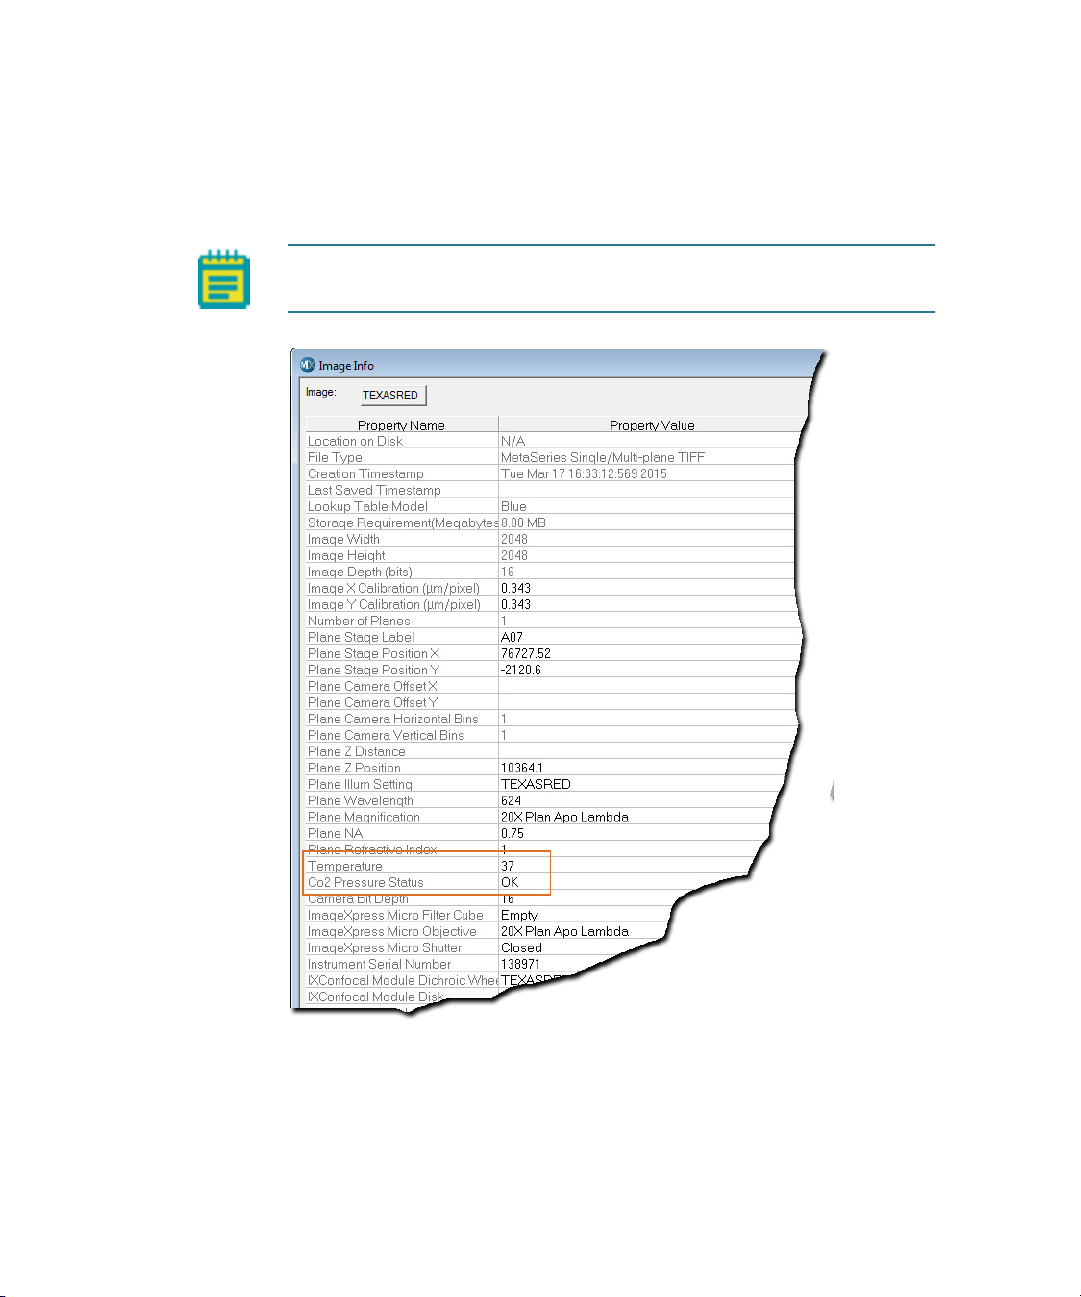
Environmental Parameters in Image Information
The MetaXpress Software records environmental information when
images are captured as shown in Figure 1-11 on page 22.
Note: There are wire sensors in the system to detect water, but the
software does not record this as an image annotation.
Figure 1-11: Image information annotation with environmental
parameters
22 5014166 D
Page 23
Doing Timelapse Experiments
The ImageXpress Environment Control option incubates live cells,
enabling imaging experiments to be performed over hours or days. Wells
can be imaged repeatedly at fixed time intervals, and movies can be
constructed from a series of images.
Note: In a timelapse experiment, the time starts when the first well is
acquired. If the acquisition time exceeds the time specified for the
timelapse experiment, the system proceeds as fast as possible. As a
result, the time between time points might not match the time
specified, but timestamps on images are accurate.
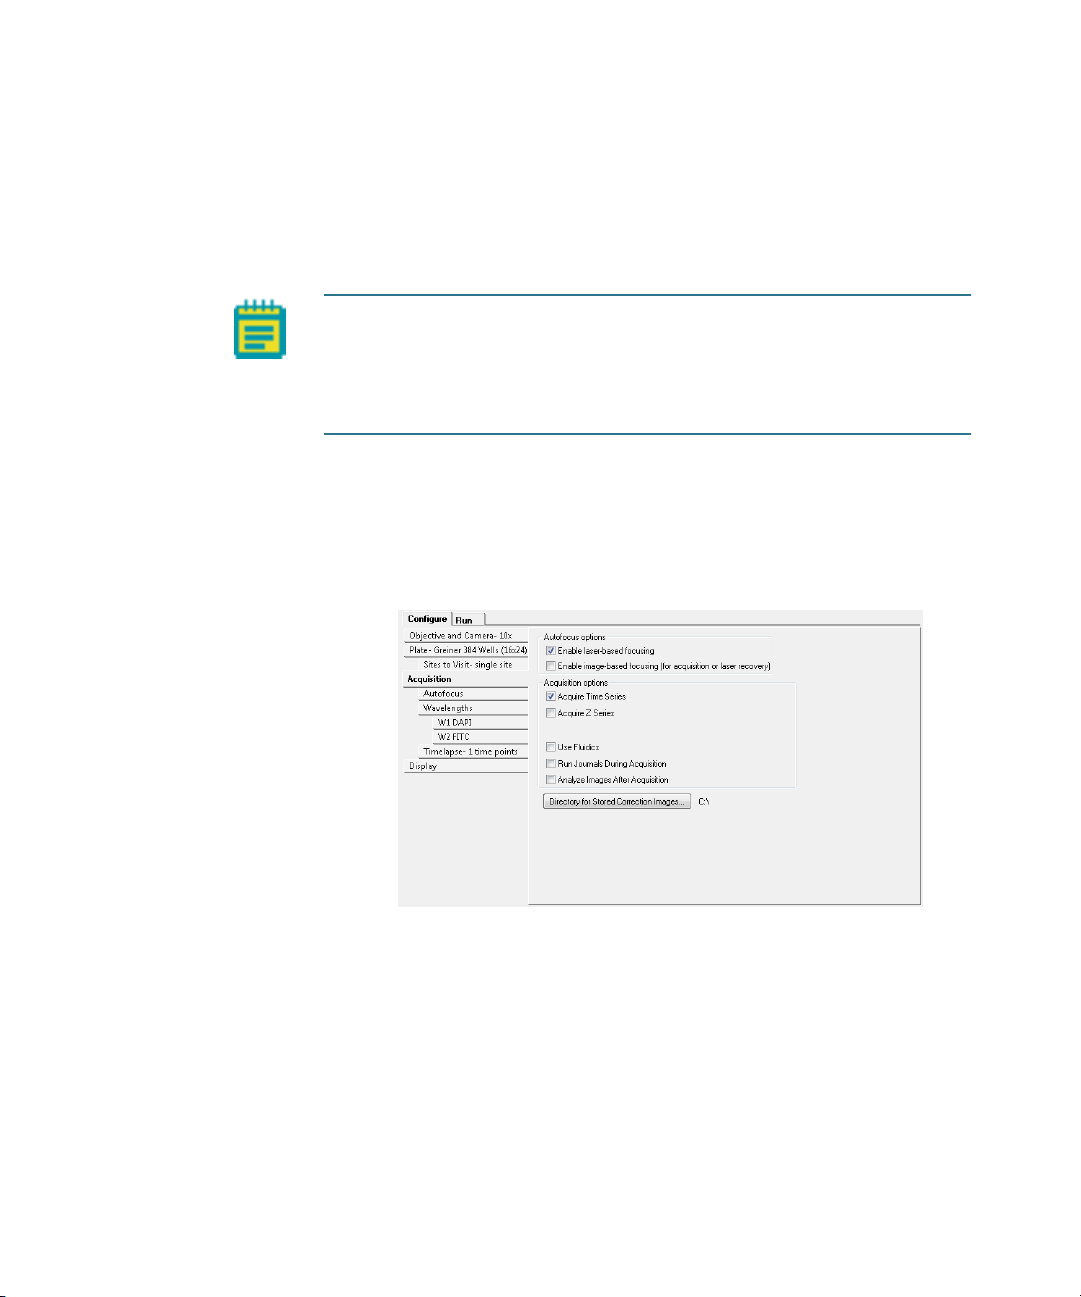
To Set Up a Timelapse Experiment
1. In the MetaXpress software, click Screening > Plate Acquisition
Setup.
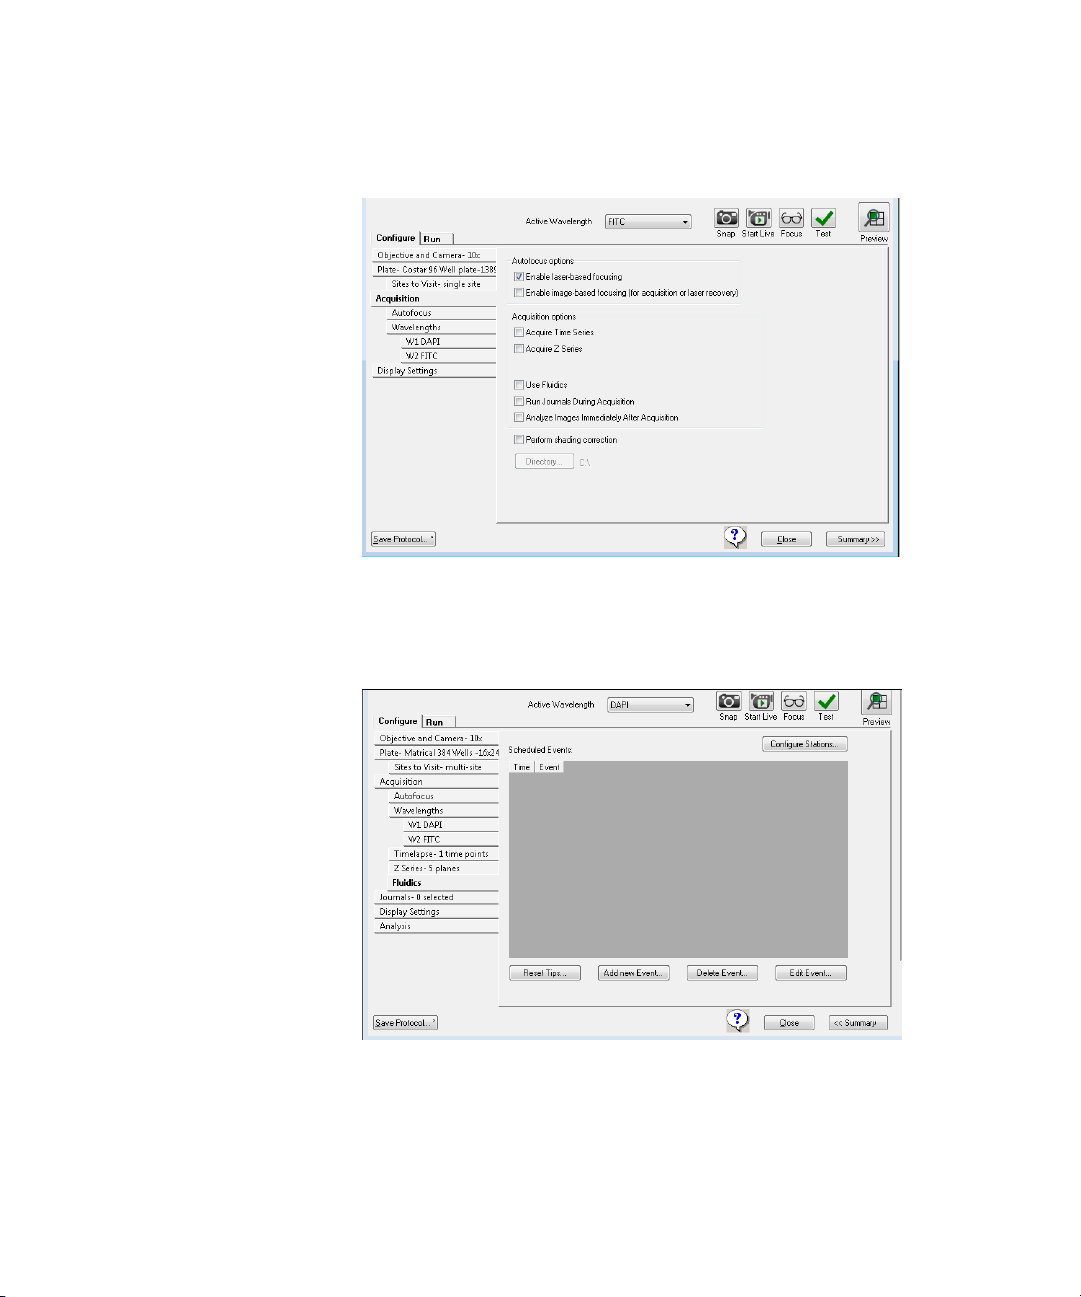
2. In the Plate Acquisition Setup dialog, in the Configure tab, open
the Acquisition tab. See
Environment Control Option Operations
Figure 1-12.
p
Figure 1-12: Acquire Time Series
3. Select Acquire Time Series.
5014166 D 23
Page 24
ImageXpress Micro High Content Imaging System Options User Guide
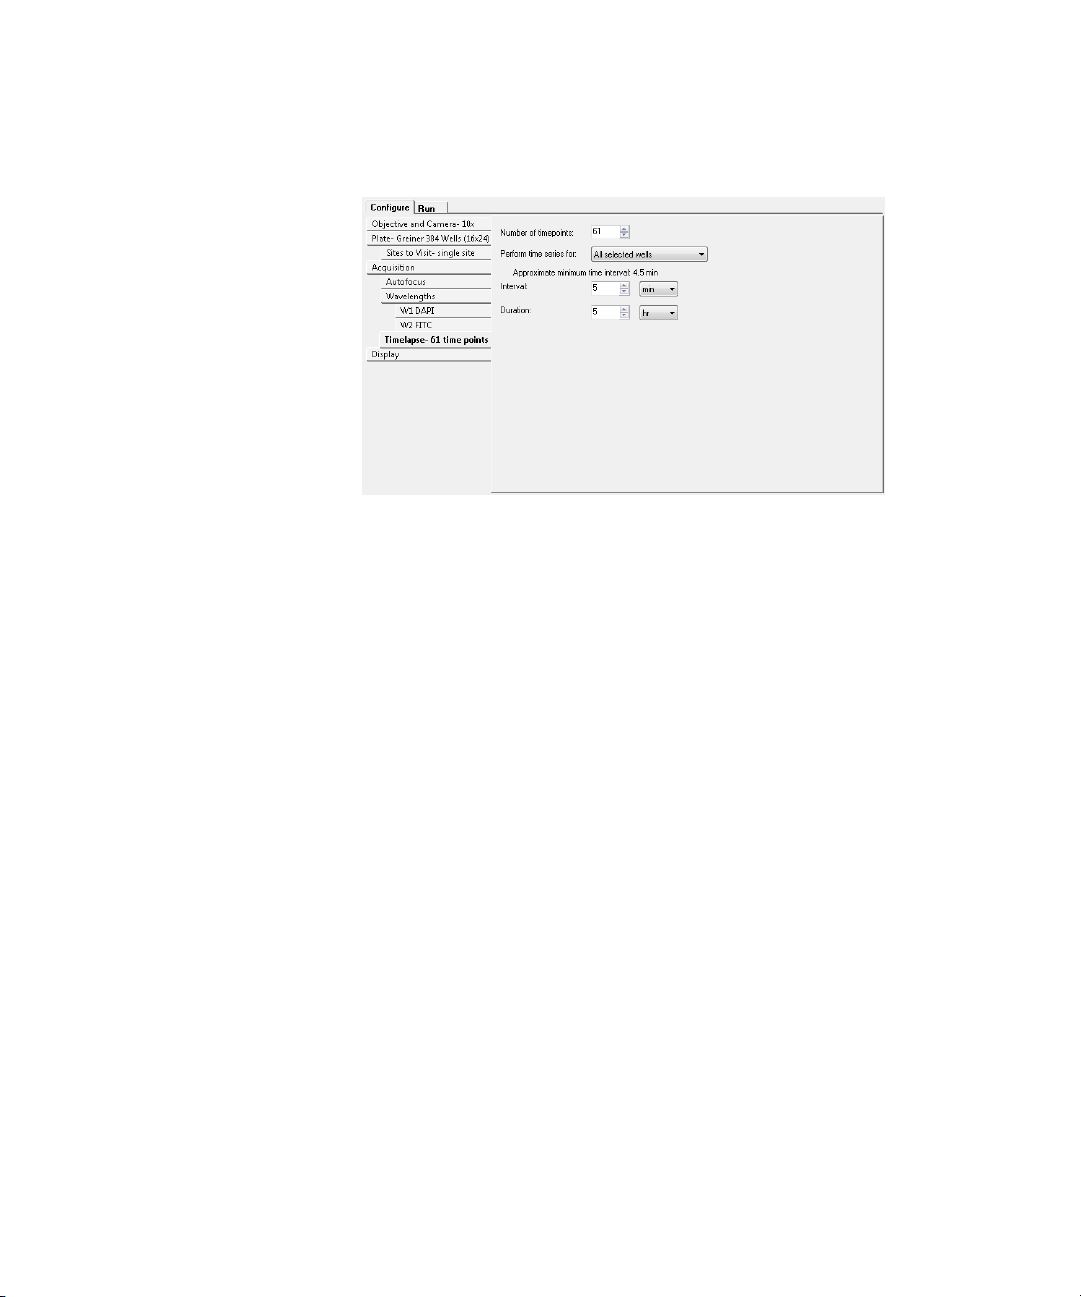
4. Under Configure, click Timelapse to configure timelapse
acquisition options. See Figure 1-13 on page 24.
Figure 1-13: Timelapse tab
5. In the Number of time points field, specify the number of time
points to use. Fluidic events can be associated with these time
points. See
Doing Fluidics Experiments on page 43.
6. Click Perform time series for and select one of the following
methods for acquiring a series of timelapse images,
corresponding to different types of experiments:
All selected wells is used for long timelapse experiments.
The system images all wells at the first time-point, then all
wells at the second time point, and so on.
One well then the next is used for a fast kinetic experiment.
The system images all time points on well 1, then moves to
well 2 and images all time points, and so on.
One row then the next or one column then the next is
suitable for an experiment using manual pipetting.
24 5014166 D
Page 25
Environment Control Option Operations
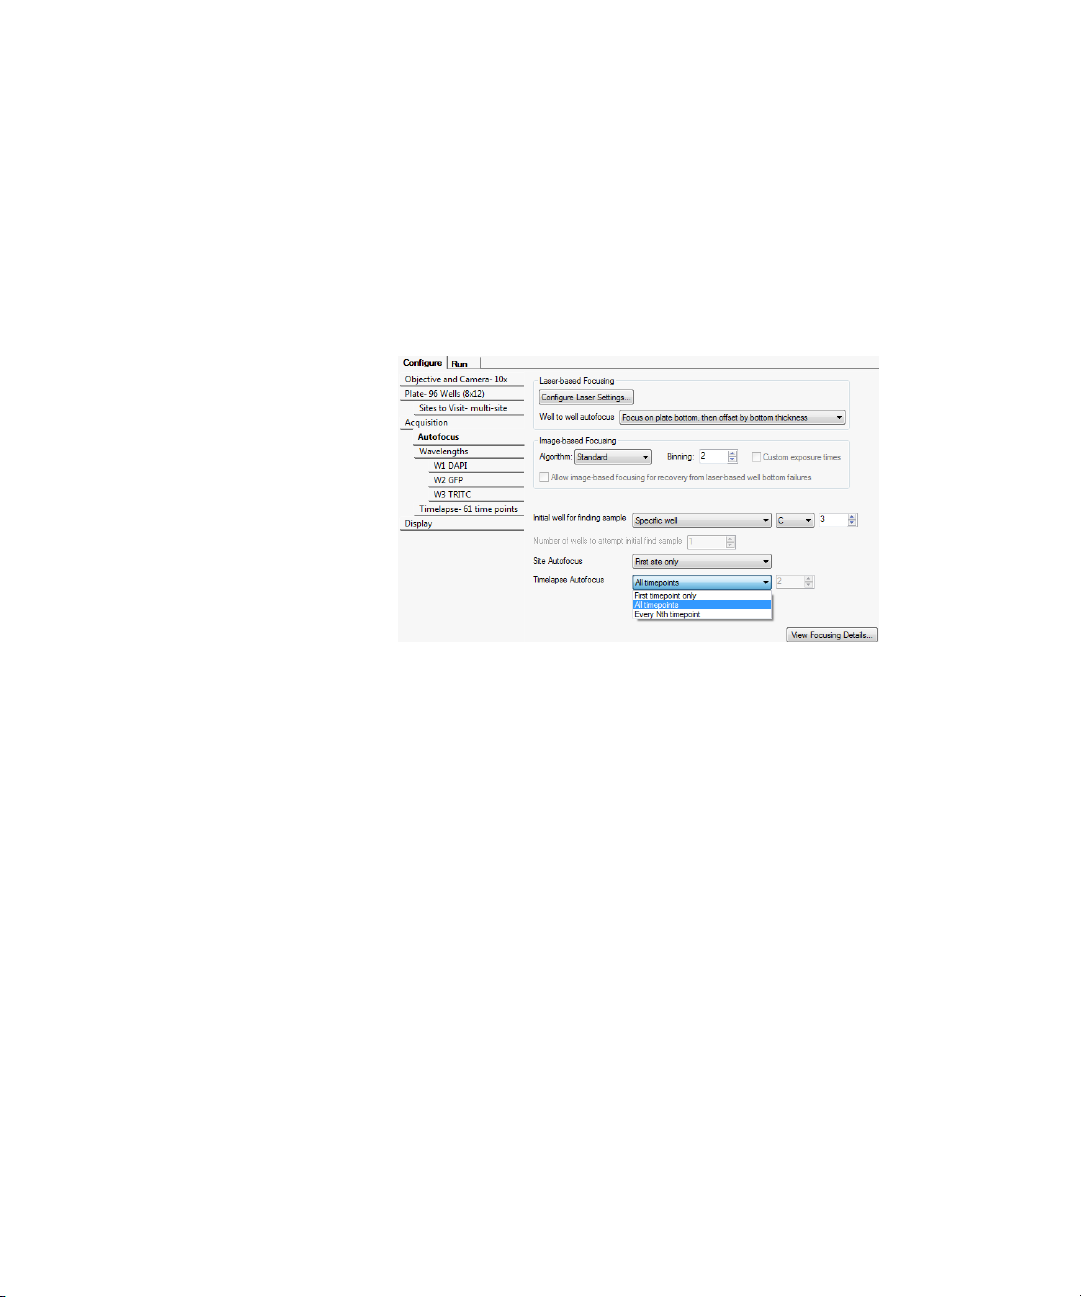
7. If applicable, select additional options on the Autofocus tab. See
Figure 1-14 on page 25. These options include:
First timepoint only: Recommended for fast kinetic
experiments.
All timepoints: Recommended for long timelapse
experiments.
Every Nth timepoint: Offers the flexibility to autofocus
regularly during a timelapse experiment.
Figure 1-14: Timelapse Autofocus options
5014166 D 25
Page 26

ImageXpress Micro High Content Imaging System Options User Guide
8. If applicable, select additional options on the Wavelength tabs.
Wavelength tabs provide options for acquiring individual
wavelength images during a timelapse experiment. See
Figure 1-15 on page 26.
These options include:
At all time points: The default for timelapse experiments. All
time points are acquired for this wavelength.
At start of experiment: Only the first time-point is acquired
for this wavelength.
At start/end of experiment: Only the first and last time
points are acquired for this wavelength.
Every nth time point: Acquires timelapse images only for
every nth time-point for this wavelength.
If you do not image a wavelength at every time point, the most
recent image acquired for that wavelength is saved in the
database for that time-point.
Figure 1-15: The Timelapse Acquisition field on the Wavelength
1 tab
26 5014166 D
Page 27

Environment Control Option Operations
Reviewing Timelapse Data
As with other ImageXpress System data, timelapse data is displayed in
the MetaXpress software Review Plate Data dialog.
To review the timelapse data
1. In the MetaXpress software, click Screening > Review Plate Data.
Figure 1-16: Review Plate Data dialog
2. Click Select Plate.
3. In the Select Plate for Review dialog, select a plate, and then
click Select.
4. In the Data view list, click Time vs Well. The montage displays
thumbnails of each time point.
5. To create a stack for viewing as a movie, right-click on one well to
select it.
The well changes color to indicate that the well is selected.
5014166 D 27
Page 28

ImageXpress Micro High Content Imaging System Options User Guide
Note: To clear the selection, click Clear Selection at the bottom
of the dialog.
6. Click Load Selected Images.
In the image window, you can view each time point as a plane in
the stack using the navigation buttons above the image pane.
Figure 1-17: Stack of images with navigation buttons above the
image pane
Note: In a timelapse experiment, the time starts when the first
well is acquired. If the acquisition time exceeds the time
specified for the timelapse experiment, the system proceeds as
fast as possible. As a result, the time between time points might
not match the time specified, but the timestamps on images are
accurate.
28 5014166 D
Page 29

Environment Control Option Operations
To make a movie
1. Before you begin, load timelapse images and create a stack. See
Reviewing Timelapse Data on page 27.
2. Select the image window of the stack on the MetaXpress
Software desktop.
3. In the MetaXpress software, click Stack > Make Movie.
In the Simplified Menu Structure, click Edit > Stack > Make
Movie.
Figure 1-18: Make Movie dialog
4. In the Make Movie dialog, select the desired options.
For information about the available options, view the application
help by pressing F1 while viewing the dialog.
5. Click Save.
5014166 D 29
Page 30

ImageXpress Micro High Content Imaging System Options User Guide
30 5014166 D
Page 31

Fluidics Option Operations
The ImageXpress® Fluidics option consists of a single-channel, fluidics
robot. This robot picks up tips from a tip box and draws fluid from and
delivers fluid to a given well on the compound and sample plates. For the
sample plate, the solenoid-operated plate shutter opens briefly, allowing
the robot access to a given well without compromising the
environmental control.
The robot is capable of dispensing volumes between 3 μL and 200 μL
with an accuracy of ±5% or ±1 μL.
The ImageXpress Fluidics option must be installed with the Environment
Control option. It is not compatible with the Transmitted Light option.
See Also:
• Environment Control Option Operations on page 9.
This chapter contains the following sections:
• Fluidics Hardware on page 31
• Setting Up Fluidics Hardware on page 33
• Configuring Fluidics Software (Stations and Properties) on
page 35
• Doing Fluidics Experiments on page 43
• Preventing Evaporation from Compound Plates on page 49
2
Fluidics Hardware
The ImageXpress Fluidics option consists of the following hardware
components. See Figure 2-1.
• Single-channel pipettor. Used to transfer fluid between two
compound/media plates and the sample plate.
• Shutter. Allows the system to maintain the environment when
not actively pipetting.
• Plate heaters. Used to heat the compound plates. These heat a
little higher than the displayed temperature, which represents
the temperature of the liquid in the well.
• Tip adapters and tip rack positions. Compatible with FLIPR® Tetra
96 tips (Part 9000-0761, 50 racks/case) or 384 tips (Part 90000763, 50 racks/case).
5014166 D 31
Page 32
ImageXpress Micro High Content Imaging System Options User Guide
• Tip stripper. Used for ejecting tips.
• Waste bin. Used to contain ejected tips and discarded liquid.
• Doors with safety interlocks. Prevents doors from being opened
during operation.
Figure 2-1: Fluidics hardware
32 5014166 D
Page 33

Fluidics Option Operations
Items to Be Provided by the Customer
The customer must provide the following items (in addition to the
Environment Control option items):
• ANSI standard compound plates.
• FLIPR Tetra 96 tips (Part 9000-0761, 50 racks/case) or 384 tips
(Part 9000-0763, 50 racks/case). Tips can be ordered from
Molecular Devices.
• Absorbent pad for liquid waste disposal.
Tips
The ImageXpress Fluidics option is compatible with FLIPR Tetra 96 or 384
tips.
After compounds are dispensed, tips are disposed into the waste
disposal tray located at the back of the environmental enclosure.
Plates
The tip and compound plate region inside the environmental enclosure
can accommodate up to two compound plates. Molecular Devices
recommends using standard 96-well or 384-well plates. U-bottom and Vbottom plates are beneficial when withdrawing and dispensing very
small volumes of compound.
Setting Up Fluidics Hardware
The FSE (Field Service Engineer) installs the ImageXpress Fluidics option.
After installation, fluidics can be set up for experiments.
To set up the fluidics hardware
1. Load the tip racks. For proper fit and alignment, insert the right
side first, and then press the left side down into place.
2. Change the tip adapter as appropriate. The tip adapter should be
screwed on firmly but not over-tightened. If the tip adapter is not
properly attached, it might not match the fluidics robot
calibration.
3. Load the compound plates. For proper fit and alignment, insert
the right side first, and then press the left side down into place.
4. Set up environmental control as needed, and allow the
compound-plate temperature to reach equilibrium. See
Up Environmental Control on page 14.
5014166 D 33
Setting
Page 34
ImageXpress Micro High Content Imaging System Options User Guide
5. If required, empty the waste bin.
6. Load an unlidded plate with the live-cell sealing ring on the top.
See
Loading the Sample Plate on page 18.
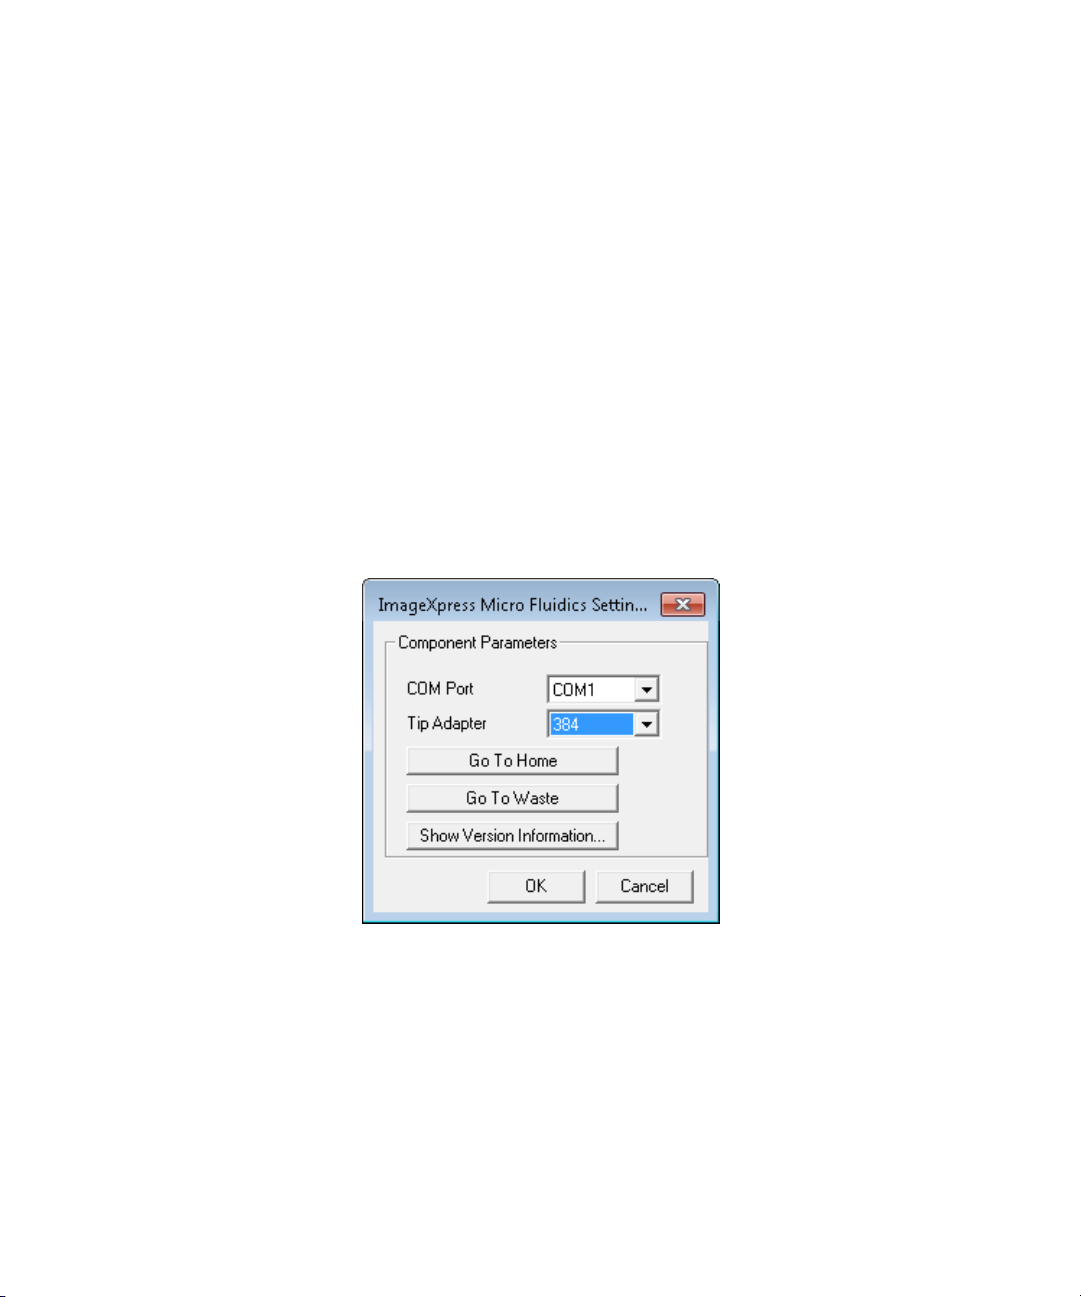
To Configure Fluidics in Meta Imaging Series Administrator
If you change tips, from a 96-well to a 384-well tip, or from a 384-well to
a 96-well tip, you need to configure the fluidics as described in the
following procedure.
1. Click Start > Programs > MetaXpress and then right-click Meta
Imaging Series Administrator and select Run as administrator to
start the MetaXpress Meta Imaging Series Administrator
software.
2. Click Configure Hardware.
3. In the Configure Hardware dialog, select the correct hardware
configuration, and then click Configure Devices.
4. In the right pane of the User Settings for hardware configuration
dialog, click ImageXpress Micro Fluidics, and then click Settings.
Figure 2-2: ImageXpress Micro Fluidics Settings dialog
5. In the ImageXpress Micro Fluidics Settings dialog, If applicable,
change the tip adapter or the COM port.
34 5014166 D
Page 35
Fluidics Option Operations
Configuring Fluidics Software (Stations and Properties)
To use the ImageXpress® Fluidics option, you must configure fluidics
stations and properties.
Note: The Configure Fluidic Stations functions are available at Devices
> Configure Fluidic Stations, in the simplified menu, Control >
ImageXpress > Configure Fluidics Stations, and from the Configure
Stations option from Plate Acquisition Setup > Configure > Fluidics.
This section details the Plate Acquisition Setup > Fluidics > Configure
location, but the procedures are the same if you access the functions
from the menu.
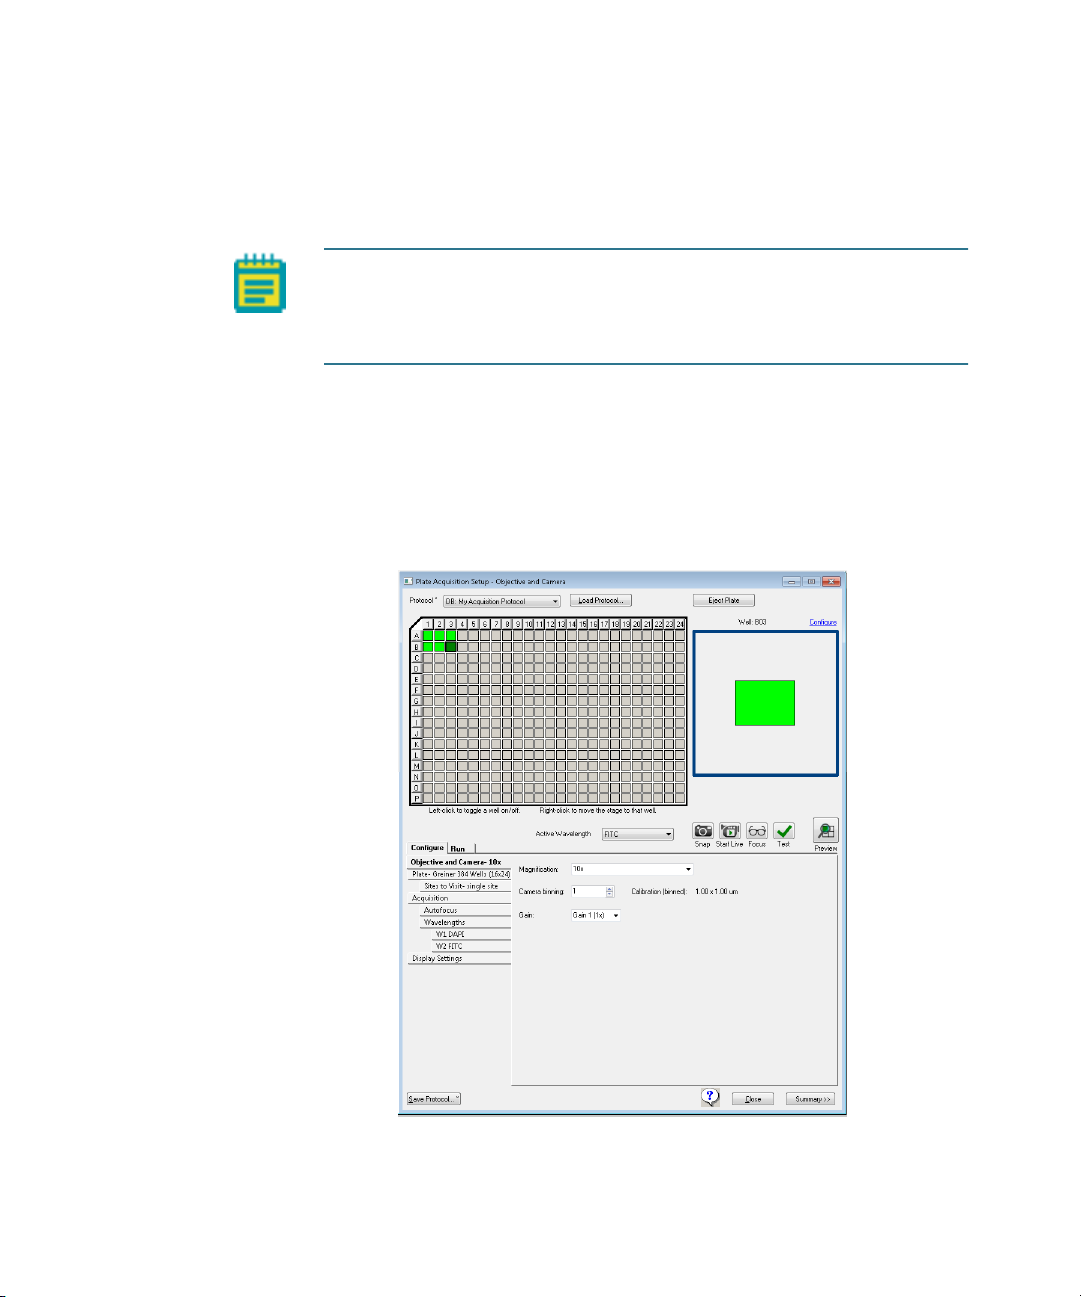
To configure fluidics software
1. In the MetaXpress Software, click Screening > Plate Acquisition
Setup.
Figure 2-3: Plate Acquisition Setup dialog
5014166 D 35
Page 36
ImageXpress Micro High Content Imaging System Options User Guide
2. On the Plate Acquisition Setup dialog, on the Configure tab,
open the Acquisition tab.
Figure 2-4: Plate Acquisition Setup dialog: Configure tab,
Acquisition tab
3. Under Acquisition, select Use Fluidics.
4. Open the Fluidics tab.
Figure 2-5: Plate Acquisition Setup dialog, Configure tab:
Fluidics tab
36 5014166 D
Page 37

5. Click Configure Stations.
Fluidics Option Operations
Figure 2-6: Configure Fluidics Stations dialog
6. On the Configure Fluidics Stations dialog, for each Tip Tray,
select a Tip Type.
Note: The system comes pre-configured with settings for FLIPR
Tetra 96 and 384 tips.
7. For each Compound Plate, select a Plate Type.
Note: You can use only standard 96-well or 384-well plates for
fluidics.
5014166 D 37
Page 38
ImageXpress Micro High Content Imaging System Options User Guide
8. If applicable, for the Sample Plate, type a value for X, Y, and Z
offsets from the well center (in μm) for the sample plate.
Type a positive Z offset to have the pipettor sample higher than
normal. Type a negative Z offset to have the pipettor sample
lower than normal.
CAUTION! An incorrect X, Y, or Z offset can cause the pipette tip
to crash into the sample plate.
9. If applicable, select Track Volume, and then type a value for the
Initial Volume for Tracking (μl) for each plate.
10. Do one of the following:
If you selected Track Volume, then select Track Liquid
Surface, and then go to Step 11.
Optionally, select Track Volume, select Track Liquid Surface,
clear Track Volume, and then go to Step 11.
Otherwise, go to Step 13.
Note: The Track Liquid Surface feature is used in conjunction
with the Wet Dispense feature. If Track Liquid Surface is
selected, then wet dispensing is done near the liquid surface.
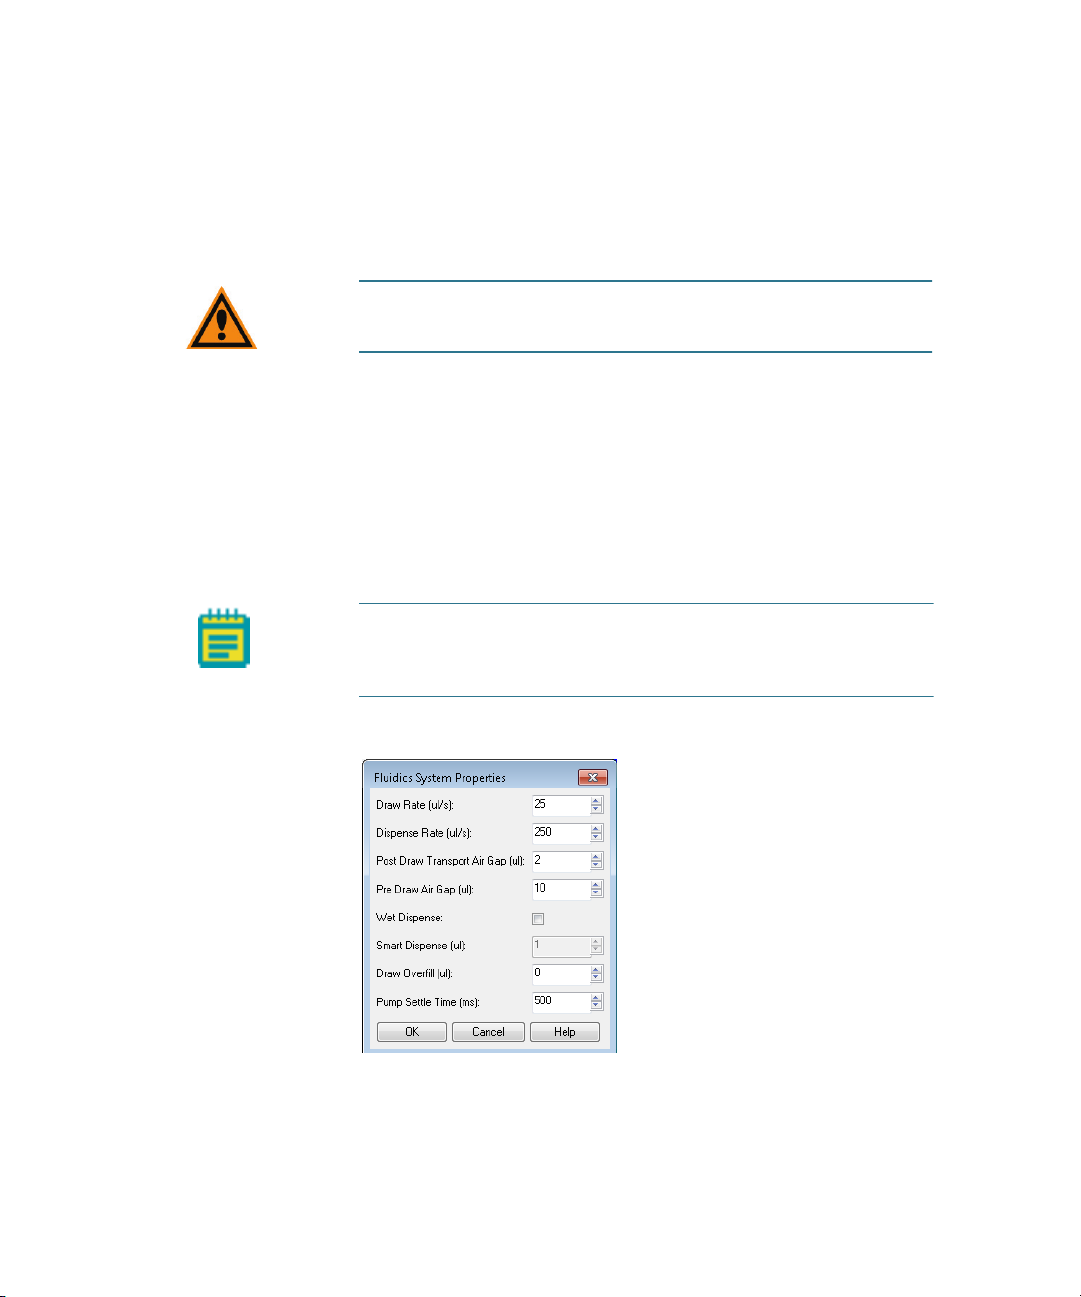
11. Click System Properties.
Figure 2-7: Fluidics System Properties dialog
38 5014166 D
Page 39

Fluidics Option Operations
12. On the Fluidics System Properties dialog, leave the default
values for the fluidic system properties set as-is, or modify any
values as needed.
Table 2-1: Fluidic Systems Property values
Option Description
Draw Rate (μl/s) The rate at which the pump draws fluid.
Dispense Rate (μl/s) The rate at which the pump dispenses fluid.
Post Draw Transport
Air Gap (μl)
Pre Draw Air Gap (μl) The volume of air that the pump draws
Wet Dispense Specifies whether the tip should be
Smart Dispense (μl) Enabled only if Wet Dispense is selected. The
Draw Overfill (μl) The volume of fluid that the pump draws in
Pump Settle Time (ms) The time delay that is used to pause
The volume of air that the pump draws after
it draws fluid but before the pump arm
moves. This air prevents fluid from dripping
during pump arm movement. Select this
option for fluids such as DMSO.
before drawing fluid. This is used to push
remaining drops of fluid out of the tip when
dispensing.
immersed in the fluid during dispense
operations at the imaging location. When
enabled, if Track Liquid Surface is also
selected. then dispensing occurs near the
liquid surface; otherwise, the dispensing
occurs near the bottom of the well.
volume that the pump dispenses beyond the
requested fluid dispense volume. The
additional volume is subtracted from the Pre
Draw Air Gap volume. The Smart Dispense
volume must be less than or equal to the Pre
Draw Air Gap volume.
addition to the requested volume of fluid.
You can use Draw Overfill to increase
dispense accuracy when drawing from
compound plates.
Note: Draw Overfill is not applicable for any
other plate type.
movement of the pump arm after a pump
draw or dispense operation to overcome
hysteresis. For most operations, 100 ms is
the recommended value.
5014166 D 39
Page 40
ImageXpress Micro High Content Imaging System Options User Guide
13. Click OK to close the Fluidics System Properties dialog and
return to the Configure Fluidics Stations dialog.
14. If applicable, click Define Tips and in the Define Tips dialog,
define additional tip types, and then click Save.
CAUTION! Improper tip definitions can cause the pipette tip to
crash into the sample plate. Molecular Devices recommends
that you do not make changes to the standard tip definitions.
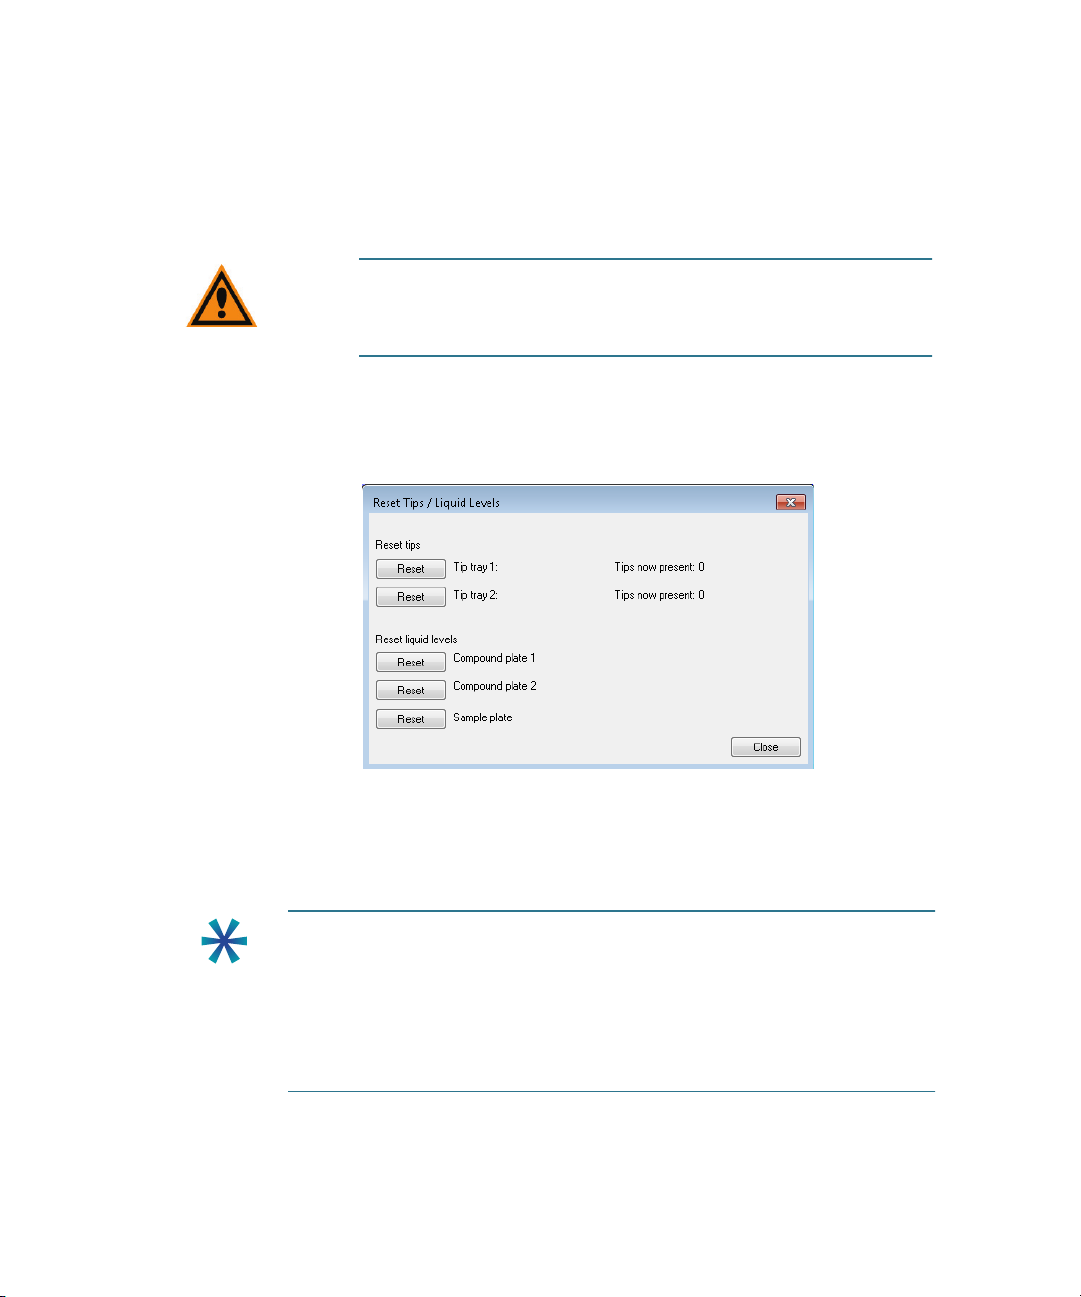
15. After you have completed a dispensing cycle, to indicate that you
have reloaded tip racks and plates, click Reset Tips, and on the
Reset Tips/Liquid Levels dialog, click Reset for the appropriate
tip trays and plates, and then click Close.
Figure 2-8: Reset Tips/Liquid Levels dialog
Manual Fluidics Control
Do the following procedure to control the fluidics station manually.
Tip: The fluidics interface enables you to transfer fluid from one well of
the compound plate to a corresponding well in the sample plate. If you
need to transfer fluid between non-corresponding wells, or if different
actions need to be performed for different wells, record these actions in
a journal (custom routine) to accomplish this. See
a journal on page 42
experiment. See To configure a fluidics experiment on page 43.
40 5014166 D
. You can add journals as events when you run an
To record the steps in
Page 41
Fluidics Option Operations
To control fluidics manually
1. In the MetaXpress software, click Devices > Fluidic Control.
In the simplified menu, click Control > ImageXpress > Fluidic
Control.
2. In the Fluidic Control dialog, specify the action you would like to
do. You can manually pick up and eject tips, draw and dispense
fluid, and mix.
For example, to remove 20 μl from well A01 in the compound
plate and add it to the sample plate, specify the following:
Action: Draw
Station: Compound Plate 1
Row: A
Column: 1
Volume (μl): 20
3. Click Go.
The fluid is drawn from the plate.
4. In the Action list, click Dispense, and then click Go to add the
fluid to the plate.
Figure 2-9: Fluidic Control dialog
5014166 D 41
Page 42

ImageXpress Micro High Content Imaging System Options User Guide
To record the steps in a journal
1. In the MetaXpress software, on the Journal menu, click Start
recording.
2. Do the steps that you want to record. See
manually on page 41.
3. Click Journal > Stop recording, and then save the journal file.
4. To modify the journal, click Journal > Edit Journal, and then
select the journal to be edited. See
To control fluidics
Figure 2-10 on page 42.
Figure 2-10: Example Journal using manual fluidics control
42 5014166 D
Page 43

Doing Fluidics Experiments
Fluidics experiments are defined by adding events to the Scheduled
Events list. You can add three types of events: Compound Addition,
Washout, and Journal. Fluidics events can be performed on all wells
being imaged, or on a subset of wells. For example, you can add different
amounts of compound to different wells, or treat wells for different
amounts of time.
Do the following procedure to configure a fluidics experiment.
To configure a fluidics experiment
1. In the MetaXpress software, click Screening > Plate Acquisition
Setup.
2. On the Plate Acquisition Setup dialog, on the Configure tab,
open the Acquisition tab.
Fluidics Option Operations
Figure 2-11: Plate Acquisition Setup dialog: Configure tab,
Acquisition tab
3. Under Configure, click Fluidics to schedule fluidics events. See
Figure 2-12.
5014166 D 43
Page 44

ImageXpress Micro High Content Imaging System Options User Guide
Figure 2-12: Adding events to a fluidics experiment
4. Click Add new Event to add an event to the Scheduled Events
field.
5. In the Fluidic Event dialog, specify the time point at which you
want the event to occur, and then specify whether the event
should occur before or after the time point. See Figure 2-13.
44 5014166 D
Page 45

Fluidics Option Operations
Figure 2-13: Time point setting in Fluidic Event dialog
For example, if you select time point 5 and select Before
imaging, then the fluidic event occurs before the time point. If
you select After imaging, then the fluidic event occurs after the
time point. See
Time point 12345N
Figure 2-14 on page 45.
Event occurs before time point
Before imaging
Event occurs after time point
After imaging
Figure 2-14: Setting events to occur before and after a time
point
Note: The number of time points is set on the Timelapse tab.
See Doing Timelapse Experiments on page 23.
5014166 D 45
Page 46

ImageXpress Micro High Content Imaging System Options User Guide
6. In the Fluidic Event dialog, select the event type and its
properties. Event types include:
Compound addition: A Compound addition event, shown in
Figure 2-15 on page 46, draws liquid from the compound
plate and adds it to the sample plate. There is a one-to-one
mapping between the wells on the compound plate and the
sample plate. That is, compound is removed from a well on
the compound plate and applied to the well in the same
position on the sample plate (for example, A1 to A1, A2 to
A2). When you are running mixes that consist of more than a
single cycle, Mix Dead Volume specifies an amount of fluid
that is to remain in the tip and not to be returned to the well
during intermediate repeated cycles of draws and dispense.
For more information about compound addition settings,
see the MetaXpress Software application help (press F1
while viewing the dialog).
Figure 2-15: Fluidic Event dialog Compound addition event
46 5014166 D
Page 47

Fluidics Option Operations
Washout: A Washout event removes liquid from the sample
plate and replaces it with liquid from the compound plate.
There is a one-to-one mapping between the wells as shown
in Figure 2-16.
An exchange consists of a washout event in which fluid is
removed from the sample plate and discarded, and fresh
media or fluid is placed in the well. If you want the system to
discard the old tip after removing and discarding the fluid
from the sample plate, select New tip each exchange. For
more information, see the software Help (press F1 while
viewing the dialog).
Figure 2-16: Fluidic Event dialog Washout Event
5014166 D 47
Page 48
ImageXpress Micro High Content Imaging System Options User Guide
Journal: A Journal event is used for any special cases or
custom protocols (for example, experiments not using a oneto-one mapping of wells, or drawing once and dispensing
multiple times) as shown in Figure 2-17.
Figure 2-17: Fluidic Event dialog Journal event
7. Click OK.
48 5014166 D
Page 49

Preventing Evaporation from Compound Plates
Incubation at elevated temperatures, such as 37°C, causes rapid
evaporation of water from aqueous compound preparations in storage
plates. DMSO-based preparations are hygroscopic and absorb water from
the surrounding air. To minimize these problems, seal the compound
storage plates with aluminum foil seals before placing them in the
environmental chamber. Foil seals can be pierced during the experiment
by the pipette tips on the fluidics robot, only exposing individual wells
after use.
Seals generally adhere better to plates with raised rings around the wells
than to plates with a smooth surface. Evaporation is greater from the
outer wells of a microplate, both from micro-environmental variations,
and because of poorer adhesion at the outer edges of the seal. It might
be preferable to omit these wells from experiments with long incubation
periods. It is also useful to set up the fluidics plate configuration on an
equivalent, unsealed plate before trying to pipette from a sealed plate.
Evaluated Seals
Molecular Devices has evaluated both heat-applied and pressure-applied
seals with a variety of polypropylene and polystyrene plates. Two
examples are listed here. Other manufacturers might provide similar
performance.
Fluidics Option Operations
Heat-applied seals
Tomtec heat-applied aluminum foil seals
• Part numbers: Tomtec AutoSeal instrument (710-100) and foil
seal material (AS-3)
• For specifications, ordering information, pricing, and sealing
instructions, contact Tomtec (www.tomtec.com)
• Features
Automated robotic plate sealing
Suitable for polypropylene plates
Easily punctured by the fluidics robot using FLIPR Tetra
pipette tips
Compatible with DMSO
Easily peeled from the plate
5014166 D 49
Page 50

ImageXpress Micro High Content Imaging System Options User Guide
Pressure-applied seals
G&L Precision Die Cutting pressure-applied aluminum foil seals
• Part number: G&L Aluminum Microplate Liddings (GL-255)
• For specifications, ordering information, pricing, and sealing
instructions, contact G&L Precision (www.glprecision.com)
• Features
Manual plate sealing
Suitable for polypropylene and polystyrene plates
Easily punctured by the fluidics robot using FLIPR Tetra
pipette tips
Compatible with DMSO
50 5014166 D
Page 51

Environment Control and Fluidics Options Maintenance
It is important to regularly clean the environmental enclosure, including
specific fluidics and environmental components. Components can come
in contact with biological, chemical, and toxic agents. Therefore, all
cleaning procedures should be handled with care. Molecular Devices
recommends that you wear powder-free gloves at all times when you
access the internal components of the enclosure. For additional
information about cleaning the system, see the ImageXpress Micro
Widefield High Content Imaging System User Guide or the ImageXpress
Micro Confocal High Content Imaging System User Guide.
The following sections provide information on how to clean fluidics
components. If you have any further questions about specific cleaning
procedures, contact Technical Support. See
This chapter contains the following sections:
• Carbon Dioxide Tubing on page 52
• Cleaning the Water Reservoir on page 53
• Waste Disposal Box and Plate Sealing Ring on page 54
3
Obtaining Support on page 7.
CAUTION! Never use an autoclave to clean any instrument
components.
5014166 D 51
Page 52

ImageXpress Micro High Content Imaging System Options User Guide
Carbon Dioxide Tubing
The tubing within the environmental enclosure should be cleaned only if
moisture has collected in the tubing or visual inspection of the tubing
suggests contamination. There are two tubing sections associated with
carbon dioxide delivery. One runs from the carbon dioxide controller
located outside the enclosure to the water reservoir within the
enclosure, and the other one exits the water reservoir and delivers the
carbon dioxide to the stage (plate) area.
Do not let the second stretch of tubing leaving the water reservoir to the
stage area come into contact with the water in the reservoir. When
replacing or cleaning tubing, make sure that the exit tubing from the
reservoir is well above the water’s surface. If at any time, you can see
moisture within the tubing, disconnect both ends and use compressed
air to dry the inside of the tubing. Make sure that you reconnect all
tubing.
The tubing that runs from the carbon dioxide controller to the enclosure
has an in-line filter installed near the end closest to the controller. When
reconnecting this tubing make sure that the in-line filter is in the correct
position.
To clean any portion of the tubing
1. Note how the tubing is connected, and then disconnect the
portion of the tubing that is contaminated and remove it from
the environmental enclosure.
2. Use 70% isopropanol to flush the interior of the tubing.
3. Use compressed air to dry the interior of the tubing.
4. Reconnect the tubing within the environmental enclosure,
making sure all connections are tight.
5. Confirm that carbon dioxide is being delivered to the water
reservoir by visually confirming that bubbles move through the
reservoir. See
Setting Up the Carbon Dioxide on page 17.
52 5014166 D
Page 53

Cleaning the Water Reservoir
Air supplied to the environmental enclosure flows through the water
reservoir, ensuring the air has a high degree of humidity.
To clean the water reservoir
Required tool: Phillips screwdriver
1. In the MetaXpress software, click Screening > Plate acquisition
and Control > Eject Plate to open the top door of the instrument.
2. Exit the MetaXpress Software and turn off the ImageXpress
Micro instrument at the main power switch, which is located on
the instrument's external power supply.
3. Remove the insert surrounding the top door, and open or
remove the side panel.
4. Disconnect the air tubing and the sensors from the water
reservoir.
5. Remove the reservoir from the instrument.
6. Using a Phillips screwdriver, remove the screws securing the
reservoir lid to the instrument.
7. Dispose of the water, and then rinse the reservoir with 70%
ethanol.
8. Replace the lid, tighten the screws, and then place the reservoir
back in the instrument.
9. Fill the reservoir with deionized water to the fill line. See
Up the Water Reservoir on page 15.
10. Reconnect the air tubing and sensors to the water reservoir.
11. Replace the insert surrounding the top door, close or replace the
side panel, and close the top door of the instrument.
Environment Control and Fluidics Options Maintenance
Setting
5014166 D 53
Page 54

ImageXpress Micro High Content Imaging System Options User Guide
Waste Disposal Box and Plate Sealing Ring
Proper cleaning of the waste disposal box and the plate sealing ring is
highly dependent on the type of waste being disposed of and whether
the box is being used with a protective liner. These components can
come into direct contact with unlidded sample plates, compounds, and
media. Therefore, Molecular Devices strongly recommends that you
regularly clean between experiments. Clean both components by first
removing them from the environmental enclosure, and then using one of
the following cleaning techniques depending on the severity of
contamination of the box:
• Damp wipe followed by a disinfectant wipe (70% ethanol)
• Exposure to UV by placement within a tissue culture hood
54 5014166 D
Page 55

Transmitted Light Option Operations
The ImageXpress® Transmitted Light option is designed for phasecontrast transmitted-light imaging. In general terms, transmitted light is
used to describe microscopy in which light is transmitted from a source
on one side of the specimen, with the objective on the other side.
Typically the light is first passed through a condenser so high illumination
is focused on the specimen. For more information on phase contrast
microscopy, visit the Nikon website:
www.microscopyu.com/articles/phasecontrast/phasemicroscopy.html
The ImageXpress Transmitted Light option can be installed with or
without the Environment Control option. It is not compatible with the
Fluidics option.
See Also:
• Environment Control Option Operations on page 9
This chapter contains the following sections:
• Transmitted Light Hardware on page 56
• Transmitted Light Software Configuration on page 59
• Transmitted Light Phase Ring Alignment on page 61
4
5014166 D 55
Page 56

ImageXpress Micro High Content Imaging System Options User Guide
Transmitted Light Hardware
The ImageXpress Transmitted Light option consists of the following
hardware components.
• Nikon phase optics. Allows either phase contrast or brightfield
imaging. See Figure 4-1 on page 57 and Figure 4-2 on page 57.
• Phase contrast objectives. Must be selected for phase contrast
imaging.
• White light lamp (halogen). The software controls the lamp
power.
The halogen lamp has a limited life and can be replaced. For
instructions see the following knowledge base article:
http://mdc.custhelp.com/app/answers/detail/a_id/19101/
• Transmitted Light shutter. Controlled by the software. The
shutter protects the sample from the transmitted light when not
imaging. The shutter window maintains the environment of the
sample. See Figure 4-3 on page 58.
• Flip-in Lens. Enables phase ring alignment for the ImageXpress
Micro Standard, XL, and XLS Systems. See Transmitted Light
Phase Ring Alignment on page 61.
On the ImageXpress Micro Confocal System, the phase ring
alignment lens is in the emission filter wheel and is placed in
position using the software.
• Hinge. Allows robotic access to the plate if necessary. See
Figure 4-4 on page 58.
• ImageXpress Micro Transmitted Light Option Controller or the
ImageXpress Micro Systems Power & Options Controller. Used
to turn the option on and off. It is shared with the Environment
Control option when both options are installed. See Figure 1-1
on page 11 and Figure 1-2 on page 11.
56 5014166 D
Page 57

Transmitted Light Option Operations
Figure 4-1: ImageXpress Micro Standard System with the Transmitted
Light option
Figure 4-2: ImageXpress Micro Standard System with Transmitted Light
option (detailed view)
5014166 D 57
Page 58

ImageXpress Micro High Content Imaging System Options User Guide
Figure 4-3: Transmitted Light shutter
1
2
4
3
Figure 4-4: Hinge-release knob and hinge
Item Description
1 Hinge-release knob
2 Hinge
3 Hinge-release knob
4 Assembly tipped back with hinge-release knob unscrewed
58 5014166 D
Page 59
Transmitted Light Software Configuration
You can create illumination settings to turn the lamp on and off. Do the
following procedure to create illumination settings named Transmitted
Lamp Off and Transmitted Light, and to set a level for the lamp
illumination.
Tip: Do not turn the transmitted light on and off or adjust the lamp
power during acquisition. Doing so takes a considerable amount of time
and can possibly damage the lamp.
To configure transmitted light settings in the MetaXpress software
1. In the MetaXpress software, click Devices > Configure
Illumination.
In the simplified menu structure, click Control > Devices >
Configure Illumination.
Transmitted Light Option Operations
Figure 4-5: Configure Illumination dialog: Lamp On
5014166 D 59
Page 60

ImageXpress Micro High Content Imaging System Options User Guide
2. In the Configure Illumination dialog, create an illumination
setting named Transmitted Lamp Off, select Lamp, ImageXpress
Micro Transmitted Light, and set the lamp illumination to zero,
as shown in Figure 4-6.
Figure 4-6: Configure Illumination dialog: Transmitted Lamp Off
3. Create an illumination setting named Transmitted Light, select
Lamp, ImageXpress Micro Transmitted Light, and set lamp
illumination as a percentage of full power, as shown in
Figure 4-7.
The example sets the lamp power to 20% of maximum. You can
adjust this setting to meet the requirements of your experiment.
Figure 4-7: Configure Illumination dialog: Transmitted Light
After the settings have been configured, Transmitted Light can be
selected as a wavelength in the Plate Acquisition Setup dialog.
60 5014166 D
Page 61

Transmitted Light Phase Ring Alignment
The FSE (Field Service Engineer) performs phase ring alignment when
installing the ImageXpress Transmitted Light option. After the phase ring
is aligned, the microscope generally holds its position for some objective
changes. However, the alignment should be checked periodically, or
when you see degradation of phase contrast image quality.
Phase ring alignment requires a special lens to be placed in position
before starting the phase ring adjustment procedure.
• On the ImageXpress Micro Standard and XL Systems, the optics
cover is removed and the flip-in lens is manually placed in
position for the phase ring adjustment. See To use the flip-in lens
on the ImageXpress Micro Standard and XL Systems on page 61.
• On the ImageXpress Micro XLS System, the flip-in lens is
manually placed in position for the phase ring adjustment
without removing the optics cover. See To use the flip-in lens on
the ImageXpress Micro XLS System on page 63.
• On the ImageXpress Micro Confocal System, the phase ring
adjustment lens is placed in position for the phase ring
adjustment using the Meta Imaging Series Administrator
Software. See To use the phase ring adjustment lens on the
ImageXpress Micro Confocal System on page 65.
Transmitted Light Option Operations
To use the flip-in lens on the ImageXpress Micro Standard and XL Systems
CAUTION! Wear gloves, and do not touch, move, or otherwise damage
the mirror to the right of the flip-in lens.
1. Power off the instrument.
2. Use a Phillips screwdriver to remove both of the left side panels
of the instrument.
3. Use a 1/16 inch hex key to remove the black optics cover over the
lens.
5014166 D 61
Page 62
ImageXpress Micro High Content Imaging System Options User Guide
4. Move the flip-in lens into place for the alignment procedure.
The flip-in lens must be out of the way for any actual imaging.
Figure 4-8: Flip-in lens on the ImageXpress Micro Standard and
XLS Systems
5. Power on the instrument.
6. Adjust the phase ring. See
To align the phase ring on page 67.
7. After the phase ring has been adjusted, power off the
instrument.
8. Move the flip-in lens out of the optical path.
9. Use a 1/16 inch hex key to install the black optics cover over the
lens.
10. Use a Phillips screwdriver to install both of the left side panels on
the instrument.
62 5014166 D
Page 63

Transmitted Light Option Operations
To use the flip-in lens on the ImageXpress Micro XLS System
1. Power off the instrument.
2. Use a Phillips screwdriver to remove both of the left side panels
of the instrument to access the flip-in lens mounted on the
outside of the optics cover.
Figure 4-9: Flip-in lens on the ImageXpress Micro XLS System
3. Remove the two thumbscrews and their washers from the flip-in
lens mounting plate.
There is a flat washer and a split-ring washer on each
thumbscrew on the flip-in lens assembly.
Figure 4-10: Thumbscrew and washers
4. Remove the flip-in lens assembly from the instrument.
5. Remove the protective cloth bag from the flip-in lens.
6. Move the flip-in lens into it fully extended position.
5014166 D 63
Page 64

ImageXpress Micro High Content Imaging System Options User Guide
Figure 4-11: Flip-in lens extended for phase ring alignment
7. Slide the flip-in lens assembly onto the optics cover with the
flip-in lens on the inside for the phase ring alignment.
8. Install the washers and tighten the thumbscrews to hold the
flip-in lens assembly in position for phase ring alignment.
9. Adjust the phase ring. See
To align the phase ring on page 67.
10. After the phase ring has been adjusted, power off the
instrument.
11. Remove the two thumbscrews and their washers from the flip-in
lens mounting plate.
12. Remove the flip-in lens assembly from the instrument.
13. Move the flip-in lens into it fully closed position.
14. Cover the flip-in lens with the protective cloth bag.
15. Mount the flip-in lens assembly on the optics cover with the
closed and covered flip-in lens on the outside.
16. Install the washers and tighten the thumbscrews.
17. Use a Phillips screwdriver to install both of the left side panels on
the instrument.
64 5014166 D
Page 65

Transmitted Light Option Operations
To use the phase ring adjustment lens on the ImageXpress Micro Confocal System
1. Exit the MetaXpress Software if it is running.
2. Click Start > Programs > MetaXpress and then right-click Meta
Imaging Series Administrator and select Run as administrator to
start the MetaXpress Meta Imaging Series Administrator
software.
3. Click Configure Hardware.
4. In the Configure Hardware dialog, select the correct hardware
configuration, and then click Configure Devices.
5. In the right pane of the User Settings for hardware configuration
dialog, click IXConfocal Module Emission Wheel, and then click
Settings.
Figure 4-12: User Setting Selection of IXConfocal Module
Emission Wheel Settings
5014166 D 65
Page 66
ImageXpress Micro High Content Imaging System Options User Guide
6. In the IXConfocal Module Emission Wheel Settings dialog, set
the Filter Exchange Mode to Off.
Figure 4-13: The IXConfocal Module Emission Wheel Settings
dialog
7. Click Open Control Dialog.
Figure 4-14: IXConfocal Module Emission Wheel Control dialog
8. From the Position Controls, select the numbered position for the
phase ring adjustment lens.
By default, the phase ring adjustment lens is installed in
position 8.
9. After the wheel moves to the selected position, click Done.
10. Close all open dialogs and exit the MetaXpress Meta Imaging
Series Administrator software.
66 5014166 D
Page 67
Transmitted Light Option Operations
To align the phase ring
Note: For the ImageXpress Micro Confocal System, make sure that the
instrument is in widefield mode before aligning the phase ring.
1. Make sure that the phase ring adjustment lens is in place.
On the ImageXpress Micro Standard and XL Systems, the
optics cover is removed and the flip-in lens is manually
placed in position for the phase ring adjustment. See
the flip-in lens on the ImageXpress Micro Standard and XL
Systems on page 61.
On the ImageXpress Micro XLS System, the flip-in lens is
manually placed in position for the phase ring adjustment
without removing the optics cover. See To use the flip-in lens
on the ImageXpress Micro XLS System on page 63.
On the ImageXpress Micro Confocal System, the phase ring
adjustment lens is placed in position for the phase ring
adjustment using the Meta Imaging Series Administrator
Software. See To use the phase ring adjustment lens on the
ImageXpress Micro Confocal System on page 65.
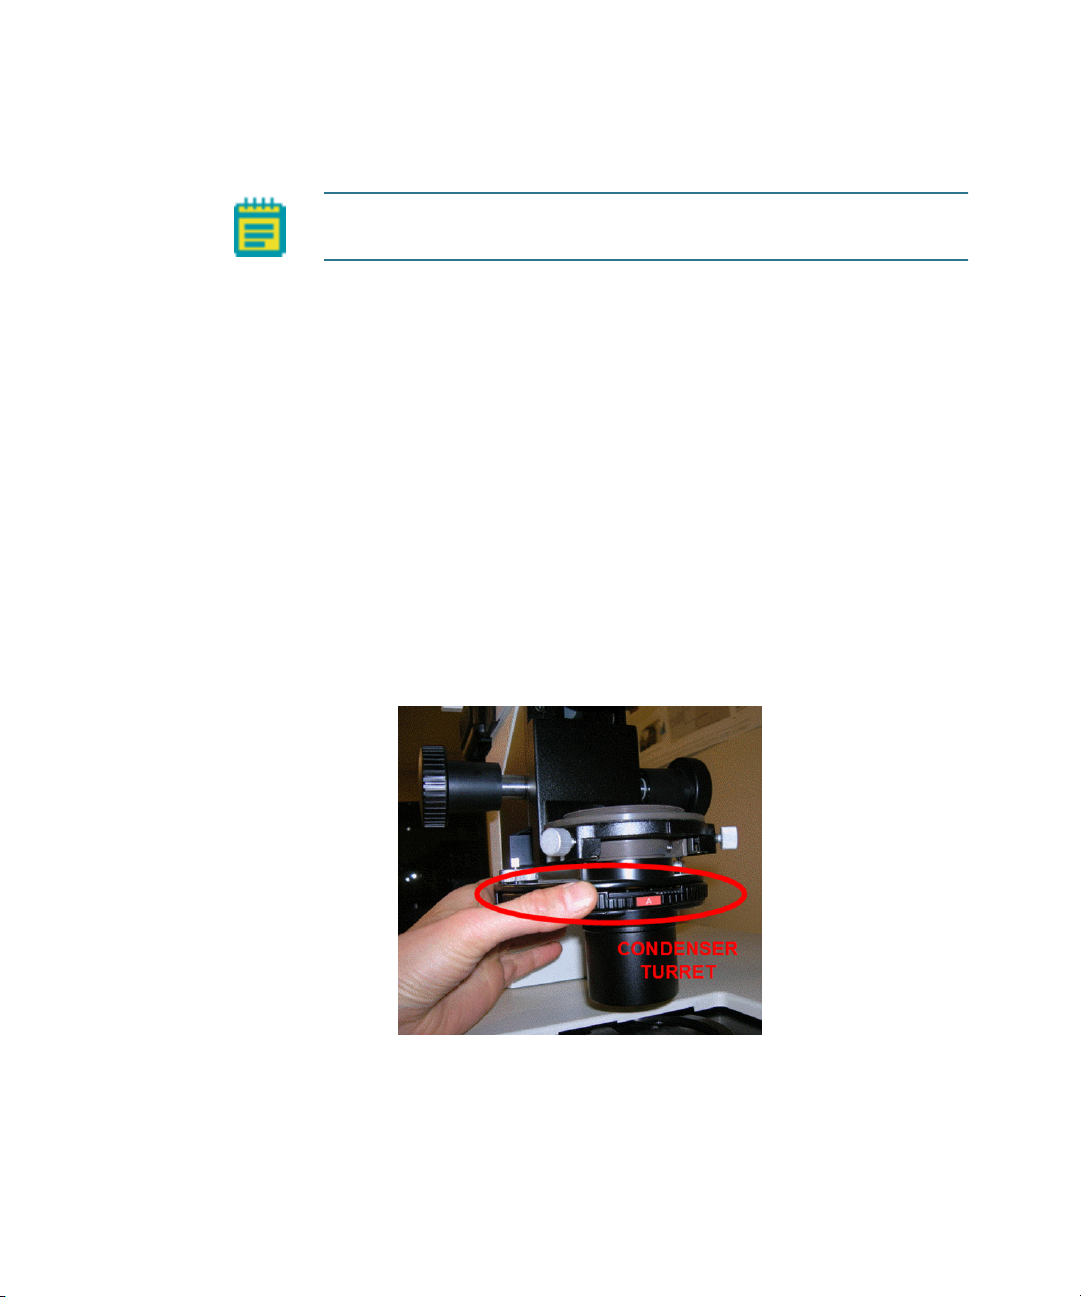
2. Rotate the condenser turret so that the A position is selected (at
the front).
To use
Figure 4-15: Condenser turret with position A at the front
5014166 D 67
Page 68
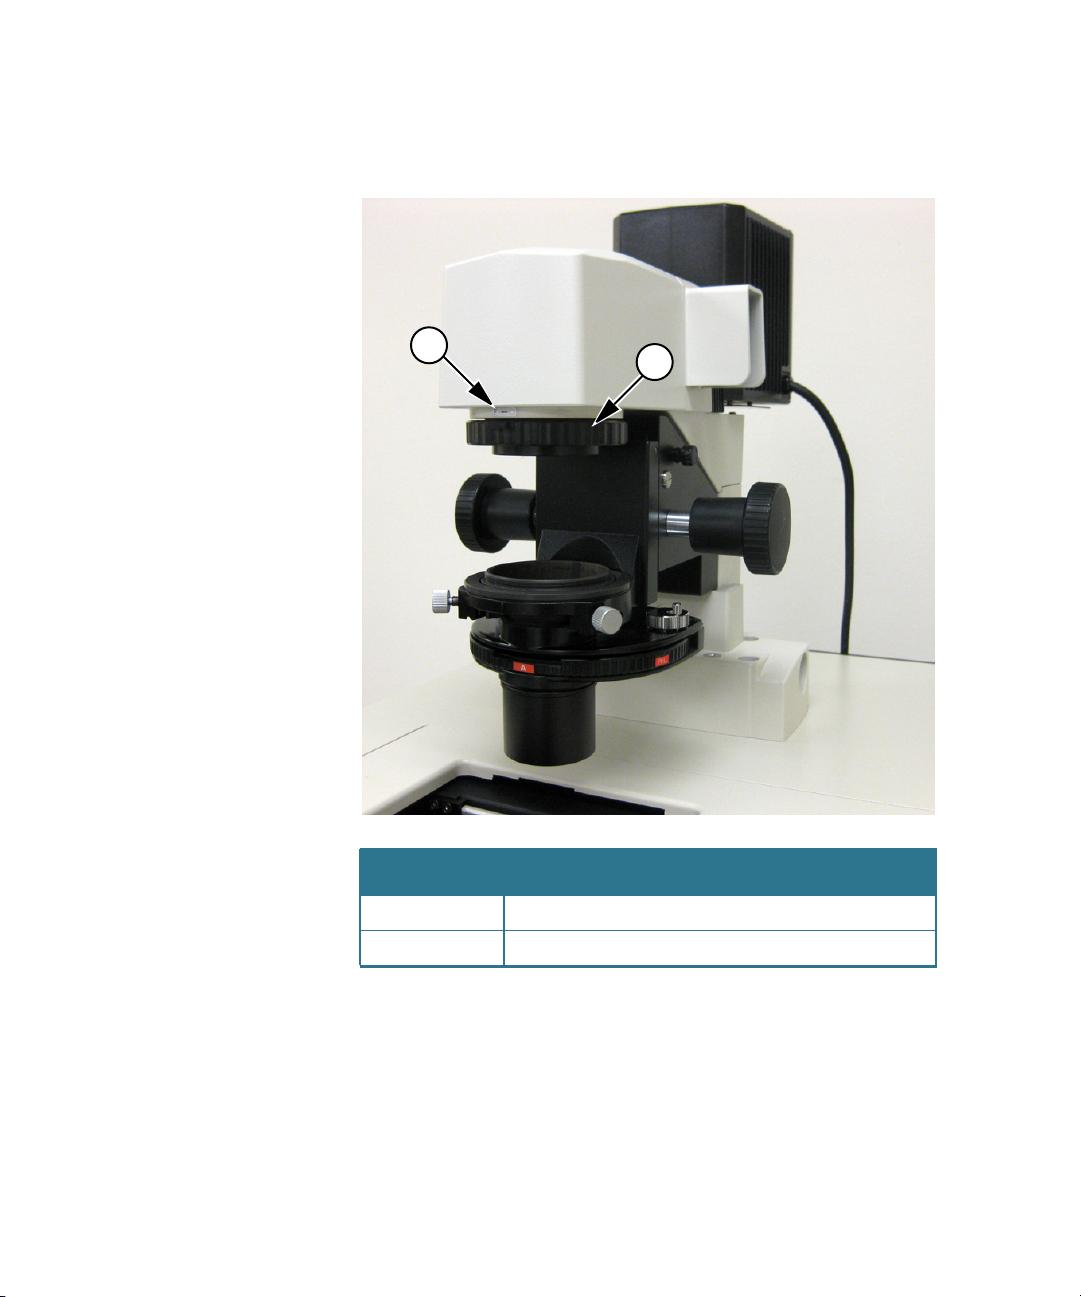
ImageXpress Micro High Content Imaging System Options User Guide
3. Turn the adjustment ring, which is located below the arm of the
Transmitted Light tower, to the middle of the aperture range.
1
2
Figure 4-16: Aperture stop position for phase ring alignment
Item Description
1 Label indicating aperture range
2 Adjustment ring
68 5014166 D
Page 69
Transmitted Light Option Operations
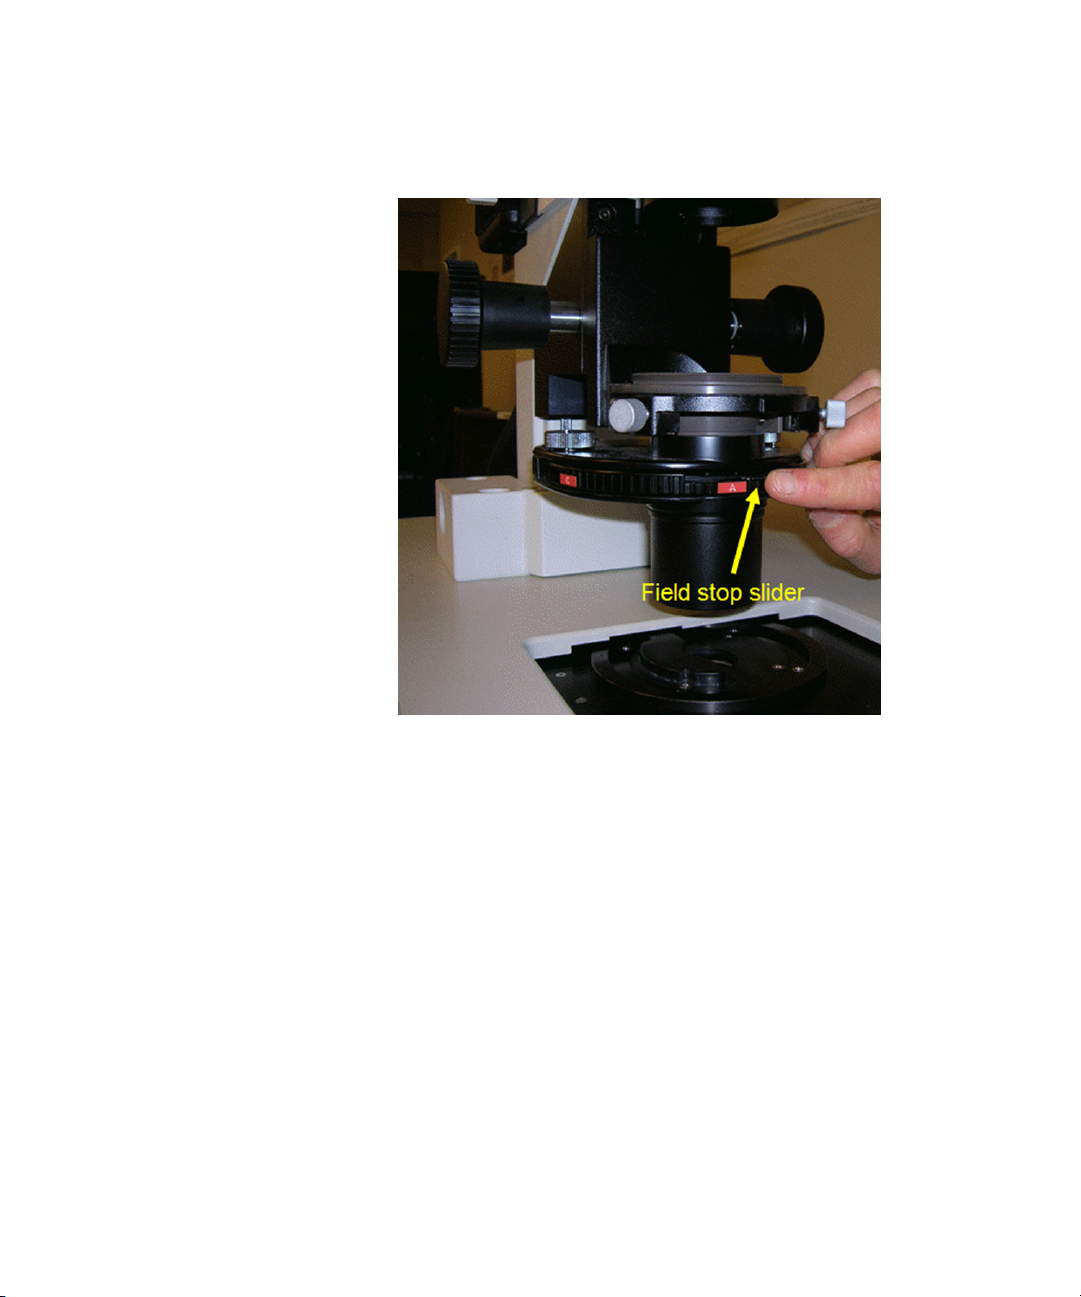
4. Move the field-stop slider, located just above the A label on the
condenser turret, all the way to the right.
Figure 4-17: Field stop slider
5. Select the diffusion filter, or place some lens paper or lint-free
wipes on top of the condenser lens to serve as a diffuser. If
necessary, weigh them down slightly to keep them from blowing
away.
6. In the MetaXpress software, select the desired phase contrast
objective.
7. Set the focus (Z position) to approximately 8000 μm.
If necessary, you can adjust this later.
8. Select the Transmitted Light illumination setting.
9. With no sample present, snap an image.
10. If necessary, adjust the illuminator level and the exposure time
to obtain a visible but not saturated image. The image of the
phase ring might be off-center. See
Figure 4-18. This is
acceptable as long as most of the image is visible.
5014166 D 69
Page 70
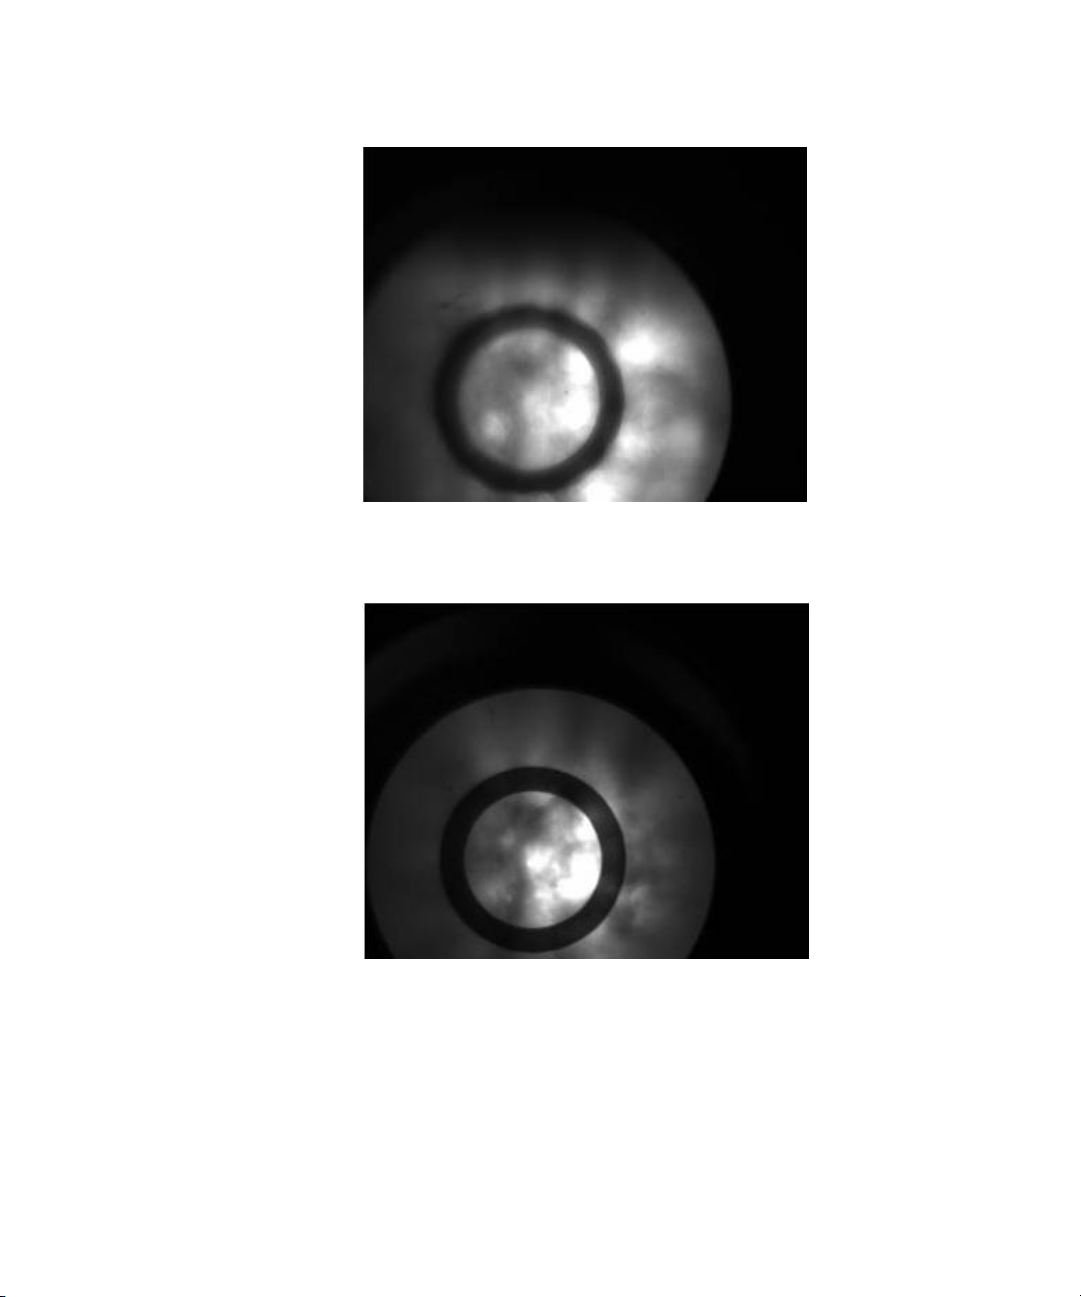
ImageXpress Micro High Content Imaging System Options User Guide
Figure 4-18: Out-of-focus image of phase contrast ring
11. Adjust the position of the Z-stage to obtain a reasonably sharp
image of the objective phase ring.
Figure 4-19: In-focus image of phase contrast ring
70 5014166 D
Page 71
Transmitted Light Option Operations
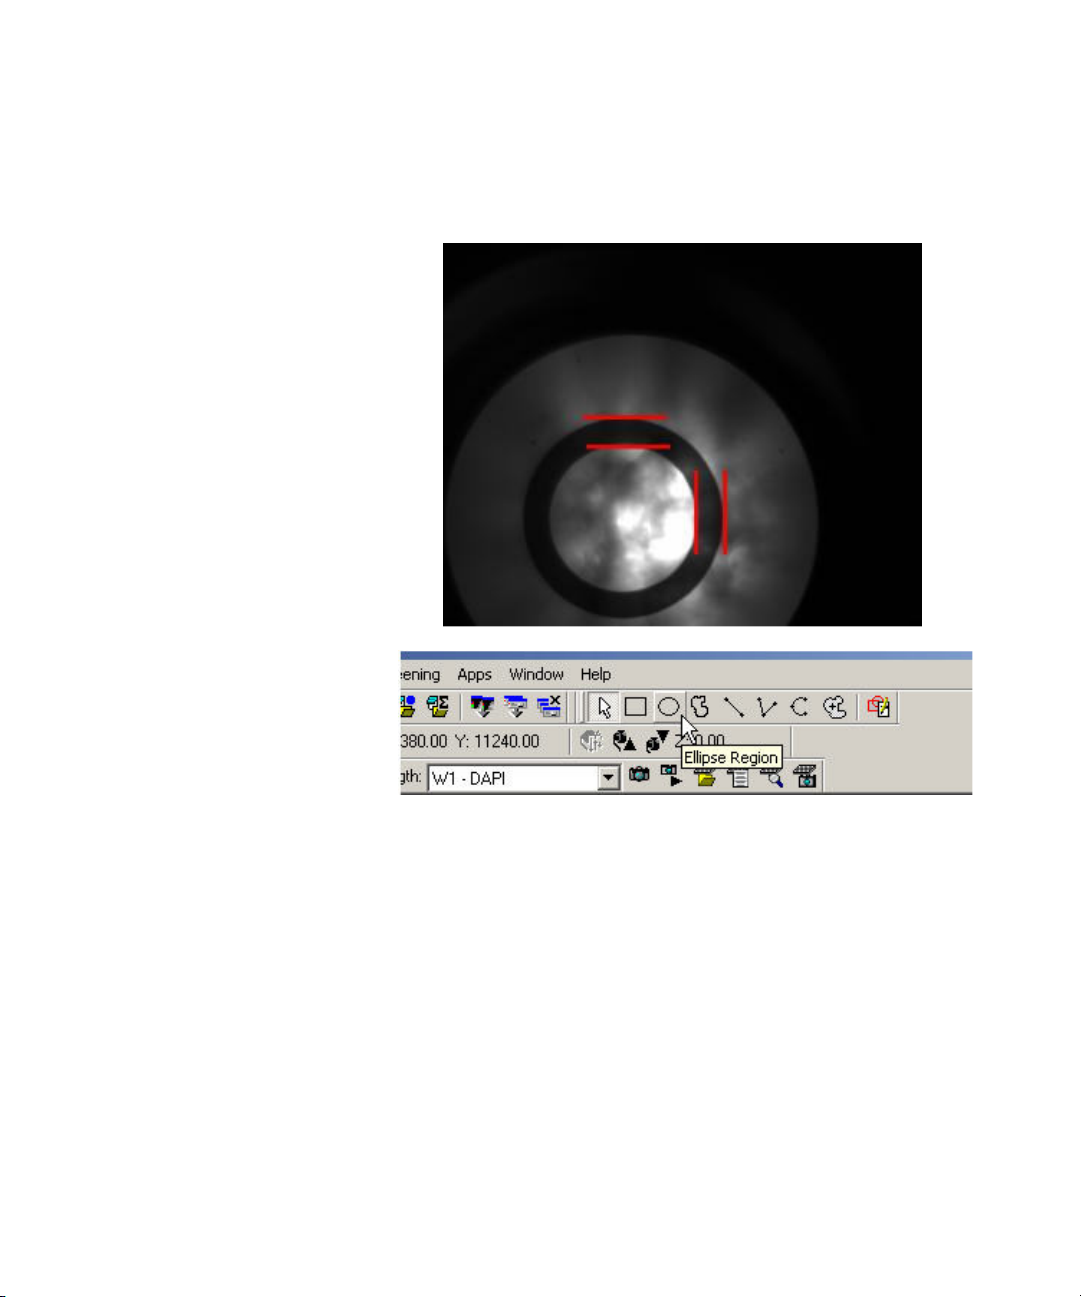
12. Use the region tools in the MetaXpress software to mark the
position of the phase ring. Make sure that you capture both
horizontal and vertical axes. Use either the ellipse region tool or
multiple line tools. See Figure 4-20.
Figure 4-20: Marking the position of the phase ring
13. In the MetaXpress software, click Regions > Save Regions to save
the marked positions.
14. Manually rotate the condenser turret to the appropriate annulus
for the objective (PhL for 4x, Ph1 for 10x and 20x, Ph2 for 40x).
The selected annulus is at the front of the condenser turret.
Phase contrast objectives typically have their specifications
indicated in green letters on the outer barrel. These
specifications also include the matching annulus designation (for
example, PhL, Ph1, Ph2).
5014166 D 71
Page 72

ImageXpress Micro High Content Imaging System Options User Guide
15. Snap an image.
The condenser annulus ring shows. See
need to adjust the exposure time.
Figure 4-21: Image of condenser annulus ring
Figure 4-21. You might
16. In the MetaXpress software, click Live Mode in either the
Acquire or Plate Acquisition and Control dialog.
17. Click Regions > Load Regions to load in the saved regions.
18. Using the condenser annulus centering knobs located on the
right top and left top surface of the condenser turret, center the
condenser annulus ring with the objective phase ring. See
Figure 4-22.
72 5014166 D
Page 73

Transmitted Light Option Operations
19. Lock down the annulus centering knobs.
Figure 4-22: Centering the condenser annulus ring with the
objective phase ring
20. Adjust the height of the Transmitted Light condenser with the
condenser height adjustment knob until a sharp image is
obtained. If required, adjust the lamp power or exposure level.
21. In the MetaXpress software, click Stop Live.
22. For the ImageXpress Micro Standard, XL, or XLS Systems, move
the flip-in lens out of the optical path.
For the ImageXpress Micro Standard and XL Systems, see To
use the flip-in lens on the ImageXpress Micro Standard and
XL Systems on page 61.
For the ImageXpress Micro XLS System, see To use the flip-in
lens on the ImageXpress Micro XLS System on page 63.
For the ImageXpress Micro XLS System, the lens used for phase
ring adjustment automatically moves out of the optical path
when an emission wavelength is selected for your acquisition.
5014166 D 73
Page 74

ImageXpress Micro High Content Imaging System Options User Guide
Transmitted Light Experiments
Do the following procedure if you are running an experiment with
Transmitted Light as one of the selected wavelengths.
Transmitted light acquisition is compatible with the confocal modes in
the ImageXpress Micro Confocal System.
To run a Transmitted Light experiment
1. If you are running a phase-contrast experiment, make sure a
phase-contrast objective is selected. Phase-contrast objectives
are not required for brightfield experiments.
2. Make sure the annulus on the Transmitted Light arm matches the
objective.
3. Load a suitable plate.
The plate must be unlidded, have a clear lid, or have a clear plate
seal on the top. Condensation on a lid or plate seal can
negatively affect image quality.
4. Turn on the Transmitted Lamp by selecting the appropriate
Illumination setting in the Configure Illumination dialog.
5. In the MetaXpress software, click Screening > Plate Acquisition
Setup.
6. In the Plate Acquisition Setup dialog, define one of the
wavelengths as Transmitted Light.
7. Configure the remaining settings as usual.
8. Run the acquisition.
Tip: To increase the life of the halogen lamp, turn off the lamp when
the transmitted light unit is not in use by selecting the Transmitted
Lamp Off setting in the Configure Illumination dialog.
74 5014166 D
Page 75

Index
A
aperture stop 68
doors with safety interlocks 32
draw overfill
draw rate
40
40
C
carbon dioxide
environmental control
recording
setting up
tubing
cleaning
tubing
components, customer-provided
Environment Control
Fluidics
components, included
Environment Control
Fluidics
Transmitted Light
compound addition event
compound plates
condenser annulus centering knobs
72
condenser lens
condenser turret
21
17
52
52
33
31
33
69
67
10
14
10
56
46
E
environmental control
hardware
environmental control option
evaporation prevention
experiments
10
43
F
field-stop thumb slider 69
flip-in lens
fluidics
experiments
hardware
manual control
setting up
fluidics option
focus
setting up
56
43
31
40
33
31, 35
69
9
49
H
D
diffusion filter 69
5014166 D 75
heat-applied seals 49
Page 76

ImageXpress Micro High Content Imaging System Options User Guide
humidity
environmental control
I
illumination settings 59
interlocks
32
J
journal
recording steps
journal event
42
48
L
live-cell sealing ring 10
10
P
phase contrast
objectives
transmitted light
phase ring alignment
plate heaters
plate region
plate sealing ring
plates
compound
unlidded
post draw transport air gap
pre draw air gap
pressure-applied seals
preventing evaporation
pump settle time
57, 69
55
61
31
33
54
33
34
40
40
50
49
40
R
M
manual control
fluidics station
menu map
movie making
6
40
29
recording
carbon dioxide
temperature
replacing
tubing
21
22
52
S
N
Nikon phase optics 56
O
options controller 11
76 5014166 D
safety interlocks 32
setting up
carbon dioxide
fluidics
focus
temperature
water reservoir
33
69
14
17
15
Page 77

shutter 31
simplified menu structure
single-channel pipetting
systems power and options
controller
environmental control
6
31
11
T
temperature
recording
setting up
temperature control
timelapse
data review
movie
tip adapters
tip rack positions
tip stripper
tip type
tips
33
track volume
transmitted light
hardware
software
transmitted light option
tubing
carbon dioxide
cleaning
replacing
22
14
10
27
29
31, 33
31
32
37
38
56
59
55
52
52
52
W
washout event 47
waste bin
waste disposal box
water reservoir
wet dispense
white light lamp
32
setting up
15
40
56
Index
54
V
volume tracking 38
5014166 D 77
Page 78

The trademarks used herein are the property of Molecular Devices, LLC or their respective owners.
Specifications subject to change without notice. Patents: www.moleculardevices.com/productpatents
FOR RESEARCH USE ONLY. NOT FOR USE IN DIAGNOSTIC PROCEDURES
©2015 Molecular Devices, LLC.
All rights reserved.
5014166 D
 Loading...