

Molecular Devices AquaMax 2000, AquaMax 4000 User Manual

AquaMax® 2000/4000
Microplate Washer
User Guide
0112-0151 K
June 2014
www.moleculardevices.com

This document is provided to customers who have purchased Molecular Devices, LLC
(“Molecular Devices”) equipment, software, reagents, and consumables to use in the
operation of such Molecular Devices equipment, software, reagents, and
consumables. This document is copyright protected and any reproduction of this
document, in whole or any part, is strictly prohibited, except as Molecular Devices
may authorize in writing.
Software that may be described in this document is furnished under a license
agreement. It is against the law to copy, modify, or distribute the software on any
medium, except as specifically allowed in the license agreement. Furthermore, the
license agreement may prohibit the software from being disassembled, reverse
engineered, or decompiled for any purpose.
Portions of this document may make reference to other manufacturers and/or their
products, which may contain parts whose names are registered as trademarks and/or
function as trademarks of their respective owners. Any such usage is intended only to
designate those manufacturers’ products as supplied by Molecular Devices for
incorporation into its equipment and does not imply any right and/or license to use
or permit others to use such manufacturers’ and/or their product names as
trademarks.
Molecular Devices makes no warranties or representations as to the fitness of this
equipment for any particular purpose and assumes no responsibility or contingent
liability, including indirect or consequential damages, for any use to which the
purchaser may put the equipment described herein, or for any adverse circumstances
arising therefrom.
For research use only. Not for use in diagnostic procedures.
The trademarks mentioned herein are the property of Molecular Devices, LLC or their respective owners. These
trademarks may not be used in any type of promotion or advertising without the prior written permission of
Molecular Devices, LLC.
Product manufactured by Molecular Devices, LLC.
1311 Orleans Drive, Sunnyvale, California, United States of America 94089.
Molecular Devices, LLC is ISO 9001 registered.
© 2014 Molecular Devices, LLC.
All rights reserved.

Contents
Contents. . . . . . . . . . . . . . . . . . . . . . . . . . . . . . . . . . . . . . . . . . . . . . 3
Foreword . . . . . . . . . . . . . . . . . . . . . . . . . . . . . . . . . . . . . . . . . . . . . 7
Who This User Guide Is For . . . . . . . . . . . . . . . . . . . . . . . . . . . . . . . . . 7
Conventions. . . . . . . . . . . . . . . . . . . . . . . . . . . . . . . . . . . . . . . . . . . . . . 7
Chapter 1: Introduction . . . . . . . . . . . . . . . . . . . . . . . . . . . . . . . . . 9
Instrument Features . . . . . . . . . . . . . . . . . . . . . . . . . . . . . . . . . . . . . . . 9
Robot and Stacker Compatibility. . . . . . . . . . . . . . . . . . . . . . . . . . . 10
Components . . . . . . . . . . . . . . . . . . . . . . . . . . . . . . . . . . . . . . . . . . . . 10
Touch Screen . . . . . . . . . . . . . . . . . . . . . . . . . . . . . . . . . . . . . . . . . . 11
Wash Heads . . . . . . . . . . . . . . . . . . . . . . . . . . . . . . . . . . . . . . . . . . . 11
Microplate Carriage . . . . . . . . . . . . . . . . . . . . . . . . . . . . . . . . . . . . . 14
Reagent and Waste Bottle Ports . . . . . . . . . . . . . . . . . . . . . . . . . . . 16
Back Panel . . . . . . . . . . . . . . . . . . . . . . . . . . . . . . . . . . . . . . . . . . . . . 17
Chapter 2: Installation . . . . . . . . . . . . . . . . . . . . . . . . . . . . . . . . . 19
Unpacking . . . . . . . . . . . . . . . . . . . . . . . . . . . . . . . . . . . . . . . . . . . . . . 20
Setting Up the Instrument . . . . . . . . . . . . . . . . . . . . . . . . . . . . . . . . . 21
Connecting to a StakMax
®
Plate Stacker . . . . . . . . . . . . . . . . . . . . . . 27
Chapter 3: Getting Started . . . . . . . . . . . . . . . . . . . . . . . . . . . . . 31
Starting the Instrument . . . . . . . . . . . . . . . . . . . . . . . . . . . . . . . . . . . 31
Main Tab . . . . . . . . . . . . . . . . . . . . . . . . . . . . . . . . . . . . . . . . . . . . . . . 32
Running Programs. . . . . . . . . . . . . . . . . . . . . . . . . . . . . . . . . . . . . . . . 34
Stopping Programs . . . . . . . . . . . . . . . . . . . . . . . . . . . . . . . . . . . . . . . 35
Shutting Down the Instrument . . . . . . . . . . . . . . . . . . . . . . . . . . . . . 36
Chapter 4: Operation: The Touch Screen Interface . . . . . . . . . . 37
Administrative Mode . . . . . . . . . . . . . . . . . . . . . . . . . . . . . . . . . . . . . 37
Program Tab . . . . . . . . . . . . . . . . . . . . . . . . . . . . . . . . . . . . . . . . . . . . 38
Program Tab: Administrative Mode . . . . . . . . . . . . . . . . . . . . . . . . 39
Program Settings Dialog. . . . . . . . . . . . . . . . . . . . . . . . . . . . . . . . . . 40
0112-0151 K 3

AquaMax® 2000/4000 Microplate Washer User Guide
Program Options . . . . . . . . . . . . . . . . . . . . . . . . . . . . . . . . . . . . . . . .41
Program Messages . . . . . . . . . . . . . . . . . . . . . . . . . . . . . . . . . . . . . . 42
Program Stacker Settings . . . . . . . . . . . . . . . . . . . . . . . . . . . . . . . . . 43
Adjust Dispense. . . . . . . . . . . . . . . . . . . . . . . . . . . . . . . . . . . . . . . . . 44
Program Tab: Program Editing . . . . . . . . . . . . . . . . . . . . . . . . . . . . . 45
New Step Selection . . . . . . . . . . . . . . . . . . . . . . . . . . . . . . . . . . . . . . 46
Dispense Settings . . . . . . . . . . . . . . . . . . . . . . . . . . . . . . . . . . . . . . . 47
Aspirate Settings . . . . . . . . . . . . . . . . . . . . . . . . . . . . . . . . . . . . . . . . 49
Wash Settings . . . . . . . . . . . . . . . . . . . . . . . . . . . . . . . . . . . . . . . . . . 50
FastWash Settings . . . . . . . . . . . . . . . . . . . . . . . . . . . . . . . . . . . . . . . 53
Shake Settings . . . . . . . . . . . . . . . . . . . . . . . . . . . . . . . . . . . . . . . . . . 54
Soak Settings . . . . . . . . . . . . . . . . . . . . . . . . . . . . . . . . . . . . . . . . . . . 55
Repeat Settings . . . . . . . . . . . . . . . . . . . . . . . . . . . . . . . . . . . . . . . . . 56
Purge Settings . . . . . . . . . . . . . . . . . . . . . . . . . . . . . . . . . . . . . . . . . . 57
Rinse Settings . . . . . . . . . . . . . . . . . . . . . . . . . . . . . . . . . . . . . . . . . . 58
Standby Settings . . . . . . . . . . . . . . . . . . . . . . . . . . . . . . . . . . . . . . . . 59
Prime Settings . . . . . . . . . . . . . . . . . . . . . . . . . . . . . . . . . . . . . . . . . . 60
Managing the Program Library . . . . . . . . . . . . . . . . . . . . . . . . . . . . . . 61
Plates Tab . . . . . . . . . . . . . . . . . . . . . . . . . . . . . . . . . . . . . . . . . . . . . . . 70
Plates Tab: Administrative Mode. . . . . . . . . . . . . . . . . . . . . . . . . . . 71
Plate Definition Dialog . . . . . . . . . . . . . . . . . . . . . . . . . . . . . . . . . . .72
Managing the Plate Library . . . . . . . . . . . . . . . . . . . . . . . . . . . . . . . .73
Options Tab . . . . . . . . . . . . . . . . . . . . . . . . . . . . . . . . . . . . . . . . . . . . . 74
Advanced Options Dialog . . . . . . . . . . . . . . . . . . . . . . . . . . . . . . . . . 76
Options Tab: Administrative Mode . . . . . . . . . . . . . . . . . . . . . . . . . 76
Shutdown Options Dialog. . . . . . . . . . . . . . . . . . . . . . . . . . . . . . . . . 78
Managing the Software . . . . . . . . . . . . . . . . . . . . . . . . . . . . . . . . . . . . 79
Automatic Shutdown . . . . . . . . . . . . . . . . . . . . . . . . . . . . . . . . . . . .79
Restricting Functions. . . . . . . . . . . . . . . . . . . . . . . . . . . . . . . . . . . . . 80
Screen Calibration . . . . . . . . . . . . . . . . . . . . . . . . . . . . . . . . . . . . . .81
Chapter 5: Maintenance . . . . . . . . . . . . . . . . . . . . . . . . . . . . . . . 83
Technical Support . . . . . . . . . . . . . . . . . . . . . . . . . . . . . . . . . . . . . . . . 83
Routine Maintenance . . . . . . . . . . . . . . . . . . . . . . . . . . . . . . . . . . . . .84
Purging the Instrument. . . . . . . . . . . . . . . . . . . . . . . . . . . . . . . . . . . 85
Decontaminating the Instrument . . . . . . . . . . . . . . . . . . . . . . . . . . 86
Cleaning the Exterior. . . . . . . . . . . . . . . . . . . . . . . . . . . . . . . . . . . . . 87
Removing and Storing Wash Heads . . . . . . . . . . . . . . . . . . . . . . . . 88
Cleaning Wash Heads . . . . . . . . . . . . . . . . . . . . . . . . . . . . . . . . . . . . 91
4 0112-0151 K

Contents
Moving an AquaMax® Microplate Washer . . . . . . . . . . . . . . . . . . . . 92
Preparing for Storage . . . . . . . . . . . . . . . . . . . . . . . . . . . . . . . . . . . . . 93
Chapter 6: Troubleshooting. . . . . . . . . . . . . . . . . . . . . . . . . . . . . 95
Troubleshooting Charts . . . . . . . . . . . . . . . . . . . . . . . . . . . . . . . . . . . 95
General Instrument Issues. . . . . . . . . . . . . . . . . . . . . . . . . . . . . . . . 95
System Fluidics Issues . . . . . . . . . . . . . . . . . . . . . . . . . . . . . . . . . . . 96
System Pressure Issues . . . . . . . . . . . . . . . . . . . . . . . . . . . . . . . . . . 97
External Communication Issues . . . . . . . . . . . . . . . . . . . . . . . . . . . 98
Dispense Issues. . . . . . . . . . . . . . . . . . . . . . . . . . . . . . . . . . . . . . . . . 99
Aspiration Issues. . . . . . . . . . . . . . . . . . . . . . . . . . . . . . . . . . . . . . . 100
Wash Issues. . . . . . . . . . . . . . . . . . . . . . . . . . . . . . . . . . . . . . . . . . . 102
Cell Wash Issues . . . . . . . . . . . . . . . . . . . . . . . . . . . . . . . . . . . . . . . 103
Instrument Error Messages . . . . . . . . . . . . . . . . . . . . . . . . . . . . . . 103
Chapter 7: Specifications . . . . . . . . . . . . . . . . . . . . . . . . . . . . . . 107
AquaMax® Microplate Washer. . . . . . . . . . . . . . . . . . . . . . . . . . . . . 107
Appendix A: Microplate Library . . . . . . . . . . . . . . . . . . . . . . . . 111
Appendix B: Cleaning Solutions . . . . . . . . . . . . . . . . . . . . . . . . 113
Appendix C: AquaMax Sterilant . . . . . . . . . . . . . . . . . . . . . . . . 115
Principle of Use . . . . . . . . . . . . . . . . . . . . . . . . . . . . . . . . . . . . . . . . . 115
Contents. . . . . . . . . . . . . . . . . . . . . . . . . . . . . . . . . . . . . . . . . . . . . . . 116
Materials Required but Not Provided. . . . . . . . . . . . . . . . . . . . . . 116
Storage . . . . . . . . . . . . . . . . . . . . . . . . . . . . . . . . . . . . . . . . . . . . . . 116
Preparing the Reagent . . . . . . . . . . . . . . . . . . . . . . . . . . . . . . . . . . . 117
Preparing the Complete Sterilant . . . . . . . . . . . . . . . . . . . . . . . . . 117
Using Reagent . . . . . . . . . . . . . . . . . . . . . . . . . . . . . . . . . . . . . . . . . . 117
Warnings, Precautions, and Limitations . . . . . . . . . . . . . . . . . . . . . 118
Sterilant Solution A Concentrate (4X). . . . . . . . . . . . . . . . . . . . . . 118
Sterilant Solution B. . . . . . . . . . . . . . . . . . . . . . . . . . . . . . . . . . . . . 118
Appendix D: Tips and Applications . . . . . . . . . . . . . . . . . . . . . . 119
Using the Washer for ELISA Based Applications . . . . . . . . . . . . . 119
Using the Washer for Cell Based Applications . . . . . . . . . . . . . . . 119
0112-0151 K 5

AquaMax® 2000/4000 Microplate Washer User Guide
Appendix E: Robot Command Interface . . . . . . . . . . . . . . . . . . 121
Instrument Configurations . . . . . . . . . . . . . . . . . . . . . . . . . . . . . . . .121
Hardware Interfaces . . . . . . . . . . . . . . . . . . . . . . . . . . . . . . . . . . . . .121
Host Computer Interface . . . . . . . . . . . . . . . . . . . . . . . . . . . . . . . . 121
Command Format . . . . . . . . . . . . . . . . . . . . . . . . . . . . . . . . . . . . . . .122
Document Conventions . . . . . . . . . . . . . . . . . . . . . . . . . . . . . . . . .122
No Error (OK) Responses . . . . . . . . . . . . . . . . . . . . . . . . . . . . . . . .123
Error Responses. . . . . . . . . . . . . . . . . . . . . . . . . . . . . . . . . . . . . . . . 123
General Commands . . . . . . . . . . . . . . . . . . . . . . . . . . . . . . . . . . . . . .124
Initialization . . . . . . . . . . . . . . . . . . . . . . . . . . . . . . . . . . . . . . . . . . .124
Device Information . . . . . . . . . . . . . . . . . . . . . . . . . . . . . . . . . . . . . 125
Motion Control . . . . . . . . . . . . . . . . . . . . . . . . . . . . . . . . . . . . . . . . 128
Program Control . . . . . . . . . . . . . . . . . . . . . . . . . . . . . . . . . . . . . . . 129
User Adjustment . . . . . . . . . . . . . . . . . . . . . . . . . . . . . . . . . . . . . . . 131
Program Management Commands . . . . . . . . . . . . . . . . . . . . . . . . . 132
Factory-defined Protocols . . . . . . . . . . . . . . . . . . . . . . . . . . . . . . .132
Protocol (Program) Control . . . . . . . . . . . . . . . . . . . . . . . . . . . . . . 133
Edit/view Opened Protocol Steps . . . . . . . . . . . . . . . . . . . . . . . . . 136
Function-specific Step Arguments and Return Data . . . . . . . . . . . . 138
Plate Library Access . . . . . . . . . . . . . . . . . . . . . . . . . . . . . . . . . . . . . .147
StakMax
Stacker Control . . . . . . . . . . . . . . . . . . . . . . . . . . . . . . . . . . . . . . . . 151
Errors. . . . . . . . . . . . . . . . . . . . . . . . . . . . . . . . . . . . . . . . . . . . . . . . . . 153
Error Reporting . . . . . . . . . . . . . . . . . . . . . . . . . . . . . . . . . . . . . . . . 153
Error Recovery. . . . . . . . . . . . . . . . . . . . . . . . . . . . . . . . . . . . . . . . . 154
Instrument Response . . . . . . . . . . . . . . . . . . . . . . . . . . . . . . . . . . . 154
®
Robot Control . . . . . . . . . . . . . . . . . . . . . . . . . . . . . . . . . .151
Index . . . . . . . . . . . . . . . . . . . . . . . . . . . . . . . . . . . . . . . . . . . . . . 155
6 0112-0151 K

Who This User Guide Is For
This guide is intended for users of the AquaMax® 2000 and AquaMax
4000 Microplate Washers. The user guide contains setup, operation, and
general maintenance information.
Conventions
Within the scope of this user guide, the following typographical
conventions are used:
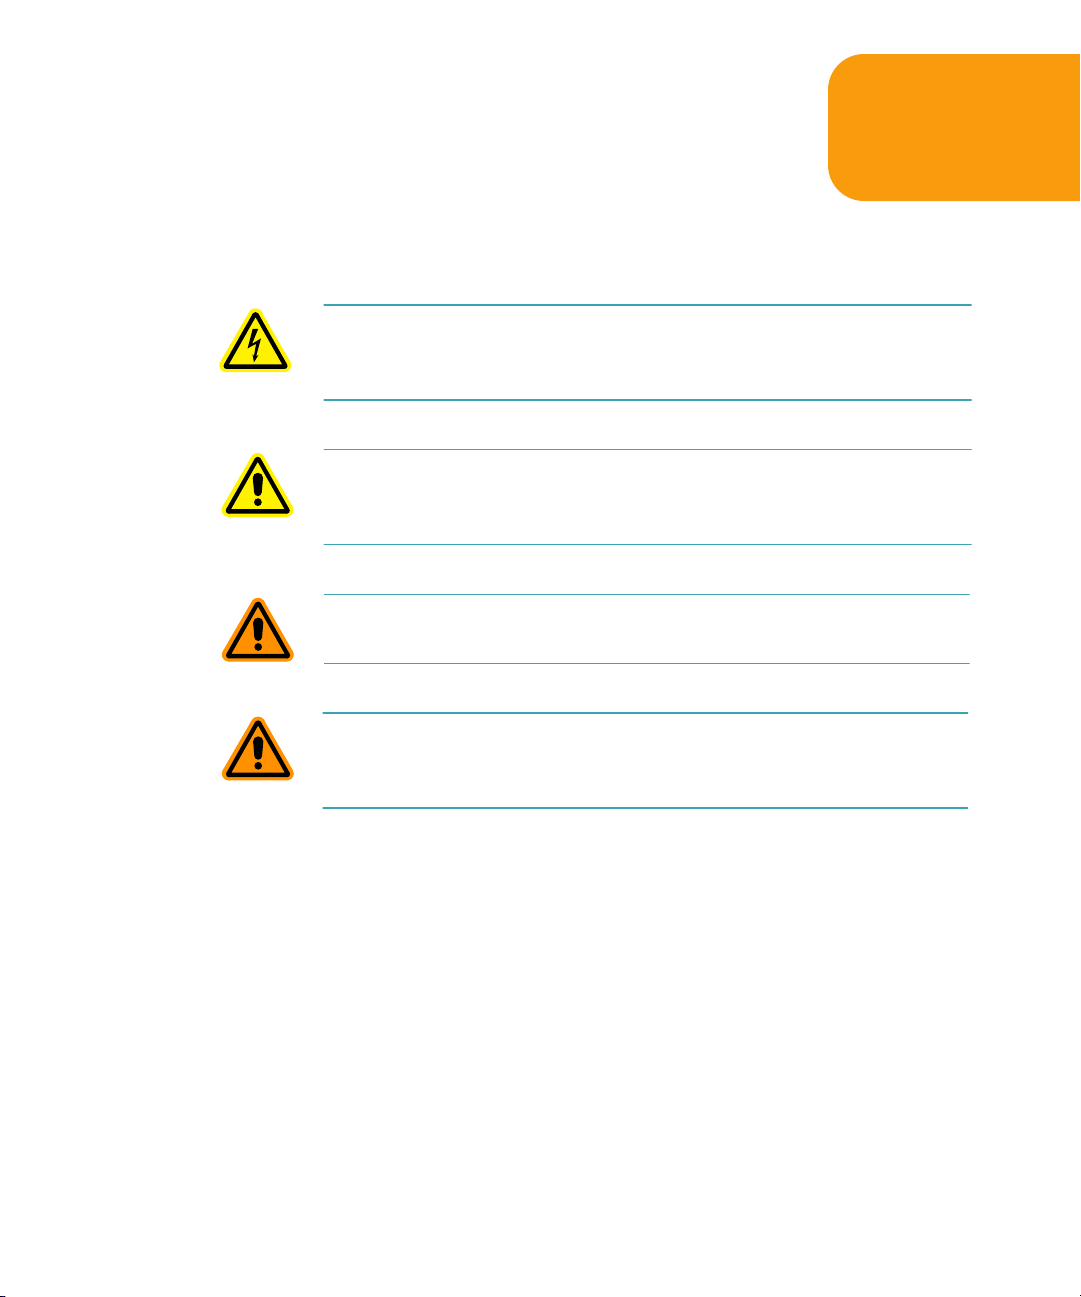
WARNING! A warning indicates an operation that can cause personal
injury if precautions are not followed.
CAUTION! Indicates an operation that might cause damage to the
instrument, device, or data, if the precautions are not followed.
Foreword
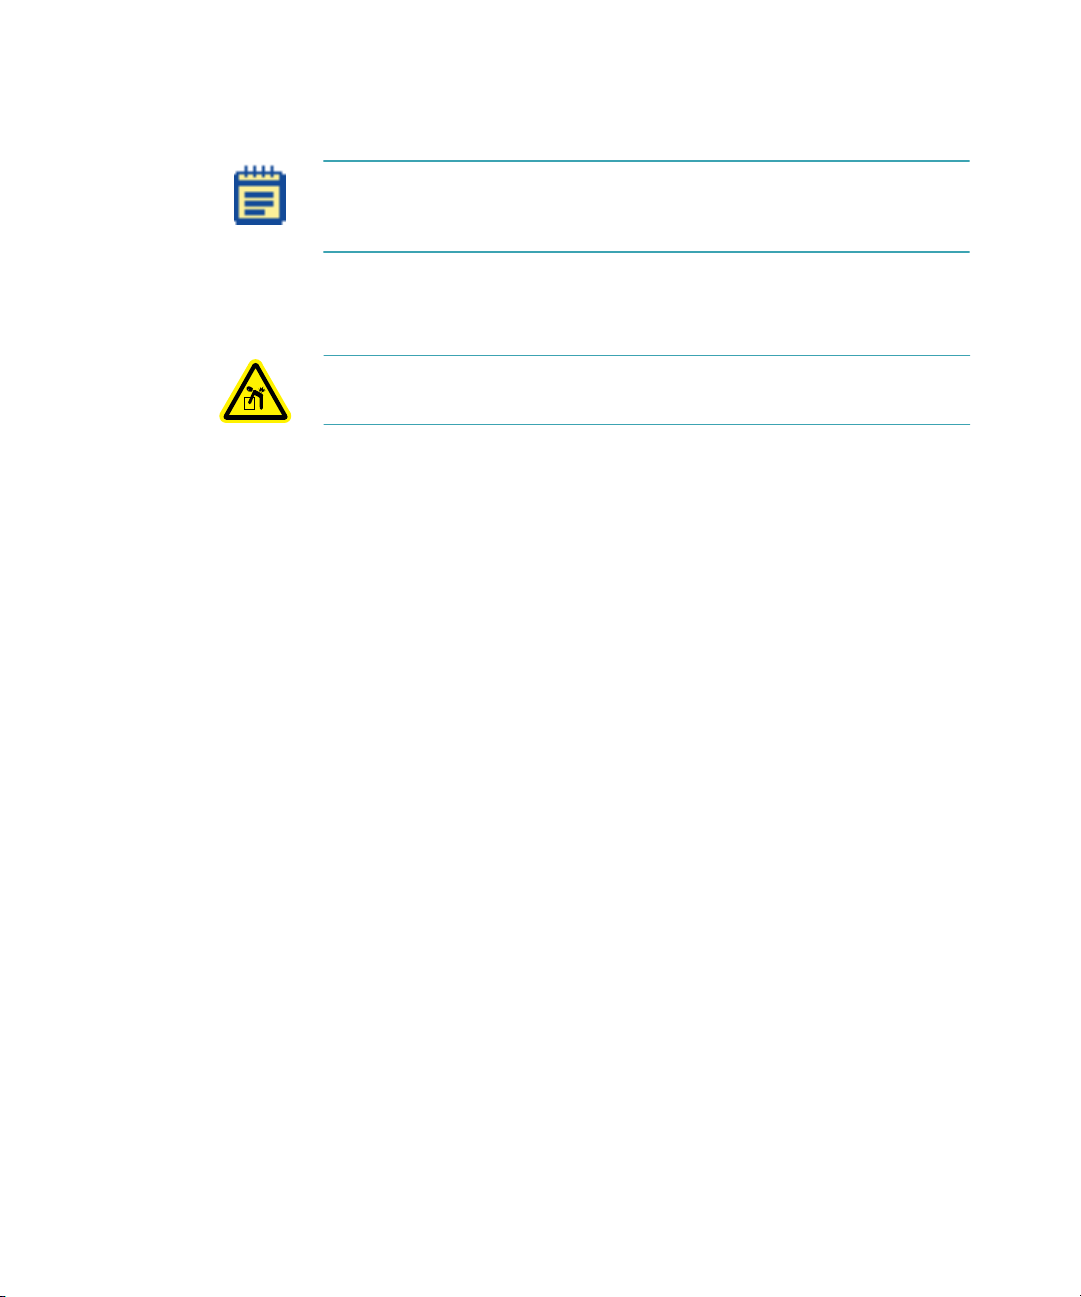
Note: Emphasizes significant information in a procedure or description.
Tip: Provides useful information or shortcuts, but is not essential to the
completion of a procedure.
0112-0151 K 7

AquaMax® 2000/4000 Microplate Washer User Guide
8 0112-0151 K

Introduction
The AquaMax® Microplate Washers from Molecular Devices can be easily
configured to meet your current application requirements. The modular
design provides affordable upgrade options when your lab requirements
change.
Instrument Features
AquaMax 2000 and AquaMax 4000 Microplate Washers can be
configured to process 96-well and 384-well microplates used in both
biochemical and cell-based assays.
• Wash heads are available in 96-well and 384-well configurations
• All wash heads are interchangeable. The software automatically
• The AquaMax Microplate Washer primes, cleans, and rinses the
• The AquaMax Microplate Washer processes all plate wells
• Whole-well dispensing and aspiration in 384-well plates result in
• The AquaMax Microplate Washer supports most microplate
• The AquaMax Microplate Washer is equipped with two
• All washer operations are controlled through an on-board
• The program library can store up to 3 factory-defined and 100
1
for both plate wash and cell wash.
detects which wash head is installed.
wash heads with the touch of a single button.
simultaneously during dispense, aspirate, and wash operations.
2 to 4 times faster plate processing than other commercially
available plate washers.
formats through its user-definable plate library. Up to 32 plate
types can be stored in the plate library.
(AquaMax 2000 washer) or four (AquaMax 4000 washer) reagent
ports to connect 2 or 4 different dispense bottles. Waste can be
drained into any waste bottle. Non-toxic waste can be drained
directly into a sink. The AquaMax Microplate Washer supports
4 L or 10 L bottles only.
touch-screen user interface.
user-defined programs. Each program can contain up to 50 steps.
0112-0151 K 9
AquaMax® 2000/4000 Microplate Washer User Guide
Robot and Stacker Compatibility
AquaMax Microplate Washers are compatible with Molecular Devices
StakMax® Microplate Handling System. Third party robots can be set up
to control the AquaMax Microplate Washers through a USB command
interface. The USB command interface is detailed in Robot Command
Interface on page 121.
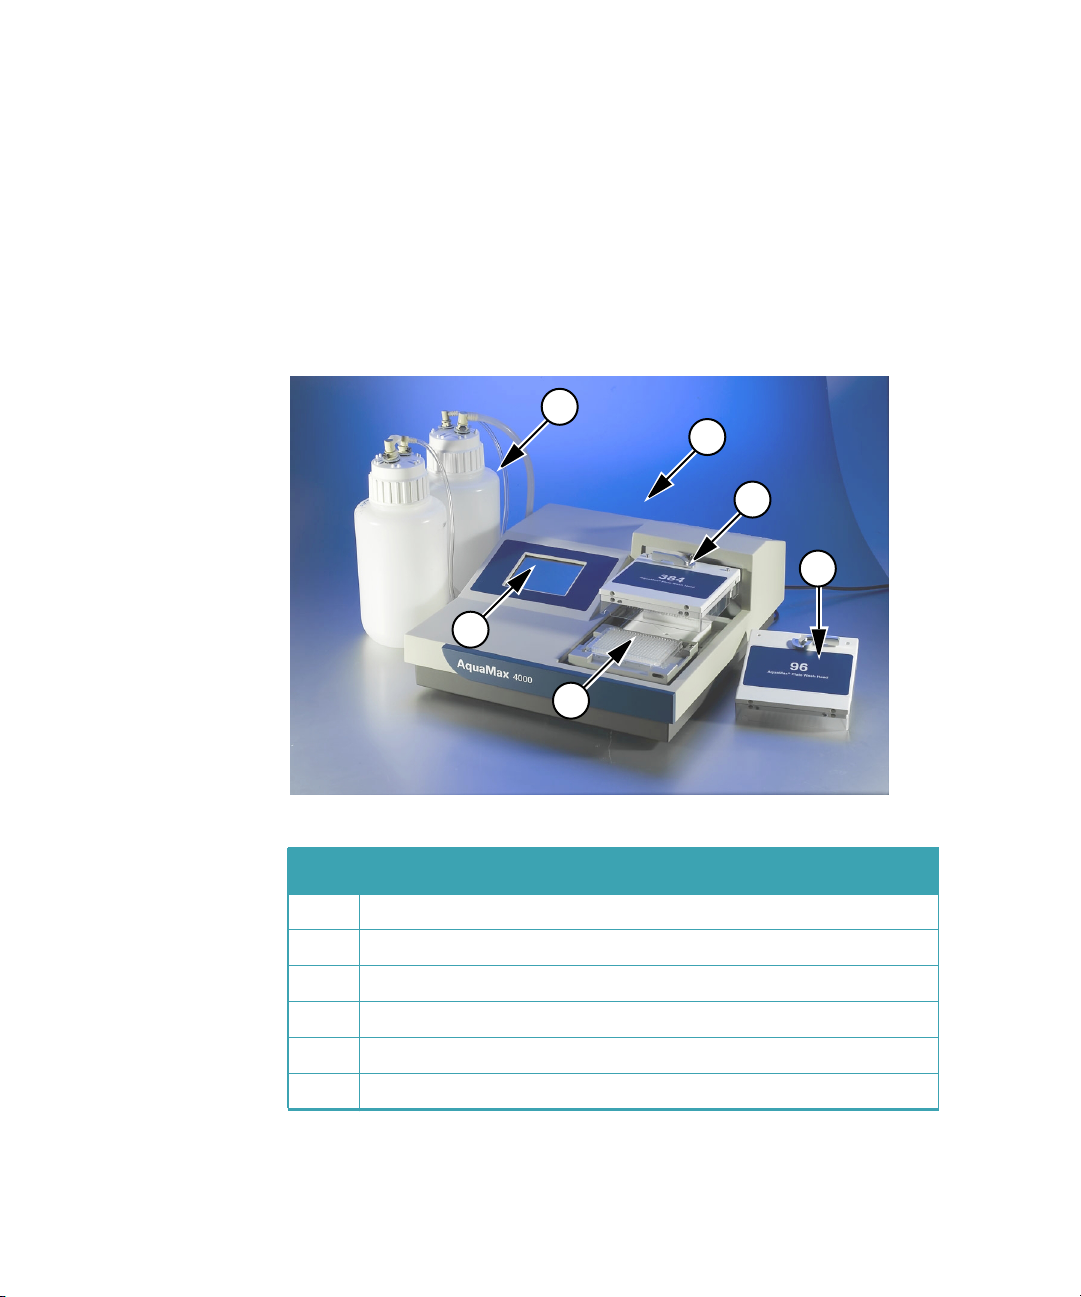
Components
6
1
2
3
4
5
Table 1-1: AquaMax® 4000 Components
Item Description
1 4L reagent reservoirs
2 Back panel with USB and StakMax connectors
3 384-well wash head installed
4 96-well wash head
5 Microplate carriage with microplate
6 Touch screen
10 0112-0151 K

Introduction
Touch Screen
Figure 1-1: AquaMax® touch screen
Instrument operation is controlled through a touch-screen user interface.
The touch screen displays instrument status, provides access to
instrument settings and programs, and controls the optional StakMax
Plate Stacker.
Wash Heads
AquaMax wash heads have either 96 or 384 paired probes. The longer
probe of each pair is used for aspiration. The short probe is used for
dispensing. The plate wash heads have straight dispense probes and are
intended for thorough cleaning and aspiration. The cell wash heads have
angled dispense probes to minimize cell loss during washing.
The wash heads are interchangeable and can be removed and
re-attached using a simple lever mechanism.
0112-0151 K 11
AquaMax® 2000/4000 Microplate Washer User Guide
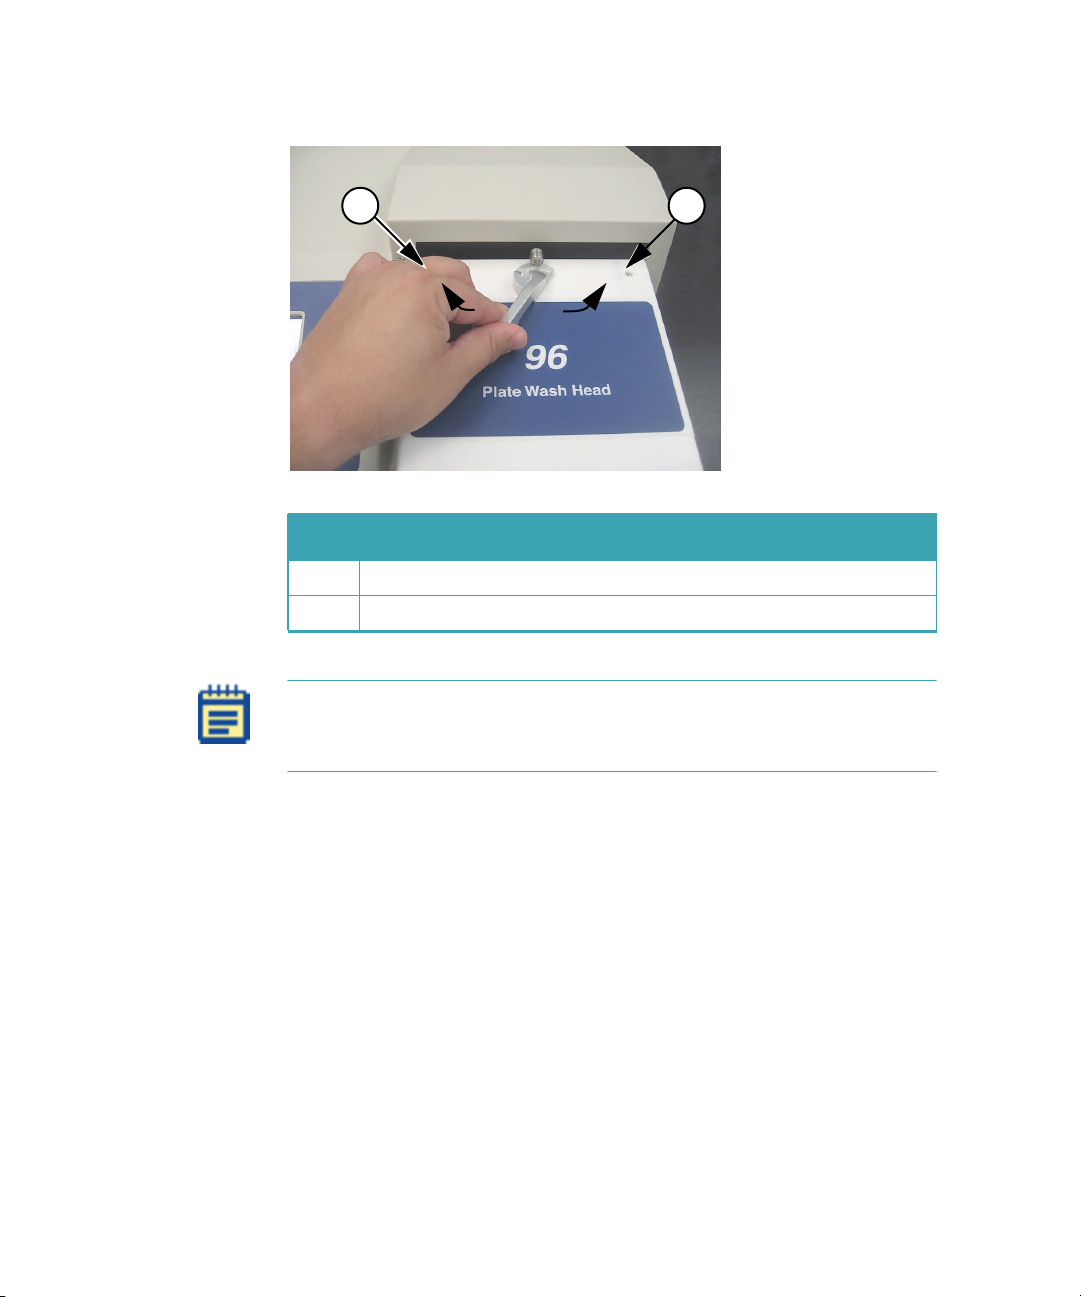
1 2
Table 1-2: 96-plate wash head lock
Item Description
1 Close
2 Open
Note: A mismatched wash head and microplate will cause a motor
pinch error when the wash head tries to descend toward the wells. A
mismatch should not damage the wash head.
12 0112-0151 K
Introduction
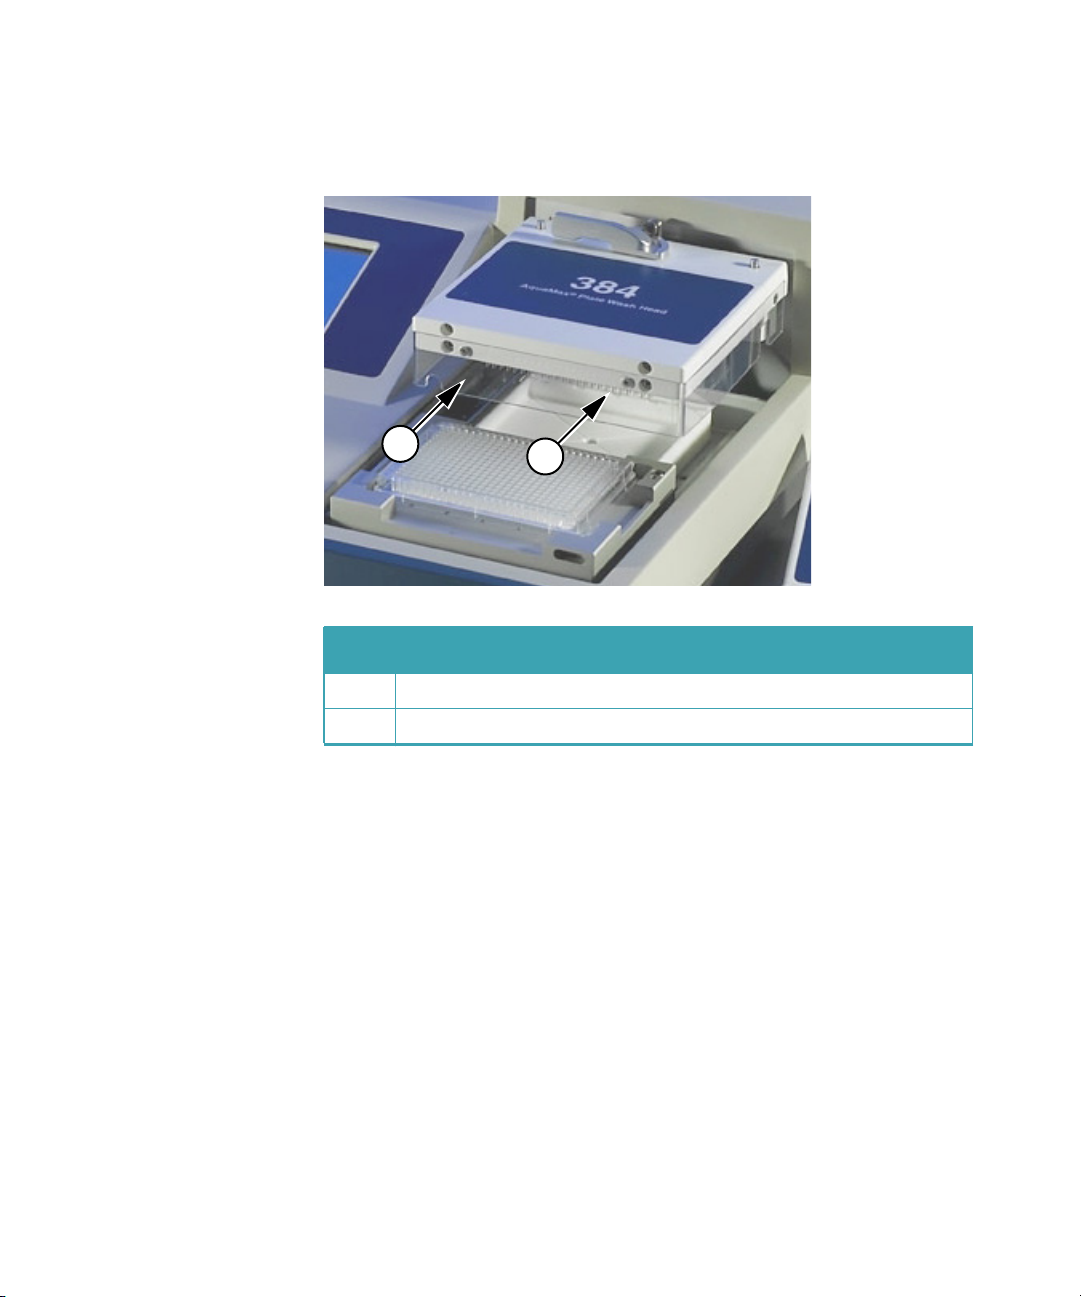
Each wash head has a clear plastic guard to protect the probes from
damage, and to prevent spills, sprays, and injury to users.
1
2
Table 1-3: 384-plate wash head and guard
Item Description
1 Plastic guard
2 Aspiration and dispensing probes on underside of wash head
0112-0151 K 13
AquaMax® 2000/4000 Microplate Washer User Guide
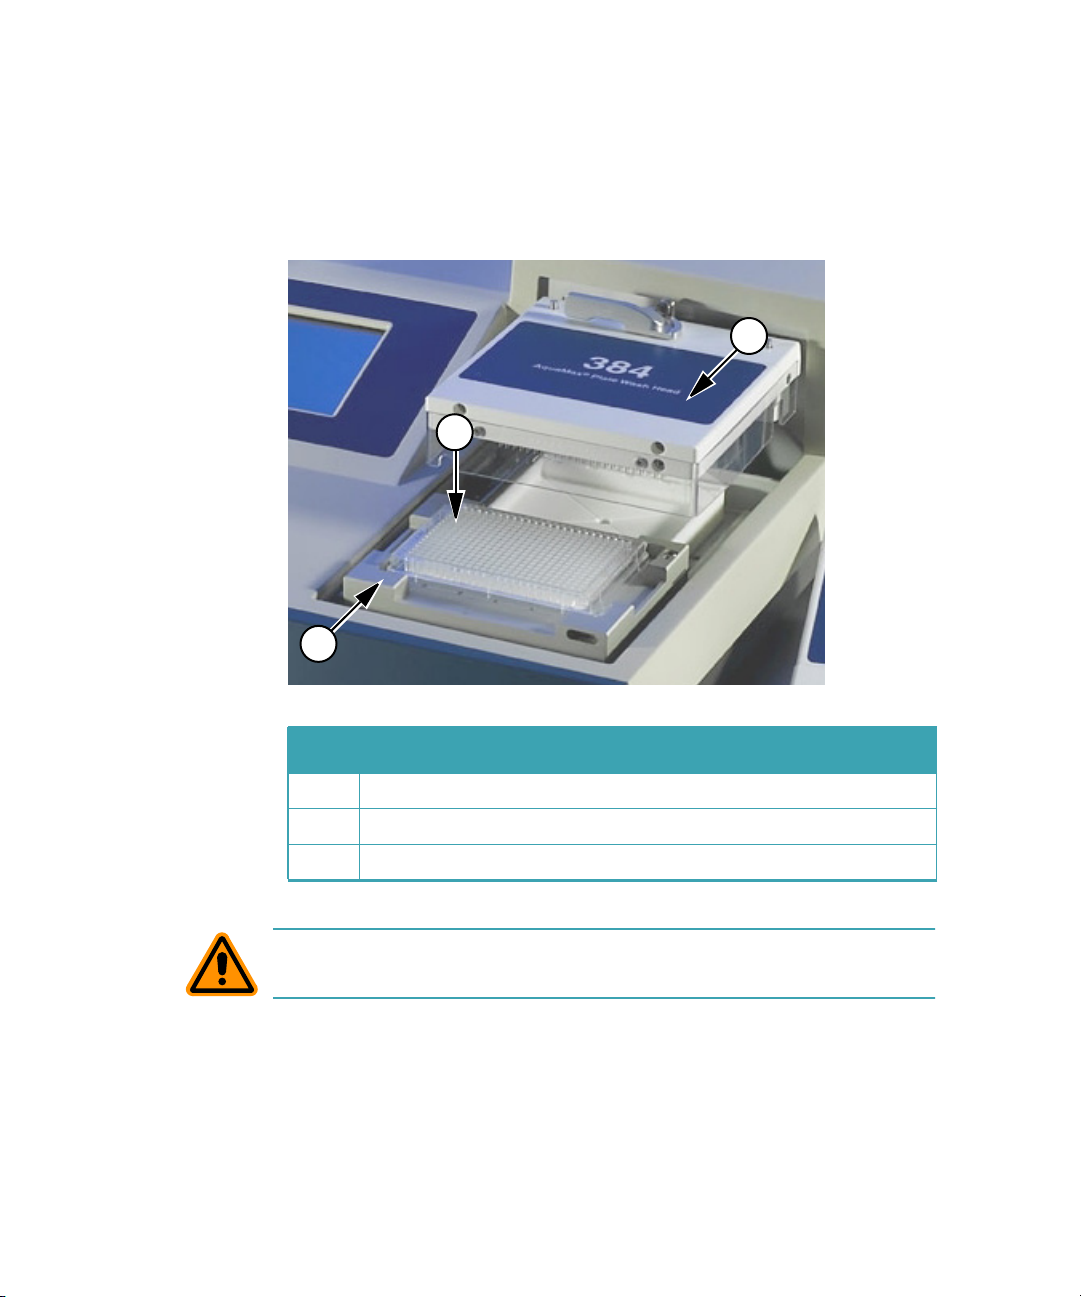
Microplate Carriage
The microplate carriage is located on the right side of the washer. The
plate carriage slides in and out of the washing chamber for loading and
unloading.
2
1
3
Table 1-4: Plate carriage
Item Description
1 Plate carriage, in eject position
2 384-well microplate
3 384 wash head
CAUTION! Do not obstruct the movement of the plate carriage during
operation. Obstruction can damage the instrument.
14 0112-0151 K

Introduction
Supported Microplates
AquaMax Microplate Washers accommodate rigid SBS-standard
polystyrene and polypropylene microplates with dimensions 128.2 mm
(L) × 86.0 mm (W), and heights ranging from 13.5 mm to 15.5 mm,
including:
• 96-well and 384-well standard formats (U-bottom, V-bottom, or
Flat)
• 96-well half area
• 96-well and 384-well small volume
Note: Some microplates with conical or tapered wells and some small
volume microplates are not compatible with bottom wash and aspirate
operations.
Note: 96-well “strip plates” fall outside SBS guidelines, and
compatibility of these plates with the AquaMax Microplate Washer
varies across brands. Plates with strips that are held firmly in a more
rigid frame and have smaller tabs are generally more washercompatible. Plates with strips that have large tabs and are held loosely
in a flexible frame, such as Nunc strip plates with C8 configuration,
should be avoided. If you are unsure whether a plate is compatible,
consult Technical Support or your sales representative before
proceeding.
The AquaMax Microplate Washer also supports magnetic bead washing
using the Dexter Magnetic Technologies LifeSep magnetic beadseparator adapter plates. For more details, refer to the Dexter Magnetic
Technologies website:
http://www.dextermag.com/lifesep.aspx.
The plate library includes eight commonly used microplates (4 each of
96-well and 384-well):
• Corning/Costar: 96 and 384
• BD/Falcon: 96 and 384
• Greiner: 96 and 384
• Nunc/Nalgene: 96 and 384
Detailed manufacturer numbers and dimensions for these default plate
types are listed in
0112-0151 K 15
Microplate Library on page 111.

AquaMax® 2000/4000 Microplate Washer User Guide
The plate library can store up to 32 plate types. For information about
adding a plate type, see Managing the Plate Library on page 73.
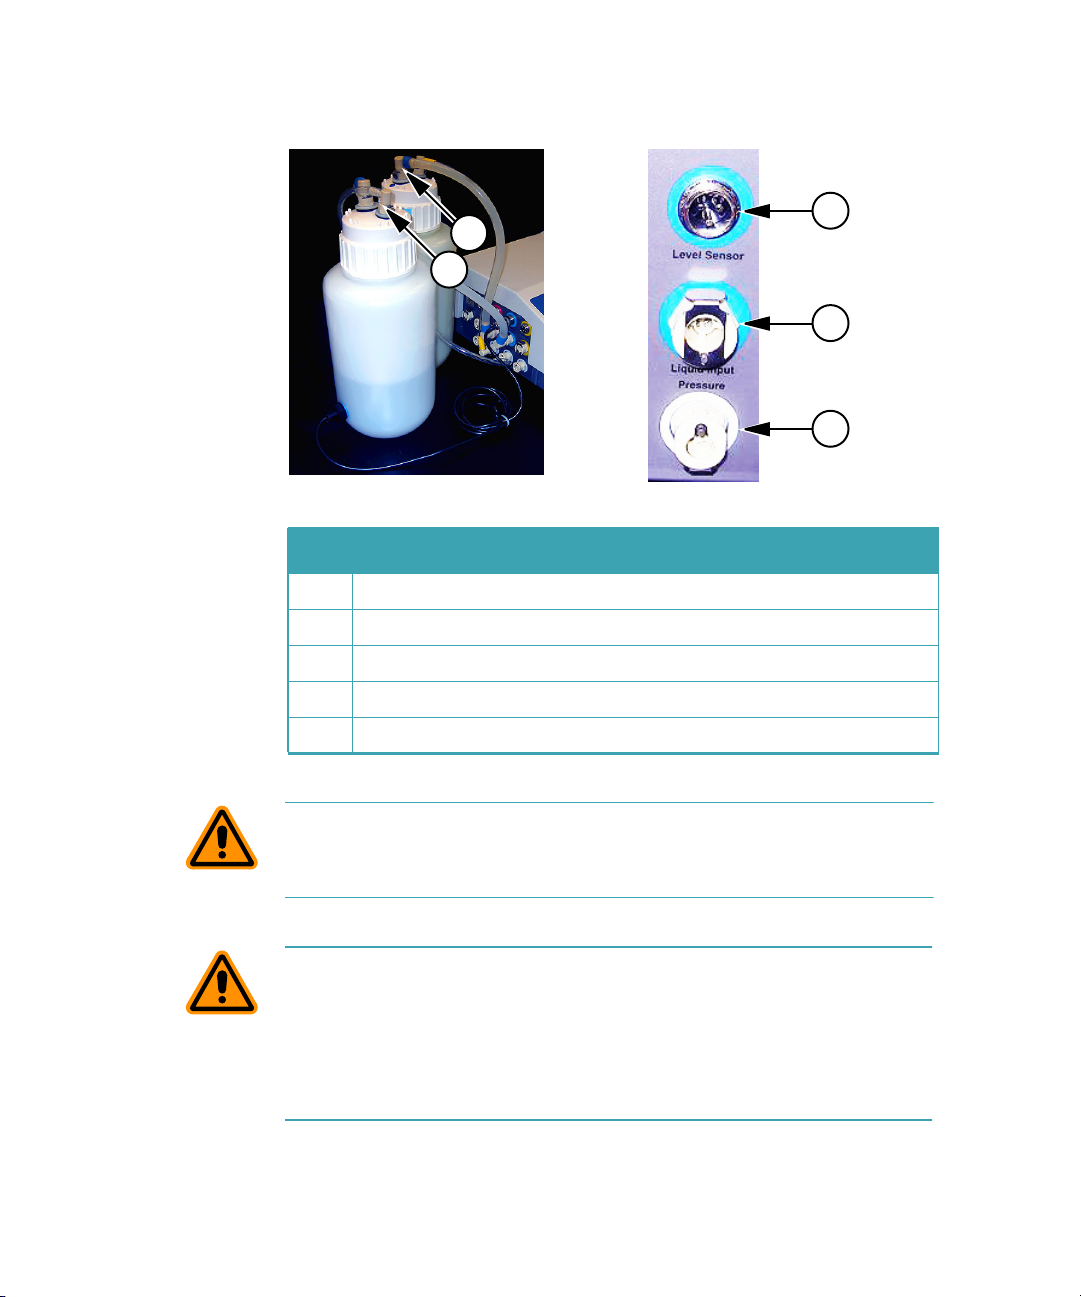
Reagent and Waste Bottle Ports
The source channels and waste connections are located on the left side
of the instrument. The AquaMax 2000 Microplate Washer has two
source channels, while the AquaMax 4000 Microplate Washer has four.
Each source channel can be connected to a reagent bottle, and is
composed of a fluid input, a pressure output, and an optional level
sensor connector. Waste can be drained into any waste bottle. A waste
sensor can be installed to detect a full waste bottle. Non-toxic waste can
be drained directly into a sink.
The AquaMax Microplate Washer supports 4 L or 10 L bottles only.
1
2
3
®
Table 1-5: Reagent ports for AquaMax
Item Description
1 Waste full sensor input
2 Waste fluid output
3 Source channels (green, red, blue, and yellow)*
4 Source bottle pressure outputs
5 Source bottle fluid inputs
6 Source bottle empty sensor inputs
4000 Microplate Washer.
6
5
4
16 0112-0151 K
Introduction
*The AquaMax 2000 Microplate Washer has only green and red inlets.
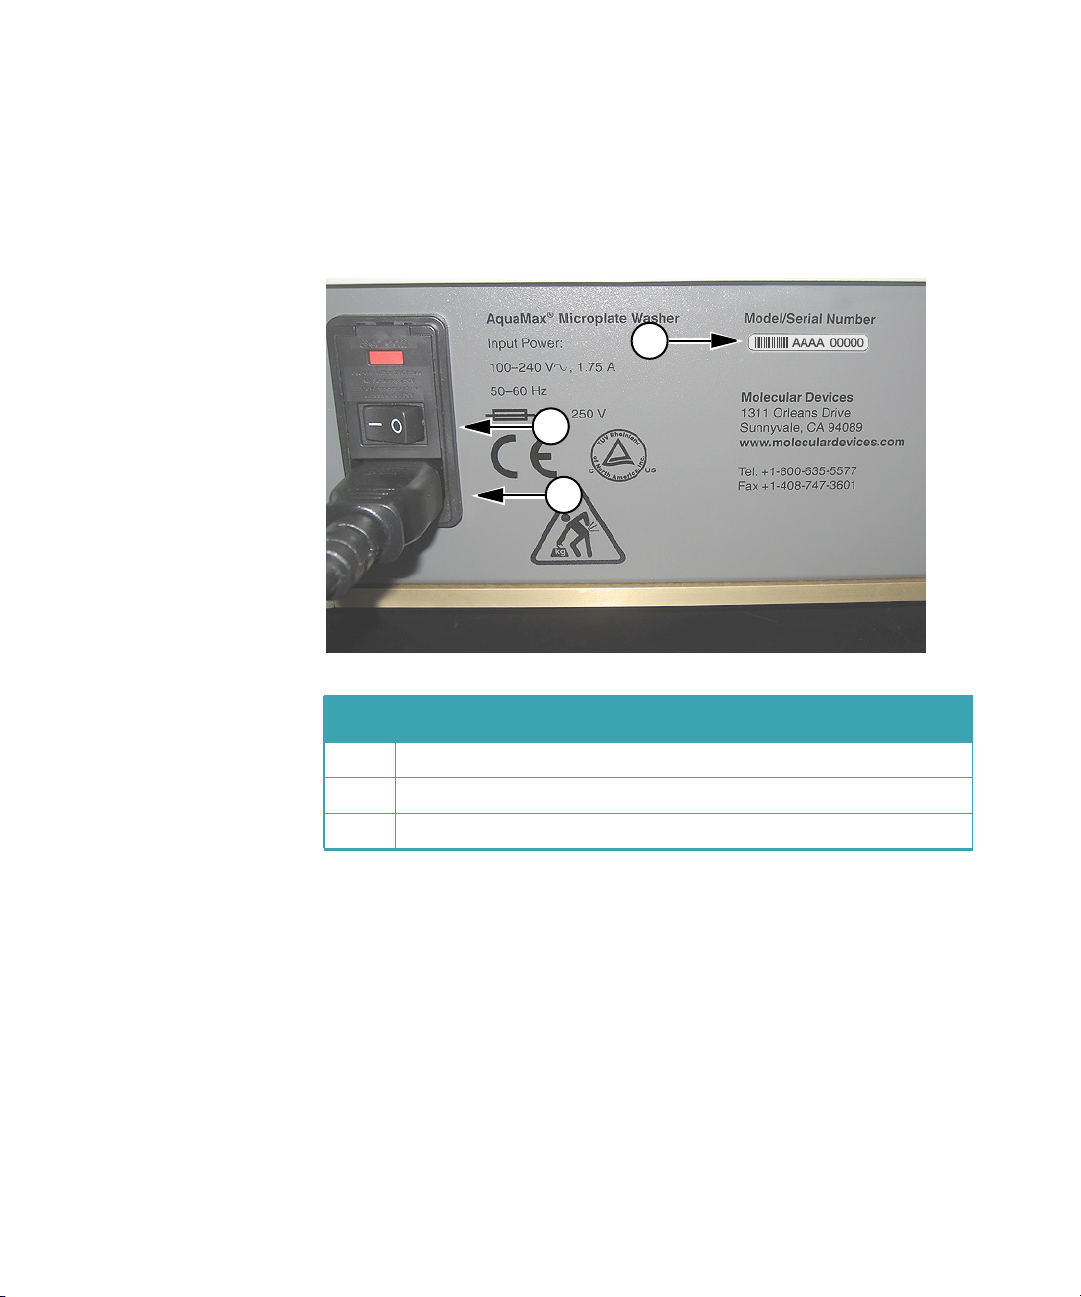
Back Panel
The power switch, power cord receptacle, communication ports, and
instrument information, are located on the back panel of the instrument.
3
1
2
Table 1-6: Back panel, right side
Item Description
1 Power switch
2 Power cord receptacle
3 Serial number
The power cord receptacle and power switch are located on the right
side of the instrument.
Labels and text next to the power switch provide important information
about the AquaMax Microplate Washer, such as line voltage rating and
serial number. Use the model/serial number on this label when
contacting Molecular Devices for technical support issues.
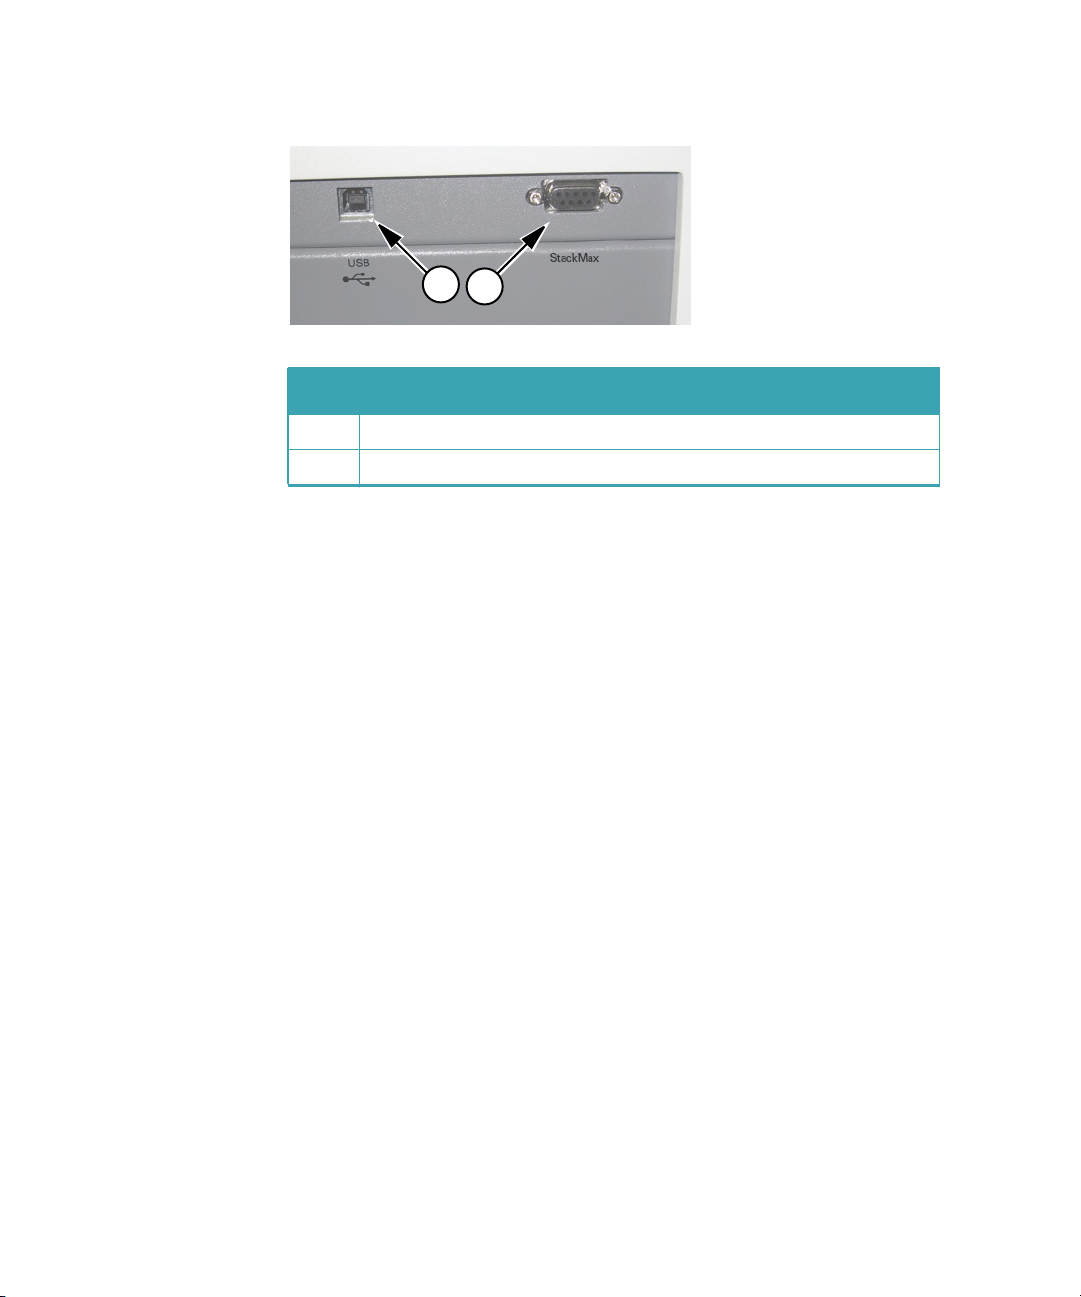
Two communication ports are located on the left side of the back panel.
0112-0151 K 17
AquaMax® 2000/4000 Microplate Washer User Guide
1
2
®
Table 1-7: AquaMax
Microplate Washer USB and StakMax® connectors
Item Description
1 USB port
2 StakMax® connector
The USB Type B port is designated for external robotic control. The
StakMax communication port is dedicated to control StakMax stacker
operations. The StakMax control cable is available with the StakMax
integration kit (Part Number: 0310-5454).
18 0112-0151 K
Installation
2
WARNING! Shock Hazard. To avoid electrical shock, always make sure
the power switch is in the OFF position, and the power cord is
removed, before installing or moving the instrument.
WARNING! Risk of fire, explosion, or shock. Do not operate the
instrument in an environment where potentially damaging liquids or
gases are present.
CAUTION! Do not operate the instrument in an environment with a
temperature below 15°C.
CAUTION! Do not touch or loosen any screws or parts unless specifically
instructed by Molecular Devices. Doing so can cause misalignment and
voids the instrument warranty.
0112-0151 K 19

AquaMax® 2000/4000 Microplate Washer User Guide
Unpacking
WARNING! Each AquaMax Microplate Washer weighs approximately
41 lbs (18.5 kg) and should be lifted with care.
The AquaMax® Microplate Washers are shipped in two specially designed
containers.
• The base unit box contains the washer unit and accessories
(manual, power cord, waste tube, and tubing label kit):
AquaMax 2000 Microplate Washer (Part Number: 0310-
5363)
AquaMax 4000 Microplate Washer (Part Number: 0310-
5227)
The tubing label kit contains 4×3 pieces of colored slip-on
plastic spiral wraps, one group of each color, for labeling
bottle connections (liquid, pressure, level sensor).
• The wash head box contains up to four wash heads, each in a
clamshell container:
96-Well Microplate Wash Head (Part Number: 0310-5216T)
96-Well Cell Wash Head (Part Number: 0310-5217T)
384-Well Microplate Wash Head (Part Number: 0310-5219T)
384-Well Cell Wash Head (Part Number: 0310-5218T)
The standard AquaMax Microplate Washer unit does not include any
bottles. If you have purchased bottles separately, check to make sure that
all bottles and tubing are present. Each reservoir bottle should contain a
cap, fluid tubing, and air tubing. The waste bottle should contain its own
waste tubing.
• Reagent and waste bottles:
4-Liter Reservoir without Level Sensor (Part Number:
5000801)
4-Liter Reservoir with Level Sensor (Part Number: 5000802)
10-Liter Reservoir (Part Number: 9000-0299)
10-Liter Waste Reservoir (Part Number: 9000-0296)
The AquaMax Microplate Washer supports 4 L or 10 L bottles only.
Keep all boxes and packing materials, including the clamshell containers
for the wash heads. Use the original packing materials for long-term
storage of the instrument. Original packing material must be used for
shipping if the unit is returned for repair.
20 0112-0151 K
Note: If a box has been damaged in transit, it is particularly important
that you retain it for inspection by the carrier in case there has also
been damage to the instrument.
Setting Up the Instrument
WARNING! Each AquaMax Microplate Washer weighs approximately
41 lbs (18.5 kg) and should be lifted with care.
Set up the instrument on a level surface, away from direct sunlight, dust,
drafts, and vibrations. Complete the following procedures:
• To turn on the instrument on page 21
• To connect a reagent bottle on page 21
• To connect a waste bottle on page 24
• To install the wash head on page 26
To turn on the instrument
Installation
Molecular Devices recommends that you use a surge protector between
the power cord and the grounded power outlet.
1. Connect the power cord to the back panel.
2. Connect the power cord to a surge protector or grounded power
outlet.
The instrument automatically detects the voltage setting.
To connect a reagent bottle
Each reagent bottle comes with two quick-connect fittings and tubing in
two sizes. The larger tubing is for fluid. The smaller tubing is for bottle
pressure.
The AquaMax Microplate Washer supports 4 L or 10 L bottles only.
0112-0151 K 21
AquaMax® 2000/4000 Microplate Washer User Guide
2
1
Table 2-1: Reagent bottles and connections fittings
Item Description
1 Small fitting for pressure connection
2 Large fitting for liquid input
3
4
5
3 Level sensor fitting on the instrument
4 Liquid input fitting on the instrument
5 Pressure connector on the instrument
CAUTION! The source bottle and waste fluid fittings are the same size.
Do not connect source bottles to the Waste Output, or damage to the
instrument can occur.
CAUTION! Pressurized bottles for the AquaMax Microplate Washer
provide up to 5 years of service. Eventually, they will show signs of aging
such as yellowing, plastic degradation, or thread wear. Therefore, it is
imperative to replace bottles at the earliest signs of aging. Use only
bottles supplied for use with the AquaMax 2000 and 4000 Microplate
Washers.
22 0112-0151 K

Installation
1. Fill the bottle with a reagent, and tighten the cap firmly.
Tip: For quick and accurate assembly of reagent bottles, use slip-
on rings to color-code all tubing and sensor connections.
2. Connect one end of the fluid tubing to the large fitting on the
bottle cap.
3. Connect the other end to a Liquid Input on the left side of the
instrument (green, red, blue, or yellow).
Tip: Push down on the metal fitting of the quick connector to
ease the fitting into place.
4. Connect one end of the pressure tubing to the small fitting on
the bottle cap.
5. Connect the other end to the Pressure fitting below the Liquid
Input.
6. If the bottle has an Empty sensor, connect the sensor to the Level
Sensor connector above the Liquid Input fitting used.
0112-0151 K 23
AquaMax® 2000/4000 Microplate Washer User Guide
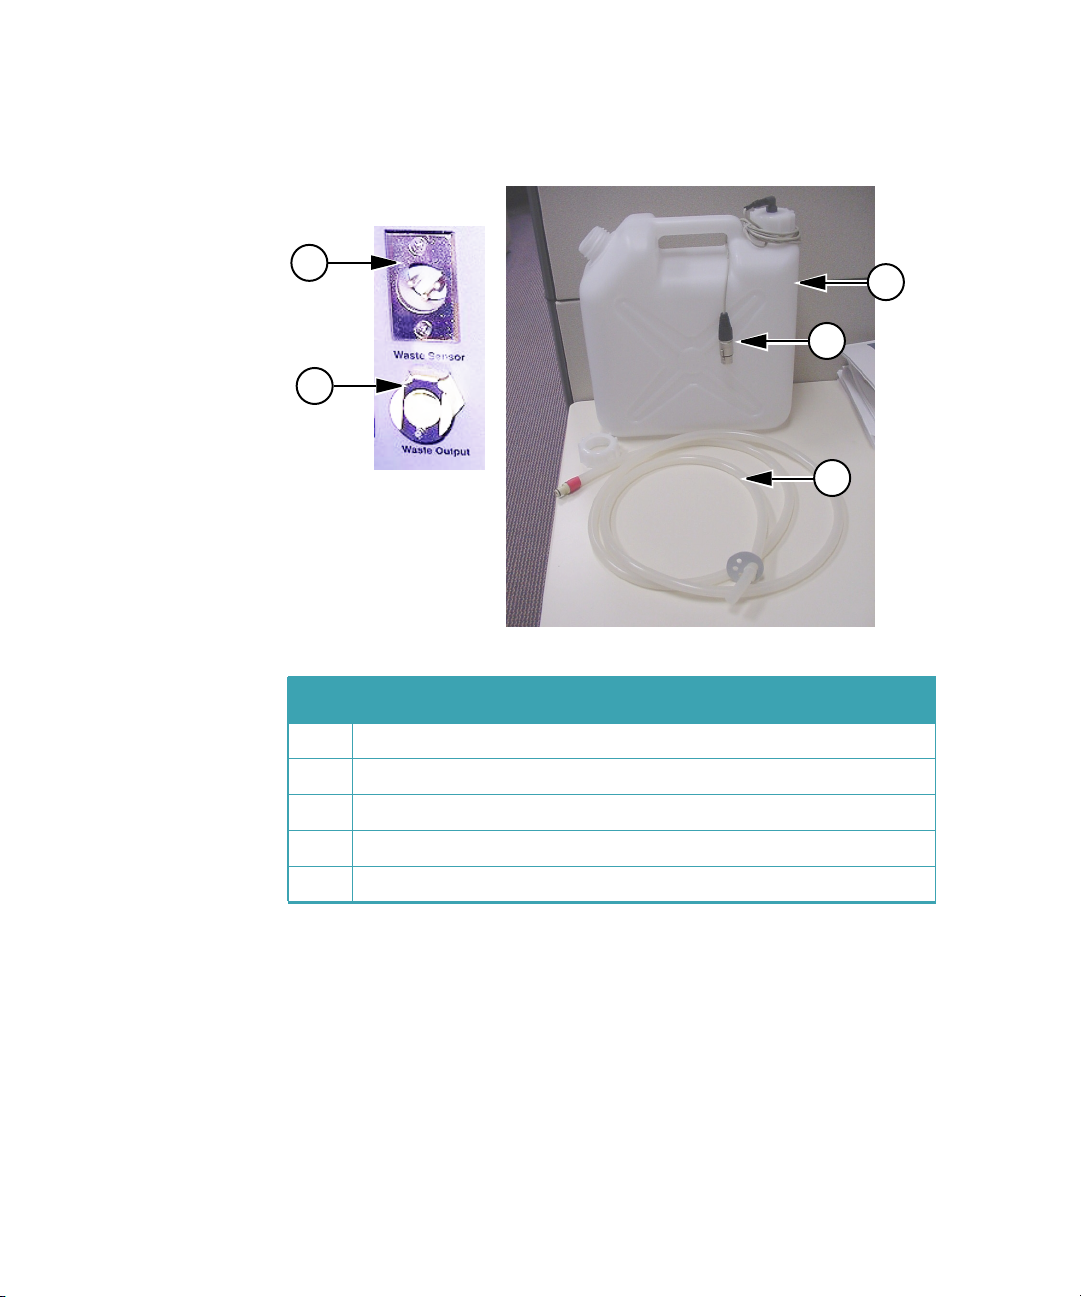
To connect a waste bottle
1
2
Table 2-2: Waste bottle and connection fittings
Item Description
1 Waste sensor connector
2 Waste output fitting
3 Waste bottle
3
4
5
4 Waste full sensor
5 Waste tubing
24 0112-0151 K
Installation
1. Connect the quick connect fitting of the waste tubing to the
Waste Output fitting on the left side of the instrument.
2. Connect the free end of the tubing to any vented waste
container.
For non-toxic waste the free end of the tubing can be placed
directly into a sink. The open end of the waste tubing must be
below the level of the Microplate Washer, and must remain free
of obstruction.
CAUTION! An obstructed waste tubing can damage the
instrument.
3. If the bottle has a waste full sensor, connect the waste full sensor
to the Waste Sensor input fitting.
WARNING! Biohazard. Waste tubing must be connected during
operation. Waste fluid is ejected out of the waste port. If no
waste tubing is connected, waste will spray and spill from the
waste output port.
CAUTION! Waste containers must be vented. Connecting the
waste tubing to a pressurized or closed vessel will cause damage
to the waste pump.
0112-0151 K 25
AquaMax® 2000/4000 Microplate Washer User Guide
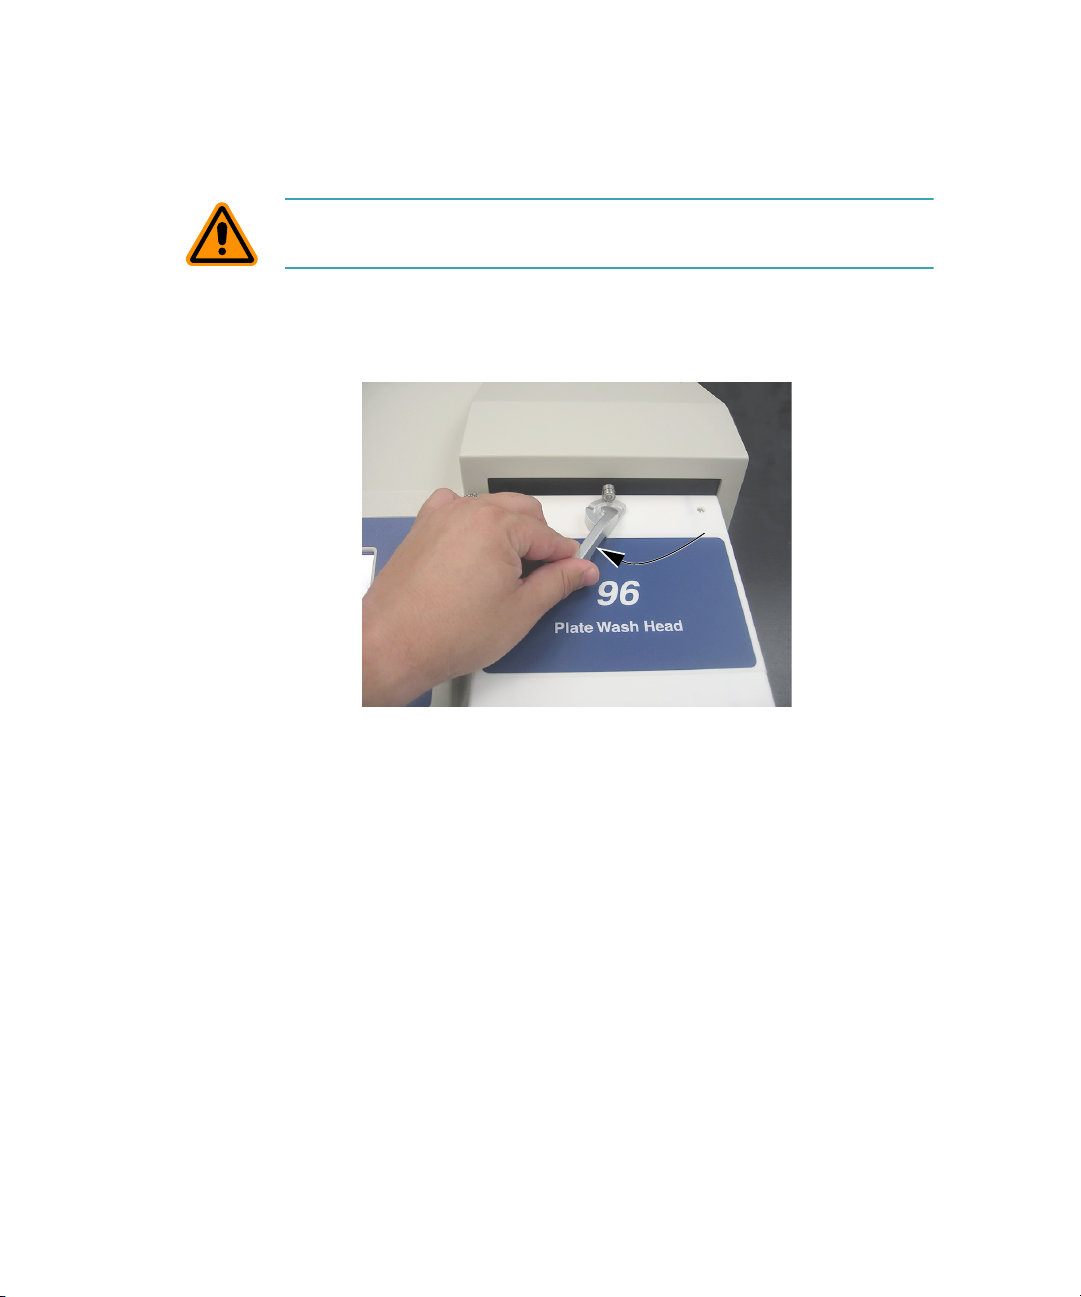
To install the wash head
CAUTION! The probes on the underside of the wash head are delicate.
Take care when handling the wash heads.
1. Install the wash head (96 or 384) of choice. Wash heads are
shipped pre-qualified and will work with any base unit.
2. Move the lever to the left to lock the wash head in place.
Figure 2-1: Wash head lock
3. Turn ON the instrument power switch located on the back panel.
The following operations occur as the instrument initializes when
turned on:
The wash head rises to prepare for plate loading.
The touch screen turns on and displays instrument status.
The plate carriage and wash head motor find home and
return to eject positions.
26 0112-0151 K
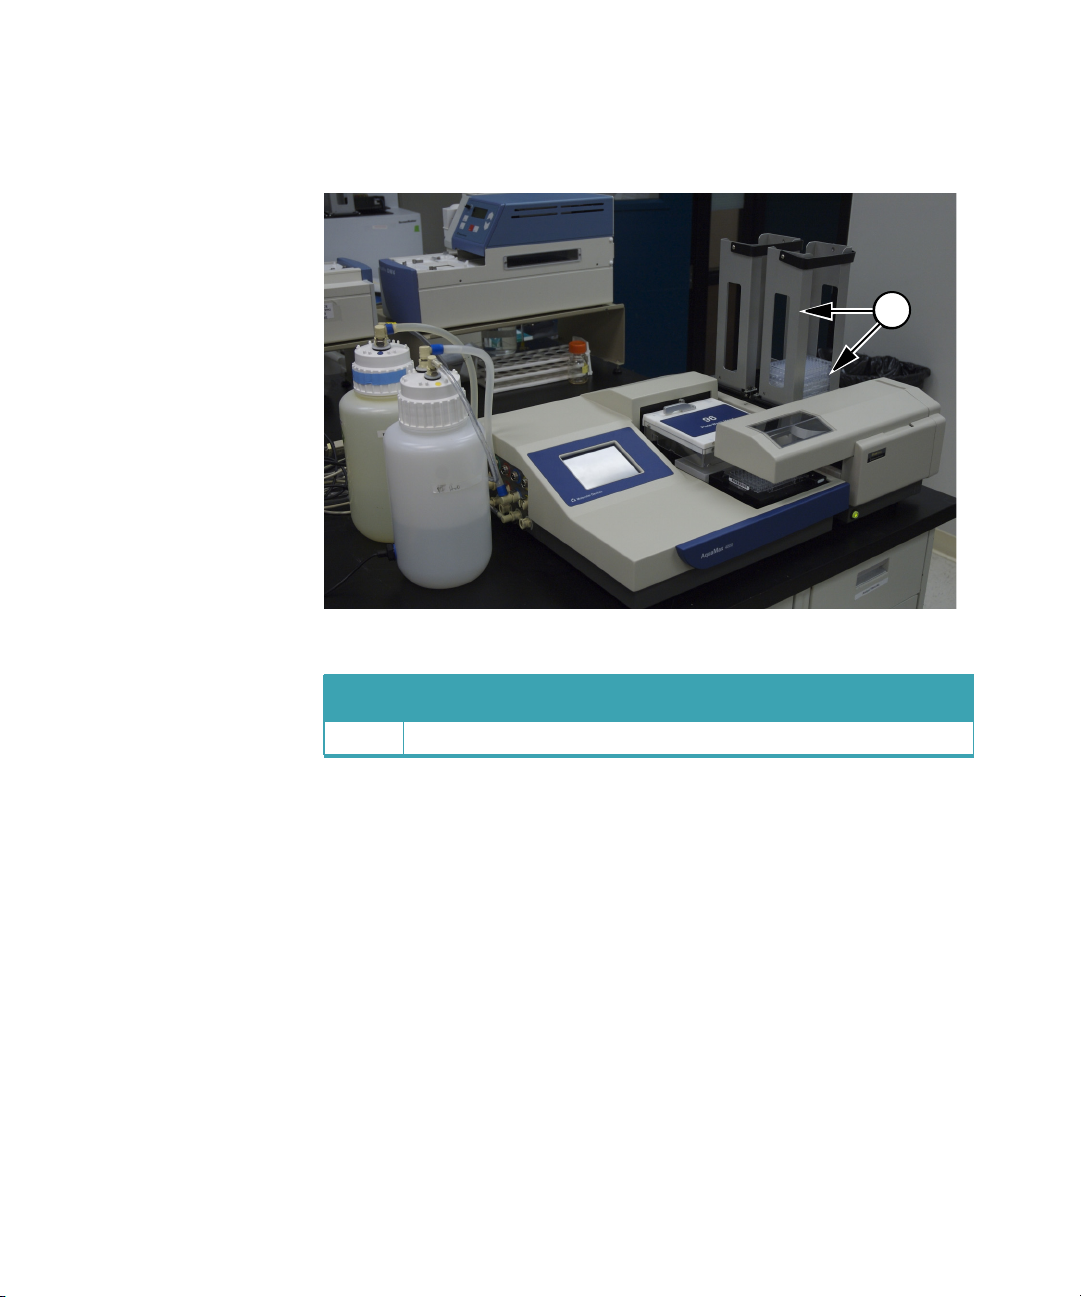
Connecting to a StakMax® Plate Stacker
®
Table 2-3: AquaMax
installed
Microplate Washer with StakMax® Plate Stacker
Installation
1
88
Item Description
1 StakMax® Plate Stacker
To connect the AquaMax Microplate Washer to the StakMax® Plate
Stacker you will need the StakMax integration kit (Part Number: 0310-
5454). The integration kit consists of a StakMax/AquaMax base plate,
bolts for the base plate, a tool for the bolts, a StakMax communication
cable, and an integration manual.
To set up a StakMax® Plate Stacker with an AquaMax® Microplate Washer
For more detailed instructions, see the integration manual.
1. Make sure that both the AquaMax Microplate Washer and the
StakMax Plate Stacker are turned off and that the power cords
are disconnect from the power supply.
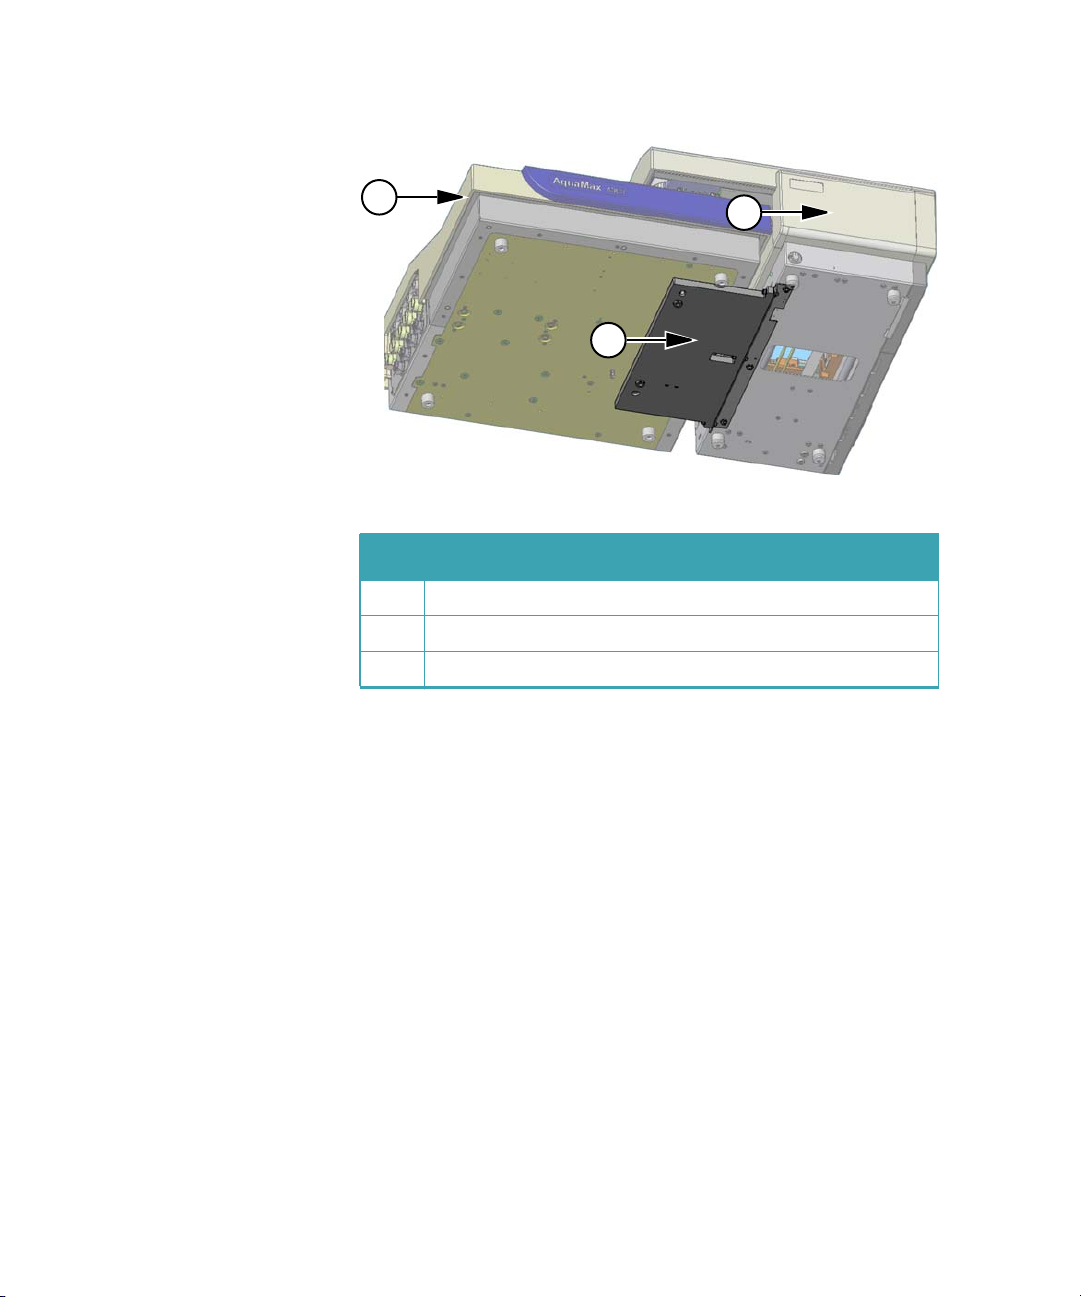
2. Use the StakMax/AquaMax base plate to connect the StakMax
Plate Stacker to the AquaMax Microplate Washer (
0112-0151 K 27
Figure 2-4).
AquaMax® 2000/4000 Microplate Washer User Guide
1
2
3
Table 2-4: StakMax
®
Plate Stacker to AquaMax® Microplate
Washer adapter plate
Item Description
1 AquaMax® Microplate Washer
2 StakMax® Plate Stacker
3 Adapter plate
3. Connect the StakMax communication cable to the serial port on
the back of the StakMax Plate Stacker.
4. Connect the StakMax communication cable to the StakMax port
on the back panel of the AquaMax Microplate Washer. See
Back
Panel on page 17.
5. Turn on both the AquaMax Microplate Washer and the StakMax
Plate Stacker.
The StakMax Plate Stacker automatically detects that it is
connected to the AquaMax Microplate Washer.
The AquaMax Microplate Washer detects the StakMax Plate
Stacker.
28 0112-0151 K

Installation
Figure 2-2: StakMax Stacker indicator
The washer controls the stacker through its on board programs.
For information about using the stacker in a program, see
Program Stacker Settings on page 43.
0112-0151 K 29

AquaMax® 2000/4000 Microplate Washer User Guide
30 0112-0151 K
 Loading...