


AquaMax® 2000/4000
Microplate Washer
User Guide
0112-0151 K
June 2014
www.moleculardevices.com

This document is provided to customers who have purchased Molecular Devices, LLC
(“Molecular Devices”) equipment, software, reagents, and consumables to use in the
operation of such Molecular Devices equipment, software, reagents, and
consumables. This document is copyright protected and any reproduction of this
document, in whole or any part, is strictly prohibited, except as Molecular Devices
may authorize in writing.
Software that may be described in this document is furnished under a license
agreement. It is against the law to copy, modify, or distribute the software on any
medium, except as specifically allowed in the license agreement. Furthermore, the
license agreement may prohibit the software from being disassembled, reverse
engineered, or decompiled for any purpose.
Portions of this document may make reference to other manufacturers and/or their
products, which may contain parts whose names are registered as trademarks and/or
function as trademarks of their respective owners. Any such usage is intended only to
designate those manufacturers’ products as supplied by Molecular Devices for
incorporation into its equipment and does not imply any right and/or license to use
or permit others to use such manufacturers’ and/or their product names as
trademarks.
Molecular Devices makes no warranties or representations as to the fitness of this
equipment for any particular purpose and assumes no responsibility or contingent
liability, including indirect or consequential damages, for any use to which the
purchaser may put the equipment described herein, or for any adverse circumstances
arising therefrom.
For research use only. Not for use in diagnostic procedures.
The trademarks mentioned herein are the property of Molecular Devices, LLC or their respective owners. These
trademarks may not be used in any type of promotion or advertising without the prior written permission of
Molecular Devices, LLC.
Product manufactured by Molecular Devices, LLC.
1311 Orleans Drive, Sunnyvale, California, United States of America 94089.
Molecular Devices, LLC is ISO 9001 registered.
© 2014 Molecular Devices, LLC.
All rights reserved.

Contents
Contents. . . . . . . . . . . . . . . . . . . . . . . . . . . . . . . . . . . . . . . . . . . . . . 3
Foreword . . . . . . . . . . . . . . . . . . . . . . . . . . . . . . . . . . . . . . . . . . . . . 7
Who This User Guide Is For . . . . . . . . . . . . . . . . . . . . . . . . . . . . . . . . . 7
Conventions. . . . . . . . . . . . . . . . . . . . . . . . . . . . . . . . . . . . . . . . . . . . . . 7
Chapter 1: Introduction . . . . . . . . . . . . . . . . . . . . . . . . . . . . . . . . . 9
Instrument Features . . . . . . . . . . . . . . . . . . . . . . . . . . . . . . . . . . . . . . . 9
Robot and Stacker Compatibility. . . . . . . . . . . . . . . . . . . . . . . . . . . 10
Components . . . . . . . . . . . . . . . . . . . . . . . . . . . . . . . . . . . . . . . . . . . . 10
Touch Screen . . . . . . . . . . . . . . . . . . . . . . . . . . . . . . . . . . . . . . . . . . 11
Wash Heads . . . . . . . . . . . . . . . . . . . . . . . . . . . . . . . . . . . . . . . . . . . 11
Microplate Carriage . . . . . . . . . . . . . . . . . . . . . . . . . . . . . . . . . . . . . 14
Reagent and Waste Bottle Ports . . . . . . . . . . . . . . . . . . . . . . . . . . . 16
Back Panel . . . . . . . . . . . . . . . . . . . . . . . . . . . . . . . . . . . . . . . . . . . . . 17
Chapter 2: Installation . . . . . . . . . . . . . . . . . . . . . . . . . . . . . . . . . 19
Unpacking . . . . . . . . . . . . . . . . . . . . . . . . . . . . . . . . . . . . . . . . . . . . . . 20
Setting Up the Instrument . . . . . . . . . . . . . . . . . . . . . . . . . . . . . . . . . 21
Connecting to a StakMax
®
Plate Stacker . . . . . . . . . . . . . . . . . . . . . . 27
Chapter 3: Getting Started . . . . . . . . . . . . . . . . . . . . . . . . . . . . . 31
Starting the Instrument . . . . . . . . . . . . . . . . . . . . . . . . . . . . . . . . . . . 31
Main Tab . . . . . . . . . . . . . . . . . . . . . . . . . . . . . . . . . . . . . . . . . . . . . . . 32
Running Programs. . . . . . . . . . . . . . . . . . . . . . . . . . . . . . . . . . . . . . . . 34
Stopping Programs . . . . . . . . . . . . . . . . . . . . . . . . . . . . . . . . . . . . . . . 35
Shutting Down the Instrument . . . . . . . . . . . . . . . . . . . . . . . . . . . . . 36
Chapter 4: Operation: The Touch Screen Interface . . . . . . . . . . 37
Administrative Mode . . . . . . . . . . . . . . . . . . . . . . . . . . . . . . . . . . . . . 37
Program Tab . . . . . . . . . . . . . . . . . . . . . . . . . . . . . . . . . . . . . . . . . . . . 38
Program Tab: Administrative Mode . . . . . . . . . . . . . . . . . . . . . . . . 39
Program Settings Dialog. . . . . . . . . . . . . . . . . . . . . . . . . . . . . . . . . . 40
0112-0151 K 3

AquaMax® 2000/4000 Microplate Washer User Guide
Program Options . . . . . . . . . . . . . . . . . . . . . . . . . . . . . . . . . . . . . . . .41
Program Messages . . . . . . . . . . . . . . . . . . . . . . . . . . . . . . . . . . . . . . 42
Program Stacker Settings . . . . . . . . . . . . . . . . . . . . . . . . . . . . . . . . . 43
Adjust Dispense. . . . . . . . . . . . . . . . . . . . . . . . . . . . . . . . . . . . . . . . . 44
Program Tab: Program Editing . . . . . . . . . . . . . . . . . . . . . . . . . . . . . 45
New Step Selection . . . . . . . . . . . . . . . . . . . . . . . . . . . . . . . . . . . . . . 46
Dispense Settings . . . . . . . . . . . . . . . . . . . . . . . . . . . . . . . . . . . . . . . 47
Aspirate Settings . . . . . . . . . . . . . . . . . . . . . . . . . . . . . . . . . . . . . . . . 49
Wash Settings . . . . . . . . . . . . . . . . . . . . . . . . . . . . . . . . . . . . . . . . . . 50
FastWash Settings . . . . . . . . . . . . . . . . . . . . . . . . . . . . . . . . . . . . . . . 53
Shake Settings . . . . . . . . . . . . . . . . . . . . . . . . . . . . . . . . . . . . . . . . . . 54
Soak Settings . . . . . . . . . . . . . . . . . . . . . . . . . . . . . . . . . . . . . . . . . . . 55
Repeat Settings . . . . . . . . . . . . . . . . . . . . . . . . . . . . . . . . . . . . . . . . . 56
Purge Settings . . . . . . . . . . . . . . . . . . . . . . . . . . . . . . . . . . . . . . . . . . 57
Rinse Settings . . . . . . . . . . . . . . . . . . . . . . . . . . . . . . . . . . . . . . . . . . 58
Standby Settings . . . . . . . . . . . . . . . . . . . . . . . . . . . . . . . . . . . . . . . . 59
Prime Settings . . . . . . . . . . . . . . . . . . . . . . . . . . . . . . . . . . . . . . . . . . 60
Managing the Program Library . . . . . . . . . . . . . . . . . . . . . . . . . . . . . . 61
Plates Tab . . . . . . . . . . . . . . . . . . . . . . . . . . . . . . . . . . . . . . . . . . . . . . . 70
Plates Tab: Administrative Mode. . . . . . . . . . . . . . . . . . . . . . . . . . . 71
Plate Definition Dialog . . . . . . . . . . . . . . . . . . . . . . . . . . . . . . . . . . .72
Managing the Plate Library . . . . . . . . . . . . . . . . . . . . . . . . . . . . . . . .73
Options Tab . . . . . . . . . . . . . . . . . . . . . . . . . . . . . . . . . . . . . . . . . . . . . 74
Advanced Options Dialog . . . . . . . . . . . . . . . . . . . . . . . . . . . . . . . . . 76
Options Tab: Administrative Mode . . . . . . . . . . . . . . . . . . . . . . . . . 76
Shutdown Options Dialog. . . . . . . . . . . . . . . . . . . . . . . . . . . . . . . . . 78
Managing the Software . . . . . . . . . . . . . . . . . . . . . . . . . . . . . . . . . . . . 79
Automatic Shutdown . . . . . . . . . . . . . . . . . . . . . . . . . . . . . . . . . . . .79
Restricting Functions. . . . . . . . . . . . . . . . . . . . . . . . . . . . . . . . . . . . . 80
Screen Calibration . . . . . . . . . . . . . . . . . . . . . . . . . . . . . . . . . . . . . .81
Chapter 5: Maintenance . . . . . . . . . . . . . . . . . . . . . . . . . . . . . . . 83
Technical Support . . . . . . . . . . . . . . . . . . . . . . . . . . . . . . . . . . . . . . . . 83
Routine Maintenance . . . . . . . . . . . . . . . . . . . . . . . . . . . . . . . . . . . . .84
Purging the Instrument. . . . . . . . . . . . . . . . . . . . . . . . . . . . . . . . . . . 85
Decontaminating the Instrument . . . . . . . . . . . . . . . . . . . . . . . . . . 86
Cleaning the Exterior. . . . . . . . . . . . . . . . . . . . . . . . . . . . . . . . . . . . . 87
Removing and Storing Wash Heads . . . . . . . . . . . . . . . . . . . . . . . . 88
Cleaning Wash Heads . . . . . . . . . . . . . . . . . . . . . . . . . . . . . . . . . . . . 91
4 0112-0151 K

Contents
Moving an AquaMax® Microplate Washer . . . . . . . . . . . . . . . . . . . . 92
Preparing for Storage . . . . . . . . . . . . . . . . . . . . . . . . . . . . . . . . . . . . . 93
Chapter 6: Troubleshooting. . . . . . . . . . . . . . . . . . . . . . . . . . . . . 95
Troubleshooting Charts . . . . . . . . . . . . . . . . . . . . . . . . . . . . . . . . . . . 95
General Instrument Issues. . . . . . . . . . . . . . . . . . . . . . . . . . . . . . . . 95
System Fluidics Issues . . . . . . . . . . . . . . . . . . . . . . . . . . . . . . . . . . . 96
System Pressure Issues . . . . . . . . . . . . . . . . . . . . . . . . . . . . . . . . . . 97
External Communication Issues . . . . . . . . . . . . . . . . . . . . . . . . . . . 98
Dispense Issues. . . . . . . . . . . . . . . . . . . . . . . . . . . . . . . . . . . . . . . . . 99
Aspiration Issues. . . . . . . . . . . . . . . . . . . . . . . . . . . . . . . . . . . . . . . 100
Wash Issues. . . . . . . . . . . . . . . . . . . . . . . . . . . . . . . . . . . . . . . . . . . 102
Cell Wash Issues . . . . . . . . . . . . . . . . . . . . . . . . . . . . . . . . . . . . . . . 103
Instrument Error Messages . . . . . . . . . . . . . . . . . . . . . . . . . . . . . . 103
Chapter 7: Specifications . . . . . . . . . . . . . . . . . . . . . . . . . . . . . . 107
AquaMax® Microplate Washer. . . . . . . . . . . . . . . . . . . . . . . . . . . . . 107
Appendix A: Microplate Library . . . . . . . . . . . . . . . . . . . . . . . . 111
Appendix B: Cleaning Solutions . . . . . . . . . . . . . . . . . . . . . . . . 113
Appendix C: AquaMax Sterilant . . . . . . . . . . . . . . . . . . . . . . . . 115
Principle of Use . . . . . . . . . . . . . . . . . . . . . . . . . . . . . . . . . . . . . . . . . 115
Contents. . . . . . . . . . . . . . . . . . . . . . . . . . . . . . . . . . . . . . . . . . . . . . . 116
Materials Required but Not Provided. . . . . . . . . . . . . . . . . . . . . . 116
Storage . . . . . . . . . . . . . . . . . . . . . . . . . . . . . . . . . . . . . . . . . . . . . . 116
Preparing the Reagent . . . . . . . . . . . . . . . . . . . . . . . . . . . . . . . . . . . 117
Preparing the Complete Sterilant . . . . . . . . . . . . . . . . . . . . . . . . . 117
Using Reagent . . . . . . . . . . . . . . . . . . . . . . . . . . . . . . . . . . . . . . . . . . 117
Warnings, Precautions, and Limitations . . . . . . . . . . . . . . . . . . . . . 118
Sterilant Solution A Concentrate (4X). . . . . . . . . . . . . . . . . . . . . . 118
Sterilant Solution B. . . . . . . . . . . . . . . . . . . . . . . . . . . . . . . . . . . . . 118
Appendix D: Tips and Applications . . . . . . . . . . . . . . . . . . . . . . 119
Using the Washer for ELISA Based Applications . . . . . . . . . . . . . 119
Using the Washer for Cell Based Applications . . . . . . . . . . . . . . . 119
0112-0151 K 5

AquaMax® 2000/4000 Microplate Washer User Guide
Appendix E: Robot Command Interface . . . . . . . . . . . . . . . . . . 121
Instrument Configurations . . . . . . . . . . . . . . . . . . . . . . . . . . . . . . . .121
Hardware Interfaces . . . . . . . . . . . . . . . . . . . . . . . . . . . . . . . . . . . . .121
Host Computer Interface . . . . . . . . . . . . . . . . . . . . . . . . . . . . . . . . 121
Command Format . . . . . . . . . . . . . . . . . . . . . . . . . . . . . . . . . . . . . . .122
Document Conventions . . . . . . . . . . . . . . . . . . . . . . . . . . . . . . . . .122
No Error (OK) Responses . . . . . . . . . . . . . . . . . . . . . . . . . . . . . . . .123
Error Responses. . . . . . . . . . . . . . . . . . . . . . . . . . . . . . . . . . . . . . . . 123
General Commands . . . . . . . . . . . . . . . . . . . . . . . . . . . . . . . . . . . . . .124
Initialization . . . . . . . . . . . . . . . . . . . . . . . . . . . . . . . . . . . . . . . . . . .124
Device Information . . . . . . . . . . . . . . . . . . . . . . . . . . . . . . . . . . . . . 125
Motion Control . . . . . . . . . . . . . . . . . . . . . . . . . . . . . . . . . . . . . . . . 128
Program Control . . . . . . . . . . . . . . . . . . . . . . . . . . . . . . . . . . . . . . . 129
User Adjustment . . . . . . . . . . . . . . . . . . . . . . . . . . . . . . . . . . . . . . . 131
Program Management Commands . . . . . . . . . . . . . . . . . . . . . . . . . 132
Factory-defined Protocols . . . . . . . . . . . . . . . . . . . . . . . . . . . . . . .132
Protocol (Program) Control . . . . . . . . . . . . . . . . . . . . . . . . . . . . . . 133
Edit/view Opened Protocol Steps . . . . . . . . . . . . . . . . . . . . . . . . . 136
Function-specific Step Arguments and Return Data . . . . . . . . . . . . 138
Plate Library Access . . . . . . . . . . . . . . . . . . . . . . . . . . . . . . . . . . . . . .147
StakMax
Stacker Control . . . . . . . . . . . . . . . . . . . . . . . . . . . . . . . . . . . . . . . . 151
Errors. . . . . . . . . . . . . . . . . . . . . . . . . . . . . . . . . . . . . . . . . . . . . . . . . . 153
Error Reporting . . . . . . . . . . . . . . . . . . . . . . . . . . . . . . . . . . . . . . . . 153
Error Recovery. . . . . . . . . . . . . . . . . . . . . . . . . . . . . . . . . . . . . . . . . 154
Instrument Response . . . . . . . . . . . . . . . . . . . . . . . . . . . . . . . . . . . 154
®
Robot Control . . . . . . . . . . . . . . . . . . . . . . . . . . . . . . . . . .151
Index . . . . . . . . . . . . . . . . . . . . . . . . . . . . . . . . . . . . . . . . . . . . . . 155
6 0112-0151 K

Who This User Guide Is For
This guide is intended for users of the AquaMax® 2000 and AquaMax
4000 Microplate Washers. The user guide contains setup, operation, and
general maintenance information.
Conventions
Within the scope of this user guide, the following typographical
conventions are used:
WARNING! A warning indicates an operation that can cause personal
injury if precautions are not followed.
CAUTION! Indicates an operation that might cause damage to the
instrument, device, or data, if the precautions are not followed.
Foreword
Note: Emphasizes significant information in a procedure or description.
Tip: Provides useful information or shortcuts, but is not essential to the
completion of a procedure.
0112-0151 K 7

AquaMax® 2000/4000 Microplate Washer User Guide
8 0112-0151 K

Introduction
The AquaMax® Microplate Washers from Molecular Devices can be easily
configured to meet your current application requirements. The modular
design provides affordable upgrade options when your lab requirements
change.
Instrument Features
AquaMax 2000 and AquaMax 4000 Microplate Washers can be
configured to process 96-well and 384-well microplates used in both
biochemical and cell-based assays.
• Wash heads are available in 96-well and 384-well configurations
• All wash heads are interchangeable. The software automatically
• The AquaMax Microplate Washer primes, cleans, and rinses the
• The AquaMax Microplate Washer processes all plate wells
• Whole-well dispensing and aspiration in 384-well plates result in
• The AquaMax Microplate Washer supports most microplate
• The AquaMax Microplate Washer is equipped with two
• All washer operations are controlled through an on-board
• The program library can store up to 3 factory-defined and 100
1
for both plate wash and cell wash.
detects which wash head is installed.
wash heads with the touch of a single button.
simultaneously during dispense, aspirate, and wash operations.
2 to 4 times faster plate processing than other commercially
available plate washers.
formats through its user-definable plate library. Up to 32 plate
types can be stored in the plate library.
(AquaMax 2000 washer) or four (AquaMax 4000 washer) reagent
ports to connect 2 or 4 different dispense bottles. Waste can be
drained into any waste bottle. Non-toxic waste can be drained
directly into a sink. The AquaMax Microplate Washer supports
4 L or 10 L bottles only.
touch-screen user interface.
user-defined programs. Each program can contain up to 50 steps.
0112-0151 K 9
AquaMax® 2000/4000 Microplate Washer User Guide
Robot and Stacker Compatibility
AquaMax Microplate Washers are compatible with Molecular Devices
StakMax® Microplate Handling System. Third party robots can be set up
to control the AquaMax Microplate Washers through a USB command
interface. The USB command interface is detailed in Robot Command
Interface on page 121.
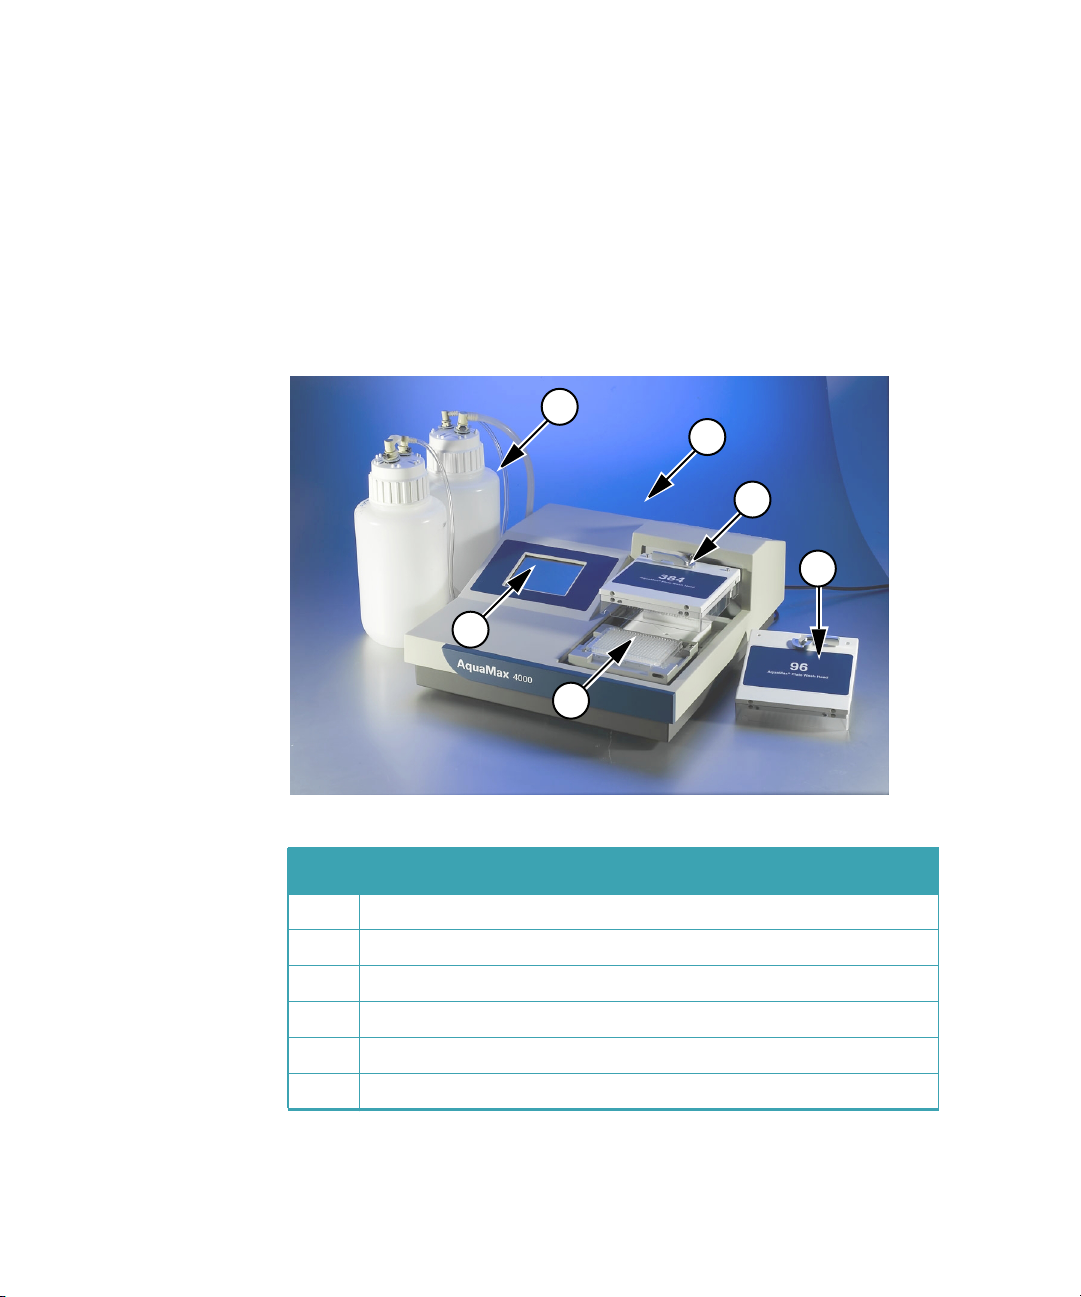
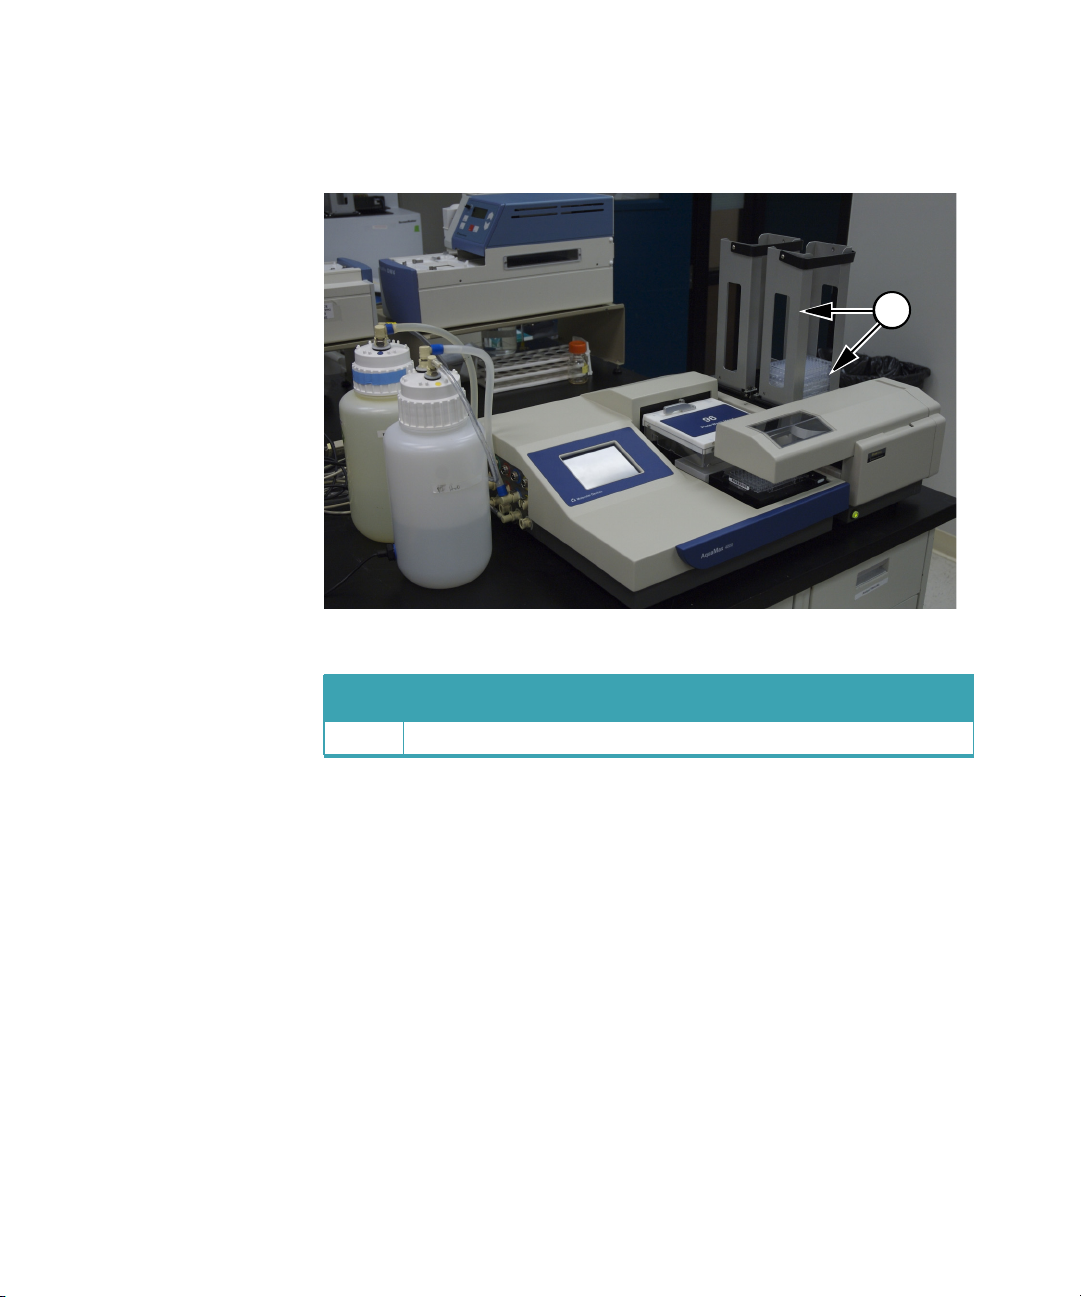
Components
6
1
2
3
4
5
Table 1-1: AquaMax® 4000 Components
Item Description
1 4L reagent reservoirs
2 Back panel with USB and StakMax connectors
3 384-well wash head installed
4 96-well wash head
5 Microplate carriage with microplate
6 Touch screen
10 0112-0151 K

Introduction
Touch Screen
Figure 1-1: AquaMax® touch screen
Instrument operation is controlled through a touch-screen user interface.
The touch screen displays instrument status, provides access to
instrument settings and programs, and controls the optional StakMax
Plate Stacker.
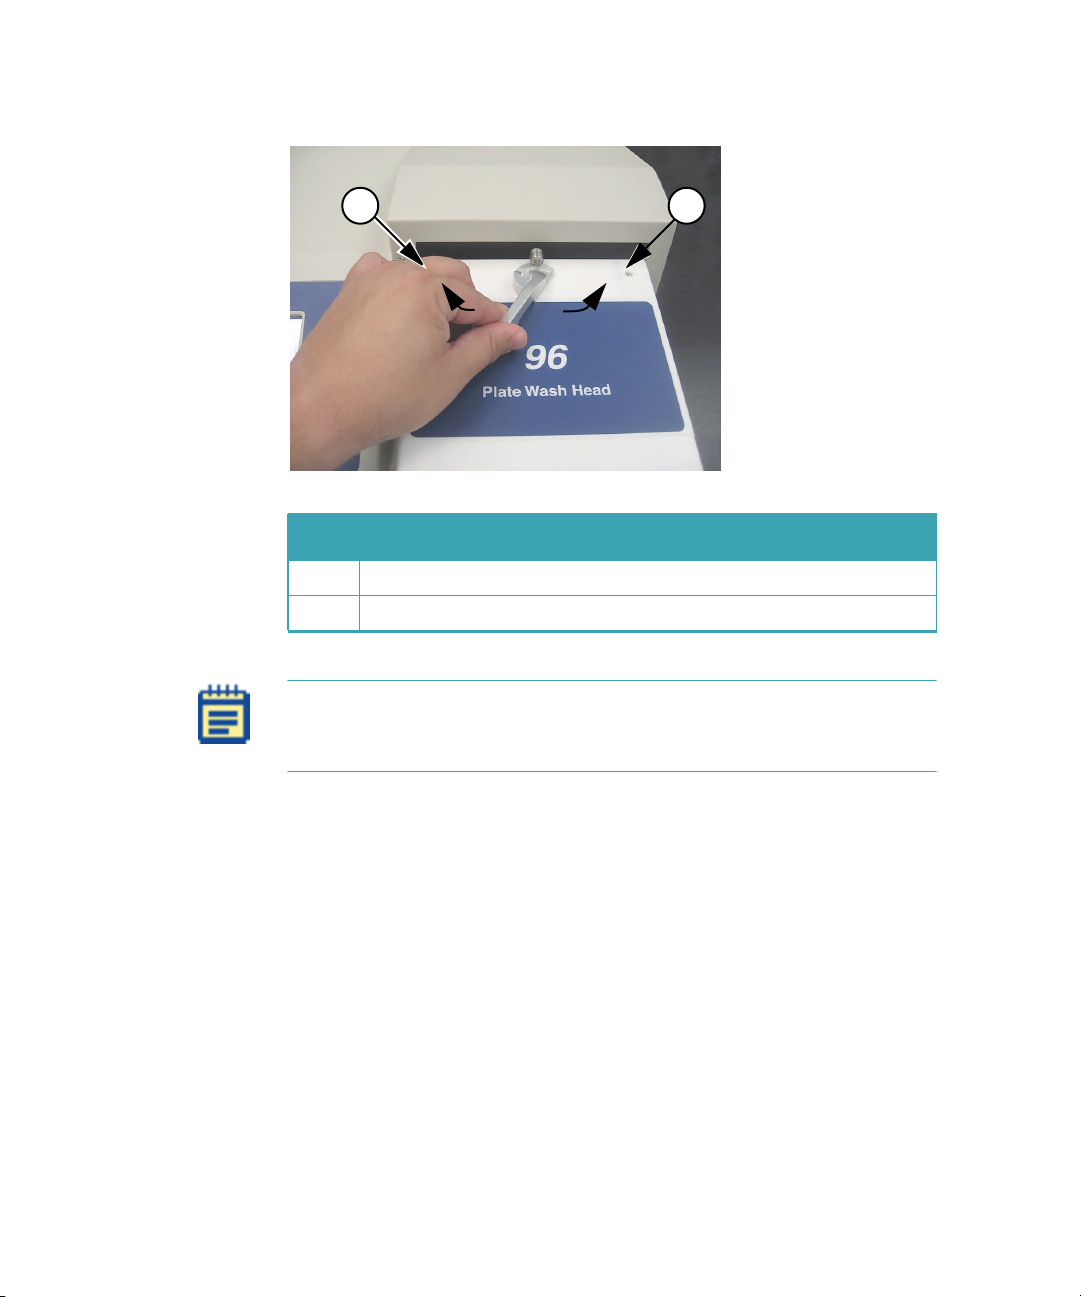
Wash Heads
AquaMax wash heads have either 96 or 384 paired probes. The longer
probe of each pair is used for aspiration. The short probe is used for
dispensing. The plate wash heads have straight dispense probes and are
intended for thorough cleaning and aspiration. The cell wash heads have
angled dispense probes to minimize cell loss during washing.
The wash heads are interchangeable and can be removed and
re-attached using a simple lever mechanism.
0112-0151 K 11
AquaMax® 2000/4000 Microplate Washer User Guide
1 2
Table 1-2: 96-plate wash head lock
Item Description
1 Close
2 Open
Note: A mismatched wash head and microplate will cause a motor
pinch error when the wash head tries to descend toward the wells. A
mismatch should not damage the wash head.
12 0112-0151 K
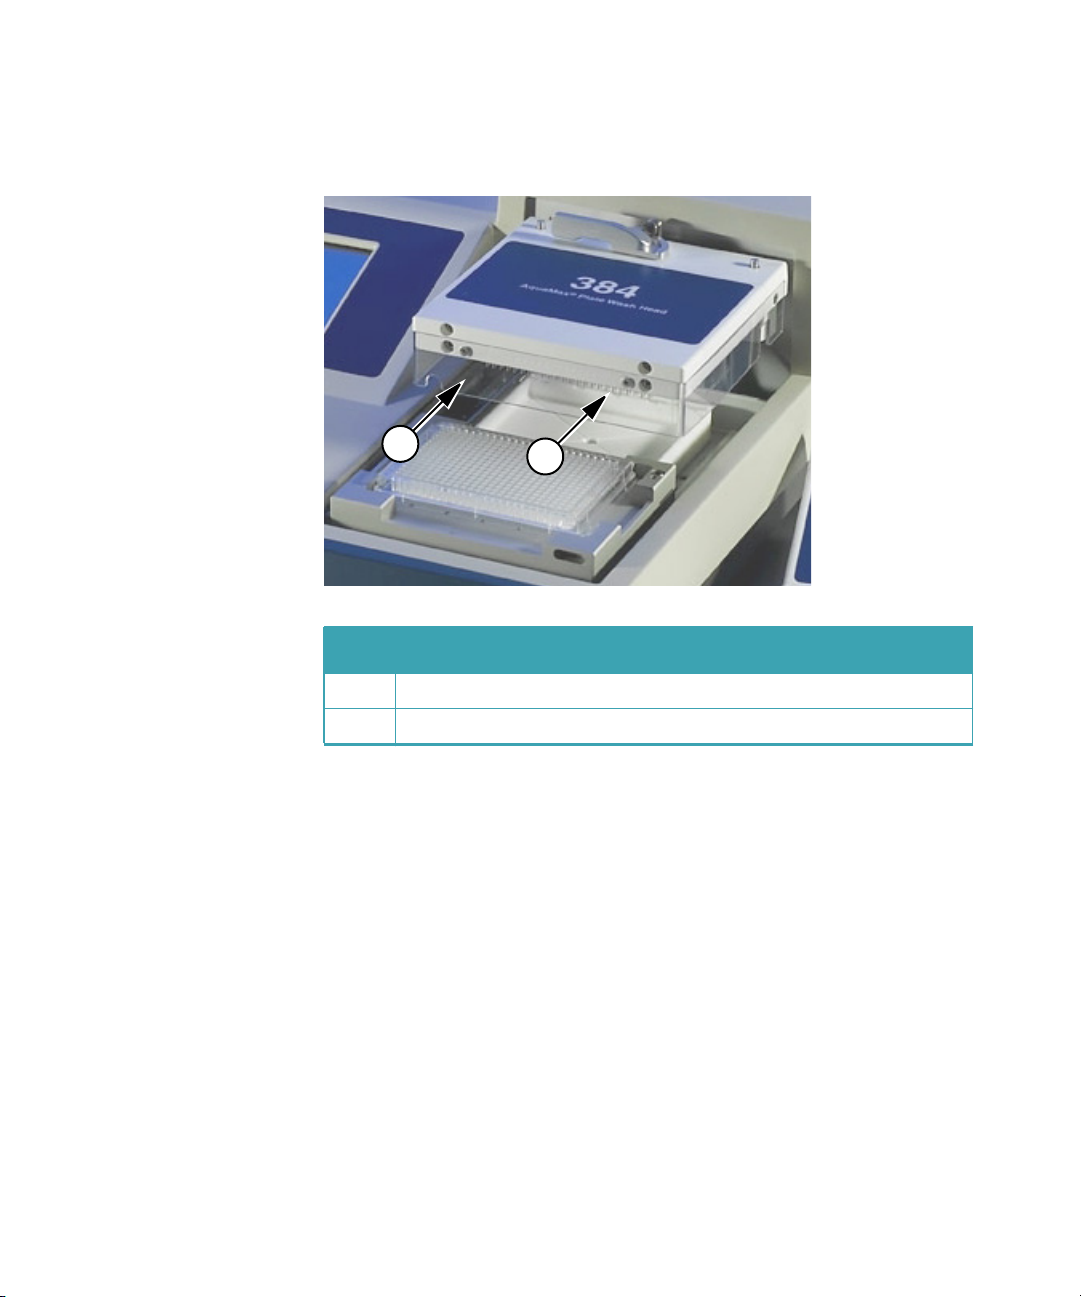
Introduction
Each wash head has a clear plastic guard to protect the probes from
damage, and to prevent spills, sprays, and injury to users.
1
2
Table 1-3: 384-plate wash head and guard
Item Description
1 Plastic guard
2 Aspiration and dispensing probes on underside of wash head
0112-0151 K 13
AquaMax® 2000/4000 Microplate Washer User Guide
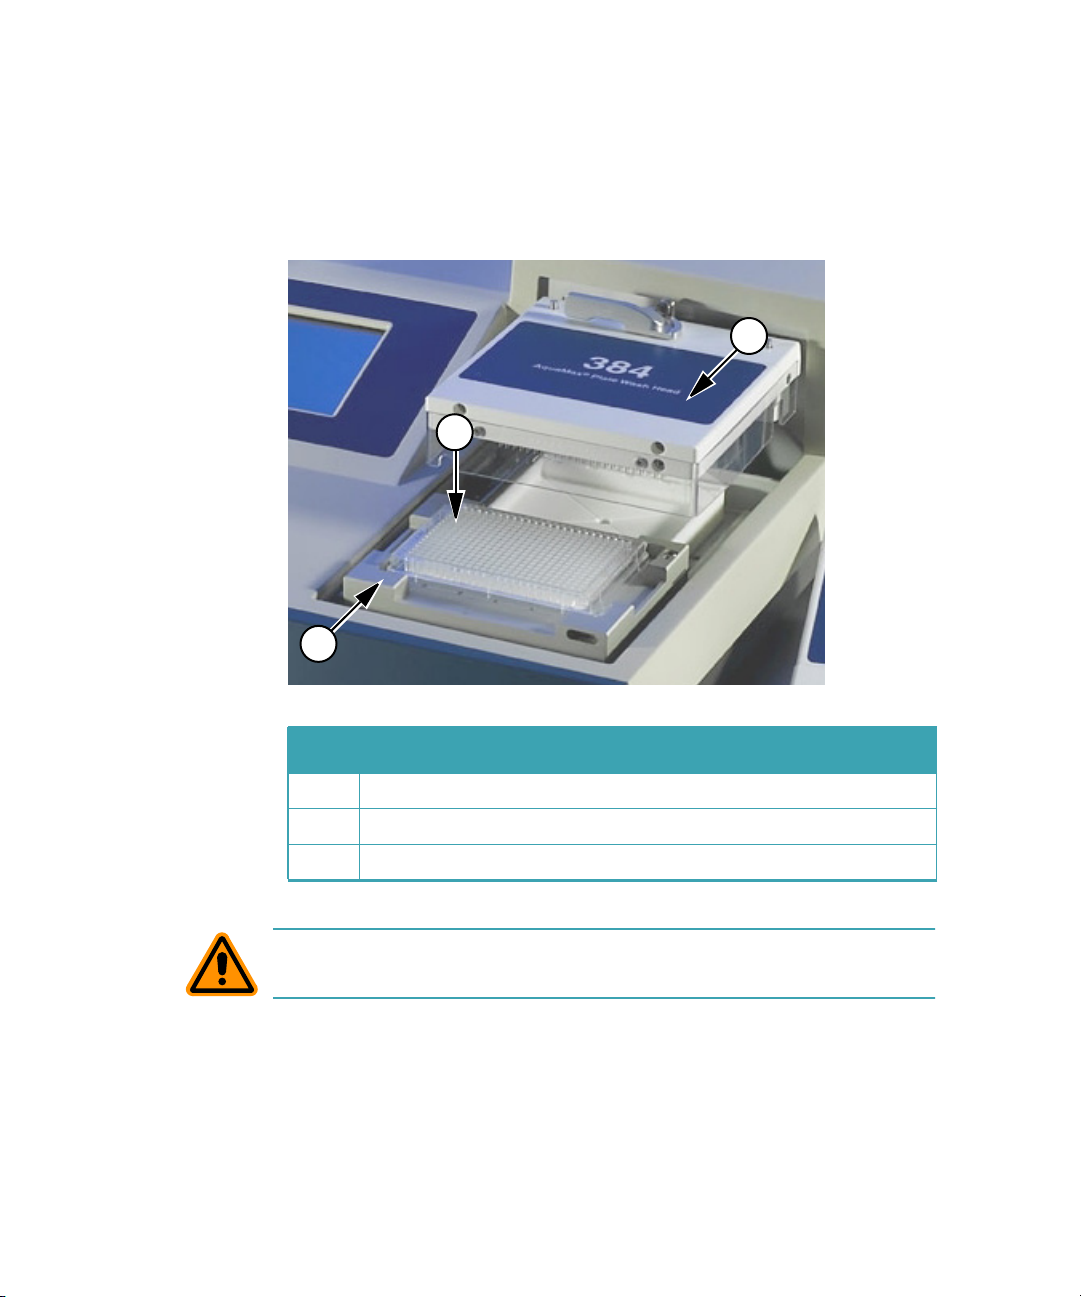
Microplate Carriage
The microplate carriage is located on the right side of the washer. The
plate carriage slides in and out of the washing chamber for loading and
unloading.
2
1
3
Table 1-4: Plate carriage
Item Description
1 Plate carriage, in eject position
2 384-well microplate
3 384 wash head
CAUTION! Do not obstruct the movement of the plate carriage during
operation. Obstruction can damage the instrument.
14 0112-0151 K

Introduction
Supported Microplates
AquaMax Microplate Washers accommodate rigid SBS-standard
polystyrene and polypropylene microplates with dimensions 128.2 mm
(L) × 86.0 mm (W), and heights ranging from 13.5 mm to 15.5 mm,
including:
• 96-well and 384-well standard formats (U-bottom, V-bottom, or
Flat)
• 96-well half area
• 96-well and 384-well small volume
Note: Some microplates with conical or tapered wells and some small
volume microplates are not compatible with bottom wash and aspirate
operations.
Note: 96-well “strip plates” fall outside SBS guidelines, and
compatibility of these plates with the AquaMax Microplate Washer
varies across brands. Plates with strips that are held firmly in a more
rigid frame and have smaller tabs are generally more washercompatible. Plates with strips that have large tabs and are held loosely
in a flexible frame, such as Nunc strip plates with C8 configuration,
should be avoided. If you are unsure whether a plate is compatible,
consult Technical Support or your sales representative before
proceeding.
The AquaMax Microplate Washer also supports magnetic bead washing
using the Dexter Magnetic Technologies LifeSep magnetic beadseparator adapter plates. For more details, refer to the Dexter Magnetic
Technologies website:
http://www.dextermag.com/lifesep.aspx.
The plate library includes eight commonly used microplates (4 each of
96-well and 384-well):
• Corning/Costar: 96 and 384
• BD/Falcon: 96 and 384
• Greiner: 96 and 384
• Nunc/Nalgene: 96 and 384
Detailed manufacturer numbers and dimensions for these default plate
types are listed in
0112-0151 K 15
Microplate Library on page 111.

AquaMax® 2000/4000 Microplate Washer User Guide
The plate library can store up to 32 plate types. For information about
adding a plate type, see Managing the Plate Library on page 73.
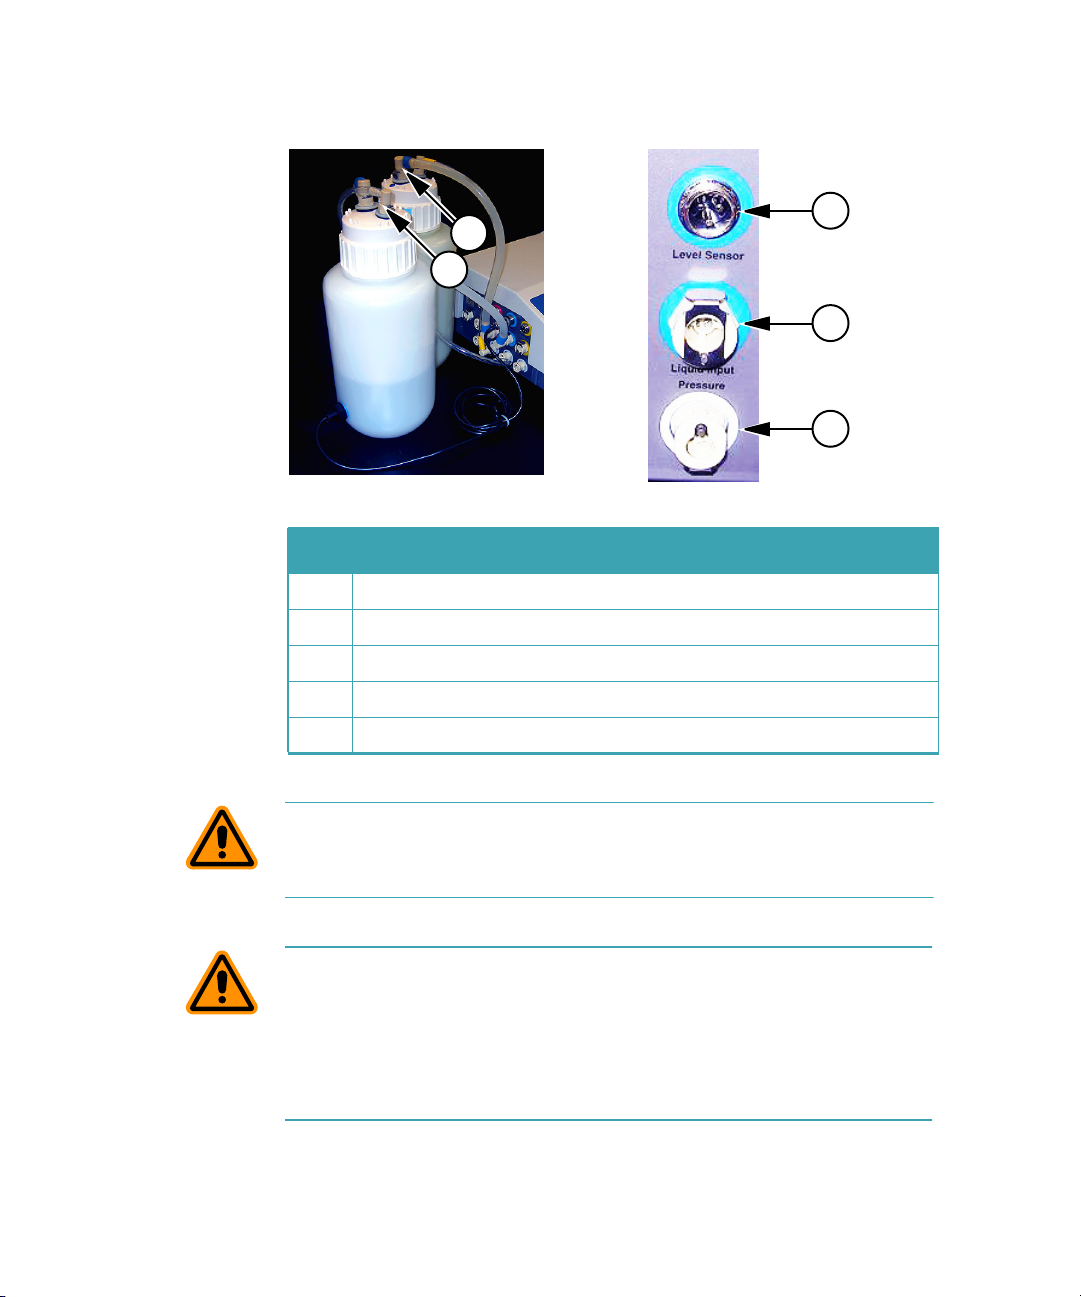
Reagent and Waste Bottle Ports
The source channels and waste connections are located on the left side
of the instrument. The AquaMax 2000 Microplate Washer has two
source channels, while the AquaMax 4000 Microplate Washer has four.
Each source channel can be connected to a reagent bottle, and is
composed of a fluid input, a pressure output, and an optional level
sensor connector. Waste can be drained into any waste bottle. A waste
sensor can be installed to detect a full waste bottle. Non-toxic waste can
be drained directly into a sink.
The AquaMax Microplate Washer supports 4 L or 10 L bottles only.
1
2
3
®
Table 1-5: Reagent ports for AquaMax
Item Description
1 Waste full sensor input
2 Waste fluid output
3 Source channels (green, red, blue, and yellow)*
4 Source bottle pressure outputs
5 Source bottle fluid inputs
6 Source bottle empty sensor inputs
4000 Microplate Washer.
6
5
4
16 0112-0151 K
Introduction
*The AquaMax 2000 Microplate Washer has only green and red inlets.
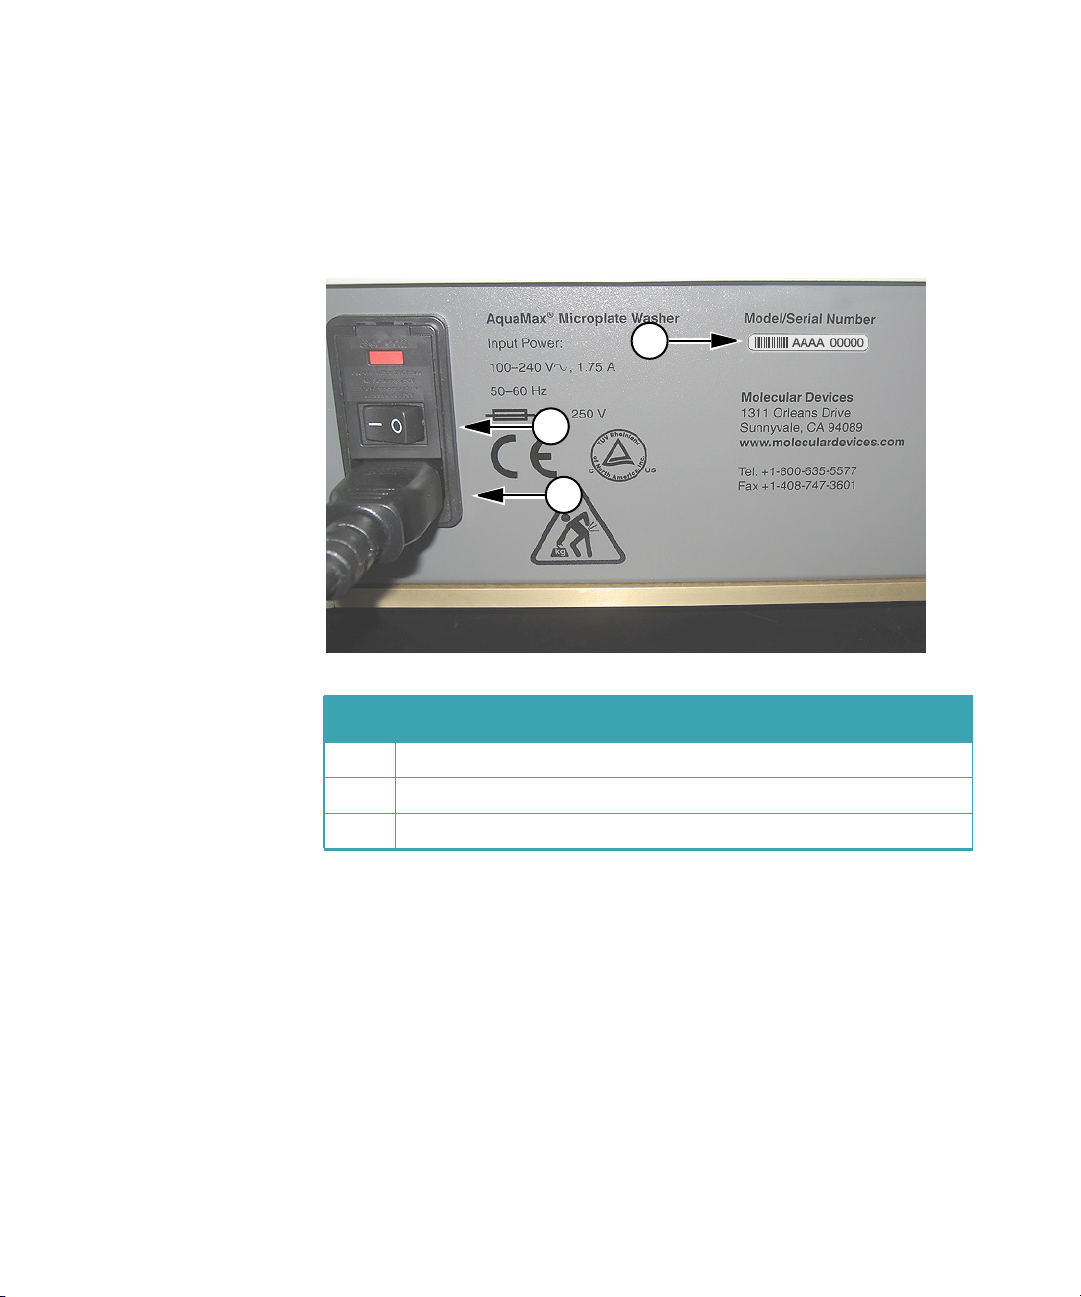
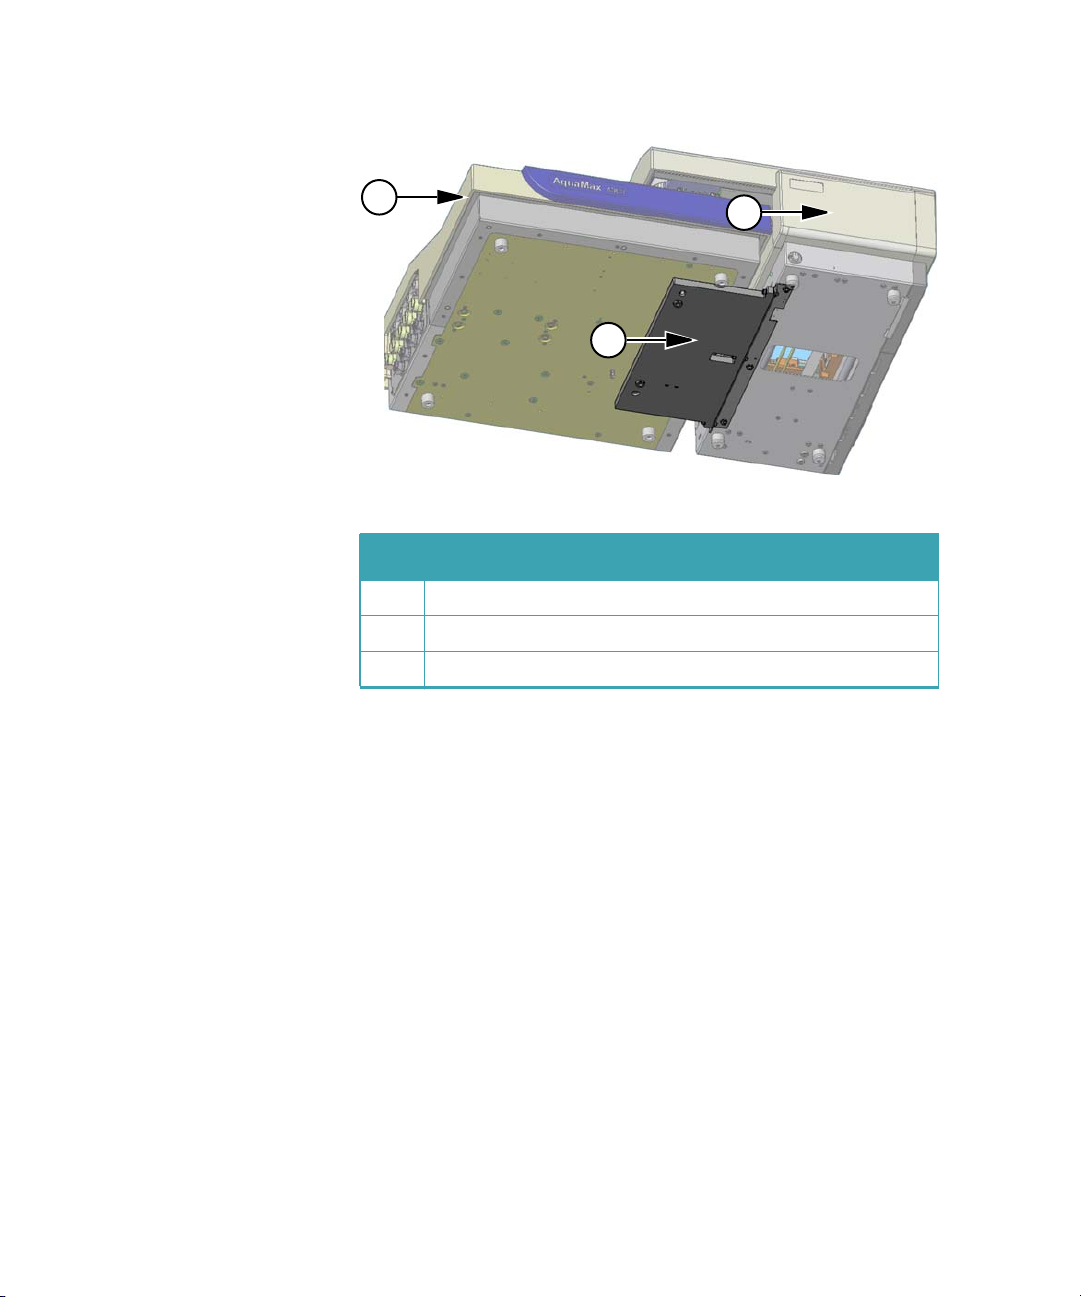
Back Panel
The power switch, power cord receptacle, communication ports, and
instrument information, are located on the back panel of the instrument.
3
1
2
Table 1-6: Back panel, right side
Item Description
1 Power switch
2 Power cord receptacle
3 Serial number
The power cord receptacle and power switch are located on the right
side of the instrument.
Labels and text next to the power switch provide important information
about the AquaMax Microplate Washer, such as line voltage rating and
serial number. Use the model/serial number on this label when
contacting Molecular Devices for technical support issues.
Two communication ports are located on the left side of the back panel.
0112-0151 K 17
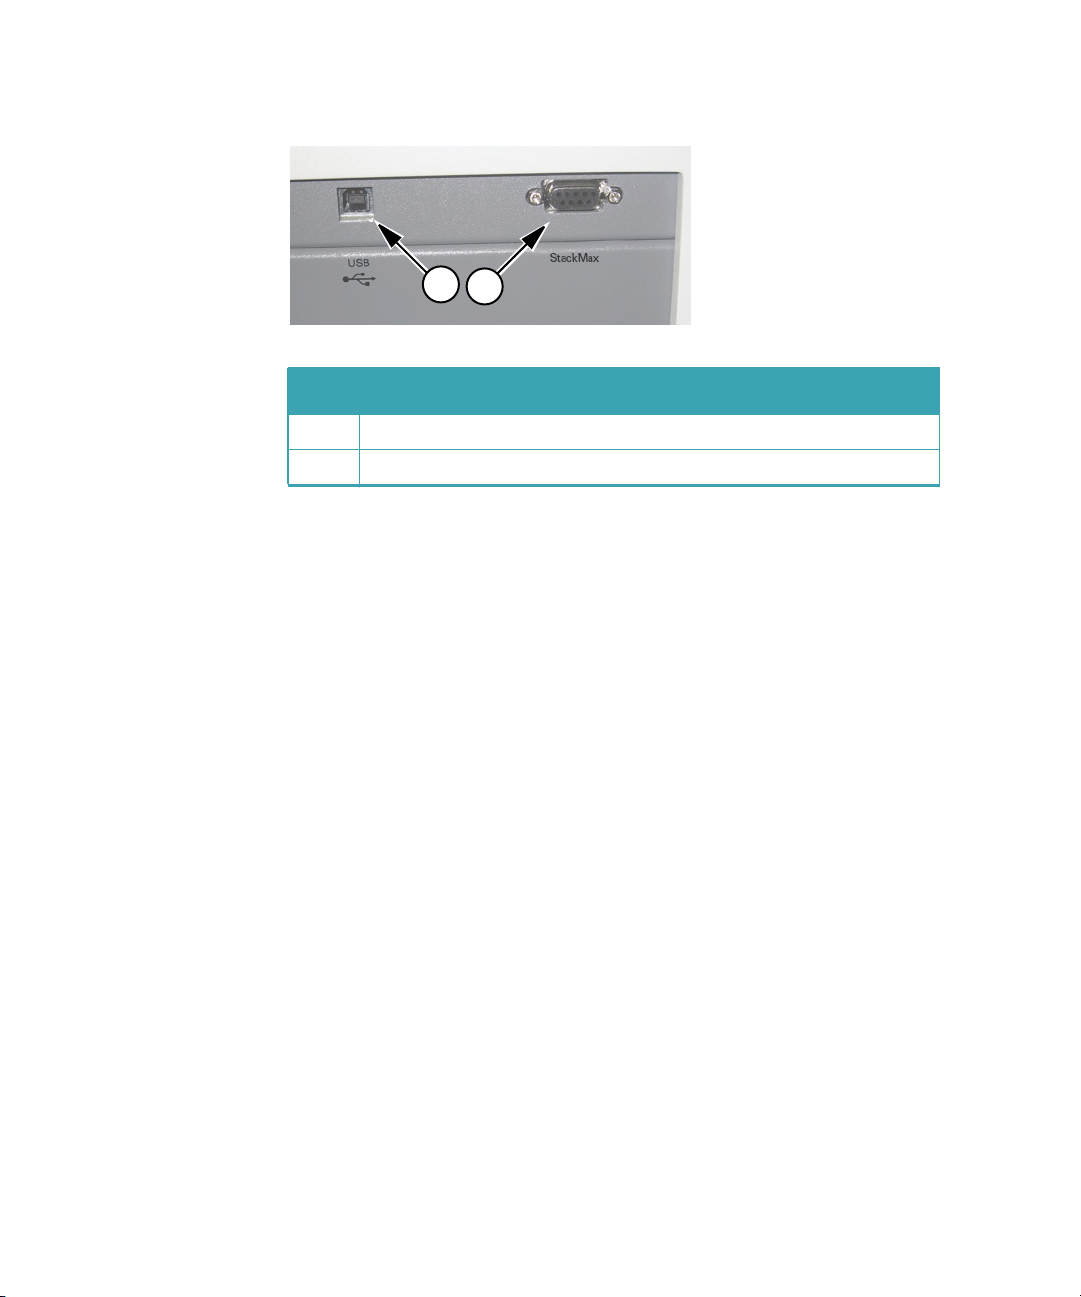
AquaMax® 2000/4000 Microplate Washer User Guide
1
2
®
Table 1-7: AquaMax
Microplate Washer USB and StakMax® connectors
Item Description
1 USB port
2 StakMax® connector
The USB Type B port is designated for external robotic control. The
StakMax communication port is dedicated to control StakMax stacker
operations. The StakMax control cable is available with the StakMax
integration kit (Part Number: 0310-5454).
18 0112-0151 K
Installation
2
WARNING! Shock Hazard. To avoid electrical shock, always make sure
the power switch is in the OFF position, and the power cord is
removed, before installing or moving the instrument.
WARNING! Risk of fire, explosion, or shock. Do not operate the
instrument in an environment where potentially damaging liquids or
gases are present.
CAUTION! Do not operate the instrument in an environment with a
temperature below 15°C.
CAUTION! Do not touch or loosen any screws or parts unless specifically
instructed by Molecular Devices. Doing so can cause misalignment and
voids the instrument warranty.
0112-0151 K 19

AquaMax® 2000/4000 Microplate Washer User Guide
Unpacking
WARNING! Each AquaMax Microplate Washer weighs approximately
41 lbs (18.5 kg) and should be lifted with care.
The AquaMax® Microplate Washers are shipped in two specially designed
containers.
• The base unit box contains the washer unit and accessories
(manual, power cord, waste tube, and tubing label kit):
AquaMax 2000 Microplate Washer (Part Number: 0310-
5363)
AquaMax 4000 Microplate Washer (Part Number: 0310-
5227)
The tubing label kit contains 4×3 pieces of colored slip-on
plastic spiral wraps, one group of each color, for labeling
bottle connections (liquid, pressure, level sensor).
• The wash head box contains up to four wash heads, each in a
clamshell container:
96-Well Microplate Wash Head (Part Number: 0310-5216T)
96-Well Cell Wash Head (Part Number: 0310-5217T)
384-Well Microplate Wash Head (Part Number: 0310-5219T)
384-Well Cell Wash Head (Part Number: 0310-5218T)
The standard AquaMax Microplate Washer unit does not include any
bottles. If you have purchased bottles separately, check to make sure that
all bottles and tubing are present. Each reservoir bottle should contain a
cap, fluid tubing, and air tubing. The waste bottle should contain its own
waste tubing.
• Reagent and waste bottles:
4-Liter Reservoir without Level Sensor (Part Number:
5000801)
4-Liter Reservoir with Level Sensor (Part Number: 5000802)
10-Liter Reservoir (Part Number: 9000-0299)
10-Liter Waste Reservoir (Part Number: 9000-0296)
The AquaMax Microplate Washer supports 4 L or 10 L bottles only.
Keep all boxes and packing materials, including the clamshell containers
for the wash heads. Use the original packing materials for long-term
storage of the instrument. Original packing material must be used for
shipping if the unit is returned for repair.
20 0112-0151 K
Note: If a box has been damaged in transit, it is particularly important
that you retain it for inspection by the carrier in case there has also
been damage to the instrument.
Setting Up the Instrument
WARNING! Each AquaMax Microplate Washer weighs approximately
41 lbs (18.5 kg) and should be lifted with care.
Set up the instrument on a level surface, away from direct sunlight, dust,
drafts, and vibrations. Complete the following procedures:
• To turn on the instrument on page 21
• To connect a reagent bottle on page 21
• To connect a waste bottle on page 24
• To install the wash head on page 26
To turn on the instrument
Installation
Molecular Devices recommends that you use a surge protector between
the power cord and the grounded power outlet.
1. Connect the power cord to the back panel.
2. Connect the power cord to a surge protector or grounded power
outlet.
The instrument automatically detects the voltage setting.
To connect a reagent bottle
Each reagent bottle comes with two quick-connect fittings and tubing in
two sizes. The larger tubing is for fluid. The smaller tubing is for bottle
pressure.
The AquaMax Microplate Washer supports 4 L or 10 L bottles only.
0112-0151 K 21
AquaMax® 2000/4000 Microplate Washer User Guide
2
1
Table 2-1: Reagent bottles and connections fittings
Item Description
1 Small fitting for pressure connection
2 Large fitting for liquid input
3
4
5
3 Level sensor fitting on the instrument
4 Liquid input fitting on the instrument
5 Pressure connector on the instrument
CAUTION! The source bottle and waste fluid fittings are the same size.
Do not connect source bottles to the Waste Output, or damage to the
instrument can occur.
CAUTION! Pressurized bottles for the AquaMax Microplate Washer
provide up to 5 years of service. Eventually, they will show signs of aging
such as yellowing, plastic degradation, or thread wear. Therefore, it is
imperative to replace bottles at the earliest signs of aging. Use only
bottles supplied for use with the AquaMax 2000 and 4000 Microplate
Washers.
22 0112-0151 K

Installation
1. Fill the bottle with a reagent, and tighten the cap firmly.
Tip: For quick and accurate assembly of reagent bottles, use slip-
on rings to color-code all tubing and sensor connections.
2. Connect one end of the fluid tubing to the large fitting on the
bottle cap.
3. Connect the other end to a Liquid Input on the left side of the
instrument (green, red, blue, or yellow).
Tip: Push down on the metal fitting of the quick connector to
ease the fitting into place.
4. Connect one end of the pressure tubing to the small fitting on
the bottle cap.
5. Connect the other end to the Pressure fitting below the Liquid
Input.
6. If the bottle has an Empty sensor, connect the sensor to the Level
Sensor connector above the Liquid Input fitting used.
0112-0151 K 23
AquaMax® 2000/4000 Microplate Washer User Guide
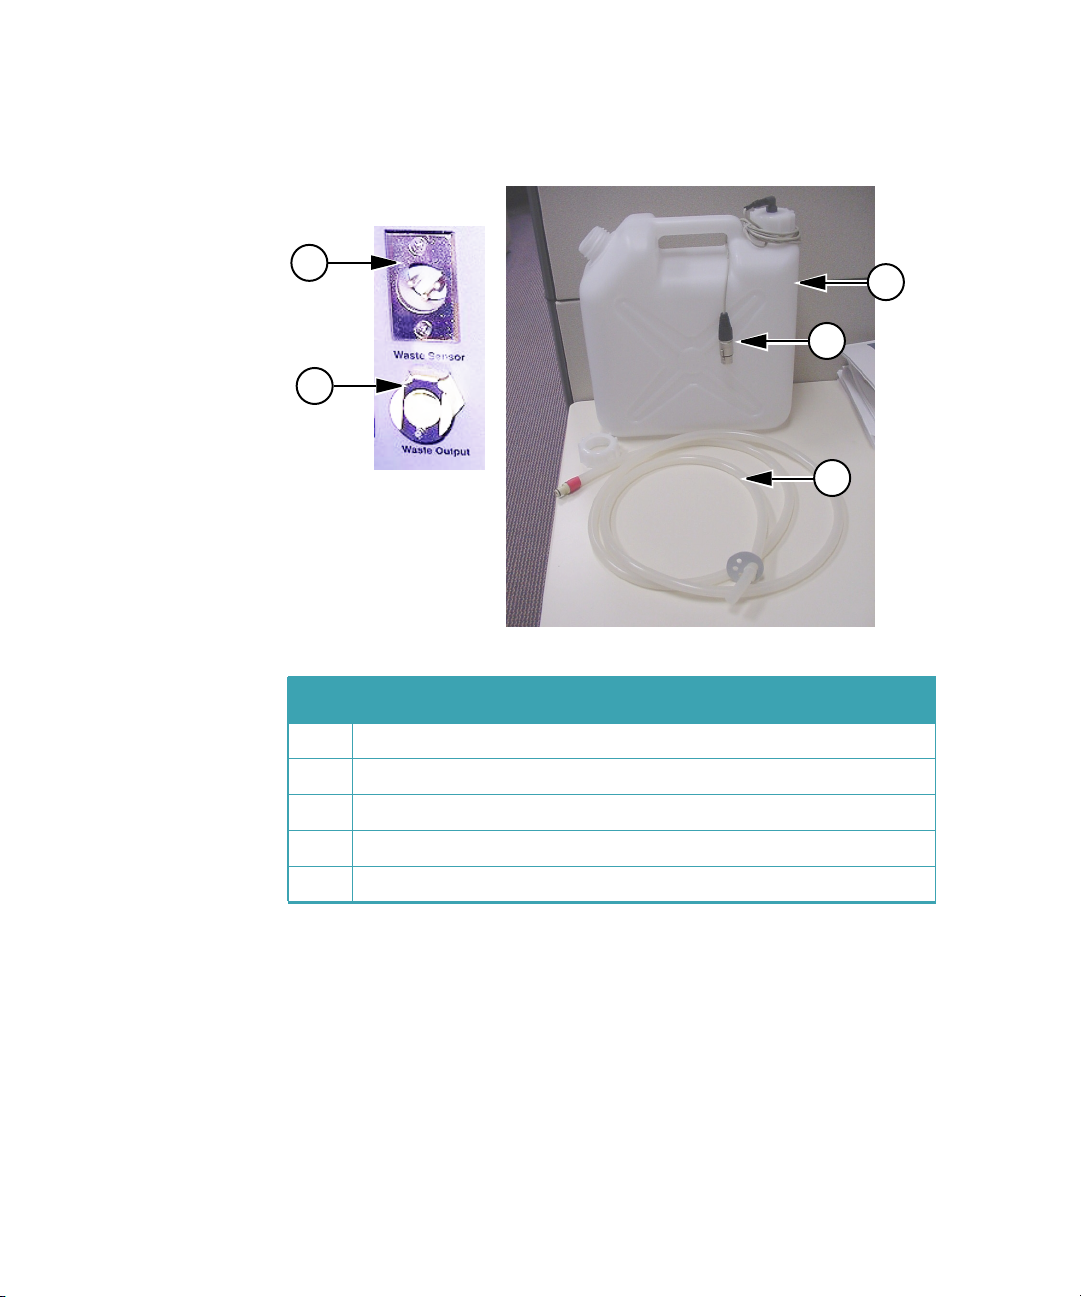
To connect a waste bottle
1
2
Table 2-2: Waste bottle and connection fittings
Item Description
1 Waste sensor connector
2 Waste output fitting
3 Waste bottle
3
4
5
4 Waste full sensor
5 Waste tubing
24 0112-0151 K
Installation
1. Connect the quick connect fitting of the waste tubing to the
Waste Output fitting on the left side of the instrument.
2. Connect the free end of the tubing to any vented waste
container.
For non-toxic waste the free end of the tubing can be placed
directly into a sink. The open end of the waste tubing must be
below the level of the Microplate Washer, and must remain free
of obstruction.
CAUTION! An obstructed waste tubing can damage the
instrument.
3. If the bottle has a waste full sensor, connect the waste full sensor
to the Waste Sensor input fitting.
WARNING! Biohazard. Waste tubing must be connected during
operation. Waste fluid is ejected out of the waste port. If no
waste tubing is connected, waste will spray and spill from the
waste output port.
CAUTION! Waste containers must be vented. Connecting the
waste tubing to a pressurized or closed vessel will cause damage
to the waste pump.
0112-0151 K 25
AquaMax® 2000/4000 Microplate Washer User Guide
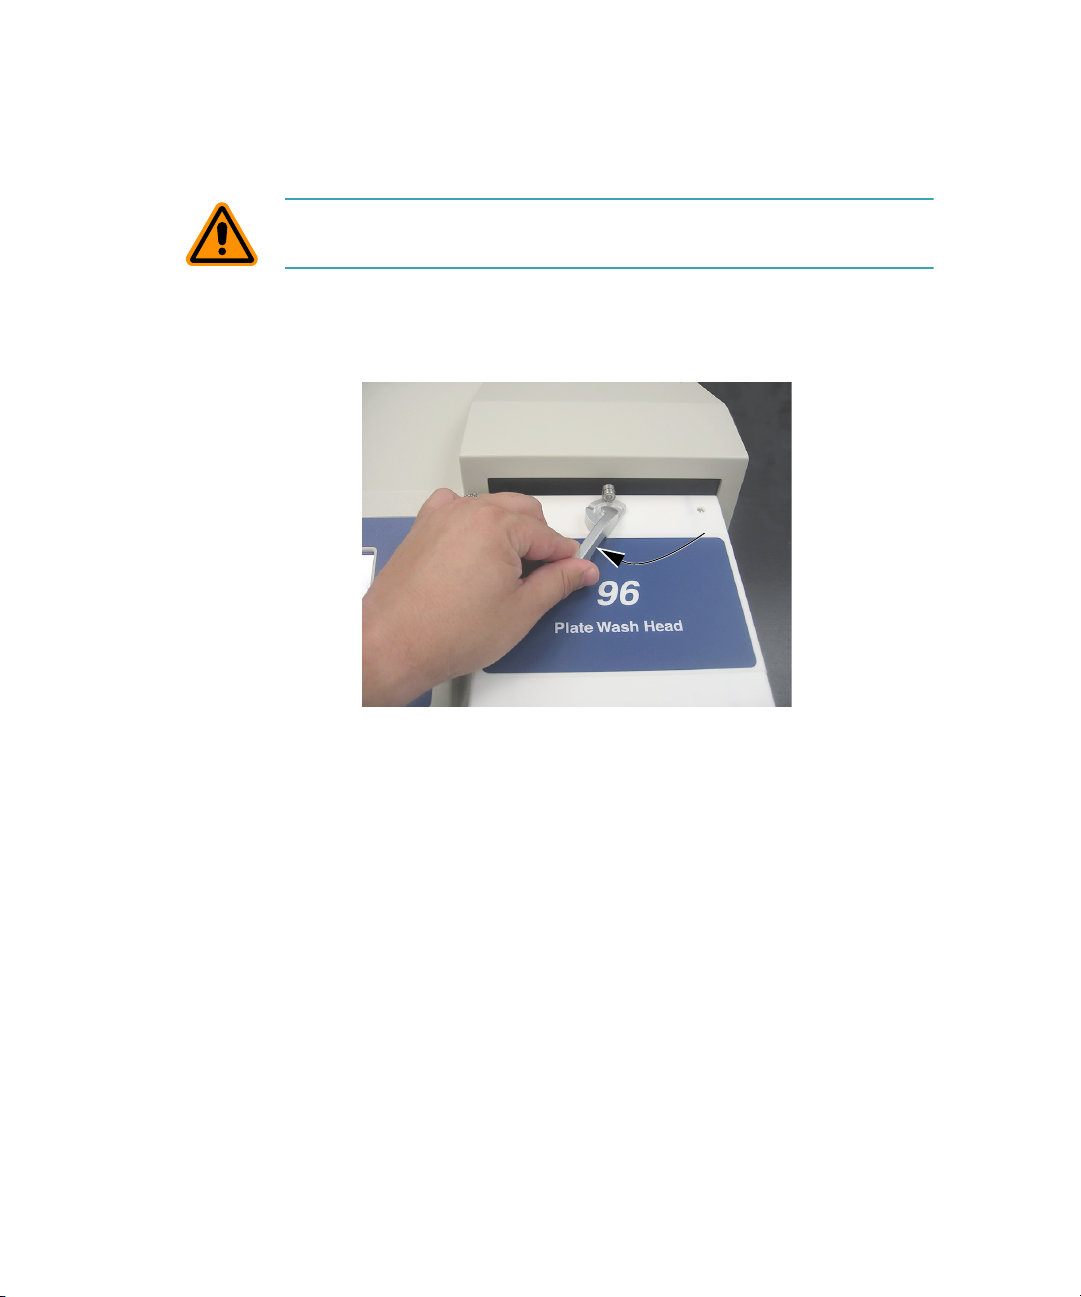
To install the wash head
CAUTION! The probes on the underside of the wash head are delicate.
Take care when handling the wash heads.
1. Install the wash head (96 or 384) of choice. Wash heads are
shipped pre-qualified and will work with any base unit.
2. Move the lever to the left to lock the wash head in place.
Figure 2-1: Wash head lock
3. Turn ON the instrument power switch located on the back panel.
The following operations occur as the instrument initializes when
turned on:
The wash head rises to prepare for plate loading.
The touch screen turns on and displays instrument status.
The plate carriage and wash head motor find home and
return to eject positions.
26 0112-0151 K
Connecting to a StakMax® Plate Stacker
®
Table 2-3: AquaMax
installed
Microplate Washer with StakMax® Plate Stacker
Installation
1
88
Item Description
1 StakMax® Plate Stacker
To connect the AquaMax Microplate Washer to the StakMax® Plate
Stacker you will need the StakMax integration kit (Part Number: 0310-
5454). The integration kit consists of a StakMax/AquaMax base plate,
bolts for the base plate, a tool for the bolts, a StakMax communication
cable, and an integration manual.
To set up a StakMax® Plate Stacker with an AquaMax® Microplate Washer
For more detailed instructions, see the integration manual.
1. Make sure that both the AquaMax Microplate Washer and the
StakMax Plate Stacker are turned off and that the power cords
are disconnect from the power supply.
2. Use the StakMax/AquaMax base plate to connect the StakMax
Plate Stacker to the AquaMax Microplate Washer (
0112-0151 K 27
Figure 2-4).
AquaMax® 2000/4000 Microplate Washer User Guide
1
2
3
Table 2-4: StakMax
®
Plate Stacker to AquaMax® Microplate
Washer adapter plate
Item Description
1 AquaMax® Microplate Washer
2 StakMax® Plate Stacker
3 Adapter plate
3. Connect the StakMax communication cable to the serial port on
the back of the StakMax Plate Stacker.
4. Connect the StakMax communication cable to the StakMax port
on the back panel of the AquaMax Microplate Washer. See
Back
Panel on page 17.
5. Turn on both the AquaMax Microplate Washer and the StakMax
Plate Stacker.
The StakMax Plate Stacker automatically detects that it is
connected to the AquaMax Microplate Washer.
The AquaMax Microplate Washer detects the StakMax Plate
Stacker.
28 0112-0151 K

Installation
Figure 2-2: StakMax Stacker indicator
The washer controls the stacker through its on board programs.
For information about using the stacker in a program, see
Program Stacker Settings on page 43.
0112-0151 K 29

AquaMax® 2000/4000 Microplate Washer User Guide
30 0112-0151 K

Getting Started
This chapter provides the information required to get started with the
AquaMax® 2000 and AquaMax 4000 Microplate Washers.
• Starting the Instrument on page 31
• Main Tab on page 32
• Running Programs on page 34
• Stopping Programs on page 35
• Shutting Down the Instrument on page 36
Starting the Instrument
To turn on the instrument, use one of the following procedures:
• If the instrument is in shutdown mode, touch anywhere on the
screen to wake the instrument up. For information about
shutdown mode, see Shutdown Options Dialog on page 78.
• If the instrument has been turned off, turn ON the instrument
power switch located on the back panel.
The instrument automatically performs diagnostic checks to
make sure that it is functioning correctly. When the diagnostic
checks are complete, the touch screen displays the Main tab.
3
Figure 3-1: Main tab
0112-0151 K 31

AquaMax® 2000/4000 Microplate Washer User Guide
Main Tab
The Main tab is used to execute stored programs. It features quick access
buttons for the one-touch maintenance programs and a list of
user-defined programs.
1
2
3
7
4
5
6
Table 3-1: Main tab
Item Description
1 Function Tabs–The Main tab is selected.
2 Run–Runs the selected program in the list.
3 Stacker Attached–Indicates that the StakMax® Plate Stacker is
attached.
4 Prime–Runs the one-touch prime program.
The one-touch prime program performs a full prime on the wash
head and internal fluidics from the default user-prompted fluid inlet.
5 Clean–Runs the one-touch cleaning program.
The one-touch clean program cleans and decontaminates internal
fluid paths. The system primes with the cleaning solution, pauses for
5 minutes to allow the cleaning solution to soak in the system, and
follows with 3 rinse cycles using the rinse solution. The default
program uses the red inlet for cleaning and the green inlet for rinsing.
The system is purged at the end of this program.
See Table B-1: AquaMax® Microplate Washer Compatible and
Incompatible Cleaning Solutions on page 113.
8
9
10
32 0112-0151 K

Getting Started
Table 3-1: Main tab (cont’d)
Item Description
6 Rinse–Runs the one-touch rinse program.
The one-touch rinse program runs the standard rinse cycle three
times to flush the internal fluidics with rinse solution from the default
green inlet. At the end of the rinse program, the system drains the
rinse solution from the fluid paths.
7 Program List–Displays a list of the user-defined programs in the
program library. The number to the right of the program name (96 or
384) refers to the plate type used.
• Red indicates that the program uses a plate type that has been
changed since the program was last saved. When you run a red
program, an error message prompts you to accept the plate
parameter change before the program runs.
• Gray indicates that the program is not compatible with the
installed wash head. You cannot run gray programs.
8,10 Up Arrow and Down Arrow–Scroll the list if the number of programs
exceeds the display area.
9 Head–Identifies the installed wash head or cell head:
• PW96: 96-well plate wash head
• PW384: 384-well plate wash head
• CW96: 96-well cell wash head
• CW384: 384-well cell wash head
Note: One-touch programs can be edited and copied like any other
programs, but they cannot be renamed or deleted.
Note: Only program settings applicable to the installed wash head are
available in the on-screen menus.
0112-0151 K 33

AquaMax® 2000/4000 Microplate Washer User Guide
Running Programs
To run a stored program
Note: Gray programs are not compatible with the installed wash head.
You cannot run a gray program.
Note: Red programs indicate a change in the plate type. When you run
a red program, the message “Plate parameters changed” appears. Click
OK to acknowledge the changes and return to the program list. The red
is removed and you can run the program as usual. Click Cancel to exit
the program without changing the red status indicator.
1. Make sure that all appropriate reagent bottles are connected to
Liquid Input and Pressure fittings on the left side of the
instrument.
2. Make sure that the waste tubing is connected to the Waste
Output fitting and the Waste bottle.
3. Load the appropriate microplate in the plate carriage.
4. On the Main tab, touch the program from the list and touch Run.
When a program is running, the touch screen displays a status
dialog.
Figure 3-2: Status dialog
34 0112-0151 K

To run a one-touch maintenance program
Stopping Programs
To interrupt a program in non-emergency conditions
Getting Started
1. Make sure that all appropriate reagent bottles are connected to
Liquid Input and Pressure fittings on the left side of the
instrument.
2. Make sure that the waste tubing is connected to the Waste
Output fitting and the Waste bottle.
3. On the Main tab, touch the appropriate one-touch program
button.
When a program is running, the touch screen displays a status
dialog. (See
Note: For information about one-touch program defaults, see
Program Tab on page 38. One-touch programs can be copied and
edited.
Figure 3-2.)
When you run a program, the touch screen displays a status dialog. (See
Figure 3-2.)
• For non-emergency stops touch Cancel.
Cancel stops the program when appropriate. It turns off the
pumps, resets the wash head, moves the plate carriage to the
plate load position, and performs program clean up before
returning control to the touch screen.
To interrupt a program in emergency conditions
When you run a program, the touch screen displays a status dialog. (See
Figure 3-2.)
1. For emergency stops touch Stop.
Stop halts the program immediately. It turns off all pumps and
motors, closes valves, and releases system pressure.
2. Touch OK to recover and remove the plate.
A software reset is performed before returning control to the
touch screen.
0112-0151 K 35

AquaMax® 2000/4000 Microplate Washer User Guide
3. If fluid remains in the trough, then in the Options tab, touch
Purge.
Note: The wash head must be re-primed to continue.
Shutting Down the Instrument
The AquaMax Microplate Washer supports the following shutdown
options:
• For general use with short periods of inactivity, use Automatic
Shutdown. Automatic Shutdown puts the instrument in a low
power mode after a user-specified time of inactivity. It turns off
the screen, releases system pressure, and shuts off all motors
and valves. The shutdown process can include a rinse and purge
cycle. For information about automatic shutdown options, see
Shutdown Options Dialog on page 78.
• For longer periods of inactivity, for example if the instrument is
not used every day, turn off the instrument. For information, see
To turn off the instrument on page 93.
• For storage or shipping, rinse and purge the instrument and
remove the wash head before turning off the power. For
information, see To prepare the wash head for storage on
page 94.
36 0112-0151 K

Operation: The Touch Screen Interface
Operation of the AquaMax® Microplate Washer is controlled by the onboard touch screen.
This chapter provides information about the functions that are available
on each tab of the interface.
• Administrative Mode on page 37
• Program Tab on page 38
• Managing the Program Library on page 61
• Plates Tab on page 70
• Managing the Plate Library on page 73
• Options Tab on page 74
• Managing the Software on page 79
For information about the Main tab and about running programs, see
Getting Started on page 31.
Administrative Mode
The default operating mode of the touch-screen interface allows all users
to access all program functions, plate functions, and options.
You can restrict access to editing functions and system options by setting
an administrator passcode. (See
setting an administrator passcode, you must use the administrator
passcode to access the following functions and options:
Restricting Functions on page 80.) After
4
• New (Program, Plates) • Copy (Program)
• Rename (Program) • Restack (Options)
• Delete (Program, Plates) • Change passcode (Options)
• Calibrate screen (Options) • Shutdown options (Options)
• Edit (Program, Plates)
You can access the restricted functions by touching the Admin button
and entering the administrator passcode. There is only one passcode for
the instrument, but the passcode must be entered separately on each
tab.
0112-0151 K 37

AquaMax® 2000/4000 Microplate Washer User Guide
The passcode is not required to run existing programs, view program
details and plate details, or access Depressurize, Purge, and Shutdown on
the Options tab.
Program Tab
The Program tab contains the functions to manage the program library.
1
2
3
7
4
5
6
Table 4-1: Program tab, general access to all functions
Item Description
1 Function Tabs–The Program tab is selected.
2 New–Creates a new program.
3 Edit–Opens the selected program for review and editing.
4 Rename–Renames the selected program.
5 Copy–Copies the selected program.
6 Delete–Deletes the selected user-defined program.
The one-touch programs cannot be deleted.
7 Program List–Displays a list of programs in the program library.
The number to the right of a user-defined program (96 or 384) refers
to the plate type used. Red indicates that the program uses a plate
type that has been changed since the program was last saved.
8
9
10
11
8,11 Up Arrow and Down Arrow–Pages up and down through the program
list if the list exceeds the display area.
38 0112-0151 K

Operation: The Touch Screen Interface
Table 4-1: Program tab, general access to all functions (cont’d)
Item Description
9,10 Move Up and Move down–Moves the selected program up or down
in the program list.
The one-touch programs cannot be moved. They are always listed at
the top of the program list.
Program Tab: Administrative Mode
In administrative mode, general users have access only to the View
button and the Admin button. The Admin button and the administrator
passcode access the program editing options.
1
2
3
Table 4-2: Program tab with administrator passcode
Item Description
1 View–Opens the selected program so that you can view the settings
and steps.
2 Admin–Opens the passcode dialog to access the program editing
options.
3 Admin–Indicates that the AquaMax® Microplate Washer is in
administrator mode, and exits administrator mode when
programming changes are complete.
For information about the program editing buttons, see
Program Tab on
page 38.
0112-0151 K 39

AquaMax® 2000/4000 Microplate Washer User Guide
For information about restricting access to editing functions, see
Restricting Functions on page 80.
Program Settings Dialog
The Program Settings dialog controls step-independent program
information. It appears automatically when you create a new program
and is the first item in the program after the program has been saved.
See To access the Program Settings dialog for a program on page 41.
1
2
3
Table 4-3: Program Settings
Item Description
1 Plate–Lists the plates in the plate library. The highlighted option is the
option used for the current program. Plate type is not required for
programs involving only maintenance steps such as Prime, Soak,
Clean, Rinse, and Standby. Select no plate for maintenance programs.
Gray indicates that the plate is not compatible with the installed wash
head and is not available for selection.
2 Program Options–Opens the Program Options dialog with additional
program specific options.
3 Up/Down Arrows–Page through the list plates in the plate library.
Note: Program options and menus are optimized for the installed wash
head. Plate types that are not compatible with the installed wash head
are disabled.
40 0112-0151 K

Operation: The Touch Screen Interface
To access the Program Settings dialog for a program
1. Touch the Program tab.
2. Select a program from the list.
3. Touch Edit.
4. Touch Program Settings at the top of the list of program steps.
5. Touch Edit.
Program Options
Access Program Options from the Program Settings dialog. Messages,
stacker settings, and dispense accuracy adjustments are program
specific.
1
2
3
Table 4-4: Program Settings
Item Description
1 Messages–Opens the Messages dialog where you can set Program
Start and Program Done messages for the current program.
2 Stacker–Opens the stacker functions dialog for the current program.
3 Adjust Dispense–Opens the Adjust Dispense dialog for the current
program.
0112-0151 K 41

AquaMax® 2000/4000 Microplate Washer User Guide
Program Messages
You can set up the program to display a message before and after
running the steps of the program. Messages are optional.
1
2
Table 4-5: Messages dialog
Item Description
1 Program Start Message–Opens the keypad where you can enter a
message to display on the touch panel when the current program is
run. Running a program that has a Program Start Message defined
displays the message first. The user must confirm the message before
the program can run.
2 Program Done Message–Opens the keypad where you can enter a
message to display on the touch panel when all the steps of the
current program have been run.
To access the messages options for the current program
1. Select Program Settings from the list of steps.
2. Touch Edit.
3. Touch Program Options.
4. Touch Messages.
42 0112-0151 K

Operation: The Touch Screen Interface
Program Stacker Settings
In the stacker settings dialog you can enable stacker options for the
current program. Stacker settings are optional. See To access the stacker
options for the current program on page 44.
With the stacker enabled, plates are supplied from the stacker input.
Each plate is washed using the same program and then placed in the
stacker output. The program ends when the input stack is empty.
Table 4-6: Program stacker settings
Item Description
1 Enable Stacker–Enables and disables the plate stacker. The stacker is
enabled when the button is highlighted.
2 Restack at End–Transfers the plates back to the input stack at the end
of the program.
The stacker options are available when a stacker is not attached to the
washer. If you run a program with the stacker functions enabled and no
stacker, the washer displays a warning with instructions to add a plate
manually.
0112-0151 K 43

AquaMax® 2000/4000 Microplate Washer User Guide
To access the stacker options for the current program
1. Select Program Settings from the list of steps.
2. Touch Edit.
3. Touch Program Options.
4. Touch Stacker.
Adjust Dispense
The Adjust Dispense dialog lets you optimize the accuracy of the
dispense volumes based on the specific requirements of the individual
program. For more information, see To adjust dispense accuracy for a
program on page 68.
Figure 4-1: Adjust dispense
44 0112-0151 K

Operation: The Touch Screen Interface
Program Tab: Program Editing
The Program Tab contains the functions to manage the steps in the
current program. See To access program details on page 46.
1
2
7
8
3
9
4
5
6
Table 4-7: Program details
Item Description
1 New–Opens the New Step dialog where you can select the type of
new step to add to the current program.
2 Edit–Opens the selected step for editing.
3 Copy–Copies the selected step.
4 Delete–Deletes the selected step.
5 Test–Runs through the steps in the current program.
6 Done–Closes the current program and returns to the list of programs.
7 Displays the name of current program.
8 Program Settings–Opens the Program Settings dialog.
To view and change the details, select Program Settings and touch
Edit.
9 Program Details–Lists the steps that make up the program.
Details for the steps are noted to the right. To change the details,
select the step and touch Edit.
0112-0151 K 45

AquaMax® 2000/4000 Microplate Washer User Guide
To access program details
1. Touch the Program tab.
2. Touch a program.
3. Touch Edit.
New Step Selection
The New Step dialog lists the steps that can be included in the current
washer program. Steps that are not compatible with the currently
installed equipment options appear gray.
Each program can have up to 50 steps.
Note: Before creating or editing a program, make sure that the
equipment is configured for the operations you want to program. The
system detects the installed options and tailors menus and program
options.
Figure 4-2: Steps that can be included in a program
The following sections detail the settings for each step type:
• Dispense Settings on page 47
• Aspirate Settings on page 49
• Wash Settings on page 50
• FastWash Settings on page 53
• Shake Settings on page 54
• Soak Settings on page 55
46 0112-0151 K

Operation: The Touch Screen Interface
• Repeat Settings on page 56
• Purge Settings on page 57
• Rinse Settings on page 58
• Standby Settings on page 59
• Prime Settings on page 60
Dispense Settings
The Dispense step dispenses fluid into a microplate using predefined
parameters. Fluid dispense occurs at the top of the wells to prevent
contamination to the probes.
1
2
3
4
Table 4-8: Dispense settings
Item Description
1 Inlet–Liquid to be used for this step.
Available options correspond to the color-coded reagents connected
to the washer.
2 Prompt–Indicates that system will pause before dispensing and wait
for the user to specify the inlet.
3 Rate–Dispense rate.
See Table 4-9: Plate Wash and Cell Wash Dispense Rates.
0112-0151 K 47

AquaMax® 2000/4000 Microplate Washer User Guide
Table 4-8: Dispense settings
Item Description
4 Volume–Volume to be dispensed.
Use 5 to 150 μL for 384-well plates and 20 to 400 μL for 96-well
plates. The volume must be within the specified range for the plate or
the program cannot be saved or run.
Note: You should never dispense a greater volume than is
listed by the plate manufacturer.
Table 4-9: Plate Wash and Cell Wash Dispense Rates
Plate wash
96 plate wash 384 plate wash
dispense
rate
1 150 18300 150 21600
2 200 22100 200 25600
3 250 25400 250 26200
4 350 31300 350 35600
5 450 36600 450 41400
Cell wash
(mmHg) (μL/plate/sec) (mmHg) (μL/plate/sec)
96 cell wash 384 cell wash
dispense
rate
1 75 7200 150 19400
2 100 9100 200 23000
3 150 12400 250 26300
4 250 17800 350 32100
5 350 22500 450 37400
(mmHg) (μL/plate/sec) (mmHg) (μL/plate/sec)
Tip: Best dispense volume accuracy and precision are achieved at the
highest rate (Rate 5) and volume.
48 0112-0151 K

Operation: The Touch Screen Interface
Dispense accuracy is set to specification during manufacturing. The
following factors can affect dispense accuracy:
• Types of reagent.
• Locations and size of reagent bottles.
The AquaMax Microplate Washer supports 4 L or 10 L bottles
only.
• Level of reagent in bottles (too full or too low).
To adjust dispense factors, see
To adjust dispense accuracy for a program
on page 68.
Aspirate Settings
The Aspirate step removes fluid from a microplate using predefined
parameters.
1
2
3
4
5
Table 4-10: Aspirate settings
Item Description
1 Mode–Aspiration from Center, Edge, or Crosswise (from front to back
of wells).
Edge and Crosswise aspiration are supported for flat bottom wells
only.
2 Rate–Aspiration rate.
See Table 4-11: Aspiration Rates.
3 Descent speed–The speed at which the probes enter the wells.
4 Dwell time–Dwell time at the final probe position. The default value is
1 second. Range is 0-30 seconds.
0112-0151 K 49

AquaMax® 2000/4000 Microplate Washer User Guide
Table 4-10: Aspirate settings
Item Description
5 Probe height–final probe height above the bottom of the well. The
range is 0 to the top of well. The maximum probe height is the well
depth specified in the plate library.
To avoid damage to probes and plate bottom, the AquaMax®
Microplate Washer has a “no touch” feature. If the height is set to
0mm, the aspiration pins are offset from the well bottom by a
minimum clearance.
Table 4-11: Aspiration Rates
AQ 4000 AQ 2000 96 (μL/well/sec) 384 (μL/well/sec)
5 Fast 270 70
4 240 60
3 200 50
2 Gentle 80 20
15010
Tip: For plate washing, minimal residual volume is best achieved using
Crosswise aspiration, a rate of 5, a fast descent speed, a 1 second dwell time,
and 0 mm to 0.2 mm probe height.
Wash Settings
The Wash step washes a microplate using predefined parameters.
Note: To prevent overflow when using the Wash function with a plate wash
head, add a surfactant such as Tween to wash solutions.
50 0112-0151 K

Operation: The Touch Screen Interface
1
2
3
4
5
Table 4-12: Wash settings
Item Description
1 Inlet–Liquid to be used for this step.
The available options correspond to the color-coded reagents
connected to the washer.
2 Prompt–Indicates that the system will pause before dispensing and
wait for the user to specify an inlet.
3 Rate–Wash rate (see Table 4-13: Wash Rates). This option is available
for the AquaMax® 4000 Microplate Washer only.
4 Volume–Volume of wash fluid used per well. Use 50 μL to 3000 μL.
5 Wash position–Position of aspiration probes during the wash.
• Bottom: The aspiration probes aspirate to the bottom of the well,
then wash with the specified amount of wash fluid at that
position. Bottom washing results in partially empty wells at the
end of the wash.
• Top: The aspiration probes remain just below the top of the well,
then wash with the specified amount of wash fluid at that
position. Top washing results in full wells at the end of the wash.
Table 4-13: Wash Rates
Model # Options 96 (μL/well/sec) 384 (μL/well/sec)
AQ 4000 Fast 270 70
Gentle 200 60
0112-0151 K 51

AquaMax® 2000/4000 Microplate Washer User Guide
Table 4-13: Wash Rates
Model # Options 96 (μL/well/sec) 384 (μL/well/sec)
AQ 2000 (no option) 270 70
Tip: Wash volume should not exceed 10x the well volume.
Tip: The wash step leaves the wells partially empty (bottom wash) or
full (top wash). To empty the wells, add an aspiration step.
52 0112-0151 K

Operation: The Touch Screen Interface
FastWash Settings
The FastWash step is designed for rapid microplate washing using
multiple aspirate-dispense cycles with predefined parameters. FastWash
performs a final aspiration after the last cycle. All aspirations use a rate of
5 and a fast descent speed. See Table 4-11: Aspiration Rates.
1
3
4
6
7
Table 4-14: FastWash settings
Item Description
1 Inlet–Liquid to be used for this step.
The available options correspond to the color-coded reagents
connected to the washer.
2 Prompt–Indicates that the system will pause before dispensing and
wait for the user to specify an inlet.
3 Rate–Dispense rate.
See Table 4-9: Plate Wash and Cell Wash Dispense Rates.
4 Volume–Volume of wash fluid to be dispensed per well in each cycle.
Use 5 to 150 μL for 384-well plates and 20 to 400 μL for 96-well
plates.
2
5
5 Cycles–Number of times the volume is dispensed.
6 Dwell Time–Duration in seconds (0 to 30) that the probe rests at the
final probe position. The default value is 1 second.
7 Probe Height–Final probe height above the bottom of the well during
aspiration.
The range for plate wash heads is 0 mm to the top of the well.
0112-0151 K 53

AquaMax® 2000/4000 Microplate Washer User Guide
Shake Settings
The Shake step shakes a microplate in the carriage using predefined
parameters.
1
2
Table 4-15: Shake settings
Item Description
1 Shake speed–Speed of shaking (Slow, Medium, or Fast).
A fast shake is vigorous and generally mixes the wells in 10 to 30
seconds.
2 Time–Duration of shake. Acceptable range is 1 to 600 seconds.
54 0112-0151 K

Operation: The Touch Screen Interface
Soak Settings
The Soak step pauses the program for a specified duration. During a Soak
step, probes are removed from the microplate wells. No other operations
are performed for the duration.
1
\
Table 4-16: Soak settings
Item Description
1 Time–Duration of soak, in minutes and seconds. Acceptable range is 1
second to 120 minutes.
0112-0151 K 55

AquaMax® 2000/4000 Microplate Washer User Guide
Repeat Settings
1. The Repeat step repeats a set of previous program steps.
1
2
Table 4-17: Repeat settings
Item Description
1 Repeat from step–The numbered step at which to start the
repetition.
The list contains the previous steps in the current program.
2 Repetitions–The number of extra cycles to be performed. For
example, setting repetitions to 5 means that the specified step would
be executed once from the original program, and then repeated 5
more times in the Repeat step, for a total of 6 cycles.
Note: One Repeat step counts as just one step in the 50-step program
limit, regardless of the number of steps or cycles repeated. The system
will not allow a Repeat step within another Repeat step.
56 0112-0151 K

Operation: The Touch Screen Interface
Purge Settings
The Purge step evacuates liquids from the installed wash head. It has no
programmable parameters.
Figure 4-3: Purge screen (no settings)
Tip: Run a Purge step when the washer will not be used again
immediately. Purging prevents needle clogging or mold growth when
the instrument is idle.
Tip: Run a Purge step before removing the wash head.
0112-0151 K 57

AquaMax® 2000/4000 Microplate Washer User Guide
Rinse Settings
The Rinse step flushes the selected reagent through the internal fluidics
and the installed wash head.
1
2
Table 4-18: Rinse settings
Item Description
1 Inlet–Liquid to be used for this step.
The available options correspond to the color-coded reagents
connected to the washer.
2 Prompt–Indicates that the system will pause before dispensing and
wait for the user to specify an inlet.
After rinsing with a harsh reagent, such as a cleaning solution, rinse with
water several times to fully remove any harmful residues. Rinsing does
not empty the wash head completely. Follow the rinse with a Purge step
before you remove the wash head or shutdown the system.
58 0112-0151 K

Operation: The Touch Screen Interface
Standby Settings
Use Standby mode to keep wash fluid in the head without the need to
prime the head if there is a delay between uses.
The Standby step fills the prime/soak trough with a wash fluid and leaves
the dispense/aspirate probes in the wash fluid.
You can use the touch screen buttons to select the source bottle for the
wash fluid and to program the wash fluid to automatically change at
specific time intervals.
To discontinue the Standby step and continue using the AquaMax
Microplate Washer, touch Cancel. This drains the trough and dispenses a
small amount of the wash fluid through the dispense needles.
1
2
3
Table 4-19: Standby settings
Item Description
1 Inlet–Liquid to be used for this step.
The available options correspond to the color-coded reagents
connected to the washer.
2 Prompt–Indicates that the system will pause before dispensing and
wait for the user to specify an inlet.
3 Change solution every–Drains and refills the solution in the soaking
trough at the specified refresh interval.
0112-0151 K 59

AquaMax® 2000/4000 Microplate Washer User Guide
Prime Settings
The Prime step primes the internal fluidics and installed wash head with
the selected reagent. During the Prime step, the needles are immersed in
the priming liquid to wash the outsides of the needles. This is a
maintenance step and does not require a microplate to run.
1
2
3
Table 4-20: Prime settings
Item Description
1 Inlet–Liquid to be used for this step.
The available options correspond to the color-coded reagents
connected to the washer.
2 Prompt–Indicates that the system will pause before dispensing and
wait for the user to specify an inlet.
3 Mode–Level of priming fluid.
• Maintenance: Uses 150 mL of the reagent to prepare the
instrument after long periods of system inactivity.
• Full: Uses 400 mL of the reagent to prepare the instrument after
a wash head installation, reagent exchange, or system purge.
60 0112-0151 K

Managing the Program Library
All programs can be modified. Factory-provided one-touch programs can
be edited, but not renamed or deleted.
Note: Program options and menus are optimized for the installed wash head.
Before creating or editing a program, make sure that the appropriate wash head
is installed. Do not remove the wash head until your program changes have
been saved. Removing the wash head resets the touch screen. Any unsaved
program changes are lost.
To create a new program
1. On the Program tab, touch New.
Operation: The Touch Screen Interface
Figure 4-4: Program tab
Tip: You can also create a new program by copying an existing program
(see To copy a program on page 64).
2. Type a name for the new program on the keypad, and touch OK.
The Program Settings dialog opens automatically.
0112-0151 K 61

AquaMax® 2000/4000 Microplate Washer User Guide
3. In the Program Settings dialog, touch a plate type from the Plate
list.
Figure 4-5: Program settings
Note: Plates that are not compatible with the installed wash
head appear gray.
4. If applicable, click Program Options to add Program Start and
Program Done messages to the program (see
Program Messages
on page 42), enable stacker options for the program (see
Program Stacker Settings on page 43), or adjust the dispense rate
accuracy for the program.
Figure 4-6: Program options
62 0112-0151 K

Operation: The Touch Screen Interface
Note: Test dispense accuracy separately and use the results to
adjust the settings in your program. For more information, see
adjust dispense accuracy for a program on page 68.
5. Touch OK to save your changes and close the Program Settings
dialog.
6. Add steps to the program. For more information see
To add a
step to a program on page 65.
7. Touch Done to exit programming mode.
8. Touch Yes to confirm your changes.
To
0112-0151 K 63

AquaMax® 2000/4000 Microplate Washer User Guide
To copy a program
1. On the Program tab, touch the program to be copied, and touch
Copy.
2. In the Copy Program dialog type the name of the new program.
The default name of the copy is the name of the existing
program followed by an asterisk (*).
3. In the Program Settings dialog, select a plate type and touch OK.
4. Edit the steps in the program as required:
Add a step
Copy a step
Edit a step
Delete a step
5. Touch Move Up and Move Down to rearrange program steps
within the list.
6. Touch Done to exit programming mode.
7. Touch Yes to confirm your changes.
To edit a program
1. Select the program to be edited, and touch Edit.
2. Touch New to add new steps, or touch Edit, Copy, or Delete to
modify existing ones.
3. Touch Move Up and Move Down to rearrange program steps
within the list.
4. After all program steps have been set up, touch Te st to execute a
test run, or touch Done to exit programming mode.
5. Touch Yes to confirm your changes.
64 0112-0151 K

Operation: The Touch Screen Interface
To rename a program
1. Select the program to be renamed, and touch Rename.
2. Type a new name for the program.
3. Touch OK to save the change.
Note: One-touch programs cannot be renamed.
To delete a program
Note: A deleted program cannot be recovered.
1. Select the program to be deleted, and touch Delete.
2. Touch OK to confirm the deletion.
Note: One-touch programs cannot be deleted.
To change the plate type for a program
1. Select the program to be edited, and touch Edit.
2. In the program details area, touch Program Settings and touch
Edit.
3. Select the plate type.
4. Touch OK to exit the Program Settings dialog.
5. Touch Done to exit programming mode and OK to confirm your
changes.
To add a step to a program
1. Select the program to be edited and touch Edit. The Program tab
displays the details for the selected program.
0112-0151 K 65

AquaMax® 2000/4000 Microplate Washer User Guide
Figure 4-7: Program tab, program editing
2. To add a step, touch New and touch the type of step you want to
add. The parameters dialog for the selected step type appears.
3. Complete the parameters dialog and touch OK when finished.
The newly-created program step appears in the program list.
Note: For information about step types and associated
parameters, see New Step Selection on page 46.
4. For each additional program step, repeat
Step 2 and Step 3
5. Touch Move Up and Move Down to rearrange program steps
within the list.
6. To test run the program, touch Test.
7. Touch Done to exit programming mode.
8. Touch Yes to confirm your changes.
66 0112-0151 K

Operation: The Touch Screen Interface
To edit a step in a program
1. Select the program to be edited and touch Edit.
The Program tab displays the details for the selected program.
2. Select the step you want to work with and choose one of the
following options:
To edit the selected step, touch Edit and change the
parameters in the associated dialog as required. Touch OK to
close the dialog.
To copy the selected step, touch Copy. The copied step is
added to the end of the program.
To delete the selected step, touch Delete.
Note: For information about step types and associated
parameters, see New Step Selection on page 46.
3. Touch Move Up and Move Down to rearrange program steps
within the list.
4. To test run the program, touch Test.
5. Touch Done to exit programming mode.
6. Touch Yes to confirm your changes.
0112-0151 K 67

AquaMax® 2000/4000 Microplate Washer User Guide
To adjust dispense accuracy for a program
Dispense accuracy in the AquaMax Microplate Washer is set to
specification during manufacturing. However, various installation
configurations can also affect accuracy, such as location and size of
reagent bottles, types of reagent, and so on. These adjustment are
specific and individual to every program. However, after you determine
an adjustment for a given set of parameters, you can use the same
setting whenever that combination is used (Liquid type, Head type, and
so on).
The AquaMax Microplate Washer supports 4 L or 10 L bottles only.
For best results test dispense accuracy in a separate program and use the
results to adjust your working program.
1. Make sure that the system is set up to match the parameters of
your working program.
2. Create a new program and in the Program Settings dialog, touch
Program Options.
3. Touch Adjust Dispense.
Figure 4-8: Adjust dispense options
4. In the Adjust Dispense dialog, set the adjustment to 0% for the
chosen fluid inlet.
5. Weigh an empty plate.
6. Complete the program with a dispense function from the fluid
inlet of choice: 300 μL/well/96-well plate or 100 μL/well/384-well
plate.
7. Run the program.
68 0112-0151 K

Operation: The Touch Screen Interface
8. Weigh the plate after the dispense to measure the amount of
liquid dispensed.
9. Divide the fluid mass by the fluid density and number of wells to
get the measured volume per well:
Measured volume per well
Fluid mass Fluid density§
---------------------------------------------------------------=
Number of wells (96 or 384)
10. Determine the fractional dispense accuracy using the equation
below:
Measured Volume
Dispense accuracy 100
---------------------------------------
Expected Volume
100–=
11. Round up this value to the nearest integer and type it in the
Adjust Dispense dialog for the chosen fluid inlet. Use whole
numbers in the range of 50% to 200%.
12. Repeat
Step 3 to Step 11 for each fluid intake that needs
adjusting.
13. Enter the results in the Adjust Dispense dialog of your working
program.
0112-0151 K 69

AquaMax® 2000/4000 Microplate Washer User Guide
Plates Tab
The Plates tab contains the functions for managing the plate library.
1
5
2
3
4
Table 4-21: Plates tab
Item Description
1 New–Creates a new plate type.
2 Edit–Opens the details of the selected plate type for editing.
3 Delete–Deletes the selected plate type.
4 Plate List–Lists the plate types stored in the library.
5 Up Arrow and Down Arrow–Moves up and down through the plate
list if the list exceeds the display area.
70 0112-0151 K

Operation: The Touch Screen Interface
Plates Tab: Administrative Mode
In administrative mode, general users have access to only the View
button and the Admin button. The Admin button and the administrator
passcode access the plate editing options.
1
2
3
Table 4-22: Plates tab with administrative mode
Item Description
1 View–Opens the selected plate so that you can view the plate details.
2 Admin–Opens the passcode dialog to access the plate editing options.
3 Admin–Indicates that the AquaMax® Microplate Washer is in
administrator mode, and exits administrator mode when your
changes are complete.
For information about the plate editing buttons, see
Plates Tab on
page 70.
For information about restricting access to editing functions, see
Restricting Functions on page 80.
0112-0151 K 71

AquaMax® 2000/4000 Microplate Washer User Guide
Plate Definition Dialog
A plate definition details the parameters used by the instrument during
operations. The plate definition controls the position of the plate and the
probes. Inaccurate settings can cause some operations to run incorrectly.
1
2
3
4
5
6
Table 4-23: Plate definition
Item Description
1 Name–Name of the plate type. The name can be up to 20 characters.
2 Wells–Number of wells in the plate (96 or 384).
3 Bottom–Bottom profile of the wells:
• Flat: plates with full-size flat-bottom wells. Crosswise and edge
aspiration are supported for Flat plates only.
• U: plates with round-bottom wells.
• V: plates with tapered wells.
• Small Vol: Small volume or half-area plates.
4 Plate Height (mm)–Distance in millimeters from the plate base to the
top of the wells.
When using a magnetic bead-washing insert (LifeSep 96F or 384F
biomagnetic separators), the plate height is the total height of the
carriage insert and plate stack.
Note: Carriage inserts cannot be used with robotics.
72 0112-0151 K

Table 4-23: Plate definition (cont’d)
Item Description
5 Well Depth (mm): Distance in millimeters from the bottom of the well
to the top of the well. Well depth is critical to reliable instrument
operation. An incorrect well depth can result in inefficient plate
aspiration, plate and wash head damage, or “Vertical Error 225”
appearing on the screen.
6 Auto–Calibrates the well depth.
See To calibrate the well depth on page 73.
Managing the Plate Library
To create a plate type
Tip: Values in the plate type dialog are automatically set to the
parameters of the highlighted plate type. When creating a new plate
type, select a similar plate type to start.
Operation: The Touch Screen Interface
1. On the Plates tab, touch New.
2. Type a name for the new plate type and touch OK.
3. Select the plate parameters in the dialog.
4. Touch OK to save and exit.
To calibrate the well depth
When setting up a plate type, the system can automatically calibrate the
well depth.
Tip: We highly recommend this automatic feature when using a new
plate type with your instrument.
1. In the Plate Type Definition dialog, touch Auto next to the Well
Depth field.
2. Insert a plate in the carriage, and touch OK.
The measured well depth appears in the Well Depth field.
0112-0151 K 73

AquaMax® 2000/4000 Microplate Washer User Guide
To edit a plate type
1. Select the plate to be edited in the Plate tab, and touch Edit.
2. Select new plate parameters in the dialog.
3. Touch OK to save and exit, or Cancel to exit without saving.
All programs that refer to the edited plate type are listed in red in
the program list to indicate changes in the plate definition.
To delete a plate
1. Select the plate to be deleted in the Plate tab, and touch Delete.
2. Confirm the deletion.
Note: A deleted plate type cannot be recovered.
Options Tab
The Options tab contains instrument options and administrative
functions.
1
5
4
2
3
8
74 0112-0151 K
6
7
9

Operation: The Touch Screen Interface
Table 4-24: Instrument options
Item Definition
1 Depressurize–Releases the system and bottle pressure. During
operation, the source bottles can be under mild pressure—up to 500
mmHg (10 psi or 70 kPa). Before changing the fluid in the source
bottles, depressurize to avoid releasing pressure when opening the
cap.
2 Purge–Purges the system fluidics. Purging empties the wash head,
prime trough, and common fluid paths. Use this function before
changing the wash heads to remove excess fluids. In addition, after a
system failure, Purge can be used to drain the liquid left in the
Prime/Soak trough.
3 Shutdown–Starts the user-defined automatic shutdown.
4 Restack–Commands the StakMax
in the output stack to the input stack, leaving them in their original
input order. Restack is available only if a stacker is connected to the
instrument.
5 Change Passcode–Opens the keypad where you can change the
administrative passcode for the instrument. See Restricting Functions
on page 80.
®
stacker to move all plates currently
6 Calibrate Screen–Opens the Calibrate Screen where you can calibrate
the touch positions on the touch screen. See Screen Calibration on
page 81.
7 More Options–Opens the Advanced Options dialog.
8 Load/Eject–Loads or ejects the plate carriage. Use this option to
retrieve a microplate after a system failure.
9 Reset–Performs a software reset without power cycling the
instrument and positions the plate carriage at eject position.
0112-0151 K 75

AquaMax® 2000/4000 Microplate Washer User Guide
Advanced Options Dialog
1
2
Table 4-25: Advanced options
Item Description
1 Shutdown Options–Opens the Shutdown Options dialog where you
can modify the instrument’s automatic shutdown options. See
Shutdown Options Dialog on page 78.
2 Auto Drain–Drains the trough every time the plate is ejected.
3
3 Done–Closes the Advanced Options dialog.
Options Tab: Administrative Mode
In administrative mode, general users have access to the following
options:
1
2
3
4
76 0112-0151 K
5
6

Operation: The Touch Screen Interface
Table 4-26: Options tab with administrative mode
Item Description
1 Depressurize–Releases the system and bottle pressure. During
operation, the source bottles can be under mild pressure—up to 500
mmHg (10 psi or 70 kPa). Before changing the fluid in the source
bottles, depressurize to avoid releasing pressure when opening the
cap.
2 Purge–Purges the system fluidics. The wash head, prime trough, and
common fluid paths are evacuated. Use this function before changing
wash heads to remove excess fluids. In addition, after a system failure,
Purge can be used to drain the liquid left in the Prime/Soak trough.
3 Shutdown–Starts the user-defined automatic shutdown.
4 Admin–Starts and exits administrative mode and provides access to
secured functions. Administrative mode requires the administrative
passcode.
5 Load/Eject–Loads or ejects the plate carriage. Use this option to
retrieve a microplate after a system failure.
6 Reset–Performs a software reset without power cycling the
instrument.
0112-0151 K 77

AquaMax® 2000/4000 Microplate Washer User Guide
Shutdown Options Dialog
1
2
3
4
Table 4-27: Shutdown options
Item Description
1 Timeout–Wait time in hours and minutes before the system enters
Shutdown mode.
2 Rinse–Indicates whether the system should be rinsed before shutting
down (On or Off).
3 Inlet–Liquid Input to be used for rinse fluid (Green, Red, Blue, or
Yellow).
4 Purge–Indicates whether the system should be purged after rinsing
and before shutting down (On or Off).
78 0112-0151 K

Managing the Software
Automatic Shutdown
The shutdown runs automatically when the instrument has been inactive
for a user-specified amount of time. While the system is in shutdown
mode, its power consumption is minimal.
Note: You can trigger the shutdown manually by touching Shutdown on
the Options tab. To wake up the system, touch anywhere on the screen.
To set up the automatic shutdown
Long periods of inactivity can increase the chance of clogging due to
solutions settling in the fluid channels and wash heads.
1. On the Options tab, touch Other Options.
2. Touch Shutdown Options.
The Shutdown Options dialog appears.
3. Adjust the settings as required.
Operation: The Touch Screen Interface
Note: Touch the hr. and min. boxes to access the keypad.
4. Touch OK to save your changes and exit.
0112-0151 K 79

AquaMax® 2000/4000 Microplate Washer User Guide
Restricting Functions
By default, no passcode is set, and all functions are available to all users.
The AquaMax Microplate Washer can be set up to use an Administrative
passcode to prevent unintentional modifications to stored programs,
plate types, and instrument settings. Setting an administrative passcode
restricts access to the following program editing functions and options:
New (Program, Plates) Copy (Program)
Rename (Program) Restack (Options)
Delete (Program, Plates) Change passcode (Options)
Calibrate screen (Options) Shutdown options (Options)
Edit (Program, Plates)
You can access the restricted functions by touching the Admin button
and entering the administrative passcode. The passcode must be entered
for each tab separately.
To set or change the passcode
Note: If the Change Passcode button is unavailable, a passcode has
been set previously.
1. Touch Admin and type in the current passcode to enter
Administrative mode.
2. Touch Change Passcode in the Options tab.
3. Type a new passcode using the on-screen keypad.
4. Touch OK to save and exit.
To remove the administrative passcode
1. Touch Admin and type in the current passcode to enter
Administrative mode.
2. Touch Change Passcode in the Options tab.
3. Delete the existing passcode using the back arrow key.
4. Touch OK to save and exit.
80 0112-0151 K

Operation: The Touch Screen Interface
Screen Calibration
The AquaMax Microplate Washer has a screen calibration feature that
enables the user to calibrate the position of the touch screen overlay on
the LCD screen.
To calibrate the screen
1. On the Options Tab, touch Calibrate Screen.
Figure 4-9: Screen calibration screen
2. Touch the crosses as they appear on the screen.
The system exits Screen Calibration mode automatically when
the calibration is completed, or when the 10-second timeout is
reached.
0112-0151 K 81

AquaMax® 2000/4000 Microplate Washer User Guide
82 0112-0151 K

Maintenance
The following sections contain information about the maintenance of the
AquaMax® series Microplate Washers.
All maintenance procedures described in this manual can be safely
performed by experienced lab personnel. Review the manual prior to
beginning the maintenance procedures. Maintenance not covered in this
manual should be performed only by a Molecular Devices representative.
Technical Support
Molecular Devices is a leading worldwide manufacturer and distributor
of analytical instrumentation. We are committed to the quality of our
products and to fully supporting our customers with the highest possible
level of technical service.
If you have any problems using your AquaMax Microplate Washer in the
U.S., contact our Technical Support group at 1-800-635-5577. Elsewhere
contact your local representative.
WARNING! BioHazard. Decontaminate the instrument and all
accessories before requesting service by Molecular Devices
representatives and before returning the instrument or any
components to Molecular Devices.
5
WARNING! Risk of electrical shock. There are no user-serviceable
parts in the interior of the instrument. Removal of protective covers
that are marked with the High Voltage warning symbol can result in a
personal injury. Refer servicing to Molecular Devices service
representatives.
0112-0151 K 83

AquaMax® 2000/4000 Microplate Washer User Guide
WARNING! Risk of electrical shock. Always turn the power switch off
and disconnect the power cord from the main power source before
performing any maintenance procedure that requires removal of any
panel or cover or disassembly of any interior instrument component.
Refer servicing to Molecular Devices service representatives.
WARNING! Never perform any operation on the instrument in an
environment where potentially damaging liquids or gases are present.
CAUTION! Do not touch or loosen any screws or parts other than those
specifically designated in the instructions. Doing so can cause
misalignment and possibly void the warranty.
Routine Maintenance
Routine maintenance should be performed at the end of each day, or
before extended inactivity on the instrument.
Routine maintenance includes the following activities:
• Purging the Instrument on page 85
• Decontaminating the Instrument on page 86
• Cleaning the Exterior on page 87
• Removing and Storing Wash Heads on page 88
• Cleaning Wash Heads on page 91
84 0112-0151 K

Maintenance
Purging the Instrument
CAUTION! All maintenance programs must be run with a wash head
installed.
CAUTION! If using decontaminant solutions other than AquaMax
Sterilant, consult the chemical compatibility table (
page 113
damage to the instrument.
Follow the procedures below to clean the microplate washer. Each step
can be performed using one of the one-touch maintenance programs or
a similar user-defined program.
) to verify that the decontaminant solution will not cause
To purge the instrument
1. Prime each inlet used with sterile water to remove the last wash
buffers used.
2. Clean each inlet with a cleaning solution using the one-touch
Clean program.
The one-touch Clean program cleans and decontaminates
internal fluid paths. The system primes with the cleaning
solution, pauses for 5 minutes to allow the cleaning solution to
soak in the system, and follows with 3 rinse cycles using the rinse
solution. The default program uses the red inlet for cleaning and
the green inlet for rinsing. The system is purged at the end of this
program.
3. Purge all fluid from the system.
4. For long-term storage, Prime each inlet with an empty bottle to
remove all fluids from the system.
Table B-1 on
Note: Reservoir bottles can be autoclaved without the caps. The caps
cannot be autoclaved.
0112-0151 K 85

AquaMax® 2000/4000 Microplate Washer User Guide
Decontaminating the Instrument
WARNING! Biohazardous Material. Wear protective equipment and
dispose of waste materials in accordance with laboratory site
regulations and procedures. Solutions used in the instrument and
waste materials might be biohazardous.
WARNING! Chemical Waste Disposal Hazard. Wear protective
equipment and dispose of waste materials in accordance with
applicable regulations and procedures. Waste material might contain
toxic, corrosive, and biohazardous material.
Decontaminate the instrument after using infectious or toxic materials in
the instrument. You can safely use alcohol (such as ethanol or
isopropanol) in the fluid channels and on the external surface of the
instrument. You can also use AquaMax Sterilant or other commerciallyavailable laboratory decontaminants. See Table B-1: AquaMax®
Microplate Washer Compatible and Incompatible Cleaning Solutions on
page 113 for a list of compatible and incompatible cleaning solutions.
These products remove buildup of blood serum, fatty and amino acids,
protein complexes, and polymer films to prevent clogging of the washer
channels and wash heads. Such solutions should be mixed according to
the manufacturers’ instructions.
Note: The interaction between disinfectants and the materials used in
the AquaMax Microplate Washer should be carefully considered before
disinfectants are introduced.
86 0112-0151 K

Maintenance
Cleaning the Exterior
WARNING! Biohazardous Material. Wear protective equipment and
dispose of waste materials in accordance with laboratory site
regulations and procedures. Solutions used in the instrument and
waste materials might be biohazardous.
WARNING! Chemical Waste Disposal Hazard. Wear protective
equipment and dispose of waste materials in accordance with
applicable regulations and procedures. Waste material might contain
toxic, corrosive, and biohazardous material.
WARNING! Risk of electrical shock. There are no user-serviceable
parts inside the instrument. Refer servicing to Molecular Devices
service representatives.
CAUTION! Risk of equipment damage. Do not open the panels and
covers to clean inside the instrument. The exposed circuitry and power
supply inside the instrument can be damaged by water-based or
conductive cleaning agents. Refer servicing to Molecular Devices service
representatives.
Periodically, you should clean the outside surfaces of the instrument
using a cloth or sponge that has been dampened with water.
• Do not use abrasive cleaners.
• If necessary, use a mild soap solution diluted with water or a
glass cleaner, and wipe clean with a damp cloth or sponge to
remove any residues.
• Do not spray cleaner directly onto the instrument.
• If needed, clean the microplate drawer using a cloth or sponge
that has been dampened with water.
0112-0151 K 87

AquaMax® 2000/4000 Microplate Washer User Guide
Fluids that spill in the instrument during operation drain through the
prime/soak trough.
CAUTION! If the trough fluid overfills or spills elsewhere, it leaks
through the bottom of the instrument to the counter beneath and must
be wiped up immediately to prevent damage.
Removing and Storing Wash Heads
Heads must always be washed and purged before they are removed. Any
remaining fluid can spill out onto the instrument and potentially cause
damage. Fluid remaining in the head can also lead to the growth of mold
and salt crystals, causing blockage in the dispense and aspiration probes.
WARNING! Biohazardous Material. Wear protective equipment and
dispose of waste materials in accordance with laboratory site
regulations and procedures. Solutions used in the instrument and
waste materials might be biohazardous.
WARNING! Chemical Waste Disposal Hazard. Wear protective
equipment and dispose of waste materials in accordance with
applicable regulations and procedures. Waste material might contain
toxic, corrosive, and biohazardous material.
88 0112-0151 K

Maintenance
To remove the wash head
1. To prepare the wash head for removal, run the one-touch Rinse
program using sterile water as the rinse fluid. (See Program Tab
on page 38.).
Note: Repeat several times if a particularly harsh reagent was
used previously.
2. On the Options tab, touch Purge to remove water from the head.
3. Disengage the lever mechanism and remove the wash head.
4. Always store wash heads with the clear plastic guards installed,
with the probes facing down, and on a flat surface or inside a
protective container.
Note: For long-term storage, use the clamshell container from
the original shipment.
Tip: If the carriage does not eject automatically after an error condition
or power outage, retrieve the carriage manually by following
instructions in
page 90.
To recover the microplate and wash head manually on
0112-0151 K 89

AquaMax® 2000/4000 Microplate Washer User Guide
To recover the microplate and wash head manually
The Reset button on the bottom right corner of the Options tab performs
a software reset without power cycling the instrument. If the washer fails
during an operation, perform a reset to manually retrieve any microplate
still stuck in the system.
1. To return the wash head and microplate to their unloaded
positions, touch Reset.
2. Retrieve the microplate.
If the plate carriage cannot be unloaded by a software Reset,
continue with the following steps.
3. Lift the wash head gently by the finger guard until it clears the
microplate.
CAUTION! Do not touch or put pressure on the dispense or
aspiration probes, as they can be damaged easily.
4. Disengage the lever mechanism and remove the wash head.
5. Carefully slide the plate carriage out.
6. If the plate carriage is stuck, touch Load/Eject in the Options tab.
7. Remove the plate from the plate carriage.
90 0112-0151 K

Maintenance
Cleaning Wash Heads
Occasionally one or more of the aspiration/dispense probes might be
clogged if the wash heads are not purged properly after use. When one
or more probes are clogged, you might see uneven dispense/aspirate
rates, or liquid dripping out of the probes.
To clean wash heads using the on-board programs
1. On the Main tab, touch Clean to clean the wash head with the
AquaMax Sterilant.
The one-touch Clean program cleans and decontaminates
internal fluid paths. The system primes with the cleaning
solution, pauses for 5 minutes to allow the cleaning solution to
soak in the system, and follows with 3 rinse cycles using the rinse
solution. The system is purged at the end of this program.
The standard setup has the AquaMax Sterilant connected to the
red inlet and the rinse water connected to the green inlet.
If desired, you can change the parameters of the one-touch
Clean program. See
Note: If the problem persists, clean the wash head in an
ultrasonic wash bath with either sterile water or a mild
detergent. If necessary, clean individual clogged dispense or
aspiration probes with cleaning wires.
Program Tab on page 38.
Note: To clean a wash head for storage, follow the cleaning
procedure in To prepare the wash head for storage on page 94.
0112-0151 K 91

AquaMax® 2000/4000 Microplate Washer User Guide
Moving an AquaMax® Microplate Washer
Make sure that the new location meets the specifications as described in
Setting Up the Instrument on page 21.
To move an AquaMax® Microplate Washer to another location
1. Remove any microplate from the instrument.
2. For extended storage, follow the procedures in
Instrument on page 85 to remove all reagents from the system. If
the instrument will be used immediately after the move, a Purge
cycle is sufficient.
3. Remove any installed wash head.
4. Disconnect all source and waste bottles and tubing.
5. Turn off the power switch and unplug the power cord.
6. Tilt the microplate washer to drain any liquid that might have
spilled during microplate washer operation.
7. Empty the waste reservoir.
Note: Depending on the distance that you are moving the instrument,
you might want to repackage it in its original shipping packaging to
secure the Z and Y axis motion stages.
Purging the
If you do not have the shipping container for the AquaMax Microplate
Washer, please contact Technical Support to obtain a replacement
container.
92 0112-0151 K

Preparing for Storage
To turn off the instrument
Use this procedure for prolonged inactivity. For regular use, the
automatic shutdown feature manages power, screen, motors, and valves.
(See Automatic Shutdown on page 79.)
1. Make sure that the wash head remains installed throughout the
2. Make sure that the waste tubing is correctly installed with either
3. On the Main tab, touch Rinse. Use AquaMax Sterilant, DI water,
4. On the Options tab, touch Purge.
5. Make sure that the Prime program specifies Prompt for the Inlet
6. Replace each reagent bottle with an empty bottle. See
7. On the Main tab, touch Prime and specify the inlet with the
procedure.
a waste bottle or drain. See
page 24.
or your usual rinsing agent.
option. See
connect a reagent bottle on page 21.
empty bottle. Repeat this step two more times.
To edit a program on page 64.
To connect a waste bottle on
Maintenance
To
Note: If you do not have enough empty bottles, you can
perform Step 6 and Step 7 separately for each inlet in turn.
8. When the fluid channels have been cleaned and emptied,
remove the wash head before turning off the power. See
prepare the wash head for storage on page 94.
9. On the back of the instrument, switch the power switch to the
Off position.
0112-0151 K 93
To

AquaMax® 2000/4000 Microplate Washer User Guide
To prepare the wash head for storage
Note: If you have followed the instructions in To turn off the
instrument on page 93
and start at Step 3.
1. On the Main tab, touch Rinse. Use AquaMax Sterilant, DI water,
or your usual rinsing agent.
2. On the Options tab, touch Purge. The wash head can retain
approximately 3 cc of liquid after a purge.
3. Release the locking lever on the wash head and lift the wash
head away from the instrument.
4. Turn the wash head so that the inlets for the wash head are
pointing down over a folded paper towel. Avoid touching the
probes.
5. Drain any remaining fluid from the wash head by gently tapping
the inlet end on the paper towel.
Tip: To achieve the greatest level of dryness, you can do a
second rinse with ethanol through each of the four inlets on the
wash head to help dry the wash head and the system. Follow
Step 1 through Step 5, substituting ethanol as the rinse agent.
, then skip Step 1 and Step 2 of this procedure
6. Store the wash head in the provided container.
94 0112-0151 K

Troubleshooting
This chapter lists errors that might occur while using the instrument,
followed by their most likely causes and remedies.
Troubleshooting Charts
If you experience a problem during operation of the AquaMax®
Microplate Washer, locate the problem in the following table and
perform the recommended tasks. For problems not listed here, or if the
listed resolution does not fix the problem, please call the Technical
Support department at the number listed in Technical Support on
page 83.
Note: It is your responsibility to decontaminate the instrument, as well
as any accessories, before requesting service by Molecular Devices
representatives and before returning the instrument or any
components to Molecular Devices.
6
General Instrument Issues
Table 6-1: General Instrument Issues
Problem Possible Causes & Remedies
No power to the instrument
or touch screen.
The plate carriage or wash
head does not move freely.
0112-0151 K 95
The instrument might have gone into Shutdown
mode:
• Touch anywhere on the screen to activate it.
No power to the instrument:
• Check that the power cord is plugged in.
• Check that the power outlet has power.
• Verify the power switch is turned to the ON
position.
Obstruction to the motion of the wash head or
plate carriage:
• Remove any obstructions from the path of
the wash head or plate carriage.

AquaMax® 2000/4000 Microplate Washer User Guide
System Fluidics Issues
Table 6-2: System Fluidics Issues
Problem Possible Causes & Remedies
Air in the bottle lines. Prime lines using the one-touch Prime
Leaks from the liquid inlet
quick connects on the left side
of the washer.
The prime trough does not
drain and is filled with liquid.
Liquid under instrument. If the overflow drain (see Figure 6-1) is full or
program.
When the bottle tubing is disconnected from
the quick-connect, it is normal for a small
amount of liquid to leak from the inlets.
Manually purge the trough by touching Purge
in the Options tab. This will also empty the
wash head.
wet, and liquid is overflowing from the
prime/soak trough:
• Verify that the total dispense volume in
the program does not exceed the
maximum well volume for the plate in
use.
• Adjust the dispense accuracy, see To
adjust dispense accuracy for a program on
page 68.
• Remove any blockage in the prime/soak
trough.
If the overflow drain is completely dry:
• Check around the instrument for other
sources of leaks, such as the tubing
connectors from the bottles.
• If the leakage is coming from within the
instrument, contact Technical Support.
Note: A small amount of liquid will not
cause damage to the instrument. If the
trough is full, manually purge the trough
by touching Purge in the Options tab.
Carefully wipe up any spills under the
instrument.
96 0112-0151 K

System Pressure Issues
Table 6-3: System Pressure Issues
Problem Possible Causes & Remedies
Troubleshooting
Pressure timeout error
154.
Loud pump noise during
operation.
If the system cannot achieve target bottle
pressure:
• Check that all pressure fittings are properly
connected.
• Tighten caps on all reservoir bottles.
• Remove all pressure tubing from the bottles,
and reconnect them to one reservoir bottle
at a time, to determine which bottle is having
pressure problems.
• Inspect the air tubing for leaks.
• Disconnect the air and liquid connectors from
washer, but leave the waste connected, and
then run the program. If the problem is
bottle-specific or hose-specific, you should
not get the error. If the error persists, then
contact Technical Support.
Note: If the total air volume in all the
bottles is large (>10 L), it can take up to 5
minutes to pressurize the bottles.
Waste tubing might have been connected
incorrectly:
• Verify that the waste tubing has no shut-off
valve on either end.
• Verify that the waste tubing is connected to
the Waste Output on the left side of the
instrument.
• Verify that the free end of the waste tubing is
in a sink drain or a vented bottle below the
height of the instrument.
0112-0151 K 97

AquaMax® 2000/4000 Microplate Washer User Guide
External Communication Issues
Table 6-4: External Communication Issues
Problem Possible Causes & Remedies
The StakMax® stacker is not
communicating.
The robot is not
communicating.
Data cannot be downloaded
from instrument to computer
using the AquaMax Utility.
Verify that the StakMax cable is connected to
both the StakMax stacker and the AquaMax®
Microplate Washer.
Power-cycle both instruments to re-establish
the connections.
Verify that the USB cable is connected to both
the robot and the AquaMax Microplate
Washer.
Verify that the communication port setting
corresponds to the virtual COM port assigned
to the USB driver.
Power-cycle both the robot and the AquaMax
Microplate Washer to re-establish
connections.
Verify that the USB cable is plugged into both
the AquaMax Microplate Washer and the
computer.
Verify that the communication port setting
corresponds to the virtual COM port assigned
to the USB driver.
Restart the computer and power-cycle the
AquaMax Microplate Washer to re-establish
connections.
98 0112-0151 K

Dispense Issues
Table 6-5: Dispense Issues
Problem Possible Causes & Remedies
Troubleshooting
No liquid in the plate after
dispense.
Dispense precision is out of
spec (high CV, left-right
bias, empty wells, or
outliers).
Dispense accuracy is out of
spec (high/low dispense
volume).
Dripping from the dispense
probes.
Dispense overfills the
plate.
Verify that the dispense parameters (inlet,
volume) are set correctly.
Verify that all appropriate bottles and tubing are
connected to the instrument, and that the bottles
are not empty.
Verify that the system has been primed properly.
Air bubbles in the wash head or system fluidics:
• Run a full Prime, such as the One-touch Prime
program.
One or more dispense probes might be clogged:
• Follow the procedures in Cleaning Wash
Heads on page 91 to unclog the probes.
Dispense adjustment values might be incorrect:
• Adjust the dispense accuracy, see To adjust
dispense accuracy for a program on page 68.
Air bubbles in the wash head or system fluidics:
• Run a thorough prime program (such as the
one-touch Prime program).
One or more dispense probes might be clogged:
• Follow the procedures in Cleaning Wash
Heads on page 91 to unclog the probes.
Dispense volume might be set too high:
• Verify that the total dispense volume in the
program does not exceed the maximum well
volume for the plate in use.
Dispense adjustment values might be incorrect:
• Adjust the dispense accuracy, see To adjust
dispense accuracy for a program on page 68.
0112-0151 K 99

AquaMax® 2000/4000 Microplate Washer User Guide
Aspiration Issues
Table 6-6: Aspiration Issues
Problem Possible Causes & Remedies
The microplate is stuck on the
wash head after aspiration or
wash.
Incomplete aspiration across
the entire plate.
Microplates with conical or tapered bottoms
(such as certain V-bottom or smallvolume/half-area plates) might be
incompatible with aspiration and wash
operations.
Incorrect plate definition:
• Verify that all plate parameters in the
plate library match the plate in use. If
necessary, re-calibrate the well depth
using the Auto feature according to Plate
Definition Dialog on page 72.
Incorrect aspiration parameters:
• 96-well plates require crosswise aspiration
to achieve minimal residual volumes. If
necessary, change the aspirate mode to
CrossWise.
• Aspirate dwell time and rate might have to
be increased. See Aspirate Settings on
page 49.
• Aspirate probe height should be set at
0.0 mm to 0.2 mm for minimal residual
volumes. See Aspirate Settings on
page 49.
Note: If aspiration problems persist,
follow the Aspirate Testing Procedure that
is part of the instrument’s Performance
Qualification. If you do not have this
procedure, please contact Technical
Support.
100 0112-0151 K
 Loading...