

Molbio Truelab Duo User Manual

User Manual
603022001
REF
Truelab™ Duo
Real Time Quantitative
micro PCR Analyzer
Duo

Preface
1. Introduction
1.1 Polymerase Chain Reaction (PCR)
1.2 Real-time PCR
1.3 Understanding Cycle Threshold (Ct Value)
TM
2. Setting Up the Truelab Duo
2.1 Contents
2.2 Installation Requirements
2.2.1 Installation Precautions
2.2.2 Environmental Requirements
2.3 Installing the Truelab
TM
Duo
2.3.1 Power Users
2.3.2 Regular Users
3. Specifications of the Truelab
TM
Duo
3.1 General Specifications
3.2 Shipping
TM
4. Using the Truelab Duo micro PCR Analyzer
4.1 Introduction
TM
4.1.1 Interacting with the Truelab Duo
4.1.2 Checking Battery Status before use
TM
4.1.3 Charging/Using the Truelab Duo with the AC Adaptor
1
TABLE OF CONTENTS
Truelab™ Duo
Table of Contents
Table of Figures
3
1
9
11
11
11
11
12
12
13
13
13
13
13
14
14
14
15
15
15
15
18
19
TM
4.2 Starting the Truelab Duo
TM
4.3 Loading the Truenat Chip
4.4 Starting the Test
4.4.1 Starting the Test
4.4.2 System Messages
4.5 During the Test
4.5.1 Viewing the Thermal Graph
4.5.2 Viewing the Optical Graph
4.5.3 Stopping the Test
4.5.4 System Messages
4.5.5 Test Completion
4.6 After the Test
4.6.1 Viewing the Test Results
4.6.2 Printing the Results
4.6.3 Sharing the Results
4.7 Viewing Saved Test Results
5. Power User Features
6. Generating and Transmitting Log Files
7. Sending the Data Files
8. System Settings
9. Switching off the Analyzer
TM
10. Maintaining the Truelab Duo
11. System Messages and Trouble shooting
12. Glossary
2
Truelab™ Duo
19
19
24
27
28
29
30
30
30
31
31
32
32
32
33
36
41
51
58
60
72
73
73
81

3
TABLE OF FIGURES
Truelab™ Duo
Figure 1: Model of a real-time PCR amplification plot 12
Figure 2: Illustration of Truelab™ Duo 15
Figure 3: Antenna insert direction 16
Figure 4: Antenna Position 17
Figure 5: The Boot-up Screen 18
Figure 6: Home Screen with Low Battery Alert System Message 18
Figure 7: Home Screen with Low battery icon in left corner 19
Figure 8: Login Screen 20
Figure 9: User ID Selection 20
Figure 10: The Login Screen, with the On-Screen Keyboard 20
Figure 11: Status Screen 20
Figure 12: The Profiles Screen 21
Figure 13: Profile Confirmation Prompt 21
Figure 14: Low Battery Alert before confirmation of profile 21
Figure 15: Filling-in the Sample Details From 22
Figure 16: Sample details form with invalid prompt if patient name left blank 22
Figure 17: Sample type selection 22
Figure 18: Sample menu expanded 23
Figure 19: Prompting the User to load the Sample 23
Figure 20: Chip tray opens automatically 23
TM
Figure 21: The Truenat Chip 24
TM
Figure 22: The Truenat Chip being placed correctly onto the Chip Tray 24
Figure 23: An Example of Incorrect Chip Placement 25
Figure 24: Loading the Sample onto the Chip 25
TM
Figure 25: A Summary of the Truenat Chip Loading Procedure 26
Figure 26: Incorrect Sample Loading, Showing Spillage of the Elute Around the Reaction Well 27
Figure 27: Prompting the User to load the Sample 27
Figure 28: Initialization Screen 27

4
Truelab™ Duo
Figure 29 : In-use LED Indicator 28
TM
Figure 30 : Error in matching inserted Truenat Chip to chosen Test Profile 28
Figure 31 : The Test Status Screen 29
Figure 32 : The Temperature Graph 30
Figure 33 : The Optical Graph 30
Figure 34 : Test Stop Confirmation 30
Figure 35 :The Test Status Screen after Stopping the Test 31
Figure 36 : Incorrect thermal cycling error 31
Figure 37 : Probe check failed error 31
Figure 38 : The Test Results Screen 32
Figure 39 : The Truelab™ micro PCR Printer 32
Figure 40 : The Power Button on the bottom right hand side of the Printer 32
Figure 41 : Message Displayed before the System begins Printing 33
Figure 42 : The Test Results Screen 33
Figure 43: Share pop-up on results Screen 33
Figure 44 : Share options for result transfer 33
Figure 45 : The Test Results Screen 34
Figure 46 : Email pop-up on results Screen 34
Figure 47 : The Test Results Screen 34
Figure 48 : Pop-up to send SMS 35
Figure 49 : Open/Close Tray option in Profile Screen 35
Figure 50 : The Status Screen 36
Figure 51 : The Results List 37
Figure 52 : The Results List 38
Figure 53 : Selecting the Parameter to Search By 38
Figure 54 : Searching By Name 38
Figure 55 : Options available after search feature is used 39
Figure 56 : Sort feature for results that appear after a search 39
Figure 57 : Pop-up to enter the Date into each Text Box 40
Figure 58 : The From and To Fields filled-in 40

5
Truelab™ Duo
Figure 59 : The Results List 40
Figure 60 : Test Results Sorting Options 41
Figure 61 : Tests Sorted by Name in Ascending Order 41
Figure 62 : The Status Screen 42
Figure 63 : The Settings Screen 42
Figure 64 : The User Settings Screen 43
Figure 65 : Add User Form 43
Figure 66 : The Status Screen 44
Figure 67 : The Settings Screen 44
Figure 68 : The User Settings Screen 44
Figure 69 : User Deletion Conformation Prompt 44
Figure 70 : The Status Screen 45
Figure 71 : The Settings Screen 45
Figure 72 : The User Settings Screen 45
Figure 73 : Password Reset Form 46
Figure 74 : The Status Screen 46
Figure 75 : The Settings Screen 46
Figure 76 : The App Settings Screen 47
Figure 77 : Confirmation of saved changes to app settings 48
Figure 78 : The Status Screen 48
Figure 79 : The Settings Screen 48
Figure 80 : About Screen 49
Figure 81 : The System Message when Checking for Updates 49
Figure 82 : Installation Progress Screen 50
Figure 83: The Status Screen 50
Figure 84: The Settings Screen 50
Figure 85: About Screen 50
Figure 86 : The System Message when Checking for Updates 51
Figure 89 : About Screen 52
Figure 87 : The Status Screen n 52
Figure 88 : Settings Screen 52

6
Truelab™ Duo
Figure 91 : The Status Screen 53
Figure 92 : The Settings Screen 53
Figure 93 : About Screen 53
Figure 94 : Pop-up for selection of Log File or Data file 54
Figure 95 : Log file selection 54
Figure 96 : Pop-up for selecting send or share 54
Figure 97 : Log file upload status 55
Figure 98 : The Status Screen 55
Figure 99 : The Settings Screen 55
Figure 100 : About Screen 56
Figure 101 : Pop-up for selection of Log file or Data file 56
Figure 102 : Log file list 56
Figure 103 : Pop-up for selection of Send or Share option 56
Figure 104 : Bluetooth Devices List for transmitting log files 57
Figure 105 : The Status Screen 58
Figure 106 : The Settings Screen 58
Figure 107 : About Screen 58
Figure 108 : Pop-up for selection of Log file or Data file 59
Figure 109 : Data file upload progress 59
Figure 110 : Upload status of data file 59
Figure 111 : The Settings Screen 60
Figure 112 : The System Settings Screen 60
Figure 113 : Wi-Fi Settings Screen 60
Figure 114 : Connecting to desired Wi-Fi network 61
Figure 115 : Enter the Password 61
Figure 116 : Wi-Fi advanced setting option for Dynamic or Static 61
Figure 117 : Display Screen for Static network 62
Figure 118 : Enter the Password 62
Figure 119 : Sim Slot for SIM card and direction for SIM Insertion 62
Figure 90 : Log file creation confirmation 52

7
Truelab™ Duo
Figure 120 : Selection of User Name 63
Figure 121 : Enter the password 63
Figure 122 : Cellular Screen 64
Figure 123 : Cellular Network Settings 64
Figure 124 : Search for available networks 64
Figure 125 : Screen with available network displayed for selection 64
Figure 126 : Pop-up Screen for selection of Preferred network type 65
Figure 127 : Access point names Screen 65
Figure 128 : Edit access point Screen 66
Figure 129 : Settings Screen for Bluetooth 67
Figure 130 : List of Bluetooth connection for available devices 67
Figure 131 : Pop-up for Bluetooth pairing request 68
Figure 132 : Paired devices list 68
Figure 133 : Pop-up for paired device 68
Figure 134 : The Settings Screen 68
Figure 135 : Date & Time selection under Settings Screen 69
Figure 136: Date & Time Screen 69
Figure 137 : Manual Settings of Date & Time 69
Figure 138 : Pop-up to Set Date 70
Figure 139 : Pop-up to Set Time 70
Figure 140 : Device Settings Screen to select Display 70
Figure 141 : Display Screen 71
Figure 142 : Settings Screen to select storage 71
Figure 143 : Screen to show Storage Status/Storage Screen 71
Figure 144 : Settings Screen to select Battery option 72
Figure 145 : Battery Status Screen 72
Figure 146 : Pop-up Screen for Power off 72
Figure 147 : The Settings Screen 74
Figure 148 : About Screen 74
Figure 149 : The System Status Screen 74

8
Truelab™ Duo
Figure 150 : The System Status Screen with sub-systems 75
Figure 151 : Status Screen for SIM status option 75
Figure 152 : SIM Status Screen 75
Figure 153 : Login invalid prompt 76
Figure 154 : Sample Details Screen 76
Figure 155 : Chip information read error 76
Figure 156 : Initialization error 77
Figure 157 : Used chip alert 77
Figure 158 : Expired Chip Alert 77
Figure 159 : Internet connection status 77
Figure 160 : Molbio Support Server Status 78
Figure 161 : Printer connection status 78
Figure 162: Update available alert 78
Figure 163 : Error 1 Screen Status 79
Figure 164: Error 2 Screen Status 79
Figure 165 : Error 3 Screen Status 80
Figure 166: Error 4 Screen Status 80

Preface
9
I. Contact Addresses
Molbio Diagnostics Pvt. Ltd.
Registered Office: H.No. 13, Sagar Society,
Dona Paula, Panaji, North Goa, Goa - 403 004, India.
Ph.:+91 832 2458112
II. Warranty
Warranty Information would be specified in the sales invoice / contract. Contact your Molbio
representative for further information. Normally the instrument would be under warranty for a
period of twelve (12) months from the date of installation. Post warranty services are also
available from Molbio.
III. Trademarks
Truelab™ / Truelab™ Duo / Truenat™ / Truepet™ / Trueprep™ are registered trademarks
of Molbio Diagnostics Pvt. Ltd.
IV. Intended Use
The Truelab™ Duo Real Time Quantitative micro PCR Analyzer is intended for performing
real time PCR as well as real time RT-PCR of target nucleic acids derived from a broad variety
of human pathogens using the Truenat™ disease specific micro PCR chips. It is for In Vitro
Diagnostics (IVD) Laboratory use only.
V. Preamble
Before starting the PCR testing on the Truelab™ Duo Real Time Quantitative micro PCR
Analyzer it is important to read this USER MANUAL thoroughly and completely. All
instructions contained in this manual needs to be adhered to and non-adherence may lead to
serious damage to the equipment.
VI. Usage of the Truelab™ User's Manual
The USER MANUAL at the outset introduces the fundamentals of PCR and real time PCR,
the concepts of Ct and multiplexing in PCR. It then gives the overview of the Truelab™ Duo
Real Time Quantitative micro PCR Analyzer and its specifications and thereafter proceeds
to guide the USER through the friendly software on how to perform the PCR assay using the
Truenat™ micro PCR chip on the Truelab™ Duo Real Time Quantitative micro PCR
Analyzer.
VII. Conventions Used in this Manual
This manual uses certain conventions that make it easier for you to differentiate types of
instructions.
Truelab™ Duo
Text Conventions:
Text Convention Usage
Numbered Lists Numbered Lists indicate that the steps need to be performed
according to the numbering.
Bold Text When found within a numbered list or explanatory section, Bold
Text is used to indicate an object that the user interacts with,
which can be a physical object or an object on the software
interface. For instance Touchscreen, Power Button and
AC Adapter are references to physical objects. Send and OK
are references to objects on the software interface.
Note Conventions:
You will see three types of notes in this manual. Each has a symbol and a particular type of textual
formatting to indicate what type of note it is.
The table below details their use, along with the associated symbol.
Symbol Text Formatting and Usage
Note This is a note.
A note communicates information that cannot be included as
part of a procedural list, but is useful for the user to understand
what he is doing in a certain section or to understand the
relevance of a particular section or instruction.
Important: This is an Important Note.
An important note communicates important information that
cannot be included as part of a procedural list, but is integral
for the user to read and understand.
Caution: This is a Cautionary Note.
A cautionary note is placed before or after any instruction or
section that may cause damage to the device or invalidate
the test results if performed, or if performed incorrectly.
It is also used to communicate general precautions and things to
avoid.
10
Truelab™ Duo
1 Introduction
Thank you for your purchase of the Truelab™ Duo Real Time Quantitative micro PCR
Analyzer. The Truelab™ Duo is a revolutionary portable and battery-operated PCR analyzer. It
enables fast, accurate and reliable near-care disease testing. It is easy to use and requires
minimal training.
This is the User Guide for the Truelab™ Duo Real Time Quantitative micro PCR Analyzer. It
provides detailed instructions for the use of all the Truelab™ Duo's available functions, as well as
additional information about its technical specifications, a brief introduction to the concept of PCR
and a glossary.
1.1 Polymerase Chain Reaction (PCR)
The Polymerase Chain Reaction, invented in 1983 by Kary Mullis, is a technique of amplifying
DNA that has found widespread use among professionals and researchers involved with analysis
of nucleic acids due to its high reliability, speed and sensitivity.
Since Deoxyribonucleic Acid (DNA) is unique to each species and individual, it is currently the
most reliable identifier for any living organism, from microbes to humans. Using the PCR method,
even the smallest amounts of DNA can be amplified in order to analyze it. For example, it can be
used to amplify even the smallest trace of an infectious bacterium or virus from a biological
specimen.
The process involves amplifying a specific piece of DNA in a sample using an enzyme called DNA
polymerase and periodic cycling of temperature, which anneal and split strands, respectively.
With each round of annealing and splitting, the amount of nucleic acid doubles leading to an
exponential amplification of the starting trace nucleic acid in a short amount of time.
For instance, a typical PCR reaction that runs for thirty-five cycles, at 100% efficiency, will give you:
35
2 = 34 billion copies
The amplified DNA is then analyzed separately so that it can be identified.
1.2 Real-time PCR
Real-time PCR is a variant of the regular PCR method. It has several advantages over regular
PCR that has made it the PCR method of choice. A Real-time Polymerase Chain Reaction
involves simultaneously amplifying and detecting the target DNA during every cycle, thus
generating accurate information about the presence of the target DNA and its quantity in each
reaction, thus removing the need to analyze the post-PCR product separately.
The Truelab™ Duo Real Time Quantitative micro PCR Analyzer is a Real-time PCR-based
system.
1.3 Understanding Cycle Threshold (Ct Value)
In any Real-time PCR, a positive reaction is detected by the accumulation of the amplicon and
hence of the fluorescence signal. After PCR, each amplification curve is defined by its threshold
cycle (Ct) number. The Ct can thus be defined as the number of cycles required for the
fluorescence signal to cross the threshold (exceeding the background signal of the system). Ct
levels are inversely proportional to the amount of target DNA (or cDNA) in the sample. So lower
the Ct level greater is the amount of target nucleic acids in the sample.
11
True Duolab™
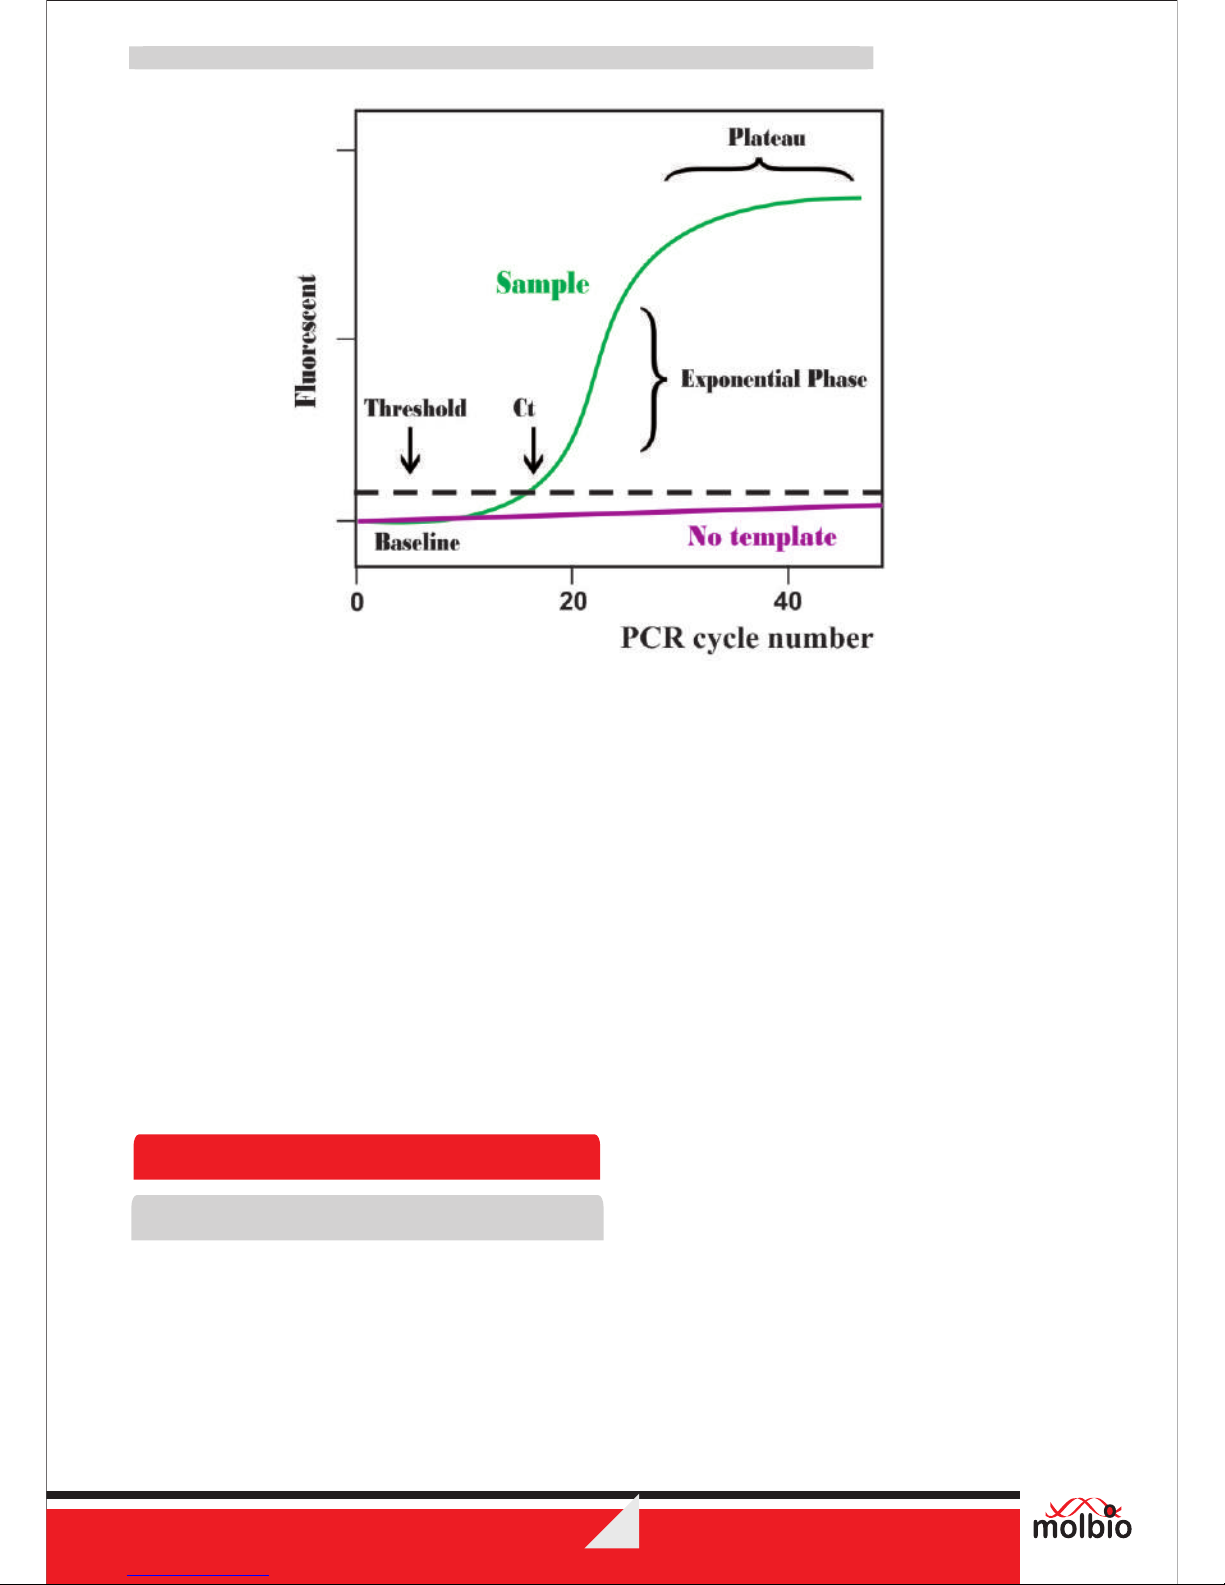
Figure 1 : Model of a real-time PCR amplification plot
Definitions:
1. Baseline: defined as the first few cycles of the PCR reaction where the fluorescent signal is almost
unchanged.
2. Threshold: used to determine the Ct value in a real time quantitative analysis is a value of the
fluorescence that is significantly higher than the baseline, falling in the region of the exponential
amplification.
3. Ct (cycle threshold: is defined as the number of cycles required for the fluorescent signal to cross
the threshold).
Note: Cycle threshold (Ct) is a relative measure of the concentration of the target in the PCR reaction.
Many factors besides the concentration of the target impact the value of the Ct. Therefore Ct
values from PCR reactions run under different conditions or obtained using different PCR
machines and/or reagents cannot and should not be compared.
TM
2 Setting Up the Truelab Duo
2.1 Contents
TM
The standard Truelab Duo package contains the following components:
TM
♦ One Truelab Duo Real Time Quantitative micro PCR Analyzer
TM
♦ One AC Adapter to power the Truelab Duo
TM
♦ One Truelab Antenna (Black) for cellular connectivity
TM
♦ One Truelab Antenna (Green) for WiFi connectivity
TM
♦ One Truelab Microtube Stand
TM
♦ One Truelab Duo Real Time Quantitative micro PCR Analyzer User Manual
12
True Duolab™

2.2 Installation Requirements
2.2.1 Installation Precautions
♦ Do not install the Truelab™ Duo next to instruments that may cause vibrations or
TM
electromagnetic interference. Please keep the Truelab Duo at least one metre away
from other instruments or equipment.
♦ Do not store the instrument in the path of direct sunlight or use it close to any
radiating or heating apparatus, such as a conventional oven, hot plate or infrared
lamp.
♦ Do not store the Truelab™ Duo in an atmosphere of potentially explosive liquids, vapors
and gas.
♦ Always place the Truelab™ Duo on a flat surface in an upright position.
2.2.2 Environmental Requirements
TM
The Truelab Duo has been designed to operate safely and reliably within the following
environment specifications:
♦ Ambient room temperatures (between 15°C to 40°C)
♦ Relative Humidity (RH) between 10% - 80% (non-condensing)
♦ The unit should be stored on a flat, dry surface.
TM
2.3 Installing the Truelab Duo
The Truelab™ Duo should be positioned on the workspace / tabletop / workbench in an upright
position.
Caution:
TM
The Truelab Duo should not be moved when a test is in progress. Attempting to do so may
interfere with its functioning and compromise test results.
At the time of installation, service personnel from Molbio will set up a user profile for the laboratory
TM
on the Truelab Duo and designate the head of the health center or any other authority assigned
for the purpose as the “Power User”, who has access to certain special administrative features on it
that regular users do not.
2.3.1 Power Users
There is only one designated Power User for each Analyzer. Power users can:
♦ Edit or change laboratory details, such as laboratory name and location
♦ View results of tests conducted by any user
♦ Generate and send log files
♦ Create new user Ids
♦ Delete users
♦ Reset a user's password
♦ Transfer results to server
TM
♦ Update Profiles and the Truelab Software
13
True Duolab™
Multiple User ID's can be created by the Power User for Regular Users to log in and run tests on the
TM
Truelab Duo. These additional users will not have power user privileges mentioned above.
2.3.2 Regular Users
Regular users can:
♦ Run tests.
♦ Print the results.
♦ View previous results of tests run using their User ID.
♦ Generate and send log file
♦ Transfer results to server
Important:
Regular users do not have access to all the administrative features of the Analyzer that are
accessible to the Power User.
TM
3 Specifications of the Truelab Duo
The Truelab™ Duo is a portable, battery-operated Real time PCR Analyzer. It houses a
TM
touchscreen for user interaction, a sliding chip tray for the Truenat microchip, optical detection
systems and electronic components that control all aspects of the system.
3.1 General Specifications
14
True Duolab™
Truelab™ Duo real-time quantitative micro PCR Analyzer
Principle Patented real-time micro PCR
Optics Fluorescence, Three Wavelength
Speed 40 cycles of PCR/35 minutes
Throughput 2 chip-Random access
Interface Wi-Fi, 3G, Bluetooth
Calibration Auto-calibration
Memory 20,000 test results
o
Operating environment Temperature: 15-40 C, RH: 10 -80%
Display Capacitive 5” Touch Screen
Printer External 2” Bluetooth Thermal Printer
Power Rechargeable Lithium Ion Battery Pack: 7.4V; 8.7 Ah
Input to AC/DC adaptor: Single Phase 100-240V; 50/60Hz; 1500 mA
Output from AC/DC adaptor: 10 V; 5500mA; 55VA.
If the input specifications in your country do not meet the above
requirements, please contact your local Molbio representative.
Weight 3.6 kgs
Size 240 mm x 242 mm x 159 mm
TM
“Truelab Duo complies with the emission and immunity requirements described in IEC 61326
series”.
This equipment has been designed and tested to CISPR 11 Class A. In a domestic environment it
may cause radio interference, in which case, you may need to take measures as instructed by
Molbio Support to mitigate the interference.
3.2 Shipping
TM TM
The Truelab Duo is shipped as part of the Truelab Real Time micro PCR Workstation (Cat no.
643010001) or as a standalone system (Cat no. 603022001).
Using the Truelab™ Duo
4.1 Introduction
TM
4.1.1 Interacting with the Truelab Duo
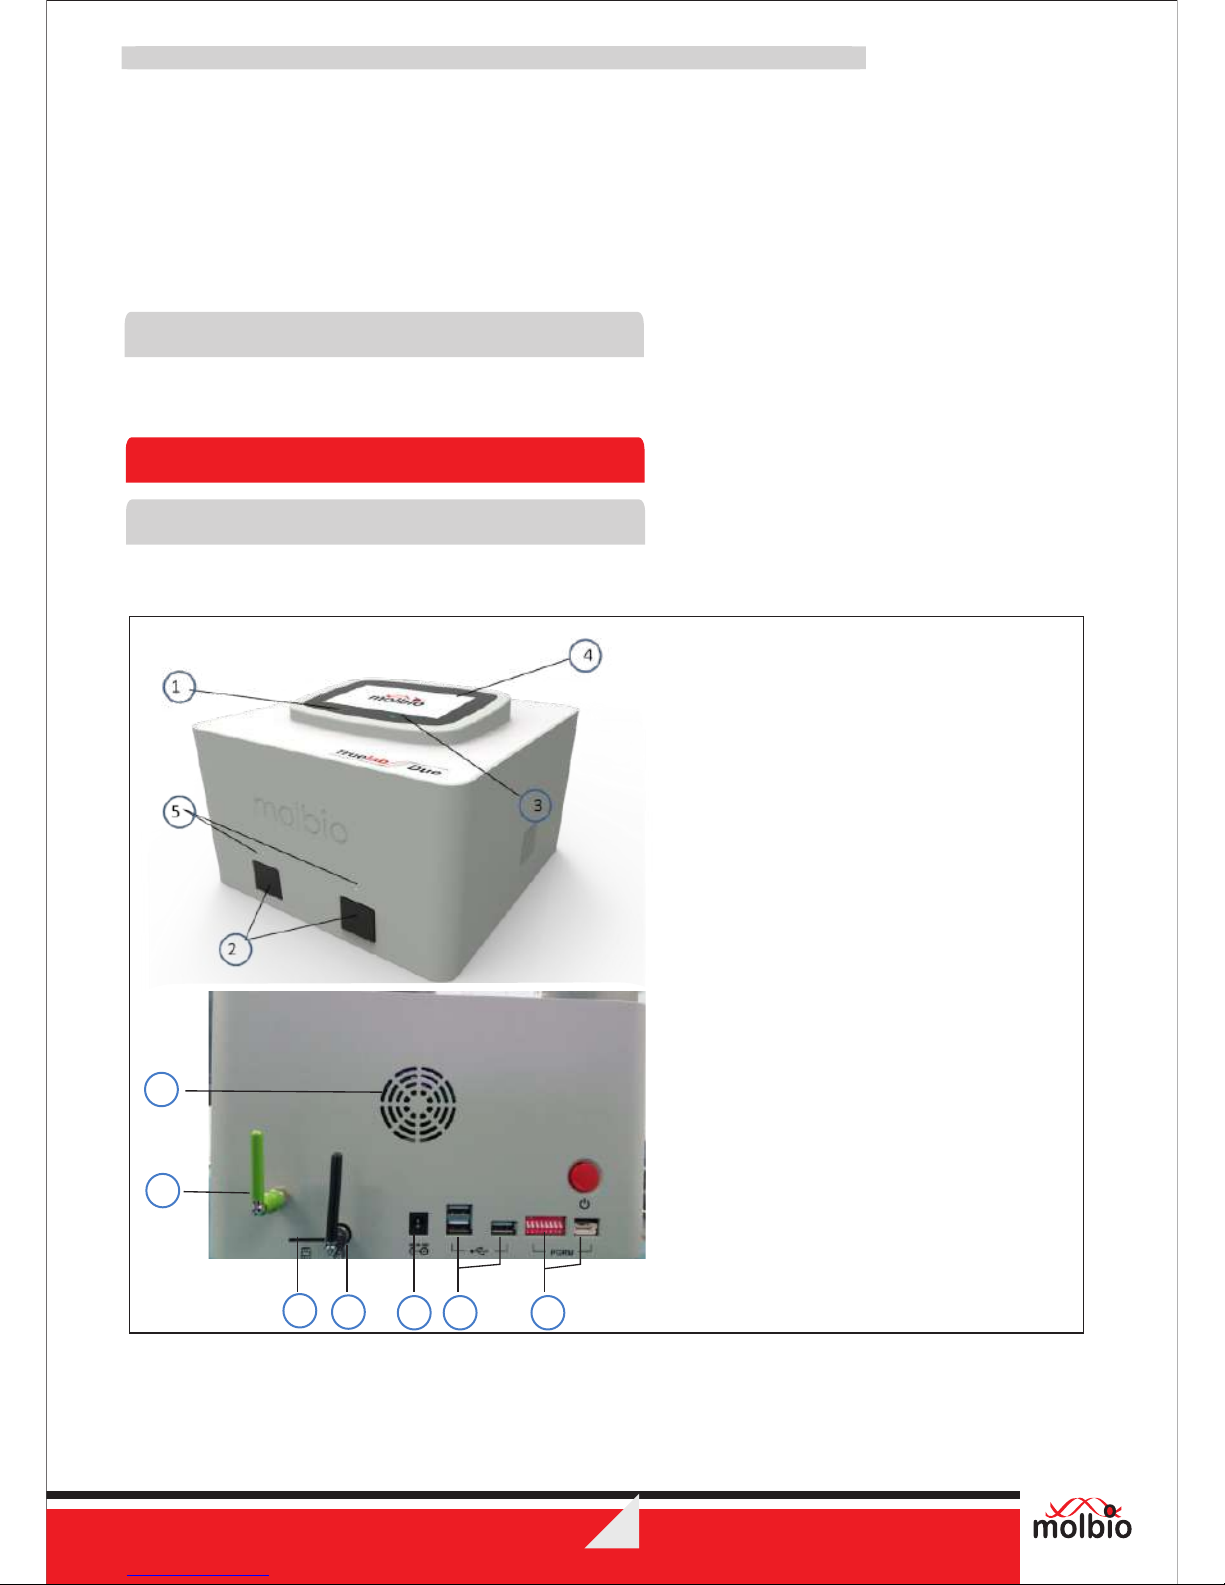
Figure 2 : Illustration of Truelab™ Duo
15
True Duolab™
1. Power On LED
2. Chip Tray
3. Low ba/ Charging
Indicator
4. Touch Screen Display
5. In use Indicator
6. SIM Slot
7. Antenna (Cellular)
8. Charging Port
9. USB Ports
10. Program Port
11. Power buon(ON / OFF)
12. WiFi Antenna
13. Air vent
13
12
6
7
8 9 10

4.1.1.1 Connecting the antenna before Use
Before using the Truelab™ Duo
One antenna (black) is required for cellular connectivity using SIM card and another antenna
To do this,
4.1.1.1.1 Straighten the antenna.
4.1.1.1.2 Place the antenna on the connector as shown in Figure 3
16
True Duo lab™
you should check if the Analyzer’s antennae are attached.
Figure 3: Antenna insert direction
(green) is required for WiFi connectivity.
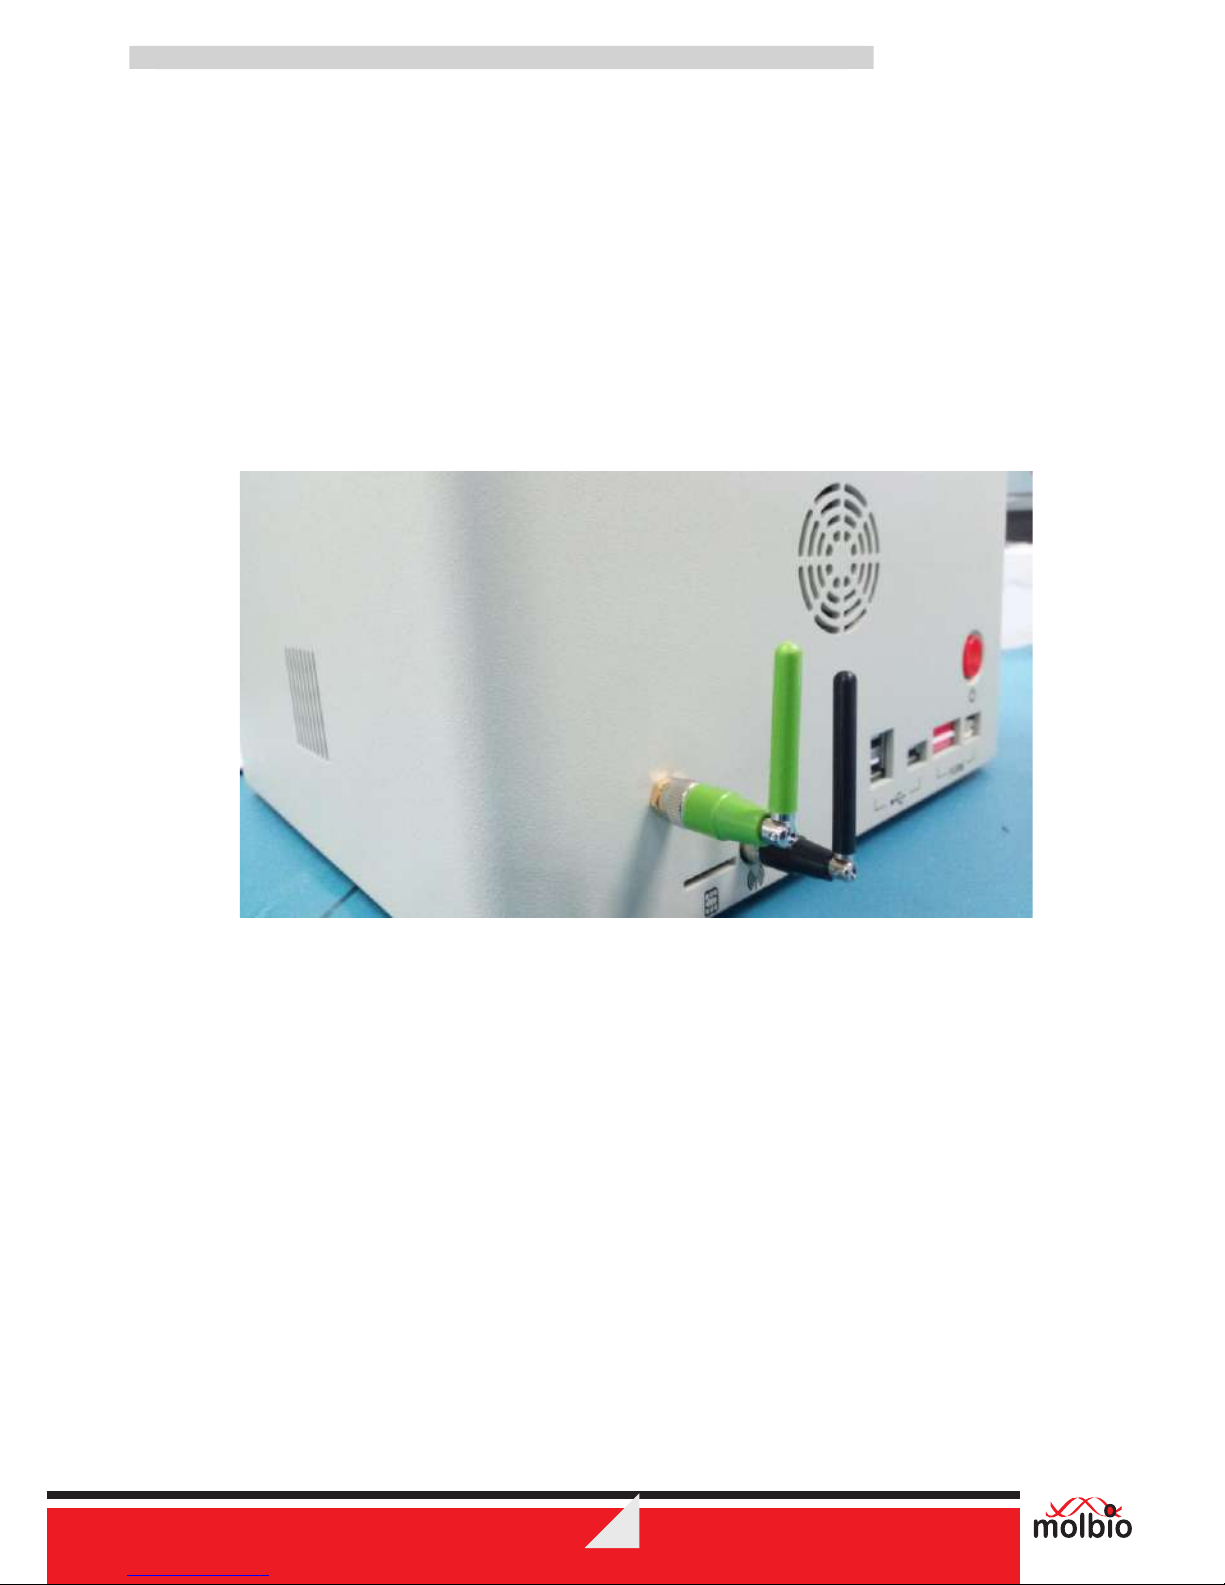
4.1.1.1.3 Slowly rotate clockwise till resistance is felt as shown in Figure 3
.
4.1.1.1.4 Twist the antenna 90 degrees as shown in Figure 4 and avoid placing
objects in three to four centimetres around the antenna for better
reception.
Figure 4: Antenna Position
To remove the antenna for transportation or storage straighten it rst and then slowly rotate anti
clock wise till it come loose.
Caution:
Do not apply excessive force as it may damage or effect the performance of network
reception.
17
True Duo lab™
The Truelab™ Duo is operated using the touch-sensitive Screen. You can use your fingers to operate it.
The Chip Tray holds the disposable, disease-specific Truenat™ chips
You can either run the Analyzer using battery power or use it with the power cable plugged in.
4.1.2 Checking Battery Status before Use
Before using the Truelab™ Duo on battery, you should check if the Analyzer is
sufficiently charged. To do this,
4.1.2.1 "Press the Power Button for 2-3 seconds to switch ON the Analyzer"
The green Power LED Indicator will glow.
If the Analyzer battery is low, the amber Low Battery LED Indicator will also glow.
Boot-up Screen will load in about 30 seconds and Login Screen will load in another 20 seconds.
Figure 5: The Boot-up Screen
4.1.2.2 Check the Battery Status Icon on the Login Screen
a) A battery icon and numeric percentage indicator is visible in the top right corner
b) An exclamation mark will be visible on the battery status icon if battery is low. A
system message will also appear indicating battery is low. This message will remain on
the Screen for 5 seconds. After 5 seconds, the battery icon with exclamation mark will be
visible on the top left corner
Figure 6 : Home Screen with Low Battery Alert System Message
18
True Duolab™
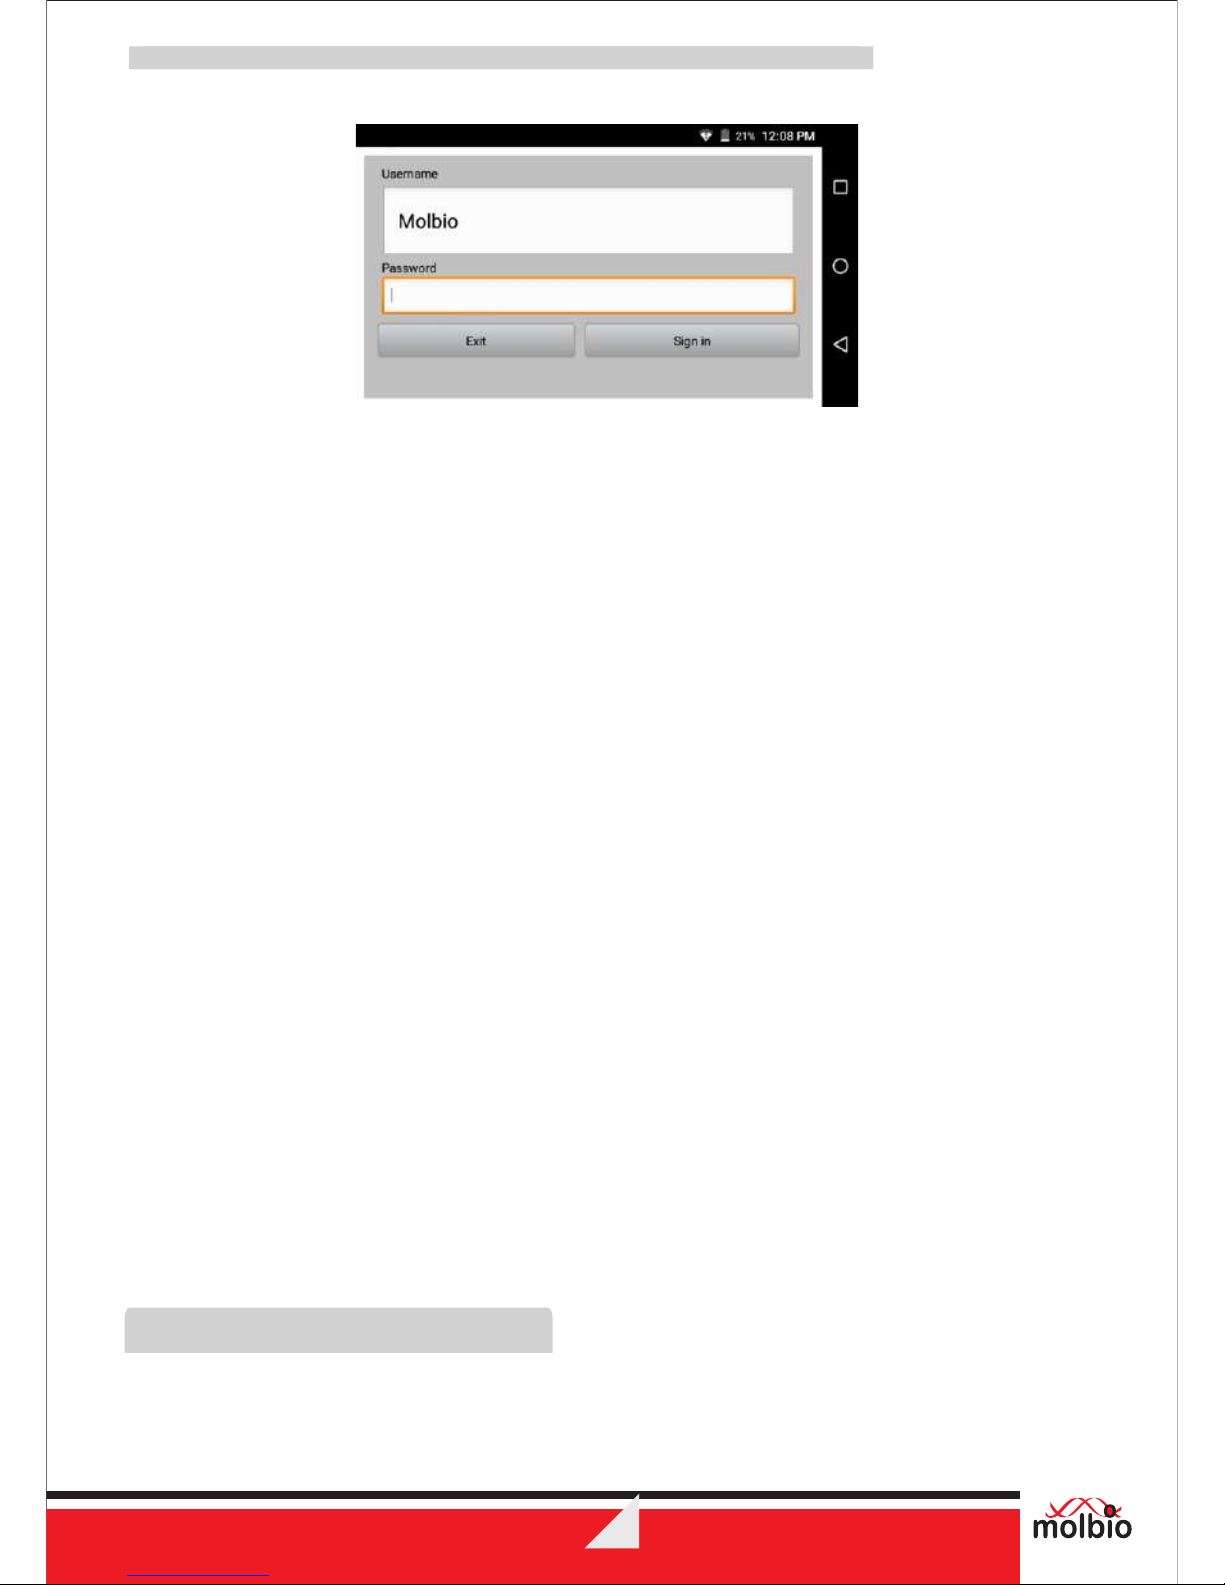
Figure 7 : Home Screen with Low battery icon in left corner
4.1.2.3 If the Low Battery LED Indicator and/or the Battery Status Icon indicate low battery
charge, you can either use the Truelab™ Duo with the AC Adaptor or you can charge it and wait
for it to finish before using it on battery power. (See the next section, 4.1.3, “Charging/Using the
Truelab™ Duo with the AC Adaptor”).
Note:
· The Battery Status Icon can be seen in the Login Screen. It can also be seen once you've
logged in and attempt to begin a test
· If the battery charge is too low to perform a test, the Analyzer will alert you with a system
message to plugin the charger before it lets you select and confirm a test profile.
· Use only the provided AC Adaptor to charge or power to Truelab™ Duo
TM
4.1.3 Charging/Using the Truelab Duo with the AC Adaptor
TM TM
4.1.3.1 Plug in the Truelab AC Adaptor to the Charging Port of the Truelab Duo
Analyzer
4.1.3.2 Plug in the other end of the AC Adaptor to a wall socket
4.1.3.3 Switch ON the wall socket
TM
4.1.3.4 When the Truelab Duo is charging, the blue Charging LED Indicator will
glow, and the Low Battery LED Indicator will go off if it was glowing.
TM
4.1.3.5 You can now use the Truelab Duo with the AC Adapter (Proceed to Section 4.2)
Charging the Analyzer will take ~4 hours. When the charging is complete, the
Charging LED Indicator will stop glowing.
TM
4.2 Starting the Truelab Duo
Note:
An on-Screen keyboard will appear every time you click on a textbox requiring text
input. This is also operated using fingers.
19
True Duolab™
20
4.2.2 Logging In
You will need to log in to the application
using the appropriate user name. To log
in,
4.2.2.1 Tap the User Name Bar in the
Login Screen, This will open a dropdown menu to select the User Name
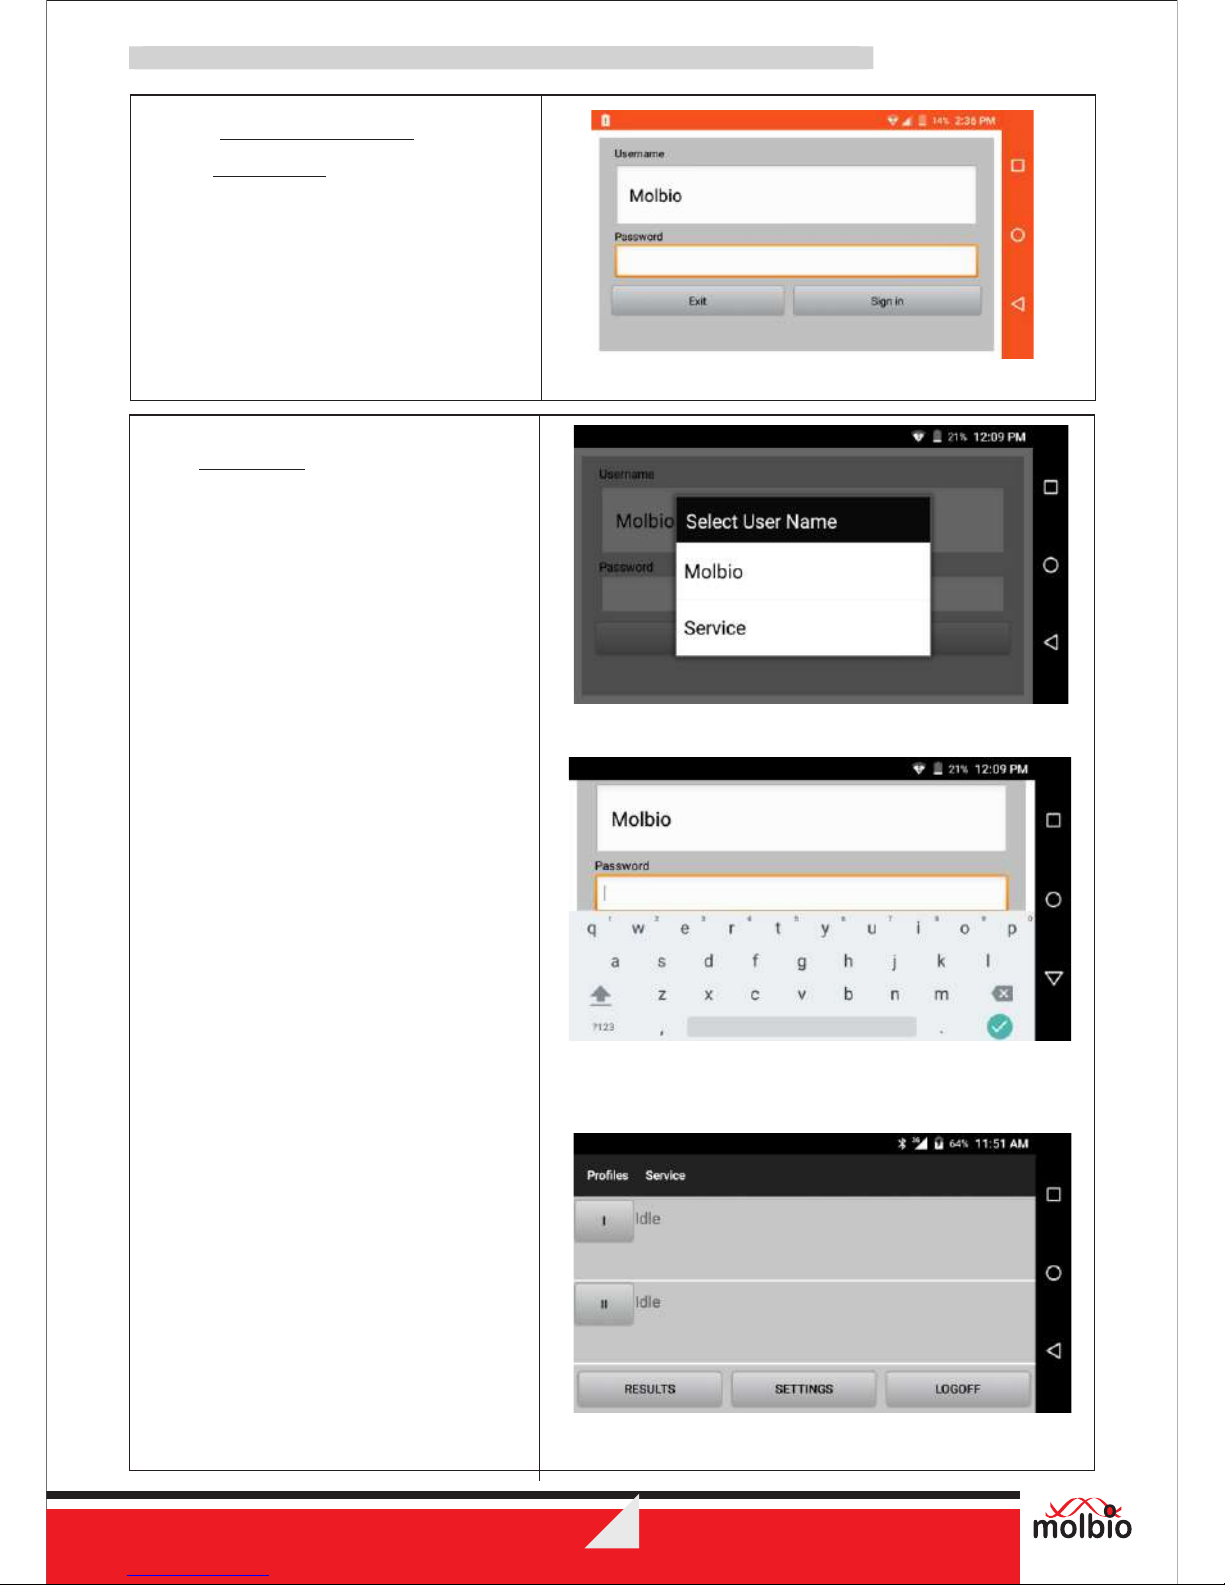
4.2.2.2 Select the user name from the
list displayed.
Note: The user name “Molbio” is
just used here as an example. The
user name is definable by the
customer.
4.2.2.3 Tap the Password text box You
will be prompted with an OnScreen keyboard.
4.2.2.4 Type the password with the on-
Screen keyboard.
4.2.2.5 Select the Next button on the on-
Screen keyboard.
4.2.2.6 Tap Sign In
This will open the Status Screen.
Test Bay Status:
The Status Screen will list out the two Bays
you can choose from. User can choose
either bays to run the test.
Tap on the Bay number to enter the Profiles
Screen.
Figure 9 : User ID Selection
Figure 10: The Login Screen, with the On-Screen
Keyboard
True Duolab™
4.2.1 Starting the Truelab™
Application
Tap the Truelab™ Duo Application
TM
Icon, this will open the Truelab Login
Screen.
Figure 8 : Login Screen
Figure 11: Status Screen
21
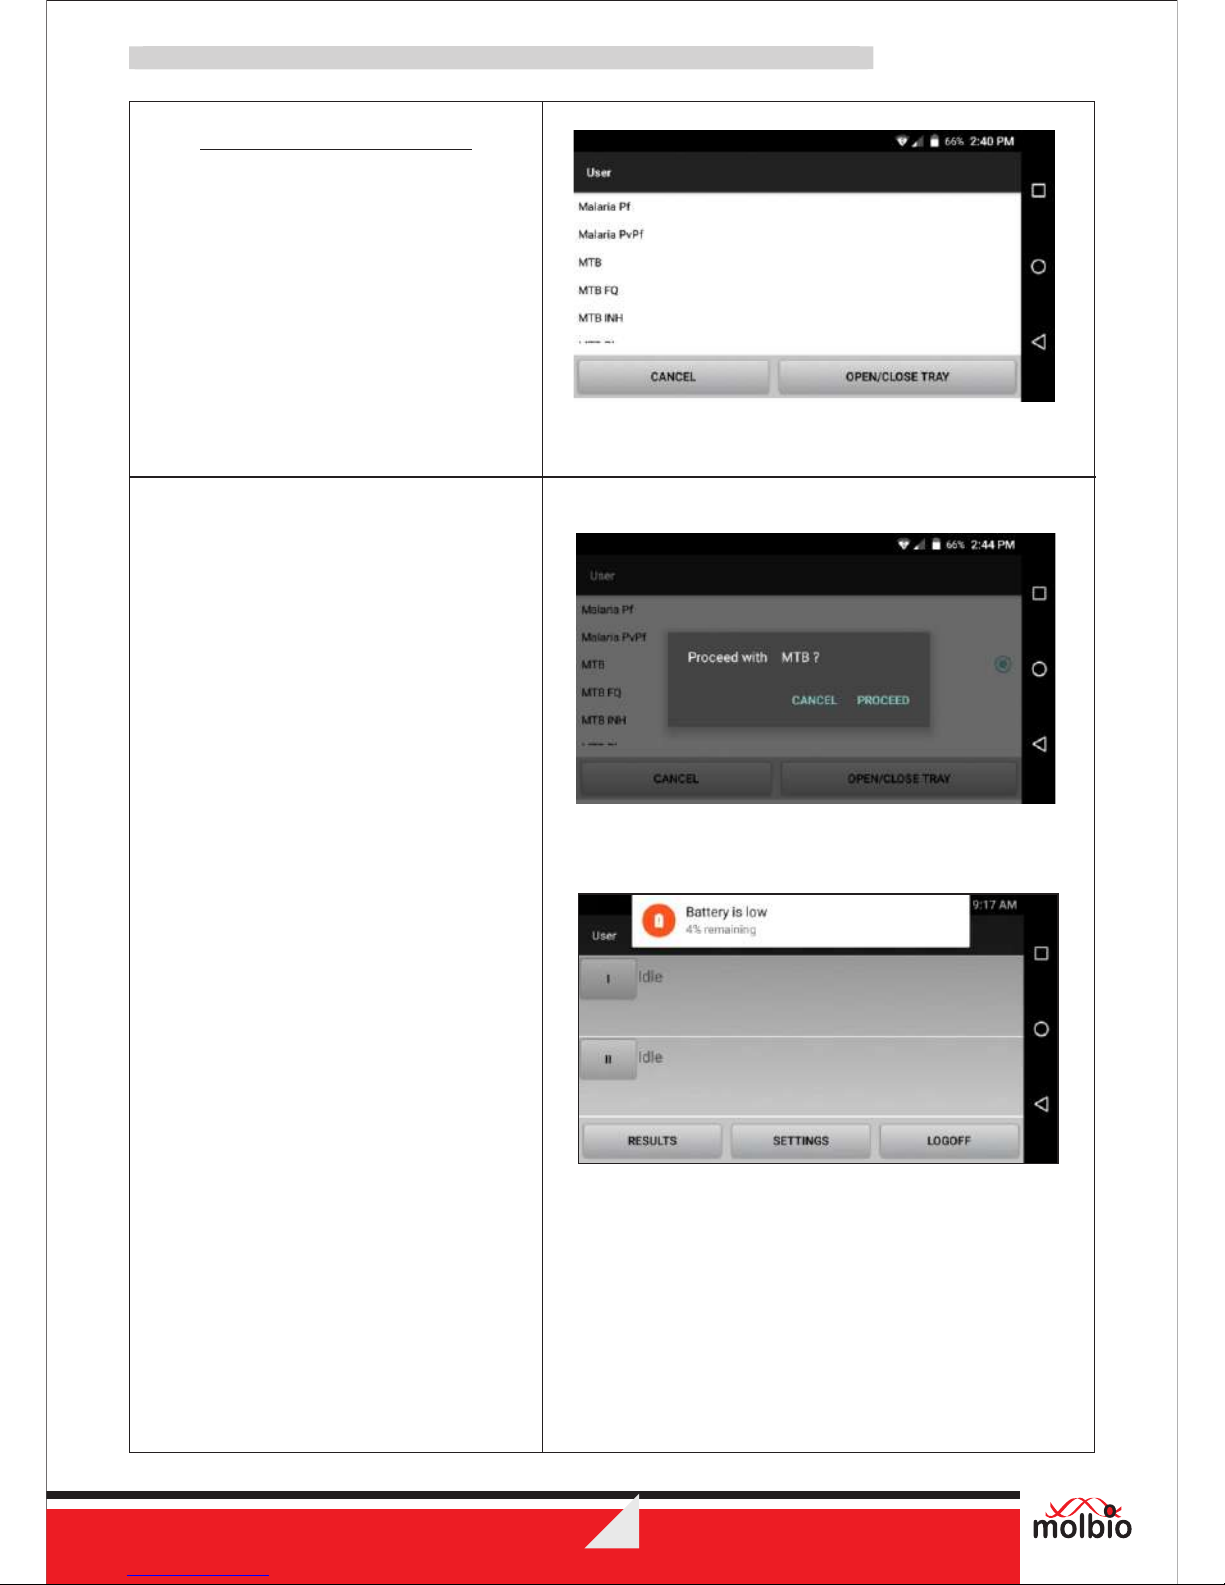
4.2.3 Profiles and Sample Details
The Profiles Screen will list out all
available disease profiles that you can
choose from. A profile contains preset
PCR parameters for that particular test.
To choose a profile,
Tap on the profile of your 4.2.3.1
choice from the list.
You will be prompted with a
message asking you if you
would like to proceed with
your choice.
Note: The profile used as an example in
this manual is “MTB”.
4.2.3.2 Tap the “Proceed” Button
on this pop-up as shown in
Figure 13.
The Sample Details Form
will be displayed.
Note: Selecting the Cancel button will
take you back to the profiles
Screen
4.2.3.3 If battery charge is too low
to perform a test, the Analyzer
will display a prompt that says
the battery is low. You are
required to plugin the charger
before the Analyzer will let you
begin a test.
Figure 13 : Profile Confirmation Prompt
Figure 14 : Low Battery Alert before
confirmation of profile
True Duolab™
Figure 12 : The Profiles Screen
22
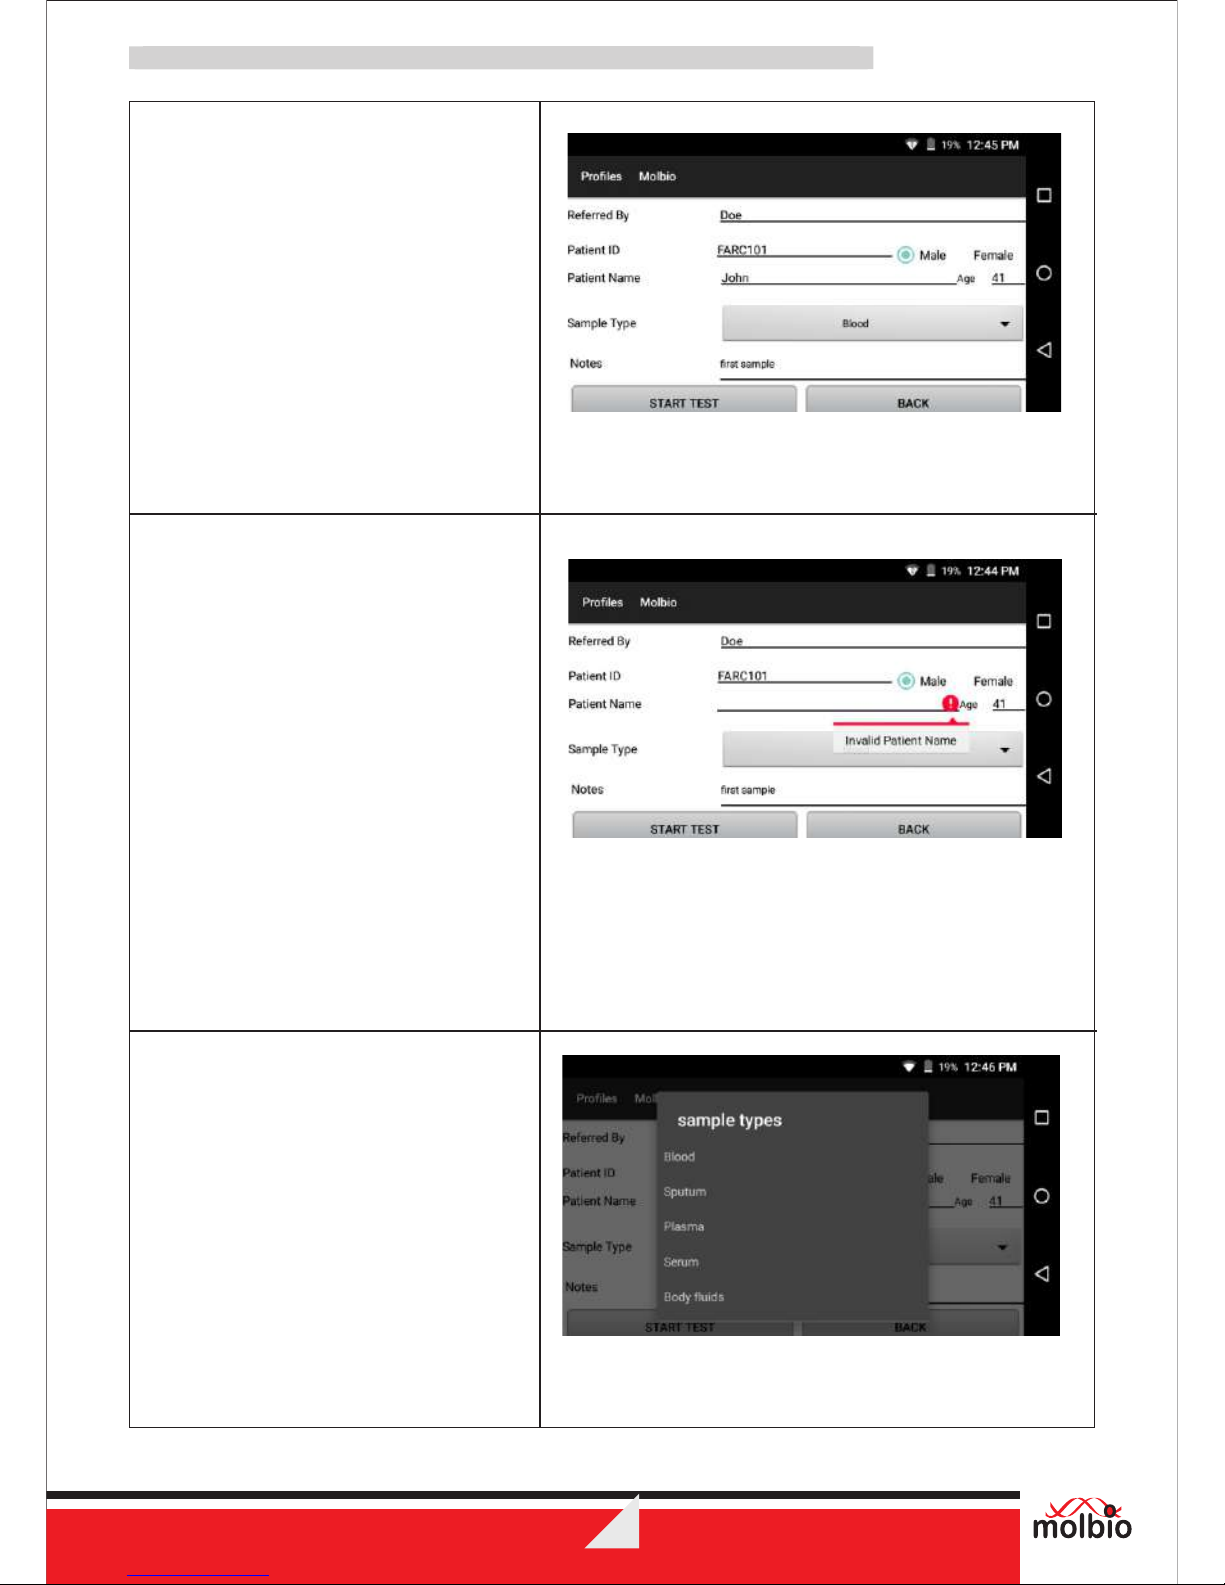
4.2.3.4 Fill in the Sample Details
Form with the details of
the test using the onScreen keyboard.
All fields accept entry of a
combination of numbers
and letters except for
“Age” which will accept
only integer numbers from
1 to 99. For ages below 1
year old in case of infants,
please enter a number
between 0.1 and 0.9 in the
Age field.
Select the relevant button
for gender.
Choose the appropriate
sample type from the dropdown menu.
Important:
Ÿ Enter the details carefully, this
Screen will not be accessible
again once the chip has been
loaded.
Ÿ The Patient Name is mandatory;
you will be prompted by the
Analyzer if you have not filled it in.
Ÿ It is recommended to enter details
in all fields
Figure 17 : Sample type selection
True Duolab™
Figure 16 : Sample details form with invalid
prompt if patient name left blank
Figure 15 : Filling in the Sample Details From
23
True Duolab™
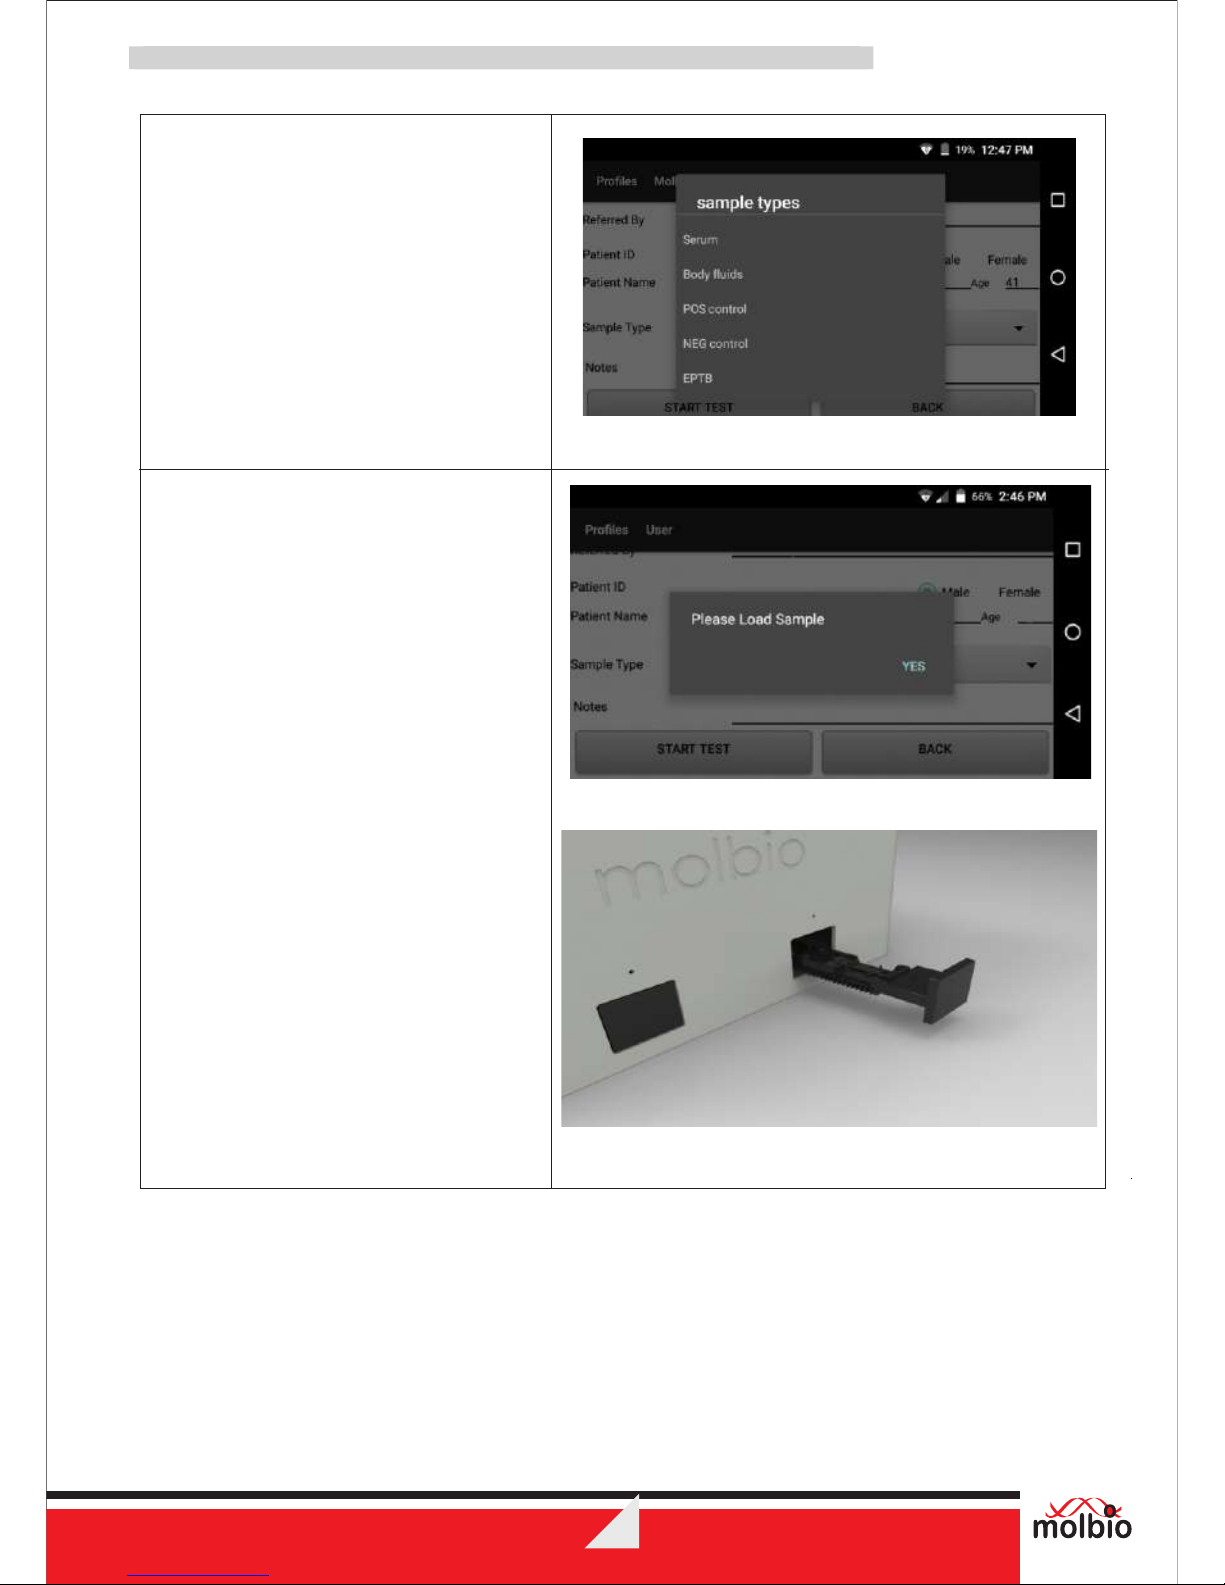
Figure 19 :
Figure 20 : Chip tray opens automatically
Note:
This data will be saved along with test
results when the test has finished and can
be viewed whenever you like. (See
section 4.7 “Viewing Saved Test Results”)
4.2.3.5 When you have completed
the Sample Details Form,
Press the “Start Reaction”
Button at the bottom of the
Screen. The chip tray opens
automatically and you will
be prompted to load the test
chip with the message
“Please load sample”.
4.2.3.6 The sample now needs to
be loaded onto the Truenat
Chip. Proceed to the next
section for instructions on
TM
loading the Truenat chip.
Important:
Do not select the ‘YES’ Button in
this prompt till you have finished
loading the test chip and pushing
the chip tray back in fully (as
detailed in Section 4.3)
Figure 18 : Sample menu expanded
Prompting the User to load the Sample
24
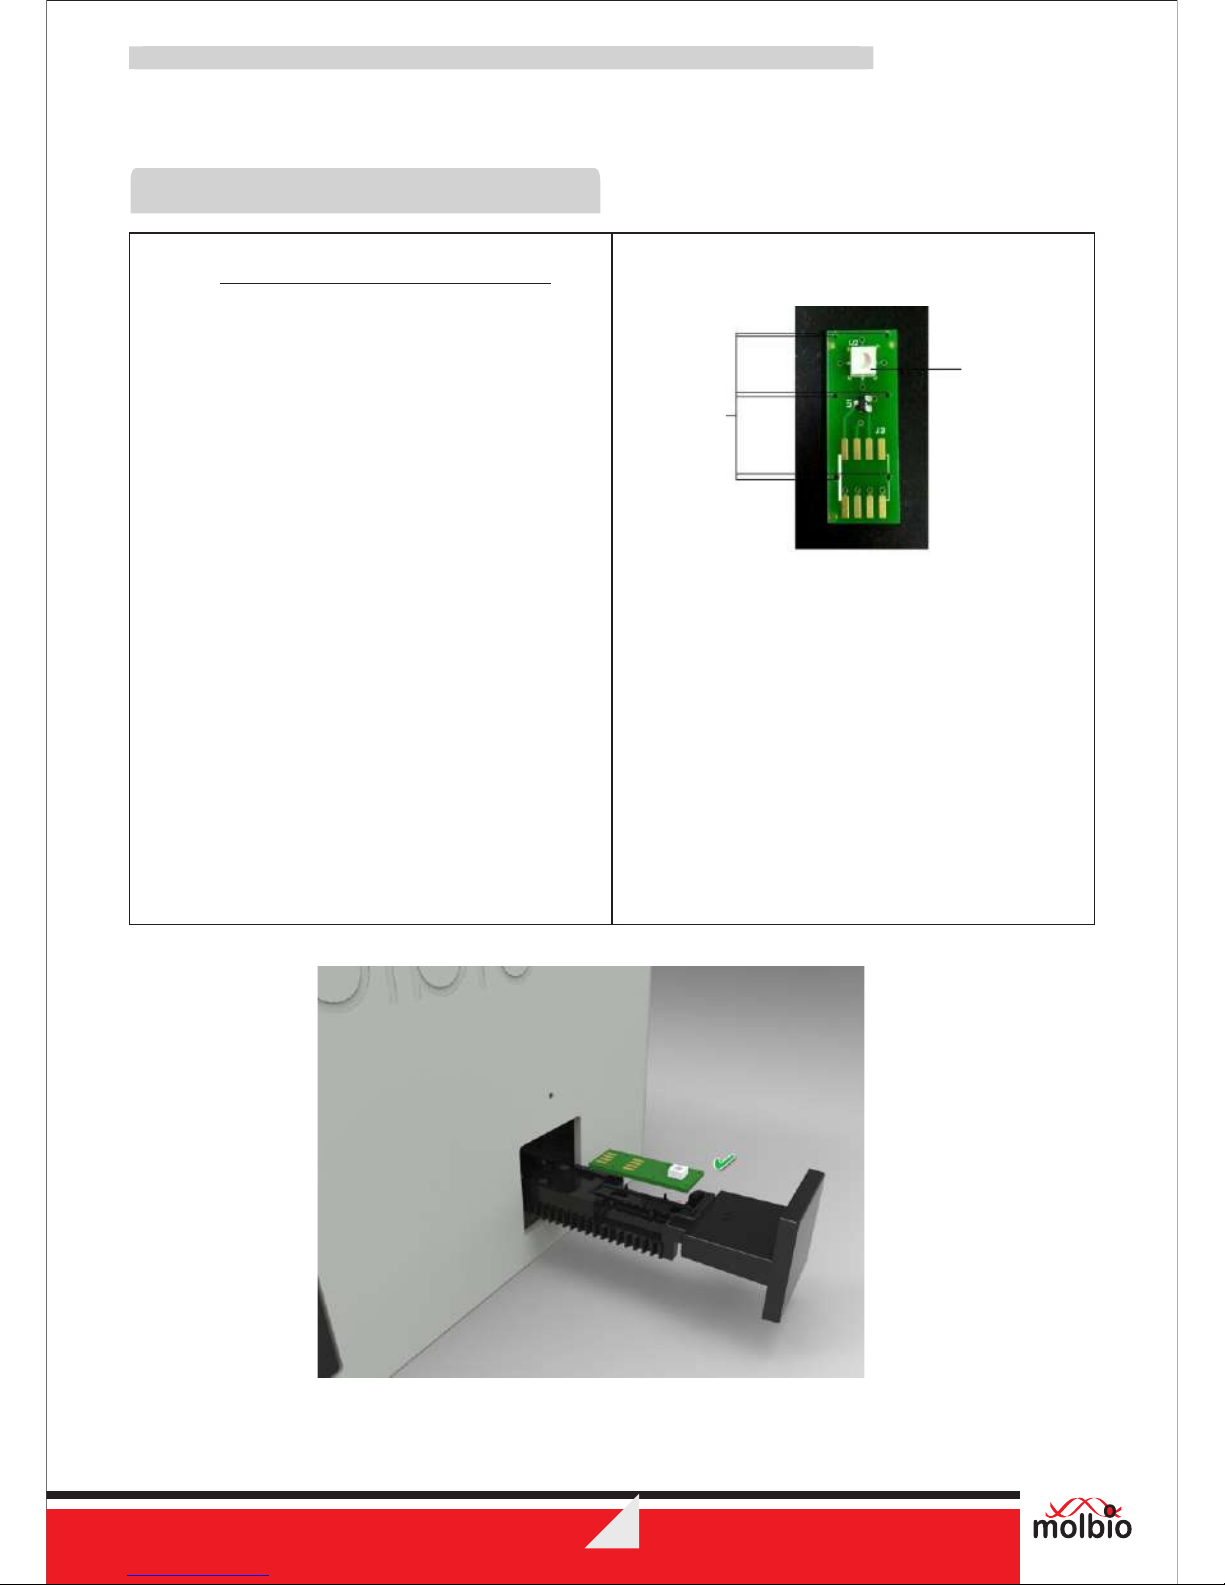
4.3.1 Placing the Chip on the Chip Tray
4.3.1.1 Place a new Truenat chip on to ™
the Chip Tray by lowering the chip
onto the chip tray.
Important : Make sure you have placed the
chip correctly onto the tray.
a) The chip's registration holes
should be placed properly onto
all the tray pins.
b) The reaction well should face
upwards.
Figure 22 below shows the correct
placement of the chip, with the reaction
well facing upwards and to the right side
and the chip being placed on the tray pins
properly.
Incorrect placement of the Chip will
prevent the tray from being pushed back in
fully
Figure 21 : The Truenat Chip™
Figure 22 : The Truenat Chip being placed correctly onto the Chip Tray ™
True Duolab™
Reaction Well
Registration
holes
TM
4.3 Loading the Truenat chip
25
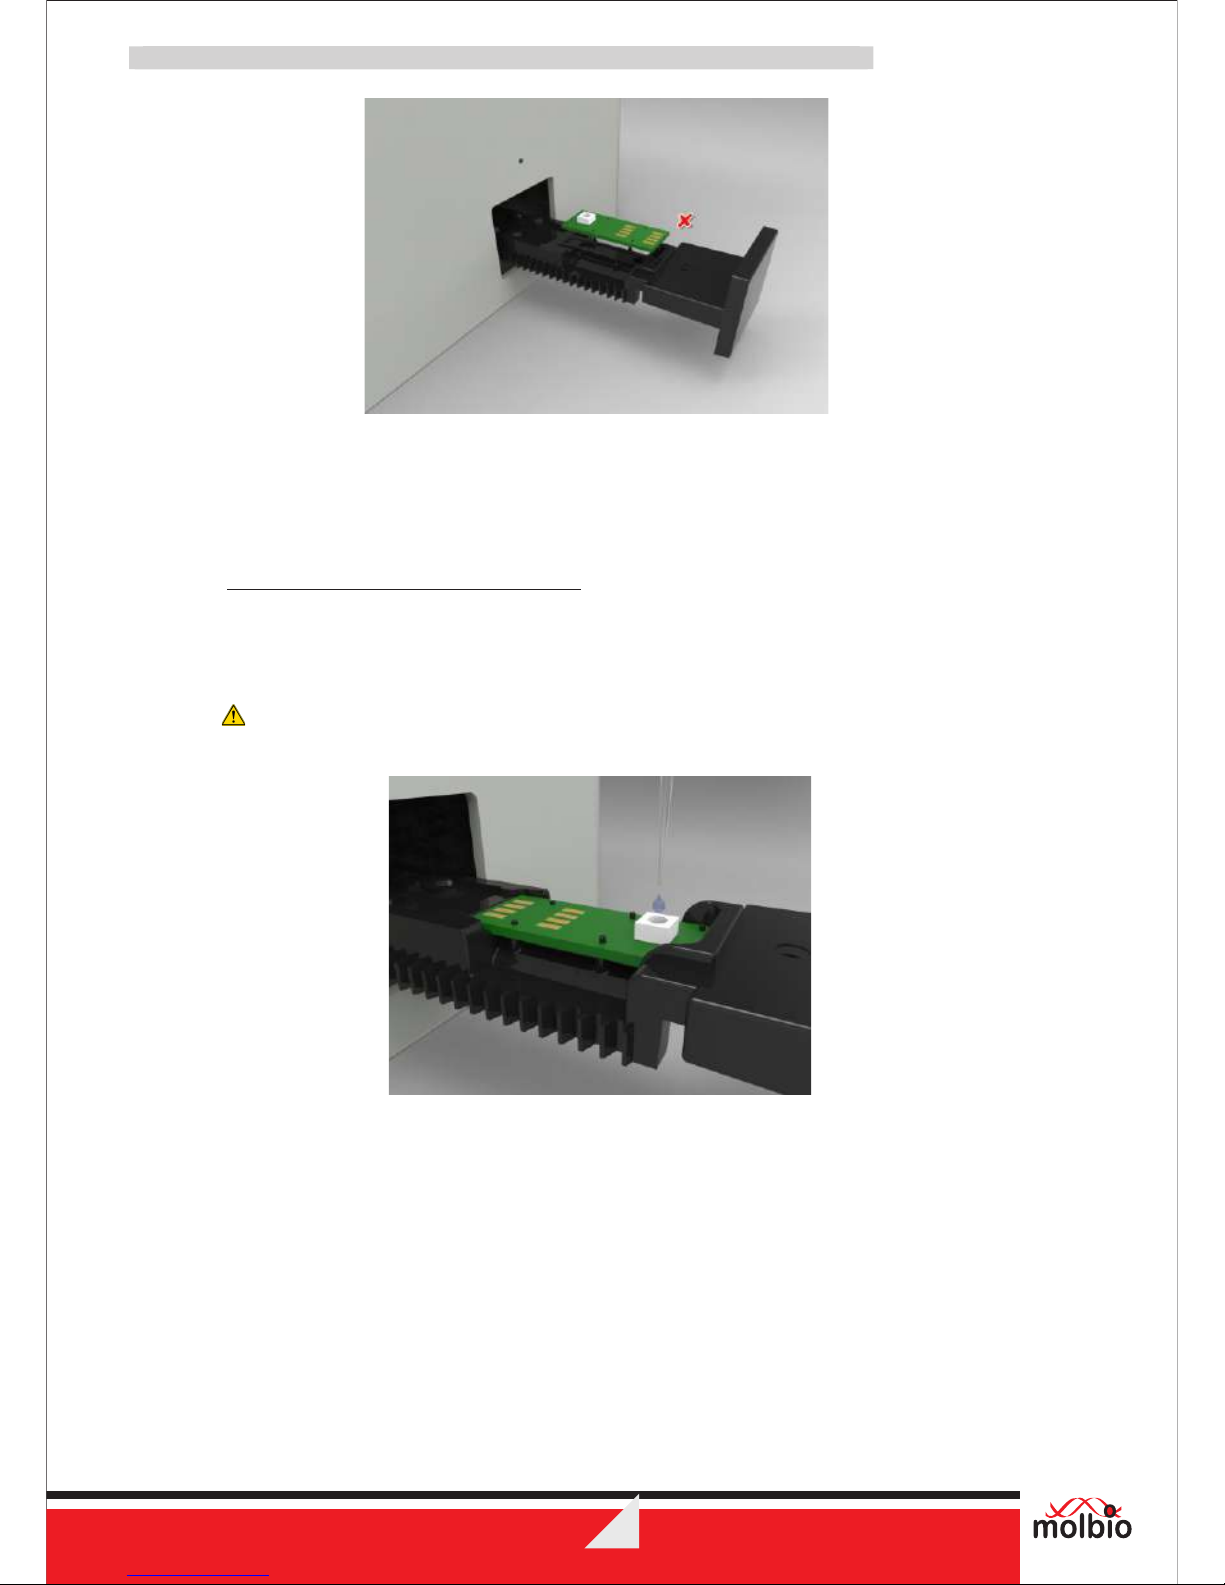
4.3.3 Loading the Sample onto the Chip
4.3.3.1 After the Chip has been properly placed onto the Chip Tray,
Pipette six (6) μl of the purified nucleic acid from ECT tube (from Trueprep AUTO Universal ™
Cartridge based Sample Prep Kit) into the microtube. Allow it to stand for 30-60 seconds to get a clear
solution. Using the same filter barrier tip, Do not mix it by tapping, shaking or by reverse pipetting.
pipette out six (6) μl of this clear solution and dispense into the center of the reaction well of the chip.
Note:
TM
a) A 6µl Truepet SP fixed volume Precision micropipette is provided with your Truelab ™
workstation.
Important:
b) Do not touch the bottom of the reaction well with the pipette tip.
c) Do not touch the reaction well with your hand.
d) Ensure that the elute has been pipetted out fully into the center of the reaction well.
e) Ensure that there is no spillage of the elute from or around the reaction well.
Figure 23 : An Example of Incorrect Chip Placement
Note:
The Tray Pins in the figures above are colored red only for the purpose of illustration.
Figure 24 : Loading the Sample onto the Chip
True Duolab™
 Loading...