

Mola Mola Makua User Manual

Mola-Mola
Kattegat 8
9723 JP Groningen
The Netherlands
+31 50 526 4993
info@mola-mola.nl
Please read this manual before operating the unit
Makua, the Preamplifier
User’s Manual
Packing List
Your product was shipped with the items checked below. Please verify that you find all
items mentioned in this list before you start setting up:
Item
Qty
Shipper’s signature
This Manual
1 Pair of Cotton Gloves
1 Preamplifier
1 Power Cord
1 Standard Remote Control Unit
Premium Remote Control Unit
Shipping Carton (Brown)
1 Display Carton (White with Logos)
1 Carrying Case (Black)
1 Phono Option (internal)
DAC Option (internal)

Makua Preamplifier
User Manual
R5
- 2 -
Welcome
First off, congratulations! With the purchase of this product you have joined a growing
community of audiophiles who value truthful sound reproduction and who consider neutral
and transparent electronics a cornerstone in this pursuit. We at Mola-Mola made it our
primary goal to build electronics capable of passing a signal with no discernible change at
all. Amplifiers make the signal bigger, converters turn the signal from a digital
representation into an analogue one. In all these processes we strive to add nothing and to
remove nothing.
Through our work designing professional audio equipment we have collected extensive
knowledge of how to achieve total freedom from colouration without having to resort to
minimalist circuitry. This allows us to build products that are purist without cutting back
functionality. So we decided that our preamp should be complete. Very complete.
The basic Makua Preamplifier is an extremely transparent gain stage and a programmable
routing matrix. The chassis has ample room to fit in optional extras, most notably a DAC
and a phono stage.
The 6 preset buttons are programmable via Bluetooth to access any combination of
channel, processing and routing. In a system with mainly digital sources, the preset buttons
would be programmed to select between them. Vinyl lovers on the other hand might want
to use several buttons to select the same turntable but with different EQ settings to suit
their large collection of historic LP's. All five inputs are switchable between XLR and floating
RCA connections, and all can be assigned as either phono or line.
We wish you a lifetime of musical enjoyment with this product and thank you for your
custom.
Bruno Putzeys, CTO and Designer.

Makua Preamplifier
User Manual
R5
- 3 -
Table of contents
Welcome ...................................................................................................................... 2
Table of contents .......................................................................................................... 3
List of tables ............................................................................................................. 4
List of figures ............................................................................................................ 4
Important Safety Instructions ........................................................................................ 5
Connections & Controls ................................................................................................ 7
Rear ......................................................................................................................... 7
Front ......................................................................................................................... 8
DIGIN module (optional) ............................................................................................ 8
Setting Up .................................................................................................................... 9
Installation ................................................................................................................ 9
Connection ............................................................................................................... 9
Basic operation .......................................................................................................... 11
Factory Preset Mode ............................................................................................... 11
Front Panel Operation .............................................................................................. 11
Premium IR Remote Control Operation ..................................................................... 12
Standard IR Remote Control Operation ..................................................................... 12
Android® and iOS® Tablet or Mobile Remote Control ................................................ 12
Advanced Control and Programming ........................................................................... 14
Signal Path ............................................................................................................. 14
Programmability ...................................................................................................... 15
The Makua App. ...................................................................................................... 16
Setting Up and Controlling the Phono Stage ............................................................. 23
DAC ........................................................................................................................ 26
Troubleshooting ......................................................................................................... 27
Audio performance data .............................................................................................. 28
Audio performance data Phono Stage.......................................................................... 29
Audio performance data DAC ...................................................................................... 30
Technical data ............................................................................................................ 31
Annex I: RC5 Codes .................................................................................................... 32
Annex II: Serial Commands ......................................................................................... 33
Connection ............................................................................................................. 33
Command Format ................................................................................................... 33
Command list ......................................................................................................... 33
Revision History ......................................................................................................... 35

Makua Preamplifier
User Manual
R5
- 4 -
List of tables
Table 1: Rear panel overview ........................................................................................ 7
Table 2: Front panel overview ........................................................................................ 8
Table 3: DIGIN module overview ................................................................................... 8
Table 4: Audio Performance Data ................................................................................ 28
Table 5: Audio performance data Phono Stage ............................................................ 29
Table 6: Audio performance data DAC ......................................................................... 30
Table 7: Technical Data .............................................................................................. 31
Table 8: RC5 Codes .................................................................................................... 32
List of figures
Figure 1: Rear panel overview ....................................................................................... 7
Figure 2: Front panel overview ....................................................................................... 8
Figure 3: DIGIN module overview .................................................................................. 8
Figure 4: Sketch of the internal signal path. .................................................................. 14
Figure 5: Status bar while the mobile device tries to contact the preamplifier................. 16
Figure 6: The app is ready to control the preamp, the preamp is on. ............................. 16
Figure 7: Home Page, Preset 1 is selected. .................................................................. 17
Figure 8: Routing Page, input 1 is selected. ................................................................. 18
Figure 9: Adjustment and Trigger Page. ....................................................................... 20
Figure 10: Balance and Update Page. .......................................................................... 21
Figure 11: Status DAC, Preset with digital input selected .............................................. 22
Figure 12: Phono Stage Page. ..................................................................................... 23
Figure 13: Select Phono Stage EQ Curve. .................................................................... 25
Figure 14: DIGIN module update tool. .......................................................................... 26
Makua Preamplifier
User Manual
R5
- 5 -
Important Safety Instructions
Mola-Mola gaat er van uit dat u deze Engelstalige tekst volledig begrijpt. Als u hier
moeite mee heeft dient u contact op te nemen met Mola-Mola. Op verzoek sturen wij u
een vertaling toe.
Mola-Mola geht davon aus, dass Sie diesen Englischen Text völlig verstehen. Wenn
notwendig, nehmen Sie bitte Kontakt auf mit Mola-Mola. Auf Wünsch wird Ihnen eine
Übersetzung zugeschickt.
Mola-Mola suppose que le lecteur comprend parfaitement le texte en Anglais cidessous. En tout cas de doute veuillez contacter Mola-Mola. Une traduction sera vous
envoyée sur demande.
Mola-Mola da por supuesto que el texto en versión Inglesa no ofrece ninguna duda de
interpretación y se entiende integramente. Si este no fuese su caso rogamos contacte
con Mola-Mola quien, a petición, se encargaría de enviarle la correspondiente
traducción.
Throughout this document, some aspects of operation that have a potential impact on
safety or reliability are noted with the words “Warning” and “Caution”. Take particular care
reading and understanding these items. Paragraphs marked with “Warning” explain safety
measures required to maintain your personal safety. Paragraphs marked with “Caution”
pertain to danger to the equipment itself or to connected equipment. Please follow these
precautions when using this product:
1. Read these instructions.
2. Keep these instructions.
3. Follow all instructions.
4. Heed all warnings.
5. Install in accordance with the manufacturer’s instructions.
6. Use only attachments or accessories specified by the manufacturer.
7. WARNING: Dangerous voltage is inside this apparatus. Opening is only allowed
by qualified service personnel.
8. WARNING: Do not defeat the safety purpose of the safety earth connection. Use
the provided three-prong power cord to insure the product is connected to safety
earth. If the provided mains cord does not fit your outlet, consult an electrician for
replacement of the obsolete outlet.

Makua Preamplifier
User Manual
R5
- 6 -
9. Protect the power cord from being walked on or pinched, particularly at plugs,
convenience receptacles, and the point where they exit from the apparatus.
10. Unplug this apparatus during lightning storms or when unused for long periods of
time.
11. WARNING: Do not use this apparatus near water. Do not expose the apparatus to
dripping or splashing. Do not place objects filled with liquids (flower vases, drink
cans, coffee cups, etc) on the apparatus. Do not use this apparatus out of doors.
12. WARNING: Clean only with a dry, soft, lint-free cloth. Do not spray any liquid
cleaner onto the cabinet, as this may lead to dangerous shocks or malfunction.
13. CAUTION: This unit runs slightly warm when operated normally. Operate in a
normally ventilated area.
14. CAUTION: Do not install near any heat sources such as radiators, heat registers,
stoves, or other apparatus (including amplifiers) that produce heat. Avoid
exposure to direct sunlight.
15. Use only with a cart, stand, bracket, or table designed for use with audio or music
equipment. In any installation, make sure that injury or damage will not result from
cables pulling on the apparatus and its mounting.
16. Refer all servicing to qualified service personnel. Servicing is required when the
apparatus has been damaged in any way, such as when the power-supply cord
or plug is damaged, liquid has been spilled or objects have fallen into the
apparatus, the apparatus has been exposed to rain or moisture, does not operate
normally, or has been dropped.
17. WARNING: To reduce the risk of fire or electric shock, do not expose this
apparatus to rain or moisture.
Makua Preamplifier
User Manual
R5
- 7 -
Connections & Controls
Rear
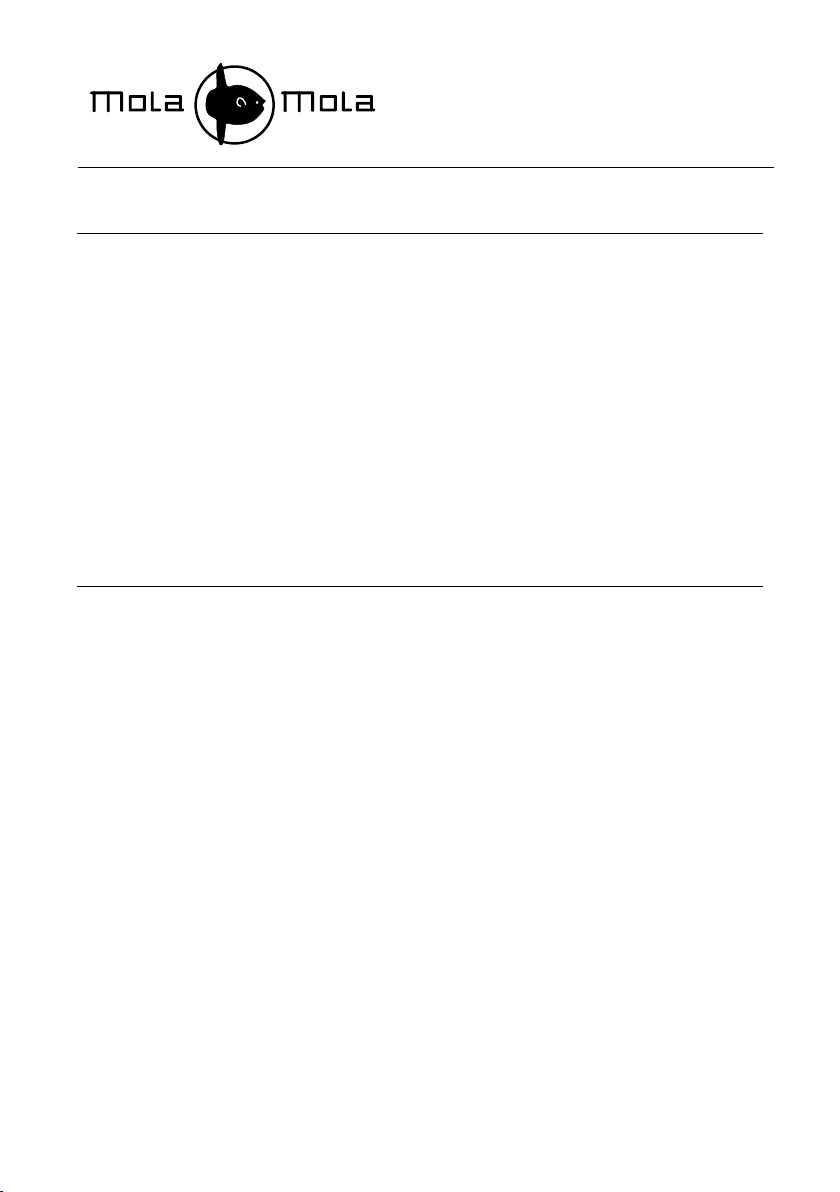
Figure 1: Rear panel overview
#
Function
Notes
1
Analogue inputs, balanced
5 stereo pairs
2
Analogue inputs, unbalanced
5 stereo pairs
3
Analogue Outputs
2 parallel stereo pairs for bi-amping
4
Trigger Outputs
4 programmable outputs
5
Mains power input
6 Chassis ground terminal
For turntable grounding
7
Option module void cover
8 (Un)Balanced toggle switch
One for each input pair
9
Serial control port connection
Optional
Table 1: Rear panel overview
Makua Preamplifier
User Manual
R5
- 8 -
Front
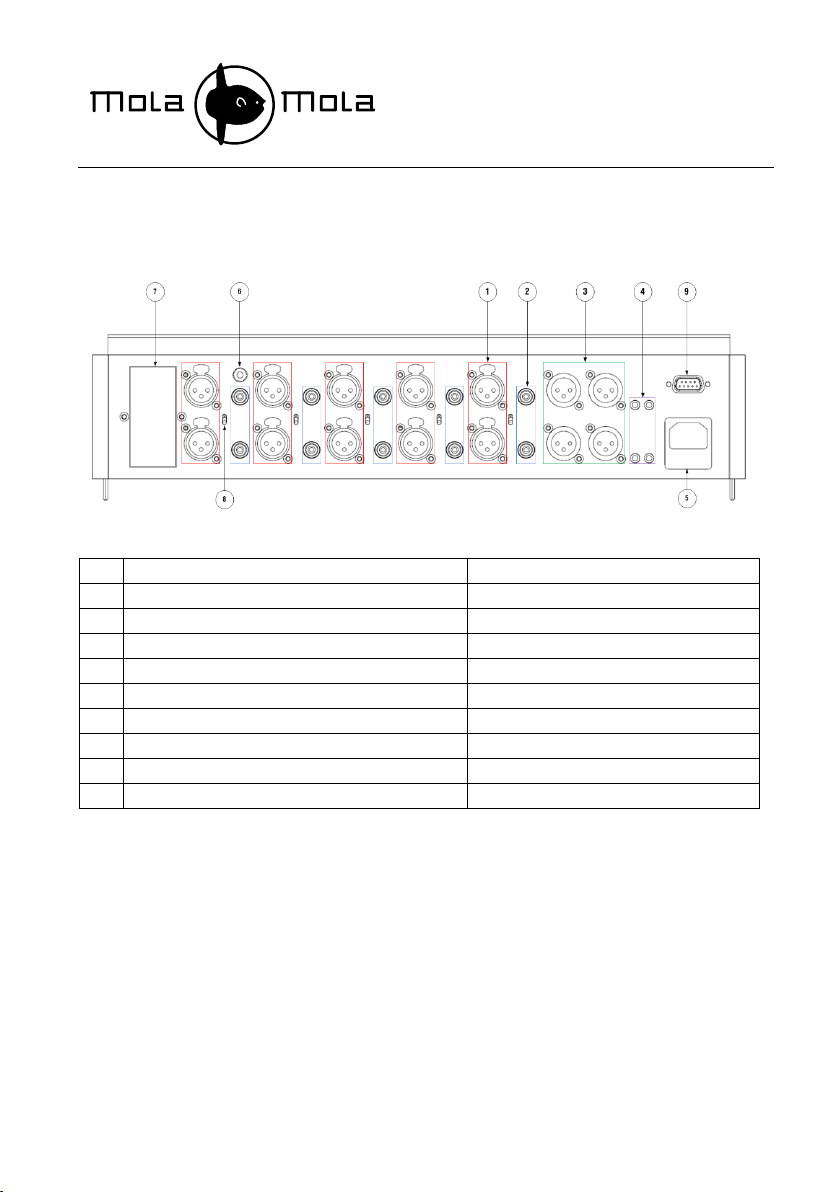
Figure 2: Front panel overview
#
Function
Notes
1
Volume control knob
With indicator LED
2
Power LED
1 LED, white or dim red
3
Preset indicator LED
6 LEDs, white
4
Presets
6 push buttons
Table 2: Front panel overview
DIGIN module (optional)
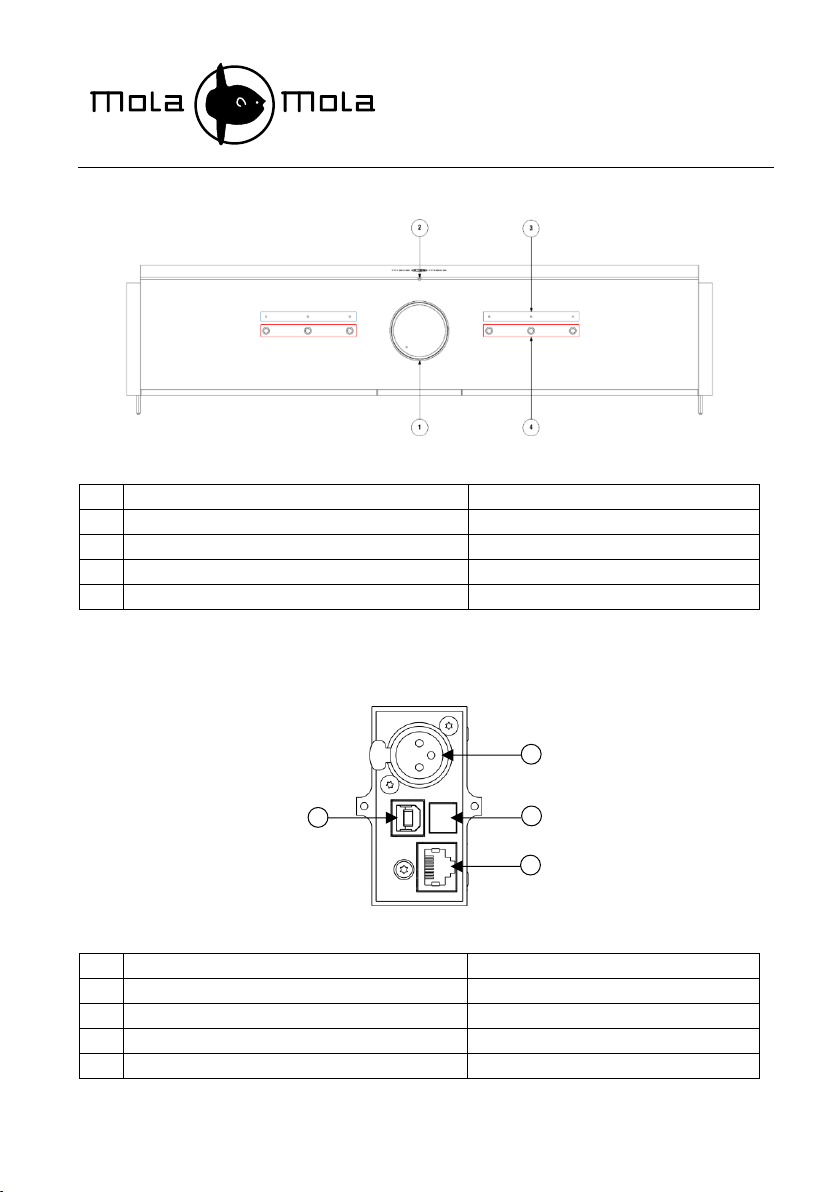
Figure 3: DIGIN module overview
#
Function
Notes
1
AES/EBU
2 Optical (Toslink)
3 USB type B
4 Ethernet
Internal purposes only
Table 3: DIGIN module overview
1
2
3
4

Makua Preamplifier
User Manual
R5
- 9 -
Setting Up
Installation
This product relies on free convection of air along the sides and top for cooling. Avoid
placing magazines, books or other objects on top of the product as this acts as thermal
insulation. Installation inside a cupboard is permissible provided at least 30cm (12”) of free
space above the product and 10cm (4”) around the sides is respected. Operation in closer
quarters requires some provision of forced convection (fan) to be installed inside the
cupboard.
Connection
CAUTION: Whenever you are plugging or unplugging cables, make sure that the volume
control is turned fully down. Failure to take this precaution may result in pops or bangs
in the loudspeaker. Use properly shielded interconnects with reliable connectors.
AC Power Input
Connect the supplied power cord to the AC input receptacle on the rear panel. Do not
connect the power cord until all the audio input and output connections have been made.
It is usually best to plug the product directly into a wall outlet. Avoid the use of extension
cords. A heavy duty multi-tap power outlet strip may be used if it and the wall outlet are
rated to handle the total current demanded by the components connected to it.
Your preamplifier has a universal input power supply, allowing it to operate anywhere from
90V to 240V mains. However, as an anti-grey-market measure, products sold in some
territories may refuse to operate from a mains voltage other than the one in regular use in
that territory. If you are planning to move overseas, consult with your retailer to have the
voltage range unlocked. The same should be done if your auditorium is custom-equipped
with a non-standard mains voltage.
If you are going to be away from home for an extended period of time such as a monthlong vacation, it is a sensible precaution to unplug electronic equipment. Do the same as a
precautionary measure during thunderstorms. No amount of surge protection or mains
filtering will save your equipment from a lightning strike in the backyard.
Input Connections
Your preamplifier accepts both RCA and XLR type connectors. If your sources have both
RCA and XLR outputs, it is exceedingly likely that using the XLR connection sounds best.
Depending on which you choose, set the toggle switch to the corresponding input.

Makua Preamplifier
User Manual
R5
- 10 -
Grounding Post
Connect any turntable ground wires to the grounding post to minimize the chances of
capacitively induced hum on the phono cartridge from the turntable.
Output connections
Two pairs of XLR outputs are provided for the purpose of bi-amping. Both pairs are
completely identical. No RCA outputs are provided because Mola-Mola considers balanced
(XLR) connections to be fundamentally superior. If you need RCA outputs to interface with
a power amp that lacks balanced inputs, most commonly available adapter cables or plugs
will work fine. Keep in mind that pin 2 is hot (signal) and pin 3 carries the reference potential
(cold).
Trigger outputs
The four 12VDC trigger outputs can be used for various purposes. The most obvious one
is making the power amplifier turn on and off with your preamplifier. Another is lowering a
projection screen when a particular source is selected. Any standard 3.5mm jack/jack
cable will do (mono or stereo). Although the factory setting is to make all 4 outputs come
on as soon as the preamplifier is turned on, they can be linked to individual channels. See
the section on advanced control and programming for more details.

Makua Preamplifier
User Manual
R5
- 11 -
Basic operation
Factory Preset Mode
Your preamplifier comes factory-programmed as a simple line amplifier. In this mode:
• The leftmost button selects the leftmost source (source 1) and so on and the
rightmost button is used for AES/EBU (if the DAC option is fitted). So for now,
think of the preset button simply as input select buttons.
• The trigger outputs are always on.
• XLR/RCA selection is determined by the toggle switches.
Should you wish to return your preamplifier to its factory-programmed state, you can do
so by holding down the two buttons directly besides the volume control for one second or
more. It makes good sense to do this if this is a unit you’re loaning for evaluation and it
was sent to you directly by a previous user.
If like most users you only have a handful of line-level sources you can just go ahead and
use the unit in this way.
Front Panel Operation
Powering Up
So long as mains power is applied the power LED can be in two states: on or standby. In
standby mode it will light up a dim red (barely visible in daylight, bright red standby LED’s
lighting up the room at night is a pet peeve of the designer). Push any of the 6 buttons to
wake up the preamp. The power LED lights up white and the preset you’ve just pushed will
be engaged (as indicated by the LED above the button).
Selecting Inputs
The preset indicator LED lights up solid when the preamp is passing signal and blinks when
it is muted. The preamp mutes temporarily for a moment after powering up or after
changing presets.
Muting
You can also make your preamplifier mute by pushing the currently selected preset button.
Push again or change presets to un-mute.
 Loading...