

Page 1
Overview
MK110 gateway supports multiple servers like EMQTT,AWS,Ali etc.This document will explain
the operation process during you use it,and the following demo pictures take android
phone as example.
Connect to MQTT server
1 Connect to EMQTT server
1.1 How to to connect app to EMQTT server
1.Download MOKO Scanner from Googleplay or APP store.Or scan the QR code below to directly
download.
2.Power on the plug and shortly press the button on plug,the indicated light will flash
green.open your MOKO Scanenr,click the upper left icon to the "MQTT settings for APP" interface.
Page 2
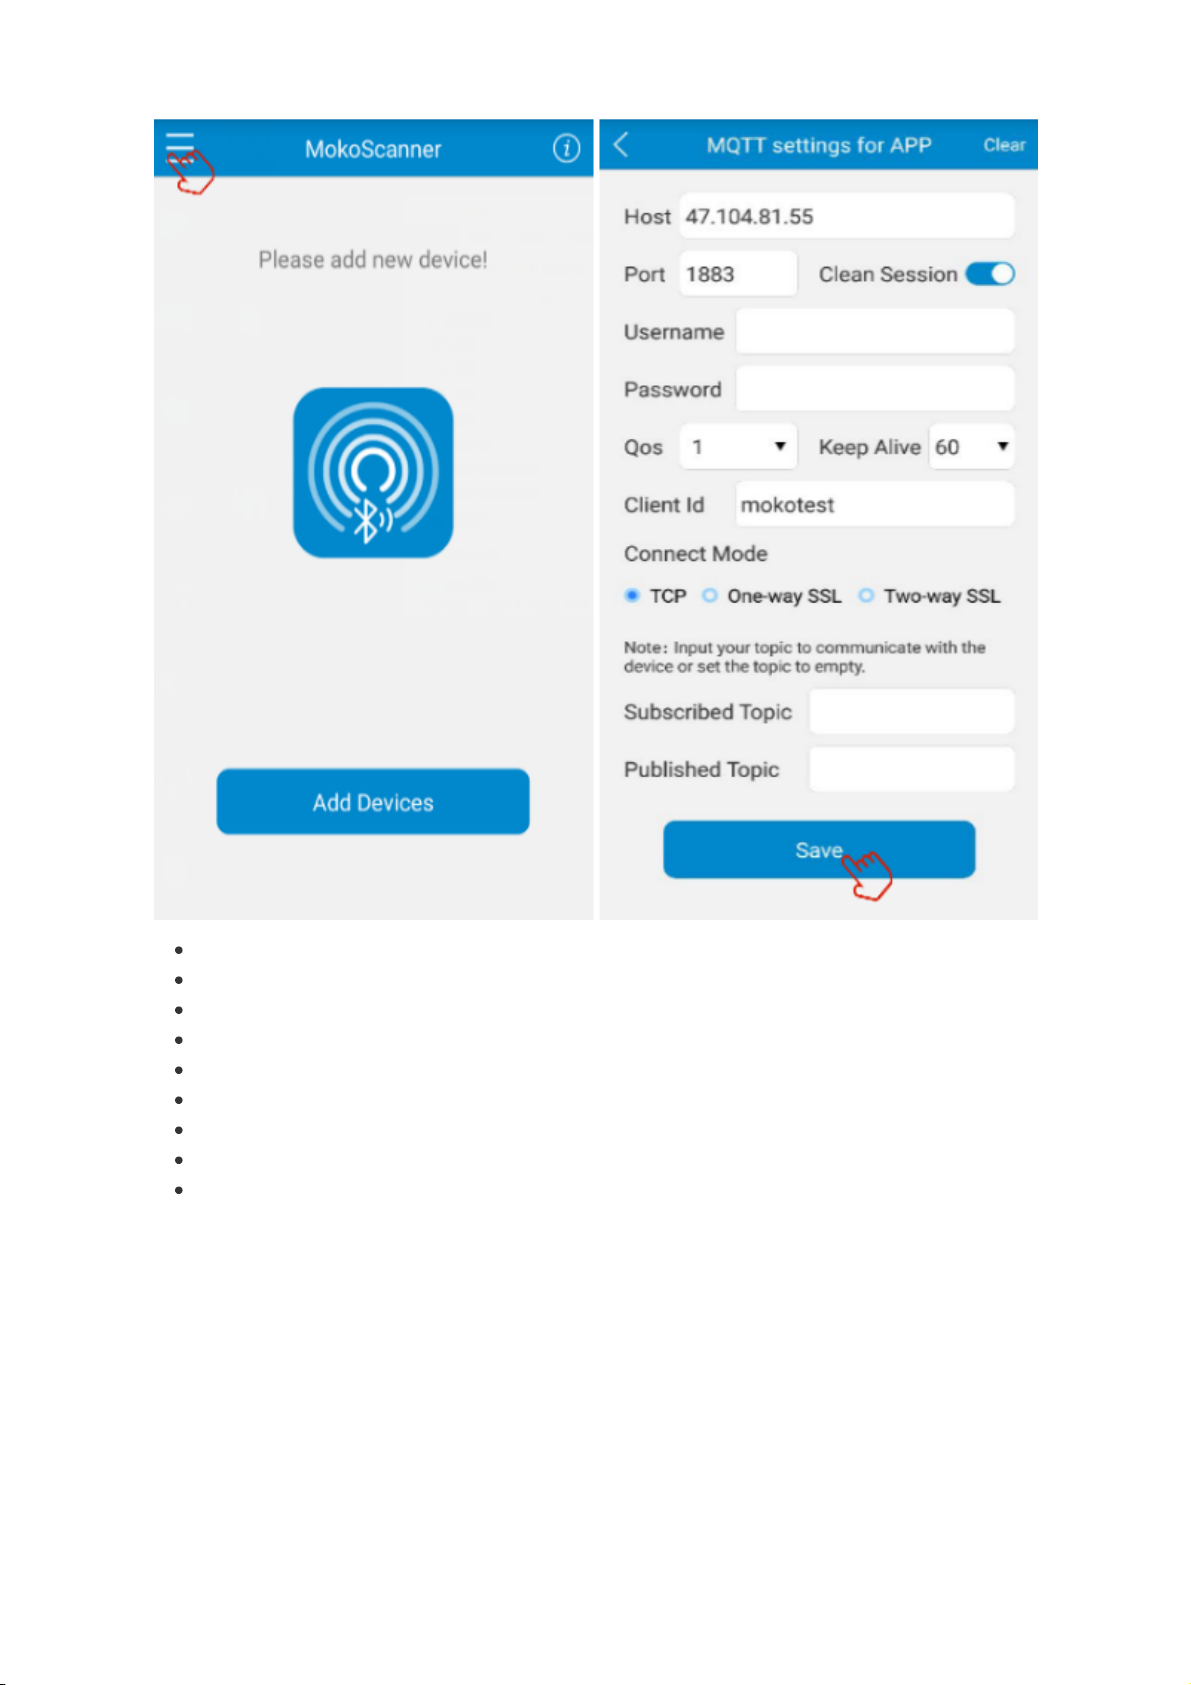
3.Enter the MQTT configuration parameters,click "Save".
Host: MQTT server host IP or domain name
Port: MQTT server host port
Clean session:on
Username: can be set or can be null
Password: can be set or can be null
QoS: Range: 0~2
Client id: Unique identity after the client connects to the server
Connect mode: tcp :EMQTT,One-way SSL: ALi ,Two-way SSL: AWS
Subscribed Topic and Publish Topic can be set or empty
Note: The host ip and port in the DEMO can be used directly if you need.
Host:47.104.81.55
port:1883
Just available for test
1.2 How to connect plug to EMQTT server
Page 3
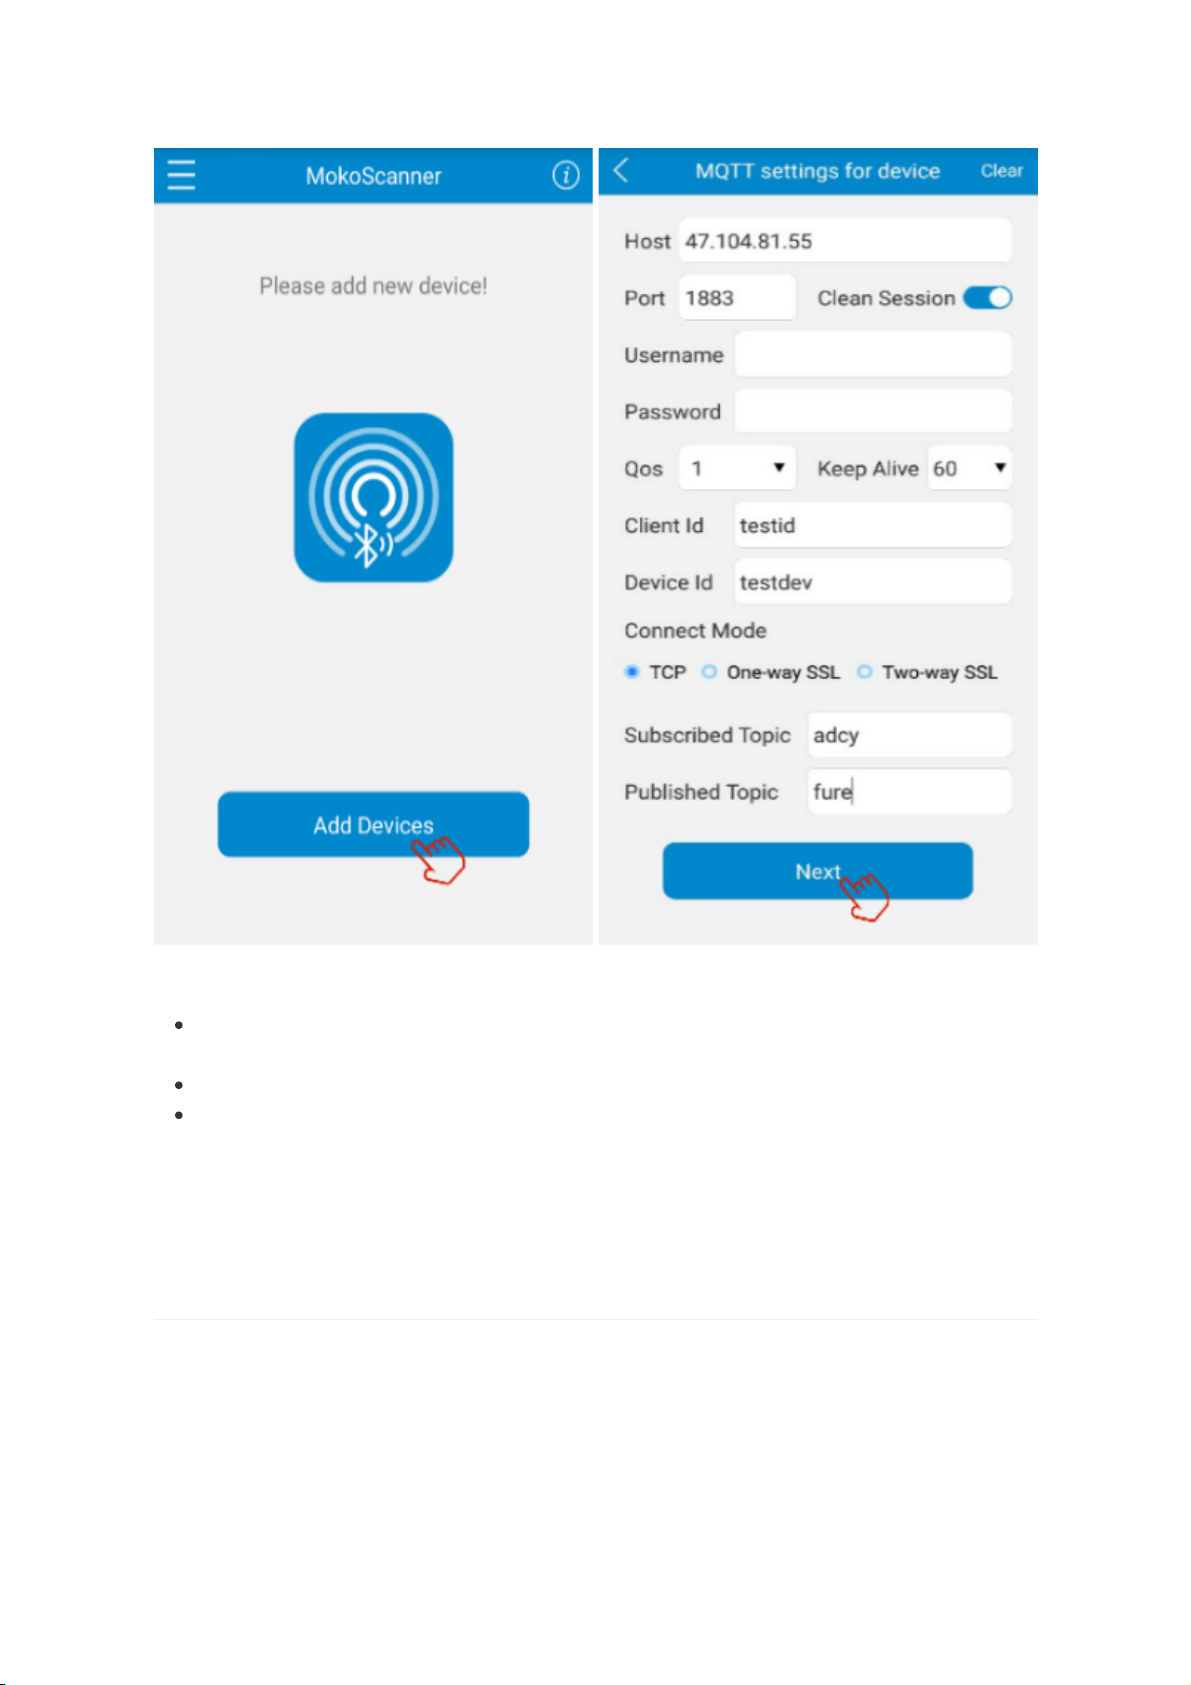
1.Afer MQTT settings for APP successed,click "Add device" to choose the waiting connection
device.then enter into the "MQTT settings for device"
Differences from MQTT settings for APP:
Client id: Unique identifier for MQTT servre distinguishing device. It can't be set the same as
APP side Client Id and can't be null.
Device id: Unique identifier for APP distinguishing device and it can't be null.
Subscribed Topic and Published Topic are neccessary,If APP side is null,you can set them
everything.If APP topics have been set,you should set them according to the APP side.The
device Subscribed Topic must be consistent with APP Published Topic,and the device
Published Topic is the same as APP Subscribed Topic too.(Setting rules:APP Subscribed
Topic = Device Published Topic and APP Published Topic = Device Subscribed Topics)
2.Connect to AWS
2.1 How to connect app to AWS
1.Download MOKO Scanner from Googleplay or APP store.
2.Power on the plug and shortly press the button on plug,the indicated light will flash
green.open your MOKO Scanenr,click the upper right icon to the "MQTT settings for APP"
interface.
Page 4
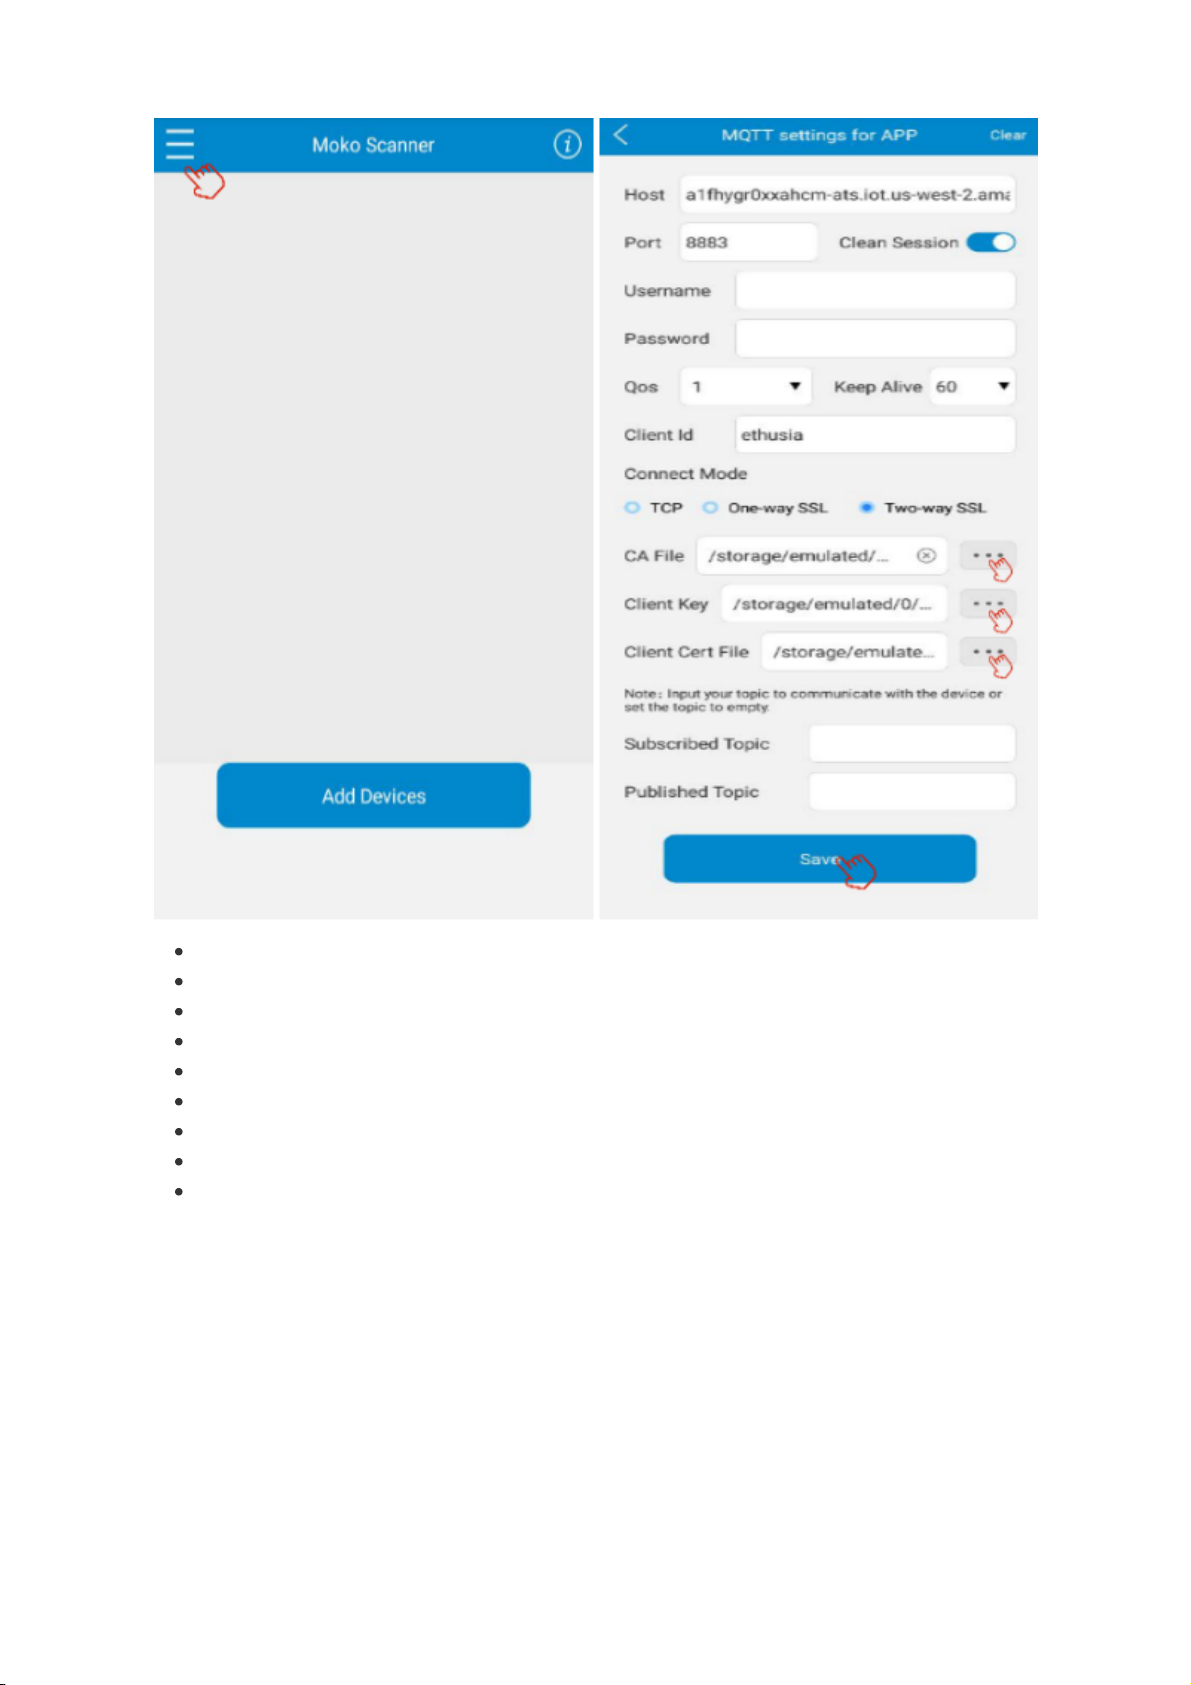
3.Enter the MQTT configuration parameters,click "Save".
Host: MQTT server host IP or domain name
Port: MQTT server host port
Clean session:on
Username: can be set or can be null
Password: can be set or can be null
QoS: Range: 0~2
Client id: Unique identity after the client connects to the server
Connect mode: tcp :EMQTT,One-way SSL: ALI ,Two-way SSL: AWS
Certificate files: Including CA root certificate,client private key and client certificate
2.2 How to connect plug to AWS
Page 5
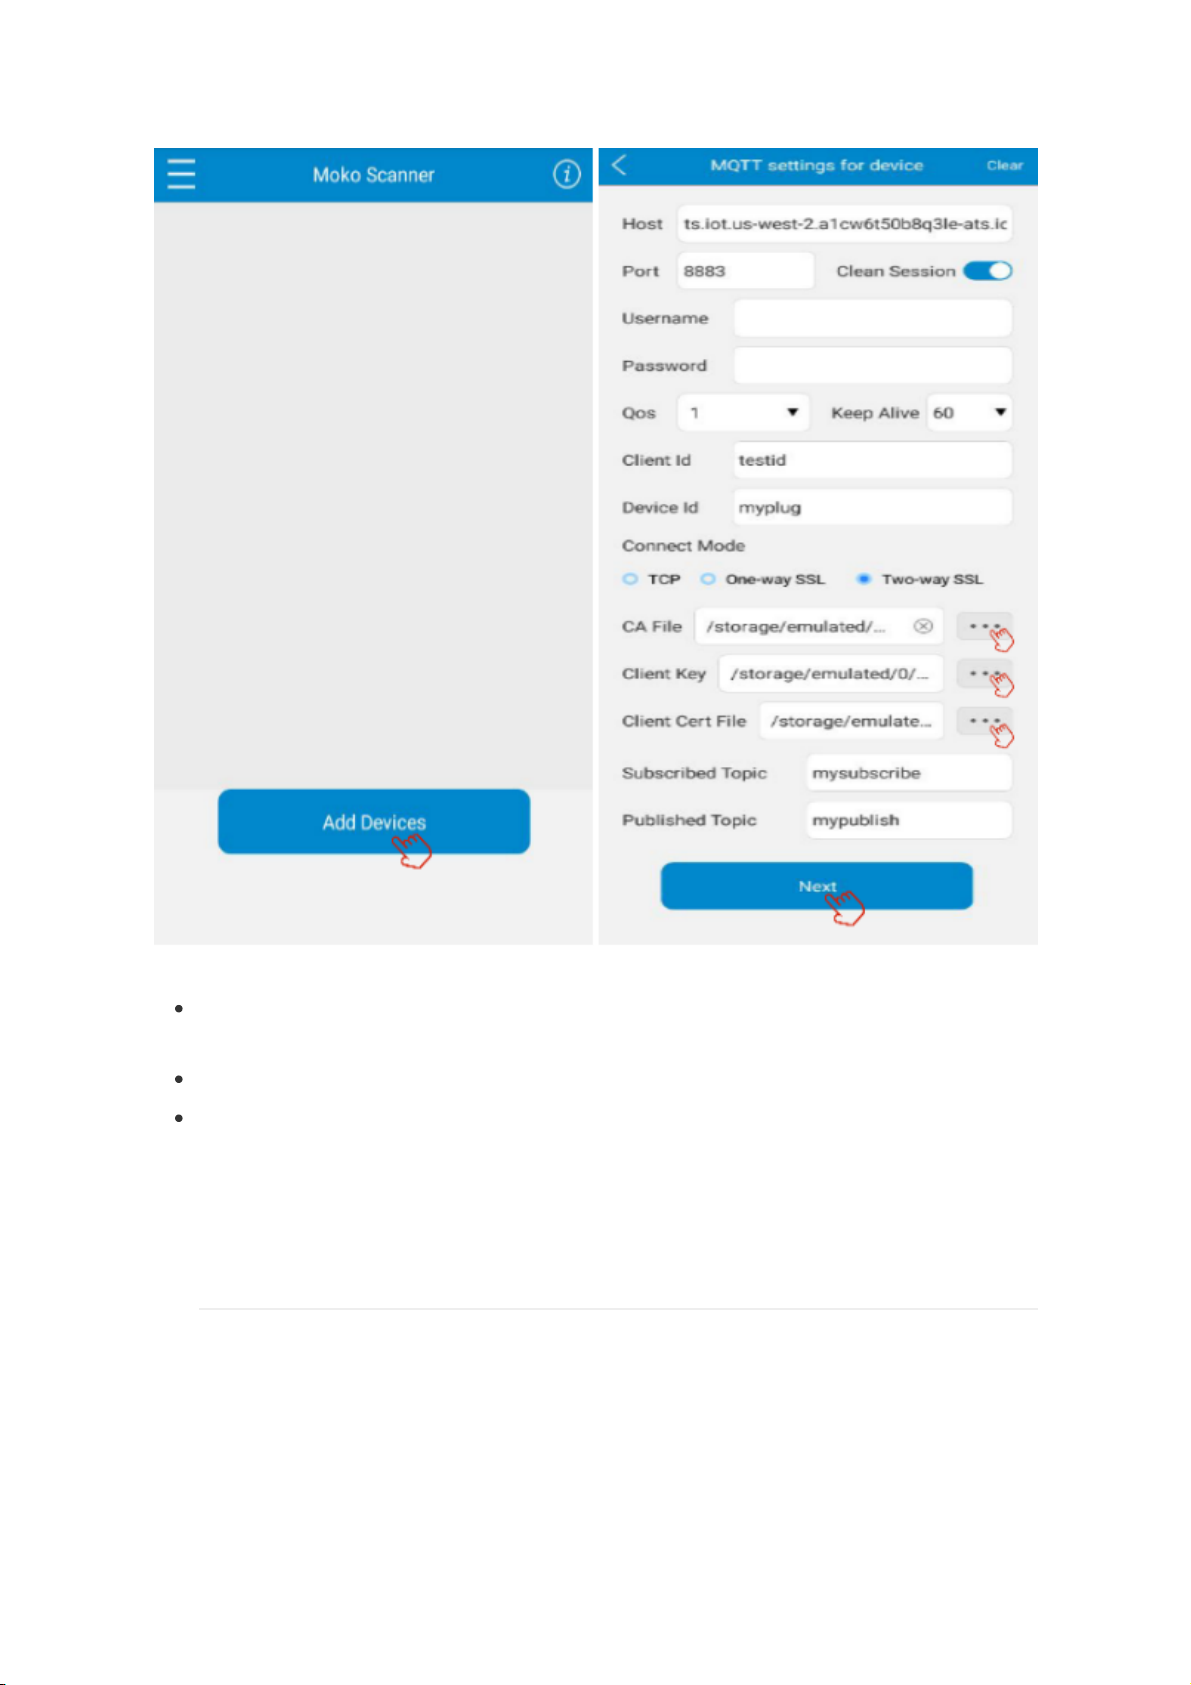
1.Afer MQTT settings for APP successed,click "Add device" to choose the waiting connection
device.then enter into the "MQTT settings for device"
Differences from MQTT settings for APP:
Client id: Unique identifier for MQTT servre distinguishing device. It can't be set the same as
APP side Client Id and can't be null.
Device id: Unique identifier for APP distinguishing device and it can't be null.
Subscribed Topic and Published Topic are neccessary.If APP topics have been set,you should
set them according to APP topics and must cross-corresponds.(Setting rules:APP
Subscribed Topic = Device Published Topic and APP Published Topic = Device Subscribed
Topics)
3. Connect to router
Page 6

1.After the MQTT configuration parameters entered,click "Next".The app interface will jump
to the network connection interface like this:
2.Click in the SSID and password of your router,enter "Confirm".the indicated light flash green
turns to solid green.it means that the plug bluetooth connected with APP.Once network
connection successed,the indicated light becomes solid blue.Then you can rename the device as
you want,and click "Done".then the device shows “online”.
Page 7

3.Click the online device name,now you can configure the MK110 gateway through MOKO
Scanner app.
4 How to set MK110 gateway via MOKO Scanner
4.1 Scan BLE device
Click the switch status menu to turn on the scanner switch. and set the scanning time,click
“Save”,Your plug will start scaning BLE device nearby.When the scanning time reached, the device
will automatically stop scanning.
Page 8

4.2 Set the filter parameter
Page 9

Click the "Edit filter" textbox,app will go to the setting interface.the filter RSSI and filter name can
be set according to your needs.
4.3 About OTA
Click the upper right icon of the scanning interface,APP enters "More".Click "OTA" ,enter the
server IP,port,and certificate file path where the upgrade package is stored,then click "Start
Upadate",we can update the firmware of the plug online.
Page 10

4.4 Factory reset
Click the upper right icon of the scanning interface,app enters "More" interface,and then click
the "Reset",the led will flash blue and green alternately once,that means you reset the plug
successfully. In another way,you can press the button on the plug for 10 seconds to reset the
plug.
Page 11

4.5 Remove device
Page 12

You can remove devices both in the device list interface and the "More" interface.After clicking
"Remove Device" and "Confirm",the removed device will disappear in the device list.
FAQ
1.What should I do when device configuaration
failed?
First you should check whether MQTT settings parameters are correct:
APP side you need to confirm the host,port,and the CA files(except EMQTT)
Device side you need confirm those three paremeters as well as topics
If APP side has been set the topics,the device topics must cross-corresponds to APP topics.
Second you should check the router SSID and password.
2.What is the function of button on plug?Can it
control the switch on /off?
With MOKO standard firmware,the button is only for factory reset(long press button for 10s)
and
set bluetooth broadcast on/off not the relay.
And we reserve the relay and Energy monitor chip for Customized service,thus you can develop
the switch control function or energy management if you need.
Page 13

3.What devices can the MK110 gateway scan for?
MK110 gateway can scan almost all Bluetooth devices,such as beacon,wristband and so on.
FCC STATEMENT
1.This device complies with Part 15 of the FCC Rules. Operation is subject to the following two
conditions:
This device may not cause harmful interference.
This device must accept any interference received, including interference that may cause
undesired operation.
2.any Changes or modifications not expressly approved by the party responsible for compliance
could void the user's authority to operate the equipment.
NOTE:
1)This equipment has been tested and found to comply with the limits for a Class B digital
device, pursuant to Part 15 of the FCC Rules. These limits are designed to provide reasonable
protection against harmful interference in a residential installation.
2)This equipment generates uses and can radiate radio frequency energy and, if not installed
and used in accordance with the instructions, may cause harmful interference to radio
communications. However, there is no guarantee that interference will not occur in a particular
installation. If this equipment does cause harmful interference to radio or television reception,
which can be determined by turning the equipment off and on, the user is encouraged to try to
correct the
interference by one or more of the following measures:
Reorient or relocate the receiving antenna.
Increase the separation between the equipment and receiver.
Connect the equipment into an outlet on a circuit different from that to which the receiver is
connected.
Consult the dealer or an experienced radio/TV technician for help.
3)FCC Radiation Exposure Statement
This equipment complies with FCC radiation exposure limits set forth for an uncontrolled
environment. This equipment should be installed and operated with minimum distance 20cm
between the radiator & your body.
 Loading...