

Wi-Fi Portable Phone
Liberty L2
User Manual
Model:WP300S

User Precautions
Please read these instructions carefully to protect yourself and others
from personal injury or damage to property.
Precautions when installing
· Avoid installing in excessively hot, cold, dusty or humid places.
· Avoid exposure to strong vibrations or direct sunlight.
· Since the phone generates heat when it operates, please do not install
it in locations with low heat tolerance.
· To prevent re or risk of electric shock, do not use with a damaged cord
or plug. Do not touch the power outlet with wet hands.
· Do not place on an unstable surface to avoid injury or breakage if
device falls or is dropped.
Precautions when cleaning
· Use a dry, soft cloth when you clean the phone.
· Do not use harsh chemicals such as benzene or thinner to clean the
phone.
· Wipe the power plug with a dry, soft cloth to avoid re or electric shock
hazards.
2 3
Precautions when using
· Do not touch the phone with wet hands.
· Do not use the phone for anything other than its intended purpose.
· Do not pull on the power plug and adapter when unplugging the phone.
· If the phone emits an unusual noise or smell, or if you see smoke coming
from the phone, please unplug the adapter and cable immediately.
· Do not place the phone in an area that is wet or dusty.
· Do not place anything heavy on top of the phone.
· Do not put any foreign material inside the product or charger.
· Do not place the phone near or in areas of extreme heat, such as in
direct sunlight or beside a heater.
· Do not place the product close to magnetic objects such as a magnet,
TV, monitor or speaker.
· Back up your valuable data on the phone regularly.
· Please note that the phone and battery can heat up during a lengthy call.
· Failure to comply with the precautions in this section will void any
applicable warranty.
Any changes or modications to the equipment not expressly
·
approved by the party responsible for compliance could void user’s
authority to operate the equipment.
Precautions when using battery
· Do not use this phone with a battery from another manufacturer, as this
could damage the device.
· Replace the battery if it appears swollen, as there is a risk of explosion.
· Use only the specied manufacturer's adapter to charge the phone.
· Keep the phone and battery away from children and pets.
· Do not place the phone or battery near rearms or unlicensed radio
products.
· Do not submerge the phone in liquid or get the battery wet.
· Do not store the phone inside a car during the summer, or other areas
with high temperature and humidity.
· Do not use the phone in steam rooms, or other areas with high
temperature and humidity.
· Do not continuously use the phone for long periods of time.
· Do not place the phone directly on blankets, electric blankets, or
carpeted areas.
· Do not allow metallic objects to come into contact with the battery
terminals.
· Do not disassemble, crush, or puncture the phone or battery, as there
is a risk of explosion and electric shock.
· Do not incinerate the battery. Please dispose of it responsibly or recycle
it in accordance with local regulations.
· Normal battery life should continue for at least 6 months from date of
purchase.
· Before rst-time use, and after using the phone for a long period of time
without charging, please charge the battery fully by placing the phone
in the cradle.
Basic Instructions01

User Precautions
FCC Compliance statement
This equipment has been tested and found to comply with the limits for
a Class B digital device, pursuant to part 15 of the FCC Rules. These
limits are designed to provide reasonable protection against harmful
interference in a residential installation.
This equipment generates, uses and can radiate radio frequency energy
and, if not installed and used in accordance with the instructions, may
cause harmful interference to radio communications. However, there is
no guarantee that interference will not occur in a particular installation.
If this equipment does cause harmful interference to radio or television
reception, which can be determined by turning the equipment off and on,
the user is encouraged to try to correct the interference by one or more
of the following measures:
- Reorient or relocate the receiving antenna.
- Increase the separation between the equipment and receiver.
- Connect the equipment into an outlet on a circuit different from that to
which the receiver is connected.
- Consult the dealer or an experienced radio/TV technician for help.
FCC SAR Compliance Statement
Your wireless phone is a radio transmitter and receiver. It is designed
and manufactured not to exceed the emission limits for exposure to radio
frequency (RF) energy set by the Federal Communications Commission
(FCC) of the U.S. Government. These limits are part of comprehensive
guidelines and establish permitted levels of RF energy for the general
population.
The guidelines are based on safety standards previously set by both U.S.
and international standards bodies:
· American National Standards Institute (ANSI) IEEE. C95.1-1992.
· National Council on Radiation Protection and Measurement
(NCRP). Report 86.1986.
· International Commission on Non-Ionizing Radiation Protection
(ICNIRP) 1996.
· Ministry of Health (Canada). Safety Code 6.
The standards include a substantial safety margin designed to assure
the safety of all persons, regardless of age and health. The exposure
4 5
standard for wireless mobile phones employs a unit of measurement
known as the Specic Absorption Rate, or SAR. The SAR limit set by the
FCC is 1.6W/kg.
Warning
· This device is for indoor use, only in the 5150~5250Mhz frequency
range.
· This device was tested for typical body-worn operations.
· To comply with RF exposure requirements, keep at least 1.5 cm
(0.5 inches) between the user's body and the headset, including
the antenna.
· Do not use third-party belt clips, holsters, or other accessories that
contain metallic components.
· Avoid use of body-worn accessories that do not meet the above
criteria, as they may not comply with RF exposure requirements.
User manual specications and the IP Phone software version may be
updated by the manufacturer without any notice.
CAUTION(ATTENTION)
· RISK OF EXPLOSION IF BATTERY IS REPLACED BY AN
INCORRECT TYPE. DISPOSE OF USED BATTERIES
ACCORDING TO THE INSTRUCTIONS.
· Risque d'éxplosion si la batterie est remplacée par un un model
incorect. Jetter les batteries usagées selon les instructions.
Basic Instructions01

Contents
Basic Instructions
User Precautions .......................... 02
Components ................................. 07
HD Voice Features ....................... 08
About the Phone ........................... 09
LCD Status ................................... 10
Insert the Battery ........................... 11
Install the Adapter ......................... 11
Wi-Fi Connection .......................... 12
Access Web UI ......................... 13
6 7
Basic Functions
Make a Call/Hang Up ................... 17
Multi-line Account ......................... 17
Answer a Call ................................ 17
Call History .................................... 18
Transfer ......................................... 18
Pick Up .......................................... 19
Vibrate Mode................................. 19
Mute .............................................. 19
Speaker Phone ............................ 19
Adjust Volume ............................... 19
Ring Type ...................................... 19
Phone Book .................................. 20
Call Forwarding ............................ 21
Push to Talk (PTT) ........................ 21
Messaging .................................... 22
Extra Functions
Useful Functions ........................... 23
Text Input ....................................... 25
Display .......................................... 26
Settings ......................................... 27
System Info ................................... 28
CLive ............................................. 29
Self-Diagnosis .............................. 30
Supplements
Troubleshooting ........................... 31
Treatment before Disposal ........... 32
Warranty ....................................... 32
Specications ............................... 35
Components
Please check to ensure the components pictured below are in the box after purchase.
If there are any missing items, please contact the retail store where you purchased the device.
: Device, Power Adapter, Battery, User Manual
Basic
Battery
User ManualDevice Power Adapter
: Cradle, Ruggedized Case
Options
Cradle
Ruggedized Case
Basic Instructions01

HD Voice Features
· This device uses high-end speakers and receivers to
support HD Voice capability.
· This device deploys HD Voice clarity similar to an HD TV.
· This device outputs a higher voice quality than the
standard Internet phone.
<Voice quality comparison between standard
phone voice technology, and HD Voice technology>
8 9
About the Phone
Volume : Adjust the sound volume.
Menu : Access the phone menu.
Search : Search your contact list by name.
Wireless Line : Search Wi-Fi networks.
Call Logs : Access the call logs.
Message : SMS (Texting is not supported at this time).
Phone Book : Access the phone book.
OK : Select the item.
Speaker Phone : During a calling, press the [Speaker] button to call
via the external speakers.
Keypad : To input text, press the [Keypad] button then
Text input keypad will appear.
Call : Receive or end a call.
End : End a call. Power on/off.
Number/Text : Input numbers or text.
/Vibrate Mode : Press and hold the button for vibrate mode.
/Lock : Press and hold the button to lock/unlock the keypad.
Pick Up : Pick up a call from another phone on your account.
Mute : Mute your current call.
Transfer : Transfer current call to another phone number.
Basic Instructions01
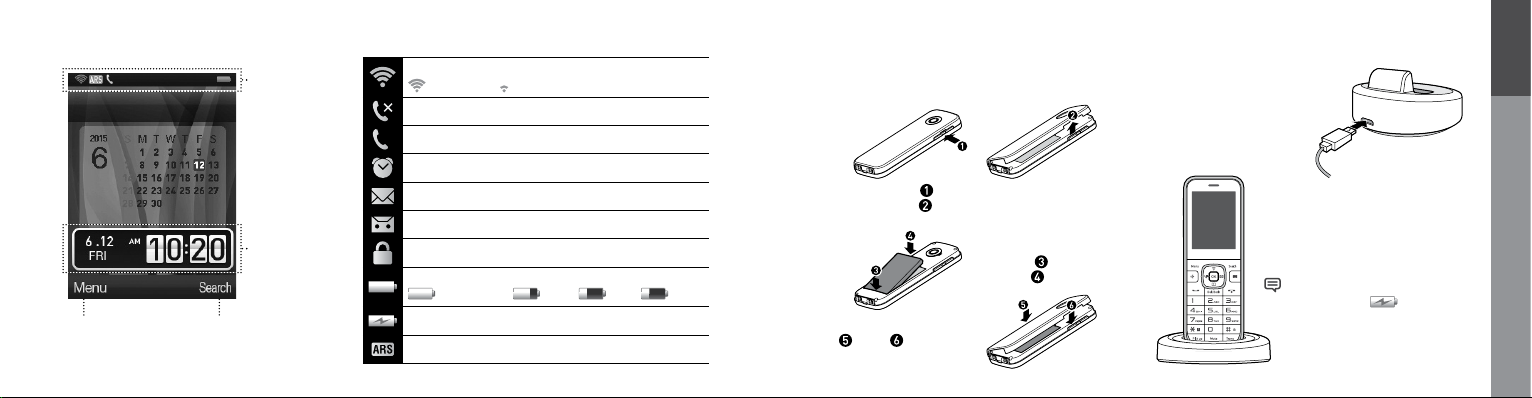
LCD Status
Status Icon
Indicates phone
status. Please refer
to the icon legend
on the right, for
details.
Time, Date
Indicates the time
and date.
Menu
Press to access
phone menu.
10 11
Search
Press to search
Phone Book.
Indicates Wi-Fi signal strength.
Strong signal Weak signal
Indicates the phone call function is unavailable.
Indicates the phone call function is available.
Indicates the alarm has been set.
Indicates you have unread messages.
Indicates the answering machine function has been set.
Indicates that the phone is in locked mode.
Indicates battery status.
Fully charged Good Poor Charge
Indicates the battery is charging, and the charging status.
Indicates the CLive server status.
Insert the Battery Install the Adaptor
Please use the included battery. If you need to exchange or
purchase another battery, please contact an authorized service
centre.
Pull out the cover at
and lift the cover up
Fit up
Replace the battery cover from the
to right and press down
left
until you hear a click.
the side as shown above,
.
Push
Insert the battery with the
charging pins aligned with
the grooves
push down
.
and
Connect the adaptor to the
rear connector.
Connect the charger plug into
a power outlet.
Place the Wi-Fi phone on the
charging cradle to charge.
You can check the charging status
with the indicated
top display.
icon on the
Basic Instructions01

Wi-Fi Connection
Access Web UI
You can check the phone status or set up the phone via the
Web Browser. Please follow the steps below.
1. To check IP address
→ 8. System Info → 3. Network Info
2. Type http://IPaddress:8000 into the Web Browser to access
Web UI
3. Input User Name: "user", and Password: "0000" to log-in
Basic Instructions01
Press and hold the button
for 3 seconds to power on the phone.
Press
available Wi-Fi connections
When connecting to a Wi-Fi network, the Web Browser opens automatically if Web Authentication is required. If registration
to the server fails, open the Web Browser again to conrm if it has connected to the AP (Refer to the page 24).
12 13
to search for
Select the desired network, Press ,
and enter applicable password.
You will be connected and
can begin using your device.

Access Web UI
Call SetupHome
Displays real-time phone status and information. Account : Check and confirm account information.
14 15
Access Web UI
Phone Setup Function Setup
Phone Password : Change the user password.
Network : Set roaming feature.
QoS : Set up QoS related settings.
Time : Select Time Zone and set NTP server.
Functions : Enable or Disable phone functions.
Wi-Fi Scan Channel : Select Wi-Fi channels.
Basic Instructions01

Access Web UI
Maintenance
Reboot : Reboot the phone.
Factory Default : Restore to factory default settings.
· Before restoring default settings, please be sure as all
personal settings will be completely deleted.
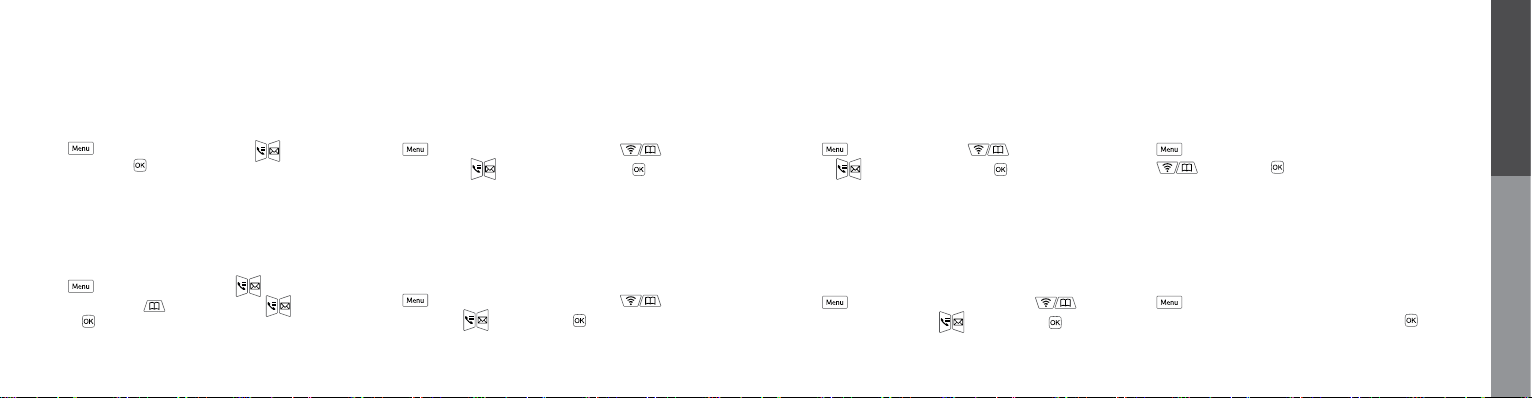
Make a Call / Hang Up
Input the call
number
Using Phone
History
Using
Phone Book
Short Dial
Press the phone number.
Select the number
in history.
Search and select
the desired number.
In standby mode, press and hold the last digit
of Short Dial. (Short Dial setup from 00 to 99)
Answer a Call
Answer Call directly
· If Answer Type is set to [Press] button : Press any button to
receive incoming calls, except the
· If Answer Type is set to [Hold] : Call is connected when
you lift the phone from the charging cradle.
To set the answer type :
→ 2. Call Manage → 2. Answer Type.
button.
Basic Functions02
End Call
Multi-line Account
Liberty L2 supports two (2) SIP accounts. To swap between
accounts, press the
16 17
key.
Answer Call with Out of Ofce function
· If the Out of Ofce function is activated, the phone will answer
calls with an auto-answer.
If you press the button, moves the call to the Logs.
To set the Out of Ofce function :
→ 4.Useful Functions → 1.Out of Ofce

Call History
You can check outgoing, incoming and missed calls.
The phone saves up to 100 Logs in your history.
·
Button : Call one of the logged phone numbers.
·
Button : See phone number details.
·
Button : Send a message (if enabled) or save/delete
number.
To manage calls : → 2. Call Manage → 1. Logs
18 19
Transfer
You can transfer a call to another number or to another phone
in the same group.
On the
call
call
On the
call
Input the
number
Input the
number
Input the
number
New
call
RingingOn the
Pick Up
You can answer another ringing phone on the same network.
This function requires a pickup code and group.
Vibrate Mode
To place the phone in vibrate mode, press key
for 2 seconds, and press once more to turn off vibrate mode.
Mute
Press button during an ongoing call to mute your voice.
Speaker Phone
To use the Speaker Phone, press the key during a call,
and press once more to turn off.
Adjust Volume
In standby mode, press [Volume] and click the button.
You can adjust Volume, Ring, Call, Power On/Off, Alarm.
Adjust the volume on call : Adjust the voice volume
on a phone call (8 levels) by pressing the [Volume]
button.
Ring Type
Easily search and change ringtones.
Select from 10 WAV ringtones or 10 MIDI ringtones.
→ 5. Sound → 1. Ring Setting
If you press and hold the Key, you can change to
Vibrate Mode.
Basic Functions02

Phone Book
Search Contacts
Search by assigned number, name, phone number,
or group. Press the
the [Call] button to place a call.
→ 1. Search Contacts → Select →
In the Phone Book list, press the button to delete
or edit entries.
20 21
button to select the contact, then press
Register Contacts
Follow the steps below to register new contacts.
Input
Name
Select
Short Dial
Select Bell
· Store up to 500 Contacts and up to 100 on speed dial.
· Press the
· Manage groups at
· Press the
members. Register up to 30 contacts per Group.
· After saving and storing a number, register it as a group
member by pressing the
button to locate the phone number type.
→ 3. Manage Groups.
button to Add, Edit, Delete groups and
button.
Select
Group
Input
Number
Call Forwarding
Receive forwarded calls from another number.
How to set :
→ 2. Call Manage → 5. Additional Settings →
2. Call Forwarding →
input the number to Call Forwarding →
How to clear :
→ 2. Call Manage → 5. Additional Settings →
2. Call Forwarding →
Select Call Forwarding in the Call FWD section to set the
No Answer, Always, and Busy options.
Select [Set] → →
Select [Unset] →
Push to Talk (PTT)
Liberty L2 provides a new Push to Talk (PTT) feature, similar to
two-way radios, for quick and easy communications.
Press and hold the
release the
and hold the
How to set :
→ 2. Call Manage → 5. Additional Settings
→ 5. Push to Talk (PTT)
(To use this feature, both parties must have the PTT option
and should be enabled before use. This feature may not be
available so please check with your Service Provider. We
recommend turning off the PTT option when the feature is not in
use.)
key the entire time to talk. After talking,
key to hear the party speak. To talk again, press
key and repeat.
Basic Functions02

Messaging
Send and receive messages with your phone.
Please check with your Service Provider to ensure this feature
is available in your area.
Write the Message
→ 1. Write →
Save Mode →
Use the Search or Draft Box Save function on the
Receive Number screen.
→ Input the Number →
→ Input the Sender Number →
→ Select
Inbox
→ 2. Inbox
· Check received, sent and draft messages.
· Select a message and press the
Deliver, Save Number and Delete functions.
22 23
button to access
Spam Message
→ 3. Spam Message
· Register spam numbers : Register up to 5 spam numbers.
· Spam Inbox : Check spam messages.
· Setting : Choose whether to block the spam message or not.
Message Settings
→ 4. Message Settings
· Arrival Alarm Interval : Set alarm notices for 2 minute
intervals. Clear the alarm when message received.
· Setting Alarm Bell : Select from 3 notification bell tones.
This function available at → 4. Message.
Useful Functions
Auto Attendant
→ 4. Useful Functions → 1. Auto Attendant
· Auto attendant : Set and clear the Out of Ofce auto
answer while away from your desk/work.
Alarm
Set and clear multiple alarm functions.
How to set :
→ 4. Useful Functions → 2. Alarm →
→ Input Time → → Select Notice → →
Select the repeat interval and times
How to clear :
→ 4. Useful Functions → 3. Alarm →
Press the button to delete and add alarm.
Select Setting →
Select Bell Type →
Select Clear →
Extra Functions03

Useful Functions
World Time
Use the direction buttons to cycle through to select
and display the time and date of major cities worldwide.
How to set :
→ 4. Useful Functions → 3. World Time
Web Browser
To connect to an Access Point (AP) or Wi-Fi Network requiring
Web Authentication, in your Web browser, move the cursor
with the [Navi] key. Use long key presses for faster cursor
movement.
How to set :
→ 4. Useful Functions → 4. Web Browser →
[Navi] button to go to Input Box →
Password → Click [Sign In] button
24 25
→ Input User Name &
use
1. In the Input Box, press the button to delete
all details.
2. In the Web Browser, use the [Volume] button to toggle
Page Up/Page Down and use the [Pickup] key and
[Trans] key to toggle Page Left/Page Right.
3. To change text entry mode, use
capital/ numeric, and
4. If your Web Browser is freezing, click
back to the main page.
5. In the Input Box, press
mode.
6. Escape from theText Input keypad after the Web page
is refreshed. Then press the [Navi] key to use the Text
Input keypad again.
key for small/
key for special characters.
key to use Text Input
button to go
Text Input
To use Text Input Mode
· To input text, press any number or button then the Text
Input keypad will pop up.
· Use the [Navi] button to move, and press
character, and press
Hold the
· Press
to modify.
· Use
for special characters. To go back to character entry mode
press ‘a’ or ‘A’.
· Alternatively, press "*" on the handset keypad to change text
entry mode.
button to nish text input, and press button
key for small/capital character, and press key
button to delete.
button longer to delete all.
to select the
Using Keypad on the Phone
· Use keypad on the phone and press button to complete.
· Press
entry mode.
· Special characters are only available in Text Input mode.
button on the handset keypad to change text
Extra Functions03
Display
Wallpaper Brightness
Select from 10 different wallpapers for on-screen display.
How to set :
→ 6. Display → 1. Wallpaper →
Wallpaper →
Select the
Adjust display brightness (10 levels).
How to set :
→ 6. Display → 3. Display Settings → → Select
Brightness →
Choose Brightness level →
Menu Style
Select a Menu Style (Rotate or Grid).
How to set :
→ 3.Display Settings → → Select Menu Style
Select the Menu Option →
→
Settings
Wi-Fi Settings
To search for available Wi-Fi connections or Access Points (AP).
How to set :
→ 7. Settings→ 1. Wi-Fi Setting → 2.Search Wi-Fi AP →
Select One →
Extra Functions03
BacklightBanner
Display a desired phrase or phone number on the screen.
How to set :
→ 6.Display → 2.Banner →
Direct Input →
→
26 27
→ Input Phrase →
Phone numer,
Select the Color
Select a time out period for the Backlight (10 secs, 20 secs,
30 secs, 1 min, 3 min, always on).
How to set :
→ 6. Display → 3. Display Settings → → Select
Backlight →
Select Option →
Home Screen Phone Lock
Display the calendar or time on the home screen.
How to set :
→ 6. Display → 3. Display Settings → →
Select Home Screen →
Select Option →
To lock the phone and change the password.
How to set :
→ 7. Settings → 2.Phone Lock → 1.PIN Number →
Input current password and Input new password →

Settings
User Default
To delete all user setting values including phone numbers.
How to set :
→ 7. Settings → 3. User Default → Input User Password
(default password ‘0000’) →
System Info
Wi-Fi Info
Displays Wi-Fi Network (Access Point) connection information.
About Phone
Displays the current Hardware {H/W} and Software {S/W}
version.
Diagnosis
If the phone status shows ‘Not Available’ for longer than
1 minute, the phone will automatically start diagnosis mode
and will show the result.
To escape from this mode, press
Status and Phone Status manually on the following menu.
:
How to set
→ 8. Self Diagnosis → 1. Self Diagnosis
button to check Network
CLive
Apivio provides Liberty L2 users access to CLive, a new phone
management software system to help with a more seamless
communication experience.
To register, turn the phone on, choose Service Provider and
select additional services. Then, enter email address and
postal account information. CLive will then give an update on
the software upgrade information and phone setup information
when they are available.
Extra Functions03
Time Zone
To set up the current time zone and daylight savings time.
How to set :
→ 7. Settings → 4. Time Zone → Select the Zone →
28 29
Network Info
Displays the current Network information.
· This manual is for software version 1.00.000 and browser
version 1.0.0.
· If your device's software version is different than the version
above, you may download the most current version of the
manual from www.apivio.com.

Self-Diagnosis
Diagnosis Results
Failed to connect by registered SSID.
Please check SSID information.
Failed to obtain IP address.
Please check DHCP setting of AP
Failed to connect to network via the current AP.
Please check the AP set-up.
There is no account information.
Please enter the server and account information.
The account is unauthorized.
Please check the account and try again.
The account set-up error,
Please check the account and try again.
Temporary server error.
Please try later.
Possible Solutions
Can't nd the registered prole.
Please register AP (or Wi-Fi Network) information again.
Failed to obtain IP from AP. Please check AP setup.
If you still can't obtain IP from AP, please use static IP.
AP is not connected to to the Internet.
Please check the WAN port of the AP.
The phone has no account information.
Please contact Service Provider to get an account.
The account information is wrong.
Please contact Service Provider.
The account information is wrong.
Please contact Service Provider.
Service Provider side temporary server error.
Please contact Service Provider.
Troubleshooting
Solutions to common issues (may occur even when the phone is functioning normally).
Symptoms Possible Solutions
The battery must be sufciently charged for the phone to operate. Please charge the phone in the cradle,
The phone does not work.
Phone call quality is bad.
The phone does
not charge.
Ringtone is too quiet.
and ensure it is positioned correctly and securely. If the battery is fully charged but the phone does not work
after the power button is pressed, remove the battery, reinsert it, and press the power button again.
Remove the battery, reinsert it, and press the power button.Phone is unresponsive.
- Ensure that the distance between the device and other call locations is not too far.
- Check for obstacles, such as walls, or for any severe local electromagnetic interference.
- If call quality is bad for calls between short distances, please power the phone off and then power it on again.
- If call volume is low, increase it using the volume control on the side of the phone.
- Make sure your adaptor or cradle are connected securely to the phone.
- Please use the dedicated adaptor provided with the phone.
- Make sure you clean the charging contacts on the charging cradle. Clean any loose foreign material or moisture
on the contacts by wiping with a soft, dry cloth.
- If the phone still does not charge, please contact the Warrantor to receive or purchase a new battery.
Press
+ [5. Sound] + [3. Volume] buttons to adjust ringtone volume.
30 31
Supplement04

Troubleshooting
Symptoms Possible Solutions
Press
Screen is too dark.
Text message service Caller
Information does not display.
Battery usage and
standby time is shorter.
[3. Display Settings] buttons to adjust
brightness of the screen.
Make sure you are connected to
a Service Provider.
The battery life decreases over
time with normal use.
Please contact the Warrantor to
receive/ purchase a new battery.
+ [6. Display] +
Treatment Before Disposal
Please dispose of this product according
to local municipal regulations, or recycle
where facilities exist.
Warranty
If your product does not work properly because of a defect
in materials or workmanship, Apivio Systems Inc. (referred
to as “the Warrantor”) will, at its option, either (a) repair your
product with new or refurbished parts, or (b) replace it with a
new or a refurbished product. Please see the chart on page
32 for details. 12 month Warranty period begins on the date of
original purchase. Proof of purchase required.
The decision to repair or replace will be made by the Warrantor.
Contact information: www.apivio.com
Warranty
Free Service
Major repair within 10 days from the purchase
Major repair within 1 month from the purchase
Damages occurred during shipping or installation
An exchanged product requires major repair within 1 month of exchange date
Failures of
If exchange is not possible
performance
and features
when
Repairable Case
products
have been
The Warrantor loses the product requested for repair.
used in the
normal state
The Warrantor does not have the parts to repair the product within the warranty period
The Warrantor has the parts for repair, but repair is impossible
Impossible to repair
Same defect occurs 3 times
Same defect occurs 4 times
Different defects occur 5 times
Service Guidelines for manufacturer’s defects or spontaneous failure within the 12 month Warranty period.
Types of Damage
Within Warranty After Warranty
Exchange or Refund
Exchange or Free Repair
Exchange
Refund
Free Repair
Exchange or
Refund
Pay fee for Repair
and Exchange
Free Repair
Compensation
Repair with charge
Repair with charge
Repair with charge
Refund the amount after depreciation
10% of the amount after depreciation
Refund the amount after depreciation
Refund the amount
after depreciation
Repair with charge
N/A
32 33
Supplement04

Warranty
Service Charges
Please read the manual carefully.
A service fee will be charged if you request repair on a non-faulty product.
Fault of users or failure due to mishandling
· Unauthorized repairs
· Intentional negligence
· Mishandling (dropping, submersion, excessive operation, etc.)
· Using third party parts or accessories
Other causes
· Natural disasters
· End of life of consumable parts
· The product or components are installed in a way other than the
procedures shown in this manual
Specications
Section Description
RF Protocol
RF Channel /
Frequency
Audio Interface
Battery
IEEE 802.11 a/b/g/n(CSMA/CA)
FCC - 2.400~2.4835 GHz / 11 Channel
- 5.150~5.250, 5.250~5.350,
5.470~5.725, 5.725~5.825 GHz
/ 23 Channel
CE - 2.400~2.4835 GHz / 13 Channel
- 5.150~5.250, 5.250~5.350, 5.470
~5.725, 5.725~5.825 GHz / 19 Channel
2.4 inch, 65K, TFT QVGA, 240x320 pixelsDisplay
Built-in Microphone,
Receiver and Speaker
Support for earphone w/ 3.5Ф,
4pole type (American standard)
Talk Time : over 5 Hours
Standby Time : over 100 Hours
Charging Time : under 3 Hours
Section Description
Adaptor
Dimensions(mm)
(WxDxH)
Operating Temperature
Humidity
Options : Charging Cradle, Ruggedized Case
This device complies with part 15 of the FCC Rules.
Operation is subject to the following two conditions:
1. This device may not cause harmful interference, and
2. This device must accept any interference received,
including interference that may cause undesired operation.
Input : AC 100-240V, 50/60Hz, 0.5A
Output : DC 5V/2A
Handset : 153x53x17
Cradle : 94x94x43
Handset : 90g, Cradle : 30gWeight (g)
-10℃~50℃ Ambient Temperature
10~95%, Atmospheric Humidity
34 35
Supplement04

User manual may change without notice due to updates to the IP Phone software.
Liberty L2-01(20150629)
 Loading...