

Page 1

Materials Required for Installation
UNICLIC INSTALLATION,
CARE AND MAINTENANCE
• Tape Measure
• Carpenter Square
NOTE: We recommend placing a single order for all cartons required for larger installations and commercial ooring projects.
Asbestos Warning
Warning! DO NOT MECHANICALLY CHIP OR PULVERIZE EXISTING PREVIOUSLY INSTALLED RESILIENT FLOORING, BACKING, LINING FELT, ASPHALTIC
“CUTBACK” ADHESIVES OR OTHER ADHESIVES. Previously installed resilient oor covering products and the asphaltic or cutback adhesives used to install them
may contain either asbestos bers and/or crystalline silica. Avoid creating dust. Inhalation of asbestos or crystalline dust is a cancer and respiratory track hazard.
Smoking by individuals exposed to asbestos bers greatly increases the risk of seriously bodily harm. Unless you are positive that installed product is a nonasbestos containing material, you must presume it contains asbestos. Regulations may require that the material be tested to determine asbestos content and
may govern the removal and disposal of material. See current edition of the Resilient Floor Covering Institute (RFCI) publication “Recommended Work Practices
for Removal of Resilient Floor Coverings” for detailed information and instructions on removing all resilient covering structures.
• Full Face Tapping Block
• Utility Knife/blades
• Saber Saw/Circular Saw
• Chalk Line
• Pull Bar
• Safety Glasses
• Tile Cutter
Underlayments
Mohawk’s vinyl ooring products can be installed directly over most existing oor coverings, EXCLUDING carpet (including needle felt), oating laminate, oating
oors systems, Luan, and cushioned vinyl ooring. You may install directly over Ceramic (well bonded with a skim coat) PVC, VCT (well bonded, on and above grade),
Terrazzo (well bonded), glued laminate, glued hardwood and xed wooden boards provided they are installed over a wooden suboor.
NOTE: Do not use chemical adhesive removers to remove existing adhesive.
Wood underlayments
Wood suboor systems require a double layer construction. The top layer must be underlayment grade as specied and warranted by the manufacturer. Always
fasten underlayment in accordance with the manufacturer’s recommendations. Any failure of the Mohawk ooring because of the underlayment is NOT the
responsibility of Mohawk.
• A moisture test is required using a pin-type moisture meter. The moisture content must not exceed 14%.
• Wood suboors must be structurally sound and in compliance with local building codes.
• Double-layered APA rated wood suboors should be a minimum 1” total thickness, with a least 18” well-ventilated air space beneath.
• Insulate and protect crawl space with a 6mil vapor barrier.
• It is recommended that your chosen APA underlayment be designed for installation under resilient ooring and carry a written warranty.
• Underlayment can only correct minor deciencies in the sub-oor while providing a smooth, sound surface on which to adhere the resilient ooring.
• Always follow the underlayment manufacturer’s installation instructions.
• Wood suboors directly fastened to concrete, or sleeper construction, are not recommended.
• APA rated Sturd-I-Floor panels are designed as combination underlayment/suboor and are designed for carpet only. Installing Mohawk resilient ooring
over Sturd-I-Floor panels would require installation of a minimum ¼” underlayment on top of the Sturd-I-oor suboor.
• Mohawk resilient ooring is not recommended directly over re-retardant treated plywood or preservative treated plywood. The materials used to treat
the plywood may cause problems with adhesive bonding. An additional layer of APA rated ¼” thick underlayment should be installed over top any
treated suboor.
OSB
• OSB panels and joints must be fastened and reinforced according to manufacturer’s instructions. Completely sand the oor with a oor sander, so that the
oor is smooth and at. Note: The chips in OSB overlap. Without sanding properly, OSB has high and low spots throughout the oor that could telegraph
through the vinyl.
• The sanded OSB surface must be primed using a Mohawk PrimeCoat acrylic oor primer.
Particle board
• Particle board underlayment panels must be underlayment grade as specied and warranted by the manufacturer.
• Surface must be primed using a Mohawk PrimeCoat acrylic oor primer.
NOTE: Perform moisture tests using a reliable moisture meter in multiple locations. Moisture readings should never exceed 14% for plywood, OSB,
particle board, chipboard, or solid hardwood suboors. If moisture readings exceed 14%, conditions must be corrected at the job site before installing
the Mohawk ooring.
Please contact Technical Services at 888-387-9881 with any questions. 0213_2021 | EH | 03/2021 | 1 of 12
Page 2

Resilient Floor Covering as an Underlayment
• Must be single layered, non-cushioned backed, fully adhered, and smooth.
• Show no signs of moisture or alkalinity.
• Wax, polish, grease and grime must be removed.
• Cuts, cracks, gouges, dents and other irregularities in the existing oor covering must be repaired or replaced.
NOTE: The responsibility of determining if the existing ooring is suitable to be installed over rests solely with the installer/ooring contractor on
site. If there is any doubt as to suitability, the existing ooring should be removed, or an acceptable underlayment installed over it. Installations over
existing resilient ooring may be more susceptible to indentation.
Concrete
New and existing concrete suboors should meet the guidelines of the latest edition of ACI 302 and ASTM F 710, “Standard Practice for Preparing Concrete
Floors to Receive Resilient Flooring” available from the American Society for Testing and Materials.
Moisture levels of concrete slabs before, during and after installation must be 8 lbs. or less per 1000 square feet per 24 hours using an anhydrous calcium
chloride test according to ASTM F1869 and pH must be between 5.0 and 9.0; or, if using ASTM F2170 InSitu Probes, should be less than 90% RH (relative
humidity). Three tests should be conducted for areas up to 1,000 Sq. Ft. One additional test, for each additional 1,000 Sq. Ft. Always measure, record and keep
your testing results.
• Never use liquid adhesive remover or solvent cleaners for removing old adhesive residue or other substances on the substrate; their use will cause future
failures in the new ooring.
• On or below-grade slabs must have an effective vapor retarder directly under the slab.
• Concrete oors shall be at and smooth within 3/16 inch over a 10-foot span.
• F-Number System: Overall values of FF 36/ FL 20 may be appropriate for resilient oor coverings.
• Glossy or waxed oors may require a higher value FF 75/ FL 50 to prevent telegraphing issues.
Old Adhesive Residue
If the adhesive is asphalt-based (cut-back) or any other type of adhesive is present, it must be dealt with in one of two ways:
1. It may be mechanically removed using methods such as bead blasting or scarifying, using a licensed professional contractor (See Asbestos
Warning above).
2. A Portland-based self-leveling underlayment may be applied over it. Check with the underlayment manufacturer for suitability, application
instructions, and warranties.
Other approved underlayments
• Self-leveling and patching compounds (latex fortied Portland cement based only).
• Radiant heat oors (not exceeding 85°F (29°C) and approved by the manufacturer for the use of their product with resilient vinyl ooring applications).
• Gypcrete can be utilized when necessary due to radiant heat and in high rise buildings. Gypcrete must be sealed using a Mohawk PrimeCoat acrylic
oor primer to stabilize the surface. All issues with gypcrete cracking, crumbling, powdering and resulting in the release of adhesive bond are NOT
warranted by Mohawk.
Storage and Handling
• Flooring must be acclimated in the room of installation between 55-85°F (13°-29°C) for 48 hours before installation. These temperatures should be
maintained before, during and thereafter the installation is complete.
• Always store and transport rigid luxury vinyl ooring on a at surface in neat stacks to prevent warping. Never store the cartons upright or in moist, dusty
rooms or in places with extreme temperatures. Cartons should be evenly stacked and away from any heating/cooling ducts or direct sunlight.
• Installation in enclosed Three Season Rooms: acclimate product and room at 55°- 85°F (13-29°C) for 48-hours prior, during and 48 hours after installation is
complete. Maximum installation span for Three Season Rooms is 40’ x 40’ (12.2m X 12.2m) with a 1/2” (13mm) minimum expansion for the perimeter or all
vertical objects.
Suboor and Wall/Door Preparation
• Floor must be clean, smooth, at and dry. Remove all foreign substances such as wax, grease, dirt, construction markings and contaminants, and any
substance or chemical that would interfere with a good bond. Fill all holes and cracks with a latex fortied Portland cement-based patching compound.
Sand high spots to eliminate the possibility of telegraphing. Prime oor if needed with a Mohawk acrylic latex primer to prevent over absorption of
adhesives, dust containment, and to ensure a better bond of the adhesive to the suboor.
• Any unevenness of more than 3/16 inch over a 10-foot span (5 mm over a length of 3 m) must be leveled out. Remove bumps in the suboor by
sanding or scraping.
• Fill any low spots in the suboor with a Portland cement based leveling compound.
Please contact Technical Services at 888-387-9881 with any questions. 0213_2021 | EH | 03/2021 | 2 of 12
Page 3

• Ceramic tile and embossed ooring exceeding the above requirements will require skim coating with a Portland cement-based patch to avoid bottom up
pattern telegraphing.
• Remove any existing oor molding. Removal of wall baseboards is optional providing quarter round is installed to cover the required expansion gap.
• Undercut doorjambs allowing the rigid luxury vinyl ooring to slip under doorjamb/case molding.
• Sweep the suboor clean. The oor must also be free of all contaminates.
Job Site Conditions
• It is recommended that resilient oor covering installation shall not begin until all other trades are completed.
• Areas to receive ooring shall be clean, fully enclosed, with the permanent HVAC set at a uniform temperature range of 55ºF(13ºC) and 85ºF(29ºC) and
maintained following the installation.
• Adhesive working and open times vary based on job conditions, substrate, temperature and humidity.
Temperature – Ambient
• Controlled environments are critical for testing and installation. Fully operational HVAC systems are the best way to ensure temperature and
humidity control.
• Do not install resilient ooring products until the work are can be temperature controlled. Minimum installation temperature is 55ºF (13ºC) with a
maximum installation temperature of 85ºF(29ºC) and humidity below 65% for 48-hours prior to, during and after pre-installation testing.
NOTE: Do not install ooring if suboor moisture test results exceed recommended limits.
Temperature – Radiant Heat
• Radiant heated substrates must never exceed 85ºF(29ºC) surface temperature.
• Several days prior to installing resilient products over newly constructed radiant heated systems, make sure the radiant system has been on and operating
at maximum temperature to reduce residual moisture within the concrete.
• Three days prior to installation, lower the temperature to 65ºF(18ºC), and 24-hours after installation, gradually increase the temperature in increments of 5ºF.
• After continuous operation of the radiant system, ensure the surface of the oor does not exceed 85ºF(29ºC).
Installation Instructions
Inspection of ooring material prior to installation is required. Any defects should be immediately reported to the retail store from which the ooring was
purchased before installation. Mohawk will not be responsible for labor costs to repair or replace material with defects that were apparent before or noticed at
the end of an installation.
NOTE: Your starter rows will consist of your rst and second row to provide additional stability. See Diagram 1 for examples of the instructions below.
NOTE: Do not install cabinets on top of vinyl ooring.
• The rst plank (#1) of the rst row should be a full-length plank. Trim off the proles facing the wall and position the cut edges adjacent to the wall making
sure that you leave an expansion gap of 3/8 inch (9 mm) between the plank and wall, using spacers as needed. The entire installation requires a 3/8”
expansion space.
NOTE: Cutting tiles and planks may be cut with a small resilient tile cutter or scored with a utility knife and snapped.
• The rst plank (#2) of the second row should not exceed 50% of the length of the plank.
• Align the rst plank (#2) of the second row with the rst plank (#1) of the rst row at an angle and engage the long side joint by folding down until joints
lock. The factory end should face in from the perimeter of the installation. Cut edges always face away from the eld of the installation. To properly seal the
joint, if necessary use a small scrap of plank/tile to gently tap along the entire length of the plank/tile. Lock the scrap piece-groove to tongue or tongue to
groove-to the plank/tile requiring tightening and gently tap the edge of the scrap with a tapping block. This will bring the tile edges tight together.
• Align the second plank (#3) of the rst row against the end joint of plank (#1) of the rst row at a slight angle and fold down until joints lock.
• When joining the next plank (#4) to the rst plank in the second row (#2), join the short side edges rst. There will be a gap on the long side joints when the
plank is rotated down.
• Raise the outside long edge of the plank upward approximately 1”. This will raise the outside long edge of planks in that row. Maintain this angle as you
push the plank in until the long edge of the plank meets the long edge of the rst row. Rotate downward on the plank until the joint locks. Tap the long
side or short side joints closed, if necessary, by using a tapping block or pull bar.
• Align the third plank (#5) of the rst row against the end joint of plank (#3) of the rst row at a slight angle and fold down until joints lock.
• When joining the next plank (#6) to the second plank in the second row (#4), join the short side edges rst. There will be a gap on the long side joints when
the plank is rotated down.
• Raise the outside long edge of the plank upward approximately 1”. This will raise the outside long edge of planks in that row. Maintain this angle as you
push the plank in until the long edge of the plank meets the long edge of the rst row. Rotate downward on the plank until the joint locks. Tap the long
side or short side joints closed, if necessary, by using a tapping block or pull bar.
Please contact Technical Services at 888-387-9881 with any questions. 0213_2021 | EH | 03/2021 | 3 of 12
Page 4
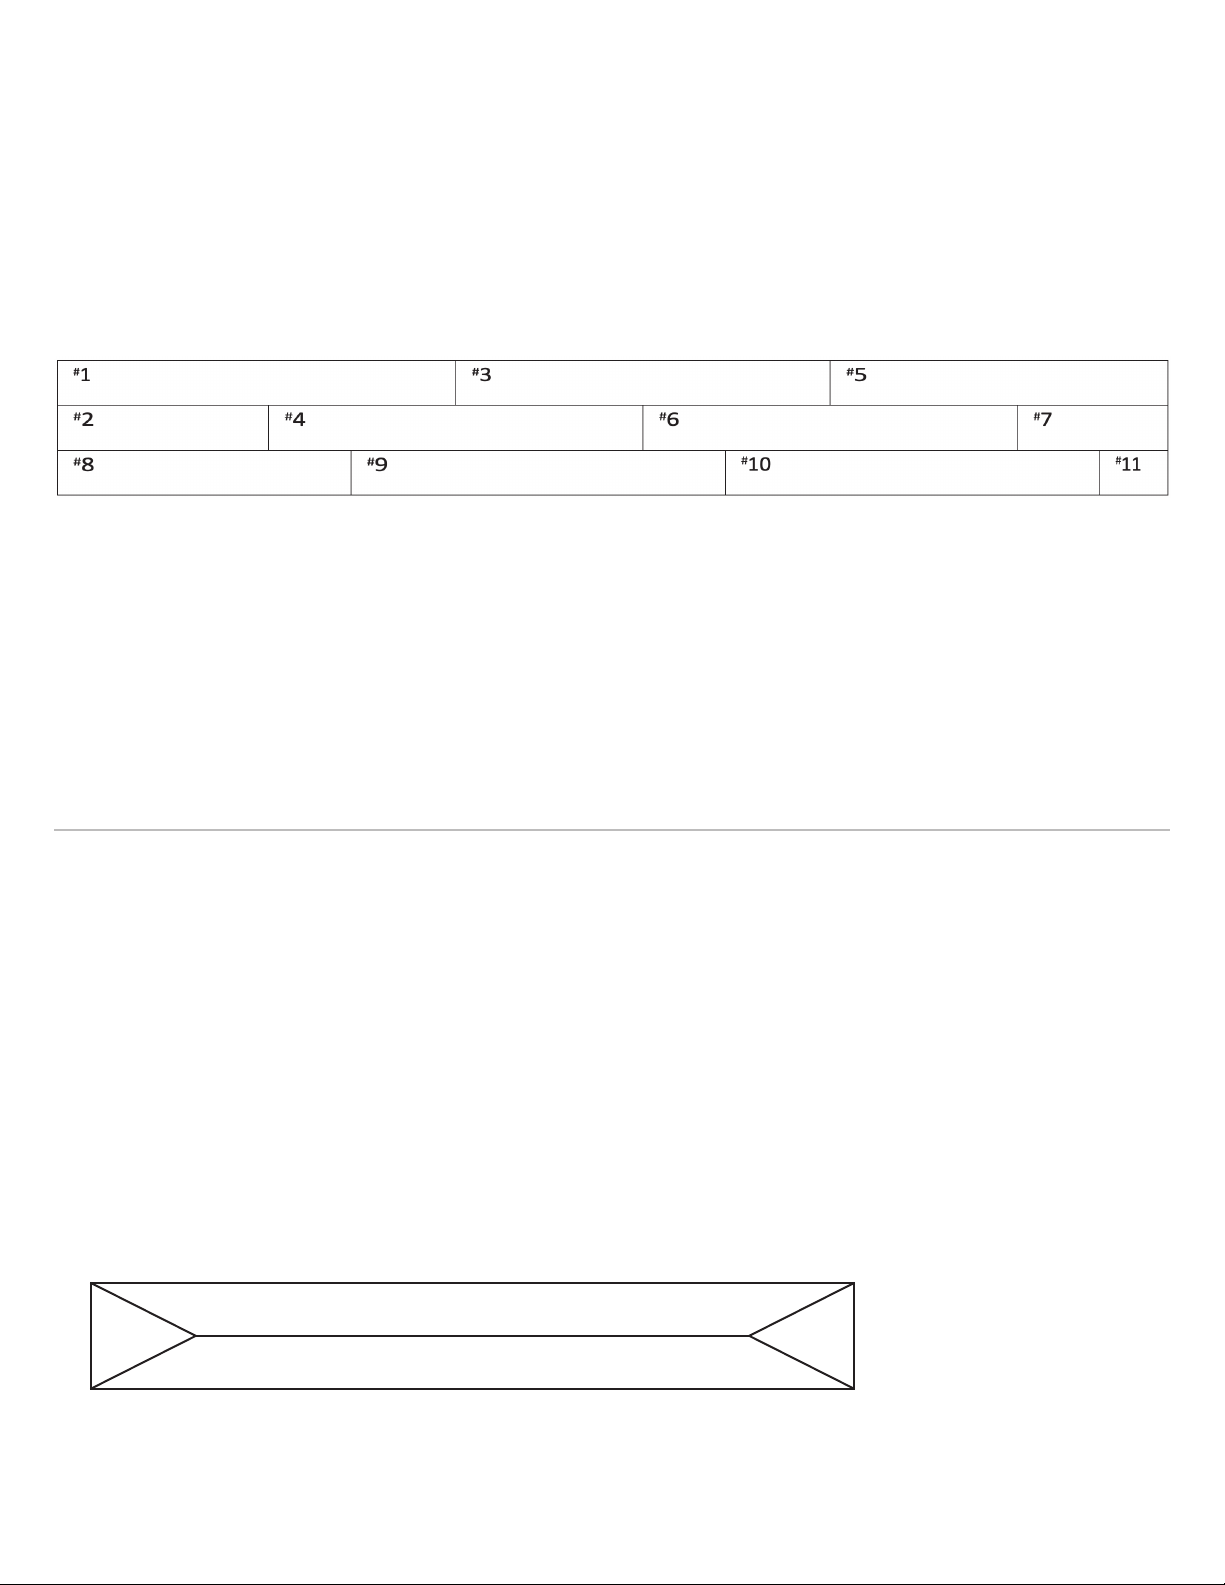
• When joining the next plank (#7) to the third plank in the second row (#6), join the short side edges rst. There will be a gap on the long side joints when the
plank is rotated down.
• Raise the outside long edge of the plank upward approximately 1”. This will raise the outside long edge of planks in that row. Maintain this angle as you
push the plank in until the long edge of the plank meets the long edge of the rst row. Rotate downward on the plank until the joint locks. Tap the long
side or short side joints closed, if necessary, by using a tapping block or pull bar.
• After each row is complete ensure, there is gap no less than 3/8” (10mm) around the perimeter.
• Repeat these steps to complete the installation.
NOTE: Check oor squareness and straightness regularly.
Diagram 1
Wall
• To install the nal row of planks/tiles, you will usually need to cut them. We recommend the following: lay a plank face up on top of the last row installed
with the tongue and groove facing the same way as the eld of the installation (This will represent your nal row to be trimmed). Place another plank against the
edge of the wall and on top of the nal row. Mark the plank underneath. Cut the plank and install the last row leaving ample expansion space.
NOTE: In place of a resilient tile cutter, a miter or circular saw (with the blade cutting into the design of the plank) can be used to cut the rigid luxury vinyl
ooring. A utility knife can also be used, scoring the top of the pattern and snapping the plank. It will be necessary to cut the foam underlayment after
snapping the plank.
NOTE: Maintain a 3/8” (.95 cm) expansion space around all walls and vertical objects. Quarter round or baseboard molding will cover this
expansion space.
NOTE: Maintain the 3/8-inch space around cabinets, pipes, toilet anges and any obstacle in the oor (It is not recommended to trim around a toilet,
however leave the expansion space around the toilet ange)
Additional Instructions/Notes
Multi-Width Plank Installation
• To install the multi-width product, install a row of the 7” wide plank alternating between the 5” and 9” plank sizes. Install a 5” row, then 7” row, then 9” row,
and then 7” row again, and then repeat this pattern.
Molding and Transitions
• All oor molding and transition strips need to provide a 3/8-inch (10mm) expansion space to allow expansion and contraction.
• Ensure moldings and transitions strips will not pinch the ooring. This will prevent the oor from properly expanding and contracting as well as allowing
the structure to move freely over the oor.
• For rooms that have a run greater than 50 feet, a transition strip must be installed.
• Never allow nails or screws to enter the rigid luxury vinyl ooring or the expansion zone around the ooring perimeter as it will prevent proper expansion
and contraction of the structure and ooring.
• Quarter round, base board, door jambs etc. should never pinch the ooring. This will prevent the oor from properly expanding and contracting as well as
allowing the structure to move freely over the oor.
Plank Replacement
Should one of your planks/tiles become damaged and need to be replaced, follow these simple instructions:
1. Mark the top of damaged plank/tile with a marker or pencil. Make two triangle cuts near the end joint and then connect the points with one long cut in the
middle of the plank/tile. (See diagram below)
SCORE TILE AS SHOWN
2. The use of a chisel to tap through the plank (on scored triangle cut points) works well to complete the cut.
3. Lift and remove damaged tile.
Please contact Technical Services at 888-387-9881 with any questions. 0213_2021 | EH | 03/2021 | 4 of 12
Page 5
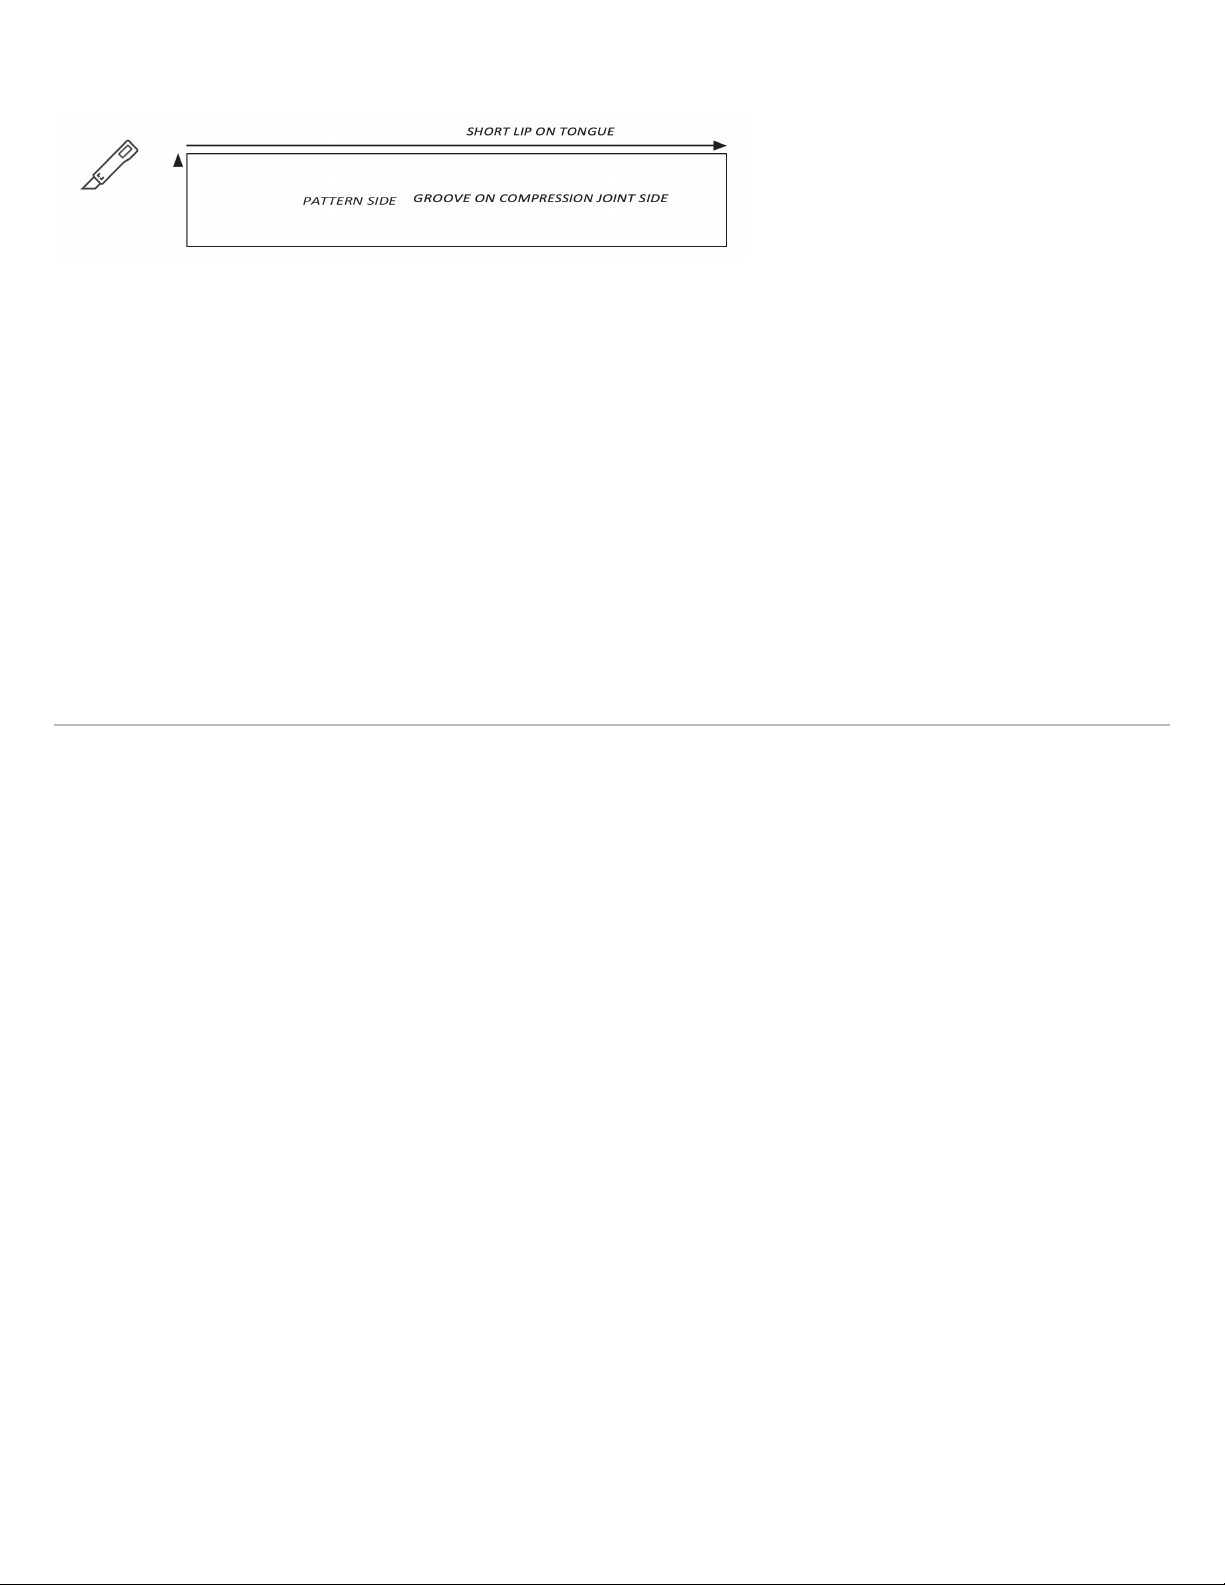
4. With the pattern side facing up on the new replacement plank/tile, trim off the short lip (tongue side) along the length of the plank and the groove on the
lower prole of the end joint making it ush with the edge of the plank. Be careful not to damage the nish surface of the plank.
5. It will be necessary to remove the slim white insert from the end joint existing plank to allow a proper t.
6. Cut several pieces of acrylic double face tape made for vinyl oors and slide under the edges of the existing oor on the two edges where the replacement
plank/tile will have tongue trimmed off. The end joint will need a section of tape under it to secure it. Tape should face sticky side up; leave the paper on
the lower side.
7. Using MOHAWK M7 Seam Sealer, run a small bead of sealer on the groove edge of the plank of the existing oor where the replacement plank/tile will rest.
NOTE: The long tongue of the replacement plank/tile and the uncut compression t end joint will not need tape or seam sealer, as you will be using
the plank’s/tile’s locking mechanism.
8. Install replacement plank/tile by angling the long groove of the replacement plank under and over the tongue of the oor plank until the nish edge of
the replacement plank is tight against the nish edge of the oor plank, and the compression end joint is lined up. Rotate down, locking the length tongue
joint then pressing the end joint with your thumb or palm of your hand to lock into place.
9. Wipe any excess sealer that comes to the surface of the tiles with a damp cloth and follow with a dry cloth to assure all sealer is removed from tile surface.
10. Keep foot trafc off the replaced plank/tile for 24 hours.
NOTE: Mohawk will not be held responsible for problems that may arise for alternative seam sealers. Please contact the alternative seam sealer’s
manufacturer with issues
Rigid Care & Maintenance
To help protect and keep your oor clean, following these proper care and maintenance guidelines:
Preventative Maintenance
• Prevent indentations and scratches by using non-staining oor protectors on the legs of chairs, appliances and all heavy furniture. Floor protectors should
be at least one inch in diameter.
• Do not ood oor or subject to standing water.
• Protect your oor from tracked-in dirt by using mats at all outside entrances. Mats should have a non-rubberized backing and be marked as non-staining.
• Avoid tracking-in tar or asphalt from driveways.
• Avoid high heel shoes on your oor as they can cause permanent indentations.
• Protect your oors against burns. Burns from cigarettes, matches or other extremely hot items can cause permanent damage.
• Avoid exposure to direct sunlight for prolonged periods, as this can cause discoloration.
Cleaning & Maintenance
• Sweep the oor regularly with a soft bristle broom to remove loose dirt.
• Wash the oor with non-abrasive, neutral PH oor cleaner.
• For every day maintenance, a mop moistened with warm water will sufce.
• Spills should be cleaned up immediately.
DO NOT use the following on your Mohawk rigid luxury vinyl oor
• Soap based detergents
• Abrasive or mop and
NOTE: Always read the cautionary information on all cleaners prior to use.
NOTE: Never push, pull or drag furniture, appliances or other items across the oor. When moving furniture or heavy items, always lift and carry
the items. To minimize the risks of scratches and gouges when moving heavy objects, place plywood underlayment between the ooring and
object to be moved.
shine products
• Floor wax
• Vacuum cleaners with a
rotating beater bar
• Ammonia
• Bleach solution greater than 3%
Please contact Technical Services at 888-387-9881 with any questions. 0213_2021 | EH | 03/2021 | 5 of 12
Page 6

How to Treat Stains, Spills & Scuffs
Follow the remedies in order. Unless instructed otherwise, use a clean, white cloth or towel with products recommended for Mohawk LVT ooring. Always rinse
the affected area with clean water after treatment.
The Stain or Spill:
Acids, alkalis, blood, ketchup, mustard, food, fruit, fruit juices, candy, cleaners, strong soaps, dye, dye markings, urine and feces, grass, iodine,
mercurochrome and rust.
The Remedy:
• First, remove as much solid material as possible.
• Scrub area with cleaner full strength.
• Rub the area with isopropyl alcohol.
• If rust stain does not respond, use lemon juice or a cream of tartar solution.
The Stain or Spill:
Dry cleaning uids, lacquer and latex paint, nail polish, solvents, oil-based paints, wood stains and varnish
The Remedy:
• If substance is dry, gently peel it from the oor. Avoid sharp instruments that could scratch oor.
• Scrub area with non-abrasive cleaner.
• Rub lightly with odorless mineral spirits or paint thinner.
NOTE: DO NOT USE ACETONE OR NAIL POLISH REMOVER!
Substances that Won’t Wipe Up:
Adhesives, chewing gum, oil, grease, candle wax and tar
The Remedy:
• First, remove as much solid material as possible.
• Carefully remove excess with a spoon or ngernail.
• Scrub area with non-abrasive cleaner.
• Rub lightly with odorless mineral spirits, isopropyl alcohol or lighter uids.
Scuffs & Smudges:
Rubber heel marks, shoe polish, scuffs and smudges
The Remedy:
• Rub the scuff with ngertip, rubber will come right off. The friction from the rubbing will remove rubber.
• Scrub area with non-abrasive cleaner.
• Rub lightly with isopropyl alcohol or lighter uid.
CAUTION! Isopropyl alcohol, lighter uid, odorless mineral spirits and paint thinner are ammable solvents. Carefully read and follow cautionary
information on their respective labels. Keep trafc off treated area for 30 minutes.
Please contact Technical Services at 888-387-9881 with any questions. 0213_2021 | EH | 03/2021 | 6 of 12
 Loading...