

MOGOBIKE MB-6000-UD User Manual
User Manual
MB-6000-UD Rev. 1.03

Pg. 2
Table of Contents
I. The Controls
II. Unit Operations
A. Folding the Unit
B. Folding the Handlebars
C. Unlocking and Unfolding
D. Precautions and Starting
E. Power Assist Mode
III. Maintenance and Care
IV. Specifications

Pg. 3
Our Mission
Here at FTR Systems, we are committed to excellence in providing the
highest level of customer service. We believe that maintaining effective
policies, a positive attitude, and providing swift responses will result in a
valuable, long-term relationship between our company and the
customer.
To Our Customers
Thank you for purchasing the Mogobike! We hope that our product will
meet and exceed all of your expectations. As a valued customer, your
comments and opinions are very important to us. If you have any
questions, concerns or comments, we hope you will bring them to our
attention.
The Mogobike smart design uses a patented balanced-controlled dual
motor, making the Mogobike a perfect “last mile” solution to your
everyday commute.
The Mogobike was built for durability while also providing flexibility on
the go. Whether on a bus, train, boat or RV, the Mogobike folds into a
compact size for easy storage.
This user manual contains all essential information for the user to make
full use of the Mogobike. The manual includes descriptions of the
system functions and capabilities, and step-by-step startup and use.

Pg. 4
I. THE CONTROLS
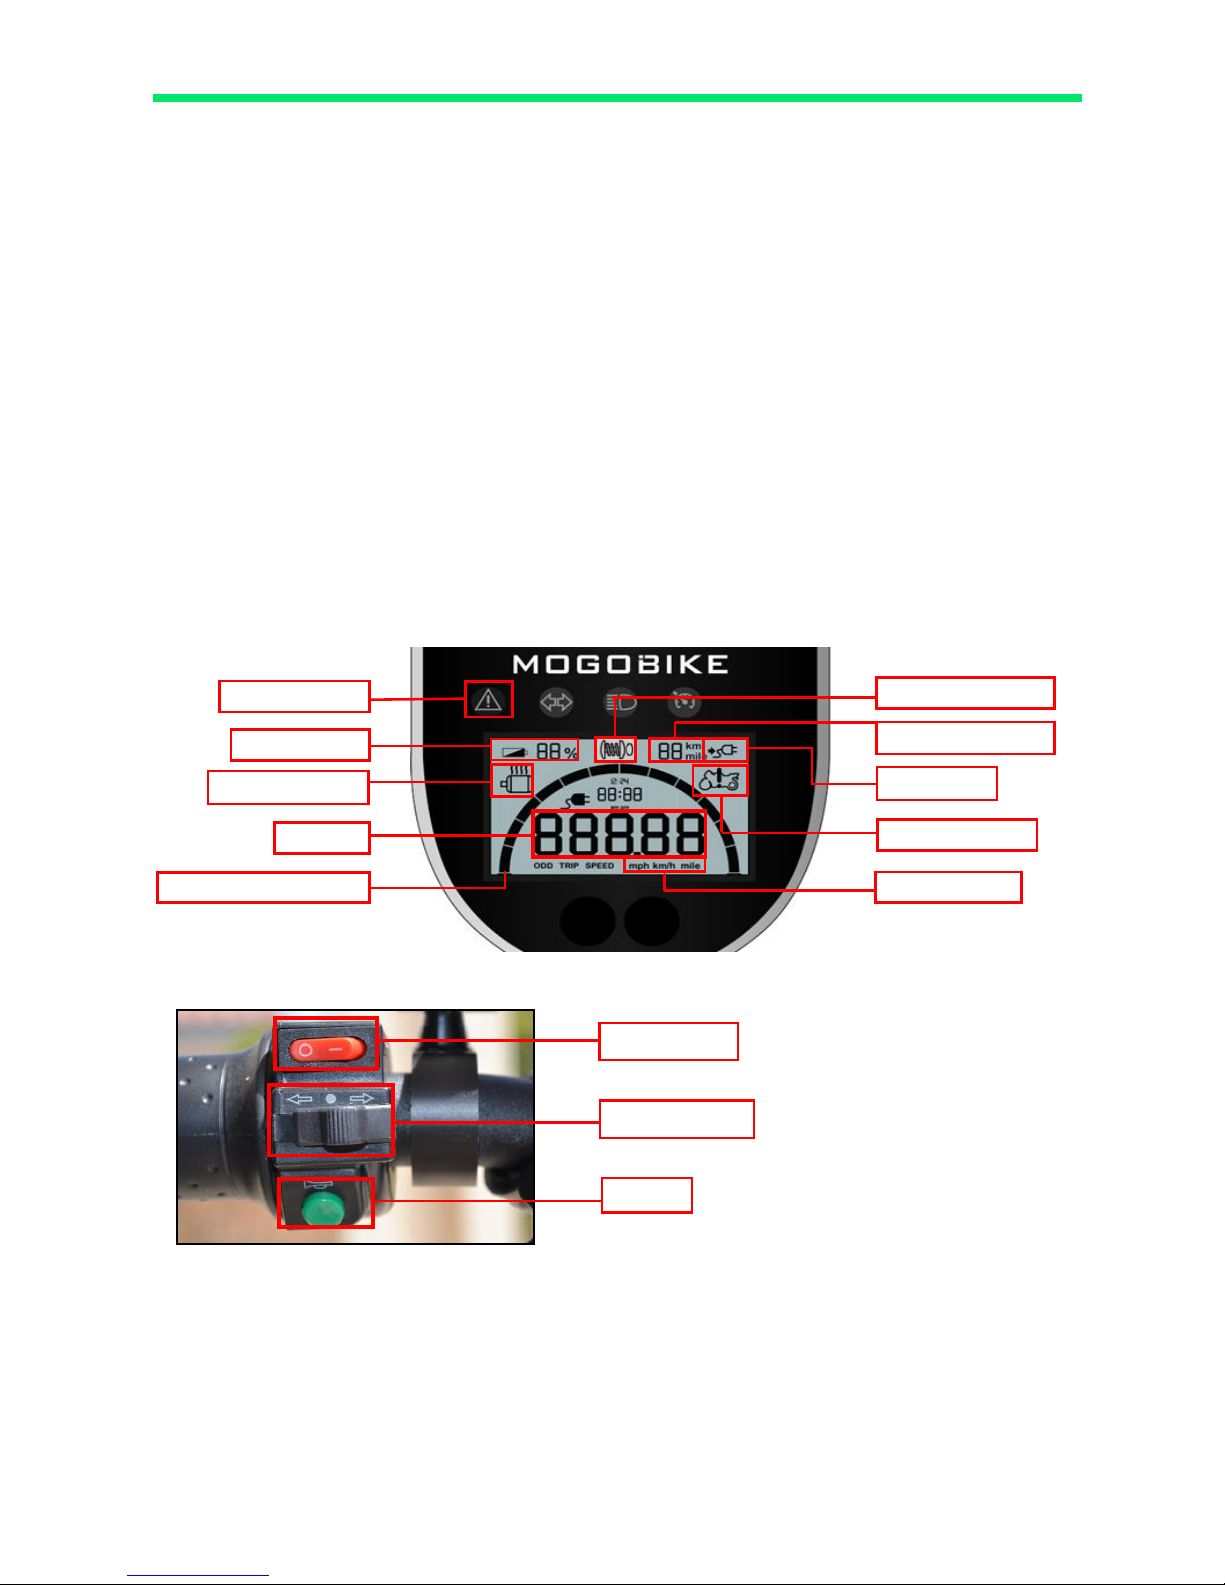
Display Monitor
The Mogobike comes equipped with a backlight monitor for speed, trip
distance, clock, and battery life.
The distance counter located at the top right of the monitor acts as a
mileage/kilometer countdown, estimating how much distance is available
based on remaining battery life. After a rider's first run, the Mogobike
creates a baseline for the rider, as remaining distance depends on the
weight and riding style of the rider. The distance will be set accordingly on
the next run based on the previous baseline.
Battery indicator is expressed as a percentage at the top-left corner.
The Power Output Meter shows the amount of draw against the battery as
you are riding.
The Clutch Symbol will display when the vehicle is in a neutral state.
Adjusting Monitor Settings
The two buttons on the monitor are used to change what displays on the
monitor. A user can toggle between and reset the trip meter, clock, or
change from mileage to kilometers.
The left button is used to activate the settings mode for the monitor. Click
through on the right button to enter the various settings for adjusting the
display.
Change the clock
Hold down the left button to adjust the clock. Once activated, the blue
headlamp light on the display will light up. Click the right button to toggle
between a 24 or 12 hour clock. Hold down the left button to enter the
clock settings. Adjust the hour and minutes with the right button. When
the clock is adjusted to your preference, the monitor will reset
automatically with the updated settings after a brief pause.
Reset the trip meter
Toggle through display modes by pressing the right button. When the trip
meter displays on the monitor, hold down the left button to reset the
counter to zero.
Change to mileage or kilometers
Toggle through display modes by pressing the right button. When the
odometer displays on the monitor, hold down the left button to toggle
between mileage or kilometers.
Pg. 5
Vehicle Alert
I. THE CONTROLS
Error and Diagnostic Information
The Mogobike provides some error readings back to the rider in case the
bike encounters a problem.
If the Mogobike emits an error, the "Vehicle Alert" icon will display on the
monitor. In the case of an error, contact the Mogobike support
department.
If the overheating icon displays, this can result from a number of components,
such as motors, headlamp or control board. In many cases, it will typically be
the motors. The Mogobike comes with a built in shut off function, so that
when the vehicle overheats, it will shut down in order to protect itself from
incurring damage.
Note about driving styles. Erratic driving, such as quick starts and stops can
be a factor in overheating.
Left Hand Controls
Turn Signals
The Mogobike is a fully equipped street machine, with lights, turn signals
and brake lamp. Move the blinker control switch left or right to initiate the
turn signals. The unit will emit a clicking sound to indicate the blinker
signal is initiated. Slide it back to the middle (neutral) position to turn the
signal off.
Headlight
Turn Signal
Battery Life
Low Battery
Recharge
Horn
Headlight
The headlight meets
industry standards for
DOT regulations.
Speed
Mph / kmh
Distance Meter
Overheating
Clutch Symbol
Pg. 6
II. UNIT OPERATION
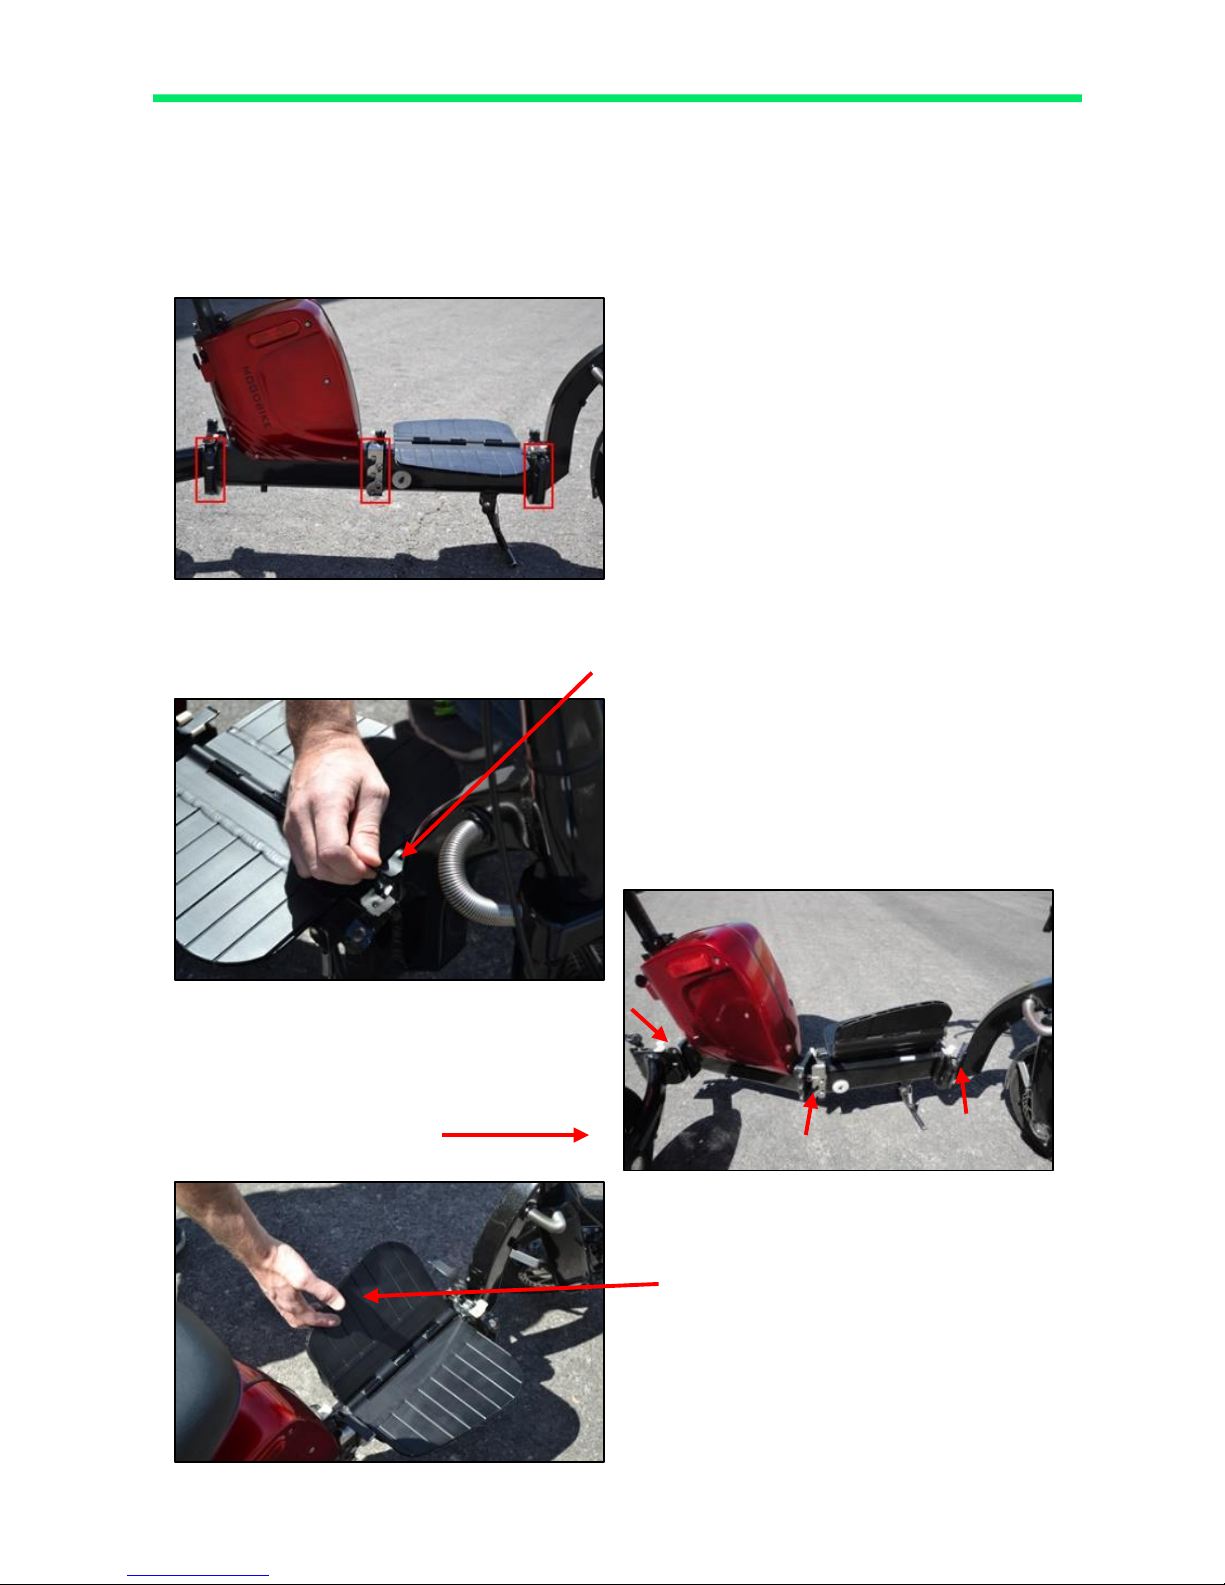
Folding the Mogobike
Folding the Mogobike is a quick and easy operation, but one that takes a
little practice in the beginning. To shorten the learning curve, this section
will walk users through folding their Mogobike.
Take notice of the position of the
locking hinges. There are three
hinges that run along the frame and
one on the steering column. These
hinges are made of tempered
stainless steel. The latch that runs
along the top of the hinge is fastened
by a hard plastic clip.
Position your thumb on the clip release Tab and push it away from the
latch, releasing the latch in the process.
II. UNIT OPERATION
Run down the length of the frame,
releasing the three hinges and rotating
the latches upwards to unlock the
hinges.
With the hinges now unlocked, you
will notice that the Mogobike can
easily pivot at each break point
(marked by arrows).
Rotate the foot pad next to you
upwards. The pad will stay in
place in a vertical position.
 Loading...