

Mogar Music 3DENHANCER User Manual
USER’S MANUAL

SAFETY INSTRUCTIONS
This symbol, wherever it appears,
alerts you to important operating and
maintenance instructions in the
accompanying literature. Read the
manual.
Detailed Safety and Operation Instructions:
All the operation instructions and safety should be read before the machine is operated.
Follow instructions:
All operation and user instructions should be followed by the user or the installer.
Retain Instructions:
The safety and operating instructions should be carefully retained for future reference.
Heed Warnings:
All warnings on the machine and in the operating instructions should be adhered to.
Water and Moisture:
The machine should not be used near water or in place full of moisture.
Ventilation:
The machine should be placed so that its location does not interfere with its proper ventilation. For
example, the appliance should not be situated on a bed, carpet, or similar surface that may create an
obstacle for the ventilation openings: or placed in a built-in installation, such as a bookcase or cabinet that
may impede the flow of air around the machine.
Heat:
The machine should be situated far away from heat sources such as heat registers, radiators, stoves, or
other machines (including amplifiers) that produce heat.
Power Source:
The machine should be connected to a power supply only of the type described in the operating
instructions or as marked on the external power transformer.
Power-Cord Protection:
Power supply cord should be routed so that it is not likely to be walked on or pinched by items placed
upon or against it, paying particular attention to cords, power transformer and plugs and the point where
they exit from the appliance.
Cleaning:
The machine should be cleaned only as recommended by the manufacturer.
Non-use Periods:
The external power transformer should be unplugged from the outlet when left unused for a medium or
long period of time.
Object and Liquid Entry:
Care should be taken so that objects do not fall and liquids are not spilled into the enclosure through
openings, do not leave bottles or cans upon the unit.
Damages that Require Service:
The unit should be serviced by qualified service personnel in the following cases:
1. The external power transformer, power supply cord or the plug has been damaged.
2. The enclosure of the unit has been damaged.
3. The unit has been exposed to water or moisture.
4. The unit does not appear to operate normally or exhibits a marked change in performance.
5. Objects have fallen, or liquid has been spilled into the unit.
Servicing:
The user should not attempt to service the unit beyond what is described in the Operating Instructions. All
other servicing should be referred to qualified and authorized service personnel.
2 – 3D ENHANCER USER’S MANUAL

3D ENHANCER
PROFESSIONAL STEREO ENHANCER WITH VIRTUAL SURROUND
PROCESSOR
Stereo Professional Enhancer with Virtual Surround in XXL Half Rack Frame
Fantastic audio quality even with extremely high volume levels
Gives your music extra sparkle and makes instruments or mixes stand out.
Provides incredible bass power and high frequency transparency.
Adds detail to instruments, vocals and mixed program material.
Surround processor for real spatial enhancement improving stereo imaging.
Servo-balanced Inputs and Outputs to avoid noise problems
Ultra-low noise 4580 audio op-amps for outstanding sound performance
High-quality potentiometers and illuminated switches
High-quality, low tolerance components for highest results.
Full Aluminium rugged construction ensures long life and durability
External power supply design for professional applications
Battery use possibility with external dedicated battery pack
3 – 3D ENHANCER USER’S MANUAL

TABLE OF CONTENT
1.INTRODUCTION p. 4
1.1High Technology p. 4
2.THE DESIGN p. 4
2.1 The INPUT LEVEL controlp. 4
2.2 The BASS PROCESSOR control p. 4
2.3 The FAT BURNER Switch p. 5
2.4 The PUNCH control p. 5
2.5 The HIGH SHAPE control p. 5
2.6 The HIGH ENHANCER control p. 5
2.7 The METER MODE switchp. 5
2.8 The 3D PROCESSORp. 5
2.9 The PROCESS ON switchp. 6
3.INSTALLATION p. 6
3.1 Packaging p. 6
3.2 Rack mounting p. 6
3.3 Mains voltage p. 6
3.4 Audio connections p. 6
Fig. 3.1: Different Connector Types and Wiring p. 7
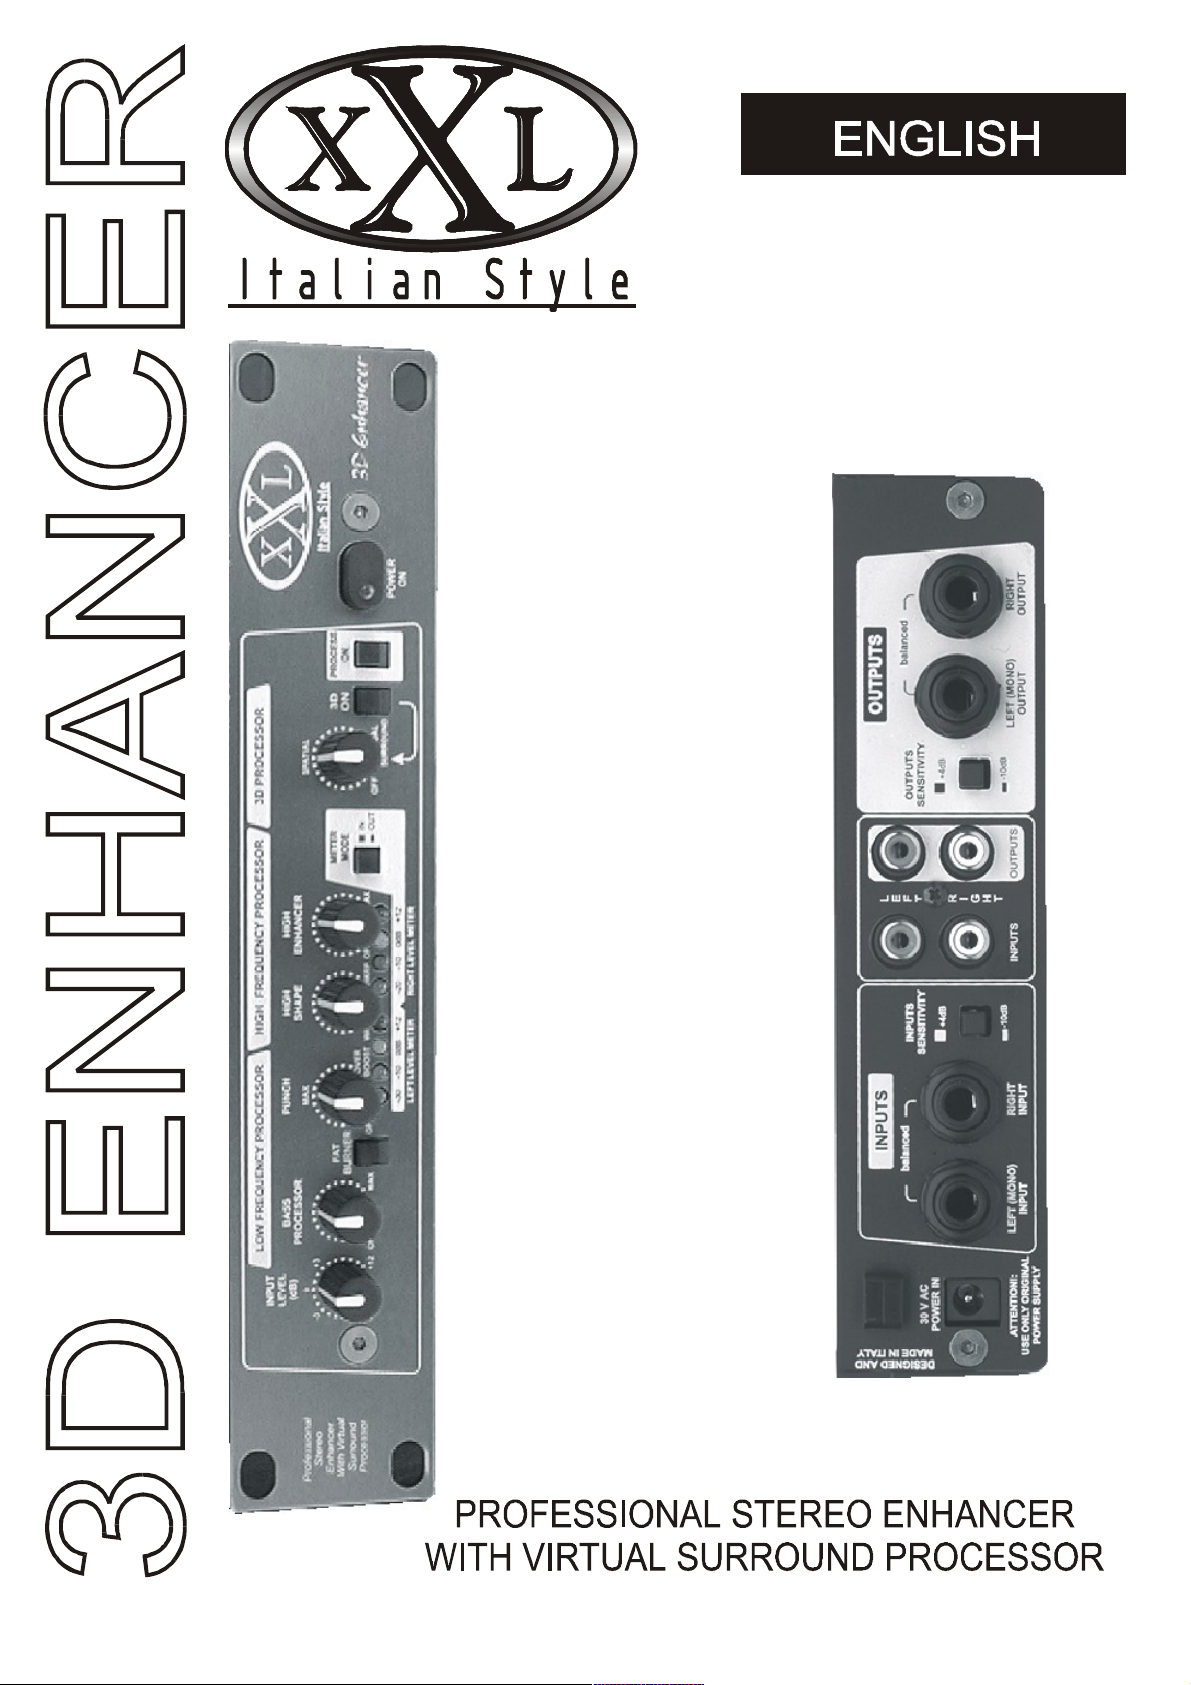
4.CONTROLS p. 8
Fig.4.1 Front panel controls p. 8
Fig. 4.2 Back panel connections p. 9
5.APPLICATIONS p. 10
5.1 During replay p. 10
5.2 During Recording p. 10
5.3 Live Situationp. 10
5.4 Hi-fi, Video and DJs applications p. 11
Fig. 5.1 Studio Playback applicationp. 12
Fig. 5.2 Live/Studio Channel/Master Insert Wiring p. 12
6. TECHNICAL SPECIFICATIONS p. 13
4 – 3D ENHANCER USER’S MANUAL

1.INTRODUCTION
In purchasing the XXL 3D Enhancer, you have acquired a professional Enhancement
System of the high-end class, which meets all the demands and requirements of studio
and live works. The sound precision and flexibility of the functions are the main
outstanding features of this high-end unit. The 3D ENHANCER is our state-of-the-art
sound enhancement system offering a special combination of sound improvement
designs. The unit can be used wherever professional sound improvement is required.
The XXL 3D ENHANCER is the no-compromise answer when the situation demands a
no-compromise solution.
1.1 High Technology
Our experience in the field of professional studios drove us to design the 3D
ENHANCER, an incredible small size Stereo Enhancer that is able to give answer to all
the demands in Studio, Live, broadcast and TV applications. All the electronics is
assembled directly on PCB with no wires use, it means less possibility of malfunction.
All the internal IC are 4580, ultra High quality Operational Amplifier that allow high
current output with very low noise threshold. All the outputs are protected in order to
guarantee safe operating conditions in every situation. All the inputs are balanced
(except RCAs), in this way you can have the best matching conditions with the other
machines. The choice of having the external power supply ensure professional features
with minimum noise, and allow you to drive the unit also with an external optional
battery pack to use the unit also without the presence of main AC power.
1.THE DESIGN
2.1 The INPUT LEVEL control
The INPUT LEVEL potentiometer allows setting the proper level of input signal in
order to not overdrive the internal stages of the unit. Verify on the VU meter set to
“INPUT” that the level is correct (around 0 dB) otherwise adjust the level using the
INPUT LEVEL potentiometer. If your signal is far from the level you desire (too high or
too low), verify the source signal amplitude and the correct setting of SENSITIVITY
switches on the back of the unit.
2.2 The BASS PROCESSOR control
The BASS PROCESSOR control determines the amount of signal used for sound
enhancement (from Off to Max). Turn the control clockwise for a more strong and
punchy bass sound. The setting depends on the application you are addressing.
Attention! Please note that the Bass Processor should be carefully set to avoid
possible speaker damage. Most near-field monitors could not be capable of handling
the bass produced by the 3D Enhancer.
5 – 3D ENHANCER USER’S MANUAL
 Loading...