

Page 1

Page 2
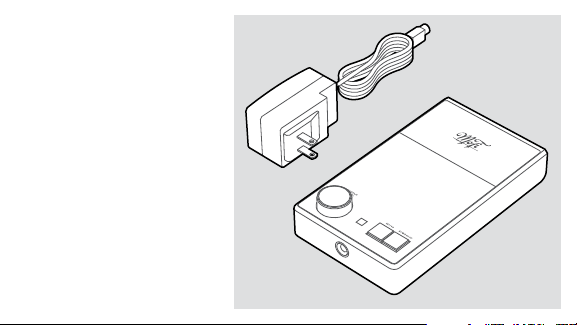
IN THE BOX
1. UltraPhono™ Phono Preamp/
Headphone Amplifier
2. Universal Power Supply
2
1
Page 3
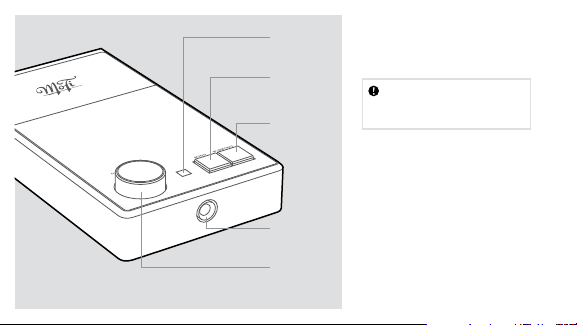
Indicator
Light
Mono/
Stereo
Selector
Subsonic
Filter
Headphone
Jack
Headphone
Volume Knob/
Mute Button
INSTALLATION
Check all connections
before you plug in the
power supply
UltraPhono™ will operate at its
best when properly installed
in a location that’s free from
magnetic fields like those
generated by equipment with
power transformers (such as
an amplifier), and within a
reasonable distance between
your turntable and audio
component(s).
Page 4
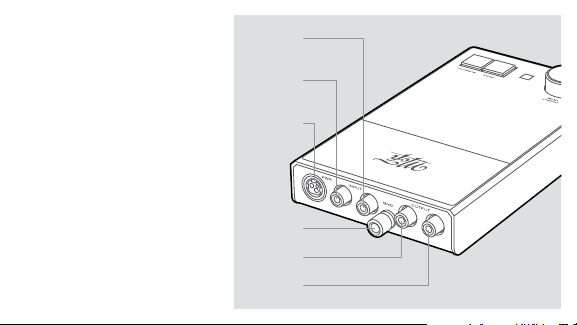
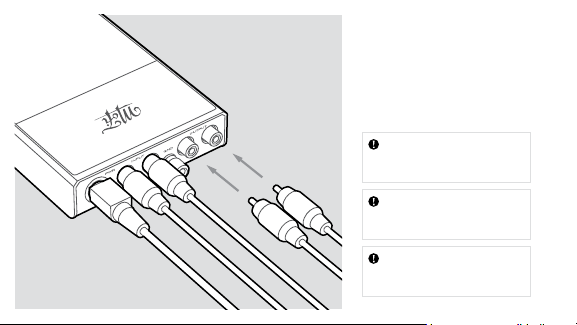
Once you’ve placed UltraPhono™
in a suitable area, connect your
turntable’s interconnects and
ground wire (if supplied) to the
phono preamp’s inputs, matching
each connector to the inputs as
shown. Attach another set of
interconnects from the phono
preamp’s outputs to the line-level
analog inputs of your amplifier or
preamplifier/processor.
Plug in the provided power
supply between the phono
preamp’s power input and a wall
outlet or line conditioner.
Input Right
(Red)
Input Left
(White)
Power
Connector
Ground Wire
Connection
Output Left
(White)
Output Right
(Red)
Page 5
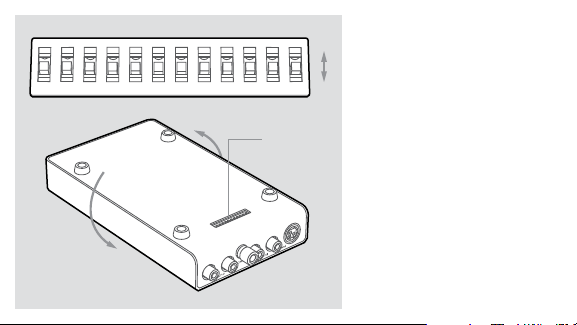
1 2 3 4 5 6 7 8 9 10 11 12
DIP Switches
Located on
Underside
CARTRIDGE LOADING
On
UltraPhono™ has been engineered
to work with a wide array of
phono cartridges on the market
Off
today. Because phono cartridges
require special impedance
and gain settings, you should
configure UltraPhono™ to suit the
cartridge of your choice.
Out of the box, UltraPhono™
is factory set to operate with
most high-output Moving
Magnet (MM), Moving Coil (MC),
or Moving Iron (MI) phono
cartridges. If you are using a
low-output Moving Coil (MC)
cartridge, you will need to adjust
the phono preamplifier’s settings
for best results.
Page 6

Locate the DIP switches, which
are found on the underside.
Each switch is arranged in a
mirror pattern for left and right
channels.
Start by selecting each DIP switch
for the recommended impedance
of your cartridge as shown in the
Input Impedance Settings chart.
Next, select the best gain setting
for your cartridge using the
Cartridge Output Settings chart
and set DIP switches accordingly.
For Moving Magnet (MM), start
with 40dB. For Moving Coil (MC),
start with 60dB. An additional
6dB can be added via DIP
switches 1 and 12.
Input Impedance Settings
DIP Switch No. 3 , 10 4, 9 5, 8 6, 7
100 Ohms On Off Off Off
500 Ohms Off On Off Off
1000 Ohms Off Off Off On
47000 Ohms Off Off Off Off
Cartridge Output Settings
DIP Switch No. 2 , 11 1, 12
> 3mV / 40dB Gain Off Off
1mv–3mV / 46dB Gain Off On
0.3mV–1mV / 60dB Gain On Off
Page 7
OPERATION
Once you have connected cables
between UltraPhono™ and
your turntable and amplifier/
preamplifier, and completed the
setup of your impedance and gain
settings, plug in the power supply.
When playing a mono
record, depress the Mono
button
To mute the headphone
amp output, depress the
Output Level knob
To bypass subsonic filter,
depress the Subsonic
button
Page 8

StudioPhono™ UltraPhono™
Gain Adjustable from 40dB - 66dB Adjustable from 40dB - 66dB
THD < .01% (MM) / < .012% (MC) < .006% (MM) / < .055% (MC)
Load Impedance (MM) 47,000 Ohms 47,000 Ohms
Load Impedance (MC) 75, 100, 500, 1k, 10k, 47k Ohms 75, 100, 500, 1k, 10k, 47k Ohms
Headphone Amplifier
Headphone Output – 8V RMS Max, 62 Ohms, 1.5 w/ch
Volume Control – 31 steps, 2dB per/step, 62dB range
Mute Switch – -90dB
Minimum Impedance – > 10 Ohms
Page 9

www.mofielectronics.com
MoFi Electronics – 1811 W Bryn Mawr Ave Chicago IL
 Loading...