

Page 1

Ranges
Electric Coil
Safety Information
Operating Instructions
Troubleshooting Tips
Consumer Support
4
6-7
. . . . . . . . . .
Write the model and serial
numbers here:
Model #
Serial #
Surface Units. . . . . . . . . . . . . . . .
Oven . . . . . . . . . . . . . . . . . . . . . .
Consumer Support . . . Back Cover
Product Registration. . . . . . . . . . .
Warranty. . . . . . . . . . . . . . . . . . .
Owner’s Manual and
Installation Instructions
Coil Top Models
MCAS724
2-4, 12, 14
16
21,22
23
Care and Cleaning
Shelves . . . . . . . . . . . . . . . . . . . . .
Surface Units and Drip Pans. . . .
Cooktop . . . . . . . . . . . . . . . . . . .
Broiler Pan and Grid. . . . . . . . . .
Oven Door . . . . . . . . . . . . . . . . .
Oven Heating Elements . . . . . . .
Knobs . . . . . . . . . . . . . . . . . . . . .
Oven Interior. . . . . . . . . . . . . . . .
Painted Surfaces . . . . . . . . . . . . .
8
8
8,9
9
9
9
10
10
10
Installation Instructions
Anti-Tip Device . . . . . . . . . . . . . .
Dimensions and Clearances . . . .
Flooring . . . . . . . . . . . . . . . . . . . .
Preparation . . . . . . . . . . . . . . . . .
Tools You Will Need. . . . . . . . .
Electrical Connections . . . . . . . .
Leveling . . . . . . . . . . . . . . . . . . . .
12
13
13
13
13
14
15
Lift up the cooktop to find the
label.
183D9541P005 29-5616
Warming Drawer . . . . . . . . . . . . .
11
Page 2

IMPORTANT SAFETY INFORMATION.
READ ALL INSTRUCTIONS BEFORE USING.
WARNING!
WARNING
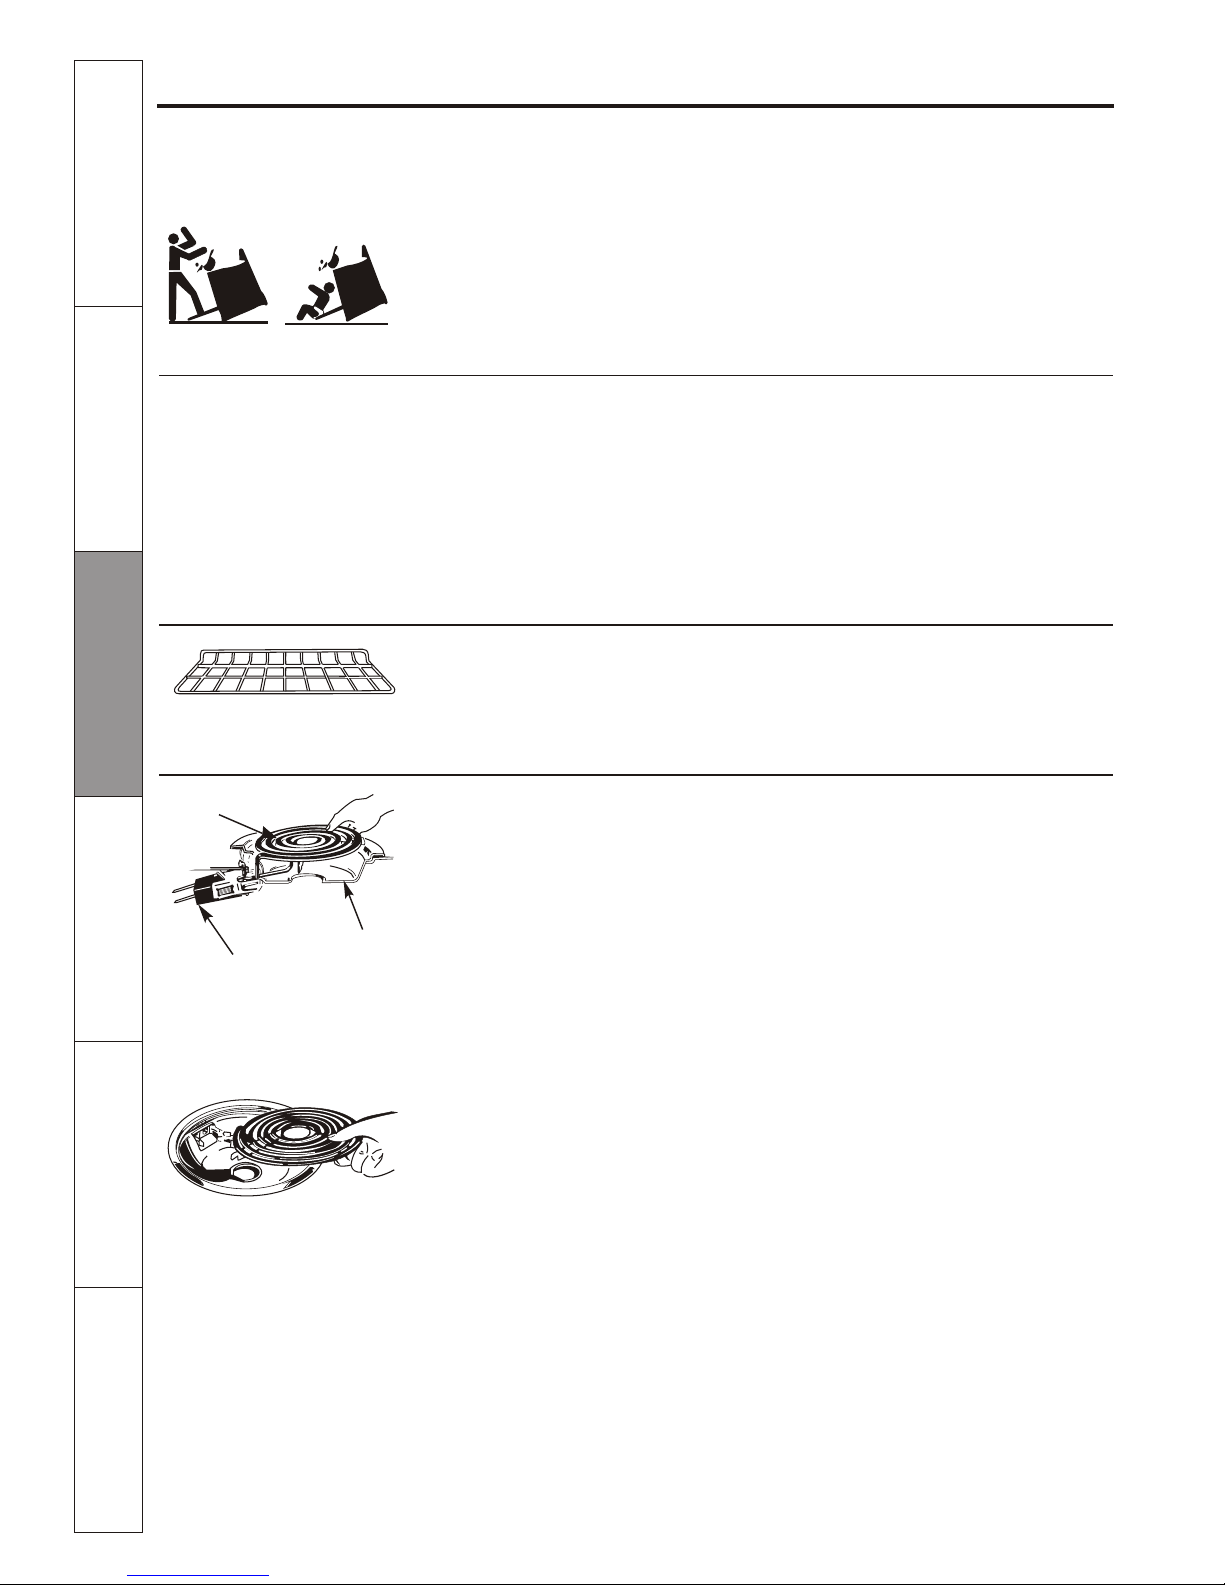
All ranges can tip and injury could result.
To prevent accidental tipping of the range, attach
it to the wall by installing the Anti-Tip device
supplied.
SAFETY PRECAUTIONS
When using electrical appliances, basic safety precautions should be followed, including the following:
Use this appliance only for its intended
purpose as described in this Owner's Manual.
Be sure your appliance is properly installed
and grounded by a qualified technician in
accordance with the provided installation
instructions.
Do not attempt to repair or rep1ace any
part of your range unless it is specifically
recommended in this manual. All other
servicing should be referred to a qualified
technician.
Do not leave children alone-children
should not be left alone or unattended in
an area where an appliance is in use. They
should never be allowed to sit or stand on
any part of the appliance.
Do not allow anyone to climb, stand
or hang on the door, storage drawer, or
cooktop. They could damage the range
and even tip it over, causing severe personal
injury.
Do not store flammable materials in an oven
or near the cooktop.
CAUTION:
ITEMS OF INTEREST TO
CHILDREN SHOULD NOT BE STORED IN CABINETS
ABOVE A RANGE OR ON THE BACKSPLASH OF A
RANGE-CHILDREN CLIMBING ON THE RANGE TO
REACH ITEMS COULD BE SERIOUSLY INJURED.
For your safety, the information in this manual must be followed to minimize the risk of fire or explosion,
electric shock, or to prevent property damage, personal injury, or loss of life.
ANTI-TIP DEVICE
If the Anti-Tip device supplied with the range does
not fit this application, use the universal Anti-Tip
device WB2X7909
To check if the device is installed and engaged
properly, carefully tip the range forward. The
Anti-Tip device should engage and prevent
the range from tipping over.
Please refer to the Anti-Tip device information
in this manual. Failure to take this precaution
could result in tipping of the range and injury.
If you pull the range out from the wall for
any reason, make sure the device is properly
engaged when you push the range back against
the wall. If it is not, there is a possible risk of the
range tipping over and causing injury if you or
a child stand, sit or lean on an open door.
Safety Instructions
Operating
Instructions
Care and Cleaning
Installation
Instructions
Troubleshooting Tips
Consumer Support
BEFORE PERFORMING ANY SERVICE, DISCONNECT
THE RANGE POWER SUPPLY AT THE HOUSEHOLD
DISTRIBUTION PANEL BY REMOVING THE FUSE OR
SWITCHING OFF THE CIRCUIT BREAKER.
2
Page 3

Cook meat and poultry thoroughly-- meat to at Ieast an INTERNAL temperature of 160°F and poultry to at least an
INTERNAL temperature of 180°F. Cooking to these temperatures usually protects against foodborne illness.
COOK MEAT AND POULTRY THOROUGHLY. . .
SAFETY PRECAUTIONS
WARNING!
Never wear loose-fitting or hanging garments
while using the appliance. Be careful when
reaching for items stored over the range.
Flammable material could be ignited if
brought in contact with hot surface units
or heating elements and may cause severe
burns.
Use only dry pot holders-moist or damp pot
holders on hot surfaces may result in burns
from steam. Do not let pot holders touch hot
surface units or heating elements. Do not
use a towel or other bulky cloth.
For your safety never use your appliance
for warming or heating the room.
Do not let cooking grease or other flammable
materials accumulate in or near the range.
Do not use water on grease fires. Never pick
up a flaming pan. Turn the controls off.
Smother a flaming pan on a surface unit by
covering the pan completely with a wellfitting lid, cookie sheet or flat tray. Use a
multi-purpose dry chemical or foam-type
fire extinguisher.
Flaming grease outside a pan can be put
out by covering it with baking soda or,
if available, by using a multi-purpose dry
chemical or foam-type fire extinguisher.
Flame in the oven can be smothered
completely by closing the door and turning
the oven off or by using a multi-purpose dry
chemical or foam-type fire extinguisher.
Do not touch the surface units, the heating
elements or the interior surface of the oven.
These surfaces may be hot enough to burn
even though they are dark in color. During
and after use, do not touch, or let clothing
or other flammable materials contact, the
surface units, areas nearby
the surface units
or any interior area of
the oven; allow
sufficient
time for cooling first.
Potentially hot surfaces include the cooktop,
areas facing the cooktop, oven vent
opening,
surfaces near the opening, crevices around
the oven door and metal trim parts above
the door.
REMEMBER: The inside surface of the oven
may be hot when
the door is opened.
Do not store or use combustible
materials,
gasoline or other flammable vapors and
liquids in the vicinity of this or any other
appliance.
Keep the hood and grease filters clean
to
maintain good venting and to avoid
grease fires.
Never block the vents (air openings) of the
range. They provide the air inlet and outlet
that are necessary for the range to operate
properly with correct combustion. Air
openings are located at the rear of the
cooktop, at the top and bottom of the oven
door, and at the
bottom of the range under
the storage drawer.
Safety Instructions
Operating
Instructions
Care and Cleaning
Installation
Instructions
Troubleshooting Tips
Consumer Support
3
Page 4
Stand away from the range when opening
the oven door. Hot air or steam which
escapes can cause burns to hands, face
and/or eyes.
Do not heat unopened food containers.
Pressure could build up and the container
could burst, causing an injury.
Keep the oven vent unobstructed.
Keep the oven free from grease buildup.
Place the oven shelf in the desired position
while the oven is cool. lf shelves must be
handled when hot, do not let pot ho1der
contact the heating elements in the oven.
Pulling out the shelf to the stop-lock is a
convenience in lifting heavy foods. It is also
a precaution against burns from touching
hot surfaces of the door or oven walls.
When using cooking or roasting bags in the
oven, follow the manufacturer's directions.
Do not use.the oven to dry newspapers.
If overheated, they can catch on fire.
Do not use the oven for a storage area.
Items stored in an oven can ignite.
Do not leave paper products, cooking
utensils or food in the oven when not in use.
OVEN
IMPORTANT SAFETY INFORMATION.
READ ALL INSTRUCTIONS BEFORE USING.
Never leave the surface units unattended at
high heat settings. Boilovers cause smoking
and greasy spillovers that may catch on fire.
Only certain types of glass, glass/ceramic,
earthenware or other glazed containers are
suitable for cooktop service, others may
break because of the sudden change in
temperature.
To minimize the possibility of burns,
ignition of flammable materials and spillage,
the handle of a container should be turned
toward the center of the range without
extending over nearby surface units.
Always turn the surface units off before
removing cookware.
Do not flame foods on the cooktop. If you
do flame foods under the hood, turn the
fan on.
Keep an eye on foods being fried at high or
medium high heat settings.
Foods for frying should be as dry as possible.
Frost on frozen foods or moisture on fresh
foods can cause hot fat to bubble up and
over the sides of the pan.
Use little fat for effective shallow or deep fat
frying. Filling the pan too full of fat can
cause spillovers when food is added.
If a combination of oils or fats will be used in
frying, stir together before heating, or as fats
melt slowly.
Always heat fat slowly, and watch as it heats.
Use a deep fat thermometer whenever
possible to prevent overheating fat beyond
the smoking point.
SURFACE UNITS-ALL MODELS
Use proper pan size-select cookware having flat bottoms large enough to cover the surface unit
heating element. The use of undersized cookware will exposed portion of the surface unit to direct
contact and may result in ignition of clothing. Proper relationship of cookware to surface unit will also
improve efficiency.
4
Safety Instructions
Operating
Instructions
Care and Cleaning
Installation
Instructions
Troubleshooting Tips
Consumer Support
Page 5
Safety Instructions
Operating
Instructions
Care and Cleaning
Installation
Instructions
Troubleshooting Tips
Consumer Support
Throughout this manual, features and appearance may vary from your model.
Using the surface units.
In a quiet kitchen, you may hear
slight clicking sounds during cooking,
indicating heat settings selected are being
maintained.
Switching heats to higher settings always
shows a quicker change in temperature
than switching to lower settings.
Surface Cooking Controls
Your surface units and controls are designed
to give you a variety of heat settings for surface
unit cooking.
At both LO and Hl positions, there is
a slight niche so control clicks at those
positions; Hl marks the highest setting;
LO, the lowest setting.
How to Set the Controls
Push the control knob in.
Turn either clockwise or
counterclockwise to desired
heat setting.
Control must be pushed in to set only
from the 0FF position.
When control is in any position
other than OFF, you can turn it without
pushing in.
Be sure you turn control to OFF when
you finish cooking. An indicator light
will glow wen ANY surface unit is on.
A Burner On indicator light will glow
when any surface unit is on.
Heat Setting Guide
Hl —Quick start for cooking; bring water
to boil.
MEDIUM HIGH—Fast fry, pan broil;
maintain fast boil on large amount
of food.
MED — Saute and brown; maintain slow
boil on large amount of food.
MEDIUM LOW-Cereal; maintain serving
temperature of most foods.
NOTE:
LO — Cook after starting at HI; cook
with little water in covered pan. Use to
steam rice.
At Hl or MEDIUM HIGH, never leave
food unattended. Boilovers cause
smoking; greasy spillovers may
catch fire.
At LO, melt chocolate, butter on
small unit.
Cooking Tips
Use medium- or heavyweight
cookware. Aluminum cookware
conducts heat faster than other
metals. Cast-iron and coated cast-iron
cookware is slow to absorb heat,
but generally cooks evenly at low or
medium heat settings. Steel pans may
cook unevenly if not combined with
other metals.
Do not overfill cookware with fat
that may spill over when adding food.
Frosty foods bubble vigorously. Watch
foods frying at high temperatures.
Keep range and hood clean from
accumulated grease.
To conserve the most cooking energy,
pans should be flat on the bottom,
have straight sides and tight-fitting
lids. Match the size of the saucepan
to the size of the surface unit. A pan
that extends more than an inch
beyond the edge of the drip pan
traps heat, which causes “crazing”
(fine hairline cracks) on porcelain,
and discoloration ranging from blue
to dark gray on chrome drip pans.
1
2
1
2
2
1
3
4
5
6
7
8
9
OFF
LO HI
Medium
low
Medium
high
5
Page 6
Using the oven.
The OVEN TEMP knob is located on the control panel on the front of the range.
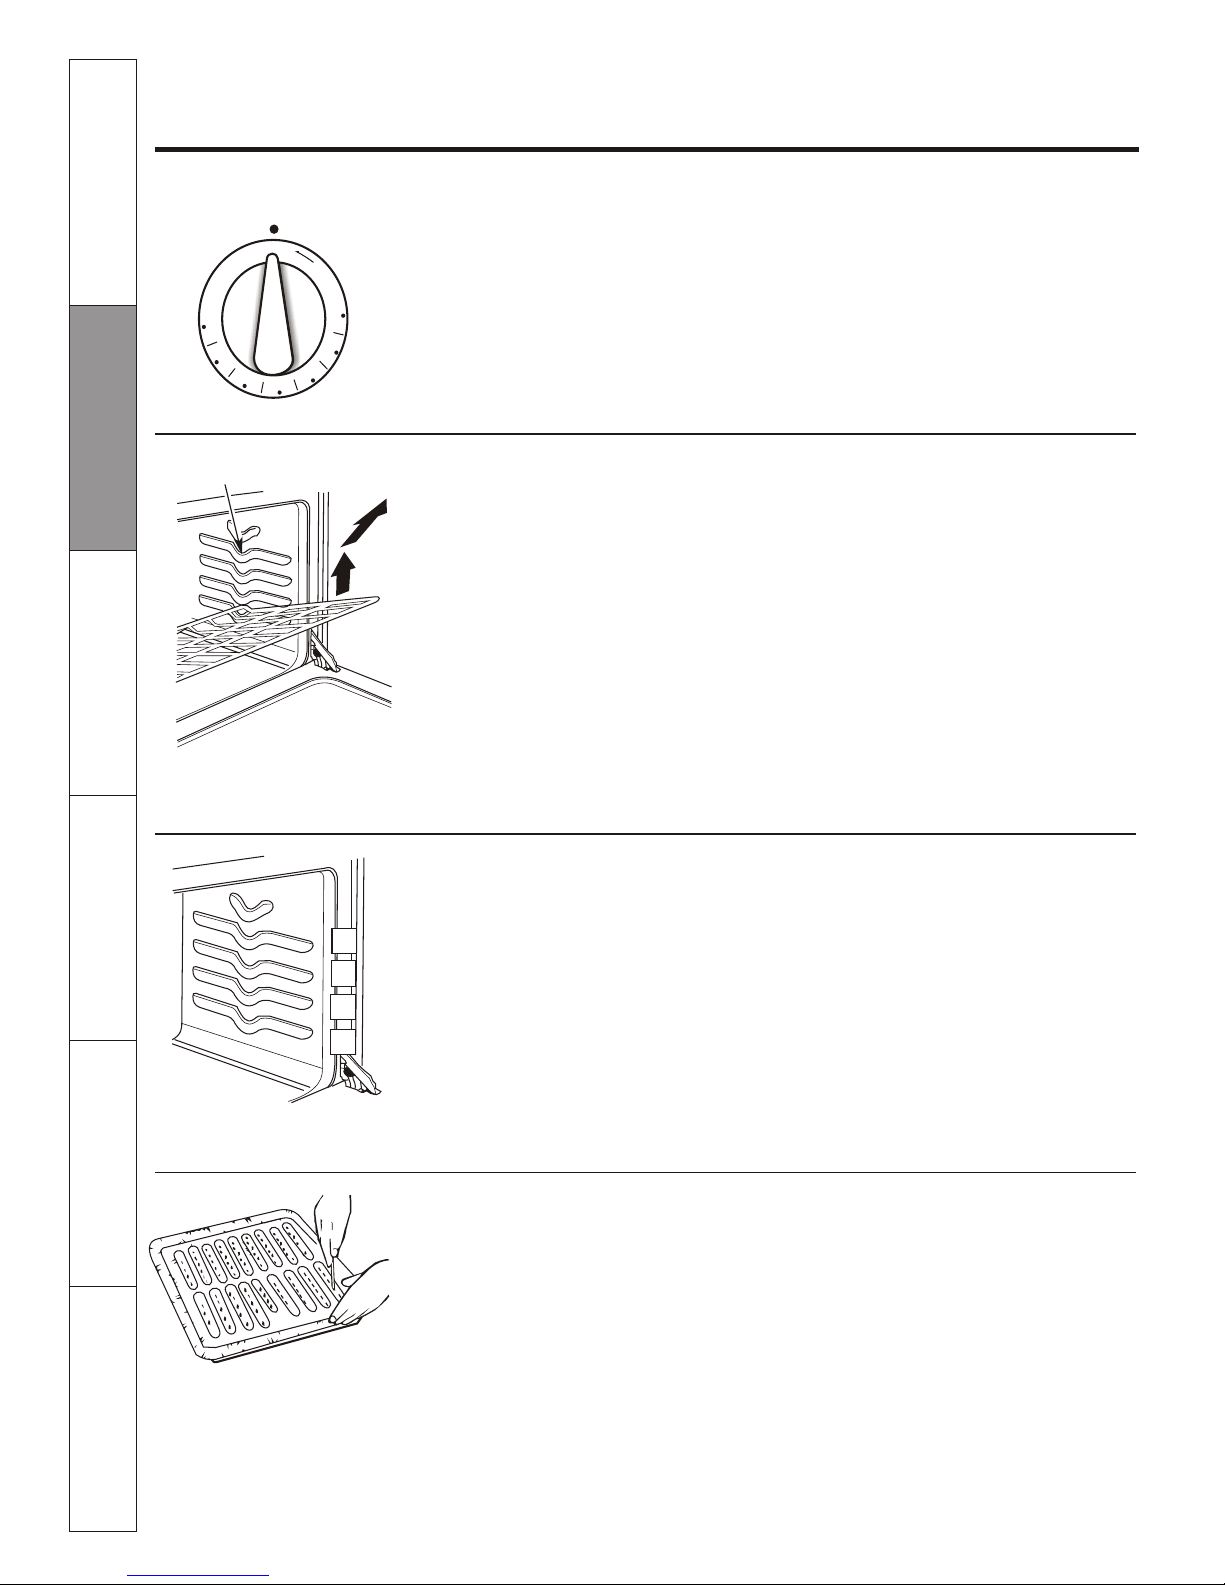
The shelves are designed with stop-locks
so when placed correctly on the shelf
supports, they will stop before coming
completely out of the oven and will not
tilt when you are removing food from
them or placing food on them.
When placing cookware on a shelf, pull
the shelf out to the bump on the shelf
support. Place the cookware on the
shelf, then slide the shelf back into the
oven. This will eliminate reaching into
the hot oven.
The oven has four shelf supports—A
(bottom), B, C and D (top).
Shelf positions for cooking are suggested
on Baking and Roasting pages.
If desired, a sheet of aluminum
foil may be used on the floor of the
oven under the bake element.
Be certain foil does not touch bake
element. Aluminum foil used in this
way may slightly affect the browning
of some foods. Change foil when it
becomes soiled.
The Oven Cycling Light glows until the oven
reaches your selected temperature, then goes off
and on with the oven unit(s) during cooking.
To remove the shelves from the oven, pull
them toward you, tilt front end upward
and pull them out.
To replace, place shelf on shelf support
with stop-locks (curved extension of
shelf) facing up and toward back of oven.
Tilt up front and push shelf toward back
of oven until it goes past the bump on
the shelf support. Then lower front of
shelf and push it all the way back.
DO NOT place a sheet of aluminum
foil on the shelf. To do so may result
in improperly cooked foods, damage
to oven finish and increase in heat
on outside surfaces of the oven.
You may use aluminum foil to line the
broiler pan and broiler grid. However,
you must mold the foil tightly to the
grid and cut slits in it just like the grid.
Oven Shelves
Oven Shelf Positions
Use of Aluminum Foil
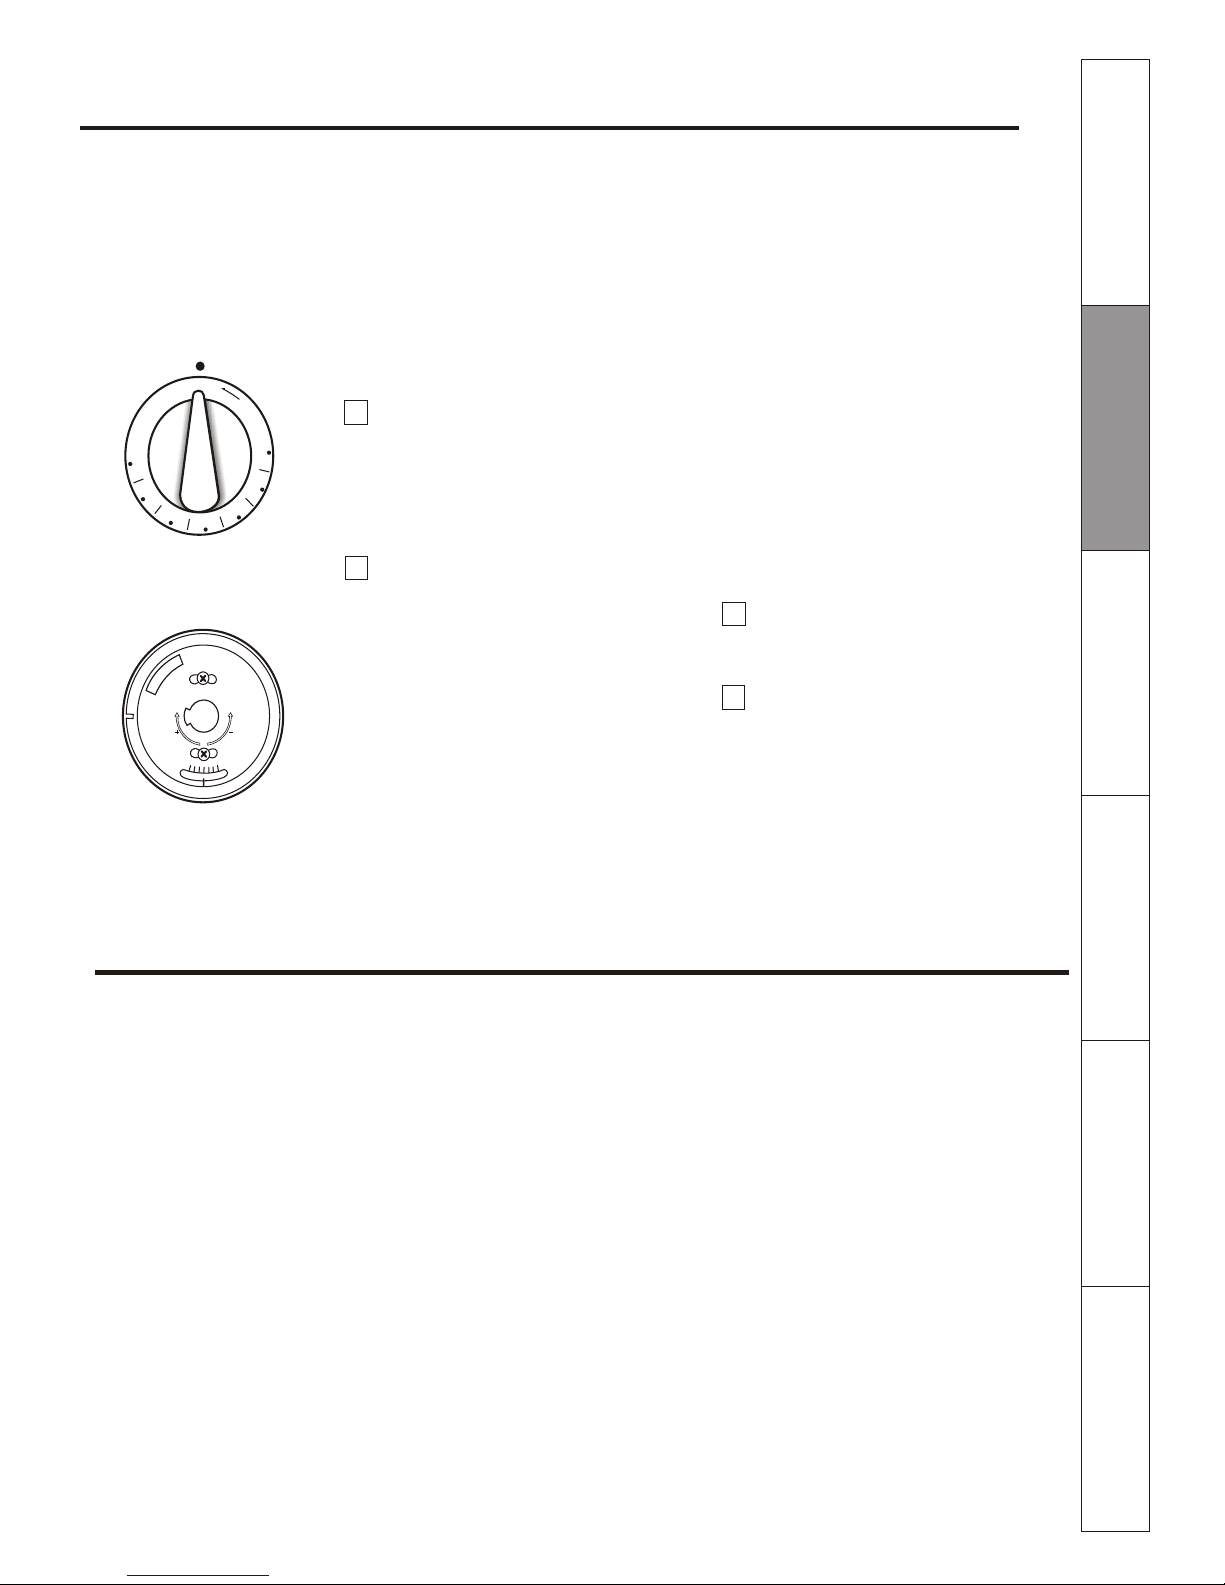
Oven Temperature Control
To use the oven, simply turn the knob
to the desired cooking temperatures,
which are marked in 25°F increments
on the dial. OVEN TEMP maintains the
temperature you set, from 200°F to BROIL.
0
2
0
2
50
3
0
0
350
0
40
04
5
500
OVEN TEMP
OFF
B
R
O
I
L
A
B
C
D
The oven has 4 shelf positions.
6
Safety Instructions
Operating
Instructions
Care and Cleaning
Installation
Instructions
Troubleshooting Tips
Consumer Support
Page 7
Adjust the oven thermostat—Easy to do yourself!
Do not use thermometers, such as those found in grocery stores, to check the temperature setting of your oven.
These thermometers may vary 20—40°F.
You may find that your new oven cooks differently than the one it replaced. Use your new oven for a few weeks to
become more familiar with it. If you still think your new oven is too hot or too cold, you can adjust the thermostat
yourself.
NOTE:This adjustment will not affect the broiling temperatures. The adjustment wilI be retained after a power faiIure.
Each click will change the oven
temperature approximately 10°F.
(Range is plus or minus 60°F from
the arrow.) We suggest that you make
the adjustement one click from the
original setting and check oven
performance before making any
additional adjustments.
Replace the knob, matching the flat
area of the knob to the shaft, and
check performance.
After the adjustment is made, retighten
screws so they are snug, but be
careful not to overtighten.
To Adjust the Thermostat with this Type of Knob
To increase the oven temperature,
move the top screw toward the right.
You’ll hear a click for each notch you
move the knob.
Pull the OVEN TEMP knob off the range
and Iook at the back side.
To make an adjustment, loosen
(approximately one turn), but do
not completely remove, the two
screws on the back of the knob.
With the back of the knob facing
you, hold the outer edge of the knob
with one hand and turn the front of
the knob with the other hand.
To decrease the oven temperature,
move the top screw toward the left.
200
25
0
300
350
4
00
450
500
OVEN TEMP
OFF
B
R
O
I
L
Front of OVEN TEMP knob
(knob appearance may vary)
L
O
S
S
E
N
S
C
R
E
W
S
T
O
R
O
T
A
T
E
M
A
KE
C
OOL
ER
M
AKE
H
O
TTER
Back of OVEN TEMP knob
1
2
3
4
The type of margarine wiII affect baking performance!
Most recipes for baking have been developed
using high fat products such as butter or
margarine (80% fat). If you decrease the fat, the
recipe may not give the same results as with a
higher fat product.
Federal standards require products labeled
“margarine” to contain at least 80% fat by
weight. Low-fat spreads, on the other hand,
contain less fat and more water. The high
moisture content of these spreads affects
the texture and flavor of baked goods. For
best results with your old favorite recipes,
use margarine, butter or stick spreads
containing at least 70% vegetable oil.
Recipe failure can result if cakes, pies, pastries,
cookies or candies are made with Iow fat spreads.
The Iower the fat content of a spread product, the
more noticeable these differences become.
Safety Instructions
Operating
Instructions
Care and Cleaning
Installation
Instructions
Troubleshooting Tips
Consumer Support
7
Page 8
Care and cleaning of the range.
Proper care and cleaning are important so your range wiII give you efficient and satisfactory service. Follow these
directions carefully in caring for your range to assure safe and proper maintenance.
Be sure electrical power is off and all surfaces are cool before cleaning any part of the range.
lf your range is removed for cleaning, servicing or any reason, be sure the anti-tip
device is reengaged properly when the range is replaced. Failure to take this
precaution could result in tipping of the range and cause injury.
Porcelain Enamel Cooktop
The porcelain enamel finish is sturdy
but breakable if misused. This finish is
acid-resistant. However, any acidic foods
spilled (such as fruit juices, tomato or
vinegar) should not be permitted to
remain on the finish.
Oven Shelves
Clean the shelves with an abrasive
cleanser or steel wool.
After cleaning, rinse the shelves with
clean water and dry with a clean cloth.
Surface Units and Drip Pans
To clean the surface units, turn the
control to the highest setting for a
minute. The coils will burn off any soil.
To remove a suiface unit:
To remove the drip pans for cleaning,
the surface units must be removed first.
Make sure the surface units are cool
before touching them.
Replace the drip pan into the recess in
the cooktop. Make sure the opening in
the pan lines up with the receptacle.
Lift the surface unit about 1 inch above
the drip pan and pull it out.
Do not Iift the surface unit more than 1 inch. If
you do, it may not Iie flat on the drip pan when
you plug it back in.
NOTE: Repeated lifting of the surface unit
more than 1 inch above the drip pan can
permanently damage the receptacle.
To replace a surface unit:
Insert the terminals of the surface unit
through the opening in the drip pan and
into the receptacle.
Guide the surface unit into place so it
rests evenly.
To clean the drip pans:
Drip pans can be cleaned in the
dishwasher or by hand. If you use a
scouring pad, rub lightly to prevent
scratching.
Can I cover the drip pans with foil?
No, because using foil so close to
the receptacle could cause shock,
fire or damage to the range.
CAUTION:
Do not immerse the surface units in
Iiquids of any kind.
Do not attempt to clean, adjust or in
any way repair the plug-in receptacle.
Do not clean the surface units in a
dishwasher.
Do not bend the surface unit plug
terminals.
To remove the surface unit, lift it
about 1 inch above the drip pan
and pull it out.
Replace the drip pan into the
recess in the cooktop.
Surface unit
Receptacle
Drip pan
8
Safety Instructions
Operating
Instructions
Care and Cleaning
Installation
Instructions
Troubleshooting Tips
Consumer Support
Page 9

To make cleaning easier, the cooktop
may be lifted up and propped open.
Lift-Up Cooktop
Clean the area under the cooktop often. Built-up
soil, especially grease, may catch on fire.
Be sure all surface units are turned off
before raising the cooktop.
Remove the front surface and drip pans.
See the Surface Units and Drip Pans
section. Grasp the two front surface unit
wells and lift the cooktop up and prop it
open with the prop rod provided.
After cleaning underneath the cooktop
with hot, soapy water and a clean cloth,
hold the cooktop up, return the prop
rod to its storage position and lower the
cooktop until it snaps into position.
Be careful not to pinch your fingers.
Replace the two front drip pans and
surface units. See the Surface Units and
Drip Pans section.
Open the door to the full open
position.
Lift-Off Oven Door
The oven door is removable, but it is
heavy. You may need help removing and
replacing the door.
To remove the door:
Pull the hinge locks up over the
hinge hooks on both sides.
Grasp the door firmly on each side,
Iift slightly and pull it straight out
and away from the oven.
The bake element can be lifted gently to
clean the oven floor. Do not attempt to
clean any oven surface when any burner
element is on. Always wear protective
hand-wear when cleaning interior oven
surfaces or surfaces near heating
Oven Heating Elements
Do not clean the bake element or the
broil element. Any soil will burn off when
the elements are heated.
After broiling, remove the broiler pan
from the oven. Remove the grid from the
pan. Carefully pour out grease from the
pan into a proper container. Wash and
rinse the broiler pan and grid in hot
water with a soap-filled or plastic
scouring pad.
Broiler Pan and Grid
DO NOT ATTEMPT TO CLOSE THE DOOR
UNTIL THIS STEP IS COMPLETE. THE
HINGE OR DOOR COULD BE DAMAGED.
To replace the door:
Firmly grasp both sides of the door
at the top.
Insert and seat the upper and lower
hinge arms into the oven slots.
Push the hinge locks down from the
hinge hooks.
Close the oven door and make sure
it is working properly. If it is not
working properly, remove and
replace it following the above steps.
elements. lf spillovers, residue or ash
accumulate around the bake element,
gently wipe around the element with
warm water.
If food has burned on, sprinkle the grid
with detergent while hot and cover with
wet paper towels or a dishcloth. Soaking
the pan will remove burned on foods.
Do not store a soiled broiler pan and grid
anywhere in the range.
Both the broiler pan and grid can
also be cleaned in the dishwasher.
1
2
3
4
1
2
3
Upper
hinge arm
Lower
hinge arm
Hinge lock
Slot
9
Safety Instructions
Operating
Instructions
Care and Cleaning
Installation
Instructions
Troubleshooting Tips
Consumer Support
Page 10

Care and cleaning of the range.
Make sure the knobs are in the OFF
positions and pull them straight off the
stems for cleaning.
The knobs can be cleaned in a
dishwasher or they may also be washed
with soap and water. Make sure the insides
of the knobs are dry before replacing.
Control knobs
The control knobs may be removed for easier
cleaning.
Replace the knobs in the OFF position
to ensure proper placement.
Do not use commercial oven cleaners, cleansing
powders, steel wool or harsh abrasives on any
painted surface.
Painted Surfaces
Painted surfaces include the sides,
control panel, door and kick panel.
Clean these with soap and water or a
vinegar and water solution.
Household ammonia may make the
cleaning job easier. Place 1/2 cup
ammonia in a shallow glass pan and leave
in a cold oven overnight. The ammonia
fumes will help loosen the burned-on
grease and food.
Porcelain Oven Interior
With proper care, the porcelain enamel interior
will retain ¡ts attractive finish for many years.
Soap and water wiIl normally do the job.
Heavy spattering or spillovers may
require cleaning with a mild abrasive
cleanser. Soapy, wet pads may also be
used. Do not allow food spills with a high
sugar or acid content (such as milk,
tomatoes, sauerkraut, fruit juices or pie
filling) to remain on the surface. They
may cause dull spots even after cleaning.
When necessary, you may use a
commercial oven cleaner. FolIow the
package directions.
Cautions about using spray-on oven
cleaners:
Do not spray any oven cleaner on the
outside oven door, handles or any
exterior surface of the oven, cabinet
or painted surfaces. The cleaner can
damage these surfaces.
Do not spray the oven cleaner on the
electrical controls and switches because
it could cause a short circuit and result
in sparking or fire.
Do not directly spray oven cleaner
onto the oven heating elements.
Do not allow a film from the
cleaner to remain on the temperature
sensor—it could cause the oven to
heat improperly. (The sensor is located
at the top of the oven.) Carefully
wipe the bulb clean after each
oven cleaning, being careful not to
move the sensor since a change in
its position could affect how the oven
bakes.
10
Safety Instructions
Operating
Instructions
Care and Cleaning
Installation
Instructions
Troubleshooting Tips
Consumer Support
Page 11
National Parts Center
To Order Parts
To inquire about purchasing a part or
an accesory for your appliance, please call
our toll-free number:
1-800-661-1616
11
Safety Instructions
Operating
Instructions
Care and Cleaning
Installation
Instructions
Troubleshooting Tips
Consumer Support
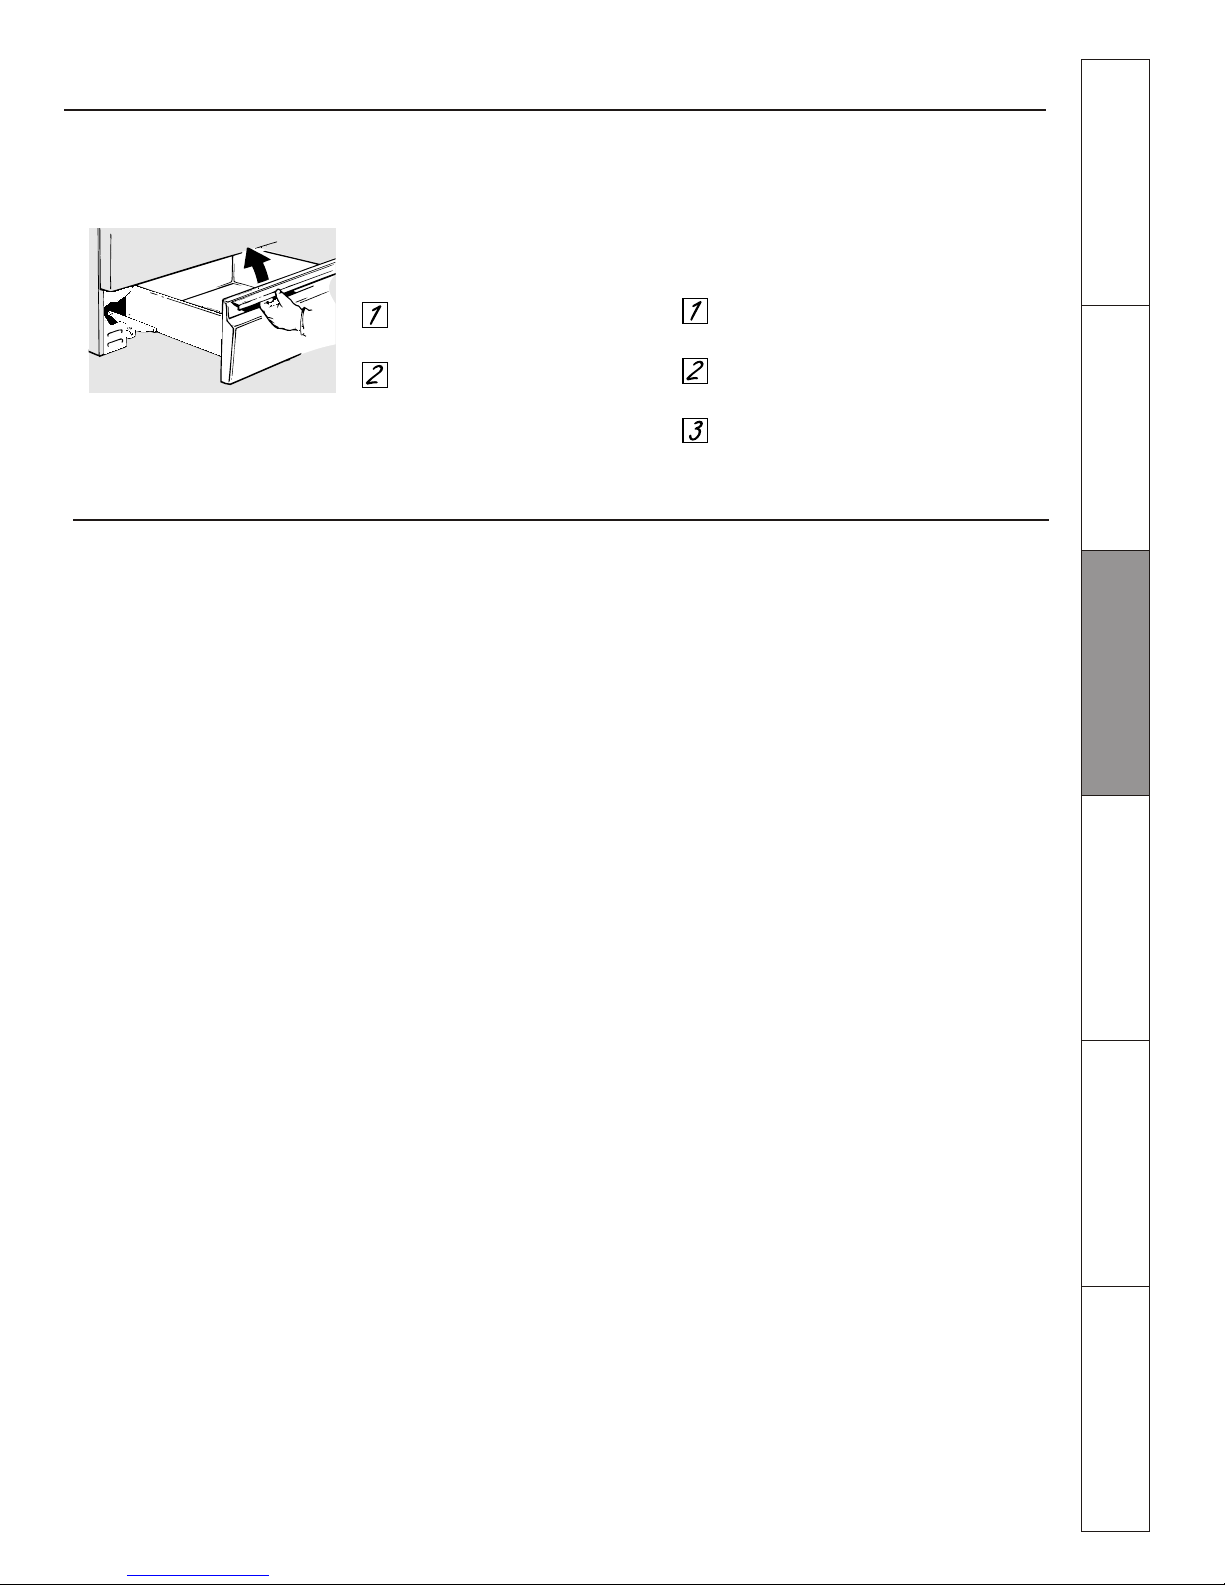
To remove the storage drawer:
Pull the drawer out all the way.
Tilt up the front and remove it.
To replace the storage drawer:
Insert glides at the back of the drawer
beyond the stop on range glides.
Lift the drawer if necessary to insert
easily.
Let the front of the drawer down, then
push in to close.
Storage Drawer Removal.
Most cleaning can be done with the drawer in place. However, the drawer may be removed
if further cleaning is needed. Use soap and warm water to thoroughly clean.
Page 12
InstaIlation
Instructions
24” Moffat Electric Ranges
BEFORE YOU BEGIN
Read these instructions completely
and carefully.
IMPORTANT
IMPORTANT
— Save these
— Observe all
governing codes and ordinances.
instructions for local inspector’s use.
Note to Installer
Be sure to leave these
instructions with the Consumer.
instructions for future reference.
Keep these
Note to Consumer
Skill level
Installation of this appliance
requires basic mechanical skills.
Completion time
1 to 3 hours
Proper installation is the responsibility of
the installer.
Product failure due to improper installation
is not covered under the Warranty.
WARNING
— This appliance must
be properly grounded.
WARNING
FOR YOUR SAFETY:
— Before beginning the
installation, switch power off at service panel
and Iock the service disconnecting means to
prevent power from being switched on
accidentally. When the service disconnecting
means cannot be locked, securely fasten a
prominent warning device, such as a tag, to
the service panel.
FOR YOUR SAFETY:
All rough-in and spacing dimensions must be
met for safe use of your range. Electricity to
the range can be disconnected at the outlet
without moving the range if the outlet is in
the preferred location (remove lower drawer).
To reduce the risk of burns or fire when
reaching over hot surface elements, cabinet
storage space above the cooktop should be
avoided. lf cabinet storage space is to be
provided above the cooktop, the risk can
be reduced by installing a range hood that
sticks out at least 5” beyond the front of the
cabinets. Cabinets installed above a cooktop
must be no deeper than 13”.
Be sure your appliance is properly installed
and grounded by a qualified technician.
Make sure the cabinets and wall coverings
around the range can withstand the temperatures
(up to 200°F) generated by the range.
ANTI-TIP DEVICE
WARNING
— To reduce the risk
of tipping, the appliance must be secured by
properly installed Anti-Tip device packed with
this appliance.
lf the Anti-Tip device supplied with the range
does not fit this application, use the universal
Anti-Tip device WB2X7909.
WARNING
AlI ranges can tip
lnjury to persons could result
Install Anti-Tip device packed
with range
See Installation Instructions
lf you pull the range out and away from the
waIl for any reason, make sure the Anti-Tip
device is engaged when the range is pushed
back against the walI.
12
Questions? Call 1.800.561.3344 or consults our web page: www.moffatappliances.ca
Page 13
Installation Instructions
PREPARE TO INSTALL THE RANGE
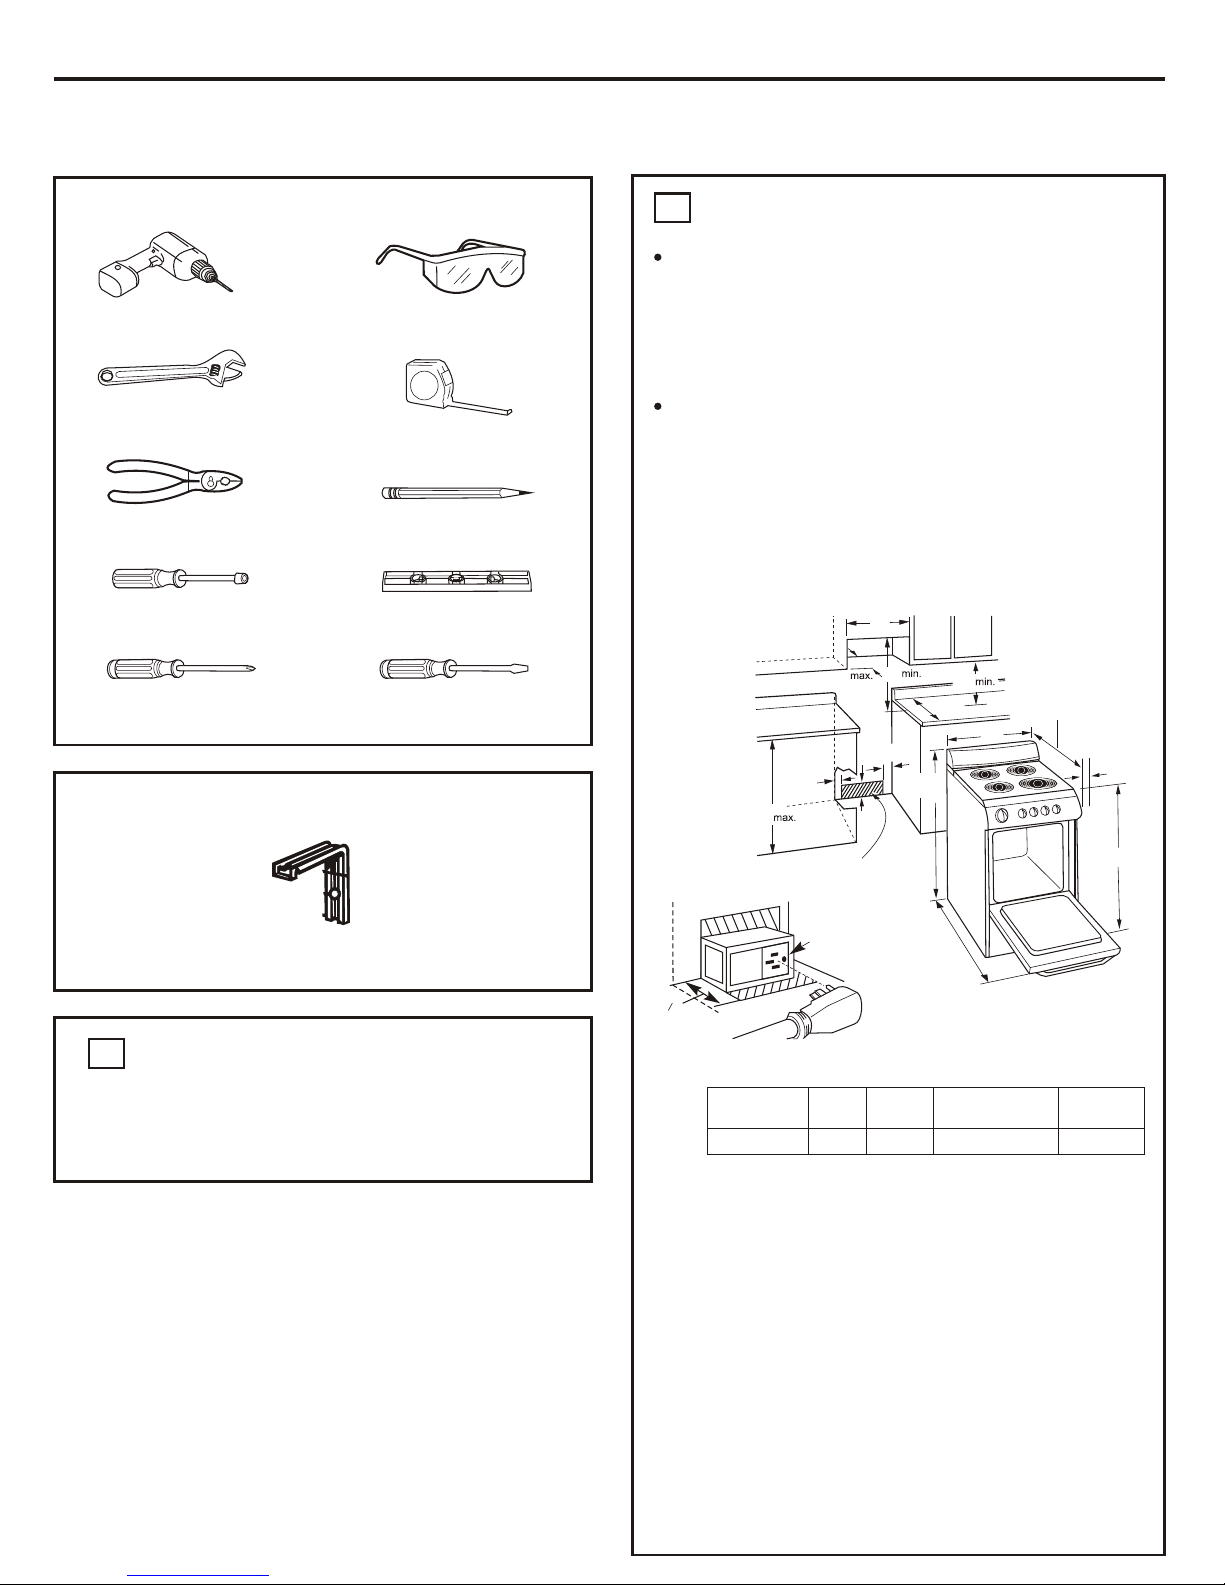
Allow 2” spacing from the range to adjacent
vertical walls above the cooktop surface. Allow
30” minimum clearance between the surface
units and the bottom of unprotected wood or
metal top cabinet, and 18” minimum between
the countertop and adjacent cabinet bottom.
PREPARE THE OPENING
To eliminate the risk of burns or fire when
reaching over hot surface elements, cabinet
storage space above the cooktop should be
avoided. lf cabinet storage space is to be
provided above the cooktop, the risk can be
reduced by ¡nstalling a range hood that
protrudes at least 5” beyond the front of the
cabinets. Cabinets installed above a cooktop
may be no deeper than 13”.
Flooring under the range
Your range, Iike many other household items,
is heavy and can settle into soft floor coverings
such as cushioned vinyl or carpeting.
When moving the range on this type of
flooring, it should be installed on a 1/4”
thick sheet of plywood (or similar material)
as foIlows:
When the floor covering ends at the front
of the range, the area that the range will
rest on should be built up with plywood
to the same level or higher than the floor
covering. This wiIl allow the range to be
moved for cleaning or servicing.
Recommended acceptable electrical outlet
area. Orient theelectrical receptacle so
the length is parallel to the floor
B
13”
30”
18”
24”
26” from wall
to front of
control panel
From
combustible
walls above
cooking
surface
2”
5”
2½”
36”
36”
C
Surface
mount
outlet
Outlet-box
Wall
D
(depth
with door
open)
Cord
Floor
2 ”
1
4
Wall Mounted
Models A B
C
D
MCAS724 40 ½” 24 ”
/
3
8
2” (5,08 cm)
41” (104,14cm)
(recommended)
Pencil
Level
PhiIIips Screwdriver
Screwdriver
Remove packaging materials. Failure to
remove packaging materials could result
in damage to the appliance.
TOOLS YOU WILL NEED
Drili with 1/8” Bit
Safety Glasses
Adjustable Wrench
Tape Measure
Pliers
1/4” Nut Driver
FIat-bIade
PARTS INCLUDED
Anti-Tip Bracket Kit
REMOVE SHIPPING MATERIALS
1
2
13
A
24”
Page 14
Installation Instructions
ELECTRICAL CONNECTIONS
ELECTRICAL REQUIREMENTS
CAUTION:
For personal safety,
do not use an extension cord with this
appliance. Remove house fuse or open circuit
breaker before beginning installation.
This appliance must be supplied with the
proper voltage and frequency, and connected
to an individual properly grounded branch
circuit, protected by a circuit breaker or fuse
having amperage as specified on the rating
plate. The rating plate is located under the
cooktop. See the Lift-Up Cooktop section
in this manual for instructions on how to
lift the cooktop.
We recommend you have the electrical wiring
and hookup of your range connected by a
qualified electrician. After installation, have
the electrician show you where your main
range disconnect is located.
Check with your local utilities for electrical
codes which apply in your area. Failure to
wire your oven according to governing codes
could result in a hazardous condition. If there
are no local codes, your range must be wired
and fused to meet the requirements of the
Canadian Electrical Code Part 1
Latest Edition.
Rating Plate
14
Page 15
INSTALL THE RANGE
Installation Instructions
ANTI-TIP DEVICE INSTALLATION
WARNING:
Range must be secured with an
approved Anti-Tip device.
Mark the waIl where the RIGHT EDGE of
the range is to be located. Be sure to allow
for the countertop overhang if you intend
to install the range next to cabinets.
Unless properly installed, the range could
be tipped by you or a child standing, sitting
or Ieaning on an open door.
After installing the Anti-Tip device, verify
that it is in place by carefully attempting
to tilt the range forward.
This range has been designed to meet all
recognized industry tip standards for alI
normal conditions.
After installing the Anti-Tip device, verify
that it is in place by carefully attempting
to tilt the range forward:
The use of this device does not preclude
tipping of the range when not properly
instaIIed.
Locate the
outside edge
of the device
2 ” toward
the center of
the range
from the
marked edge
of the range.
1
8
Using the device as a template, mark the
position of the hole for the screw.
For wood construction, drill a pilot hole at
an angle of 20 degrees from the horizontal.
A nail or awl may be used if a drill is not
available.
Mount the Anti-Tip device with the screw provided.
For cement or concrete construction, you will
need a 1/4” x 1½”
lag bolt and a
1/2” O.D. Sleeve
anchor, which
are not provided.
Drill the
recommended
size hole for the
hardware.
ANTI-TIP DEVICE INSTALLATION
Install the sleeve anchor into the drilled hole
and then install the lag bolt through the
device. The bolts must be properly tightened
as recommended for the hardware.
Slide the range against the wall, and check
for proper installation by grasping the front
edge of the cooktop and carefully
attempting to tilt the range forward.
LEVEL THE RANGE
For proper cooking and baking, the range
must be leveled. Leveling legs are located
on each corner at the base of the range.
Install the oven shelves
(see Using the oven
section for instructions).
Put a spirit level or a glass
measuring cup partially
filled with water on one
of the oven shelves.
Turn the Iegs clockwise
to raise the range and
counterclockwise to
lower the range. Adjust
the leveling legs until
the range is level.
FINAL INSTALLATION CHECKLIST
Check to make sure the circuit breaker is closed
(RESET) or the circuit fuses are replaced.
Be sure power is in service to the building.
Check to be sure that all packing materials
and tape have been removed. This will
include tape on metal panel under control
knobs (if applicable), adhesive tape, wire
ties, cardboard and protective plastic. Failure
to remove these materials could result in
damage to the appliance once the appliance
has been turned on and surfaces have heated.
Check to make sure that the Anti-Tip device
is securely ¡nstalled.
Be sure alI range controis are in the 0FF
position before leaving the range.
(cont.)
Anti-Tip
device
Wallplate
Marked
edge
of range
Slotted
head
screw
Approx. 20°
2 ”
1
8
Wallboard
Anti-Tip
device
Wood screw
Back of
range
3
A
B
C
D
3
E
4
A
B
5
15
Page 16

Before you call for service...
Troubleshooting Tips
Oven AII Models
Problem
Coil Cooktops
Surface units
not functioning
properly
Oven light does not work
Food does not bake
or roast properly
No power supply from
convenience outlet
on top of backguard
(on some models)
Oven will not work
Possible Causes
What To Do
The surface units are not
plugged in solidly.
Small appliance plug is not
completely inserted in the
convenience outlet.
The drip pans are not set securely
in the cooktop.
The surface unit controls
improperly set.
Light bulb is loose or defective.
Switch operating light is broken.
PIug on range is not completely
inserted in the electrical outlet.
A fuse in your home may
be blown or the circuit
breaker tripped.
Oven controls improperly set.
On self-cleaning models door
left in the locked position.
Oven controls improperly set.
SheIf positions is incorrect or the
shelf is not level.
Incorrect cookware or cookware
of improper size being used.
Oven thermostat needs
adjustment.
The backguard is too hot
and the convenience outlet
breaker has tripped.
With the controls off, check to make sure the surface
unit is plugged completely into the receptacle.
With the controls off, check to make sure the drip pan is
in the recess in the cooktop and that the opening in the
pan lines up with the receptacle.
Check to see the correct control is set for the surface
unit you are using.
Replace fuse or reset circuit breaker.
Tighten or replace the bulb.
Call for service.
Make sure electrical plug is plugged into a live properly
grounded outlet.
If necessary, allow the oven to cool then unlock the door.
See the Using the oven section.
See the Using the oven section.
See the Using the oven section.
See the Using the oven section.
See the Adjust the oven thermostat—Easy to do yourself!
Section.
Make sure the small appliance plug is properly
inserted.
Allow the range to cool, then reset the circuit
breaker by pressing the switch located near the
convenience outlet.
16
Safety Instructions
Operating
Instructions
Care and Cleaning
Installation
Instructions
Troubleshooting Tips
Consumer Support
Page 17

Problem
Possible Causes
What To Do
Food does not
broil properly
In some areas the power
(voltage) may be low.
Oven is not set to BROIL.
Door not open to the broil stop
position as recomended.
Improper shelf position
being used.
Food being cooked in a hot pan.
Cookware not suited for broiling.
Aluminium foil used on the
broiling pan and grid has
not been fitted properly and
slit as recomended.
Preheat the broil element for 10 minutes.
On models with a temperature knob, make sure you turn
it all the way to the BROIL position. On models with a
BROIL pad, make sure it is turned on.
See the Using the oven section.
See the Broiling guide.
Use the broiling pan and grid that came with your
range. Make sure it is cool.
Use the broiIing pan and grid that came with your
range.
See the Using the oven section.
Broil for the longest. period of time recommended in
the BroiIing guide.
Safety Instructions
Operating
Instructions
Care and Cleaning
Installation
Instructions
Troubleshooting Tips
Consumer Support
17
Page 18

Before you call for service...
Troubleshooting Tips
Problem
Possible Causes
What To Do
Oven temperature too
hot or too cold
Clock and timer do
not work
Display goes blank
Oven door is crooked
Oven makes
clicking noise
“F-and number
or letter” flash in
the display
Power outage
Display flashes
Unable to get the display
to show “SF”
Oven thermostat
needs adjustment.
Plug on range is not completely
inserted in the electrical outlet.
A fuse in your home may be
blown or the circuit breaker
tripped.
Oven controls improperly set.
A fuse in your home may be
blown or the circuit breaker
tripped.
The clock is turned off from
showing in the display.
The door is out of position.
This is the sound of the
heating.element turning
off and on during
cooking functions.
You have a function error code.
If the function code repeats:
Oven control pads were not
pressed properly.
Power outage or surge.
Power failure.
See the Adjust the oven thermostat—Easy to do
yoursefl! section.
Make sure electrical plug is plugged into a live, properly
grounded outlet.
Replace fuse or reset circuit breaker.
See the Using the clock, timer and convenience outlet
section.
Replace the fuse or reset the circuit breaker.
See the Using the clock, timer and convenience outlet
section.
Because the oven door is removable, it sometimes gets
out of position during installation. To straighten the
door, push down on the high corner.
This is normal.
Press the OFF pad. Put the oven back into
operation.
Disconnect all power to the range for at least 30
seconds and then reconnect power. If the function
error code repeats, call for service.
On self-cleaning models, if a function error code
appars during the self-cleaning cycle, check the oven
door latch. The latch may have been moved, if only
slightly, from the locked position. Make sure the latch
is moved to the right as far as it will go. Press the
OFF pad. Allow the oven to cool for one hour. Put the
oven back into operation.
Some models will automatically resume their setting once
the power is restored. On models with a clock, you must
reset the clock. If the oven was in use, you must reset it by
pressing the OFF pad, setting the clock and resetting any
cooking function.
Reset the clock.
The BAKE and BROIL pads must be pressed at the
same time and held for 3 seconds.
Safety Instructions
Operating
Instructions
Care and Cleaning
Installation
Instructions
Troubleshooting Tips
Consumer Support
18
Page 19

Problem
Possible Causes
What To Do
Strong odor
“Burning” or “oily”
odor emitting from the
oven vent
This is normal in a new oven
and will disappear in time.
An odor from the insulation
around the inside of the oven
is normal for the first few times
the oven is used.
To speed the process, set a self-clean cycle for a
minimum of 3hours. See the Using the self-cleaning
oven section.
This is temporary.
Safety Instructions
Operating
Instructions
Care and Cleaning
Installation
Instructions
Troubleshooting Tips
Consumer Support
19
The drawer is out of alignment. Fully extend the drawer and push it all the way in.
smoothly or drags See the Care and cleaning of the range section.
is unbalanced.
Drawer does not slide
Reduce weight. Redistribute drawer contents.
Drawer is overloaded or load
Page 20

Accessories.
To inquire about purchasing a part or an accessory for yor appliance,
call our National Parts Center at 1.800.661. 1616.
Looking For Something More?
parts
Our innovative, self-cleanable porcelain-coated oven racks!
Heavy Duty
Durable
Able tobe cleaned in a seIf-cleaning oven
Tired of discolored racks? Wishing you had extra-heavy-duty oven racks?
NOW AVAILABLE
for your range:
Surface Elements & Drip Pans Over Racks Broiler Pan
Oven Elements Knobs
Cleaner
CERAMA
BRYTE
Safety Instructions
Operating
Instructions
Care and Cleaning
Installation
Instructions
Troubleshooting Tips
Consumer Support
20
Page 21

21
(FOR CANADIAN CONSUMERS ONLY POUR RÉSIDENTS CANADIENS SEULEMENT)
Please place in envelope and mail to:
Veuillez mettre dans une enveloppe et envoyez à:
OWNERSHIP REGISTRATION
P.O. BOX 1780
MISSISSAUGA, ONTARIO
L4Y 4G1
Page 22

YES /OUI
NO / NON
NAME OF SELLING DEALER / NOM DU MARCHAND
MODEL/MODÉLE
INSTALLATION DATE/DATE D’INSTALLATION
SERIAL/SÉRIE
OWNERSHIP REGISTRATION CERTIFICATE - FICHE D’INSCRIPTION DU PROPRIÉTAIRE
Please register your product to enable us to contact you
in the remote event a safety notice is issued for this product
and to allow for efficient communication under the terms
of your warranty, should the need arise.
Veullez enregistrer votre produit afin de nous permettre de
communiquer avec vous si jamais un avis de sécurité concemant
ce produit était émis et de communiquer facilement avec vous en
vertu de votre garantie, si le besoin s’en faith sentir.
CUT ALONG THIS LINE AND RETURN CARD- -THANKS
REGISTER ON-LINE:
ENREGISTREMENT SUR INTERNET A:
www.geappliances.ca
www.electromenagersge.ca
MAIL TO:
POSTER Á:
APT. NO/APP./RR#
P.O. BOX 1780, MISSISSAUGA
ONTARIO, L4Y 4G1
LAST NAME/NOM
FIRST NAME/PRENOM
MRS./MME.
MS.
MR./M
MISS/MLLE.
STREET NO/N° RUE
STREET NAME/RUE
CITY/VILLE
PROVINCE
POSTAL CODE/POSTAL
AREA CODE/IND. RÉG.
TELEPHONE
E-MAIL
DID YOU PURCHASE A SERVICE CONTRACT FOR THIS APPLIANCE?
AVEZ-VOUZ ACHETÉ UN CONTRAT DE SERVICE POUR CET APPAREIL?
ENGLISH
FRANCAIS
I do not wish to receive any promotional offers regarding this product.
Je ne désire pas recevoir d’offers promotionnelles concemant ce produit.
CORRESPONDENCE
CORRESPONDANCE
IF YES/SI OUI:EXPIRATION
Y/A
M
D/J
Y/A
M
D/J
For Canadian
Customer
Pour les
Consommateurs
Canadiens
22
Page 23

Safety Instructions
Operating
Instructions
Care and Cleaning
Installation
Instructions
Troubleshooting Tips
Consumer Support
23
Electric Range Warranty.
All warranty service provided by our Factory Service Centers,
or an authorized Customer Care technician. To schedule
service, 24 hours a day, calI 1.800.561.3344. Please have serial
number and model number available when calling for service.
Staple your receipt here.
Proof of the original purchase.
date is needed to obtain service
under the warranty.
Mabe Will Provide:
Any part of the range which fails due to a defect in materials or workmanship. During this
Iimited one-year warranty, Mabe will also provide, free of charge, all labor and related
service to replace the defective part.
Service trips to your home to teach you how to use
the product.
Improper installation, delivery or maintenance.
Failure of the product if it is abused, misused,
or used for other than the intended purpose or
used commercially.
Damage to the glass cooktop caused by use of cleaners
other than the recommended cleaning creams and
pads.
Damage the gIass cooktop caused by hardened
spills of sugary materlais or melted plastic that
are not cleaned according to the directions in
the Owner’s Manual.
Replacement of house fuses or resetting of circuit
breakers.
Damage to the product caused by accident, fire, floods
or acts of God.
Incidental or consequential damage caused by possible
defects with this appliance.
Damage caused after delivery.
Product not accessible to provide required service.
EXCLUSION OF IMPLIED WARRANTIES—Your sole and exclusive remedy is product repair as provided
in this Limited Warranty. Any implied warranties, including the implied warranties of merchantability
or fitness for a particular purpose, are limited to one year or the shortest period allowed by law.
This warranty is extended to the original purchaser and any succeeding owner for products purchased for
ordinary home use within Canada. In-home warranty service will be provided in areas where it is available and
deemed reasonable by Mabe to provide.
Some provinces do not allow the exclusion or limitation of incidental or consequential damages, so the above
exclusion may not apply to you. This warranty gives you specific legal rights, and you may also have other rights
which vary from province to province. To know what your legal rights are ¡n your province, consult your local or
provincial consumer affairs office.
Warrantor: Mabe Canada lnc.,
Burlington,Ontario
For The Period Of:
One Year
From the date of the
original purchase
What Mabe Will Not Cover:
Page 24

This book is printed on recycled paper.
Printed in Mexico
Consumer Support.
Schedule Service
Expert repair service is only one step away from your door. Call 1-800-561-3344, 24 hours a day, 7
days a week.
Parts and Accessories
To inquire about purchasing a part or an accessory for your appIiance, call our National Parts Center
at 1-800-661-1616.
Contact Us
If you are not satisfied with the service you receive, contact us on our Website with all the details including
your phone number, or write to:
1 Factory Lane
Moncton, New Brunswick
E1C 9M3
Mabe Canada, Inc.
5
6
1
2
3
1
21
22
2
3
42
82
9
2
0
3
31
parts
www.moffatappliances.ca
Page 25

Cuisinières
electriques, à éléments en serpentins
Consignes de sécurité
Mode d'emploi
Entretien et nettoyage
Instructions d'installation
Conseils de depannoge
Service à la clientèle
4
6-7
. . . . . . .
Inscrivez ici les numéros de
modèle et de série :
N° de modèl
N° de série
. . . . . . . . . . .
Four . . . . . . . . . . . . . . . . . . . . . . .
Éléments de surface
Service à la clientèle. . . Couverture arriére
Enregistrement du produit . . . . .
Garantie. . . . . . . . . . . . . . . . . . . .
Manuel d’utilisation et
instructions d’installation
Surface de cuisson des éléments
MCAS724
2-4, 12, 14
16
21,22
23
0
8
8
8-9
9
9
9
10
10
10
Éléments de surface et cuvettes
de propreté. . . .
Grilles . . . . . . . . . . . . . . . . . . . . .
Surface de cuisson. . . . . . . . . . . .
Lèchefrite et sa grille . . . . . . . . .
Porte du four . . . . . . . . . . . . . . .
Éléments chauffants du four . . .
Boutons. . . . . . . . . . . . . . . . . . . .
Intérieur du four. . . . . . . . . . . . .
Surfaces peintes. . . . . . . . . . . . . .
Dispositif antibasculement . . . . .
Dimensions et dégagements . . . .
Revêtement de sol. . . . . . . . . . . .
Préparation . . . . . . . . . . . . . . . . .
Outils nécessaires. . . . . . . . . . . .
Raccordements électriques. . . . .
Mise à niveau . . . . . . . . . . . . . . .
12
13
13
13
13
14
15
Relevez la surface de cuisson pour
trouver l’étiquette
Tiroir de rangement . . . . . . . . . . . 11
183D9541P005 29-5616
Page 26

2
Consignes
de sécurité
Mode d’emploi
Entretien et
nettoyage
Instructions
d’installation
Dépannage
Service à la
clientèle
INSTRUCTIONS DE SÉCURITÉ IMPORTANTES. LISEZ LES
INSTRUCTIONS QUI SUIVÉNT AVANT D’UTILISER VOTRE APPAREIL.
AVERTISSEMENT!
Toutes les cusinières peuvent basculer et causer ainsi des blessures.
DISPOSITIF ANTIBASCULEMENT
AVERTISSEMENT
Si vous devez éloigner lá cuisinière du mur pour une raison ou pour une autre, assurez-vous que le dispositif
est de nouveau engagé lorsque vous remettez la cuisinière en place contre le mur. Autrement, la cuisinière
risqe de basculer et de causer des blessures si vous ou un enfant montez, si vous vous assoyez ou si vous
appuyez sur la porte ouverte du four.
Reportez-vous aux renseignements sur le dispositif antibasculement donnés dans le présent manuel. Si vous
ne prenez pas cette précaution, la cuisinière pourrait basculer et causer des blessures.
Pour éviter que votre cuisinière ne bascule accidentellement, fixez-la au mur et au sol à l’aide du
dispositif antibasculement fourni.
Si le dispositif antibasculement fourni avec la cuisinière ne convient pas à cette application, utilisez
le dispositif antibasculement universal WB2X7909.
Faites basculer doucement vers l’avant,votre.cuisinière, Le mécanisme antibasculement doit
s’engager et empêcher la cuisinière de basculer totalement.
Pour votre sécurité et pour minimiser les risques d’incendie ou d’explosion, de décharge électrique,
de dommages matériels ou corporels, ou même d’accidents mortels, les utilisateurs doivent se
conformer aux instuctions présentées dans ce manuel.
Lors de l’utilisation d’appareils électriques, des précautions de sécurité de base doivent être observés,
,y compris les suivantes:
N’utilisez cet appareil que pour 1’usage pour
lequel il a été prévu, comme il est décrit dans
ce manuel de l’utilisateur.
Assurez-vous que votre apparil a été
correctement mis à la terre et installé par
un installateur qualifité, conformément aux
instructions d’installation fournies.
Ne tentez pas dé réparer ou de remplacer
toute pièce de votre cuisinière, moins que
cela ne soit spécifiquement recommandé dans
le présent manuel. Confiez toutes les autres dans
réparations à un technicien qualifié.
Avant toute réparation, coupez l’alimentation
électrique de la cuisinière au panneau
d’alimentation en électricité de l’habitation,
en retirant le fusible ou déconnectant le
coupe-circuit.
Ne laissez pa les enfant sans surveillance—les
enfants ne devraient pas être 1aissés seuls ou sans
surveillance dans un endroit où un appareil
électroménager est en cours d’utilisation. Ils ne
devraient pas non plus être autorisés à s’asseoir
ou se tenir debout sur toute partie de l’appareil.
Ne laissez personne monter sur la porte, le tiroir
de rangement ou la surface de cuisson, s’y tenir
ou s’y accrocher. Cela pourrait endommager
l’appareil ou le faire basculer, causant ainsi de
graves blessures
Ne rangez pas de matériaux inflammables dans
un four ou près de la surface de cuisson.
armoires se trouvant au-dessus de la cuisinière ou sur le
dosseret de l’appareil des articles qui présentent un intérêt
pour les enfants—ceux-ci pourraient grimper sur l’appareil
pour les atteindre et risqueraient de se blesser gravement.
ATTENTION:
Ne rangez pas dans les
MESURES DE SÉCURITÉ
Page 27

Cuisez bien la viande et la volaille—la viande jusqu’à une température INTERNE d’au moins 70 °C (160 °F) et
la volaille jusqu’à une témpérature INTERNE d’au moins 80 °C (180° F). La cuisson à ces températures protège
habituallement contre les maladies d’origine alimentaire.
CUISEZ BIEN LA VIANDE ET LA VOLAILLE...
3
AVERTISSEMENT!
MESURES DE SÉCURITÉ
Ne portez jamais de vêtements amples ou pendats
lorsque vous utilisez cet appareil. Faites attention
lorsque vous prenez des articles rangés dans les
armoires au-dessus de cuisinière. Les tissus
inflammables peuvent prendre feu s’ils entrent
en contact avec les éléments de surface ou les
éléments chauffants chaud et peuvent causer
de graves brûlures.
N’utilisez que des póignées ou des mitaines
sèches-les poignées ou mitaines humides ou
mouilIeés entrant en contact avec des surfaces
chaudes peuvent causer des brûlures de vapeur. Ne
laissez pas les poignées entrer en contact avec les
éléments de surface ou les éléments chaufants
chauds. N’utilisez pas de serviette ou de morceau
d’étoffe volumineux à la place de poignées.
Pour votreé sécurité, n’utilisez jamais votre appareil
pour chauffer ou réchauffer la pièce.
Ne laissez pas de produit gras de cuisine ou autres
matériaux inflammables s’accumuler dans ou près
de la cuisinière.
Ne tentez pas d’eteindre des feux de graisse
avec de l’eau. Ne prenez jamais une csserole
enflammée dans vos mains. Éteignez les
commandes. Étouffez les flammes d’un ustensile
reposant sur un élément de surface en le couvrant
complètement avec un couvercle ajusté, une plaque
à biscuit ou un plateau plat. Utilisez un extincteur
chimique tout usage à poudre sèche ou à mousse.
Éteignez les feux de graisse à l’exterieur du
poêlon avec du bicarbonate de soude ou, si
possible, un extincteur tout usage à poudre
chimique ou à mousse.
Pour éteindre les flammes dans le four, fermez
complètement la porte du four et éteignez le four
ou utilisez un extincteur tout usage à poudre
chimique ou à mousse.
Ne touchez pas les éléments de surface, les éléments
chauffants ou la surface intérieure du four. Ces
surfaces peuvent être suffisamment chaudes pour
entrainer des brûlures même si elles sont de couleur
foncée. Pendant et aprés l’utilisation, ne touchez
pas ou ne laissez pas les vêtements ou tout autre
matériau inflammable entrer en contact avec les
éléments de surface, leur périphérie, ou toute partie
de l’intérieur du four; attendez suffisamment de
temps que la cuisinière refroidisse.
Les surfaces pouvant devenir chaudes comprennent
la surface de cuisson, les zones en face de la surface
de cuisson, l’évent du four, les surfaces situées près
de l’évent, les fentes situées autour de la porte du
four et les garnitures de métal au dessus de la porte.
N’OUBLIEZ PAS: La surface intérieure du four peut être
assez chaude Iorsque vous ouvrez la porte.
N’utilisez et ne rangez jamais de matériaux
combustibles, d’essence ou autres liquides ou
vapeurs inflammables à proximité de cet appareil ou
de tout autre électroménager.
Veillez à ce que la hotte et les filtres à graisse restent
propres pour maintenir une bonne ventilation et
pour empêcher les feux de graisse.
Ne bloquez jamais les évents (les ouvertures
d’aération) de votre cuisinière. Ils permettent à
l’air d’entrer et de sortir, ce qui est nécessaire pour
assurer le bon fonctionnement de votre cuisinière,
avec une bonne combustion. Les ouvertures
d’aération sont situées à l’arriére de la surface de
cuisson, en haut et en bas de la porte du four et en
bas de votre cuisinière, sous le tiroir de rangement.
Consignes
de sécurité
Mode d’emploi
Entretien et
nettoyage
Instructions
d’installation
Dépannage
Service à la
clientèle
Page 28

Tenez-vous à l’écart de la cuisinière en ouvrant la
porte du four L’air chaud ou la vapeur qui s’en
échappent pourraient brûler les mains, le visage
et/ou les yeux.
Ne chauffez pas de contenants d’aliments non
ouverts. La pression pourrait s’accumuler et le
contenant pourrait éclater, causant des blessures.
Veillez à ne pas obstruer la ventilation du four.
Assurez-vous que le four ne présente pas
d’accumulation de graisse.
Placez la grille du four à la position désirée
lorsque le four est froid. Si vous devez manipuler
les grilles lorsqu’elles sont chaudes, veillez à ne
pas laisser vos poignées ou mitaines entrer en
contact avec les éléments chauffants.
Il est pratique de tirer la grille jusqu’à la butée
pour soulever des aliments lourds. C’est aussi
une précaution contre les brûlures pour éviter
de toucher les surfaces chaudes de la porte ou
des parois du four.
Si vous utilisez des sachets de cuisson ou de
rôtissage dans le four, suivez les instructions
du fabricant.
N’utilisez pas votre four pour sécher des
journaux. En cas de surchauffe, ils pourraient
prendre feu.
N’utilisez pas le four comme espace de
rangement. Les articles rangés dans le four
pourraient prendre feu.
Ne laissez pas de produits en papier, ustensiles
de cuisine ou aliments dans le four quand il
n’est pas en cours d’utilisation.
FOUR
INSTRUCTIONS DE SÉCURITÉ IMPORTANTES. LISEZ LES
INSTRUCTIONS QUI SUIVENT AVANT D’UTILISER VOTRE APPAREIL
ÉLÉMENTS DE SURFACE—TOUTS LES MODÈLES
4
Utilisez des ustensiles de la dimension appropriée—sélectionnez des ustensiles à fond plat, suffisamment
grands pour couvrir l’élément chauffant de l’élément de surface. L’utilisation d’ustensiles trop petits exposera
une partie de l’élément de surfacé à des contacts directs, et pourrait mettre le feu aux vêtements. Une
relation correcte entre l’ustensile et l’élémente de surface améliore aussi l’efficacité.
Ne laissez jamais les éléments de surface sans
surveillance lorsqu’ils sont réglés sur une haute
température. Les aliments renversés peuvent fumer
et la graisse peut s’enflammer.
Seuls certains types de verre, vitrocéramique,
potterie et autres récipients en terre cuite
conviennent au service des aliments cuits sur la
surface de cuisson; les autres peuvent se briser à
cause du changement soudain de température.
Pour réduire les risques de brûlures et d’incendie,
de même que les renversements, la poignée des
ustensiles devrait être orientée vers le centre de la
cuisinière, en évitant de la placer au-dessus des
éléments de surface adjacents.
Arrêtez toujours les éléments de surface avant de
retirer les ustensiles.
Ne flambez pas les aliments sur la surface de
cuisson. Si vous le faites sous la hotte, mettez le
ventilateur en marche.
Surveillez attrentivement les aliments lorsque vous
les faites frire un réglage élevé ou moyen.
Lorsque vous désirez frire des aliments, assurez-vous
qu’il sont aussi secs que posible. Le givre sur les
aliments surgelés ou l’humidité des aliments frais
peuvent faiire bouillonner le gras et le faire
déborder sur les cótés du récipient.
Utilisez peu de graisse pour une friture efficace à la
poêle ou en friteuse. Si le récipient contient trop de
graisse, il peut en résulter des débordements lors de
l’ajout des aliments.
Si vous utilisez plus d’un type d’huile ou de graisse
pour la friture, remuez-les bien ensemble avant de
les faire chauffer ou pendant qu’ils fondent
Ientement.
Faites toujours chauffer les matières grasses à feu
doux, et surveillez-les constamment.
Utilisez un thermomètre de cuisson pour la grande
friture lorsque cela est possible, afin d’empêcher
que l’huile ne fume.
Mode d’emploi
Entretien et
nettoyage
Instructions
d’installation
Dépannage
Service à la
clientèle
Consignes
de sécurité
Page 29

1
2
1
2
5
Utilisation des éléments de surface
Les fonctions et l'apparence des éléments présentés dans ce manuel pourraient différer de votre appareil.
Commandes de la surface de cuisson
Les éléments de surface et les commandes de
cet appareil sont conçus pour vous offrir un grand
nombre de réglages de températures de cuisson.
Les réglages LO (BAS) et HI (ÉLEVÉ)
comportent de légères encoches qui font
entendre un léger clic lorsque la commande
est placée dans l'une de ces positions; HI est
le réglage le plus élevé; LO est le réglage le
plus bas.
Dans une cuisine silencieuse, il est possible que
vous entendiez un léger clic durant la cuisson.
Cela indique que les réglages de température
sélectionnés sont maintenus.
Les changements de température se font
toujours plus rapidement lorsque vous
augmentez le réglage de température que
lorsque vous le baissez.
Réglage des commandes
Enfoncez le bouton de commande.
Tournez-le vers la gauche ou vers la
droite jusqu'au réglage désiré.
Le bouton doit être enfoncé seulement
lorsque les réglages sont effectués à partir de
la position OFF (arrêt).
Lorsque la commande est placée dans une
autre position que OFF (arrêt), vous
pouvez la tourner sans l'enfoncer.
Assurez-vous de tourner le bouton de commande
à la position OFF (arrêt) lorsque la cuisson est
terminée. Un voyant lumineux s'allume lorsque
l’un des éléments de surface est en marche.
Un voyant lumineux de fonctionnement s'allume
lorsque l'un des éléments de surface est en
marche.
Guide des réglages de température
HI (ÉLEVÉ) Démarrer rapidement la cuisson;
amener l'eau à ébullition.
MEDIUM HIGH (MOYEN ÉLEVÉ) Frire
rapidement, griller à la poêle; maintenir une
grande quantité de nourriture à grande
ébullition.
MED (MOYEN) Sauter et brunir; maintenir une
grande quantité de nourriture à faible
ébullition.
MEDIUM LOW (MOYEN BAS) Cuire des
céréales; maintenir la plupart des aliments à
leur température de service.
LO (BAS) Poursuivre la cuisson après l'avoir
commencée à feu élevé; cuire avec un peu
d'eau dans un ustensile couvert. Utilisez ce
réglage pour cuire le riz à la vapeur.
REMARQUE :
Ne laissez jamais cuire sans surveillance
de la nourriture aux réglages HI (ÉLEVÉ)
ou MEDIUM HIGH (MOYEN ÉLEVÉ). Les
débordements peuvent produire de la
fumée; les projections de graisse peuvent
s'enflammer.
Faites fondre le chocolat et le beurre au
réglage LO (BAS), sur de petits éléments.
Conseils de cuisson
Utilisez des ustensiles de cuisson de poids
moyen ou lourd. Les ustensiles en
aluminium conduisent la chaleur plus
rapidement. Les ustensiles en fonte ou en
fonte émaillée absorbent lentement la
chaleur, mais cuisent généralement de
façon uniforme à basse ou à moyenne
température. Les ustensiles en acier
peuvent cuire de façon inégale si cet acier
n’est pas combiné à un autre métal.
Ne remplissez pas les ustensiles de cuisson
de graisse. Vous limiterez ainsi les
éclaboussures qui peuvent survenir lors de
l'ajout des aliments. Les aliments couverts
de givre provoquent une forte ébullition
Surveillez avec attention les aliments qui
sont frits à de hautes températures. Ne
laissez pas la graisse s'accumuler sur la
cuisinière ni sur la hotte.
Pour une efficacité de cuisson maximale,
utilisez des casseroles à fond plat et à côtés
droits et munies de couvercles bien ajustés.
Utilisez une casserole dont le diamètre
correspond à celui de l'élément de surface.
Une casserole dont les côtés dépassent de
plus d'un pouce la cuvette de propreté
emprisonne la chaleur, ce qui entraîne le
faïençage (fines fissures capillaires) de la
porcelaine et une décoloration
(allant du bleu au gris foncé) des cuvettes de
propreté chromées.
2
1
3
4
5
6
7
8
9
OFF
LO HI
Moyen
élevé
Moyen
bas
Consignes
de sécurité
Mode d’emploi
Entretien et
nettoyage
Instructions
d’installation
Dépannage
Service à la
clientèle
Page 30

200
25
0
300
350
040
045
500
OVEN TEMP
OFF
B
R
O
I
L
A
B
C
D
6
Utilisation du four
Le bouton OVEN TEMP (TEMPÉRATURE DU FOUR) est situé sur le panneau de commande, à l'avant de la cuisinière.
Commande du four
Pour faire fonctionner le four, tournez
simplement le bouton à la température désirée.
Les températures indiquées sur le cadran
augmentent par intervalles de 25 °F. OVEN
TEMP maintient la température réglée, de 200 °F
à BROIL (GRIL).
Le voyant de fonctionnement du four reste
allumé jusqu'à ce que le four ait atteint la
température sélectionnée, puis s'allume e
s'éteint de façon intermittente pendant la
cuisson.
Grilles du four
Les grilles possèdent des crans d'arrêt. Ainsi,
si elles sont placées correctement, elles
s'arrêtent avant de sortir complètement du
four et ne basculent pas lorsque vous y
placez ou que vous en retirez des aliments.
Lorsque vous placez un ustensile de cuisson
sur une grille, tirez la grille jusqu'à
l'excroissance du support de la grille. Placez
l'ustensile sur la grille, puis glissez la grille
dans le four. Ainsi, vous n'aurez pas à
avancer vos bras dans le four chaud.
Pour retirer une grille du four, tirez-la vers vous,
faites basculer l'avant de la grille vers le haut,
puis sortez-la.
Pour la remettre en place, positionnez la grille
sur le support en plaçant le cran d'arrêt (partie
recourbée de la grille) vers le haut, vis-à-vis le
fond du four. Soulevez l'avant de la grille et
poussez-la vers l'arrière du four jusqu'à ce
qu'elle passe les excroissances du support.
Rabaissez ensuite l'avant de la grille et
poussez-la tout au fond.
Position des grilles du four
Le four est muni de quatre supports de grille
A (bas), B, C et D (haut).
Les positions idéales pour la cuisson sont
suggérées dans les sections « Cuisson au
four » et « Cuisson au gril ».
Les grilles du four peuvent être
placées dans 4 positions.
Utilisation du papier d'aluminium
Si vous le désirez, vous pouvez placer une
feuille de papier d'aluminium sur la sole du
four, sous l'élément de cuisson.
Assurez-vous que le papier d'aluminium ne
touche pas à l'élément du four. Une telle
utilisation du papier d'aluminium peut
légèrement influencer le brunissage de
certains aliments. Remplacez la feuille
lorsqu'elle est sale.
NE PLACEZ PAS de feuille de papier
d'aluminium sur les grilles. Vous pourriez
nuire à la cuisson des aliments, endommager
le fini du four et faire augmenter la chaleur
sur les surfaces extérieures du four.
Vous pouvez utiliser du papier d'aluminium
pour recouvrir la lèchefrite et sa grille.
Cependant, vous devez bien ajuster le papier
d'aluminium sur la grille et pratiquer des
ouvertures aux endroits où on en retrouve
sur la grille.
Consignes
de sécurité
Mode d’emploi
Entretien et
nettoyage
Instructions
d’installation
Dépannage
Service à la
clientèle
Page 31

Il se peut que vous trouviez que votre nouveau four cuit différemment de votre ancien four. Utilisez votre nouveau four pendant
quelques semaines pour vous y familiariser. Si vous pensez toujours que votre four est trop ou pas assez chaud, vous pouvez
régler le thermostat vous-même.
N’utilisez pas de thermomètre, comme ceux que l’on trouve dans les épiceries, pour vérifier le réglage de température de votre
four. Ce type de thermomètre peut varier de 20 à 40 °F (11 à 22 °C).
REMARQUE : Ce réglage ne s’applique pas aux températures de gril. Ce réglage reste en mémoire après une coupure
de courant.
Réglage du thermostat – Faites-le vous-même!
Tirez sur le bouton OVEN TEMP pour
l’enlever de la cuisinière et regardez au dos
de celui-ci. Pour le régler, desserrez
(d’environ un tour) les deux vis situées à
l’arrière du bouton, mais ne les retirez
pas complètement.
Avec le dos du bouton face à vous, tenez
le bord extérieur du bouton d’une main
et tournez l’avant du bouton de l’autre
main.
Pour augmenter la température du four,
déplacez la vis supérieure vers la droite.
Vous entendrez un « clic » à chaque cran.
Pour diminuer la température du four,
déplacez la vis supérieure vers la gauche.
Chaque cran modifie la température
d’environ 10 °F (6 °C). (Cela va de plus
ou moins 60 °F/33 °C à partir de la
flèche). Nous vous conseillons de ne
changer le réglage que d’un cran et de
vérifier la performance du four avant de
faire des modifications supplémentaires.
Une fois le réglage effectué, resserrez bien
les vis pour, mais pas à l’excès.
Remettez le bouton en place, en
positionnant la surface plate du bouton
au-dessus de l’axe, et vérifiez la
performance du four.
Pour régler le thermostat avec ce type de bouton
L
O
O
S
E
N
S
C
R
E
W
S
T
O
R
O
T
A
T
E
M
A
K
E
C
O
O
L
E
R
M
A
K
E
H
O
T
T
E
R
Arrière du bouton OVEN TEMP
Avant du bouton OVEN TEMP
(Température du four) (l’aspect du
bouton peut varier)
2
00
25
0
030
350
400
450
0
50
OVEN TEMP
OFF
B
R
O
I
L
7
Consignes
de sécurité
Mode d’emploi
Entretien et
nettoyage
Instructions
d’installation
Dépannage
Service à la
clientèle
Page 32

Entretien et nettoyage de la cuisinière
Assurez-vous que l'alimentation électrique est coupée et que toutes les surfaces sont froides avant de nettoyer toute
partie de la cuisinière. L'entretien et le nettoyage adéquats sont importants et contribuent au fonctionnement efficace et
satisfaisant de votre cuisinière. Suivez ces consignes attentivement pour vous assurer d'un entretien sécuritaire et
adéquat de votre cuisinière.
Si votre cuisinière doit être déplacée pour être nettoyée, réparée ou pour toute autre
raison, assurez-vous que le dispositif antibasculement est bien réenclenché lorsque
a cuisinière est remise en place. Le non-respect de cette précaution pourrait entraîner
e basculement de la cuisinière et causer des blessures.
Surface de cuisson en émail vitrifié
Le fini en émail vitrifié est robuste mais
cassable lorsqu'utilisé de façon inappropriée.
Ce fini résiste aux acides. Cependant, les
éclaboussures provenant d'aliments acides
(jus de fruits, tomate ou vinaigre) ne devraient
pas être laissées sur le fini.
Grilles du four
Nettoyez les grilles à l'aide d'un nettoyant
abrasif ou d'une laine d'acier.
Après le nettoyage, rincez les grilles à l'eau
claire et séchez-les avec un chiffon propre.
Éléments de surface et cuvettes de propreté
Pour nettoyer les éléments de surface, tournez
la commande au réglage le plus élevé pendant
une minute. Les serpentins brûleront tout
résidu.
Pour retirer un élément de surface :
Pour retirer la cuvette de propreté afin de la
nettoyer, vous devez d'abord enlever l'élément
de surface.
Assurez-vous que les éléments de surface sont
froids avant de les toucher.
Soulevez l'élément de surface d'environ 1 po
(2,5 cm) au-dessus de la cuvette de propreté et
tirez-le pour le sortir.
Ne soulevez pas l'élément de surface de plus de 1
po (2,5 cm), sans quoi il risque de ne plus être
parallèle à la cuvette de propreté lorsque vous le
remettrez en place.
REMARQUE : Le fait de soulever à répétition
l'élément de surface de plus de 1 po (2,5 cm)
au-dessus de la cuvette de propreté peut
endommager la prise de façon permanente.
Pour replacer un élément de surface :
Remettez la cuvette de propreté dans la cavité
de la surface de cuisson. Assurez-vous que
l'ouverture de la cuvette est alignée avec la
prise.
Insérez les bornes de l'élément de surface dans
l'ouverture de la cuvette de propreté, puis
dans la prise.
Guidez l'élément de surface pendant sa mise
en place de façon à ce qu'il soit parfaitement
horizontal.
Pour nettoyer les cuvettes de propreté :
Les cuvettes de propreté peuvent être
nettoyées au lave-vaisselle ou à la main. Si
vous utilisez un tampon à récurer, frottez
doucement pour éviter les égratignures.
Puis-je recouvrir les cuvettes de
propreté de papier d'aluminium?
Non. L'utilisation de papier
d'aluminium aussi près de la prise
pourrait entraîner un choc électrique,
un incendie ou endommager la
cuisinière.
ATTENTION :
N'immergez pas les éléments de surface
dans quelque liquide que ce soit.
Ne nettoyez pas les éléments de surface
au lave-vaisselle.
Ne tordez pas les bornes de la fiche de
l'élément.
N'essayez pas de nettoyer, de réparer ou
d'ajuster la prise de branchement de
quelque manière que ce soit.
Élément de surface
Prise
Cuvette de propreté
Pour retirer l'élément de surface,
soulevez-le d'environ 1 po (2,5 cm)
au-dessus de la cuvette de propreté
et tirez-le pour le sortir.
Remettez la cuvette de propreté
dans la cavité de la surface de cuisson.
8
Mode d’emploi
Entretien et
nettoyage
Instructions
d’installation
Dépannage
Service à la
clientèle
Consignes
de sécurité
Page 33

protecteurs lorsque vous nettoyez les surfaces
intérieures du four ou les surfaces situées près
des éléments chauffants. Si des éclaboussures,
des résidus ou de la cendre s'accumulent
autour de l'élément de cuisson, essuyez-les
doucement avec de l'eau chaude.
1
2
3
4
1
2
3
Surface de cuisson relevable
Lavez souvent la zone située sous la surface de
cuisson. Les résidus accumulés, particulièrement
la graisse, peuvent prendre feu.
La surface de cuisson peut être relevée et
rester ouverte pour faciliter le nettoyage.
Assurez-vous que tous les éléments de surface
sont arrêtés avant de relever la surface de
cuisson.
Retirez les éléments de surface avant et les
cuvettes de propreté. Consultez les sections
« Éléments de surface » et « Cuvettes de
propreté ». Agrippez les deux cavités des
éléments de surface avant, soulevez la surface
de cuisson et maintenez-la ouverte à l'aide de
la tige fournie.
Après avoir nettoyé le dessous de la surface de
cuisson avec de l'eau chaude savonneuse et un
chiffon propre, tenez la surface de cuisson
relevée, replacez la tige dans sa position de
rangement et rabaissez la surface de cuisson
jusqu'à ce qu'elle s'enclenche. Faites attention
à ne pas vous pincer les doigts. Replacez les
deux cuvettes de propreté et les éléments de
surface avant. Consultez les sections
« Éléments de surface » et « Cuvettes de
propreté ».
Porte de four amovible
La porte du four est amovible, mais lourde.
Vous aurez peut-être besoin d'aide pour
enlever et remettre la porte.
Pour enlever la porte :
Ouvrez complètement la porte.
Tirez les dispositifs de verrouillage des
charnières vers le haut, au-dessus des
crochets de charnière, des deux côtés.
Tenez la porte fermement de chaque
côté, soulevez-la légèrement et tirez-la
vers l'extérieur, loin du four.
Pour remettre la porte en place :
Tenez fermement le haut de la porte, des
deux côtés.
Insérez et assoyez les bras supérieurs et
inférieurs des charnières dans les fentes
du four.
Poussez les dispositifs de verrouillage
des charnières vers le bas à partir des
crochets de charnière.
Fermez la porte du four et assurez-vous
qu'elle fonctionne correctement. Si elle
ne fonctionne pas correctement,
enlevez-la et replacez-la en suivant les
étapes ci-dessus.
N'ESSAYEZ PAS DE FERMER LA PORTE
AVANT D'AVOIR COMPLÉTÉ CETTE ÉTAPE.
VOUS POURRIEZ ENDOMMAGER LES
CHARNIÈRES OU LA PORTE.
Éléments chauffants du four
Ne nettoyez pas l'élément de cuisson ni
l'élément du gril. Toutes les saletés qui
pourraient s'y trouver brûleront lorsque les
éléments chaufferont.
L'élément de cuisson peut être soulevé
légèrement pour permettre le nettoyage de la
sole du four. Ne tentez pas de nettoyer aucune
surface du four lorsqu'un élément chauffant
fonctionne. Portez toujours des gants
Lèchefrite et sa grille
Après avoir utilisé le gril, retirez la lèchefrite
du four. Retirez la grille de la lèchefrite.
Versez doucement la graisse contenue dans la
lèchefrite dans un récipient approprié. Lavez
et rincez la lèchefrite et sa grille avec de l'eau
chaude et un tampon à récurer en plastique
imbibé de savon.
Si des aliments ont brûlé sur la grille,
aspergez-la de détergent lorsqu'elle est encore
chaude et couvrez-la d'un torchon ou
d'essuie-tout humides. Faire tremper la
lèchefrite permet de retirer les aliments qui y
ont brûlé.
Ne rangez pas la lèchefrite et sa grille dans la
cuisinière lorsqu'elles sont sales.
Fente
Dispositif de
verrouillage
de la
charnière
Bras supérieur
de la charnière
Bras inférieur
de la charnière
La lèchefrite et sa grille peuvent
également être nettoyées au
lave-vaisselle.
9
Mode d’emploi
Entretien et
nettoyage
Instructions
d’installation
Dépannage
Service à la
clientèle
Consignes
de sécurité
Page 34

Assurez-vous que les boutons sont à la
position OFF (arrêt) et tirez-les hors des
tiges pour les nettoyer.
Boutons de commande
Les boutons de commande peuvent être enlevés
pour faciliter le nettoyage.
Surfaces peintes
Fini en émail vitrifié
Mises en garde concernant l'utilisation
de nettoyants pour four en aérosol :
Entretien et nettoyage de la cuisinière
Les boutons peuvent être nettoyés au
lave-vaisselle ou avec de l'eau et du savon.
Assurez-vous que l'intérieur des boutons est
sec avant de les replacer.
Replacez les boutons à la position OFF
(ARRÊT) pour assurer un positionnement
adéquat.
Les côtés de la cuisinière, le panneau de
commande, la porte et la plaque de protection
sont recouverts de peinture. Nettoyez-les
avec de l'eau et du savon ou avec une
solution d'eau et de vinaigre.
N'utilisez pas de nettoyant commercial pour four,
de poudre nettoyante, de laine d'acier ou
d'abrasif fort sur les surfaces peintes.
Grâce à un entretien approprié, l'intérieur du four
en émail vitrifié conservera son fini attrayant
pendant de nombreuses années.
En général, de l'eau et du savon suffisent.
Les éclaboussures ou projections importantes
peuvent nécessiter l'utilisation d'un nettoyant
abrasif doux. Vous pouvez également utiliser
un tampon à récurer imbibé de savon. Ne
laissez pas de projections d'aliments à teneur
élevée en sucre ou en acide (lait, tomates,
choucroute, jus de fruits ou garnitures pour
tarte) sur la surface. Ces projections
pourraient causer des taches ternes qui
résistent au nettoyage.
L'utilisation d'ammoniaque domestique peut
faciliter le nettoyage. Versez 120 mL (1/2 t.)
d'ammoniaque dans un verre ou un contenant
en porcelaine peu profond et placez celui-ci
dans le four froid pendant une nuit entière.
Les vapeurs d'ammoniaque aideront à
désincruster les aliments et les graisses
brûlés.
Au besoin, vous pouvez utiliser un nettoyant
commercial pour four. Suivez les instructions
fournies sur l'emballage.
Ne vaporisez pas le nettoyant pour four sur
les commandes et les interrupteur
électriques. Cela pourrait entraîner un
court-circuit et provoquer la formation
d'étincelles ou causer un incendie.
Ne vaporisez pas le nettoyant pour four
directement sur les éléments chauffants.
Ne laissez pas le nettoyant former un film
sur le capteur de température. Cela pourrait
entraîner un mauvais chauffage du four.
(Le capteur se situe dans la partie supérieure
du four.) Essuyez soigneusement l'ampoule
avec un chiffon après chaque nettoyage en
prenant soin de ne pas déplacer le capteur.
Un changement de position pourrait
influencer la cuisson.
Ne vaporisez aucun nettoyant pour four sur
l'extérieur de la porte, les poignées ou toute
autre surface extérieure du four, les armoires
ou les surfaces peintes. Le nettoyant peut
abîmer ces surfaces.
10
Mode d’emploi
Entretien et
nettoyage
Instructions
d’installation
Dépannage
Service à la
clientèle
Consignes
de sécurité
Page 35

Pour commader des pièces
Pour vous renseigner sur l’achat d’une pièce
ou d’un accessoire pour votre appareil
électroménager, veuillez appeler notre
numéro sans frais:
Centre national des piéces 1-800-661-1616
Mode d’emploi
Entretien et
nettoyage
Instructions
d’installation
Dépannage
Service à la
clientèle
Consignes
de sécurité
11
Pour enlever le tiroir de rangement:
Tirez complètement le tiroir.
Faites basculer l’avant et enlevez
le tiroir.
Pour remettre en place le tiroir de rangement:
Insérez les rails situés à l’arrière du tiroir
en dépassant l’arrêt sur les guides de votre
cuisinière.
Soulevez le tiroir le cas échéant pour le
faire entrer plus facilement.
Faites redescendre l’avant du tiroir, puis
poussez pour le fermer.
Enlèvement du tiroir de rangement.
La grande partie du nettoyage peut se faire avec le tiroir en place. Cependant, le tiroir peut
être retiré si un nettoyage plus minutieux est nécessaire. Utilisez de l'eau tiède savonneuse
pour bien nettoyer.
Page 36

l'installation, coupez le courant au tableau
de distribution et bloquez le disjoncteur pour
éviter que le courant ne soit accidentellement
rétabli. S'il n'est pas possible de bloquer le
disjoncteur, posez un avertissement bien
visible, comme une étiquette, sur le tableau
de distribution.
—
12
Instructions
d'installation
Cuisinières électriques
moffat et 24 po (61 cm)
Des questions? Téléphonez au 1-800-561-3344 ou consultez notre site Web
au www.electromenagersmoffat.ca
AVANT DE COMMENCER
Lisez attentivement toutes ces
instructions.
IMPORTANT
IMPORTANT
—
—
correctement mis à la terre.
Conservez ces
instructions pour l'inspecteur local.
Observez tous
les codes et règlements en vigueur.
Remarque à l'installateur Assurez-vous de
laisser ces instructions au consommateur.
Remarque au consommateur Conservez ces
instructions pour vous y reporter ultérieurement.
Niveau de compétence L'installation de cet appareil
nécessite des compétences de base en mécanique.
Durée de l'installation 1 à 3 heures
L'installateur est responsable de la qualité de
l'installation.
Une panne de l'appareil due à une mauvaise installation
n'est pas couverte par la garantie.
AVERTISSEMENT Cet appareil doit être
—
POUR VOTRE SÉCURITÉ :
AVERTISSEMENT Avant decommencer
POUR VOTRE SÉCURITÉ :
Toutes les dimensions de raccordement et d'espacement
doivent être respectées pour une utilisation sécuritaire de
votre cuisinière. L'alimentation électrique de la cuisinière peut
être débranchée à la prise sans que vous n'ayez à déplacer
la cuisinière si la prise est située à l'endroit recommandé
(retirez le tiroir inférieur).
Pour réduire les risques de brûlures ou d'incendie quand vous
vous penchez au-dessus des éléments de surface chauds,
vous devez éviter de placer une armoire au-dessus de la
surface de cuisson. Si des armoires doivent être placées
au-dessus de la surface de cuisson, le risque peut être réduit
par l'installation d'une hotte de cuisinière qui avance au
moins de 5 po (12,7 cm) par rapport à l'avant de l'armoire.
La profondeur des armoires installées au-dessus d'une
surface de cuisson ne doit pas dépasser 13 po (33,02 cm).
Assurez-vous que votre appareil est correctement installé et
mis à la terre par un technicien qualifié.
Veillez à ce que les armoires et les revêtements muraux qui
entourent la cuisinière supportent les températures générées
par la cuisinière (jusqu'à 200 °F/93 °C).
DISPOSITIF ANTIBASCULEMENT
AVERTISSEMENT
Pour éviter que
l'appareil ne bascule accidentellement, celui-ci doit être fixé
à l'aide d'un dispositif antibasculement installé correctement
(fourni avec l'appareil).
Si le dispositif antibasculement fourni avec la cuisinière ne
convient pas à cette installation, utilisez le dispositif
antibasculement universel WB2X7909.
AVERTISSEMENT
Toutes les cuisinières peuvent
basculer
Le basculement peut entraîner des
blessures
Installez le dispositif antibasculement
fourni avec la cuisinière
Reportez-vous aux instructions
d'installation
Si vous devez éloigner la cuisinière du mur pour quelque
raison que ce soit, assurez-vous que le dispositif
antibasculement est correctement enclenché lorsque vous la
repoussez contre le mur.
Page 37

B
13”
30”
18”
24”
A
26”
2”
5”
2½”
36”
C
2 ”
1
4
Modèle A B
C
D
MCA5724 40 ½”
/
3
8
2” (5,08 cm)
41” (104,14cm)
(Recommandé)
2
13
Instructions d'installation
PRÉPARATION À L'INSTALLATION DE LA CUISINIÈRE
OUTILS DONT VOUS AUREZ BESOIN
1
Perceuse avec mèche de 1/8 po
Clé à molette
Pinces
Tournevis à douille 1/4 po
Tournevis Phillips
Lunettes de sécurité
Ruban à mesurer
Crayon
Niveau
Tournevis plat
PIÈCES FOURNIES
Support antibasculement
RETIRER LES MATÉRIAUX D'EMBALLAGE
Retirez les matériaux d'emballage. Si vous n'enlevez
pas les matériaux d'emballage, vous pourriez
endommager l'appareil.
PRÉPARER L'OUVERTURE
Laissez un espace de 2 po (5,08 cm) entre la cuisinière et les
murs verticaux adjacents situés au-dessus de la surface de cuisson.
Laissez un dégagement minimal de 30 po (76,2 cm) entre les
éléments de surface et le bas de l'armoire supérieure en métal ou
en bois non protégé, et un dégagement minimal de 18 po
(45,72 cm) entre le comptoir et le bas de l'armoire adjacente.
Pour éliminer les risques de brûlure ou d'incendie causés lorsqu'on
se penche au-dessus des éléments de surface, il est préférable
d'éviter la pose d'armoires au-dessus de la surface de cuisson.
Si des armoires doivent être placées au-dessus de la surface de
cuisson, le risque peut être réduit par l'installation d'une hotte de
cuisinière qui avance au moins de 5 po (12,7 cm) par rapport à
l'avant de l'armoire. La profondeur des armoires installées
au-dessus d'une surface de cuisson ne doit pas dépasser 13 po
(33,02 cm).
Revêtement de plancher sous la cuisinière
Votre cuisinière, comme tout autre appareil
ménager, est lourde et peut s'enfoncer dans les
revêtements de plancher mous comme le vinyle
coussiné ou la moquette.
Lorsque vous placez une cuisinière sur ce type de
revêtement, installez-la sur une planche de contreplaqué
(ou un autre matériau similaire) de 1/4 po (0,25 cm)
d'épaisseur en suivant la procédure suivante:
Lorsque le revêtement de plancher s'arrête à l'avant de la
cuisinière, la zone où repose la cuisinière doit être
surmontée d'une planche de contreplaqué d'une hauteur
égale ou supérieure à celle du revêtement de plancher.
Cela permet de déplacer la cuisinière pour le nettoyage
ou la réparation.
(33,02 cm)
(76,2 cm)
(45,72 cm)
(66,04 cm) entre le mur et
l'avant du panneau de
commande
Des murs
combustibles situés
au-dessus de la
surface de cuisson
D (profondeur
lorsque la porte
est ouverte)
36”
(91,44 cm)
Prise de la
surface de
montage
Montage mural
Mur
Plancher
Zone recommandée pour la prise électrique.
Orientez la prise de manière à ce qu'elle
soit parallèle au sol.
Cordon d'alimentation
Boîte de la prise
de courant
24 ”
24”
Page 38

14
Instructions d'installation
RACCORDEMENTS ÉLECTRIQUES
EXIGENCES ÉLECTRIQUES
AVERTISSEMENT :
Pour votre sécurité,
n’utilisez pas de cordon prolongateur avec cet
appareil. Enlevez le fusible ou déclenchez le
disjoncteur au panneau de distribution
électrique avant d’entreprendre l’installation.
Cet appareil est conçu pour être alimenté à
une tension et à une fréquence appropriées, et
doit être branché à un circuit de dérivation
individuel correctement mis à la terre et
protégé par un disjoncteur ou par un fusible
temporisé d'une intensité conforme aux
indications de la plaque signalétique. La
plaque signalétique est située sous la surface
de cuisson. Consultez la section « Surface de
cuisson relevable » de ce manuel pour des
instructions sur la façon de relever la surface
de cuisson.
Plaque signalétique
Nous vous recommandons d'avoir recours aux
services d'un électricien qualifié pour
effectuer le câblage électrique et le
raccordement de votre cuisinière. Une fois
l'installation terminée, demandez à
l'électricien de vous montrer l'emplacement du
sectionneur principal de votre cuisinière.
Renseignez-vous auprès des services publics
locaux pour savoir quels sont les codes
électriques applicables dans votre région. Ne
pas raccorder votre four conformément aux
codes en vigueur pourrait se révéler
dangereux. En l'absence de codes locaux,
votre cuisinière devrait être raccordée et
protégée par un fusible, conformément au
code canadien de l’électricité (CSA)
Page 39

Vis à tête
fendue
2 ”
1
8
3
A
B
C
D
3
E
4
A
B
5
15
INSTALLATION DE LA CUISINIÈRE
INSTALLATION DU DISPOSITIF
ANTIBASCULEMENT
La cuisinière doit être maintenue par un
dispositif antibasculement agréé.
Si la cuisinière n'est pas bien installée, vous ou un
enfant pouvez la faire basculer en vous tenant debout,
en vous asseyant ou en vous appuyant sur la porte du
four lorsqu'elle est ouverte.
Une fois le dispositif antibasculement installé, vérifiez
qu'il est en place en essayant de faire basculer
doucement la cuisinière vers l'avant.
Cette cuisinière a été conçue pour se conformer à
toutes les normes industrielles de basculement dans
des conditions normales d'utilisation.
Une fois le dispositif antibasculement installé, vérifiez
qu'il est en place en essayant de faire basculer
doucement la cuisinière vers l'avant.
Ce dispositif n'empêche pas le basculement de la
cuisinière s'il a été mal installé.
Faites une marque sur le mur là où le CÔTÉ DROIT
de la cuisinière doit être situé. Prévoyez un espace
suffisant pour le rebord de la cuisinière si vous souhaitez
installer cette dernière à côté d'armoires.
Placez le côté
extérieur du
dispositif à
2 1/8 po (5,4 cm)
à gauche de la
marque tracée
sur le mur.
En utilisant le dispositif comme gabarit, marquez
l'emplacement du trou de la vis.
Pour les constructions en bois, percez un avant-trou à
un angle de 20° par rapport à l'horizontal. Vous pouvez
utiliser un clou ou un poinçon si vous n'avez pas de
perceuse.
Fixez le dispositif antibasculement à l'aide de la vis fournie.
Pour les constructions en ciment ou en béton, vous aurez
besoin d'une vis à bois
de ¼ x 1½ po
(0,65 x 3,8 cm) et d'une
cheville métallique d'un
diamètre extérieur de
½ po (1,3 cm)
(non fournis). Percez un
trou d'une dimension
appropriée à la cheville.
INSTALLATION DU DISPOSITIF
ANTIBASCULEMENT (suite)
Installez la cheville métallique dans le trou percé, puis
visez la vis à bois en la faisant traverser le dispositif
antibasculement. La vis doit être correctement serrée,
comme recommandé pour ce type de quincaillerie.
Remettez la cuisinière contre le mur en la faisant glisser
et vérifiez que l'installation a été bien faite en agrippant
le devant de la surface de cuisson, puis en essayant de
faire basculer doucement la cuisinière vers l'avant.
MISE À NIVEAU DE LA CUISINIÈRE
Pour de bons résultats de cuisson, la cuisinière doit
être mise à niveau. Les pieds de mise à niveau sont
situés aux quatre coins à la base de la cuisinière.
Installez les grilles du four
(consultez la section Utilisation
du four pour les instructions).
Placez un niveau à bulle ou une
tasse à mesurer partiellement
remplie d'eau
Tournez les pieds dans le sens
horaire pour élever la cuisinière
et dans le sens antihoraire pour
la baisser. Règlez le niveau des
pieds jusqu'à ce que la cuisinière
soit mise à niveau.
LISTE DE VÉRIFICATION POUR
L'INSTALLATION FINALE
Vérifiez que le disjoncteur est fermé (RÉENCLENCHÉ) ou
que les fusibles ont été remis en place.
Assurez-vous que l'alimentation électrique fonctionne.
Vérifiez que tout le matériel d'emballage et le ruban ont été
enlevés. Le matériel d'emballage comprend le ruban situé
sur le panneau de métal en dessous des boutons de
commande (s'il y a lieu), le ruban adhésif, les attaches
métalliques, le carton et le plastique de protection. Si vous
n'enlevez pas tout ce matériel, vous pourriez endommager
l'appareil une fois qu'il aura été mis en fonction et que la
surface aura chauffé.
Assurez-vous que le dispositif antibasculement a été
correctement installé.
Vérifiez que toutes les commandes de la cuisinière sont en
position ARRÊT (OFF) avant de la quitter.
AVERTISSEMENT :
Environ 20°
Marque
(côté droit
de la
cuisinière)
Sablière
Dispositif
antibasculement
Panneau de
revêtement
Dispositif
antibasculement
Vis à bois
Arrière de
la
cuisinière
Instructions d'installation
Page 40

Problème
Surfaces de cuisson serpentins
Les unités de surface
ne fonctionnent pas bien
Four tout modèles
L’ampoule de four ne
marche pas
Le four ne marche pas
Les aliments ne sont
pas cuits ou rôtis
correctement
Il n’y a pas de courant
dans les prises de courant
qui se trouvent en haut du
dosseret de protection
(sur certains modèles)
Causes possibIes
Solution
Les unité de surface ne sont pas
bien branchées.
Les contrôles en position 0FF (arrét), verifiez que l’unité de
surface soit bien branchée dans la prise.
Les contrôles des unités de surface
ne sont pas bien réglés.
Vérifiez que l’unité de surface que vous utilisez soit bien réglée.
Les cuvettes de propreté
ne sont pas bien installées
dans la surface de cuisson.
Les contrôles en positio 0FF (arrêt), assurez-vous que les
cuvettes de propreté soient bien installées dans la surface
de cuisson et que l’ouverture de la cuvette soit alignée à la prise.
L’ampoule est desserrée or
defective.
Le commutateur qui commande
la lumière est cassé.
Resserrez l’ampoule ou remplacez-la.
Appelez le service.
La prise de la cuisinière n’est
pas complètement insérée dans
la prise d’alimention.
Veillez à ce que la prise soit insérée dans une prise murale
sous tension, correctement mise à la terre.
Il se peut qu’un des fusibles de
votre domicile soit hors de
service ou que le coupe-circuit
ait disjoncté.
Si nécessaire laissez le four refroidir; déverrouillez ensuite la
la porte.
Commandes du four mal réglées
Voyez la section Utilisation du four.
Sur les modèles autonettoyant,
la porte est laissée en position
verrouillée.
Commandes du four mal réglées.
Voyez la section Utilisation du four.
Voyez la section Utilisation du four.
Position de grille incorrecte ou
grille pas horizontable.
Voyez la section Utilisation du four.
Mauvais ustensiles, ou ustensile
de la mauvaises taille utilisé.
Le thermostat du four a besoin
d’être réglé
Voyez la section Réglage du thermostat du four Faites-le
voús-même!
Remplacez le fusible ou réamorcez le coupe-circuit.
La fiche du petit appareil
électroménager n’entre pas bien
dans la prise de courant.
Assurez-vous de bien faire entrer la fiche de petit appareil
électoménager dans la prise de courant.
Le dosseret est trop chaude et
le commutateur de la prise de
courant a basculé.
Laissez refroidir le dosseret de protection, puis remettez le
courant en appuyant sur le commutateur placé près de la
prise de courant.
Avant d’appeler le réparateur...
ConseiIs de dépannage
Mode d’emploi
Entretien et
nettoyage
Instructions
d’installation
Dépannage
Service à la
clientèle
16
Consignes
de sécurité
Page 41

Les aliments ne grillent
pas correctement
Problème
Causes possibIes
Solution
Le four n’est pas réglé
sur BROIL (GRILL).
Sur les modèles avec un bouton de température, assurez-vous
de bien tourner ce bouton jusqu’à sa positon BROIL (GRILL)
Sur les modèles avec une touche BROIL (GRILL), assurez-vous
que cette touche a bien été mise.
La porte n’est pas ouverte en
position d’arrêt de grillade
comme c’est recommandé.
Voyez la section Utilisation du four.
Mauvaise position de grille utilisée.
Voyez le Guide de cuisson au gril.
Aliments cuit dans un
ustensile chaud.
Utilisez le gril-léchefrite et la grille livrés avec votre cuisinière.
Assurez-vous qu’ils sont froids.
Ustensile ne convenant pas
à la cuisson au gril.
Utilisez la lèchefrite et sa grille, livrées avec votre cuisinière.
Voyez la section Utilisation du four.
Le papier d’aluminium utilisé
sur la lèchefrite et sa gille n’a pas
été ajusté conrrecteme et perforé
selon les recommandations.
Dans certaines régions,
le courant peut être bas.
Préchauffez l’élément de gril pendant 10 minutes.
Faites griller pendant la plus longue période recommandée
dans le Guide de cuisson au gril.
Mode d’emploi
Entretien et
nettoyage
Instructions
d’installation
Dépannage
Service à la
clientèle
17
Consignes
de sécurité
Page 42

Problème
Causes possibIes
Solution
Température du four trop
chaude ou trop froide
L’horloge et la minuterie
ne marchent pas.
L’afficheur est effacé
La porte du four est tordue
Le four cliquette
F et un chiffre ou
une lettre clignotent à
l’afficheur
Panne de courant
L’afficheur clignote
L’afficheur n’indique
pas SF
Le thermostat du four a besoin
d’être réglé.
Voyez la section Réglage du thermostat du four—Faites-le
vous-même!
Vous n’avez pas appuyé
correctement sur les touches
de commande du fou.
Vérifiez que la prise est insérée dans une prise murale sous
tension, correctement mise à la terre.
Remplacez le fusible ou réamorcez le coupe-circuit.
Voyez la section Utilisation de l’horloge, de Ia minuterie et
prise confort.
Remplacez le fusible ou réamorcez le coupe-circuit.
Consultez la section Utilisation de l’horloge et de la minuterie.
Comme la porte du four est amovible, elle sort parfois de sa
bonne place pendant l’installation. Pour mettre la porte en
place, poussez vers le bas son coin du haut.
C’est normal.
Appuyez sur la touche OFF(ARRÊT). Essayez de
réactiver les commandes.
Sur les modèles autonettoyants, si un code d’erreur de fonction
apparaît pendant le cycle d’autonettoyage, vériflez le verrou
de la porte du four. Le verrou peut avoir bougé, même
légèrement, de la position verrouillée. Assurez-vous de pousser
le verrou aussi loin que possible vers la droite. Appuyez sur le
verrou est complètement à droite. Appuyez sur la touche
OFF (ARRÊT) Laissez le four refroidir pendant une heure.
Remettez le four en marche.
Certains modèles retrouvent automatiquemént leur réglage
quand le courant revient. Sur les modèles avec une horloge,
vous devez remettre l’horloge à l’heure. Si le four était en cours
d’utilisation, vous devez le reprogrammer en appuyant sur la
touche OFF (ARRÊT), en réglant l’horloge et en reprogrammant
les fonctions de cuisson qui étaient en cours d’utilisation.
La prise de la cuisinière n’est
pas complètement insérée dans
la prise d’alimentation.
Il se peut qu’un fusible de votre
domicile soit hours de service ou
que la coupe-circuit ait disjoncté.
Commades du four mal réglées.
Il se peut qu’un des fusibles de
yotre domicile soit hors de
service ou que le coupe-circuit
ait disjoncté.
L’horloge n’indique pas l’heure
sur l’afficheur.
La porte n’est pas à sa bonne place.
C’est le son de l’élément de
chauffage qui se met en marche
et s’arrête pendant la cuisson.
Vous avez un code d’erreur
de fonction.
Si le code de fonction se répète:
Panne de courant ou
augmentation souhaine
de la tension.
Panne de courant.
Débranchez complètement la cuisinière pendant
30 secondes puis rebranchez-la. Si le code d’erreur de
fonction se répète, appelez le service aprés-vente.
Reprogrammez l’horloge.
Vous devez appuyer simultanément sur les touches
BROIL (GRILL) et BAKE et les maintenir enfocées pendant
3 secondes.
Avant d’appeler le réparateur...
ConseiIs de dépannage
Mode d’emploi
Entretien et
nettoyage
Instructions
d’installation
Dépannage
Service à la
clientèle
18
Consignes
de sécurité
Page 43

Odeur de brûle ou
d’ huile venant de
l’event
Problème
Causes possibIes
Solution
Ces odeurs sont normales dans
un four neuf et disparaîtront
à l’usage.
Pour accélérer le processus, réglez un cycle d’ autonettoyage
d’au moins 3 heures. Voyez la section Utilisation du four
autonettoyant.
Une odeur venant de l’isolant
autour et à l’intérieur du four est
normale pendant les premières
utilisations du four.
Cette odeur est temporaire.
Forte odeur
Mode d’emploi
Entretien et
nettoyage
Instructions
d’installation
Dépannage
Service à la
clientèle
19
Consignes
de sécurité
Le tiroir ne glisse pas
bien ou se blo qu e
Le tiroir n’est pas droit
Tirez le tiroir au maximum et repoussez-le complètement.
Reportez-vous à la partie concernant le tiroir de rangement
dans la section Entretien et nettoyage de la cuisinière.
Le tiroir est trop chargé ou sa
charge est mal répartie
Diminuez la poids du tiroir. Redistribuez le contenu du tiroir.
Page 44

Une innovation : les grilles de four porcelanisées, autonettoyantes!
Ultra-résistantes
Durables
Pouvant être nettoyées dans un four autonettoyant
Vous en evez assez de vos grilles décolorées?
DISPONIBLES ACTUELLEMENT pour votre cuisinière:
Accessories.
Pour vous renseigner sur l’achat d’une pièce ou d’un accesories pour votre
appareil, applez notre centre national de piéces au 1.800.661. 1616.
Vous cherchez autre chose?
parts
Grilles du four Lechefritè
Élements du four Boutons
Nettoyant
ERC AMA
R TEB Y
Élements de surface et
cuvettes de propreté
Vous aimeriez avoir des grilles de four ultra-sésistantes?
Mode d’emploi
Entretien et
nettoyage
Instructions
d’installation
Dépannage
Service à la
clientèle
20
Consignes
de sécurité
Page 45

21
(FOR CANADIAN CONSUMERS ONLY POUR RÉSIDENTS CANADIENS SEULEMENT)
Please place in envelope and mail to:
Veuillez mettre dans une enveloppe et envoyez à:
OWNERSHIP REGISTRATION
P.O. BOX 1780
MISSISSAUGA, ONTARIO
L4Y 4G1
Page 46

YES /OUI
NO / NON
NAME OF SELLING DEALER / NOM DU MARCHAND
MODEL/MODÉLE
INSTALLATION DATE/DATE D’INSTALLATION
SERIAL/SÉRIE
OWNERSHIP REGISTRATION CERTIFICATE - FICHE D’INSCRIPTION DU PROPRIÉTAIRE
Please register your product to enable us to contact you
in the remote event a safety notice is issued for this product
and to allow for efficient communication under the terms
of your warranty, should the need arise.
Veullez enregistrer votre produit afin de nous permettre de
communiquer avec vous si jamais un avis de sécurité concemant
ce produit était émis et de communiquer facilement avec vous en
vertu de votre garantie, si le besoin s’en faith sentir.
CUT ALONG THIS LINE AND RETURN CARD- -THANKS
REGISTER ON-LINE:
ENREGISTREMENT SUR INTERNET A:
www.geappliances.ca
www.electromenagersge.ca
MAIL TO:
POSTER Á:
APT. NO/APP./RR#
P.O. BOX 1780, MISSISSAUGA
ONTARIO, L4Y 4G1
LAST NAME/NOM
FIRST NAME/PRENOM
MRS./MME.
MS.
MR./M
MISS/MLLE.
STREET NO/N° RUE
STREET NAME/RUE
CITY/VILLE
PROVINCE
POSTAL CODE/POSTAL
AREA CODE/IND. RÉG.
TELEPHONE
E-MAIL
DID YOU PURCHASE A SERVICE CONTRACT FOR THIS APPLIANCE?
AVEZ-VOUZ ACHETÉ UN CONTRAT DE SERVICE POUR CET APPAREIL?
ENGLISH
FRANCAIS
I do not wish to receive any promotional offers regarding this product.
Je ne désire pas recevoir d’offers promotionnelles concemant ce produit.
CORRESPONDENCE
CORRESPONDANCE
IF YES/SI OUI:EXPIRATION
Y/A
M
D/J
Y/A
M
D/J
For Canadian
Customer
Pour les
Consommateurs
Canadiens
22
Page 47

Les services sous garanties sont dispensés par nos centres
de réparation ou par nos réparateurs Customer Care
autorisés. Pour prendre rendez-vous 24 heures sur 24,
appelez le 1.800.561.3344. Veuillez fournir le numéro de
série et le numéro de modèle lorsque vous appelez pour
obtenir le service.
Agrafez votre reçu ici.
Pour l’obtention des services sous garantie,
il sera nécessarie de présenter un document
attestant de la date d’achat initial de l’appareil.
Pendant une période de :
Une année
À compter de la date
d’achat initial
Mabe remplacera ce qui suit :
Toute pièce de la çuisinire manifestant un vice de matériau ou de fabrication.
Durant cette période de garantie limitée d’ unnée, Mabe fournira aussi,
gratuitement, la main-d’oeuvre et le service de réparation connexe pour le
remplacement de la pièce défectueuse.
Déplacement d’un technicien au domicile pour des
explications sur le produit.
Ce que Mabe ne couvre pas :
Installation, livraisou on entretien incorrectement
effectués.
Défaillance du produit imputable à un emploi
lncorrect ou abusif, ou à une utIlisation commerciale
ou non prévue.
Déterioration de la surface de cuisson en verre
provoquée par l’usage de nettoyants autres que les
crèmes et tampons de nettoyage recommandés.
Détérioration de la surface de cuisson en verr causée
par des éclaboussures de produits sucrés durcis, ou
du plastique fondu qui n’a pas été nettoyé selon les
instructions données dans le manuel de l’utilisateur.
Dommages causés après la livraison.
Remplacement des fusibles ou réarmament des
disjoncteurs de la résidence.
Détérioration du produit imputable à : accident,
icendie, inondation ou catastrophe naturelle.
Dommages matériels secondaires ou indirects imputables
à une éventuelle défectuosité de l’appareil.
Le service s’il est impossible d’avoir accès au produit
pour ce faire.
EXCLUSION DE GARANTIES IMPLICITES - Votre seul et unique recours est la réparation du produit selon les
dispositions de cette Garantie limitée. Toutes les garanties implicites, incluant les garanties de commercialité
et d’adéquation à un usage spécifique, sont limitées à unée ou à la période la plus courte autorisée par
la législation.
Cette garantie est valable pour le premier propriétaire et tout autre propriétaire du produit s’il acheté pour utilisation
domestique au Canada. Le service à domicile sous garantie sera fourni là où il est disponible et dans les régions que
Mabe considère que l’ offre de service est raisonnable.
Dans certaines provinces, il est intertdit d’exclure ou de limiter les dommages directs ou indirects II est alors possible que
les limitations ou exclusions ci-dessus ne s’appliquent pas dans votre cas. La présente garantie vous confère des droits
juridiques spécifiques. Vous pouvez bénéficier d’autres droits, qui varient d’une province à I’autre. Pour connaître les
droits dont vous béneficiez dans votre province, communiquez avec le bureau des relations avec les consommateurs de
votre région.
Garant : Mabe Canada Inc.,
Burlington, Ontario
Cuisinière électrique Garantie
R
Mode d’emploi
Entretien et
nettoyage
Instructions
d’installation
Dépannage
Service à la
clientèle
Consignes
de sécurité
23
Page 48

Ce livre est imprimé sur du papier recyclé.
Imprimé au Mexique
Service à la clientèle.
Prise de rendez-vous
Il est très facile de demander l’intervention d’un technicien expert en réparation.
Appelez le 1-800-561-3344, 24 heures par jour, 7 jours par semaine
Pièces et eccessoires
Pour vous renseigner sur l’achat d’une pièce ou d’un accessoire pour votre appareil, appelez notre
Centre national de pièces au 1-800-661-1616.
Contact Us
Si vous n’êtes pas satisfaits des services fournis, contactez-nous sur notre site Internet et donnez-nous tous les
détails voulus, y compris votre numéro de téléphone, ou écrivez à:
Mabe Canada, Inc.
1 Factory Lane
Moncton, New Brunswick
E1C 9M3
5
6
1
2
3
1
21
22
2
3
42
82
9
2
0
3
31
parts
www.electromenagersmoffat.ca
 Loading...