


Moffat GSC5061W Users Manual
GAS COOKER
GSC 5061 W

2

CONTENTS
Instructions for the user Instructions for the installer
Safety Advice
Important Safety Information
Description of the appliance
Technical Features
Using the appliance
- Using the oven
- Hints & Tips
- Using the Grill
- Using the Hob
4
Technical Data
5
Installation
6
- Positioning
7
7
9
10
11
- Ventilation
- Location
Gas connections
- Electrical connection
18
19
19
19
20
20
21
23
Maintenance and Cleaning
Something Not Working
Service & Spare Parts
Customer Care
Guarantee conditions
The symbols below will guide you when reading the
13
Conversion of gas
15
16
16
17
How to read the instruction book
instruction book
Safety instructions
Step by Step Operation
24
Advice and recommendations
Environmental Information
3
IMPORTANT SAFETY INFORMATION
You MUST read these warnings carefully before installing or using the appliance. If you
need assistance, contact our Customer Care Department on 08705 950950.
Installation
• This cooker must be installed by qualified
personnel, according to the manufacturer’s
instructions and to the relevant British
Standards.
• This cooker is heavy. Take care when
moving it.
• Any gas installation must be carried out by a
registered CORGI installer.
• Remove all packaging before using the
cooker.
• Ensure that the gas and electrical supply
complies with the type stated on the rating
plate, located near the gas supply pipe.
• Do not attempt to modify the cooker in any
way.
Child Safety
• This cooker is designed to be operated by
adults. Do not allow children to play near or
with the cooker.
• The cooker gets hot when it is in use.
Children should be kept away until it has
cooled.
• Children can also injure themselves by
pulling pans or pots off the cooker.
During Use
• Ensure the control knobs are in the ‘OFF’
position when not in use.
• When using other electrical appliances,
ensure the cable does not come into contact
with the hot surfaces of the cooker.
• Unstable or misshapen pans should not be
used on the hob burners as unstable pans
can cause an accident by tipping or spillage.
• Never leave the cooker unattended when
cooking with oil and fats.
• This cooker should be kept clean at all times.
A build-up of fats or foodstuffs could result in
a fire.
• Never use plastic dishes in the oven or on
the hob burners. Never line any part of the
oven with aluminium foil.
• Always ensure that the oven vent, which is
located at the centre back of the hob, is left
unobstructed to ensure ventilation of the
oven cavity.
• Perishable food, plastic items and aerosols
may be affected by heat and should not be
stored above the cooker.
Service
• This cooker should only be repaired or
serviced by an authorised Service Engineer
and only genuine approved spare parts
should be used.
• This cooker is intended for domestic cooking
only. It is not designed for commercial or
industrial purposes.
• When in use a gas cooker will produce heat
and moisture in the room in which it has been
installed. Ensure there is a continuous air
supply, keeping air vents in good condition or
installing a cooker hood with a venting hose.
• When using the cooker for a long period
time, the ventilation should be improved, by
opening a window or increasing the extractor
speed.
• Do not use this cooker if it is in contact with
water. Do not operate the cooker with wet
hands.
• The grill pan will become hot during use,
always use oven gloves when removing or
replacing a hot grill pan.
Environmental Information
• After installation, please dispose of the
packaging with due regard to safety and the
environment.
• When disposing of an old appliance, make it
unusable, by cutting off the cable.
Keep this instruction book for future
reference and ensure it is passed on to any
new owner.
4
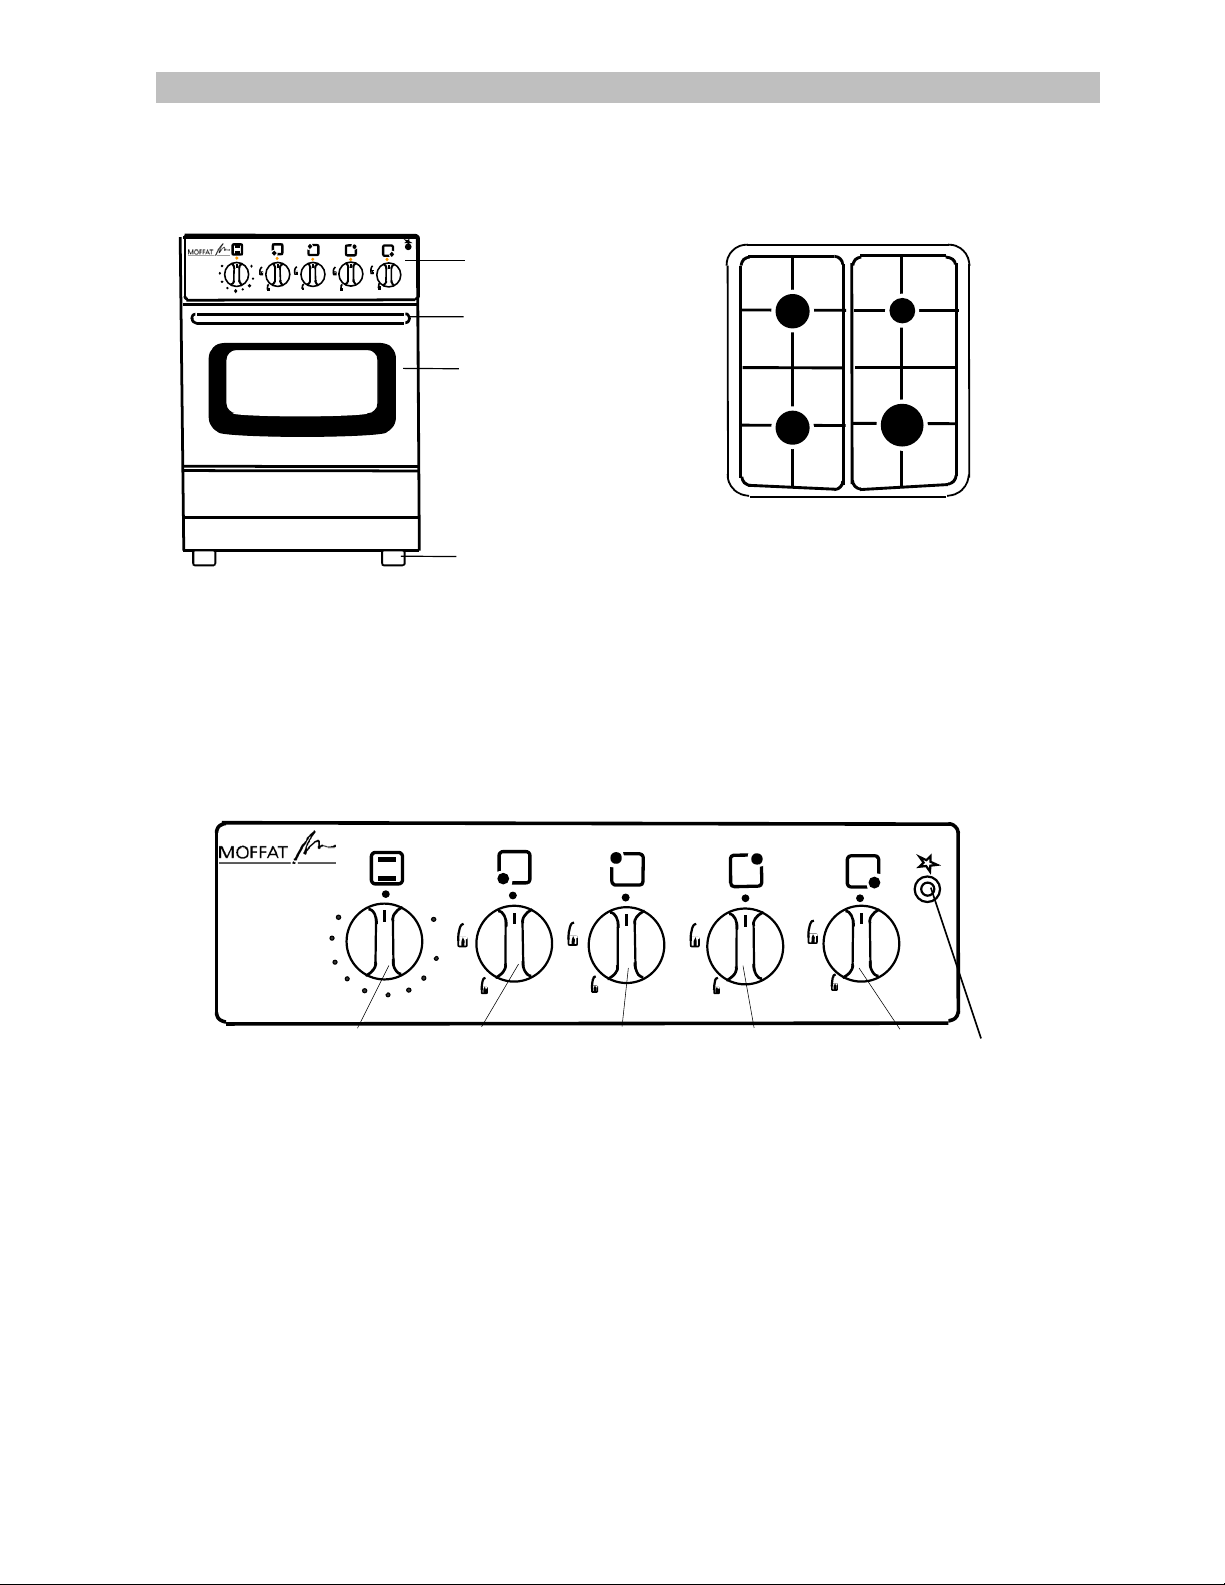
DESCRIPTION OF THE APPLIANCE
y
K
K
Hob
Control panel
Control panel
Handle door
Oven door with
glass
Adjustable
small feet
Model : GSC 5061 W
2000W
semi-rapid
1000W
auxiliar
2
1
semi-rapid
2000W
1. Front left burner (semi-rapid)
2. Back left burner (semi-rapid)
3. Back right burner (auxiliary)
4. Front right burner (rapid)
rapid
2600W
3
4
oven
1
2
3
4
5
6
OVEN/GRILL
KNOB
grill
9
8
7
FRONT
BURNER
CONTROL
KNOB
LEFT
normal
normal
BAC
LEFT
BURNER
CONTROL
KNOB
small rapid
BAC
RIGHT
BURNER
CONTROL
KNOB
GSC 5061 W
FRONT
RIGHT
BURNER
CONTROL
KNOB
IGNITION
SWITCH
5
TECHNICAL FEATURES
Free standing Class 1
Hob Pan support
Front right
Back right
Front left
Back left
Oven
Accessories
Dimensions Height to the hob
This appliance complies with the following
EEC Directives :
89/336 (Electromagnetical Compatibility
Directive) and subsequent modifications,
90/396 (Gas Appliance Directive)
93/68 (General Directives) and subsequent
modifications.
Oven
Oven power
Grill
Grill power
Oven grid
Roasting tray
Roasting grid
Protective screen
Width
Depth
Enamelled
Rapid
Auxiliary
Semi rapid
Semi rapid
Gas
3,20kW
Gas
2,50kW
Chromed
Enamelled
Chromed
Enamelled
880 - 890 mm
500 mm
600 mm
2,60kW
1,00kW
2,00kW
2,00kW
6
USING THE APPLIANCE
Before the First Use of the Cooker
Remove all packaging both inside and
outside of the cooker, before using it.
Before first use, the oven should be heated
without food. During this time, an unpleasant
odour may be emitted. This is quite normal.
1. Remove the oven accessories and ensure all
packaging has been removed.
2. Ignite the oven burner (see instructions) and
turn the control knob to 9 (maximum).
3. Open a window for ventilation
4. Allow the oven to run empty for
approximately 45 minutes.
This procedure should be repeated with the grill
function for approximately 5-10 minutes.
Using the Oven
The cooker gets hot when it is in use.
Children should be kept away until it
has cooled.
Stand clear when opening the drop
down oven door.
Do not allow it to fall open - support the
door using the door handle, until it is
fully open.
Atention: when turning on the oven and
grill burner the oven door has to be
opened.
oven
1
2
3
4
grill
9
8
5
7
6
The oven has three shelf levels, and is supplied
with one shelf.
The shelf positions are counted from the bottom
of the oven as shown in the diagram.
Do not place cookware or foil directly
on the oven base.
Oven Safety device
The cooker features a thermocouple; if for
any reason the flame should extinguish, the
device will stop the gas flow.
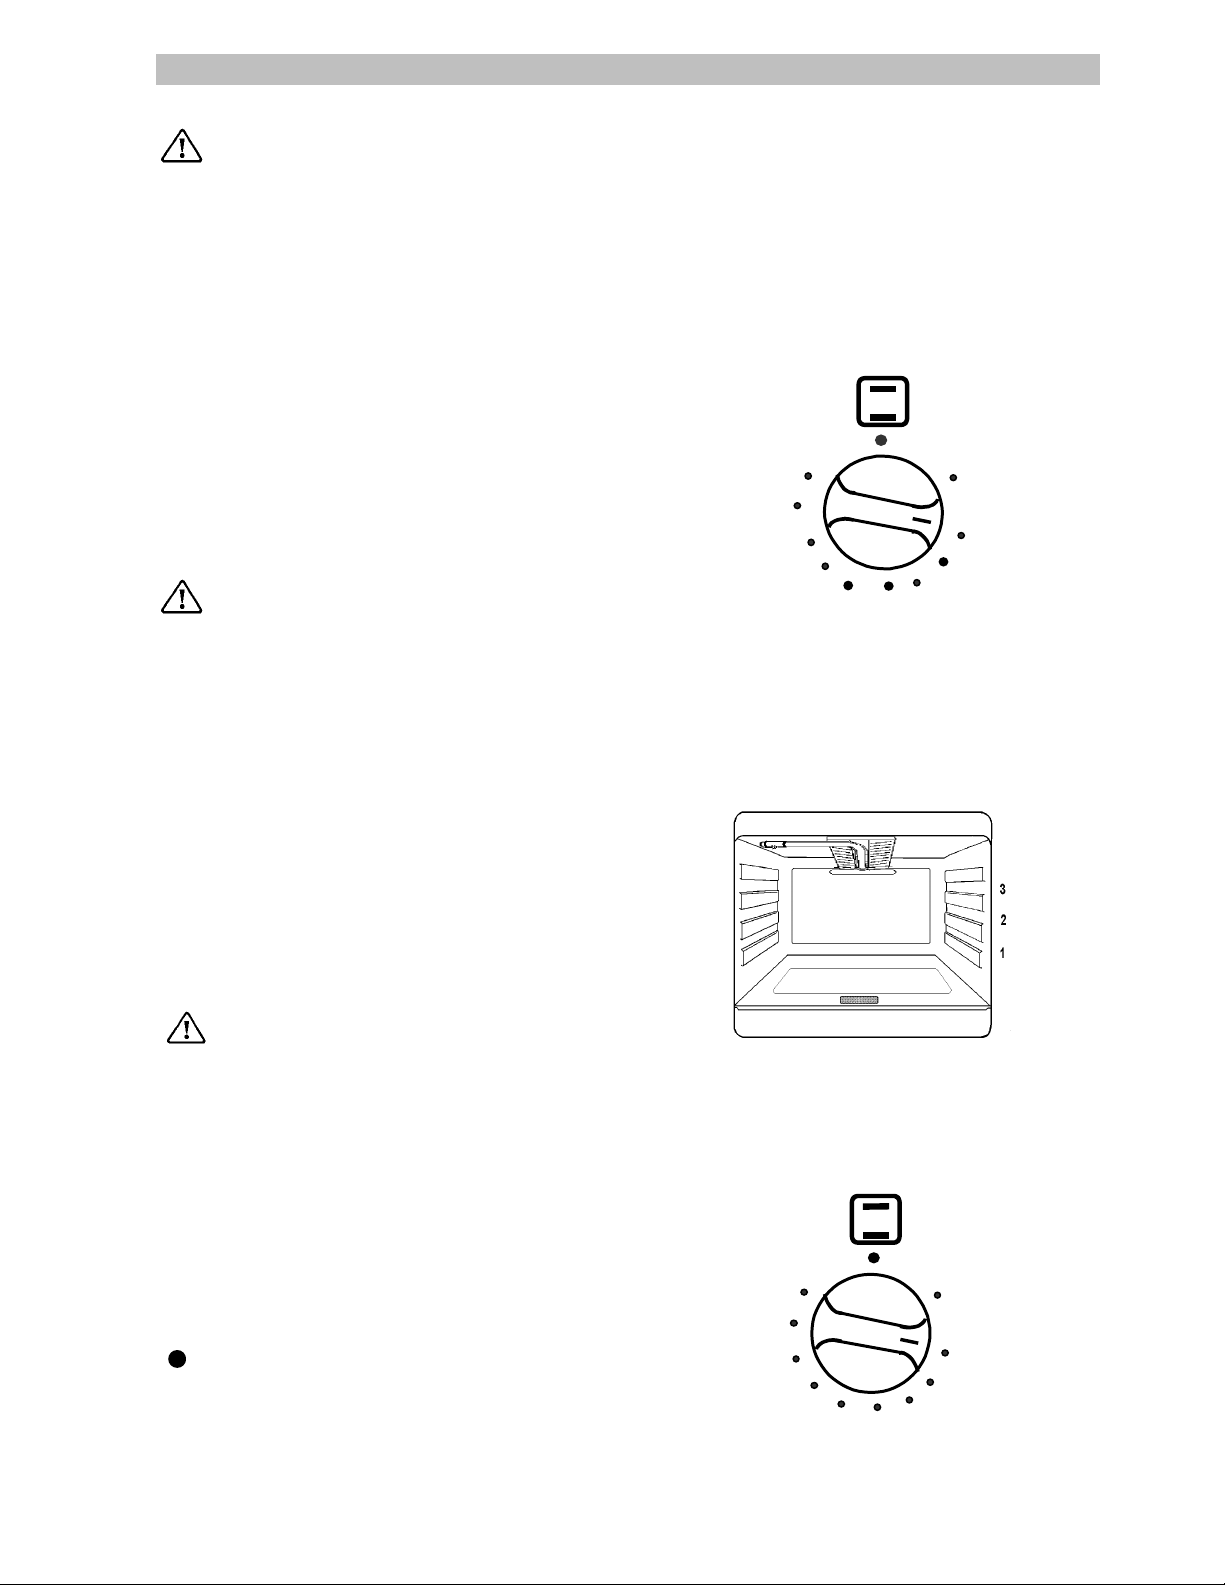
Use
The oven can be used for traditional cooking, or
for grilling, but not both functions simultaneously.
The symbol on the knob corresponds to the
symbol on the control panel.
Off
“9” Maximum
“1” Minimum
“Grill” Grill function (heat come from the top
burner only.
oven
2
3
grill
1
9
4
5
6
8
7
7
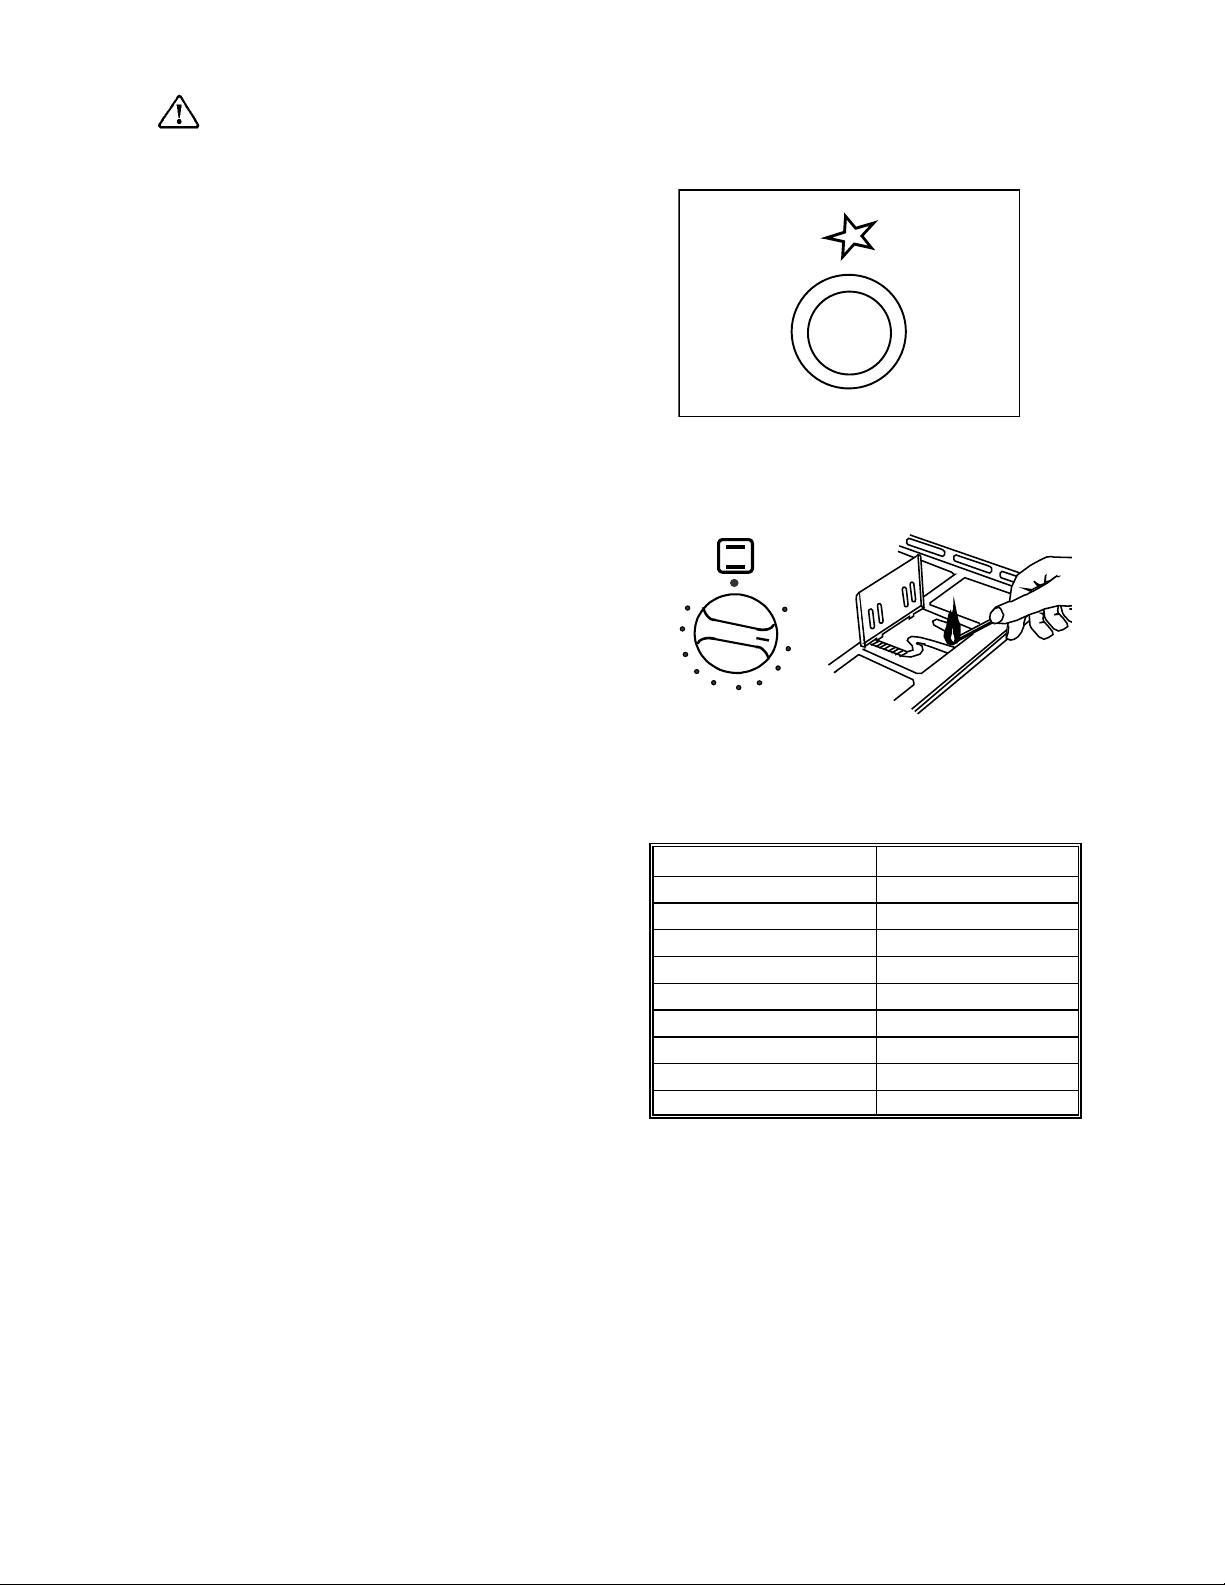
Ignition
Attention: when turning on the oven
and grill burner the oven door has to be
opened.
• Open the oven door and lift the small lid
on the bottom of the cavity, push and turn
the control knob to the left to position 9,
keeping the control knob pressed.
• At the same time, push the electronic
ignition knob (see fig). Keep it pushed until
the gas ignites (1 spark / second).
• Release the knob after 10 seconds and
check that the burner is ignited through the
holes in the bottom lid.
OR
Lack of power
• Open the oven door and lift the small lid on
the bottom of the cavity, push and turn the
control knob to the left to position 9, keeping
the control knob pressed.
• Hold a flame to the gas grill burner holes
(see fig.).
• Release the knob after 10 seconds and
check that the burner is ignited through the
holes in the bottom lid.
oven
1
2
3
grill
9
4
5
8
7
6
If for any reason the flame should extinguish
turn control knob to the off position, after at least
1 minute, try to re-ignite the oven.
Cooking in the Oven
Traditional cooking is made by natural
convection; the heated air circulates on the
principle of ascending and descending draughts.
It is necessary to pre-heat the oven.
All cookers vary and it is important to be
aware of the approximate cooking
temperatures before you use the cooker.
The chart shows the gas mark temperatures
together with the approximate equivalent
temperatures in
It may be necessary to adjust the temperature to
suit your individual requirements. Only
experience will enable you to determine the
correct setting for your personal requirements.
o
C.
Gas Mark Temperature oC
1 150
2 162
3 175
4 187
5 200
6 212
7 225
8 237
9 250
8