

Page 1
INS11736 - 8/21
PLEASE CONTACT MOEN FIRST
For Installation Help, Missing or Replacement Parts
(USA) 1-800-BUY-MOEN (1-800-289-6636) www.moen.com
(Canada) 1-800-465-6130 www.moen.ca
POR FAVOR, CONTÁCTESE PRIMERO CON MOEN
Para obtener ayuda de instalación, piezas faltantes o de
recambio
(Costa Este) 011 52 (800) 718-4345 www.moen.com.mx
VEUILLEZ D’ABORD CONTACTER MOEN
En cas de problèmes avec l’installation, ou pour obtenir
toute pièce manquante ou de rechange
(Canada) 1-800-465-6130 www.moen.ca
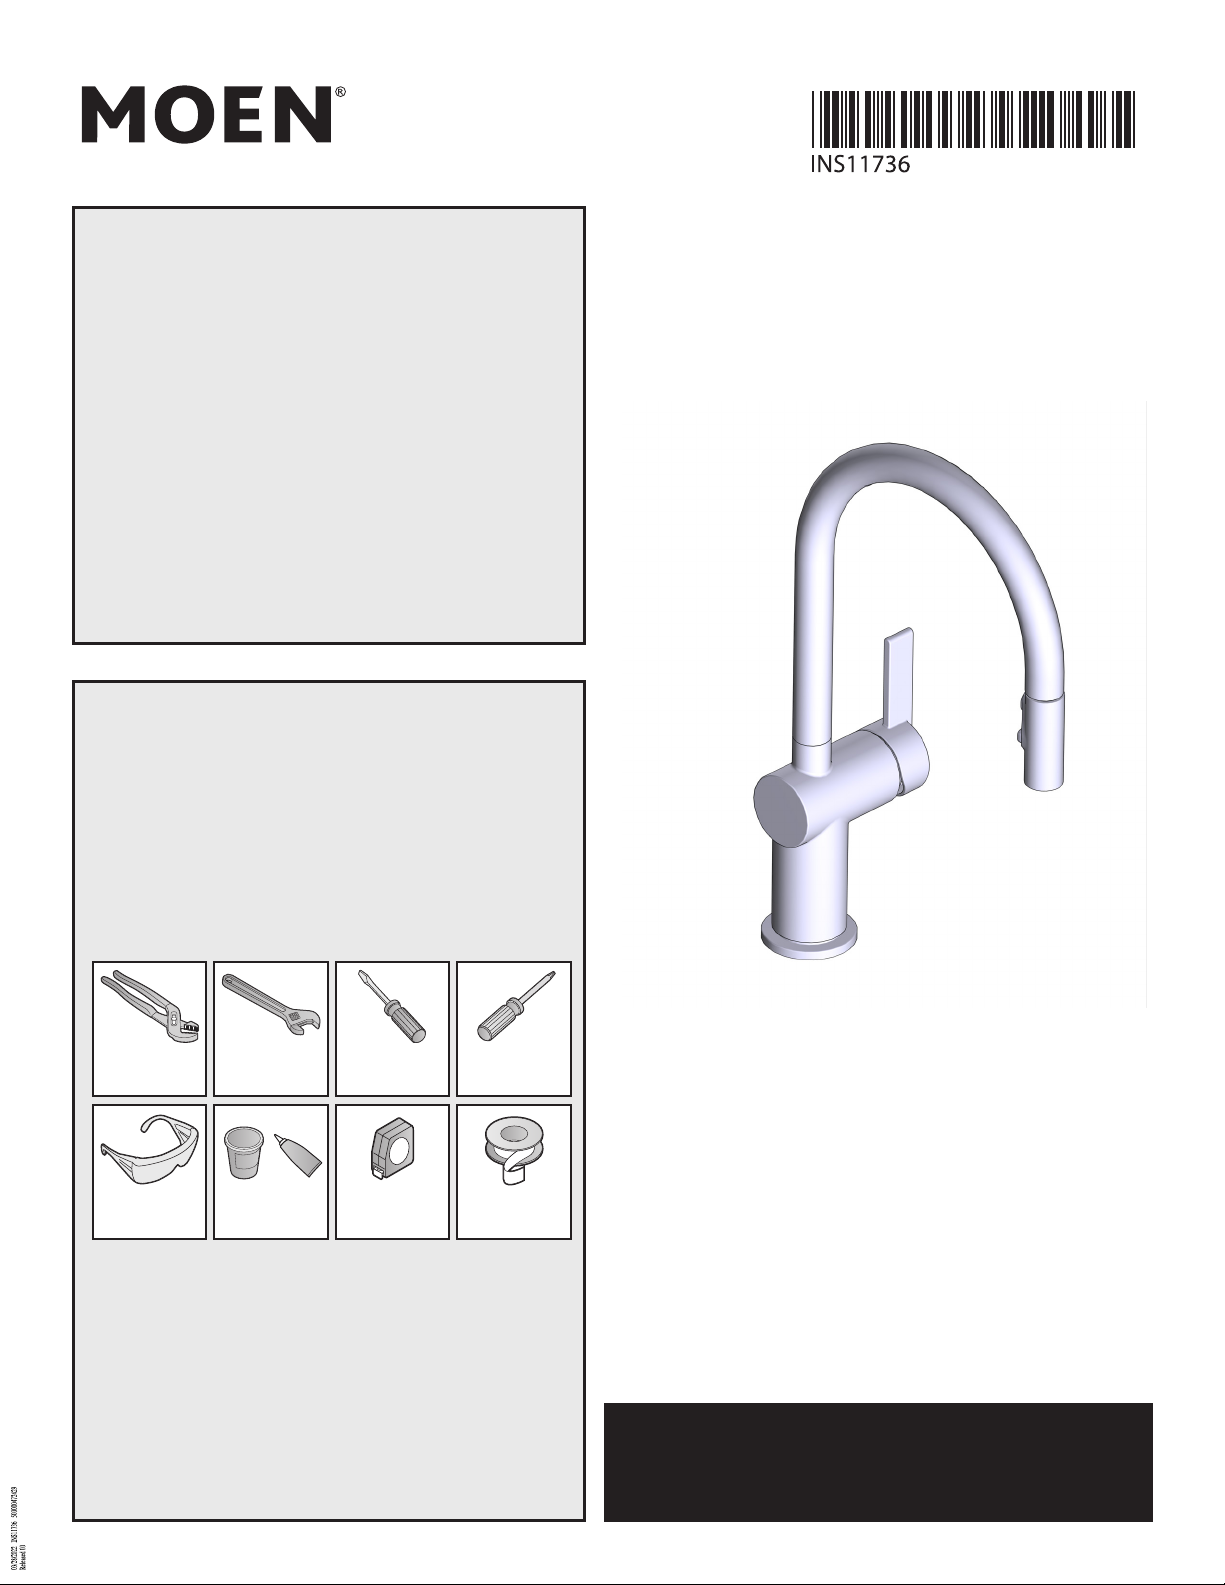
HELPFUL TOOLS
For safety and ease of faucet replacement, Moen
recommends the use of these helpful tools.
HERRAMIENTAS ÚTILES
Para que el cambio de la llave sea fácil y seguro, Moen le
recomienda usar estas útiles herramientas.
SINGLE HANDLE PULLDOWN KITCHEN FAUCET
MEZCLADORA MONOMANDO EXTENSIBLE
PARA COCINA
ROBINET DE CUISINE À BEC RÉTRACTABLE
ET POIGNÉE UNIQUE
OUTILS UTILES
Par mesure de sécurité et pour faciliter l’installation, Moen
suggère l’utilisation des outils suivants.
Adjustable Pliers
Alicate ajustable
Pinces réglables
Safety Glasses
Gafas de seguridad
Lunettes de sécurité
Required for Optional Hardwire Installation
Necesario para la instalación optativa del cableado permanente
Requis pour l’installation câblée optionnelle
Adjustable Wrench
Llave ajustable
Clé anglaise
Sealant
Sellador
Mastic
Flathead Screwdriver
Destornillador de punta chata
Tournevis à tête plate
Tape Measure
Cinta métrica
Mètre à ruban
Phillips Screwdriver
Destornillador Phillips
Tournevis Phillips
Thread Seal Tape
Cinta para sellar
Ruban pour joints
roscas
filetés
Image is for reference only
(Style varies by model)
La imagen es sólo como referencia
(El estilo varía por el modelo)
Cette image n'est offerte qu'à titre indicatif seulement
(Le style varie selon le modèle)
Record Purchased Model Number:
Registro del número de modelo comprado:
Consigner ici le numéro du modèle acheté :
_______________________
(Save instruction sheet for future reference)
(Guarde la hoja de instrucciones para futura referencia)
(Garder ces directives pour référence ultérieure)
Register Online:
Regístrese en línea:
S’enregistrer en ligne :
www.moen.com/product-registration
Page 2
Parts List
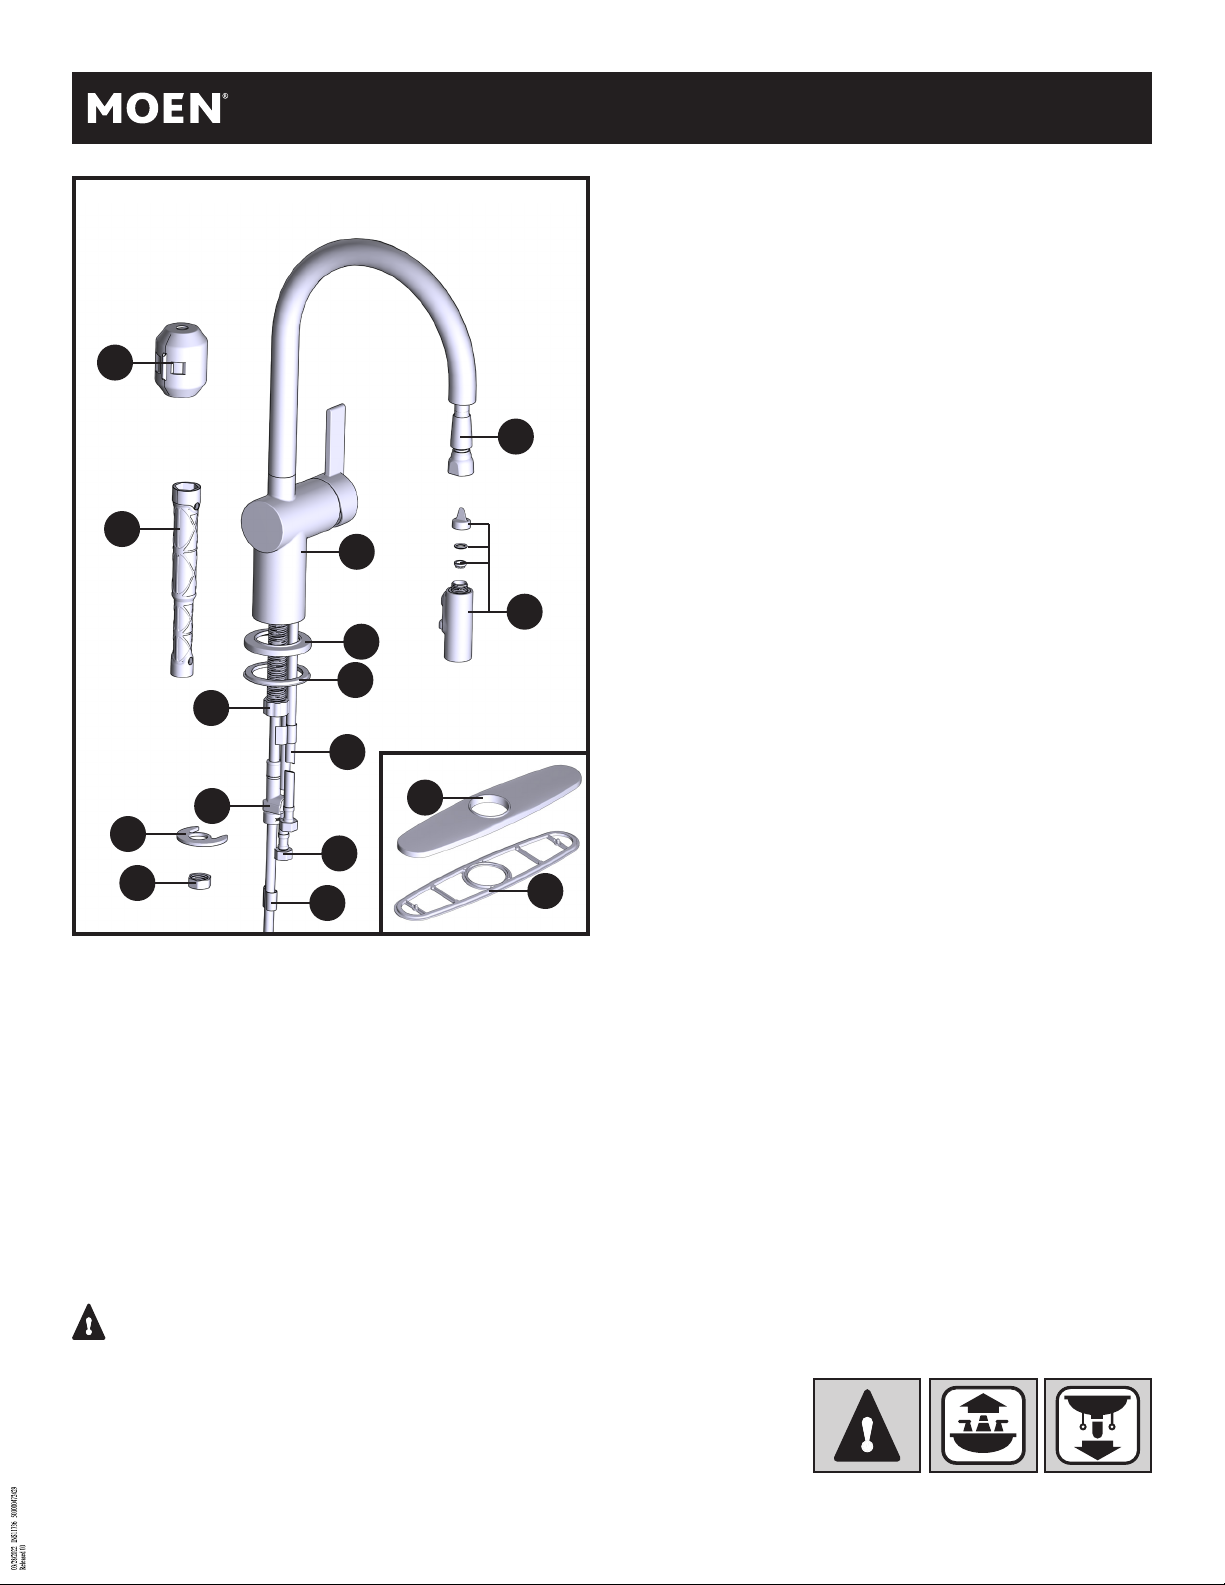
A. Faucet Body
B. Escutcheon
C. Deck Gasket
D. Installation Tool
E. Support Bracket
H
F. Mounting Bracket Nut
G. Spray Wand
J
H. Hose Weight
I. Hose Protector
J. Pulldown Hose
D
A
G
B
C
I
L
K
N
E
M
F
J1
O
Liste des pièces
A. Faucet Body
B. Escutcheon
C. Deck Gasket
D. Installation Tool
E. Support Bracket
F. Mounting Bracket Nut
G. Spray Wand
H. Hose Weight
I. Hose Protector
J. Pulldown Hose
Lista de piezas
J1. Pulldown Hose Weight
Indicator Mark
K. Outlet Hose
L. Supply Hose Hot
M. Supply Hose Cold
N. Deck Plate
O. Deck Plate Gasket
J1. Pulldown Hose Weight
Indicator Mark
K. Outlet Hose
L. Supply Hose Hot
M. Supply Hose Cold
N. Deck Plate
O. Deck Plate Gasket
A. Faucet Body
B. Escutcheon
C. Deck Gasket
D. Installation Tool
E. Support Bracket
F. Mounting Bracket Nut
G. Spray Wand
H. Hose Weight
I. Hose Protector
J. Pulldown Hose
CAUTION — TIPS FOR REMOVAL OF OLD FAUCET:
Always turn water supply OFF before removing existing faucet or disassembling the valve. Open
faucet handle to relieve water pressure and ensure that complete water shut-off has been
accomplished.
PRECAUCIÓN — CONSEJOS PARA CAMBIAR LA LLAVE MEZCLADORA:
Siempre CIERRE la toma de agua antes de quitar la llave existente o desmontar la válvula. Abra la
llave para liberar la presión, y asegúrese de que esté bien cerrada el agua.
ATTENTION SUGGESTIONS POUR ENLEVER L’ANCIEN ROBINET:
Toujours couper l’alimentation en eau avant d’enlever ou de démonter le robinet. Ouvrir le robinet
pour libérer la pression d’eau et pour s’assurer que l’alimentation en eau a bien été coupée.
J1. Pulldown Hose Weight
Indicator Mark
K. Outlet Hose
L. Supply Hose Hot
M. Supply Hose Cold
N. Deck Plate
O. Deck Plate Gasket
Icon Legend/Leyenda de Iconos/
Légende des icônes
Warning
Advertencia
Avertissement
Above sink
Encima del lavabo
Au-dessus de l’évier
Below sink
Debajo del fregadero
Sous l’évier
2
Page 3
INS11736 - 8/21
A
or
A
o
N
ou
B
C
O
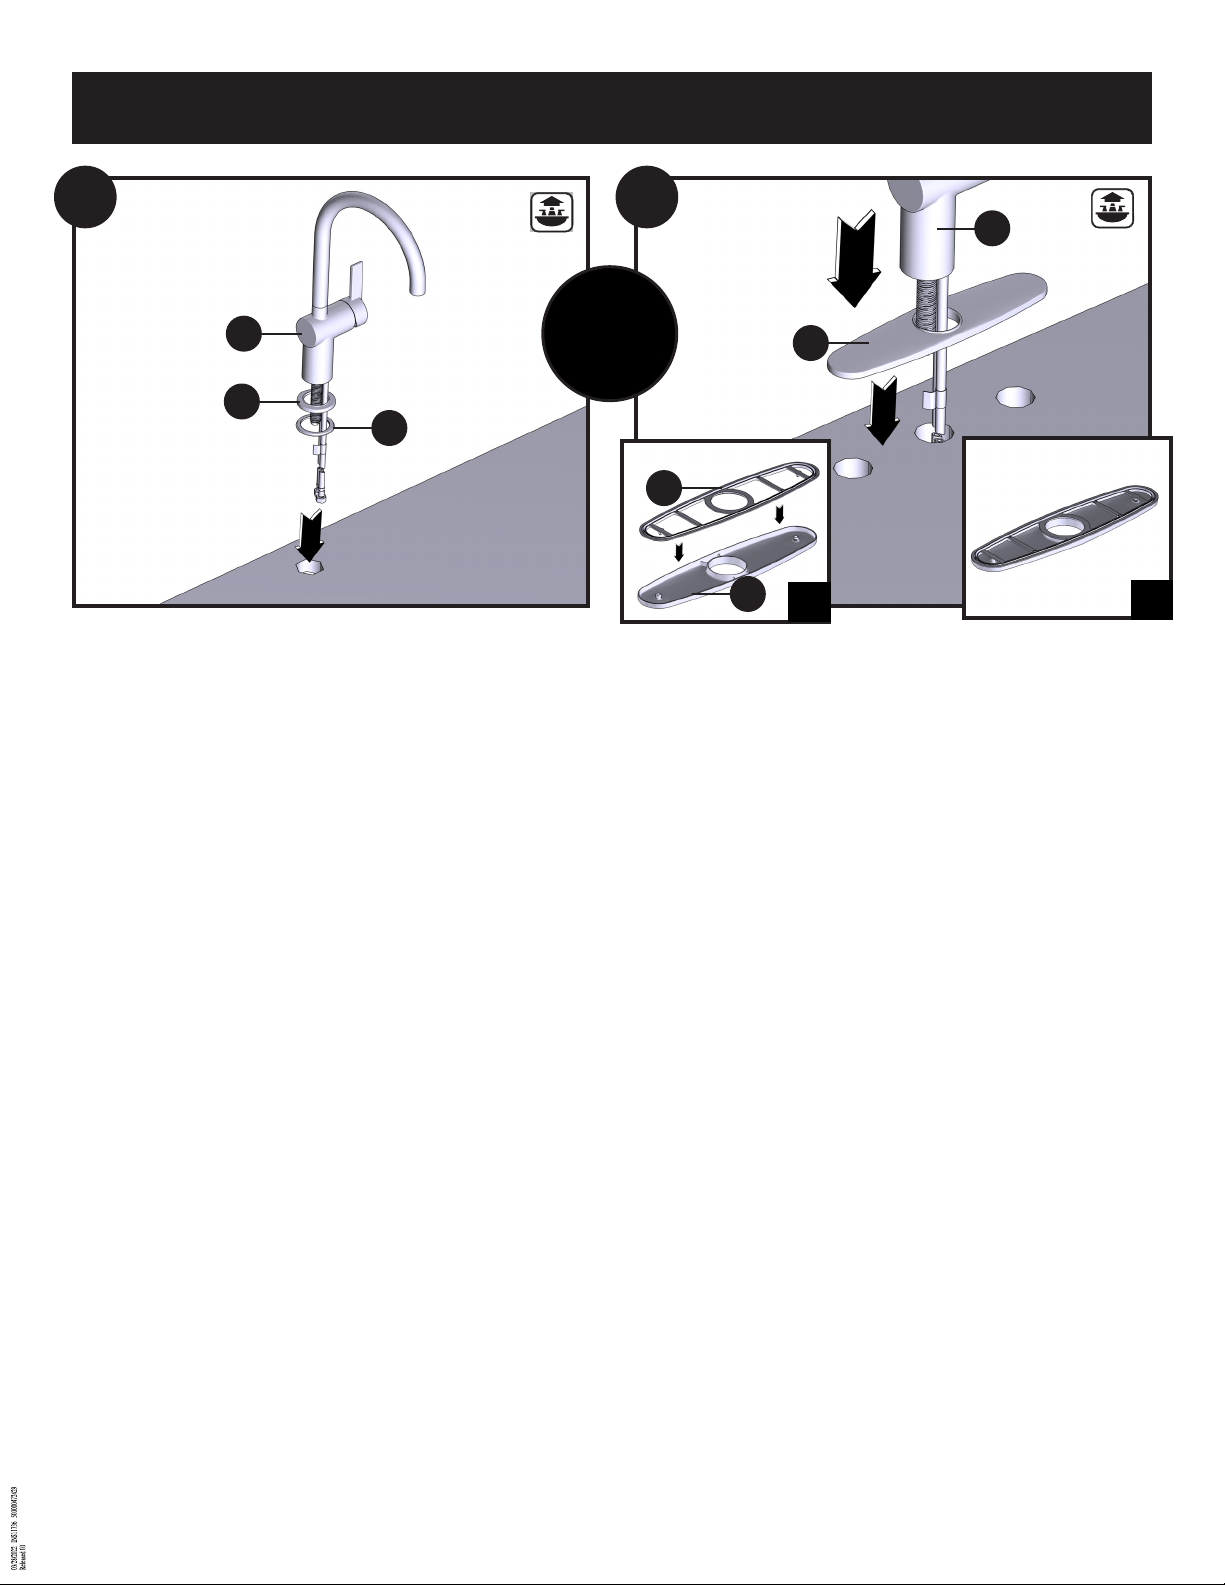
For Single Hole Applications:
1. Place Escutcheon (B) and Deck Gasket (C) onto base of Faucet Body
(A) and place into sink hole.
NOTE: Install with handle on right side only
For Single Hole Applications:
1. Place Escutcheon (B) and Deck Gasket (C) onto base of Faucet Body
(A) and place into sink hole.
NOTE: Install with handle on right side only
For Single Hole Applications:
1. Place Escutcheon (B) and Deck Gasket (C) onto base of Faucet Body
(A) and place into sink hole.
NOTE: Install with handle on right side only
N
1. Place Deck Plate Gasket (O) onto Deck Plate (N).
2. Firmly snap Deck Plate Gasket (O) onto Deck Plate (N).
3. Flip Deck Plate (N) over and place onto Mounting surface and
install Faucet Body (A) in hole on sink.
1. Place Deck Plate Gasket (O) onto Deck Plate (N).
2. Firmly snap Deck Plate Gasket (O) onto Deck Plate (N).
3. Flip Deck Plate (N) over and place onto Mounting surface and
install Faucet Body (A) in hole on sink.
1. Place Deck Plate Gasket (O) onto Deck Plate (N).
2. Firmly snap Deck Plate Gasket (O) onto Deck Plate (N).
3. Flip Deck Plate (N) over and place onto Mounting surface and
install Faucet Body (A) in hole on sink.
1
2
3
Page 4
A
F
E
D
F
1
2
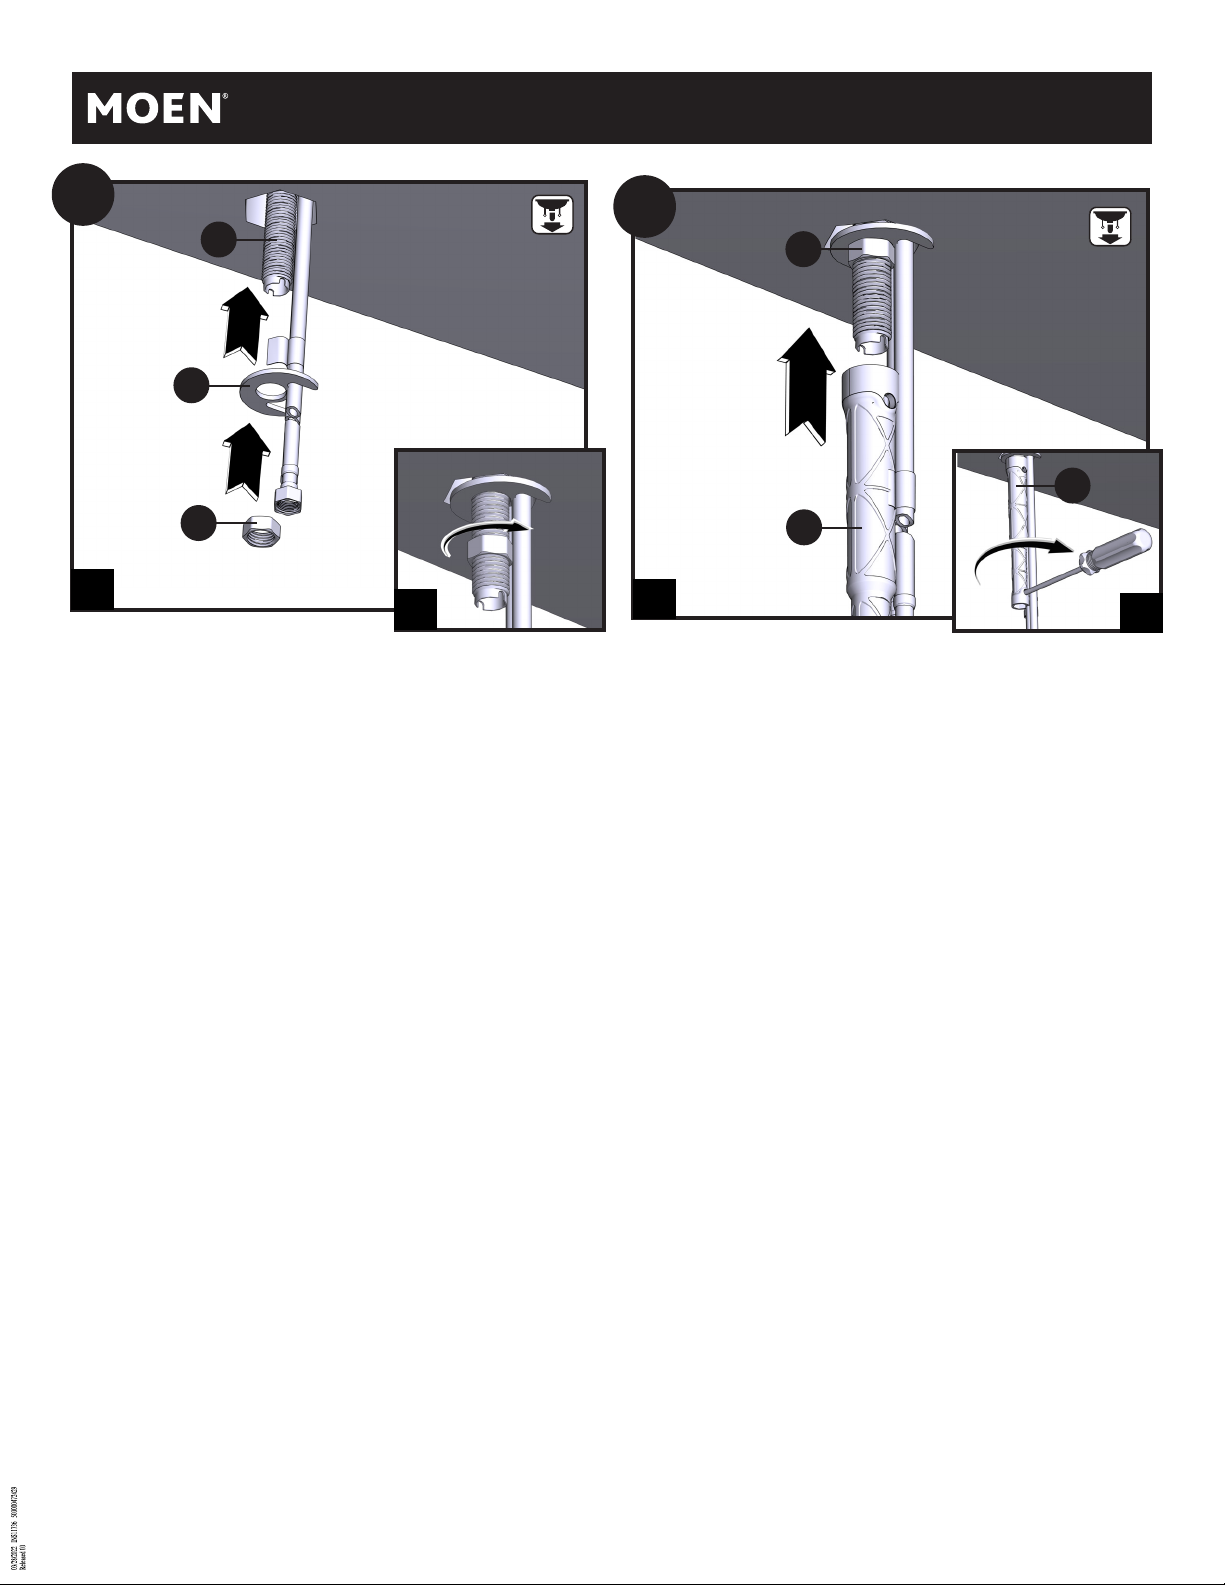
1. Slide Mounting Washer (E) up onto Faucet Body (A) under sink.
2. Install Mounting Nut (F).
1. Slide Mounting Washer (E) up onto Faucet Body (A) under sink.
2. Install Mounting Nut (F).
1. Slide Mounting Washer (E) up onto Faucet Body (A) under sink.
2. Install Mounting Nut (F).
D
1
1. Hand tighten Mounting Nut (F) with Installation Tool (D).
2. Use screwdriver though hole in Installation Tool (D)
to tighten firmly.
1. Hand tighten Mounting Nut (F) with Installation Tool (D).
2. Use screwdriver though hole in Installation Tool (D)
to tighten firmly.
1. hand tighten Mounting Nut (F) with Installation Tool (D).
2. Use screwdriver though hole in Installation Tool (D)
to tighten firmly.
2
4
Page 5
INS11736 - 8/21
M
L
M
I
1
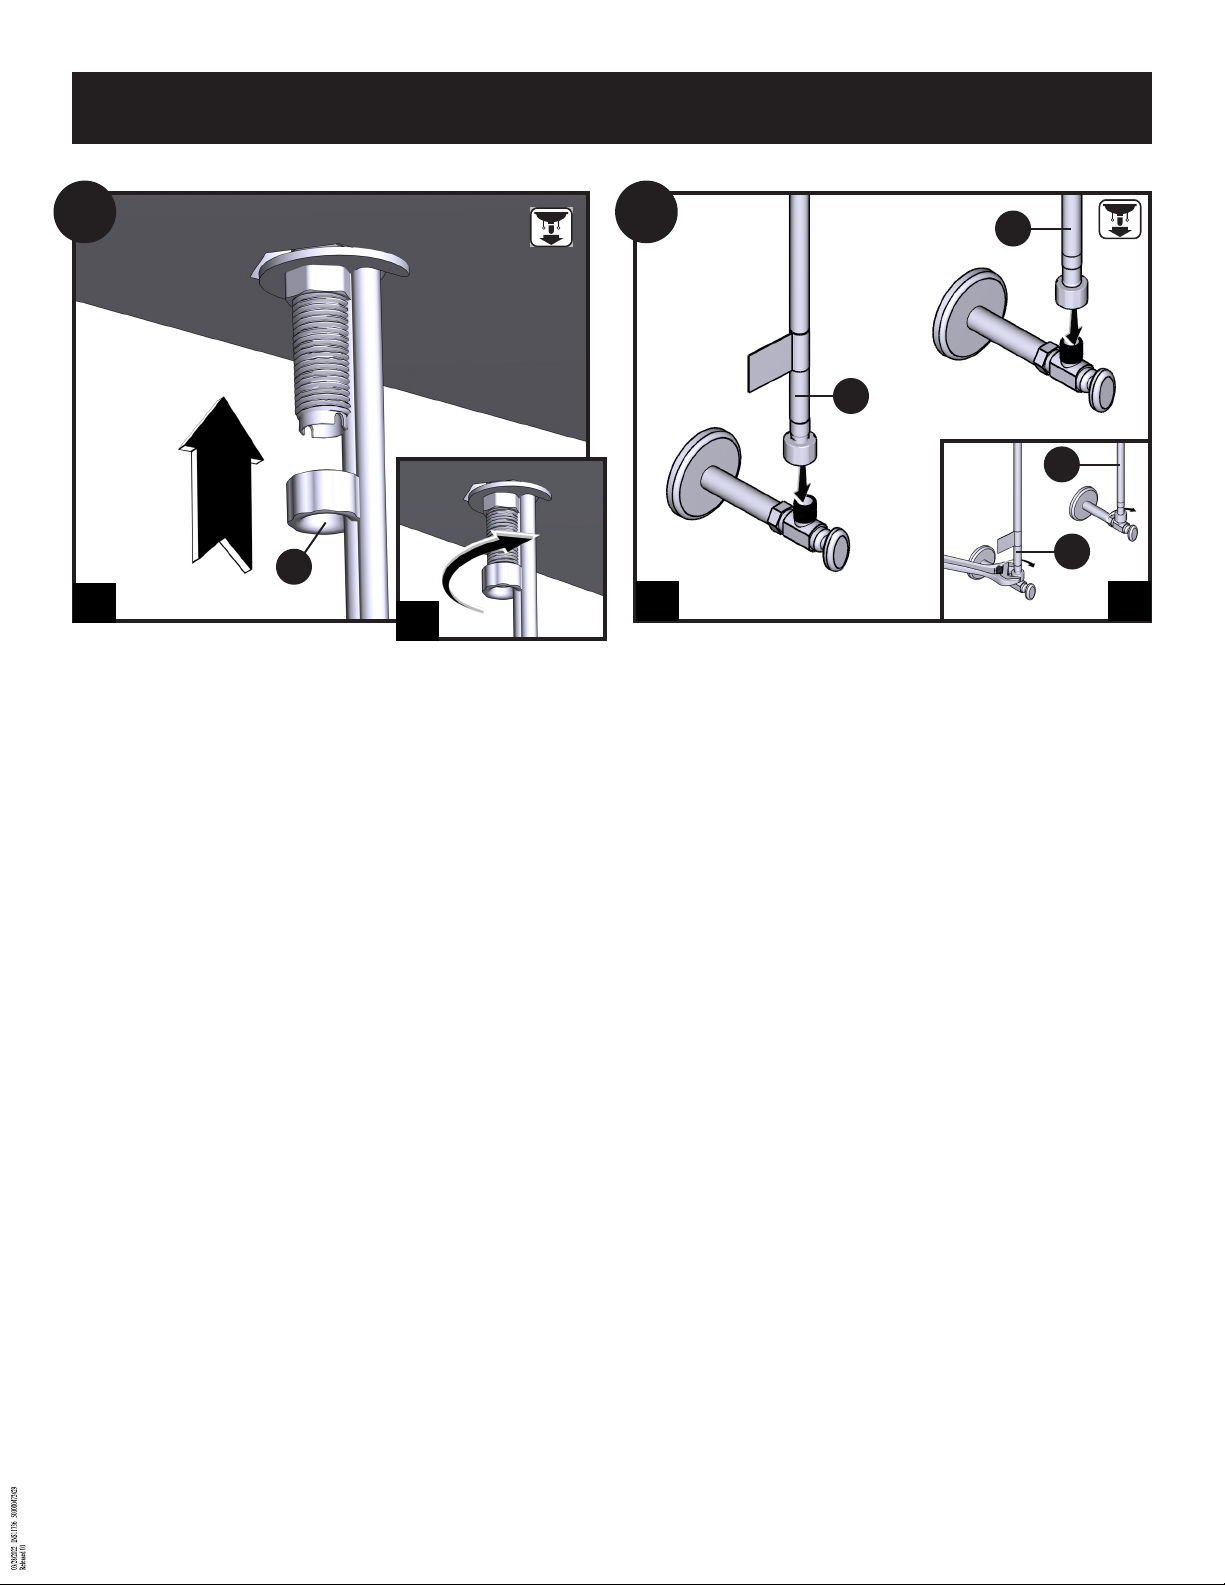
1. Install Hose Protector (I) finger tight.
1. Install Hose Protector (I) finger tight.
1. Install Hose Protector (I) finger tight.
L
2 1
2
1. Attach Flexible lines (L and M) to shutoff valves.
2. Tighten with wrench until secure.
1. Attach Flexible lines (L and M) to shutoff valves.
2. Tighten with wrench until secure.
1. Attach Flexible lines (L and M) to shutoff valves.
2. Tighten with wrench until secure.
5
Page 6
A
H
H
2
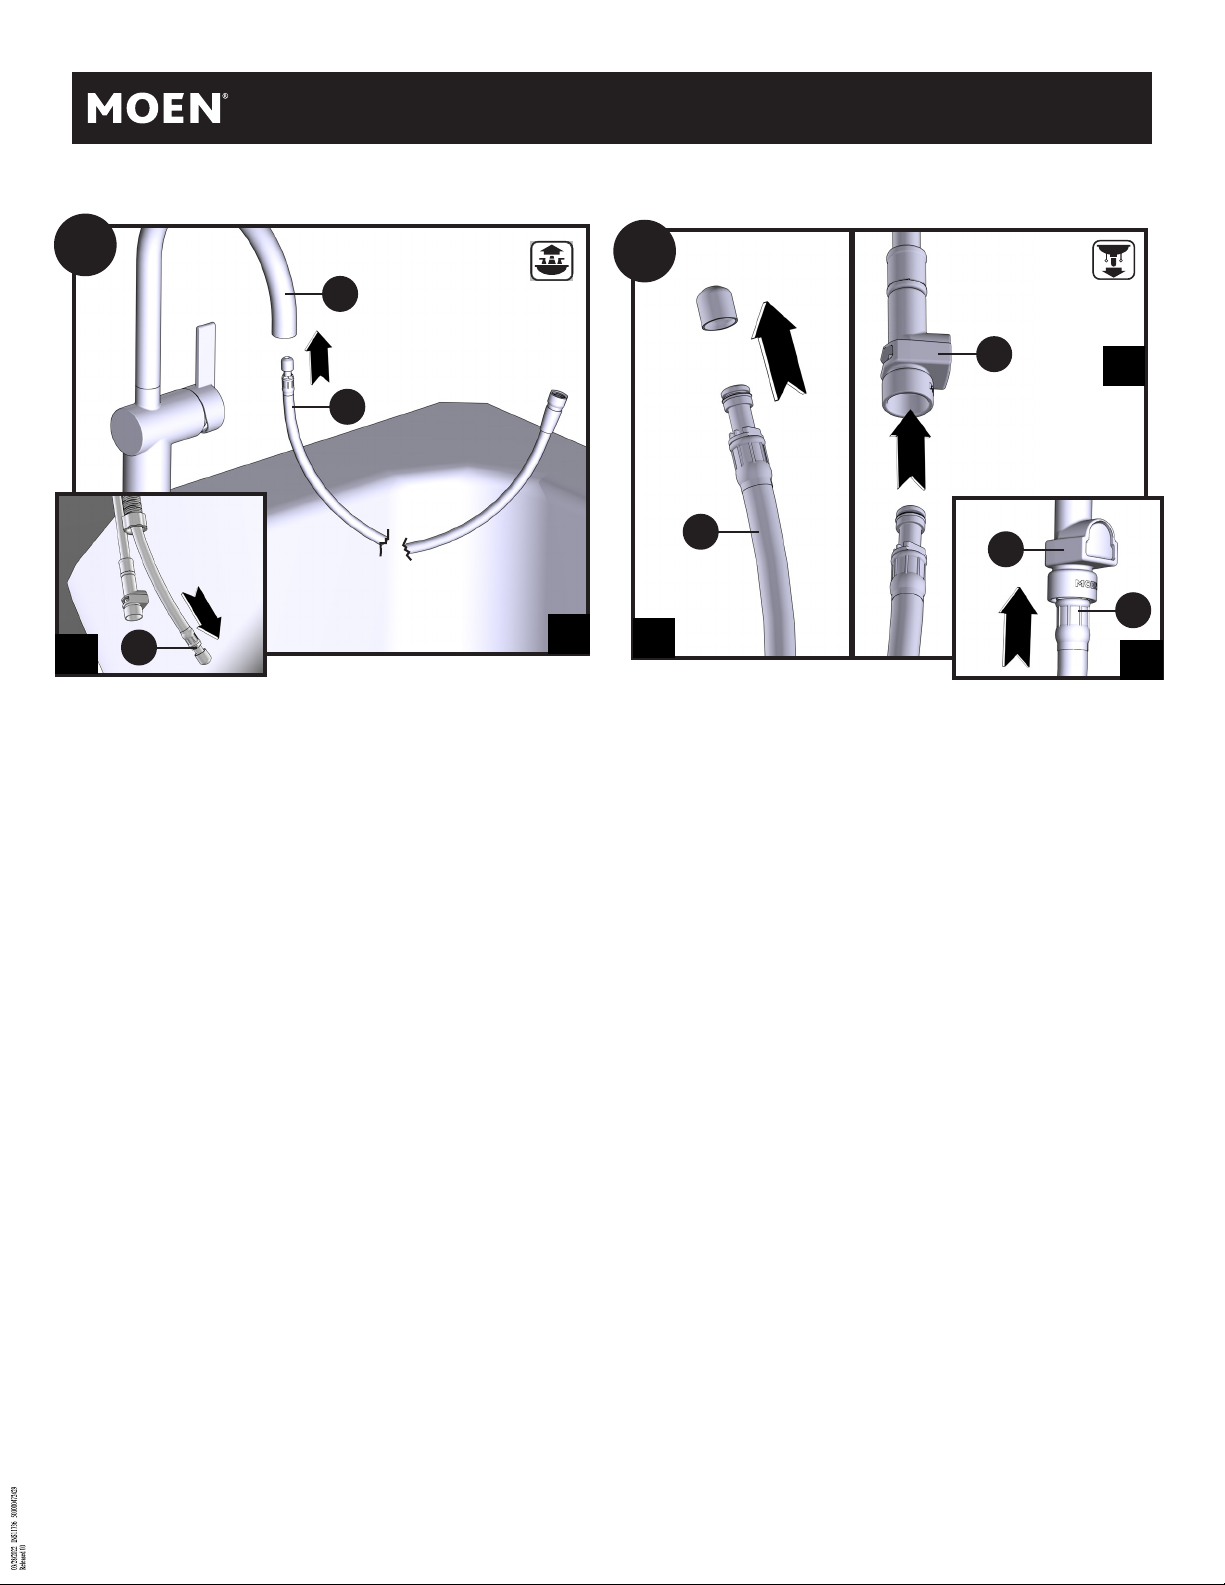
1. Insert small end of Pulldown Hose (H) into spout and feed through
Faucet Body (A).
1. Insert small end of Pulldown Hose (H) into spout and feed through
Faucet Body (A).
1. Insert small end of Pulldown Hose (H) into spout and feed through
Faucet Body (A).
1
L
H
L
1
1. Remove and discard plastic cap from end of Pullout Hose (H).
2. Insert hose into Quick Connect Adapter (L).
3. Push until a “click” is heard. Tug Downward to test engagement.
1. Remove and discard plastic cap from end of Pullout Hose (H).
2. Insert hose into Quick Connect Adapter (L).
3. Push until a “click” is heard. Tug Downward to test engagement.
2
H
3
1. Remove and discard plastic cap from end of Pullout Hose (H).
2. Insert hose into Quick Connect Adapter (L).
3. Push until a “click” is heard. Tug Downward to test engagement.
6
Page 7
INS11736 - 8/21
J1
J
Install zone
Zona de instalacion
Zone d’installation
H
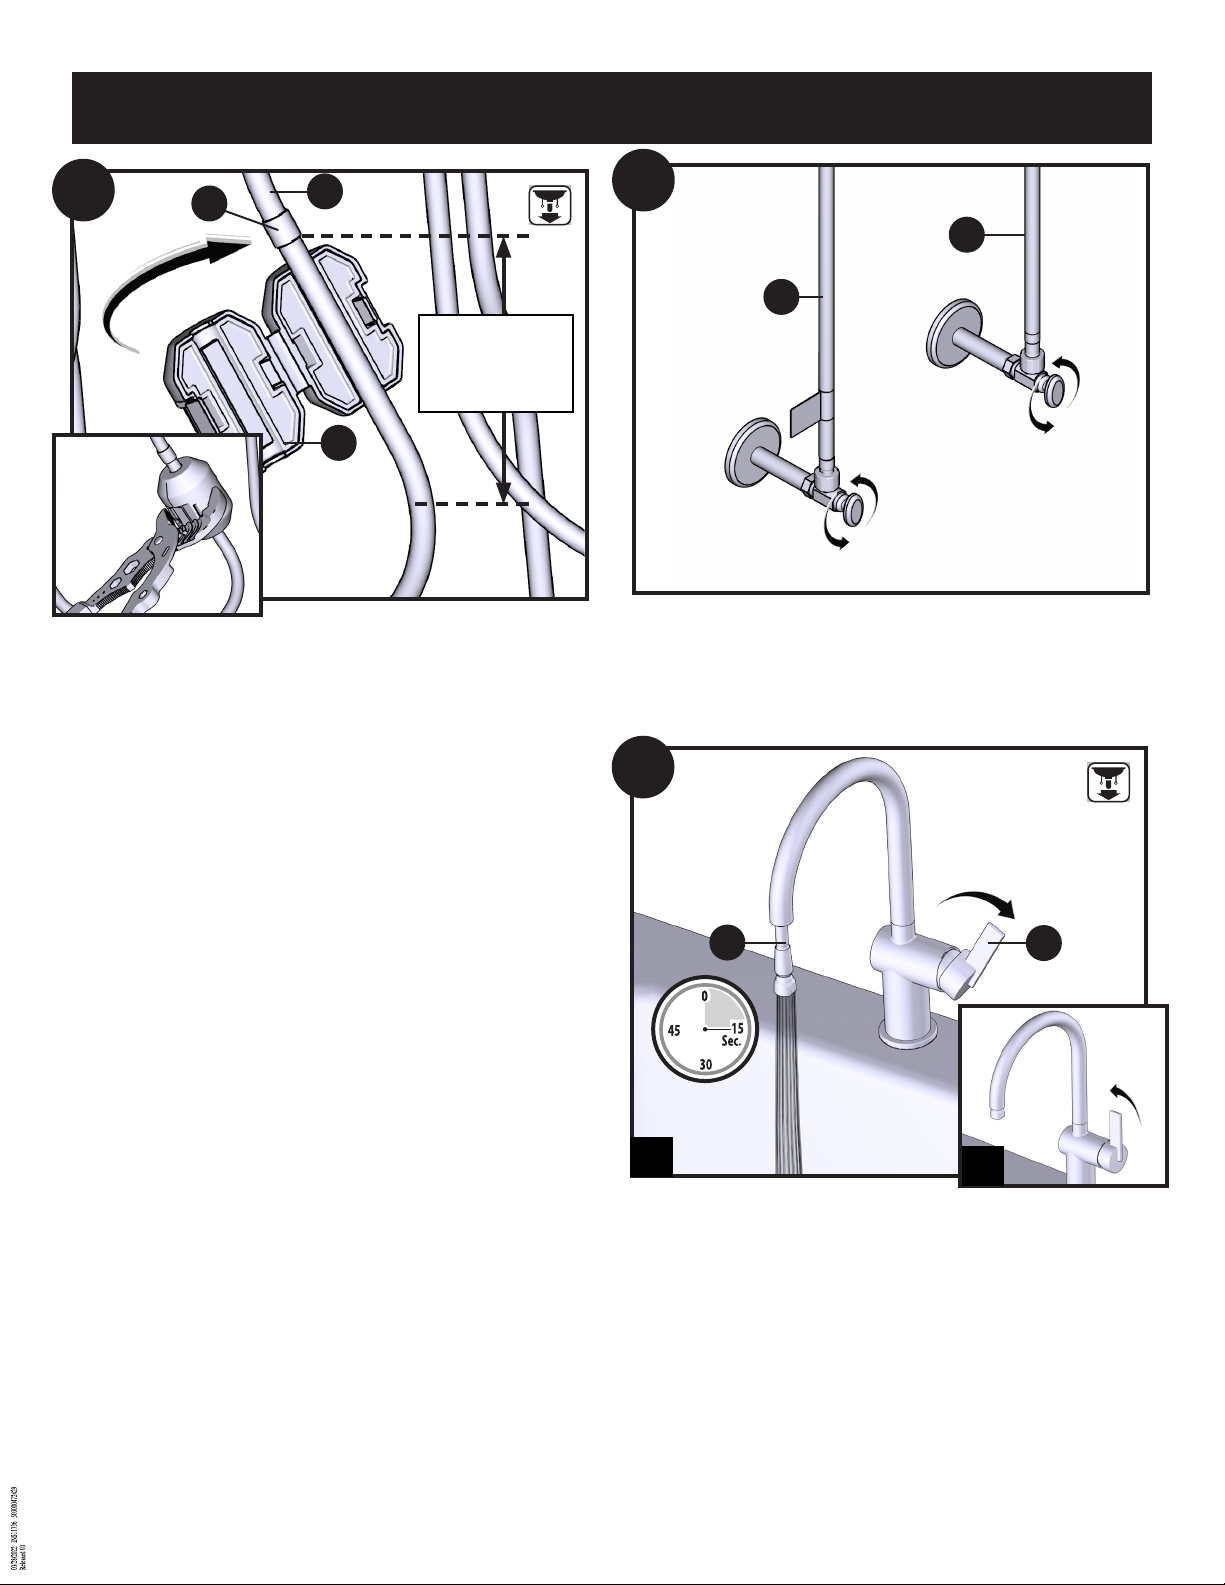
IMPORTANT - Locate Hose Weight Locator Mark (J1) on Pulldown Hose (J). Install Hose
Weight (F) just above of loop curvature in hose on same side of hose as locator mark.
Adjustable pliers may be useful to securely clamp Hose Weight (H).
IMPORTANTE: Localice la marca de ubicación del peso de la manguera (J1) en la manguera
retráctil (J). Instale el peso de la manguera (H) justo sobre el inicio de la curva de la
manguera, del mismo lado donde se encuentra la marca de ubicación en el tubo. Los alicates ajustables pueden ser útiles para sujetar firmemente el peso de la manguera (H).
IMPORTANT - Trouver la marque de l’emplacement du contrepoids du tuyau (J1) sur le
tuyau rétractable (J). Installer le contrepoids du tuyau (H) juste au-dessus de la courbure
de la boucle du tuyau, du même côté que la marque de l’emplacement sur le tuyau. On peut
utiliser une pince ajustable pour bien serrer le contrepoids du tuyau (H).
M
L
1. Turn on Hot (L) and Cold (M) water supply.
1. Turn on Hot (L) and Cold (M) water supply.
1. Turn on Hot (L) and Cold (M) water supply.
J
1
1. Hold Pulldown Hose (J) and turn on Faucet (A), allow water to run
for 15 seconds.
2. Turn off faucet (A).
1. Hold Pulldown Hose (J) and turn on Faucet (A), allow water to run
for 15 seconds.
2. Turn off faucet (A).
1. Hold Pulldown Hose (J) and turn on Faucet (A), allow water to run
for 15 seconds.
2. Turn off faucet (A).
A
2
7
Page 8
ATTENTION / ATENCIÓN / MISE EN GARDE
8" (203mm)
8" (203mm)
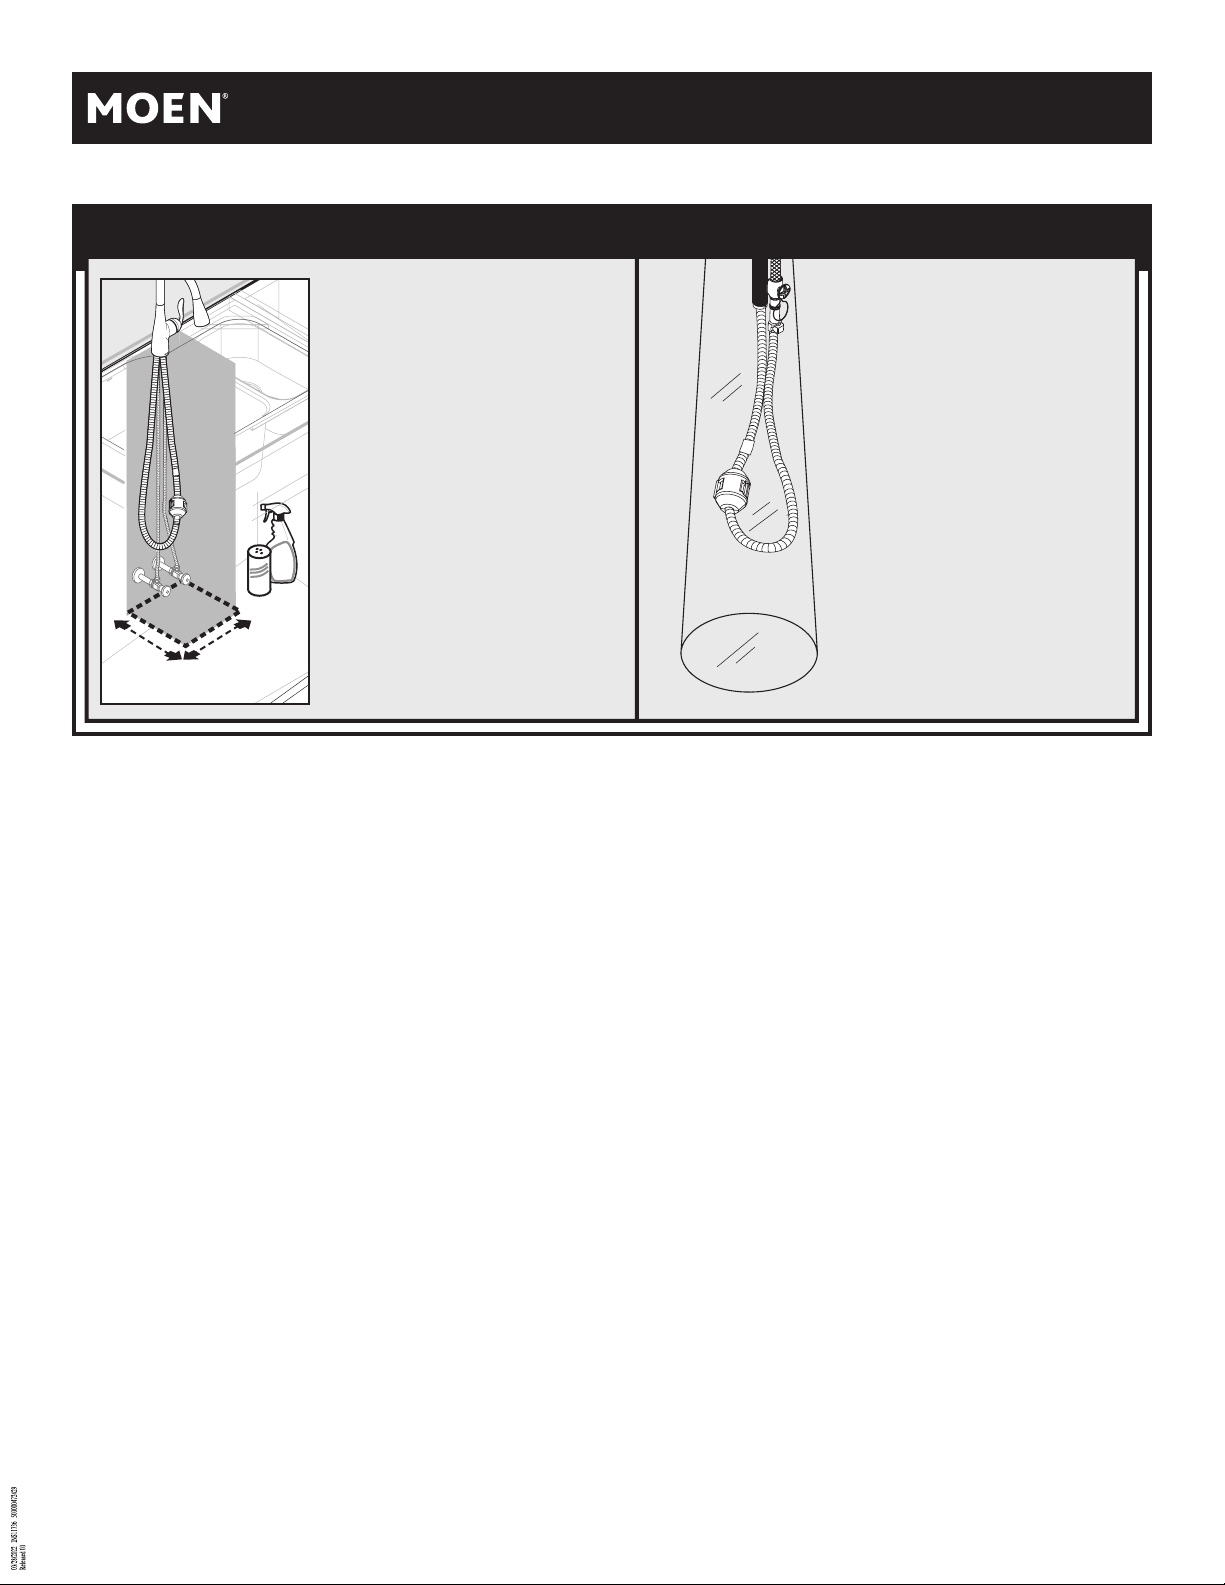
For the best performance of your new pulldown faucet,
Moen recommends the following:
• Maintain 8"x8" clear area for the hose and weight to travel, free of
any moveable items including (bottles, cleaning supplies, etc.).
See Illustration.
• If non-moveable pipes or other xtures are interfering, consider
repositioning the weight higher on the hose.
• Periodically check to be sure no obstructions have entered this
clear zone.
Para obtener el mayor rendimiento de su nueva llave
retractable, Moen recomienda lo siguiente:
• Mantenga un espacio de 20 cm x 20 cm para el movimiento de la
manguera y peso, libre de objetos movibles como botellas,
material de limpieza, etc. Vea la ilustración.
• Si existen elementos no movibles u otros elementos jos que
intereren, es probable que deba colocar el peso más arriba en la
manguera.
• Observe periódicamente para cerciorarse que no hayan entrado
obstrucciones en este espacio libre.
Pour vous permettre d’obtenir le meilleur rendement de
votre nouveau robinet à bec rétractable, Moen fait la
recommandation suivante:
• Garder un espace de 8 x 8 po libre de toute obstruction, pour
permettre au tuyau et au poids de se déplacer librement sans
risquer de heurter d’objets susceptibles d’être renversés, y
compris des bouteilles, des fournitures de nettoyage, etc. Voir
l'illustration.
• Si des tuyaux non amovibles ou autres se trouvent dans la
trajectoire du tuyau, envisager de repositionner le poids en le
plaçant plus haut sur le tuyau.
• De temps à autre, vérier qu’il n’y a aucun objet obstruant cette
zone.
To enhance the performance of your pulldown or
pullout wand, Moen oers the 159060 Hose Guide
to isolate the hose from plumbing lines and other
items under the kitchen sink. Call our Product Consultants
at 800-289-6636 or visit www.moen.com to order
part #159060.
Para mejorar el rendimiento de su manguera o varilla
retráctil,, Moen ofrece la guía de la manguera 159060
para aislar la manguera de las tuberías y otros
elementos bajo el fregadero de la cocina. Llame a
nuestros asesores de productos en 800-289-6636 o
visite www.moen.com pedir pieza # 159060.
Pour améliorer le rendement de votre bec rétractable
ou bec de pulvérisation, Moen ore le guide-tuyau
159060 pour isoler le tuyau des conduites de
plomberie et d'autres articles sous l'évier de cuisine.
Appeler nos spécialistes des produits au
1-800-289-6636 ou visiter www.moen.com pour
commander la pièce no 159060.
8
Page 9
INS11736 - 8/21
J
J
3
G
2
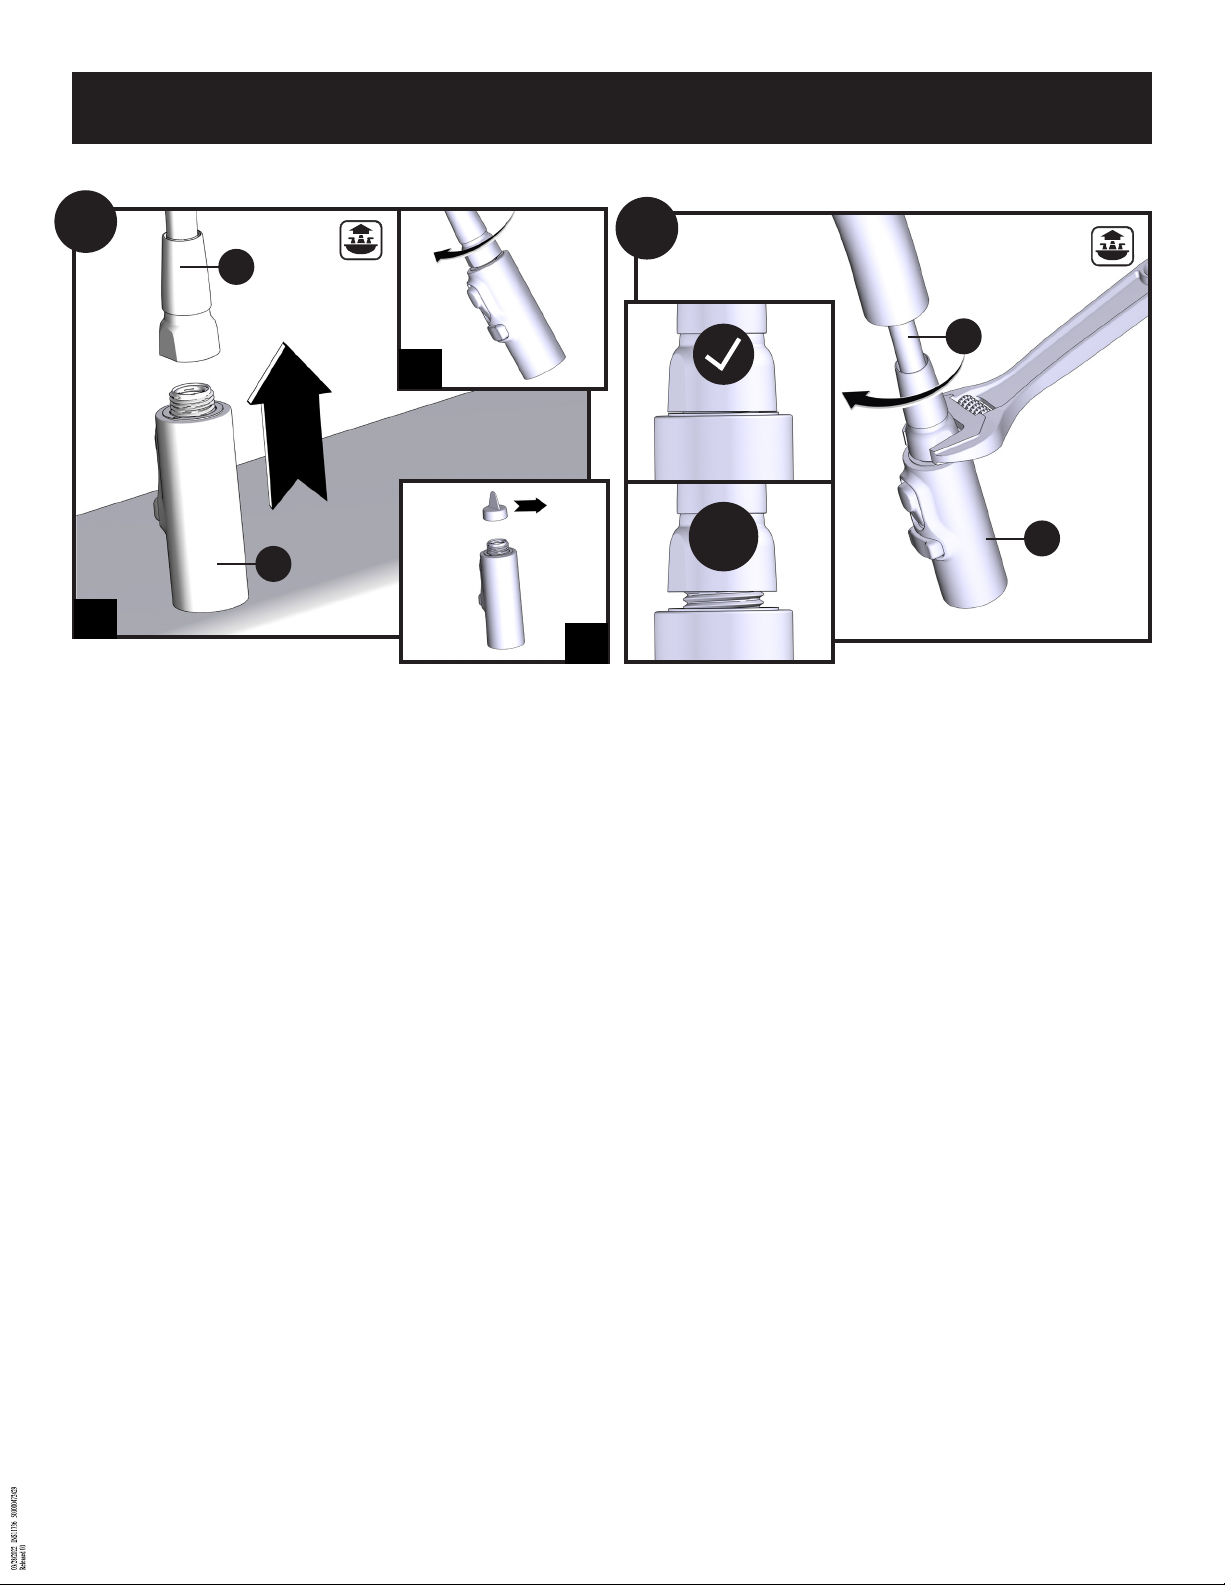
1. Remove protective cap from Spray Wand (G).
2. Attach Spray Wand (G) to Pulldown Hose (J).
3. Finger tighten.
1. Remove protective cap from Spray Wand (G).
2. Attach Spray Wand (G) to Pulldown Hose (J).
3. Finger tighten.
1. Remove protective cap from Spray Wand (G).
2. Attach Spray Wand (G) to Pulldown Hose (J).
3. Finger tighten.
X
1
1. Tighten Pulldown Hose (J), flush with Spray Wand (G). Do not
overtighten.
1. Tighten Pulldown Hose (J), flush with Spray Wand (G). Do not
overtighten.
1. Tighten Pulldown Hose (J), flush with Spray Wand (G). Do not
overtighten.
G
9
Page 10
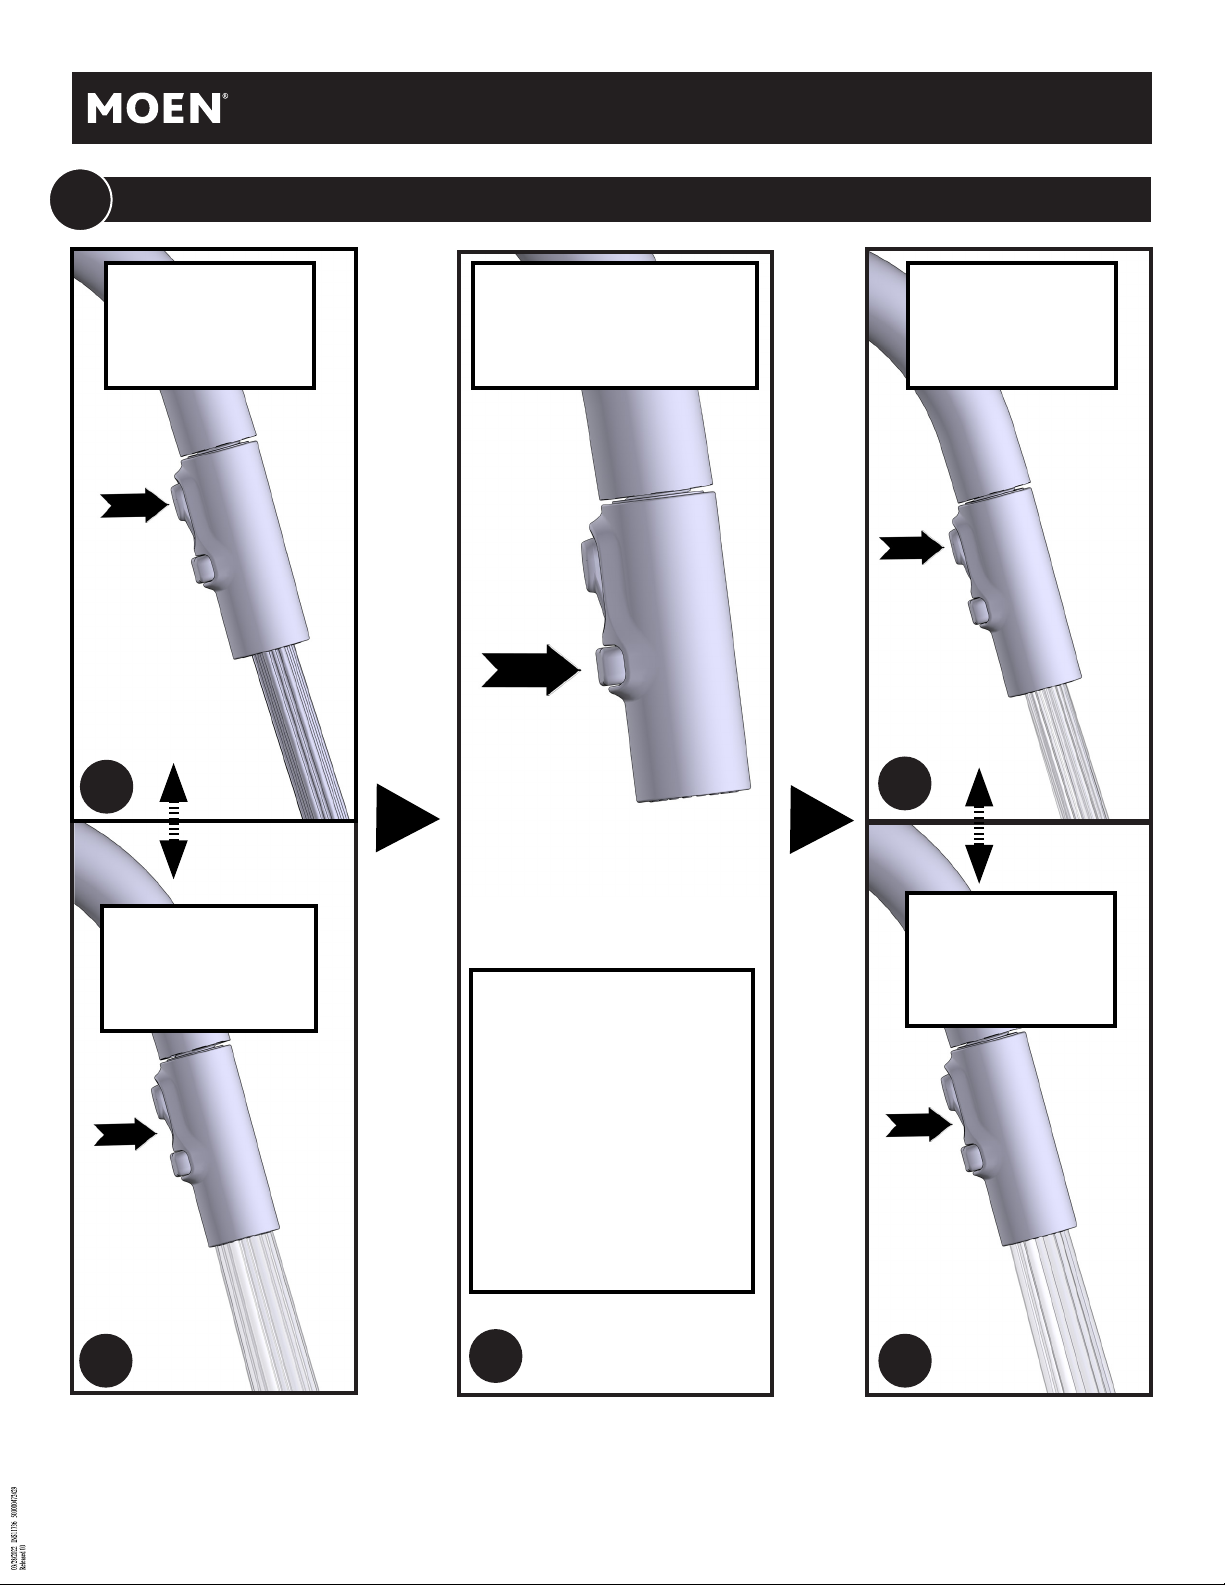
Spray Wand with Powerboost™ / Varilla del rociador con PowerBoost™ / Bec pulvérisateur avec PowerBoostMC
Stream Mode
Modo de chorro
Mode jet ar
A
Enable PowerBoost™ modes
Active los modos PowerBoost
Activer les modes PowerBoost
TM
MC
Boosted Stream
Chorro aumentado
Jet plus puissant
D
Spray Mode
Modo de rociado
Mode pulvrisation
B
To disengage
PowerBoost™:
Turn water off.
Para desenganchar
el PowerBoost
Cierre el agua.
Pour dsactiver
PowerBoost
Couper l’alimentation en eau.
MC
TM
:
:
C
Boosted Spray
Rocio aumentado
Pulvrisation
plus puissante
E
10
Page 11
J
G
1
2
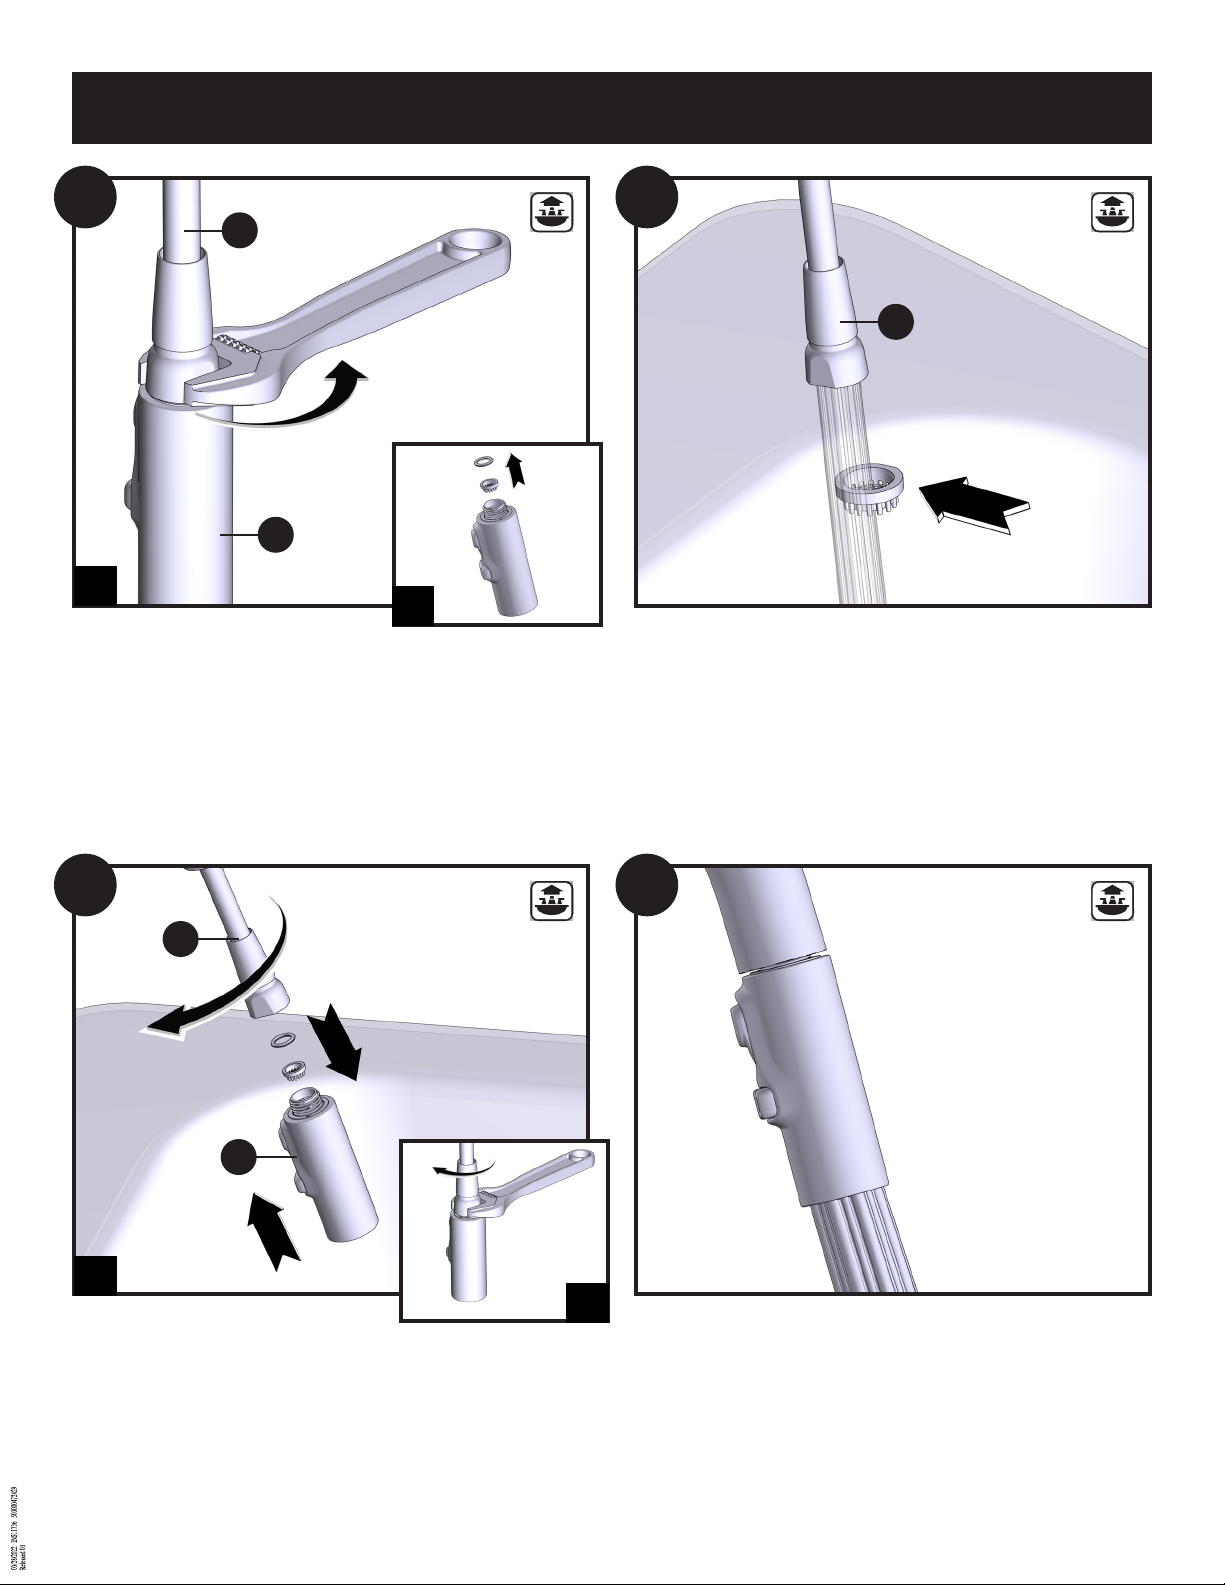
1. Unscrew Pulldown Hose (J) from Spray Wand (G) and remove
screen and o-ring.
INS11736 - 8/21
J
1. Rinse debris from screen.
1. Enjuaque los residuos del filtro.
1. Unscrew Pulldown Hose (J) from Spray Wand (G) and remove
screen and o-ring.
1. Unscrew Pulldown Hose (J) from Spray Wand (G) and remove
screen and o-ring.
J
G
1
1. Renistall screen and o-ring as shown. Thread Pulldown Hose (J)
onto Spray Wand (G) and tighten.
1. Renistall screen and o-ring as shown. Thread Pulldown Hose (J)
onto Spray Wand (G) and tighten.
1. Rincer le filtre pour en retirer tous le debris.
2
1. Re-check water flow.
1. Vuelva a revisar el flujo de agua.
1. Vrifier de nouveau le ddit de ľeau.
1. Renistall screen and o-ring as shown. Thread Pulldown Hose (J)
onto Spray Wand (G) and tighten.
11
Page 12

Moen Limited Lifetime Warranty Moen le otorga Garantía limitada de por vida Garantie à vie limitée de Moen
Moen products have been manufactured under the highest
standards of quality and workmanship. Moen warrants to
the original consumer purchaser for as long as the original
consumer purchaser owns their home (the “Warranty
Period" for homeowners), that this product will be leakand drip-free during normal use and all parts and fi nishes
of this product will be free from defects in material and
manufacturing workmanship. All other purchasers (including
purchasers for industrial, commercial and business use) are
warranted for a period of 5 years from the original date of
purchase (the “Warranty Period" for non-homeowners).
If this product should ever develop a leak or drip during the
Warranty Period, Moen will FREE OF CHARGE provide the
parts necessary to put the product back in good working
condition and will replace FREE OF CHARGE any part or
fi nish that proves defective in material and manufac-turing
workmanship, under normal installation, use and service.
Replacement parts may be obtained by calling 1-800-2896636 (Canada 1-800-465-6130), or by writing to the address
shown. Proof of purchase (original sales receipt) from the
original consumer purchaser must accompany all warranty
claims. Defects or damage caused by the use of other than
genuine Moen parts is not covered by this warranty. This
warranty is applicable only to products purchased after
December, 1995 and shall be effective from the date of
purchase as shown on purchaser’s receipt.
This warranty is extensive in that it covers replacement of
all defective parts and fi nishes. However, damage due to
installation error, product abuse, product misuse, or use of
cleaners containing abrasives, alcohol or other organic solvents, whether performed by a contractor, service company,
or yourself, are excluded from this warranty. Moen will not
be responsible for labor charges and/or damage incurred
in installation, repair or replacement, nor for any indirect,
incidental or consequential damages, losses, injury or costs
of any nature relating to this product. Except as provided by
law, this warranty is in lieu of and excludes all other warranties, conditions and guarantees, whether expressed or
implied, statutory or otherwise, including without restriction
those of merchantability or of fi tness for use.
Some states, provinces and nations do not allow the exclusion or limitation of incidental or consequential damages,
so the above limitations or exclusions may not apply to
you. This warranty gives you specifi c legal rights and you
may also have other rights which vary from state to state,
province to province, nation to nation. Moen will advise you
of the procedure to follow in making warranty claims. Simply
write to Moen Incorporated using the address below. Explain
the defect and include proof of purchase and your name,
address, area code and telephone number.
Los productos Moen son fabricados bajo las más estrictas
normas de calidad y mano de obra. Moen le garantiza al comprador original que durante el tiempo que la tenga su casa (el
“periodo de garantía", para los propietarios), este producto no
tendrá ni goteras ni fugas durante el uso normal, y que todas
las piezas y acabados estarán libres de defectos en material y
mano de obra. Asimismo, a todos nuestros otros consumidores
(industriales, comerciales y empresariales), les otorgamos
5 años de garantía a partir de la fecha original de compra (el
“periodo de garantía" para usos no domésticos).
Si en este producto mezcladora se llegara a producir alguna
fuga o gotera durante el periodo de garantía, Moen le proporcionará SIN COSTO ALGUNO las piezas necesarias para que
vuelva a funcionar en perfectas condiciones y reemplazará
también SIN COSTO para usted, cualquier pieza o acabado
que pudiera tener algún defecto en la fabricación o mano de
obra, bajo condiciones normales de instalación, uso y servicio.
Las piezas de repuesto se pueden obtener llamando en la
República Mexicana al 01-800-718-4345 o si escribe en la
dirección que aparece aquí. Para que el comprador original
pueda hacer efectiva la garantía, cualquier reclamación deberá
ir acompañada por el comprobante de compra (nota de venta
original). La garantía no cubre los defectos o daños causados
por el uso de otras partes que no sean piezas originales Moen.
Esta garantía es aplicable sólo para los productos compradas
después de diciembre de 1995, y entrará en vigencia a partir
de la fecha que aparece en la nota de compra.
Esta garantía es amplia en el sentido que cubre el reemplazo
de todas las partes y acabados defectuosos. Sin embargo, se
excluyen de esta garantía los daños causados por un error
de instalación, abuso del producto, mal uso del mismo, o uso
de limpiadores que contengan abrasivos, alcohol u otros solventes orgánicos, ya sea por parte del contratista, compañía de
servicio o usted mismo. Moen no se hace tampoco responsable
por los gastos de mano de obra ni por los daños incurridos
en la instalación, reparación o sustitución, ni por ningún daño
indirecto, directo o consecuente, ni por pérdidas, lesiones o
costos de alguna otra índole relacionados con este producto.
A menos que lo estipule la ley, esta garantía reemplaza y excluye cualquier otra garantía y condiciones, ya sea expresas o
implícitas, establecidas por la ley o de otra manera, incluyendo
sin restricción aquellas en que el producto se encuentra en
condiciones aptas para la venta o se adecúa al uso específi co
para el cual fue adquirido.
Algunos estados, provincias y naciones no permiten la exclusión o limitación de los daños incidentales o consecuentes,
de modo que las limitaciones o exclusiones mencionadas
pueden no ser aplicables a usted. Esta garantía le otorga derechos legales específi cos y usted puede también tener otros
derechos que cambian de un estado a otro o de una provincia o
nación a otra. Moen lo asesorará en el procedimiento a seguir
para hacer válida esta garantía. Sencillamente escriba a Moen
Incorporated utilizando la dirección que aparece a continuación. Explique el tipo de defecto e incluya comprobantes de
compra, su nombre, dirección, código de área y número de
teléfono.
Les produits Moen sont fabriqués selon les normes les plus
élevées de qualité et de main-d’œuvre. Moen garantit à
l’acheteur original, tant qu’il sera propriétaire de la maison (la
« période de garantie » des propriétaires), que ce produit sera
libre de toute fuite pendant son usage normal et qu’aucune
pièce et qu’aucun fi ni de ce produit ne présenteront de
défaut de matériel et de main-d’œuvre en usine. Tous les
autres achats (y compris les achats à des fi ns industrielles,
commerciales et d’affaires) sont garantis pendant cinq (5) ans
à compter de la date d’achat originale (période de garantie
commerciale).
Si ce produit fuit ou dégoutte durant la période de garantie,
Moen s’engage à fournir GRATUITEMENT les pièces de
rechange requises pour remettre le robinet en état de
fonctionnement ainsi qu’à remplacer GRATUITEMENT
toute pièce ou tout fi ni dont le matériel, la fabrication ou la
main-d’œuvre, lors de l’installation, de l’usage et du service
habituels, s’avèrent défectueux. On peut obtenir les pièces
de rechange en composant le 1-800-465-6130 ou en écrivant
à l’adresse indiquée ci-dessous. Le reçu de vente original de
l’acheteur initial du robinet doit accompagner toute réclamation. Les défauts ou les dommages causés par l’utilisation de
pièces non fournies par Moen ne sont pas couverts par cette
garantie. Cette garantie s’applique uniquement aux produit
achetés après décembre 1995 et entre en vigueur à compter
de la date d’achat indiquée sur le reçu de caisse du client.
Cette garantie s’étend aussi au remplacement de toute pièce
ou de tout fi ni défectueux. Cependant, sont exclus de cette garantie, les dommages causés par une erreur d’installation, un
abus du produit, une mauvaise utilisation du produit, l’utilisation de produits de nettoyage contenant des agents abrasifs,
de l’alcool ou des solvants organiques, qu’ils soient utilisés
par un entrepreneur, une entreprise de service ou le consommateur. Moen décline toute responsabilité quant aux frais de
main-d’œuvre et aux dommages causés durant l’installation,
la réparation ou le remplacement, et aux dommages, pertes,
blessures ou coûts, indirects ou consécutifs, connexes à ce
produit. Sauf lorsque la loi le stipule, cette garantie remplace
et exclut toutes les autres garanties et conditions, qu’elles
soient indiquées expressément ou non, obligatoires ou autres,
y compris, sans restriction, celles qui visent la commercialisation ou l’aptitude d’utilisation.
Certains pays, états ou provinces ne permettent aucune
exclusion, ni limitation suite aux dommages indirects ou
consécutifs. Les limitations ou les exclusions précitées ne
s’appliqueraient pas dans ces cas. Cette garantie accorde des
droits juridiques et il est possible que d’autres droits soient
applicables selon l’état, la province ou le pays. Moen avisera
le consommateur de la procédure à suivre pour soumettre
une réclamation. Il suffi t d’écrire à Moen inc. à l’adresse
indiquée ci-dessous. Expliquer la défectuosité et inclure une
preuve d’achat, inscrire votre nom, votre adresse, ainsi que
vos indicatif régional et numéro de téléphone.
Moen Incorporated
25300 Al Moen Drive
North Olmsted, Ohio 44070-8022
U.S.A.
INS11736 - 8/21
©2021 Moen Incorporated
Moen de Mexico, S.A. de C.V.
Carretera Saltillo-Monterrey KM 14.7
Ramos Arizpe, Coahuila
Mexico 25900
Moen Inc.
2816 Bristol Circle
Oakville, Ontario L6H 5S7
Canada
 Loading...