

Page 1

Industrial AutomationBuilding Automation Systems
User Manual
MFD-CP4
Power supply/
Communication module
10/04 AWB2528-1548GB
Think future. Switch to green.
Page 2

All brand and product names are trademarks or registered
trademarks of the owner concerned.
st
published 2004, edition date 10/04
1
© Moeller GmbH, 53105 Bonn
Authors: Dieter Bauerfeind, Jörg Mattke
Editor: Thomas Kracht
Translator: Terence Osborn
All rights reserved, including those of the translation.
No part of this manual may be reproduced in any form
(printed, photocopy, microfilm or any other process) or
processed, duplicated or distributed by means of electronic
systems without written permission of Moeller GmbH, Bonn.
Page 3

Warning!
Dangerous electrical voltage!
Before commencing the installation
• Disconnect the power supply of the device.
• Ensure that devices cannot be accidentally
restarted.
• Verify isolation from the supply.
• Earth and short circuit.
• Cover or enclose neighbouring units that
are live.
• Follow the engineering instructions (AWA)
of the device concerned.
• Only suitably qualified personnel in
accordance with EN 50110-1/-2
(VDE 0105 Part 100) may work on this
device/system.
• Before installation and before touching
the device ensure that you are free of
electrostatic charge.
• The functional earth (FE) must be
connected to the protective earth (PE) or
to the potential equalisation. The system
installer is responsible for implementing
this connection.
• Connecting cables and signal lines should
be installed so that inductive or capacitive
interference does not impair the
automation functions.
• Install automation devices and related
operating elements in such a way that they
are well protected against unintentional
operation.
• Suitable safety hardware and software
measures should be implemented for the
I/O interface so that a line or wire breakage
on the signal side does not result in
undefined states in the automation
devices.
• Ensure a reliable electrical isolation of the
low voltage for the 24 volt supply. Only
use power supply units complying with
IEC 60364-4-41 (VDE 0100 Part 410) or
HD 384.4.41 S2.
• Deviations of the mains voltage from the
rated value must not exceed the tolerance
limits given in the specifications, otherwise
this may cause malfunction and dangerous
operation.
•Emergency stop devices complying with
IEC/EN 60204-1 must be effective in all
operating modes of the automation
devices. Unlatching the emergency-stop
devices must not cause restart.
• Devices that are designed for mounting in
housings or control cabinets must only be
operated and controlled after they have
been installed with the housing closed.
Desktop or portable units must only be
operated and controlled in enclosed
housings.
Moeller GmbH
Safety instructions
I
Page 4

• Measures should be taken to ensure the
proper restart of programs interrupted
after a voltage dip or failure. This should
not cause dangerous operating states even
for a short time. If necessary, emergencystop devices should be implemented.
• Wherever faults in the automation system
may cause damage to persons or property,
external measures must be implemented to
ensure a safe operating state in the event
of a fault or malfunction (for example, by
means of separate limit switches,
mechanical interlocks etc.).
II
Page 5

10/04 AWB2528-1548GB
Contents
About This Manual 3
Explanation of terms 3
Other manuals 4
Writing conventions 4
1 About the Display/Operator System 5
Target readership 5
Proper use 5
Overview 6
– Display/operator system at a glance 8
Type references 9
Operating principles 10
Main menu 11
2 Installation 13
Mounting 13
– Fitting the protective membrane 14
– Mounting the protective cover 16
– Mounting the display/operator unit
(front mounting) 19
– Removing the display/operator unit
(front mounting) 21
– Mounting the power supply/communication
module 22
– Removing the power supply/communication
module 23
Terminals 23
–Terminals 23
– Connecting the power supply 24
– Connecting the connection cable 25
1
Page 6

10/04 AWB2528-1548GB
3 Commissioning 29
Switching on 29
Initial Commissioning 30
4Use 31
Point-to-point connection 31
Net operation 32
Connection faulty 33
Graphic mode on the remotely operated device 33
5 Settings 35
Station selection 35
Setting the menu language 36
Changing the lighting 37
Changing the contrast 38
6 Appendix 39
Dimensions 39
– MFD-80.. display/operator unit 39
Technical data 40
– General ambient conditions 40
– MFD-80.. display/operator unit 42
– MFD-XM-80 protective membrane 44
– MFD-80-XS protective cover 44
– MFD-CP4 power supply/communication
module 45
Index 47
2
Page 7

10/04 AWB2528-1548GB
About This Manual
This manual describes the installation, commissioning and
possible settings on the display/operator system.
Explanation of terms The display/operator system described here consists of the
MFD-CP4 power supply/communication module, the
MFD-80.. display/operator unit and an MFD-CP4-...-CAB
connection cable for the easy basic units.
If the display/operator system is connected with an easy
basic unit it, can be used to read the text and status display
of the basic unit or operate the basic unit remotely via the
keypad.
The following tables shows the individual components of the
display/operator system with their type designations.
Components that can be ordered are indicated by a grey
background.
Table 1: Components of the display/operator system with type
designation and possible order combinations
Display/
operator unit
MFD-80
MFD-80-B
Power supply unit/
communication
module
MFD-CP4
MFD-CP4-500 or MFD-CP4-800
Connection cable to
easy basic unit
MFD-CP4-500-CAB5/
MFD-CP4-800-CAB5
3
Page 8

About This Manual
Other manuals The MFD-CP4 can be connected to easy500, easy700,
easy800 or MFD-CP8... basic units.
These easy basic units are described in separate manuals
(AWBs):
• easy500/700 (AWB2528-1508GB)
• easy800 (AWB2528-1423GB)
• MFD-Titan, multi-function display (AWB2528-1480GB).
All manuals can be downloaded as PDF files from the
Internet. To find the manual quickly, enter the
documentation number at http://www.moeller.net/support
Writing conventions Symbols used in this manual have the following meanings:
X Indicates actions to be taken.
Attention!
h
Warns of the possibility of slight damage.
10/04 AWB2528-1548GB
.
Caution!
i
j
h
4
Warns of the possibility of serious damage and slight
injury.
Warning!
Warns of the possibility of substantial damage, serious
injury or death.
Indicates interesting tips and additional information
For greater clarity, the name of the current chapter is shown
in the header of the left-hand page and the name of the
current section in the header of the right-hand page. This
does not apply to pages at the start of a chapter and empty
pages at the end of a chapter.
Page 9

10/04 AWB2528-1548GB
1 About the Display/Operator
System
Target readership The MFD-CP4 must only be installed and connected up by
trained electricians or persons familiar with the installation
of electrical equipment.
A specialist knowledge of electrical engineering is needed
for commissioning. When controlling active components
such as motors or pressure cylinders, parts of the system can
be damaged and persons put at risk if the MFD-CP4 is
connected or programmed incorrectly.
Proper use The MFD-CP4 must be properly installed before use.
• The MFD-80/MFD-80-B display and operator unit is
protected to IP65 and does not normally require any
special housing protection.
• The rear of the MFD-CP4 unit is designed as a mounting
unit and must be installed in an enclosure, control cabinet
or a service distribution board.
• The installation must comply with regulations for
electromagnetic compatibility (EMC).
• The power up of the MFD-CP4 must not cause any hazards
arising from activated devices, such as unexpected motor
startups or power ups.
5
Page 10

About the Display/Operator
System
10/04 AWB2528-1548GB
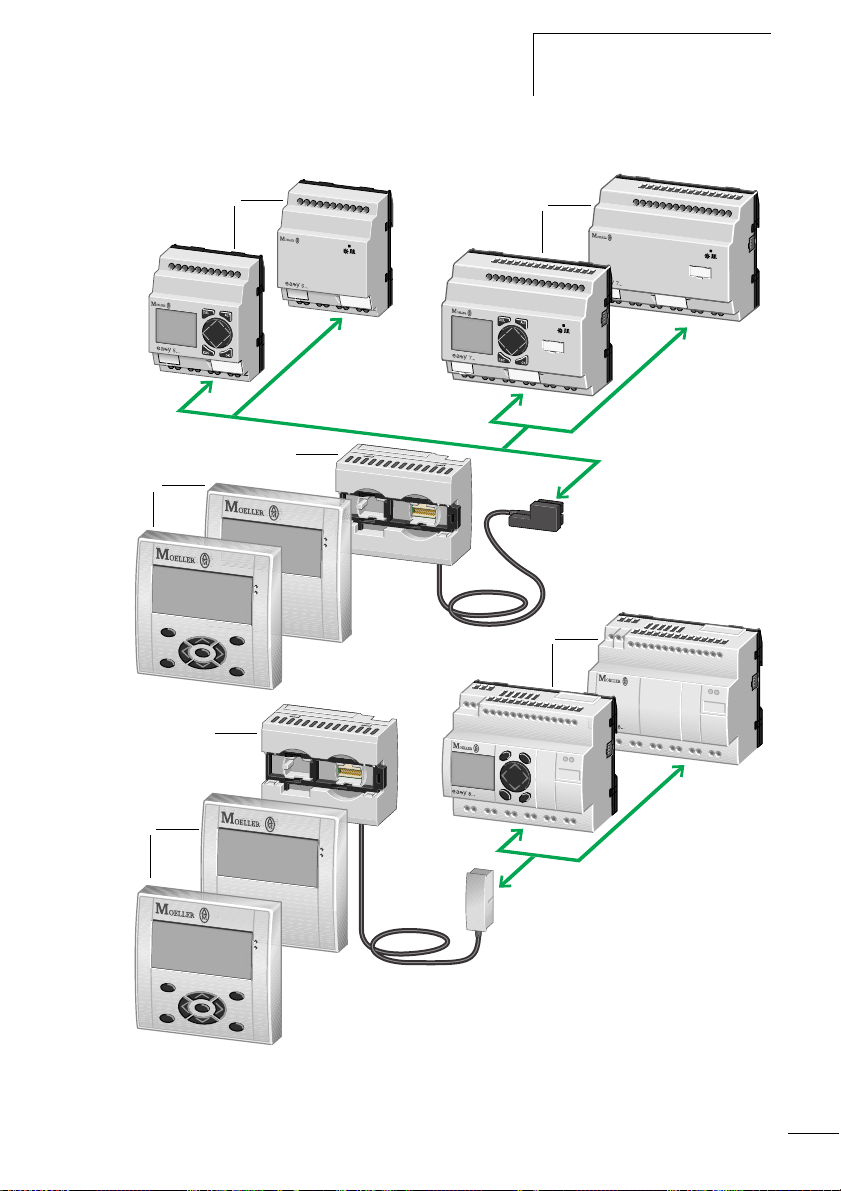
Overview The display/operator system can be connected with easy500,
easy700, easy800 or MFD-CP8... basic units to implement
the following tasks:
• Display on the MFD-CP4 of the status or text display of the
connected basic unit.
• Remote operation of the connected basic unit via the
MFD-CP4 keypad.
The devices can be linked together easily via the serial
interface.
If the display/operator system is connected to an easy basic
unit in the EASY-NET network, it is also possible to operate
any other device in the EASY-NET via the display/operator
unit and display its status, regardless of the device in the
EASY-NET to which the display/operator system is
connected.
Legend for figure 1:
a easy500 basic units
b easy700 basic units
c MFD80-B/MFD-80 multi-function display
d Power supply/communication module with MFD-CP4-500
(above) or MFD-CP4-800 (below) connection cable
e easy800 basic units
6
Page 11
10/04 AWB2528-1548GB
Proper use
c
d
a
d
b
e
ALT
DEL
c
ESC
OK
Figure 1: System overview ( Legend a page 6)
7
Page 12
About the Display/Operator
System
10/04 AWB2528-1548GB
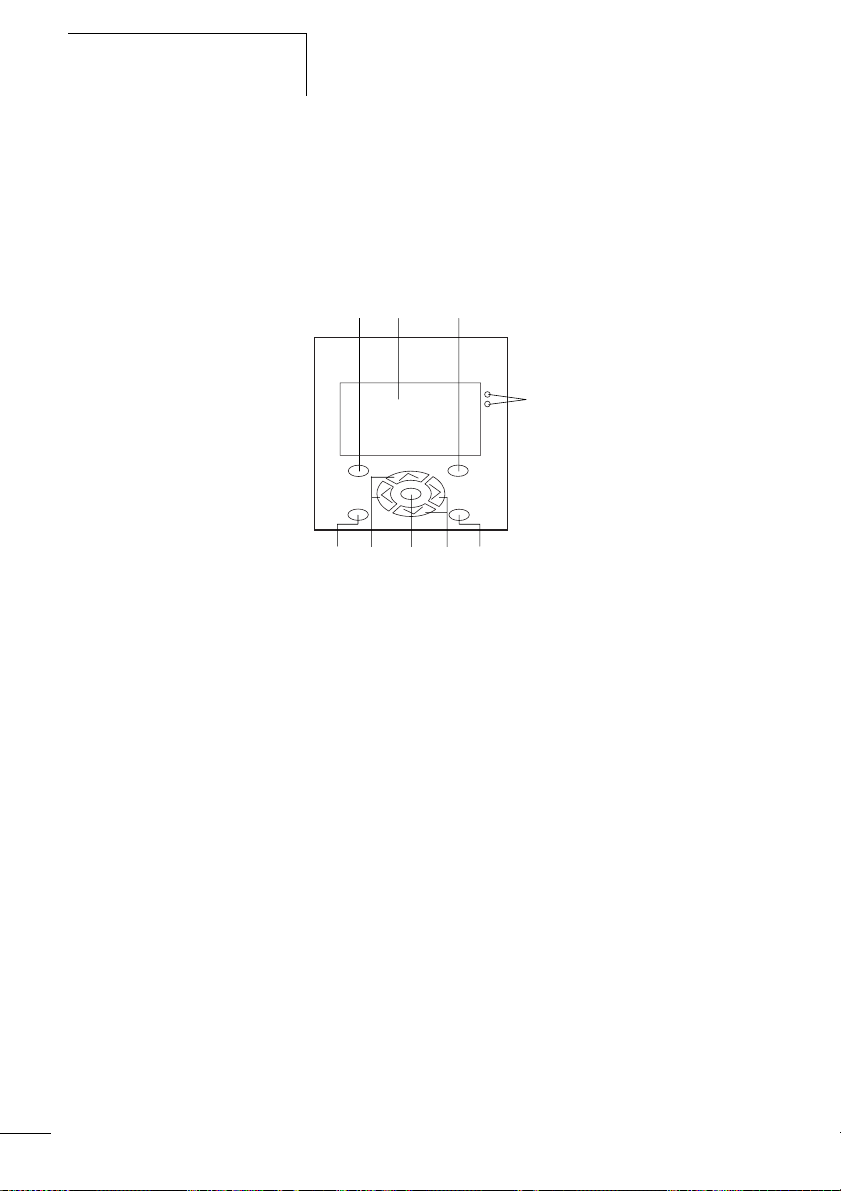
Display/operator system at a glance
The display/operator system consists of the power supply
unit/communication module and the display/operator unit
Display and operator unit
adb
i
h
Figure 2: Display/operator unit
a DEL button
b Graphic display
c ALT button
d LEDs for signalling
e Mode button
f Right, down cursor buttons
g OK button
h Left, up cursor buttons
i ESC button
c
efg
8
Page 13
10/04 AWB2528-1548GB
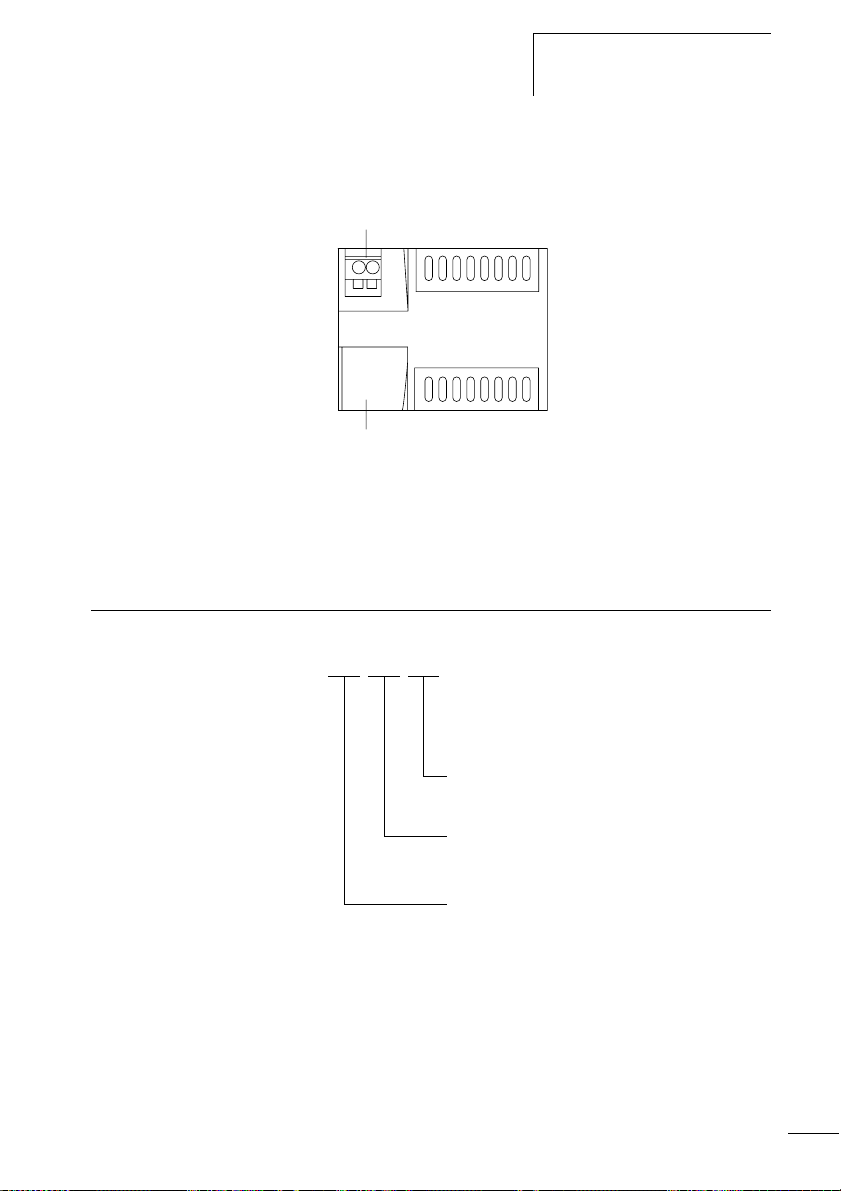
Type references
Power supply/communication module
a
b
Figure 3: Power supply/communication module
a Power supply
b Serial interface for point-to-point connection
Type references
MFD - CP4 - XXX
Supplied
connection cable for interface (optional)
500 = MFD-CP4-500-CAB5
800 = MFD-CP4-800-CAB5
CP4 = Power supply/
CPU rating 4
Multi-function display
9
Page 14

About the Display/Operator
System
10/04 AWB2528-1548GB
Operating principles The buttons of the display/operator unit have the following
functions:
Go to next menu level
OK
Select menu item
Activate, modify, save your entry
Return to last menu level
ESC
Cancel your entry since the last OK
Í Ú
Change menu item
Change value
Change place
ú í
Toggle between Terminal mode and main menu.
*
10
Page 15
10/04 AWB2528-1548GB
a
12
a
12
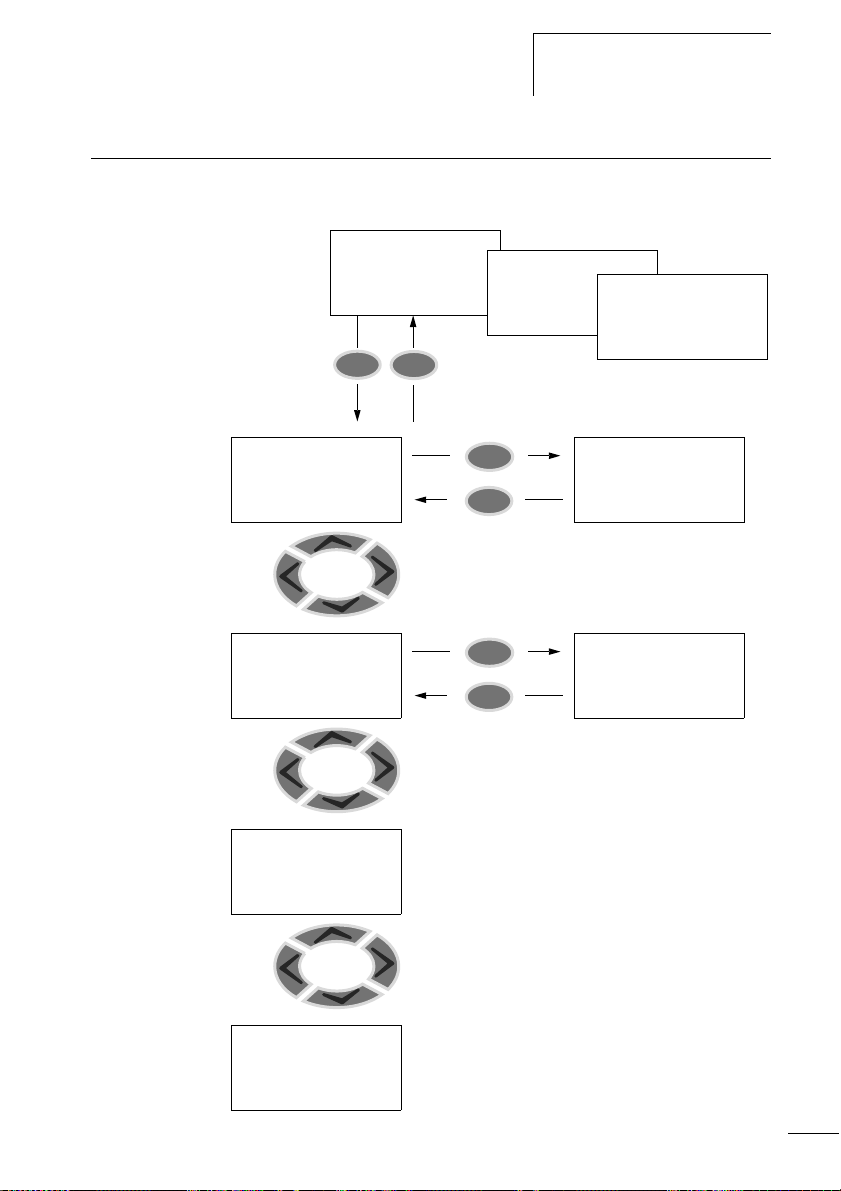
Main menu Status display
Connection
establishment
in progress...
*
*
Type references
I .2..5.......
MO 08:00
Q..34.... RUN
NT1 P-
Text display
Status or text display of the
connected device
Main menu
Current
selection
flashes in
the
MFD-CP4
menu
COM...
MENU LANGUAGE...
LIGHTING: 60%
CONTRAST: +2
Cursor
Í Ú
COM...
MENU LANGUAGE...
LIGHTING: 60%
CONTRAST: +2
Cursor
Í Ú
COM...
MENU LANGUAGE...
LIGHTING: 60%
CONTRAST: +2
Cursor
Í Ú
page
OK
ESC
OK
ESC
STATION ID: 0
BAUDRATE: 9600B
ENGLISH a
DEUTSCH
FRANCAIS
ESPANOL b
ITALIANO
PORTUGUES
NEDERLANDS
SVENSKA
POLSKI
TÜRKCE
MAGYAR
CESKY
RUSSKIJ
COM...
MENU LANGUAGE...
LIGHTING: 60%
CONTRAST: +2
page
11
Page 16
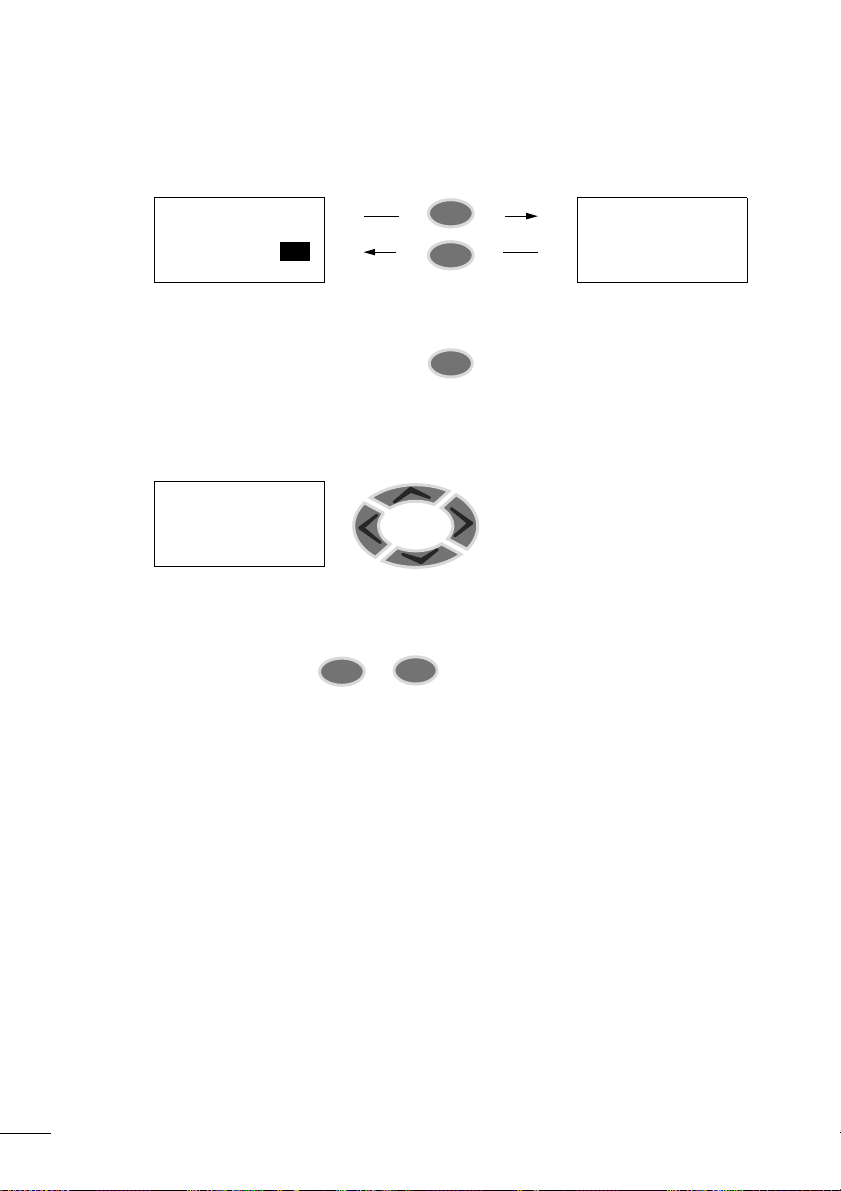
Setting values
10/04 AWB2528-1548GB
COM...
MENU LANGUAGE...
LIGHTING 60%
CONTRAST: +2
Selection mode:
Black rectangle flashing
OK
OK
or
ESC
COM...
MENU LANGUAGE...
LIGHTING: 60%
CONTRAST: +2
Entry mode:
Number flashing
Press OK to toggle between Selection and Entry modes.
Press OK or ESC to move from Entry mode to Selection mode of the main menu
COM...
Í Ú Change value
MENU LANGUAGE...
LIGHTING: 60%
CONTRAST: +2
The result of the value change is immediately visible
Special function
ALT
+
If the remotely operated device is an
ESC
MFD device in graphic mode, this
button combination can be used to
close the graphic mode on this device.
The “*” button on the remotely
operated MFD device has the same
local function when pressed.
12
Page 17

10/04 AWB2528-1548GB
2 Installation
The MFD-CP4 must only be installed and connected up by
trained electricians or a person familiar with the installation
of electrical equipment.
The MFD-CP4 is installed in the following order:
• Mounting,
• Connecting the serial interface,
• Connecting the power supply.
Mounting Install the display/operator unit in the front of a control
cabinet, a service distribution board, operator panel or in an
enclosure. You can protect the display/operator unit with a
protective membrane or cover, depending on the
environment in which it is to be used. This must be fitted
before the MFD-CP4 is mounted and is therefore described
in the next section.
The MFD-CP4 power supply/communication module must be
mounted in such a way that all the terminals are protected
against direct contact, liquids and dust during operation.
For sufficient heat circulation around the device, the rear of
the MFD-CP4 and the terminals must have a clearance of at
least 3 cm from the wall or adjacent devices.
13
Page 18

Installation
10/04 AWB2528-1548GB
30
30
30
Figure 4: Minimum clearance to MFD-CP4
Fitting the protective membrane
For special applications such as in the food industry, the
operator unit must be protected against the ingress of dust,
liquids etc. In this case fit the protective membrane over the
display/operator unit.
14
h
Fit the protective membrane before mounting the display/
operator unit.
Page 19

10/04 AWB2528-1548GB
Mounting
b
a
Figure 5: Fitting the protective membrane
a Protective membrane
b Display and operator unit
Caution!
Ensure that the membrane fits snugly in the groove of the
display/operator unit.
Otherwise a proper seal cannot be guaranteed and
particles may enter underneath the membrane. This may
cause malfunctions in the keypad.
In food industry applications, there is the risk of bacteria
building up underneath the membrane.
15
Page 20

Installation
10/04 AWB2528-1548GB
Figure 6: Correct position of the protective membrane
h
h
If the protective membrane has to be replaced, the display/
operator unit has to be removed. Replace the membrane
and refit the device.
Mounting the protective cover
The protective cover is provided for using the device in
aggressive environments. This protects the display and the
operator unit against mechanical damage or destruction.
Protection to IP 65 is maintained.
The protective cover can be opened so that the operator
buttons can be used.
The protective cover can be closed with a sealing facility to
provide protection against unauthorised operation.
Fit the protective cover before mounting the display/
operator unit.
16
Page 21

10/04 AWB2528-1548GB
Mounting
X First remove the front frame before mounting.
Figure 7: Removing the front frame
The protective cover can be mounted in two different
positions.
X Choose the position that is most suitable for the
application at hand and your requirements.
Figure 8: Position of the protective cover
17
Page 22

Installation
10/04 AWB2528-1548GB
X Mount the protective cover as shown in the figure.
18
Figure 9: Mounting the protective cover
Sealing the protective cover
Figure 10: Sealing the protective cover
The grip handle of the protective cover is provided with holes
that can be used in any mounting position. You can fit a wire
or similar material through these holes in order to seal the
cover. The cover is sealed properly if the wire is provided
with a lead seal. The cover can then only be opened by
breaking the seal or the wire.
Page 23

10/04 AWB2528-1548GB
Mounting
Mounting the display/operator unit (front mounting)
h
The protective membrane or the protective cover must be
fitted beforehand.
X Drill and punch out two 22.5 mm diameter holes in the
front plate. The diameter is the same as is normally
required for control circuit devices.
h
Observe the following technical requirements:
• The hole spacing is 30 mm.
• The maximum thickness of the front plate for mounting
the power supply/CPU module must not be more than
6 mm.
• Ensure minimum clearances for the power supply/CPU
module a page 14
• In order to ensure protection to IP 65, the surface of the
mounting front must be even and smooth.
22.5
Figure 11: Drill holes for the MFD
30
19
Page 24

Installation
10/04 AWB2528-1548GB
X Fit the display/operator unit in the punched fixing holes.
20
Figure 12: Mounting the display/operator unit
X Tighten the display/operator unit with the M22-MS
combination box spanner (a Figure 13).
The tightening torque must be between 1.2 and 2 Nm
h
Ensure that the correct torque is used. If the tightening
torque is too low or high, this may impair the seal.
Page 25

10/04 AWB2528-1548GB
Mounting
2 x
Figure 13: Screw fastening the display/operator unit
Figure 14: Rear of the mounted display/operator unit
Removing the display/operator unit (front mounting)
X Unscrew the fixing element and remove the display/
operator unit.
21
Page 26

Installation
10/04 AWB2528-1548GB
Mounting the power supply/communication module
22
Figure 15: Mounting the power supply/communication module
Page 27

10/04 AWB2528-1548GB
Terminals
Removing the power supply/communication module
Use a screwdriver with a 100 x 3.5 mm slot width.
X Insert the screwdriver into the lug of the fixing shaft
catch.
1
X Lever out the slide catch.
X Pull out the power supply/CPU module from the fixing
shafts.
3
2
3
2
Figure 16: Releasing the fixing shaft
Terminals Terminals
The MFD-CP4 is fitted with cage clamp terminals for
connecting the power supply and the connection cable to the
serial interface.
Tool for cage clamp terminals
Slot-head screwdriver, width 3.5 mm x 0.6 mm.
Connection cross-sections of the MFD cage clamp
terminal cables
• Power supply terminal:
0.08 to 2.5 mm
• Interface terminal
0.14 to 0.5 mm
1
2
(AWG 28 – 12)
2
(AWG 26 – 20)
23
Page 28

Installation
10/04 AWB2528-1548GB
Connecting the power supply
h
The required connection data for the MFD-CP4 is provided
in the Section “Technical data”, Page 40.
DC power supply MFD-CP4
L01+ L02+
L01–
> 1 A
Ue = 24 V H
(20.4 – 28.8 V H)
Ie = 150 mA
0.6 x 3.5 x 100
Figure 17: Power supply on the MFD
h
The MFD-CP4 is protected against polarity reversal. Ensure
0V24V
the correct polarity of the terminals to ensure that the
MFD-CP4 functions correctly.
Cable protection
Provide cable protection (F1) of at least 1 A (slow) on the
MFD-CP4.
24
h
When the MFD-CP4 is switched on for the first time, its
power supply circuit behaves like a capacitor. Use a
suitable device for switching on the power supply and do
not use any reed relay contacts or proximity switches.
With the power supply ensure that the response threshold
for the short-circuit current is higher than the inrush
current of the MFD-CP4.
Page 29

10/04 AWB2528-1548GB
Terminals
Connecting the connection cable
The MFD-CP4 is provided with a serial interface. This is used
for point-to-point communication between the MFD-CP4
and an easy500, easy700, easy800 or MFD-CP8.. if there is
no PC connected to these devices.
Selecting a suitable connection cable
Different connection cables are required depending on
which device is connected to the MFD-CP4:
Table 2: Selecting connection cables
MFD-CP4 connected to ... Connection cable
easy500 (from device version 01) MFD-CP4-500-CAB5
easy700 (from device version 01)
easy800 (from device version 04)
MFD-CP8.. (from device
version 01)
MFD-AC-CP8.. (from device
version 01)
MFD-CP4-800-CAB5
The MFD-CP4-500-CAB5 and MFD-CP4-800-CAB5
connection cables are 5 m long.
h
In order to ensure correct EMC, the MFD-CP4-500-CAB5
and MFD-CP4-800-CAB5 connection cables must not be
lengthened.
25
Page 30

Installation
10/04 AWB2528-1548GB
Connecting the connection cable
X Remove the interface cover carefully.
X Use a screwdriver to press down the recess next to the
terminal and connect the wires of the connection
2
cable to the terminals in the order stated . Proceed
1
3
accordingly in the reverse order to remove the connection
cable .
4
X Refit the interface cover.
5
26
MFD-CP4-..-CAB5
Figure 18: Connecting the connection cable
X1 = grey, X2 = brown, X3 = yellow, X4 = white, X5 = green
2
X5
X4
X3
X2
X1
15
3
4
Page 31

10/04 AWB2528-1548GB
Terminals
X Fit the connection cable plug into the easy basic unit.
Figure 19: Fitting the connection plug a to the easy basic unit
Left:easy800/MFD, right: easy500/700
27
Page 32

10/04 AWB2528-1548GB
28
Page 33

10/04 AWB2528-1548GB
3 Commissioning
Switching on Before switching on check that the power supply and the
connection cable are properly connected:
– Terminal +24 V: voltage +24 V
– Terminal 0 V: voltage 0 V
If you have already integrated devices into a system, secure
any parts of the system connected to the working area to
prevent access and ensure that no-one can be injured if, for
example, motors start up unexpectedly.
Caution!
The MFD-CP4 allows you to operate a device that may be
positioned far from your actual location. All access rights
that you would also require "locally" are granted to you.
It is not always possible to obtain a view of the situation
“locally”. Use of this operating mode and the execution of
any changes to device settings should only be carried out
with the utmost caution.
h
You can also carry out settings locally on the device whilst
you are operating a device remotely via the keypad. In this
case, the local operation on the device is always faster
than the remote operation in Terminal mode. Bear in mind
that this may lead to conflicts that may trigger faults or
unforeseen events.
A MFD-CP4 makes its display and operator unit available
to the connected device. Only data for the display and the
status of the buttons is sent via the connection. This
ensures that the local data of the connected device is not
destroyed in the event of a communication fault.
29
Page 34

Commissioning
10/04 AWB2528-1548GB
Initial Commissioning When you switch on the display/operator system for the first
time, you will be asked to select the menu language.
X Select the required menu language and confirm the
setting by pressing the OK button.
X Press ESC to exit language selection.
Connection
establishment
in progress...
h
If you do not set the language, the display/operator system
will display this language menu every time you switch on,
and wait for you to select a language.
You can change the language setting at a later time as
required, (see a Section “Setting the menu language”,
Page 36).
If the device was switched on for the first time, the display/
operator system will try to establish a connection with the
default settings to a connected device. The status and text
display of the remotely operated device is displayed as soon
as the connection can be established.
30
Page 35

10/04 AWB2528-1548GB
Point-to-point connection
4Use
You can use the display/operating system for a point-topoint connection or in the easy-NET network. easy-NET
operation is only possible in combination with easy800/MFD
devices.
easy5..
easy7..
easy8..
MFD-CP4
D
E
L
E
CS
MFD-CP4-500-CAB5
A
L
T
O
K
ED
L
A
L
T
E
CS
O
K
MFD-CP8..
MFD-CP4-800-CAB5
Figure 20: Possible point-to-point connection via the serial
interface
31
Page 36

Use
Net operation
10/04 AWB2528-1548GB
MFD-CP4
EASY 8..
EASY 8..
MFD-CP4
EASY 8..
MFD-CP8..
MFD-CP8..
EASY 8..
PC
32
h
h
Communication via EASY-SOFT is not possible if a network
station (easy800 or MFD-CP8) is connected with a PC and
an MFD-CP4 is accessing this device. This also applies to
program uploads and downloads.
To enable communication simply set a different station ID
in the main menu of the CP4 in the COM menu
(a page 11).
Avoid data conflicts between the connected devices!
Page 37

10/04 AWB2528-1548GB
Graphic mode on the remotely operated device
Connection faulty If the connection is faulty or interrupted, the MFD-CP4 will
display the message “Connection establishment in
progress...” continuously. This message may, however, also
be due to an incorrect COM setting (a section “Main
menu”, page 11).
Connection
establishment
in progress...
Graphic mode on the
remotely operated device
If the display/operator system is connected with another
MFD device which is in Graphic mode, this graphic will not
be shown by the display/operator system. You can terminate
graphic mode from the display/operator system by pressing
ALT + ESC. The same thing can be achieved by pressing the
“*” button on the remotely operated MFD device as long
another function was not assigned to this button
(a section “Special function”, page 12).
33
Page 38

10/04 AWB2528-1548GB
34
Page 39

10/04 AWB2528-1548GB
5 Settings
The following settings to the connected basic unit can be
made via the display/operator system.
Station selection Pressing the “*” activates the main menu of the display/
operator system.
X Press the “*” button.
COM...
MENU LANGUAGE...
LIGHTING: 60%
CONTRAST: +2
STATION ID: 0
BAUDRATE: 9600B
h
STATION ID: 0
BAUDRATE: 9600B
h
The main menu will appear.
X Select the COM menu item and press the OK button.
The Station ID menu will appear.
X Press the OK button and select the station number with Í
and
Ú.
X Confirm with OK.
Station ID 0 is always assigned to the device directly
connected via the interface. All other station IDs are
assigned to the NET-IDs of the individual NET stations in
an EASY-NET.
X Press the OK button and select the baud rate using Í and
Ú.
X Confirm with OK.
The transfer rate for easy500 and easy700 is limited to
9600 baud. The maximum baud rate for easy800 and
MFD-CP8 is 19200 baud.
35
Page 40

Settings
10/04 AWB2528-1548GB
COM...
MENU LANGUAGE...
LIGHTING: 60%
CONTRAST: +2
Connection
establishment
in progress...
Setting the menu language
COM...
MENU LANGUAGE...
LIGHTING: 60%
CONTRAST: +2
ENGLISH a
DEUTSCH j
FRANCAIS
ESPANOL b
X Exit the COM menu with ESC.
You can leave the main menu at any time by pressing the
“*” button.
When the main menu is left, the MFD-CP4 tries to establish
connection to the selected device. The status and text
display of the remotely operated device is displayed as soon
as the connection can be established.
If the main menu of the display/operator system is not active,
press the “*” button to enter the menu.
X Use the Í and Ú buttons to select the Menu language
menu item.
X Confirm with OK.
X Use the cursor buttons Í or Ú to select the language
required.
–English
–German
–French
–Spanish
– Italian
–Portuguese
–Dutch
–Swedish
– Polish
–Turkish
– Hungarian
–Czech
– Russian
36
X Press OK to confirm your choice and press ESC to exit the
menu.
You can leave the main menu at any time by pressing the
“*” button.
Page 41

10/04 AWB2528-1548GB
Setting the menu language
Changing the lighting If the main menu of the display/operator system is not active,
press the “*” button to enter the menu.
COM...
MENU LANGUAGE...
LIGHTING: 60%
CONTRAST: +2
h
COM...
MENU LANGUAGE...
LIGHTING: 70%
CONTRAST: +2
X Use the Í and Ú buttons to select the Lighting menu
item.
The cursor moves to the percentage value of the lighting.
When Selection mode is active, the cursor appears as
black flashing rectangle. Pressing OK will activate Edit
mode in which the cursor will disappear and the number
will flash. In Edit mode, use the
Í and Ú to change the
value. The changes are displayed immediately.
X Press OK.
Now change the value in 10% steps with the
X Press the Í or Ú buttons to change the value.
X Press OK or ESC to exit Edit mode
Í and Ú.
If Selection mode is active, you can exit the main menu at
any time by pressing the “*” button.
37
Page 42

Settings
10/04 AWB2528-1548GB
Changing the contrast If the main menu of the display/operator system is not active,
press the “*” button to enter the menu.
COM...
MENU LANGUAGE...
LIGHTING: 70%
CONTRAST: +2
h
COM...
MENU LANGUAGE...
LIGHTING: 70%
CONTRAST: +1
X Use the Í and Ú buttons to select the Contrast menu
item.
The cursor moves to the percentage value of the contrast.
When Selection mode is active, the cursor appears as
black flashing rectangle. Pressing OK will activate Edit
mode in which the cursor will disappear and the number
will flash. In Edit mode, use the
Í and Ú to change the
value. The changes are displayed immediately.
X Confirm with OK.
Use the
Í and Ú buttons to change the value between -2
and +2 in increments of 1.
X Press the Í or Ú buttons to change the value.
X Press OK or ESC to exit Edit mode
If Selection mode is active, you can exit the main menu at
any time by pressing the “*” button.
38
Page 43

10/04 AWB2528-1548GB
6Appendix
Dimensions MFD-80.. display/operator unit
32 17
86.5
g0.2
28.25 28.25
MFD-80-XM protective membrane
30
62
86.5
+0.4
22.3
30
MFD-CP...
20 13.7
88.5
88.5
MFD-80-XS protective cover
95
86.5
22.5
25
39
Page 44

Appendix
10/04 AWB2528-1548GB
MFD-CP4 power supply/communication module
58
22.5
30
75
22.5
36.2
Technical data General ambient conditions
Climatic conditions
(damp heat constant to IEC 60068-2-78; cyclical to
IEC 600618-2-30)
(cold to IEC 60068-2-1, heat to IEC 60068-2-2)
Ambient temperature
Installed horizontally/vertically
Condensation Prevent condensation with
Display legibility °C, (°F) –5 to 50, (–23 to 122)
Storage/transport temperature °C, (°F) –40 to 70, (–40 to 158)
Relative humidity (IEC 60068-2-30), non-condensing % 5 to 95
Air pressure (operation) hPa 795 to 1080
°C, (°F) –25 to 55, (–13 to 131)
suitable measures
40
Page 45

10/04 AWB2528-1548GB
Ambient mechanical conditions
Pollution degree
Power supply/CPU module 2
Display/operator unit 3
Degree of protection (EN 50178, IEC 60529, VBG4)
Power supply/CPU module IP20
Display/operator unit IP65
Display/operator unit with protective cover IP65
Display/operator unit with protective membrane IP65
Oscillations (IEC 60068-2-6)
Constant amplitude 0.15 mm Hz 10 to 57
Constant acceleration 2 g Hz 57 to 150
Shocks (IEC 60068-2-27) semi-sinusoidal 15 g/11 ms Shocks 18
Drop (IEC 60068-2-31) Drop
height
Free fall, when packed (IEC 60068-2-32) m 1
Electromagnetic compatibility (EMC)
Electrostatic discharge (ESD),
(IEC/EN 61000-4-2, severity level 3)
Air discharge kV 8
Contact discharge kV
Electromagnetic fields (RFI),
(IEC/EN 61000-4-3)
Radio interference suppression (EN 55011, EN 55022), limit class
Burst (IEC/EN 61000-4-4, severity level 3)
Power cables kV 2
Signal cables kV
High energy pulses (Surge) MFD
(IEC/EN 61000-4-5, severity level 2), power cable
symmetrical
Line-conducted interference (IEC/EN 61000-4-6) V
Technical data
mm 50
6
V/m 10
B
2
kV 1
10
41
Page 46

Appendix
10/04 AWB2528-1548GB
Dielectric strength
Overvoltage category II
Measurement of the air clearance and creepage distance EN 50178, UL 508,
CSA C22.2, No 142
Dielectric strength EN 50178
Tools and cable cross-sections
Power supply terminal
Solid and flexible with ferrule, minimum to
maximum
2
mm
0.08 to 2.5
AWG 28 to 12
Interface terminal
Flexible, tin-coated, minimum to maximum mm
2
0.14 to 0.5
AWG 26 to 20
Slot-head screwdriver, width mm 3.5 x 0.5
inch 0.14 x 0.02
MFD-80.. display/operator unit
Front dimensions W x H x D
With buttons mm 86.5 x 86.5 x 21.5
Without buttons mm 86.5 x 86.5 x 20
Overall dimensions with fixing shaft W x H x D
With buttons mm 86.5 x 86.5 x 43
Thickness of fixing wall (minimum; maximum) mm 1; 6
Weight g 130
42
/
inches 3.41 x 3.41 x 0.85
inches 3.41 x 3.41 x 0.79
inches 3.41 x 3.41 x 1.69
inches 0.04; 0.24
lb 0.287
Page 47

10/04 AWB2528-1548GB
Technical data
Mounting
Maximum tightening torque of the fixing rings [Nm]
Power supply By means of MFD-CP4 power
LCD display
Type Graphic/monochrome
Visible area W x H mm 62 x 33
Size of pixels mm 0.4 x 0.4
Number of pixels (W x H) 132 x 64
Spacing (pixel centre to pixel centre) mm 0.42
LCD backlight Yes
Backlight colour Yellow/green
The backlight can be used and programmed in
visualization applications
LEDs
Number of LEDs 2
Operating buttons
Number 9
Pushbutton illumination (LED)
Number 5
Colour Green
2 22.5 mm (0.886 in) holes
Display fastened with two
fixing rings
1.2 to 2
supply/communication
module
Yes
43
Page 48

Appendix
10/04 AWB2528-1548GB
MFD-XM-80 protective membrane
Dimensions W x H x Dmm88 x 88 x 25
inches 3.46 x 3.46 x 0.98
Weight g 25
lb 0.055
Mounting Is fitted over the
display/keypad
(with Titan front ring)
MFD-80-XS protective cover
Dimensions W x H x Dmm86.5 x 94 x 25
inches 3.41 x 3.41 x 0.98
Weight g 36
lb 0.079
Mounting Is fitted over the
display/keypad
(without Titan front
ring)
44
Page 49

10/04 AWB2528-1548GB
Technical data
MFD-CP4 power supply/communication module
Dimensions W x H x Dmm75 x 58 x 36.2
inches 2.95 x 2.28 x 1.43
Weight g 164
lb 0.362
Mounting Fitted on the fixing
shaft of the display
Power supply
Rated voltage
Rated value V DC,
(%)
Permissible range V DC 20.4 to 28.8
Residual ripple % F 5
Input current
with 24 V DC, MFD-CP4,
MFD-80.., normally
Voltage dips, IEC/
EN 61131-2
Heat dissipation
with 24 V DC, MFD-CP4,
MFD-80.., normally
mA 150
ms 10
W 3.6
24, (+20, –15)
45
Page 50

10/04 AWB2528-1548GB
46
Page 51

10/04 AWB2528-1548GB
Index
B Baud rate ............................................................11
C Cable protection ..................................................24
Commissioning ....................................................29
Communication via EASY-SOFT ...........................32
Connecting the connection cable .........................25
Connecting the power supply ..............................24
Connection
Connection cable ..........................................25
Power supply ................................................24
Connection faulty ................................................33
Connection plug ..................................................27
Contrast ..............................................................38
D Dimensions ..........................................................39
Dimensions, easy .................................................42
Display and operator unit ......................................8
Drill holes ............................................................19
F Fitting the protective membrane ..........................14
G Graphic mode ................................................12, 33
K Keypad ............................................................8, 10
L Language setting .................................................30
Lighting ...............................................................37
M Main menu
Selection ......................................................11
Menu language ...................................................30
Minimum clearances, to MFD-CP4 .......................14
47
Page 52

Index
10/04 AWB2528-1548GB
Mounting
Display/operator unit .................................... 19
Power supply/communication module .......... 22
Protective cover ...........................................16
Protective membrane ...................................14
Mounting the display/operator unit .....................19
Mounting the power supply/communication module
22
N Net operation ......................................................32
Network operation ................................................ 6
P Point-to-point connection ....................................31
Power supply ........................................................9
Protective cover
Mounting .....................................................16
Sealing .........................................................18
48
S Sealing the protective cover ................................18
Serial interface ......................................................9
Setting the menu language .................................36
Setting values .....................................................12
Settings ...............................................................35
Station ID
....................................................................11
Station selection ..................................................35
Status display ................................................11, 12
Switching on .......................................................29
System menu
Selection ......................................................11
System overview ...................................................7
T Task ......................................................................6
Terminals ............................................................23
Transfer rate .......................................................35
Type references .....................................................9
Page 53

10/04 AWB2528-1548GB
Index
U Use ........................................................................5
49
Page 54

10/04 AWB2528-1548GB
50
 Loading...