


Quick User Guide
Model MCN-AS1020
Before using this machine, read the operator’s manual in its entirety.
Failure to follow operating instructions could result in death or serious
injury. Full operation manual available at www.moe-cleaner.com
Step 1
Insert Handle
Step 3
Insert Locking Taper Pin
Step 2
Insert Clevis Pin
Connect Electrical Connectors from
Handle to Cleaning Head
Step 4
Connect 4 Pin (Female) into 4 Pin
Receiver. Turn threads to lock.
Step 5
Connect 3 Pin same as 4 Pin Cable
Step 6
Connect Power Cable from
Pump to Cleaning Head
Step 7
Connect Power Cable from
Handle to Pump
Step 8
Add 2 gallons clean cold water and
approved Encapsulator Cleaning
Solution

Step 9
Connect Power Cord to
Electrical Outlets
A) Check Power is ON
B) Turn Cable Lock to locked position
Step 10
A) Check tank water level before use
B) Do not activate Spray Lever (STEP 13) without water in Tank
C) Check water pressure to Spray Nozzle by holding Spray Lever up
D) DO NOT OPERATE MOE-CLEANER if water pump is making a ‘vibrating noise’
E) Clean and flush Water Filter Screen (STEP 14) to correct Water Pump noise, then
refill tank with water
Step 11
INSTRUCTIONS FOR CLEANING CARPET
Vacuum Carpet Before Using
Moe-Cleaner
A) Vacuum carpet to remove all debris,
loose hair, twine, rope, and loose soils to
avoid damage to Cleaning Head
B) Refer to STEP 14 to clean Brushes
properly
Step 13
INSTRUCTIONS FOR CLEANING CARPET
Li ‘Kick Stand’ into ‘upward and
locked position’ as shown
Step 12
INSTRUCTIONS FOR CLEANING CARPET
Pre-Spray Heavy Soils and Traic Patterns
Use Pre-Sprayer Commercial Pump and
Moe Stick Nylon Brush (pictured here)
Add 2 gallons of cold water and approved
Pre-Spray Cleaners solution to Pump
Sprayer.
Spray carpets as needed and agitate to
loosen soils while wet. Do not allow PreSpray to dry on carpets before cleaning
with Moe-Cleaner. High-quality Pre-Spray
Cleaner Solution will promote carpet fibers
to ‘soen and release’ soils, diminishing
stains and traic patterns if used properly
with Moe-Cleaner.
Release ‘Moe-Cleaner ‘Lock-
ing Handle Bar’ downward as
shown, to lower Handle into
‘Operating Position’. When
Moe-Cleaner is not in use,
ALWAYS release Kickstand to
‘down position’ to protect Moe
Brushes.
Step 14
With Moe-Cleaner Handle in operating position, press Green Button to start
Moe-Cleaning Head Brushes. Gently push Moe-Cleaner forward to begin cleaning
carpet, and walk forward while holding the Spray Lever Handle ‘up’. SPRAY
‘Encapsulator Solution’ from the Moe-Cleaner Tank onto the carpet path ahead,
but ONLY while walking in a forward motion.
Release Spray Handle at the end of forward motion path (row), and ‘walk
backward’ in the same path to allow Moe to PICK UP excess moisture and to
dry carpet. To begin cleaning the ‘next row’ of carpet, reposition Moe-Cleaner
and overlap prior row by 2-3”. Begin cleaning next row in forward motion as
described above. Remember to release Spray Handle while walking backward
to dry carpet.
PRESS RED BUTTON TO TURN MOE- CLEANER Brushes ‘OFF’
ALWAYS DISCONNECT MOE-CLEANER FROM ELCTRICAL POWER SOURCE BEFORE REMOVING SOIL TRAY OR WHEN WORKING
UNDER MOE CLEANING HEAD.
Remove and clean Soil Tray every 800-1,000 SF and replace as described in STEP 9
INSTRUCTIONS FOR CLEANING CARPET
ON/OFF Switch
Green = ON, Red = OFF
Step 15
ALWAYS DISCONNECT MOE-CLEANER FROM ELECTRICAL POWER SOURCE BEFORE
PERFORMING MAINTENANCE
NOTE: IT IS NOT NECESSARY TO REMOVE BRUSHES TO CLEAN THEM PROPERLY
Clean Brushes by (a) rinsing undercarriage of Cleaning Head with water hose. Use
caution not to wet electrical connections from handle or tank, (b) Use scissors to
cut and remove hair and other debris from brushes, following along the rows of
bristles. Remove hair from both ends of brushes to avoid hair tangling and interfering with axle bearings. Do not rinse or wash top of Moe-Cleaner, Moe Handle, or
Pump with water hose.
Clean Water Filter Screen weekly.
Loosen this cap to drain tank.
Step 16
To REMOVE SOIL TRAY - Hold the SOIL TRAY AND SLIDE SOIL TRAY to Right side of SOIL TRAY COMPARTMENT towards
the Retractable PINS. This SLIDING ACTION will release the LEFT Side of SOIL TRAY and allow removal of the SOIL TRAY.
Daily Routine Maintenance
RETRACTABLE PINS are located
at top RIGHT SIDE of SOIL TRAY
Compartment

(STEP 16 cont.)
To RE-ATTACH SOIL TRAY - Place top side (w/ TABS) of SOIL TRAY in between the Retractable PINS on RIGHT SIDE of Compart-
ment. SLIDE SOIL TRAY UP and to the RIGHT This SLIDING ACTION will depress the PINS, and allow the SOIL TRAY to SLIDE
UP and to the LEFT inside the Compartment. This will RE-POSITION AND RE-ATTACH THE SOIL TRAY, LOCKING IT into the
Compartment. CHECK TO ENSURE THAT THE SOIL TRAY IS FIRMLY ATTACHED AND ‘LOCKED IN’ BEFORE CONNECTING TO
ELECTRICAL POWER STARTING THE MOE-CLEANER.
TO CLEAN SOIL TRAY - Dip the SOIL TRAY into a bucket half-full of water to rinse o debris collected from carpet.
Replace the SOIL TRAY in Compartment when clean. BE CERTAIN THAT SOIL TRAY IS ‘LOCKED IN’ BEFORE RESTARTING MOE-CLEANER.
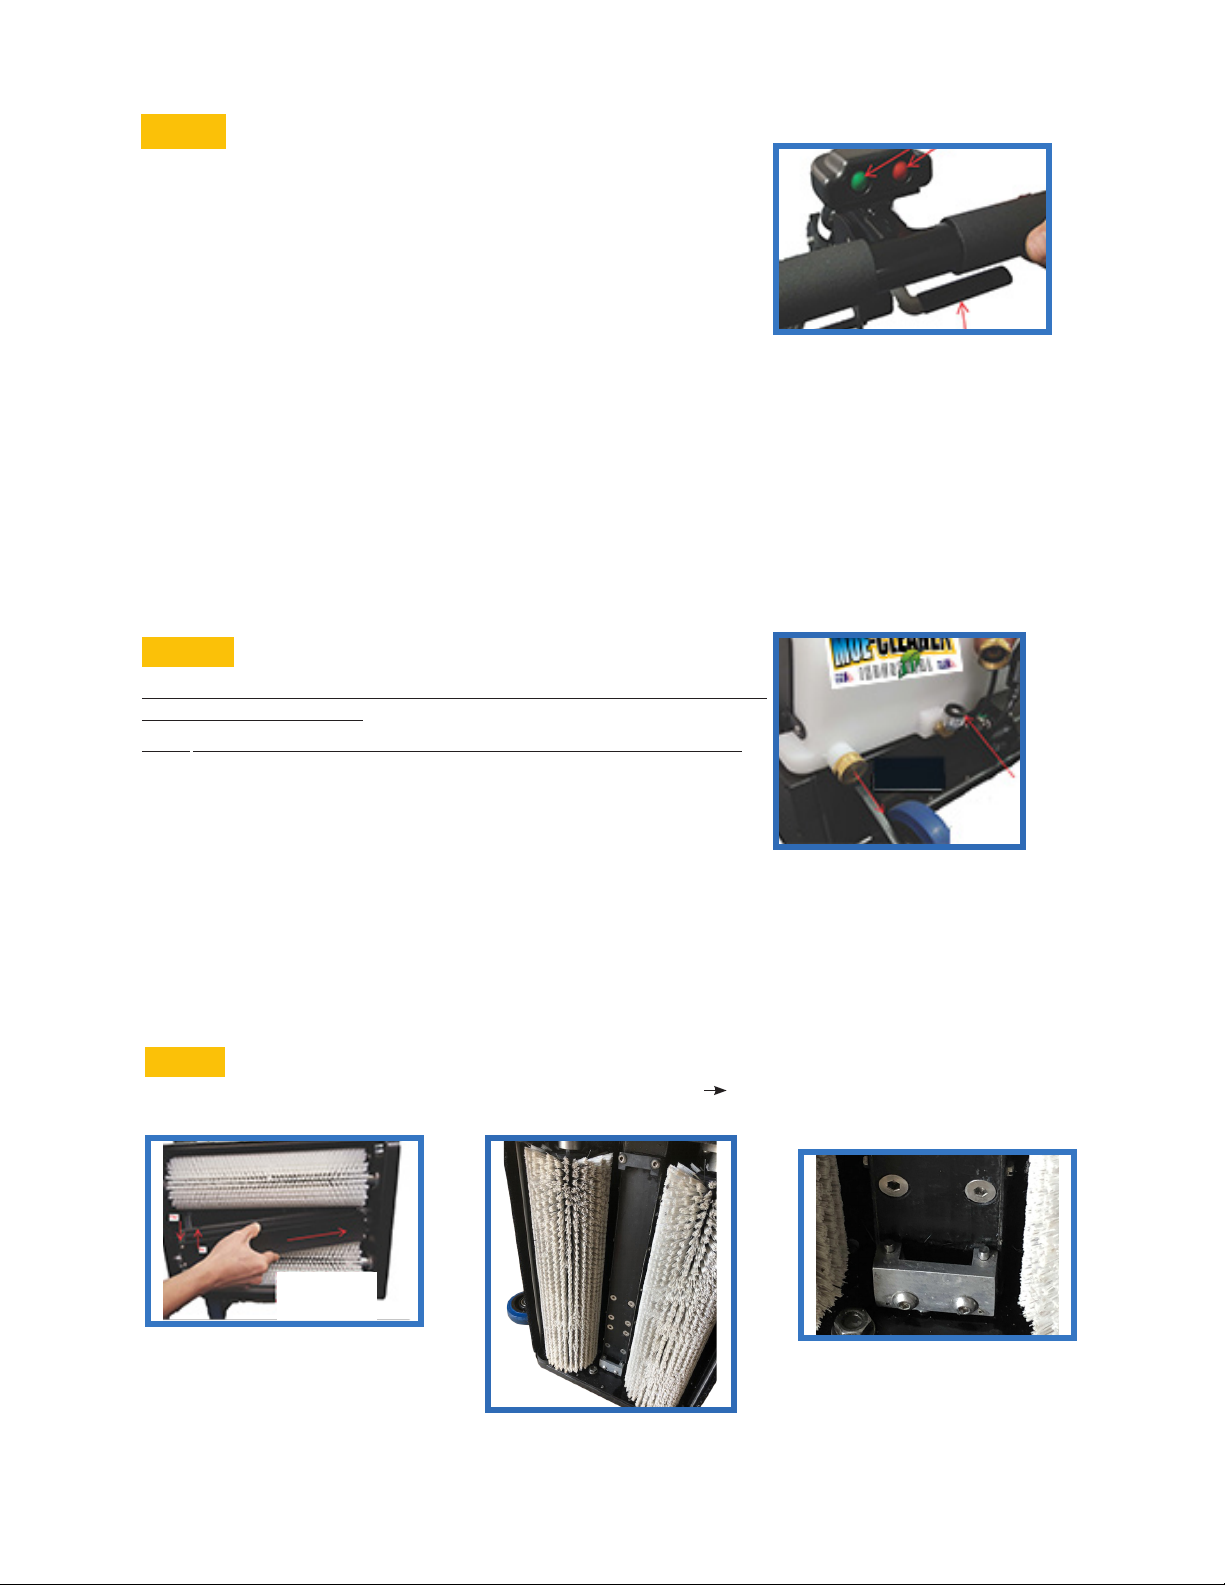
Annual Maintenance Tips
Remove Brushes annually to inspect,
clean and rotate - front to back etc.
To remove brushes, li and PULL this
Pin by pulling on Pin Ring. Use and
insert Pin on opposite side of Cleaning
Head to push the Axle out. Repeat for
both brush axles.
Step 18Step 17
To Remove Brushes- Push Axle out
from this direction and pull out and
remove Axle from opposite side of
cleaning head
Step 19
Remove Brush by pulling out Axle in
this direction
714-265-0630 | 714-785-3284 | vinh@moe-cleaner.com | www.moe-cleaner.com
 Loading...